WANT TO SAVE THIS RECIPE?
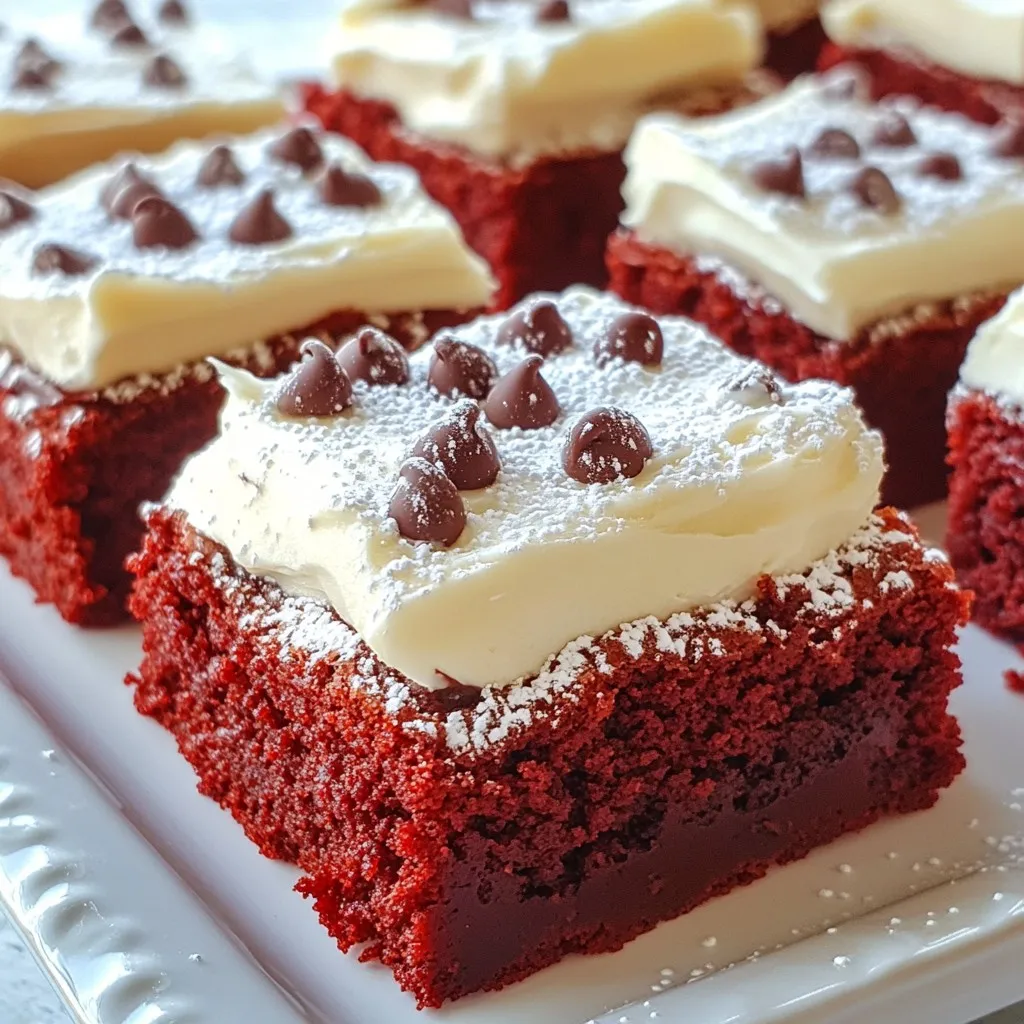
Are you ready to indulge in the ultimate dessert? Fudgy Red Velvet Brownies are rich, soft, and oh-so-delicious. They combine the classic flavors of red velvet with the texture of fudgy brownies. Plus, they’re simple to make! I’ll guide you through each step so you can create this sweet treat with ease. Get your baking gear ready; these brownies will be a hit at any gathering!
Why I Love This Recipe
- Decadent Fudginess: These brownies are incredibly fudgy, providing a rich, melt-in-your-mouth experience that is simply irresistible.
- Stunning Appearance: The vibrant red color makes these brownies visually striking, perfect for special occasions or festive gatherings.
- Easy to Make: With simple ingredients and straightforward steps, this recipe is accessible for bakers of all skill levels.
- Perfect with Cream Cheese Frosting: The tangy cream cheese frosting complements the sweetness of the brownies, elevating the overall flavor profile.
Ingredients
List of Ingredients
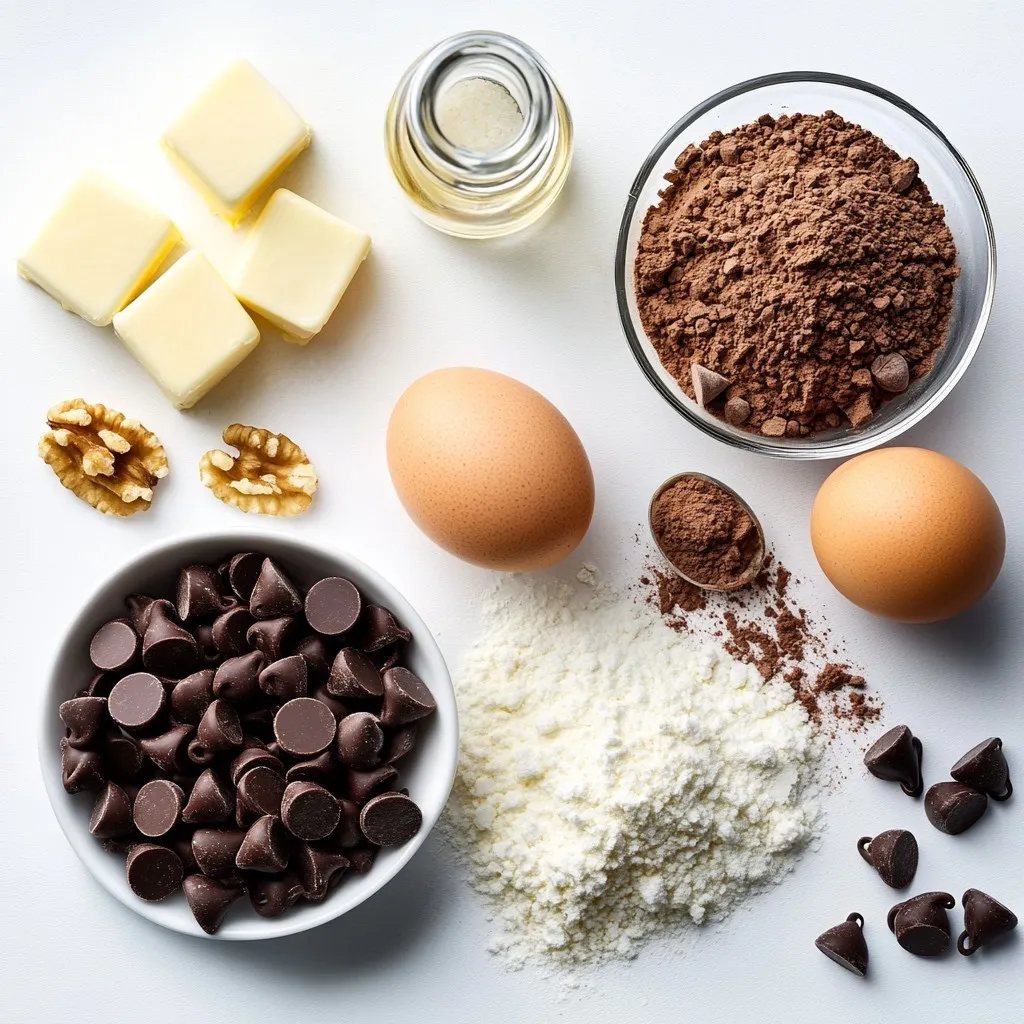
– 1 cup unsalted butter
– 1 ½ cups granulated sugar
– 1 teaspoon vanilla extract
– 2 large eggs
– 1 ½ cups all-purpose flour
– ½ cup unsweetened cocoa powder
– 1 teaspoon baking powder
– ½ teaspoon salt
– 1 tablespoon red food coloring
– ½ cup semi-sweet or dark chocolate chips
– Cream cheese frosting (for topping)
To make fudgy red velvet brownies, you need simple and tasty ingredients. Start with one cup of unsalted butter. Melt it gently to give your brownies a rich flavor. Then, measure out one and a half cups of granulated sugar. This sugar will add sweetness and help create that fudgy texture.
Next, you need one teaspoon of vanilla extract. This will enhance the flavor of the brownies. Don’t forget two large eggs! They bind everything together and add moisture.
For the dry ingredients, gather one and a half cups of all-purpose flour. This gives structure to the brownies. Add half a cup of unsweetened cocoa powder for that deep, chocolate taste. One teaspoon of baking powder will help the brownies rise a bit. Lastly, use half a teaspoon of salt to balance the sweetness.
The star of this recipe is one tablespoon of red food coloring. It gives those brownies their signature color. You can also mix in half a cup of semi-sweet or dark chocolate chips for extra chocolatey goodness. Finally, finish with cream cheese frosting on top for a deliciously creamy finish.
These ingredients combine to create a beautiful and tasty treat. You will love how they look and taste!
Step-by-Step Instructions
Preparing the Baking Pan
Start by preheating your oven to 350°F (175°C). Take a 9×13 inch baking pan and grease it lightly. You can also line it with parchment paper. This makes it easy to lift the brownies out after baking.
Mixing Wet Ingredients
In a large bowl, pour in 1 cup of melted unsalted butter. Add 1 ½ cups of granulated sugar. Whisk them together until smooth and glossy. This step helps create the fudgy texture we love. Then, add 1 teaspoon of vanilla extract and crack in 2 large eggs. Whisk them until fully blended.
Combining Dry Ingredients
In another bowl, sift together 1 ½ cups of all-purpose flour, ½ cup of unsweetened cocoa powder, 1 teaspoon of baking powder, and ½ teaspoon of salt. Sifting helps remove lumps. It also makes sure the baking powder spreads evenly.
Mixing the Batter
Now, gradually fold the dry mixture into the wet mixture. Use a spatula or wooden spoon, mixing gently. Only combine until you see no flour. Over-mixing can make your brownies tough. Next, add 1 tablespoon of red food coloring to the batter. Stir until the color is evenly mixed throughout.
Baking the Brownies
Gently fold in ½ cup of semi-sweet or dark chocolate chips. Pour the brownie batter into the prepared pan. Use a spatula to spread it evenly. Place the pan in the oven and bake for 25-30 minutes. Check with a toothpick; it should come out with moist crumbs.
Cooling and Topping
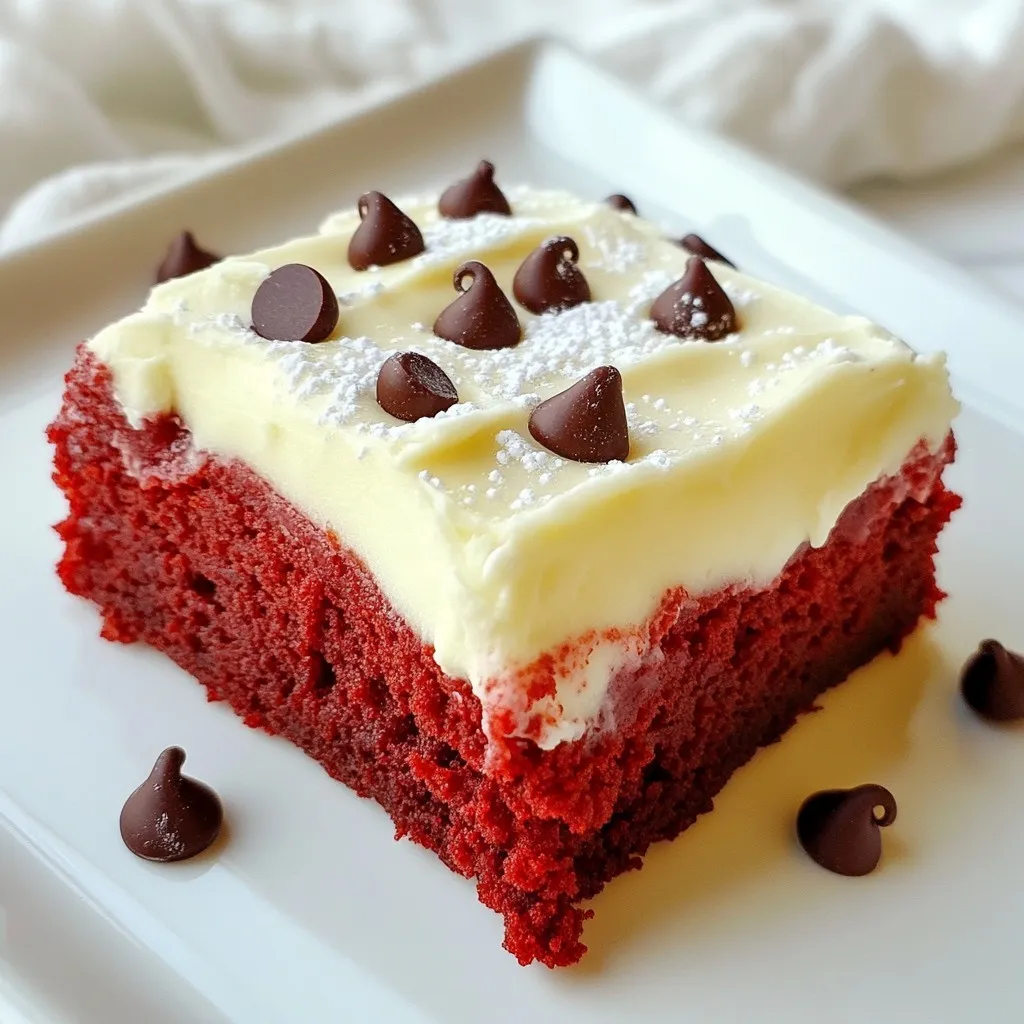
Once they are baked, remove the pan from the oven. Let the brownies cool completely on a wire rack. This step is key for a fudgy texture. After they cool, spread a layer of cream cheese frosting on top. Slice them into squares, serve, and enjoy your fudgy red velvet brownies!
Tips & Tricks
How to Achieve a Fudgy Texture
To get that rich, fudgy texture, focus on the melted butter and sugar mix. Whisk them until they are smooth and shiny. This step is key for the chewy feel. When you mix in the dry ingredients, do not overwork the batter. Just mix until you see no flour. This keeps the brownies dense and moist.
Avoiding Over-Mixing
Mixing too much can make the brownies tough. After adding the dry mix, use a spatula. Fold gently until everything combines. If you see a few flour spots, that’s okay. A light touch here helps keep them soft.
Enhancing Flavor with Add-Ins
You can make these brownies even tastier. Try adding chopped nuts or white chocolate chips. They add a nice crunch and extra sweetness. You can also mix in a bit of espresso powder. This will boost the chocolate flavor without being too strong.
Presentation Tips Before Serving
Make your brownies look great before serving. After cooling, spread cream cheese frosting on top. For a fun touch, dust powdered sugar over it. You can also sprinkle extra chocolate chips for flair. Serve with a scoop of vanilla ice cream for a treat everyone loves!
Pro Tips
- Use Room Temperature Ingredients: Allow your eggs and butter to come to room temperature before mixing. This helps create a smoother batter and contributes to a better texture.
- Careful with Food Coloring: Start with a small amount of red food coloring and gradually add more until you achieve your desired hue. This prevents overpowering the flavor.
- Don’t Overmix: Once you combine the wet and dry ingredients, mix just until incorporated. Overmixing can lead to tougher brownies.
- Storage Tips: Store brownies in an airtight container at room temperature for up to 3 days or refrigerate for up to a week. They can also be frozen for longer shelf life!
Variations
Gluten-Free Fudgy Red Velvet Brownies
You can make these brownies gluten-free with a simple swap. Use gluten-free all-purpose flour instead of regular flour. Make sure the blend contains xanthan gum. This will help keep the texture fudgy and delicious. The taste will stay rich and chocolatey, just like the classic version.
Red Velvet Brownie Sundae Recipe
Take your brownies to the next level! Cut the brownies into squares and place them in bowls. Top each square with a scoop of vanilla ice cream. Drizzle with hot fudge or chocolate sauce. Add whipped cream and a cherry on top. This sundae twist will wow your family and friends at any gathering.
Adding Nuts or Other Mix-Ins
Get creative by adding nuts or other mix-ins. Walnuts or pecans work great for a crunchy contrast. You can also toss in white chocolate chips or even crushed candy canes for a fun twist. Just fold them in gently, so you don’t over-mix the batter. This will add texture and new flavors to your fudgy brownies.
Storage Info
Best Storage Practices
Store your fudgy red velvet brownies in an airtight container. This keeps them fresh and moist. You can place parchment paper between layers to prevent sticking. Keep them at room temperature for up to four days. If it’s warm or humid, refrigerate them for better preservation.
Freezing Brownies for Later
To freeze brownies, cut them into squares first. Wrap each piece tightly in plastic wrap. Then, place them in a freezer-safe bag or container. Label the bag with the date. Your brownies will stay fresh for up to three months. When you’re ready to eat, just thaw them in the fridge overnight.
How to Reheat Brownies
To reheat brownies, preheat your oven to 350°F (175°C). Place the brownies on a baking sheet. Heat for about 10 minutes, or until warm. You can also microwave them for 15-20 seconds. This softens them and brings back that fudgy texture. Enjoy them warm with a scoop of ice cream!
FAQs
How do I know when my brownies are done?
You can tell your brownies are done by using a toothpick. Insert it in the center. If it comes out with moist crumbs, your brownies are ready. Avoid a clean toothpick since that means they are overbaked. The perfect bake keeps them fudgy and soft.
Can I use different types of chocolate chips?
Yes, you can use various chocolate chips. Semi-sweet or dark chocolate chips work best. You might also try white chocolate chips for a sweeter taste. Feel free to mix and match to find your favorite flavor.
What can I substitute for cream cheese frosting?
If you need an alternative to cream cheese frosting, try buttercream. You can also use whipped cream or chocolate ganache. Each option adds a unique taste and texture to your brownies.
How long do fudgy red velvet brownies last?
Fudgy red velvet brownies last about 3 to 4 days at room temperature. Store them in an airtight container to keep them fresh. If you want to keep them longer, you can freeze them for up to three months.
Making fudgy red velvet brownies is simple and fun. You start with key ingredients like butter, sugar, and cocoa powder. Follow the steps to mix wet and dry items, then bake. Use my tips to achieve the best texture and choose variations to suit your taste. Proper storage helps keep them fresh. Finally, remember to check doneness and enjoy your delicious brownies! These brownies are a delightful treat for any occasion. Happy bakin
Fudgy Red Velvet Brownies
Deliciously rich and fudgy red velvet brownies topped with cream cheese frosting.
Course Dessert
Cuisine American
Servings 12
Calories 250 kcal
- 1 cup unsalted butter, melted
- 1.5 cups granulated sugar
- 1 teaspoon vanilla extract
- 2 large eggs
- 1.5 cups all-purpose flour
- 0.5 cup unsweetened cocoa powder
- 1 teaspoon baking powder
- 0.5 teaspoon salt
- 1 tablespoon red food coloring
- 0.5 cup semi-sweet or dark chocolate chips
- 1 serving cream cheese frosting (for topping)
Preheat your oven to 350°F (175°C). Prepare a 9x13 inch baking pan by greasing it lightly or lining it with parchment paper for easy removal of the brownies after baking.
In a large mixing bowl, pour in the melted butter and granulated sugar. Whisk them together vigorously until the mixture becomes smooth and glossy.
Add the vanilla extract and crack in the two large eggs. Continue whisking until all ingredients are fully combined.
In a separate bowl, sift together the all-purpose flour, unsweetened cocoa powder, baking powder, and salt.
Gradually fold the dry mixture into the wet ingredients using a spatula or wooden spoon. Mix gently, only until the two mixtures are just combined.
Incorporate the red food coloring into the batter, stirring until the color is uniformly distributed.
Gently fold in the chocolate chips, ensuring they are evenly mixed throughout the batter.
Pour the brownie batter into the prepared baking pan and use a spatula to spread it out evenly.
Place the pan in the preheated oven and bake for 25-30 minutes. You’ll know they’re done when a toothpick inserted in the center comes out with moist crumbs.
Once baked, remove the brownies from the oven and let them cool completely in the pan on a wire rack.
After they’ve cooled, evenly spread a generous layer of cream cheese frosting on top.
Finally, slice the brownies into squares, serve, and enjoy every bite!
For an extra touch, dust the top with powdered sugar or sprinkle some additional chocolate chips before serving. Pair with a scoop of vanilla ice cream for an indulgent dessert experience!
Keyword brownies, chocolate, dessert, red velvet
WANT TO SAVE THIS RECIPE?