WANT TO SAVE THIS RECIPE?
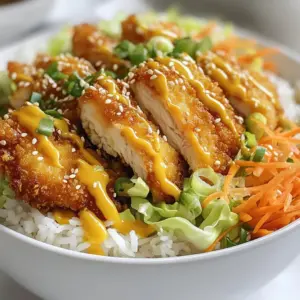
If you’re looking for a meal that’s both tasty and easy to make, Crispy Chicken Katsu Bowls are perfect for you! This dish brings together golden-brown chicken, fluffy rice, and fresh veggies in one delightful bowl. I’ll show you how to cook this dish step by step, ensuring it turns out crispy and flavorful. Your family will love this simple yet satisfying meal! Let’s dive into the ingredients and get started.
Why I Love This Recipe
- Crispy Texture: The panko breadcrumbs create a delightful crunch that contrasts beautifully with the tender chicken.
- Flavorful Bowls: This recipe combines savory chicken with fresh vegetables and rice, making for a balanced and satisfying meal.
- Quick and Easy: With a total time of just 40 minutes, this dish is perfect for a weeknight dinner.
- Customizable Toppings: Feel free to add your favorite sauces or vegetables to make the dish your own.
Ingredients
Main Ingredients
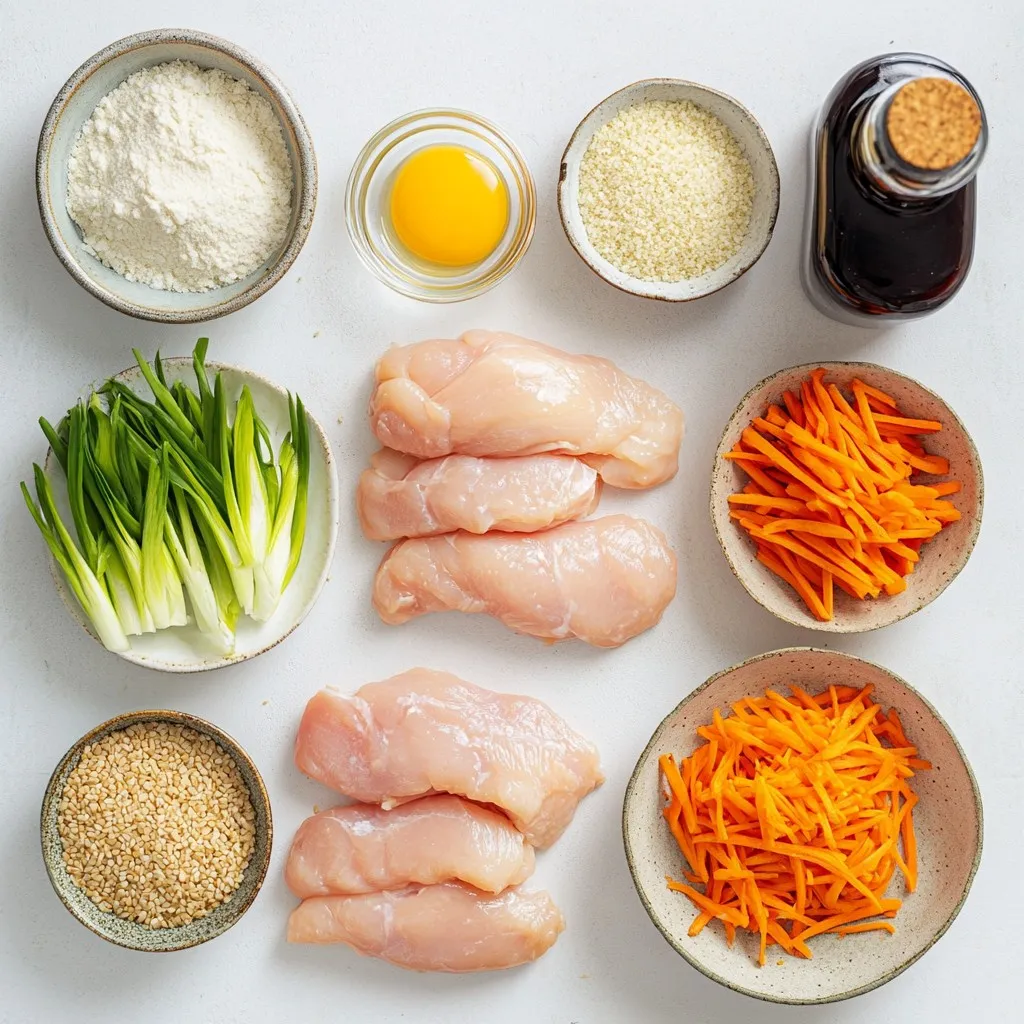
– 2 boneless, skinless chicken breasts
– 1 cup panko breadcrumbs
– 1/2 cup all-purpose flour
– Salt and freshly cracked black pepper
Accompaniments
– 1 cup cooked jasmine rice
– 1 cup shredded cabbage
– 1 small carrot, julienned
– 3 green onions, chopped
Sauce and Garnish
– Tonkatsu sauce or a blend of ketchup and soy sauce
– Sesame seeds for garnish
Crispy chicken katsu bowls are fun to make and full of flavor. To start, I always choose fresh, boneless, and skinless chicken breasts. They cook evenly and taste great. For the crispy coating, I use panko breadcrumbs and all-purpose flour. Panko gives that perfect crunch.
Seasonings are key. I sprinkle salt and black pepper all over the chicken. This basic seasoning brings out the best taste.
Next, I prepare the accompaniments. Cooked jasmine rice serves as the base. It’s fluffy and fragrant. I love adding fresh veggies like shredded cabbage, julienned carrots, and chopped green onions. They add color and crunch.
Lastly, no katsu bowl is complete without sauce. I use tonkatsu sauce, but a ketchup-soy blend also works well. A sprinkle of sesame seeds on top adds a nice touch. These ingredients come together to create a tasty meal that looks great too!
Step-by-Step Instructions
Preparing the Chicken
To start, get your chicken breasts ready. Place each breast between two sheets of plastic wrap or parchment paper. Use a meat mallet or a heavy pan to pound the chicken. Aim for an even thickness of about 1/2 inch. This step helps the chicken cook evenly. After pounding, season both sides with salt and freshly cracked black pepper. This adds a nice flavor to the meat.
Setting Up the Breading Station
Now, let’s set up your breading station. You need three shallow dishes. Fill the first dish with all-purpose flour. In the second dish, pour in the beaten eggs. The third dish should hold the panko breadcrumbs. This setup makes breading easy and neat.
For breading, take a chicken breast and dredge it in the flour. Shake off any excess flour. Next, dip it in the beaten eggs, letting any drips fall back into the bowl. Finally, coat the chicken in panko breadcrumbs. Press down firmly to ensure the crumbs stick well. Repeat this with the second chicken breast.
Cooking the Chicken
Next, it’s time to cook the chicken. In a large skillet, pour enough vegetable oil to create about 1/2 inch of depth. Heat the oil over medium heat. To check the temperature, drop in a small piece of breadcrumb. If it sizzles and bubbles, your oil is ready.
Carefully place the breaded chicken breasts in the hot oil. Fry each side for about 4-5 minutes until golden brown. Flip the chicken and cook the other side for another 4-5 minutes. Ensure the internal temperature reaches 165°F (75°C). When done, transfer the chicken to a plate lined with paper towels to absorb excess oil.
Assembling the Bowls
While the chicken cools, let’s assemble the bowls. Start by spooning warm jasmine rice into the bottom of each bowl. Next, arrange the shredded cabbage on one side. Add the julienned carrots and chopped green onions on top.
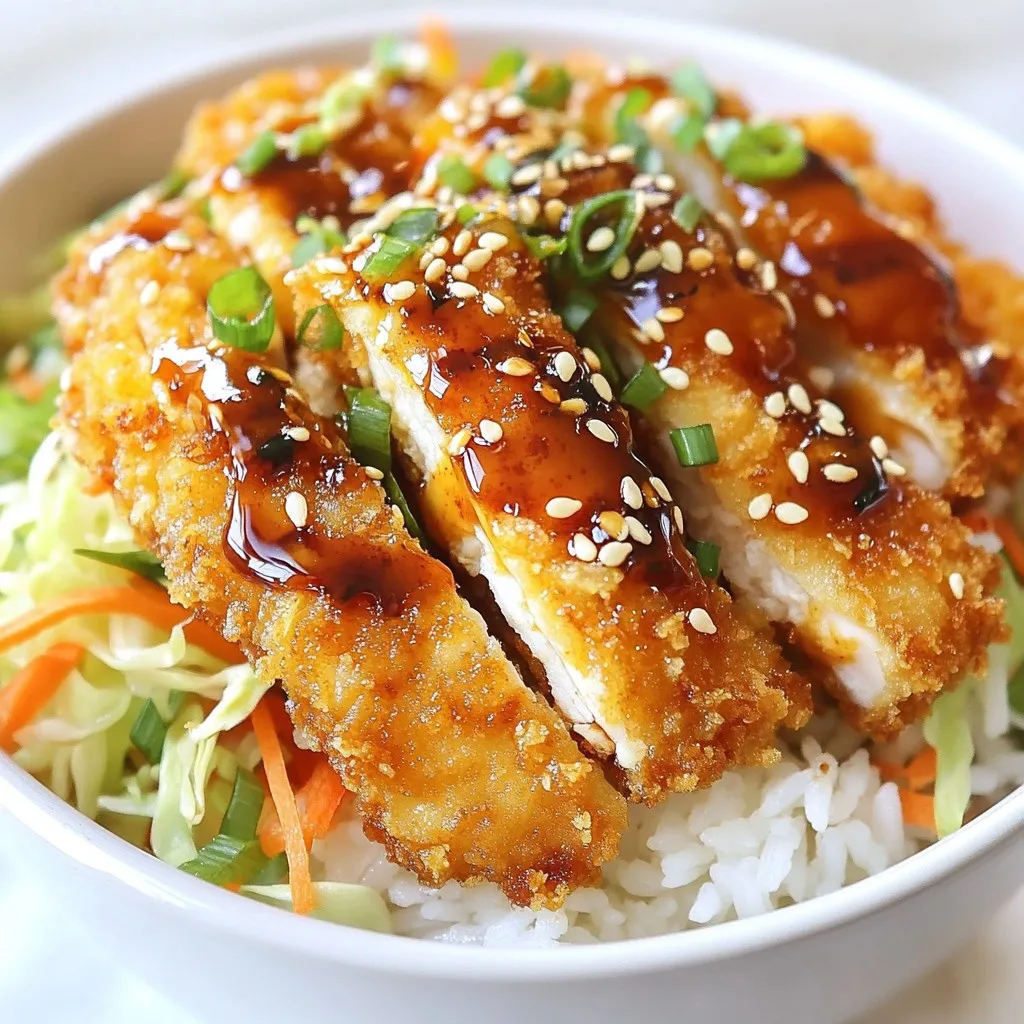
Once the chicken has cooled a bit, slice it into strips. Place these strips artfully on top of the rice and vegetables in each bowl. This way, you showcase the beautiful golden crust of the chicken.
Tips & Tricks
Ensure Optimal Crispiness
To make your chicken katsu really crispy, use panko breadcrumbs. They are light and flaky. Panko gives a crunch that regular breadcrumbs can’t match. For frying, use just enough oil. Aim for a depth of about 1/2 inch in your skillet. Heat the oil over medium heat. When it’s hot, a small piece of breadcrumb should sizzle and bubble right away. This heat helps create that golden crust. Avoid overcrowding the pan. Fry one or two pieces at a time. This keeps the oil hot and makes for an even cook.
Presentation Tips
To make your bowls eye-catching, use colorful plates. Bright colors make the meal pop. Arrange the vegetables in a vibrant pattern. Place the shredded cabbage and julienned carrots next to each other. Add the chicken strips on top for height. Garnish with chopped green onions or a lime wedge. This adds a fresh look. A sprinkle of sesame seeds also enhances the dish’s appeal. These small touches make a big difference in how your meal looks.
Pro Tips
- Use Fresh Ingredients: Fresh chicken and vegetables enhance flavor and texture, making your Katsu bowls even more delicious.
- Maintain Oil Temperature: Keep the oil at a consistent temperature while frying to achieve that perfect crispy texture without overcooking the chicken.
- Experiment with Toppings: Feel free to add other toppings like sliced avocado or a drizzle of spicy mayo to customize your bowls to your taste.
- Make Ahead: You can bread the chicken ahead of time and store it in the refrigerator. Just fry it when you’re ready to serve for a quick meal.
Variations
Alternative Proteins
You can switch out chicken for pork. Just follow the same steps. Thin pork chops work well. For a plant-based option, use tofu. Press the tofu to remove moisture, then slice it into thick pieces. Bread and fry it just like chicken. You’ll get a crispy delight that everyone will love.
Flavor Enhancements
Spice things up by adding garlic powder or paprika to the flour. This gives your chicken a nice kick. You can also marinate the chicken in soy sauce or ginger for more flavor. As for sauces, try a sweet chili sauce or a homemade peanut sauce. These options add a unique twist to your meal.
Storage Info
Refrigeration Tips
To store leftovers, let the chicken katsu cool first. Place it in an airtight container. You can keep it in the fridge for up to three days. If you need to reheat, use the oven instead of the microwave. This keeps the chicken crispy. Heat it at 350°F (175°C) for about 10-15 minutes. Check the internal temperature; it should be 165°F (75°C) when safe to eat.
Freezing Instructions
Yes, you can freeze crispy chicken katsu! Start by letting it cool completely. Place it in a freezer-safe bag or container. Be sure to remove as much air as possible. You can freeze it for up to three months. When ready to eat, thaw it in the fridge overnight. Reheat in the oven at 350°F (175°C) for about 15-20 minutes. This helps the texture stay nice and crispy.
FAQs
How do I make chicken katsu crispy?
To make chicken katsu crispy, follow these steps:
– Pound the Chicken: Use a meat mallet to pound the chicken. Aim for an even thickness of 1/2 inch.
– Use Panko Breadcrumbs: Panko gives a light and crunchy texture. It’s better than regular breadcrumbs.
– Fry at the Right Temperature: Heat oil to medium. If it sizzles with a breadcrumb test, it’s ready.
– Don’t Rush the Frying: Cook for 4-5 minutes on each side until golden brown.
These steps help ensure a crunchy, tasty katsu. The texture is key to this dish’s appeal.
Can I bake chicken katsu instead of frying?
Yes, you can bake chicken katsu. Here’s how:
– Preheat Your Oven: Set your oven to 400°F (200°C).
– Use a Baking Sheet: Line it with parchment paper for easy cleanup.
– Spray with Oil: Lightly spray the breaded chicken with cooking oil before baking.
– Bake for 20-25 Minutes: Flip halfway through for even cooking.
Baking will yield a different texture. The chicken may not be as crunchy, but it’s a healthier option.
What can I serve with crispy chicken katsu bowls?
You can serve many great sides with chicken katsu bowls:
– Steamed Vegetables: Broccoli or green beans add color and nutrients.
– Pickled Radishes: These add a nice tang to balance flavors.
– Miso Soup: A warm bowl of miso soup pairs well.
– Cold Green Tea: This refreshing drink complements the richness of the katsu.
These sides round out the meal and enhance your dining experience!
This guide covered how to make delicious crispy chicken katsu bowls. We discussed the main ingredients, cooking steps, and tips for perfect presentation. You learned how to ensure your chicken is crispy and how to store leftovers properly. Experimenting with different proteins and flavors adds variety to your meal. Whether you fry or bake, these insights will help you create a dish that impresses everyone. Enjoy making and sharing your tasty chicken katsu bowl
Crispy Chicken Katsu Bowls
Delicious crispy chicken katsu served over jasmine rice with fresh vegetables.
Course Main Course
Cuisine Japanese
Servings 2
Calories 600 kcal
- 2 pieces boneless, skinless chicken breasts
- 1 cup panko breadcrumbs
- 1 2 cup all-purpose flour
- 2 large eggs, beaten
- 1 cup cooked jasmine rice
- 1 cup shredded cabbage
- 1 small carrot, julienned
- 3 pieces green onions, chopped
- to taste salt and freshly cracked black pepper
- for frying oil vegetable oil
- for serving tonkatsu sauce or a blend of ketchup and soy sauce
- for garnish sesame seeds
Prepare the Chicken: Start by placing the chicken breasts between two sheets of plastic wrap or parchment paper. Using a meat mallet or the flat side of a heavy pan, gently pound the chicken to an even thickness of about 1/2 inch. This ensures quicker and more uniform cooking. Season both sides of the chicken with salt and freshly cracked black pepper.
Set Up the Breading Station: Create a breading station by arranging three shallow dishes in a line. Fill the first dish with all-purpose flour, the second with the beaten eggs, and the third with panko breadcrumbs.
Bread the Chicken: Take one chicken breast and first dredge it in the flour, shaking off any excess. Next, dip it into the beaten eggs, allowing any drips to fall back into the bowl. Finally, coat the chicken in the panko breadcrumbs, pressing down firmly to ensure the crumbs adhere well. Repeat this process with the second chicken breast.
Heat the Oil: In a large skillet, pour in enough vegetable oil to create a depth of about 1/2 inch. Heat the oil over medium heat. To check if the oil is ready, drop in a small piece of breadcrumb; if it sizzles and bubbles immediately, the oil is hot enough.
Fry the Chicken: Carefully place the breaded chicken breasts in the hot oil. Fry each piece for about 4-5 minutes on one side, or until it turns a rich golden brown. Flip the chicken and cook for another 4-5 minutes on the other side until fully cooked and the internal temperature reaches 165°F (75°C). Once cooked, transfer the chicken to a plate lined with paper towels to absorb any excess oil.
Prepare the Bowls: While the chicken rests and cools slightly, begin assembling the bowls. Spoon a generous serving of warm jasmine rice into the bottom of each bowl. Arrange the shredded cabbage on one side, followed by the julienned carrots and chopped green onions on top.
Slice the Chicken: Once slightly cooled, slice the crispy chicken katsu into strips. Place the strips artfully on top of the rice and vegetables in each bowl, displaying the beautiful golden crust.
Serve: Drizzle your choice of tonkatsu sauce or the ketchup-soy sauce blend over the chicken and garnish with a sprinkle of sesame seeds for an extra touch of flavor and crunch.
For added appeal, consider serving the bowls on colorful plates, and garnish with additional green onions or a lime wedge for a pop of color.
Keyword chicken katsu, Japanese cuisine, rice bowl
WANT TO SAVE THIS RECIPE?