![To make a delicious Irresistible Cheesecake Danish, gather these simple ingredients: - 1 package (8 oz) cream cheese, softened to room temperature - 1/4 cup granulated sugar - 1/2 teaspoon vanilla extract - 1 tablespoon freshly squeezed lemon juice - 1 package (1 lb) refrigerated crescent dough - 1 egg, beaten (for egg wash) - 1/4 cup powdered sugar (for drizzling) - Fresh berries (raspberries, blueberries, or strawberries) for garnish - Optional: 1/2 teaspoon almond extract for an enhanced flavor profile These ingredients create a rich and creamy filling. The crescent dough adds a flaky, buttery touch. You can also adjust the flavor with optional extracts. This easy recipe lets you enjoy a sweet treat in no time. Don't forget to check the Full Recipe for more details! - Preheat oven to 375°F (190°C). - Line a large baking sheet with parchment paper. Start by preheating your oven. This gets the heat ready for the danishes. Next, take a baking sheet and line it with parchment paper. This helps the danishes not stick. - Combine cream cheese, sugar, vanilla, and lemon juice. - Use hand mixer for smooth consistency. Now, let’s make the cream cheese filling. In a bowl, mix together the cream cheese, granulated sugar, vanilla extract, and lemon juice. The lemon juice adds a nice zing! Use a hand mixer to blend everything until it is smooth. Make sure there are no lumps for a creamy texture. - Prepare and flatten crescent dough. - Fill and shape each danish. - Apply egg wash before baking. Next, unroll the crescent dough. You’ll want to separate it into rectangles. Pinch the seams to seal them. Use a rolling pin or your hands to flatten each rectangle a bit. Now, take two tablespoons of the creamy filling and place it in the center of each rectangle. Leave about an inch from the edges so you can seal them. Fold over the edges to make a neat shape. Pinch the seams well to keep the filling inside. Finally, take your beaten egg and brush it on top of each danish. This makes them golden and shiny when baked. Now, you are ready to bake! Check the [Full Recipe] for more details. To handle crescent dough well, keep it cold. Cold dough is easier to work with. When you unroll it, lay it flat on a clean surface. Pinch the seams to make rectangles. Use a rolling pin to flatten them slightly. This helps them bake evenly. To ensure even baking, space the danishes well on the baking sheet. Leave room between them. This allows hot air to flow around each one. Bake them until they turn golden brown. Check them at the 12-minute mark. If they look puffy and brown, they are likely ready. For added flavor, consider extra extracts. Almond extract adds a nice twist. You can also try orange or coconut extract. Each brings a new taste to your danish. Think about what you like most! You can modify the filling too. Try adding a bit of fruit puree to the cream cheese. You can swirl in raspberry or blueberry puree for a fruity kick. This makes your filling even more exciting! To serve your danishes attractively, think about the plate. A rustic wooden board or a white platter works well. This makes the golden color pop. You can dust them with powdered sugar for a touch of elegance. Garnishing with fresh berries adds color and freshness. Place a few berries on top of each danish. You can use raspberries, blueberries, or strawberries. They not only look good but taste great too. Enjoy your beautiful and tasty creation! {{image_4}} You can switch up the cheese in your Danish. Ricotta or mascarpone cheese makes a great filling. Both add a creamy texture and a mild taste. You can also mix in flavors like melted chocolate or fruit purees. Chocolate gives a rich twist. Fruit purees like raspberry or strawberry add a fruity zing. Both options make your cheesecake Danish even more fun. Seasonal fruits can elevate your Danish. Use fresh berries in summer, like strawberries or blueberries. In fall, try apples or pears for a cozy touch. You can also get creative with your icing. A lemon glaze adds brightness. A chocolate drizzle gives a sweet finish. Each season brings different flavors, making every Danish unique. If you're gluten-free, don’t worry. You can still enjoy this treat. Use gluten-free crescent dough instead of regular dough. Many brands make great options. Always check the label for safe ingredients. Adjust your filling to suit your diet. For example, use gluten-free powdered sugar for the icing. These changes let everyone enjoy the cheesecake Danish without missing out. Store your leftover danishes in the fridge. Place them in an airtight container. They will stay fresh for up to three days. If you want to keep them longer, freeze them. Wrap each danish in plastic wrap, then place them in a freezer bag. They will last up to three months in the freezer. Just remember to label the bag with the date. When it’s time to enjoy your danishes again, you can reheat them in different ways. The oven works best for keeping them crispy. Preheat the oven to 350°F (175°C). Place the danishes on a baking sheet and heat for about 10 minutes. If you’re short on time, use the microwave. Heat each danish for about 15-20 seconds. However, this method can make the pastry soft. To keep the pastry crispy, avoid using the microwave for longer. Enjoy your danishes warm! They taste best fresh out of the oven. A Cheesecake Danish is a soft pastry filled with a creamy cheese mixture. It typically uses cream cheese, sugar, and a hint of vanilla and lemon. The base is often made from crescent dough, which gives it a flaky texture. This treat combines sweet and tangy flavors, making it a favorite for breakfast or dessert. Yes, you can prepare the danishes in advance. Mix the cream cheese filling and store it in the fridge. You can also shape the danishes and leave them unbaked in the fridge for a few hours. When you’re ready, just bake them fresh. They will taste amazing! For longer storage, you can freeze unbaked danishes. Just wrap them well and bake straight from the freezer, adding a few extra minutes to the baking time. You can use puff pastry instead of crescent dough. Puff pastry will give you a lighter and crispier result. You can also try phyllo dough for a unique texture. Each type of dough can change the taste and feel of the final product, so experiment and see which you like best! Look for a golden brown color on the danishes. They should puff up nicely. If they are golden and no longer shiny, they are done. You can also check the bottom; it should be firm and not doughy. Trust your eyes and your nose; they will guide you to perfect danishes! This blog post covered how to make a Cheesecake Danish, from ingredients to storage. You learned about simple steps to prepare the filling and assemble the danish using crescent dough. Tips for perfecting the dough and enhancing flavor added extra value. Remember, variations with different cheeses or fruits can keep things fresh. Proper storage and reheating ensure your danish stays tasty. Enjoy making them for any occasion! They'll impress friends and family alike. Happy baking!](https://tastednest.com/wp-content/uploads/2025/05/0aab5bda-cc8a-49c7-8cca-df6bbf18e5b3.webp)
If you’re craving a sweet treat with a creamy twist, you’re in for a delight! This simple Cheesecake Danish recipe combines rich cream cheese with flaky crescent dough. It’s easy enough for beginners but impressive enough to share. Trust me, when you see how quick and delicious it is, you’ll want to make it again and again. Let’s dive into the tasty details to whip up this irresistible dessert!
Ingredients
To make a delicious Irresistible Cheesecake Danish, gather these simple ingredients:
– 1 package (8 oz) cream cheese, softened to room temperature
– 1/4 cup granulated sugar
– 1/2 teaspoon vanilla extract
– 1 tablespoon freshly squeezed lemon juice
– 1 package (1 lb) refrigerated crescent dough
– 1 egg, beaten (for egg wash)
– 1/4 cup powdered sugar (for drizzling)
– Fresh berries (raspberries, blueberries, or strawberries) for garnish
– Optional: 1/2 teaspoon almond extract for an enhanced flavor profile
These ingredients create a rich and creamy filling. The crescent dough adds a flaky, buttery touch. You can also adjust the flavor with optional extracts. This easy recipe lets you enjoy a sweet treat in no time. Don’t forget to check the Full Recipe for more details!
Step-by-Step Instructions
Preparing the Oven and Baking Sheet
– Preheat oven to 375°F (190°C).
– Line a large baking sheet with parchment paper.
Start by preheating your oven. This gets the heat ready for the danishes. Next, take a baking sheet and line it with parchment paper. This helps the danishes not stick.
Making the Cream Cheese Filling
– Combine cream cheese, sugar, vanilla, and lemon juice.
– Use hand mixer for smooth consistency.
Now, let’s make the cream cheese filling. In a bowl, mix together the cream cheese, granulated sugar, vanilla extract, and lemon juice. The lemon juice adds a nice zing! Use a hand mixer to blend everything until it is smooth. Make sure there are no lumps for a creamy texture.
Assembling the Cheesecake Danish
– Prepare and flatten crescent dough.
– Fill and shape each danish.
– Apply egg wash before baking.
Next, unroll the crescent dough. You’ll want to separate it into rectangles. Pinch the seams to seal them. Use a rolling pin or your hands to flatten each rectangle a bit.
Now, take two tablespoons of the creamy filling and place it in the center of each rectangle. Leave about an inch from the edges so you can seal them. Fold over the edges to make a neat shape. Pinch the seams well to keep the filling inside.
Finally, take your beaten egg and brush it on top of each danish. This makes them golden and shiny when baked. Now, you are ready to bake!
Check the [Full Recipe] for more details.
Tips & Tricks
Perfecting the Dough
To handle crescent dough well, keep it cold. Cold dough is easier to work with. When you unroll it, lay it flat on a clean surface. Pinch the seams to make rectangles. Use a rolling pin to flatten them slightly. This helps them bake evenly.
To ensure even baking, space the danishes well on the baking sheet. Leave room between them. This allows hot air to flow around each one. Bake them until they turn golden brown. Check them at the 12-minute mark. If they look puffy and brown, they are likely ready.
Flavor Enhancements
For added flavor, consider extra extracts. Almond extract adds a nice twist. You can also try orange or coconut extract. Each brings a new taste to your danish. Think about what you like most!
You can modify the filling too. Try adding a bit of fruit puree to the cream cheese. You can swirl in raspberry or blueberry puree for a fruity kick. This makes your filling even more exciting!
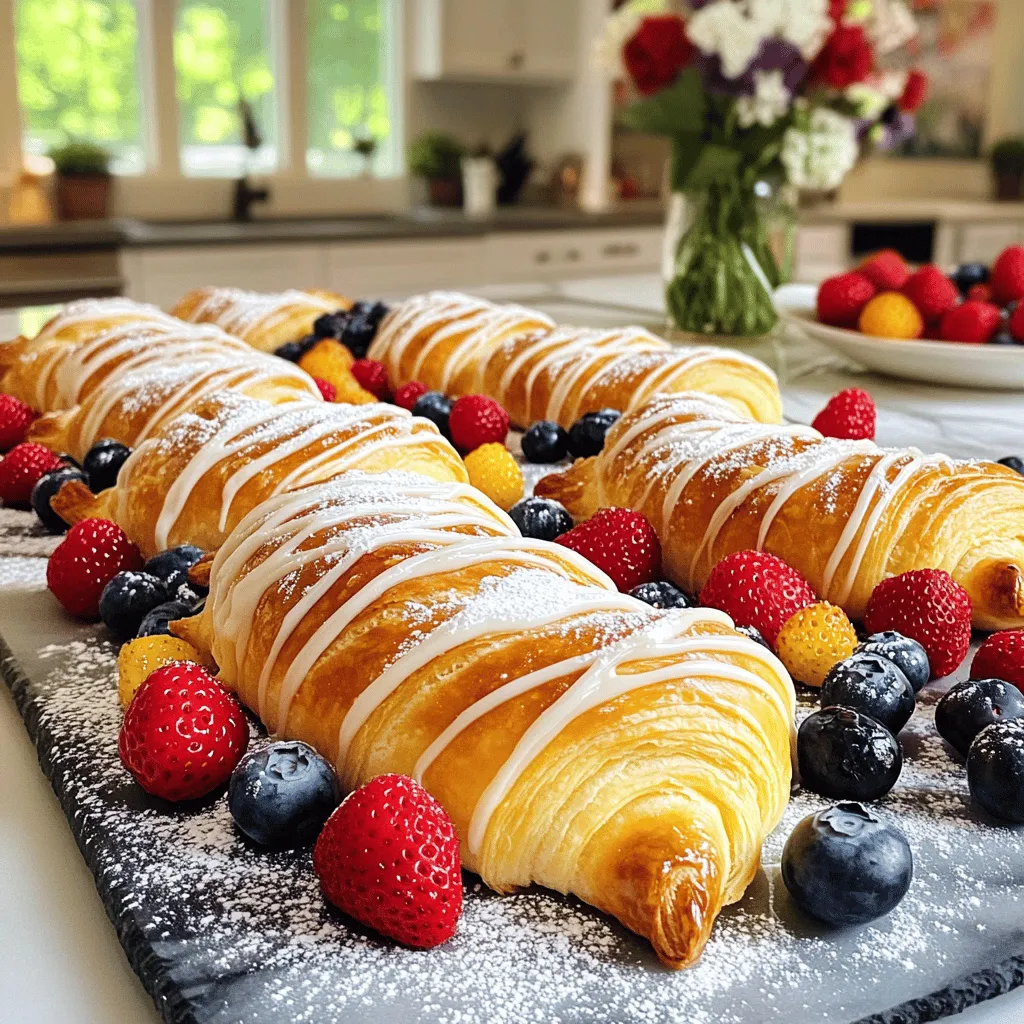
Presentation Ideas
To serve your danishes attractively, think about the plate. A rustic wooden board or a white platter works well. This makes the golden color pop. You can dust them with powdered sugar for a touch of elegance.
Garnishing with fresh berries adds color and freshness. Place a few berries on top of each danish. You can use raspberries, blueberries, or strawberries. They not only look good but taste great too. Enjoy your beautiful and tasty creation!
Variations
Different Cheese Fillings
You can switch up the cheese in your Danish. Ricotta or mascarpone cheese makes a great filling. Both add a creamy texture and a mild taste. You can also mix in flavors like melted chocolate or fruit purees. Chocolate gives a rich twist. Fruit purees like raspberry or strawberry add a fruity zing. Both options make your cheesecake Danish even more fun.
Seasonal Toppings
Seasonal fruits can elevate your Danish. Use fresh berries in summer, like strawberries or blueberries. In fall, try apples or pears for a cozy touch. You can also get creative with your icing. A lemon glaze adds brightness. A chocolate drizzle gives a sweet finish. Each season brings different flavors, making every Danish unique.
Gluten-Free Options
If you’re gluten-free, don’t worry. You can still enjoy this treat. Use gluten-free crescent dough instead of regular dough. Many brands make great options. Always check the label for safe ingredients. Adjust your filling to suit your diet. For example, use gluten-free powdered sugar for the icing. These changes let everyone enjoy the cheesecake Danish without missing out.
Storage Info
How to Store Leftover Danishes
Store your leftover danishes in the fridge. Place them in an airtight container. They will stay fresh for up to three days. If you want to keep them longer, freeze them. Wrap each danish in plastic wrap, then place them in a freezer bag. They will last up to three months in the freezer. Just remember to label the bag with the date.
Reheating Best Practices
When it’s time to enjoy your danishes again, you can reheat them in different ways. The oven works best for keeping them crispy. Preheat the oven to 350°F (175°C). Place the danishes on a baking sheet and heat for about 10 minutes.
If you’re short on time, use the microwave. Heat each danish for about 15-20 seconds. However, this method can make the pastry soft. To keep the pastry crispy, avoid using the microwave for longer.
Enjoy your danishes warm! They taste best fresh out of the oven.
FAQs
What is a Cheesecake Danish?
A Cheesecake Danish is a soft pastry filled with a creamy cheese mixture. It typically uses cream cheese, sugar, and a hint of vanilla and lemon. The base is often made from crescent dough, which gives it a flaky texture. This treat combines sweet and tangy flavors, making it a favorite for breakfast or dessert.
Can I make this recipe ahead of time?
Yes, you can prepare the danishes in advance. Mix the cream cheese filling and store it in the fridge. You can also shape the danishes and leave them unbaked in the fridge for a few hours. When you’re ready, just bake them fresh. They will taste amazing! For longer storage, you can freeze unbaked danishes. Just wrap them well and bake straight from the freezer, adding a few extra minutes to the baking time.
Can I use a different type of dough?
You can use puff pastry instead of crescent dough. Puff pastry will give you a lighter and crispier result. You can also try phyllo dough for a unique texture. Each type of dough can change the taste and feel of the final product, so experiment and see which you like best!
How do I know when the danish is done baking?
Look for a golden brown color on the danishes. They should puff up nicely. If they are golden and no longer shiny, they are done. You can also check the bottom; it should be firm and not doughy. Trust your eyes and your nose; they will guide you to perfect danishes!
This blog post covered how to make a Cheesecake Danish, from ingredients to storage. You learned about simple steps to prepare the filling and assemble the danish using crescent dough. Tips for perfecting the dough and enhancing flavor added extra value. Remember, variations with different cheeses or fruits can keep things fresh. Proper storage and reheating ensure your danish stays tasty. Enjoy making them for any occasion! They’ll impress friends and family alike. Happy baking!
![To make a delicious Irresistible Cheesecake Danish, gather these simple ingredients: - 1 package (8 oz) cream cheese, softened to room temperature - 1/4 cup granulated sugar - 1/2 teaspoon vanilla extract - 1 tablespoon freshly squeezed lemon juice - 1 package (1 lb) refrigerated crescent dough - 1 egg, beaten (for egg wash) - 1/4 cup powdered sugar (for drizzling) - Fresh berries (raspberries, blueberries, or strawberries) for garnish - Optional: 1/2 teaspoon almond extract for an enhanced flavor profile These ingredients create a rich and creamy filling. The crescent dough adds a flaky, buttery touch. You can also adjust the flavor with optional extracts. This easy recipe lets you enjoy a sweet treat in no time. Don't forget to check the Full Recipe for more details! - Preheat oven to 375°F (190°C). - Line a large baking sheet with parchment paper. Start by preheating your oven. This gets the heat ready for the danishes. Next, take a baking sheet and line it with parchment paper. This helps the danishes not stick. - Combine cream cheese, sugar, vanilla, and lemon juice. - Use hand mixer for smooth consistency. Now, let’s make the cream cheese filling. In a bowl, mix together the cream cheese, granulated sugar, vanilla extract, and lemon juice. The lemon juice adds a nice zing! Use a hand mixer to blend everything until it is smooth. Make sure there are no lumps for a creamy texture. - Prepare and flatten crescent dough. - Fill and shape each danish. - Apply egg wash before baking. Next, unroll the crescent dough. You’ll want to separate it into rectangles. Pinch the seams to seal them. Use a rolling pin or your hands to flatten each rectangle a bit. Now, take two tablespoons of the creamy filling and place it in the center of each rectangle. Leave about an inch from the edges so you can seal them. Fold over the edges to make a neat shape. Pinch the seams well to keep the filling inside. Finally, take your beaten egg and brush it on top of each danish. This makes them golden and shiny when baked. Now, you are ready to bake! Check the [Full Recipe] for more details. To handle crescent dough well, keep it cold. Cold dough is easier to work with. When you unroll it, lay it flat on a clean surface. Pinch the seams to make rectangles. Use a rolling pin to flatten them slightly. This helps them bake evenly. To ensure even baking, space the danishes well on the baking sheet. Leave room between them. This allows hot air to flow around each one. Bake them until they turn golden brown. Check them at the 12-minute mark. If they look puffy and brown, they are likely ready. For added flavor, consider extra extracts. Almond extract adds a nice twist. You can also try orange or coconut extract. Each brings a new taste to your danish. Think about what you like most! You can modify the filling too. Try adding a bit of fruit puree to the cream cheese. You can swirl in raspberry or blueberry puree for a fruity kick. This makes your filling even more exciting! To serve your danishes attractively, think about the plate. A rustic wooden board or a white platter works well. This makes the golden color pop. You can dust them with powdered sugar for a touch of elegance. Garnishing with fresh berries adds color and freshness. Place a few berries on top of each danish. You can use raspberries, blueberries, or strawberries. They not only look good but taste great too. Enjoy your beautiful and tasty creation! {{image_4}} You can switch up the cheese in your Danish. Ricotta or mascarpone cheese makes a great filling. Both add a creamy texture and a mild taste. You can also mix in flavors like melted chocolate or fruit purees. Chocolate gives a rich twist. Fruit purees like raspberry or strawberry add a fruity zing. Both options make your cheesecake Danish even more fun. Seasonal fruits can elevate your Danish. Use fresh berries in summer, like strawberries or blueberries. In fall, try apples or pears for a cozy touch. You can also get creative with your icing. A lemon glaze adds brightness. A chocolate drizzle gives a sweet finish. Each season brings different flavors, making every Danish unique. If you're gluten-free, don’t worry. You can still enjoy this treat. Use gluten-free crescent dough instead of regular dough. Many brands make great options. Always check the label for safe ingredients. Adjust your filling to suit your diet. For example, use gluten-free powdered sugar for the icing. These changes let everyone enjoy the cheesecake Danish without missing out. Store your leftover danishes in the fridge. Place them in an airtight container. They will stay fresh for up to three days. If you want to keep them longer, freeze them. Wrap each danish in plastic wrap, then place them in a freezer bag. They will last up to three months in the freezer. Just remember to label the bag with the date. When it’s time to enjoy your danishes again, you can reheat them in different ways. The oven works best for keeping them crispy. Preheat the oven to 350°F (175°C). Place the danishes on a baking sheet and heat for about 10 minutes. If you’re short on time, use the microwave. Heat each danish for about 15-20 seconds. However, this method can make the pastry soft. To keep the pastry crispy, avoid using the microwave for longer. Enjoy your danishes warm! They taste best fresh out of the oven. A Cheesecake Danish is a soft pastry filled with a creamy cheese mixture. It typically uses cream cheese, sugar, and a hint of vanilla and lemon. The base is often made from crescent dough, which gives it a flaky texture. This treat combines sweet and tangy flavors, making it a favorite for breakfast or dessert. Yes, you can prepare the danishes in advance. Mix the cream cheese filling and store it in the fridge. You can also shape the danishes and leave them unbaked in the fridge for a few hours. When you’re ready, just bake them fresh. They will taste amazing! For longer storage, you can freeze unbaked danishes. Just wrap them well and bake straight from the freezer, adding a few extra minutes to the baking time. You can use puff pastry instead of crescent dough. Puff pastry will give you a lighter and crispier result. You can also try phyllo dough for a unique texture. Each type of dough can change the taste and feel of the final product, so experiment and see which you like best! Look for a golden brown color on the danishes. They should puff up nicely. If they are golden and no longer shiny, they are done. You can also check the bottom; it should be firm and not doughy. Trust your eyes and your nose; they will guide you to perfect danishes! This blog post covered how to make a Cheesecake Danish, from ingredients to storage. You learned about simple steps to prepare the filling and assemble the danish using crescent dough. Tips for perfecting the dough and enhancing flavor added extra value. Remember, variations with different cheeses or fruits can keep things fresh. Proper storage and reheating ensure your danish stays tasty. Enjoy making them for any occasion! They'll impress friends and family alike. Happy baking!](https://tastednest.com/wp-content/uploads/2025/05/0aab5bda-cc8a-49c7-8cca-df6bbf18e5b3-300x300.webp)