![To make these tasty wraps, you need a few key ingredients. These include: - 2 cups cooked chicken, thoroughly shredded - 1 cup sharp cheddar cheese, finely shredded - 1/2 cup cream cheese, softened to room temperature - 2 cloves fresh garlic, finely minced - 1/4 cup fresh parsley, finely chopped - 1 teaspoon smoked paprika - 4 large flour tortillas (8-10 inches in diameter) - Salt and freshly ground black pepper to taste - Olive oil, for grilling These ingredients blend well, creating a rich, cheesy flavor. You can change the taste with some optional ingredients. Here are a few ideas: - Diced bell peppers for crunch - Jalapeños for heat - Spinach for added nutrients - Different herbs, like basil or cilantro Feel free to mix and match based on what you like. Choosing the right tortilla makes a big difference. I recommend: - Large flour tortillas for a soft wrap - Whole wheat tortillas for a healthy twist - Spinach or sun-dried tomato tortillas for extra flavor Using different tortillas can make your wraps more fun. Try what you enjoy best. If you want the complete recipe, check out the Full Recipe section. To make Easy Cheesy Chicken Garlic Wraps, start by gathering your ingredients. You need cooked chicken, cheddar cheese, cream cheese, garlic, parsley, smoked paprika, and tortillas. 1. Mix the Filling: In a large bowl, combine the shredded chicken, cheddar cheese, cream cheese, minced garlic, chopped parsley, and smoked paprika. 2. Season It: Add salt and pepper to taste. Mix well until all ingredients blend together nicely. Now, it’s time to wrap and cook. This part is easy and fun! 1. Prepare the Tortilla: Lay one flour tortilla flat. Spoon about 1/4 of the chicken mixture into the center. 2. Wrap It Up: Fold the sides inward and roll from the bottom to the top. Make sure the filling stays inside. 3. Repeat: Do this for the rest of the tortillas and filling. Place them seam-side down on a plate. 4. Heat the Skillet: In a non-stick skillet, drizzle a bit of olive oil and heat it over medium. 5. Cook the Wraps: Place each wrap seam-side down. Cook for 3-4 minutes until golden brown. Flip and cook the other side. Serving is just as important as cooking. Here’s how to make your wraps look great: - Slice the Wraps: After resting for a minute, slice each wrap in half diagonally. - Garnish: Arrange the slices on a colorful platter. - Add Dips: Serve with ranch dressing or garlic dip for extra flavor. This will make your meal not just tasty, but also beautiful. For the full recipe, check out the other sections of this article! To keep your wraps crispy, use a few simple tricks. First, make sure your chicken is fully cooked and cooled before mixing it with the cheese and other ingredients. Warm or hot chicken can create steam, making the wraps soggy. Also, avoid adding too much cream cheese or liquid ingredients. A thick chicken mixture will hold together better. Finally, when grilling, use medium heat. High heat can burn the wraps before they become crispy. Meal prep can save time and make cooking easy. Prepare the chicken mixture in advance and store it in the fridge for up to three days. You can also assemble wraps and freeze them. Wrap each one tightly in plastic wrap or foil to prevent freezer burn. When ready to eat, just thaw and grill them as needed. This method makes it easy to enjoy a quick meal any day. Want to kick up the flavor? Here are a few ideas. Add spices like cayenne pepper or chili powder for heat. Mix in chopped sun-dried tomatoes or olives for a tasty twist. For a fresh touch, try adding fresh spinach or arugula. You can also switch cheeses; pepper jack adds a nice kick, while mozzarella gives a milder taste. Each of these options can bring new life to your Easy Cheesy Chicken Garlic Wraps. {{image_4}} If you want a veggie option, use cooked mushrooms or roasted veggies instead of chicken. You can also try black beans or chickpeas for protein. These choices keep the dish hearty and satisfying. Adding spinach or kale can boost the nutrients too. These swaps help everyone enjoy the wraps. Cheese makes these wraps cheesy and delicious. If you want something different, try mozzarella for a milder taste. You can also use pepper jack for a spicy kick. Creamy goat cheese adds a unique flavor, while feta brings a tangy twist. Mixing different cheeses can create fun flavors. To change the heat, add more spices. Use cayenne pepper or chili powder for a spicy version. If you prefer mild, stick with the smoked paprika in the recipe. Fresh herbs, like basil or cilantro, can brighten the wraps. Experiment with garlic powder or onion powder for depth. These adjustments let you make the wraps your own. For the full recipe, check out the [Full Recipe] section. To keep your leftover wraps fresh, wrap them tightly in plastic wrap or foil. You can also use an airtight container. Store them in the fridge for up to three days. This helps maintain their taste and texture. Reheat your wraps in a skillet for the best results. Heat a non-stick skillet over medium-low heat. Place the wrap in the skillet for about 3-4 minutes on each side. This method keeps them crispy. You can also use a microwave, but they may turn soggy. If you use the microwave, heat for 30 seconds at a time until warm. You can freeze the wraps for quick meals later. First, let them cool completely. Wrap each one in plastic wrap, then place them in a freezer-safe bag. They can last up to three months in the freezer. When you're ready to eat, thaw them in the fridge overnight and reheat as described above. This way, you always have a tasty meal on hand! For the full recipe, check the details above. You can serve these wraps with many sides. Try fresh salad for crunch. Chips or fries add a nice touch. A bowl of salsa or guacamole adds flavor. You can also pair them with a creamy ranch dressing or a homemade garlic dip. These sides make the meal even more fun! Yes, you can prepare these wraps ahead of time. Just assemble them but don’t cook yet. Wrap them in plastic wrap and store in the fridge. They stay fresh for up to 24 hours. When you’re ready, just grill them until golden brown. This saves time on busy days. You can swap the chicken for cooked turkey or shredded beef. If you want a vegetarian option, try beans or roasted veggies instead. Use any cheese you like, such as mozzarella or pepper jack. Adjust the spices based on your taste. These changes keep the recipe fun and fresh. Absolutely! Kids usually love cheesy wraps. They are easy to hold and eat. You can adjust the garlic to be less strong if needed. Add extra cheese or their favorite veggies for more flavor. This makes it a great meal for the whole family. You can get creative with the filling! Add chopped bell peppers, spinach, or corn for extra veggies. Try different herbs like basil or cilantro for a fresh taste. You can also add different spices, like cumin or chili powder, for a kick. Make it your own! You can find the full recipe in the article above. It has all the details you need to make these Easy Cheesy Chicken Garlic Wraps. Enjoy the cooking process and the tasty results! In this article, we explored simple recipes for Easy Cheesy Chicken Garlic Wraps. We covered essential ingredients, cooking steps, and tips to avoid soggy wraps. You learned how to customize flavors and store leftovers. These wraps are quick, tasty, and perfect for anyone. Remember, you can change them to fit your taste and needs. Enjoy making and sharing these delicious wraps!](https://tastednest.com/wp-content/uploads/2025/06/c29d3f69-b09c-436a-b22f-8219f625e86a.webp)
Looking for a quick and tasty meal? Easy Cheesy Chicken Garlic Wraps are perfect! You can whip them up in no time, using simple ingredients you probably already have. In this guide, I’ll share essential steps, helpful tips, and fun variations to customize your wraps. Whether you’re cooking for yourself or a crowd, these wraps are sure to impress. Let’s dive in and make your new favorite meal!
Ingredients
Essential Ingredients for Easy Cheesy Chicken Garlic Wraps
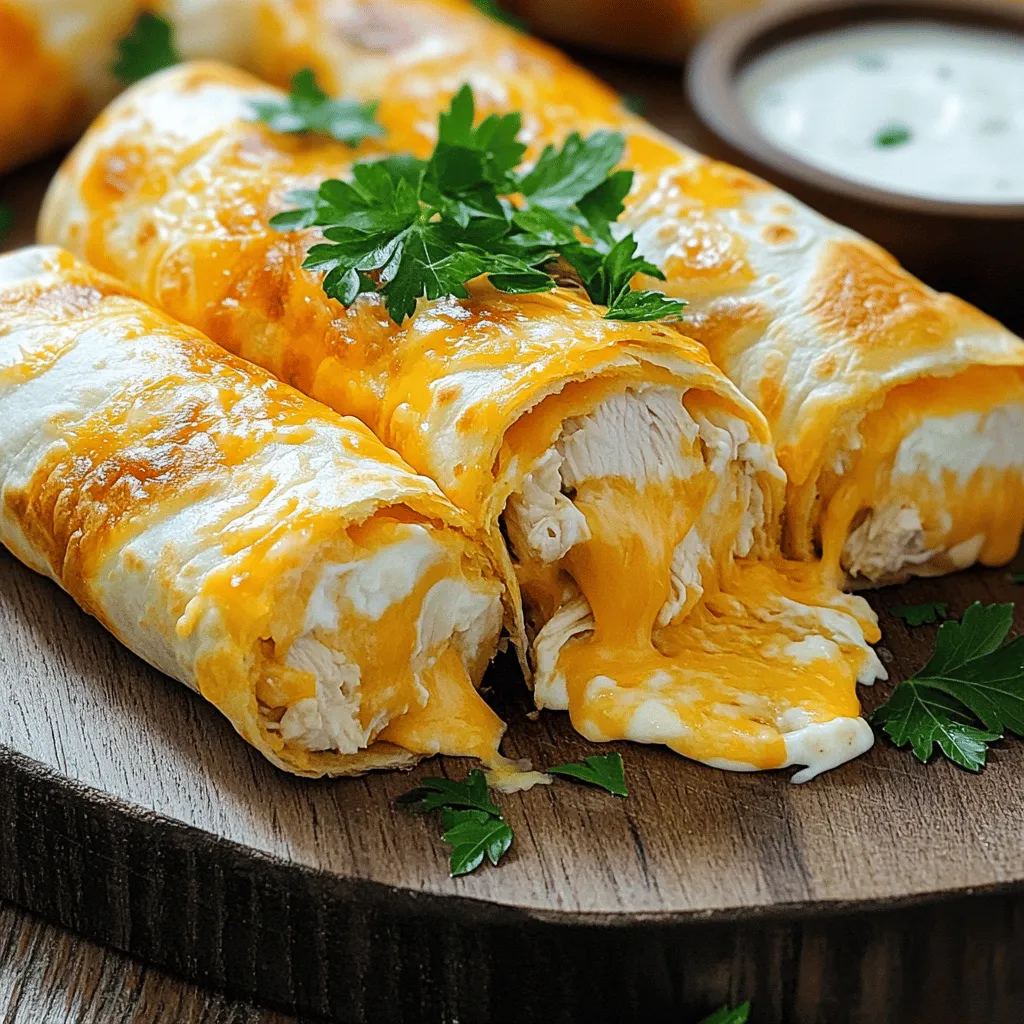
To make these tasty wraps, you need a few key ingredients. These include:
– 2 cups cooked chicken, thoroughly shredded
– 1 cup sharp cheddar cheese, finely shredded
– 1/2 cup cream cheese, softened to room temperature
– 2 cloves fresh garlic, finely minced
– 1/4 cup fresh parsley, finely chopped
– 1 teaspoon smoked paprika
– 4 large flour tortillas (8-10 inches in diameter)
– Salt and freshly ground black pepper to taste
– Olive oil, for grilling
These ingredients blend well, creating a rich, cheesy flavor.
Optional Ingredients for Custom Flavor
You can change the taste with some optional ingredients. Here are a few ideas:
– Diced bell peppers for crunch
– Jalapeños for heat
– Spinach for added nutrients
– Different herbs, like basil or cilantro
Feel free to mix and match based on what you like.
Best Tortilla Options for Wraps
Choosing the right tortilla makes a big difference. I recommend:
– Large flour tortillas for a soft wrap
– Whole wheat tortillas for a healthy twist
– Spinach or sun-dried tomato tortillas for extra flavor
Using different tortillas can make your wraps more fun. Try what you enjoy best. If you want the complete recipe, check out the Full Recipe section.
Step-by-Step Instructions
Easy Preparation Steps
To make Easy Cheesy Chicken Garlic Wraps, start by gathering your ingredients. You need cooked chicken, cheddar cheese, cream cheese, garlic, parsley, smoked paprika, and tortillas.
1. Mix the Filling: In a large bowl, combine the shredded chicken, cheddar cheese, cream cheese, minced garlic, chopped parsley, and smoked paprika.
2. Season It: Add salt and pepper to taste. Mix well until all ingredients blend together nicely.
Cooking Instructions for Perfectly Crispy Wraps
Now, it’s time to wrap and cook. This part is easy and fun!
1. Prepare the Tortilla: Lay one flour tortilla flat. Spoon about 1/4 of the chicken mixture into the center.
2. Wrap It Up: Fold the sides inward and roll from the bottom to the top. Make sure the filling stays inside.
3. Repeat: Do this for the rest of the tortillas and filling. Place them seam-side down on a plate.
4. Heat the Skillet: In a non-stick skillet, drizzle a bit of olive oil and heat it over medium.
5. Cook the Wraps: Place each wrap seam-side down. Cook for 3-4 minutes until golden brown. Flip and cook the other side.
Presentation Tips for Serving Wraps
Serving is just as important as cooking. Here’s how to make your wraps look great:
– Slice the Wraps: After resting for a minute, slice each wrap in half diagonally.
– Garnish: Arrange the slices on a colorful platter.
– Add Dips: Serve with ranch dressing or garlic dip for extra flavor.
This will make your meal not just tasty, but also beautiful. For the full recipe, check out the other sections of this article!
Tips & Tricks
Tips to Avoid Soggy Wraps
To keep your wraps crispy, use a few simple tricks. First, make sure your chicken is fully cooked and cooled before mixing it with the cheese and other ingredients. Warm or hot chicken can create steam, making the wraps soggy. Also, avoid adding too much cream cheese or liquid ingredients. A thick chicken mixture will hold together better. Finally, when grilling, use medium heat. High heat can burn the wraps before they become crispy.
Tricks for Meal Prep and Batch Cooking
Meal prep can save time and make cooking easy. Prepare the chicken mixture in advance and store it in the fridge for up to three days. You can also assemble wraps and freeze them. Wrap each one tightly in plastic wrap or foil to prevent freezer burn. When ready to eat, just thaw and grill them as needed. This method makes it easy to enjoy a quick meal any day.
Flavor Enhancements to Try
Want to kick up the flavor? Here are a few ideas. Add spices like cayenne pepper or chili powder for heat. Mix in chopped sun-dried tomatoes or olives for a tasty twist. For a fresh touch, try adding fresh spinach or arugula. You can also switch cheeses; pepper jack adds a nice kick, while mozzarella gives a milder taste. Each of these options can bring new life to your Easy Cheesy Chicken Garlic Wraps.
Variations
Vegetarian Alternatives for Chicken
If you want a veggie option, use cooked mushrooms or roasted veggies instead of chicken. You can also try black beans or chickpeas for protein. These choices keep the dish hearty and satisfying. Adding spinach or kale can boost the nutrients too. These swaps help everyone enjoy the wraps.
Different Cheese Options to Use
Cheese makes these wraps cheesy and delicious. If you want something different, try mozzarella for a milder taste. You can also use pepper jack for a spicy kick. Creamy goat cheese adds a unique flavor, while feta brings a tangy twist. Mixing different cheeses can create fun flavors.
Spice Level Adjustments and Seasoning Variations
To change the heat, add more spices. Use cayenne pepper or chili powder for a spicy version. If you prefer mild, stick with the smoked paprika in the recipe. Fresh herbs, like basil or cilantro, can brighten the wraps. Experiment with garlic powder or onion powder for depth. These adjustments let you make the wraps your own.
For the full recipe, check out the [Full Recipe] section.
Storage Info
How to Store Leftover Wraps
To keep your leftover wraps fresh, wrap them tightly in plastic wrap or foil. You can also use an airtight container. Store them in the fridge for up to three days. This helps maintain their taste and texture.
Reheating Instructions for Best Results
Reheat your wraps in a skillet for the best results. Heat a non-stick skillet over medium-low heat. Place the wrap in the skillet for about 3-4 minutes on each side. This method keeps them crispy. You can also use a microwave, but they may turn soggy. If you use the microwave, heat for 30 seconds at a time until warm.
Freezing Wraps for Future Meals
You can freeze the wraps for quick meals later. First, let them cool completely. Wrap each one in plastic wrap, then place them in a freezer-safe bag. They can last up to three months in the freezer. When you’re ready to eat, thaw them in the fridge overnight and reheat as described above. This way, you always have a tasty meal on hand! For the full recipe, check the details above.
FAQs
What can I serve with Easy Cheesy Chicken Garlic Wraps?
You can serve these wraps with many sides. Try fresh salad for crunch. Chips or fries add a nice touch. A bowl of salsa or guacamole adds flavor. You can also pair them with a creamy ranch dressing or a homemade garlic dip. These sides make the meal even more fun!
Can I make these wraps ahead of time?
Yes, you can prepare these wraps ahead of time. Just assemble them but don’t cook yet. Wrap them in plastic wrap and store in the fridge. They stay fresh for up to 24 hours. When you’re ready, just grill them until golden brown. This saves time on busy days.
What are some common substitutions for this recipe?
You can swap the chicken for cooked turkey or shredded beef. If you want a vegetarian option, try beans or roasted veggies instead. Use any cheese you like, such as mozzarella or pepper jack. Adjust the spices based on your taste. These changes keep the recipe fun and fresh.
Is this recipe suitable for kids?
Absolutely! Kids usually love cheesy wraps. They are easy to hold and eat. You can adjust the garlic to be less strong if needed. Add extra cheese or their favorite veggies for more flavor. This makes it a great meal for the whole family.
How do I customize the filling further?
You can get creative with the filling! Add chopped bell peppers, spinach, or corn for extra veggies. Try different herbs like basil or cilantro for a fresh taste. You can also add different spices, like cumin or chili powder, for a kick. Make it your own!
Where can I find the full recipe?
You can find the full recipe in the article above. It has all the details you need to make these Easy Cheesy Chicken Garlic Wraps. Enjoy the cooking process and the tasty results!
In this article, we explored simple recipes for Easy Cheesy Chicken Garlic Wraps. We covered essential ingredients, cooking steps, and tips to avoid soggy wraps. You learned how to customize flavors and store leftovers. These wraps are quick, tasty, and perfect for anyone.
Remember, you can change them to fit your taste and needs. Enjoy making and sharing these delicious wraps!
![To make these tasty wraps, you need a few key ingredients. These include: - 2 cups cooked chicken, thoroughly shredded - 1 cup sharp cheddar cheese, finely shredded - 1/2 cup cream cheese, softened to room temperature - 2 cloves fresh garlic, finely minced - 1/4 cup fresh parsley, finely chopped - 1 teaspoon smoked paprika - 4 large flour tortillas (8-10 inches in diameter) - Salt and freshly ground black pepper to taste - Olive oil, for grilling These ingredients blend well, creating a rich, cheesy flavor. You can change the taste with some optional ingredients. Here are a few ideas: - Diced bell peppers for crunch - Jalapeños for heat - Spinach for added nutrients - Different herbs, like basil or cilantro Feel free to mix and match based on what you like. Choosing the right tortilla makes a big difference. I recommend: - Large flour tortillas for a soft wrap - Whole wheat tortillas for a healthy twist - Spinach or sun-dried tomato tortillas for extra flavor Using different tortillas can make your wraps more fun. Try what you enjoy best. If you want the complete recipe, check out the Full Recipe section. To make Easy Cheesy Chicken Garlic Wraps, start by gathering your ingredients. You need cooked chicken, cheddar cheese, cream cheese, garlic, parsley, smoked paprika, and tortillas. 1. Mix the Filling: In a large bowl, combine the shredded chicken, cheddar cheese, cream cheese, minced garlic, chopped parsley, and smoked paprika. 2. Season It: Add salt and pepper to taste. Mix well until all ingredients blend together nicely. Now, it’s time to wrap and cook. This part is easy and fun! 1. Prepare the Tortilla: Lay one flour tortilla flat. Spoon about 1/4 of the chicken mixture into the center. 2. Wrap It Up: Fold the sides inward and roll from the bottom to the top. Make sure the filling stays inside. 3. Repeat: Do this for the rest of the tortillas and filling. Place them seam-side down on a plate. 4. Heat the Skillet: In a non-stick skillet, drizzle a bit of olive oil and heat it over medium. 5. Cook the Wraps: Place each wrap seam-side down. Cook for 3-4 minutes until golden brown. Flip and cook the other side. Serving is just as important as cooking. Here’s how to make your wraps look great: - Slice the Wraps: After resting for a minute, slice each wrap in half diagonally. - Garnish: Arrange the slices on a colorful platter. - Add Dips: Serve with ranch dressing or garlic dip for extra flavor. This will make your meal not just tasty, but also beautiful. For the full recipe, check out the other sections of this article! To keep your wraps crispy, use a few simple tricks. First, make sure your chicken is fully cooked and cooled before mixing it with the cheese and other ingredients. Warm or hot chicken can create steam, making the wraps soggy. Also, avoid adding too much cream cheese or liquid ingredients. A thick chicken mixture will hold together better. Finally, when grilling, use medium heat. High heat can burn the wraps before they become crispy. Meal prep can save time and make cooking easy. Prepare the chicken mixture in advance and store it in the fridge for up to three days. You can also assemble wraps and freeze them. Wrap each one tightly in plastic wrap or foil to prevent freezer burn. When ready to eat, just thaw and grill them as needed. This method makes it easy to enjoy a quick meal any day. Want to kick up the flavor? Here are a few ideas. Add spices like cayenne pepper or chili powder for heat. Mix in chopped sun-dried tomatoes or olives for a tasty twist. For a fresh touch, try adding fresh spinach or arugula. You can also switch cheeses; pepper jack adds a nice kick, while mozzarella gives a milder taste. Each of these options can bring new life to your Easy Cheesy Chicken Garlic Wraps. {{image_4}} If you want a veggie option, use cooked mushrooms or roasted veggies instead of chicken. You can also try black beans or chickpeas for protein. These choices keep the dish hearty and satisfying. Adding spinach or kale can boost the nutrients too. These swaps help everyone enjoy the wraps. Cheese makes these wraps cheesy and delicious. If you want something different, try mozzarella for a milder taste. You can also use pepper jack for a spicy kick. Creamy goat cheese adds a unique flavor, while feta brings a tangy twist. Mixing different cheeses can create fun flavors. To change the heat, add more spices. Use cayenne pepper or chili powder for a spicy version. If you prefer mild, stick with the smoked paprika in the recipe. Fresh herbs, like basil or cilantro, can brighten the wraps. Experiment with garlic powder or onion powder for depth. These adjustments let you make the wraps your own. For the full recipe, check out the [Full Recipe] section. To keep your leftover wraps fresh, wrap them tightly in plastic wrap or foil. You can also use an airtight container. Store them in the fridge for up to three days. This helps maintain their taste and texture. Reheat your wraps in a skillet for the best results. Heat a non-stick skillet over medium-low heat. Place the wrap in the skillet for about 3-4 minutes on each side. This method keeps them crispy. You can also use a microwave, but they may turn soggy. If you use the microwave, heat for 30 seconds at a time until warm. You can freeze the wraps for quick meals later. First, let them cool completely. Wrap each one in plastic wrap, then place them in a freezer-safe bag. They can last up to three months in the freezer. When you're ready to eat, thaw them in the fridge overnight and reheat as described above. This way, you always have a tasty meal on hand! For the full recipe, check the details above. You can serve these wraps with many sides. Try fresh salad for crunch. Chips or fries add a nice touch. A bowl of salsa or guacamole adds flavor. You can also pair them with a creamy ranch dressing or a homemade garlic dip. These sides make the meal even more fun! Yes, you can prepare these wraps ahead of time. Just assemble them but don’t cook yet. Wrap them in plastic wrap and store in the fridge. They stay fresh for up to 24 hours. When you’re ready, just grill them until golden brown. This saves time on busy days. You can swap the chicken for cooked turkey or shredded beef. If you want a vegetarian option, try beans or roasted veggies instead. Use any cheese you like, such as mozzarella or pepper jack. Adjust the spices based on your taste. These changes keep the recipe fun and fresh. Absolutely! Kids usually love cheesy wraps. They are easy to hold and eat. You can adjust the garlic to be less strong if needed. Add extra cheese or their favorite veggies for more flavor. This makes it a great meal for the whole family. You can get creative with the filling! Add chopped bell peppers, spinach, or corn for extra veggies. Try different herbs like basil or cilantro for a fresh taste. You can also add different spices, like cumin or chili powder, for a kick. Make it your own! You can find the full recipe in the article above. It has all the details you need to make these Easy Cheesy Chicken Garlic Wraps. Enjoy the cooking process and the tasty results! In this article, we explored simple recipes for Easy Cheesy Chicken Garlic Wraps. We covered essential ingredients, cooking steps, and tips to avoid soggy wraps. You learned how to customize flavors and store leftovers. These wraps are quick, tasty, and perfect for anyone. Remember, you can change them to fit your taste and needs. Enjoy making and sharing these delicious wraps!](https://tastednest.com/wp-content/uploads/2025/06/c29d3f69-b09c-436a-b22f-8219f625e86a-300x300.webp)