Japanese Fried Chicken Crunchy and Flavorful Recipe

WANT TO SAVE THIS RECIPE?

If you’ve ever craved a dish that’s crispy, juicy, and packed with flavor, look no further than Japanese Fried Chicken, or Karaage! In this post, I’ll walk you through my favorite recipe to create crunchy, mouthwatering chicken right at home. From marinating to frying, I’ll share all the tips you need for perfect Karaage every time. Let’s dive into the delicious world of Japanese fried chicken and make your taste buds dance!

Ingredients

Main Ingredients for Karaage

– 500g boneless, skinless chicken thighs, cut into bite-sized pieces

– 2 tablespoons soy sauce

– 1 tablespoon mirin (or rice vinegar)

– 1 teaspoon garlic powder

– 1 teaspoon ground ginger

– 1 tablespoon sesame oil

– 1 large egg, beaten

– 1 cup potato starch (or cornstarch)

– Salt and pepper to taste

– 1-2 cups vegetable oil (for frying)

These ingredients will create the base for your delicious Japanese fried chicken. The chicken thighs give you a juicy texture, while the marinade makes it super tasty. The potato starch or cornstarch forms the perfect crust when fried.

Optional Ingredients for Variations

– Substitutions for seasoning: You can swap soy sauce for tamari for a gluten-free option.

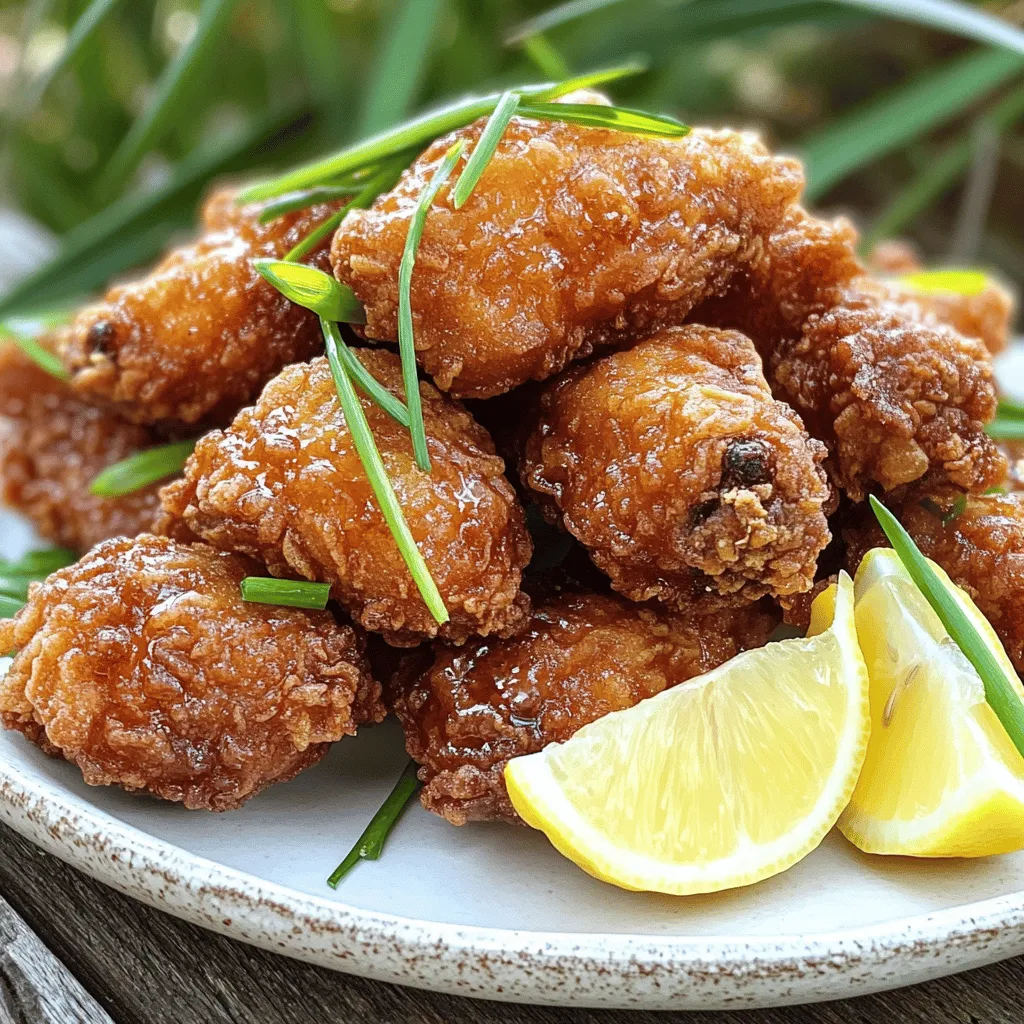
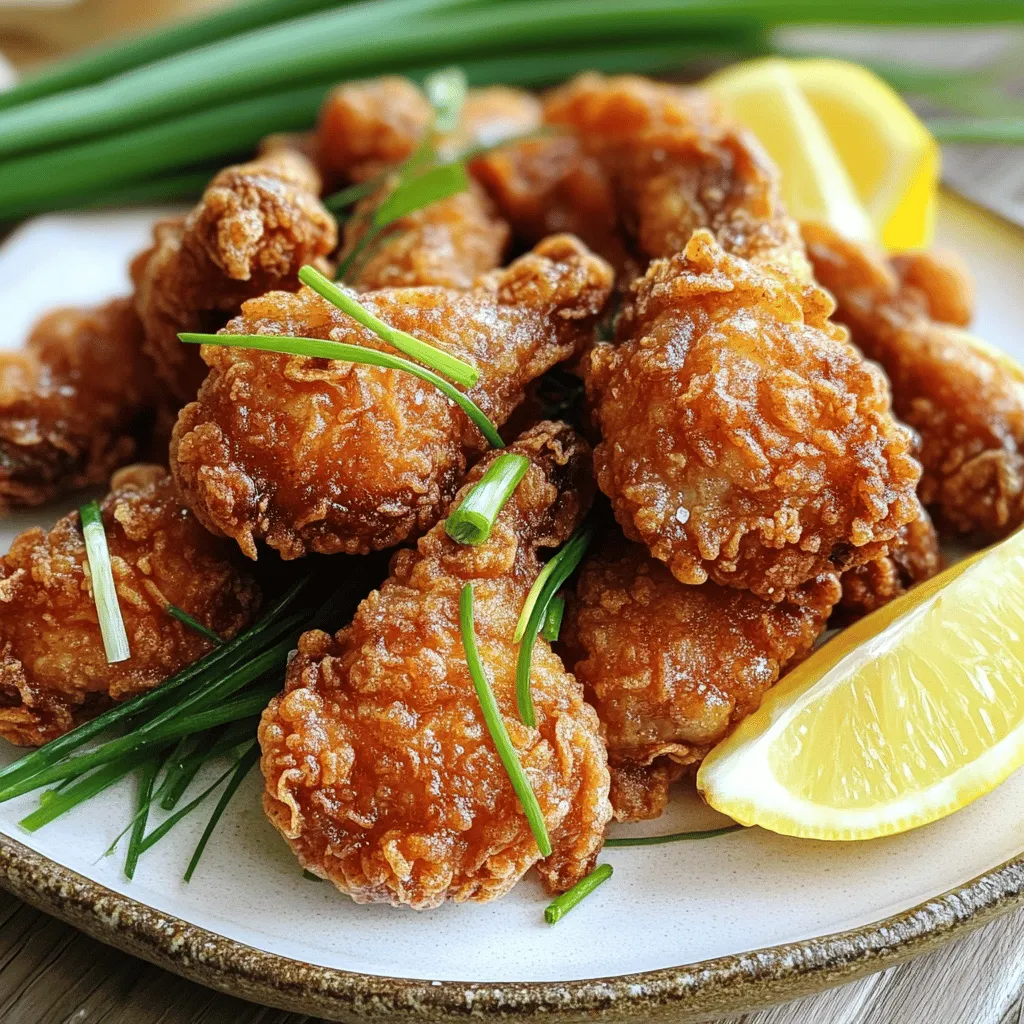
– Garnishes: Chopped green onions add color and flavor. Lemon wedges bring a nice zing.

– Side dishes: Serve with steamed rice or a simple salad to balance the meal.

Feel free to experiment with these optional ingredients. They can elevate your dish and make it unique. Enjoy creating your own version of Karaage!

Step-by-Step Instructions

Marinating the Chicken

To start, you need a flavorful marinade. In a large bowl, whisk together these ingredients:

– 2 tablespoons soy sauce

– 1 tablespoon mirin (or rice vinegar)

– 1 teaspoon garlic powder

– 1 teaspoon ground ginger

– 1 tablespoon sesame oil

– Salt and pepper to taste

Add the chicken pieces and mix well. Make sure every piece gets coated. Cover the bowl with plastic wrap. Let it sit in the fridge for at least 30 minutes. If you have time, marinate for up to 2 hours. This step adds deep flavor to the chicken.

Coating Techniques

Next, set up your dredging station. You’ll need two shallow dishes. In one, place 1 cup of potato starch. In the other, beat one large egg until it’s smooth.

Now for the coating! Take each piece of marinated chicken, letting excess marinade drip off. First, dredge it in potato starch. Shake off any extra starch. Then, dip it into the egg, making sure it’s evenly coated. For an extra crunch, return each piece to the potato starch for a second light coating. This double coating is key to getting that crispy texture.

Frying Process

It’s time to fry! In a large pan or deep fryer, pour in enough vegetable oil to reach about 2-3 inches deep. Heat the oil over medium-high heat until it reaches 180°C (350°F).

To check if the oil is hot enough, drop in a small piece of chicken. It should sizzle right away.

Carefully add the coated chicken pieces in small batches. Don’t overcrowd the pan. This keeps the oil temperature steady and your chicken crispy. Fry each piece for about 6-8 minutes. They should turn golden brown and crispy. Turn them occasionally for even cooking.

Once done, use a slotted spoon to remove the chicken. Place it on a plate lined with paper towels to soak up extra oil. Serve the chicken hot, and enjoy the crunch! For the full recipe, check the earlier sections of this article.

Tips & Tricks

Achieving the Perfect Crunch

To get that crunchy texture, choose the right oil. I recommend using vegetable oil or canola oil. These oils have a high smoke point, which helps achieve the best fry. Keep the oil temperature around 180°C (350°F). If the oil is too cool, your chicken will be soggy. Adjust the heat as needed while cooking.

Common Mistakes to Avoid

One big mistake is overcrowding the pan. If you add too many chicken pieces at once, they won’t cook evenly. This can lead to soggy spots. Make sure to fry in small batches. Another mistake is skipping the marinating step. Marinating adds flavor, and without it, your chicken will taste bland. Aim for at least 30 minutes in the marinade for great taste.

Serving Suggestions

For a fresh touch, garnish your fried chicken with chopped green onions. They add color and flavor. Serve it with lemon wedges for a bright zing in every bite. Pair your chicken with dipping sauces like soy sauce or spicy mayo. You can also serve it with steamed rice or a simple salad for a balanced meal. Enjoy your crispy Japanese fried chicken with these ideas! For the full recipe, check out the details above.

Variations

Flavor Enhancements

You can change the taste of your Japanese fried chicken with different marinades. Try using miso paste mixed with soy sauce for a deeper umami flavor. You can also replace mirin with sake for a unique twist.

For spice, create your own blend. Mix paprika, cayenne, and black pepper for a kick. Or use five-spice powder for a sweet and savory taste. Each marinade and spice blend brings its own flair.

Healthier Alternatives

If you want a lighter meal, consider baking instead of frying. To bake, coat the chicken as usual, then place it on a baking sheet. Bake at 200°C (400°F) for about 25-30 minutes. This gives you crispy chicken with less oil.

You can also use leaner cuts of chicken, like breasts. While thighs are juicier, chicken breasts still taste great. They may not be as rich, but they soak up flavor well.

For the full recipe, check out the section above!

Storage Info

Storing Leftover Karaage

To keep your leftover karaage fresh, store it in an airtight container. This helps maintain its crunch and flavor. Place the container in the fridge. It will last for 2 to 3 days. When you are ready to eat it again, reheating properly is key.

To reheat, use an oven or an air fryer. Preheat your oven to 180°C (350°F). Place the chicken on a baking tray and heat for about 10-15 minutes. This method will help restore its crunchy texture. Avoid using a microwave, as it can make the chicken soggy.

Freezing Tips

If you want to save karaage for later, freezing is a great option. Start by letting the chicken cool down to room temperature. Then, place it in a freezer-safe bag. Remove as much air as possible and seal it tightly. This helps prevent freezer burn. You can freeze karaage for up to 2 months.

When you want to eat it, the best way to thaw is in the fridge overnight. This keeps the chicken juicy. If you need it fast, you can use the microwave on defrost mode. After thawing, reheat in the oven or air fryer for the best taste. Enjoy your crispy Japanese fried chicken anytime!

FAQs

What is Karaage?

Karaage is a popular Japanese dish. It features bite-sized pieces of marinated chicken. The chicken is coated in starch and deep-fried until golden brown. This dish is loved for its crunchy texture and savory taste.

Karaage has roots in Japan, dating back to the 16th century. It is influenced by Chinese cooking methods. Over the years, it became a staple in Japanese home cooking. You can find karaage at izakayas, festivals, and family meals. Enjoying this dish brings a sense of comfort and joy.

Can I use chicken breast instead of thighs?

Yes, you can use chicken breast for karaage. However, the texture and flavor will change. Chicken thighs have more fat, making them juicier and more tender. They also soak up the marinade better, enhancing the flavor.

If you opt for chicken breast, be mindful of cooking time. Breast meat cooks faster and can dry out if overcooked. To keep it juicy, watch the frying closely and test for doneness.

How do I make Karaage gluten-free?

To make karaage gluten-free, start with the soy sauce. Use gluten-free soy sauce or tamari as a substitute. These options provide the same depth of flavor.

For the coating, replace potato starch with a gluten-free flour blend. You can also use cornstarch for that crispy texture. Always check labels to ensure all ingredients are gluten-free. Enjoy your delicious gluten-free karaage worry-free!

Karaage is a delicious way to enjoy crispy chicken. We explored key ingredients, marinade tips, and frying techniques for the best results. I shared ways to enhance flavor and how to store leftovers. Remember, a good marinate and double coating are key for crunch. Avoid common mistakes, like overcrowding the pan. In the end, making Karaage can be simple and rewarding. Don’t hesitate to try your own twists for a unique take!

- 500g boneless, skinless chicken thighs, cut into bite-sized pieces - 2 tablespoons soy sauce - 1 tablespoon mirin (or rice vinegar) - 1 teaspoon garlic powder - 1 teaspoon ground ginger - 1 tablespoon sesame oil - 1 large egg, beaten - 1 cup potato starch (or cornstarch) - Salt and pepper to taste - 1-2 cups vegetable oil (for frying) These ingredients will create the base for your delicious Japanese fried chicken. The chicken thighs give you a juicy texture, while the marinade makes it super tasty. The potato starch or cornstarch forms the perfect crust when fried. - Substitutions for seasoning: You can swap soy sauce for tamari for a gluten-free option. - Garnishes: Chopped green onions add color and flavor. Lemon wedges bring a nice zing. - Side dishes: Serve with steamed rice or a simple salad to balance the meal. Feel free to experiment with these optional ingredients. They can elevate your dish and make it unique. Enjoy creating your own version of Karaage! To start, you need a flavorful marinade. In a large bowl, whisk together these ingredients: - 2 tablespoons soy sauce - 1 tablespoon mirin (or rice vinegar) - 1 teaspoon garlic powder - 1 teaspoon ground ginger - 1 tablespoon sesame oil - Salt and pepper to taste Add the chicken pieces and mix well. Make sure every piece gets coated. Cover the bowl with plastic wrap. Let it sit in the fridge for at least 30 minutes. If you have time, marinate for up to 2 hours. This step adds deep flavor to the chicken. Next, set up your dredging station. You'll need two shallow dishes. In one, place 1 cup of potato starch. In the other, beat one large egg until it's smooth. Now for the coating! Take each piece of marinated chicken, letting excess marinade drip off. First, dredge it in potato starch. Shake off any extra starch. Then, dip it into the egg, making sure it's evenly coated. For an extra crunch, return each piece to the potato starch for a second light coating. This double coating is key to getting that crispy texture. It's time to fry! In a large pan or deep fryer, pour in enough vegetable oil to reach about 2-3 inches deep. Heat the oil over medium-high heat until it reaches 180°C (350°F). To check if the oil is hot enough, drop in a small piece of chicken. It should sizzle right away. Carefully add the coated chicken pieces in small batches. Don't overcrowd the pan. This keeps the oil temperature steady and your chicken crispy. Fry each piece for about 6-8 minutes. They should turn golden brown and crispy. Turn them occasionally for even cooking. Once done, use a slotted spoon to remove the chicken. Place it on a plate lined with paper towels to soak up extra oil. Serve the chicken hot, and enjoy the crunch! For the full recipe, check the earlier sections of this article. To get that crunchy texture, choose the right oil. I recommend using vegetable oil or canola oil. These oils have a high smoke point, which helps achieve the best fry. Keep the oil temperature around 180°C (350°F). If the oil is too cool, your chicken will be soggy. Adjust the heat as needed while cooking. One big mistake is overcrowding the pan. If you add too many chicken pieces at once, they won’t cook evenly. This can lead to soggy spots. Make sure to fry in small batches. Another mistake is skipping the marinating step. Marinating adds flavor, and without it, your chicken will taste bland. Aim for at least 30 minutes in the marinade for great taste. For a fresh touch, garnish your fried chicken with chopped green onions. They add color and flavor. Serve it with lemon wedges for a bright zing in every bite. Pair your chicken with dipping sauces like soy sauce or spicy mayo. You can also serve it with steamed rice or a simple salad for a balanced meal. Enjoy your crispy Japanese fried chicken with these ideas! For the full recipe, check out the details above. {{image_4}} You can change the taste of your Japanese fried chicken with different marinades. Try using miso paste mixed with soy sauce for a deeper umami flavor. You can also replace mirin with sake for a unique twist. For spice, create your own blend. Mix paprika, cayenne, and black pepper for a kick. Or use five-spice powder for a sweet and savory taste. Each marinade and spice blend brings its own flair. If you want a lighter meal, consider baking instead of frying. To bake, coat the chicken as usual, then place it on a baking sheet. Bake at 200°C (400°F) for about 25-30 minutes. This gives you crispy chicken with less oil. You can also use leaner cuts of chicken, like breasts. While thighs are juicier, chicken breasts still taste great. They may not be as rich, but they soak up flavor well. For the full recipe, check out the section above! To keep your leftover karaage fresh, store it in an airtight container. This helps maintain its crunch and flavor. Place the container in the fridge. It will last for 2 to 3 days. When you are ready to eat it again, reheating properly is key. To reheat, use an oven or an air fryer. Preheat your oven to 180°C (350°F). Place the chicken on a baking tray and heat for about 10-15 minutes. This method will help restore its crunchy texture. Avoid using a microwave, as it can make the chicken soggy. If you want to save karaage for later, freezing is a great option. Start by letting the chicken cool down to room temperature. Then, place it in a freezer-safe bag. Remove as much air as possible and seal it tightly. This helps prevent freezer burn. You can freeze karaage for up to 2 months. When you want to eat it, the best way to thaw is in the fridge overnight. This keeps the chicken juicy. If you need it fast, you can use the microwave on defrost mode. After thawing, reheat in the oven or air fryer for the best taste. Enjoy your crispy Japanese fried chicken anytime! Karaage is a popular Japanese dish. It features bite-sized pieces of marinated chicken. The chicken is coated in starch and deep-fried until golden brown. This dish is loved for its crunchy texture and savory taste. Karaage has roots in Japan, dating back to the 16th century. It is influenced by Chinese cooking methods. Over the years, it became a staple in Japanese home cooking. You can find karaage at izakayas, festivals, and family meals. Enjoying this dish brings a sense of comfort and joy. Yes, you can use chicken breast for karaage. However, the texture and flavor will change. Chicken thighs have more fat, making them juicier and more tender. They also soak up the marinade better, enhancing the flavor. If you opt for chicken breast, be mindful of cooking time. Breast meat cooks faster and can dry out if overcooked. To keep it juicy, watch the frying closely and test for doneness. To make karaage gluten-free, start with the soy sauce. Use gluten-free soy sauce or tamari as a substitute. These options provide the same depth of flavor. For the coating, replace potato starch with a gluten-free flour blend. You can also use cornstarch for that crispy texture. Always check labels to ensure all ingredients are gluten-free. Enjoy your delicious gluten-free karaage worry-free! Karaage is a delicious way to enjoy crispy chicken. We explored key ingredients, marinade tips, and frying techniques for the best results. I shared ways to enhance flavor and how to store leftovers. Remember, a good marinate and double coating are key for crunch. Avoid common mistakes, like overcrowding the pan. In the end, making Karaage can be simple and rewarding. Don't hesitate to try your own twists for a unique take!

Japanese Fried Chicken

Indulge in the deliciousness of crispy Japanese fried chicken that will have everyone coming back for more! This easy recipe features marinated chicken thighs coated in a light and crunchy potato starch batter, all fried to golden perfection. Whether it's for a fun dinner or a party treat, this dish is a crowd-pleaser. Ready to impress your taste buds? Click through to explore the full recipe and get cooking today!

Ingredients
  

500g boneless, skinless chicken thighs, cut into bite-sized pieces

1 cup potato starch (or cornstarch)

2 tablespoons soy sauce

1 tablespoon mirin (or rice vinegar)

1 teaspoon garlic powder

1 teaspoon ground ginger

1 tablespoon sesame oil

1 large egg, beaten

1-2 cups vegetable oil (for frying)

Salt and pepper to taste

Chopped green onions (for garnish)

Lemon wedges (for serving)

Instructions
 

Marinate the Chicken: In a large mixing bowl, whisk together the soy sauce, mirin (or rice vinegar), garlic powder, ground ginger, sesame oil, a pinch of salt, and a few grinds of black pepper. Add the bite-sized chicken pieces to the marinade, ensuring each piece is thoroughly coated. Cover the bowl with plastic wrap and refrigerate for a minimum of 30 minutes, or for a more robust flavor, up to 2 hours.

    Prepare the Coating: Once marinated, take the chicken out of the refrigerator. Set up a dredging station: place the potato starch in a shallow dish, and in another dish, beat the egg until smooth and fully mixed.

      Coat the Chicken: Remove each marinated chicken piece from the marinade, letting any excess liquid drip off. First, dredge the chicken in the potato starch, shaking off the excess. Next, dip it into the beaten egg, ensuring an even coating. For an extra crispy texture, return each piece to the potato starch for a second light coating.

        Heat the Oil: In a large frying pan or deep fryer, pour in enough vegetable oil to reach a depth of about 2-3 inches. Heat the oil over medium-high heat until it reaches approximately 180°C (350°F). To test if the oil is ready, drop in a small piece of chicken; it should sizzle immediately upon contact.

          Fry the Chicken: Carefully add the coated chicken pieces to the hot oil in small batches, making sure not to overcrowd the pan. This prevents the temperature from dropping and keeps the chicken crispy. Fry each batch for about 6-8 minutes, or until the chicken is golden brown and perfectly crispy, turning occasionally for even cooking.

            Drain and Serve: Once each batch is done, use a slotted spoon to remove the fried chicken from the oil, placing it on a plate lined with paper towels to absorb any excess oil.

              Garnish and Serve: Serve the crispy Japanese fried chicken while hot, generously garnished with freshly chopped green onions. Present with lemon wedges on the side to add a refreshing zest with every bite.

                Prep Time: 40 minutes | Total Time: 1 hour 15 minutes | Servings: 4

                  WANT TO SAVE THIS RECIPE?