No-Bake Oreo Cheesecake Bars Simple and Delicious Treat

WANT TO SAVE THIS RECIPE?

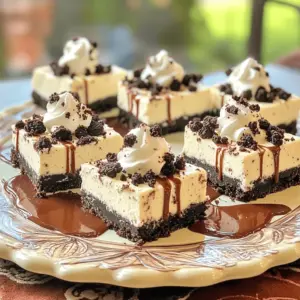
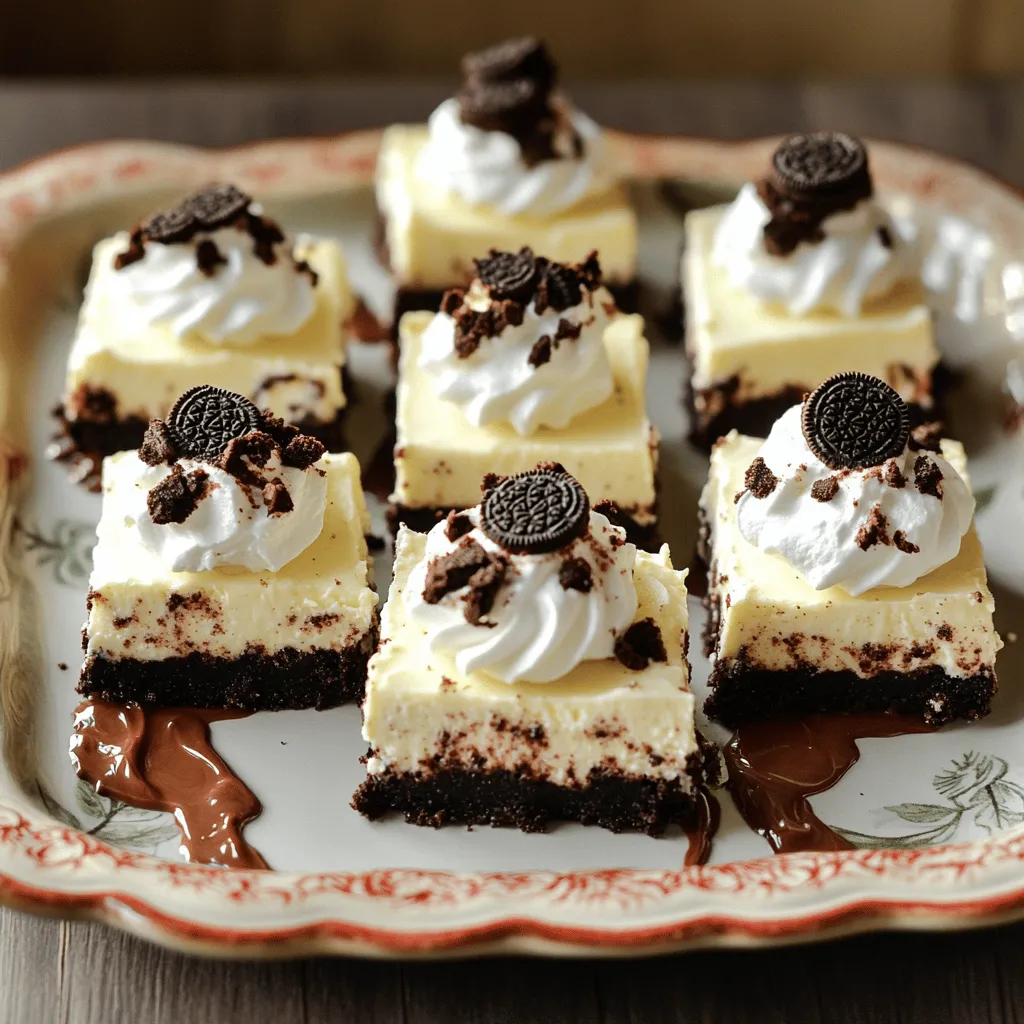
Craving a sweet treat that’s both simple and delicious? Look no further! In just a few steps, you can whip up scrumptious No-Bake Oreo Cheesecake Bars. With creamy filling and a rich crust, these bars are perfect for any occasion. Forget baking—this recipe keeps it cool while delivering big flavor. Join me as we dive into this easy, fun dessert that will impress everyone at your next gathering!

Ingredients

To make No-Bake Oreo Cheesecake Bars, you need the following ingredients:

– 24 Oreo cookies (plus extra for garnish)

– 1/4 cup unsalted butter, melted

– 16 oz cream cheese, softened

– 1 cup powdered sugar, sifted

– 1 teaspoon vanilla extract

– 1 cup heavy whipping cream, chilled

– 1/4 cup chocolate sauce (optional)

These ingredients create a rich and creamy cheesecake that pairs perfectly with the crunchy Oreo crust. The cream cheese gives it a smooth texture, while the whipped cream adds lightness. The melted butter helps bind the crust, making it sturdy. Don’t forget the chocolate sauce, if you want an extra touch of sweetness!

Using quality ingredients makes a big difference. I always choose fresh cream cheese and real vanilla extract for the best flavor. If you can’t find Oreo cookies, you can use any chocolate cookie as a base. Just make sure it has a similar texture. This treat is simple to make and a delight to share!

Step-by-Step Instructions

Preparing the Crust

To start, we need to crush the Oreo cookies. Place 24 Oreo cookies in a food processor. Pulse them until they look like fine sand. This step is key for a great crust. Next, melt 1/4 cup of unsalted butter. Pour the melted butter into the crushed cookies. Pulse again until the mix is moist and well combined.

Forming the Base

Now, take the Oreo mixture and press it firmly into a 9×9 inch baking dish. Use your hands or the back of a spoon to make it even. Make sure the crust is compact. This helps it hold together well. Once you finish, place the dish in the fridge. Let it chill while you prepare the filling.

Making the Filling

In a large bowl, beat 16 oz of softened cream cheese with an electric mixer. Mix until it’s totally smooth. This makes a creamy filling. Gradually add in 1 cup of sifted powdered sugar and 1 teaspoon of vanilla extract. Keep mixing until the mixture is lump-free and blended.

Whipping the Cream

In a separate bowl, pour in 1 cup of chilled heavy whipping cream. Use an electric mixer on high speed. Beat it until stiff peaks form. This step is very important. It gives your cheesecake a light and fluffy texture.

Combining the Mixtures

Now, gently fold the whipped cream into the cream cheese mixture. Use a spatula and be careful not to over-mix. You want to keep that airy texture. Once combined, pour the cheesecake filling over the chilled Oreo crust. Use a spatula to spread it evenly across the top.

Adding Toppings and Chilling

For the final touch, crush a few extra Oreo cookies. Sprinkle these crumbs on top of the cheesecake filling. If you like, drizzle some chocolate sauce too. It adds a nice touch. Cover the dish tightly with plastic wrap. Chill it in the fridge for at least 4 hours. This helps the cheesecake set properly.

Tips & Tricks

Perfecting Your Cheesecake Texture

Softening cream cheese is key. If it’s too cold, it clumps. Leave it out for an hour. This makes mixing easy. I recommend using a mixer to beat it until smooth. This step helps create a creamy filling.

Whipping cream is also crucial. Start with chilled heavy cream. Beat it on high speed until stiff peaks form. This adds air and lightness. Don’t rush! If you beat it too long, it can turn into butter.

Serving Suggestions

You can present cheesecake bars in fun ways. Try cutting them into fun shapes. A heart or star can make it special. Adding a dollop of whipped cream on top is always a hit. You can also sprinkle extra Oreo crumbs for a nice touch.

Pair these bars with drinks like coffee or milk. A sweet red wine can work too. This creates a delightful balance of flavors.

Troubleshooting Common Issues

If your cheesecake does not set, it may need more chilling time. Chill it longer, then check again. You can also try adding gelatin next time for a firmer texture.

Grainy filling happens if the cream cheese is not smooth enough. Make sure to beat it well. If it still seems grainy, avoid over-mixing the whipped cream. Gently fold it in to keep the air.

Variations

Flavor Variations

You can easily change the flavor of these cheesecake bars. Adding fruit gives a fresh twist. Fresh strawberries, raspberries, or blueberries work well. Just fold in fruit before pouring the filling. You can also use flavored cream cheese to add unique tastes.

Using different cookies for the crust can change the whole vibe. Try chocolate sandwich cookies or graham crackers. Each type brings its own flavor and texture. Mix and match to find your favorite.

Dietary Alternatives

If you want a gluten-free version, just use gluten-free Oreo cookies. These cookies taste great and keep the same yummy flavor. You can also use almond flour for the crust if you need a grain-free option.

For a low-sugar version, try using stevia or erythritol. These sweeteners give you the sweetness without the calories. Make sure to adjust the amount to taste.

Seasonal Versions

Incorporating seasonal flavors can make these bars even more special. For fall, add pumpkin puree and spices like cinnamon. This gives the bars a warm, cozy flavor. For winter, consider peppermint extract. Just a tiny bit can create a festive treat.

Storage Info

How to Store the Cheesecake Bars

To keep your cheesecake bars fresh, you should store them in the fridge. Place the bars in an airtight container. This helps prevent them from absorbing odors from other foods. You can also cover the dish tightly with plastic wrap. If you want to save some for later, freezing works well too. Cut the bars into portions and wrap each piece in plastic wrap. Then place them in a freezer-safe bag or container. This way, you can enjoy them even after a few weeks.

Shelf Life

These cheesecake bars last about 5 days in the fridge. Make sure to keep them covered. If they start to look dry or change color, it’s best to toss them. Signs of spoilage include a sour smell or any mold growth. Always trust your senses when deciding if food is still good. If you see, smell, or taste anything off, it’s safer to discard the dessert.

FAQs

Can I use different cookies for the crust?

Yes, you can. Here are some great options:

– Chocolate sandwich cookies

– Graham crackers

– Digestive biscuits

– Peanut butter cookies

Experimenting with other cookies can change the flavor. Use what you love!

How can I make this recipe without dairy?

You can make it dairy-free easily. Try these swaps:

– Use dairy-free cream cheese

– Replace heavy cream with coconut cream

– Use almond milk or oat milk instead of regular milk

These options keep it creamy and delicious.

Can I make these cheesecake bars ahead of time?

Sure! Here are some tips:

– Prepare and chill them the night before.

– Cover them well so they stay fresh.

– Serve within three days for best taste.

Making them in advance saves time for your celebration!

You learned how to make delicious Oreo cheesecake bars from start to finish. We covered the key ingredients, step-by-step instructions, and helpful tips. You can get creative with flavors and variations too.

Enjoy making these treats just how you like them. With practice, you’ll bake perfect cheesecake bars every time. Now, gather your ingredients and impress your friends and family with your new skills!

To make No-Bake Oreo Cheesecake Bars, you need the following ingredients: - 24 Oreo cookies (plus extra for garnish) - 1/4 cup unsalted butter, melted - 16 oz cream cheese, softened - 1 cup powdered sugar, sifted - 1 teaspoon vanilla extract - 1 cup heavy whipping cream, chilled - 1/4 cup chocolate sauce (optional) These ingredients create a rich and creamy cheesecake that pairs perfectly with the crunchy Oreo crust. The cream cheese gives it a smooth texture, while the whipped cream adds lightness. The melted butter helps bind the crust, making it sturdy. Don't forget the chocolate sauce, if you want an extra touch of sweetness! Using quality ingredients makes a big difference. I always choose fresh cream cheese and real vanilla extract for the best flavor. If you can't find Oreo cookies, you can use any chocolate cookie as a base. Just make sure it has a similar texture. This treat is simple to make and a delight to share! To start, we need to crush the Oreo cookies. Place 24 Oreo cookies in a food processor. Pulse them until they look like fine sand. This step is key for a great crust. Next, melt 1/4 cup of unsalted butter. Pour the melted butter into the crushed cookies. Pulse again until the mix is moist and well combined. Now, take the Oreo mixture and press it firmly into a 9x9 inch baking dish. Use your hands or the back of a spoon to make it even. Make sure the crust is compact. This helps it hold together well. Once you finish, place the dish in the fridge. Let it chill while you prepare the filling. In a large bowl, beat 16 oz of softened cream cheese with an electric mixer. Mix until it's totally smooth. This makes a creamy filling. Gradually add in 1 cup of sifted powdered sugar and 1 teaspoon of vanilla extract. Keep mixing until the mixture is lump-free and blended. In a separate bowl, pour in 1 cup of chilled heavy whipping cream. Use an electric mixer on high speed. Beat it until stiff peaks form. This step is very important. It gives your cheesecake a light and fluffy texture. Now, gently fold the whipped cream into the cream cheese mixture. Use a spatula and be careful not to over-mix. You want to keep that airy texture. Once combined, pour the cheesecake filling over the chilled Oreo crust. Use a spatula to spread it evenly across the top. For the final touch, crush a few extra Oreo cookies. Sprinkle these crumbs on top of the cheesecake filling. If you like, drizzle some chocolate sauce too. It adds a nice touch. Cover the dish tightly with plastic wrap. Chill it in the fridge for at least 4 hours. This helps the cheesecake set properly. Softening cream cheese is key. If it's too cold, it clumps. Leave it out for an hour. This makes mixing easy. I recommend using a mixer to beat it until smooth. This step helps create a creamy filling. Whipping cream is also crucial. Start with chilled heavy cream. Beat it on high speed until stiff peaks form. This adds air and lightness. Don’t rush! If you beat it too long, it can turn into butter. You can present cheesecake bars in fun ways. Try cutting them into fun shapes. A heart or star can make it special. Adding a dollop of whipped cream on top is always a hit. You can also sprinkle extra Oreo crumbs for a nice touch. Pair these bars with drinks like coffee or milk. A sweet red wine can work too. This creates a delightful balance of flavors. If your cheesecake does not set, it may need more chilling time. Chill it longer, then check again. You can also try adding gelatin next time for a firmer texture. Grainy filling happens if the cream cheese is not smooth enough. Make sure to beat it well. If it still seems grainy, avoid over-mixing the whipped cream. Gently fold it in to keep the air. {{image_4}} You can easily change the flavor of these cheesecake bars. Adding fruit gives a fresh twist. Fresh strawberries, raspberries, or blueberries work well. Just fold in fruit before pouring the filling. You can also use flavored cream cheese to add unique tastes. Using different cookies for the crust can change the whole vibe. Try chocolate sandwich cookies or graham crackers. Each type brings its own flavor and texture. Mix and match to find your favorite. If you want a gluten-free version, just use gluten-free Oreo cookies. These cookies taste great and keep the same yummy flavor. You can also use almond flour for the crust if you need a grain-free option. For a low-sugar version, try using stevia or erythritol. These sweeteners give you the sweetness without the calories. Make sure to adjust the amount to taste. Incorporating seasonal flavors can make these bars even more special. For fall, add pumpkin puree and spices like cinnamon. This gives the bars a warm, cozy flavor. For winter, consider peppermint extract. Just a tiny bit can create a festive treat. To keep your cheesecake bars fresh, you should store them in the fridge. Place the bars in an airtight container. This helps prevent them from absorbing odors from other foods. You can also cover the dish tightly with plastic wrap. If you want to save some for later, freezing works well too. Cut the bars into portions and wrap each piece in plastic wrap. Then place them in a freezer-safe bag or container. This way, you can enjoy them even after a few weeks. These cheesecake bars last about 5 days in the fridge. Make sure to keep them covered. If they start to look dry or change color, it’s best to toss them. Signs of spoilage include a sour smell or any mold growth. Always trust your senses when deciding if food is still good. If you see, smell, or taste anything off, it’s safer to discard the dessert. Yes, you can. Here are some great options: - Chocolate sandwich cookies - Graham crackers - Digestive biscuits - Peanut butter cookies Experimenting with other cookies can change the flavor. Use what you love! You can make it dairy-free easily. Try these swaps: - Use dairy-free cream cheese - Replace heavy cream with coconut cream - Use almond milk or oat milk instead of regular milk These options keep it creamy and delicious. Sure! Here are some tips: - Prepare and chill them the night before. - Cover them well so they stay fresh. - Serve within three days for best taste. Making them in advance saves time for your celebration! You learned how to make delicious Oreo cheesecake bars from start to finish. We covered the key ingredients, step-by-step instructions, and helpful tips. You can get creative with flavors and variations too. Enjoy making these treats just how you like them. With practice, you'll bake perfect cheesecake bars every time. Now, gather your ingredients and impress your friends and family with your new skills!

No-Bake Oreo Cheesecake Bars

Indulge in the ultimate dessert with these Decadent No-Bake Oreo Cheesecake Bars! This easy recipe features a luscious cream cheese filling and a crunchy Oreo crust, perfect for any occasion. With simple ingredients and quick prep, you'll impress friends and family in no time. Ready to create this delicious treat? Click through to explore the full recipe and make your dessert dreams come true!

Ingredients
  

24 Oreo cookies (plus extra for garnish)

1/4 cup unsalted butter, melted

16 oz cream cheese, softened to room temperature

1 cup powdered sugar, sifted

1 teaspoon vanilla extract

1 cup heavy whipping cream, chilled

1/4 cup chocolate sauce (optional, for drizzling)

Instructions
 

Prepare the Crust: In a food processor, finely crush the Oreo cookies until they resemble sand. Add the melted butter and pulse until the mixture is evenly moistened and well blended.

    Form the Base: Take the Oreo mixture and press it firmly into the bottom of a 9x9 inch square baking dish, creating an even layer. Ensure the crust is compact for stability. Place dish in the refrigerator to set while you prepare the filling.

      Make the Filling: In a large mixing bowl, use an electric mixer to beat the softened cream cheese until it is completely smooth and creamy. Gradually sprinkle in the sifted powdered sugar and pour in the vanilla extract, continuing to mix until everything is well blended and no lumps remain.

        Whip the Cream: In a separate clean bowl, beat the heavy whipping cream with an electric mixer on high speed until stiff peaks form. This step is crucial for achieving a light and airy texture for your cheesecake filling.

          Fold Together: Carefully fold the whipped cream into the cream cheese mixture using a spatula. Gently combine until no white streaks are visible but be cautious to avoid over-mixing, which would deflate the whipped cream.

            Layer the Filling: Pour the luscious cheesecake filling over the chilled Oreo crust, using a spatula to spread it into an even layer across the surface.

              Add Toppings: Crush a few extra Oreo cookies and scatter the crumbs on top of the cheesecake filling for an appealing texture and look. If desired, drizzle chocolate sauce over the top for an extra touch of indulgence.

                Chill: Cover the baking dish tightly with plastic wrap and refrigerate for at least 4 hours, or until the cheesecake is completely set and firm to the touch.

                  Serve: Once set, remove the cheesecake from the fridge. Using a sharp knife, cut it into even bars and serve them chilled.

                    Vorbereitungszeit: 30 Minuten | Gesamtzeit: 4 Stunden 30 Minuten | Portionen: 12

                      - Präsentationstipps: Arrange the cheesecake bars neatly on a decorative platter. Top each piece with a dollop of freshly whipped cream and a sprinkle of Oreo crumbles for a stunning presentation.

                        WANT TO SAVE THIS RECIPE?