Vibrant Rainbow Orzo Salad Refreshing and Healthy Meal
![- 1 cup orzo pasta - 1 cup cherry tomatoes, halved - 1 cup cucumber, diced - 1 bell pepper (red or yellow), diced - 1 cup corn kernels (fresh or thawed from frozen) - 1/2 red onion, finely chopped - 1/2 cup feta cheese, crumbled - 1/4 cup fresh parsley, roughly chopped - 1/4 cup extra virgin olive oil - 3 tablespoons fresh lemon juice - Salt and freshly cracked black pepper to taste - Optional: sliced black olives for garnish When I make this salad, I focus on fresh, colorful ingredients. The orzo pasta forms a nice base, and it cooks up quickly. I love using cherry tomatoes because they add a burst of sweetness. Diced cucumber gives a nice crunch, while bell peppers bring vibrant colors. Corn kernels, whether fresh or thawed, add a sweet touch. Red onion gives a bit of sharpness, balancing the flavors. Feta cheese adds creaminess, and fresh parsley brightens everything. I always use high-quality extra virgin olive oil and fresh lemon juice for dressing. They enhance the salad’s taste and keep it healthy. Make sure to grab ripe tomatoes and fresh veggies. This ensures your salad has the best flavor and texture. You can find the full recipe at [Full Recipe]. Bring a large pot of salted water to a boil. Add the orzo pasta and cook it according to the package instructions. Usually, this takes about 8 to 10 minutes. Once cooked, drain the orzo and rinse it under cold water. This stops the cooking and cools the pasta quickly. While the orzo cooks, prepare your vegetables. Start by dicing the cucumber and bell pepper. Finely chop the red onion. Halve the cherry tomatoes. If using frozen corn, run warm water over it in a fine mesh strainer until it thaws. These fresh veggies add crunch and color to the salad. In a large salad bowl, combine the cooled orzo, halved cherry tomatoes, diced cucumber, bell pepper, corn, and chopped red onion. Gently toss everything together. In a small bowl, whisk together the olive oil, lemon juice, salt, and pepper. Drizzle this dressing over the salad. Toss gently to coat all the ingredients. For the best taste, cover the salad with plastic wrap or a lid. Refrigerate it for at least 30 minutes. This waiting time lets the flavors blend. Before serving, give the salad a gentle toss to mix everything well. It’s all about that fresh and vibrant taste! For the full recipe, check out the details above. To keep your orzo just right, follow these steps. First, cook the orzo in boiling, salted water. Stir often to prevent sticking. Check the package for timing, usually 8-10 minutes. You want it al dente, or firm. After cooking, drain the orzo, and rinse it with cold water. This stops the cooking and keeps it from getting mushy. You can change the flavor of your salad by using different dressings. Try a balsamic vinaigrette for a tangy twist. For a creamier taste, mix Greek yogurt with lemon juice. If you prefer a spicy kick, add some chili oil. Experiment to find your favorite dressing. Each will give a new vibe to your Rainbow Orzo Salad. When serving, make it look great! Use a large bowl for sharing or small plates for guests. You can add sliced black olives on top for an eye-catching touch. A sprinkle of extra parsley gives it a fresh look. Pair it with grilled chicken or fish for a full meal. This salad is colorful, tasty, and perfect for any table. For the full recipe, check the section above. {{image_4}} To make a vegan rainbow orzo salad, you can easily swap out some ingredients. Instead of feta cheese, use crumbled tofu or almond feta for a creamy texture. To add flavor, toss in nutritional yeast for a cheesy taste. You can also replace the olive oil with avocado oil if desired. For protein, try adding chickpeas or lentils. Both options will keep your salad filling and nutritious. If you want to boost the protein in your rainbow orzo salad, there are many great choices. Cooked chicken is a classic option. Shredded rotisserie chicken works well and adds flavor. For a vegetarian option, beans are a fantastic choice. Black beans or white beans add protein and fiber. You could also add shrimp for a seafood twist. Just sauté them lightly before mixing them in. Using seasonal vegetables can make your salad fresh and exciting. In spring, consider adding asparagus or snap peas for crunch. Summer is perfect for ripe tomatoes and zucchini. In fall, roasted butternut squash or brussels sprouts add warmth to your meal. Winter brings hearty vegetables like kale or shredded carrots, which are great for a colorful touch. Adjust your salad based on what’s fresh to keep it vibrant and tasty. Store leftover Rainbow Orzo Salad in an airtight container. This keeps it fresh. Make sure to cover the salad tightly. Avoid letting air in, as it can make your salad soggy. Keep it in the fridge right after serving. This helps maintain its taste and crunch. The salad lasts about 3 to 4 days in the fridge. Check for any signs of spoilage, like off smells or discoloration. If it looks and smells good, it should be safe to eat. However, the veggies may lose some crunch as time passes. You can freeze the salad, but be careful. The texture may change when thawed. To freeze, put it in a freezer-safe bag or container. Remove as much air as possible. When you're ready to eat, thaw it overnight in the fridge. Reheat it gently on the stove or microwave. Remember, fresh ingredients like feta and parsley are best added afterward for flavor. Try this method for an easy meal anytime! You can find the full recipe for more tips on making this salad. Yes, you can use gluten-free pasta in this recipe. Look for gluten-free orzo made from rice or corn. Other good options include quinoa or chickpea pasta. These will still give you that nice texture and make the salad enjoyable. This salad works well for meal prep. It stays fresh for up to three days in the fridge. Just keep the dressing separate until you are ready to eat. This way, the salad remains crisp and tasty. You can serve this salad warm, but make a few adjustments. Cook the orzo and let it cool slightly before mixing in the veggies. This keeps the salad vibrant. If you want, you can also add warm veggies, like roasted zucchini or asparagus. These add nice flavor and warmth. This blog covered how to make a fresh orzo salad. You learned the right ingredients, cooking steps, and tips for taste. Remember to pick ripe veggies for the best flavor. Chilling your salad makes a big difference. Try new dressings or add protein to mix it up. Store leftovers correctly to enjoy later. This salad offers great flexibility for your needs. Now, dive into this vibrant dish and enjoy every bite!](https://tastednest.com/wp-content/uploads/2025/06/547ff891-ffd1-4912-acbc-91fb9b8ff58e.webp)
Get ready for a burst of color and flavor with my vibrant Rainbow Orzo Salad! This dish is not only refreshing but also healthy, making it perfect for any meal. …
Get ready for a burst of color and flavor with my vibrant Rainbow Orzo Salad! This dish is not only refreshing but also healthy, making it perfect for any meal. …
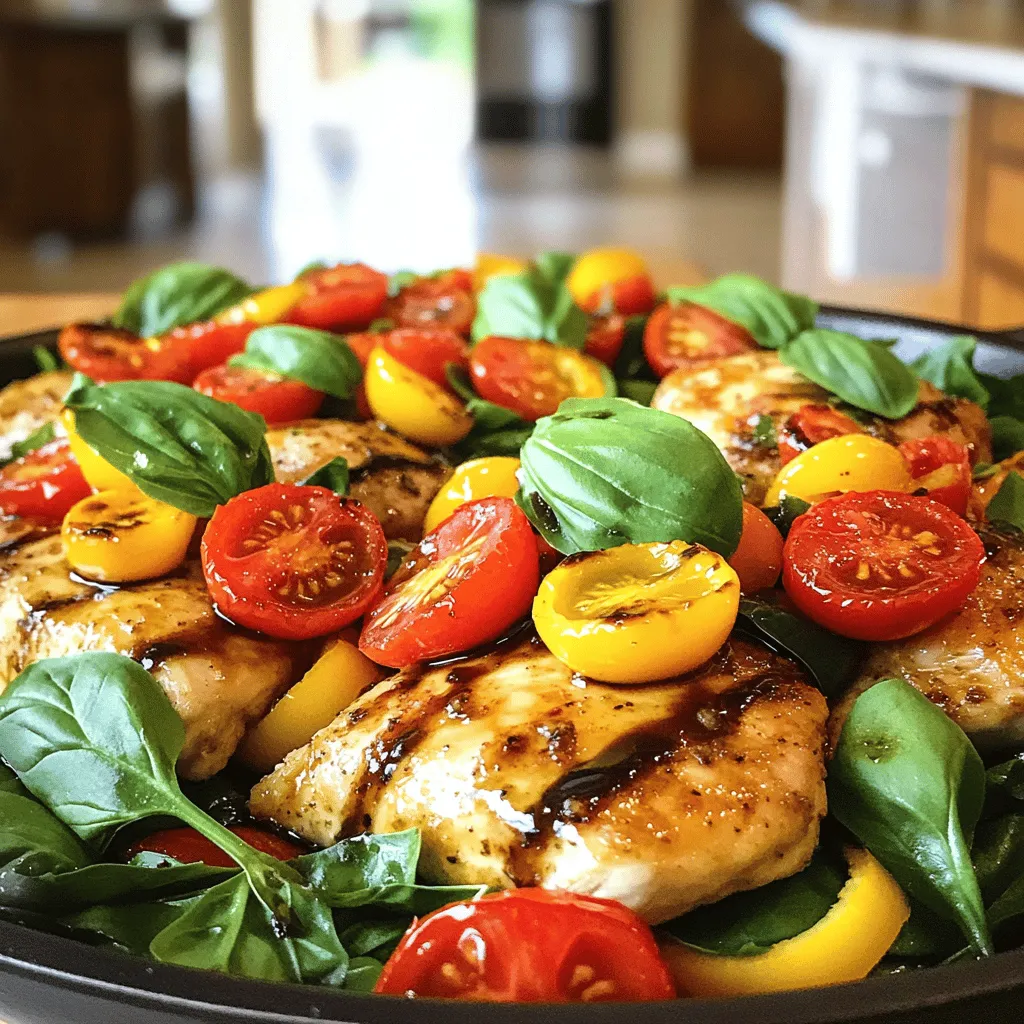
Looking for a tasty dinner that’s simple and quick? One Pan Balsamic Chicken is your answer! With just one skillet, you will enjoy juicy chicken, vibrant vegetables, and a flavorful …
![- 20 jumbo pasta shells - 2 cups ricotta cheese - 1 cup cooked spinach, finely chopped Jumbo pasta shells are the star of this dish. They hold the filling well and make every bite delightful. I prefer using a mix of ricotta cheese and cooked spinach for a creamy, rich taste. The spinach adds color and nutrients. - 1 cup grated mozzarella cheese - 1 cup grated parmesan cheese - 4 cloves garlic, minced - 1 tablespoon olive oil - 1 teaspoon dried oregano - 1/2 teaspoon salt - 1/4 teaspoon black pepper Mozzarella and parmesan blend beautifully in this dish. They add creaminess and a nice, cheesy pull. Garlic enhances the flavor, while oregano gives it a warm, earthy note. Salt and pepper are essential to balance everything. - 1/2 teaspoon red pepper flakes - Fresh parsley for garnish For those who like a kick, red pepper flakes add heat. Fresh parsley brightens the dish and adds color. You can skip the flakes if you prefer a milder flavor. For the full recipe of this delicious dish, refer to the earlier section. - Preheat your oven to 375°F (190°C). This step is key for a perfect bake. - Bring a large pot of salted water to a boil. Carefully add the jumbo shells. Cook them until they are al dente, about 10-12 minutes. Once done, drain them in a colander. Place the shells on a clean kitchen towel to cool off. - In a large skillet, heat 1 tablespoon of olive oil over medium heat. This will create a lovely base for the mushrooms. - Add 2 cups of finely chopped mushrooms to the skillet. Stir them for about 5-7 minutes until they turn golden brown. - Next, introduce 4 cloves of minced garlic. Cook for another 2 minutes until the garlic is fragrant. Remove the skillet from heat and set it aside. - In a large bowl, combine 2 cups of ricotta cheese, 1 cup of finely chopped cooked spinach, and half of the grated mozzarella and parmesan cheese. - Stir in the sautéed mushrooms, 1 teaspoon of dried oregano, and season with 1/2 teaspoon of salt and 1/4 teaspoon of black pepper. Mix everything until smooth and well combined. - In the same skillet, pour 1 cup of heavy cream. Bring it to a simmer over low heat. - Gradually add the remaining mozzarella and parmesan cheese, stirring until they melt into a creamy sauce. Season with a pinch of salt and pepper to enhance the flavor. - Take each jumbo shell and spoon about 2 tablespoons of the cheese and mushroom filling into it. - Place the stuffed shells carefully in a greased baking dish with the open side facing up. This allows the sauce to soak in. - Pour the creamy cheese sauce generously over the stuffed shells. Ensure each shell is well coated for maximum flavor. - Cover the baking dish with aluminum foil. Bake in the preheated oven for 20 minutes. - After that, remove the foil and bake for another 10-15 minutes. Look for bubbly and golden cheese on top. For the full recipe, check the details above! - To achieve al dente pasta, boil the jumbo shells in salted water. Cook them for about 1-2 minutes less than the package says. This way, they won’t turn mushy when you bake them later. - To prevent the filling from spilling out, fill each shell gently. Use about 2 tablespoons of filling and ensure the opening faces up when placing them in the dish. This keeps the creamy goodness inside. - Adding herbs like fresh basil or thyme can boost flavor. These herbs pair well with mushrooms and garlic. Just sprinkle them in the filling for a fresh taste. - If you want alternatives for creaminess, try using Greek yogurt or mascarpone. These options give you a rich texture without all the calories of heavy cream. - For garnishing, sprinkle fresh parsley or grated cheese on top. This adds color and a nice finish to your dish. - Serving suggestions include pairing the stuffed shells with garlic bread and a crisp green salad. This balances the meal with fresh and crunchy sides. For the full recipe, check out the details above! {{image_4}} You can make this dish even more exciting by adding different vegetables. Spinach is great, but you can also try zucchini, bell peppers, or artichokes. Each veggie brings its own taste. You can also substitute cheeses. If you want a lighter dish, use cottage cheese instead of ricotta. This keeps the filling creamy while cutting calories. For those who love meat, there are many options. You can include chicken or bacon for a hearty twist. Shredded rotisserie chicken works well. If you want to add bacon, cook it crispy and crumble it into the filling. You can also use ground beef or sausage. Brown them well before adding to the cheese mix. This will give a rich flavor to the dish. If you need gluten-free options, choose gluten-free pasta shells. They cook similarly to regular shells. For those who follow a vegan diet, you can use vegan cheese substitutes. Look for brands that melt well. You can also replace the heavy cream with coconut cream or a plant-based milk. These swaps keep the dish creamy without dairy. For the full recipe, check the [Full Recipe]. After enjoying your creamy garlic mushroom stuffed shells, store any leftovers in the fridge. Place them in an airtight container. This helps keep them fresh. They last for about 3 to 4 days. If you want to keep them longer, consider freezing. You can reheat these shells in two ways: the oven or the microwave. For the oven, preheat to 350°F (175°C). Place the shells in a baking dish and cover with foil. Bake for 20 minutes. For the microwave, place shells on a microwave-safe plate. Heat in 1-minute intervals until warm. To keep the texture, avoid overheating. To freeze stuffed shells, let them cool completely. Use a baking sheet to freeze them first. Once frozen, transfer the shells to a freezer-safe bag. Label the bag with the date. When ready to eat, take them out. Thaw overnight in the fridge. Reheat them in the oven or microwave as mentioned above. This way, they taste great even after freezing. Enjoy your delicious meal anytime! For the full recipe, refer to the earlier section. You can use cottage cheese or cream cheese. Both options work well. Cottage cheese gives a similar texture. Cream cheese offers a richer flavor. Blend them with some herbs for extra taste. You can store stuffed shells in the fridge for about three days. Keep them in an airtight container. This helps maintain their flavor and texture. If you want to keep them longer, consider freezing them. Yes, you can prepare the stuffed shells ahead of time. Assemble them and store them in the fridge for up to 24 hours. Just add the sauce before baking. This makes dinner easy on busy days. Stuffed shells go great with garlic bread and a light salad. You can also serve them with steamed vegetables. A simple green salad adds freshness. Choose sides that balance the creaminess of the dish. To avoid breakage, cook the shells just until al dente. Be gentle when handling them. Use a slotted spoon to remove them from boiling water. Allow them to cool on a towel to prevent sticking. Creamy Garlic Mushroom Stuffed Shells are simple and fun to make. We covered key ingredients like jumbo shells, ricotta, and spinach, plus tips for cooking, stuffing, and baking. You can get creative with variations to suit your tastes and needs. Remember, storing leftovers properly maximizes flavor and texture for later. Dive into this dish and enjoy every bite! Whether you're feeding a crowd or enjoying leftovers, this recipe shines every time. Your kitchen will be full of flavor and smiles.](https://tastednest.com/wp-content/uploads/2025/06/aa1c3bfb-a0fe-455b-ba1e-8ba858b3e5d9.webp)
Are you ready to take your dinner game to the next level? Try these Creamy Garlic Mushroom Stuffed Shells! This mouthwatering dish combines jumbo pasta shells with a rich blend …
![- 1 large cucumber - 1 ripe avocado - 1 tablespoon Greek yogurt or sour cream - 1 teaspoon fresh lemon juice - 1 clove garlic, finely minced - Salt and black pepper to taste - Fresh dill or parsley, for garnish - Optional: Cherry tomatoes, halved for topping In this recipe, the cucumber serves as a crunchy base for our snack. Choose a large cucumber that feels firm. It should have a smooth skin and be free of blemishes. The avocado adds creaminess and a rich flavor. A ripe avocado will give the best taste, so check for slight softness when you press it. The Greek yogurt or sour cream enhances the dip, adding tang and richness. For a burst of brightness, we use fresh lemon juice. It brightens the flavors. The minced garlic gives a nice kick and depth. You can adjust the salt and black pepper to your taste. Garnishing with fresh dill or parsley not only looks great but also adds fresh notes. If you like, you can top each cucumber slice with a cherry tomato half for extra color and flavor. This simple mix is not just tasty; it’s also healthy! You can make these cucumber bites quickly. For the full recipe, check out the steps that follow. Enjoy! 1. Start by washing the cucumber. Rinse it under cool running water. 2. Using a sharp knife, slice the cucumber into even round discs. Aim for about 1/4 inch thick. 3. Now, arrange the cucumber slices neatly on a serving platter. Make it look nice, as this will impress your guests. 1. In a medium bowl, scoop out one ripe avocado. 2. Mash the avocado with a fork or potato masher until it is smooth and creamy. 3. Add one tablespoon of Greek yogurt or sour cream to the bowl. 4. Pour in one teaspoon of fresh lemon juice, and add one finely minced clove of garlic. 5. Sprinkle salt and black pepper to taste. 6. Mix everything together until you have a creamy dip. 1. Take about half a tablespoon of the avocado dip. 2. Carefully spread it on top of each cucumber slice. Make sure each slice gets a nice layer. 3. For a great touch, sprinkle fresh dill or chopped parsley on top. 4. You can also place a half cherry tomato on each bite for extra color and taste. These steps will help you create a fresh and tasty snack in just 5 minutes. Don’t forget to check the [Full Recipe] for more details! - Selecting a ripe avocado for best flavor: Look for an avocado that feels slightly soft when pressed gently. A ripe avocado has smooth skin and a deep green color. Avoid hard avocados as they won’t blend well. - Picking the right cucumber variety: I prefer Persian or English cucumbers for this snack. They are sweeter and have fewer seeds. Regular cucumbers work too but may be more watery. - Arranging bites for visual appeal: Place cucumber slices in a circle on a bright platter. This draws the eye. Make sure the avocado dip is heaped on each slice for a beautiful look. - Using colorful garnishes: Fresh herbs like dill or parsley add a pop of green. You can also use cherry tomato halves for a splash of red. This adds fun color and makes the dish more inviting. - Best pairings for the snack: These cucumber bites pair well with a glass of iced tea or lemonade. For a heartier option, serve them with whole-grain crackers. - Ideal occasions for serving: These snacks work great at parties, picnics, or just a fun family lunch. They are quick and simple, making them perfect for any gathering. {{image_4}} You can try different dips with your cucumber bites. A yogurt-based dip works great. You can use Greek yogurt or sour cream. If you want a twist, make a creamy hummus dip. Just blend chickpeas, tahini, and lemon juice. For the avocado dip, add spices like cumin or chili powder for more flavor. To make your cucumber bites pop, change up the toppings. Crumbled feta cheese adds a nice salty kick. You could also sprinkle some chopped olives for a briny taste. For fun, try serving the bites on a veggie platter or skewers. This way, they look colorful and inviting. Need some dietary options? You can easily make the dip vegan. Replace Greek yogurt with a plant-based yogurt. You can also skip the yogurt and use more avocado. For gluten-free choices, serve the cucumber bites as they are. They are naturally gluten-free and perfect for everyone. Explore these variations to make your snack even more delightful! To keep your cucumber bites fresh, store them in an airtight container. Place a paper towel inside the container to absorb extra moisture. This helps the cucumbers stay crisp. You can enjoy cucumber bites for up to two days if stored this way. For the dip, keep it in a separate airtight container. It stays fresh for about three days in the fridge. If you have leftover dip, use it as a spread on sandwiches. It also works well as a dressing for salads. You can even mix it into pasta for a creamy flavor boost. If you have extra cucumbers, try adding them to your salads or smoothies for a fresh taste. To keep cucumbers crisp, avoid cutting them until you are ready to eat. Store them whole in the fridge. For avocados, use lemon or lime juice to stop them from browning. Place plastic wrap tightly over the cut surface before putting them in the fridge. This helps maintain their bright color. Cucumber bites stay fresh for about 24 hours. Store them in an airtight container. This helps keep the cucumber crunchy. Avoid letting them sit out too long. If they get warm, they may become soggy. For the best taste, eat them soon after making. Yes, you can make the avocado dip ahead of time. Store it in the fridge for up to two days. To keep it fresh, use plastic wrap. Press it directly onto the surface of the dip. This keeps air out and stops browning. When ready to serve, stir it again for a smooth texture. Cucumbers are versatile and great for many snacks. You can slice them for salads or add them to wraps. Try making cucumber sandwiches for a fresh twist. You can also pickle them for a tangy treat. Explore different dips like tzatziki or hummus for new flavors. This blog post covered how to create tasty cucumber bites with avocado dip. We explored the main ingredients, step-by-step instructions, and tips for best results. You can vary the dip, adjust presentation, and even modify recipes for dietary needs. Store leftovers wisely to keep things fresh. Enjoy making these snacks for any occasion! They are easy, healthy, and fun. You’ll impress your friends and family with this simple treat.](https://tastednest.com/wp-content/uploads/2025/06/b83f509d-6236-442a-be57-7e30e137a861.webp)
Looking for a quick and tasty snack? Try my 5-Minute Cucumber Snack that’s sure to impress! Fresh cucumber slices topped with creamy avocado dip make the perfect blend of flavors. …
![- Spaghetti noodles - Fresh vegetables: cherry tomatoes, cucumber, and red onion - Kalamata olives and feta cheese The main ingredients create a colorful and tasty dish. The spaghetti noodles form the base, providing a hearty texture. I prefer using whole grain spaghetti for added fiber. Fresh vegetables like cherry tomatoes, cucumber, and red onion add crunch and flavor. The sweet tomatoes balance the crisp cucumber and sharp onion. Kalamata olives give a briny kick. Feta cheese adds a creamy, salty finish. These ingredients together make each bite satisfying. - Olive oil and vinegar options - Seasoning: oregano, salt, and pepper The dressing is key to a great spaghetti salad. I like using high-quality olive oil for richness. Red wine vinegar brings a tangy note, but you can use apple cider vinegar for a sweeter taste. I mix in dried oregano, salt, and pepper to enhance the flavor. This simple dressing ties all the ingredients together, making every bite burst with taste. - Breakdown of calories per serving - Key nutrients from main ingredients This salad is not just tasty; it's good for you too. A serving has about 250 calories, making it a light meal. The spaghetti provides carbs for energy. Fresh vegetables are packed with vitamins and minerals. Olives add healthy fats. Feta cheese gives protein and calcium. Overall, this dish supports a balanced diet while being refreshing and delightful. For the full recipe, check out the Mediterranean Spaghetti Salad. To cook spaghetti al dente, follow the package instructions. Bring a pot of salted water to a boil. Add the spaghetti and stir occasionally. Cook until the pasta is firm but tender. This usually takes about 8 to 10 minutes. Once cooked, drain the spaghetti in a colander. Rinse it under cold water. This stops the cooking process and cools the pasta quickly. Make sure to let it cool completely before mixing it into your salad. In a large bowl, add the cooled spaghetti. Now, it's time to add some color and crunch. Toss in the halved cherry tomatoes, diced cucumber, and thinly sliced red onion. Mix these fresh veggies gently. Next, introduce the Kalamata olives. Add the crumbled or cubed feta cheese carefully. You want to fold it in gently, so it doesn't break apart too much. Grab a small bowl for the dressing. Whisk together the olive oil, red wine vinegar, and dried oregano. Use a fork or small whisk for a smooth blend. Add a pinch of sea salt and freshly ground black pepper to taste. If you want it tangier, just add a bit more vinegar. Taste as you go, and adjust the seasoning until it feels just right. Chilling is key for this salad. Cover your bowl and place it in the fridge for at least 30 minutes. This allows the flavors to mix and become more vibrant. When ready to serve, give the salad a gentle toss. Garnish with a sprinkle of fresh parsley. For a fun touch, serve it in colorful bowls or mason jars. This makes it easy for picnics or gatherings. Enjoy your tasty Mediterranean Spaghetti Salad! For the full recipe and more details, check out the [Full Recipe]. - Overcooking spaghetti: Cook your spaghetti al dente. If you overcook it, the pasta will become mushy. Follow the package instructions closely. Taste a piece to ensure it's firm yet tender. - Skipping the chilling process: Chilling the salad is key. It allows the flavors to blend well. Aim for at least 30 minutes in the fridge for the best taste. - Suggestions for adding herbs: Fresh herbs can boost the flavor. Try adding basil, mint, or dill. These herbs add freshness and a pop of color to your dish. - Tips for balancing acidity in the dressing: Adjust the vinegar to suit your taste. If the dressing is too tangy, add more olive oil. You can also add a pinch of sugar to balance the acidity. - Creative ways to serve: Serve the salad in a large bowl for sharing. For a fun twist, use mason jars to create individual servings. This makes it easy for picnics or gatherings. - Garnishing ideas with additional ingredients: Top your salad with extra feta cheese and olives before serving. You can also add a sprinkle of toasted pine nuts or sunflower seeds for crunch. {{image_4}} For a vegetarian option, you can replace feta cheese with a dairy-free alternative, like cashew cheese or tofu. This keeps the dish creamy without using dairy. If you want to make it vegan, simply skip any cheese and add more veggies or nuts. Adding chickpeas or black beans can also bring in extra protein. They add a nice texture and taste. If you need a gluten-free option, swap regular spaghetti for gluten-free pasta. There are many great types made from rice or quinoa. They taste good and hold up well in salads. When making a dressing, check the labels for gluten. Some vinegars may contain traces. Stick to pure olive oil and vinegar for safety. You can change the flavor by trying different dressings. A tangy balsamic vinaigrette or a creamy tahini dressing can give a new twist. Adding unique vegetables like bell peppers or artichokes can also change the taste. For a protein boost, try grilled chicken or shrimp. These additions can make your spaghetti salad even more exciting. To keep your spaghetti salad fresh, store it in the fridge. Use an airtight container. This helps to keep the flavors intact and prevents drying out. Glass or plastic containers work well for this. Always cool the salad completely before sealing it. How long does the salad last? When stored properly, it can last about 3 to 5 days. Always check for signs that the salad has gone bad. If you see mold or a sour smell, it’s time to toss it. When you want to enjoy leftovers, serve the salad cold. If you prefer it warm, gently reheat it on low heat. Avoid high heat, as it can make the pasta mushy. Always be cautious when reheating with ingredients like feta. They can change texture and flavor. Try the full recipe for Mediterranean Spaghetti Salad for a refreshing summer dish! Yes, you can make Spaghetti Salad ahead of time. It tastes even better after sitting. To prepare in advance, follow these tips: - Cook the spaghetti and let it cool completely. - Mix all ingredients except the dressing. - Store it in the fridge for up to 24 hours. - Add the dressing just before serving to keep it fresh. You have many choices for dressing your Spaghetti Salad. Here are some suggestions: - Use extra virgin olive oil for a rich flavor. - Red wine vinegar adds a nice tang. - Try apple cider vinegar for a sweeter taste. - You can also blend in fresh herbs for more flavor. To make your Spaghetti Salad more filling, consider these ideas: - Add proteins like grilled chicken or shrimp. - Toss in beans like chickpeas or black beans. - Include whole grains like quinoa for added texture. - Nuts or seeds can give a nice crunch and extra nutrients. Yes, you can make Spaghetti Salad gluten-free. Use gluten-free pasta made from rice or corn. This way, everyone can enjoy it. Be sure to check the labels for gluten in other ingredients like dressings. Spaghetti salad is simple to make and full of fresh flavors. You learned the key ingredients, from spaghetti noodles to bright vegetables and tangy feta. I shared tips to avoid common mistakes and enhance flavors. You can also explore variations that fit your diet, like vegan or gluten-free options. Lastly, remember to store it properly for lasting joy. Enjoy this versatile dish at your next meal or gathering. Trust me, it will impress everyone!](https://tastednest.com/wp-content/uploads/2025/06/88e7c709-cacb-48e1-81ca-ff3bce14d644.webp)
Looking for a tasty and refreshing summer dish? Spaghetti salad is the answer! This vibrant dish combines tender spaghetti noodles with colorful vegetables, Kalamata olives, and feta cheese. It’s easy …
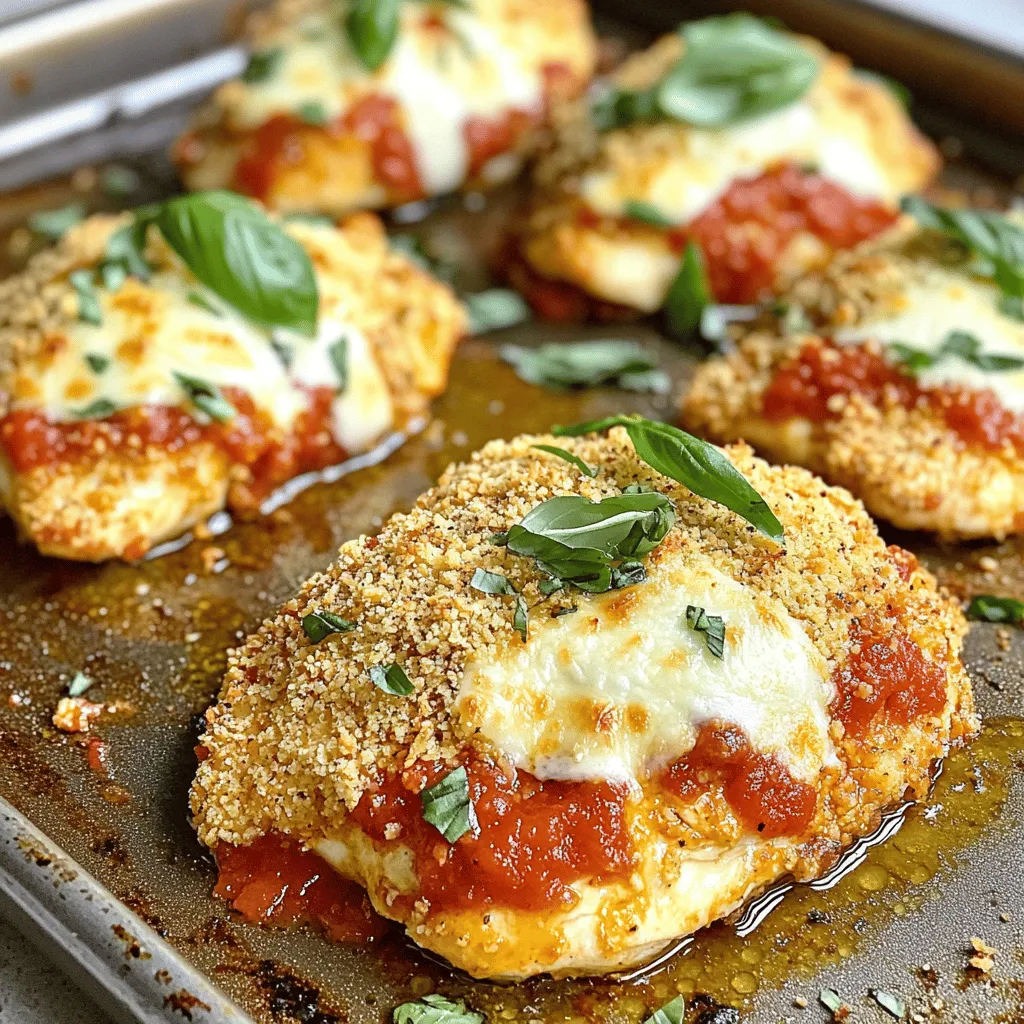
If you’re craving a dish that’s crispy, cheesy, and bursting with flavor, then baked chicken Parmesan is for you. This easy recipe transforms plain chicken into a mouthwatering delight. With …

If you’re looking for a tasty and healthy meal, my Greek Turkey Meatballs are a winner! These meatballs pack a punch of flavor while keeping things light and nutritious. In …
![- Ground turkey - Bell peppers - Cooked quinoa - Ground cumin - Chili powder - Shredded cheese - Fresh cilantro - Diced tomatoes When making Ground Turkey and Peppers, I always start with the essential ingredients. Ground turkey is lean and packed with protein. It cooks quickly and absorbs flavors well. Bell peppers add a sweet crunch and bright color. You can choose any color you like, from red to green. Cooked quinoa is a great addition. It gives the dish texture and extra nutrients. Next, I focus on flavor enhancers. Ground cumin adds a warm, earthy taste. It pairs well with chili powder, which gives a nice kick. Shredded cheese is a must for that cheesy goodness. I prefer a mix of cheddar or a Mexican blend for more flavor. For optional garnishes, fresh cilantro brightens the dish. It adds a fresh touch and a pop of green. Diced tomatoes can also enhance the look and flavor. They add juiciness and acidity, balancing the richness of the dish. Using these ingredients helps create a colorful and tasty meal. Each component plays a role in making the dish enjoyable. For the full recipe, check out Turkey Fiesta Stuffed Peppers. 1. Preheat oven to 375°F (190°C). This step is key for even cooking. 2. Slice tops off bell peppers. Make sure to remove seeds and membranes for a clean fill. Stand the peppers upright in a baking dish. 1. Brown ground turkey in skillet. Heat olive oil over medium heat first. Cook the turkey for about 5-7 minutes. Use a spatula to break it apart as it cooks. Keep stirring until it’s no longer pink. 2. Add seasonings and mix. Stir in ground cumin, chili powder, salt, and pepper. Cook for one more minute to let the spices bloom. 1. Fill each pepper with the turkey mixture. Use a spoon to pack the filling down gently. Make sure to fill them to the top. 2. Cover and bake for specified time. Use aluminum foil to cover the dish. Bake for 25 minutes, then uncover. Bake for an extra 10 minutes to melt the cheese. These steps make a great meal with ground turkey and peppers. Check the [Full Recipe] for more details! To make your ground turkey and peppers even tastier, adjust the seasoning levels. Start with a pinch of salt and pepper. Taste as you go. You can always add more, but it’s hard to take away. Try these spices for variation: - Paprika - Garlic powder - Onion powder - Oregano Mixing these spices can change the whole dish. Don’t be afraid to experiment! The best way to cook ground turkey is over medium heat. This keeps it juicy. Break it up with a spatula as it cooks. This way, it browns evenly. To avoid dry stuffing, don’t cook the turkey too long. Once it’s no longer pink, it’s ready. Mixing in the quinoa and beans helps keep moisture. For serving ideas, place the stuffed peppers upright on a colorful plate. Drizzle diced tomatoes around them for color. Add fresh cilantro on top for a nice touch. You can also use lime wedges. They add a zesty flavor when squeezed over the dish. For plate arrangement, keep it simple. A clean plate lets the food shine. Enjoy your meal! For the full recipe, you can refer to the Turkey Fiesta Stuffed Peppers section. {{image_4}} You can switch up proteins in this dish easily. Ground turkey works well, but ground chicken or beef can be used too. If you're looking for a healthier choice, consider ground turkey breast. It has less fat but still keeps the dish tasty. If you want to change the base from quinoa, try using brown rice or cauliflower rice. Both options add some nice texture. You can even use couscous if you're looking for something quick. Just remember to match the cooking time to your chosen grain. Spices can give your dish a new twist. Instead of cumin and chili powder, try smoked paprika or garlic powder for a different taste. Fresh herbs, like basil or oregano, can also brighten the mix. These small changes can make your meal feel brand new. You can also play with sauces. A splash of soy sauce or a drizzle of balsamic glaze can add a rich flavor. For a creamy touch, consider mixing in a bit of sour cream or cream cheese before stuffing the peppers. It will make each bite luscious. If you want to make this dish gluten-free, just check that your sauces and ingredients are certified gluten-free. Most canned goods are safe, but always read the labels to be sure. For a vegan version, swap the ground turkey with lentils or black beans. Use a vegan cheese substitute or skip the cheese altogether. The dish will still be full of flavor and protein without any animal products. These variations help you customize your ground turkey and peppers dish to fit your taste and dietary needs. You can always explore new paths with this flexible recipe. For the complete recipe, check out the Full Recipe. After you cook your turkey and peppers, let them cool slightly. Store the leftovers in the fridge within two hours. Use an airtight container for best results. This helps keep moisture in and prevents any odors from mixing. - Place stuffed peppers in individual containers or one big container. - Label with the date. This helps you track how long they last. If you want to save some for later, freeze them. Freeze stuffed peppers before baking for the best taste. Wrap each pepper tightly in plastic wrap. Then, place them in a freezer-safe bag or container. - For best results, eat within three months of freezing. - To thaw, place in the fridge overnight. If you’re in a hurry, use the microwave. To reheat, bake them in the oven at 375°F (190°C) until heated through, which takes about 20-25 minutes. In the fridge, your turkey and peppers last about 3-4 days. Always check for signs of spoilage. If you see mold or smell something off, it’s best to toss them out. - Look for changes in color or texture. - If it feels slimy or has a bad smell, do not eat it. By following these tips, you can enjoy your turkey fiesta stuffed peppers later without worry. For the full recipe, refer back to the earlier section. How to make ground turkey and peppers more flavorful? To boost flavor, add fresh herbs like cilantro or parsley. You can also try adding garlic and onion while cooking the turkey. A splash of lime juice or hot sauce can add a great kick. You can even mix in some diced green chilies for extra spice. Using quality spices like cumin and chili powder helps too. Can I use frozen peppers for this recipe? Yes, you can use frozen peppers! Just thaw them first and pat them dry. This prevents excess water from making the filling soggy. Frozen peppers work well when you want a quick meal. Is stuffed peppers healthy? Yes, stuffed peppers are healthy! They are packed with protein from the turkey and fiber from the beans and veggies. They are low in carbs and high in vitamins. The dish can fit well into many diets. Caloric breakdown of ingredients Here’s a quick caloric estimate for one serving of turkey stuffed peppers: - Ground turkey: about 200 calories - Bell peppers: about 30 calories - Quinoa: about 40 calories - Black beans: about 60 calories - Corn: about 30 calories - Cheese: about 100 calories Total roughly is 460 calories per pepper, depending on your choice of cheese. What to serve with stuffed peppers? Stuffed peppers go well with a simple salad or some crusty bread. You can also serve them with a side of rice or quinoa. A dollop of sour cream or Greek yogurt adds creaminess too. Can stuffed peppers be a main dish? Yes, stuffed peppers make a great main dish! They are filling and flavorful. Each pepper offers a balanced meal in one neat package. Enjoy them with a side to complete your dinner. This blog post guides you to make delicious stuffed peppers. We explored essential ingredients like ground turkey, bell peppers, and quinoa. Flavor enhancers such as cumin and chili powder will excite your taste buds. We shared helpful tips to avoid dry stuffing and enhance flavor. Those seeking variety found options for different proteins and dietary needs. Store your leftovers properly for maximum freshness. Enjoy these flavorful bites anytime, knowing they are easy to prepare and versatile! Dive into cooking, and enjoy the tasty results.](https://tastednest.com/wp-content/uploads/2025/06/d14d7a24-2bb4-4b4a-88bd-295267c79331.webp)
Looking for a tasty and easy dinner idea? Ground Turkey and Peppers is the perfect dish for you! With healthy ingredients and bold flavors, this meal will fill your kitchen …

Are you ready to transform your breakfast game? My Blueberry Buttermilk Pancake Casserole Delight is an easy, crowd-pleasing dish perfect for any morning. With fresh blueberries and a fluffy texture, …

Get ready to treat yourself to a dessert that combines two favorites: chocolate chip cookies and cheesecake! In this article, I’m going to share my easy recipe for Chocolate Chip …