Orange Teriyaki Salmon Flavorful and Easy Recipe

Are you ready for a dish that’s both vibrant and simple? My Orange Teriyaki Salmon combines the sweet brightness of orange with savory teriyaki. This recipe is perfect for busy …
Are you ready for a dish that’s both vibrant and simple? My Orange Teriyaki Salmon combines the sweet brightness of orange with savory teriyaki. This recipe is perfect for busy …
![The main ingredients in these protein bars are simple. You need: - 1 cup rolled oats - 1/2 cup natural peanut butter (or almond butter) - 1/2 cup honey (or maple syrup) - 1/2 cup chocolate-flavored protein powder These items work well together. The oats give texture. The nut butter adds creaminess. Honey or maple syrup acts as a sweetener. The protein powder boosts nutrition. You can swap some ingredients for variety. For the nut butter, try sunflower seed butter for a nut-free option. If you want a vegan bar, use maple syrup instead of honey. You can also change the protein powder flavor. Try vanilla or even strawberry for a fun twist. Each serving has about 200 calories. You get around 8 grams of protein and 10 grams of fat. The bars also have 20 grams of carbs. This makes them a great snack for energy. Adjusting the ingredients can change the nutrition slightly, so feel free to experiment. For the full recipe, check out the detailed instructions above. 1. Start by placing 1 cup of rolled oats and 1/2 cup of chocolate-flavored protein powder into a large mixing bowl. Stir them together thoroughly until fully combined, ensuring there are no clumps. 2. Next, take a separate microwave-safe bowl and add 1/2 cup of natural peanut butter and 1/2 cup of honey (or maple syrup). Heat in the microwave for 20 to 30 seconds, just long enough for the mixture to become warm and pourable. Carefully stir until the peanut butter and honey are completely blended together. 3. Pour the warm mixture of peanut butter and honey into the bowl containing the oats and protein powder. Using a spatula, mix everything thoroughly until you achieve a thick and sticky dough consistency. Make sure all dry ingredients are moistened. 4. Line an 8x8-inch baking dish with parchment paper, leaving a bit of overhang on the sides. This will make it easy to lift the bars out once set. 5. Transfer the dough into the prepared baking dish and spread it out evenly with a spatula. Press down firmly and smooth the top to ensure a compact texture, which will help the bars hold together better. 6. Place the baking dish in the refrigerator and allow it to chill for at least 1 hour. Once firm, carefully lift the entire block of bars out using the edges of the parchment paper and cut into squares or rectangles, as desired. 7. To maintain freshness, store the bars in an airtight container in the refrigerator, where they will last for up to one week. - Large mixing bowl - Microwave-safe bowl - Spatula - 8x8-inch baking dish - Parchment paper - Mix the dry ingredients well to avoid clumps. - Heat the peanut butter and honey just enough to blend smoothly. - Ensure the dough is sticky for the best texture. - Press the mixture firmly into the baking dish for compact bars. For the full recipe, check out Nutty Chocolate Bliss Protein Bars. To get that perfect chewy texture, mix the dry and wet ingredients well. You want a thick, sticky dough. Press it firmly into your baking dish. This will help the bars hold together. If the mixture feels too dry, add a bit more peanut butter or honey. If it’s too wet, sprinkle in more oats. Store your bars in an airtight container. Place them in the fridge to keep them fresh. This helps them last longer, up to one week. If you want to keep them for longer, consider freezing them. Wrap each bar in plastic wrap before placing them in a freezer bag. This way, you can enjoy them later. You can add fun extras to make these bars even better. Try adding chopped nuts or seeds for crunch. Dried fruit can give a sweet twist. For a richer flavor, mix in cocoa powder or a touch of cinnamon. You can even use nut-free butter like sunflower seed butter. This keeps the recipe safe for those with nut allergies. Each addition boosts nutrition and taste, making your bars special! For the full recipe, check out Nutty Chocolate Bliss Protein Bars. {{image_4}} You can play with flavors in your protein bars. Try different nut butters like almond or cashew. Use honey or maple syrup for sweetness. You can even swap the chocolate protein powder for vanilla or berry flavor. Add spices such as cinnamon or vanilla extract to boost taste. To make these bars vegan, simply use maple syrup instead of honey. For nut-free options, choose sunflower seed butter. You can also use pumpkin puree for a fun twist. Always check labels to avoid allergens. This keeps everyone safe and happy. Seasonal ingredients can add fun to your bars. In the fall, add pumpkin puree or chopped apples. In winter, try dried cranberries or chopped nuts. During summer, mix in fresh berries or coconut flakes. Enjoy the changing flavors with each season! For the full recipe, check out Nutty Chocolate Bliss Protein Bars 🥜. To keep your protein bars fresh, store them in the fridge. An airtight container works best. This method helps avoid moisture and keeps them firm. Try to limit exposure to air. If you plan to eat the bars within a few days, you can keep them at room temperature. Just ensure they stay in a cool, dark spot. Use a glass or plastic container with a tight lid. This helps keep the bars fresh. You can also wrap each bar in parchment paper. Then, place them in a container. This method makes it easy to grab a bar on the go. If you want to freeze them, use freezer-safe bags. Remove excess air before sealing. Homemade protein bars last about one week in the fridge. If you freeze them, they can last up to three months. Just make sure they are well-wrapped. Thaw them in the fridge before eating. This way, you always have a healthy snack ready. Enjoy these treats anytime! You can find the full recipe for Nutty Chocolate Bliss Protein Bars to get started. Yes, you can customize these protein bars. The base recipe is flexible and lets you swap ingredients easily. For example, you can use almond butter if you prefer that over peanut butter. If you want a vegan option, replace honey with maple syrup. You can also add your favorite mix-ins, like dried fruit or seeds. This makes the bars unique to your taste! Your bars should feel firm when you take them out of the fridge. If they feel sticky or too soft, they may need more time to chill. Press down lightly on the bars; they should hold their shape. If they crumble, they might need more mixing or pressing. Keeping them in the fridge for a full hour usually helps achieve the right firmness. Yes, these protein bars are great for meal prep. You can make a batch and store them for the week. They keep well in the fridge for up to one week. Just cut them into bars and place them in an airtight container. This makes it easy to grab a healthy snack when you're on the go. For more ideas, check out the [Full Recipe]. Making homemade protein bars is fun and rewarding. We’ve covered key ingredients, alternative options, and nutritional info. I shared step-by-step instructions, tools needed, and mixing tips for great texture. You can store your bars fresh and know the best containers to use. Remember, customize flavors to your liking. Whether vegan or not, options are endless. With the right storage and tips, you can enjoy your bars for weeks. Now, you have all the skills needed to craft delicious and nutritious protein bars. Enjoy your creations!](https://tastednest.com/wp-content/uploads/2025/06/5214639a-f0dd-4a2f-b258-a30e44dfedfe.webp)
Are you looking for a quick, healthy snack? Let me show you how to make protein bars with just four ingredients. These bars are easy to whip up and packed …
. To serve the Easy Cucumber Caprese Salad, use a large, shallow bowl. This helps show off the bright colors. Drizzle extra balsamic glaze over the top for a shiny finish. Add a few whole basil leaves as a garnish to make it look fancy. For sides, pair your salad with crusty bread or grilled chicken. This makes a great light lunch or dinner. A glass of chilled white wine can also complement the fresh flavors. You can mix more herbs into your salad for extra flavor. Try adding fresh oregano, parsley, or dill for a twist. Each herb brings its unique taste that uplifts the dish. Using flavored oils or vinegars can also enhance the salad. For example, try basil-infused olive oil or garlic-flavored vinegar. These small changes can make your salad stand out even more. To save time, slice your cucumbers and tomatoes in advance. You can prep these up to a day before serving. Store the cut veggies in the fridge, covered tightly. You can make the salad ahead of time, but wait to add the oil and balsamic glaze. This keeps the salad fresh. Mix in the dressing just before serving for the best taste. {{image_4}} You can make this salad even better by adding pesto. Pesto brings a rich flavor that pairs well with the fresh ingredients. Just drizzle a few tablespoons over the salad before you toss it. You'll get a burst of herbal taste that enhances the whole dish. Want to make your salad heartier? Add grilled chicken or shrimp. Both options provide protein and make the dish more filling. Simply grill your protein of choice, slice it, and mix it in with the salad. This twist makes it a satisfying meal for lunch or dinner. For those who love cheese, try using different types! Feta or goat cheese can add a tangy twist. You could also sprinkle in some nuts like walnuts or pine nuts. They add crunch and richness, making the dish even more enjoyable. For the full recipe, check out the Refreshing Cucumber Caprese Delight. To store leftovers in the refrigerator, keep your salad in an airtight container. This helps to maintain freshness and prevent odors. The salad should stay fresh for up to two days. If you notice any excess moisture, consider placing a paper towel inside to absorb it. This will keep your cucumbers crisp and your tomatoes firm. Can it be frozen? I do not recommend freezing this salad. Freezing can change the texture of cucumbers and tomatoes, making them mushy. Mozzarella also does not freeze well. For best taste and texture, enjoy your salad fresh. To keep ingredients fresh before serving, store each component separately. Place cucumbers, tomatoes, and mozzarella in different containers. This prevents sogginess and helps maintain the salad's crispiness. Combine them just before serving for the best flavor and texture. For this salad, I recommend using English cucumbers. They are long, thin, and have fewer seeds. Their skin is smooth and doesn't need peeling. You can also use Persian cucumbers, which are sweet and crunchy. Both types add a fresh taste to the salad. You can prep the salad the night before, but with some tips. Slice cucumbers and tomatoes, and store them in separate containers. This keeps them fresh and prevents sogginess. Mix everything together just before serving to ensure the salad stays crisp. If you can't find mozzarella, try using feta cheese or goat cheese. Both have a tangy flavor that pairs well with cucumbers and tomatoes. You could also use burrata for a creamier texture. These alternatives will still give you a delicious salad. The salad stays fresh in the fridge for about two days. After that, the cucumbers may lose their crunch. Always keep it in an airtight container to maintain its taste. If you notice extra liquid, drain it before serving. Enjoy your Easy Cucumber Caprese Salad! For the full recipe, check the recipe section. This salad brings fresh ingredients and simple steps together. You can easily mix cucumbers, tomatoes, mozzarella, and basil for a healthy meal. Add olive oil and balsamic glaze for flavor. Consider variations like using grilled chicken or different cheeses. Store leftovers well for later enjoyment. With these tips, you can create a delicious salad every time. Enjoy experimenting with flavors and ingredients that you love. Keep it fresh and tasty!](https://tastednest.com/wp-content/uploads/2025/06/81df6442-8f22-4c14-a193-3e73bff572d0.webp)
Looking for a refreshing dish that’s easy to make? Look no further! This Easy Cucumber Caprese Salad combines crunchy cucumbers, juicy cherry tomatoes, and creamy mozzarella. With just a few …
![- 1 cup rolled oats - 1/2 cup vanilla protein powder - 1/2 cup almond butter (or substitute with peanut butter) - 1/4 cup honey or maple syrup - 1/4 cup crushed Oreo cookies (approximately 4-5 cookies) - 2 tablespoons unsweetened cocoa powder - 1/4 cup dark chocolate chips (optional for extra indulgence) - A pinch of salt When I make Oreo Protein Balls, I start with simple ingredients. Each one plays a key role in flavor and texture. Rolled oats give a great base. They add fiber and help bind the balls. Vanilla protein powder boosts the protein and adds sweetness. Almond butter or peanut butter adds creaminess and a nutty taste. Honey or maple syrup brings in sweetness. I love using honey for its rich flavor. Crushed Oreo cookies add fun and crunch. Unsweetened cocoa powder gives a deep chocolate taste without extra sugar. Dark chocolate chips are optional, but they make each bite more indulgent. Finally, a pinch of salt balances all the flavors. Keep these ingredients handy, and you're ready to whip up a tasty, healthy snack. For the full recipe, check out the details above. First, grab a large mixing bowl. Add 1 cup of rolled oats, 1/2 cup of vanilla protein powder, and 1/4 cup of crushed Oreo cookies. You can crush the Oreos by placing them in a zip-top bag and using a rolling pin. This fun method works well! Stir these dry ingredients together until they are mixed well. Next, add 2 tablespoons of unsweetened cocoa powder and a pinch of salt. Mix again until everything is combined. In another bowl, combine 1/2 cup of almond butter and 1/4 cup of honey (or maple syrup). Use a spoon or whisk to blend them. You want a smooth and creamy mixture. This will give the protein balls a nice sweetness and texture. Now, pour the wet mixture into the bowl with the dry ingredients. Stir everything together. You want to make sure it all mixes smoothly. If the mixture feels dry or crumbly, add a bit more almond butter or honey. Add only one teaspoon at a time. Keep stirring until a nice dough forms. If you want extra chocolate, now is the time to add 1/4 cup of dark chocolate chips. Fold them gently into the mixture. With clean hands, take about one tablespoon of the mixture and roll it into a ball shape. Place each ball on a parchment-lined baking sheet. Leave some space between the balls. This helps them hold their shape. Keep rolling until you shape all of the mixture into balls. Once you're done, cover the baking sheet with plastic wrap or place it in the fridge. Chill for about 30 minutes. This helps the protein balls firm up and makes them easier to eat. For the full recipe, don't forget to check the details above! To get the right texture in your Oreo protein balls, adjust the moisture. You can add more almond butter or honey. Start with a tablespoon if the mixture feels dry. This helps the balls stick together. If they are too wet, add a little more protein powder. Make sure to mix in the chocolate chips well. Distribute them evenly throughout the mix. This way, every bite has that rich chocolate flavor you love. When serving, arrange the protein balls on a nice plate. You can stack them high for a fun look. A tiered dessert stand really showcases them. If you plan to gift these, use a clear jar or a decorative box. Add a ribbon for a special touch. It makes a great present for friends or family. Get your kids involved in rolling the balls. They love to help and it makes cooking fun! You can even let them pick their favorite add-ins. Try adding mini marshmallows or different nuts. Customizing flavors keeps everyone excited about the snack. This way, you make memories while enjoying a delicious treat together. {{image_4}} You can switch up the flavor of your Oreo protein balls easily. Try using other cookie flavors like peanut butter or birthday cake. Each flavor brings a fun twist. You can also add nut butters or spreads for more richness. Almond butter works great, but peanut butter adds a nice kick too. Get creative! Want to make these protein balls even healthier? Use plant-based protein powder instead of regular powder. This makes them great for vegans or those who want a lighter option. You can also choose low-sugar or sugar-free sweeteners. This way, you can enjoy the taste without the extra sugar. Boost the nutrition of your Oreo protein balls by adding seeds. Chia seeds or flaxseed are fantastic choices. They add healthy fats and fiber. You can also toss in dried fruits or nuts for extra texture and taste. Almonds or cranberries can elevate the flavor and nutrients. These small changes make your snack even better! For the full recipe, check out the [Full Recipe]. To keep your Oreo protein balls fresh, store them in an airtight container. This keeps moisture out and flavor in. You can place them in the fridge or freezer. Refrigeration is great for short-term storage. If you want to keep them longer, freezing is best. In the fridge, these protein balls last about one week. If you freeze them, they can stay good for up to three months. Always check for signs of spoilage. If you see mold or an off smell, it’s time to toss them. Packaging is key for easy transport. You can use small bags or containers. This makes them easy to grab when you need a snack. Aim for one or two balls per serving. This gives you a nice boost without overdoing it. Enjoy the tasty and healthy snack whenever you want! Oreo Protein Balls take about 15 minutes to prepare and 30 minutes to chill. So, you can make them in under an hour. This quick time makes them perfect for a last-minute snack or treat. Yes, you can easily make these protein balls vegan. Instead of honey, use maple syrup. For the protein powder, choose a plant-based option. Use almond butter or peanut butter as your base. These small changes keep the flavor while making it vegan-friendly. Oreo Protein Balls can be a good snack option. They have protein from the powder and healthy fats from nut butter. The oats provide fiber, which is great for digestion. However, they also have sugar from the cookies and syrup. Enjoy them as a treat, but remember moderation is key. Definitely! You can try different cookies for fun flavors. Think of chocolate chip, peanut butter, or even mint cookies. Each will give your protein balls a unique twist. Get creative and find your favorite! You can add extra ingredients to make them your own. Try adding nuts, seeds, or even dried fruit. If you want more chocolate, mix in chocolate chips. Adjust the sweetness by adding less syrup. Personalizing the recipe is easy and fun! For the full recipe, check out the detailed instructions above. You learned how to make tasty Oreo Protein Balls with easy steps. We covered the ingredients, mixing techniques, and storage tips. You can even customize them with different flavors or extra nutrients. Remember, these treats can fit any diet and be a fun project with family. Enjoy making these delicious snacks for yourself or to gift others!](https://tastednest.com/wp-content/uploads/2025/06/8646ed52-69a0-47c3-ab11-da6949828299.webp)
If you’re craving a sweet snack that packs a protein punch, you’ll love Oreo Protein Balls. They’re simple to make and oh-so-delicious! With just a few ingredients, you’ll whip up …
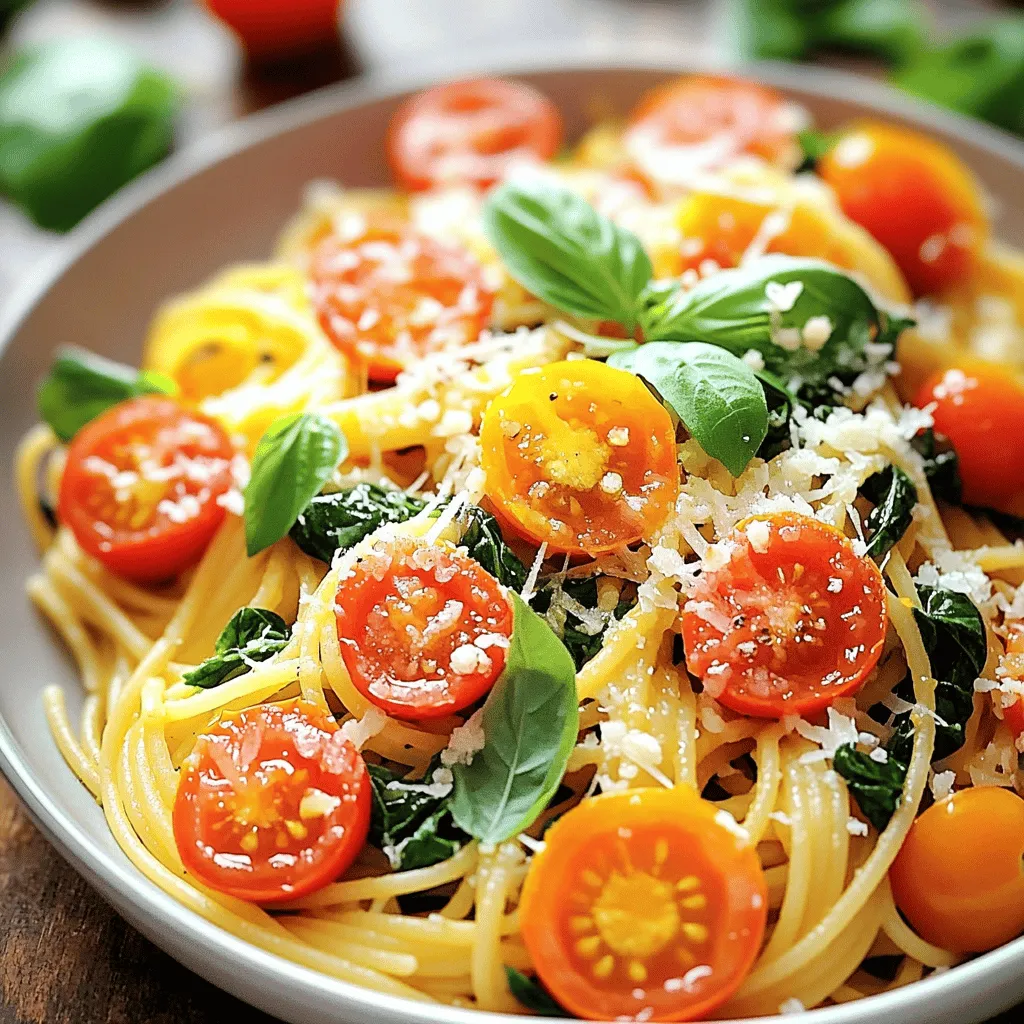
Looking for a quick, healthy meal that bursts with flavor? You’ve found it! My Tomato Spinach Pasta Delight combines fresh spinach, juicy cherry tomatoes, and aromatic garlic for a dish …
. This recipe provides step-by-step instructions and tips to create this delightful dish at home. Enjoy cooking! In this article, we explored the key ingredients for a tasty Chicken Marsala Pasta. You learned how to prepare the chicken, cook the pasta, and make a rich sauce. We also discussed tips for enhancing flavor and texture. Remember, experimenting with variations can make this dish exciting. Whether you choose a vegetarian option or tweak the sauce, the possibilities are endless. Enjoy your cooking adventure and share your delicious creations!](https://tastednest.com/wp-content/uploads/2025/06/e53ee9a3-2c1b-4835-ace0-16652a4e2628.webp)
Craving comfort food that warms your heart and thrills your taste buds? Let me introduce you to my Cozy Chicken Marsala Pasta. This dish is not just a meal; it’s …
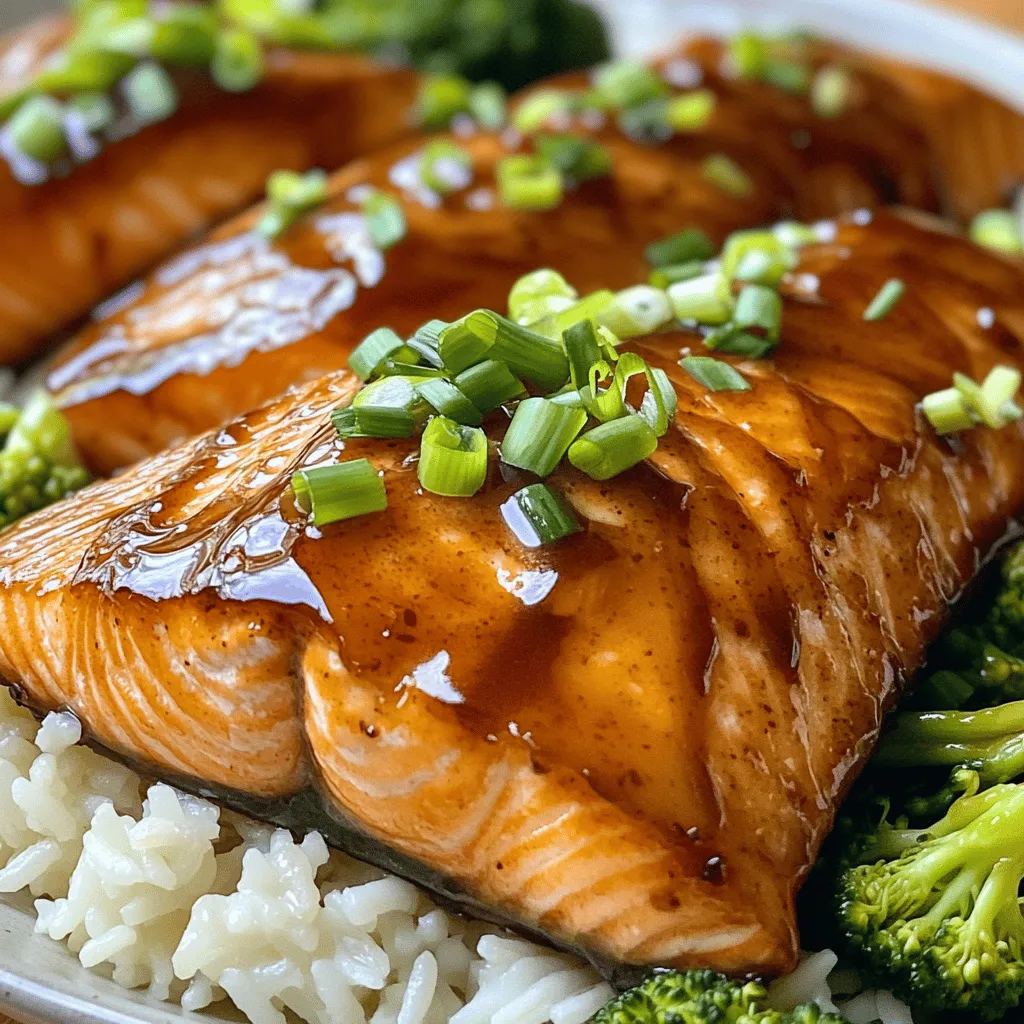
If you’re looking to impress tonight, try my Brown Sugar Glazed Salmon. This dish marries sweet and savory flavors, creating a meal that’s both easy to make and unforgettable. With …
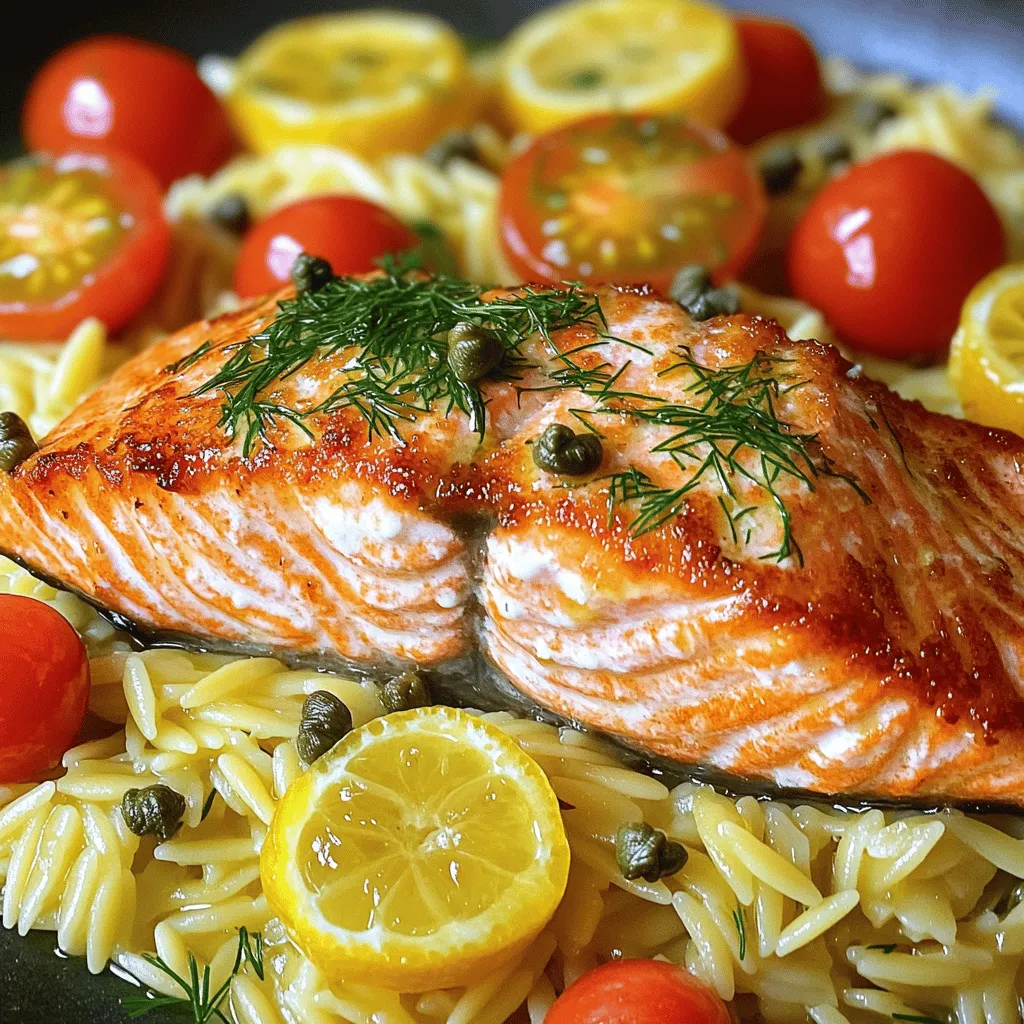
Are you ready to impress your family with a simple yet delicious meal? This Seared Salmon with Lemon Orzo recipe is your answer! You’ll learn how to cook tender salmon …
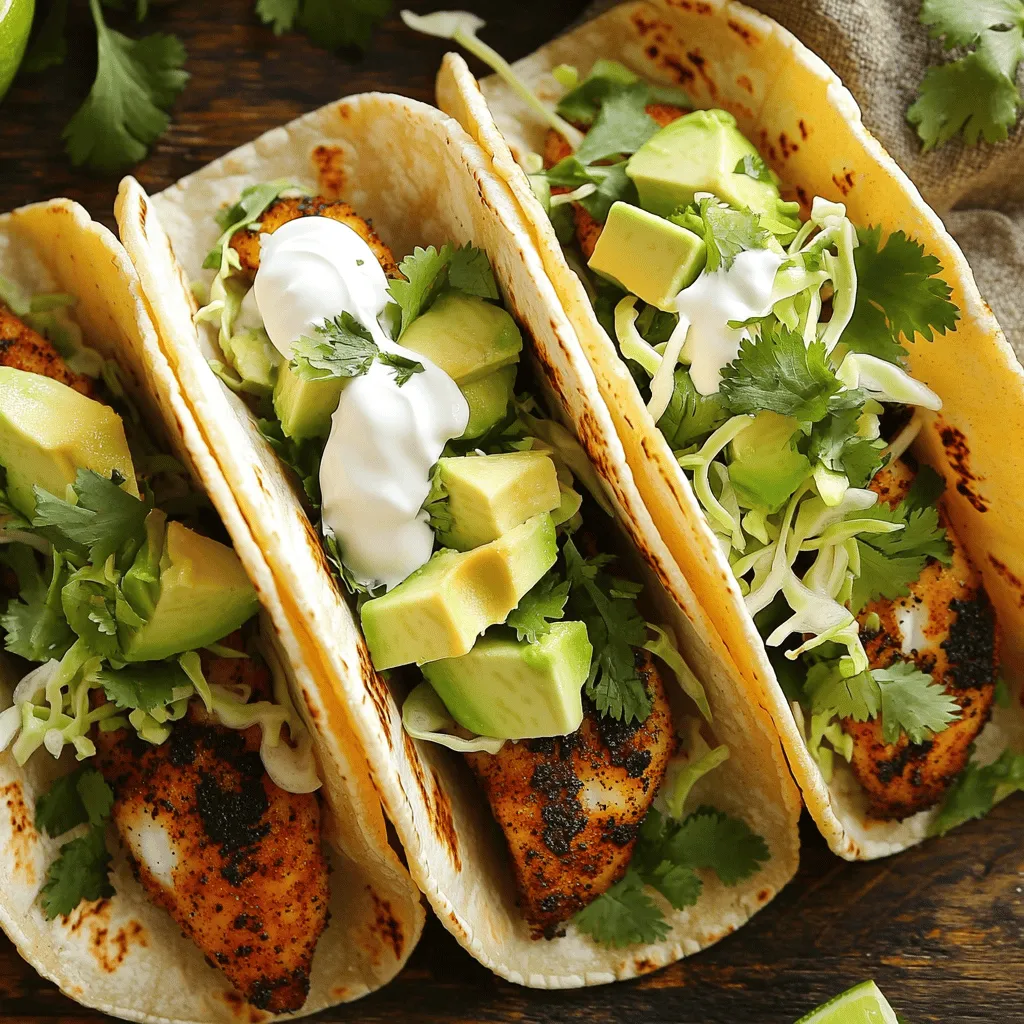
Looking to spice up your dinner rotation? Blackened fish tacos are a delicious solution. I’ll share a simple recipe that combines bold flavors with fresh ingredients. From choosing the right …
![To make Cherry Cheesecake Puppy Chow, you need simple yet tasty ingredients. The mix of flavors makes it a fun snack. You can enjoy it anytime, whether you want a sweet treat or a fun dessert for a party. - 6 cups Rice Chex cereal - 1 cup white chocolate chips - 1/2 cup cream cheese, softened to room temperature - 1/2 cup powdered sugar, plus extra for dusting - 1 teaspoon pure vanilla extract - 1 cup freeze-dried cherries, coarsely crushed - 1/4 cup graham cracker crumbs - A pinch of salt Each ingredient has a role. Rice Chex gives a nice crunch and holds the coating well. White chocolate chips add sweetness, and cream cheese makes it creamy. The powdered sugar helps bind everything together. Freeze-dried cherries give that cherry flavor and a pop of color. Graham cracker crumbs add that classic cheesecake taste. A pinch of salt balances the sweetness. These ingredients create a delicious treat you’ll want to make again and again. Start by placing 6 cups of Rice Chex cereal into a large mixing bowl. This cereal gives the puppy chow its crunch. Make sure to break any clumps apart with your hands gently. Set the bowl aside while you prepare the coating. In a microwave-safe bowl, add 1 cup of white chocolate chips and 1/2 cup of softened cream cheese. Heat this in the microwave in 30-second bursts. Stir after each time, so it melts evenly. Keep doing this until the mix is smooth and creamy. Once it is melted, stir in 1 teaspoon of pure vanilla extract and a pinch of salt. This adds flavor and balance to the sweet mix. Next, mix together 1 cup of crushed freeze-dried cherries, 1/2 cup of powdered sugar, and 1/4 cup of graham cracker crumbs in a separate bowl. This will add that cherry cheesecake taste we love. Carefully pour the melted chocolate-cream cheese mix over the Rice Chex. Use a spatula to fold the cereal until every piece is coated. Be gentle to keep the cereal intact. After coating the cereal, transfer it to the bowl with the cherry mixture. Toss it all together carefully. You want to make sure each piece gets that lovely cherry and crumb coating. Spread the mix on a parchment-lined baking sheet. Let it cool for about 30 minutes. This helps the coating set nicely. If you want more sweetness, dust with extra powdered sugar before serving. Enjoy this easy and tasty treat! For more details, check the Full Recipe. To get the best coating on your Cherry Cheesecake Puppy Chow, follow these steps. First, make sure to melt the white chocolate and cream cheese smoothly. Heat them in short bursts and stir often. This keeps the mix creamy. After coating the cereal, be gentle. Fold the cereal carefully to avoid breaking it. Every piece should get a nice layer of the mix. When it's time to serve, think fun and colorful! You can place the puppy chow in clear bags and tie them with ribbons. This makes for a cute gift or party treat. If you want it to look fancy, use a nice bowl. Add some extra crushed cherries on top for a pop of color. This not only looks great but also adds even more cherry flavor. Want to make your puppy chow even better? Try these ideas. You can mix in mini chocolate chips for extra sweetness. You could also add some nuts for crunch. If you like a bit of spice, sprinkle in some cinnamon. This can give your treat a unique twist. The Full Recipe gives you a great base, but feel free to get creative! {{image_4}} You can swap Rice Chex with other cereals. Try Corn Chex or Crispix for a change. Each cereal brings a new crunch. You can also use gluten-free options if needed. Just make sure the texture fits your taste. Mix it up with different flavors. Use milk chocolate instead of white chocolate for richer taste. You could add peanut butter for a nutty twist. Experiment with other fruits like strawberries or blueberries. They add fun colors and new tastes. Change the recipe for holidays. For Christmas, add red and green sprinkles. For Easter, use pastel-colored candies. In the summer, mix in some toasted coconut for a tropical vibe. These tweaks make your treat special for any celebration. You can find the full recipe to guide you through these variations! To keep your Cherry Cheesecake Puppy Chow fresh, store it in an airtight container. Glass jars or plastic bins work well. Avoid using bags, as they do not seal tightly. Place the container in a cool, dry spot, away from sunlight. This way, the flavors stay strong and the texture remains crispy. Cherry Cheesecake Puppy Chow can last up to two weeks when stored properly. However, for the best taste, eat it within the first week. Check for any signs of moisture. If it feels soft or sticky, it’s time to toss it. You want that crunchy texture! If your Puppy Chow loses its crunch, you can refresh it. Preheat your oven to 250°F (120°C). Spread the Puppy Chow on a baking sheet. Heat it for about 10 minutes. This will help restore some of the crispiness. Let it cool before enjoying it again. Always check the taste after reheating; it should be just as tasty as before. Yes, you can! While white chocolate gives a sweet taste, you can use milk or dark chocolate. This will change the flavor, making it richer. Just melt the chocolate the same way as in the recipe. If you don't have Rice Chex, use corn or wheat cereal. These cereals will work, but they may change the flavor a bit. Just make sure they are crunchy. You can skip the cream cheese if you want a lighter treat. Use only white chocolate and add a little more powdered sugar. This will keep it sweet and tasty without the cream cheese texture. Feel free to explore the [Full Recipe] for more details on making this fun treat! This blog post covered the essentials for making tasty puppy chow. We explored the key ingredients and the step-by-step process to create this treat. I shared helpful tips to get a perfect coating and creative serving ideas. You can make variations using different cereals or flavors. Storing puppy chow correctly will keep it fresh longer. In the end, making puppy chow is fun and easy. Enjoy sharing this snack with your friends and family!](https://tastednest.com/wp-content/uploads/2025/06/6cda5f31-74fb-4bd2-a655-6d788beceff8.webp)
If you’re looking for a fun and easy treat, Cherry Cheesecake Puppy Chow is a must-try! This sweet snack combines creamy flavors and crunchy cereal for a tasty twist on …