Honey Chipotle Chicken Rice Bowl Tasty and Simple Meal
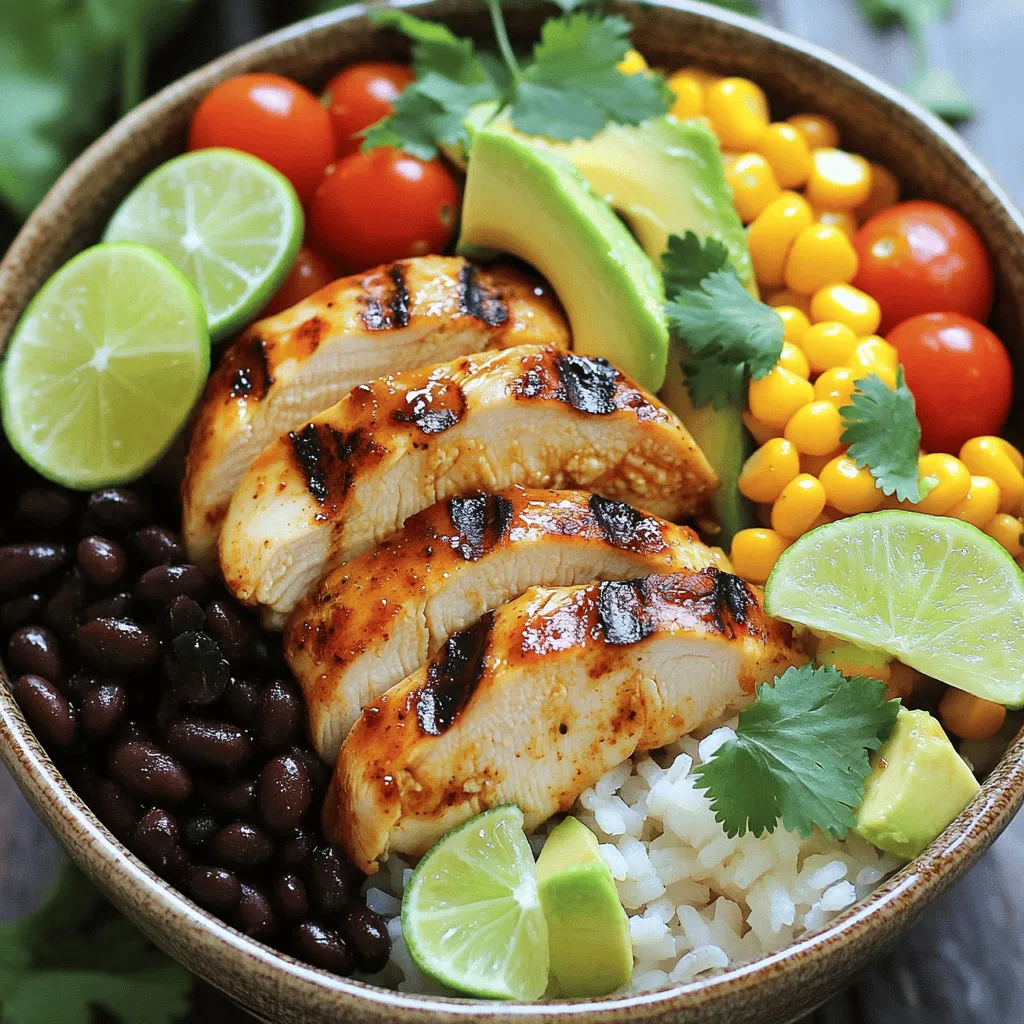
Looking for a quick and flavorful meal? The Honey Chipotle Chicken Rice Bowl is your answer! This simple dish combines tender chicken with honey, chipotle sauce, and fresh veggies, all …


![- 1 lb (450g) ground beef - 1 small onion, finely chopped - 2 cloves garlic, minced - 1 tablespoon chili powder - 1 teaspoon ground cumin - 1 teaspoon smoked paprika - ½ teaspoon sea salt - ½ teaspoon freshly ground black pepper - 8 small corn tortillas - 1 cup shredded sharp cheddar cheese - 1 cup shredded iceberg lettuce - 1 medium tomato, diced - ½ cup sour cream - Fresh cilantro, for garnish - Optional: jalapeño slices for an extra kick When I make these crispy baked ground beef tacos, I love how simple the ingredients are. The ground beef is the star. It gives the tacos their hearty flavor. I always choose lean beef for a healthier dish. Onion and garlic add a nice depth. They bring sweetness and aroma to the mix. You can’t skip these two! They make a big difference. The spices are key too. Chili powder adds warmth, while cumin and smoked paprika give a nice, smoky taste. Sea salt and black pepper boost all the flavors. Corn tortillas are perfect for holding all the goodness. They get crispy in the oven, making every bite satisfying. For toppings, I pick sharp cheddar cheese. It melts beautifully and adds creaminess. Shredded lettuce and diced tomato bring freshness and crunch. Sour cream is a must for those who love a cool touch. Fresh cilantro brightens the dish. If you like heat, jalapeño slices are a great addition. With these ingredients, you can create a fun and tasty meal. For the full recipe, check out the details above! 1. First, heat a large skillet on medium heat. Add the finely chopped onion. Sauté for 3-4 minutes. The onion should become soft and fragrant. 2. Next, add the minced garlic. Cook for about one minute. Stir often to keep it from burning. 3. Now, raise the heat to medium-high. Add the ground beef to the skillet. Use a spatula to break it up while cooking. Cook for 5-7 minutes until it is browned and fully cooked. 4. Once the beef is brown, mix in the chili powder, ground cumin, smoked paprika, sea salt, and black pepper. Stir everything well. Let it cook for another 2 minutes before you take it off the heat. 1. Preheat your oven to 400°F (200°C). This will help the tacos become crispy. 2. Stack the corn tortillas and place them in the oven for 2-3 minutes. This softens them, making them easier to fill. 3. Take the warmed tortillas out of the oven. Spoon the ground beef mixture evenly into each tortilla. 4. Sprinkle a generous amount of shredded sharp cheddar cheese on top of the beef. 5. Carefully fold the tortillas over the filling. Place them seam-side down in a baking dish. 1. Put the baking dish in the oven. Bake the tacos for 15-20 minutes. This will make the tortillas crispy and melt the cheese. 2. Once done, take the tacos out of the oven. Serve them hot. Top each taco with shredded iceberg lettuce, diced tomato, and a dollop of sour cream. 3. For extra heat, you can add jalapeño slices if you like. You can follow the Full Recipe for more details and tips on making these tasty tacos. To make your tacos perfect, focus on cooking techniques. Sauté the onion and garlic until they are soft. This makes a tasty base for your ground beef. Cook the beef until it's fully browned. This step gives your tacos a rich flavor. Warming your tortillas is key. It makes them easier to fold and fill. Just stack them and pop them in the oven for a few minutes. This helps keep them from breaking when you fill them. Pair your tacos with sides like refried beans or rice. A fresh salad can also complement the meal well. For drinks, try serving lemonade or a light beer. These choices balance the spices in the tacos. For creative presentation, use a colorful platter. Add lime wedges and extra cilantro for a pop of color. You can also serve salsa or hot sauce on the side. This lets everyone customize their taco just the way they like it. {{image_4}} You can change up the meat in these tacos. Ground turkey or chicken works well. Both options are leaner than beef. They still pack great flavor. If you want a gluten-free option, choose gluten-free tortillas. They are easy to find in most stores. This way, everyone can enjoy these tacos. Want to spice things up? You can add more spices to the meat mix. Try cayenne pepper or crushed red pepper for heat. A dash of oregano can bring in a new flavor. You can also mix in different toppings. Sliced avocados add creaminess. Diced onions or pico de gallo bring fresh taste. Get creative with your favorite toppings! For the complete recipe, check out the [Full Recipe]. To keep your crispy baked ground beef tacos fresh, follow these tips: - Refrigeration: Place any leftover tacos in an airtight container. They will stay good for up to 3 days in the fridge. Make sure to separate the toppings, like lettuce and sour cream, to keep them fresh. - Freezing options: If you want to save some for later, you can freeze the assembled tacos. Wrap each taco in plastic wrap and place them in a freezer-safe bag. They can last up to 3 months. Just remember, the tortillas may lose some crunch after freezing. When it's time to enjoy your leftovers, here’s how to reheat them while keeping that delightful crispiness: - Methods for maintaining crispiness: For the best results, use the oven. Preheat it to 350°F (175°C). Place the tacos on a baking sheet and heat for about 10-15 minutes. This way, the tortillas will crisp up again without getting soggy. - Timeframes for reheating: If you're in a hurry, you can use the microwave. Heat them for about 1-2 minutes. However, this method may not keep the crispiness intact. So, the oven is the better choice if you have the time. For the full recipe, check out the earlier section! Yes, you can prepare the filling in advance. Start by cooking the ground beef mixture, as described in the recipe. Once cooked, let it cool and store it in an airtight container. You can keep it in the fridge for up to three days. When you are ready to eat, simply warm the beef filling and assemble your tacos. This saves time on busy nights and still gives you that fresh taste. If you want to try different proteins, there are many options. Ground turkey or chicken works well and is leaner. You can also use ground pork if you want a richer flavor. For a plant-based choice, try lentils or black beans. These options add a different taste and keep the dish exciting. To add heat, you can include jalapeño slices on top of your tacos. You might also mix some cayenne pepper into the beef while cooking. Adding hot sauce as a topping gives you control over the spice level. For even more flavor, try diced green chilies in the filling. Each of these options can help you create a taco that packs a punch. We explored making delicious tacos with simple ingredients and steps. From browning ground beef to adding toppings, each part matters. Remember to warm your tortillas for the best flavor. You can customize these tacos with different proteins or spice levels. Whether you enjoy them right away or have leftovers, proper storage keeps them tasty. With these tips, you can impress anyone at your next meal. Enjoy making your own tasty tacos!](https://tastednest.com/wp-content/uploads/2025/06/78199783-447d-484a-8283-7e801fcb2c74.webp)