Skip to content
  • GDPR Privacy Policy
  • Copyright Policy
  • Disclaimer
  • Terms & Conditions
Tasted Nest
  • Home
  • Appetizers
  • Desserts
  • Salads
  • Breakfast
  • Dinner
  • Privacy Policy
  • Contact
  • About

Chef Tavio

Air Fryer Apple Fries Irresistible Crunchy Treat

December 10, 2025March 10, 2025 by Chef Tavio
To make Air Fryer Apple Fries, gather these simple ingredients: - 3 medium apples (Fuji or Honeycrisp) - 1/2 cup all-purpose flour - 1 teaspoon ground cinnamon - 1/2 cup panko breadcrumbs - 2 tablespoons granulated sugar - 1/2 teaspoon salt - 1 large egg, beaten - Cooking spray or oil for greasing Each item plays a key role in creating that irresistible crunch. The apples provide sweetness, while the flour helps the coating stick. Ground cinnamon adds warmth and flavor. Panko breadcrumbs deliver that extra crunch we all love. Granulated sugar gives a hint of sweetness, and salt balances the flavors. The egg acts as a glue to hold everything together. Finally, cooking spray or oil ensures a crispy finish in the air fryer. Using Fuji or Honeycrisp apples is best for this recipe. They are sweet and firm, making them perfect for frying. You can also adjust the sugar and cinnamon depending on your taste. If you want a healthier option, consider reducing the sugar or using a sugar substitute. Now, you have everything you need to whip up these tasty apple fries. Let’s get cooking! {{ingredient_image_2}} First, you need to peel the apples. I recommend using Fuji or Honeycrisp apples for a sweet flavor. Next, core the apples to remove the seeds. Slice them into thin strips, about the size of French fries. This helps them cook evenly. Place the apple strips on a plate or cutting board as you work. In a shallow bowl, mix the all-purpose flour, ground cinnamon, granulated sugar, and salt. Make sure to stir well so all the dry ingredients blend. In another bowl, beat one large egg until it is frothy. Take a third bowl and add the panko breadcrumbs, which will give the fries that extra crunch. Now it’s time to coat your apple strips. Start by dipping each strip into the flour mixture, covering it fully. Next, dip it into the beaten egg, letting any extra egg drip off. Finally, roll the strip in the panko breadcrumbs. Press gently to help the crumbs stick. Repeat this for all the strips to ensure they are evenly coated. Before you start cooking, you need to preheat your air fryer. Set the temperature to 375°F (190°C) and let it heat for about 5 minutes. This step is important for getting a crispy texture on your apple fries. Arrange the coated apple fries in a single layer in the air fryer basket. Make sure they are not overlapping to ensure even cooking. Lightly spray the fries with cooking spray or drizzle a little oil over the top. Air fry them for about 10 to 12 minutes. Remember to shake the basket halfway through. This helps them cook evenly. When they are done, they should look golden brown and crisp. Once the apple fries are done, carefully remove them from the air fryer. Let them cool for a few minutes on a wire rack or plate. This helps keep them crispy. Before serving, dust the apple fries with some extra cinnamon and sugar. You can also serve them with a small bowl of caramel sauce or creamy yogurt for delicious dipping! Choose apples that are firm and sweet. Fuji and Honeycrisp are my favorites. They hold their shape well when cooked. You can also try Granny Smith for a tart flavor. The key is to avoid soft apples, as they won’t fry well. To get the best crunch, coat the apple strips evenly. Each piece should be covered in flour, egg, and panko. This layering helps create a crispy shell. Preheating the air fryer to 375°F (190°C) is also crucial. It ensures even cooking and browning. Air fryers can vary in power. If yours cooks hot, check the apple fries a minute early. For slower models, you may need to add a minute or two. Shake the basket halfway through cooking for even results. This keeps them from sticking and helps them crisp up nicely. Pro Tips Choose the Right Apples: Opt for crisp, sweet varieties like Fuji or Honeycrisp to ensure great flavor and texture in your apple fries. Uniform Slicing: Make sure to cut the apple strips to a uniform thickness for even cooking and consistent texture throughout. Experiment with Spices: Feel free to add nutmeg or ginger to the flour mixture for a unique twist on flavor that complements the apples beautifully. Keep Them Crisp: Allow the apple fries to cool slightly on a wire rack to prevent steam from making them soggy before serving. {{image_4}} You can give your apple fries a special twist by adding vanilla extract or nutmeg to the coating. Simply mix in one teaspoon of vanilla extract when you prepare the egg. This small change adds a warm, sweet aroma. If you prefer nutmeg, add 1/4 teaspoon to the flour mixture. Nutmeg gives your apple fries a cozy, spiced flavor that pairs well with apples. The right dipping sauce can elevate your apple fries. Consider classic options like rich caramel sauce, creamy yogurt, or smooth chocolate sauce. Caramel brings a sweet, buttery taste that complements the apples. Yogurt adds a tangy contrast, and chocolate gives a decadent touch. You can even mix and match for a fun dipping experience! If you want to make your apple fries healthier, there are simple swaps. For a gluten-free option, use almond flour instead of all-purpose flour. To cut down on sugar, you can use a sugar substitute. Choose one that measures like sugar for easy baking. These changes keep the taste delicious while making your treat a bit lighter. To keep your apple fries crispy, store them in an airtight container. Avoid stacking the fries to prevent them from getting soggy. Place a paper towel at the bottom of the container to absorb moisture. For the best taste, enjoy them within two days. To reheat, the air fryer is best. Set it to 375°F (190°C) and warm the apple fries for about 5 minutes. This method keeps them crunchy. If using a microwave, heat them in short bursts of 15 seconds. This method can make them soft, so be careful. You can freeze apple fries for later use. First, lay them in a single layer on a baking sheet. Freeze them until solid, then transfer to a freezer bag. When ready to eat, thaw them in the fridge overnight before reheating in the air fryer. This way, you retain the crunchiness. Yes, you can use different apples! Some great choices are Granny Smith or Gala apples. Granny Smith gives a tart bite, while Gala adds sweetness. Just pick apples that are firm. This helps them hold their shape when you fry them. Absolutely! These apple fries are a hit with kids. They are sweet and crunchy. Apples are full of vitamins and fiber, which is good for kids. Plus, they are fun to dip! You can serve them with yogurt or caramel for a treat. You can skip the breadcrumbs! Try using crushed nuts or oats instead. They add crunch and flavor. You can also coat the apple strips with a mix of flour and cinnamon. This will still give them a tasty outside without the breading. There are many fun pairings! Serve them with caramel sauce for a sweet dip. Yogurt is great too, especially vanilla or honey-flavored. You can also add a sprinkle of powdered sugar on top for extra sweetness. Enjoy these with a scoop of ice cream for a yummy dessert! Air fryer apple fries are easy and fun to make! We covered all the steps, from preparing apples to cooking and serving. I shared tips for crispiness and variations to fit any taste. Remember to choose the right apples to max out flavor. Enjoy your apple fries with tasty dips or try healthier swaps. You can also store leftovers and even freeze for later. These treats are a hit for kids and adults alike. Dive into this sweet snack today, and make it your own!

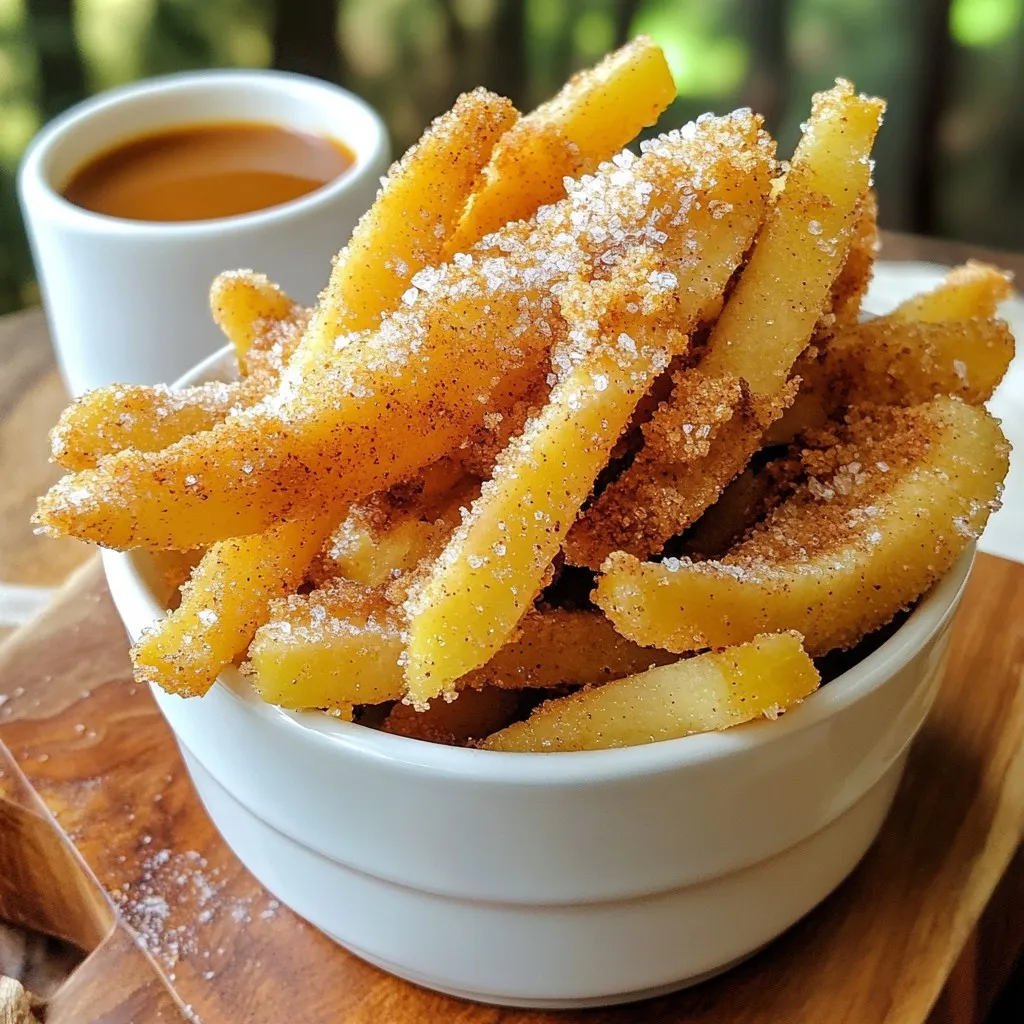
Looking for a fun and tasty treat? Let me introduce you to Air Fryer Apple Fries. These crunchy snacks are easy to make and perfect for all ages. With just …

Read more

Categories Desserts

Easy Chicken Lo Mein Flavorful and Quick Recipe

November 21, 2025March 9, 2025 by Chef Tavio
- 8 oz lo mein noodles - 1 lb boneless, skinless chicken breast, thinly sliced - 2 tablespoons soy sauce - 1 tablespoon oyster sauce - 1 tablespoon sesame oil - 1 cup bell peppers, julienned - 1 cup snap peas or snow peas - 1/2 cup carrots, julienned - 3 green onions, chopped - 2 cloves garlic, minced - 1 tablespoon fresh ginger, grated - Salt and pepper to taste - Optional: sesame seeds for garnish When choosing vegetables, look for fresh and crisp options. Bright colors mean good flavor. For bell peppers, mix red, yellow, and green for a colorful dish. You can swap snap peas with snow peas if you prefer. If you do not have lo mein noodles, use spaghetti or rice noodles. For a gluten-free version, replace soy sauce with tamari. You can skip oyster sauce or use a vegan version. If you are out of sesame oil, try using vegetable oil. These swaps will still keep your dish tasty and fun! {{ingredient_image_2}} 1. Cooking the lo mein noodles: Start by boiling salted water in a large pot. Add the lo mein noodles and cook them until they are tender, following the package instructions. This usually takes about 4 to 6 minutes. 2. Preventing sticking with sesame oil: Once cooked, drain the noodles. To keep them from sticking together, toss them with a little sesame oil. This step adds flavor and helps them stay separate. Set the noodles aside for later. 1. How to marinate properly: In a mixing bowl, combine the thinly sliced chicken with soy sauce, oyster sauce, salt, and pepper. Toss until the chicken is well-coated in the sauce. 2. Timing for marination: Let the chicken marinate for 10 to 15 minutes. This allows the flavors to soak into the meat, making it tasty and juicy. 1. Stir-frying the chicken: Heat a large skillet or wok over medium-high heat. Add 1 tablespoon of sesame oil. Once the oil is hot, add the marinated chicken. Stir-fry for 5 to 7 minutes, until the chicken turns golden brown and is fully cooked. Remove it from the pan and set it aside. 2. Cooking the vegetables: In the same skillet, add more sesame oil if needed. Add minced garlic and grated ginger, cooking for about 30 seconds until fragrant. Then, add the bell peppers, snap peas, and carrots. Stir-fry for 3 to 4 minutes until the veggies are bright and tender but still crisp. 3. Combining everything: Return the chicken to the skillet. Add the cooked lo mein noodles and gently toss everything together. Ensure the chicken and noodles are well-coated with the sauce, cooking for another 2 to 3 minutes to let the flavors blend. 1. Adding green onions: Just before serving, stir in the chopped green onions. This gives a fresh crunch to the dish. 2. Adjusting seasoning: Taste your dish and add more salt or pepper if needed. This step is key to making your Easy Chicken Lo Mein just right for your palate. - Overcooking the noodles: It's easy to cook noodles too long. Follow the package time carefully. Noodles should be al dente, not mushy. This keeps them from clumping in the stir-fry. - Ignoring the marination time: Marinating chicken is key. Let it sit for at least 10 minutes. This helps the chicken soak up flavors. Skipping this step will make your meal taste bland. - Suggestions for additional seasonings: You can add a splash of rice vinegar or chili oil for a twist. These bring a bright and spicy kick. You can also try a dash of five-spice powder for a deeper flavor. - How to achieve the best stir-fry texture: Use high heat and a good pan. A wok is ideal but any large skillet works. Keep your ingredients moving to avoid burning. This method helps everything cook evenly and stay crisp. - Recommended side dishes: Serve with spring rolls or dumplings for a full meal. A side of steamed broccoli or a simple salad also pairs well. These sides add color and balance to your plate. - Best ways to serve and present: Use a large platter for a family-style meal. For individual servings, use bowls to show off the colorful veggies. A sprinkle of sesame seeds on top adds a nice touch and crunch. Pro Tips Use Fresh Ingredients: Fresh vegetables and herbs will enhance the flavor and texture of your lo mein. Opt for seasonal produce when possible for the best taste. Don’t Overcook the Noodles: Make sure to cook the lo mein noodles just until al dente. They will continue to cook slightly when combined with the hot ingredients. High Heat is Key: Stir-frying over high heat allows the chicken and vegetables to sear quickly, locking in flavors and maintaining a crisp texture. Customize Your Protein: Feel free to swap out the chicken for shrimp, beef, or tofu to suit your taste preferences or dietary needs. {{image_4}} You can switch up the veggies in your Chicken Lo Mein. Here are some fun ideas: - Broccoli florets - Baby corn - Mushrooms - Zucchini strips Using seasonal vegetables makes your dish fresh. In summer, add tomatoes or bell peppers. In winter, use root veggies like carrots or squash. This keeps your meal exciting and healthy. Want to try something different? You can use shrimp, tofu, or beef. Here’s how: - Shrimp: Cook them for just 3-4 minutes until pink. - Tofu: Press it to remove extra water, then cube it. Cook until golden brown. - Beef: Thinly slice flank steak and stir-fry for about 3-5 minutes. Cooking times vary, so pay attention. Make sure each protein is cooked through for safe eating. Do you like heat? Add red pepper flakes or a dash of chili sauce. Start with a small amount to avoid overpowering the dish. If you prefer milder flavors, try these options: - Use less soy sauce. - Add a splash of coconut milk for creaminess. These changes make your Chicken Lo Mein just right for your taste. Enjoy experimenting! To keep Chicken Lo Mein fresh, store it in airtight containers. This helps avoid moisture loss. Let the dish cool to room temperature before sealing. Label the container with the date. This way, you know when to eat it. Use glass or sturdy plastic containers for best results. They help maintain the flavor and texture. To reheat Chicken Lo Mein, use a skillet over medium heat. Add a splash of water or broth to help it steam. Stir often to prevent sticking. Heat until it’s warm throughout. Avoid the microwave if you can. It can make the noodles soggy. Yes, you can freeze Chicken Lo Mein! Just be sure to cool it first. Portion it into freezer-safe bags or containers. Squeeze out extra air to prevent freezer burn. To thaw, place the container in the fridge overnight. For quicker thawing, use the microwave on defrost. Once thawed, reheat using the skillet method for the best texture. If you can't find lo mein noodles, you can use other types of noodles. Good options include spaghetti, egg noodles, or rice noodles. These substitutes work well in this dish. Just cook them according to the package instructions. Keep in mind that the texture may change slightly. To make Chicken Lo Mein gluten-free, swap regular soy sauce for gluten-free soy sauce or tamari. You can also choose rice noodles instead of lo mein noodles. Always check labels to ensure all ingredients are gluten-free. This way, you can enjoy the dish without worries. Yes, you can prepare Chicken Lo Mein ahead of time. Cook the noodles and chicken, then store them separately. Keep the vegetables fresh until you are ready to cook. When you're set to eat, just stir-fry everything together. It takes only a few minutes to heat up. A large non-stick skillet or a wok works best for this dish. A non-stick surface helps prevent sticking and allows for easy tossing. If you have a carbon steel wok, it can provide great heat distribution. Make sure the pan is hot before adding ingredients for the best stir-fry. Chicken Lo Mein can last in the refrigerator for about 3 to 4 days. Store it in an airtight container to keep it fresh. When you're ready to eat, simply reheat it in a skillet or microwave. Just be careful not to overcook it during reheating. You can make a simple yet tasty Chicken Lo Mein with quality ingredients and easy steps. By using fresh veggies and proper cooking techniques, you ensure great flavor. Remember to avoid common mistakes, like overcooking the noodles. Variations let you adjust the meal to your liking, making it fun to try new things. Store leftovers correctly to enjoy later. Overall, you have the tools to create a delicious meal that can impress anyone. Enjoy your cooking journey, and don't hesitate to experiment!

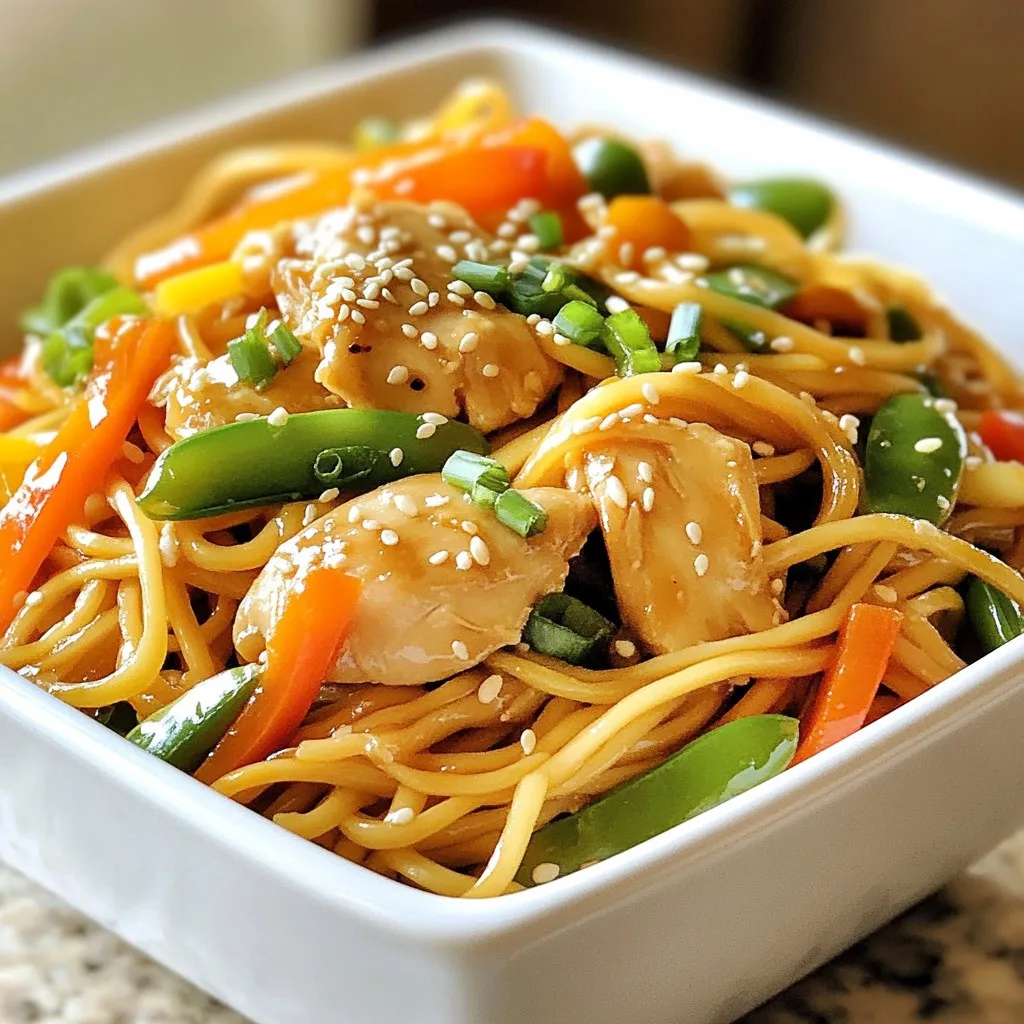
Craving a quick and tasty meal? My Easy Chicken Lo Mein recipe brings the flavors of your favorite takeout right to your kitchen! With just a few ingredients and simple …

Read more

Categories Dinner

Homestyle Classic Chili Flavorful and Hearty Recipe

November 11, 2025March 9, 2025 by Chef Tavio
- 1 pound ground beef or turkey - 1 large onion, diced - 3 cloves garlic, minced - 2 cans (15 oz each) kidney beans, drained and rinsed - 1 can (15 oz) black beans, drained and rinsed - 1 can (28 oz) diced tomatoes with their juices - 2 cups beef or vegetable broth - 1 cup corn (frozen or canned) - 2 tablespoons chili powder - 1 tablespoon ground cumin - 1 teaspoon smoked paprika - 1 teaspoon dried oregano - 1 teaspoon salt - ½ teaspoon black pepper - 1-2 jalapeños, diced (for heat) - Fresh cilantro, for garnish - Shredded cheese, for garnish This list covers all the basics for my homestyle classic chili. Each ingredient helps build a rich, hearty flavor. Ground beef or turkey forms the base of the dish. The onion and garlic add depth and aroma. Beans provide protein and a nice texture. Diced tomatoes add freshness and moisture. Broth ties everything together. The spices are key to great chili. Chili powder gives a warm kick. Ground cumin adds earthiness. Smoked paprika offers a hint of smokiness. Dried oregano gives a herbal note. Salt and black pepper enhance all flavors. Optional ingredients like jalapeños can boost heat. They add a nice bite if you like spice. Fresh cilantro and cheese make for beautiful garnishes. They also bring fresh flavors to the dish. {{ingredient_image_2}} 1. In a large pot, heat over medium. 2. Add 1 pound of ground beef or turkey. 3. Brown the meat until it is fully cooked. 4. Use a spatula to break it into small pieces. 5. If there is excess fat, drain it from the pot. 1. Add 1 large diced onion to the pot. 2. Stir in 3 minced garlic cloves. 3. Sauté for about 3-4 minutes. 4. Cook until the onion is soft and clear. 5. Add spices: 2 tablespoons chili powder, - 1 tablespoon ground cumin, - 1 teaspoon smoked paprika, - 1 teaspoon dried oregano, - 1 teaspoon salt, - ½ teaspoon black pepper, - and diced jalapeños if you want heat. 6. Cook for 1-2 minutes to toast the spices. 1. Pour in 1 can of diced tomatoes with juices. 2. Add 2 cans of kidney beans, drained, and rinsed. 3. Mix in 1 can of black beans, drained and rinsed. 4. Add 1 cup of corn. 5. Pour in 2 cups of beef or vegetable broth. 6. Stir everything together well. 7. Bring to a boil over high heat. 8. Once boiling, lower heat to a gentle simmer. 9. Let it simmer for at least 30 minutes. 10. Stir occasionally for even cooking. 11. For deeper flavor, simmer for up to an hour. 12. Taste and adjust the seasoning if needed. To make your chili just right, you can adjust the spice levels. If you like it hot, add more jalapeños. For a milder taste, skip them or use less. You can also mix in extra spices like cayenne or red pepper flakes. These add a kick without overwhelming the dish. Feel free to personalize your chili with add-ins. Want more veggies? Toss in bell peppers or zucchini. If you prefer a meaty chili, use a mix of ground beef and turkey. You can also add a splash of beer or a spoonful of cocoa powder for depth. Getting the right thickness is key to great chili. If it’s too thin, let it simmer longer. This helps it reduce and thicken. If it’s too thick, add a bit more broth or water to loosen it up. Balancing flavors is important too. Taste your chili as it cooks. If it’s too salty, add a pinch of sugar to cut the saltiness. For more depth, squeeze in fresh lime juice just before serving. Chili pairs well with warm, crusty bread. It’s great for dipping and soaking up that flavorful broth. Rice is another perfect side. It adds a nice base for the chili and makes the meal heartier. For garnish, fresh cilantro and shredded cheese make a lovely touch. You can also add diced green onions or a dollop of sour cream. These toppings not only add flavor but enhance the look of your dish too. Pro Tips Enhance the Flavor: For a richer taste, consider adding a splash of Worcestershire sauce or a teaspoon of sugar to balance the acidity of the tomatoes. Bean Variations: Feel free to mix and match the beans. Try adding pinto beans or chickpeas for a different texture and flavor profile. Make it Ahead: Chili often tastes even better the next day. Make a big batch and refrigerate overnight to allow the flavors to meld. Spice Control: Adjust the heat level by controlling the amount of jalapeños or by adding hot sauce to individual servings, allowing everyone to customize their bowl. {{image_4}} You can use different proteins in your chili. Ground turkey is a great lean choice. It has a mild flavor that blends well with spices. Ground beef is rich and hearty. It gives the chili a classic taste. For a twist, try plant-based proteins. Options like lentils or soy crumbles work well. You can mix and match proteins. For example, half beef and half turkey create a unique flavor. Making homestyle chili without meat is easy. Start with the same base of onions, garlic, and beans. Use vegetable broth instead of beef broth. This keeps the taste rich and savory. Add in more veggies like bell peppers or zucchini for texture. You can also include mushrooms for a meaty feel. Don't forget to check your spices; they enhance the flavor. Adjusting the heat in your chili is fun. If you like it mild, skip the jalapeños. For more spice, add diced jalapeños or other peppers. Try serrano or habanero for an extra kick. You can also use red pepper flakes for a different heat. Taste as you go, and find your perfect balance. With these tips, your chili will be just right for you! To store leftover chili properly, let it cool first. Place the chili in an airtight container. This helps keep it fresh. Store it in the fridge for up to four days. When reheating, use a pot on low heat. Stir often to heat evenly. You can also use a microwave. Just cover the bowl to avoid splatters. To freeze chili without losing flavor, let it cool completely. Use freezer-safe containers or bags. Leave some space for expansion. It will keep well for about three months. When you’re ready to eat, take it out of the freezer. Place it in the fridge overnight to defrost. Reheat it slowly on the stove or in the microwave. Make sure it is hot all the way through before serving. How long does chili last in the fridge? Chili lasts in the fridge for about 3 to 4 days. Make sure it cools down before you store it. Keep it in an airtight container to keep it fresh. Can I make chili in advance and reheat it? Yes, making chili in advance is a great idea. It often tastes better the next day. Just store it in the fridge and reheat on the stove or in the microwave. Can I use a slow cooker for this recipe? Absolutely! A slow cooker works great for chili. Brown the meat first, then add all ingredients to the slow cooker. Cook on low for 6 to 8 hours or high for 3 to 4 hours. What’s the best way to enhance the flavor of chili? To enhance the flavor, use fresh spices and herbs. Toast your spices in the pot before adding other ingredients. Adding a splash of vinegar or lime juice at the end can also brighten the flavors. What can I use instead of kidney beans? If you need a substitute for kidney beans, black beans or pinto beans work well. You can also use chickpeas for a different texture. Can I substitute fresh tomatoes for canned? Yes, you can use fresh tomatoes instead of canned. Use about 2 to 3 cups of diced fresh tomatoes. Just remember to add a little extra liquid since fresh tomatoes have more water. This blog post explored how to create a delicious chili from scratch. We covered key ingredients like ground meat, beans, and spices. I shared step-by-step cooking instructions, tips for perfecting flavor, and ways to personalize your chili. Remember to store leftovers properly for later enjoyment. You can adapt this recipe to fit your taste, whether through spice levels or protein choices. With these insights, you can create a chili that everyone will love. Enjoy your cooking adventure!

Looking to spice up your dinner routine? My Homestyle Classic Chili recipe combines hearty ingredients and bold flavors for a dish you’ll crave. Packed with ground beef or turkey, beans, …

Read more

Categories Dinner

Teriyaki Turkey Rice Bowls Flavorful and Easy Recipe

November 30, 2025March 8, 2025 by Chef Tavio
- 1 pound ground turkey - 1 cup jasmine rice - 2 tablespoons soy sauce - 2 tablespoons teriyaki sauce - 1 tablespoon sesame oil - 1 tablespoon olive oil - 2 cloves garlic, minced - 1 teaspoon fresh ginger, grated - 1 cup broccoli florets - 1 carrot, julienned - 4 green onions, chopped - Sesame seeds for garnish When you create your Teriyaki Turkey Rice Bowls, the ingredients make all the difference. I love using ground turkey for its lean quality. It cooks up nicely and absorbs all the flavors from the sauces. Jasmine rice is my go-to choice. Its fluffy texture pairs perfectly with the savory turkey. Soy sauce adds a salty depth, while teriyaki sauce brings sweetness. The balance of these flavors creates a dish that sings! In the aromatics, sesame oil adds a nutty note. It pairs well with garlic and ginger, both of which boost flavor. I always use fresh ginger for its punchy taste. It really elevates the dish. For veggies, I use broccoli florets and julienned carrots. They add color and crunch. Green onions give a fresh bite, and sesame seeds finish off the dish beautifully. They add a nice touch of elegance and a little extra flavor. Gather these ingredients, and you’re ready to create a meal that’s both tasty and easy! {{ingredient_image_2}} To start, prepare jasmine rice. Rinse one cup of rice under cold water. This removes extra starch. Then, cook it according to the package instructions. Once it's fluffy, set it aside. Keep it warm for later. You can cover it with a towel or lid to trap the heat. Next, grab a large skillet. Heat two tablespoons of olive oil over medium heat. Once the oil is hot, add two cloves of minced garlic and one teaspoon of grated ginger. Stir them for about one to two minutes. This step is key for a fragrant aroma. It makes the dish more inviting and flavorful. Now, add one pound of ground turkey to the skillet. Use a spatula to break it into smaller pieces. Cook for about five to seven minutes. The turkey should turn brown and be fully cooked. Season it with salt and pepper to your taste. This adds depth to the dish. After the turkey is cooked, pour in two tablespoons of soy sauce and two tablespoons of teriyaki sauce. Stir well to coat the turkey evenly. Then, drizzle in one tablespoon of sesame oil. Mix it thoroughly. This will enrich the flavors and create a savory base. While the turkey cooks, steam one cup of broccoli florets and one julienned carrot. Use a separate pot for this. Steam the veggies for about three to five minutes. They should be tender-crisp, not mushy. This keeps them vibrant and adds color to your bowl. Now it’s time to assemble! Start with a generous serving of jasmine rice as the base. Spoon the savory teriyaki turkey mixture over the rice. Then, pile on the steamed vegetables. This creates a colorful and tasty meal. Finally, sprinkle with chopped green onions and sesame seeds. This adds a lovely crunch and freshness. To make the best jasmine rice, rinse it well. This removes excess starch. Use a ratio of 1 cup rice to 1.5 cups water. Cook it until fluffy and tender. A rice cooker works great for this. It keeps the rice warm too. If using a stovetop, watch it closely. Take it off heat when water is gone. Ground turkey can be bland. I always season it well. Use salt and pepper while cooking. For extra kick, add garlic powder or onion powder. You can also try chili flakes for some heat. If you want more sauce, soy sauce or hoisin sauce can work well too. How you arrange your bowl matters. Start with rice as your base. Then, add the turkey mixture on top. Pile the veggies next for color. Use deep bowls for serving; they hold everything better. Finish with green onions and sesame seeds. This makes your dish look and taste amazing. Pro Tips Use Fresh Ingredients: Always opt for fresh vegetables and herbs to enhance the flavor and nutritional value of your rice bowls. Customize Your Sauce: Adjust the ratio of soy and teriyaki sauce according to your taste preferences; try adding a splash of rice vinegar for a tangy twist. Meal Prep Friendly: This recipe is great for meal prep! Cook extra turkey and rice to store in the fridge for quick lunches throughout the week. Experiment with Toppings: Feel free to add toppings like avocado, pickled ginger, or even a soft-boiled egg for a unique twist on your rice bowls. {{image_4}} You can switch the turkey for other proteins. Ground chicken works great for a lighter taste. Ground beef adds a rich flavor if you prefer something heartier. For a plant-based option, try using firm tofu. Just press the tofu to remove water, then cube it. Sauté it until golden for a tasty substitute. If you want to change the rice, brown rice is a healthy choice. It has more fiber and a nutty flavor. Cauliflower rice is another option. It’s low-carb and gives a fresh twist. You can also flavor your rice by cooking it in broth or adding spices like garlic powder or ginger. This adds depth to your dish. Feel free to add more veggies. Bell peppers bring color and sweetness. Snap peas add a nice crunch. You can also use seasonal vegetables like zucchini or asparagus for freshness. Mixing different vegetables keeps the dish exciting and nutritious. After enjoying your teriyaki turkey rice bowls, store leftovers right away. Cool the food to room temperature before placing it in the fridge. Use airtight containers to keep the turkey and rice fresh. Label the containers with the date for easy tracking. If you want to save the teriyaki turkey mixture for later, freezing is a great option. Place the cooled turkey in freezer-safe bags, removing as much air as you can. This helps prevent freezer burn. For reheating, thaw the mixture overnight in the fridge. Heat it in a skillet over medium heat until warm. In the fridge, the teriyaki turkey rice bowls last about 3 to 4 days. If you notice any off smells or changes in color, it's best to toss them. Always check for signs of spoilage to keep your meals safe and delicious. It takes about 15 minutes to prep and 15 minutes to cook. In total, you will need around 30 minutes to make these delicious rice bowls. This quick time frame makes it easy to enjoy a gourmet meal on a busy night. Yes, you can prepare the turkey and rice in advance. Cook the turkey and store it in the fridge for up to three days. Reheat it on the stove or in the microwave. You can also cook the rice ahead and keep it warm or refrigerate it. Just add some water when reheating to keep it fluffy. If you need a substitute, you can use soy sauce or hoisin sauce. For a homemade version, mix soy sauce with honey, rice vinegar, and sesame oil. This will give you a sweet and salty flavor similar to teriyaki. Yes, these bowls are a healthy choice. Ground turkey is lean, and the dish includes colorful veggies. Broccoli and carrots provide vitamins and fiber. Jasmine rice adds energy for your day. Overall, this meal is balanced and nutritious. To sum up, we explored how to make delicious Teriyaki Turkey Rice Bowls. We covered key ingredients like ground turkey, jasmine rice, and fresh vegetables. I shared step-by-step instructions that make cooking easy. You learned tips for enhancing flavor and ways to vary the dish. Remember, this meal is not only tasty; it’s also a healthy option. Give it a try and make it your own. Your taste buds will thank you!

Craving a quick, tasty meal? Teriyaki Turkey Rice Bowls are your answer! This easy recipe packs flavor and nutrients in every bite. Combining ground turkey, jasmine rice, and fresh veggies, …

Read more

Categories Dinner

Homemade Ravioli Sauce Rich and Flavorful Recipe

November 12, 2025March 7, 2025 by Chef Tavio
To make a rich and tasty ravioli sauce, you need the following: - 2 tablespoons extra virgin olive oil - 1 medium onion, finely chopped - 4 cloves garlic, minced - 1 can (28 ounces) crushed tomatoes - 1 tablespoon tomato paste - 1 teaspoon sugar - 1 teaspoon dried oregano - 1 teaspoon dried basil - Salt and freshly ground black pepper to taste - Fresh basil leaves for garnish You can swap some items if needed: - Use cooking oil instead of olive oil. - Sweet onion can replace the regular onion. - Canned diced tomatoes work well instead of crushed tomatoes. - Use fresh herbs if you have them. Just add more for a stronger taste. - For a vegan option, ensure the sugar is vegan-friendly. - Extra Virgin Olive Oil: This adds a fruity note. Choose a good quality for best flavor. - Onion: A finely chopped onion gives sweetness and depth. - Garlic: Fresh garlic is key. It gives the sauce its wonderful aroma. - Crushed Tomatoes: Look for high-quality brands for a bright taste. - Tomato Paste: This thickens the sauce and adds richness. - Sugar: A small amount helps balance the acidity of tomatoes. - Dried Herbs: Use dried herbs for a more concentrated flavor. Adjust based on your taste. - Salt and Pepper: Season well. This enhances all the flavors in the sauce. These ingredients and tips will help you create a sauce that pairs perfectly with your homemade ravioli. Enjoy the rich and comforting taste! {{ingredient_image_2}} To make a hearty tomato basil marinara, start by gathering your ingredients. In a large saucepan, heat 2 tablespoons of extra virgin olive oil over medium heat until it shimmers. Next, add 1 finely chopped medium onion. Sauté the onion for about 5 to 7 minutes. You want it soft and translucent. Now, stir in 4 minced garlic cloves. Cook this mix for 1 to 2 minutes. Be careful! If you brown the garlic, it can taste bitter. After that, pour in 28 ounces of crushed tomatoes and 1 tablespoon of tomato paste. Stir well to combine all the flavors. Next, add 1 teaspoon of sugar, 1 teaspoon of dried oregano, and 1 teaspoon of dried basil. Mix everything together. This helps the herbs spread their flavor throughout the sauce. Then, season it with salt and freshly ground black pepper to taste. Increase the heat until the sauce begins to simmer. Once it simmers, reduce the heat to low. Let it cook uncovered for about 20 to 25 minutes. Stir occasionally to stop it from sticking. This simmering allows the flavors to meld beautifully. When the sauce thickens, remove it from the heat. Allow it to cool slightly before serving. Sautéing garlic and onion can make or break your sauce. Start with medium heat. Too high, and your onion may burn. Cook the onion for 5 to 7 minutes until it is soft and clear. When you add garlic, watch it closely. Cook it for just 1 to 2 minutes. You want it fragrant but not brown. If it turns brown, it can taste bitter, ruining your sauce. The total cooking time for this sauce is about 40 minutes. Prep time is around 10 minutes. - Sauté the onion for 5 to 7 minutes. - Cook the garlic for 1 to 2 minutes. - Simmer the sauce for 20 to 25 minutes. These times help develop rich flavors in your sauce. Stir occasionally to keep it from sticking. Enjoy the process and the wonderful aroma filling your kitchen! To make your homemade ravioli sauce stand out, use fresh ingredients. Fresh herbs like basil can boost flavor. I recommend using good-quality olive oil. It adds richness and depth to the sauce. When cooking onions, let them soften fully. This step builds a sweet base for your sauce. Adding sugar to the sauce helps balance acidity from the tomatoes. Stir in the sugar after the tomatoes. It makes a big difference. For a deeper flavor, let the sauce simmer longer. This allows the flavors to meld beautifully. One common mistake is overcooking garlic. If it burns, it can make the sauce bitter. Keep an eye on it as you cook. Another error is not seasoning enough. Taste your sauce as it cooks. Adjust the salt and pepper to your liking. Avoid using canned tomatoes that are not crushed. Whole or diced tomatoes can change the texture. Stick to crushed tomatoes for a smooth sauce. Lastly, don't skip the simmering step. It helps thicken the sauce and deepen the flavor. When serving your ravioli, add a generous scoop of sauce on top. This helps the pasta soak up the flavor. For a nice touch, sprinkle fresh basil leaves over the dish. A drizzle of olive oil adds shine and richness. You can also serve with grated cheese, like Parmesan. It adds a salty, nutty flavor. Pair your ravioli with a side salad or garlic bread for a complete meal. Explore different ravioli fillings too, like cheese or spinach. Each filling complements the marinara sauce in its own way. Pro Tips Use Fresh Ingredients: Fresh basil and high-quality crushed tomatoes can significantly enhance the flavor of your marinara sauce. Adjust the Consistency: If you prefer a thicker sauce, let it simmer longer, and if you like it thinner, add a splash of water or broth. Flavor Enhancements: Consider adding a pinch of red pepper flakes for a subtle heat or a splash of red wine for depth. Storage Tips: This sauce can be made in advance and stored in the refrigerator for up to a week or frozen for up to three months. {{image_4}} You can easily make this sauce vegan. Start by using olive oil, as usual. Instead of adding any cheese, consider using nutritional yeast. This will give a nice cheese-like flavor. You can also add more vegetables. Try bell peppers or mushrooms for extra depth. They add great taste and texture. For gluten-free ravioli sauce, focus on the ingredients. The base sauce is naturally gluten-free. Just ensure your ravioli is gluten-free too. Look for brands that use rice or corn flour. This way, you can enjoy your meal without worry. Want to add a kick? You can spice up the sauce easily. Add red pepper flakes for heat. Start with a pinch and adjust to your taste. If you want more flavor, consider fresh herbs. Adding fresh parsley or thyme can brighten the sauce. Mix them in right at the end for the best taste. After enjoying your homemade ravioli sauce, you may have some left. To store it, let it cool first. Then, pour the sauce into an airtight container. Make sure to cover it tightly. This keeps out air and moisture, which helps maintain flavor. Store the sauce in the fridge for up to five days. Always label the container with the date. This way, you know when to use it. If you want to save your sauce for later, freezing is a great option. Use freezer-safe containers or bags for storage. Leave some space at the top of the container. Sauce expands when it freezes. You can freeze it for up to three months. When you’re ready to use it, simply thaw in the fridge overnight. For quick thawing, use the microwave on low power. To reheat your sauce, pour it into a saucepan. Heat over medium-low heat, stirring often. This helps the sauce warm evenly. If the sauce seems too thick, add a splash of water or broth. This brings back its smooth texture. Always taste the sauce after reheating. You might want to add a pinch of salt or pepper to boost the flavor. Enjoy your delicious sauce with freshly cooked ravioli! To thicken marinara sauce, you have a few great options. First, let it simmer longer. The heat helps reduce the sauce and makes it thicker. Stir it often to avoid sticking. Second, you can add a bit of tomato paste. This adds both thickness and flavor. Lastly, use a cornstarch slurry. Mix cornstarch with cold water, then stir it into the sauce. Heat until thickened. Each method works well, so choose what fits your needs best. Yes, you can make this sauce ahead of time! It tastes even better after sitting for a day. Make the sauce, then cool it. Store it in an airtight container. Keep it in the fridge for up to three days. If you want to store it longer, freeze it. It lasts for about three months in the freezer. Just thaw it in the fridge before using. Reheat gently on the stove for the best result. Many types of ravioli go well with this marinara sauce. Cheese ravioli is a classic choice. The rich cheese flavor complements the sauce nicely. If you like meat, try beef or sausage ravioli. The hearty flavors blend well together. For a veggie option, spinach and ricotta ravioli work great too. The sauce adds a nice touch to the fresh taste of the spinach. Whatever you choose, this sauce will enhance your meal! Homemade ravioli sauce is easy to make with the right ingredients and steps. You can choose fresh flavors or adapt them to suit your diet. Keep tips in mind to avoid mistakes. Consider variations to spice things up. Store leftovers properly to enjoy later. With this guide, you're ready to craft a delicious sauce that complements any ravioli. Cooking can be simple and fun. Enjoy your culinary journey!

If you want to jazz up your homemade ravioli, this sauce is a must-try. Rich and flavorful, it transforms simple pasta into a tasty dish. I’ll share my secrets on …

Read more

Categories Dinner

One Pot Creamy Tuscan Shrimp Orzo Delightful Dish

November 11, 2025March 6, 2025 by Chef Tavio
To make One Pot Creamy Tuscan Shrimp Orzo, you will need: - 1 pound large shrimp, peeled and deveined - 1 cup orzo pasta - 3 cups chicken broth - 1 cup heavy cream - 1 cup cherry tomatoes, halved - 2 cups fresh spinach, packed - 1/2 cup sun-dried tomatoes, chopped - 3 cloves garlic, minced - 1 teaspoon Italian seasoning - 1 tablespoon olive oil - Salt and pepper, to taste - Grated Parmesan cheese, for serving - Fresh basil leaves, for garnish These ingredients come together to create a rich and creamy dish. The shrimp adds protein, while the orzo gives it heartiness. You can make this recipe gluten-free by using gluten-free orzo. Quinoa also works well if you want a different grain. For a dairy-free version, swap heavy cream with coconut milk. Nutritional yeast can replace Parmesan cheese for a vegan option. To cook this dish, you will need: - A large pot or Dutch oven - A wooden spoon for stirring - A chef's knife for chopping - A cutting board for prep These tools help make cooking easy and fun. A good pot is key for even cooking, while a wooden spoon is gentle on your cookware. {{ingredient_image_2}} To start, we need to cook the shrimp. First, heat olive oil in a large pot over medium heat. Add minced garlic and let it cook for 1-2 minutes. Stir constantly to avoid burning. Then, add the shrimp. Season it with salt, pepper, and Italian seasoning. Cook the shrimp for about 2-3 minutes. You want it to turn opaque and pink. Once done, remove the shrimp and set it aside on a plate. Next, we toast the orzo. In the same pot, add the uncooked orzo. Toss it in the oil and garlic for about 1 minute. This step is key as it enhances the nutty flavor of the orzo. Make sure to coat it well with the oil. Now, it’s time to cook the orzo. Gradually pour in the chicken broth while stirring. Bring the mixture to a gentle boil. Then, turn down the heat to low and cover the pot. Cook for 8-10 minutes. Stir occasionally until the orzo is tender yet still al dente. Once the orzo is done, lower the heat. Stir in the heavy cream, halved cherry tomatoes, chopped sun-dried tomatoes, and fresh spinach. Keep stirring until the spinach wilts. Finally, gently fold the shrimp back into the pot. Warm it for 1-2 minutes. Taste and adjust the seasoning if needed. To get a silky sauce, use heavy cream. Heavy cream adds richness and thickness. Stir it in slowly after cooking the orzo. This keeps the sauce smooth. If you want a lighter sauce, use half-and-half. Just remember, this will change the creaminess. Seasoning is key. I use salt, pepper, and Italian seasoning. Taste the dish as you cook. This helps you adjust flavors to your liking. If you want more zest, add lemon juice or zest at the end. Fresh basil also adds a nice touch. Timing is important with shrimp and orzo. Cook shrimp just until they turn pink. This takes about 2-3 minutes. Overcooking makes shrimp tough. For orzo, check it around 8 minutes. You want it al dente, not mushy. Stir occasionally to prevent sticking. Pro Tips Fresh Shrimp is Best: Opt for fresh shrimp whenever possible as they provide the best flavor and texture. If using frozen shrimp, ensure they are fully thawed before cooking for even results. Customize Your Veggies: Feel free to add or substitute other vegetables such as zucchini or bell peppers to enhance the dish's flavor and nutrition. Make it Even Creamier: For a richer sauce, consider adding a bit of cream cheese along with the heavy cream. This will give the dish a velvety texture. Rest Before Serving: Allow the dish to rest for a few minutes after cooking. This helps the flavors to meld together and gives the orzo a chance to absorb the sauce. {{image_4}} You can switch shrimp for other proteins. Chicken works well in this dish. Simply cut it into small pieces and cook it the same way as shrimp. If you want a plant-based option, use mushrooms. Sauté sliced mushrooms until golden. They add a nice texture and flavor. You can change the taste of the dish with herbs and spices. Try adding fresh parsley or oregano for a bright flavor. A pinch of red pepper flakes gives a little heat. You can also add lemon juice for a zesty kick. Experiment with these additions to find your favorite mix. Adding vegetables boosts nutrition and color. Zucchini is a great choice. Slice it thin and cook it with the orzo. Bell peppers also add sweetness and crunch. Chop them up and toss them in during the last few minutes of cooking. This way, they stay crisp and vibrant. To store your One Pot Creamy Tuscan Shrimp Orzo, let it cool first. Place the dish in an airtight container. Refrigerate it for up to three days. If you want to keep it longer, you can freeze it. Just use a freezer-safe container. This way, it lasts up to three months. When reheating, add a splash of cream or broth. This helps keep the dish creamy. Heat it slowly on the stove over low heat. Stir often to mix in the added liquid. You can also use a microwave, but add a bit of liquid. Heat in short bursts and stir in between. This dish stays fresh in the fridge for about three days. If frozen, it can last for up to three months. However, for the best flavor and texture, eat it within one month of freezing. Always check for any off smells or colors before eating leftovers. Yes, you can prepare this dish ahead. Cook the shrimp and orzo, then cool them. Store them in the fridge for up to two days. When you’re ready to eat, reheat them gently. Add the cream and fresh ingredients just before serving. This keeps the dish fresh and tasty. This dish pairs well with several sides. Here are some ideas: - Garlic bread for a crunchy bite. - A fresh green salad with light dressing. - Roasted vegetables for added flavor. - Steamed asparagus for a healthy touch. Yes, you can make a vegetarian version. Substitute shrimp with sautéed mushrooms or extra veggies. Use vegetable broth instead of chicken broth. Swap heavy cream for coconut cream for a dairy-free option. This way, you can enjoy a rich and creamy dish without meat. In this blog post, we explored a delicious recipe for One Pot Creamy Tuscan Shrimp Orzo. We went over the ingredients, cooking steps, and helpful tips to create the perfect dish. Remember, you can customize it with different proteins or vegetables. Storing and reheating are simple, ensuring your meal stays fresh. I hope this guide inspires you to try this easy, creamy dish. Enjoy cooking and customizing it to your taste!

Looking for a quick and tasty dinner? My One Pot Creamy Tuscan Shrimp Orzo hits the spot! This dish combines tender shrimp with creamy orzo for a meal that warms …

Read more

Categories Dinner

Oat Quark Cookies Simple and Tasty Homemade Treat

November 29, 2025March 6, 2025 by Chef Tavio
To make Oat Quark Cookies, gather these simple ingredients: - 1 cup rolled oats - 1 cup quark (can substitute with Greek yogurt) - 1/2 cup almond flour - 1/4 cup honey or maple syrup - 1/4 cup coconut oil, melted - 1 teaspoon vanilla extract - 1 teaspoon baking powder - 1/2 teaspoon ground cinnamon - 1/4 teaspoon sea salt - 1/2 cup chocolate chips or dried fruit (optional for added flavor) If you don’t have something on hand, here are some easy swaps: - Quark: Use Greek yogurt or cottage cheese instead. - Almond flour: Any nut flour works well, or use all-purpose flour. - Coconut oil: You can also use unsalted butter or any vegetable oil. - Honey or maple syrup: Agave syrup or brown sugar can replace these sweeteners. - Chocolate chips or dried fruit: Try nuts or seeds for different flavors. Each cookie is a healthy choice! Here’s a rough estimate of the nutrition: - Calories: Approximately 120 - Protein: 3g - Carbohydrates: 15g - Fiber: 2g - Fat: 6g - Sugar: 4g These cookies pack a good amount of protein and fiber, making them a tasty and nutritious treat. {{ingredient_image_2}} Start by preheating your oven to 350°F (175°C). This heat is perfect for baking cookies. While the oven warms up, line a baking sheet with parchment paper. This step helps the cookies not stick. In a large bowl, combine the rolled oats, almond flour, baking powder, ground cinnamon, and sea salt. Use a whisk or a spoon to mix these dry ingredients well. This helps to ensure an even flavor throughout the cookies. In a separate bowl, whisk together the quark or Greek yogurt, honey or maple syrup, melted coconut oil, and vanilla extract. Mix until it feels smooth and creamy. This mixture adds moisture and flavor to your cookies. Now, pour the wet mixture into the dry ingredients. Stir gently until everything is combined. If you want some fun, fold in chocolate chips or dried fruit for extra taste. Next, use a spoon or your hands to scoop out tablespoon-sized portions of dough. Roll them into balls and place them on the baking sheet. Leave space between each ball; they will spread as they bake. Flatten each ball slightly with your hand or a spoon. Carefully place the baking sheet in the oven. Bake for 12-15 minutes until the edges are golden brown. Keep an eye on them; ovens can vary. Once done, let the cookies cool on the baking sheet for about 5 minutes. Then, move them to a wire rack to cool completely. This cooling time helps develop their full flavor. To get the best texture for your Oat Quark Cookies, focus on your mixing. Mix dry and wet ingredients well but don’t overmix. Overmixing can make the cookies tough. The dough should feel sticky but manageable. If it’s too dry, add a splash of water or more quark. If it’s too wet, sprinkle in a little more almond flour. This balance keeps your cookies chewy and soft. Here are some common mistakes to watch out for: - Not Preheating the Oven: Always preheat your oven to 350°F (175°C) before baking. This step ensures even cooking. - Skipping the Parchment Paper: Lining your baking sheet with parchment paper prevents the cookies from sticking. Don’t skip this! - Ignoring the Cooling Time: Let the cookies cool on the baking sheet for about 5 minutes. This helps them set properly. - Not Measuring Ingredients Accurately: Use measuring cups and spoons to ensure the right amounts. Too much or too little can change the texture. Enjoy your Oat Quark Cookies as a snack or dessert. They pair well with milk or tea. Try serving them on a decorative plate. A drizzle of honey or a sprinkle of cinnamon adds a lovely touch. For a fun twist, serve them warm with a scoop of ice cream. This makes for a delightful treat! Pro Tips Adjust Sweetness: If you prefer less sweetness, reduce the amount of honey or maple syrup to suit your taste. Texture Variation: For a chewier cookie, substitute half the rolled oats with quick oats or add in some chopped nuts. Storage Tips: Store cookies in an airtight container at room temperature for up to a week, or freeze for longer shelf life. Custom Add-ins: Experiment with different mix-ins like coconut flakes, nuts, or spices for a unique flavor twist. {{image_4}} You can boost the taste of your oat quark cookies with fun add-ins. Consider adding: - 1/2 cup of nuts, like walnuts or pecans - 1/2 cup of shredded coconut - 1/2 cup of dried fruit, such as cranberries or apricots - 1/2 teaspoon of nutmeg for a warm spice flavor These options not only change the flavor but also add texture. Feel free to mix and match based on what you have. If you have dietary needs, you can easily modify this recipe. To make it gluten-free, use gluten-free oats and almond flour. If you are dairy-free, substitute the quark with a plant-based yogurt. You can also replace honey with agave nectar for a vegan option. These swaps keep your cookies tasty while fitting your diet. Sweeteners can change the flavor and texture of your cookies. If you prefer a lower-glycemic option, try using coconut sugar or monk fruit sweetener. For a different taste, use brown sugar or even maple syrup. Keep in mind, different sweeteners can affect how moist your cookies turn out. Adjust the amount based on your taste and texture preference. To keep your oat quark cookies fresh, store them in an airtight container. This will help maintain their soft texture. You can keep them at room temperature for up to five days. If you want them to last longer, consider refrigeration. Just remember to let them cool completely before storing. Freezing is a great option for longer storage. To freeze, place the cookies in a single layer on a baking sheet. Freeze them for about an hour. Once they are firm, transfer them to a freezer-safe bag or container. They can last up to three months in the freezer. When you want a treat, just pull out a few cookies! To enjoy your cookies warm, you can reheat them easily. Preheat your oven to 300°F (150°C). Place the cookies on a baking sheet and heat them for about five to ten minutes. You can also use a microwave. Just heat them for about 10-15 seconds. Enjoy your cookies fresh and warm! Yes, you can use other flours. Try whole wheat flour or oat flour. Each type gives a unique taste. Keep the same amount, one-half cup. You may need to adjust the liquid a bit. If using a gluten-free blend, check the package for ratios. Quark adds a creamy texture to the cookies. You can use Greek yogurt as a substitute. It works well and gives a similar flavor. If you want a dairy-free option, try silken tofu. Blend it until smooth for best results. To make these cookies vegan, swap honey for maple syrup. Use coconut oil instead of butter. Replace quark with a non-dairy yogurt. These changes keep the cookies tasty and soft. Follow the other steps as usual for great results. Oat quark cookies last about five days at room temperature. Store them in an airtight container. For longer storage, keep them in the fridge for up to a week. You can freeze them too! They stay fresh for three months in the freezer. Oat quark cookies are simple to make and full of flavor. This post covered key ingredients, helpful tips, and variations to suit your taste. I shared how to store these cookies for the best freshness, including freezing and reheating. Remember, you can mix and match flavors to create your perfect cookie. With all this knowledge, you can confidently bake and enjoy these treats whenever you want. Happy baking!

Looking for a delicious, easy treat? Oat Quark Cookies might become your new favorite! These cookies are not just simple to make; they’re packed with flavor and nutrition. Whether you’re …

Read more

Categories Desserts

Low-Carb Burger Bowls Fresh and Flavorful Meal Prep

December 3, 2025March 5, 2025 by Chef Tavio
For tasty low-carb burger bowls, you'll need some key ingredients to create a fresh and flavorful meal. Here is what you'll need: - Ground beef (1 lb, preferably 80/20 for optimal flavor) - 1 teaspoon garlic powder - 1 teaspoon onion powder - Salt and pepper, to taste - 1 tablespoon olive oil - 4 cups mixed greens (a blend of spinach, arugula, and romaine) - 1 medium tomato, diced - 1 small cucumber, diced - 1 small red onion, thinly sliced - ½ cup shredded cheddar cheese - ¼ cup dill pickles, chopped - ½ cup keto-friendly burger sauce (store-bought or your own recipe) These ingredients come together to create a beautiful dish. The ground beef gives great flavor, while the fresh vegetables add crunch. The mixed greens act as a perfect base, making each bite refreshing. Don't forget the toppings! Cheddar cheese and dill pickles add extra zest. And the burger sauce ties everything together, making it a tasty meal. {{ingredient_image_2}} 1. Mixing Ingredients: In a large bowl, combine 1 lb of ground beef with 1 teaspoon each of garlic powder and onion powder. Add salt and pepper to taste. Use your hands to mix until everything is well blended. 2. Shaping Patties: Shape the mixture into 2-3 burger patties. The size depends on how thick you prefer them. Make sure they are even for cooking. 3. Cooking Technique: Heat 1 tablespoon of olive oil in a large skillet on medium-high heat. When the oil is hot, add the patties. Cook for 4-5 minutes on each side. For best results, use a meat thermometer to check doneness. Aim for 160°F for medium. Once done, remove them and let them rest. 1. Salad Base: Start with 4 cups of mixed greens. Place a generous handful in each bowl as the base. 2. Adding Toppings: Evenly layer the diced tomato, cucumber, sliced red onion, shredded cheddar cheese, and chopped dill pickles on top of the greens. This adds color and flavor. 3. Placing Patties: Cut the rested burger patties into strips. Arrange them artfully on top of the salad. 4. Drizzling Sauce: Finish by drizzling a generous amount of keto-friendly burger sauce over each bowl. This ties all the flavors together. 1. Presentation Tips: Use large, clear glass bowls to show off the vibrant colors. Garnish with fresh herbs like parsley or basil for a nice touch. 2. Serving Size: Each bowl is a perfect serving size for one person. This meal is not only fresh but also visually appealing. Enjoy your low-carb burger bowl! To cook great burger patties, aim for a high heat. Medium-high heat works well. Use a meat thermometer to check for doneness. Aim for 160°F for safe beef. After cooking, let your patties rest for a few minutes. This helps keep them juicy and full of flavor. To boost flavor, consider making your own burger sauce. Mix mayonnaise, mustard, and a touch of ketchup for a quick sauce. You can also add spices like smoked paprika or cayenne pepper for heat. Try mixing in fresh herbs, such as dill or parsley, to brighten the taste. These low-carb burger bowls fit well in a keto diet. If you want a lighter option, try ground turkey or chicken. Plant-based options like lentils or black beans also work great. These swaps keep your meal healthy and tasty while meeting dietary needs. Pro Tips Choose the Right Beef: Opt for 80/20 ground beef for the perfect balance of flavor and juiciness in your burger patties. Let it Rest: Allow your cooked burger patties to rest for a few minutes before slicing; this helps retain their juices for a more flavorful bite. Customize Your Toppings: Feel free to add or substitute your favorite low-carb vegetables and toppings to personalize the salad to your taste. Perfect Sauce Ratio: Drizzle the keto-friendly burger sauce generously but avoid overdoing it; you want to enhance the flavors without overpowering them. {{image_4}} You can mix up the meat in your burger bowls. Ground turkey is a lean choice. It has a mild flavor that pairs well with spices. Ground chicken also works well and is easy to find. If you prefer plant-based options, try using lentils or black beans. These add protein and are tasty. Your salad base can change too! Mixed greens like spinach and arugula give great flavor. You can even add grains like quinoa or farro. These grains add chewiness and extra nutrients. Try using kale for a heartier feel. Each green brings its unique taste and texture. Toppings are fun to swap! Instead of cheddar cheese, try feta or goat cheese. They add a tangy twist. If pickles aren’t your thing, use sliced olives or jalapeños. For sauces, think about ranch or a spicy aioli. These choices let you create a new experience each time. To keep your low-carb burger bowls fresh, store them in airtight containers. This helps prevent moisture loss and keeps the flavors intact. Place the bowls in the refrigerator right after serving. These burger bowls will stay good for about 3 to 4 days. When it's time to eat your leftovers, reheat them gently. Use the microwave for quick heating. Place the bowl in for about 30 seconds, then check the warmth. You can also use the stove. Heat a skillet over low heat, add the burger and veggies, and stir until warm. This method helps keep the texture nice. If you want to save some bowls for later, freezing is a great option! First, separate the meat from the veggies and sauce. Wrap the meat in plastic wrap and place it in a freezer bag. Store the veggies in a separate container. They should keep well for about 2 to 3 months. When you're ready to eat, thaw overnight in the fridge. Then, reheat the meat and mix it back with the fresh veggies! You can use ground turkey or chicken instead of ground beef. Both options are leaner and lower in fat. You can also try plant-based proteins like lentils or black beans. They add texture and flavor while keeping it low-carb. Each choice gives a different taste. Experiment to find your favorite! To make a simple keto-friendly burger sauce, mix ½ cup mayonnaise, 1 tablespoon mustard, and 1 tablespoon sugar-free ketchup. Add a dash of garlic powder, onion powder, and salt to taste. This sauce is creamy and flavorful. You can adjust the ingredients based on your taste. It's a great way to add zest to your burger bowls! Yes, you can prepare all the ingredients ahead of time. Chop the veggies and store them in airtight containers. Cook the burger patties and keep them in the fridge. You can mix the sauce and store it too. This way, you can quickly assemble your bowls when hunger strikes! Absolutely! Low-carb burger bowls are perfect for meal prep. They store well and taste great even after a few days. Make several bowls at once, and you’ll have a healthy meal ready to go. Just keep the sauce separate until you serve. This keeps everything fresh and tasty! I love using a mix of spinach, arugula, and romaine for a nice crunch. They are fresh and add great flavor. You can also try kale or mixed spring greens. Each type of green offers a unique taste and texture, so feel free to mix and match! In this post, I shared how to make low-carb burger bowls. We covered key ingredients, from ground beef to fresh veggies, and explored step-by-step cooking tips. You learned how to create delicious patties and assemble a vibrant salad base. Plus, I offered variations and storage tips for leftovers. Making these bowls is simple, fun, and perfect for meal prep. You can easily customize flavors to fit your tastes and diet needs. Enjoy your cooking journey!

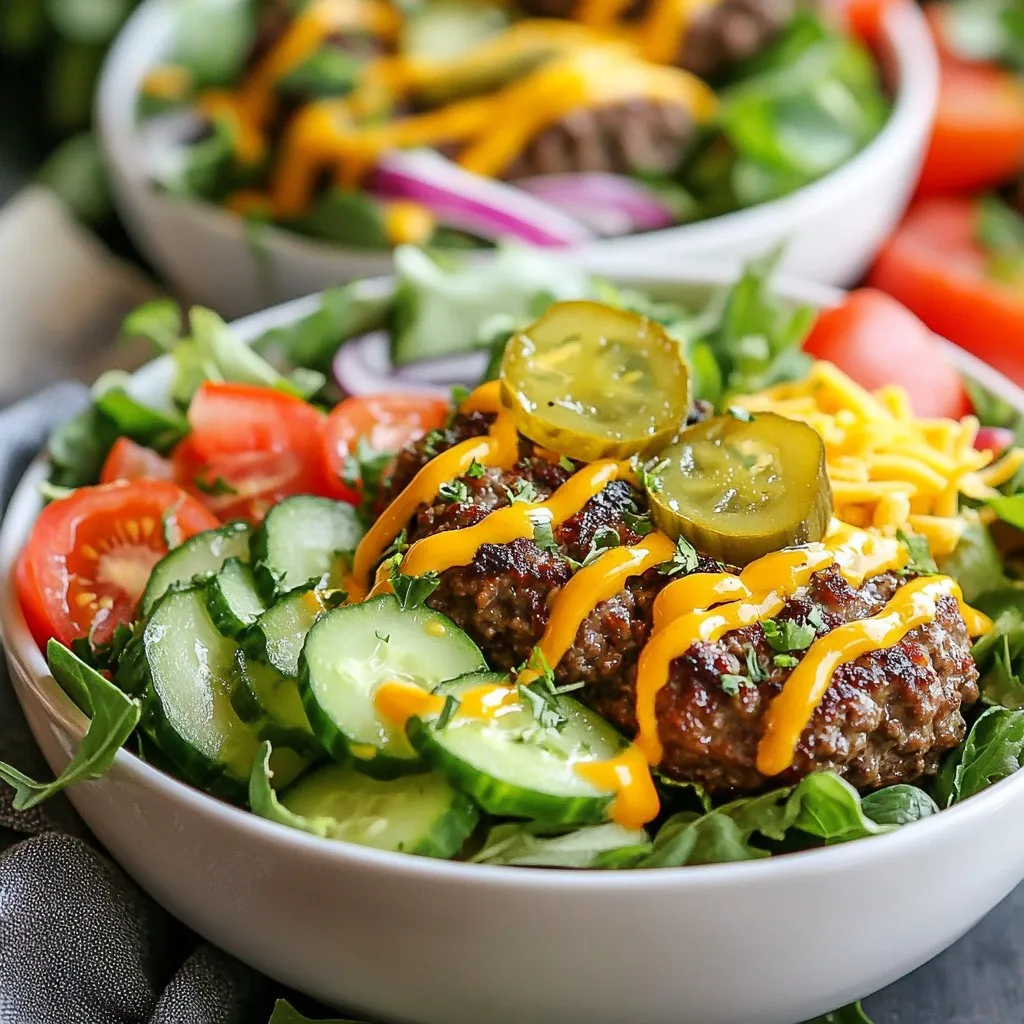
Looking for a fresh and tasty meal prep idea? Low-carb burger bowls are your answer! Packed with juicy beef, vibrant veggies, and plenty of flavor, these bowls make a perfect …

Read more

Categories Dinner

Ultimate Fudgy Brownies Rich and Satisfying Delight

December 3, 2025March 4, 2025 by Chef Tavio
- 1 cup (225g) unsalted butter - 2 cups (400g) granulated sugar - 4 large eggs - 1 teaspoon pure vanilla extract - 1 cup (130g) all-purpose flour - 1 cup (90g) unsweetened cocoa powder - 1/2 teaspoon baking powder - 1/4 teaspoon fine sea salt - 1 cup (180g) semi-sweet or dark chocolate chips - 1/2 cup (100g) chopped walnuts (optional) For the butter, unsalted works best for taste control. You can use salted butter but reduce the sea salt. Granulated sugar gives the right sweetness and texture. For a healthier option, try coconut sugar. Eggs are key for fudginess; no substitute works as well. Pure vanilla extract adds depth. If you're out, use vanilla essence. For flour, all-purpose is ideal, but you can use gluten-free flour for a gluten-free version. Cocoa powder gives rich chocolate flavor. If you prefer a lighter taste, try Dutch-processed cocoa. Baking powder helps with lift, but some recipes skip it for denser brownies. Sea salt enhances the chocolate, so don’t skip it! Chocolate chips add extra gooeyness; feel free to use milk or dark chocolate. If you dislike nuts, skip the walnuts. You can also swap them with pecans or add more chocolate chips. Using quality ingredients makes a big difference. Fresh eggs create a better texture and taste. High-quality cocoa powder gives deeper chocolate flavor. Good butter adds richness. Always opt for pure extracts over fake ones. When you use quality chocolate chips, they melt perfectly, enhancing that fudgy texture we all love. Plus, fresh ingredients lead to better results. So, invest a bit in your ingredients. Your taste buds will thank you! {{ingredient_image_2}} Start by preheating your oven to 350°F (175°C). This step is key for even baking. Next, take a 9x13 inch baking pan. You can grease it with butter or line it with parchment paper. Lining helps the brownies come out easily after baking. Use a medium saucepan for this part. Melt 1 cup of unsalted butter over low heat. Stir it gently as it melts. Once all the butter is melted, remove it from heat. Add 2 cups of granulated sugar to the butter. Mix well until smooth. Let this mixture cool for a few minutes. Then, add 4 large eggs one at a time, whisking after each. Finally, stir in 1 teaspoon of pure vanilla extract for a tasty boost. In a separate bowl, sift together the dry ingredients. You need 1 cup of all-purpose flour, 1 cup of unsweetened cocoa powder, 1/2 teaspoon of baking powder, and 1/4 teaspoon of fine sea salt. Sifting helps remove lumps and makes mixing easier later. Now, it’s time to combine the wet and dry mixes. Gradually fold the dry mixture into the wet mixture. Use a spatula and mix gently until just combined. Be careful not to overmix; this keeps the brownies fudgy. If you like, fold in 1 cup of chocolate chips and 1/2 cup of chopped walnuts. This adds rich flavor and texture. Transfer the brownie batter into your prepared baking pan. Use a spatula to spread it evenly. Place the pan in your preheated oven and bake for 25-30 minutes. To check if they are done, insert a toothpick in the center. It should come out with a few moist crumbs. If it’s wet with batter, bake a bit longer. Once done, take them out and let them cool for at least 15 minutes. This cooling time helps them set, making cutting easier. To get that perfect fudgy texture, use these steps: - Use quality chocolate: The chocolate chips should be semi-sweet or dark. - Don't overmix: When you combine wet and dry, mix just until combined. - Check baking time: Bake for 25-30 minutes. A toothpick should have a few moist crumbs. This method creates brownies that are soft and rich. Here are some common mistakes to watch for: - Overbaking: This dries out your brownies. Follow the time closely. - Not cooling: Let them cool for at least 15 minutes in the pan. - Skipping sifting: Sifting the flour and cocoa powder helps avoid lumps. Avoid these errors for a perfect batch every time. For beautiful brownies, try these ideas: - Dust with powdered sugar: This adds a nice touch. - Serve with ice cream: A scoop of vanilla ice cream pairs well. - Cut into neat squares: Use a sharp knife for clean edges. These tips make your brownies look as good as they taste! Pro Tips Use High-Quality Chocolate: Opt for high-quality semi-sweet or dark chocolate chips for richer flavor and a more luxurious texture in your brownies. Don’t Overmix: Mix the batter just until the dry ingredients are incorporated to maintain a fudgy texture; overmixing can lead to cakey brownies. Check for Doneness: Use the toothpick test; it should come out with a few moist crumbs, indicating the brownies are perfectly fudgy. Cool Before Cutting: Allow brownies to cool in the pan for at least 15 minutes before cutting to ensure clean edges and easier serving. {{image_4}} You can add a delicious crunch by using walnuts. To make nutty brownies, just fold in 1/2 cup of chopped walnuts into the batter. This adds a nice texture and nutty flavor. Walnuts also pair well with chocolate, making each bite even richer. You can also use pecans or almonds if you prefer. They will taste great too! If you love chocolate, you can boost the flavor by adding more chocolate. You can use different types of chocolate chips like milk chocolate, dark chocolate, or even white chocolate. Mixing these will create a unique taste. Another option is to melt chocolate and mix it into the wet ingredients for a deeper chocolate flavor. This makes your brownies even more fudgy and rich. For a gluten-free version, swap the all-purpose flour for a gluten-free blend. Many stores sell these blends that work well in baking. Make sure to check the labels to ensure they are safe for your diet. You might also want to add a little extra cocoa powder to keep the flavor rich. This way, you can enjoy fudgy brownies without worrying about gluten. To keep your leftover brownies fresh, first let them cool completely. Then, place them in an airtight container. This will keep them moist. You can also wrap them in plastic wrap before placing them in the container. Store them at room temperature for up to four days. If you want to keep them longer, freezing is a great option. To freeze brownies, first cut them into squares. Wrap each square tightly in plastic wrap. Then, place the wrapped brownies in a freezer-safe bag or container. They can last in the freezer for up to three months. When you’re ready to enjoy them, just thaw them in the fridge overnight or at room temperature for a few hours. Reheating brownies can bring back their fudgy texture. To do this, preheat your oven to 350°F (175°C). Place the brownies on a baking sheet and cover them with foil. Heat for about 10 minutes. You can also use the microwave for a quicker option. Heat each brownie for about 10-15 seconds. Keep an eye on them to avoid overheating. Enjoy your delicious brownies warm! You can check if your brownies are done by using a toothpick. Insert it into the center of the pan. If it comes out with a few moist crumbs, they are ready. If the toothpick comes out wet, they need more time. I usually bake them for 25 to 30 minutes. Keep an eye on them as they bake. You want the edges to look set but the center to be a bit soft. Yes, you can make brownies without eggs. Use substitutes like applesauce or mashed bananas. These options help keep the brownies moist. You can also use flaxseed meal mixed with water. For each egg, mix one tablespoon of flaxseed meal with three tablespoons of water. Let it sit for a few minutes to thicken before adding it to the mix. To cut brownies neatly, let them cool in the pan first. After about 15 minutes, use a sharp knife. You can lightly grease the knife to help it glide through. For perfect squares, cut the corners first, then slice down the middle. You can also use a ruler to make even cuts. To reduce sweetness, you can cut back on sugar. Try using one and a half cups of sugar instead of two. You could also swap some sugar with unsweetened cocoa powder. Adding a pinch of salt can help balance sweetness too. If you add nuts, they can add texture and reduce the sweet taste. You learned about key ingredients and how to use them. I shared step-by-step instructions for great brownies. We covered tips for fudginess and common mistakes to avoid. I also offered fun variations and how to store leftovers. These insights are meant to help you enjoy baking and sharing delicious brownies. With the right steps and care, your brownies will impress everyone. Enjoy your baking journey!

Are you ready to make the ultimate fudgy brownies? These rich and satisfying delights are perfect for any chocolate lover. I will guide you through simple steps to create the …

Read more

Categories Desserts

Apple Crisp Cheesecake Delightful and Easy Recipe

December 4, 2025March 2, 2025 by Chef Tavio
- 2 cups graham cracker crumbs - 1/2 cup unsalted butter, melted (plus extra for greasing) - 1/4 cup brown sugar - 2 (8-ounce) packages cream cheese, softened - 1 cup granulated sugar - 1 teaspoon pure vanilla extract - 2 large eggs, at room temperature - 2 cups apples, peeled, cored, and diced - 1 teaspoon ground cinnamon - 1/4 teaspoon ground nutmeg - 1 tablespoon fresh lemon juice - 1 cup old-fashioned oats - 1/4 cup all-purpose flour - 1/4 cup brown sugar - 1/4 teaspoon salt The ingredients in this Apple Crisp Cheesecake come together to create a delightful treat. Each layer plays a part in the overall flavor. The crust gives a sweet and crunchy base. The cheesecake filling is rich and creamy. The apple filling adds freshness and warmth. Finally, the crisp topping adds a nice crunch. Start with the crust. You will need graham cracker crumbs, melted butter, and brown sugar. These mix together to form a solid base for your cheesecake. Use unsalted butter to control the saltiness. Next is the cheesecake filling. This requires cream cheese, sugar, vanilla, and eggs. Cream cheese must be soft to mix well. This mixture gives the cheesecake its creamy texture. The apple filling includes fresh apples, cinnamon, nutmeg, and lemon juice. Granny Smith or Honeycrisp apples work best. The spices and lemon juice enhance the apple flavor. Lastly, for the crisp topping, you need oats, flour, brown sugar, and salt. This mixture creates a crumble that contrasts nicely with the smooth cheesecake. Gather all these ingredients and prepare for a delicious time in the kitchen! {{ingredient_image_2}} 1. Preheat your oven to 350°F (175°C). 2. In a bowl, mix 2 cups of graham cracker crumbs, 1/2 cup of melted butter, and 1/4 cup of brown sugar. Stir until the crumbs are moist. 3. Grease a 9-inch springform pan with a bit of butter. 4. Press the crumb mixture firmly into the bottom of the pan. Make sure it is even. 5. Bake the crust for 10 minutes. Remove it from the oven and let it cool slightly. 1. In a medium bowl, take 2 cups of diced apples. 2. Toss them with 1 teaspoon of ground cinnamon, 1/4 teaspoon of nutmeg, and 1 tablespoon of lemon juice. 3. Mix until the apples are well coated. Set this mixture aside to let the flavors blend. 1. In a large bowl, beat 2 packages of softened cream cheese until smooth. 2. Gradually add 1 cup of granulated sugar and 1 teaspoon of vanilla extract. Mix well. 3. Add 2 large eggs, one at a time, blending after each one until mixed in. 1. Gently fold the apple mixture into the cream cheese batter. 2. Pour this mixture over the cooled crust in the springform pan. 3. Smooth the top with a spatula. Bake for 45-50 minutes. The edges will set, but the center should still jiggle. 1. In a separate bowl, mix 1 cup of old-fashioned oats, 1/4 cup of flour, 1/4 cup of brown sugar, and 1/4 teaspoon of salt. 2. Drizzle in the remaining melted butter and stir until it looks like coarse crumbs. 3. After 45 minutes of baking, sprinkle the crisp topping evenly over the cheesecake. 4. Return the cheesecake to the oven for another 10-15 minutes until the topping is golden and bubbly. 1. Once baked, let the cheesecake cool at room temperature for about 1 hour. 2. Refrigerate for at least 4 hours, or overnight for best taste. 3. When ready to serve, release the sides of the springform pan. 4. Slice the cheesecake into wedges and serve it cold. You can add whipped cream or ice cream if you like. - Use fresh graham crackers for best flavor. - Ensure butter is fully melted for even mixing. When you make the crust, the flavor matters. Fresh graham crackers give a rich taste. If you use old ones, the flavor will change. Melt the butter completely before mixing. This step helps the crumbs stick well together. A well-mixed crust leads to a stronger base. - Beat cream cheese until smooth for a creamy filling. - Use room temperature eggs for better incorporation. The texture of your cheesecake is key. Start with softened cream cheese. Beat it until smooth to avoid lumps. Next, add your sugars and vanilla. This combination makes the filling sweet and creamy. Room temperature eggs blend in better. Cold eggs can cause clumps. Add them one at a time for best results. - Refrigerate leftovers properly for freshness. - Allow cheesecake to chill for enhanced flavor. After making the cheesecake, let it cool down. Once it’s cool, wrap it well. Use plastic wrap or a tight lid. This keeps it fresh in the fridge. For the best flavor, let it chill for at least four hours. Overnight chilling is even better. Enjoy your cheesecake later when it’s cold and tasty! Pro Tips Choose the Right Apples: For the best flavor and texture, use a mix of tart and sweet apples like Granny Smith and Honeycrisp. Room Temperature Ingredients: Make sure your cream cheese and eggs are at room temperature for a smoother cheesecake filling. Don’t Overmix: When folding the apple mixture into the cheesecake batter, be gentle to avoid deflating the mixture. Chill Before Serving: Allow the cheesecake to chill for at least 4 hours, or overnight for the best flavor and texture. {{image_4}} You can change up the flavor of your cheesecake. Different apple varieties can offer unique tastes. Try using Granny Smith for a tart bite or Honeycrisp for sweetness. You can also add caramel or chocolate to the filling. This adds richness and makes for a delightful treat. Switching toppings can give your cheesecake a new twist. Instead of oats, try using chopped nuts. This will add a nice crunch to your dessert. You can also use a crumbly cookie topping. This gives a fun texture and flavor that surprises your guests. If you have specific dietary needs, there are easy swaps. Use gluten-free graham crackers to make this cheesecake gluten-free. You can also choose low-fat cream cheese for a lighter version. These changes make it easier for everyone to enjoy this delicious dessert! You can store your Apple Crisp Cheesecake in the fridge. First, cover it well with plastic wrap or foil. This helps keep it fresh. You want to prevent any odors from the fridge affecting your cheesecake. It’s best to store it for up to 5 days. After that, the flavors may start to fade. If you want to save some for later, freezing is a great option. First, allow the cheesecake to cool completely. Then, wrap it tightly in plastic wrap. You can also place it in an airtight container. This way it stays moist. Your Apple Crisp Cheesecake can last in the freezer for up to 3 months. When you’re ready to enjoy it, take it out. Thaw it in the fridge overnight. This keeps the texture smooth and tasty. Avoid thawing it at room temperature, as it may become too soft. Enjoy your delicious cheesecake later! Yes, you can make Apple Crisp Cheesecake ahead of time. I often prepare it a day in advance. This helps the flavors blend well. Just cool it and refrigerate it overnight. It will taste even better when you serve it the next day. Granny Smith and Honeycrisp apples work best for this recipe. Granny Smith gives a tart flavor. Honeycrisp adds a nice sweetness. You can mix both for extra flavor. Choose firm apples that hold their shape while baking. After baking, let the cheesecake cool for about 1 hour. This helps it set properly. Then, refrigerate it for at least 4 hours. For the best taste, chill it overnight. This makes slicing easier too! Yes, you can use a different crust if you prefer. A cookie crust, like Oreos, adds a fun twist. You can also try a nut crust for added flavor. Just make sure it’s firm enough to hold the cheesecake. You can make this recipe dairy-free. Use dairy-free cream cheese as a substitute. You can also use coconut milk or almond milk for the filling. Make sure to check the labels for dairy-free options. Apple Crisp Cheesecake pairs well with whipped cream or vanilla ice cream. You can also drizzle caramel sauce on top. For a fresh touch, serve with sliced apples or berries. It adds color and flavor to the plate. This blog covers the delicious Apple Crisp Cheesecake recipe. We explored its key ingredients, including the graham cracker crust, creamy filling, and tasty apple topping. I shared step-by-step instructions to make it easy. With tips for perfecting texture and storage, you can enjoy your cheesecake longer. Feel free to try variations for different flavors. Whether for gatherings or a treat at home, this dessert will impress. Remember, making this cheesecake is simple and fun. Enjoy every bite!

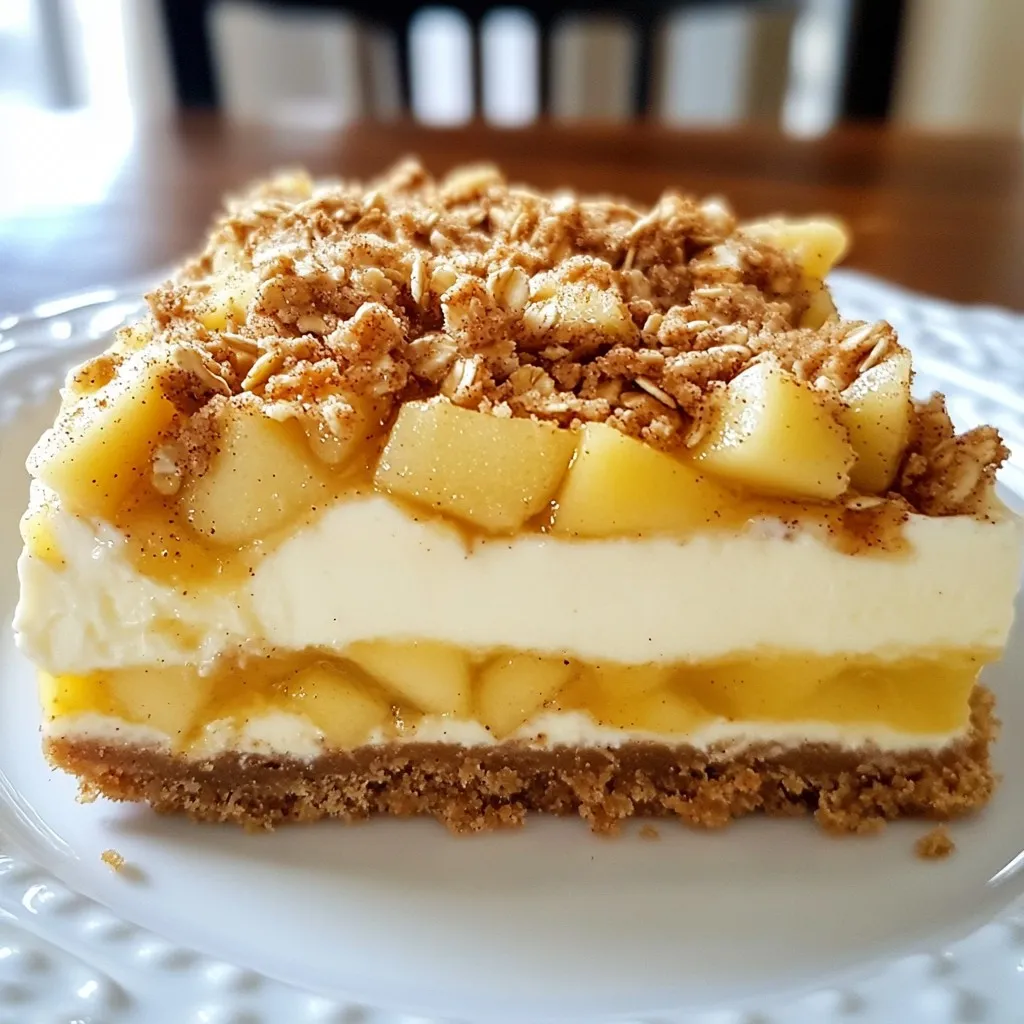
Craving a dessert that wows? Try my Apple Crisp Cheesecake! It combines creamy cheesecake with juicy apples and a crunchy topping. This recipe is easy to follow, even for beginners. …

Read more

Categories Desserts
Older posts
Newer posts
← Previous Page1 … Page148 Page149 Page150 … Page161 Next →

TASTED NEST

Where Flavor Finds a Home 🍳🏡 — warm, simple, and crave-worthy recipes made for real life, from stovetop mornings to backyard dinners.

PAGES

Home About Contact Privacy Policy Terms & Conditions Cookie Policy GDPR Policy Copyright Policy Disclaimer

CATEGORIES

Appetizers Desserts Salads Breakfast Dinner
Copyright © 2025 Tasted Nest. All rights reserved.