Skip to content
  • GDPR Privacy Policy
  • Copyright Policy
  • Disclaimer
  • Terms & Conditions
Tasted Nest
  • Home
  • Appetizers
  • Desserts
  • Salads
  • Breakfast
  • Dinner
  • Privacy Policy
  • Contact
  • About

Chef Tavio

Juicy Birria Tacos Packed with Flavor and Spice

December 3, 2025January 24, 2025 by Chef Tavio
- 2 pounds beef chuck roast, cut into large chunks - 4 dried guajillo chilies, stems removed - 2 dried pasilla chilies, stems removed - 1 medium onion, chopped - 4 cloves garlic, minced - 1 teaspoon ground cumin - 1 teaspoon dried oregano - 2 bay leaves - 4 cups beef broth - Salt and pepper, to taste - Corn tortillas The main star of Juicy Birria Tacos is the beef chuck roast. This cut has enough fat to stay juicy. It’s perfect for slow cooking. The dried guajillo and pasilla chilies give the dish its deep, rich flavor. Toasting these chilies brings out their natural sweetness. Always remove the stems before soaking them. Fresh herbs and spices are key to making a great sauce. I use onion, garlic, cumin, and oregano to create a robust flavor. The bay leaves add depth during cooking. Finally, corn tortillas bring everything together. They hold the juicy meat and sauce perfectly. - Chopped cilantro - Diced onion - Lime wedges When serving your tacos, don’t forget the toppings. Chopped cilantro adds freshness. Diced onion gives a nice crunch. A squeeze of lime brightens the flavors. Each component makes the tacos even better. Enjoy the mix of flavors and textures! {{ingredient_image_2}} To start, we need to prepare the chilis. First, toast the dried guajillo and pasilla chilis in a dry skillet over medium heat for about 2 minutes. You want them to smell fragrant, but don't burn them. After toasting, place the chilis in a bowl and cover them with hot water. Let them soak for 20 to 30 minutes until they soften. Once soft, drain the chilis and put them in a blender. For the chili sauce, you will need the softened chilis, one chopped onion, four minced garlic cloves, one teaspoon of ground cumin, one teaspoon of dried oregano, and one cup of beef broth. Blend these ingredients on high until you have a smooth paste. If it’s too thick, add more broth until you reach a pourable consistency. Next, heat a drizzle of oil in a large pot or Dutch oven over medium-high heat. Take 2 pounds of beef chuck roast, cut into chunks, and season it with salt and pepper. Sear the beef in the hot pot for about 5 to 7 minutes, turning it often until all sides are browned. Now it's time to combine flavors. Pour the smooth chili sauce over the browned beef in the pot. Add two bay leaves and the remaining beef broth. Stir everything together, cover the pot, and reduce the heat. Let it simmer gently for about 2.5 to 3 hours, until the beef is fork-tender. After cooking, transfer the beef to a cutting board and shred it using two forks. Return the shredded beef to the pot and let it simmer for another 10 to 15 minutes. While the beef simmers, warm some corn tortillas in a separate skillet over medium heat. Cook each side for about 30 seconds until they are pliable. For extra flavor, dip the warmed tortillas briefly into the broth. Now, take a generous portion of the savory shredded beef and place it on each tortilla. To serve, garnish your tacos with chopped cilantro and diced onion for a fresh crunch. Don’t forget to add lime wedges on the side. A squeeze of lime gives your tacos a fresh burst of flavor that pairs perfectly with the rich meat. Enjoy every bite! To make juicy Birria tacos, slow simmering is key. This cooking method breaks down the beef. It makes the meat tender and flavorful. A gentle simmer for 2.5 to 3 hours works best. To check for doneness, use a fork. If the meat easily shreds, it’s ready. This means you achieved the right tenderness. To boost flavor, consider adding more spices. Try smoked paprika or cayenne for heat. You can also add a pinch of cinnamon for depth. Customize the chili sauce thickness to your liking. If it’s too thick, add more broth. If too thin, simmer longer to reduce it. Pair your Birria tacos with sides like rice or beans. A fresh salad also works well. For drinks, try a light beer or a refreshing agua fresca. These tacos shine during gatherings, family dinners, or game days. They bring warmth and joy to any meal. Pro Tips Choose the Right Cut: For the best flavor and tenderness, use beef chuck roast. It has the right amount of fat, which enhances the richness of the dish. Chili Preparation: Toasting the dried chilies before soaking them brings out their natural oils and intensifies their flavor, making for a more robust sauce. Simmering Time: Allow the meat to simmer until fork-tender; this ensures maximum flavor absorption and a melt-in-your-mouth texture. Broth Dipping: For an extra layer of flavor, dip the tortillas briefly in the broth before filling them. This adds moisture and richness to each taco. {{image_4}} You can swap meat for tasty plant-based options. Try jackfruit or mushrooms for a meaty texture. Use vegetable broth instead of beef broth for a rich flavor. This change keeps the dish hearty and satisfying without meat. You can use lamb or pork for birria tacos. Both meats give a unique taste and still work well with the spices. If using lamb, cook it for about 3 hours. Pork may need about 2 to 2.5 hours to become tender. Adjust your cooking time based on the meat you choose. Add cheese or avocado for extra creaminess. Cheese melts wonderfully and adds richness. Avocado brings a fresh taste that balances the spices. Don't hesitate to try different salsas too. A spicy salsa can kick up the heat, while a mild one can cool things down. Experiment to find your favorite combination! To keep your juicy birria tacos fresh, store leftovers properly. Place any leftover meat and broth in airtight containers. Refrigerate them within two hours of cooking. They will stay fresh for about three days in the fridge. For long-term storage, you can freeze the meat and broth. Use freezer-safe containers or bags. Be sure to remove as much air as possible to prevent freezer burn. The birria can last up to three months in the freezer. When it comes to reheating, you have two main options: the oven or the stovetop. If you use the oven, preheat it to 350°F. Place the meat in a baking dish and cover it with foil. Heat for 15-20 minutes until warm. For the stovetop, heat a skillet over medium heat. Add a splash of broth to keep the meat moist. Stir it often to warm it evenly. To keep your tortillas from getting soggy, avoid microwaving them. Instead, warm them in a skillet. This will maintain their texture and make them crispier. Don’t let any leftover ingredients go to waste! You can use leftover meat in tacos, burritos, or quesadillas. The rich flavor makes any dish special. The broth is also great for soups or stews. You can even use it as a base for rice or grains. It adds depth and flavor to any meal. Get creative with your leftovers, and enjoy more delicious meals! Birria Tacos come from Jalisco, Mexico. They began as a stew made from goat. Over time, people started using beef. Today, chefs serve them as tacos, filled with tender meat. This dish celebrates rich flavors and cultural traditions. Yes, you can easily make them spicy! To add heat, use more guajillo chilies. You can also include dried arbol chilies for extra kick. Blend the chilies into your sauce. Taste as you go, adjusting to your heat level. Cook the beef for 2.5 to 3 hours. This slow simmer makes the meat very tender. Check for doneness by using a fork. If the fork slides easily through, it’s ready. Shredding the meat will be easy once tender. Look for local Mexican restaurants or food trucks. Many serve authentic Birria Tacos. Check online reviews for recommendations. You may find hidden gems in your area. Don’t be afraid to ask friends for their favorite spots! Birria tacos are a feast for your taste buds. Using beef chuck roast, rich chilies, and fresh herbs makes them unforgettable. I shared step-by-step instructions for crafting the perfect taco. You can enhance your dish with tips on textures and flavors. Whether you're into meat or prefer plant-based options, birria is versatile. Don't forget to store leftovers for easy meals later. Experiment with sauces and toppings to find your best combination. Making birria tacos is not just cooking; it's a celebration of flavor!

Are you ready to dive into the world of Juicy Birria Tacos? These tasty treats are loaded with rich flavors and spices that will delight your taste buds. I’ll show …

Read more

Categories Dinner

Spinach Tomato Pasta Flavorful and Quick Dish

November 18, 2025January 24, 2025 by Chef Tavio
- 250g pasta of your choice (spaghetti or penne recommended) - 2 cups fresh spinach, thoroughly washed and roughly chopped - 2 medium-sized ripe tomatoes, diced into small pieces - 1 small onion, finely chopped - 2 cloves garlic, minced - 1 tablespoon extra virgin olive oil - 1 teaspoon dried oregano - 1/2 teaspoon red chili flakes (optional, for heat) - Sea salt and freshly cracked black pepper to taste - A handful of fresh basil leaves for garnish - Grated Parmesan cheese (optional, for a savory finish) Now, let’s talk about the ingredients for this dish. First, you need pasta. I love using spaghetti or penne. Both work well and cook nicely. You will need 250 grams of your chosen pasta. Next, fresh spinach is a must. Use about 2 cups. Make sure to wash it well and chop it roughly. Fresh spinach adds a bright green color and a nice taste. You also need ripe tomatoes. Two medium-sized tomatoes will do the trick. Dice them into small pieces. These juicy tomatoes bring sweetness and flavor to the dish. Don’t forget the onion and garlic. Use one small onion, finely chopped, and two cloves of minced garlic. They add depth and aroma to the dish. Olive oil is important too. One tablespoon of extra virgin olive oil will help sauté the onions and garlic. It adds a lovely richness. For flavor, you will want one teaspoon of dried oregano. This herb goes well with tomatoes and spinach. If you like a bit of heat, add half a teaspoon of red chili flakes. Lastly, season the dish with sea salt and freshly cracked black pepper. Use these to taste. For garnish, add some fresh basil leaves. They give a lovely touch. If you like cheese, sprinkle some grated Parmesan on top. Gather all these ingredients, and you are ready to create a wonderful Spinach Tomato Pasta! {{ingredient_image_2}} Start with a large pot. Fill it with water and add a good amount of salt. This step helps flavor the pasta. Bring the water to a rolling boil before adding your pasta. I like to use spaghetti or penne. Cook the pasta according to the package time until it is al dente. Al dente means it should be firm but not hard. Just before draining, take out half a cup of the pasta water. This water can help make your sauce creamy later. Drain the pasta and set it aside. Next, grab the same pot or a large skillet. Pour in the olive oil and heat it on medium. Add the finely chopped onion and cook for about 2 to 3 minutes. You want it to be soft and see-through. Then, toss in the minced garlic. Cook it for about a minute. The smell should be amazing by now! It’s time to add the diced tomatoes. Cook them for about 5 minutes. This helps them break down and mix with the onion and garlic. After the tomatoes soften, fold in the chopped spinach. Also, add the dried oregano and red chili flakes if you want some heat. Season with salt and pepper. Cook everything for an additional 2 to 3 minutes until the spinach wilts. Now, turn the heat down to a gentle simmer. Add the drained pasta to the skillet with the tomato and spinach mix. Toss everything together well. If the sauce looks dry, add some reserved pasta water bit by bit. You want a light and silky sauce that coats the pasta nicely. Taste your dish. Adjust the salt and pepper if needed. Serve the pasta in deep bowls. For a pretty touch, add fresh basil leaves on top. You can also sprinkle grated Parmesan cheese if you like. Enjoy your delicious creation! To choose the best tomatoes, look for ripe and firm ones. They should have a shiny skin. Fresh tomatoes have the best taste. If you want a richer flavor, try using San Marzano tomatoes. They are sweet and juicy! To enhance flavor, add some spices. Dried oregano brings warmth. Red chili flakes add heat, but use them sparingly. Fresh basil gives a nice aroma. You can even squeeze some lemon for brightness. For storage, use airtight containers. Glass or plastic works well. Make sure to cool the pasta before sealing. This keeps it fresh longer. When reheating, add a splash of water. This helps the pasta stay moist. Heat it on low on the stove or in the microwave. Stir it well to mix in any added water. Prepping ingredients in advance saves time. Chop the onions and garlic the night before. You can also dice the tomatoes ahead of time. Store them in the fridge for quick use. For quick weeknight meals, cook the pasta and sauce ahead. Then, just mix and heat when ready to eat. You can also make a double batch for easy lunches. Pro Tips Use Seasonal Vegetables: Incorporating seasonal vegetables not only enhances flavor but also adds nutritional value to your dish. Consider adding bell peppers or zucchini for variety. Perfect Pasta Cooking: Always cook pasta in a large pot with plenty of salted water to ensure even cooking. This helps the pasta to be flavorful and prevents it from sticking together. Reserve Pasta Water: Remember to save some pasta cooking water before draining. This starchy water can be used to adjust the sauce consistency and help it adhere to the pasta. Fresh Herbs for Flavor: Adding fresh herbs like basil or parsley at the end of cooking brightens up the dish. They provide a burst of flavor that dried herbs can't match. {{image_4}} You can switch up the greens in this dish. Kale or arugula works great. They add a different taste and texture. If you do not have Parmesan cheese, try mozzarella or feta. These can give a nice twist to the dish. Want to make it heartier? Add protein! Grilled chicken or shrimp makes it filling. You can also use tofu for a plant-based option. Toss in more veggies like bell peppers or zucchini for extra nutrients. They blend well and boost the flavor. For a gluten-free meal, use gluten-free pasta. There are many options available now, and they taste great. If you need a vegan dish, skip the cheese or use a plant-based alternative. You can also use olive oil instead of butter for sautéing. This keeps the dish light and healthy. For a delightful meal, consider serving your spinach tomato pasta with a fresh salad. A simple green salad with a light vinaigrette works wonders. You can also pair it with crusty bread. This helps to soak up any leftover sauce. When it comes to drinks, a chilled white wine like Sauvignon Blanc is great. If you prefer non-alcoholic options, try a refreshing mocktail. A mix of sparkling water and fresh lemon juice will complement the dish nicely. Presentation makes a meal even more special. Serve the pasta in wide, shallow bowls. This allows the colors to pop. For a creative touch, sprinkle crushed red pepper flakes on top. It adds heat and visual interest. Do not forget the garnishes! Fresh basil leaves not only enhance flavor but also brighten the dish. A sprinkle of grated Parmesan cheese adds a savory finish. Use colorful garnishes to make your plate stand out. Your guests will love it! How can I make this dish vegan? To make this dish vegan, skip the Parmesan cheese. You can use nutritional yeast for a cheesy flavor. Replace olive oil with a plant-based option if needed. Can I use frozen spinach instead of fresh? Yes, you can use frozen spinach. Thaw it and drain excess water before adding it to the dish. This will help keep your pasta from getting too watery. What are the best types of pasta to use? Spaghetti and penne are great options. Both hold the sauce well. You can also try gluten-free pasta if you prefer. How do I store leftovers properly? Store leftovers in an airtight container. Keep them in the fridge for up to three days. Reheat gently on the stove, adding a bit of water if needed. Can I make this recipe ahead of time? Yes, you can prep the sauce ahead of time. Cook the pasta fresh when you're ready to eat. This way, the pasta stays firm and tasty. This blog post showed you how to make a simple spinach tomato pasta. We explored the best ingredients and shared step-by-step cooking tips. You learned how to sauté, combine, and serve your dish beautifully. By following these easy methods, you can enjoy a tasty meal any night. Don't forget to try different variations and pairings to keep it exciting. Cooking can be fun and satisfying, so get started and make your own delicious pasta dish!

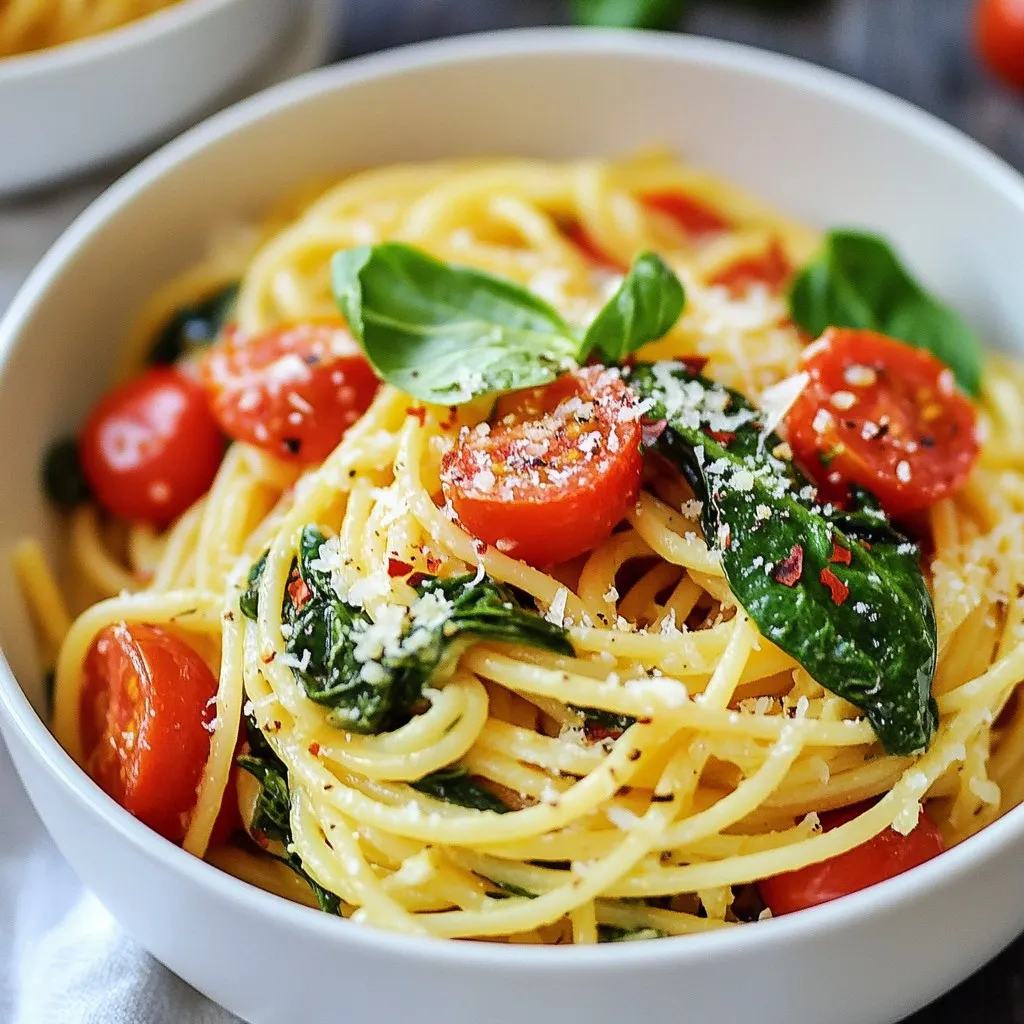
Looking for a quick and tasty meal? This Spinach Tomato Pasta recipe will delight your taste buds! It’s simple to make and requires just a few fresh ingredients. Whether you’re …

Read more

Categories Dinner

Thai Peanut Chicken Wrap Jimmy John’s Copycat Delight

December 15, 2025January 24, 2025 by Chef Tavio
- 2 boneless, skinless chicken breasts - 4 large lettuce leaves (romaine or butter) - 1 cup shredded carrots - 1 red bell pepper, thinly sliced - 1/2 cucumber, julienned - 1/4 cup fresh cilantro, chopped - 1/2 cup Thai peanut sauce (store-bought or homemade) To make this wrap, you need fresh chicken and colorful veggies. The chicken gives you protein, while the veggies add crunch and nutrition. You can use any Thai peanut sauce you like. Store-bought is quick, but homemade tastes great too. - 1 teaspoon garlic powder - 1 teaspoon ginger powder - Salt and pepper, to taste - 1/4 cup chopped peanuts (for garnish) Seasoning is key for flavor. Garlic powder and ginger powder mix well with the chicken. Be sure to add salt and pepper to taste. When ready to serve, sprinkle chopped peanuts on top. This gives your wrap a nice crunch. Fresh cilantro adds a burst of flavor and color. {{ingredient_image_2}} To start, you want to season the chicken breasts well. Sprinkle garlic powder, ginger powder, salt, and pepper on both sides. This adds great flavor. Heat a skillet to medium. Place the seasoned chicken in the skillet. Cook for about 6-7 minutes on each side. Your goal here is to reach an internal temperature of 165°F. This ensures it's safe to eat. The chicken will turn a nice golden-brown color. Once cooked, move the chicken to a cutting board to cool for a few minutes. After the chicken cools, it’s time to shred it. Use two forks to pull the chicken apart into bite-sized pieces. This makes it easy to eat in the wrap. Next, prepare the wrap base. Take four large lettuce leaves and lay them out on a clean surface. Make sure they stay whole. These lettuce leaves will hold all the tasty fillings you add. Now, it's time to fill the wraps. Distribute the shredded chicken evenly among the lettuce leaves. Add shredded carrots, thinly sliced red bell pepper, julienned cucumber, and chopped cilantro. Each ingredient adds flavor and crunch. Don’t forget the star of the show: the peanut sauce! Drizzle it generously over the chicken and veggies. This sauce brings everything together. To wrap it up, fold the sides of each lettuce leaf over the filling. Next, roll it tightly from the bottom. This keeps all the yummy ingredients inside. Once wrapped, take a sharp knife and slice each wrap in half. This makes them easier to handle. For a fun touch, sprinkle chopped peanuts on top for added crunch. Serve with extra Thai peanut sauce on the side for dipping. Enjoy your creation! To make sure your chicken is tender and juicy, start with fresh, high-quality breasts. I season them with garlic powder and ginger powder. Salt and pepper add flavor too. Cook the chicken in a hot skillet for about 6-7 minutes on each side. You want it to reach 165°F inside. Let it cool a bit before shredding. You can also grill or bake the chicken. Grilling adds a nice smoky flavor. Baking is simple and keeps the chicken moist. Just make sure to check the internal temp. Homemade Thai peanut sauce is easy to make. Start with: - 1/2 cup peanut butter - 1/4 cup soy sauce - 2 tablespoons honey - 1 tablespoon rice vinegar - 1 teaspoon sesame oil - 1-2 teaspoons chili paste (for spice) Mix all the ingredients in a bowl until smooth. If you want to adjust the taste, add more honey for sweetness or more chili for heat. This sauce makes your wraps burst with flavor. For a beautiful dish, use colorful ingredients. Place your wraps on a bright plate. Sprinkle chopped peanuts on top for a crunchy finish. Garnish with extra cilantro for color. You can also serve the wraps with extra peanut sauce in small bowls. This makes it easy for everyone to dip. Use fresh veggies like cucumber and bell peppers for an eye-catching display. Pro Tips Use Fresh Ingredients: Fresh vegetables and herbs enhance the flavor and texture of your wraps, making them more vibrant and enjoyable. Marinate the Chicken: For an extra layer of flavor, consider marinating the chicken in the peanut sauce for 30 minutes before cooking. Customize Your Fillings: Feel free to add or substitute other vegetables like sliced radishes or avocado for a personal touch and added nutrition. Make It Ahead: Prepare the chicken and chop the vegetables in advance to save time during meal prep. Just assemble the wraps when you're ready to eat! {{image_4}} You can switch the chicken for other proteins. Tofu is a fantastic choice for a plant-based twist. It's rich in protein and soaks up flavors well. Just cube it and sauté until golden. Shrimp is another great option. It cooks fast and adds a nice sweetness. For a heartier wrap, consider using tempeh. It has a nutty taste and a firm texture. You can also try seitan, which mimics meat very well. While the Thai peanut sauce is a star, you can mix it up. Try a spicy sriracha sauce for a kick. It pairs well with the fresh veggies. A sweet chili sauce can also add a nice touch. Just drizzle it on before wrapping. For a different flavor, use hoisin sauce. It's sweet and savory, making it a great dip or drizzle. Experiment with these sauces to find your favorite. Don't stop at chicken and veggies. Load up your wrap with more ingredients. You can add sliced avocado for creaminess. Fresh sprouts give a nice crunch and extra nutrition. Consider adding cooked quinoa or brown rice. They bring a hearty texture and make the wrap more filling. Try thinly sliced radishes for a peppery bite. Mix and match your favorite fillings. Your wraps can be as unique as you are! To keep your Thai peanut chicken wraps fresh, you need to store them right. Wrap each one tightly in plastic wrap or foil. You can also use an airtight container. This keeps the flavors in and the air out. You can store the wraps in the fridge for up to three days. After that, the veggies may lose their crunch. If they sit too long, the wraps may not taste fresh. Yes, you can freeze these wraps! Freezing is a great way to save leftovers for later. Just wrap them tightly in plastic wrap and then in foil. This helps to avoid freezer burn. When you want to eat them, thaw the wraps in the fridge overnight. For best results, reheat them in a skillet over medium heat. This will help to keep the chicken juicy and the veggies crisp. Enjoy your wraps anytime! To make Thai Peanut Chicken Wraps from scratch, follow these easy steps: 1. Cook the Chicken: Season two boneless, skinless chicken breasts with garlic powder, ginger powder, salt, and pepper. Cook them in a hot skillet for about 6-7 minutes per side until they're golden brown and reach 165°F. 2. Shred the Chicken: After the chicken cools, shred it into small pieces with two forks. This helps the chicken mix well with the other ingredients. 3. Prepare the Wrap Base: Take four large lettuce leaves and lay them flat. Romaine or butter lettuce works best for a fresh taste. 4. Assemble the Filling: Place the shredded chicken in the center of each lettuce leaf. Add shredded carrots, thin slices of red bell pepper, julienned cucumber, and chopped cilantro. 5. Drizzle with Peanut Sauce: Pour Thai peanut sauce over the filling. This adds a rich flavor that makes the wrap special. 6. Wrap It Up: Fold the sides of the lettuce over the filling, then roll it from the bottom up. This keeps everything inside. 7. Slice & Serve: Cut each wrap in half for easy eating. Top with chopped peanuts for crunch and serve with extra sauce for dipping. Yes, you can make this recipe vegan. Here are some easy swaps: - Chicken: Use tofu or tempeh instead of chicken. Both provide protein and absorb flavors well. - Peanut Sauce: Ensure your peanut sauce is vegan. Some store-bought sauces contain fish sauce. You can also make your own by mixing peanut butter, soy sauce, lime juice, and a bit of maple syrup. - Vegetables: Add more veggies like bell peppers, carrots, and cucumbers to enhance taste and texture. Thai Peanut Chicken Wraps pair well with light sides. Here are some ideas: - Rice: Serve jasmine or basmati rice for a filling meal. - Salad: A simple cucumber salad with lime juice and sesame oil complements the wraps. - Spring Rolls: Fresh spring rolls with dipping sauce add fun flavors and textures. - Fruit: Fresh fruit like mango or pineapple can balance the savory taste of the wraps. Yes, Thai Peanut Chicken Wraps can be healthy. Here's a quick look at their nutritional benefits: - Chicken: Provides lean protein, which helps build muscle. - Vegetables: Fresh veggies add fiber, vitamins, and minerals. Carrots and bell peppers are rich in antioxidants. - Peanut Sauce: Contains healthy fats and protein from peanuts, but use it in moderation to control calories. - Lettuce: Low in calories, lettuce provides hydration and adds bulk to meals, helping you feel full. These wraps offer a balance of nutrients, making them a tasty and healthy choice. This article guided you through making Thai Peanut Chicken Wraps. You learned about the main ingredients, seasoning, and cooking methods. We also covered variations, tips for storage, and how to serve. In the kitchen, don’t be afraid to try new flavors. With simple tweaks, you can adjust the recipe to fit your taste. Enjoy crafting these wraps, sharing them with friends and family, and making your own delicious variations!

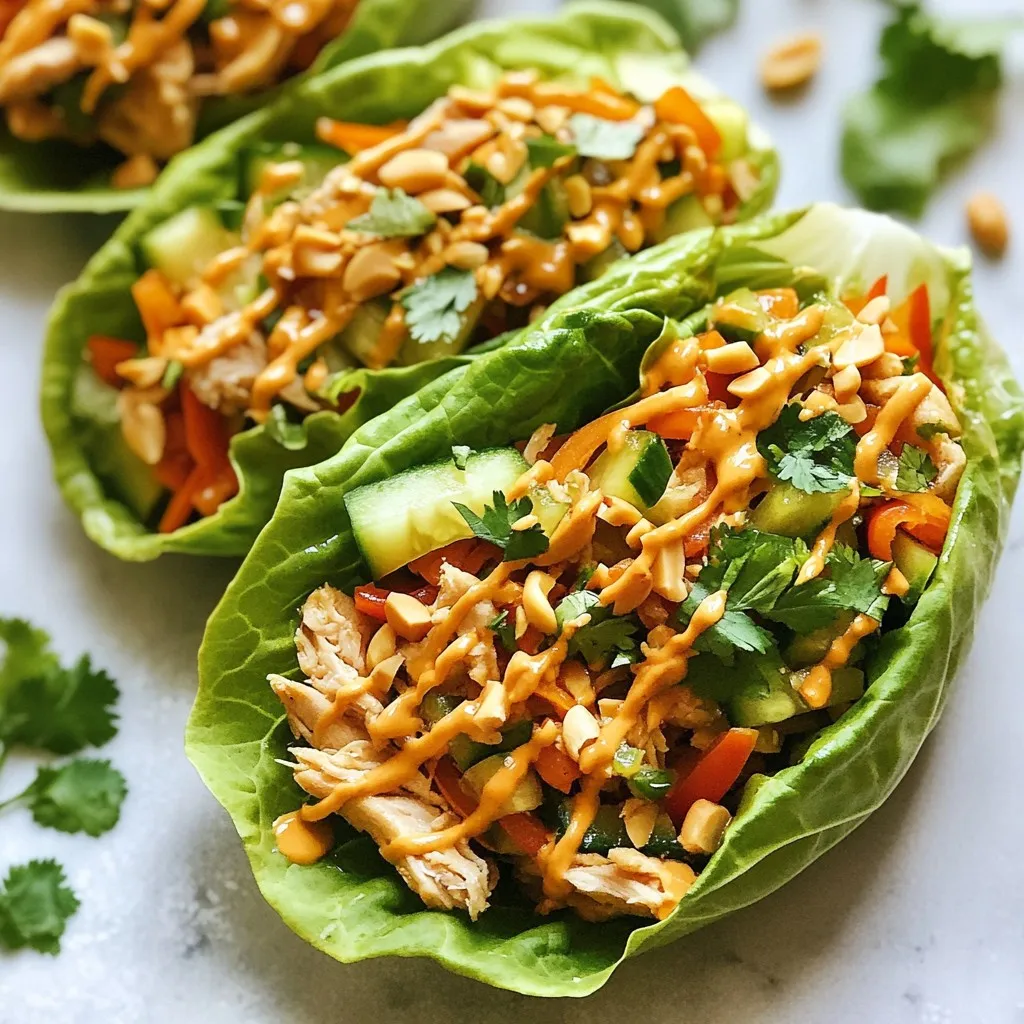
Dive into a world of flavor with my Thai Peanut Chicken Wrap Jimmy John’s copycat recipe! This dish is packed with juicy chicken, fresh veggies, and a creamy peanut sauce. …

Read more

Categories Appetizers

Creamy Chicken Noodle Soup Comforting and Quick Meal

November 19, 2025January 24, 2025 by Chef Tavio
- 2 tablespoons unsalted butter - 1 medium yellow onion, diced - 2 cloves garlic, finely minced - 3 medium carrots, peeled and sliced into rounds - 2 stalks celery, chopped into small pieces - 1 teaspoon dried thyme - 1 teaspoon dried rosemary - 6 cups low-sodium chicken broth - 2 cups cooked chicken, shredded or diced - 1 cup egg noodles - 1 cup heavy cream - Salt and freshly cracked black pepper to taste - Fresh parsley, chopped (for garnish) When picking your veggies, look for bright colors. The carrots should be firm and not soft. Choose celery that is crisp and has a nice green hue. The onion needs to be dry and firm too. Fresh herbs like thyme and rosemary should smell strong. For chicken, I prefer using fresh, high-quality meat for the best flavor. If you need a dairy-free option, swap the heavy cream for coconut milk. You can use gluten-free egg noodles if you want to avoid gluten. For a leaner soup, replace chicken with turkey. If you want a vegetarian version, use vegetable broth and add beans for protein. Just remember to adjust cooking times for any changes! {{ingredient_image_2}} 1. Start by melting 2 tablespoons of unsalted butter in a large pot over medium heat. 2. Add 1 medium yellow onion, diced, and sauté for 3-4 minutes until soft. 3. Now, stir in 2 cloves of minced garlic, 3 sliced carrots, and 2 chopped celery stalks. Cook for another 5 minutes. 4. Next, sprinkle in 1 teaspoon of dried thyme and 1 teaspoon of dried rosemary. Mix well. 5. Gradually pour in 6 cups of low-sodium chicken broth while stirring gently. 6. Increase the heat to bring this mixture to a gentle boil. 7. Once boiling, add 2 cups of cooked chicken and 1 cup of egg noodles. Stir again. 8. Reduce the heat to simmer for 10-12 minutes until the noodles are tender. 9. Lower the heat and slowly pour in 1 cup of heavy cream. Stir carefully to keep it creamy. 10. Taste the soup and season with salt and pepper to your liking. 11. Let the soup sit uncovered for a few minutes to thicken. 12. Serve hot in bowls and top with fresh parsley. Using visuals can make the cooking process easier. Consider taking photos at each step. You can show the melted butter, the sautéed vegetables, and the final creamy soup. Videos can also help. A quick clip can show how to chop vegetables or how the soup should look at each stage. - Prepping your ingredients beforehand saves time. Chop all your vegetables before you start cooking. - Make sure to watch the heat after adding cream. You want it warm, not boiling, to keep it smooth. - If you have leftovers, let them cool before storing. This helps to keep the flavors fresh. - Serve with warm bread for a complete meal. It adds a nice touch and makes it even cozier. To boost the taste of your creamy chicken noodle soup, use fresh herbs. Fresh thyme and rosemary add depth. You can also add a squeeze of lemon juice for brightness. It lifts the flavors without overpowering them. Using high-quality chicken broth makes a big difference. For a richer taste, try roasting your chicken before adding it to the soup. To get that perfect creaminess, add the heavy cream slowly. Stir gently as you pour it in. This helps it blend well without separating. You can also use a mix of cream and milk for a lighter version. If you want an even thicker soup, use a cornstarch slurry. Mix equal parts of cornstarch and cold water, then stir it in as you heat the soup. A common mistake is boiling the soup after adding the cream. This can cause it to curdle. Always lower the heat and let it warm gently. Another pitfall is under-seasoning. Taste your soup often and adjust with salt and pepper. Lastly, don't skip the resting time after cooking. Letting it sit thickens the soup and melds the flavors. Pro Tips Use Fresh Herbs: Fresh herbs can elevate the flavor of your soup. If possible, use fresh thyme and rosemary instead of dried for a more vibrant taste. Customize Your Veggies: Feel free to add or substitute other vegetables like peas or corn to make the soup more colorful and nutritious. Perfect the Creaminess: For an even creamier texture, consider adding a splash of lemon juice along with the heavy cream; it brightens the flavors beautifully. Storing Leftovers: Store any leftover soup in an airtight container in the fridge for up to 3 days. Reheat gently to avoid overcooking the noodles. {{image_4}} To make a lighter version of creamy chicken noodle soup, swap heavy cream for half-and-half or low-fat milk. This change cuts down on fat but keeps some creaminess. You can also use low-sodium chicken broth to reduce salt content. Fresh herbs boost flavor without adding calories, so use them freely. If you want to switch proteins, turkey works well. Use cooked turkey in place of chicken for a tasty twist. For a plant-based option, try tofu. Firm tofu adds great texture. Just cube it and add it with the noodles for a rich, creamy soup that everyone can enjoy. Feel free to add more veggies for extra nutrition. Peas, spinach, or green beans can enhance color and taste. Fresh herbs like dill or basil can change the soup's flavor profile. For some spice, add a pinch of red pepper flakes. These simple changes can make your soup unique and exciting. To store your creamy chicken noodle soup, let it cool first. Use an airtight container to keep it fresh. This soup stays good in the fridge for about 3 to 4 days. Always label your container with the date, so you know when you made it. When you're ready to eat your leftovers, reheat them on the stove or in the microwave. If using the stove, warm it over low heat. Stir often to prevent sticking. If you're using a microwave, heat it in short bursts, stirring in between. This helps the soup stay creamy and tasty. If you want to save the soup for later, freezing works great. Pour the cooled soup into freezer-safe containers. Leave some space at the top for expansion. It can last in the freezer for about 2 to 3 months. When you're ready to enjoy it again, thaw it in the fridge overnight before reheating. Yes, you can make this soup ahead of time. It tastes even better after resting. Just store it in an airtight container in the fridge. When you are ready to eat, reheat it slowly on the stove. This soup lasts about three to four days in the fridge. Make sure to keep it in a sealed container. If you notice any changes in smell or color, it's best to throw it out. Absolutely! Using rotisserie chicken saves time and adds great flavor. Just shred the chicken and add it to the soup at the same point in the recipe. It will make your cooking much quicker. Yes, you can make this soup dairy-free. Use coconut milk or a dairy-free cream substitute instead of heavy cream. This keeps the soup creamy without any dairy. Just adjust the seasoning a bit to match the new flavors. In this blog post, we covered key ingredients and how to choose fresh ones. You learned step-by-step cooking details and tips to enhance flavor. We discussed variations, including healthy swaps and creative add-ins. Also included were storage methods to keep your soup fresh. With these insights, you can make a delicious soup, tailored to your taste. Try experimenting with different ingredients and techniques, and enjoy the results! Happy cooking!

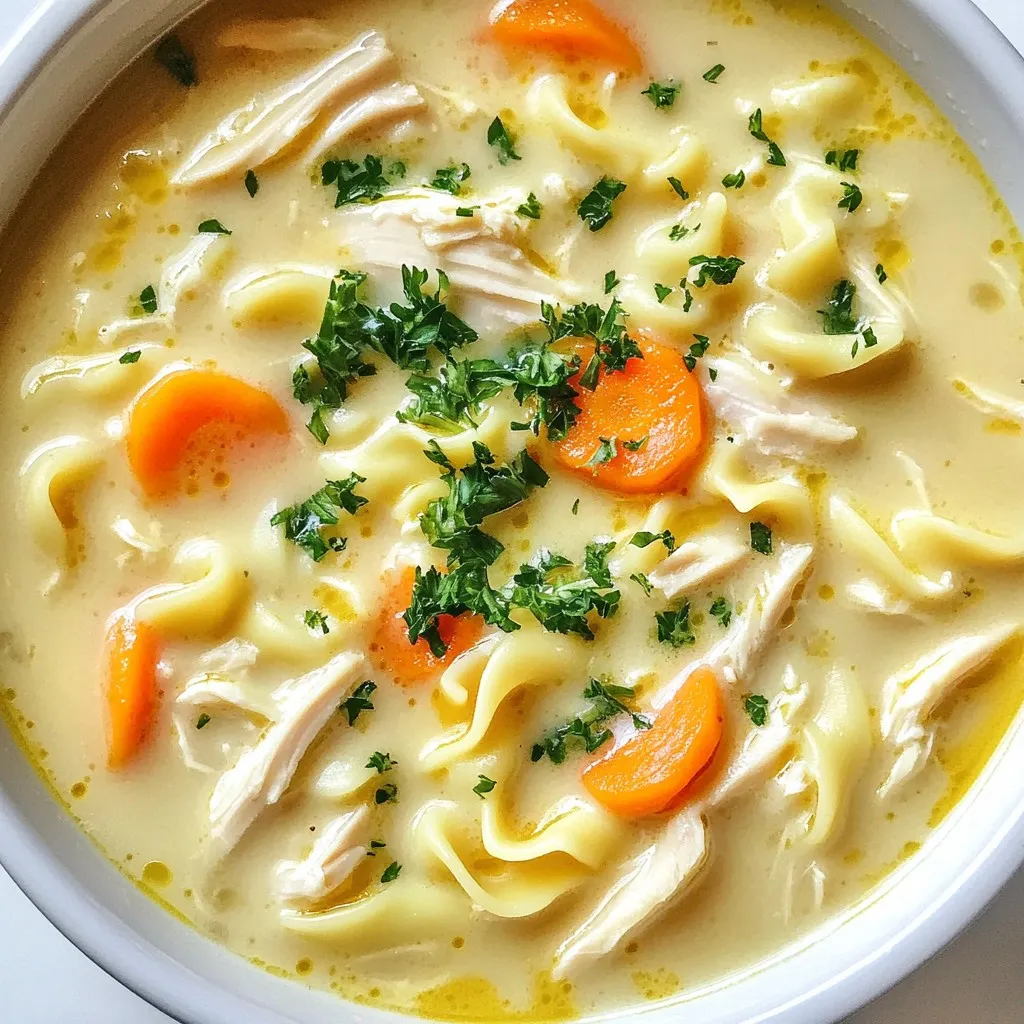
When you crave warmth and comfort, nothing beats a bowl of creamy chicken noodle soup. This easy recipe delivers rich flavors and a silky texture without taking much time. Plus, …

Read more

Categories Dinner

Sheet Pan Lemon Garlic Chicken Easy and Flavorful Meal

December 2, 2025January 24, 2025 by Chef Tavio
- 4 bone-in, skin-on chicken thighs - 1 pound baby potatoes, halved - 2 cups fresh broccoli florets - 4 cloves garlic, minced - 1 large lemon, zested and juiced - 3 tablespoons extra virgin olive oil - 1 teaspoon dried oregano - 1 teaspoon smoked paprika - Salt and freshly ground black pepper, to taste - Fresh parsley, chopped, for garnish Use four bone-in, skin-on chicken thighs for rich flavor. The baby potatoes should weigh one pound and be halved to cook evenly. You will need two cups of fresh broccoli florets for a colorful crunch. For the marinade, use four cloves of minced garlic, one large lemon for zest and juice, and three tablespoons of extra virgin olive oil. Add one teaspoon each of dried oregano and smoked paprika. Don’t forget salt and black pepper to taste. You can add bell peppers or carrots for more color and taste. Swap chicken thighs for breasts or drumsticks if you prefer. For a spice kick, try adding a pinch of cayenne pepper to the marinade. Fresh herbs like thyme or rosemary can also enhance the flavor! {{ingredient_image_2}} First, preheat your oven to 425°F (220°C). This high heat helps the chicken cook well and get crispy. Next, take a large sheet pan and line it with parchment paper. This makes cleanup easier and saves time later. In a mixing bowl, combine four cloves of minced garlic, the zest and juice of one large lemon, and three tablespoons of extra virgin olive oil. Add one teaspoon of dried oregano, one teaspoon of smoked paprika, and a sprinkle of salt and freshly ground black pepper. Whisk everything together until you create a fragrant marinade. This mixture brings the lemon garlic flavor to the chicken. Now, place the four bone-in, skin-on chicken thighs in the marinade. Make sure each piece gets a good coating. Let the chicken sit while you prep the veggies. Take one pound of baby potatoes, cut them in half, and toss them with a splash of olive oil, salt, and pepper in a separate bowl. Arrange the potatoes on one side of the prepared sheet pan. Then, place the marinated chicken thighs on the other side, skin-side up. This setup allows the chicken skin to crisp up nicely while cooking. Roast everything in the oven for about 25 minutes. After that, add two cups of fresh broccoli florets to the pan. Drizzle a bit of olive oil over the broccoli and toss gently to coat. Return the pan to the oven for another 10-15 minutes. The chicken should reach an internal temperature of 165°F (74°C) when done. Enjoy this easy and flavorful meal! Marinate the chicken for at least 30 minutes. This time allows the flavors to soak in. If you can, marinate for up to 2 hours. The longer marinating time gives a richer taste. To get crispy skin, start with dry chicken. Pat the chicken thighs with a paper towel before marinating. Place the chicken skin-side up on the pan. Cook at a high temperature, like 425°F (220°C). This helps the skin brown and crisp up. Cook the chicken for about 25 minutes before adding the broccoli. The chicken should reach 165°F (74°C) for safety. The potatoes will be fork-tender at this point. Add the broccoli and cook for 10-15 more minutes. This timing ensures everything is done perfectly. Pro Tips Marinate for Flavor: Allow the chicken to marinate for at least 30 minutes, or ideally a few hours, to enhance the flavors of the lemon and garlic. Uniform Vegetable Sizing: Cut the baby potatoes and broccoli florets to similar sizes to ensure even cooking and perfect tenderness. Check for Doneness: Use a meat thermometer to ensure the chicken reaches an internal temperature of 165°F (74°C) for safe consumption. Add a Crunch: For extra crispiness, broil the chicken for the last 2-3 minutes of cooking. Just watch closely to avoid burning! {{image_4}} You can easily swap chicken thighs for other proteins. Chicken breasts work well, too. They cook faster, so check them at about 20 minutes. If you prefer dark meat, drumsticks are a tasty choice. They stay juicy and flavorful. You can also try turkey thighs for a unique twist. Adjust your cooking time as needed. Feel free to change the veggies based on what you have. Carrots or bell peppers add a sweet crunch. Zucchini or asparagus can work well, too. Just cut them into similar sizes for even cooking. If you want more color, consider using cherry tomatoes or green beans. This keeps your dish fresh and exciting. Want to mix up the taste? You can try different marinades. A honey mustard blend adds a nice sweetness. A balsamic glaze can give a tangy kick. For spice lovers, a chili powder or curry powder mix can wake up your dish. You can also add fresh herbs like rosemary or thyme for a fragrant touch. Store any leftovers in an airtight container. Make sure to let the chicken cool first. Place the chicken, potatoes, and broccoli in the container. This keeps them fresh and tasty. You can store leftovers in the fridge for about 3 to 4 days. To reheat, use the oven for best results. Preheat your oven to 350°F (175°C). Place the leftovers on a baking sheet. Cover them with foil to keep moisture in. Heat for about 15-20 minutes, or until warm. You can also use a microwave, but it may not keep the crispiness. If you have extra servings, you can freeze them. Use a freezer-safe container or heavy-duty bag. Make sure to remove as much air as possible. Label the container with the date. You can freeze the dish for up to 3 months. When ready to eat, thaw it overnight in the fridge before reheating. Yes, you can use boneless chicken. Boneless chicken cooks faster. You should reduce the cooking time by about 10 minutes. Check it around 20 minutes in the oven to avoid overcooking. There are many tasty sides to pair with this dish. Here are some ideas: - Rice: Fluffy white or brown rice works well. - Quinoa: A healthy grain full of protein. - Salad: A fresh green salad adds a nice crunch. - Bread: A crusty bread is great for soaking up juices. - Roasted Vegetables: Try carrots or asparagus for extra color. The chicken should reach an internal temperature of 165°F (74°C). This ensures it is safe to eat. Look for golden skin and juices that run clear. If the juices are pink, it needs more time. Use a meat thermometer for best results. This blog post covered everything you need for a tasty sheet pan lemon garlic chicken. We discussed the key ingredients, including chicken, potatoes, and broccoli, along with measurements and optional add-ins. The step-by-step instructions help you prepare and cook with ease. I shared tips for marinating, achieving crispy skin, and proper cooking times. You can even explore variations and learn how to store leftovers. Now, you’re ready to enjoy a delicious meal that’s simple and satisfying. Dive in and create your dish today!

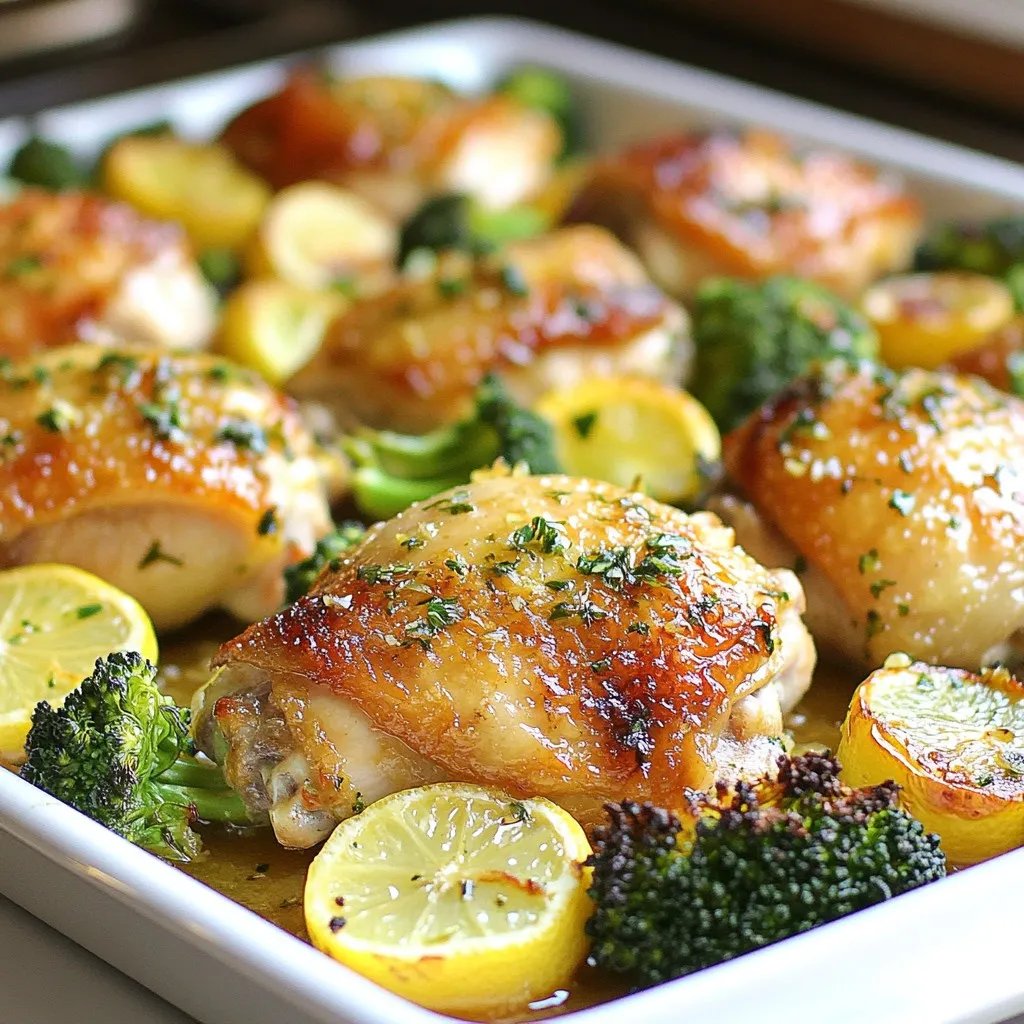
Looking for a simple but tasty dinner? You’ve come to the right place! My Sheet Pan Lemon Garlic Chicken is your answer. With juicy chicken, crispy potatoes, and fresh broccoli, …

Read more

Categories Dinner

Protein Breakfast Biscuits Delicious and Nutritious Snack

November 20, 2025January 23, 2025 by Chef Tavio
- 1 cup rolled oats - 1 cup almond flour - 1/2 cup protein powder (either vanilla or chocolate flavor) - 1/4 cup honey or maple syrup (for a vegan option, choose maple syrup) - 1/2 cup unsweetened almond milk - 1/2 teaspoon baking powder - 1/2 teaspoon ground cinnamon - 1/4 teaspoon salt - 1/2 cup dark chocolate chips (optional, for an added treat) - 1/4 cup chopped nuts (such as walnuts or pecans, also optional) Let’s break down the ingredients in detail. Rolled oats are the base of these biscuits. They add fiber and texture. Almond flour gives a nutty flavor and is gluten-free. You can choose protein powder in vanilla or chocolate. This adds protein and makes the biscuits filling. Sweeteners can be honey or maple syrup. Honey gives a rich taste, while maple syrup is great for vegans. Almond milk keeps the biscuits moist. Make sure it’s unsweetened, so the biscuits aren’t too sweet. Baking powder makes the biscuits rise. Ground cinnamon adds warmth and flavor. Salt balances the sweetness. Optional dark chocolate chips add a yummy twist, while nuts give crunch and nutrition. Feel free to mix and match these ingredients to suit your taste! {{ingredient_image_2}} 1. Preheating the oven Start by preheating your oven to 350°F (175°C). This step is key for even baking. 2. Preparing the baking tray Line a baking tray with parchment paper. This will stop the biscuits from sticking. 3. Mixing dry ingredients In a large bowl, combine: - 1 cup rolled oats - 1 cup almond flour - 1/2 cup protein powder - 1/2 teaspoon baking powder - 1/2 teaspoon ground cinnamon - 1/4 teaspoon salt Stir these together until you see no lumps. 4. Combining wet ingredients In another bowl, whisk together: - 1/2 cup unsweetened almond milk - 1/4 cup honey or maple syrup Make sure this mixture is smooth and well-blended. 5. Forming and shaping the biscuits Slowly mix the wet ingredients into the dry ones. Stir until you have a thick dough. If you want, fold in: - 1/2 cup dark chocolate chips - 1/4 cup chopped nuts Scoop out spoonfuls of dough and place them on the tray. Flatten each ball to about 1/2 inch thick. 6. Baking instructions Put the tray in the oven and bake for 15-20 minutes. Look for golden edges to know they are done. 7. Cooling and storing Let the biscuits cool on a wire rack. Once cool, store them in an airtight container for up to a week. You can also freeze them for later use. How to choose protein powder When picking protein powder, think about flavor and quality. You can choose vanilla or chocolate. Always check the label for added sugars or fillers. A clean protein powder helps keep your biscuits healthy and tasty. Adjusting sweetness levels You can change how sweet your biscuits are. If you like them sweeter, add more honey or maple syrup. If you prefer less sweetness, cut back on the sweetener. Taste the dough before baking to find your perfect balance. Ensuring the right dough consistency The dough should be thick and hold its shape. If it seems too dry, add a splash of almond milk. If it’s too wet, sprinkle in more almond flour. The right consistency makes for a better biscuit. Importance of cooling before storage Cooling is key! Let your biscuits cool on a wire rack. This step prevents them from getting soggy. Once cool, they can be stored in an airtight container. This keeps them fresh longer. Serving suggestions for added taste For a fun twist, serve your biscuits with nut butter or a drizzle of honey. You can also add fresh fruit or yogurt on the side. These toppings enhance the flavor and make breakfast special. Pro Tips Storage Tip: To keep your biscuits fresh, store them in an airtight container. They can last up to a week at room temperature. Flavor Boost: Experiment with different spices like nutmeg or cardamom to give your biscuits a unique flavor profile. Protein Power: Choose a protein powder that aligns with your dietary preferences, such as whey, pea, or hemp for varied nutritional benefits. Custom Add-ins: Feel free to include dried fruits like cranberries or raisins for added sweetness and texture in your biscuits. {{image_4}} You can easily change these protein breakfast biscuits to fit your needs. Here are some great swaps you can try: - Gluten-free options: Use gluten-free oats and almond flour. This keeps the biscuits tasty and safe for those with gluten allergies. - Vegan modifications: Replace honey with maple syrup. This simple switch makes your breakfast biscuits vegan-friendly. - Flavor variations: Add different spices like nutmeg or ginger. You can also use vanilla or almond extract for a fun twist. - Alternative add-ins: Mix in dried fruits like cranberries or raisins. You can also add seeds like chia or flax for extra crunch and nutrition. These swaps let you make the recipe your own. You can enjoy new flavors while keeping the biscuits healthy and packed with protein. To keep your protein breakfast biscuits fresh, use an airtight container. This helps prevent them from drying out. You can store them at room temperature for up to a week. Just make sure they are cool before sealing them. If you want to keep them longer, freeze the biscuits. They can last up to three months in the freezer. To freeze, place the cooled biscuits in a single layer on a baking sheet. Once frozen solid, transfer them to a freezer-safe bag. This method prevents them from sticking together. When you're ready to enjoy a biscuit, thaw it at room temperature. This usually takes about 30 minutes. If you want to heat them, pop them in the oven at 300°F (150°C) for about 5-10 minutes. This makes them warm and soft again. You can also microwave them. Just heat for 15-30 seconds, checking often to avoid overheating. Enjoy your protein-packed snack anytime! Protein biscuits offer a great way to start your day. They help build and repair muscles. They also keep you full for longer. This means you might snack less later. Plus, they are easy to make at home. These biscuits are healthier than many store-bought ones. You control the ingredients. You can skip added sugars and unhealthy fats. They also taste fresher since you make them yourself. Yes, you can! If you skip the protein powder, use more almond flour. You can also add nut butter for extra protein. Just know that the texture may change a bit. These biscuits last up to a week at room temperature. Store them in an airtight container. If you freeze them, they can last for months. Just thaw them before eating. Absolutely! You can change the sweetener or add spices. Use different nuts or seeds for crunch. Add dried fruits for a sweet twist. The options are endless, so have fun! These protein biscuits are quick and simple to make. You learned about key ingredients, preparation steps, tips, and variations. Each choice can boost flavor and nutrition. I shared storage tips to keep biscuits fresh. In summary, you can enjoy tasty, healthy biscuits. Feel free to customize them to fit your needs. With the right ingredients and techniques, you will make a snack you love. Happy baking!

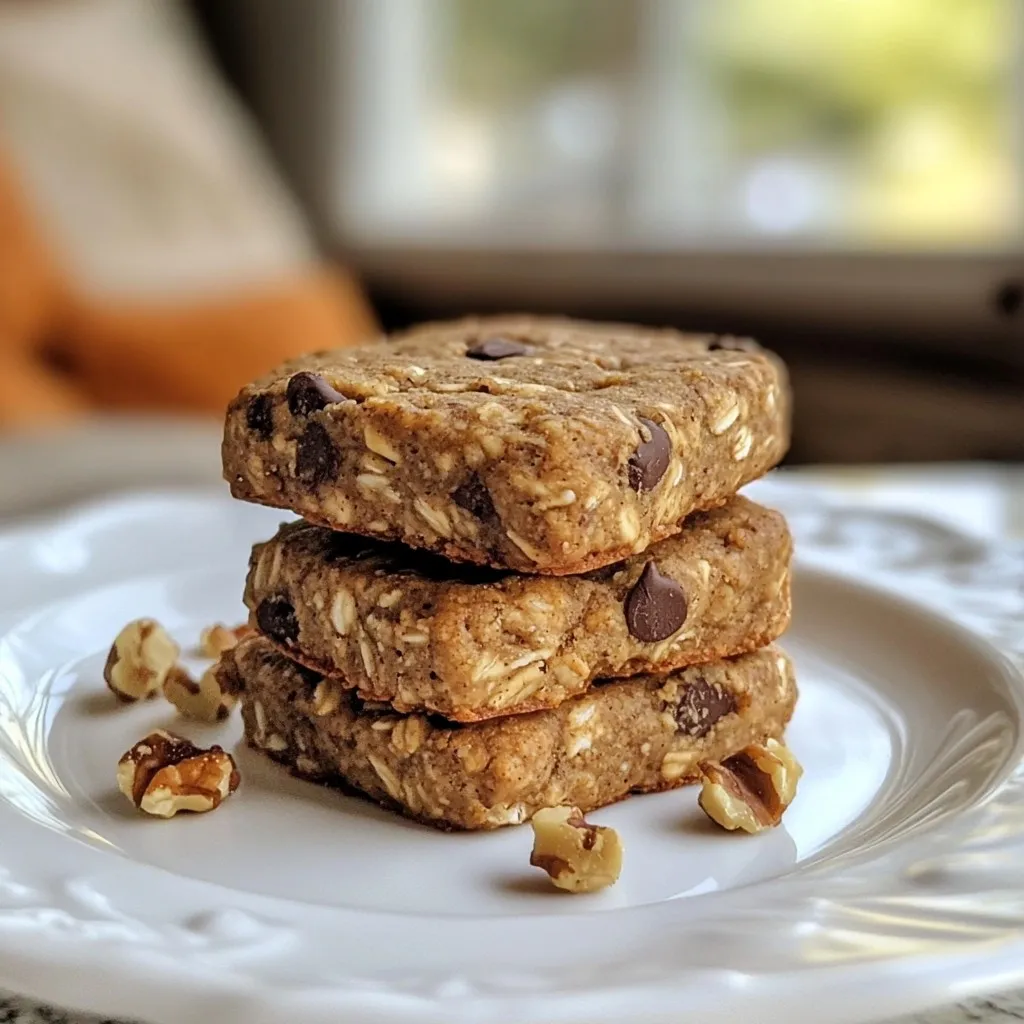
Looking for a tasty way to boost your morning routine? Try my Protein Breakfast Biscuits! These delightful snacks are packed with nutrients and protein, making them perfect for busy days. …

Read more

Categories Breakfast

Easy Spicy Salmon Sushi Bake Delicious and Simple Recipe

December 12, 2025January 22, 2025 by Chef Tavio
- 2 cups sushi rice - 1 pound fresh sushi-grade salmon - 1 ripe avocado - 1/4 cup mayonnaise - 2 tablespoons sriracha - Nori sheets for serving - 1 tablespoon rice vinegar - 1 tablespoon sugar - 1 teaspoon salt - 1 green onion - 1 tablespoon sesame seeds - Soy sauce for dipping The key to a great spicy salmon sushi bake lies in the ingredients. Fresh sushi-grade salmon is a must. It ensures the best flavor and safety. I like to use ripe avocados for creaminess and texture. Mayonnaise adds richness, while sriracha gives that spicy kick. You can adjust the sriracha amount based on your spice level. For the rice, sushi rice is essential. It sticks together and forms the perfect base. The seasoning mix of rice vinegar, sugar, and salt enhances the flavor. It balances the dish nicely. When it comes to garnishes, I love adding sliced green onions and sesame seeds. They add a pop of color and crunch. Nori sheets are great for wrapping your sushi bake. Serve soy sauce on the side for dipping to boost the taste. Having the right ingredients makes all the difference. Enjoy this easy recipe with family or friends. It’s a fun way to bring sushi to your kitchen! {{ingredient_image_2}} - Rinse the sushi rice thoroughly under cold water. This removes extra starch. - In a medium pot, combine the rinsed rice and 2 1/2 cups of water. - Bring the water to a boil over medium-high heat. - Once boiling, turn the heat to low and cover the pot. - Let the rice simmer for 18 minutes. - After that, remove the pot from heat but keep it covered for 10 more minutes. - In a small bowl, mix rice vinegar, sugar, and salt. Stir until they dissolve. - Transfer the cooked rice to a large bowl. - Gently fold the vinegar mix into the rice. Use a rice paddle for best results. - Let the seasoned rice cool to room temperature. - In a new bowl, combine diced salmon, mayonnaise, and sriracha. - Gently mix the ingredients until the salmon is well coated. - Taste and adjust the sriracha to your heat level. - Preheat your oven to 350°F (175°C). - Spread the seasoned rice evenly in a medium baking dish. - Press the rice down lightly with a spatula to form a base. - Spoon the spicy salmon mixture over the rice layer. Spread it evenly. - Place the dish in the oven. Bake for 15-20 minutes. - Look for the salmon to be cooked through and the top to be golden. - Remove the dish from the oven. Top with diced avocado, sliced green onions, and sesame seeds. Now, you have a delicious spicy salmon sushi bake ready to enjoy! Rinsing the sushi rice is very important. Rinsing removes excess starch. This step helps the rice become fluffy and not sticky. Use cold water and rinse until the water runs clear. Next, cover the rice while it cooks. This keeps the steam in and cooks the rice evenly. After cooking, let it sit covered for ten more minutes. This step ensures the rice gets tender and perfect. You can customize the spice in your sushi bake. Start with two tablespoons of sriracha. Then taste the mix. If you want more heat, add more sriracha. If you prefer less spice, reduce the amount. You can also swap mayonnaise for Greek yogurt for a lighter option. This change still gives a creamy texture without the extra fat. Present your sushi bake in a fun way. Cut it into squares for easy serving. Place the squares on a colorful plate to impress your guests. You can also serve nori sheets on the side. This adds a fun touch for wrapping the sushi bake. For sides, consider a simple salad or steamed veggies. Soy sauce is a must for dipping. It adds a salty flavor that pairs well with the spicy salmon. Pro Tips Perfect Sushi Rice: Rinse the sushi rice thoroughly to remove excess starch, ensuring a sticky yet fluffy texture. This is key for the perfect sushi bake. Customize the Heat: Adjust the amount of sriracha in the spicy salmon mixture to match your spice tolerance. Start with a small amount and gradually increase to taste. Even Baking: Spread the salmon mixture evenly over the rice to ensure uniform cooking and flavor throughout the dish. This helps prevent dry spots. Serving Suggestions: Serve with freshly sliced nori sheets and soy sauce to enhance the authenticity and flavor of your sushi bake experience. {{image_4}} You can switch the salmon for crab or shrimp. Both taste great and add fun flavor. For crab, use canned or fresh lump crab meat. Toss it with the mayo and sriracha. For shrimp, cook it first and chop it into bite-sized pieces. You can also make a vegetarian version. Try using tofu or mushrooms. They soak up flavors well and provide a nice texture. Add more flavor with fun toppings. Try spicy mayo on top for an extra kick. You can also mix in some green chili or garlic powder. For veggies, think about adding diced bell peppers or carrots. They add crunch and color. You can even use edamame for a protein boost. Get creative and find what you like best. If you need a gluten-free option, swap regular soy sauce for gluten-free soy sauce. Check labels for sushi rice, as it's often gluten-free. Make sure the mayonnaise you use is gluten-free too. With these swaps, you can enjoy your sushi bake without worries. Always read labels to ensure your meal stays gluten-free. Store your spicy salmon sushi bake in the fridge. Use an airtight container to keep it fresh. Make sure it cools down before sealing it. This helps prevent moisture build-up. You can keep it for up to three days in the fridge. To reheat, use the oven for best results. Preheat to 350°F (175°C). Place the sushi bake in a baking dish, cover it with foil. Heat for about 10-15 minutes. This keeps the top crispy and the inside warm. You can also use the microwave, but it may not keep the texture as nice. You can freeze the sushi bake if you want to save some for later. Cut it into portions, then wrap each piece in plastic wrap. Place the wrapped pieces in a freezer bag. It can last up to three months in the freezer. When you're ready to eat, let it thaw in the fridge overnight. Reheat it in the oven for the best flavor and texture. Yes, you can make this sushi bake ahead. First, prepare the sushi rice and spicy salmon mix. Store them separately in the fridge. You can assemble the sushi bake just before you plan to serve it. This keeps everything fresh and tasty. For meal prep, consider these steps: - Cook the rice and let it cool. - Mix the salmon, mayo, and sriracha. - Store both in airtight containers. - Assemble and bake when ready to eat. You can serve many tasty sides with this sushi bake. Here are some popular options: - Edamame: A light and healthy snack. - Seaweed salad: Offers a fresh taste and crunch. - Pickled ginger: Adds a zesty kick to each bite. - Miso soup: A warm and comforting pairing. - Cucumber salad: A refreshing option to balance the flavors. To check if the salmon is cooked, look for these signs: - The salmon should change from bright pink to a lighter shade. - It should flake easily with a fork. - The center should be opaque, not raw. For best results, use a thermometer. The salmon should reach 145°F (63°C). This ensures it is safe to eat and still juicy. You can create a delicious sushi bake using simple ingredients like sushi rice, salmon, and avocado. Start with preparing the rice and seasoning it well. Mix salmon with mayonnaise to create a spicy blend. Assemble and bake the dish for a tasty meal. Remember, you can customize this recipe with different proteins or add-ins. Keeping leftovers or reheating them is easy. With these tips, you’ll enjoy sushi bake any time. Dive in and have fun experimenting in your kitchen!

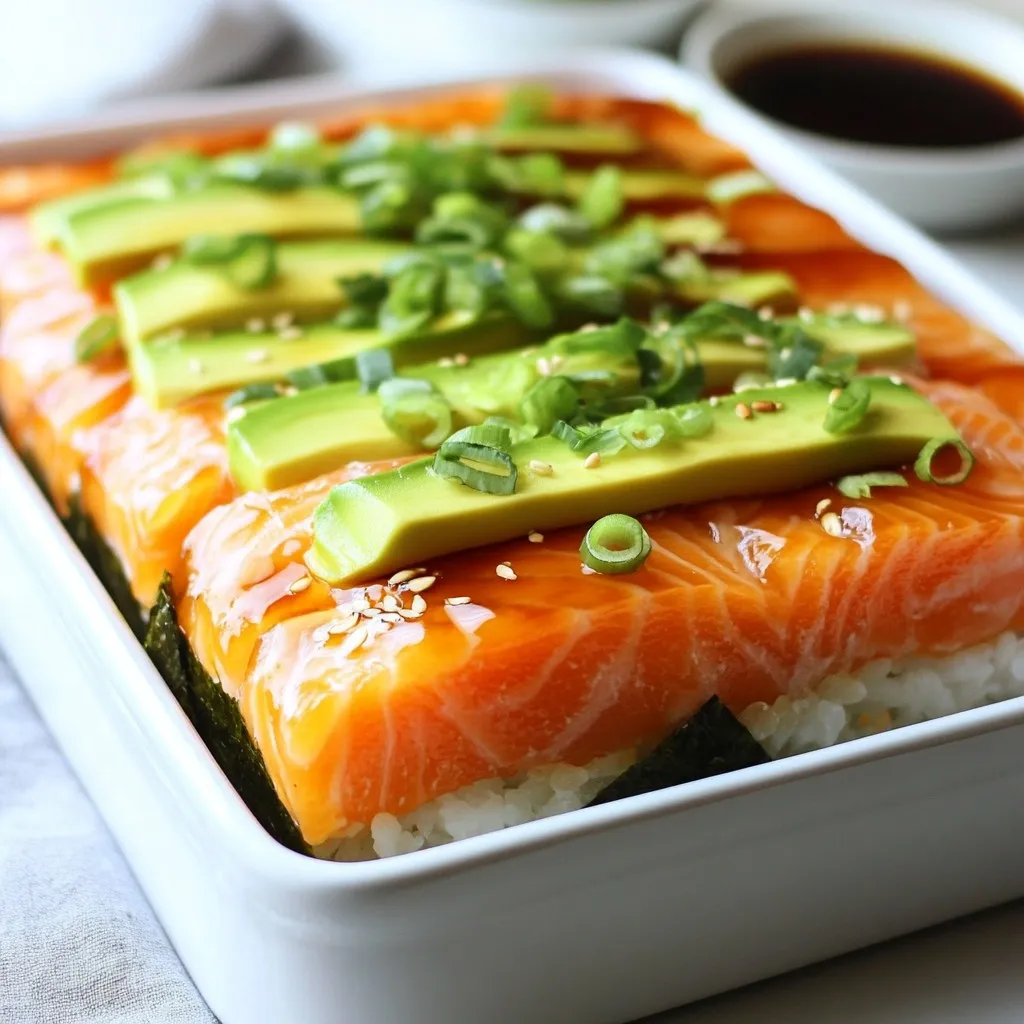
Looking for an easy and tasty dinner idea? Try my Easy Spicy Salmon Sushi Bake! This dish combines creamy salmon with fluffy sushi rice, perfect for family meals or gatherings. …

Read more

Categories Dinner

Cinnamon Sugar French Toast Muffins Delicious Breakfast

November 22, 2025January 21, 2025 by Chef Tavio
To make these delightful muffins, you need a few key ingredients: - 1 cup brioche bread, cut into small cubes - 2 large eggs - 1/2 cup milk These ingredients form the base of your muffins. Brioche bread adds a rich flavor and soft texture. Eggs and milk create a light and fluffy batter. You can enhance your muffins with these optional ingredients: - 1/4 cup pure maple syrup - 1 teaspoon pure vanilla extract Adding maple syrup gives a sweet touch. Vanilla extract adds a warm, inviting flavor. The right spices and sugars make these muffins special: - 1 teaspoon ground cinnamon - 1/4 teaspoon ground nutmeg - 1/4 cup granulated sugar - 1/4 cup packed brown sugar Cinnamon and nutmeg create a warm taste. The combination of granulated and brown sugar gives a sweet, crunchy topping. {{ingredient_image_2}} 1. First, preheat your oven to 350°F (175°C). This step is key to getting even baking. 2. Next, grease the muffin tin well with cooking spray or butter. This will keep the muffins from sticking. 1. In a large bowl, whisk together the eggs, milk, maple syrup, vanilla extract, ground cinnamon, and nutmeg. Make sure it is well blended and frothy. 2. Now, gently fold in the brioche bread cubes into the egg mixture. Ensure each piece gets coated. Let this mixture rest for 10 minutes so the bread absorbs all the flavors. 1. Use a spoon or scoop to fill each muffin cup about 3/4 full with the soaked bread mixture. This gives them room to rise. 2. In a separate bowl, mix the granulated sugar and remaining cinnamon to create the topping. Sprinkle this mixture over the muffins for a sweet crunch. Drizzle melted butter generously on top for extra flavor. 1. Place the muffin tin in your preheated oven. Bake for 15-18 minutes. Check for doneness by inserting a toothpick in the center. If it comes out clean, they are ready. 2. After baking, let the muffins cool in the tin for a few minutes. Then, transfer them to a wire rack to cool slightly. Enjoy them warm with a drizzle of maple syrup if you like! To make perfect Cinnamon Sugar French Toast Muffins, focus on soaking time. After mixing the bread cubes with the egg mixture, let them soak for 10 minutes. This step is key. It allows the bread to absorb all the flavors. If you skip it, your muffins may turn out dry. Avoiding over-baking is also important. Keep an eye on your muffins as they bake. Start checking them at 15 minutes. A toothpick should come out clean when they are done. If you bake them too long, they can get tough. Serve your muffins warm for the best taste. A drizzle of maple syrup adds a nice touch. It makes each bite sweet and sticky. You can also arrange the muffins on a nice platter. Dust them with powdered sugar for extra charm. Add fresh berries for color and freshness. This makes your dish look inviting. You can easily add more flavor to your muffins. Try mixing in some fruits like blueberries or sliced bananas. Chocolate chips also work well for a sweet twist. Using different types of bread can change the taste, too. Try challah or whole wheat bread for a new flavor. Each option gives a unique texture and taste, making your muffins even more delicious. Pro Tips Choose the Right Bread: Using brioche adds a rich flavor and soft texture, but you can also experiment with challah or even croissants for a unique twist. Let it Soak: Allowing the bread to soak in the egg mixture for 10 minutes ensures every piece is fully infused with flavor, resulting in a more delicious muffin. Watch the Baking Time: Ovens vary, so keep an eye on the muffins after 15 minutes to prevent over-baking; they should be golden brown and spring back when lightly touched. Serve with Style: For an appealing presentation, dust the muffins with powdered sugar and serve with fresh berries and a drizzle of maple syrup for a beautiful brunch dish. {{image_4}} You can switch the brioche for other types of bread. Challah works great for a rich flavor. Whole wheat bread gives a nutty taste and more fiber. Both options will still soak up all the yummy flavors. Want to jazz up your muffins? Try adding orange zest for a fresh twist! Just a teaspoon adds bright flavor. If you like a crunch, fold in some chopped nuts or raisins. They bring texture and extra sweetness. If you need gluten-free muffins, no problem! Just use gluten-free bread. Many brands offer tasty options that work well in this recipe. You won’t miss the gluten at all! To keep your muffins fresh, use airtight containers. I recommend glass or plastic containers. Place the muffins in a single layer to avoid squishing them. You can also use a resealable bag. Be sure to remove excess air before sealing. Store them at room temperature for up to 3 days. If you want them to last longer, refrigerate them for up to a week. To reheat the muffins, the oven is your best choice. Preheat your oven to 350°F (175°C). Place the muffins on a baking sheet. Heat them for about 5 to 10 minutes. This keeps them warm and crispy. You can also use a microwave. Heat for 15 to 20 seconds. This method is quick but may make them a bit soggy. Freezing is a great way to save muffins for later. First, let them cool completely. Wrap each muffin tightly in plastic wrap. Then, place them in a freezer-safe bag or container. Label and date the bag. You can freeze them for up to 3 months. When you're ready to eat, thaw them in the fridge overnight. For a quick treat, you can also reheat them straight from the freezer. Just add a few extra minutes in the oven. To check if your muffins are done, use the toothpick test. Insert a toothpick into the center of a muffin. If it comes out clean, your muffins are ready. You can also look for visual cues. The tops should be golden brown, and the muffins should spring back when lightly touched. Yes, you can make these muffins ahead of time. Prepare the batter and fill the muffin tins. Cover them and place them in the fridge overnight. Bake them in the morning for a fresh breakfast. This saves time and gives you warm muffins when you need them. If you don’t have brioche bread, you can use other types. Challah bread works well and has a similar texture. You can also use whole wheat bread for a healthier option. Just remember to cut it into small cubes to soak up the flavor. In this blog post, we explored how to make delicious muffins using brioche bread and simple steps. You learned key ingredients, from eggs to spices, and how to mix the batter like a pro. I shared tips for perfecting your muffins and even offered variations for fun flavors. You can store and reheat these treats easily, making them perfect for any time. Enjoy these muffins warm with syrup or add your favorite mix-ins. Happy baking!

Rise and shine! If you’re craving a sweet breakfast treat that’s both easy and delicious, these Cinnamon Sugar French Toast Muffins are for you. With just a few simple ingredients …

Read more

Categories Breakfast

Baked Protein Pancake Bowls Easy and Healthy Delight

November 28, 2025January 21, 2025 by Chef Tavio
- Rolled oats: They are the base of this dish. Oats provide fiber and help you feel full. They also add a nice texture. - Banana: A ripe banana adds natural sweetness and moisture. It helps bind the batter for a smooth mix. - Protein powder: This boosts the protein content. Choose vanilla or chocolate to match your taste. - Milk alternatives: I like almond milk, but you can use any milk you prefer. It helps blend the ingredients and keeps everything moist. - Sweeteners: Maple syrup is optional. It adds a touch of sweetness if you like your pancakes sweeter. - Variety of berries: Fresh berries, like blueberries, strawberries, and raspberries, add flavor and color. They are also rich in vitamins. - Nuts: Chopped nuts, like walnuts or almonds, add crunch. They also provide healthy fats and protein. - Yogurt options: Top with Greek yogurt or almond yogurt. This adds creaminess and extra protein. - Additional flavor enhancers: Consider adding a sprinkle of cinnamon or a drizzle of honey for more taste. {{ingredient_image_2}} Start by preheating your oven to 350°F (175°C). This step makes sure the pancake bowls bake evenly. While the oven heats, grease a muffin tin with cooking spray or a bit of oil. This prevents the bowls from sticking. Next, grab a large mixing bowl. Here, combine one cup of rolled oats, one ripe mashed banana, one scoop of your favorite protein powder, and two tablespoons of almond milk. Add one teaspoon of baking powder and one teaspoon of ground cinnamon. If you like it sweeter, mix in one tablespoon of maple syrup. Stir until you have a smooth batter. Now, it's time to add some fun! Carefully fold in half a cup of mixed berries and one tablespoon of chopped nuts. Make sure they spread throughout the batter for yummy bites. Next, spoon the batter into the muffin tin, filling each cup about two-thirds full. This allows room for the pancake bowls to rise while baking. Place the muffin tin in the oven and bake for 15 to 20 minutes. They are done when the tops turn golden and a toothpick comes out clean. When the timer goes off, take the muffin tin out of the oven. Let the pancake bowls cool for a few minutes. This makes them easier to handle. Serve them warm, topping each bowl with Greek yogurt or almond yogurt. For a pretty touch, add a few extra fresh berries on top. Enjoy your tasty and healthy baked protein pancake bowls! To get the best texture, measure your ingredients carefully. Accurate measurements make a big difference. Too much flour or oats can make your pancake bowls dry. Use a kitchen scale if you can. Baking time is also key. Bake your pancake bowls for 15-20 minutes. Check them at 15 minutes. The tops should be golden, and a toothpick should come out clean. If they need more time, add a couple of minutes. One common mistake is overmixing the batter. Mix just until combined. Overmixing makes the texture tough. On the flip side, under-mixing can leave lumps. Aim for a smooth batter, but don’t worry about perfection. Another mistake is not greasing the tin well. If you skip this step, your pancake bowls might stick. Use cooking spray or a bit of oil to coat the tin well. This way, your bowls will pop out easily after baking. You can swap out protein powder easily. Try Greek yogurt or nut butter for added protein. These options can also boost flavor. To increase fiber and nutrients, add seeds like chia or flaxseed. You can also use whole grain oats instead of regular oats. Mixing in spinach or sweet potato puree adds nutrition without changing the taste much. Pro Tips Use Ripe Bananas: The riper the banana, the sweeter your pancake bowls will be. This natural sweetness can reduce the need for added sugars. Experiment with Flavors: Feel free to mix in different spices such as nutmeg or vanilla extract to customize the flavor profile of your pancake bowls. Berry Variations: Try using seasonal berries or even chopped apples for a different taste and texture. Adjust the baking time if using larger fruit pieces. Make Ahead: These pancake bowls can be made in advance and stored in the fridge. Just reheat them in the microwave for a quick breakfast option. {{image_4}} You can change the flavor of your baked protein pancake bowls in many ways. Try different fruit combinations. Use strawberries, blueberries, or even apples. Each fruit will bring its own flavor. You can also mix spices for unique tastes. Instead of just cinnamon, try nutmeg or vanilla extract. These small changes can make a big difference. If you need gluten-free options, use gluten-free oats. They work the same but are safe for those with gluten issues. For vegan adaptations, swap the protein powder for a plant-based kind. You can use almond milk or coconut milk instead of regular milk. This way, everyone can enjoy these tasty bowls. You can change your ingredients based on the season. In summer, add fresh peaches or cherries. In winter, use pumpkin puree or spiced apples. These seasonal choices keep your pancake bowls exciting. For festive toppings, consider using crushed peppermint in December or fresh berries for a spring touch. Enjoying what's in season makes each bowl special. To keep your baked protein pancake bowls fresh, store them in the fridge. Place them in an airtight container. This will help them last for about three to five days. You can also wrap them in plastic wrap before putting them in a container. If you want to keep them longer, freezing is a great option. Allow the pancake bowls to cool completely. Then, wrap each bowl in plastic wrap and place them in a freezer bag. They can stay good for up to three months in the freezer. When you're ready to eat them, just take out the number you need. When it’s time to enjoy your pancake bowls again, there are a few easy ways to reheat them. The microwave is the quickest method. Place a pancake bowl on a microwave-safe plate and heat it for about 30 seconds to one minute. Check to see if it's warm enough. If not, heat it in 10-second bursts. If you want to keep the texture nice, try reheating in the oven. Preheat your oven to 350°F (175°C). Place the pancake bowls on a baking sheet and heat for about 10 minutes. This method keeps them fluffy and delicious. Remember to add a dollop of yogurt or some fresh berries on top after reheating. This enhances the taste and makes them feel fresh again! You can replace protein powder with Greek yogurt or nut butter. Greek yogurt adds creaminess and protein, while nut butter gives healthy fats. You can use about 1/4 cup of Greek yogurt or 2 tablespoons of nut butter. This change keeps the dish tasty and boosts nutrition. Yes, you can easily make these pancake bowls vegan. Replace the egg with flaxseed meal or applesauce. Use almond milk or any plant-based milk for dairy. Opt for a plant-based protein powder if you want to keep the protein boost. These swaps keep the flavors and texture great! Baked protein pancake bowls can last up to five days in the fridge. Store them in an airtight container to keep them fresh. You can also freeze them for up to three months. To reheat, just pop them in the microwave or oven for a few minutes. To sum up, baked protein pancake bowls combine rolled oats, bananas, and protein powder for nutrition. You can personalize them with berries, nuts, and yogurt. Follow the step-by-step guide for perfect baking. Remember to measure ingredients carefully. Avoid mixing too much to get the right texture. Explore different flavors and dietary options to keep things exciting. With proper storage and reheating tips, enjoy them fresh every time. These bowls can be a delicious part of your day. Enjoy making and eating them!

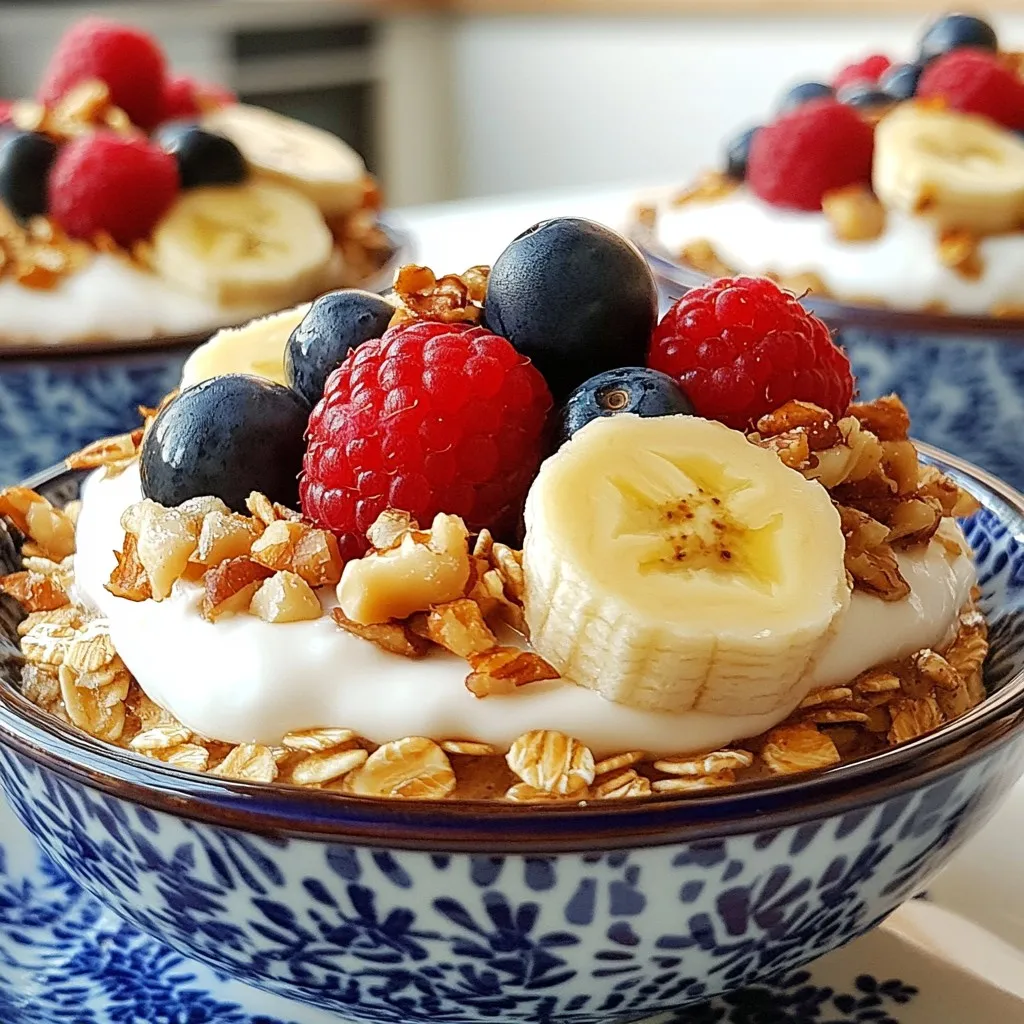
Welcome to a tasty twist on breakfast! Baked Protein Pancake Bowls are your new go-to dish for a healthy morning. Packed with oats, bananas, and protein powder, they’re simple to …

Read more

Categories Breakfast

Churro Cheesecake Bars Irresistible Dessert Delight

December 10, 2025January 20, 2025 by Chef Tavio
To make these churro cheesecake bars, you will need: - 1 cup all-purpose flour - 1/4 cup granulated sugar - 1/2 teaspoon baking powder - 1/4 teaspoon salt - 1/2 cup unsalted butter, softened - 1 large egg - 8 oz cream cheese, softened - 1/2 cup powdered sugar - 1 teaspoon vanilla extract - 1 teaspoon ground cinnamon - 1/4 cup granulated sugar (for coating) - 1/4 cup caramel sauce (optional) You can swap some ingredients if needed. For a gluten-free option, use gluten-free flour instead of all-purpose flour. Coconut sugar can replace granulated sugar for a different flavor. If you don't have cream cheese, use ricotta cheese for a lighter texture. For a vegan version, try a vegan cream cheese and substitute the egg with a flax egg. Always use fresh ingredients for the best taste. Check the expiration dates on dairy products like cream cheese and butter. For flour, store it in a cool, dry place to keep it fresh. Use pure vanilla extract for a richer flavor rather than imitation. When it comes to cinnamon, fresh ground cinnamon adds a wonderful aroma and taste. {{ingredient_image_2}} Start by preheating your oven to 350°F (175°C). This temp helps the bars bake evenly and become golden. Grab an 8x8-inch baking pan. Grease it with non-stick spray or line it with parchment paper. This makes removing the bars easy later on. In a medium bowl, mix together 1 cup of all-purpose flour, 1/4 cup of granulated sugar, 1/2 teaspoon of baking powder, and 1/4 teaspoon of salt. This is your dry mix. In a large bowl, use an electric mixer to beat 1/2 cup of softened unsalted butter with 1 large egg. Mix until it is creamy. Gradually add the dry mix to the wet mix. Keep mixing until a soft dough forms. In another bowl, beat 8 oz of softened cream cheese with an electric mixer. Mix until it is smooth. Add in 1/2 cup of powdered sugar, 1 teaspoon of vanilla extract, and 1 teaspoon of ground cinnamon. Keep mixing until everything blends well and becomes creamy. Take half of the dough and press it into the bottom of your greased pan. This forms the base. Then, carefully spread the cream cheese mixture over this layer. Make sure it is even. Crumble the rest of the dough on top of the cream cheese. Spread it out to ensure a good mix of textures. Put the pan in the oven and bake for 25-30 minutes. Look for a golden top and make sure the cheesecake layer is set. Once done, take the pan out and let it cool completely on a wire rack. After it cools, slice it into squares. Finish by sprinkling a cinnamon-sugar mix over the top. If you want, drizzle some caramel sauce on the side when you serve. Enjoy your delicious churro cheesecake bars! To create a smooth filling, start with room-temperature cream cheese. Cold cream cheese can cause lumps. Beat it well until creamy. Gradually add the powdered sugar, vanilla, and cinnamon. Mix until all ingredients blend smoothly. If you see lumps, keep mixing until you achieve that perfect creamy texture. Taste your filling before spreading it on the dough. You may want it sweeter or less sweet. If you prefer a sweeter bar, add more powdered sugar, a tablespoon at a time. For a less sweet option, reduce the sugar by the same amount. Balance is key, so find what suits your taste best. Avoid overmixing the dough; this can make it tough. When you press the dough into the pan, don’t pack it too tightly. It should be smooth but not dense. Also, watch the baking time. Overbaking can dry out the cheesecake filling. Aim for a golden top and a slightly jiggly center for the best texture. Pro Tips Chill the Cream Cheese: For an extra smooth filling, make sure your cream cheese is well-chilled before mixing. This helps achieve a creamier texture in the cheesecake layer. Check for Doneness: Keep an eye on the cheesecake bars as they bake. The edges should be set, while the center may still have a slight jiggle when you take them out of the oven. Use Parchment Paper: Lining your baking pan with parchment paper not only makes removing the bars easier but also prevents them from sticking to the pan, ensuring a clean cut. Customize the Topping: Feel free to add your favorite toppings! Chopped nuts, chocolate chips, or an extra sprinkle of cinnamon-sugar can elevate the flavor and presentation. {{image_4}} You can add fun flavors to your churro cheesecake bars. Try mixing in chocolate chips or a swirl of Nutella. For chocolate chips, just fold in 1/2 cup before spreading the cream cheese layer. If you want Nutella, add 1/4 cup to the cream cheese mixture after beating it. This gives a rich, chocolatey twist. To make gluten-free churro cheesecake bars, swap the all-purpose flour for a gluten-free blend. Look for a blend that works well in baking. Follow the same recipe steps. This way, you can enjoy the same great taste without gluten. You can make these bars vegan with a few easy swaps. Use plant-based butter instead of regular butter. For the cream cheese layer, try vegan cream cheese. Replace the egg with a flaxseed egg. Mix one tablespoon of flaxseed meal with three tablespoons of water and let it sit for five minutes. This mixture works great as a binding agent. You still get a tasty treat while keeping it vegan! To keep your churro cheesecake bars fresh, place them in an airtight container. Make sure they cool completely before storing. You can stack them with parchment paper between layers to avoid sticking. These bars stay tasty for up to three days in the fridge. You can freeze churro cheesecake bars for up to two months. First, let them cool completely. Then, cut them into squares and wrap each piece in plastic wrap. Place the wrapped bars in a freezer-safe bag or container. This way, you can enjoy a sweet treat later! To reheat, remove the desired amount from the fridge or freezer. If frozen, let them thaw in the fridge overnight. For warm bars, place them in the microwave for about 15-20 seconds. You can also reheat them in an oven at 350°F for about 10 minutes. Enjoy them warm with a drizzle of caramel sauce! Yes, you can make these bars a day before serving. Just let them cool completely. Then, store them in an airtight container in the fridge. This helps the flavors blend well. When you are ready to serve, sprinkle some cinnamon-sugar on top for extra flair. Your bars are done when the top is golden brown. The cheesecake layer should look set and not jiggly. A toothpick inserted in the center should come out clean. This means the center is cooked well. Keep an eye on them in the last few minutes to prevent burning. These bars pair well with a drizzle of caramel sauce. You can also serve with whipped cream or ice cream. Fresh fruit like strawberries or raspberries adds a nice touch too. For a crunch, consider nuts or chocolate chips on the side. These bars contain gluten and dairy, so they are not gluten-free or vegan. However, you can adapt the recipe. Use gluten-free flour and dairy-free cream cheese. This way, you can make a version for those with dietary restrictions. Always check labels for allergens. We covered how to make Churro Cheesecake Bars, from choosing ingredients to storing leftovers. You learned about ingredient swaps, baking steps, and fun variations. Remember to strive for the perfect filling and avoid common mistakes. These bars can fit many diets and delight everyone. Enjoy sharing this tasty treat with friends and family!

Are you ready for a dessert that combines creamy richness with a sweet cinnamon twist? Churro Cheesecake Bars are the perfect treat to impress your friends and family. In this …

Read more

Categories Desserts
Older posts
Newer posts
← Previous Page1 … Page153 Page154 Page155 … Page161 Next →

TASTED NEST

Where Flavor Finds a Home 🍳🏡 — warm, simple, and crave-worthy recipes made for real life, from stovetop mornings to backyard dinners.

PAGES

Home About Contact Privacy Policy Terms & Conditions Cookie Policy GDPR Policy Copyright Policy Disclaimer

CATEGORIES

Appetizers Desserts Salads Breakfast Dinner
Copyright © 2025 Tasted Nest. All rights reserved.