Skip to content
  • GDPR Privacy Policy
  • Copyright Policy
  • Disclaimer
  • Terms & Conditions
Tasted Nest
  • Home
  • Appetizers
  • Desserts
  • Salads
  • Breakfast
  • Dinner
  • Privacy Policy
  • Contact
  • About

Chef Tavio

Cinnamon Sugar Pan Fried Bananas Delightful Treat

November 27, 2025December 29, 2024 by Chef Tavio
- 2 ripe bananas, sliced into 1/2-inch rounds - 2 tablespoons unsalted butter - 3 tablespoons packed brown sugar - 1 teaspoon ground cinnamon - A pinch of salt - Optional toppings: Whipped cream or vanilla ice cream To make Cinnamon Sugar Pan Fried Bananas, you need just a few ingredients. First, grab two ripe bananas. The riper the bananas, the sweeter they will be. Slice them into rounds that are about half an inch thick. Next, you need some unsalted butter. You will use two tablespoons to help cook the bananas and add richness. For sweetness and flavor, gather three tablespoons of packed brown sugar. This will caramelize beautifully when heated. You also need one teaspoon of ground cinnamon. This spice gives the dish its warm, comforting taste. Lastly, add a pinch of salt. This little bit enhances the flavors and balances the sweetness. If you want to take it up a notch, consider optional toppings. Whipped cream or vanilla ice cream pairs perfectly with the warm bananas. These ingredients come together to create a delightful treat that feels special and tastes amazing. {{ingredient_image_2}} In a small bowl, combine three tablespoons of brown sugar, one teaspoon of ground cinnamon, and a pinch of salt. Mix them well until they blend nicely. This mixture adds a sweet and spicy flavor to our dish. Next, place a large skillet over medium heat. Add two tablespoons of unsalted butter to the pan. Let it melt slowly, keeping an eye on it. You want the butter to foam slightly, but do not let it turn brown. That can change the taste. Once the butter is melted, add the sliced bananas to the skillet. Make sure to lay them out in a single layer. Cook them for about one to two minutes. You want them to soften but still hold their shape. Now, sprinkle half of your cinnamon sugar mixture over the bananas. Using a spatula, gently flip the bananas to coat them in sugar. Let them cook for another one to two minutes. This will help them caramelize and turn a lovely golden brown. Carefully take the bananas out of the skillet and place them on a serving plate. Sprinkle the remaining cinnamon sugar mixture over the warm bananas. This extra touch intensifies the flavor and makes them even more delicious. Enjoy your warm cinnamon sugar pan-fried bananas right away. For an extra treat, add a fluffy dollop of whipped cream or a scoop of vanilla ice cream. This makes your dessert even more special and fun to eat! For the best taste, use ripe bananas. They should be yellow with a few brown spots. This ripeness means they are sweet and soft. Overripe bananas will be mushy, while underripe bananas will not taste as good. You want bananas that are firm yet can be easily sliced. This balance gives your dish great flavor and texture. When cooking, keep the heat at medium. If the butter gets too hot, it will brown. Brown butter has a nutty taste, which can change the flavor of your dish. Watch the butter closely. When it foams but does not brown, it's ready. This careful step ensures your bananas cook perfectly without any burnt taste. Serve your pan-fried bananas warm. They are delicious on their own, but toppings can make them even better. Try adding a scoop of vanilla ice cream or a dollop of whipped cream. This adds creaminess and richness to the dish. You can also drizzle the leftover melted butter from the pan over the bananas for extra flavor. A sprinkle of extra cinnamon can make your dish look fancy and taste amazing! Pro Tips Choose the Right Bananas: Opt for ripe bananas that are slightly speckled for the best flavor and sweetness. Monitor the Heat: Keep the skillet on medium heat to avoid burning the sugar while caramelizing the bananas. Experiment with Spices: Try adding a pinch of nutmeg or vanilla extract to the cinnamon sugar for a unique twist. Serving Suggestions: For an extra indulgent experience, serve with a drizzle of chocolate sauce or a sprinkle of chopped nuts. {{image_4}} You can make your cinnamon sugar pan-fried bananas even better. Try adding nuts like walnuts or almonds. They give a nice crunch. You can also add other fruits. Sliced strawberries or apples can bring new flavors. Mix and match to find your favorite. Want to change up the taste? Try adding spices like nutmeg or allspice. A pinch can make a big difference. Nutmeg adds warmth, while allspice brings a hint of sweetness. Don't be afraid to play around. You might create your new favorite treat! You can make this treat a bit healthier. Use coconut oil instead of butter for a lighter option. For less sugar, try using honey or maple syrup. These swaps can lower calories while keeping the flavor. Enjoy a tasty dessert without the guilt! To keep your cinnamon sugar pan-fried bananas fresh, store them in an airtight container. Place them in the fridge. They will stay tasty for up to two days. Make sure to let them cool to room temperature before sealing them up. This way, you prevent extra moisture that can make them mushy. When you're ready to enjoy leftovers, reheat them on the stove for the best taste. Use a small pan over low heat. Add a little butter to the pan to help with flavor. Heat for about 2-3 minutes until warm. This keeps the bananas soft and tasty, without losing their charm. Can you freeze cinnamon sugar pan-fried bananas? Yes, but they may change in texture. If you want to freeze them, place the bananas in a single layer on a baking sheet. Freeze for a few hours, then transfer them to a freezer bag. They can last up to a month. When you’re ready to use them, thaw them in the fridge overnight. They may not be as firm, but they will still taste great! You can use frozen bananas, but they change texture. Fresh bananas keep their shape and firmness when cooked. Frozen ones become mushy. If you use frozen, thaw them first. Drain any extra liquid. This helps avoid a soggy dish. If you want a dairy-free option, use coconut oil or vegan butter. Both give a nice flavor. You can also use olive oil for a different taste. Just measure the same amount as butter. This still keeps your bananas rich and tasty. To cut the sweetness, reduce the brown sugar. Use just one tablespoon instead of three. You can also add a splash of lemon juice. This balances the flavors. If you like spice, try adding nutmeg or ginger for extra flavor without more sugar. This recipe for cinnamon sugar pan-fried bananas is easy and fun. You learned the key steps: sautéing ripe bananas and mixing in sugar and spice. Remember, picking ripe bananas makes a big difference. You can even try add-ins for more flavor. Storing leftovers is simple too. Whether you enjoy them warm or topped with ice cream, this treat satisfies. Happy cooking, and enjoy your sweet creation!

Looking for a quick and yummy dessert? Let me show you how to make Cinnamon Sugar Pan Fried Bananas! This simple treat uses just a few ingredients and requires little …

Read more

Categories Desserts

Strawberry Glazed Strawberry Bread Fresh and Flavorful

December 9, 2025December 29, 2024 by Chef Tavio
To make this delightful bread, gather these fresh ingredients: - 1 cup fresh strawberries, pureed - 1/2 cup unsalted butter, softened to room temperature - 1 cup granulated sugar - 2 large eggs, at room temperature - 1 teaspoon pure vanilla extract - 2 cups all-purpose flour - 1 teaspoon baking soda - 1/2 teaspoon salt - 1/2 cup buttermilk, at room temperature - 1/2 cup diced strawberries (for added texture) These ingredients come together to create a moist, flavorful bread that is bursting with strawberry goodness. For the sweet and tangy glaze, you will need: - 1 cup powdered sugar - 2 tablespoons fresh strawberry puree - 1-2 teaspoons milk (adjust as needed for desired consistency) This glaze adds a perfect finish, making your bread even more special. You can enhance your bread with some fun add-ins if you like: - Chopped nuts, such as walnuts or pecans - A sprinkle of cinnamon or nutmeg - Chocolate chips for a sweet twist - Zest from a lemon or orange for brightness These options allow you to customize your strawberry glazed strawberry bread to fit your taste perfectly. {{ingredient_image_2}} To start, preheat your oven to 350°F (175°C). This step warms the oven for even baking. Next, take a 9x5 inch loaf pan and grease it with butter. You can also dust it with flour or line it with parchment paper. This helps the bread come out easily later. In a medium bowl, mix 1 cup of pureed strawberries with 1/2 cup of softened butter and 1 cup of granulated sugar. I use an electric mixer to blend these until the mix is smooth and creamy. Then, add 2 large eggs one by one. Make sure each egg blends well before adding the next. Stir in 1 teaspoon of pure vanilla extract for flavor. In another bowl, whisk together 2 cups of all-purpose flour, 1 teaspoon of baking soda, and 1/2 teaspoon of salt. This mix is the dry part of your recipe. Gradually add this dry mix to the strawberry mix. Alternate adding the flour mix and 1/2 cup of buttermilk, starting and ending with the flour. Finally, gently fold in 1/2 cup of diced strawberries. Be careful not to overmix. Then, pour the batter into your prepared loaf pan, smoothing the top with a spatula. Now it's time to bake! Place the loaf pan in the preheated oven. Bake for 55 to 65 minutes. You'll know the bread is done when a toothpick inserted in the center comes out clean or with a few moist crumbs. Once baked, let the bread cool in the pan for about 10 to 15 minutes. Then, carefully move the loaf to a wire rack. Let it cool completely before adding the glaze. This cooling step is crucial; glazing a warm loaf can make it messy. While the bread cools, we can prepare the glaze. In a small bowl, whisk together 1 cup of powdered sugar, 2 tablespoons of fresh strawberry puree, and 1 to 2 teaspoons of milk. Keep adding milk until the glaze reaches a pourable consistency. Once the bread is cooled, drizzle the glaze over the top. Allow it to cascade down the sides for a beautiful finish. Let the glaze set before slicing into your delicious creation. To make the best strawberry bread, start with ripe strawberries. They add natural sweetness. Use fresh strawberries for the glaze too. Always measure your ingredients carefully. This keeps your bread light and fluffy. Room temperature eggs and buttermilk mix better. This helps create a smoother batter. The glaze needs to be smooth and pourable. Start with one cup of powdered sugar. Add two tablespoons of fresh strawberry puree. Mix well. Then, add milk one teaspoon at a time. Keep stirring until you like the thickness. If it’s too thin, add more sugar. If it's too thick, add more milk. Don’t skip cooling the bread before glazing. If it’s warm, the glaze will melt. Also, avoid overmixing the batter. This can make the bread dense. When adding the strawberries, fold them in gently. Finally, make sure to use a toothpick to test for doneness. If it comes out clean, your bread is ready. Pro Tips Use Ripe Strawberries: For the best flavor, make sure to use ripe, juicy strawberries. They will enhance the sweetness and overall taste of your bread. Don’t Overmix: When folding in the diced strawberries, be gentle. Overmixing can lead to a dense bread rather than a light and fluffy texture. Check for Doneness: Since oven temperatures can vary, check the bread a few minutes before the baking time is up. A toothpick should come out clean or with a few moist crumbs. Let It Cool Fully: Allow the bread to cool completely before glazing. This prevents the glaze from melting off and ensures a beautiful finish. {{image_4}} You can enjoy this bread without gluten. Use a gluten-free flour blend instead of regular flour. Look for blends made with almond flour or coconut flour. Make sure the blend has xanthan gum, which helps with texture. Follow the same steps as in the regular recipe. It will taste great and be safe for those with gluten issues. Feel free to mix in other fruits or nuts. Blueberries, raspberries, or chopped bananas work well. These fruits add different flavors and colors. For nuts, try walnuts or pecans. Chop them finely and fold them in at the end. This twist gives the bread a new layer of taste and a delightful crunch. You can change how sweet your bread is. If you prefer less sugar, cut the sugar by a third. You could also use honey or maple syrup as a natural sweetener. Just remember to adjust the liquid ingredients if you do. Taste the batter before baking; it should be sweet but not overpowering. This helps you create the perfect balance just for you. To keep your strawberry glazed bread fresh, wrap it tightly in plastic wrap. This keeps moisture in and prevents it from drying out. You can also place it in an airtight container. Store it at room temperature for up to three days. If you want to keep it longer, consider freezing it. To freeze leftover bread, slice it first. Wrap each slice in plastic wrap, then place them in a freezer bag. Remove as much air as possible to prevent freezer burn. Label the bag with the date. The bread will stay fresh for up to three months. Thaw slices at room temperature or pop them in the toaster for a warm treat. When you’re ready to serve, let the bread come to room temperature. If it was frozen, thaw it first. You can add a fresh glaze on top for a nice touch. Serve with whole strawberries for a pop of color. Enjoy it with a cup of tea or coffee for a perfect snack! Strawberry glazed bread stays fresh for about 3 to 5 days at room temperature. Store it in an airtight container. If you want it to last longer, keep it in the fridge, where it can last up to a week. To enjoy it at its best, eat it fresh! Yes, you can use frozen strawberries. Just make sure to thaw and drain them first. This helps get rid of extra moisture, which can change the bread's texture. After thawing, you can mash them into a puree or chop them for added texture. If you don’t have buttermilk, you can make a quick substitute. Mix 1/2 cup of milk with 1/2 tablespoon of lemon juice or vinegar. Let it sit for about 5 minutes. This will give you a similar tangy flavor and acidity that buttermilk provides. This blog post covered how to make strawberry glazed bread from start to finish. We went over the key ingredients, steps for preparation and baking, and tips for the best results. You also learned about variations, storage, and answered common questions. Strawberry glazed bread is a fun treat to make. It’s easy to customize and share. Enjoy the delicious flavors and use the tips to make your version perfect. I hope you feel excited to bake and enjoy this tasty recipe!

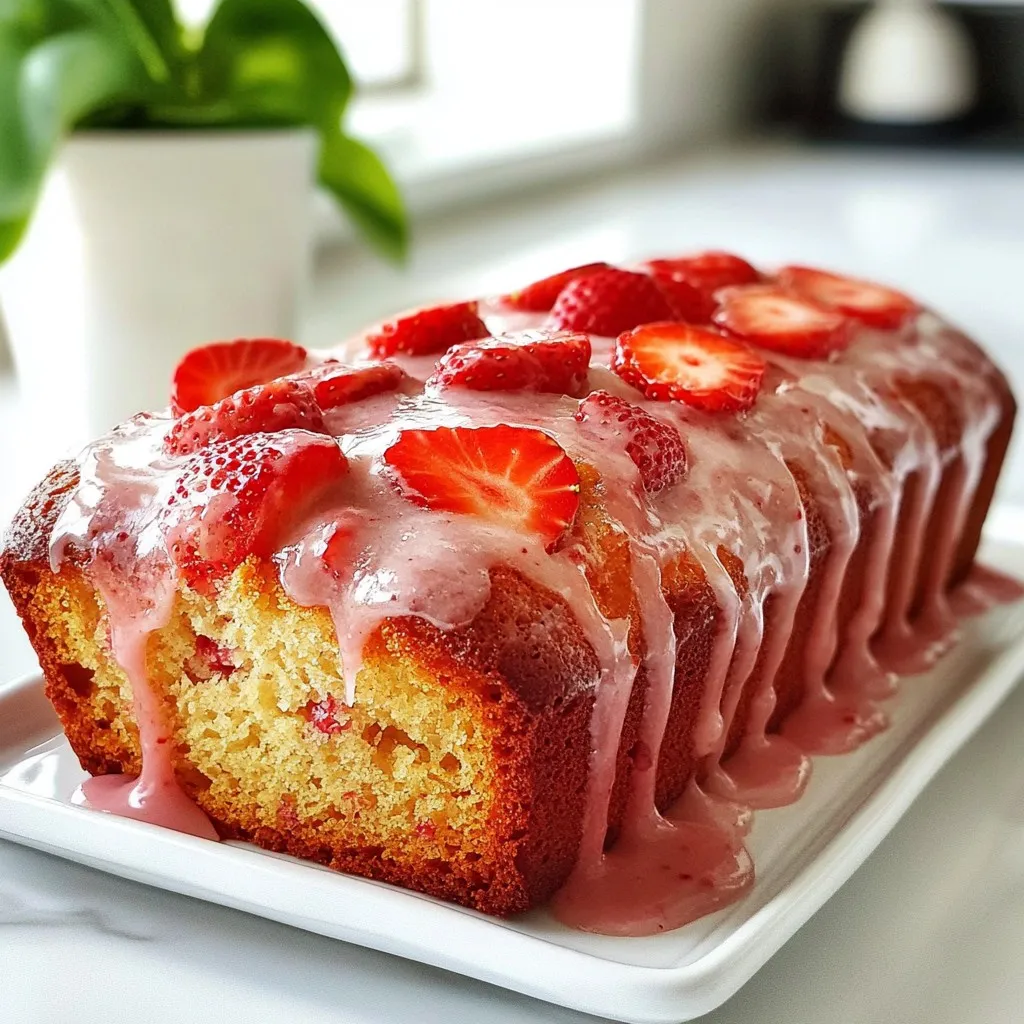
Craving a delicious and fresh treat? Let me show you how to make the most amazing Strawberry Glazed Strawberry Bread! This easy recipe is packed with juicy strawberries and topped …

Read more

Categories Desserts

Cannoli French Toast Delightful and Creamy Recipe

November 26, 2025December 26, 2024 by Chef Tavio
- 4 slices thick-cut Italian bread - 1 cup ricotta cheese - ½ cup powdered sugar - 1 teaspoon pure vanilla extract - ½ teaspoon ground cinnamon - 2 large eggs - ½ cup whole milk - 2 tablespoons unsalted butter - ¼ cup mini chocolate chips - Chopped pistachios (for garnish) To make Cannoli French Toast, you need some special ingredients. The main part is the thick-cut Italian bread. It holds up well and soaks up flavors. You also need ricotta cheese. This creamy cheese makes the filling rich and smooth. Powdered sugar adds sweetness. A touch of vanilla extract gives a nice flavor. For extra flavor, ground cinnamon adds warmth. Eggs and milk help bind everything together. The unsalted butter is key for cooking. It makes the toast golden and adds a rich taste. Mini chocolate chips give a fun surprise in each bite. Lastly, chopped pistachios add a nice crunch on top. Gather these ingredients to get ready for a delightful treat! {{ingredient_image_2}} - In a medium bowl, combine: - 1 cup ricotta cheese - ½ cup powdered sugar - 1 teaspoon pure vanilla extract - ½ teaspoon ground cinnamon - ¼ cup mini chocolate chips Mix these ingredients until they are smooth and creamy. This will be your tasty cannoli filling. The ricotta gives it a rich flavor, while the chocolate chips add a sweet surprise. - Take two slices of the thick-cut Italian bread. - Spread a generous amount of the ricotta mixture between the slices. - Make sure to spread evenly for the best taste. - Repeat this with the remaining bread slices to create more sandwiches. This step is key. The filling should be thick enough to stay in the middle while cooking. - In another bowl, whisk together: - 2 large eggs - ½ cup whole milk This creates the egg mixture for dipping. Whisk until it is blended and frothy. - Preheat a non-stick skillet over medium heat. Add: - 2 tablespoons unsalted butter Let it melt and coat the skillet. - Carefully dip each stuffed sandwich into the egg mixture. Soak for about 30 seconds on each side. - Once soaked, place the sandwiches in the skillet. Cook for about 3-4 minutes on each side. They should turn golden brown. Repeat with the remaining butter and sandwiches until all are cooked. The outside will be crispy while the inside stays creamy. The best heat for cooking French toast is medium. This way, the bread cooks evenly. If the heat is too high, the outside burns while the inside stays raw. I aim for a nice golden color, which takes about 3-4 minutes per side. You want that crispy outside and soft inside. To achieve this perfect color, use a non-stick skillet. Melt butter in the pan, but don’t let it brown. Dip the stuffed bread in the egg mix for about 30 seconds. Don't rush this step; soaking is key. You can make your French toast look great with simple garnishes. Dust it with powdered sugar for a sweet touch. A sprinkle of chopped pistachios adds color and crunch. Pair the French toast with fresh fruit. Berries or bananas make a tasty and colorful side. You could also add a drizzle of chocolate sauce for a fun twist. One big mistake is over-soaking the bread. If you soak too long, it gets soggy. Aim for just the right time. Another mistake is using the wrong bread. Thick-cut Italian bread works best. Avoid thin slices, as they won’t hold the filling well. Stick to the recipe for the best results. Pro Tips Use Day-Old Bread: Day-old bread is perfect for French toast as it absorbs the egg mixture better without falling apart. Customize Your Filling: Feel free to add other mix-ins to the ricotta filling, such as orange zest, or swap mini chocolate chips for dried fruit. Perfect Cooking Temperature: Keep the skillet or griddle at medium heat to ensure the outside cooks evenly while the inside stays creamy. Garnish Wisely: Adding a drizzle of chocolate sauce or a sprinkle of crushed nuts can enhance the flavor and presentation of your dish. {{image_4}} You can easily add fun flavors to your cannoli French toast. Try adding fruit or nuts to the filling. Fresh berries, like strawberries or blueberries, add a burst of flavor. Pecans or walnuts give a nice crunch. You can also use different types of bread. Brioche or challah adds sweetness and a fluffy texture. If you have dietary needs, I have some options for you. For a gluten-free version, use gluten-free bread. Make sure the filling ingredients are also gluten-free. For a vegan twist, swap ricotta for a plant-based cream cheese. Use flax eggs instead of regular eggs. These changes keep the dish tasty and inclusive. You can mix sweet and savory flavors for a fun twist. Try adding crispy bacon or sausage on the side. This gives a nice balance to the sweet filling. You can also introduce spices like nutmeg or cardamom. These spices add warmth and depth to the dish. Experiment with these ideas to find your favorite version! To keep your cannoli French toast fresh, place it in an airtight container. This helps seal in moisture. If you plan to eat it within two days, store it in the fridge. For longer storage, freeze it. Wrap each slice in plastic wrap, then place them in a freezer bag. This prevents freezer burn. To reheat your French toast, use a skillet on low heat. This warms it evenly and keeps it crispy. You can also use an oven. Preheat it to 350°F. Place the slices on a baking sheet and heat for about 10 minutes. This method keeps the texture nice. In the fridge, cannoli French toast lasts about two days. If frozen, it can last up to three months. Just remember to thaw it in the fridge before reheating. Enjoy your tasty treat anytime you want! Cannoli French toast is a sweet twist on the classic dish. It combines the rich flavors of cannoli filling with crispy French toast. You make a filling from ricotta cheese, powdered sugar, and chocolate chips. Then, you spread this filling between slices of thick-cut Italian bread. You dip the stuffed bread in a mixture of eggs and milk, then cook it in a skillet until golden brown. The result is creamy, sweet, and delicious! Yes, you can prepare some parts in advance. You can make the ricotta filling a day ahead and store it in the fridge. This saves time in the morning. You can also assemble the sandwiches the night before. Just keep them in the fridge to stay fresh. When you’re ready to eat, dip them in the egg mixture and cook them. It makes breakfast quick and easy! To make Cannoli French toast healthier, you can try some simple swaps. Use whole grain bread instead of thick-cut Italian bread. This adds fiber and nutrients. You can also reduce the sugar in the filling. Use a sugar substitute or less powdered sugar. If you want to cut calories, use egg whites instead of whole eggs. Lastly, add fresh fruit for extra flavor and vitamins. This keeps the dish tasty while making it a bit healthier! This blog post showed you how to make Cannoli French Toast. We covered ingredients, step-by-step instructions, and handy tips. You now know how to prepare, cook, and serve this tasty dish. Remember to avoid common mistakes like over-soaking the bread. Explore variations to fit your taste. Store leftovers with care to enjoy later. Cannoli French Toast is easy to make and delicious for breakfast or brunch. Enjoy making this dish for friends and family!

Imagine starting your day with a twist on a classic favorite! Cannoli French Toast combines the rich, creamy filling of cannoli with warm, golden-brown French toast. This delightful recipe is …

Read more

Categories Breakfast

White Cheddar Spinach Chicken Burgers Flavor Burst

November 17, 2025December 25, 2024 by Chef Tavio
- 1 lb ground chicken - 1 cup fresh spinach, finely chopped - 1 cup white cheddar cheese, shredded The main base of our burgers is ground chicken. It is lean and moist, which makes it perfect for this dish. Adding finely chopped spinach gives a fresh taste and a pop of color. The white cheddar cheese adds a creamy and sharp flavor that melts beautifully on top of the patties. - 1/2 cup breadcrumbs - 1/4 cup red onion, finely chopped - 2 cloves garlic, minced - 1 teaspoon dried oregano - 1/2 teaspoon salt - 1/4 teaspoon black pepper - 1 tablespoon olive oil - Whole wheat burger buns We need breadcrumbs to help bind the chicken mixture. Red onion adds a nice crunch and sweetness. Garlic brings a strong, fragrant flavor that enhances the overall taste. Dried oregano, salt, and black pepper give the burgers depth and aroma. Whole wheat burger buns are a healthy choice for serving. - Fresh arugula or lettuce leaves for serving - Tomato slices for garnish - Avocado slices for garnish For toppings, fresh arugula or crisp lettuce adds crunch and freshness. Tomato slices give a juicy burst with each bite. Avocado slices offer creaminess and healthy fats. You can serve these burgers with crispy sweet potato fries or a fresh salad for a complete meal. {{ingredient_image_2}} To start, grab a large mixing bowl. Add 1 pound of ground chicken. Then, toss in 1 cup of finely chopped fresh spinach. Next, sprinkle in 1 cup of shredded white cheddar cheese. The cheese adds a rich flavor. After that, mix in 1/2 cup of breadcrumbs. This helps bind the patties. Add 1/4 cup of finely chopped red onion and 2 minced garlic cloves for extra taste. Then, season with 1 teaspoon of dried oregano, 1/2 teaspoon of salt, and 1/4 teaspoon of black pepper. Mix all these ingredients well, but don’t overmix. Overmixing makes the patties tough! Now, divide the chicken mixture into four equal portions. With your hands, shape each portion into a uniform patty. Make sure they are evenly thick. This helps them cook evenly. If you want, you can make them a little larger, but keep them the same thickness for best results. Next, heat 1 tablespoon of olive oil in a skillet over medium heat. You’ll know the oil is ready when it shimmers. Carefully place the patties in the skillet. Cook them for about 5-7 minutes on one side until they turn golden brown. Then, flip the patties and cook for another 5-7 minutes. Use a meat thermometer to check if they reach 165°F (75°C). During the last minute, sprinkle some more shredded white cheddar on top of each patty. Cover the skillet briefly with a lid. This helps the cheese melt perfectly! While the patties cook, toast whole wheat burger buns on another pan until they are golden and crisp. Now, you’re ready to assemble your delicious burgers! To get the perfect patty texture, mix your ingredients just enough. Overmixing makes the patties tough. Aim for a smooth blend where you can still see bits of spinach and cheese. This keeps them juicy and full of flavor. Shape each patty evenly. This helps them cook at the same rate. You can easily adjust how you cook these burgers. If you want a smoky flavor, try grilling them instead of using a skillet. Just make sure the grill is hot before you add the patties. You can also bake them in the oven. Set it to 375°F (190°C) and cook for about 20 minutes. Always check the internal temperature to ensure they're safe to eat. These burgers shine when you serve them with fresh toppings. Try adding arugula or lettuce for crunch. Tomato slices add juiciness, while avocado gives creaminess. Crispy sweet potato fries make a great side. For a lighter option, pair them with a fresh salad. Finish with a sprig of parsley for a pop of color on your plate. Pro Tips Don’t Overmix: Be careful not to overmix the chicken mixture. Overmixing can lead to tough and dry patties. Uniform Patties: Ensure the patties are shaped uniformly for even cooking. This helps them cook through at the same rate. Check Temperature: Always use a meat thermometer to check that the internal temperature of the patties reaches 165°F (75°C) for safe consumption. Toast the Buns: Toasting the burger buns adds texture and prevents them from becoming soggy when loaded with toppings and sauces. {{image_4}} You can swap white cheddar for other cheeses. Try gouda for a smoky taste. Mozzarella adds creaminess, while feta brings a salty kick. Each cheese changes the flavor. Choose what you love most. I enjoy using pepper jack for a spicy twist. Grilling gives a nice char and smoky flavor. It helps fat drip away, making burgers leaner. A skillet cooks the burgers evenly and keeps them juicy. Both methods work well. Use a grill for sunny days and a skillet for indoor cooking. If you want a meatless burger, use chickpeas or black beans. Mash them and mix with spinach and cheese. You can also use plant-based ground meat. Add breadcrumbs to bind the mix. This makes a tasty, filling burger for vegetarians. After you enjoy your White Cheddar Spinach Chicken Burgers, store any leftovers. Let the burgers cool to room temperature. Place them in an airtight container. Keep the burgers in the fridge for up to three days. This helps keep the flavors fresh and tasty. If you want to save burgers for later, freezing works well. Wrap each patty in plastic wrap. Then, place them in a freezer bag. They can last up to three months in the freezer. When you’re ready to eat, thaw them in the fridge overnight. Reheat them in a skillet over medium heat for about 5-7 minutes. Ensure they are hot all the way through before serving. For best results, use glass or BPA-free plastic containers. These containers seal well and prevent spills. If you freeze the burgers, use heavy-duty freezer bags. This keeps out air and prevents freezer burn. Proper storage keeps your burgers delicious and enjoyable for days. You can check the chicken burgers' doneness by using a meat thermometer. The internal temperature should reach 165°F (75°C). This ensures the meat is safe to eat. If you don’t have a thermometer, look for a golden brown color on both sides. The juices should run clear when you cut into the patty. Yes, you can make the patties ahead of time. Shape them and store them in the fridge for up to one day. This helps flavors blend well. You can also freeze them. Wrap each patty in plastic wrap and place them in a freezer bag. They can last for up to three months. Just thaw them overnight in the fridge before cooking. You can serve these burgers with many healthy sides. Here are a few ideas: - A fresh garden salad with mixed greens - Steamed broccoli or green beans - Sweet potato fries for a tasty twist - Quinoa salad with diced vegetables - Roasted vegetable medley for added flavor These sides add color and nutrients to your meal. Enjoy experimenting with different combinations! You learned about creating tasty chicken burgers with spinach and cheese. We went through the key ingredients, step-by-step cooking methods, and helpful tips. I shared ideas for variations, like using different cheeses or cooking methods. We also talked about storing leftovers and answered common questions. These burgers are easy to make and enjoy. With a few changes, you can make them fit your taste. I hope you feel inspired to try making these delicious meals at home!

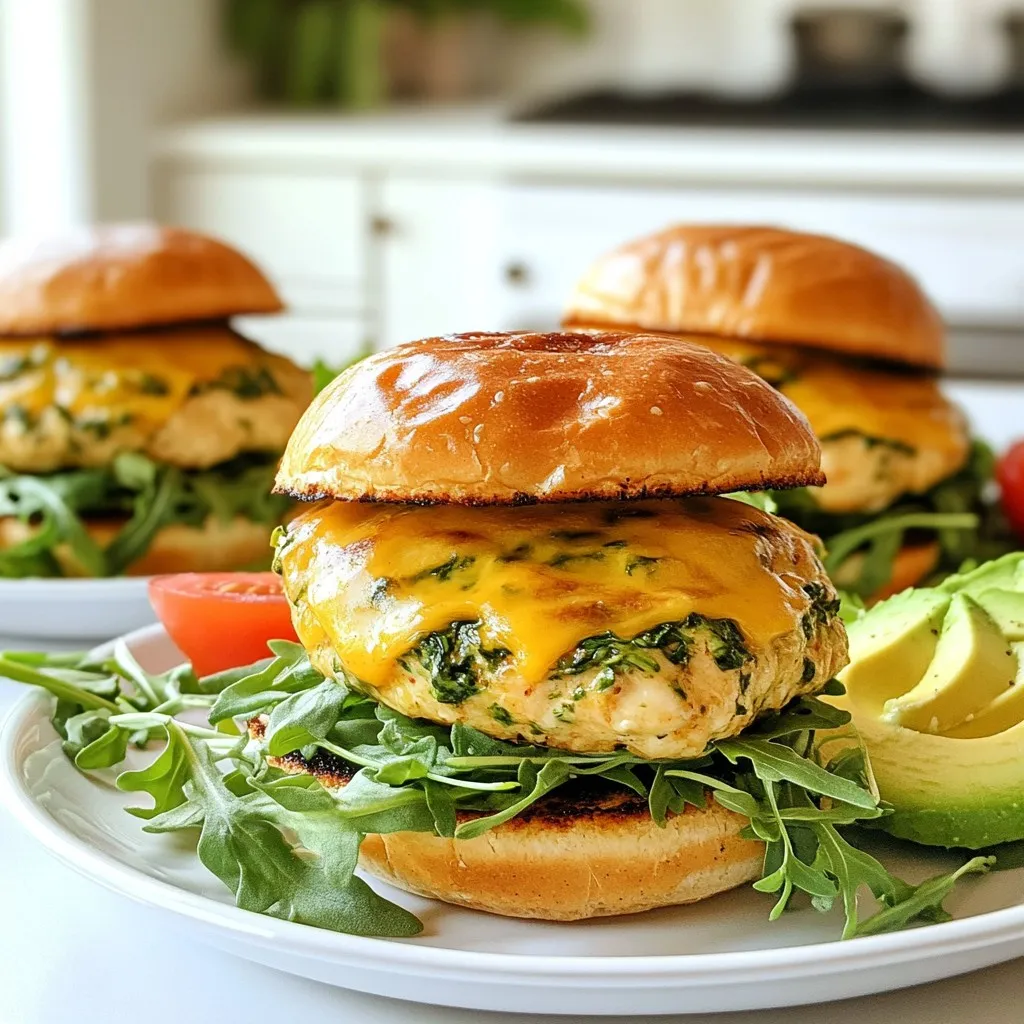
Get ready for a flavor explosion with my White Cheddar Spinach Chicken Burgers! These tasty burgers mix juicy chicken, fresh spinach, and creamy cheddar to create a meal that sings …

Read more

Categories Dinner

Meal Prep Breakfast Bowls Tasty and Easy Guide

November 28, 2025December 24, 2024 by Chef Tavio
- 1 cup quinoa, thoroughly rinsed - 2 cups water or vegetable broth - 1 tablespoon olive oil - Salt and freshly ground black pepper - 1 cup cherry tomatoes, halved - 1 cup fresh spinach, roughly chopped - 4 large eggs - 1 ripe avocado, sliced - 1 tablespoon feta cheese, crumbled (optional) - 2 tablespoons fresh herbs, chopped You can mix in your favorite ingredients to make your bowls unique. Here are some fun ideas: - Cooked bacon or sausage for extra protein - Sliced radishes for a crunch - Greek yogurt for creaminess - Hot sauce for a kick These add-ins give flavor and fun to your breakfast bowls. You might not have all the ingredients at home. Here are some easy swaps: - Use brown rice instead of quinoa for a different grain. - Swap spinach with kale or arugula for a new taste. - Replace eggs with silken tofu for a vegan option. - Try goat cheese in place of feta for a tangy twist. These substitutions allow you to customize your bowls while keeping them tasty. {{ingredient_image_2}} To cook the quinoa, start by rinsing 1 cup of quinoa in cold water. This helps remove any bitterness. Next, place the quinoa in a medium pot and add 2 cups of water or vegetable broth. Bring the mixture to a boil over high heat. Once boiling, lower the heat, cover the pot, and let it simmer for about 15 minutes. The quinoa is ready when it is fluffy and all the liquid is gone. Remove the pot from heat and set it aside. While the quinoa cooks, heat 1 tablespoon of olive oil in a large skillet over medium heat. Add 1 cup of halved cherry tomatoes to the skillet. Sauté them for about 3-4 minutes. This will help them blister and bring out their sweetness. After the tomatoes, add 1 cup of roughly chopped fresh spinach. Cook for an additional 2-3 minutes until the spinach is wilted but still bright green. Season with salt and pepper, then take the skillet off the heat. In a separate pot, fill it with water and bring it to a gentle boil. Lower the heat to let it simmer. Carefully crack 4 large eggs, one at a time, into the water. Poach them for about 4-5 minutes if you like runny yolks. If you want firmer yolks, let them cook a bit longer. Once done, use a slotted spoon to remove the eggs and place them on a paper towel to drain. To build your breakfast bowls, divide the cooked quinoa evenly among four meal prep containers. Top the quinoa with the sautéed tomatoes and spinach mixture. Place one poached egg in each bowl. Add slices of 1 ripe avocado on top. If you want, sprinkle crumbled feta cheese for extra flavor. Lastly, garnish each bowl with fresh chopped herbs like basil or parsley, and add a light sprinkle of salt and pepper. To make meal prep easy, plan ahead. Choose a day to cook. I like Sundays. Cook all the base ingredients first. Make quinoa, sauté veggies, and poach eggs. Use a large pot for quinoa. This saves time. Store cooked ingredients in separate containers. This way, you can mix and match later. Keep it fun and fresh! To poach eggs well, start with fresh eggs. They hold their shape better. Use a pot with simmering water, not a rolling boil. Add a splash of vinegar to the water. This helps keep the egg together. Crack each egg in a small bowl first. Slowly slide it into the water. Cook for 4-5 minutes for runny yolks. Adjust the time for your taste. You can make your breakfast bowls pop with flavor. Use fresh herbs like basil or parsley. They add a bright taste. Season your veggies with salt and pepper. Drizzle a little olive oil on top. Add a squeeze of lemon for zing. If you like cheese, sprinkle feta on your bowl. These small touches make a big difference! Pro Tips Perfectly Poached Eggs: Use fresh eggs for the best results, and gently swirl the water before adding the eggs to help them maintain their shape. Meal Prep Storage: To keep your breakfast bowls fresh, store the avocado separately or add it just before serving to prevent browning. Flavor Boost: Try adding spices like smoked paprika or chili flakes to the sautéed tomatoes for an extra kick of flavor. Customizable Ingredients: Feel free to swap ingredients based on your preferences; roasted sweet potatoes or black beans can be excellent additions for variety. {{image_4}} You can make your breakfast bowls vegetarian or vegan easily. For a vegetarian option, skip the eggs and add more veggies. Try mushrooms, bell peppers, or zucchini. You can also add cheese if you like. For a vegan bowl, replace the eggs with tofu. Use firm tofu and sauté it with spices for flavor. This keeps your meal rich and filling. Want to up your protein game? Adding chicken or tofu works great. For chicken, grill or bake it first. Shred or chop it into bite-sized pieces. Mix it with your quinoa for a hearty meal. If you choose tofu, marinate it in soy sauce or spices before cooking. This adds flavor that complements the other ingredients. Explore global flavors in your breakfast bowls. For a Mediterranean twist, add olives, roasted red peppers, or hummus. Use couscous instead of quinoa for a different texture. For a Mexican flair, add black beans, corn, and salsa. Top with avocado and cilantro for freshness. These variations not only taste great but also make breakfast exciting! To keep your meal prep breakfast bowls fresh, store them in airtight containers. This keeps out air and moisture. Place the bowls in the fridge right after cooling. They stay good for up to four days. Always check for odors or changes in color before eating. You can freeze your breakfast bowls if you want to keep them longer. Use freezer-safe containers or bags for best results. Store the bowls for up to three months. To freeze, let the bowls cool completely. Label them with the date for easy tracking. Reheating is easy. You can use the microwave or the oven. For the microwave, heat for 1-2 minutes. Stir halfway through to warm evenly. If using an oven, preheat to 350°F (175°C). Cover the bowl with foil and heat for about 15 minutes. Always check that the egg is hot before serving. Meal prep breakfast bowls are healthy, ready-to-eat meals packed in containers. They often include grains, veggies, and protein. These bowls make mornings easier and save time. You can enjoy them throughout the week. They are colorful, tasty, and full of nutrients. Meal prep breakfast bowls last about 4 to 5 days in the fridge. Keep them in airtight containers to maintain freshness. If you notice any change in smell or color, it’s best to throw them out. Yes, you can customize your breakfast bowl! Use different grains like brown rice or farro. Add your favorite vegetables, such as bell peppers or zucchini. You can also switch proteins, like using tofu or chicken. This makes each bowl unique and tailored to your taste. The best containers for meal prepping are glass or BPA-free plastic. Look for airtight containers to keep food fresh. Choose different sizes for various meals. Make sure they are microwave and dishwasher safe for easy use. To make breakfast bowls ahead of time, cook the quinoa and veggies in advance. Store them in containers. Poach eggs fresh each morning for the best taste. You can also prepare toppings, like sliced avocado, and add them just before eating. This keeps everything fresh and delicious. Meal prep breakfast bowls are easy to make and enjoy. We covered the main ingredients, cooking steps, and storage tips. You can add your favorite items or switch ingredients for variety. Remember, meal prep saves time and makes mornings better. Make sure to use proper storage for freshness. With practice, you can create delicious bowls that meet your taste. Enjoy the process and have fun experimenting!

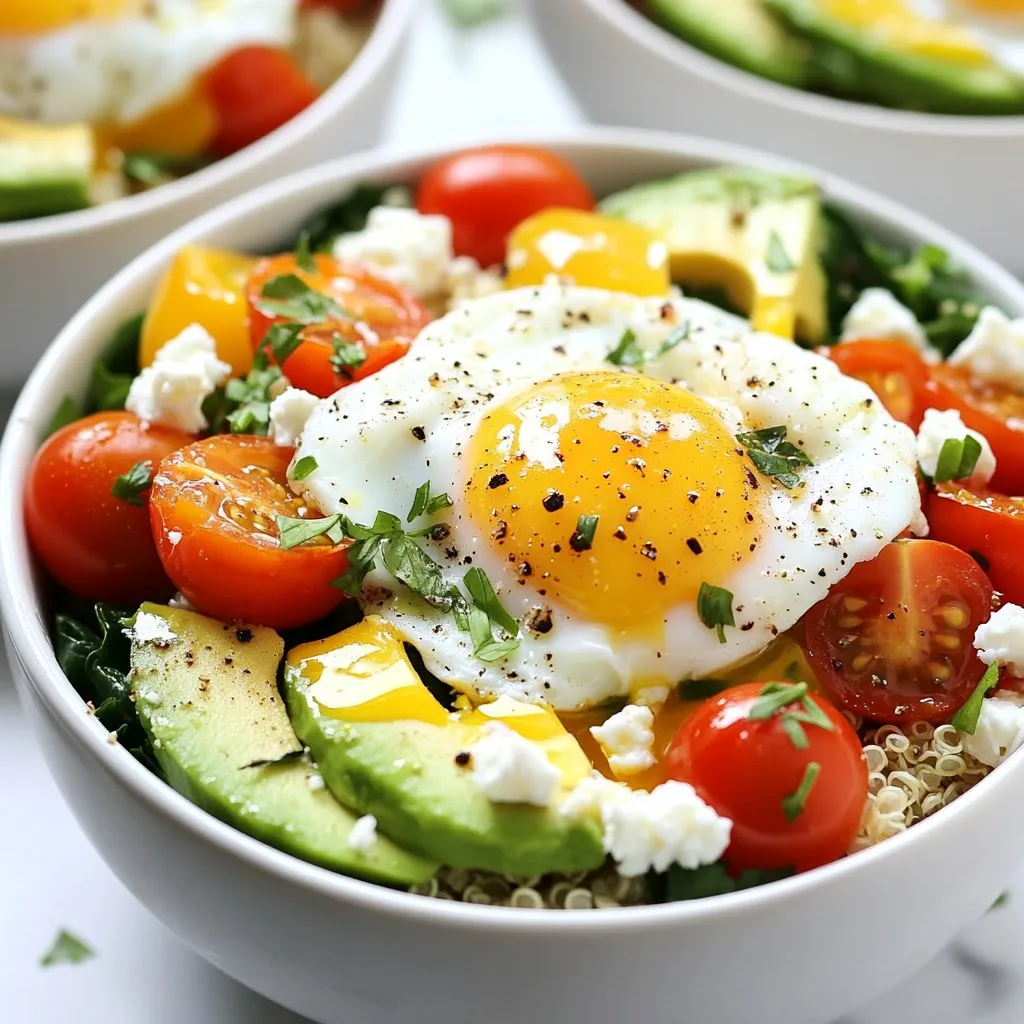
Start your day with meal prep breakfast bowls that are both tasty and simple to make! In this guide, I’ll share how to create healthy bowls packed with flavor. You’ll …

Read more

Categories Breakfast

Big Mac Wraps That Deliver a Tasty Twist

November 14, 2025December 24, 2024 by Chef Tavio
- Ground beef and seasoning Use 1 pound of ground beef. Season with 1 tablespoon onion powder, 1 teaspoon garlic powder, salt, and pepper. These spices add depth to the beef. - Special sauce components The sauce is key! Mix 1 tablespoon yellow mustard, 1 tablespoon ketchup, 1 tablespoon mayonnaise, and 1 tablespoon sweet relish. This blend gives a tangy kick that makes the wraps special. - Fresh vegetables and wraps You need 4 large tortilla wraps, 1 cup shredded iceberg lettuce, 1 cup shredded cheddar cheese, and 1 large sliced tomato. Each adds crunch, flavor, and color to your wraps. For extra zest, consider optional dill pickle slices as a garnish. {{ingredient_image_2}} To start, heat a large skillet over medium heat. Add 1 pound of ground beef to the skillet. Cook the beef until it is well-browned. Use a spatula to break the meat apart as it cooks. Once the beef is browned, drain off any extra fat. Next, season the beef. Sprinkle 1 tablespoon of onion powder and 1 teaspoon of garlic powder over the meat. Add salt and pepper to taste. Then, stir in 1 tablespoon of yellow mustard and 1 tablespoon of ketchup. Cook for an extra 2-3 minutes. This helps the spices mix in well. While the beef cooks, you can make the special sauce. In a small bowl, mix together 1 tablespoon of mayonnaise and 1 tablespoon of sweet relish. Stir the mixture until it is smooth. This sauce adds a lot of flavor to your wraps. Now it's time to assemble your wraps. First, warm your tortillas. You can do this in a dry skillet or microwave for about 20 seconds. Warming makes them easier to roll. Lay each warm tortilla flat on a plate. Spread about 1 tablespoon of the special sauce in the center of each tortilla. Next, add a generous scoop of the seasoned beef. Top it with a handful of shredded iceberg lettuce, a few slices of fresh tomato, and a sprinkle of shredded cheddar cheese. If you like, add dill pickle slices for extra crunch. To wrap, fold the sides of the tortilla inward. Roll from the bottom up tightly to keep the filling inside. If you want a crispy finish, grill the wraps. Place them seam-side down in the skillet. Cook for 2-3 minutes until they are golden brown and slightly crisp. This step gives them a nice crunch and warms everything inside. Carefully slice each wrap in half for easy serving. Enjoy them with extra special sauce on the side for dipping! Seasoning is key to great flavor. Start with onion powder and garlic powder. They add depth without being too strong. Use salt and pepper to taste. This helps balance the flavors. Be careful not to over-season. Taste as you cook. You can always add more, but you can't take it out. Making a perfect wrap takes care. First, warm the tortillas. This makes them easy to fold. Spread the special sauce in the center. Add a scoop of seasoned beef and veggies. Layer the ingredients evenly. Avoid overstuffing; this helps keep the wrap secure. Fold in the sides and roll tightly. This keeps the filling inside and makes it easier to eat. Dipping sauces can enhance your meal. Serve the wraps with extra special sauce on the side. You may like ranch or barbecue sauce too. Fresh veggies or chips make great sides. They add crunch and color to your plate. Arrange everything nicely for a fun meal. Enjoy the tasty twist of your Big Mac Wraps! Pro Tips Brown the Beef Well: Ensure the ground beef is well-browned for maximum flavor. This caramelization adds depth to your wraps. Customize Your Sauce: Feel free to adjust the special sauce ingredients to suit your taste. Adding a dash of hot sauce can give it a spicy kick! Layering is Key: Layer the ingredients evenly to ensure every bite is packed with flavor. This will help prevent any one ingredient from overpowering the others. Grill for Extra Crispiness: If you enjoy a crunchy texture, grilling the wraps seam-side down gives them a delightful crispiness while sealing the filling inside. {{image_4}} You can swap the ground beef for plant-based options. This choice is great for vegetarians. Try using lentils, mushrooms, or a plant-based burger mix. These options add texture and flavor. You still get the classic Big Mac taste with a twist. Just season them the same way as the beef. For a low-carb twist, use lettuce wraps instead of tortillas. Large leaves of romaine or iceberg lettuce work best. They hold the filling well and add a nice crunch. This version is fresh and light, perfect for those watching carbs. Just layer the ingredients like you would in a tortilla. You can customize your Big Mac Wrap with extra toppings. Add more veggies like bell peppers or cucumbers for crunch. You can also include different sauces. Try barbecue sauce or hot sauce for a spicy kick. Each topping adds a unique flavor and makes your wrap special. Get creative and make it your own! To keep your Big Mac Wraps fresh, place them in an airtight container. Store them in the fridge. They stay good for up to three days. Make sure they cool down first. This way, they won’t get soggy. When you're ready to eat the leftovers, reheating is key. The best way is to use a skillet. Heat it over medium heat. Place the wrap in the skillet for about 2-3 minutes. This keeps the wrap crispy. You can also use a microwave, but it may make the wrap soft. If you want to save wraps for later, freezing works well. Wrap each one tightly in plastic wrap. Then, place them in a freezer bag. They can last up to two months in the freezer. When you’re ready to eat, thaw them in the fridge overnight. Then, reheat as mentioned. Enjoy your tasty twist anytime! A Big Mac Wrap is a fun twist on the classic Big Mac burger. It uses the same key flavors but wraps them in a tortilla. You get the taste of seasoned beef, special sauce, and fresh veggies all in one hand-held meal. The wrap keeps the flavor but makes it easier to eat on the go. Yes, you can prep these wraps ahead of time! Cook the beef and make the special sauce. Then, store both in the fridge. When you're ready to eat, just warm the beef and tortillas. This way, you save time during busy days. Each Big Mac Wrap has about 400-450 calories. It contains roughly: - 20g of protein - 25g of fat - 30g of carbs This can vary based on how much cheese or sauce you add. You can make it healthier by using less sauce or adding more veggies. The Big Mac Wrap offers a different eating experience. In a burger, you have layers stacked high. In a wrap, the flavors mix together. The wrap has a softer texture and is easier to hold. You can also customize it more easily, adding your favorite toppings. You learned how to make Big Mac wraps from scratch. We covered key ingredients, cooking steps, and variation ideas. Remember, fresh veggies and the right sauces can boost your wraps. Try using plant-based ingredients for a twist or lettuce wraps for a low-carb meal. Store any leftovers properly and enjoy them later. Personalizing your wraps can make your meal even better. Now, it's time to put your skills to the test. Enjoy the fun of creating your Big Mac wraps!

Are you ready to spice up your dinner routine? Big Mac Wraps deliver a tasty twist on the classic burger we all love. In this post, I’ll show you how …

Read more

Categories Dinner

Savory Ultimate BLT Wraps with Secret Sauce Recipe

November 20, 2025December 23, 2024 by Chef Tavio
- 4 large whole wheat tortillas - 8 slices of crispy bacon (turkey or regular) - 16 slices of ripe tomatoes - 8 slices of fresh lettuce (romaine or iceberg) - 1 cup shredded cheese (cheddar or a flavorful blend) - ½ cup mayonnaise - 2 tablespoons Dijon mustard - 1 tablespoon honey - 1 teaspoon smoked paprika - ¼ teaspoon garlic powder - Salt and pepper to taste The main ingredients start with large whole wheat tortillas. They provide a hearty base. You will need crispy bacon, either turkey or regular. The bacon gives the wrap its savory flavor. Fresh tomatoes add sweetness and juiciness. Lettuce adds crunch and freshness. Lastly, shredded cheese gives a creamy texture. The secret sauce is what makes these wraps special. Start with mayonnaise, which adds creaminess. Next, add Dijon mustard for a tangy kick. Honey adds a touch of sweetness. Smoked paprika gives it a warm, smoky flavor. Garlic powder enhances the taste. Don’t forget to season with salt and pepper. This balance of flavors and textures makes every bite exciting. Enjoy crafting these wraps with your favorite ingredients! {{ingredient_image_2}} To start, mix the ingredients for the secret sauce. In a medium bowl, add: - ½ cup mayonnaise - 2 tablespoons Dijon mustard - 1 tablespoon honey - 1 teaspoon smoked paprika - ¼ teaspoon garlic powder - Salt and pepper to taste Whisk until smooth and creamy. This sauce adds a rich flavor to the wrap. Let the sauce sit for a few minutes. This allows the flavors to meld and deepen. Next, cook the bacon. If you choose regular bacon, heat a skillet over medium heat. Cook the bacon slices for 6-8 minutes until crispy. Drain them on paper towels to absorb extra grease. For turkey bacon, follow the package instructions. Cook it until it’s crispy, then let it cool a bit before handling. Crispiness is key for a great wrap. Now it’s time to assemble. Take a whole wheat tortilla and lay it flat. Spoon 2-3 tablespoons of the secret sauce into the center. Spread it with the back of a spoon. Layer the ingredients carefully. Start with 2 slices of crispy bacon (or 4 slices of turkey bacon). Next, add 2-3 slices of juicy tomato. Then, place 2 leaves of crisp lettuce. Finally, sprinkle ¼ cup of shredded cheese on top. Wrap it up tightly. Fold the sides of the tortilla inward. Then roll it from the bottom to the top. Press gently to secure everything inside. Repeat this for the rest of the tortillas and ingredients. Slice each wrap in half diagonally for a nice look. Serve with extra secret sauce on the side for dipping. This makes each bite even better. Use large whole wheat tortillas for a hearty wrap. Whole wheat adds fiber and nutrients. You can also try spinach or tomato tortillas for a fun twist. They add color and taste to your wraps. Just ensure they are large enough to hold all the goodies. You can change up the secret sauce easily. Add hot sauce for a spicy kick. Swap honey for maple syrup for a different sweetness. You can also mix in fresh herbs like dill or basil for extra flavor. These changes can make your wraps unique every time you make them. Make your wraps look great on the plate. Cut them in half diagonally for a nice look. Serve with a small bowl of extra secret sauce for dipping. You can also add a sprinkle of fresh herbs on top. This adds color and makes your meal feel special. Use colorful plates to make the dish pop. Pro Tips Choose the Right Tortilla: Whole wheat tortillas add a nutty flavor and extra fiber, but feel free to swap for spinach or tomato tortillas for a colorful twist. Perfect Bacon Crispiness: For the crispiest bacon, ensure your skillet is preheated and avoid overcrowding the pan, which can cause steaming instead of frying. Layering for Flavor: To enhance the flavor, season each layer with a pinch of salt and pepper, especially the tomatoes, to bring out their natural sweetness. Wrap Tight: When rolling the wrap, make sure to tuck in the sides securely to prevent spills and ensure a neat presentation when sliced. {{image_4}} If you want to make a vegetarian version of these wraps, swap out the bacon. You can use crispy tempeh or even roasted mushrooms. Both options give great flavor and texture. Tempeh has a nice bite, while mushrooms add an earthy taste. You can marinate them in soy sauce or your favorite spices for extra flavor. Enjoy the same fresh veggies and secret sauce for a tasty meal. For those who love spice, add some heat to your wraps. You can include jalapeños or hot sauce in the secret sauce. A sprinkle of crushed red pepper flakes on top also works well. If you want a smoky flavor, try adding chipotle powder to the sauce. These spicy tweaks will give your wraps a nice kick! You can switch up the ingredients based on the seasons. In spring, add fresh avocados or sprouts for a creamy texture. Summer is perfect for using heirloom tomatoes and fresh basil. In fall, consider roasted pumpkin slices or spinach. These seasonal swaps keep your wraps fresh and exciting all year round! To keep your leftover wraps fresh, wrap them tightly in plastic wrap. This helps keep air out. You can also place them in an airtight container. Store them in the fridge to maintain their taste and texture. If you want to save wraps for later, freezing is a great choice. First, wrap each one in foil or freezer paper. This protects them from freezer burn. Label the wraps with the date. To thaw, place them in the fridge overnight. This way, they stay moist and tasty. When stored in the fridge, your wraps will stay fresh for about 3 days. Check for any signs of spoilage, like unusual smells or colors. If you see anything off, throw it out. Always trust your senses when it comes to food safety. Yes, you can prepare the wraps in advance. For best taste, wrap them tightly in plastic wrap. Store them in the fridge. This keeps them fresh for up to a day. Just remember to add the secret sauce right before serving. This keeps the wraps from getting soggy. If you want to avoid mayonnaise, there are great options. Try Greek yogurt for a creamy texture. You can also use avocado for a rich taste. For a vegan option, use silken tofu blended smooth. These choices still keep the sauce tasty and thick. To make gluten-free wraps, choose gluten-free tortillas. Many stores sell good options made from rice or corn. These wraps work well with the same ingredients. Just be sure to read labels to avoid gluten. This way, everyone can enjoy the wraps! This blog post has covered how to make delicious ultimate BLT wraps. We explored key ingredients, like whole wheat tortillas, crispy bacon, and fresh veggies. We shared step-by-step instructions, tips for customizable sauces, and storage info to keep your wraps fresh. Remember, you can mix it up with vegetarian options or seasonal twists. These wraps are not just tasty; they are flexible and fun. Try these ideas for your next meal, and enjoy the flavors!

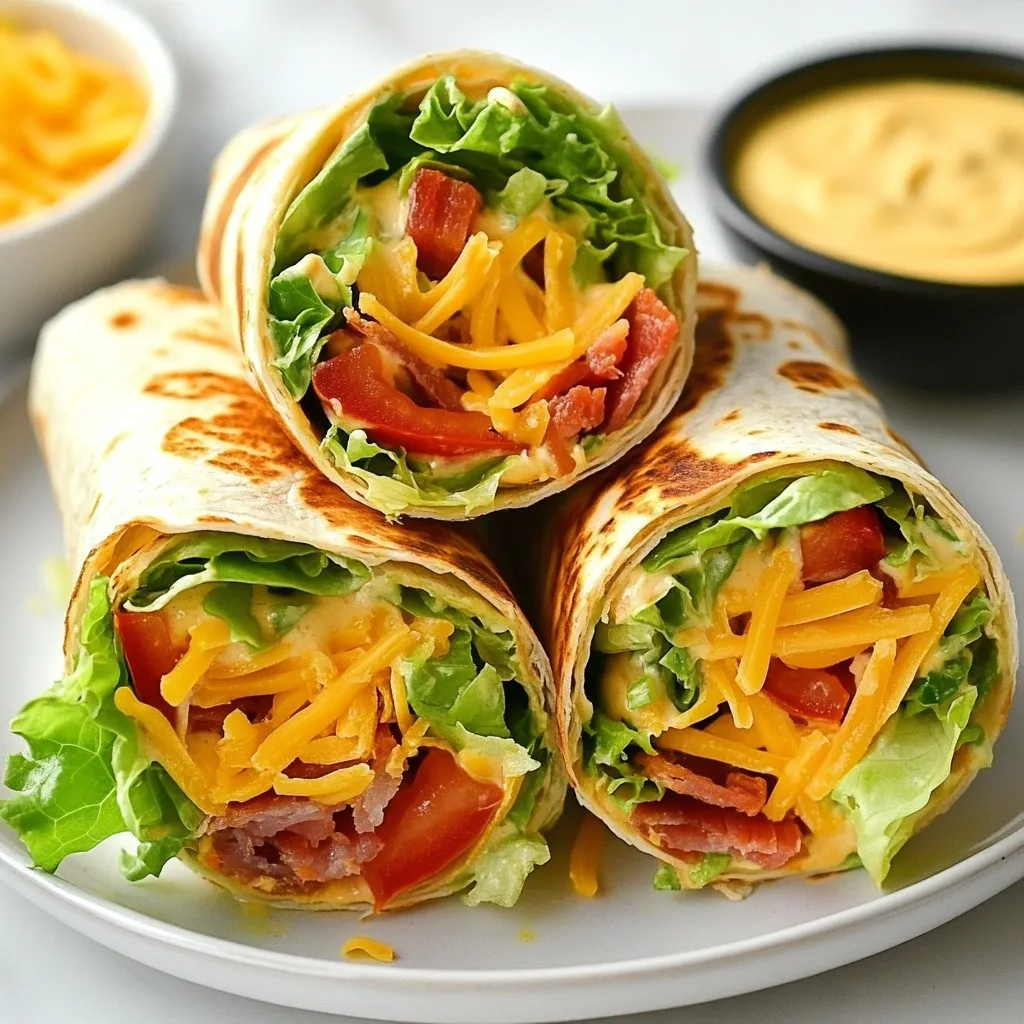
If you love a classic BLT but crave a fun twist, you’re in for a treat! My savory Ultimate BLT Wraps with Secret Sauce will take your lunch game to …

Read more

Categories Dinner

Cheddar Jalapeño Cornbread Muffins Flavor Explosion

November 12, 2025December 22, 2024 by Chef Tavio
- 1 cup cornmeal - 1 cup all-purpose flour - 1 tablespoon baking powder - 1/2 teaspoon salt - 1/4 teaspoon black pepper - 1 cup buttermilk - 1/3 cup vegetable oil - 1 large egg, beaten - 1 cup shredded sharp cheddar cheese - 1/2 cup fresh jalapeños, finely chopped (seeds removed for less heat) - 2 tablespoons honey (optional, for a touch of sweetness) The mix of dry and wet ingredients sets the stage for flavor. Cornmeal gives a nice base. The all-purpose flour adds fluffiness. Baking powder helps the muffins rise. Salt and black pepper bring out all the flavors. The wet mix starts with buttermilk. It adds creaminess and moisture. Vegetable oil keeps the muffins light and tender. The egg binds everything together, adding richness. Now, let’s talk about the exciting flavors. Sharp cheddar cheese melts into gooey goodness. It gives a rich taste that pairs well with the corn. Fresh jalapeños add a spicy kick. You can remove the seeds to lower the heat. If you want a hint of sweetness, add honey. It balances the spice and cheese. These ingredients work together to create a flavor explosion in every bite. {{ingredient_image_2}} Set your oven to 400°F (200°C). This temperature helps the muffins rise and brown well. Prepare your muffin tin by lightly greasing it or using paper liners. This makes it easy to remove the muffins later. In a large bowl, combine 1 cup of cornmeal, 1 cup of all-purpose flour, 1 tablespoon of baking powder, 1/2 teaspoon of salt, and 1/4 teaspoon of black pepper. Whisk these ingredients together until they blend well. This step ensures the baking powder spreads evenly, giving you fluffy muffins. In another bowl, whisk together 1 cup of buttermilk, 1/3 cup of vegetable oil, and 1 large beaten egg. Mix until it feels smooth and creamy. This mix adds moisture and richness to your muffins. Pour the wet mixture into the dry ingredients. Use a spatula to gently stir until just combined. Don’t overmix; small lumps are okay. This keeps your muffins tender and light. Now, gently fold in 1 cup of shredded sharp cheddar cheese and 1/2 cup of finely chopped jalapeños. If you like a hint of sweetness, add 2 tablespoons of honey. Make sure the cheese and jalapeños spread evenly in the batter. Spoon the batter into the prepared muffin cups. Fill each cup about two-thirds full to allow for rising. Place the muffin tin in the oven. Bake for 15 to 20 minutes. They are ready when the tops are golden and a toothpick comes out clean. After baking, take the muffins out of the oven. Let them cool in the tin for about 5 minutes. Then, transfer them to a wire rack to cool completely. This cooling helps them firm up and enhances their texture. Enjoy the warm muffins with butter or a spicy dip! - Overmixing the batter: Mixing too much can make your muffins tough. Stir just enough to combine the wet and dry ingredients. Small lumps are okay! - Incorrect oven temperature: Always preheat your oven to 400°F (200°C). An incorrect temperature can lead to uneven baking. - Adjusting jalapeño quantity for heat preference: If you like it hot, add more jalapeños. For less heat, remove the seeds or use fewer peppers. - Cheese substitution options: Sharp cheddar is great, but you can try mozzarella or pepper jack for a different taste. - Serving suggestions with butter or dipping sauces: Serve warm muffins with melted butter on top. You can also pair them with a spicy dipping sauce. - Garnishing for added visual appeal: Add a slice of fresh jalapeño on each muffin. This not only looks nice but also adds a kick! Pro Tips Use Fresh Jalapeños: For the best flavor and heat, opt for fresh jalapeños instead of jarred ones. Remove the seeds for a milder taste or keep them for an extra kick! Experiment with Cheese: While sharp cheddar adds great flavor, feel free to mix in other cheeses like pepper jack or Monterey Jack for a different twist. Check for Doneness: To ensure your muffins are perfectly baked, insert a toothpick into the center; it should come out clean or with only a few crumbs. Storage Tips: Store any leftover muffins in an airtight container at room temperature for up to 3 days or freeze them for longer shelf life. Reheat in the oven for the best texture. {{image_4}} To amp up the heat in your cornbread muffins, try adding more jalapeños. You can also swap in different peppers. For a smoky flavor, use poblano or chipotle peppers. If you love spice, consider serrano peppers. Each pepper brings its unique taste. Adjust the quantity based on your heat tolerance. If you crave a hint of sweetness, add sugar or honey. You can use brown sugar for a richer flavor. Maple syrup also pairs well with the savory notes. Just remember to balance the sweetness with the salty cheese. This mix creates a fun, sweet-savory bite. Cheddar is great, but feel free to play with other cheeses. Mozzarella provides a mild, gooey texture. Pepper jack adds spice and creaminess. You can even blend several cheeses for a more complex flavor. Experimenting with cheese lets you create a new muffin every time. I like to store Cheddar Jalapeño Cornbread Muffins at room temperature. Keep them in an airtight container. This keeps them soft and fresh. If you want to keep them longer, you can refrigerate them. Just note, refrigeration may dry them out a bit. Freezing is a great way to save extras. To freeze, wrap each muffin well in plastic wrap. Then, place them in a freezer bag. This prevents freezer burn. When you want to enjoy them, take a muffin out and let it thaw. You can reheat it in the oven for a warm treat. Heat at 350°F (175°C) for about 10-15 minutes. Homemade cornbread muffins stay fresh for about 2-3 days at room temperature. If you keep them in the fridge, they can last up to a week. When frozen, they stay good for about 2-3 months. Just remember to label your bags with dates to keep track. Yes, you can make these muffins ahead of time. Bake them and let them cool. Store the muffins in an airtight container for up to three days. You can also freeze them for later use. Just thaw and reheat before serving. This makes it easy to enjoy them fresh, even on busy days. To make these muffins gluten-free, swap all-purpose flour with a gluten-free flour blend. Ensure the blend has xanthan gum for better texture. Also, check that your baking powder is gluten-free. This way, you can enjoy the same great taste without the gluten. These muffins pair well with many dishes. You can serve them with chili for a warm meal. They also go great with soups or stews. For a lighter option, enjoy them with a fresh salad. Don’t forget to add a dab of butter or a spicy dipping sauce for extra flavor. Yes, you can use regular milk instead of buttermilk. To mimic buttermilk, add one tablespoon of lemon juice or vinegar to the milk. Let it sit for five minutes before using. This helps achieve a similar tangy flavor and keeps the muffins moist. You learned how to make Cheddar Jalapeño Cornbread Muffins from scratch. We covered ingredients, mixing, baking, and tips to enhance flavor. Remember to avoid common mistakes like overmixing the batter. Try adding your own twist! Change the cheese or adjust the heat level with jalapeños. Store your muffins well to keep them fresh. Enjoy your baking journey, and share your creations with family and friends!

Welcome to a taste adventure! Cheddar Jalapeño Cornbread Muffins blend sweet, spicy, and cheesy flavors all in one bite. You’ll love the warm, soft texture and the punch of jalapeños. …

Read more

Categories Appetizers

Low-Carb Philly Cheesesteak Bowls Flavorful and Easy

December 2, 2025December 22, 2024 by Chef Tavio
To make the Low-Carb Philly Cheesesteak Bowls, gather these fresh ingredients: - 1 pound ribeye steak, thinly sliced against the grain - 1 medium green bell pepper, sliced into strips - 1 medium onion, sliced into half-moons - 2 cloves garlic, minced - 2 tablespoons olive oil, divided - 1 teaspoon salt (adjust to taste) - ½ teaspoon black pepper - 1 teaspoon smoked paprika - 1 cup provolone cheese, shredded - 2 cups cauliflower rice (can use fresh or frozen) - Fresh parsley, chopped (for garnish) These ingredients create a tasty, low-carb meal. The ribeye steak brings rich flavor. The bell pepper and onion add sweetness and crunch. Garlic gives it a nice kick. Olive oil helps cook everything evenly. The seasonings bring out the best in the steak. Provolone cheese melts beautifully over the top. Cauliflower rice serves as a great base. Finally, fresh parsley adds a pop of color. {{ingredient_image_2}} - Heat the skillet: Start by pouring 1 tablespoon of olive oil into a large skillet. Set the heat to medium-high and wait for the oil to shimmer. This means it is hot enough. - Sear the steak: Add thinly sliced ribeye steak in batches. Do not crowd the pan. Season with salt, black pepper, and smoked paprika. Cook for 2-3 minutes until the edges brown. Remove the steak and set it aside. - Sauté the vegetables: In the same skillet, add the other tablespoon of olive oil. Lower the heat to medium. Add sliced onion and green bell pepper. Sauté for 5-7 minutes until they become tender. Stir in minced garlic and cook for one more minute until it smells great. - Mix steak and veggies: Return the cooked steak to the skillet. Stir everything together. Heat for about 2 minutes until warm. - Prepare the cauliflower rice: In a different pot, cook cauliflower rice as the package says. If using fresh rice, sauté it in a pan with salt and pepper for 5-7 minutes until soft. - Assemble the bowls: In each bowl, add a big scoop of cauliflower rice. Top it with the steak and vegetable mix. - Melt the cheese: Sprinkle shredded provolone cheese over the hot mix. Let the cheese melt a little from the heat. - Garnish and serve: Add chopped fresh parsley on top for color and flavor. Enjoy your meal! - Avoid overcrowding the skillet: When cooking, add only enough steak to cover the pan. This helps the meat sear well. If you add too much at once, it will steam instead of sear. - Best practices for searing steak: Use a hot skillet and don't move the steak too much. Let it brown on one side before flipping. This gives it a nice crust and boosts flavor. - Alternate cheese options: If you want, you can swap provolone for cheese like mozzarella or cheddar. Each adds a different taste and texture to the dish. - Vegetable swaps: Feel free to change the bell pepper and onion. Mushrooms or zucchini work great too. They add flavor and keep things low-carb. - Serving suggestions: Use wide, deep bowls to make your dish pop. The colors from the steak and veggies look great together. - Enhancing flavor: A drizzle of olive oil on top boosts flavor and gives a nice shine. You can also add some fresh herbs for a burst of color and taste. Pro Tips Choose the Right Cut: Ribeye steak is ideal for this recipe due to its marbling, which adds flavor and tenderness. However, you can substitute with flank steak or sirloin for a leaner option. Slice Against the Grain: Always slice your steak against the grain to ensure the meat is tender and easy to chew. This will make a significant difference in the texture of your dish. Customize Your Veggies: Feel free to add other vegetables such as mushrooms or spinach for extra flavor and nutrition. Just sauté them along with the onion and bell pepper. Perfectly Melted Cheese: For a gooey cheese topping, cover the skillet with a lid for a minute after adding the provolone. The steam will help melt the cheese evenly. {{image_4}} For those on a keto diet, low-carb Philly cheesesteak bowls are a great choice. You can swap out high-carb ingredients for low-carb ones. Instead of regular rice, use cauliflower rice. It adds a nice texture without the carbs. If you're looking for vegetarian versions, try using portobello mushrooms as the base. They have a hearty texture and absorb flavors well. You can also use tempeh or tofu instead of steak. Season them with the same spices to keep that classic taste. You can change the flavor of your bowl with spices. Adding Italian seasoning gives it an herbaceous twist. If you like heat, sprinkle in chili flakes. This small change can make a big difference in taste. For sauces and toppings, hot sauce brings heat and depth. A drizzle of mayonnaise adds creaminess. You can also try a garlic aioli for a flavorful kick. These additions let you personalize your dish. Pair your low-carb Philly cheesesteak bowls with a fresh salad. A simple side of mixed greens balances the meal and adds crunch. Another option is low-carb bread. You can use it to scoop up the bowl, giving you that classic sandwich feel. These bowls work well for lunch or dinner. They’re also great for meal prep. You can make a big batch, store it, and enjoy it throughout the week. Just reheat and enjoy! To store leftovers, first let the bowls cool. Then, transfer them to airtight containers. This keeps the flavors fresh and prevents drying. When reheating, use the microwave or a skillet. Heat until warm, stirring occasionally. This helps keep the steak and veggies juicy. Yes, you can freeze this dish. Allow it to cool first. Separate the steak and veggies from the cauliflower rice. Place each in freezer-safe bags. This way, each part stays fresh. When ready to eat, thaw overnight in the fridge. Reheat on the stove or microwave. In the fridge, expect your bowls to last about 3-4 days. Check for any off smells or changes in color. If the veggies look slimy or the steak has a strange odor, it’s time to toss them. Always trust your senses to keep food safe. What is a low-carb diet? A low-carb diet limits carbs to help with weight loss. It often focuses on protein and healthy fats. Foods like vegetables, meats, and cheese are key. This diet can help stabilize blood sugar and reduce hunger. Can I make this recipe ahead of time? Yes, you can prep this dish early. Cook the steak and veggies, then store them separately. Keep the cauliflower rice in the fridge as well. This way, you can assemble your bowls quickly when you're ready to eat. What substitutes can I use for cauliflower rice? If you don't have cauliflower rice, try using zucchini noodles or broccoli rice. Both of these options keep the dish low in carbs and add great flavor. You can also use shredded cabbage for a crunchy twist. How do I achieve tender steak? To get tender steak, slice the ribeye against the grain. This means cutting across the muscle fibers. Also, don’t overcook it; just sear until browned. Letting it rest after cooking also helps keep it juicy. What is the best method to sauté vegetables? Start by heating the skillet with oil until it shimmers. Add the veggies in a single layer. Stir occasionally to let them cook evenly. Cook until they are soft and slightly caramelized, about 5-7 minutes. How many carbs are in low-carb Philly cheesesteak bowls? These bowls have about 8 grams of carbs per serving. Most carbs come from the cauliflower rice and veggies. It's a great option if you want to enjoy a hearty meal while keeping carbs low. What are the calorie and protein content? Each serving has roughly 400 calories and 30 grams of protein. The ribeye steak provides most of the protein, while the cheese adds flavor and richness. This makes it a filling meal without too many calories. Is this recipe suitable for meal prep? Absolutely! This recipe is perfect for meal prep. You can store the cooked ingredients in separate containers. Just reheat before serving, and you’ll have a tasty meal ready in minutes. This blog post covered how to make delicious low-carb Philly cheesesteak bowls. You learned about the key ingredients, step-by-step instructions, and helpful tips. We explored variations, like vegetarian options, and discussed storage tips. In closing, this dish is easy to customize and perfect for any meal. Enjoy trying out different flavors and serving ideas. Make this bowl your own!

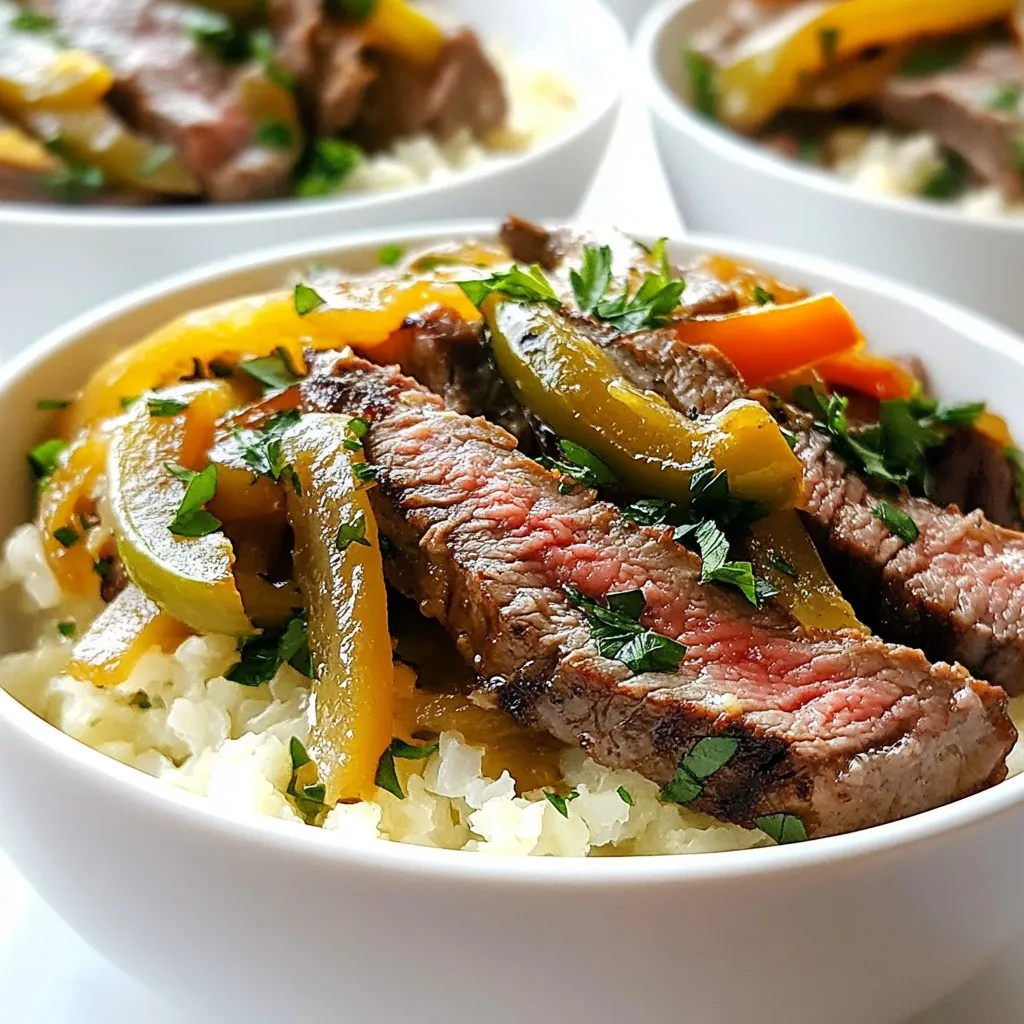
Craving a delicious, low-carb meal? Let me introduce you to Low-Carb Philly Cheesesteak Bowls—flavorful, hearty, and easy to make! Packed with tender ribeye, sautéed veggies, and melted provolone, this dish …

Read more

Categories Dinner

Overnight Croissant Breakfast Casserole Delightful Dish

November 24, 2025December 19, 2024 by Chef Tavio
To make this tasty Overnight Croissant Breakfast Casserole, gather these simple ingredients: - 4 large buttery croissants, torn into bite-sized pieces - 6 large eggs - 2 cups whole milk - 1 cup shredded Gruyère cheese - 1 cup cooked breakfast sausage, crumbled (or a vegetarian alternative) - 1 cup baby spinach, roughly chopped - 1/2 teaspoon garlic powder - 1/2 teaspoon fine sea salt - 1/4 teaspoon freshly ground black pepper - 1/4 teaspoon ground nutmeg - Fresh chives, finely chopped for garnish Not all of these ingredients may be available. No problem! Here are some easy swaps: - Croissants: Use any flaky bread like brioche or puff pastry. - Gruyère cheese: Try Swiss or cheddar for a different flavor. - Breakfast sausage: Use crumbled tofu or mushrooms for a veggie option. - Whole milk: Almond milk or oat milk can work in a pinch. - Baby spinach: Kale or Swiss chard also make great choices. Using the right tools makes cooking easier. Here’s what you need: - Large mixing bowl - Whisk for beating eggs - 9x13 inch baking dish - Non-stick spray or softened butter for greasing - Plastic wrap or aluminum foil for overnight soaking - Oven for baking These simple tools will help you create a wonderful dish! {{ingredient_image_2}} Start by cracking six large eggs into a big mixing bowl. Use a whisk to mix them well. Add two cups of whole milk to make the eggs creamy. Sprinkle in half a teaspoon of garlic powder, half a teaspoon of fine sea salt, a quarter teaspoon of black pepper, and a quarter teaspoon of nutmeg. Keep whisking until it is smooth and well blended. This egg mixture is the heart of your casserole. Grease a 9x13 inch baking dish with non-stick spray or butter. Tear four large buttery croissants into bite-sized pieces. Spread these pieces evenly across the bottom of the dish. Next, sprinkle one cup of crumbled breakfast sausage over the croissants. If you want a vegetarian option, skip the sausage. Add one cup of roughly chopped baby spinach on top of the sausage. The greens will add color and nutrition. Now, carefully pour the egg mixture over the layers in the dish. Use a spoon to push down any croissant pieces that float up. This helps them soak up all the egg goodness. Finish by sprinkling one cup of shredded Gruyère cheese over everything. This cheese melts beautifully and adds rich flavor. Cover the dish tightly with plastic wrap or foil. Place it in the fridge overnight. This step allows the flavors to blend and makes the croissants soft. The next morning, take the casserole out of the fridge while you preheat your oven to 350°F (175°C). Bake the casserole uncovered for about 40 to 45 minutes. Look for the egg to be fully set and the top to be golden brown. Let it rest for a few minutes before slicing. Garnish each slice with fresh chives for a pop of color and flavor. Enjoy this delightful dish with your family and friends! To make your casserole great, follow these steps. First, use fresh croissants. They should be buttery and soft. Tear them into bite-sized pieces for even soaking. Next, whisk the eggs well. Combine them with milk until smooth. This makes a rich base. Add the spices for flavor. Garlic and nutmeg really enhance the taste. Layer the ingredients carefully. Start with croissants, then sausage, and spinach. This helps each bite taste amazing. Finally, pour the egg mix slowly. This ensures every piece soaks well overnight. One common mistake is not using enough eggs. Six large eggs give the right texture. Another mistake is skipping the overnight soak. This step allows flavors to blend. If you rush and bake right away, the dish may turn out dry. Make sure to cover the dish tightly. This keeps moisture in. Also, avoid using low-fat milk. Whole milk gives a creamier finish. Lastly, don’t forget to let it rest after baking. This helps the casserole set before slicing. To get a creamy texture, use whole milk instead of skim. You can also mix in some heavy cream for extra richness. When whisking the eggs, go for a light and airy mix. This helps add fluffiness. Consider adding an extra layer of cheese. Gruyère melts beautifully and adds creaminess. If you want, fold in some cream cheese into the egg mix. It creates a delightful texture. Lastly, let the casserole cool for a few minutes before serving. This helps maintain its creamy feel as you slice it. Pro Tips Use Day-Old Croissants: For the best texture, use croissants that are at least a day old. They will absorb the egg mixture better without becoming too mushy. Add Flavor Variations: Feel free to experiment with different cheeses, such as cheddar or feta, or add herbs like thyme or basil for extra flavor. Make It Ahead: This casserole is perfect for meal prep. Assemble it a day in advance and bake it fresh in the morning for an effortless breakfast. Check for Doneness: To ensure the casserole is fully cooked, use a toothpick or knife in the center; it should come out clean when the casserole is done. {{image_4}} You can easily make a vegetarian version of this casserole. Instead of using breakfast sausage, simply swap it out for plant-based sausage or mushrooms. Both options add great flavor and texture. You can also add more veggies like bell peppers or zucchini for extra nutrition. Mixing in some diced tomatoes can also brighten the dish. To make your casserole even more exciting, try adding different spices and herbs. Fresh herbs like rosemary or thyme can elevate the taste. A pinch of cayenne pepper can add a nice kick. You might also consider adding some sun-dried tomatoes for a burst of flavor. If you love sweet and savory, a handful of berries mixed in can surprise your taste buds. Gruyère is fantastic, but feel free to experiment with different cheeses. Cheddar adds a sharp flavor, while feta brings a creamy texture. For a unique twist, try goat cheese or mozzarella. You can also mix in other fillings like cooked bacon, ham, or even artichokes. The key is to choose flavors that you enjoy and that complement each other. To store leftover casserole, let it cool completely. Once cooled, cover it tightly with plastic wrap or aluminum foil. You can also transfer it to an airtight container. This helps keep it fresh. Store it in the fridge for up to three days. If you want to freeze the casserole, cut it into portions first. Wrap each piece in plastic wrap, then foil. This prevents freezer burn. Store it in the freezer for up to three months. To reheat, thaw it overnight in the fridge. Bake the thawed casserole at 350°F (175°C) until heated through, about 25-30 minutes. Use glass or plastic containers with tight-fitting lids for storage. These keep air out and moisture in. If you plan to freeze, choose freezer-safe containers. For easy portioning, consider using individual serving dishes. This way, you can grab just what you need. Yes, you can make this casserole without eggs. Use a mix of silken tofu or a plant-based egg substitute. This will keep the creamy texture. For best results, blend the tofu until smooth and mix it with milk and seasonings. This way, you still get a rich flavor. You can store the casserole in the fridge for up to three days. Make sure to cover it tightly with plastic wrap or foil. If you notice any changes in smell or appearance, it's best to toss it out. Freshness matters for taste and safety. This dish goes well with fresh fruit. Mixed berries add a bright touch. You can also serve it with a light salad for crunch. A dollop of yogurt on the side makes it feel special. These sides balance the richness of the casserole and enhance your meal. In this blog post, we covered every aspect of making an Overnight Croissant Breakfast Casserole. We discussed key ingredients, cooking tools, and step-by-step instructions. I shared tips for perfecting your casserole and ways to avoid common mistakes. You can even explore fun variations and get guidance on storing leftovers. Now, you have the knowledge to create this delicious dish. Enjoy making it and sharing it with others! Your breakfast will never be the same again.

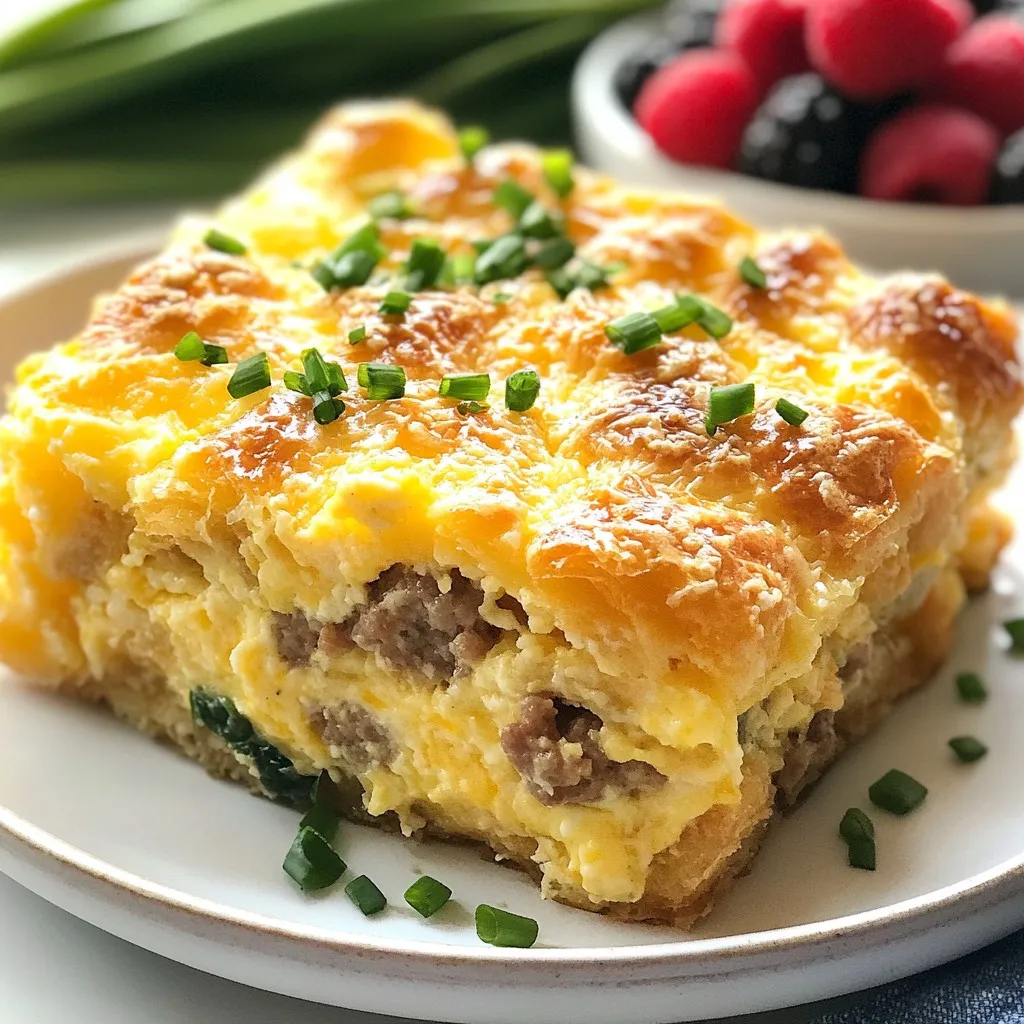
Are you ready to transform breakfast into a special treat? This Overnight Croissant Breakfast Casserole is your new go-to dish. It’s rich, buttery, and perfect for lazy mornings. No need …

Read more

Categories Breakfast
Older posts
Newer posts
← Previous Page1 … Page155 Page156 Page157 … Page159 Next →

TASTED NEST

Where Flavor Finds a Home 🍳🏡 — warm, simple, and crave-worthy recipes made for real life, from stovetop mornings to backyard dinners.

PAGES

Home About Contact Privacy Policy Terms & Conditions Cookie Policy GDPR Policy Copyright Policy Disclaimer

CATEGORIES

Appetizers Desserts Salads Breakfast Dinner
Copyright © 2025 Tasted Nest. All rights reserved.