Skip to content
  • GDPR Privacy Policy
  • Copyright Policy
  • Disclaimer
  • Terms & Conditions
Tasted Nest
  • Home
  • Appetizers
  • Desserts
  • Salads
  • Breakfast
  • Dinner
  • Privacy Policy
  • Contact
  • About

Chef Tavio

Quick Parmesan Chicken Pasta Flavorful and Easy Meal

January 3, 2026April 4, 2025 by Chef Tavio
To make Quick Parmesan Chicken Pasta, you need fresh and simple ingredients. Each part plays a role in creating tasty flavors. Here’s what you will need: - Chicken and Pasta - 2 boneless, skinless chicken breasts, thinly sliced - 8 ounces pasta (penne or fettuccine) - Cream and Cheese - 1 cup heavy cream (or half-and-half for a lighter option) - 1 cup freshly grated Parmesan cheese, plus extra for serving - Seasoning & Garnishes - 2 tablespoons extra-virgin olive oil - 2 cloves garlic, finely minced - 1 teaspoon Italian seasoning blend - Salt and freshly ground black pepper, to taste - Fresh parsley, finely chopped (for garnish) - Zest of 1 lemon (optional) This list gives you all the flavors and textures you need for a creamy and satisfying dish. The chicken provides protein, while the pasta brings a nice bite. The cream and cheese create a rich sauce that ties everything together. Seasoning and garnishes add freshness and brightness. Enjoy gathering these ingredients for a delightful meal! {{ingredient_image_2}} Boiling and Draining First, fill a large pot with water. Add salt and bring it to a boil. Once it's bubbling, add 8 ounces of your favorite pasta, like penne or fettuccine. Cook until it's just al dente, following the package directions. Then, drain the pasta in a colander, but save about ½ cup of the pasta water for later. Reserving Pasta Water The reserved pasta water is important. It helps adjust the sauce's thickness. Keep it close by as you move on to the next steps. Heating Oil and Cooking Chicken In a large skillet, heat 2 tablespoons of extra-virgin olive oil over medium-high heat. Once the oil shimmers, add the thinly sliced chicken. Make sure to season it well with salt and pepper. Cook the chicken for about 5 to 7 minutes until it turns golden brown. Ensuring Proper Cooking Temperature Check that the chicken reaches an internal temperature of 165°F (75°C). This ensures it’s safe to eat. Once done, remove the chicken from the skillet and place it on a plate. Cooking Garlic and Adding Cream In the same skillet, lower the heat to medium. Add 2 cloves of minced garlic and stir for about 30 seconds. This will release its lovely aroma. Carefully pour in 1 cup of heavy cream, stirring gently. Bring it to a simmer. Incorporating Parmesan Cheese Stir in 1 teaspoon of Italian seasoning. Then, gradually whisk in 1 cup of freshly grated Parmesan cheese. Keep stirring until the sauce is creamy and smooth. If it gets too thick, add a splash of the reserved pasta water. Tossing Pasta and Chicken in the Sauce Return the cooked chicken to the skillet. Add the drained pasta, tossing everything together. Make sure the pasta and chicken are well-coated in the creamy sauce. Adjusting Sauce Consistency If the sauce feels too thick, add more of the reserved pasta water. This will help it cling better to the pasta. Taste and adjust with more salt and pepper if needed. Plating and Garnishing Spoon the creamy pasta into generous portions on plates. Garnish each plate with chopped fresh parsley for color. Optional Additional Toppings For an extra touch, sprinkle more Parmesan cheese on top. You can also add lemon zest for a burst of freshness. Enjoy your beautiful dish! - Seasoning Tips: Start with fresh salt and black pepper. Season the chicken well before cooking. I like to add a pinch of Italian seasoning. This adds depth to the flavor. You can also use garlic powder for extra taste. - Cooking Techniques: Use medium-high heat to get a nice golden color. Make sure the skillet is hot before adding the chicken. Cook the chicken until it reaches 165°F. This ensures it is safe to eat and stays juicy. - Adjusting with Pasta Water: Always reserve some pasta water before draining. If your sauce feels too thick, add a splash of this water. It helps the sauce cling to the pasta better. - Making it Creamier: To give your sauce a rich texture, stir in more cheese. You can also add a bit more cream if you want it extra smooth. Just remember to keep stirring until it’s well mixed. - Elegant Serving Suggestions: Serve your pasta in shallow bowls for a nice look. Drizzle a little olive oil on top for shine. This adds a gourmet touch to your meal. - Garnishing Tips: Fresh parsley is a great garnish. It adds color and freshness. You can also sprinkle more grated Parmesan on top. A little lemon zest enhances the dish’s flavor and brightens the plate. Pro Tips Cook Pasta Al Dente: Cooking the pasta until just al dente ensures it maintains its texture and won’t become mushy when mixed with the creamy sauce. Season the Chicken Well: Don’t skimp on seasoning the chicken! A good amount of salt and pepper enhances the flavor of the entire dish. Use Fresh Ingredients: Whenever possible, use fresh garlic and freshly grated Parmesan cheese for the best flavor and creaminess in your sauce. Garnish for Color: A sprinkle of fresh parsley and a touch of lemon zest not only adds color but also brightens the dish with a fresh flavor. {{image_4}} Alternate Proteins You can swap chicken for shrimp or tofu. Shrimp cooks fast and adds a sweet touch. Tofu gives a nice texture and is great for a plant-based meal. Vegetable Add-ins Adding veggies can make this dish even better. Try spinach, cherry tomatoes, or broccoli. They not only add flavor but also color. You can sauté them with the chicken or toss them in at the end. Spicy Versions Want some heat? Add crushed red pepper flakes to the sauce. You could also use spicy sausage instead of chicken. This will give your pasta a kick. Herb Variations Fresh herbs can change the whole dish. Basil, thyme, or oregano can add depth. Just chop and sprinkle them in when you add the cream. Gluten-Free Options Switch the pasta to a gluten-free brand. There are many tasty options made from rice or lentils. This keeps the dish friendly for everyone. Lighter Cream Options If you want a lighter meal, use half-and-half instead of heavy cream. You can also try Greek yogurt for a creamy finish with less fat. This way, you keep the flavor without the heaviness. How do you store leftovers? After enjoying your Quick Parmesan Chicken Pasta, let any leftovers cool down. Place them in an airtight container. This keeps them fresh for up to three days in the fridge. What are the best practices for reheating? To reheat, use a skillet over low heat. Add a splash of water or cream to help moisten the pasta. Stir gently until warmed through. You can also use the microwave. Heat in short bursts, stirring in between, until hot. What are the best freezing tips for meal prep? For longer storage, you can freeze this meal. Let it cool completely, then transfer it to a freezer-safe container. It’s best to freeze it within two days of cooking. This way, it will stay fresh for up to three months. How do you reheat from frozen? To reheat, let it thaw in the fridge overnight. Then, warm it in a skillet over low heat. Add a little cream or reserved pasta water to revive the sauce. If you're in a hurry, you can use the microwave, but make sure to stir every few minutes for even heating. You can store Quick Parmesan Chicken Pasta in the fridge for up to three days. Keep it in an airtight container for best results. After three days, the pasta may lose its taste and texture. Yes, you can try other cheeses. Mozzarella or Gruyère works well. Both add a nice flavor and melt nicely. If you like blue cheese, that can add a bold twist, too! The best way to reheat is on the stove. Add a splash of water or cream in a pan. Heat it over low heat, stirring often. This keeps the pasta creamy and prevents it from drying out. Yes, you can make this dish in advance. Cook it, let it cool, and store it in the fridge. When ready to eat, reheat as mentioned above. The flavors will blend well over time. This post covered everything you need to make Quick Parmesan Chicken Pasta. We explored ingredients like chicken, pasta, cream, and cheese. You learned about cooking, sautéing, and preparing the sauce. Tips helped you perfect the chicken and sauce. Variations showed ways to adapt the dish. Finally, storage info ensured your leftovers stay fresh. With these insights, you can create a delicious meal and impress anyone at your table. Enjoy your cooking journey and feel free to try new twists on this recipe!

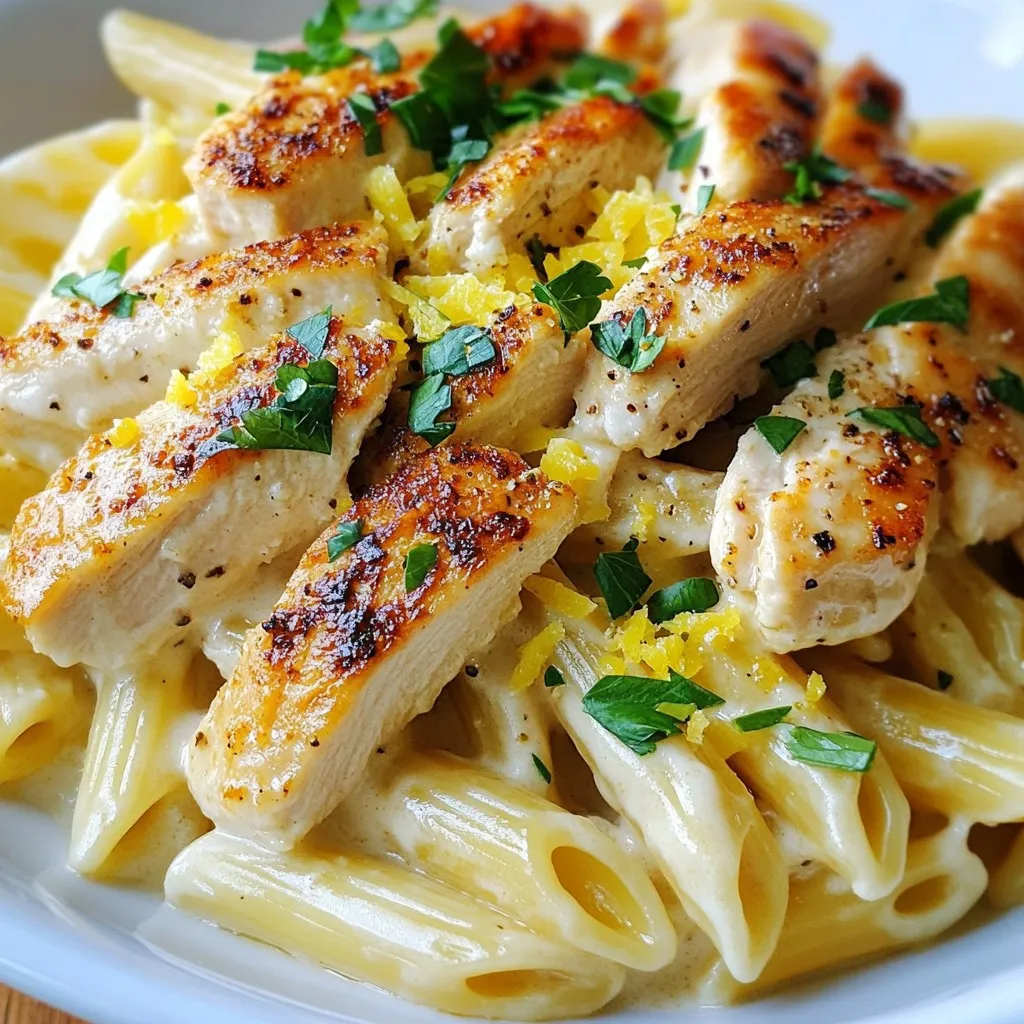
Are you craving a meal that’s both fast and packed with flavor? Look no further than this Quick Parmesan Chicken Pasta! In just a few easy steps, you can whip …

Read more

Categories Dinner

Taco Stuffed Peppers Flavorful and Simple Meal

December 10, 2025April 4, 2025 by Chef Tavio
To make taco stuffed peppers, you need these main items: - 4 large bell peppers (any color of your choice) - 1 lb ground turkey or ground beef - 1 small onion, finely chopped - 2 cloves garlic, minced - 1 cup canned black beans, rinsed and drained - 1 cup corn kernels (fresh or canned) - 1 cup diced tomatoes (canned or fresh) - 2 tablespoons taco seasoning - 1 cup shredded cheddar cheese - Salt and pepper, to taste You can enhance your meal with these tasty options: - Fresh cilantro, chopped (for garnish) - Sour cream - Sliced avocado These taco stuffed peppers can fit many diets. Ground turkey is lean, making it great for those watching fat. If you're vegan, swap meat with lentils or mushrooms. Black beans add fiber and protein. For gluten-free eaters, this dish is naturally safe. Just use gluten-free taco seasoning. Always check labels to be sure! {{ingredient_image_2}} Start by preheating your oven to 375°F (190°C). This step warms up the oven for baking. Next, take four large bell peppers. I like using colorful ones for a fun look. Cut the tops off each pepper and remove the seeds and membranes. This makes space for the tasty filling. Set the hollowed peppers aside on a baking dish. Grab a large skillet and heat it over medium heat. Add one pound of ground turkey or beef to the skillet. Cook it until it turns brown. Use a spatula to break the meat into small pieces. If there's extra grease, drain it. Now, add one small chopped onion and two minced garlic cloves. Sauté them together for about three to four minutes. The onion should look clear and smell great. Then, mix in one cup of rinsed black beans, one cup of corn, and one cup of diced tomatoes. Sprinkle in two tablespoons of taco seasoning, along with salt and pepper to taste. Cook everything for another three to five minutes. This warms up the mix and blends the flavors. Finally, take the skillet off the heat and stir in half of the cup of shredded cheddar cheese until it melts into the filling. Now it’s time to fill the peppers! Stuff each bell pepper with the taco filling, packing it in well. Place the filled peppers upright in your baking dish. Cover the dish tightly with aluminum foil and bake it in the preheated oven for 25 minutes. After that time, carefully remove the foil. Sprinkle the remaining cheddar cheese on top of each pepper. Return the dish to the oven for another 10 to 15 minutes. Look for the cheese to melt and bubble, and the peppers should be soft enough to pierce with a fork. Once done, take the dish out of the oven. Let the peppers cool for a few minutes. This prevents burns when you serve them. After enjoying your taco stuffed peppers, store leftovers in an airtight container. Keep them in the fridge for up to three days. To reheat, microwave them for a few minutes. You can also bake them in the oven at 350°F (175°C) until warm. This dish still tastes great the next day! You can prepare taco stuffed peppers in advance. Cook the filling and stuff the peppers. Then, cover them and place them in the fridge for up to 24 hours. When you're ready, bake them as directed. This makes busy weeknights easier and tastier. To enhance the flavor of your stuffed peppers, use fresh ingredients. Fresh herbs like cilantro add bright notes. You can also adjust the taco seasoning to your taste. For extra heat, add diced jalapeños or a splash of hot sauce to the filling. Pro Tips Choose Colorful Peppers: Using a mix of red, yellow, and green bell peppers not only makes the dish visually appealing but also adds a variety of flavors. Make it Spicy: If you enjoy heat, consider adding some diced jalapeños or a splash of hot sauce to the filling for a spicy kick. Customize Your Filling: Feel free to substitute the ground turkey or beef with shredded chicken, tofu, or even a mixture of grains and vegetables for a vegetarian version. Layer the Cheese: For an extra cheesy topping, layer the cheese in between the filling as well as on top before baking for a gooey texture. {{image_4}} To make vegetarian taco stuffed peppers, skip the meat. Use more black beans and corn. You can add cooked quinoa for extra protein. Mix in some diced zucchini or mushrooms for texture. The taco seasoning will still give great flavor. You can use any color bell pepper you like. For a low-carb version, replace the corn and beans. Use cauliflower rice instead. This keeps the meal light and tasty. You can also add spinach for more nutrients. The spices will keep it flavorful without the carbs. Feel free to swap the ground turkey or beef. Ground chicken or pork works well too. You can also mix meats for a unique taste. For a bean twist, try kidney beans or pinto beans. Each option brings a different flavor to the dish. Taco stuffed peppers shine on their own, but sides can add more flavor. Here are some fun ideas: - Mexican Rice: Serve fluffy rice with lime and cilantro for freshness. - Refried Beans: Creamy beans will complement the peppers nicely. - Guacamole: This cool dip works great with the spicy filling. - Corn Salad: A sweet corn salad adds a crisp touch to your meal. Finding the right drink can make your meal even better. Here are some tasty options: - Margaritas: A classic lime margarita brings zest to each bite. - Iced Tea: Sweet or unsweet, tea is refreshing and balances the meal. - Soda: A light soda can be a fun, fizzy choice. - Sparkling Water: Flavored sparkling water cleanses the palate well. Garnishes can elevate your taco stuffed peppers. They add color and taste. Here are some simple ideas: - Fresh Cilantro: Chopped cilantro adds a burst of flavor and looks great. - Sour Cream: A dollop of sour cream gives a creamy contrast. - Avocado Slices: Creamy avocado enhances the texture and flavor. - Lime Wedges: A squeeze of lime adds brightness to every bite. These serving suggestions will help you enjoy taco stuffed peppers to the fullest! Yes, you can use different types of peppers. Bell peppers are great, but you can try poblano, jalapeño, or banana peppers. Each kind adds its own taste. For a sweeter flavor, stick to bell peppers. For heat, choose jalapeños. The choice is yours! To make your taco stuffed peppers spicier, add jalapeños or hot sauce to the filling. You can also mix in diced green chiles or sprinkle chili powder into the taco seasoning. Taste as you go, and adjust the spice level to what you like best. It's fun to find your perfect heat! Absolutely! You can freeze stuffed peppers for later. Once they cool, wrap each pepper in plastic wrap. Place them in a freezer bag or airtight container. They can last for up to three months. When ready to eat, just thaw and reheat in the oven. Enjoy your tasty meal anytime! Stuffed peppers are easy and fun to make. We covered the main ingredients and options for serving. I shared steps to prep, cook, and bake. Tips for storage and meal prep can save time. You can try vegetarian or low-carb versions. Don't forget pairing ideas for sides and drinks. Finally, stuffed peppers are great for any meal. They are tasty and flexible for everyone's diet. Enjoy your cooking and let your taste buds explore!

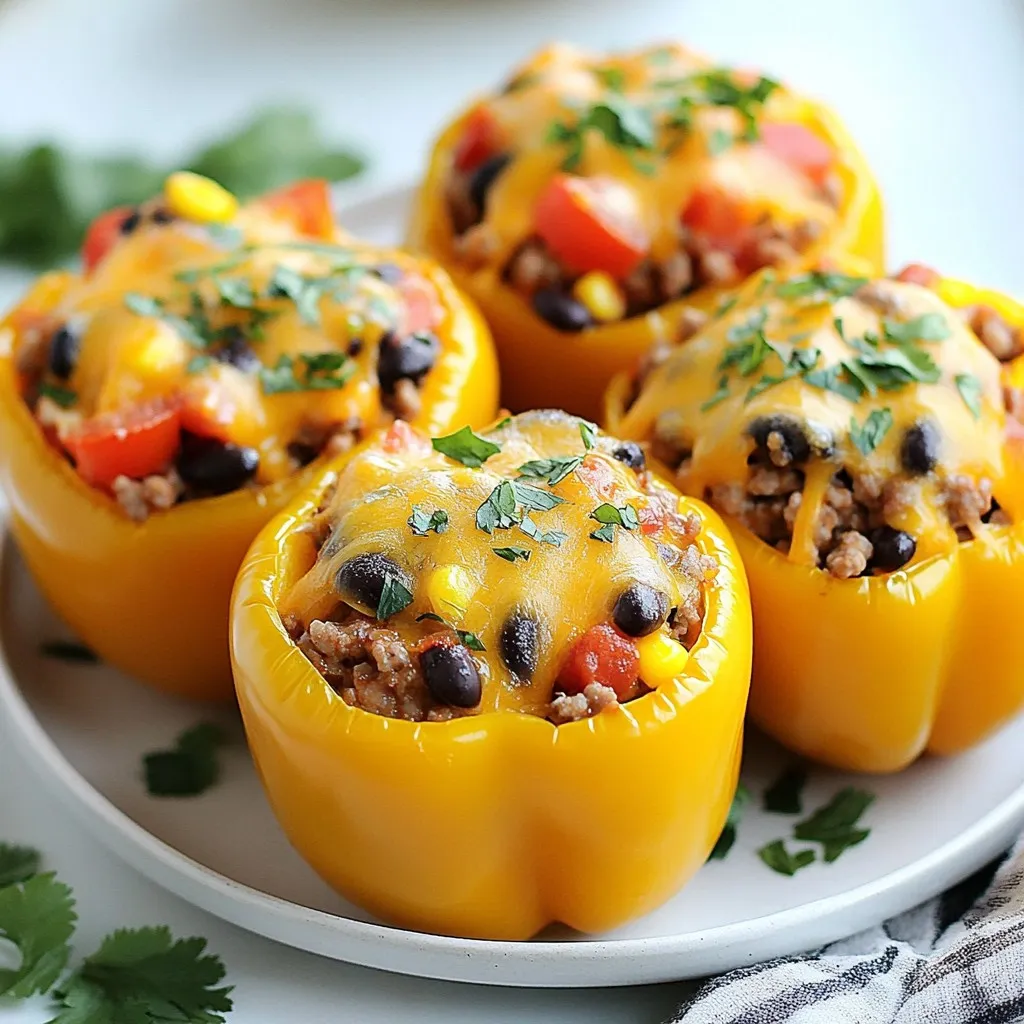
Do you need a quick, tasty dinner idea? Taco Stuffed Peppers are your answer! This meal is simple to make and packed with flavor. You’ll love how easy it combines …

Read more

Categories Dinner

Min Tomato Basil Angel Hair Pasta Quick and Flavorful

December 30, 2025April 3, 2025 by Chef Tavio
- 8 ounces angel hair pasta - 1 cup cherry tomatoes, halved - 1 cup fresh basil leaves, tightly packed - 3 cloves garlic, finely minced - 1 tablespoon extra virgin olive oil - 1 teaspoon red pepper flakes - 1/4 cup grated Parmesan cheese - Zest of 1 lemon - 1 tablespoon balsamic glaze When I create Min Tomato Basil Angel Hair Pasta, I focus on fresh, simple ingredients. Angel hair pasta cooks quickly and has a light texture. Cherry tomatoes add sweetness and a pop of color. Fresh basil gives a fragrant touch and bright flavor. For flavor, I use garlic. It brings warmth to the dish. Extra virgin olive oil adds richness, while red pepper flakes bring a gentle heat. Adjust the flakes based on your spice preference. Garnishes can elevate your meal. Grated Parmesan cheese adds creaminess. Lemon zest gives a fresh zing, and balsamic glaze offers a sweet contrast. Each garnish enhances the dish and makes it special. {{ingredient_image_2}} - Bring a large pot of salted water to a boil. - Add 8 ounces of angel hair pasta. - Cook until al dente, about 4-5 minutes. - Set aside 1/2 cup of pasta water before draining. - Drain the pasta and keep it warm in the pot. - Heat 1 tablespoon of extra virgin olive oil in a skillet over medium heat. - Add 3 cloves of finely minced garlic to the pan. - Sauté for about 1 minute until the garlic smells good but does not brown. - Incorporate 1 cup of halved cherry tomatoes into the skillet. - Add 1 teaspoon of red pepper flakes based on your heat preference. - Cook for 3-4 minutes, stirring occasionally until the tomatoes soften. - Toss in the cooked angel hair pasta to the skillet. - Gradually add the reserved pasta water, mixing until a light sauce forms. - Fold in 1 cup of fresh basil leaves and a pinch of salt and pepper. - Drizzle with 1 tablespoon of balsamic glaze before serving. - To avoid overcooking, check the pasta at 4 minutes. - Angel hair cooks fast. You want it al dente, firm to the bite. - Always reserve some pasta water. It helps the sauce stick and adds flavor. - Adjust the red pepper flakes to match your heat preference. - Fresh herbs like parsley or chives can boost the taste. - Try adding a pinch of oregano for a warm, earthy note. - Serve the pasta in warm bowls for a cozy look. - Garnish with fresh basil and lemon zest for color. - A drizzle of balsamic glaze adds a nice shine and flavor. Pro Tips Use Fresh Ingredients: The quality of the tomatoes and basil greatly affects the flavor of the dish. Opt for ripe, in-season cherry tomatoes and fresh basil for the best results. Adjust the Spice Level: Feel free to modify the amount of red pepper flakes based on your heat preference. Start with a smaller amount and add more if you like extra heat. Perfect Pasta Cooking: To ensure the pasta is cooked perfectly, taste it a minute before the suggested cooking time on the package. It should be tender but still firm to the bite. Garnish for Presentation: A drizzle of balsamic glaze and a sprinkle of lemon zest not only adds flavor but also enhances the visual appeal of your dish, making it look more enticing. {{image_4}} You can add protein to your Min Tomato Basil Angel Hair Pasta for a heartier meal. Grilled chicken is a great option. It adds flavor and helps fill you up. Simply slice the chicken and toss it in with the pasta before serving. Shrimp is another tasty choice. Just sauté the shrimp in olive oil until it turns pink. Mix it in with the pasta for a seafood twist. If you want a vegetarian option, try adding chickpeas. They are rich in protein and give a nice texture. Just add a can of drained chickpeas when you mix in the pasta. Adding vegetables can brighten the dish and boost nutrition. Spinach is a lovely choice. It wilts nicely when added to the hot pasta. Just toss in a handful right before serving for a fresh taste. Arugula also works well. It has a peppery bite that adds depth. You can mix it in at the end, just like spinach. Feel free to use other seasonal vegetables too. Zucchini, bell peppers, or asparagus can all add color and flavor. Just chop them up and sauté them with the garlic and tomatoes. If you need gluten-free options, you can use gluten-free angel hair pasta. Many brands make great substitutes that cook up well. Look for brands like Banza or Barilla, which are popular choices. You can also try spiralized vegetables, such as zucchini noodles. They provide a fun twist and are low in carbs. Just sauté them briefly and mix with your sauce for a fresh take on the dish. To store leftover Min Tomato Basil Angel Hair Pasta, use an airtight container. This keeps the flavors fresh and prevents drying out. Place the pasta in the fridge within two hours of cooking. Leftovers stay fresh for up to three days. If you want to keep it longer, consider freezing it. The best way to reheat pasta is on the stove. Add a splash of water or olive oil to a skillet over low heat. Stir often to avoid sticking. You can also use a microwave. Place the pasta in a microwave-safe bowl with a little water. Cover it with a damp paper towel. Heat in short intervals, stirring in between. This keeps the pasta moist. Avoid overcooking, as this can make the pasta mushy. For longer storage, you can freeze the pasta. Use a freezer-safe container and store it for up to three months. To reheat, let it thaw overnight in the fridge. For quick lunches, pack it with some extra cherry tomatoes and a side of basil. This makes a tasty and easy meal. It takes about 25 minutes to make this dish. You need 10 minutes to prep and around 15 minutes to cook. The angel hair pasta cooks quickly, usually in 4-5 minutes. Yes, you can prepare parts of the dish ahead. Cook the pasta and store it in the fridge. Sauté the garlic and tomatoes, then mix everything right before serving. This keeps the pasta fresh and tasty. If you lack fresh basil, you can use dried basil. Use about one tablespoon of dried basil. You could also try parsley or oregano for a different taste. These herbs can give a nice flavor to your dish. Yes, this recipe is perfect for vegetarians. It contains no meat or animal products, making it a great choice for anyone who avoids meat. You can use different pasta types if you like. Spaghetti or fettuccine works well. Just adjust the cooking time based on the type of pasta you choose. Enjoy exploring new flavors! This blog post covered a simple and fresh recipe for Min Tomato Basil Angel Hair Pasta. We explored key ingredients, from angel hair pasta to cherry tomatoes and basil. I shared how to cook the pasta and create a flavorful sauce with garlic and red pepper flakes. Remember to reserve your pasta water for the best texture. Feel free to tweak the recipe by adding proteins or vegetables. Store leftovers wisely, and enjoy this dish as an easy meal prep option. Enjoy every bite!

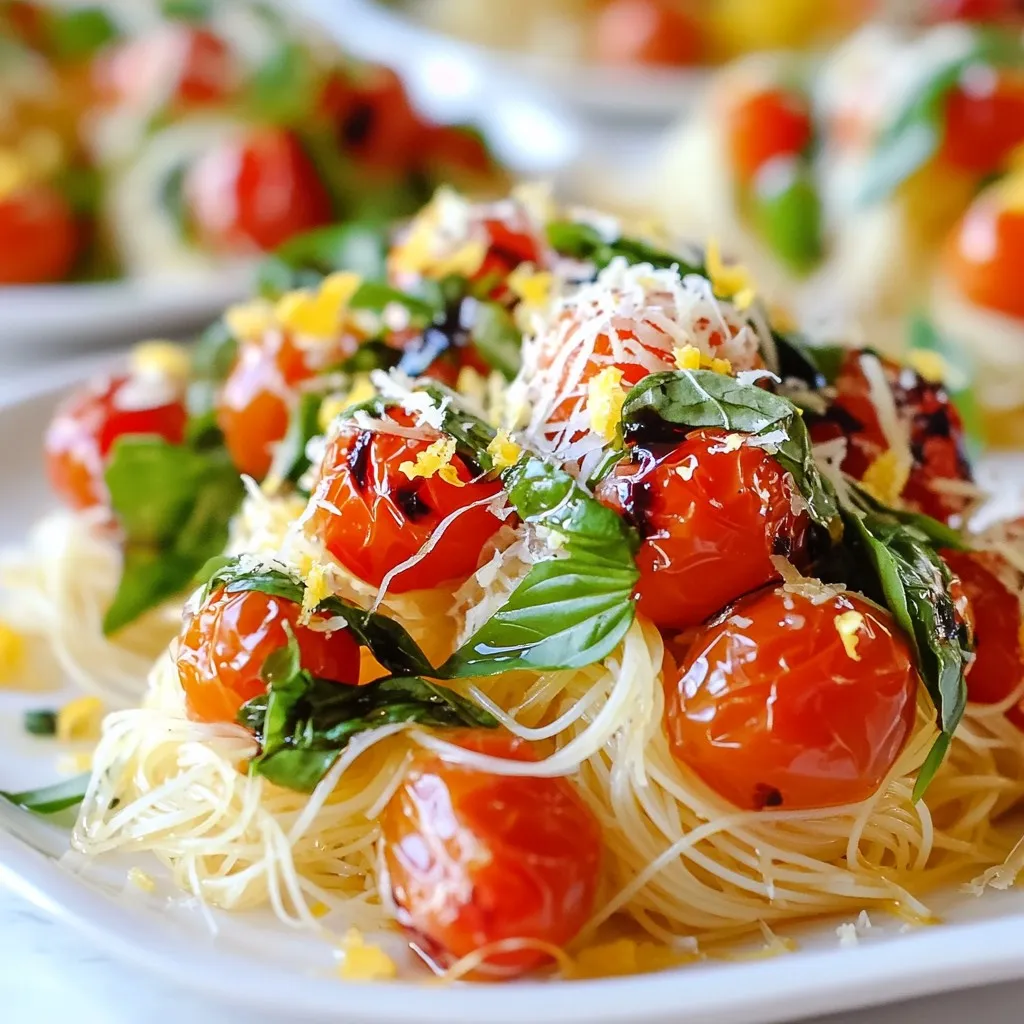
Are you looking for a quick and tasty pasta dish? Let me introduce you to Min Tomato Basil Angel Hair Pasta! This vibrant meal features fresh cherry tomatoes, aromatic basil, …

Read more

Categories Dinner

Mini Protein Cheesecakes Delightful and Easy Treat

December 13, 2025April 3, 2025 by Chef Tavio
To create these mini protein cheesecakes, gather the following ingredients: - 1 cup cottage cheese - 1 cup plain Greek yogurt (fat-free) - 1/4 cup honey or maple syrup - 2 tablespoons vanilla extract - 1 tablespoon fresh lemon juice - 2 scoops vanilla-flavored protein powder - 1/2 cup almond flour (for the crust) - 2 tablespoons melted coconut oil (for the crust) - 1 tablespoon maple syrup (for the crust) - Pinch of salt These ingredients blend to make a tasty cheesecake base. The cottage cheese and Greek yogurt give it a creamy texture. The protein powder boosts the protein content, making these treats filling and nutritious. You can customize your mini cheesecakes with fun toppings. Consider these options: - Fresh berries (strawberries, blueberries, raspberries) - A drizzle of honey or maple syrup - Crushed nuts or granola for crunch - A sprinkle of cocoa powder for a chocolate touch These toppings add color and flavor. They also provide extra nutrients, making your cheesecakes even better. These mini protein cheesecakes are a smart choice for a snack or dessert. Each cheesecake packs a punch with protein. Here’s a quick breakdown: - Cottage cheese and Greek yogurt offer about 20 grams of protein total. - Each mini cheesecake has about 5 grams of protein, depending on serving size. This high protein content helps you feel full longer. Enjoy these cheesecakes as a tasty way to boost your protein intake while satisfying your sweet tooth. {{ingredient_image_2}} First, preheat your oven to 350°F (175°C). While it warms up, grab a muffin tin. Line it with silicone or paper cupcake liners. This will help keep the cheesecakes from sticking. Next, in a medium bowl, mix together the almond flour, melted coconut oil, maple syrup, and a pinch of salt. Use a fork or your hands to combine everything. You want a crumbly dough that holds together when pressed. Take about 1 tablespoon of this mixture and press it down into each liner. Make sure it covers the bottom well. Bake these crusts for 8-10 minutes. Look for a light golden color. Once done, take them out and let them cool. Now, it's time for the filling. In a blender, add the cottage cheese, Greek yogurt, honey or maple syrup, vanilla extract, lemon juice, and protein powder. Blend this mixture on high speed until it is smooth and creamy. You want to ensure there are no lumps. Once smooth, carefully pour the filling over the cooled crusts. Fill each liner to the top. Give the muffin tin a gentle tap on the counter. This helps to remove any air bubbles trapped in the filling. Now, bake the cheesecakes in the oven for another 15-18 minutes. They should look set but still have a slight jiggle in the center. After baking, remove them from the oven and let them cool at room temperature for about 10-15 minutes. Next, move them to the refrigerator to chill for at least 2 hours. This will help them firm up completely. While waiting, you can prepare some fresh berries to top them. Before serving, add a handful of berries on each mini cheesecake for a tasty and beautiful touch. Enjoy your delightful treat! To get a smooth and creamy texture, use fresh ingredients. I recommend blending the cottage cheese and Greek yogurt well. This helps break down any lumps. Make sure to blend everything until it’s silky. The protein powder also adds creaminess, so don’t skip it. If your mix seems thick, add a little extra lemon juice. This will keep it light and fresh. One common error is overbaking the cheesecakes. If you bake them too long, they become dry. Watch them closely. The centers should be slightly jiggly when done. Another mistake is not cooling properly. Let them cool at room temperature first. Then, chill them in the fridge for at least two hours. This step is key for the right texture. Store your mini protein cheesecakes in an airtight container. They keep well in the fridge for up to five days. If you want to freeze them, wrap each cheesecake tightly. Use plastic wrap or foil. They can last up to three months in the freezer. When serving, add fresh berries right before enjoying. This adds color and a burst of flavor to each bite. Pro Tips Use Room Temperature Ingredients: Allow your cottage cheese and Greek yogurt to sit out for about 15-30 minutes before mixing. This helps achieve a smoother filling. Customize Sweetness: Adjust the amount of honey or maple syrup to your taste. You can start with less and add more if needed, especially if using sweet toppings. Freeze for Longer Storage: If you want to keep these cheesecakes for longer, freeze them instead of refrigerating. Just thaw them in the fridge before serving. Experiment with Flavors: Add different extracts like almond or orange, or mix in cocoa powder for a chocolate version to keep it interesting. {{image_4}} You can easily change up the flavor of mini protein cheesecakes. For a chocolate twist, add cocoa powder to the filling. Use about 1/4 cup for a rich taste. If you love fruit, try mixing in pureed strawberries or blueberries. This will give your cheesecakes a fresh, fruity flavor. You can also add lemon zest for a bright, zesty kick. Feel free to get creative with different flavors! These cheesecakes can fit many diets. To make them vegan, swap dairy products with plant-based options. Use silken tofu instead of cottage cheese and coconut yogurt instead of Greek yogurt. For a gluten-free option, ensure your almond flour is certified gluten-free. You can also use gluten-free cookies for the crust if you want something crunchy. These mini cheesecakes are perfect for sharing! Each recipe makes 12 servings. If you want smaller bites, pour the filling into mini muffin tins. They will bake faster, so watch them closely. For a beautiful presentation, place a few whole berries on top of each cheesecake. Drizzle extra honey or maple syrup around the plate. This will make your dessert look fancy and inviting! To keep your mini protein cheesecakes fresh, store them in the fridge. Place them in an airtight container. Make sure to layer parchment paper between each cheesecake to prevent sticking. They can last about 3 to 5 days this way. You can freeze these cheesecakes if you want to save some for later. First, wrap each cheesecake in plastic wrap. Then, place them in a freezer-safe bag. They will stay fresh for up to 2 months. When you're ready to eat one, just thaw it in the fridge overnight. For the best taste and texture, eat the cheesecakes within the first few days. After that, they may become drier. If you see any signs of freezer burn, it’s best to toss them. Always check for any odd smells or changes in color before enjoying your stored treats. Yes, you can use regular yogurt. It will change the texture a bit. You can also try cottage cheese for a similar taste. Use a smooth blend to keep it creamy. If you pick non-dairy yogurt, choose one with protein. Keep in mind, this change may alter the flavor. To boost protein, add more protein powder. You can mix in up to three scoops. Another option is to include nut butter. Almond or peanut butter works great. You can also use protein-rich toppings, like nuts or seeds. These ideas will make your mini cheesecakes even healthier. Fresh berries are a top choice for toppings. Strawberries, blueberries, and raspberries add color and taste. Chopped nuts or seeds add a nice crunch. You can also drizzle with honey or maple syrup for extra sweetness. For a fancy touch, try a dollop of Greek yogurt. In this post, we explored how to make mini protein cheesecakes from scratch. We covered ingredients, step-by-step instructions, and helpful tips for a smooth result. You also learned about storage, variations, and FAQs to make your baking easier. Mini protein cheesecakes are tasty and healthy treats anyone can enjoy. With these simple ideas, you can feel confident in your baking. Get creative with flavors and toppings, and enjoy your delicious, guilt-free desserts. Happy baking!

Looking for a dessert that tastes great and packs a protein punch? You’ll love these Mini Protein Cheesecakes! They are simple to make and perfect for any occasion. With steps …

Read more

Categories Desserts

Crispy Oven Sweet Potato Fries Simple and Flavorful Snack

December 5, 2025April 2, 2025 by Chef Tavio
- 2 large sweet potatoes - 2 tablespoons cornstarch - 2 tablespoons olive oil - 1 teaspoon smoked paprika - 1 teaspoon garlic powder - ½ teaspoon salt - ¼ teaspoon black pepper - Optional: ¼ teaspoon cayenne pepper for an extra spicy kick To make crispy oven sweet potato fries, you need a few simple ingredients. First, choose two large sweet potatoes. Sweet potatoes give a sweet flavor and a nice texture. Next, cornstarch is essential. It helps the fries get that extra crunch. You will also need two tablespoons of olive oil. The oil helps the seasonings stick and adds flavor. For seasonings, use smoked paprika and garlic powder. These bring warmth and depth to the fries. Adding salt and black pepper will enhance the taste too. If you like heat, sprinkle in some cayenne pepper. This is optional but adds a nice kick. These ingredients come together to create a simple and flavorful snack. {{ingredient_image_2}} First, preheat your oven to 425°F (220°C). This high heat helps the fries get nice and crispy. Next, line a spacious baking sheet with parchment paper. This makes it easy to remove the fries later and keeps the sheet clean. Now, take your sweet potatoes. Peel them and cut them into evenly sized fries. In a large mixing bowl, add the fries. Make sure they are in a single layer for even coating. Sprinkle 2 tablespoons of cornstarch over the fries. Use your hands or a spatula to toss them gently. This step is vital for crispiness! Next, drizzle 2 tablespoons of olive oil over the fries. Add 1 teaspoon of smoked paprika, 1 teaspoon of garlic powder, ½ teaspoon of salt, and ¼ teaspoon of black pepper. If you like heat, add ¼ teaspoon of cayenne pepper. Toss everything together until the fries are well coated with the oil and seasonings. Carefully spread the seasoned fries on the prepared baking sheet in a single layer. Make sure they do not overlap. This helps them crisp up while baking. Place the baking sheet in the preheated oven and bake for 25-30 minutes. Flip the fries halfway through to ensure they cook evenly. This gives them that lovely golden-brown color. Once they are crispy, remove them from the oven and let them cool for a few minutes. This resting time makes them even crunchier! To get that perfect crunch, cornstarch is your best friend. It helps absorb moisture from the potatoes. When you sprinkle it on your fries, make sure to coat them evenly. This step is key for a crispy bite. Also, spacing the fries on the baking sheet is important. You want them in a single layer without any overlap. This allows hot air to circulate and crisp them up nicely. Letting your fries rest after baking is crucial. When you take them out of the oven, the steam inside can make them soggy. By resting them for a few minutes, you allow that steam to escape. This results in a crunchier fry that you will love. Cutting sweet potatoes evenly is vital for uniform cooking. Use a sharp knife for clean cuts. Aim for fries that are about the same size, around a quarter inch thick. This helps them cook evenly. When selecting sweet potatoes, look for firm ones with smooth skin. Avoid any that have soft spots or blemishes. Fresh sweet potatoes will give you the best flavor and texture in your fries. Pro Tips Cut Evenly: Ensure all sweet potato fries are cut to the same size for even cooking and crispiness. Use Parchment Paper: This prevents the fries from sticking and makes cleanup a breeze. Don’t Overcrowd: Spread fries in a single layer on the baking sheet to allow for optimal air circulation and crisping. Rest Before Serving: Let the fries cool for a few minutes after baking to enhance their crunchiness. {{image_4}} You can change the flavor of your fries easily. Try different spice blends to keep things fun. Here are some ideas: - Cajun Spice: Use a mix of paprika, cayenne, and garlic powder for a kick. - Italian Herbs: Mix dried oregano, basil, and a touch of garlic for a savory twist. - Sweet Cinnamon: Sprinkle cinnamon and a bit of brown sugar for a sweet treat. You can choose sweet or savory options based on your mood. Use your favorite spices and make it your own! If you want to switch things up, use other root vegetables. Here are some tasty options: - Carrots: Cut them into fry shapes for a sweet and crunchy snack. - Parsnips: They have a sweet, nutty flavor that pairs well with spices. - Beets: They add a vibrant color and earthy taste to your meal. Experimenting with these alternatives can lead to new favorites! Baking and air frying each have their perks. Here’s how they compare: - Baking: This method takes longer but gives you crisp fries with a rich flavor. You can cook a big batch at once. - Air Frying: This method cooks faster and uses less oil. It still gives you crispy fries, but the texture may differ slightly. Choose the method that fits your time and taste. Both ways will lead to delicious sweet potato fries! To keep your leftover fries fresh, cool them first. Then, place them in an airtight container. This helps lock in moisture and flavor. Make sure to store them in the fridge. They are best eaten within three days for good taste. To bring back their crispiness, use your oven. Preheat it to 400°F (200°C). Spread the fries on a baking sheet. Bake for about 10 to 15 minutes. This method helps retain texture. If you want a quick option, a toaster oven works well too. Just watch them closely so they don’t burn. Avoid using the microwave if you don’t want soggy fries. They lose their crunch that way. Enjoy your crispy oven sweet potato fries again! To make your sweet potato fries extra crispy, follow these tips: - Use cornstarch: Tossing the fries in cornstarch helps absorb moisture. This is key for crispiness. - High heat: Bake your fries at 425°F (220°C). This temperature ensures they brown well. - Avoid overlap: Spread the fries out on the baking sheet. Overlapping causes steaming, which leads to sogginess. - Flip halfway: Turn the fries during baking to achieve even cooking and crispness. By using these methods, you'll enjoy fries that are crunchy on the outside and soft inside. Yes, you can freeze sweet potato fries! Here’s how: - Prep before freezing: Cut your fries and toss them with cornstarch and seasonings. - Flash freeze: Spread the fries on a baking sheet in a single layer. Freeze them for about an hour. This prevents them from sticking together. - Store in a bag: After they freeze, transfer the fries to a freezer bag. Remove as much air as possible. - Cooking from frozen: Bake them directly from the freezer. Increase the baking time by 5-10 minutes. Freezing helps save time for later while still giving you that crispy texture. Sweet potato fries pair well with many tasty dips. Here are some popular options: - Garlic aioli: Creamy and flavorful, it contrasts nicely with the sweetness of the fries. - Spicy ketchup: Add a kick to your fries with zesty ketchup. - Honey mustard: This sweet and tangy dip is a fun choice. - Ranch dressing: A classic that brings a cool flavor to the table. Experiment with these dips to find your favorite combination! To make sweet potato fries, start with simple ingredients and easy steps. Preheat your oven and prep your sweet potatoes by cutting them evenly. Toss them with cornstarch, oil, and your favorite seasonings for tasty flavor. Remember to space them out on the baking sheet for crispy fries. Try new spice blends or even other vegetables for fun twists! Store leftovers right and reheat properly for the best crunch. Making sweet potato fries can be quick and rewarding. Enjoy the process and share these tips with friends!

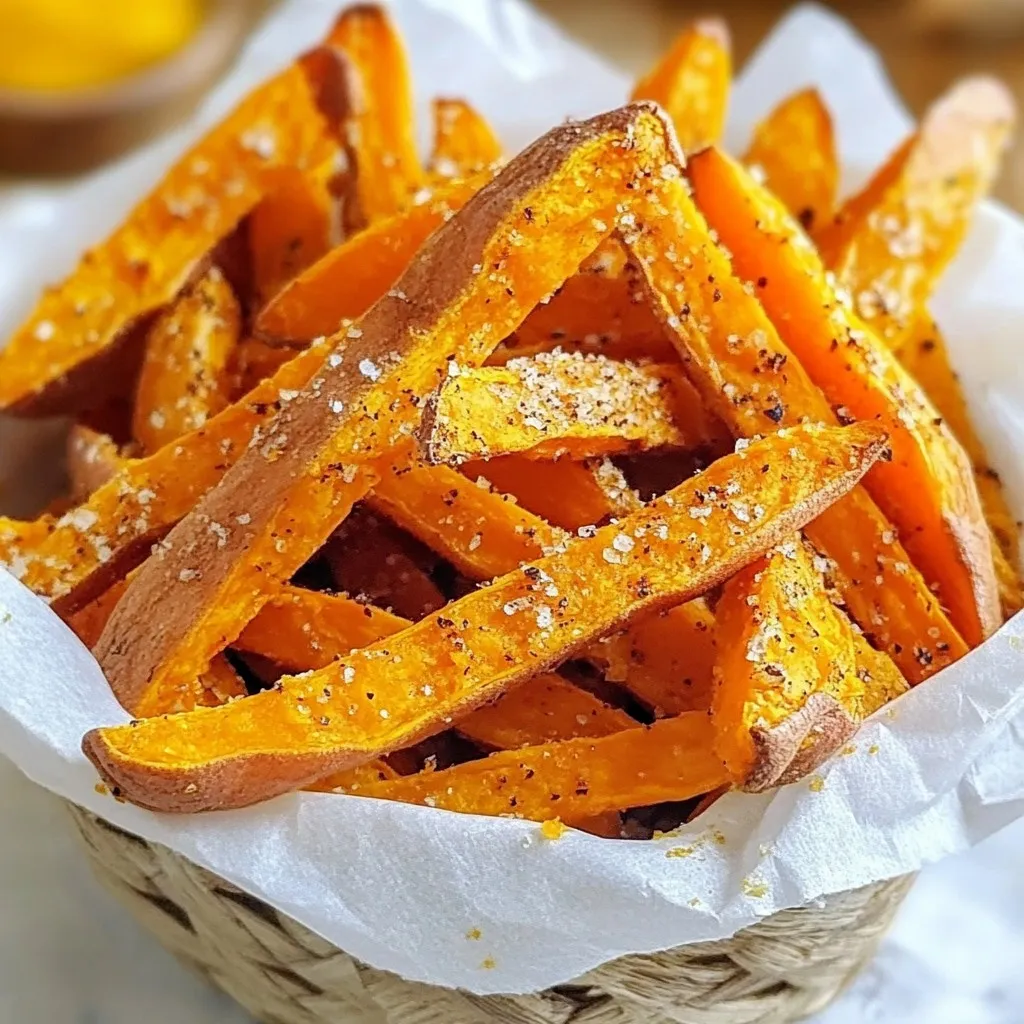
Looking for a tasty snack that’s both easy to make and full of flavor? Crispy oven sweet potato fries are the answer! I’ll show you how to transform simple sweet …

Read more

Categories Appetizers

Ingredient Date Cookies Simple and Nutritious Treat

December 8, 2025April 2, 2025 by Chef Tavio
To make these tasty ingredient date cookies, you need the following items: - 1 cup pitted dates, finely chopped - 1 cup rolled oats - 1/2 cup almond flour - 1/2 teaspoon baking soda - 1/2 teaspoon ground cinnamon - 1/4 teaspoon salt - 1/3 cup coconut oil, melted - 1/4 cup honey or maple syrup - 1 teaspoon pure vanilla extract These ingredients work together to create a soft and chewy cookie. The dates add natural sweetness and a nice texture. You can change the recipe by adding these optional items: - 1/2 cup walnuts or pecans, chopped Adding nuts gives the cookies a nice crunch. You can also try different nuts based on your taste. If you need to make swaps, here are some ideas: - Instead of almond flour, use oat flour or all-purpose flour. - If you don’t have coconut oil, olive oil or butter works well. - Replace honey with agave syrup or another liquid sweetener. These swaps will still keep your cookies delicious and healthy. Feel free to get creative with what you have at home! {{ingredient_image_2}} Start by heating your oven to 350°F (175°C). This step is key for even baking. Next, take a baking sheet and line it with parchment paper. This keeps your cookies from sticking and makes cleanup easy. In a large bowl, add the rolled oats, almond flour, baking soda, ground cinnamon, and salt. Mix these dry items well. This ensures that the flavors blend nicely. Make sure there are no clumps in your mixture. In a separate bowl, take 1 cup of finely chopped dates. Mash them with a fork for about a minute. Aim for a creamy and sticky consistency. This will add natural sweetness and moisture to your cookies. Now, add the melted coconut oil, honey (or maple syrup), and pure vanilla extract to your mashed dates. Mix these wet ingredients until smooth. Once done, pour this mixture into the bowl with the dry ingredients. Stir everything together until combined well. If you like nuts, fold in 1/2 cup of chopped walnuts or pecans now. Using a tablespoon, scoop out cookie dough and drop it onto the lined baking sheet. Space each scoop about 2 inches apart. Gently flatten each cookie with the back of the spoon. Bake them in the oven for 10-12 minutes. Look for golden brown edges as a sign they are ready. After baking, let the cookies cool on the sheet for 5 minutes before moving them to a wire rack. This helps them set properly. To get the right cookie texture, use fresh dates. They should be soft and sticky. If your dates are dry, soak them in warm water for a few minutes. This helps them blend better. Use rolled oats instead of quick oats for a chewy bite. Adjust the baking time as needed. Keep an eye on the edges. They should turn golden brown. This means the cookies are ready. One common mistake is over-mixing the dough. Stir just until everything blends. Over-mixing can make cookies tough. Another mistake is skipping the cooling time. Letting cookies cool on the rack helps them firm up. Also, do not crowd the baking sheet. Space cookies about two inches apart. This allows them to spread evenly. After baking, let the cookies cool for five minutes on the sheet. This helps them set before moving. Afterward, transfer them to a wire rack. Let them cool completely to keep their texture. Store in an airtight container at room temperature. They should stay fresh for about five days. For longer storage, freeze them. They can last up to three months in the freezer. Pro Tips Chop Dates Finely: For better texture and easier mixing, ensure your dates are chopped finely before mashing them. Adjust Sweetness: Feel free to adjust the amount of honey or maple syrup based on your personal sweetness preference. Use Fresh Nuts: For enhanced flavor, toast your walnuts or pecans lightly before adding them to the dough. Store Properly: To keep your cookies fresh, store them in an airtight container at room temperature for up to a week. {{image_4}} To make vegan ingredient date cookies, simply swap out honey for maple syrup. This change keeps the cookies sweet and tasty. You can also replace coconut oil with vegan butter or any plant-based oil. Use these simple swaps to enjoy a cookie that fits your vegan diet. To create gluten-free ingredient date cookies, use gluten-free rolled oats and almond flour. These ingredients work together to give your cookies a soft texture. Always check that your oats are certified gluten-free. This way, you avoid any cross-contamination and enjoy your treat worry-free. If you need a nut-free cookie, skip the almond flour and use oat flour instead. You can make oat flour by blending rolled oats in a blender until they turn to powder. For the optional nuts, simply leave them out. The cookies will still taste great without them, and you will have a safe snack for everyone. To keep your baked Ingredient Date Cookies fresh, place them in an airtight container. This helps maintain their soft texture. You can stack them with parchment paper between layers. This prevents sticking. Keep the container in a cool, dry place. If you live in a warm area, store them in the fridge. They will last for up to one week. For best taste, eat them within a few days. If you want to save some dough for later, freezing is simple. First, scoop the cookie dough onto a baking sheet. Space the dough balls apart so they don’t stick together. Freeze them for about two hours until hard. Then, transfer the dough balls into a freezer-safe bag. Make sure to remove as much air as possible. You can freeze the dough for up to three months. When you’re ready to bake, just let the dough thaw in the fridge overnight before baking. Ingredient Date Cookies have a good shelf life. When stored correctly, they stay fresh for about one week at room temperature. If you store them in the fridge, they can last up to two weeks. If frozen, the cookies can last for three months. However, they taste best when eaten fresh. Enjoy them soon after baking for the best flavor and texture! Yes, you can use maple syrup or agave nectar. Both will keep the cookies sweet. If you want a lower-glycemic option, try coconut sugar. Just make sure to adjust the amount, as different sweeteners have different sweetness levels. The cookies will be ready when the edges turn a light golden brown. This usually takes around 10 to 12 minutes. They may look soft in the center. That’s okay! They will firm up as they cool. Absolutely! Chocolate chips can add a delicious twist. Simply fold in about 1/2 cup of chocolate chips with the nuts. This will give you a sweet and rich flavor that pairs well with the dates. Ingredient date cookies are simple and fun to make. We covered key ingredients, baking steps, and helpful tips. You learned about variations like vegan and gluten-free options too. These cookies are tasty and can fit many diets. Remember to store them properly for lasting freshness. Enjoy sharing your delicious creations with friends and family. Happy baking!

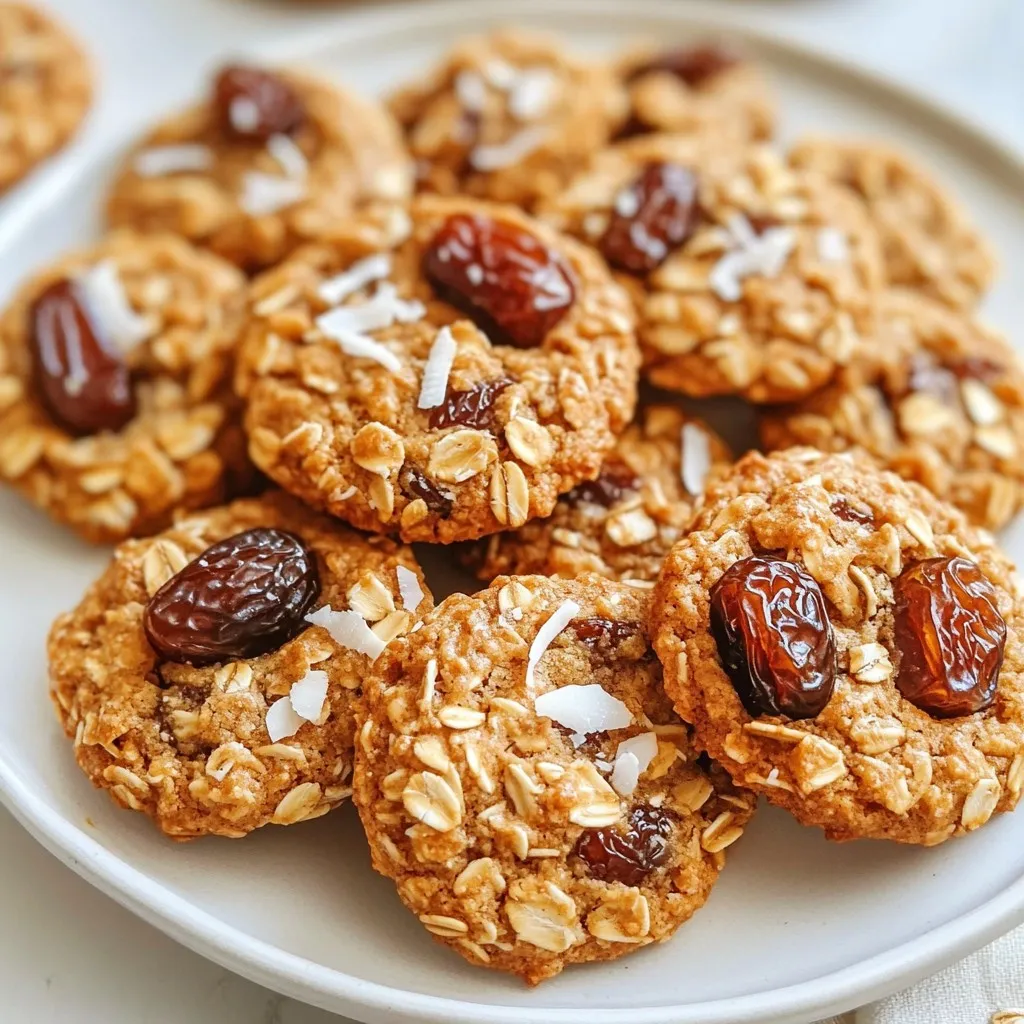
Looking for a simple and nutritious treat? Ingredient Date Cookies are your answer! Packed with flavor and healthy goodness, these cookies are easy to make and great for any occasion. …

Read more

Categories Desserts

Easy Chicken Enchiladas Simple and Tasty Recipe

November 18, 2025April 2, 2025 by Chef Tavio
To make tasty chicken enchiladas, gather these key ingredients: - 2 cups shredded cooked chicken (rotisserie works great!) - 1 cup black beans, rinsed and drained - 1 cup corn kernels (fresh, frozen, or canned) - 1 cup bell peppers, chopped (mix of red and green for color) - 1 teaspoon ground cumin - 1 teaspoon chili powder - ½ teaspoon garlic powder - ½ teaspoon onion powder - 1 cup enchilada sauce (store-bought or homemade) - 8 small flour or corn tortillas - 1 cup shredded cheese (cheddar or Monterey Jack) - Fresh cilantro, chopped (for garnish) - Sour cream (for serving) These ingredients create a vibrant flavor. The chicken and beans provide protein, while the corn and peppers add sweetness and crunch. You can enhance your enchiladas with some fun garnishes and sides: - Sliced jalapeños for heat - Avocado or guacamole for creaminess - Lime wedges for a zesty kick - Mexican rice or refried beans as side dishes - A fresh salad to balance the meal These options can add more flavor and texture to your dish. Mix and match to find your favorite combos! To make the cooking process smooth, here are some tools you will need: - Large mixing bowl for combining ingredients - Baking dish to hold enchiladas while baking - Measuring cups and spoons for accurate portions - Wooden spoon or spatula for mixing - Aluminum foil to cover the dish while baking Having the right tools makes cooking easier and more fun. You’ll be ready to whip up these enchiladas in no time! {{ingredient_image_2}} First, preheat your oven to 375°F (190°C). This heats the oven for baking. In a large bowl, mix 2 cups of shredded cooked chicken, 1 cup of black beans, 1 cup of corn, and 1 cup of chopped bell peppers. Add 1 teaspoon of ground cumin, 1 teaspoon of chili powder, ½ teaspoon of garlic powder, and ½ teaspoon of onion powder. Stir well until everything is combined. Grab a tortilla and place about ¼ cup of the chicken mixture in the center. Roll the tortilla tightly and place it seam-side down in a greased baking dish. Repeat this for all the tortillas. After arranging the rolled tortillas, pour 1 cup of enchilada sauce over them. Make sure each tortilla is covered. Next, sprinkle 1 cup of shredded cheese over the top. Cover the dish with aluminum foil to avoid burning. Bake the enchiladas for 20 minutes. After that, remove the foil and bake for another 10 minutes. This helps the cheese melt and turn golden. Once done, take the dish out and let it cool for a few minutes. Before serving, sprinkle fresh cilantro on top for a burst of flavor. Serve the enchiladas on a colorful plate. Drizzle with extra enchilada sauce and add a dollop of sour cream. This makes the dish look great and taste even better! Enjoy your meal! To keep your enchiladas moist, use enough sauce. Pour it over the tortillas before baking. This step is key. You want every tortilla to soak up the flavor. If you like, add some sauce inside the tortillas too. It makes each bite juicy and delicious. Rolling tortillas can be tricky. First, warm them slightly to make them flexible. This helps prevent tearing. Lay down about ¼ cup of the chicken mixture. Start at one end and roll tightly. Make sure to tuck in the sides as you roll. Place the seam side down in the baking dish. This keeps them from unrolling. Watch out for overfilling your tortillas. If they are too full, they won’t roll well. Also, don’t skip the sauce on top. It adds moisture and flavor. Lastly, avoid baking them too long. They should be bubbly and slightly golden but not dried out. Pay attention to these tips for the best enchiladas! Pro Tips Use Rotisserie Chicken: For a quick and flavorful option, shredded rotisserie chicken saves time and adds delicious seasoning to your enchiladas. Mix Your Cheeses: Combining cheddar and Monterey Jack cheese not only enhances the flavor but also creates a melty texture that pulls perfectly when served. Customize Your Fillings: Feel free to add other ingredients like diced zucchini, mushrooms, or jalapeños for a personal twist on the classic recipe. Let Them Rest: Allow the enchiladas to cool for a few minutes before serving; this helps the flavors meld and makes them easier to serve. {{image_4}} You can change the filling for your chicken enchiladas. Here are some ideas: - Vegetarian Option: Use black beans, corn, and extra veggies like zucchini or mushrooms. - Spicy Kick: Add diced jalapeños or hot sauce to the chicken mix. - Cheesy Goodness: Mix in cream cheese or ricotta for a creamy filling. - Protein Swap: Try ground turkey or beef for a different meat flavor. You can mix and match to find your favorite combination! The sauce can make or break your enchiladas. Here are some alternatives: - Green Sauce: Use green salsa or tomatillo sauce for a fresh taste. - Creamy Sauce: Try a white cheese sauce for a rich twist. - BBQ Sauce: For a fun fusion, use barbecue sauce instead of enchilada sauce. These sauces can add a unique flavor to your dish! You can easily adapt this recipe to fit various diets: - Gluten-Free: Use corn tortillas instead of flour ones. - Dairy-Free: Swap cheese for a dairy-free cheese or skip it altogether. - Low-Carb: Use lettuce wraps instead of tortillas for a lighter meal. These adjustments make it easy to enjoy enchiladas no matter your diet! To keep your leftover enchiladas fresh, place them in an airtight container. Make sure they cool down first. You can store them in the fridge for up to four days. If you want to keep them longer, freezing is a great option. To freeze enchiladas, let them cool completely. Wrap each one tightly in plastic wrap. Then, place them in a freezer-safe container or bag. They can last for up to three months in the freezer. When you are ready to eat them, just thaw in the fridge overnight. For the best taste, reheat enchiladas in the oven. Preheat the oven to 350°F (175°C). Place the enchiladas in a baking dish and cover with foil. Heat for about 20 minutes, or until they are warmed through. You can also microwave them, but the oven gives a better texture. Yes, you can use various tortillas. Flour tortillas are soft and easy to roll. Corn tortillas have a nice flavor but can break. If you want a gluten-free option, choose corn. They both work well in this recipe. You might need to warm corn tortillas first. This helps them stay intact while you roll them. To add heat, use spicy enchilada sauce. You can also mix in diced jalapeños or hot sauce. Adding more chili powder boosts spice too. If you like, sprinkle crushed red pepper on top before serving. Remember, start with a little spice. You can always add more! Many sides go great with chicken enchiladas. Consider serving them with rice or beans. A fresh salad adds a nice crunch. Guacamole or chips with salsa are popular choices too. You can also serve sour cream on the side. This helps cool down any heat from the enchiladas. You learned how simple it is to make easy chicken enchiladas. We discussed the best ingredients, Cooking tools, and step-by-step instructions. I shared tips to keep your enchiladas moist and tricks to avoid common mistakes. You can customize them or freeze leftovers for later. Explore different tortillas and sauces to make them your own. Now, you are ready to impress family and friends with your cooking skills and tasty meal. Enjoy every bite and have fun in the kitchen!

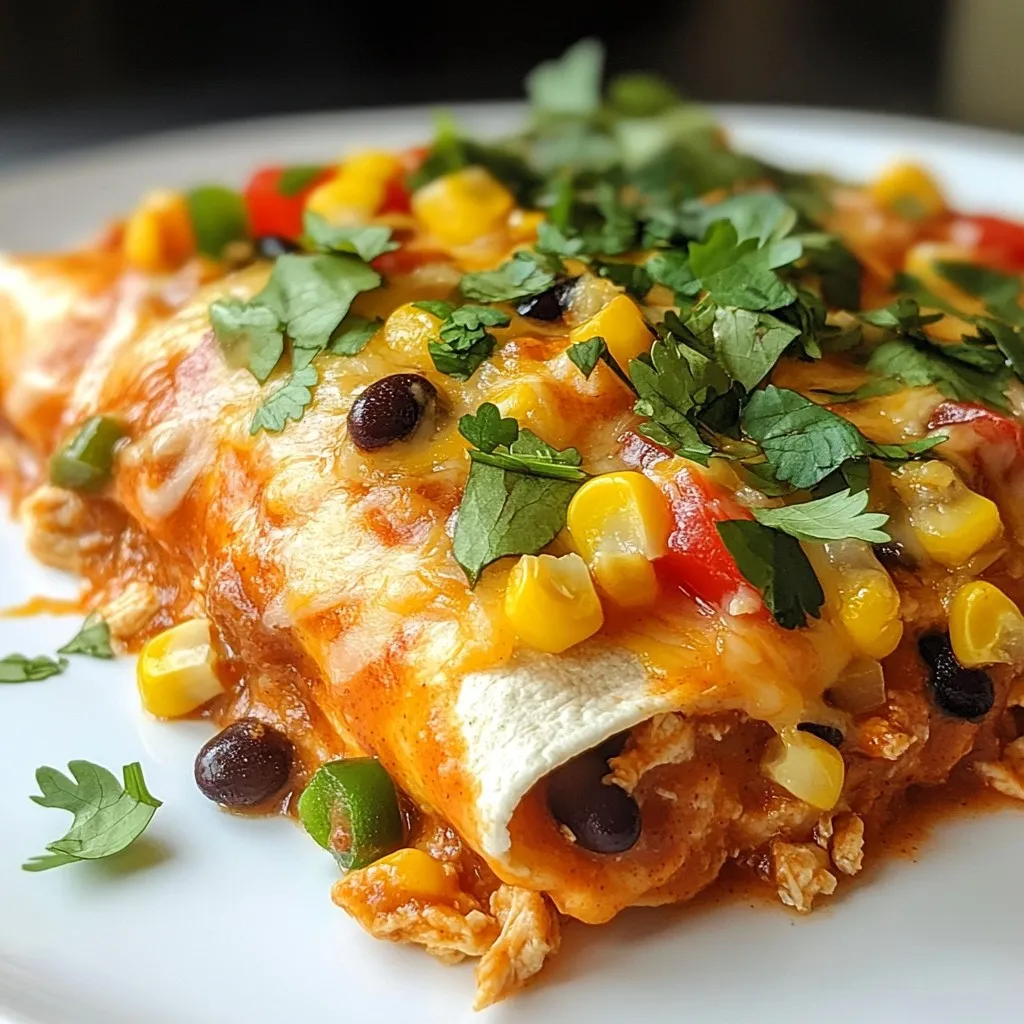
Looking for a simple way to spice up dinner? These Easy Chicken Enchiladas are the answer! With just a few basic ingredients and quick steps, you can create a meal …

Read more

Categories Dinner

Soft Gooey Protein Blondies Delightful and Easy Treat

January 1, 2026April 2, 2025 by Chef Tavio
Here’s what you need for Soft Gooey Protein Blondies: - 1 cup creamy almond butter - 1/2 cup honey or pure maple syrup - 1/2 cup vanilla-flavored protein powder - 1/4 cup coconut flour - 1/4 teaspoon sea salt - 1/2 teaspoon baking soda - 1/2 cup mini chocolate chips - 1/3 cup chopped nuts (walnuts or pecans) - 1/4 cup almond milk These simple ingredients come together to create a treat that is not only tasty but also packed with protein. Using creamy almond butter gives the blondies a rich texture. Honey or maple syrup adds sweetness while keeping it natural. Vanilla protein powder boosts the protein content, making these blondies a great snack after a workout. Coconut flour keeps the batter light and adds a slight sweetness. Sea salt balances the flavors and enhances the sweetness. Baking soda helps the blondies rise, giving them a nice, soft texture. Mini chocolate chips add gooey pockets of chocolate in every bite. Chopped nuts provide a nice crunch and extra flavor. Lastly, almond milk adjusts the batter’s thickness, ensuring the perfect gooeyness. Mix these ingredients, and you’re on your way to enjoying a delicious, healthy treat! {{ingredient_image_2}} 1. Preheating the oven and preparing the baking pan Start by preheating your oven to 350°F (175°C). This step ensures your blondies bake evenly. Line an 8x8 inch baking pan with parchment paper. This makes it easy to remove the blondies later. 2. Mixing wet ingredients for a smooth base In a large bowl, combine 1 cup of creamy almond butter with 1/2 cup of honey or maple syrup. Stir these together until the mixture is smooth and creamy. This forms the base of your blondies. 3. Combining dry ingredients into the mixture Add 1/2 cup of vanilla protein powder, 1/4 cup of coconut flour, 1/4 teaspoon of sea salt, and 1/2 teaspoon of baking soda to the wet mixture. Mix well. Make sure there are no dry spots left. This ensures every bite is packed with flavor. 4. Adjusting the batter consistency with almond milk Gradually add 1/4 cup of almond milk to your batter. Mix until it reaches a thick, dough-like consistency. If it feels too dry, add more almond milk, one tablespoon at a time. This step is key for that soft, gooey texture. 5. Folding in chocolate chips and nuts Gently fold in 1/2 cup of mini chocolate chips and 1/3 cup of your favorite chopped nuts, like walnuts or pecans. Make sure they are spread evenly throughout the batter. This adds a delightful crunch and extra flavor. 6. Baking time and doneness check Pour the batter into the lined baking pan. Spread it out evenly with a spatula. Bake in the oven for about 20-25 minutes. Keep an eye on it. The edges should turn light golden brown. To check doneness, insert a toothpick into the center. It should come out with a few moist crumbs. 7. Cooling and serving Once baked, remove the pan from the oven. Let the blondies cool in the pan for about 10 minutes. Then, transfer them to a wire rack to cool completely. Cut into squares and enjoy the soft, gooey goodness! To make these blondies soft and gooey, use creamy almond butter. It gives a rich base. If you use chunky almond butter, the texture changes. Next, adjust the almond milk for thickness. Start with 1/4 cup but add more if needed. The batter should be thick but not dry. Finally, check doneness carefully. Bake until the edges are golden. A toothpick should come out with moist crumbs for that gooey finish. For a fun presentation, serve blondies on a colorful plate. You can sprinkle extra chocolate chips on top. A light dusting of powdered sugar adds a nice touch. Pair the blondies with a glass of almond milk or hot tea. You could also add toppings like whipped cream or fresh fruit for extra flavor. Pro Tips Choose the Right Nut Butter: Opt for a creamy nut butter like almond or cashew for the best texture. Natural varieties without added sugars or oils yield the best results. Adjust Sweetness to Taste: Feel free to modify the amount of honey or maple syrup according to your preference. Start with less and add more if needed to suit your taste. Mix-Ins for Variety: Experiment with different types of chocolate chips or nuts. Dried fruits like cranberries or apricots can also add a delightful twist to your blondies. Storing Tips: Store your blondies in an airtight container at room temperature for up to a week. For longer freshness, refrigerate them, and simply warm them slightly before enjoying! {{image_4}} You can easily customize these blondies. If you want a vegan option, swap honey for pure maple syrup. This switch keeps the sweetness while making it plant-based. Use different flavors of protein powder to change the taste. Chocolate or peanut butter protein powder works great. This adds a fun twist to your blondies. For a nut-free version, leave out the almond butter. You can use sun butter instead. This keeps the gooey texture while making it safe for those with nut allergies. Adding spices can elevate the flavors in your blondies. A dash of cinnamon adds warmth. Vanilla extract gives a sweet aroma that blends well with the other ingredients. Incorporating dried fruits can add a chewy texture. Try raisins, cranberries, or chopped dates. Seeds are another great choice. Chia seeds or flaxseeds can boost nutrition while adding crunch. These simple swaps and additions can make your blondies unique and delicious! Store your soft gooey protein blondies at room temperature for up to three days. Keep them in an airtight container to lock in freshness. If you want them to last longer, place them in the fridge. This way, they stay good for about a week. Use a glass or plastic container with a tight lid for best results. To freeze your blondies, follow these steps: 1. First, let your blondies cool completely. 2. Next, cut them into squares. 3. Wrap each square in plastic wrap. 4. Place the wrapped blondies in a freezer-safe bag or container. 5. Label the bag with the date. For thawing, take one blondie out of the freezer. Leave it on the counter for about 30 minutes. For the best texture, you can warm it in the microwave for 10-15 seconds. Enjoy your soft, gooey treat anytime! Can I substitute almond butter with peanut butter? Yes, you can use peanut butter instead of almond butter. The taste will change, but it still works well. How do I make these blondies gluten-free? To make these blondies gluten-free, simply use gluten-free coconut flour. It will keep the texture nice and soft. Can I use a different type of protein powder? Yes, feel free to use any protein powder you like. Just keep in mind that flavors may vary. How long do these blondies last? These blondies can last about 5 days at room temperature. Store them in an airtight container. Can I add more chocolate chips? Absolutely! You can add more chocolate chips if you want. Just make sure not to overdo it, or they may lose their gooey texture. You now know how to make tasty blondies using simple ingredients. Start with creamy almond butter and add in protein powder for a boost. Mix your wet and dry items to get the right batter. Don't forget to fold in chocolate chips and nuts for extra flavor. These blondies can fit many diets with easy swaps. Store them well and enjoy fresh each time. Baking can be fun and easy with these tips. Try making them today and enjoy!

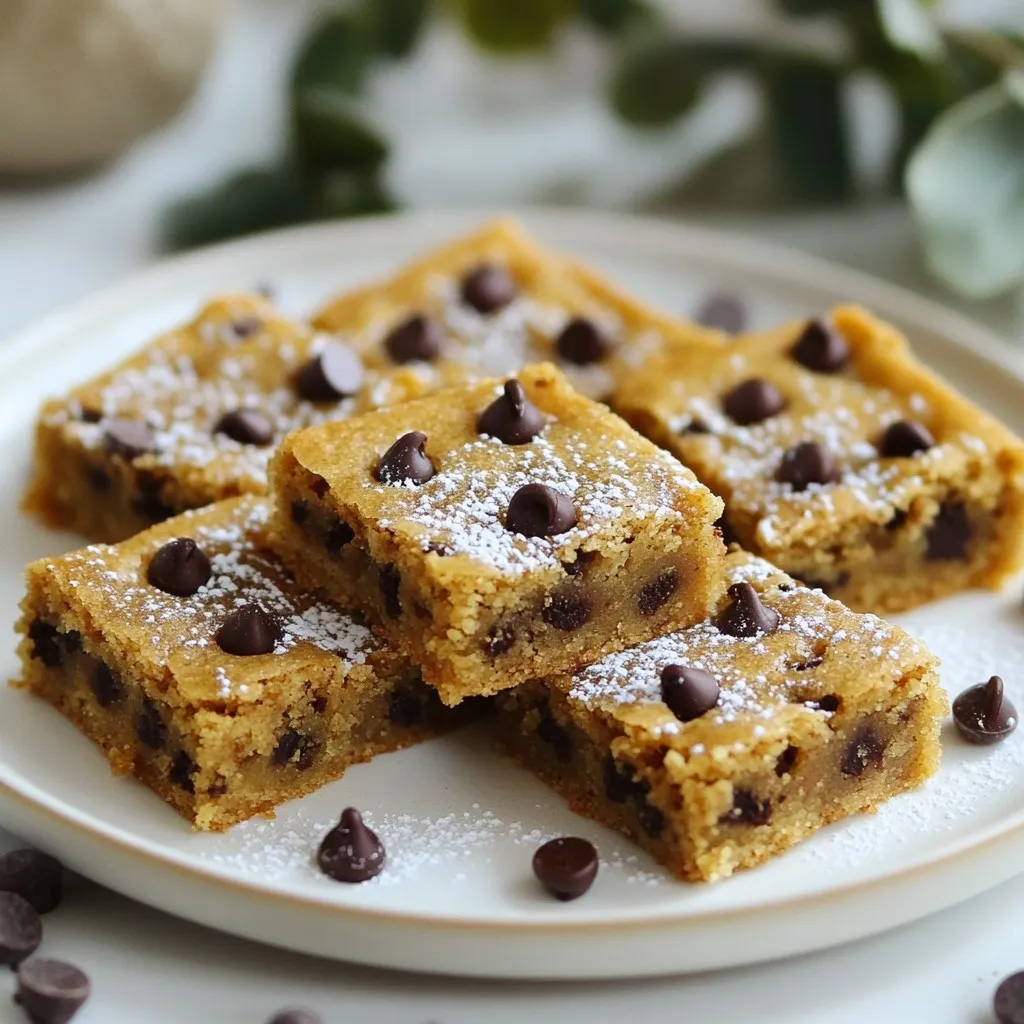
Looking for a delicious treat that’s both soft and gooey? You’re in the right place! These Soft Gooey Protein Blondies are not only easy to make but pack a protein …

Read more

Categories Desserts

Loaded Burger Bowls Flavorful and Filling Meal Guide

December 24, 2025April 1, 2025 by Chef Tavio
- 1 lb ground beef (or ground turkey for a lighter option) - 1 tablespoon extra virgin olive oil - 1 teaspoon garlic powder - 1 teaspoon onion powder - 1 teaspoon smoked paprika - Sea salt and freshly ground black pepper, to taste - 4 cups mixed salad greens (a blend of lettuce, spinach, and arugula) - 1 cup cherry tomatoes, halved - 1 cup cucumber, diced into bite-sized pieces - 1 cup shredded sharp cheddar cheese - ½ cup dill pickles, sliced into rounds - ½ cup red onion, finely diced - ¼ cup ketchup - ¼ cup yellow mustard - ¼ cup mayonnaise - Sliced jalapeños - Avocado slices - Crispy fried onions - Use ground chicken or beef alternatives for a leaner option. - Swap mixed salad greens with spinach or kale for a different taste. - Try different cheeses like mozzarella or pepper jack. - Use Greek yogurt instead of mayonnaise for a lighter dressing. {{ingredient_image_2}} To start, heat a large skillet over medium-high heat. Add one tablespoon of olive oil and let it get hot. Then, add one pound of ground beef or ground turkey. Use a spatula to break the meat apart as it cooks. Sauté the meat for about 8-10 minutes. You want it to be well-browned and fully cooked. Once the meat is browned, it's time to season it. Sprinkle in one teaspoon each of garlic powder, onion powder, and smoked paprika. Add sea salt and black pepper to taste. Stir the mixture well and cook for another 5 minutes. This lets the spices blend their flavors into the meat. While the meat cooks, grab four bowls. Divide four cups of mixed salad greens among them. You can use a blend of lettuce, spinach, and arugula for a tasty mix. Make sure to create a nice bed of greens for the toppings. Next, add fresh toppings to each bowl. Layer one cup of diced cucumber, one cup of halved cherry tomatoes, and one cup of shredded sharp cheddar cheese. Don’t forget the sliced dill pickles and half a cup of finely diced red onion. Distribute these ingredients evenly among the bowls for a colorful look. Once your meat is fully cooked, remove it from the heat. Spoon the meat generously over the salad bases in each bowl. Make sure each bowl gets an equal portion of the flavorful meat. Now, it's time to add condiments. Drizzle ketchup, mustard, and mayonnaise over the meat. Adjust the amounts based on your taste. For the final touch, consider adding optional toppings. Sliced jalapeños add heat, while avocado slices bring creaminess. Crispy fried onions give a great crunch. Serve your loaded burger bowls right away for the best taste and freshness. Enjoy this fun, tasty meal! To get the best flavor from your ground meat, start by using a hot skillet. Heat your olive oil until it shimmers. Then, add the ground beef or turkey. Break it up with a spatula while it cooks. Make sure it's well-browned. This should take about 8-10 minutes. After browning the meat, season it. Use garlic powder, onion powder, smoked paprika, sea salt, and black pepper. Stir these in and let the meat cook for another 5 minutes. This step is key for great flavor. Presentation matters! Serve your loaded burger bowls in colorful dishes. This makes each bowl pop. You can also use a bright tablecloth to make the meal festive. For a fun touch, put small serving dishes of extra toppings on the side. This lets your guests customize their bowls. Options like sliced jalapeños, creamy avocado, or crispy fried onions add a nice visual and taste. To boost flavor, think outside the box. Try mixing in different spices like chili powder for heat or Italian herbs for a twist. You can also experiment with your toppings. Add fresh herbs like cilantro or parsley for freshness. A squeeze of lime or lemon juice can brighten the bowl. Lastly, don't forget about the sauces. Ketchup, mustard, and mayonnaise are classics, but you might want to try barbecue sauce or a spicy aioli for something new. Pro Tips Use Quality Meat: Choosing high-quality ground beef or turkey can elevate the flavor of your burger bowls significantly. Look for grass-fed or organic options for the best taste. Customize Your Greens: Feel free to mix and match your salad greens based on personal preference. Kale, romaine, or even cabbage can add different textures and flavors. Make It Ahead: Prepare the meat and toppings in advance, and store them separately in the fridge. This allows for quick assembly during busy weeknights. Experiment with Dressings: While ketchup, mustard, and mayo are classic choices, try adding ranch, barbecue sauce, or a vinaigrette for a unique twist on flavor. {{image_4}} You can switch up the meat in your Loaded Burger Bowls. Ground beef is popular, but you can try ground turkey for a lighter taste. You could also use ground chicken or even pork if you want something different. For a fun twist, consider using chorizo. It adds a spicy kick and great flavor. If you want a meatless meal, there are great options. Use black beans or lentils as a protein base. You can also try quinoa or a veggie burger. Tofu is another great choice. Just season it well and cook until golden. For a vegan dressing, mix tahini or avocado with lemon juice. This keeps your bowl creamy and delicious. Dress your Loaded Burger Bowls with different sauces. Instead of ketchup, try barbecue sauce for a smoky flavor. Ranch dressing is another tasty option. You can also make a yogurt-based sauce with garlic and herbs. This adds freshness and tang to your bowl. Don't forget about spicy sauces if you like heat. You can store Loaded Burger Bowls in the fridge. Place them in an airtight container. They stay fresh for up to three days. Keep the toppings separate to avoid sogginess. To freeze, pack the cooked meat and salad base in separate containers. Avoid freezing fresh toppings like greens, tomatoes, and cucumbers. You can freeze the meat for up to three months. Thaw it in the fridge before reheating. When ready to eat, reheat the meat in a skillet over medium heat. Stir until warm. For the salad, serve it fresh. You can add the heated meat on top just before serving. This keeps the greens crisp and the meal enjoyable. Yes, you can prepare Loaded Burger Bowls ahead of time. Cook the meat and let it cool. Store it in the fridge for up to three days. You can also chop the veggies and keep them fresh in a sealed container. When you are ready to eat, just assemble the bowls. This saves time on busy days. The best toppings include: - Shredded sharp cheddar cheese - Sliced dill pickles - Diced red onion - Cherry tomatoes - Cucumber - Optional: Sliced jalapeños, avocado slices, or crispy fried onions These toppings add flavor and crunch. Feel free to mix and match based on your taste. To make a healthier version, try these tips: - Use ground turkey instead of beef for less fat. - Swap out regular cheese for low-fat cheese. - Add more veggies like bell peppers or zucchini. - Use Greek yogurt instead of mayo for creaminess. These changes keep the taste while cutting calories. Enjoy a lighter meal without losing flavor! Loaded burger bowls combine tasty ingredients with easy steps for great meals. You learned about the main ingredients and optional toppings to make these bowls your own. I shared tips on cooking meat, presenting your dish, and boosting flavors. Whether you prefer meat, vegetarian options, or different sauces, there's a perfect version for you. Lastly, I covered storage tips to keep your bowls fresh. Enjoy making and customizing your loaded burger bowls for a fun and flavorful meal!

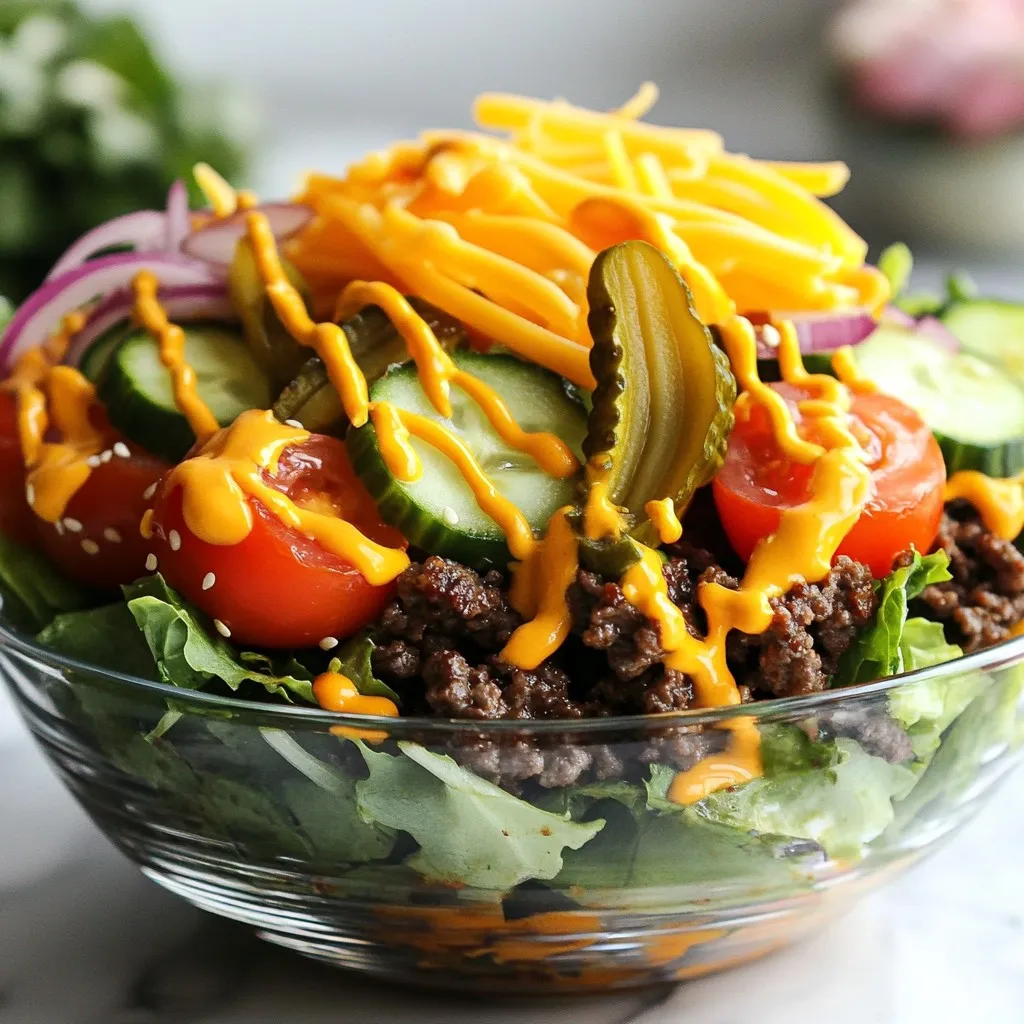
Craving a meal that’s both tasty and satisfying? Loaded burger bowls are your answer! These bowls combine the flavors of your favorite burger with fresh ingredients, creating a fun twist …

Read more

Categories Dinner

Chewy Sugar Cookies Simple and Delightful Recipe

December 21, 2025April 1, 2025 by Chef Tavio
To make chewy sugar cookies, gather these ingredients: - 2 ¾ cups all-purpose flour - 1 teaspoon baking soda - ½ teaspoon baking powder - 1 cup unsalted butter, softened to room temperature - 1 ½ cups granulated sugar, plus ½ cup for rolling - 1 large egg - 1 teaspoon vanilla extract - ½ teaspoon almond extract - ½ teaspoon fine salt These ingredients work together to create soft, chewy cookies that melt in your mouth. You can easily swap some ingredients if needed. Here are some ideas: - Butter alternatives: Use coconut oil or vegan butter for a dairy-free option. - Egg replacement: Try a flaxseed egg (1 tablespoon of ground flaxseed mixed with 2.5 tablespoons of water) for a vegan option. - Sugar options: Brown sugar can add a deeper flavor and more chewiness. These swaps allow you to adapt the recipe to fit your diet and preferences. When baking, the quality of the ingredients matters. Here are tips to help you choose wisely: - Flour: Use fresh, high-quality all-purpose flour. Check the expiration date to ensure freshness. - Sugar: Granulated sugar should be fine and free from clumps. This gives your cookies a nice texture. - Butter: Always use unsalted butter. This way, you can control the salt in your cookies. Choosing quality ingredients helps you bake the best chewy sugar cookies. Enjoy the process, and happy baking! {{ingredient_image_2}} Start by gathering your ingredients. You will need: - 2 ¾ cups all-purpose flour - 1 teaspoon baking soda - ½ teaspoon baking powder - 1 cup unsalted butter, softened - 1 ½ cups granulated sugar, plus ½ cup for rolling - 1 large egg - 1 teaspoon vanilla extract - ½ teaspoon almond extract - ½ teaspoon fine salt Measure each ingredient carefully. This step is key for perfect cookies. Preheat your oven to 350°F (175°C). Line two baking sheets with parchment paper. This will prevent sticking and make cleanup easy. In a medium bowl, whisk together the flour, baking soda, baking powder, and salt. Make sure they are well mixed. Set this bowl aside. In a large bowl, use an electric mixer to cream the softened butter and 1 ½ cups of sugar. Beat this mixture for about three minutes. It should look light and fluffy. Next, add the egg, vanilla extract, and almond extract to the butter mix. Beat on low speed until it all blends well. Now, slowly add the dry ingredients into the wet mix. Mix on low speed until they just combine. Do not overmix, or your cookies may lose their chewy texture. Scoop out the dough using a cookie scoop or a tablespoon. Roll each piece into a ball. Then, coat each ball in the extra ½ cup of sugar. Place the sugar-coated balls on your baking sheets, leaving about 2 inches between each one. Gently flatten the tops using a fork or your fingertips. This helps them bake evenly. Bake your cookies for 8 to 10 minutes. They should be golden at the edges but soft in the center. Avoid overbaking to keep them chewy. When done, take the cookies out and let them cool on the sheet for 5 minutes. After that, move them to a wire rack to cool completely. Enjoy your chewy sugar cookies! To get that perfect chewy texture in your sugar cookies, pay attention to a few key steps. First, use softened unsalted butter. It blends well with sugar and gives a nice, soft base. Cream the butter with sugar until fluffy, about 3 minutes. This adds air and makes the cookies light. Next, mix the wet and dry ingredients just until combined. Overmixing can lead to tough cookies. Also, try to bake the cookies until they are lightly golden around the edges. They will continue to cook after you take them out. Many bakers make simple mistakes that can ruin their cookies. One big mistake is not measuring the flour correctly. Too much flour makes cookies dry. Use the spoon-and-level method for accuracy. Another mistake is skipping the chilling step. If you chill the dough for at least 30 minutes, it helps the cookies hold their shape. Lastly, don’t overbake. The cookies should look soft in the center when you take them out. Having the right tools makes baking easier and more fun. Here are some must-haves for making chewy sugar cookies: - Mixing bowls (medium and large) - Electric mixer or a whisk - Measuring cups and spoons - Cookie scoop or tablespoon - Baking sheets - Parchment paper - Wire rack for cooling With these tools, you can create cookies that are chewy, soft, and oh-so-delicious! Pro Tips Chill the Dough: For an even chewier texture, chill the cookie dough for at least 30 minutes before baking. This helps the flavors meld and prevents excessive spreading. Use Fresh Ingredients: Ensure your baking soda and baking powder are fresh for the best rise and texture. Old leavening agents can lead to flat cookies. Experiment with Mix-ins: Feel free to add chocolate chips, nuts, or dried fruit to the dough for added flavor and texture. Just be mindful of the total volume to maintain cookie integrity. Store Properly: Keep cookies in an airtight container at room temperature for up to a week. For longer storage, freeze the baked cookies in a single layer and transfer them to a zip-top bag. {{image_4}} You can make gluten-free chewy sugar cookies easily. Just replace the all-purpose flour with a gluten-free blend. Look for one that works well in baking. Make sure it has xanthan gum in it. This ingredient helps to mimic the texture of regular flour. Follow the same steps in the recipe. Your cookies will taste great and be safe for those who can’t eat gluten. To make vegan chewy sugar cookies, swap the butter for a plant-based alternative. Use coconut oil or vegan butter. Instead of a large egg, try a flaxseed egg. Mix 1 tablespoon of ground flaxseed with 2.5 tablespoons of water. Let it sit for a few minutes until it thickens. Use this in your dough. The rest of the recipe stays the same. You’ll enjoy soft, chewy cookies without any animal products. You can add fun flavors to your chewy sugar cookies. Try mixing in chocolate chips for a tasty twist. About one cup of chips works well. You can also add nuts for extra crunch. Chopped walnuts or pecans complement the sweetness nicely. If you want a fruity touch, add some lemon or orange zest. A teaspoon will brighten up the flavor. These simple changes make your cookies unique and exciting! To keep your chewy sugar cookies fresh, store them in an airtight container. This keeps air out and helps the cookies stay soft. Place a piece of bread in the container. The bread adds moisture, which keeps the cookies chewy. You can store them at room temperature for up to a week. Freezing is a great way to save cookies for later. To freeze cookie dough, scoop the dough into balls and place them on a baking sheet. Freeze them for about an hour, then transfer them to a freezer bag. You can bake them straight from the freezer; just add a minute or two to the baking time. If you want to freeze baked cookies, let them cool completely. Layer the cookies in a freezer-safe container. Use parchment paper between layers to prevent sticking. These cookies can last for up to three months in the freezer. The best containers for storing cookies are airtight ones. Glass jars, plastic containers, or metal tins all work well. Make sure they seal tightly to keep air out. Avoid using paper bags, as they let in air and moisture. For longer storage, use freezer bags when freezing dough or cookies. If your chewy sugar cookies spread too much, it could be due to a few reasons. First, your butter might be too warm. Use softened butter, not melted. Second, you may have skipped chilling the dough. Chilling helps the cookies hold their shape. Lastly, ensure you measure your flour correctly. Too little flour can lead to excess spreading. If your cookies turn out hard, you can fix them! Try adding a bit more butter to the dough next time. Butter adds moisture, which helps with texture. You can also bake them for a shorter time. Cookies should look soft in the center when you take them out. Lastly, store them with a slice of bread. This keeps them moist and chewy. Yes, you can double the recipe! Just make sure you have enough space on your baking sheets. Take care to mix the dough well. Doubling the ingredients means more delicious cookies for everyone to enjoy. Keep in mind that you might need to bake them in batches if your oven is small. In this post, we explored how to make delicious chewy sugar cookies. We covered key ingredients, replacements, and tips for quality. I shared step-by-step instructions for mixing and baking, plus tricks to avoid common mistakes. Don't forget the tasty variations, like gluten-free and vegan recipes. Lastly, I guided you on proper storage to keep cookies fresh. Remember, great cookies start with great ingredients and careful techniques. Enjoy baking and sharing these treats with loved ones!

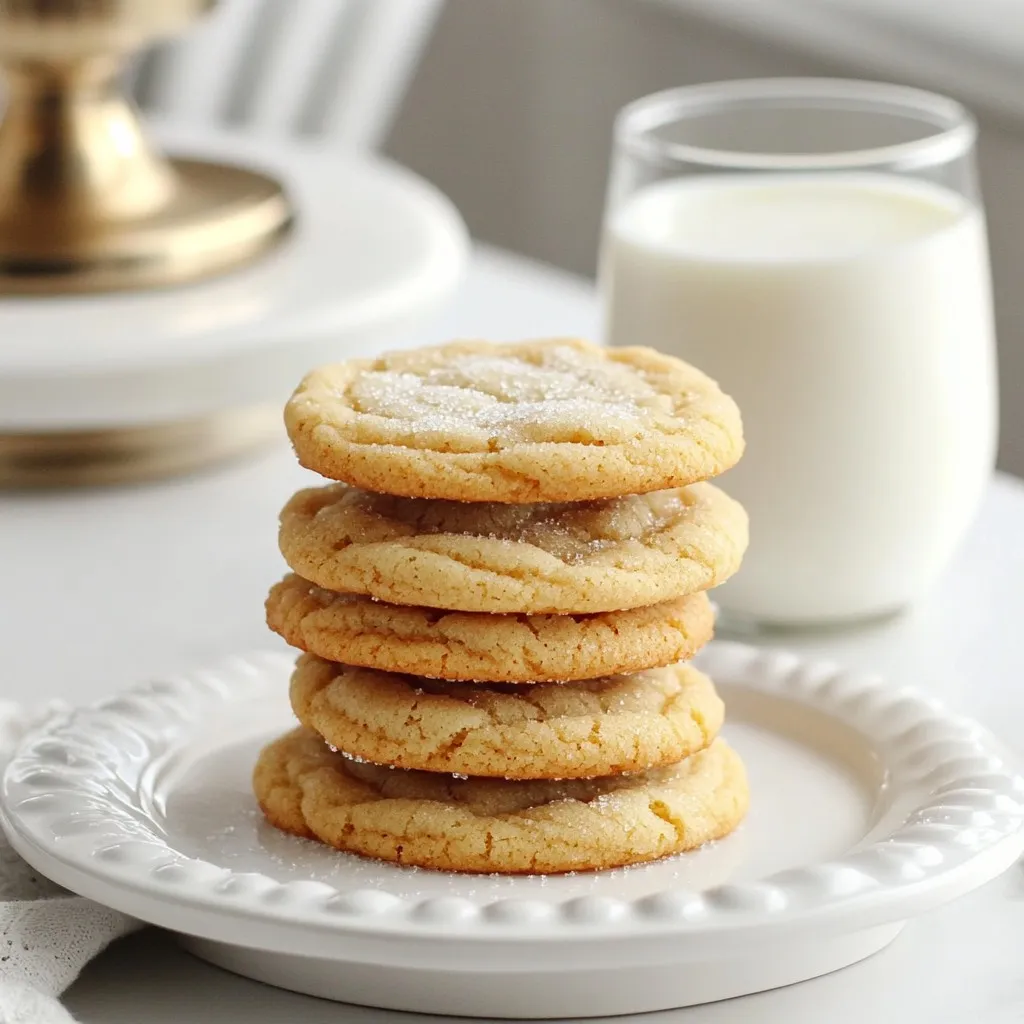
If you crave cookies that are soft, sweet, and downright delightful, you’re in the right place! In this simple recipe, I’ll guide you through making chewy sugar cookies that melt …

Read more

Categories Desserts
Older posts
Newer posts
← Previous Page1 … Page168 Page169 Page170 … Page191 Next →

TASTED NEST

Where Flavor Finds a Home 🍳🏡 — warm, simple, and crave-worthy recipes made for real life, from stovetop mornings to backyard dinners.

PAGES

Home About Contact Privacy Policy Terms & Conditions Cookie Policy GDPR Policy Copyright Policy Disclaimer

CATEGORIES

Appetizers Desserts Salads Breakfast Dinner
Copyright © 2026 Tasted Nest. All rights reserved.