Skip to content
Tasted Nest
  • Home
  • Appetizers
  • Desserts
  • Salads
  • Breakfast
  • Dinner
  • Privacy Policy
  • Contact
  • About

Chef Tavio

Air Fryer Apple Chips Crunchy and Delicious Snack

August 15, 2025 by Chef Tavio
- 2 medium apples (preferably Granny Smith or Honeycrisp for tartness) - 1 teaspoon ground cinnamon - 1 teaspoon granulated sugar (optional, for a hint of sweetness) - A pinch of salt - Cooking spray (optional, for easy removal) I suggest using Granny Smith or Honeycrisp apples. Granny Smith apples offer a nice tartness. They balance well with the sweetness of the cinnamon. Honeycrisp apples are sweet and juicy, making them a great choice too. Both types hold their shape well when cooked. You can play with the flavors! If you want a sweeter chip, add more sugar. For a twist, try adding nutmeg or ginger. If you prefer a savory kick, sprinkle chili powder or paprika. The options are endless! Adjust the seasoning to fit your taste. Start by washing your apples well. Use cold water and a clean towel to dry them. This step is key for a tasty snack. You want to remove any dirt or wax. I recommend using Granny Smith or Honeycrisp apples for the best flavor. These apples are tart and crisp, perfect for chips. Next, you will slice the apples. Use a mandoline slicer or a sharp knife. Aim for thin rounds, about 1/8 inch thick. Keep the skin on! It adds texture and holds nutrients. If you like, remove the core first. In a bowl, mix the apple slices with ground cinnamon, a pinch of salt, and sugar if you want some sweetness. Toss them gently to coat every slice evenly. Now, preheat your air fryer to 300°F (150°C) for 3-5 minutes. This step helps cook the apples evenly. If you want, spray the basket lightly with cooking spray. Place the apple slices in a single layer. Make sure they don’t overlap; this helps them get crispy. Cook them for 15-20 minutes. Halfway through, shake the basket to mix them around. Watch closely in the last few minutes to avoid burning. When they turn golden brown and crispy, they’re ready. Remove them and let them cool on a wire rack or plate. This helps them become even crispier. Enjoy your apple chips right away or store them in an airtight container. For the best apple chips, choose Granny Smith or Honeycrisp apples. These apples have a nice balance of tartness and sweetness. They hold their shape well when cooked. Avoid soft apples like Red Delicious, as they won't crisp up. To get crispy apple chips, slice the apples thinly, about 1/8 inch thick. Use a mandoline slicer for even cuts. Keep the skin on for added crunch and nutrients. Arrange the slices in a single layer in the air fryer. Overlapping slices can lead to soggy chips. One mistake is not preheating the air fryer. Preheating helps the chips cook evenly and become crispier. Another mistake is overcrowding the basket. Always leave space between slices. Lastly, don't skip the cooling step. Letting them cool on a rack helps them reach peak crispiness. {{image_4}} You can enhance the sweetness of your apple chips. Try adding a little honey or maple syrup before cooking. These natural sweeteners add a nice touch. You can also sprinkle some brown sugar for a richer flavor. Vanilla extract can give the chips a lovely aroma. For a savory twist, consider using spices like paprika or chili powder. A little bit of garlic powder can add depth. Mixing in some dried herbs like rosemary or thyme can also work well. These options can create a unique snack that surprises your taste buds. If you don’t have an air fryer, you can still make apple chips. Use your oven instead. Preheat it to 200°F (93°C). Spread the apple slices on a baking sheet. Make sure they don’t touch each other. Bake for about 2 to 3 hours. Flip them halfway to ensure even crispiness. Keep an eye on them to avoid burning. Once your apple chips cool, store them in an airtight container. This keeps them fresh and crunchy. You can use a glass jar or a plastic bag. Make sure to seal it well. If you have a vacuum sealer, that works great too! Avoid placing them in a humid area. Moisture will make them soft. Apple chips can last about one to two weeks. If stored properly, they stay crispy longer. You can also keep them in the fridge for extra freshness. However, I recommend eating them within a week for the best taste. If you notice any signs of moisture, it’s best to toss them. Always check before snacking! If your apple chips lose their crispiness, you can re-crisp them easily. Preheat your air fryer to 300°F (150°C). Place the apple chips in the basket for about 3-5 minutes. Keep a close watch to prevent burning. This will bring back their crunch and make them tasty again! Enjoy your snack! Yes, you can use different apples. Granny Smith and Honeycrisp work best for a nice balance of tartness and sweetness. They hold up well during cooking. You can also try Fuji or Gala apples. Each type gives a unique taste and texture to the chips. You will know the apple chips are done when they turn golden brown and feel crispy. Start checking them after about 15 minutes of cooking. If they still seem soft, let them cook for a few more minutes. Keep an eye on them to avoid burning. The last few minutes are key for perfect texture. Yes, you can make apple chips in the oven. Preheat your oven to 225°F (about 107°C). Place the apple slices on a baking sheet lined with parchment paper. Bake for about 1.5 to 2 hours. Flip them halfway through for even cooking. The result will be just as tasty, though it may take longer. You've learned how to make apple chips using various ingredients, methods, and tips. Selecting the right apples is key. Remember to slice them thin for great crispiness. Try different flavors to make your chips unique. Store them to keep that crunch, and learn how to re-crisp if needed. Apple chips are simple to make and customize. Enjoy your homemade snack, and share your tasty creations with others!

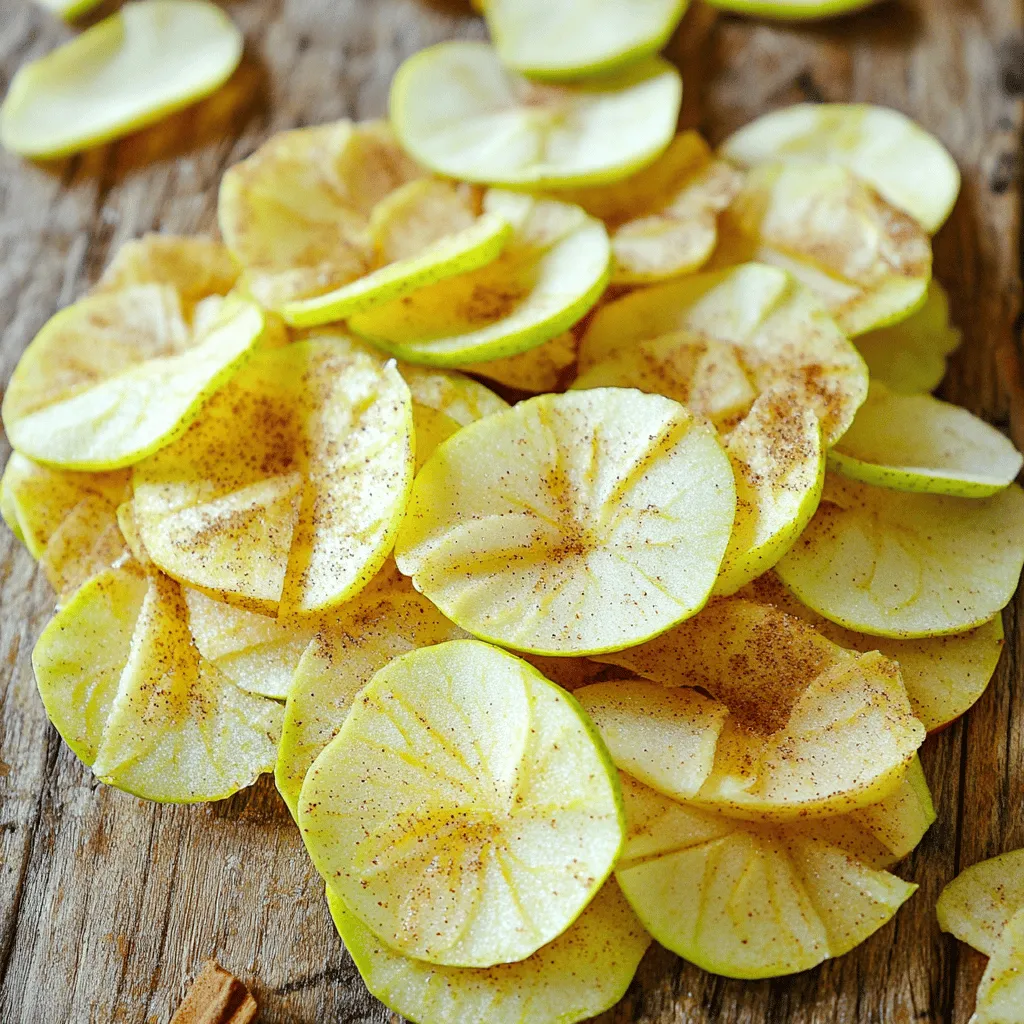
Looking for a fun, healthy snack? You’ll love making Air Fryer Apple Chips! They are easy to prepare and pack a crunchy, sweet punch. In this guide, I’ll share the …

Read more

Categories Desserts

TikTok Baked Feta Pasta Irresistible Flavor Awaits

August 15, 2025 by Chef Tavio
- 1 block (8 oz) of feta cheese - 2 cups cherry tomatoes, halved - 3 cloves garlic, minced - 1/4 cup extra virgin olive oil - 1 teaspoon dried oregano - 1/2 teaspoon crushed red pepper flakes (optional) - Salt and freshly ground black pepper, to taste - 12 oz pasta (penne or fusilli recommended) - 1/2 cup fresh basil leaves, torn - Freshly grated Parmesan cheese for serving (optional) The star of this dish is the feta cheese. It becomes creamy and rich after baking. The cherry tomatoes burst with flavor, adding sweetness. Garlic adds depth, while olive oil brings smoothness. Oregano and red pepper flakes give the dish warmth. You can use any pasta, but penne or fusilli work best. Fresh basil adds brightness, and Parmesan finishes it off. - Instead of feta cheese, you can try goat cheese for a tangy flavor. - If you want whole grain or gluten-free pasta, those are great swaps. - For a vegan version, use a plant-based feta made from nuts or tofu. If you're out of basil, try parsley or spinach. You can also mix in other veggies like spinach or zucchini. Get creative with your ingredients to suit your taste! 1. Preheat the oven: Start by setting your oven to 400°F (200°C). This will get it hot and ready for baking. 2. Prepare the tomato mixture: In a large baking dish, mix 2 cups of halved cherry tomatoes, 3 cloves of minced garlic, and 1/4 cup of extra virgin olive oil. Add 1 teaspoon of dried oregano and 1/2 teaspoon of crushed red pepper flakes if you like a spicy kick. Season with salt and freshly ground black pepper to taste. Stir until everything is well coated. 1. Adding feta to the mixture: Make a small well in the center of the tomato mix. Place 1 block (8 oz) of feta cheese right in the middle. Drizzle a bit more olive oil over the feta for extra flavor. 2. Baking time and what to look for: Put the baking dish in the oven. Bake for about 25-30 minutes. You want the tomatoes to blister and the feta to soften and turn golden brown. 1. Boiling water and cooking pasta: While the tomato and feta bake, boil water in a large pot. Add salt to the water. Cook 12 oz of pasta according to the package instructions until it is al dente. 2. Draining and setting aside: Once the pasta is cooked, drain it and set it aside. 1. Mashing baked ingredients: Carefully remove the baking dish from the oven. Using a fork, mash the baked feta and tomatoes together. This will create a creamy sauce. 2. Combining pasta with the sauce: Add the drained pasta to the baking dish. Toss everything together until the pasta is fully coated with the creamy sauce. 1. Incorporating fresh basil: Gently fold in 1/2 cup of torn fresh basil leaves. Mix it well so the basil spreads throughout the dish. 2. Serving suggestions: Serve the pasta hot. You can garnish with extra basil leaves and a sprinkle of freshly grated Parmesan cheese if you like. Enjoy your delicious TikTok Baked Feta Pasta! To make your TikTok baked feta pasta shine, start by ensuring your feta is softened. Bake it for the full time until it turns golden and creamy. A great feta should spread easily when you mash it. Next, focus on the pasta texture. Cook it until al dente, so it has a slight bite. This will help it hold up against the creamy sauce. Drain it and set it aside while the feta and tomatoes bake. Presentation matters! Serve your pasta in warm bowls or plates. This keeps the dish hot and inviting. Drizzle a hint of extra virgin olive oil on top for added flair. A sprinkle of black pepper can give it a nice contrast. You can also add fresh basil leaves as a garnish. They not only add color but also enhance the flavor. If you like, top it with freshly grated Parmesan for an extra touch. One common mistake is overcooking the pasta. If it becomes mushy, it won't hold the sauce well. Keep an eye on the boiling time to avoid this. Another mistake is skipping the seasoning steps. Make sure to salt your tomato mixture well. This brings out the flavors and makes every bite delicious. Seasoning is key to a great dish! {{image_4}} You can make TikTok baked feta pasta even better with some fun additions. By adding vegetables, you boost the flavor and nutrition. Try bell peppers, zucchini, or spinach. Just toss them in with the tomatoes before baking. This way, they soak up all the tasty juices. For a heartier meal, add protein like chicken or shrimp. Cook the protein first, then mix it in with the creamy pasta. This makes the dish filling and satisfying. If you want to keep it simple, just use cooked shrimp. They mix well with the sauce. If you're looking for gluten-free options, choose gluten-free pasta. Many brands offer great choices that taste just as good. Look for penne or fusilli made from brown rice or chickpeas. They work well with the creamy sauce. For those who avoid dairy, you can make a dairy-free version. Swap the feta cheese for a plant-based alternative. Nutritional yeast can also add a cheesy flavor without the dairy. It’s a fantastic way to enjoy this dish while sticking to your diet. Using seasonal ingredients can elevate this dish. Fresh, ripe tomatoes in summer give the best flavor. They burst with sweetness when baked. In colder months, look for different types of canned tomatoes. They can still provide rich taste. You can also change the herbs based on what you have. Fresh basil is great, but try thyme or parsley for a twist. These herbs add freshness and can change the dish's vibe. Always use what you like and what’s in season for the best taste. After you enjoy your TikTok baked feta pasta, let it cool. Place leftovers in an airtight container. Store it in the fridge for up to three days. If you want to keep it longer, consider freezing. Just make sure to use a freezer-safe container. Frozen pasta can last up to three months. When you're ready to eat leftovers, reheat them gently. The best method is using the stove. Add a splash of water or olive oil to the pan. Heat on low until warm. Stir often to keep the pasta creamy. You can also use a microwave. Just cover it with a damp paper towel to keep moisture in. Heat in short bursts, stirring in between. Refrigerated leftovers are good for three days. If you see any mold or an off smell, throw it away. Always check for signs before eating. If you freeze the pasta, it stays fresh for about three months. After that, the flavor may fade. To be safe, label your containers with the date. This way, you know when it’s time to eat or toss. TikTok Baked Feta Pasta is a simple and tasty dish. It became famous on TikTok for good reason. The recipe combines feta cheese, cherry tomatoes, garlic, and pasta. You bake the feta and tomatoes together until soft. Then, you mix it with cooked pasta. This dish is creamy, bright, and full of flavor. Yes, you can use other types of cheese! Some good options include goat cheese or ricotta. These cheeses will change the taste but still make a creamy sauce. Goat cheese adds a tangy flavor. Ricotta gives a mild, creamy taste. Experiment with your favorites to find the best fit. You can pair this dish with many sides. A simple green salad works well. Garlic bread is also a great choice. For drinks, a crisp white wine or sparkling water goes nicely. You want to balance the creaminess of the pasta with something fresh. To make this dish dairy-free, swap the feta for a vegan cheese. Look for brands that melt well. You can also use cashew cream or blended silken tofu for a creamy texture. These swaps keep the dish tasty and rich without dairy. Baked feta pasta is easy, tasty, and fun to make. You learned about its key ingredients, substitutions, and how to bake and serve it. Try adding veggies or protein for extra flavor. Remember to avoid common mistakes like overcooking the pasta. This dish is great for any meal. With a few simple tips, you can impress your family or friends. Enjoy your baked feta pasta and make it your own!

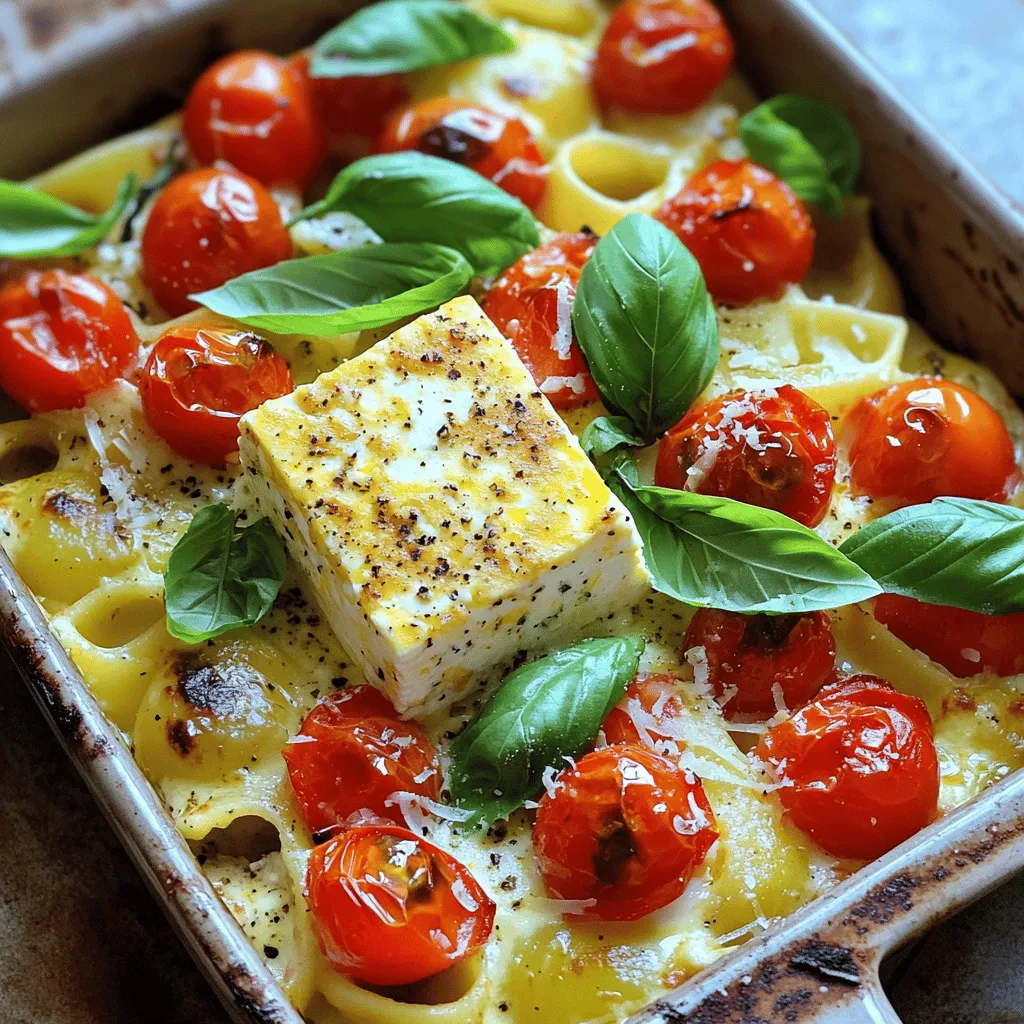
Are you ready to try the viral TikTok Baked Feta Pasta that everyone is raving about? This dish combines creamy feta, juicy tomatoes, and perfectly cooked pasta for a taste …

Read more

Categories Dinner

No-Bake Peanut Butter Bars Quick and Tasty Treat

August 15, 2025 by Chef Tavio
To make these tasty bars, you need a few key items: - 1 cup creamy peanut butter - 1/2 cup honey or maple syrup - 2 cups rolled oats - 1/2 cup almond flour - 1/4 cup unsweetened cocoa powder - 1/4 cup chocolate chips (optional) - 1 teaspoon vanilla extract - A pinch of sea salt These ingredients come together to create a rich and delicious treat. The creamy peanut butter gives a smooth texture. Honey or maple syrup adds sweetness and helps bind everything. Rolled oats provide a chewy base, while almond flour adds nutty flavor. Cocoa powder makes the bars chocolatey. You can get creative with your bars. Here are some optional ingredients: - Dried fruits like cranberries or raisins - Chopped nuts for extra crunch - A sprinkle of sea salt on top Adding these ingredients can change the flavor and texture. For example, nuts add crunch, while dried fruits add sweetness. You can easily swap some ingredients based on what you have: - Use natural peanut butter instead of creamy for a more rustic flavor. - Swap honey for agave syrup if you prefer a vegan option. - Oats can be replaced with a gluten-free option if needed. These substitutions keep the essence of the bars while fitting your needs. Always aim for ingredients you enjoy to make the bars truly yours. Start by grabbing a medium saucepan. Set your stove to low heat. Add 1 cup of creamy peanut butter and 1/2 cup of honey or maple syrup. Stir the mix constantly until it melts and becomes smooth. This step ensures a tasty base for your bars. Once melted, take the saucepan off the heat. Next, stir in 1 teaspoon of vanilla extract and a pinch of sea salt. Mix well to blend all the flavors together. Now, grab a large mixing bowl. Add 2 cups of rolled oats, 1/2 cup of almond flour, and 1/4 cup of unsweetened cocoa powder. Use a whisk or spoon to mix these dry ingredients thoroughly. You want them evenly blended for the best taste. This step adds texture and a rich flavor to your bars. You will need an 8x8 inch square baking dish for this part. Line it with parchment paper, letting some paper hang over the sides. This helps with easy removal later. Pour the warm peanut butter mix into the bowl with the dry ingredients. Stir until everything is fully coated. If you want a sweeter touch, fold in 1/4 cup of chocolate chips now. Transfer the mixture into the prepared baking dish. Use a spatula or your hands to press it down firmly and evenly. This step is crucial for a nice texture. Place the dish in the fridge for at least 1 hour. This chilling time helps the bars set and become firm. Once chilled, lift the bars out using the parchment paper. Cut them into squares of your choice. Enjoy your creation! To get the best texture, use creamy peanut butter. It mixes well and keeps the bars smooth. When you melt the peanut butter, do it slowly. Low heat helps to avoid burning. After mixing, press the mixture firmly into the dish. This step helps the bars stay together. If they are too crumbly, add a bit more honey or maple syrup. This will bind the ingredients better. For serving, cut the bars into even squares. This makes them easy to grab. Place them on a nice platter. You can sprinkle extra chocolate chips on top for a fun look. For a fancy touch, drizzle melted chocolate over each bar. This gives a nice shine and adds flavor. Serve them cold for a refreshing treat on a warm day. One common mistake is not pressing the mixture down enough. If it’s loose, bars may crumble. Another mistake is using too much heat when melting. This can change the flavor and texture. Be careful with ingredient measurements. Too much cocoa powder can make them bitter. Finally, don’t skip chilling the bars. They need time to set properly before cutting. {{image_4}} You can switch up the flavor of your no-bake peanut butter bars easily. Add in some vanilla protein powder for a boost. You can also swap out the cocoa powder for carob powder if you want a different taste. Try using almond butter instead of peanut butter for a nutty twist. You can even add a splash of peppermint extract for a fresh surprise. Mix in some dried fruit like cranberries or raisins for extra sweetness. You can also use chopped nuts, like walnuts or pecans, for crunch. Want a little more chocolate? Throw in more chocolate chips or even mini marshmallows. Each extra ingredient can change the whole vibe of your bars. To make these bars vegan, just use maple syrup instead of honey. Ensure that your chocolate chips are dairy-free. For a gluten-free option, check that your rolled oats are certified gluten-free. Almond flour is naturally gluten-free, so you're already set on that front. This way, everyone can enjoy your tasty treats! To keep your no-bake peanut butter bars fresh, store them in an airtight container. This will help prevent them from drying out. I recommend placing parchment paper between layers to avoid sticking. Keeping them in the fridge is best. The cool air helps maintain their texture and taste. When stored properly in the fridge, these bars can last up to one week. After that, they may start to lose their texture and flavor. If you notice any changes in smell or appearance, it’s best to toss them. Always trust your senses to ensure safety. If you want to keep your bars for longer, freezing is a great option. Wrap each bar in plastic wrap, then place them in a freezer-safe bag. They can last up to three months in the freezer. When you’re ready to enjoy them, let them thaw in the fridge for a few hours before eating. This keeps their flavor intact. Yes, you can use natural peanut butter. Just make sure it is creamy. Natural peanut butter can be a bit runnier, so it may change the texture. You might need to adjust the amount of oats if it feels too soft. To make the bars more chocolatey, add more cocoa powder. You could also use more chocolate chips. Drizzling melted chocolate on top adds a rich touch. Just melt some chocolate and pour it over the bars before chilling. If you want a substitute for honey or maple syrup, try agave nectar. You can also use brown rice syrup or date syrup. These options will keep the bars sweet and sticky. Yes, you can make these bars in advance. They store well in the fridge for up to a week. You can also freeze them for longer storage. Just wrap them tightly in plastic wrap or foil. No-bake peanut butter bars are simple and fun to make. We covered key ingredients and how to tweak them. I shared step-by-step instructions for a smooth process. You learned tips to get the perfect texture and avoid common mistakes. We explored tasty variations to keep it exciting. Lastly, I provided storage tips for freshness. Now, it’s time to get inventive in the kitchen. Enjoy your tasty creations, and share them with friends!

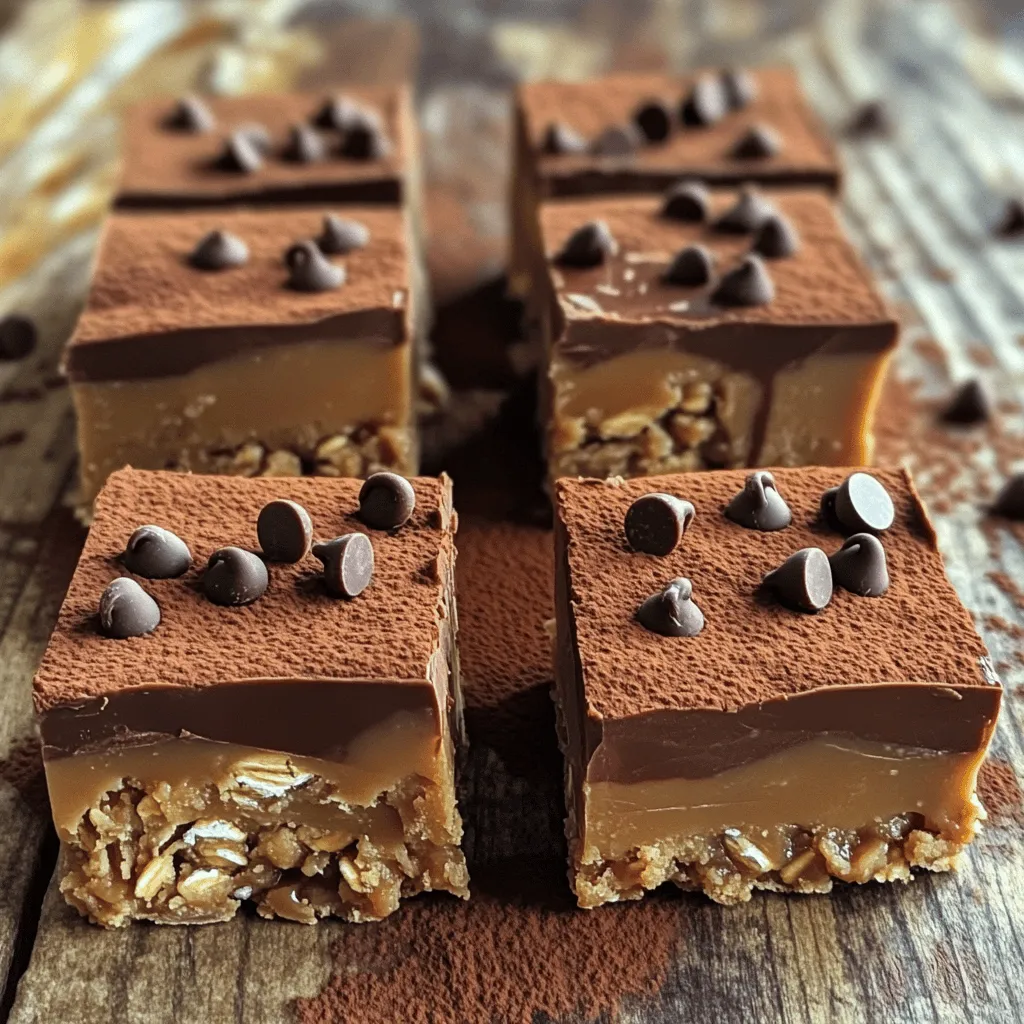
Are you craving a quick and tasty treat? These No-Bake Peanut Butter Bars hit the spot! They’re easy to make, need simple ingredients, and require no oven. In just a …

Read more

Categories Desserts

Vegan Pumpkin Muffins Delightful and Easy Recipe

August 15, 2025 by Chef Tavio
To make delicious vegan pumpkin muffins, you need the following key ingredients: - 1 cup canned pumpkin puree - 1/2 cup almond milk (or any plant-based milk) - 1/3 cup pure maple syrup - 1/4 cup melted coconut oil (plus some for greasing) - 1 teaspoon vanilla extract - 1 1/2 cups whole wheat flour - 1 teaspoon baking powder - 1/2 teaspoon baking soda - 1 teaspoon ground cinnamon - 1/2 teaspoon ground nutmeg - 1/2 teaspoon ground ginger - 1/4 teaspoon salt - 1/2 cup chopped pecans or walnuts (optional) - 1/4 cup vegan chocolate chips (optional) These ingredients create a moist and flavorful muffin that everyone will love. You can easily swap out some ingredients if needed. Here are some great options: - Almond milk: Use soy milk or oat milk for a different taste. - Maple syrup: Agave nectar or brown rice syrup works too. - Coconut oil: You can use vegetable oil or applesauce for a lighter muffin. - Whole wheat flour: Gluten-free flour blends are a good choice for gluten-free muffins. These substitutions keep your muffins tasty and vegan-friendly. If you want to take your muffins to the next level, consider adding these options: - Chopped nuts: Pecans or walnuts add a nice crunch. - Vegan chocolate chips: These bring a sweet touch to the muffins. - Dried fruits: Raisins or cranberries add natural sweetness and chewiness. - Seeds: Flaxseeds or chia seeds boost nutrition and texture. Feel free to mix and match these add-ins to create your perfect vegan pumpkin muffins. First, set your oven to 350°F (175°C). This helps the muffins bake evenly. While the oven heats, grab a muffin tin. You can line it with paper liners or grease each cup with coconut oil. In a big bowl, add 1 cup of pumpkin puree, 1/2 cup of almond milk, 1/3 cup of maple syrup, 1/4 cup of melted coconut oil, and 1 teaspoon of vanilla extract. Whisk these together until the mix is smooth. This blend gives the muffins their moist texture. In another bowl, mix 1 1/2 cups of whole wheat flour, 1 teaspoon of baking powder, 1/2 teaspoon of baking soda, 1 teaspoon of cinnamon, 1/2 teaspoon of nutmeg, 1/2 teaspoon of ginger, and 1/4 teaspoon of salt. Stir well so every bite is tasty. Now, add the dry mix to the wet ingredients slowly. Stir gently until just combined. It’s fine if a few lumps remain. Overmixing can make the muffins tough, and nobody wants that! Using a spoon or ice cream scoop, fill each muffin cup about 3/4 full. This gives them space to rise. Place the muffin tin in the oven and bake for 18-20 minutes. Test for doneness by inserting a toothpick. It should come out clean. After baking, let the muffins cool in the tin for about 5 minutes. Then, move them to a wire rack to cool completely. For extra delight, you can serve them on a rustic board and sprinkle some cinnamon on top. Drizzling maple syrup or adding nut butter can make each bite even better! To make great muffins, start with the right mixing. Always mix wet and dry ingredients in separate bowls. This helps keep the right texture. When you mix them together, do it gently. Stir just until combined. Lumps are okay; they keep the muffins light. Want fluffier muffins? Use fresh baking powder and baking soda. This gives the muffins a nice rise. Make sure your wet ingredients are at room temperature. Cold liquids can make the batter dense. Lastly, avoid overmixing! This keeps the air in and makes them light. Once baked, cool the muffins for five minutes in the pan. This helps them set. After that, move them to a wire rack. Let them cool completely to avoid sogginess. To store, keep them in an airtight container. They stay fresh for up to five days. You can also freeze them for up to three months. Just thaw and enjoy whenever you want! {{image_4}} You can change the flavor of these muffins by adding your favorite spices. For a maple twist, add 1/4 cup of maple syrup instead of sugar. You can also add a pinch of allspice or clove for a warm taste. Seasonal spices make the muffins cozy and fun to eat! If you want a nut-free version, skip the pecans or walnuts. You can also use sunflower seeds for crunch. For gluten-free muffins, swap the whole wheat flour with a gluten-free flour blend. Make sure to check that the baking powder is gluten-free too! You can mix in fruits like blueberries or cranberries for a burst of flavor. Chia seeds or flaxseeds also add nutrition and a nice crunch. Just fold them in gently when you mix the batter. This way, each bite is full of surprises! To keep your vegan pumpkin muffins fresh, place them in an airtight container. Line the container with paper towels to absorb extra moisture. This will help keep the muffins soft. You can store them at room temperature for about three days. If you want them to last longer, consider refrigerating them. They can stay fresh there for up to a week. For longer storage, freeze your muffins. First, let them cool completely. Wrap each muffin tightly in plastic wrap or aluminum foil. Place the wrapped muffins in a freezer-safe bag or container. They can last in the freezer for about three months. When you are ready to eat, just thaw them in the fridge overnight or at room temperature for a few hours. To enjoy your muffins warm, reheat them in the oven. Preheat your oven to 350°F (175°C). Place the muffins on a baking sheet for about 10 minutes. You can also use a microwave. Heat them for 15-20 seconds. This will bring back their fresh-baked taste. If you like, spread a little vegan butter or maple syrup on top for an extra treat. Yes, you can use fresh pumpkin. First, cook the pumpkin until it’s soft. Then, mash it until smooth. Fresh pumpkin may have a different texture. It might be a bit more watery. Adjust the liquid in your recipe if needed. If you don’t have maple syrup, use agave nectar or brown rice syrup. You can also use regular sugar. Just mix it with a bit of water to make a syrup. This keeps the muffins sweet and moist. Check the muffins after 18 minutes. Insert a toothpick into the center of one muffin. If it comes out clean, they are done. If it has batter on it, bake for a few more minutes. Yes, these muffins are great for meal prep. You can bake them ahead of time and store them. They stay fresh in an airtight container for up to five days. You can also freeze them for up to three months. These muffins stay fresh for about five days at room temperature. If you keep them in the fridge, they may last a week. To enjoy them longer, freeze them. Just thaw them before eating. We explored the key ingredients and important steps to make tasty muffins. I shared vegan swaps and fun add-ins to boost flavor. You learned tips for perfecting your mix and keeping muffins fresh. Seasonal variations provide new ways to enjoy muffins all year. Lastly, we covered storage options to keep them tasty for longer. Remember, with simple steps and creative twists, you can bake muffins that everyone loves. Happy baking!

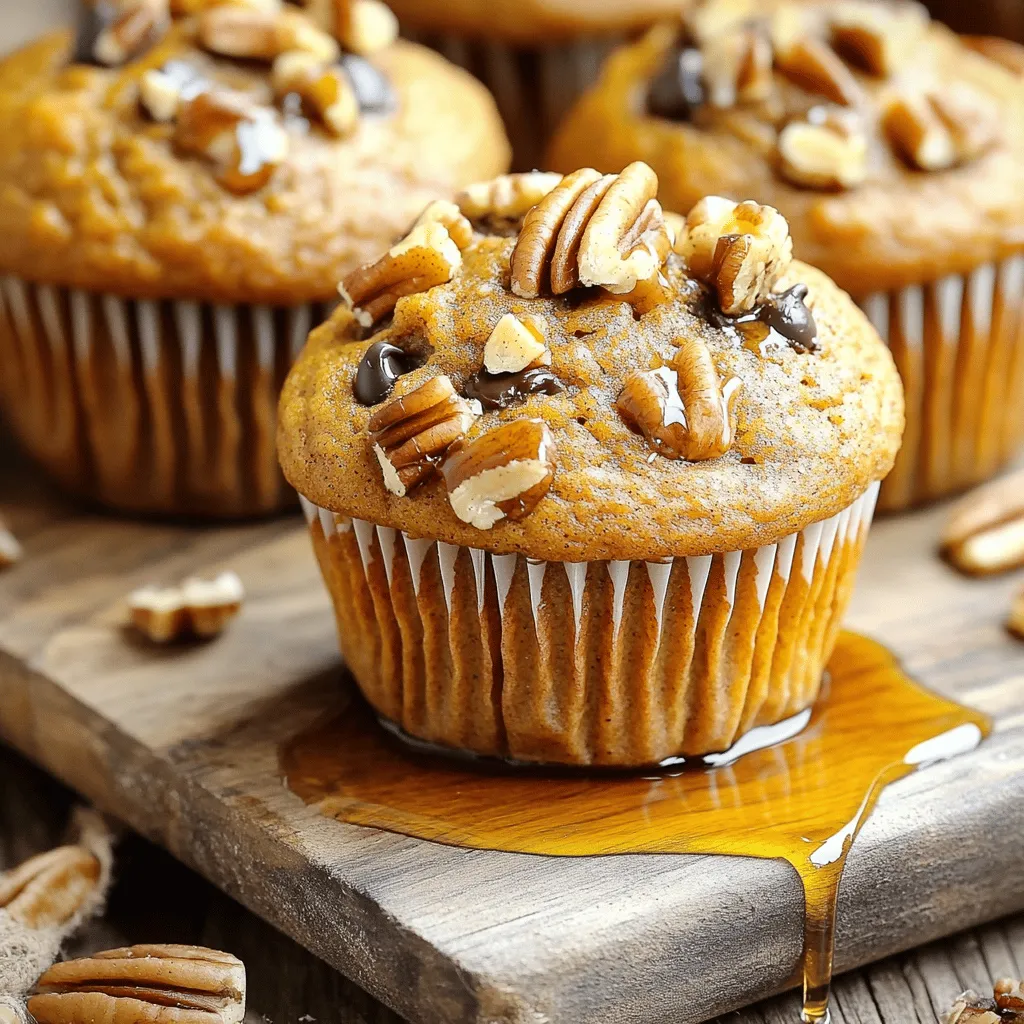
Who doesn’t love a warm, cozy muffin fresh out of the oven? In this blog post, I’ll show you how to make Vegan Pumpkin Muffins that are not just easy …

Read more

Categories Desserts

Caramelized Onion Dip Flavorful Coworker Favorite

August 15, 2025 by Chef Tavio
- 2 large onions, thinly sliced - 2 tablespoons extra virgin olive oil - 1 teaspoon sea salt - 1 teaspoon granulated sugar - 1 cup sour cream, at room temperature - 1 cup cream cheese, softened for easy blending - 2 tablespoons fresh chives, finely chopped - 1 tablespoon fresh thyme leaves, finely chopped - Freshly cracked black pepper, to taste If you run out of sour cream, use Greek yogurt. It adds creaminess and tang. For cream cheese, cottage cheese works well too. Blend it until smooth. If you don’t have fresh herbs, dried herbs can be a quick option. Use half the amount since dried herbs are stronger. You will need a large skillet for caramelizing the onions. A mixing bowl helps when blending the dip. A spatula or wooden spoon is great for stirring. Finally, use a serving bowl to hold your dip when it’s ready. Start by heating a large skillet over medium heat. Add 2 tablespoons of extra virgin olive oil. Then, toss in 2 large onions that you have thinly sliced. Sprinkle 1 teaspoon of sea salt over the onions. This salt pulls out moisture and helps them soften. Stir often for about 10 minutes until they look soft and translucent. Next, add 1 teaspoon of granulated sugar. This sugar makes the onions sweet and helps them caramelize. Lower the heat to a gentle simmer. Cook the onions for 25 to 30 minutes. Stir every few minutes. You want them to turn a deep golden brown and smell sweet. Once they are caramelized, take the skillet off heat. Let the onions cool a bit in the pan. In a mixing bowl, combine 1 cup of softened cream cheese and 1 cup of sour cream at room temperature. Mix them well until the blend is smooth and creamy. This is key for a rich texture. Next, gently fold in the cooled caramelized onions. Also, add in 2 tablespoons of finely chopped chives and 1 tablespoon of fresh thyme leaves. These herbs add a nice touch of flavor. Finally, season your dip with freshly cracked black pepper to taste. Transfer the dip to a serving bowl. Cover it well and place it in the fridge for at least 30 minutes. Chilling helps the flavors meld together. This time is crucial for a tasty dip. When ready to serve, you can add a sprinkle of extra chives on top for a pretty finish. To get sweet, golden onions, start with medium heat. Use a large skillet so the onions cook evenly. Add sea salt right after the onions. This draws out moisture and helps them soften. After about ten minutes, sprinkle in sugar. Sugar boosts the sweetness and speeds up caramelization. Stir every few minutes for about 25 to 30 minutes. Watch them turn from translucent to deep brown, which means they are ready. For a smooth dip, blend the cream cheese and sour cream well. Make sure both are at room temperature. This makes mixing easier. After adding the caramelized onions, chives, and thyme, fold gently. This keeps the dip fluffy. If it feels too thick, mix in a little more sour cream until you reach your desired texture. Serve your dip with colorful veggies, pita chips, or crusty bread. This adds texture and makes a great display. For a fun touch, garnish with more chives and a drizzle of olive oil. This not only looks nice but adds extra flavor. If you’re feeling adventurous, try adding different herbs or spices to change things up! {{image_4}} You can change the flavor of your dip by adding herbs and spices. Fresh dill brings a bright taste. You might also try parsley for a fresh note. A pinch of smoked paprika adds a warm depth. If you want heat, cayenne pepper is a great choice. Just remember, start with a little. You can always add more later. Cheese can make your dip even richer. Creamy goat cheese gives a tangy kick. Or try mixing in some sharp cheddar. For a twist, add feta for a salty punch. Mix in cheese after blending the base for a creamy texture. This creates layers of flavor that will impress your friends. You can still enjoy this dip if you avoid dairy. Use a dairy-free cream cheese and a plant-based yogurt. They work well in the same amounts. For added richness, blend in some soaked cashews. This keeps the creamy texture while being vegan friendly. You won't miss the dairy at all! To keep your caramelized onion dip fresh, store it in an airtight container. Make sure the dip has cooled completely before sealing it. This helps prevent moisture build-up. Place it in the main part of your fridge, not in the door. The dip will stay nice and creamy that way. If you have extra dip, freezing is a great option. Use a freezer-safe container and leave some space at the top. The dip may expand when frozen. For best results, use it within three months. When ready to eat, thaw it overnight in the fridge. When stored properly, the dip lasts about five days in the fridge. Keep an eye out for any changes in smell or texture. If you notice anything off, it’s best to toss it. Always check before serving to ensure it’s still fresh. Yes, you can use frozen onions. They save time and are easy to find. However, fresh onions yield better flavor. When using frozen, thaw them first. Then, follow the same cooking steps. This ensures they caramelize well. To add spice, try these ideas: - Add a pinch of cayenne pepper. - Mix in some diced jalapeños. - Use spicy flavored cream cheese. These changes will give your dip a nice kick. Serve with: - Fresh vegetable sticks like carrots and celery. - Crispy pita chips for crunch. - Slices of crusty bread for a hearty option. - Pretzel bites for a fun twist. These pairings enhance the dip's rich flavor and texture. To make a great caramelized onion dip, I've shared all the key ingredients, steps, and tips. You can substitute ingredients easily and use different flavors to create your own twist. Storage tips help you keep leftovers fresh, and the FAQs answer your common questions. Overall, making this dip is simple and fun. Enjoy it at your next gathering, and don’t forget to add your favorite snacks for dipping. Experiment with flavors to make it yours!

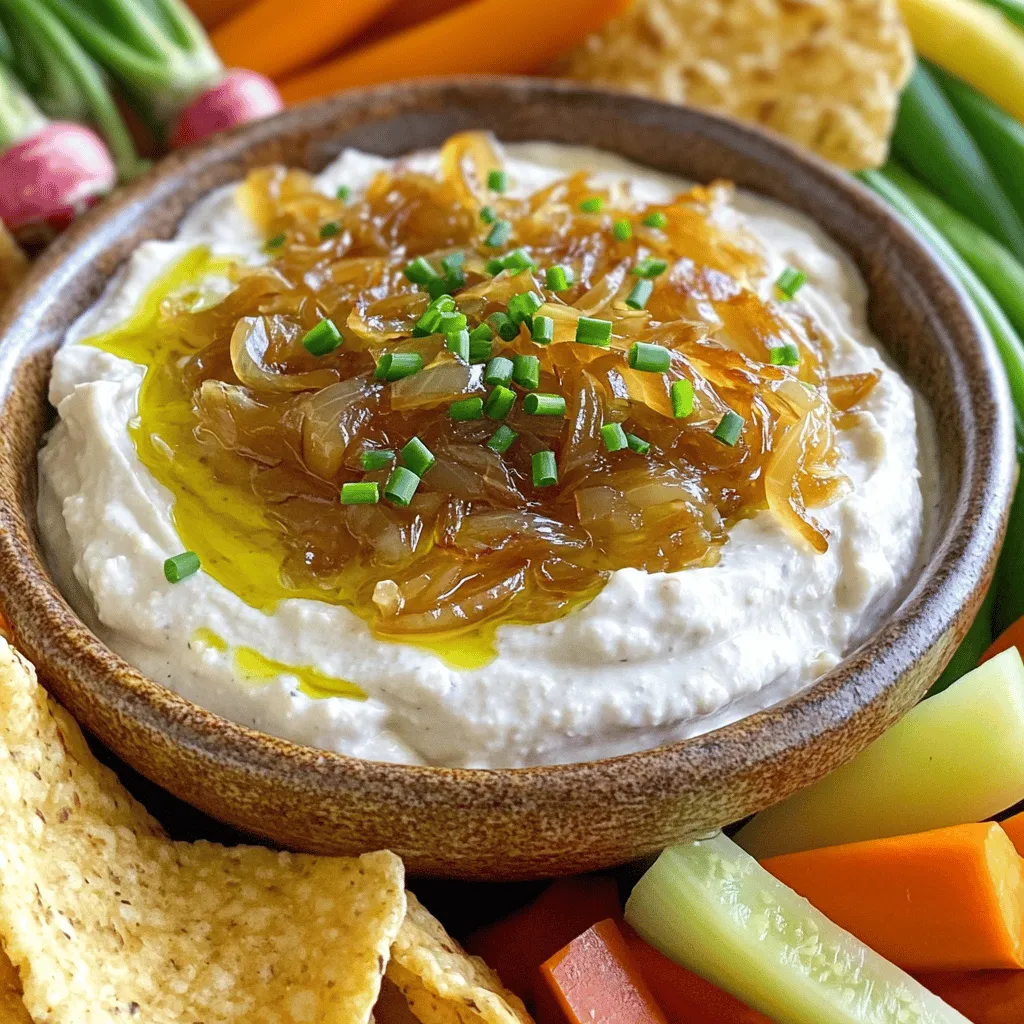
Want to impress your coworkers with a tasty snack? This Caramelized Onion Dip is a simple yet crowd-pleasing choice that packs a punch. With just a few ingredients, you can …

Read more

Categories Appetizers

Salted Honey Pie Irresistible Dessert Delight

August 15, 2025 by Chef Tavio
- 1 ½ cups all-purpose flour - 1/3 cup granulated sugar - 1/2 teaspoon salt - 1/2 cup unsalted butter, cold and cubed - 1 egg yolk - 2 tablespoons ice water - 1 cup clover honey - 3 large eggs - 1/2 cup heavy cream - 1 teaspoon vanilla extract - 1 teaspoon sea salt (for topping) The first step to making Salted Honey Pie is gathering the ingredients. The crust is key for a tasty pie. You need all-purpose flour, granulated sugar, a pinch of salt, and unsalted butter. The butter must be cold and cubed. This keeps the crust flaky. Next, we need an egg yolk and some ice water to bind the crust. The ice water helps keep the dough cool. Too much heat can make it tough. For the filling, you will want clover honey. This honey is sweet and floral. You also need large eggs, heavy cream, and vanilla extract. These ingredients blend well and create a rich filling. Lastly, don't forget the sea salt for topping! It adds a lovely contrast to the sweet pie. All these ingredients come together to create a dessert that is truly delightful. When you have everything ready, you are set to start making your pie! 1. Mixing dry ingredients: In a large bowl, whisk together 1 ½ cups of all-purpose flour, 1/3 cup of granulated sugar, and 1/2 teaspoon of salt. This mix sets a sweet base for our pie. 2. Incorporating the butter: Add 1/2 cup of cold, cubed unsalted butter to the dry mix. Use a pastry cutter or your fingers to blend until it looks like coarse crumbs. Leave some pea-sized bits for texture. 3. Forming and chilling the dough: In a small bowl, whisk 1 egg yolk with 2 tablespoons of ice water. Slowly add this mix into the flour and butter. Use a fork to gently combine until the dough holds together. Form it into a disc, wrap it in plastic, and chill for at least 30 minutes. This step helps the dough stay tender. 1. Whisking the honey mixture: In a mixing bowl, combine 1 cup of clover honey, 3 large eggs, 1/2 cup of heavy cream, and 1 teaspoon of vanilla extract. Whisk until smooth. The honey gives a rich sweetness, while the eggs and cream add body to the filling. 1. Rolling out the dough: On a floured surface, roll out the chilled dough into a circle. It should be large enough for a 9-inch pie pan. Carefully place it in the pan and trim any excess. Crimp the edges if you like. 2. Blind baking the crust: Preheat your oven to 350°F (175°C). Place the pie crust in the oven and bake for 15-20 minutes. It should be lightly golden and firm. Let it cool slightly on a wire rack. 3. Filling the pie and final baking: Pour the honey filling into the cooled crust, spreading it evenly. Return it to the oven and bake for 25-30 minutes. Check if it jiggles slightly in the center; that means it’s done. To avoid a tough crust, handle the dough gently. Overworking it makes it tough. Mix the butter into the flour until it looks like wet sand. You want some small bits of butter left. This helps create a flaky crust. Chilling the dough is key. After mixing, form it into a disc and wrap it. Chill it for at least 30 minutes. This relaxes the gluten and makes rolling easier. For the filling, check the consistency. It should be smooth and thick, not runny. If it seems too liquidy, give it a good whisk. This helps blend everything well. If it still looks watery, let it sit for a few minutes. The honey will thicken as it sits. When you serve the pie, think about how it looks. Cut it into neat slices. Place each slice on a pretty plate. Top it with whipped cream or some fresh fruit. A drizzle of honey makes it look fancy, too. This pie shines with simple, elegant touches. {{image_4}} You can make Salted Honey Pie your own by adding spices. A sprinkle of cinnamon or nutmeg adds warmth and depth. These spices blend well with the honey’s sweetness. You can also switch honey types. Wildflower honey gives a unique flavor twist. Each type of honey brings its own notes, so feel free to experiment! Need a gluten-free crust? You can use almond flour or a gluten-free blend. This will keep the pie tasty and safe for gluten-free eaters. If you want a dairy-free option, swap heavy cream for coconut cream or a nut milk. Both will give a rich texture without dairy. Making these changes keeps the pie delicious for everyone! You can store Salted Honey Pie at room temperature or in the refrigerator. If you choose room temperature, cover the pie loosely with foil or plastic wrap. It stays fresh for up to two days this way. If you want to keep it longer, place it in the fridge. In the fridge, the pie lasts up to five days. To enjoy leftovers, reheating is simple. Preheat your oven to 350°F (175°C). Place the pie on a baking sheet and cover it with foil. Heat for about 15 minutes. This warms it up without making the crust soggy. You can also enjoy it cold, straight from the fridge. Either way, it's a treat! Salted Honey Pie is a sweet treat made with a creamy honey filling. The flavor is a mix of sweet and salty, making it hard to resist. This pie uses clover honey, which adds a floral note. The crust is buttery and complements the rich filling. You get a smooth texture, with a hint of salt on top that enhances the sweetness. Each bite is a delightful balance of flavors. Yes, you can freeze Salted Honey Pie! To freeze, let the pie cool completely. Wrap it tightly in plastic wrap and then in foil. This keeps the pie fresh for up to three months. When you want to eat it, thaw it in the fridge overnight. After thawing, let it sit at room temperature for a bit before serving. This helps regain its fresh taste. The best honey for this pie is clover honey. It has a light, sweet flavor that works well in desserts. You can also try wildflower honey for a more complex taste. If you want a stronger flavor, go for orange blossom honey. Each type adds its unique character to the pie. Choose a honey you enjoy, as it will shine through in the final dish. Making Salted Honey Pie ahead is easy! You can prepare the crust a day before. Simply chill it in the fridge overnight. For the filling, mix it up and pour it into the crust the next day. Bake as directed. If you want to make it even earlier, bake the pie and let it cool. Store it in the fridge, and it will last for a few days. Just remember to add the sea salt topping just before serving for the best taste. This post shared how to make a delicious Salted Honey Pie from scratch. I covered ingredients for the crust and filling. I detailed step-by-step instructions, tips for a perfect pie, and variations to try. Storing and reheating tips ensure your pie stays tasty. Remember, baking is fun! Enjoy every step and make it your own. With practice, you'll impress everyone with your pie-making skills. Don't be afraid to experiment with flavors. Happy baking!

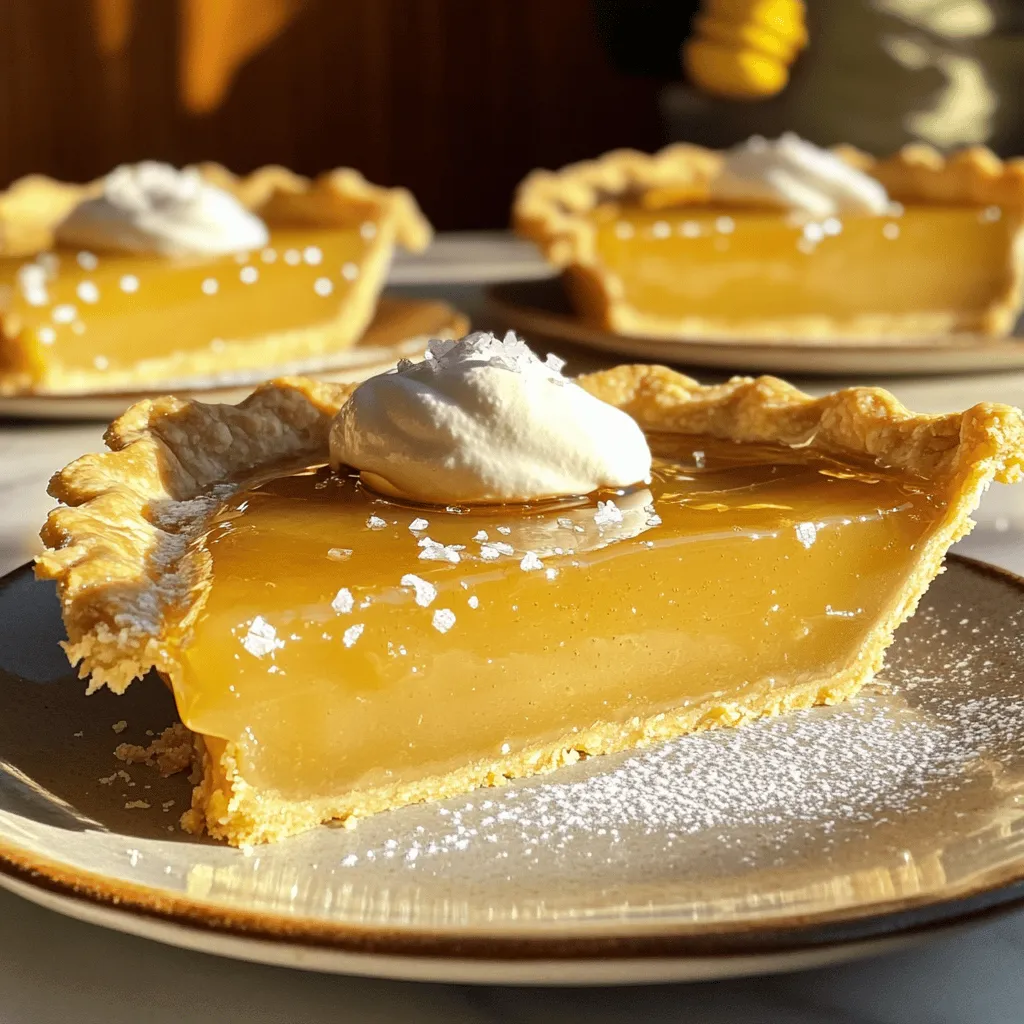
Are you ready to elevate your dessert game? Salted Honey Pie is a sweet and creamy treat that will impress everyone. This delightful pie combines rich honey flavor with a …

Read more

Categories Desserts

Dunkin Copycat Pumpkin Muffins Tasty Fall Delight

August 15, 2025 by Chef Tavio
To make these delightful Dunkin copycat pumpkin muffins, you will need the following ingredients: - 1 ½ cups all-purpose flour - 1 cup granulated sugar - 1 teaspoon baking soda - ½ teaspoon baking powder - ½ teaspoon salt - 1 teaspoon ground cinnamon - ½ teaspoon ground nutmeg - ½ teaspoon ground ginger - ½ cup vegetable oil - 2 large eggs - 1 cup canned pumpkin puree - 1 teaspoon vanilla extract - Optional additions: ½ cup chocolate chips, ¼ cup chopped pecans or walnuts Each ingredient plays a key role in creating a moist and flavorful muffin. The flour gives structure, while sugar adds sweetness. Baking soda and baking powder help the muffins rise. The spices bring warmth and that classic fall flavor. Using canned pumpkin puree simplifies the recipe and guarantees a rich pumpkin taste. The oil keeps the muffins moist, and eggs bind everything together. If you want a little extra, mix in chocolate chips or nuts for added texture and flavor. These ingredients are easy to find, making this recipe a perfect choice for any home cook. You can adjust the optional ingredients to suit your taste. - Preheat your oven to 350°F (175°C). - Prepare your muffin tin by lining it with paper liners or using non-stick spray. - In a large bowl, combine 1 ½ cups all-purpose flour, 1 cup granulated sugar, 1 teaspoon baking soda, ½ teaspoon baking powder, ½ teaspoon salt, 1 teaspoon ground cinnamon, ½ teaspoon ground nutmeg, and ½ teaspoon ground ginger. - Whisk them together until smooth. This step helps blend the flavors well. - In another bowl, blend ½ cup vegetable oil, 2 large eggs, 1 cup canned pumpkin puree, and 1 teaspoon vanilla extract. - Use a whisk or fork to mix until everything is smooth and well combined. - Pour the wet mixture into the dry ingredients. - Stir gently with a spatula until just combined. It’s okay if small lumps remain. - If you want, fold in ½ cup chocolate chips and ¼ cup chopped pecans or walnuts for extra flavor. - Use a scoop to fill the muffin cups about ¾ full with batter. - Bake in the preheated oven for 18-20 minutes. Check doneness by inserting a toothpick; it should come out clean. - Let the muffins cool in the tin for about 5 minutes. - Then move them to a wire rack to cool completely. To get moist and fluffy muffins, avoid overmixing the batter. Mix until just combined. It’s okay if a few lumps remain. Also, fill the muffin cups about ¾ full. This ensures they rise nicely while baking. Try adding a pinch of cloves or allspice for a warm kick. You can also mix in some vanilla or almond extract for depth. When choosing pumpkin puree, go for 100% pure pumpkin. The flavor will shine through in your muffins. Serve these muffins warm with a spread of butter or cream cheese. For a fun twist, top them with a sprinkle of cinnamon sugar. Pair your muffins with hot coffee or spiced tea. This creates a cozy experience perfect for fall. {{image_4}} For a gluten-free version, use a blend of gluten-free all-purpose flour. Brands like Bob's Red Mill or King Arthur Flour can work well. You might need to add a bit of xanthan gum to mimic the texture of wheat flour. Check your muffins at the 15-minute mark. Gluten-free muffins can bake faster, so adjust the time if needed. To make these muffins vegan, replace the eggs with flaxseed meal. Mix 1 tablespoon of flaxseed meal with 2.5 tablespoons of water for each egg. Let it sit for a few minutes to thicken. Use coconut oil or any vegan butter instead of vegetable oil. Ensure that the sugar is vegan, as some brands use bone char in processing. Add a festive touch by mixing in spices like allspice or cloves for a warm flavor. You can also fold in dried cranberries, raisins, or pumpkin seeds for a fun texture. These twists can make your muffins perfect for holiday gatherings or cozy family dinners. To keep your Dunkin copycat pumpkin muffins fresh, store them in airtight containers. This helps lock in moisture and flavor. You can use a plastic container or a resealable bag. Line the container with a paper towel to absorb excess moisture. This keeps the muffins tasty for longer. If you want to enjoy these muffins later, freezing is a great option. Place cooled muffins into a freezer-safe bag or container. Remove as much air as possible to prevent freezer burn. When you're ready to eat them, take out a muffin and let it thaw at room temperature. To warm it up, pop it in the microwave for about 15-20 seconds. You can also reheat them in the oven at 350°F for 5-10 minutes. At room temperature, these muffins last about 3-4 days. For longer storage, keep them in the fridge, where they can last up to a week. Make sure to check for signs of spoilage, like mold or an off smell. Enjoy your muffins fresh for the best taste! These muffins taste just like Dunkin's famous pumpkin muffins. They have a soft and moist texture. The warm spices, like cinnamon and nutmeg, give it that cozy flavor we love. The sweetness is just right, making each bite a treat. You can also add chocolate chips or nuts for extra flavor. Yes, you can use fresh pumpkin! First, cook the pumpkin until soft. Then, mash it until smooth. Fresh pumpkin has a slightly different taste and texture. It may be a bit more watery, so you might need to adjust the flour. This way, your muffins will still turn out great! You can easily make these muffins healthier. Try using whole wheat flour instead of all-purpose flour. This adds fiber and nutrients. You can also reduce the sugar by a third. For a sweet touch, use mashed bananas or applesauce. These changes keep your muffins tasty and a bit healthier! If your muffins don't rise, check a few things. First, make sure your baking powder and baking soda are fresh. Old leavening agents may not work well. Also, avoid overmixing the batter. Too much mixing can make muffins dense. Lastly, fill each muffin cup about ¾ full for the best rise. Absolutely! You can add many fun mix-ins to your muffins. Try folding in some chopped apples or dried cranberries for added sweetness. Nuts like pecans or walnuts give a nice crunch. You can also add white chocolate chips for a twist. Get creative and make these muffins uniquely yours! To recap, I shared a simple recipe for pumpkin muffins. We covered key ingredients, detailed instructions, and helpful tips. You can customize these muffins with options like chocolate chips or nuts. Remember, avoiding overmixing helps keep them moist. Experiment with flavors and storage methods for the best results. Enjoy your baking journey! You’ll find these muffins are a delightful treat for any occasion.

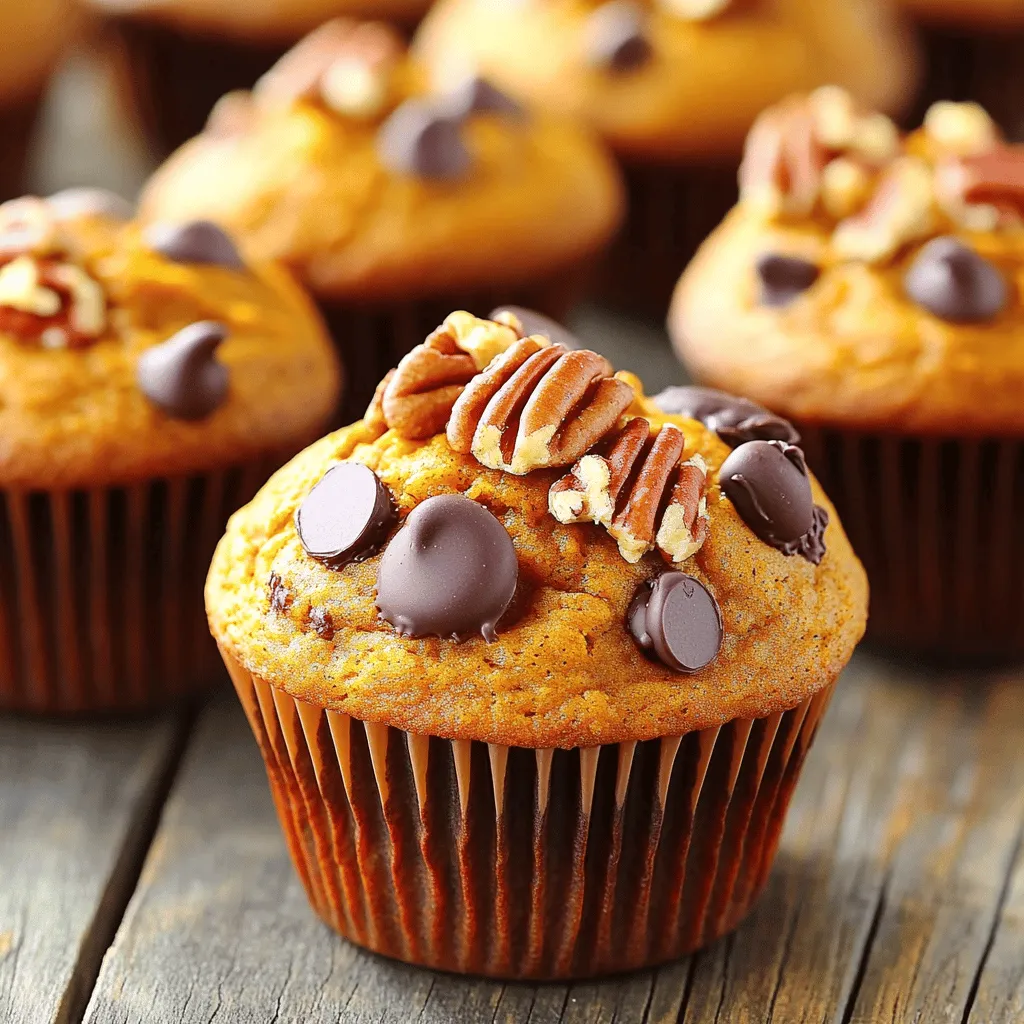
Craving Dunkin’s famous pumpkin muffins? You’re in luck! In this simple guide, I’ll show you how to recreate that delicious fall treat right in your kitchen. With just a few …

Read more

Categories Desserts

Carrot Cake Overnight Oats Delightful and Easy Recipe

August 14, 2025 by Chef Tavio
To make carrot cake overnight oats, you will need: - 1 cup rolled oats - 1 cup almond milk (or your preferred milk alternative) - 1 medium carrot, finely grated - 1/4 cup Greek yogurt (or a dairy-free alternative) - 2 tablespoons maple syrup (adjust for sweetness) - 1 teaspoon ground cinnamon - 1/2 teaspoon ground nutmeg - 1/4 teaspoon ground ginger - 1/4 cup walnuts or pecans, finely chopped - 1/4 cup raisins (optional) - Pinch of salt You can switch some ingredients if needed. For the milk, use any milk you like. Coconut milk adds a nice creaminess. If you want a vegan option, skip the Greek yogurt or use a plant-based version. For sweetness, honey works too. You can swap nuts for seeds like sunflower or pumpkin seeds if you have nut allergies. If you don’t like raisins, leave them out or add dried cranberries instead. Using fresh ingredients makes a big difference in flavor and texture. Fresh carrots add a sweet crunch. Fresh nuts give a nice nutty taste. When you use fresh spices, they pack more flavor. Always check your ingredients before cooking. This ensures your overnight oats taste great and look good too. Fresh ingredients also help you enjoy a healthy breakfast every day. Start by taking a medium bowl. Add 1 cup of rolled oats. Pour in 1 cup of almond milk. You can use any milk you like. Then, add 1/4 cup of Greek yogurt. Stir with a spoon until the oats soak up the liquid. This base is key for creamy oats. Next, it’s time to add flavor! Grate 1 medium carrot and toss it in. Then, add 2 tablespoons of maple syrup for sweetness. Sprinkle in 1 teaspoon of ground cinnamon, 1/2 teaspoon of nutmeg, and 1/4 teaspoon of ginger. Chop 1/4 cup of walnuts or pecans and mix them in. If you like, add 1/4 cup of raisins too. Finish with a pinch of salt. Stir well to mix everything evenly. Now, carefully move the mixture into airtight containers. Seal them tightly to keep the flavors fresh. Place the jars in the fridge. Let them sit overnight, or for at least 4 hours. This soak helps the oats soften and absorb all the yummy flavors. In the morning, stir again before enjoying! To get the best texture, soak the oats overnight. This step makes the oats soft and creamy. If you like a thicker mix, add less milk. For a creamier result, use more yogurt. Stir well before serving to blend all the flavors and textures. You can change the sweetness based on your taste. Start with two tablespoons of maple syrup. If you want it sweeter, add more syrup a little at a time. You can also use honey or a sugar substitute. Just remember to mix well for an even taste. Serve your oats in a clear jar or bowl to show off their colors. Top with extra chopped nuts or a sprinkle of cinnamon for flair. You can add a dollop of yogurt on top for more creaminess. Fresh carrot curls make a pretty garnish too! Enjoy your oats cold or warm them slightly if you prefer. {{image_4}} You can easily make carrot cake overnight oats vegan. Just swap Greek yogurt for a plant-based yogurt. Almond milk works well, but you can use soy, oat, or coconut milk too. Maple syrup is already vegan, so no changes there. This way, everyone can enjoy this tasty treat! If you need a nut-free version, skip the walnuts or pecans. You can add seeds like sunflower or pumpkin seeds for a crunch instead. For a gluten-free option, use certified gluten-free oats. This ensures you can enjoy your oats without worry while keeping them healthy and delicious. Feel free to play with flavors! You can add a splash of vanilla extract for extra warmth. Dried cranberries or apricots can replace raisins for a fruity twist. For a tropical touch, consider adding coconut flakes. Each new flavor will make your overnight oats exciting and unique! To keep your carrot cake overnight oats fresh, store them in airtight containers. This helps to lock in flavor and moisture. Make sure to seal the lids tightly. If you plan to make a batch for the week, use separate jars for each serving. This way, you grab one easily each morning. These oats stay good for up to five days in the fridge. After that, they may lose flavor and texture. Always check for any signs of spoilage before eating. If the oats smell off or look strange, it's best to toss them. When prepping these oats, consider making double the batch. This saves time on busy mornings. You can mix up the flavors by adding different nuts or fruits. Keep a few jars ready in your fridge. This way, you enjoy a healthy breakfast all week long! Yes, you can use quick oats. They will cook faster and absorb liquid quicker. The texture will be softer, but the flavor remains delightful. If you prefer a chewier bite, stick with rolled oats. They give a heartier feel and help keep the oats full. To cut calories, consider these tips: - Use less maple syrup. You can reduce it to one tablespoon. - Swap Greek yogurt for a low-fat version. - Choose unsweetened almond milk instead of regular milk. - Skip the nuts or use fewer. These small changes can help you enjoy this tasty treat without the extra calories. Absolutely! You can prepare multiple jars at once. Just follow the recipe, and divide it into jars. Store them in the fridge. They last up to five days. This makes breakfast easy and quick throughout the week. Just grab a jar, stir, and enjoy! To sum up, we explored the best ingredients, step-by-step instructions, and helpful tips for making delicious overnight oats. Fresh ingredients are key for flavor and texture. Remember to try different variations and adjust sweetness to your taste. Proper storage will ensure your oats stay fresh. With these insights, you'll create tasty and healthy meals each day. Enjoy your oat journey!

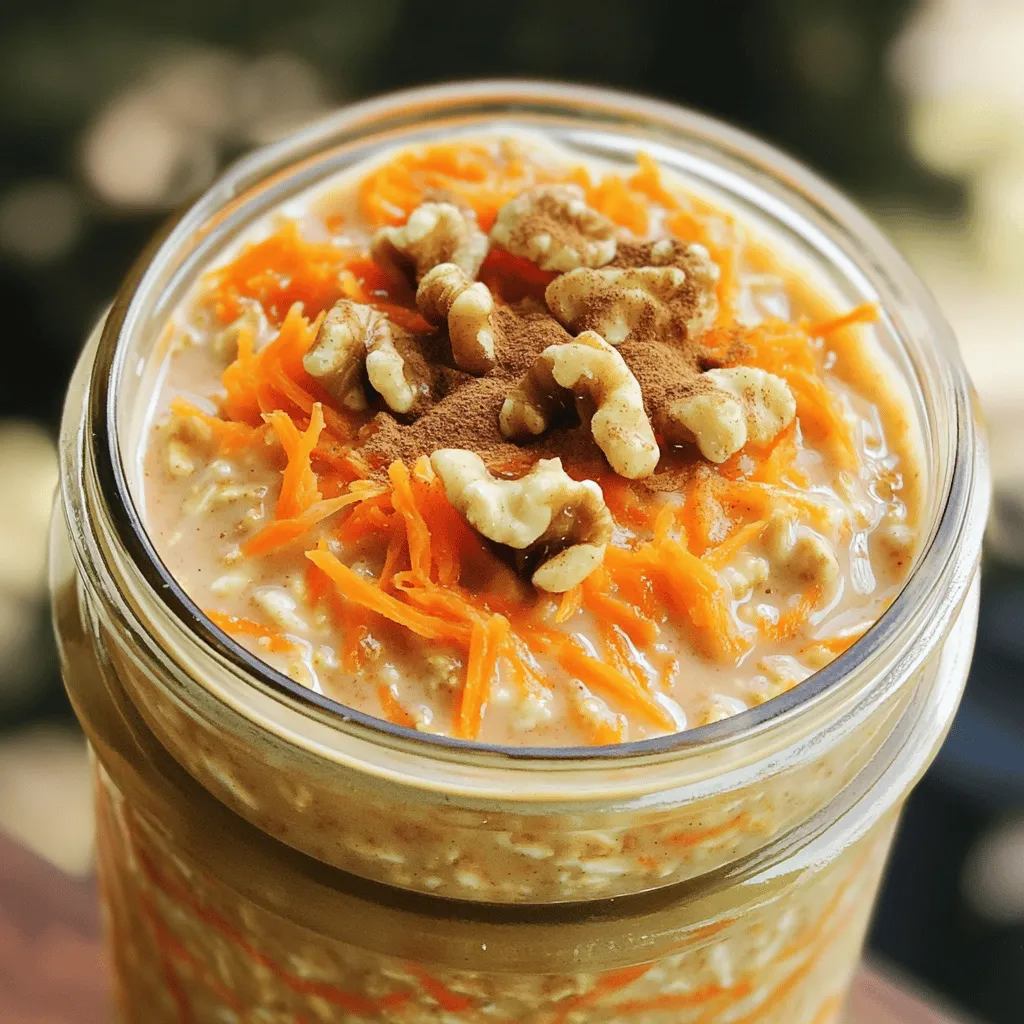
Do you love carrot cake but want a healthier start to your day? I’ve got just the thing for you! In this post, I’ll show you how to make delicious …

Read more

Categories Breakfast

Banana Nutella Swirl Muffins Irresistible Treats

August 14, 2025 by Chef Tavio
To make Banana Nutella Swirl Muffins, gather these simple ingredients: - 2 ripe bananas, thoroughly mashed - 1/3 cup unsalted butter, melted - 1/2 cup packed brown sugar - 1/4 cup granulated sugar - 1 large egg, at room temperature - 1 teaspoon pure vanilla extract - 1 teaspoon baking soda - 1/4 teaspoon fine salt - 1 cup all-purpose flour - 1/2 cup Nutella or your favorite chocolate-hazelnut spread - Optional: Chopped walnuts for topping Each ingredient plays a key role in creating the perfect muffin. The ripe bananas give natural sweetness and moisture. The unsalted butter adds richness and depth. Using both brown and granulated sugar balances sweetness and enhances flavor. The egg binds everything together and helps with rising. Baking soda is crucial for leavening, while the salt enhances the overall taste. All-purpose flour provides structure. Nutella brings a delicious swirl of chocolate that makes each bite irresistible. If you want more crunch, chopped walnuts are a great optional topping. This blend of ingredients makes these muffins a treat you won’t forget! First, preheat your oven to 350°F (175°C). This step is crucial for even baking. Next, grab your muffin tin. You can line it with paper liners or spray it with non-stick spray. This helps muffins come out easily. In a large bowl, combine the mashed bananas and melted butter. Stir them together until smooth. Then, add the brown sugar and granulated sugar. Mix until everything blends well. Now, crack in the egg and pour in the vanilla extract. Stir until the mixture looks uniform. In another bowl, whisk together the baking soda, salt, and flour. This helps to evenly distribute the baking soda. Gradually add this dry mix to the wet banana mixture. Gently stir until just combined. The batter should remain slightly lumpy to keep it soft. Use a spoon to fill each muffin cup about two-thirds full with batter. This allows space for rising. Next, take Nutella and add a dollop on top of each filled cup. Using a toothpick or knife, swirl the Nutella into the batter to create a pretty pattern. Place the muffin tin in the preheated oven. Bake for 18-20 minutes. To check if they are done, insert a toothpick into the center of a muffin. If it comes out clean, they are ready. Let the muffins cool in the tin for about 5 minutes. After that, transfer them to a wire rack to cool completely. Enjoy your warm muffins! To swirl Nutella into your batter, use a spoon to scoop it on top. Then, take a toothpick or knife to swirl it gently. Don’t overdo it; you want a marbled look, not a mixed one. Overmixing can make your muffins tough. Keep the batter slightly lumpy for best results. Set your oven to 350°F (175°C) for even baking. Avoid opening the oven door too soon. This can cause your muffins to sink. Use a toothpick to test doneness. Insert it into the center; it should come out clean when they’re ready. If you want to try different sweeteners, maple syrup or honey can work well. For fat, you can replace butter with coconut oil. If you need gluten-free muffins, use almond flour or a gluten-free mix. Adjust the liquid if needed to keep the right texture. {{image_4}} You can make these muffins even better by adding spices. A pinch of cinnamon or nutmeg gives a warm touch. These spices blend well with the banana and Nutella. You might also want to add chocolate chips. The extra chocolate makes each bite more exciting. You can use dark chocolate or milk chocolate chips. Chopped nuts, like walnuts, can also add crunch. If you want to make these muffins vegan, swap the egg for a flax egg. Mix one tablespoon of flaxseed meal with three tablespoons of water. Let it sit for five minutes to thicken. Use plant-based butter or oil instead of regular butter. For a low-sugar option, you can cut the sugar in half. Consider using a sugar substitute like stevia or coconut sugar. These changes keep the muffins tasty while fitting your diet. Pair your muffins with a nice drink. They go great with coffee, tea, or even a glass of milk. If you want, top them with whipped cream or yogurt. This adds creaminess that balances the sweetness. You can also serve them warm with a drizzle of extra Nutella. For special occasions, arrange them on a platter with fresh fruit. This makes a colorful and fun display for guests. To keep your Banana Nutella Swirl Muffins fresh, store them in a sealed container. If you have leftovers, place them in the fridge. For freezing, wrap each muffin tightly in plastic wrap. Then, put them in a freezer bag. This way, you can enjoy them later without losing flavor. At room temperature, these muffins stay fresh for about 2-3 days. If you store them in the fridge, they can last up to a week. Freezing extends their life to about 2-3 months. Just remember, the sooner you eat them, the better they taste! To enjoy your muffins warm, use a microwave. Heat them for about 10-15 seconds. You can also place them in a toaster oven at 350°F for a few minutes. This warms them nicely and brings back the soft texture. Enjoy each bite as if they just came out of the oven! Yes, you can use frozen bananas. First, thaw them completely. Once thawed, drain any excess liquid. Mash the bananas well, and they are ready to mix into your batter. The flavor will still be sweet and delicious. If you don't have Nutella, try using other spreads. Chocolate peanut butter works great. Almond butter or any chocolate spread can also do the trick. You can even use homemade chocolate hazelnut spread for a personal touch. Look for a few signs. The muffins will be golden brown on top. Press the top gently; it should spring back. If you want to be sure, check the edges. They should pull away from the muffin cups slightly. Yes, you can make mini muffins! Use a mini muffin tin and fill each cup about halfway. Bake them for about 10-12 minutes. Keep an eye on them, as they bake faster than regular muffins. This blog post detailed how to make delicious banana muffins with Nutella. You learned about the necessary ingredients, step-by-step baking instructions, and tips for perfect results. We explored variations and storage methods to enjoy your muffins longer. Baking at home can be fun and simple. You can share these muffins with friends or family. Remember, there’s no limit to how you can customize this recipe. Enjoy the baking journey, and happy muffin-making!

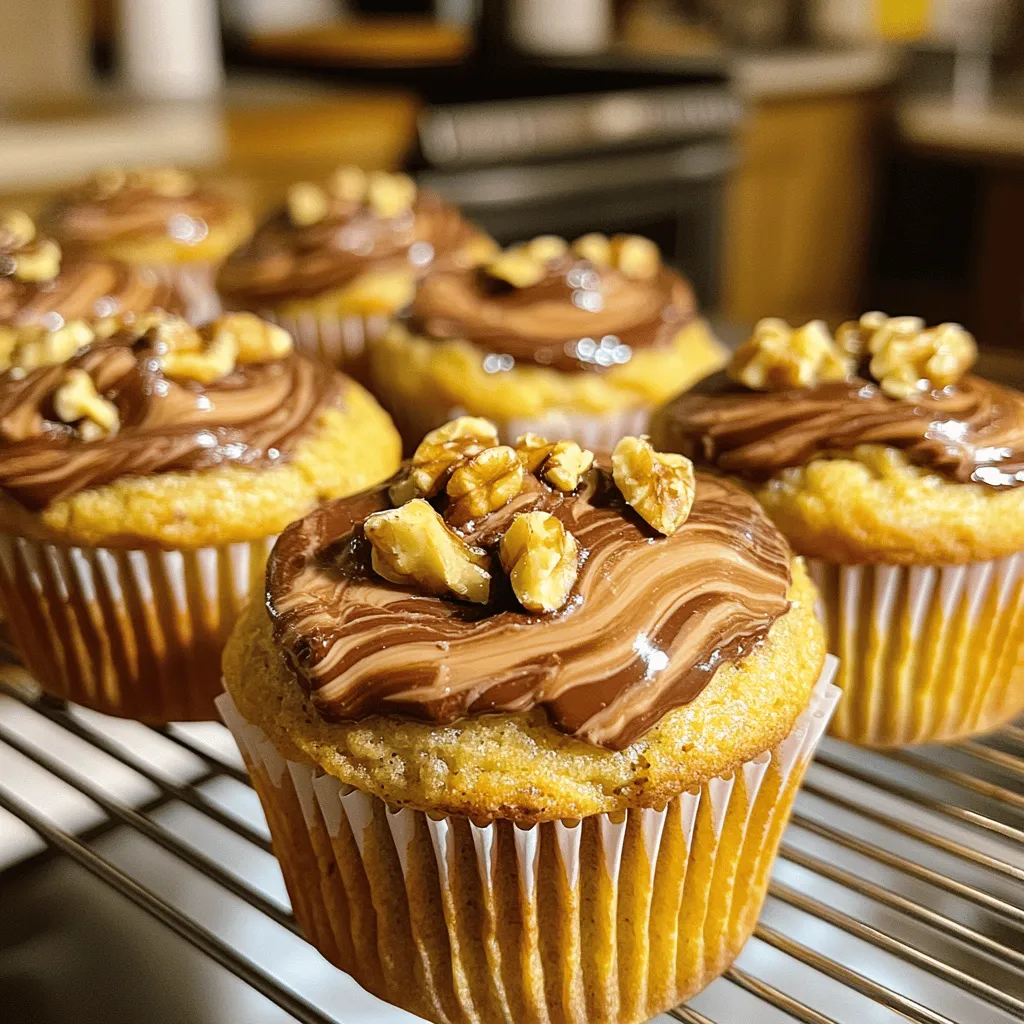
Are you ready for a treat that combines rich, creamy Nutella with sweet, ripe bananas? My Banana Nutella Swirl Muffins are not just delicious; they’re simple to make. Whether you’re …

Read more

Categories Desserts

Buffalo Chicken Stuffed Zucchini Boats Delightful Dish

August 14, 2025 by Chef Tavio
- 4 medium zucchinis - 2 cups cooked shredded chicken - 1/2 cup buffalo sauce - 1/2 cup cream cheese, softened - 1 cup shredded cheddar cheese, divided - 1/2 cup green onions, sliced - Salt and pepper to taste - Olive oil for drizzling I love this recipe because it uses simple, fresh ingredients. First, we need zucchinis. They act as the boat for our filling. Next, cooked shredded chicken gives a great source of protein. Buffalo sauce adds that spicy kick we crave. Cream cheese makes everything creamy and rich. Don’t forget the cheddar cheese! It melts beautifully on top. Green onions add a nice crunch and fresh flavor. Finally, you’ll need salt and pepper to balance everything out. A drizzle of olive oil will help with browning the tops. Gather these ingredients before you start cooking. This way, you will have everything ready to create a delicious meal. 1. Preheat your oven to 375°F (190°C). This is key for even cooking. 2. Rinse the zucchinis under cold water. Slice them in half lengthwise. 3. Use a spoon to scoop out the flesh. This creates the boat shape for the filling. Leave about 1/4 inch of skin to hold the filling. Set the flesh aside for later use. 1. In a mixing bowl, combine cooked shredded chicken, buffalo sauce, cream cheese, half of the cheddar cheese, and sliced green onions. 2. Mix everything well using a spatula. Taste the filling and season with salt and pepper to your liking. 1. If you want, finely chop the reserved zucchini flesh and add it to the filling. This adds flavor and moisture. 2. Carefully spoon the buffalo chicken filling into each zucchini boat. Pack it in gently, so it holds shape. 3. Place the stuffed zucchini boats on a baking sheet lined with parchment paper. Drizzle a light coat of olive oil over the tops. This helps them get crispy. 4. Bake the zucchini boats for 20-25 minutes. About five minutes before they are done, sprinkle the remaining cheddar cheese on top. Return to the oven until the cheese melts and bubbles. - How to ensure zucchinis are cooked perfectly Start by preheating your oven to 375°F (190°C). This sets the right heat for cooking. Slice the zucchinis in half lengthwise and scoop out the flesh, but leave a bit of skin. This helps keep the shape. Bake them for 20-25 minutes. They should be tender but not mushy. - Best practices for filling the zucchini boats Mix shredded chicken, buffalo sauce, cream cheese, half the cheddar, and green onions in a bowl. Taste the mixture and add salt and pepper as needed. For a moist filling, add chopped zucchini flesh. Spoon the filling into the boats, packing gently. Leave some space on top for more cheese. - Presentation tips for serving Place the baked zucchini boats on a pretty platter. Drizzle extra buffalo sauce on top for color and flavor. Garnish with sliced green onions for a fresh look. This makes the dish pop and looks fun! - Pairing ideas with sides or dips Serve with a cool ranch dip or celery sticks for a crunchy side. You can also pair with a fresh salad or some crispy tortilla chips. These sides balance the heat from the buffalo sauce and add more texture. Enjoy! {{image_4}} To make buffalo chicken stuffed zucchini boats gluten-free, check your buffalo sauce. Some sauces may contain gluten. Look for brands that are labeled gluten-free. You can also use gluten-free bread crumbs in the filling for added texture. For vegetarian or vegan options, swap the chicken with a mix of beans or lentils. Use vegan cream cheese and nutritional yeast for a cheesy flavor. This way, you still get a tasty, hearty dish without meat or dairy. Using different types of cheese can change the flavor of your dish. Try pepper jack cheese for a spicy kick or mozzarella for a milder taste. You can mix two or more cheeses to create a unique blend. Adding vegetables to your filling can boost flavor and nutrition. Finely chopped bell peppers, spinach, or mushrooms work great. You can even mix in the reserved zucchini flesh for extra moisture and taste. To store leftovers, place the zucchini boats in an airtight container. Make sure to cool them first. These will stay fresh for up to three days in the fridge. Always check for any signs of spoilage before eating. If they look or smell off, it’s best to toss them. To freeze stuffed zucchini boats, wrap each one tightly in plastic wrap. You can also place them in a freezer-safe bag. They will keep well for up to three months. When you're ready to eat, thaw them in the fridge overnight. For reheating, place the thawed boats in an oven at 350°F (175°C). Bake for about 20 minutes. This helps restore their texture and taste. Enjoy your tasty meal! Can I use raw chicken instead of cooked? No, you should not use raw chicken. Using cooked chicken keeps the dish safe and tasty. Cooked chicken adds flavor and helps the filling mix well with the other ingredients. How long do stuffed zucchini boats last in the fridge? Stuffed zucchini boats can last about 3 days in the fridge. Make sure to store them in an airtight container. This keeps them fresh and ready for you to enjoy later! Can I prepare zucchini boats ahead of time? Yes, you can prepare zucchini boats ahead. You can scoop the zucchinis and make the filling in advance. Just store them separately until you are ready to bake. This saves time on busy days. What can I use instead of buffalo sauce? If you want a milder taste, try using barbecue sauce or ranch dressing. You can also make a homemade sauce using hot sauce mixed with butter. This gives you control over the heat and flavor! This post covered making delicious Buffalo Chicken Stuffed Zucchini Boats. We discussed ingredients, step-by-step instructions, and tips for cooking. You learned about variations and how to store leftovers. Try these boats for a tasty meal. They are simple to make and can please many taste buds. Enjoy creating your own version with the tips shared here. Cooking can be fun and rewarding!

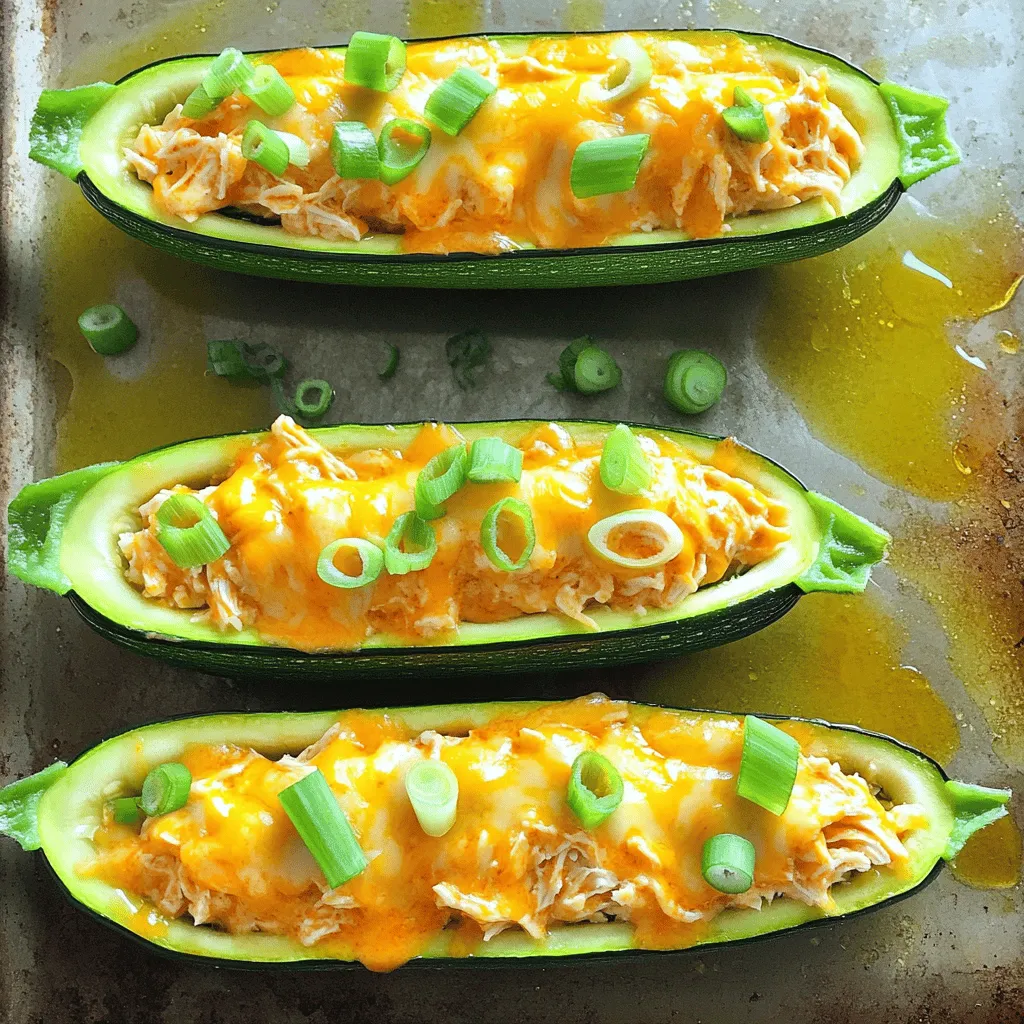
Are you craving a delicious and easy meal? My Buffalo Chicken Stuffed Zucchini Boats will satisfy your hunger and excite your taste buds! This dish combines tender zucchini with spicy …

Read more

Categories Appetizers
Older posts
Newer posts
← Previous Page1 … Page16 Page17 Page18 … Page92 Next →

TASTED NEST

Where Flavor Finds a Home 🍳🏡 — warm, simple, and crave-worthy recipes made for real life, from stovetop mornings to backyard dinners.

PAGES

Home About Contact Privacy Policy Terms & Conditions Cookie Policy GDPR Policy Copyright Policy Disclaimer

CATEGORIES

Appetizers Desserts Salads Breakfast Dinner

Contact

  • Pinterest
  • Mail
Copyright © 2025 Tasted Nest. All rights reserved.