Skip to content
  • GDPR Privacy Policy
  • Copyright Policy
  • Disclaimer
  • Terms & Conditions
Tasted Nest
  • Home
  • Appetizers
  • Desserts
  • Salads
  • Breakfast
  • Dinner
  • Privacy Policy
  • Contact
  • About

Chef Tavio

Creamy White Chicken Chili Flavorful and Simple Recipe

December 16, 2025March 19, 2025 by Chef Tavio
- 1 lb boneless, skinless chicken breasts, diced - 1 tablespoon olive oil - 1 medium onion, finely chopped - 2 cloves garlic, minced - 1 green bell pepper, diced - 2 cans (15 oz each) white beans, rinsed - 2 cups chicken broth - 1 cup frozen or canned corn Chicken is the star of this dish. I use boneless, skinless chicken breasts for a tender bite. Diced into small pieces, they cook quickly and soak up flavor well. Next, I add fresh vegetables. Onions and garlic give a strong base. The green bell pepper adds a nice crunch. I use white beans, like cannellini or great northern. These beans blend smoothly into the chili, giving it a creamy feel. Corn adds a sweet touch, balancing the dish. Chicken broth ties it all together, making every bite warm and comforting. - 1 teaspoon ground cumin - 1 teaspoon chili powder - 1/2 teaspoon smoked paprika - 1/4 teaspoon cayenne pepper (optional) Spices are key to flavor. Cumin brings a warm earthiness. Chili powder adds depth with a mild heat. Smoked paprika gives a subtle smoky taste. If you like spice, cayenne is great for a kick. You can adjust these to fit your taste. - 1 cup heavy cream or coconut milk - 1/4 cup fresh cilantro, chopped (for garnish) - Slices of jalapeño (optional) - Lime wedges (for serving) Creaminess makes this chili stand out. I use heavy cream for richness, or coconut milk for a dairy-free option. The cream blends in perfectly, giving a velvety texture. For garnish, I love fresh cilantro and jalapeño slices. They add color and brightness. Lime wedges serve to add a zesty finish, enhancing all the flavors. {{ingredient_image_2}} To start, you need to sauté the chicken. Heat one tablespoon of olive oil in a large pot over medium heat. Once the oil is hot, add one pound of diced chicken. Lightly season the chicken with salt and pepper. Cook for about five to seven minutes. You want the chicken to be cooked through and slightly golden. For seasoning tips, keep it simple. A bit of salt and pepper works well. You can also add a sprinkle of garlic powder for extra flavor. Next, it’s time to add aromatics. Stir in one finely chopped onion, two minced garlic cloves, and one diced green bell pepper. Cook these for about three to five minutes. Stir occasionally until the onion is soft and turns translucent. This step builds a great base for your chili. Now, let’s mix in the beans and broth. Add two cans of rinsed white beans, two cups of low-sodium chicken broth, and one cup of corn. Next, add one teaspoon of ground cumin, one teaspoon of chili powder, and half a teaspoon of smoked paprika. If you like heat, add a quarter teaspoon of cayenne pepper. Stir everything well and let it come to a gentle simmer. For simmering tips, keep the heat low. This helps flavors meld together. Let it simmer for about ten minutes, stirring occasionally. To enrich the chili, stir in one cup of heavy cream or coconut milk once it simmers. This adds a rich, creamy texture. Let the chili continue to simmer gently for another ten to fifteen minutes. Stir it often to prevent sticking. For final touches, taste the chili to see if it needs more seasoning. Adjust salt and pepper as needed. If you want more heat, add more cayenne or toss in sliced jalapeños. For presentation tips, ladle the chili into bowls. Top with chopped cilantro and optional jalapeño slices. Serve with lime wedges on the side for a bright, zesty finish. You can also drizzle some extra cream on top for a nice look. Enjoy this comforting dish! - How to avoid sticking: Use a non-stick pot or add enough olive oil. Stir the chili often while it simmers. This keeps the chicken and beans from sticking to the bottom. - Achieving the perfect consistency: The key is to add cream slowly. Stir until it blends well. If the chili is too thick, add a splash of chicken broth. If it's too thin, let it simmer a bit longer. - Adding more spice options: Want more heat? Try adding more cayenne pepper or diced jalapeños. You can also mix in a dash of hot sauce for an extra kick. - Incorporating additional veggies: You can add diced zucchini or spinach to boost nutrition. Bell peppers are great, but corn and carrots work well too. - Best practices for prepping in advance: You can prep all your veggies the day before. Store them in airtight containers. Cook the chicken and chili a day ahead, then heat it up when you’re ready to eat. This makes the flavors even better! Pro Tips Perfectly Cooked Chicken: To ensure your chicken stays tender and juicy, avoid overcooking it during the sautéing process. Remove it from the heat as soon as it’s no longer pink in the center. Flavor Depth: For an extra layer of flavor, consider adding a splash of white wine or a tablespoon of lime juice when incorporating the beans and broth. Creamy Consistency: If you prefer a thicker chili, let it simmer uncovered for a few more minutes to reduce the liquid. You can also mash some of the beans for added creaminess. Garnish Wisely: Fresh toppings like avocado, cheese, or sour cream can enhance the dish. Experiment with different garnishes to find your perfect pairing! {{image_4}} - Dairy-free options: You can easily make this chili dairy-free. Use coconut milk instead of heavy cream. This keeps the chili rich and creamy without dairy. - Gluten-free considerations: The main ingredients in this chili are naturally gluten-free. Just ensure your chicken broth and spices are also gluten-free. - Alternative proteins: If you prefer a different protein, try turkey or tofu. Both options work well in this dish. Cook them as you would the chicken for the same great flavor. - Body-friendly beans: You can swap white beans for black beans or kidney beans. These beans add different textures and flavors, making the chili even more interesting. - Adding different spices: Experiment with spices like oregano, coriander, or even curry powder. Each spice brings a new twist that can enhance the chili's taste. - Incorporating different vegetables: Feel free to add veggies like zucchini or carrots. These not only add nutrition but also make the chili more colorful and fun to eat. To keep your creamy white chicken chili fresh, store it in an airtight container. Place it in the fridge within two hours after cooking. It will stay good for about three to four days. Make sure to let it cool down first to avoid condensation. If you want to save it for later, freezing is a great option. Use freezer-safe containers or bags. Label them with the date so you know when to use them. Frozen chili can last up to three months. When you’re ready to eat it, thaw it overnight in the fridge. When it's time to enjoy your chili again, the best way to reheat it is on the stove. Pour the chili into a pot and heat over medium-low heat. Stir it often to avoid sticking. This method helps keep the flavors intact. You can also use the microwave. Place the chili in a microwave-safe bowl. Cover it loosely to avoid splatters. Heat it in short bursts, stirring in between, until it's hot throughout. If the chili seems too thick, add a splash of broth or water to bring it back to the right consistency. If you want a vegetarian option, try using tofu or mushrooms. Both work well. You can also use canned jackfruit for a unique texture. These alternatives add protein and flavor to your chili without meat. Yes, you can! Add more cayenne pepper or chili powder to increase heat. You can also include diced jalapeños or hot sauce for extra spice. Start with a little, then taste as you go. Adjust until it's just right for you. You can keep cream-based chili in the fridge for about 3-4 days. Store it in an airtight container. If you want to keep it longer, freeze it for up to 3 months. Just be sure to cool it completely before freezing. Serve your chili with warm bread or cornbread, which is perfect for dipping. A fresh salad or tortilla chips also pairs well. For a zesty touch, add lime wedges to squeeze over your chili. This adds great flavor and brightness. This blog post covered all you need to know for a great creamy white chicken chili. We discussed the key ingredients, including chicken, beans, and spices. I shared step-by-step instructions to help you create this dish. You can also explore tips for enhancing flavors and making it ahead of time. In the end, let your creativity shine. Adjust flavors and ingredients to fit your taste. Enjoy each bowl and share with loved ones. Happy cooking!

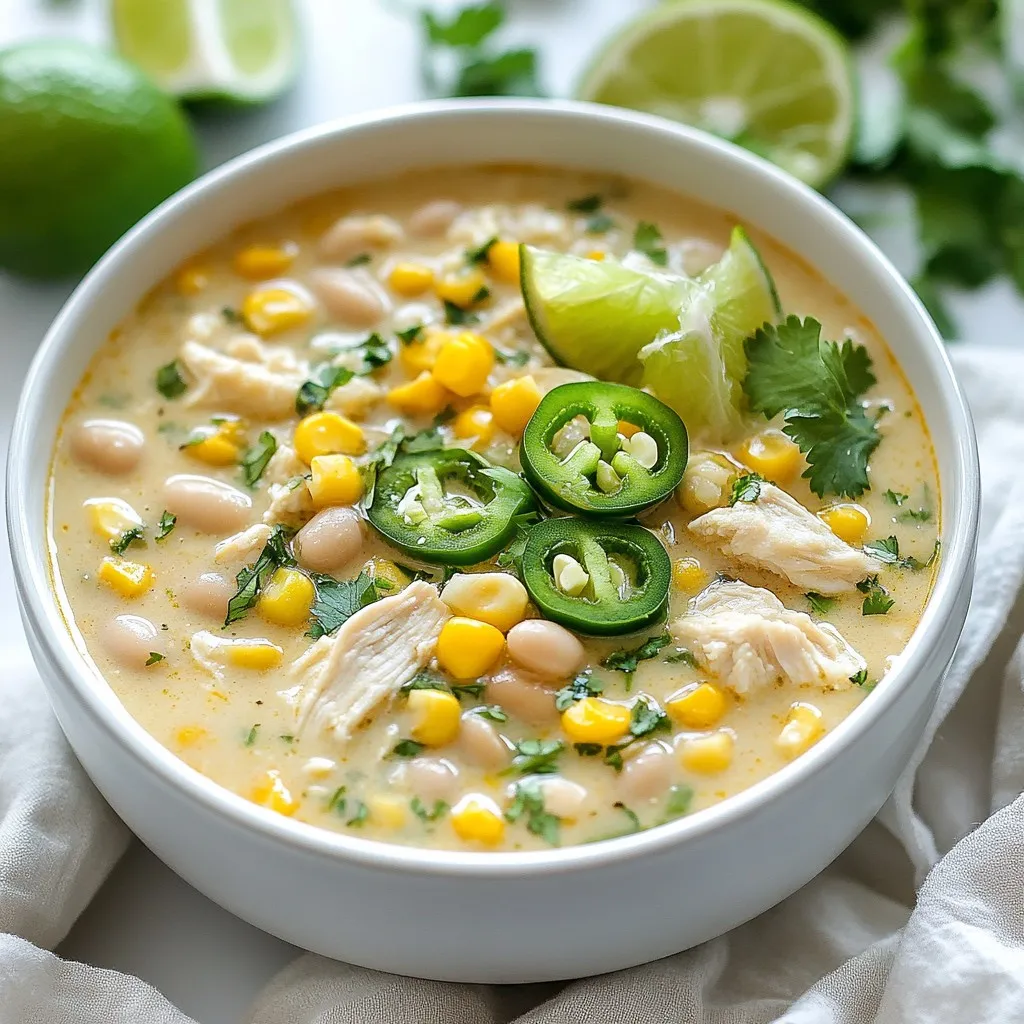
Creamy White Chicken Chili is a hearty meal that warms the soul. This simple recipe combines chicken, beans, and spices for a tasty dish. With creamy elements like heavy cream …

Read more

Categories Dinner

Honey Garlic Shrimp Skillet Easy and Tasty Recipe

January 7, 2026March 18, 2025 by Chef Tavio
To make honey garlic shrimp, gather these items: - 1 pound large shrimp, peeled and deveined - 2 tablespoons extra virgin olive oil - 4 cloves garlic, finely minced - 1/4 cup pure honey - 2 tablespoons low-sodium soy sauce - 1 tablespoon apple cider vinegar - 1/2 teaspoon crushed red pepper flakes (optional) - Salt and freshly ground black pepper, to taste - 1/4 cup green onions, chopped, for garnish - 1 teaspoon toasted sesame seeds, for garnish You can change some ingredients if needed. - Use shrimp with the shell on for more flavor. - Replace honey with maple syrup for a vegan option. - Swap olive oil with coconut oil for a hint of sweetness. - Use regular soy sauce if low-sodium is not available. - White vinegar or lemon juice can replace apple cider vinegar. Fresh ingredients really make a difference. Fresh shrimp have a better taste and texture. Fresh garlic gives a strong, nice flavor. When using fresh green onions, they add a bright touch to the dish. Always choose quality items to enhance your meal. The better the ingredients, the more you will enjoy your honey garlic shrimp. {{ingredient_image_2}} To start, grab a large non-stick skillet. Pour in 2 tablespoons of extra virgin olive oil. Turn the heat to medium-high. Wait until the oil shimmers but does not smoke. This step is key because it helps cook the shrimp evenly. Next, add 4 cloves of finely minced garlic. I love this part! Stir the garlic for about 30 seconds. You want it to become fragrant and lightly golden. Be careful! If the garlic burns, it will taste bitter. Now, it's time for the shrimp. Add 1 pound of peeled and deveined shrimp to the skillet. Spread them out in a single layer. Season with salt and freshly ground black pepper. Cook for about 2-3 minutes on each side. You’ll know they are ready when they turn pink and opaque. Once done, transfer the shrimp to a plate and set them aside. To cook shrimp just right, start with fresh or thawed shrimp. I prefer large shrimp, as they cook evenly. Make sure to peel and devein them first. When you heat your skillet, let the oil shimmer but not smoke. This means it’s hot enough. Place the shrimp in a single layer. Cook them for 2-3 minutes on each side. Look for a nice pink color and opaque look. If you overcrowd the skillet, the shrimp may steam instead of cook. The honey garlic sauce is key to this dish. Use pure honey for the best sweetness. Low-sodium soy sauce adds a nice saltiness. For a tangy kick, include apple cider vinegar. If you like spice, add crushed red pepper flakes. You can adjust the amount based on your taste. Mix the sauce well and let it simmer. This helps all the flavors come together. Taste it before serving, and adjust if needed. For a beautiful plate, serve the shrimp over jasmine rice or steamed broccoli. This adds color and texture. Use a generous amount of chopped green onions on top. A sprinkle of toasted sesame seeds adds crunch. For a fresh touch, add a lime wedge on the side. The lime juice can brighten the flavors. Serve right away for the best experience! Pro Tips Prep Your Ingredients: Before starting to cook, have all your ingredients prepped and ready to go. This ensures a smooth cooking process and helps prevent overcooking the shrimp. Use Fresh Shrimp: For the best flavor and texture, opt for fresh shrimp when possible. If using frozen shrimp, make sure to thaw them properly in advance. Adjust the Sweetness: Depending on your taste preference, you can adjust the amount of honey in the sauce. If you prefer a less sweet flavor, reduce the honey by a tablespoon or two. Experiment with Add-Ins: Feel free to add vegetables such as bell peppers, snap peas, or carrots to the skillet for an extra nutritional boost and color. {{image_4}} You can add vegetables to your honey garlic shrimp skillet. Bell peppers, snap peas, and broccoli work well. Chop them into small pieces for even cooking. Add them to the skillet with the garlic. Sauté until they are tender but still crisp. This adds color and nutrients to your dish. If you want to switch things up, try different sauces. You can use teriyaki sauce for a sweet twist. Or, try a spicy chili sauce for extra heat. You can even mix honey with mustard for a tangy flavor. Each option gives a new taste to the dish. You can easily change the spice level of this dish. If you like it mild, skip the red pepper flakes. For more heat, add more red pepper or use fresh chili. You can also add some sriracha sauce for a spicy kick. Taste as you go to find what you love best. After cooking honey garlic shrimp, let it cool. Place the shrimp in an airtight container. Store it in the fridge for up to three days. This helps keep the shrimp fresh and tasty. If you have extra sauce, store it in a separate container. This way, the shrimp won't get soggy. When you want to eat leftovers, reheat the shrimp gently. Use a skillet over medium heat. Add a bit of olive oil to prevent sticking. Heat for about 5 minutes until warm. Stir often to keep the shrimp from overcooking. You can also use a microwave. Cover the bowl with a damp paper towel. Heat for short bursts, about 30 seconds at a time. This helps keep the shrimp moist. If you want to save honey garlic shrimp for later, freezing is a great option. Let the shrimp cool completely. Place it in a freezer-safe bag. Remove as much air as possible before sealing. Label the bag with the date. You can freeze it for up to three months. When ready to eat, thaw overnight in the fridge. Reheat it gently, as mentioned above, for the best taste. Yes, you can use frozen shrimp. Just make sure to thaw them first. Place the shrimp in a bowl of cold water for about 15-20 minutes. This method keeps them firm and tasty. After thawing, pat them dry with a paper towel. This helps the shrimp sear better in the skillet. Honey garlic shrimp is great with many sides. You can serve it over steamed jasmine rice or fluffy quinoa. These grains soak up the sauce well. You can also pair it with steamed broccoli or sautéed spinach. They add color and nutrients to your meal. For extra crunch, try adding some crispy green beans. To make this dish gluten-free, use tamari instead of soy sauce. Tamari is a gluten-free soy sauce that offers great flavor. Always check the label to ensure it’s gluten-free. This small swap keeps the taste while making it safe for those with gluten sensitivities. Enjoy your meal without worries! In this blog post, I covered the key ingredients and their fresh qualities. I shared step-by-step instructions for preparing shrimp with garlic, along with tips for cooking and serving. You learned about delicious variations and essential storage methods. Remember, using fresh ingredients makes a big difference. Experiment with flavors, and adjust spice levels to suit your taste. Enjoy your cooking journey and impress others with your tasty honey garlic shrimp!

If you’re looking for a quick and tasty meal, the Honey Garlic Shrimp Skillet is a must-try! This recipe is easy to follow and packed with flavor. You’ll impress your …

Read more

Categories Dinner

Air Fryer Buffalo Cauliflower Crispy and Flavorful Snack

November 14, 2025March 18, 2025 by Chef Tavio
- 1 large head of cauliflower, cut into bite-sized florets - 1 cup all-purpose flour - 1/2 cup water - 1 teaspoon garlic powder - 1 teaspoon onion powder - 1 teaspoon smoked paprika - 1/2 teaspoon salt - 1/4 teaspoon black pepper - 1/2 cup buffalo sauce (store-bought or homemade) - 1 tablespoon olive oil To make this dish, you need fresh cauliflower. Choose a large head with tight, white florets. This helps get a great texture when cooking. - 1 teaspoon garlic powder - 1 teaspoon onion powder - 1 teaspoon smoked paprika - 1/2 teaspoon salt - 1/4 teaspoon black pepper These seasonings add nice flavors to the batter. I love smoked paprika for its mild, smoky taste. It gives the cauliflower a warm flavor that pairs well with buffalo sauce. - Fresh parsley, chopped (for garnish) - Optional: celery sticks and ranch dressing for serving Chopped parsley adds color and freshness. Celery sticks and ranch dressing balance the heat of the buffalo sauce. It’s a classic combination that many enjoy. {{ingredient_image_2}} To start, rinse the cauliflower under cool water. This helps remove any dirt. Next, cut the cauliflower into bite-sized florets. Aim for uniform pieces to ensure they cook evenly. After chopping, pat the florets dry with a paper towel. Removing excess moisture is key for a crispy texture. In a medium bowl, mix the flour, water, garlic powder, onion powder, smoked paprika, salt, and black pepper. Whisk until you have a smooth batter without lumps. This thick batter will stick well to the cauliflower. It gives each piece a tasty coating. Preheat your air fryer to 390°F (200°C) for about 5 minutes. This step is crucial for crispiness. Lightly grease the air fryer basket with olive oil. Place the battered cauliflower florets in a single layer, avoiding overcrowding. Cook them for 12–15 minutes, shaking the basket halfway through. This ensures even cooking and crisping. When they turn golden brown, transfer the florets to a bowl and drizzle with buffalo sauce. Toss gently to coat each piece. Return them to the air fryer for another 3–5 minutes. This final step sets the sauce and enhances the flavor. Afterward, serve them hot, topped with fresh parsley. To get that perfect crispy bite, follow these steps: - Dry the cauliflower: After rinsing, make sure to pat the florets dry. This helps them crisp up well. - Use a thick batter: Mix the flour, water, and spices until smooth. A thick batter sticks better. - Don’t overcrowd the basket: Place the florets in a single layer. This allows hot air to circulate and crisp them evenly. - Preheat the air fryer: Always preheat it to 390°F (200°C) for about 5 minutes. This is key! - Shake halfway through: Shake the basket during cooking to help them cook evenly. You can make your buffalo cauliflower as spicy as you want. Here’s how: - Mild: Use a bit less buffalo sauce. Try starting with 1/4 cup. - Medium: Stick to the full 1/2 cup. This is the standard. - Hot: Add extra buffalo sauce or use a hotter sauce. - Customize: Mix in some cayenne pepper or chili powder to the batter for more heat. Cooking time is important for great results: - Cook for 12–15 minutes: This makes them golden and crunchy. - Final toss: After adding buffalo sauce, air fry for 3–5 more minutes. This helps the sauce stick. - Check for doneness: If they look golden and crisp, they are ready! Adjust time as needed for your air fryer model. These tips help you create a snack that is not just tasty but crispy and full of flavor! Pro Tips Choose the Right Cauliflower: Look for a large head of cauliflower that is firm and free of blemishes. Fresh cauliflower will yield the best flavor and texture for your dish. Make It Gluten-Free: Substitute all-purpose flour with a gluten-free flour blend or almond flour to accommodate gluten-sensitive guests while maintaining a delicious crunch. Experiment with Spices: Feel free to customize the batter by adding your favorite spices, such as cayenne pepper for extra heat or cumin for a unique flavor twist. Air Fryer Capacity: Avoid overcrowding the air fryer basket. Cooking in batches ensures even cooking and allows each floret to become crispy without steaming. {{image_4}} You can easily make this dish gluten-free. Instead of all-purpose flour, use gluten-free flour. Rice flour or chickpea flour works well. Both create a nice batter that sticks to the cauliflower. Just follow the same steps in the recipe. You’ll get the same crispy texture without the gluten. Buffalo sauce is great, but feel free to mix it up! You can use BBQ sauce for a sweet twist. If you like it hot, try a spicy Asian sauce like sriracha. You can also blend sauces for a unique flavor. Mixing buffalo sauce with honey gives a sweet and spicy kick that many love. Don’t stop at just cauliflower! You can add other veggies to your air fryer. Try using broccoli or Brussels sprouts for variety. Cut them to similar sizes for even cooking. Toss them in the batter just like the cauliflower. This way, you’ll have a colorful and tasty mix! After you enjoy your Air Fryer Buffalo Cauliflower, store leftovers in an airtight container. Make sure they cool down first. Proper storage keeps them fresh for 3 to 4 days in the fridge. If you want to keep them longer, consider freezing. Reheat the cauliflower in your air fryer for the best results. Set it to 350°F (175°C) and cook for about 5 minutes. This helps restore the crispiness. You can also use an oven. Simply place them on a baking sheet and heat at 350°F (175°C) for about 10 minutes. Microwaving is quick, but it may make them soggy. To freeze buffalo cauliflower, place cooled florets in a single layer on a baking sheet. Freeze them for 1 to 2 hours until solid. Then, transfer them to a freezer-safe bag or container. They can last up to 3 months in the freezer. When you're ready to enjoy them, you can cook them straight from frozen. Just add a few extra minutes to the air frying time. You can use either fresh or frozen cauliflower. Fresh cauliflower gives a crispier bite. If using frozen, thaw it first and pat it dry. This helps keep your snack crunchy. To add heat, use more buffalo sauce. You can also mix in cayenne pepper or hot sauce. Adjust based on your taste. Feel free to add spices like chili powder for extra flavor. Buffalo cauliflower pairs well with celery sticks and ranch dressing. The cool ranch balances the heat. You can also serve it with blue cheese or a yogurt dip. These sides enhance your snack experience. In this blog post, we explored how to make Air Fryer Buffalo Cauliflower. We covered essential ingredients, seasonings, and garnishing options for perfect flavor. You learned step-by-step instructions, including how to prepare and cook the cauliflower for that ideal crunch. I shared tips for crispiness and adjusting spice levels. Plus, we discussed fun variations and how to store leftovers. Air Fryer Buffalo Cauliflower is a tasty and healthy choice. Enjoy experimenting with this simple recipe!

Looking for a tasty snack that’s easy to make? Air Fryer Buffalo Cauliflower is your answer! This dish packs a punch with crispy texture and bold flavor, perfect for game …

Read more

Categories Appetizers

Minute Strawberry Crunch Cookies Easy and Fun Recipe

December 18, 2025March 15, 2025 by Chef Tavio
- 1 cup all-purpose flour - 1/2 cup unsalted butter, softened at room temperature - 1/2 cup tightly packed brown sugar - 1/4 cup granulated sugar - 1/2 teaspoon baking powder - 1/4 teaspoon salt - 1 cup freeze-dried strawberries, crushed into small pieces - 1/2 cup rolled oats - 1/2 cup mini chocolate chips (optional) To make the Minute Strawberry Crunch Cookies, gather these simple ingredients. Each one plays a key role. The all-purpose flour gives the cookies structure. The unsalted butter adds creaminess. Brown sugar and granulated sugar add sweetness and texture. Baking powder helps the cookies rise, while salt enhances the flavors. Freeze-dried strawberries bring a burst of fruity goodness. Rolled oats add a chewy texture. If you like, add mini chocolate chips for extra fun. These ingredients are easy to find. You may already have some in your pantry. Just imagine the sweet smell of cookies baking with these tasty items! {{ingredient_image_2}} First, set your oven to 350°F (175°C). While it heats, grab a baking sheet and line it with parchment paper. This step helps the cookies not stick. In a big bowl, mix 1/2 cup softened unsalted butter with 1/2 cup brown sugar and 1/4 cup granulated sugar. Use a hand mixer or a wooden spoon. Mix until it feels smooth and fluffy, which takes about 2-3 minutes. Add 1/2 teaspoon of pure vanilla extract to the butter mixture. Stir until mixed well. In another bowl, whisk together 1 cup all-purpose flour, 1/2 teaspoon baking powder, and 1/4 teaspoon salt. Slowly add these dry ingredients to the wet mixture. Stir gently until just combined. Be careful not to mix too much. Next, fold in 1 cup of crushed freeze-dried strawberries and 1/2 cup of rolled oats. If you like, add 1/2 cup of mini chocolate chips too. Mix lightly until everything is spread out in the dough. Use a tablespoon to scoop out dough portions and place them on the baking sheet. Leave about two inches between each cookie. Now, put the baking sheet in the oven. Bake for 10 to 12 minutes. Look for lightly golden edges while the centers stay soft and puffy. When done, take them out and let cool on the baking sheet for about 5 minutes. Then, move them to a wire rack to cool fully. To make the best Minute Strawberry Crunch Cookies, follow these tips: - Use Room Temperature Butter: This helps the butter mix well with sugar. - Don’t Overmix the Dough: Mix until just combined for soft cookies. - Space Cookies: Leave two inches between each dough ball for even baking. - Check for Doneness: Look for lightly golden edges and soft centers. Measuring ingredients correctly is key. Here’s how: - Use Dry Measuring Cups: Fill the cup with flour and level it with a knife. - Pack Brown Sugar: Press it into the cup firmly to ensure the right amount. - Use a Liquid Measuring Cup for Wet Ingredients: Look at eye level for accuracy. Make your cookie presentation fun and tasty: - Decorative Plate: Arrange cookies on a pretty plate to catch the eye. - Dust with Powdered Sugar: Add a sweet touch by lightly dusting the cookies. - Serve with Fresh Strawberries: A bowl of fresh berries adds color and flavor. Pro Tips Chill the Dough: For even chewier cookies, chill the dough in the refrigerator for 30 minutes before baking. This helps the flavors meld and prevents spreading too much during baking. Use Fresh Ingredients: Ensure your baking powder is fresh for the best rise. Old baking powder can lead to flat cookies. Experiment with Flavors: Feel free to add a pinch of cinnamon or swap out the chocolate chips for white chocolate or nuts for a unique flavor twist! Storage Tips: Store cookies in an airtight container at room temperature for up to a week. You can also freeze them for longer storage—just make sure to separate layers with parchment paper. {{image_4}} You can change the flavor of your Minute Strawberry Crunch Cookies. Swap out strawberries for other freeze-dried fruits. Try blueberries, raspberries, or peaches. Each fruit brings a new taste. You can also add nuts for a crunch. Chopped pecans or walnuts work well. For a chocolate twist, use dark chocolate chips instead of mini chocolate chips. Each choice adds fun to your cookies! If you lack an ingredient, don’t worry! You can replace unsalted butter with coconut oil. This gives a light coconut taste. If you need a gluten-free option, use almond flour or gluten-free flour mix. Just remember to adjust the amount. If you don't have brown sugar, white sugar or coconut sugar can work too. These swaps help you make the cookies even if you're missing something. To make these cookies vegan, use plant-based butter. Replace the chocolate chips with dairy-free ones. For a gluten-free version, use gluten-free flour and oats. This way, everyone can enjoy these tasty treats! Make sure to check ingredient labels. This ensures they meet your dietary needs. With a few changes, you can make Minute Strawberry Crunch Cookies fit any diet. To keep your Minute Strawberry Crunch Cookies fresh, store them in an airtight container. Place parchment paper between layers to prevent sticking. This will help keep them soft and chewy. Store the cookies at room temperature. These cookies stay fresh for about five days at room temperature. If you keep them in the fridge, they last up to a week. But, they might lose some of their softness when chilled. To freeze these cookies, first let them cool completely. Then, wrap each cookie in plastic wrap or place them in a freezer bag. Label the bag with the date. You can freeze them for up to three months. To enjoy, just thaw at room temperature before serving. This way, you can enjoy a sweet treat anytime! To make cookies less crumbly, use more fat. You can add an extra tablespoon of butter. This helps bind the ingredients. Make sure to cream the butter well with the sugars. You can also chill the dough for 30 minutes before baking. This helps cookies stay together better. You can use fresh strawberries, but the texture will change. Fresh strawberries have more moisture. This can make your cookies soggy. If you use fresh strawberries, chop them small and reduce other liquids in the recipe. Freeze-dried strawberries give a crunchy bite and bright flavor. If your cookies spread too much, check the dough's temperature. If it's warm, chill it for 30 minutes. You can also add a bit more flour. Too much sugar can cause spreading too. Make sure you measure ingredients correctly to avoid this issue. You can tell cookies are done when the edges are golden. The centers should look soft and puffy. If you insert a toothpick, it should come out clean or with just a few crumbs. Let them cool on the sheet for a bit. This helps them firm up. In this article, I shared how to bake delicious Strawberry Crunch Cookies. We covered all the key ingredients, from flour to freeze-dried strawberries. Step-by-step instructions guided you from prepping the oven to cooling the cookies. I also offered tips for baking perfect cookies and shared fun variations. Remember, practice makes perfect. Feel free to try new flavors or storage tips. These cookies are sure to impress! Enjoy every bite.

Looking for a quick and fun way to satisfy your sweet tooth? You’re in the right place! These Minute Strawberry Crunch Cookies are easy to whip up and bursting with …

Read more

Categories Desserts

Sticky Garlic Chicken Noodles Flavorful Dinner Delight

January 5, 2026March 13, 2025 by Chef Tavio
- 300g chicken breast, sliced thinly - 250g rice noodles - 4 tablespoons soy sauce, divided - 2 tablespoons honey - 3 cloves garlic, finely minced - 1 tablespoon fresh ginger, grated - 1 red bell pepper, sliced into thin strips - 1 cup broccoli florets - 2 tablespoons sesame oil, divided - 3 green onions, chopped for garnish - Sesame seeds, for garnishing - Salt and freshly ground black pepper, to taste Sticky garlic chicken noodles taste great and are easy to make. You need fresh chicken breast, which I slice thinly for quick cooking. The rice noodles add a nice texture. I use soy sauce for salty flavor and honey for sweetness. For extra flavor, garlic and ginger are key. I chop garlic finely and grate fresh ginger. These ingredients make a fragrant sauce. I also add colorful vegetables like red bell pepper and broccoli. They add crunch and nutrition. To finish, I garnish with green onions and sesame seeds. They bring brightness and a nice look to the dish. A sprinkle of salt and pepper enhances everything. Each ingredient plays a role in making these noodles a delicious dinner. {{ingredient_image_2}} Start by boiling a large pot of water. Once the water is bubbling, gently add 250g of rice noodles. Cook them according to the package instructions until they are just tender. This usually takes about 4-6 minutes. After cooking, drain the noodles. Rinse them under cold water to stop the cooking. This step keeps them from getting mushy. Set the noodles aside in a colander. Next, prepare the chicken for marinating. Take 300g of thinly sliced chicken breast. In a mixing bowl, drizzle 1 tablespoon of soy sauce over the chicken. Add a pinch of salt and some freshly ground black pepper. Mix well so the chicken is coated. Let it marinate for about 10 minutes while you prep other ingredients. This helps the chicken soak in the flavor. For the sauce, gather your ingredients. You will need 3 tablespoons of soy sauce, 2 tablespoons of honey, 3 cloves of minced garlic, and 1 tablespoon of grated ginger. In a small bowl, whisk these together. This mixture will create a rich and sticky sauce that adds great taste to the dish. Now it's time to cook the chicken. Heat 1 tablespoon of sesame oil in a large frying pan or wok over medium-high heat. Once the oil is hot, add the marinated chicken. Stir-fry the chicken for about 5-7 minutes. Cook until it turns golden brown and is fully cooked. When done, remove the chicken from the pan and set it aside on a plate. Using the same pan, add the remaining tablespoon of sesame oil. When the oil looks shiny, add the sliced red bell pepper and broccoli florets. Stir-fry these for about 3-4 minutes. You want the veggies to be bright and crisp but still tender. This adds color and crunch to your dish. Return the cooked chicken to the pan. Add the drained rice noodles along with the garlic-ginger sauce. Gently toss everything together over medium heat. Make sure all the ingredients are evenly coated in the sauce. Heat until everything is warm, which usually takes a couple of minutes. Once mixed well and heated, remove the pan from the heat. Serve the sticky garlic chicken noodles hot in individual bowls. Top each bowl with a sprinkle of chopped green onions and sesame seeds. This adds a nice texture and flavor contrast. For a fun presentation, you can arrange the green onions in a neat layer on top. To cook noodles just right, follow these steps: - Avoiding mushy noodles: Start with a large pot of boiling water. Add the rice noodles and stir. This keeps them from sticking. Cook until they are firm but tender, known as al dente. - Testing for doneness: Check the noodles a minute before the package time ends. They should be soft but still have a little bite. Drain them right away and rinse with cold water. This stops the cooking. For a flavorful dish, marinating and choosing the right soy sauce matter: - Tips for marinating: Use one tablespoon of soy sauce to coat the chicken evenly. Add salt and pepper for basic seasoning. Let it sit for about 10 minutes. This builds flavor in the chicken. - Best types of soy sauce to use: I recommend using a good quality soy sauce. You can try both light and dark soy sauce. Light soy sauce gives saltiness, while dark adds depth and color. Making your dish look good is key to enjoying it: - Visual appeal and garnishing: Use colorful veggies to make your dish pop. Sprinkle chopped green onions and sesame seeds on top. This adds a fresh look and extra crunch. - Creating layers with ingredients: When serving, start with the noodles. Add chicken and veggies on top. This layers the flavors and makes the dish look more inviting. Pro Tips Use Fresh Ingredients: Always opt for fresh garlic and ginger to enhance the flavor of your sticky garlic chicken noodles. Fresh ingredients pack a more vibrant taste compared to dried alternatives. Adjust Sweetness: Depending on your preference, you can adjust the amount of honey in the sauce. For a sweeter dish, add a bit more honey, or reduce it for a more savory profile. Don’t Overcook the Noodles: Ensure you cook the rice noodles until just al dente, as they will continue to cook slightly when combined with the hot ingredients. Rinse them under cold water to stop the cooking process. Garnish Generously: Don’t skip the garnishing step! Adding green onions and sesame seeds not only enhances the visual appeal but also adds a delightful crunch and flavor contrast to the dish. {{image_4}} You can switch the chicken for other proteins. Tofu or shrimp work great here. - Tofu: Use firm tofu, cut into cubes. Cook it for 8-10 minutes until golden. - Shrimp: Use large shrimp, cooking them for 3-5 minutes until pink. Choose your protein based on your taste or diet. Each option brings its own flavor. Adding more veggies makes the dish colorful and healthy. You can try carrots or snap peas. - Carrots: Slice them thin and add them with the bell peppers. Cook for 3-4 minutes. - Snap Peas: Toss them in during the last minute of cooking for a sweet crunch. Season these veggies with a pinch of salt or a splash of soy sauce for a flavor boost. Adjusting the sauce can change the entire dish. You can tweak the sweetness or spice level. - Sweetness: Want it sweeter? Add more honey. If you like it less sweet, cut back on the honey. - Spice: To spice things up, add chili flakes or sriracha to the sauce. Start with a little and taste. These small changes let you create a meal that fits your mood. Experiment and have fun! To store leftovers, first let the sticky garlic chicken noodles cool down. Place them in an airtight container. This helps keep flavors fresh. You can store them in the fridge for up to three days. After that, the noodles may lose their taste and texture. The best way to reheat noodles is in a pan. Heat a small amount of water or oil. This keeps the noodles moist. Stir them gently over low heat until warm. Avoid using a microwave if you can. Microwaving can make the noodles soggy and chewy. If you want to freeze the dish, let it cool completely. Then, place it in a freezer-safe container. Seal it tightly to prevent freezer burn. You can freeze for up to three months. To thaw, move the container to the fridge overnight. This helps keep the noodles from getting mushy when you reheat them. Yes, you can use gluten-free noodles. Look for rice noodles made from brown rice or other gluten-free grains. They work well and taste great. You can also try zucchini noodles or shirataki noodles for a low-carb option. Just follow the cooking instructions on the package. Rinse and drain them as you would with regular noodles. To cut calories, use less honey or substitute it with a low-calorie sweetener. You can also reduce the amount of sesame oil. Use lean chicken breast and add more vegetables like spinach or carrots. They add volume without many calories. Serve smaller portions, too. This way, you enjoy the dish while keeping it light. A simple side salad pairs nicely. A fresh cucumber salad with lime juice brightens the meal. Steamed edamame adds protein and fiber. You can also serve grilled asparagus or sautéed bok choy for extra greens. These sides balance the flavors and add variety to your dinner. This recipe for sticky garlic chicken noodles combines simple ingredients to create great flavor. You learned how to cook noodles, marinate chicken, and mix everything together. I shared tips on cooking and presentation for a beautiful dish. Feel free to use different proteins and veggies to suit your taste. With the right storage, you can enjoy this meal later too. Cooking should be fun and easy, so try it out and make it your own!

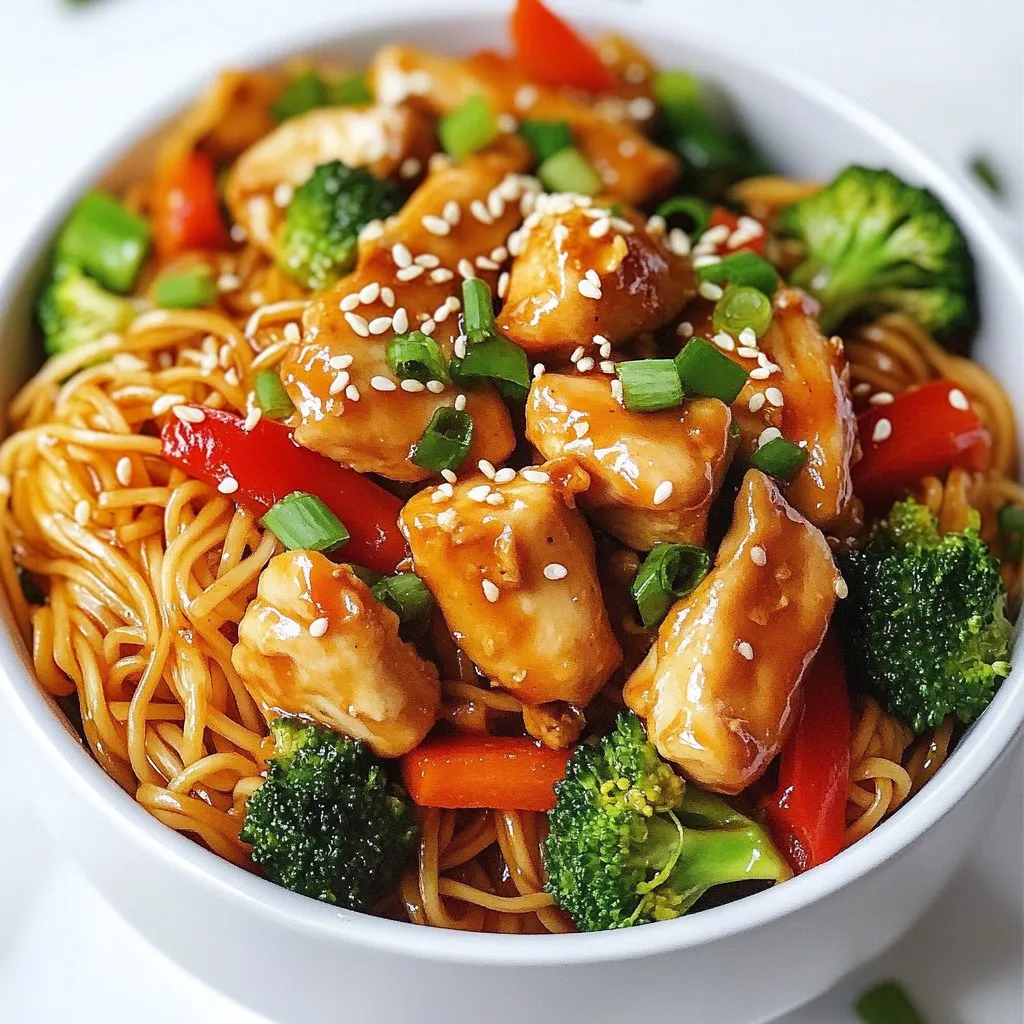
Craving a dinner that’s both quick and packed with flavor? Look no further! My Sticky Garlic Chicken Noodles bring bold tastes to your table in no time. With juicy chicken, …

Read more

Categories Dinner

Edible Protein Cookie Dough Tasty and Simple Recipe

December 26, 2025March 12, 2025 by Chef Tavio
- 1 cup almond flour - 1/2 cup vanilla protein powder - 1/4 cup pure maple syrup or light honey - 1/4 cup coconut oil, melted and slightly cooled - 1 teaspoon pure vanilla extract - 1/2 teaspoon sea salt - 1/4 cup dark chocolate chips or cacao nibs - 1/4 cup optional chopped nuts The edible protein cookie dough packs a punch with its protein. Each serving gives you a boost of protein thanks to the vanilla protein powder. Coconut oil adds healthy fats, making it a great choice for energy. Maple syrup or honey is a low glycemic index sweetener, keeping your blood sugar steady. This dough not only satisfies your sweet tooth but also supports your diet. When picking a protein powder, choose one with simple ingredients. Whey or plant-based protein works well. You can swap almond flour with oat flour if you need a nut-free option. For chocolate chips, look for high-quality brands that use real cocoa. This choice enhances the flavor and richness of your cookie dough. {{ingredient_image_2}} 1. First, prepare your workspace. Clear off your counter and gather all your tools. 2. In a medium mixing bowl, combine the almond flour and vanilla protein powder. 3. Use a whisk to mix these dry ingredients until there are no clumps left. 4. In a separate bowl, combine the maple syrup or honey, melted coconut oil, vanilla extract, and sea salt. 5. Whisk these wet ingredients together until the mixture is smooth and well-mixed. 1. Slowly add the wet mixture to the dry ingredients. 2. Stir with a spatula or wooden spoon until the dough comes together. 3. It should feel slightly sticky but still manageable. 4. Gently fold in the dark chocolate chips and any chopped nuts you want. 5. Ensure the chips and nuts are evenly mixed throughout the dough. 1. Transfer the cookie dough into an airtight container. 2. Press it down slightly to compact it. 3. Chill in the refrigerator for at least 30 minutes. This helps it firm up. 4. When ready to serve, scoop out portions with a spoon. 5. Enjoy it straight from the fridge or at room temperature for different textures. 6. For a fun touch, drizzle extra honey on top and add a sprinkle of sea salt. To make the best edible protein cookie dough, focus on the texture. You want it to be slightly sticky but easy to scoop. If it feels too dry, add a little more coconut oil. If it's too wet, mix in more almond flour. You can also adjust the sweetness by adding more maple syrup or honey. Taste as you go to find your favorite balance. For a gourmet look, serve the dough in small bowls. Drizzle some honey on top and sprinkle flaky sea salt for a nice touch. To add color and flavor, pair your dough with fresh fruit slices like strawberries or apple wedges. This not only looks great but also gives a refreshing contrast to the rich cookie dough. Store your edible protein cookie dough in an airtight container. It keeps best in the fridge. It will last for about one week. If you want to enjoy it later, you can freeze it in small portions. Just make sure to let it thaw in the fridge before serving. Pro Tips Storage Tip: Keep the cookie dough in an airtight container in the refrigerator for up to one week, or freeze for longer storage. Texture Tip: For a softer texture, let the dough sit at room temperature for a few minutes before scooping. Flavor Tip: Experiment with different protein powder flavors, such as chocolate or peanut butter, to customize your cookie dough. Mix-In Tip: Feel free to add dried fruits or seeds to the dough for added nutrition and flavor. {{image_4}} You can easily change the taste of your edible protein cookie dough. Here are some fun ideas: - Different extracts: Swap vanilla for almond or hazelnut extract. Each will give a unique flavor twist. - Sweeteners: Instead of maple syrup or honey, try agave nectar. This will change the sweetness level while keeping it tasty. If you want a nut-free dough, don’t worry. You can still enjoy this treat: - Alternatives to almond flour: Use oat flour or sunflower seed flour. Both options keep the texture smooth. - Substitutes for nuts: Instead of almonds or walnuts, add seeds like pumpkin or sunflower. They add crunch and flavor without nuts. You can make this recipe fit different diets with a few simple swaps: - Vegan adaptations: Replace honey with agave nectar. Use a plant-based protein powder to keep it vegan-friendly. - Gluten-free versions: Ensure your protein powder and flour are gluten-free. This way, everyone can enjoy your cookie dough! Many brands offer tasty edible protein cookie dough. Some popular names include: - Doughp: Known for its rich flavors and creamy texture. - Eat Pastry: Features plant-based options with a focus on natural ingredients. - Lenny & Larry's: Offers protein-packed dough with a chewy texture. These brands often receive good reviews for taste and quality. Check reviews online to find the best option for you. You can buy edible protein cookie dough online easily. Here are some top retailers to consider: - Amazon: Offers a wide variety and often has customer reviews. - Walmart: Usually has competitive prices and local pickup. - Thrive Market: Focuses on organic and health-oriented options. Compare prices and sizes to find the best deal for your needs. Some sites even offer discounts on first orders. Finding edible protein cookie dough in stores is simple. You can check both health food stores and regular grocery stores. - Health food stores: Often carry specialty brands that focus on natural ingredients. - Regular grocery stores: Usually stock popular brands like Lenny & Larry's. Look in the snack aisle or the health food section. You might find some great options nearby. Yes, edible protein cookie dough is safe to eat raw. I use ingredients that do not carry risk. For instance, I choose almond flour, which is heat-treated. I avoid raw eggs and regular flour. This way, you can enjoy it without worry. Homemade edible protein cookie dough has about 10 grams of protein per serving. This comes mainly from the vanilla protein powder. Each serving is around 1/4 cup. The almond flour adds a bit more protein, too. This makes it a great snack for muscle recovery. Yes, you can freeze edible protein cookie dough! To freeze, scoop portions into an airtight container. You can also shape it into balls. Place parchment paper between layers to keep them separate. When you want to eat it, thaw in the fridge for a few hours. Enjoy it cold or let it reach room temperature. In this blog post, we explored how to make delicious edible protein cookie dough. We covered key ingredients like almond flour and vanilla protein powder, highlighting their nutritional benefits. I shared tips for achieving the best dough texture and presentation ideas to impress. You can even adjust recipes for dietary needs. Remember, store your dough properly for freshness. Now, you have all the tools to create a tasty treat that supports your health goals. Enjoy your delicious creations and share them with friends!

Are you craving a delicious treat that’s also good for you? Look no further! This Edible Protein Cookie Dough recipe is simple to make and packed with protein. With tasty …

Read more

Categories Desserts

Whole30 Buffalo Chicken Stuffed Peppers Delight

November 30, 2025March 12, 2025 by Chef Tavio
- 1 pound ground chicken - 1 cup cauliflower rice - ½ cup celery, finely diced - ½ cup red onion, finely diced - ½ cup carrots, grated The main filling for these stuffed peppers centers around ground chicken. This protein cooks up tender and juicy, making it a great choice. Cauliflower rice adds bulk and a nice texture, while the veggies bring crunch and flavor. Use finely diced celery and red onion, and grated carrots for the best mix. - ¼ cup Whole30 compliant hot sauce - 2 tablespoons olive oil - 2 teaspoons garlic powder - 1 teaspoon onion powder - 1 teaspoon smoked paprika - Salt and freshly cracked pepper to taste For seasoning, I like to use a Whole30 compliant hot sauce. It gives the dish a spicy kick! Garlic powder, onion powder, and smoked paprika round out the flavor profile. Olive oil helps everything cook well, and salt and pepper ensure the mix tastes great. - 4 large bell peppers (choose your favorite colors) Use large bell peppers in this recipe. They hold the filling well and look vibrant. Slice the tops off and remove the seeds and membranes. This step makes it easy to fill them later. Arrange the peppers in a baking dish, cut side up, to ensure even cooking. {{ingredient_image_2}} 1. Preheat your oven to 375°F (190°C). This step helps the peppers cook evenly. 2. Take the bell peppers and slice off the tops. Remove seeds and membranes. Place the peppers cut side up in a baking dish. 1. Heat a large skillet over medium heat. Add the olive oil and let it warm. 2. Once the oil shimmers, add the diced red onion, celery, and grated carrots. Sauté for about 5 minutes. Stir often until the veggies soften and smell great. 3. Now, add the ground chicken to the skillet. Break it apart with a spatula while it cooks. Continue cooking for about 7-10 minutes until the chicken turns brown and is fully cooked. 4. Stir in the cauliflower rice. Add the hot sauce, garlic powder, onion powder, smoked paprika, salt, and pepper. Mix well and heat for 3-4 minutes. This allows all the flavors to blend perfectly. 1. With your filling ready, carefully spoon the buffalo chicken mix into each bell pepper. Pack it in lightly so it fits well. 2. Cover the dish tightly with aluminum foil. This keeps the moisture in. Bake in the preheated oven for 25 minutes. 3. After 25 minutes, take off the foil. Bake for another 10-15 minutes until the peppers are soft and the filling has a golden crust. 4. When done, remove the dish from the oven. Let the stuffed peppers cool for a few minutes. Garnish with chopped parsley or cilantro before serving for a fresh touch. - Ensuring even cooking: Preheat your oven to 375°F. This lets the peppers cook just right. Cut the tops off the peppers and remove seeds. Place them cut side up in a baking dish. This setup helps heat circulate evenly. - Techniques for packing the filling: Spoon the buffalo chicken mixture into each pepper. Use the back of the spoon to pack it lightly. This ensures each bite is full of flavor. - Additional spices to consider: Feel free to add cayenne if you love heat. A pinch of cumin can also add depth. Don’t hesitate to tweak the spices to fit your taste. - Suggested garnishes: Fresh parsley or cilantro brightens every plate. A sprinkle of green onions adds a nice crunch. These small touches can elevate your dish. - Presentation ideas: Serve the stuffed peppers on colorful plates. Drizzle with extra hot sauce for a pop of color and flavor. A side of fresh veggies can make a great contrast. - Pairing options with sides or sauces: These peppers pair well with a crisp salad. Consider a tangy ranch or a creamy avocado sauce on the side. This adds variety and makes your meal more enjoyable. Pro Tips Choose Colorful Peppers: Selecting a variety of bell pepper colors not only makes the dish visually appealing but also enhances flavor with subtle differences from each color. Pre-cook Cauliflower Rice: If using fresh cauliflower rice, lightly sauté it before adding to the filling to reduce moisture and prevent sogginess in the peppers. Customize the Spice Level: Adjust the amount of hot sauce in the filling according to your spice tolerance—less for a milder dish, or add more for an extra kick! Rest Before Serving: Allow the stuffed peppers to rest for a few minutes after baking. This helps the flavors settle and makes them easier to serve without falling apart. {{image_4}} You can switch the ground chicken for other proteins. Try ground turkey, beef, or even plant-based options. Each choice brings its unique taste. Think about your diet needs and preferences. For the filling, swap out vegetables as well. You can use chopped zucchini, mushrooms, or spinach for a fun twist. Hot sauce choices can change the spice level. Use a milder sauce for a gentler kick or a hotter one for more heat. If you’re not following Whole30, adding cheese can give a creamy flavor. Feta or cheddar works well. Fresh herbs add a nice touch. You can sprinkle parsley, cilantro, or green onions on top for extra color and flavor. To keep your Whole30 Buffalo Chicken Stuffed Peppers fresh, use airtight containers. This will help lock in flavors. You can safely store them in the fridge for up to four days. When you reheat them, use the microwave or an oven. If using the oven, cover them with foil to prevent drying out. Heat at 350°F (175°C) until warm, about 15-20 minutes. If you want to freeze your stuffed peppers, first let them cool completely. Wrap each pepper tightly in plastic wrap. Then, place them in a freezer-safe bag or container. They can last for up to three months in the freezer. When you are ready to eat, thaw them overnight in the fridge. Reheat in the oven at 350°F (175°C) for 25-30 minutes. You can also microwave them, but the oven keeps the peppers tender. The Whole30 diet is a 30-day program. It helps you reset your eating habits. You cut out sugar, grains, dairy, and legumes. Focus on whole foods like meat, fish, vegetables, and fruits. The goal is to find out how foods affect your body. After 30 days, you slowly add foods back to see how you feel. This can help you make better choices long term. Yes, you can make these stuffed peppers ahead of time. Prepare the filling and stuff the peppers. Store them in the fridge for up to three days. You can also freeze them. Just cover them tightly in a freezer-safe container. When ready to eat, thaw them overnight in the fridge. Then bake them as per the recipe. To add more heat to these stuffed peppers, use extra hot sauce. You can also mix in diced jalapeños or serrano peppers. Another option is to sprinkle in red pepper flakes. If you're brave, try adding a dash of cayenne pepper. Just remember to taste as you go, so it’s just right for you! This post covered how to create tasty stuffed peppers using ground chicken and cauliflower rice. We explored the essential ingredients, steps for prep, cooking, and tips to enhance flavor. You learned about variations to customize the dish and storage tips for leftovers. Overall, this recipe offers a healthy and satisfying meal option. Don’t hesitate to experiment with flavors and spices to suit your taste. Enjoy your cooking adventure with these delicious stuffed peppers!

Are you ready to spice up your Whole30 meals? My Whole30 Buffalo Chicken Stuffed Peppers Delight is a game-changer! These tasty peppers are filled with ground chicken, veggies, and the …

Read more

Categories Dinner

Ingredient No-Bake Fudge Brownies Easy and Delicious

December 16, 2025March 11, 2025 by Chef Tavio
To make these easy no-bake fudge brownies, you need a few key ingredients. Here’s what you will need: - 1 cup almond flour - 1/2 cup cacao powder - 1/3 cup pure maple syrup - 1/4 cup coconut oil, melted - 1/2 cup nut butter (such as almond or peanut butter) - 1 teaspoon vanilla extract - 1/4 teaspoon salt - 1/2 cup dark chocolate chips (dairy-free if preferred) These ingredients create a rich, chocolatey base. Almond flour adds a nice texture. Cacao powder gives the brownies their deep chocolate flavor. Maple syrup and nut butter provide natural sweetness and creaminess. You can make your brownies even better with fun toppings. Here are some great options: - Crushed nuts - Shredded coconut - A sprinkle of sea salt Feel free to mix and match these toppings. They add crunch and flavor to your brownies. For a twist, you can also try adding dried fruit or a drizzle of extra nut butter on top. If you need to change an ingredient, don't worry! Here are some easy swaps: - Use oat flour instead of almond flour for a different texture. - Swap honey or agave syrup for maple syrup if needed. - Try using coconut butter in place of coconut oil for a richer taste. - For nut-free options, sunflower seed butter works well. These substitutions keep the brownies tasty while meeting your dietary needs. {{ingredient_image_2}} Start by taking a medium mixing bowl. Add 1 cup of almond flour, 1/2 cup of cacao powder, and 1/4 teaspoon of salt. Use a whisk to mix these dry ingredients well. Make sure there are no clumps. A good mix helps the brownies taste even better. In another bowl, combine 1/4 cup of melted coconut oil, 1/2 cup of your favorite nut butter, 1/3 cup of pure maple syrup, and 1 teaspoon of vanilla extract. Stir these ingredients until you see a smooth and creamy mixture. This step is key for a rich flavor. Now, pour the wet mixture into the bowl with the dry ingredients. Use a spatula to mix it thoroughly. If the batter is too thick, add a tablespoon of water or nut milk. Once mixed, gently fold in 1/2 cup of dark chocolate chips. This will add a nice burst of chocolate in every bite. Line an 8x8-inch baking dish with parchment paper. Let the edges hang over the sides for easy removal. Press the brownie mixture evenly into the dish. You can use a spatula or your hands to pack it down firmly. If you want, top with crushed nuts, shredded coconut, or a sprinkle of sea salt. Cover it with plastic wrap and chill in the fridge for at least 2 hours. This helps the brownies set and firm up. Once ready, lift them out using the parchment paper, cut them into 16 squares, and enjoy your tasty brownies! To get a smooth and creamy texture, mix the wet ingredients well. Start with the melted coconut oil and nut butter. Stir until they blend completely. This helps avoid lumps. The maple syrup and vanilla extract should be fully incorporated too. If your mixture feels thick, you can add a splash of water or nut milk. This will make it easier to mix and keep it creamy. If your brownie mixture is too thick, you can easily adjust it. Add a tablespoon of water or nut milk at a time. Mix well after each addition. The goal is to have a thick but spreadable batter. If it’s too runny, add a bit more almond flour or cacao powder. This will help get the right balance without losing flavor. To cut your brownies perfectly, let them chill well in the fridge. After at least two hours, lift them out using the parchment paper. Place the brownies on a cutting board. Use a sharp knife for clean cuts. Wipe the knife with a damp cloth between cuts. This ensures nice, tidy squares without crumbling. Enjoy your perfect no-bake fudge brownies! Pro Tips Use Fresh Ingredients: Always opt for fresh almond flour and high-quality cacao powder for the best flavor and texture in your brownies. Customize Your Sweetness: Adjust the amount of maple syrup according to your taste preference; you can add more or less based on how sweet you like your brownies. Experiment with Nut Butters: Try different nut butters such as cashew or sunflower seed butter for a unique twist on flavor. Chill for Better Texture: Allowing the brownies to chill longer than 2 hours will enhance their firmness and make them easier to cut. {{image_4}} You can make these brownies vegan and dairy-free. Use almond or peanut butter as your nut butter. Ensure you use dairy-free dark chocolate chips. This way, you keep all the rich flavor without animal products. Maple syrup is already vegan, so you're good there. Feel free to change the flavor of your brownies! You can fold in different items like chopped nuts, dried fruit, or even a pinch of cinnamon. For a minty twist, add peppermint extract. If you love berries, try mixing in some freeze-dried strawberries or raspberries. These mix-ins add fun textures and flavors to your brownies. The almond flour in this recipe is a great gluten-free option. If you want to try something new, you can use oat flour or coconut flour. Just keep in mind that coconut flour absorbs more liquid. Adjust your liquids if you choose to use it. No need to worry about gluten when you enjoy these brownies! To keep your no-bake brownies fresh, store them in the fridge. Use an airtight container to prevent them from drying out. You can place parchment paper between layers if you stack them. This stops them from sticking together. If you want to enjoy them later, leave out any toppings like nuts or coconut. Add these when you serve. You can freeze these brownies for later. First, cut them into squares and wrap each piece in plastic wrap. Then, put the wrapped brownies in a freezer bag. Make sure to remove as much air as you can. They will stay fresh for up to three months in the freezer. To enjoy, just let them thaw in the fridge overnight before serving. These brownies are best eaten within a week. After that, they may lose their taste and texture. Keep an eye on them for any signs of spoilage, like changes in color or smell. If you notice anything off, it’s best to toss them. Always trust your senses! Yes, you can use different nut butters. Almond butter and peanut butter are great choices. Cashew butter adds a nice twist too. Each nut butter will change the flavor slightly. Remember to choose a smooth nut butter for the best texture. To make these brownies nut-free, use sunflower seed butter instead of nut butter. This swap keeps the texture rich and creamy. Check for nut-free chocolate chips as well. This way, you can enjoy the brownies without worry. If you need a substitute for maple syrup, try agave nectar or honey. They both add sweetness without changing the taste too much. You can also use brown rice syrup, but it may alter the flavor slightly. Adjust the amount to fit your taste. Yes, you can make these brownies without cocoa powder. Use carob powder as a substitute for a different flavor. You can also skip the cocoa and add more nut butter for a richer taste. Just keep in mind that the brownies will not be chocolate-flavored. In this post, I covered how to make no-bake fudge brownies. I shared key ingredients, step-by-step instructions, and useful tips to ensure your brownies turn out great. You also learned about variations, storage, and answers to common questions. Remember, these brownies are easy and tasty. Feel free to mix and match ingredients to suit your taste. Enjoy your baking adventure!

Craving chocolate but short on time? You’re in the right place! These no-bake fudge brownies are quick, easy, and oh-so-delicious. With just a handful of ingredients, you’ll create a treat …

Read more

Categories Desserts

Healthy Brownie Mug Cake Simple and Quick Recipe

December 22, 2025March 11, 2025 by Chef Tavio
- 1/4 cup almond flour - 2 tablespoons unsweetened cocoa powder - 1 tablespoon coconut sugar or your preferred sweetener - 1/4 teaspoon baking powder - A pinch of salt - 3 tablespoons unsweetened applesauce - 1 tablespoon almond milk or any milk of your choice - 1/2 teaspoon vanilla extract - Optional: 1 tablespoon dark chocolate chips or chopped nuts This recipe uses simple, healthy items. Almond flour gives a nice texture and nutty flavor. Unsweetened cocoa powder makes it rich without added sugar. Coconut sugar or another sweetener keeps it sweet but healthy. Baking powder helps the cake rise. A pinch of salt balances the sweetness. Unsweetened applesauce adds moisture and natural sweetness. Almond milk is a great dairy-free choice, but feel free to use any milk you like. Vanilla extract boosts the flavor. For extra joy, try adding dark chocolate chips or nuts. They make your mug cake even more special. These ingredients are easy to find and help create a delicious treat in less than 15 minutes! {{ingredient_image_2}} First, you need a microwave-safe mug. This mug will hold your cake while it cooks. A regular coffee mug works great. Next, let’s mix the dry ingredients. In your mug, combine: - 1/4 cup almond flour - 2 tablespoons unsweetened cocoa powder - 1 tablespoon coconut sugar - 1/4 teaspoon baking powder - A pinch of salt Use a small whisk or fork to mix it all together. Make sure there are no lumps. A good mix helps your cake rise well. Now it’s time to add the wet ingredients. To your dry mix, add: - 3 tablespoons unsweetened applesauce - 1 tablespoon almond milk - 1/2 teaspoon vanilla extract Stir these in until you have a smooth, creamy batter. This step is important for a great texture. If you like, you can fold in 1 tablespoon of dark chocolate chips or chopped nuts. This adds extra flavor and makes your cake even better. Place your mug in the microwave. Cook it on high for about 1 minute and 10 seconds. Keep an eye on it as it cooks. You want the cake to be set but still a bit gooey in the center. Every microwave is different, so check it at the 1-minute mark to see if it’s done. Once the time is up, carefully take the mug out. It will be hot! Let it cool for about a minute. You can eat it straight from the mug or move it to a plate for a nice look. Enjoy your healthy brownie mug cake! To get the best texture in your brownie mug cake, mixing is key. Mix the dry ingredients well before adding the wet ones. This helps combine everything evenly. After adding the applesauce, milk, and vanilla, stir until the batter is smooth. You want no lumps at all. Cooking time is also important. Start with 1 minute and 10 seconds in the microwave. Every microwave is different, so check it at the 1-minute mark. The cake should be set but a bit gooey in the middle. This is where the magic happens! Once your mug cake is done, let’s make it look great! You can sprinkle some chocolate chips or nuts on top for a nice touch. If you want to go all out, serve it with yogurt or ice cream. This makes for a lovely treat that looks as good as it tastes. Enjoy your creation! Pro Tips Use Fresh Ingredients: Ensure that your baking powder is fresh for the best rise and texture. An expired baking powder can lead to dense cakes. Adjust Sweetness: Feel free to adjust the amount of coconut sugar based on your taste preference. You can also substitute with other sweeteners like stevia or honey. Experiment with Flavors: Try adding a pinch of cinnamon or a teaspoon of espresso powder to enhance the chocolate flavor and add depth to your mug cake. Watch Cooking Time: Microwaves can vary in power; check your mug cake at the 1-minute mark and adjust cooking time as needed to achieve your preferred gooeyness. {{image_4}} To make this brownie mug cake vegan, you can easily swap out eggs and dairy. Instead of eggs, use unsweetened applesauce, which adds moisture. For milk, almond milk works great, but you can use any plant-based milk. This keeps the cake moist and delicious without any animal products. If you want a gluten-free mug cake, almond flour is already a great choice. However, you can also use coconut flour or oat flour. Coconut flour is denser, so use less—about 3 tablespoons instead of 1/4 cup. Oat flour is light and fluffy, providing a nice texture. Both options keep the cake gluten-free and tasty. You can add extra flavor to your brownie mug cake easily. For a minty twist, try adding a drop of peppermint extract. If you prefer a nutty flavor, almond extract works well too. You can also add spices like cinnamon or nutmeg for warmth. These enhancements give your mug cake a unique taste and make it even more enjoyable. To store your leftover brownie mug cake, let it cool first. Place it in an airtight container. This keeps it fresh for up to two days at room temperature. If you want it to last longer, you can store it in the fridge. Just remember to cover it well to avoid drying out. When you want to enjoy your brownie mug cake again, you can easily reheat it in the microwave. Place your mug cake in the microwave. Heat it for about 10 to 15 seconds. Check its warmth, and if it needs more time, heat in small bursts. This keeps it soft and gooey. Yes, you can freeze mug cakes! Just make sure it’s completely cool first. Wrap it tightly in plastic wrap or foil. Then, place it in a freezer bag. It can last for up to a month in the freezer. When you're ready to eat it, thaw it in the fridge overnight. Reheat it in the microwave for the best taste. To make your brownie mug cake healthier, swap some ingredients. Use applesauce instead of oil or butter. You can also choose coconut sugar or honey instead of regular sugar. This change lowers calories and adds moisture. If you want more fiber, add a bit of ground flaxseed. It blends well into the batter. Yes, you can use other flours! Each flour gives a unique taste. If you use coconut flour, remember to reduce the amount. Coconut flour absorbs more liquid. Oat flour works well too and gives a nice texture. Just ensure the flour is finely ground for the best results. If you don’t have almond flour, don’t worry! You can try oat flour, which is easy to make. Just blend rolled oats until fine. You can also use whole wheat flour for a slightly denser cake. If you want a nut-free option, use all-purpose flour. Just keep in mind that it may change the taste and texture a bit. This blog post explored how to make a delicious mug cake using simple ingredients. We covered the list of key items, from almond flour to optional mix-ins. You learned step-by-step instructions to prepare, cook, and serve your cake perfectly. I also shared tips for texture and presentation, plus variations for vegan or gluten-free options. Finally, we discussed storage and reheating methods to enjoy your cake longer. Try making your own mug cake. It can be a fun and tasty treat!

Are you craving something sweet but want to keep it healthy? This Healthy Brownie Mug Cake recipe is your answer! With simple ingredients and just a few steps, you can …

Read more

Categories Desserts

Air Fryer Apple Fries Irresistible Crunchy Treat

December 10, 2025March 10, 2025 by Chef Tavio
To make Air Fryer Apple Fries, gather these simple ingredients: - 3 medium apples (Fuji or Honeycrisp) - 1/2 cup all-purpose flour - 1 teaspoon ground cinnamon - 1/2 cup panko breadcrumbs - 2 tablespoons granulated sugar - 1/2 teaspoon salt - 1 large egg, beaten - Cooking spray or oil for greasing Each item plays a key role in creating that irresistible crunch. The apples provide sweetness, while the flour helps the coating stick. Ground cinnamon adds warmth and flavor. Panko breadcrumbs deliver that extra crunch we all love. Granulated sugar gives a hint of sweetness, and salt balances the flavors. The egg acts as a glue to hold everything together. Finally, cooking spray or oil ensures a crispy finish in the air fryer. Using Fuji or Honeycrisp apples is best for this recipe. They are sweet and firm, making them perfect for frying. You can also adjust the sugar and cinnamon depending on your taste. If you want a healthier option, consider reducing the sugar or using a sugar substitute. Now, you have everything you need to whip up these tasty apple fries. Let’s get cooking! {{ingredient_image_2}} First, you need to peel the apples. I recommend using Fuji or Honeycrisp apples for a sweet flavor. Next, core the apples to remove the seeds. Slice them into thin strips, about the size of French fries. This helps them cook evenly. Place the apple strips on a plate or cutting board as you work. In a shallow bowl, mix the all-purpose flour, ground cinnamon, granulated sugar, and salt. Make sure to stir well so all the dry ingredients blend. In another bowl, beat one large egg until it is frothy. Take a third bowl and add the panko breadcrumbs, which will give the fries that extra crunch. Now it’s time to coat your apple strips. Start by dipping each strip into the flour mixture, covering it fully. Next, dip it into the beaten egg, letting any extra egg drip off. Finally, roll the strip in the panko breadcrumbs. Press gently to help the crumbs stick. Repeat this for all the strips to ensure they are evenly coated. Before you start cooking, you need to preheat your air fryer. Set the temperature to 375°F (190°C) and let it heat for about 5 minutes. This step is important for getting a crispy texture on your apple fries. Arrange the coated apple fries in a single layer in the air fryer basket. Make sure they are not overlapping to ensure even cooking. Lightly spray the fries with cooking spray or drizzle a little oil over the top. Air fry them for about 10 to 12 minutes. Remember to shake the basket halfway through. This helps them cook evenly. When they are done, they should look golden brown and crisp. Once the apple fries are done, carefully remove them from the air fryer. Let them cool for a few minutes on a wire rack or plate. This helps keep them crispy. Before serving, dust the apple fries with some extra cinnamon and sugar. You can also serve them with a small bowl of caramel sauce or creamy yogurt for delicious dipping! Choose apples that are firm and sweet. Fuji and Honeycrisp are my favorites. They hold their shape well when cooked. You can also try Granny Smith for a tart flavor. The key is to avoid soft apples, as they won’t fry well. To get the best crunch, coat the apple strips evenly. Each piece should be covered in flour, egg, and panko. This layering helps create a crispy shell. Preheating the air fryer to 375°F (190°C) is also crucial. It ensures even cooking and browning. Air fryers can vary in power. If yours cooks hot, check the apple fries a minute early. For slower models, you may need to add a minute or two. Shake the basket halfway through cooking for even results. This keeps them from sticking and helps them crisp up nicely. Pro Tips Choose the Right Apples: Opt for crisp, sweet varieties like Fuji or Honeycrisp to ensure great flavor and texture in your apple fries. Uniform Slicing: Make sure to cut the apple strips to a uniform thickness for even cooking and consistent texture throughout. Experiment with Spices: Feel free to add nutmeg or ginger to the flour mixture for a unique twist on flavor that complements the apples beautifully. Keep Them Crisp: Allow the apple fries to cool slightly on a wire rack to prevent steam from making them soggy before serving. {{image_4}} You can give your apple fries a special twist by adding vanilla extract or nutmeg to the coating. Simply mix in one teaspoon of vanilla extract when you prepare the egg. This small change adds a warm, sweet aroma. If you prefer nutmeg, add 1/4 teaspoon to the flour mixture. Nutmeg gives your apple fries a cozy, spiced flavor that pairs well with apples. The right dipping sauce can elevate your apple fries. Consider classic options like rich caramel sauce, creamy yogurt, or smooth chocolate sauce. Caramel brings a sweet, buttery taste that complements the apples. Yogurt adds a tangy contrast, and chocolate gives a decadent touch. You can even mix and match for a fun dipping experience! If you want to make your apple fries healthier, there are simple swaps. For a gluten-free option, use almond flour instead of all-purpose flour. To cut down on sugar, you can use a sugar substitute. Choose one that measures like sugar for easy baking. These changes keep the taste delicious while making your treat a bit lighter. To keep your apple fries crispy, store them in an airtight container. Avoid stacking the fries to prevent them from getting soggy. Place a paper towel at the bottom of the container to absorb moisture. For the best taste, enjoy them within two days. To reheat, the air fryer is best. Set it to 375°F (190°C) and warm the apple fries for about 5 minutes. This method keeps them crunchy. If using a microwave, heat them in short bursts of 15 seconds. This method can make them soft, so be careful. You can freeze apple fries for later use. First, lay them in a single layer on a baking sheet. Freeze them until solid, then transfer to a freezer bag. When ready to eat, thaw them in the fridge overnight before reheating in the air fryer. This way, you retain the crunchiness. Yes, you can use different apples! Some great choices are Granny Smith or Gala apples. Granny Smith gives a tart bite, while Gala adds sweetness. Just pick apples that are firm. This helps them hold their shape when you fry them. Absolutely! These apple fries are a hit with kids. They are sweet and crunchy. Apples are full of vitamins and fiber, which is good for kids. Plus, they are fun to dip! You can serve them with yogurt or caramel for a treat. You can skip the breadcrumbs! Try using crushed nuts or oats instead. They add crunch and flavor. You can also coat the apple strips with a mix of flour and cinnamon. This will still give them a tasty outside without the breading. There are many fun pairings! Serve them with caramel sauce for a sweet dip. Yogurt is great too, especially vanilla or honey-flavored. You can also add a sprinkle of powdered sugar on top for extra sweetness. Enjoy these with a scoop of ice cream for a yummy dessert! Air fryer apple fries are easy and fun to make! We covered all the steps, from preparing apples to cooking and serving. I shared tips for crispiness and variations to fit any taste. Remember to choose the right apples to max out flavor. Enjoy your apple fries with tasty dips or try healthier swaps. You can also store leftovers and even freeze for later. These treats are a hit for kids and adults alike. Dive into this sweet snack today, and make it your own!

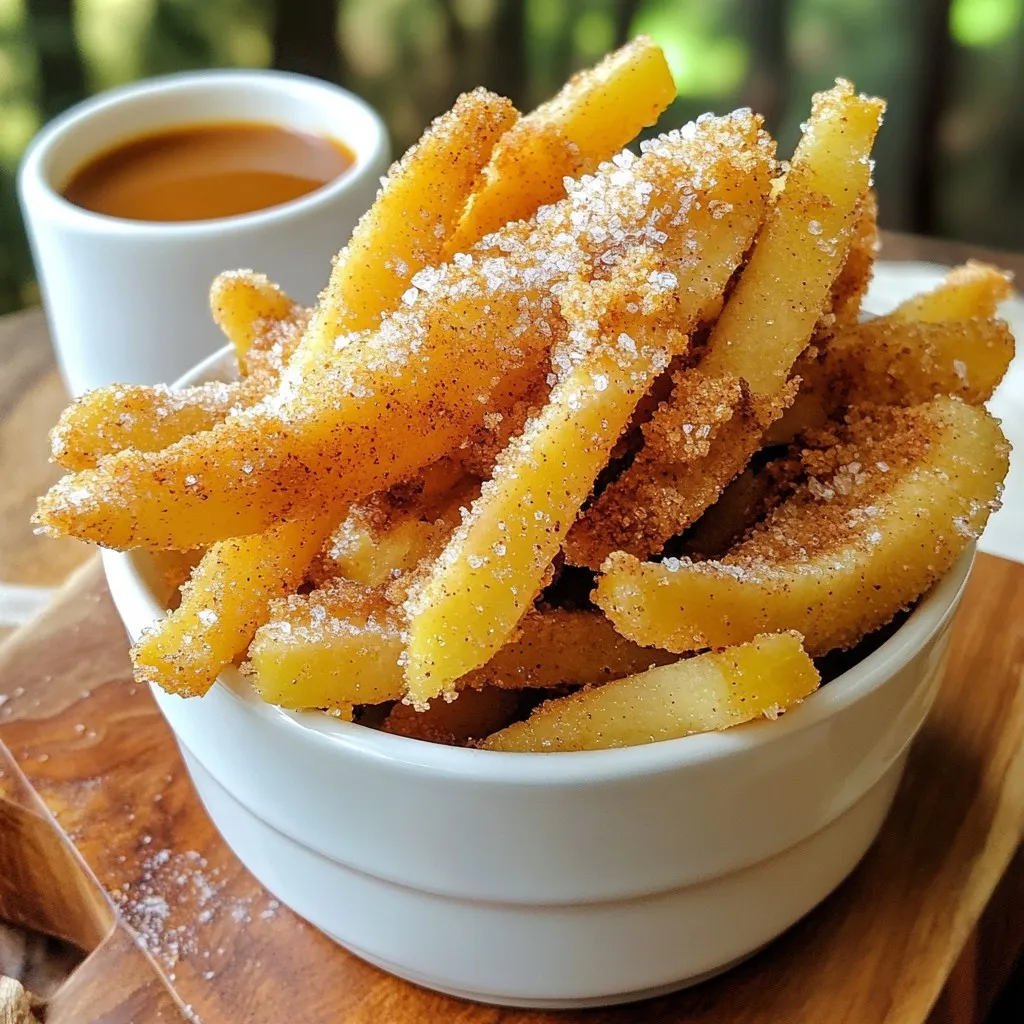
Looking for a fun and tasty treat? Let me introduce you to Air Fryer Apple Fries. These crunchy snacks are easy to make and perfect for all ages. With just …

Read more

Categories Desserts
Older posts
Newer posts
← Previous Page1 … Page172 Page173 Page174 … Page191 Next →

TASTED NEST

Where Flavor Finds a Home 🍳🏡 — warm, simple, and crave-worthy recipes made for real life, from stovetop mornings to backyard dinners.

PAGES

Home About Contact Privacy Policy Terms & Conditions Cookie Policy GDPR Policy Copyright Policy Disclaimer

CATEGORIES

Appetizers Desserts Salads Breakfast Dinner
Copyright © 2026 Tasted Nest. All rights reserved.