Skip to content
  • GDPR Privacy Policy
  • Copyright Policy
  • Disclaimer
  • Terms & Conditions
Tasted Nest
  • Home
  • Appetizers
  • Desserts
  • Salads
  • Breakfast
  • Dinner
  • Privacy Policy
  • Contact
  • About

Chef Tavio

Oatmeal Apple Breakfast Bake Nourishing Morning Dish

November 21, 2025February 17, 2025 by Chef Tavio
To make Oatmeal Apple Breakfast Bake, gather these key ingredients: - 2 cups rolled oats - 2 cups unsweetened applesauce - 1 large apple (like Granny Smith or Honeycrisp), peeled and chopped - 1/2 cup walnuts, chopped - 1/2 cup maple syrup or honey - 1/4 cup coconut oil, melted - 1 teaspoon vanilla extract - 1 teaspoon ground cinnamon - 1/2 teaspoon ground nutmeg - 1/2 teaspoon baking powder - Pinch of salt These ingredients work together to create a hearty and tasty dish. To enhance your breakfast bake, consider these optional toppings: - Greek yogurt - Sliced apples - Additional nuts These toppings add flavor and texture, making each bite even better. If you need to swap out any ingredients, here are some ideas: - Use almond milk instead of applesauce for a dairy-free option. - Substitute pecans for walnuts if you prefer. - Honey can replace maple syrup; both sweeten well. - Coconut oil can be swapped with butter if desired. These substitutes allow you to customize the recipe to fit your needs. {{ingredient_image_2}} Start by preheating your oven to 350°F (175°C). This helps the bake cook evenly. While the oven warms up, take a 9x9-inch baking dish. Lightly grease it with a bit of coconut oil. This step keeps the bake from sticking. In a large bowl, combine the following dry ingredients: - 2 cups rolled oats - 1 large apple, peeled and chopped - 1/2 cup walnuts, chopped - 1 teaspoon ground cinnamon - 1/2 teaspoon ground nutmeg - 1/2 teaspoon baking powder - Pinch of salt Mix these items well. It’s key to make sure they blend evenly. This mix gives your bake a yummy texture and flavor. In a different bowl, whisk together: - 2 cups unsweetened applesauce - 1/2 cup maple syrup or honey - 1/4 cup melted coconut oil - 1 teaspoon vanilla extract Blend these ingredients until smooth. This mix adds moisture and sweetness to the bake. Now, pour the wet mix into the dry ingredients. Stir gently, but make sure everything is combined well. The mixture will be thick, but that’s just right. Once mixed, transfer it to your greased baking dish. Spread it out evenly. Place the baking dish in your preheated oven. Bake for 30 to 35 minutes. Keep an eye on it. The top should turn golden brown. To check if it's done, insert a toothpick in the center. If it comes out clean, your bake is ready! To get the best texture, use rolled oats. They give a hearty feel. Mixing the oats with apples helps them soak up moisture. This keeps the bake soft but not mushy. Bake until the top is golden brown. This adds a nice crunch. For extra flavor, add spices like nutmeg and cinnamon. They warm up the dish. You can also mix in some nuts for crunch. Walnuts are great, but feel free to try almonds or pecans. If you like sweetness, add more maple syrup or honey. After baking, cool the dish for ten minutes. Cut it into squares. Store leftovers in an airtight container in the fridge. They stay fresh for up to five days. For longer storage, freeze the squares. Wrap them well to avoid freezer burn. Pro Tips Choose the Right Apples: For the best flavor and texture, opt for tart apples like Granny Smith or Honeycrisp. They hold their shape well during baking and provide a nice contrast to the sweetness of the syrup. Customize Your Nuts: Feel free to substitute walnuts with pecans or almonds for a different flavor profile. You can also toast the nuts beforehand to enhance their flavor. Make it Vegan: To keep this recipe vegan, use maple syrup instead of honey and ensure your coconut oil is refined if you prefer a neutral taste. Store for Later: You can prepare this dish ahead of time and store it in the fridge. Simply reheat slices in the microwave or oven before serving for a quick breakfast option. {{image_4}} You can make this dish fun by adding different fruits. Try using pears, berries, or bananas. Each fruit brings its own taste and texture. For example, pears offer a soft, sweet bite. Berries add a tart zing. Bananas bring a creamy richness. Just chop and mix them in with the apples. This way, you can enjoy a new flavor every time you bake! If you want to change up the nuts, go for it! You can swap walnuts for almonds, pecans, or even hazelnuts. Each nut adds its own crunch and taste. Almonds have a light, sweet flavor. Pecans offer a buttery richness. Hazelnuts bring a unique, earthy tone. Just remember to chop them well before mixing in. This will help them blend nicely with the oats. You can take this bake to the next level with spices and extracts. Besides cinnamon and nutmeg, add ginger or allspice for warmth. A dash of cardamom adds a fragrant touch. You can also mix in almond or coconut extract for depth. These small tweaks can turn an already tasty dish into something special. Don't be afraid to experiment! To keep your Oatmeal Apple Breakfast Bake fresh, let it cool completely. Cut it into squares. Place the squares in an airtight container. Store the container in the fridge. This way, it will stay good for about five days. If you want to enjoy it later, freezing is a great option. If you plan to freeze the breakfast bake, wrap each square in plastic wrap. Then, place the wrapped squares in a freezer-safe bag. Label the bag with the date. You can freeze them for up to three months. When you're ready to eat, just pull out a square and let it thaw in the fridge overnight. To reheat your breakfast bake, simply take a square from the fridge or freezer. If it’s frozen, it might need a little longer. For best results, heat in the microwave for about 30 to 60 seconds. If you prefer the oven, set it to 350°F (175°C) and bake for about 10 minutes. This will warm it up nicely and keep it soft. Enjoy it warm for a tasty start to your day! Yes, you can use quick oats. Quick oats will cook faster and give a softer texture. Just keep an eye on the baking time. It may change slightly from the rolled oats version. Absolutely! To make it vegan, simply use maple syrup instead of honey. Also, ensure the coconut oil is vegan-friendly. This swap will keep the bake tasty and plant-based. You can add many healthy ingredients. Here are some ideas: - Chia seeds for extra fiber - Dried fruits like raisins or cranberries - Fresh berries like blueberries or raspberries - Flaxseed for added omega-3s These add-ins boost flavor and nutrition. The oatmeal apple breakfast bake lasts about 5 days in the fridge. Store it in an airtight container. This way, you can enjoy a quick meal throughout the week. This blog post covered the key steps to make a tasty oatmeal apple breakfast bake. We looked at the main ingredients, optional toppings, and helpful substitutes. Then, I shared easy step-by-step instructions for mixing and baking. You also learned tips for texture and flavor, plus ways to store it. Finally, we explored variations and answered common questions. Now, you have all the tools to create a delicious breakfast that's both easy and fun. Happy baking!

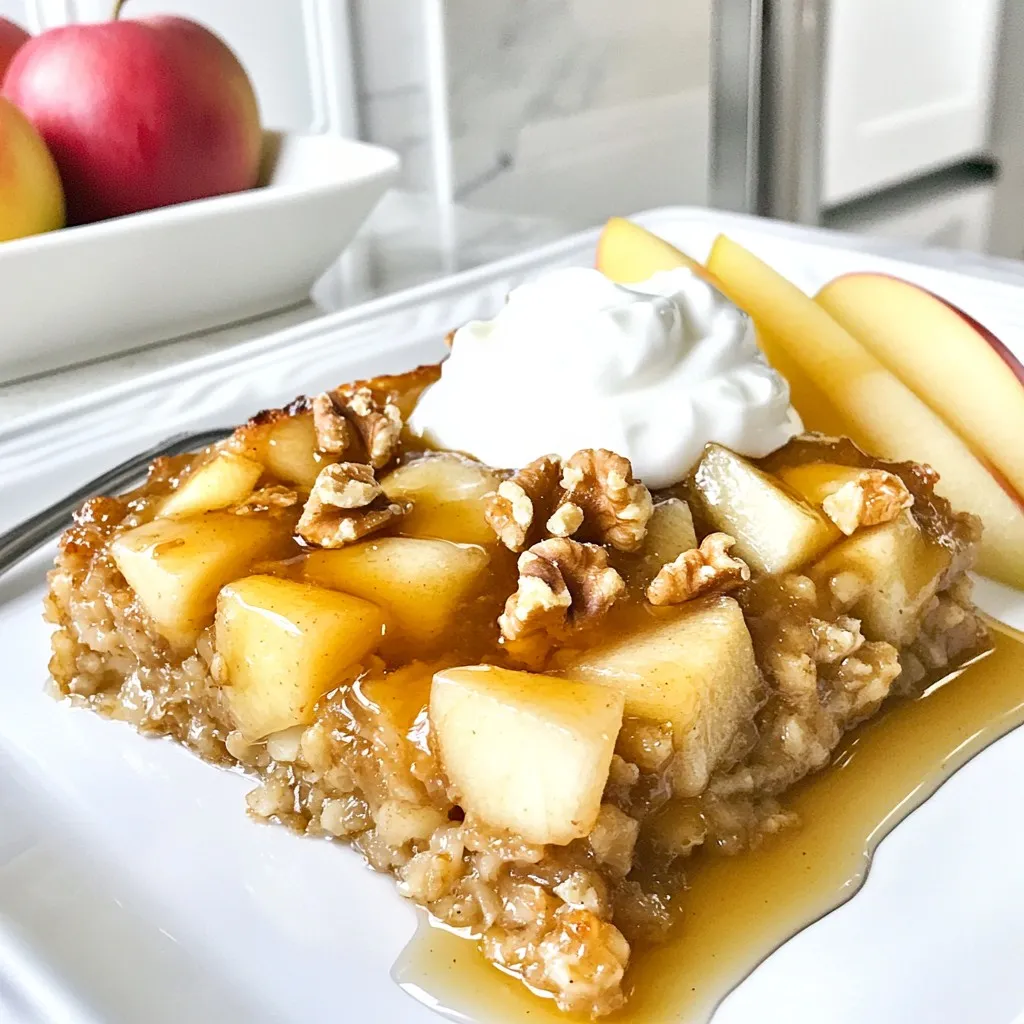
Start your day with a warm, comforting bowl of Oatmeal Apple Breakfast Bake! This simple recipe is packed with flavor and nutrients. You’ll find it easy to make and perfect …

Read more

Categories Breakfast

Beef & Broccoli Ramen Stir Fry Quick and Flavorful Meal

January 13, 2026February 16, 2025 by Chef Tavio
Here’s what you need to make Beef & Broccoli Ramen Stir Fry: - 8 oz ramen noodles - 1 lb beef (flank or sirloin), thinly sliced against the grain - 2 cups broccoli florets - 1 bell pepper, colorful and sliced (red, yellow, or green) - 3 cloves garlic, minced - 1 tablespoon fresh ginger, grated - 3 tablespoons low-sodium soy sauce - 2 tablespoons oyster sauce (or a vegetarian alternative like hoisin sauce) - 1 tablespoon sesame oil - 1 tablespoon vegetable oil - 1 teaspoon red pepper flakes (optional for heat) - Chopped green onions and sesame seeds for garnishing Ramen noodles are the base of this dish. They cook fast and soak up the flavors. Beef adds a rich taste, while broccoli brings crunch and color. Bell peppers add sweetness and more color. Garlic and ginger boost the flavor. The sauces give a savory taste that makes the dish shine. Oils help to cook everything evenly. Red pepper flakes are optional but can make it spicy. Green onions and sesame seeds are great for finishing touches. Gather all these ingredients before starting. It makes cooking smoother and more fun! {{ingredient_image_2}} 1. Boil water in a pot. 2. Add the ramen noodles. 3. Cook as per package instructions, usually 3-4 minutes. 4. Drain the noodles in a colander. 5. Rinse under cold water to stop cooking. 6. Set the noodles aside in a bowl. *Tip: Avoid soggy noodles by not overcooking them. Rinse them well to keep them firm.* 1. Heat vegetable oil in a large skillet over medium-high heat. 2. Add the thinly sliced beef in one layer. 3. Let it sear for 2-3 minutes without stirring. 4. Flip the beef and cook for another minute. 5. Remove beef from the skillet and set it aside. *Cooking in layers helps the beef brown better. Avoid crowding the pan.* 1. Lower the heat to medium in the same skillet. 2. Add minced garlic and grated ginger. 3. Sauté for about 30 seconds, stirring often. *Timing is key. You want them fragrant but not browned. This step adds depth to your dish.* 1. Add broccoli florets and bell pepper slices to the skillet. 2. Stir-fry them for about 3-4 minutes. *Make sure they stay crisp and colorful. You want them tender, not mushy.* 1. Return the cooked beef to the skillet. 2. Stir everything together to mix well. *Ensure an even coating so every bite is tasty.* 1. In a small bowl, mix soy sauce, oyster sauce, sesame oil, and optional red pepper flakes. 2. Pour the sauce into the skillet over the beef and veggies. 3. Stir well to coat everything evenly. *This sauce creates a balanced flavor and ties the dish together.* 1. Gently add the cooked ramen noodles to the skillet. 2. Toss everything together carefully. 3. Heat for another 2 minutes to meld flavors. *For serving, use deep bowls to showcase colors. Sprinkle sesame seeds and green onions on top for flair.* - Heat Levels for Optimal Stir-Frying: Use medium-high heat for the best results. This heat level helps to sear the beef and cook the veggies quickly. A hot pan allows food to cook evenly and keeps it crisp. - Tools for a More Efficient Process: A wok or large skillet works well for stir-frying. Use a wooden spoon or spatula for stirring. A good knife helps slice beef thinly, which is key for tender bites. - Additional Ingredients to Consider: Try adding sliced mushrooms or snap peas for more flavor and nutrition. You can also sprinkle in some sesame seeds for extra crunch. - Marination Tips for Beef: Marinate the beef in soy sauce and ginger for 15-30 minutes. This boosts flavor and tenderness. If you have time, marinate overnight for the best taste. - Overcooking the Beef: Avoid cooking the beef too long. It should be browned but still tender. Overcooked beef can become tough. - Soggy Noodles Issues: Make sure to drain the noodles well after cooking. If left in water, they can become mushy. Toss them gently with the sauce and other ingredients to keep them firm. Pro Tips Slice Against the Grain: This technique ensures that the beef is tender and easy to chew, making every bite enjoyable. Keep Vegetables Crisp: Stir-fry the broccoli and bell pepper just until tender-crisp to maintain their vibrant colors and nutrients. Customize Your Heat: Adjust the amount of red pepper flakes to suit your spice preference, or omit them for a milder dish. Garnish for Extra Flavor: Fresh green onions and sesame seeds not only add a pop of color but also enhance the dish's overall flavor profile. {{image_4}} For a vegetarian option, swap beef with tofu or tempeh. Use the same marinade for flavor. This keeps the dish filling and tasty. For gluten-free adaptations, choose rice noodles instead of ramen. Ensure that the soy sauce is gluten-free. You can also use tamari for a similar taste. Want some heat? Add spices like chili paste or sriracha. These will spice up your stir fry. You can also try adding sauces like teriyaki for a sweeter twist. For unique vegetable substitutions, consider using snap peas, bell peppers, or mushrooms. Each vegetable brings a new taste and look to your dish. To scale the recipe, just double or halve the amounts. This makes it easy for different gatherings. If you want to meal prep, divide the stir fry into containers. Each container can hold a single serving. This way, you have quick and tasty meals ready to go. To keep your Beef & Broccoli Ramen Stir Fry fresh, use airtight containers. Glass or plastic containers work well. You can store leftovers in the fridge for up to three days. When reheating, use a skillet for the best texture. Heat it on medium and add a splash of water. This keeps the ramen from drying out. Stir gently to avoid mushiness. If you want to freeze the stir fry, let it cool first. Place it in freezer-safe bags or containers. Remove as much air as you can. To reheat from frozen, thaw it overnight in the fridge. Then, warm in a skillet on low heat until hot. For stir fry, I recommend flank or sirloin beef. These cuts are tender and flavorful. Flank steak is lean, while sirloin has a bit more fat. Both cook quickly, perfect for high-heat methods. Slice the beef thinly against the grain. This technique makes the meat even more tender. Yes, you can use other noodles! Here are some options: - Udon noodles: Cook for about 8-10 minutes. - Soba noodles: Cook for 4-6 minutes. - Rice noodles: Soak in hot water for 5-7 minutes. Each noodle type adds a unique taste and texture. Adjust cooking times as needed. To add heat, consider these ideas: - Use more red pepper flakes. - Add sliced fresh chili peppers. - Drizzle in some hot chili oil. These options let you control the spice level. Start with small amounts and taste as you go. If you need a substitute for oyster sauce, try these options: - Hoisin sauce: It’s sweet and rich. - Soy sauce blended with sugar: Mix equal parts for a similar taste. - Mushroom sauce: Great for a vegetarian option. These alternatives keep the flavor strong while catering to different diets. Yes, this dish is perfect for meal prep. You can cook it in advance and store it easily. Here’s how: - Storage: Use airtight containers in the fridge for up to 3 days. - Reheating: Warm it on the stove or microwave. Add a splash of water to keep it moist. Meal prepping this dish saves time and ensures a tasty, quick meal all week! This guide covers how to make a tasty stir-fried ramen dish. We discussed ingredients, cooking steps, and tips for success. You learned to choose the right beef and noodles while adding fresh veggies. Remember, timing is key to keep your noodles firm and flavors vibrant. Whether you go with my variations or stick to the classic method, enjoy your meal! Happy cooking and mixing up your flavors!

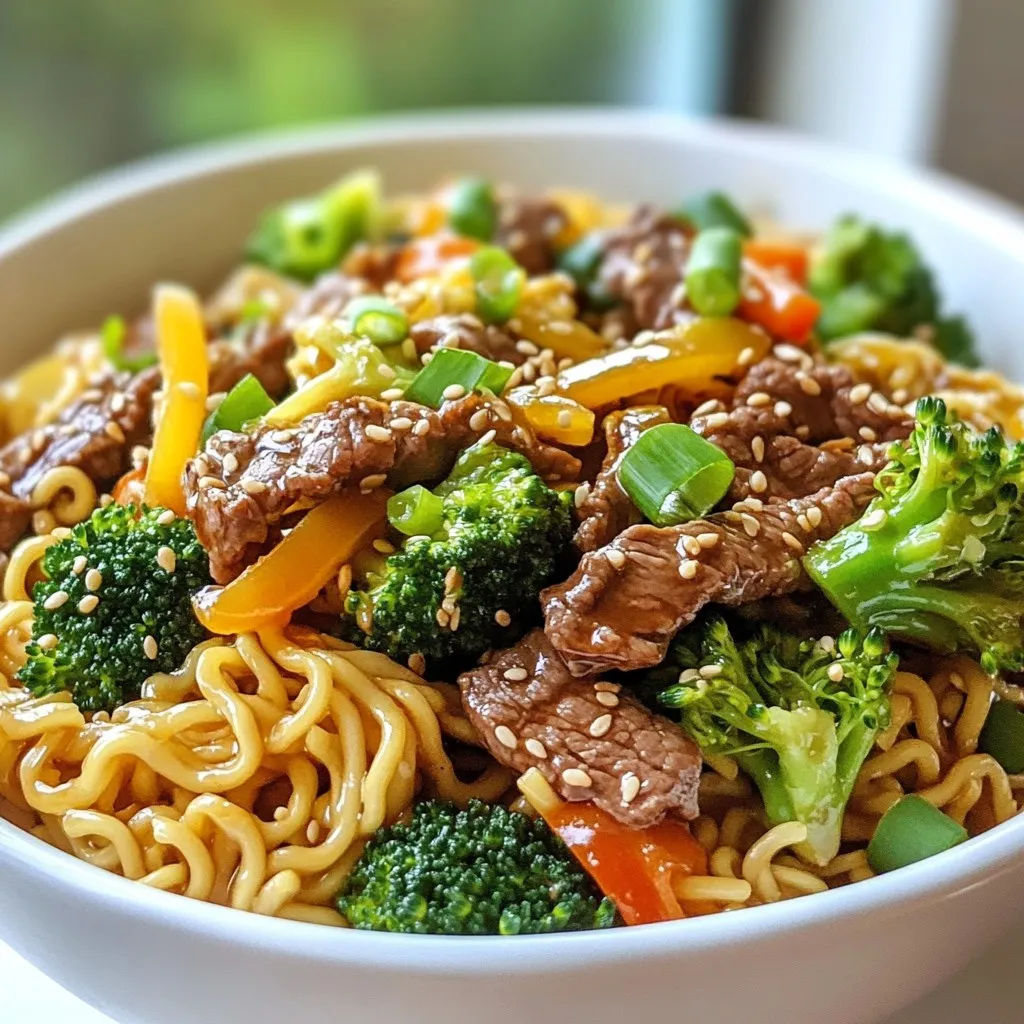
Are you ready for a quick and tasty meal that will impress everyone? This Beef & Broccoli Ramen Stir Fry packs a flavor punch while being easy to make. With …

Read more

Categories Dinner

Crispy Bang Bang Chicken Bowl Tasty Meal Idea

December 18, 2025February 16, 2025 by Chef Tavio
- 1 lb chicken breast, cut into bite-sized pieces - 1 cup buttermilk - 1 cup all-purpose flour - 1/2 cup cornstarch - 1 teaspoon garlic powder - 1 teaspoon onion powder - 1 teaspoon paprika - Salt and pepper to taste - Vegetable oil, for frying - 1/2 cup mayonnaise - 1/4 cup sweet chili sauce - 1 tablespoon sriracha (adjust for spice) - 1 teaspoon fresh lime juice - 1 cup cooked jasmine rice - 1 cup shredded cabbage (green and purple mix) - 1/2 cup cucumber, thinly sliced - 1/2 cup carrots, shredded - 1 green onion, thinly sliced - 1/4 cup fresh cilantro, chopped This dish is fun to make. You start with chicken and buttermilk. The buttermilk helps the chicken stay juicy. The coating adds crunch and flavor. You mix flour, cornstarch, and spices for a tasty crust. The sauce is creamy and sweet with a kick. You can adjust the sriracha for heat. The colorful toppings bring freshness. Jasmine rice makes a nice base for all these flavors. Each ingredient plays a special role. They work together to create a delicious meal. Enjoy making this Crispy Bang Bang Chicken Bowl! {{ingredient_image_2}} Start by cutting the chicken breast into bite-sized pieces. Place the chicken in a bowl and cover it with buttermilk. Make sure every piece is fully coated. Let it marinate for at least 30 minutes. For better flavor, consider marinating overnight. This makes the chicken tender and juicy. Next, grab a separate bowl. In this bowl, mix the all-purpose flour, cornstarch, garlic powder, onion powder, paprika, salt, and pepper. Stir well until everything blends nicely. This coating gives the chicken a crispy texture and great taste. After marinating, take the chicken from the buttermilk. Allow the extra liquid to drip off. Then, dip each piece in the flour mixture. Press lightly for a good coat. Shake off any extra flour to avoid clumps. Now it’s time to fry! Heat vegetable oil in a large pot or deep skillet. Aim for a temperature of about 350°F (175°C). Carefully add the chicken in small batches. Fry for about 5 to 7 minutes, until golden brown. Once cooked, place the chicken on a plate with paper towels. This helps soak up any extra oil. While the chicken fries, make the Bang Bang sauce. In a small bowl, whisk together mayonnaise, sweet chili sauce, sriracha, and lime juice. Mix until smooth. Taste the sauce and adjust the sriracha for your spice level. This sauce adds a tasty kick! To assemble, start with jasmine rice in each bowl. This is the base for your meal. Next, add the crispy chicken on top. Layer it with shredded cabbage, cucumber slices, and shredded carrots. Finish with green onion and chopped cilantro for freshness. Finally, take your Bang Bang sauce and drizzle it generously over each bowl. If you love sauce, add a bit more for extra flavor. Enjoy your Crispy Bang Bang Chicken Bowl! Marinating chicken makes it juicy and tasty. Use buttermilk for the best results. Soak the chicken for at least 30 minutes. For even better flavor, marinate it overnight. This extra time lets the flavors soak in well. For crispy chicken, the coating is key. Mix all-purpose flour and cornstarch together. The cornstarch helps create a crunchier texture. Be sure to coat each piece well. Press down lightly to make sure the coating sticks. Fry the chicken in hot oil, around 350°F (175°C). This high heat seals in moisture and gives you that golden crust. The Bang Bang sauce can be mild or spicy. It’s made from mayonnaise, sweet chili sauce, and sriracha. Start with one tablespoon of sriracha for a kick. If you want more heat, add more sriracha gradually. Taste as you go to find your perfect spice level. Lime juice adds brightness to the sauce, so don’t skip it! Make your bowls pop with color. Use bright dishes to serve the chicken bowl. Layer each ingredient to show off the colors. Add fresh lime wedges and a drizzle of sauce on top. This makes the dish look and taste even better. A little garnish of cilantro or green onion brightens it up too. Pro Tips Marinate for Maximum Flavor: For the best flavor and tenderness, marinate the chicken overnight in the buttermilk. This allows the buttermilk to fully penetrate the meat, enhancing its juiciness. Optimal Frying Temperature: Use a kitchen thermometer to ensure your oil reaches 350°F (175°C) before frying. This temperature is crucial for achieving a crispy texture without absorbing too much oil. Coating Technique: Press the flour mixture onto the chicken firmly during dredging. This helps create a thicker, crunchier crust that stands up well during frying. Customize Your Sauce: Feel free to adjust the spice level of the Bang Bang sauce by increasing or decreasing the amount of sriracha. You can also add lime zest for an extra kick of freshness! {{image_4}} You can make this meal lighter without losing flavor. Start by using skinless chicken breast. Baking the chicken instead of frying can also cut calories. You can coat the chicken in whole wheat flour or almond flour for a healthier option. Swap the mayonnaise in the Bang Bang sauce for Greek yogurt. It adds creaminess with less fat. Feel free to play with the ingredients! Instead of jasmine rice, use brown rice or quinoa. This adds fiber and nutrients. You can change the veggies too. Try bell peppers, snap peas, or broccoli for crunch. For the sauce, you can mix in some honey with the sweet chili sauce for extra sweetness. If you want a plant-based meal, use tofu or tempeh instead of chicken. Marinate the tofu in the same buttermilk mixture, using a dairy-free option. For the Bang Bang sauce, swap the mayonnaise for a vegan mayo. You can also add extra veggies like roasted mushrooms or grilled eggplant for heartiness. To keep your Crispy Bang Bang Chicken Bowl fresh, store leftovers in an airtight container. Let the chicken cool down before placing it in the fridge. This helps prevent sogginess. You can store the chicken and rice separately from the veggies and sauce. They stay fresh for 3 to 4 days. When you're ready to enjoy leftovers, reheat the chicken in an oven. Preheat your oven to 375°F (190°C). Place the chicken on a baking sheet for about 10-15 minutes. This keeps the chicken crispy. You can also microwave the rice and veggies for quick heating. But avoid microwaving the chicken, as it may turn soggy. If you want to save some for later, freezing is a great option. Place cooled chicken and rice in freezer bags. Remove as much air as possible before sealing. You can freeze them for up to 3 months. Just remember, the sauce should be stored separately and not frozen. It can last in the fridge for a week or in the freezer for 2 months. When you're ready to eat, thaw everything in the fridge overnight before reheating. Enjoy your tasty meal again! Bang Bang sauce has four main ingredients. You need mayonnaise, sweet chili sauce, sriracha, and lime juice. First, mix the mayonnaise and sweet chili sauce. Then, add sriracha to taste. Finally, stir in lime juice for a zesty kick. This sauce adds creaminess and spice to your dish. Yes, you can use other meats. Shrimp, pork, or tofu work well. If you choose shrimp, make sure to adjust cooking time. For pork, cut it into bite-sized pieces like chicken. Tofu is a great plant-based option. Just press and marinate it before cooking. To make the dish gluten-free, swap all-purpose flour for gluten-free flour. Also, check your sweet chili sauce and sriracha for gluten-free labels. Ensure your soy sauce, if used, is gluten-free. These simple changes let you enjoy the meal without gluten. You can serve this bowl with a variety of sides. Try a simple salad or steamed veggies. Fresh avocado slices add creaminess too. You can also serve it with extra jasmine rice or quinoa. All these options pair well with the crispy chicken and sauce. In this blog post, we explored how to make a tasty Crispy Bang Bang Chicken Bowl. We covered key ingredients, step-by-step instructions, and helpful tips. You learned how to marinate chicken, prepare a crunchy coating, and make a flavorful bang bang sauce. Remember, you can customize it with different toppings or make it vegetarian. With these details, you can create a delicious meal that fits your taste. Enjoy making this dish and share it with friends! Your cooking skills will shine.

Looking for a fun and tasty meal idea? You’ll love my Crispy Bang Bang Chicken Bowl! It’s packed with flavor and is super simple to make. In this post, I’ll …

Read more

Categories Dinner

Grilled Chicken Ranch Wraps Tasty and Simple Meal

January 5, 2026February 16, 2025 by Chef Tavio
- 2 boneless, skinless chicken breasts - 1 tablespoon extra virgin olive oil - 1 teaspoon garlic powder - 1 teaspoon smoked paprika - Sea salt and freshly ground black pepper to taste - 4 large whole wheat tortillas - 1 cup romaine lettuce, finely shredded - 1 cup cherry tomatoes, halved - 1/2 cup sharp shredded cheddar cheese - 1/4 cup creamy ranch dressing - Fresh cilantro leaves, for garnish (optional) For the chicken, you need two boneless, skinless breasts. These cook well and stay juicy. You’ll also want some olive oil, garlic powder, and smoked paprika for the marinade. Sea salt and black pepper add flavor too. For the wrap, grab four large whole wheat tortillas. They are sturdy and healthy. You will need one cup of finely shredded romaine lettuce for crunch. Cherry tomatoes add sweetness and color. Shredded cheddar cheese gives a nice sharp taste. Finally, creamy ranch dressing ties all the flavors together. If you like, sprinkle fresh cilantro on top for a pop of color and flavor. {{ingredient_image_2}} 1. Preheat your grill or grill pan to medium-high. This step helps create those great grill marks. 2. In a small bowl, mix one tablespoon of olive oil, one teaspoon of garlic powder, one teaspoon of smoked paprika, sea salt, and black pepper. This marinade adds flavor. 3. Coat both sides of the chicken breasts with the marinade. Make sure each piece gets a good layer. 4. Place the chicken on the hot grill. Cook for 6-7 minutes on each side. The inside should reach 165°F (75°C). Once done, take it off the grill and let it rest for 5 minutes. 1. Lay the whole wheat tortillas flat on a clean surface. This will make it easy to fill them. 2. Slice the grilled chicken into bite-sized strips. Distribute these strips evenly on each tortilla. 3. On top of the chicken, add a handful of shredded romaine lettuce, halved cherry tomatoes, and a sprinkle of cheddar cheese. These add freshness and crunch. 4. Drizzle creamy ranch dressing over the fillings. This gives each bite a zesty kick. 1. To roll the wraps, start at one end and fold in the sides. Then roll tightly to keep the filling inside. 2. For an extra touch, place the wraps back on the grill for 1-2 minutes. This warms them and gives nice grill marks. Enjoy your tasty wraps! They are easy to make and great for any meal. How can I check doneness? Use a meat thermometer to check the chicken. The safe internal temperature is 165°F (75°C). Insert it into the thickest part of the breast. If it reads 165°F, your chicken is fully cooked. How can I avoid dryness? Let the chicken rest for about 5 minutes after grilling. This helps keep the juices inside. Also, don’t overcook the chicken. Follow the cooking time of 6-7 minutes per side for juicy results. Can I substitute proteins? Yes! You can use turkey, shrimp, or even tofu instead of chicken. Each protein gives a different taste and texture to the wrap. Adjust the cooking time based on what you choose. What if I want more vegetables? Feel free to add more veggies! Sliced bell peppers, cucumbers, or avocados work great. You can even add some red onion for a little bite. More veggies make the wraps colorful and healthy. What sides pair well with these wraps? These wraps go great with a side of fruit salad or potato chips. You could also serve them with a crunchy coleslaw for added texture. Choose sides that complement the flavors. How can I present the wraps nicely? Slice each wrap in half diagonally. Arrange them on a platter for a neat look. Serve with a bowl of extra ranch dressing for dipping. Garnish with cilantro leaves for a fresh touch. Pro Tips Marinate Longer: For even more flavor, consider marinating the chicken breasts for at least 30 minutes or up to overnight. This allows the spices to penetrate deeper into the meat. Layer Wisely: Distributing the ingredients evenly in the wrap not only ensures a balanced flavor in every bite but also helps in easy rolling and prevents spills. Grill Marks: If you want those perfect grill marks, press down gently on the wraps with a spatula while grilling for the last minute. This creates a beautiful presentation. Customize Fillings: Feel free to add your favorite veggies or swap out the ranch dressing for a different sauce, like tzatziki or hummus, to suit your taste preferences. {{image_4}} You can switch up the ranch dressing for something new. Try a spicy chipotle sauce for a kick. Or, use a tangy vinaigrette for a fresh twist. You can mix spices into the dressing too. A pinch of cayenne or paprika adds heat. You could also try herbs like dill or parsley for extra flavor. If you want gluten-free wraps, use gluten-free tortillas. They taste great and hold the filling well. For a low-carb option, try lettuce wraps. Romaine or butter lettuce works best. Just keep in mind that these wraps are lighter and have a crunch. Adding different cheeses can elevate your wraps. Swap sharp cheddar for pepper jack for a spicy kick. You can also use mozzarella for a milder taste. Hot sauce is a fun way to add heat. A few drops can really change the flavor. Fresh herbs like basil or cilantro also give a nice touch. They add freshness and a burst of color to your meal. To store your grilled chicken ranch wraps, follow these best practices: - Wrap each one tightly in plastic wrap or foil. - Place wrapped wraps in an airtight container. This keeps them fresh and tasty. You can store them in the fridge for up to 3 days. After that, the wraps may lose their crunch and flavor. You can also freeze grilled chicken for later use. Here’s how: - Let the chicken cool completely after grilling. - Slice the chicken into strips and place them in a single layer on a baking sheet. - Freeze for 1-2 hours, then transfer to a freezer bag. This method helps the chicken keep its shape. You can freeze the chicken for up to 3 months. When you are ready to enjoy your wraps, here are tips for reheating: - Remove the wraps from the fridge or freezer. - If frozen, let them thaw in the fridge overnight. - Reheat in the oven at 350°F (175°C) for about 10-15 minutes. This warms them through and keeps them crispy. These storage tips will help you enjoy your grilled chicken ranch wraps at their best! To ensure your chicken is safe to eat, check the internal temperature. The chicken must reach 165°F (75°C). This temperature kills harmful bacteria. Use a meat thermometer for accuracy. Insert it into the thickest part of the chicken. If it reads 165°F, your chicken is done! Cooking chicken correctly keeps it juicy and safe. If you cut into it and see pink, it needs more time. Always trust the thermometer over looks. Properly cooked chicken makes your wraps tasty and safe. Yes, you can prepare these wraps ahead of time! This makes meal planning easy. After grilling the chicken, let it cool before slicing. Then, store it in an airtight container in the fridge. You can assemble the wraps a few hours before serving. To keep the wraps fresh, store the ingredients separately. Wraps can get soggy if made too early. Assemble them just before eating for the best taste. Consider making a batch for busy days. They are perfect for lunches or quick dinners. Grilled Chicken Ranch Wraps pair well with many sides! Here are some tasty ideas: - Fresh vegetable sticks like carrots and celery - A simple green salad with mixed greens - Crispy sweet potato fries for a fun crunch - Chips and salsa for a zesty touch - Fruit salad for a refreshing contrast These sides balance the flavors of the wraps. They also add color to your meal. Choose what you like best. Enjoy your delicious wraps with any of these sides! In this post, we covered how to make delicious Grilled Chicken Ranch Wraps. I shared simple recipes for chicken, marinades, and wraps, along with step-by-step instructions. You learned tips for perfecting your chicken and customizing your wraps with various ingredients. Don’t forget to use different dressings or alternatives to keep things fun! These wraps store well too, making them a great meal prep option. Enjoy these tasty wraps anytime, and let your creativity shine. With a few changes, they can become your go-to meal.

Looking for a quick, tasty meal that everyone will love? Grilled Chicken Ranch Wraps are simple and packed with flavor! With tender chicken, fresh veggies, and creamy ranch in a …

Read more

Categories Dinner

Soft Strawberry Sugar Cookies Irresistibly Delicious Treat

December 24, 2025February 16, 2025 by Chef Tavio
To make soft strawberry sugar cookies, gather these key ingredients: - 1 cup unsalted butter, softened to room temperature - 1 cup granulated sugar - 1/2 cup powdered sugar - 2 large eggs - 1 tablespoon pure vanilla extract - 3 cups all-purpose flour - 1 teaspoon baking soda - 1/2 teaspoon baking powder - 1/4 teaspoon fine salt - 1 cup fresh strawberries, pureed until smooth - 1/2 cup white chocolate chips (optional for a sweet twist) - Additional granulated sugar for rolling Butter gives cookies a rich flavor and soft texture. Softened butter blends well with sugars to create a light and fluffy base. The granulated sugar adds sweetness, while powdered sugar makes the cookies tender. Eggs help bind the dough and add moisture. Using large eggs ensures a good mix and proper rise. The dry mix is crucial for structure. Flour provides the main body, while baking soda and baking powder help the cookies rise. Fine salt enhances the flavor, balancing the sweetness. Whisk these dry ingredients well to avoid lumps, ensuring your cookies bake evenly. Fresh strawberries bring a fruity flavor and lovely pink hue. Pureeing them ensures they mix smoothly into the dough. If you want an extra treat, add white chocolate chips. They melt nicely and offer a sweet contrast to the tart strawberries. You can skip them if you prefer a classic strawberry flavor. {{ingredient_image_2}} Creaming the butter and sugars is the first step. In a large bowl, add 1 cup of softened butter, 1 cup of granulated sugar, and 1/2 cup of powdered sugar. Use an electric mixer and beat for about 3-4 minutes. You want the mix to be light and fluffy. This helps make your cookies soft. Next, add 2 large eggs to the mix, one at a time. Make sure to mix well after each egg. Then, pour in 1 tablespoon of vanilla extract and 1 cup of pureed strawberries. Blend until everything is smooth and mixed well. Now, we need to whisk the dry ingredients. In a separate bowl, combine 3 cups of all-purpose flour, 1 teaspoon of baking soda, 1/2 teaspoon of baking powder, and 1/4 teaspoon of fine salt. Whisk until there are no lumps. Slowly add this dry mix to the wet ingredients. Mix on low speed or by hand just until combined. Do not overmix. If you want to add white chocolate chips, fold in 1/2 cup now. This gives a nice sweet twist to your cookies. It’s time to shape and scoop the dough. Use a cookie scoop or a tablespoon to drop rounded portions onto a lined baking sheet. Leave about 2 inches of space between each cookie. Roll each cookie ball in extra granulated sugar. This adds sweetness and a nice texture. Preheat your oven to 350°F (175°C). Bake the cookies for 10-12 minutes. They should have light golden edges, and the centers might look a bit underbaked. This keeps them soft. Once baked, let the cookies cool on the sheet for about 5 minutes. Then, move them to a wire rack to cool completely. Enjoy the sweet smell of strawberries filling your kitchen! Temperature of Ingredients To make soft strawberry sugar cookies, start with room temperature butter. Cold butter does not cream well. It will make your cookies tough. Use eggs at room temperature too. This helps create a smooth, even dough. Avoiding Overmixing Mix just until combined. Overmixing will make the cookies dense. You want a light and airy texture. When adding dry ingredients to wet, mix on low speed. Stop as soon as you see no dry flour. The dough should feel soft and a bit sticky. Adding White Chocolate Chips Consider adding white chocolate chips for a sweet twist. They melt beautifully and pair well with strawberry. If you like, fold them in gently after mixing the dough. This adds a creamy contrast to the fruity flavor. Other Flavor Additions You can try other flavors too! A pinch of lemon zest brightens the strawberry taste. Almond extract adds a nice depth. If you want a richer cookie, add cocoa powder for a chocolatey version. Experiment and see what you enjoy! Pro Tips Chill the Dough: For an even softer cookie, chill the dough for at least 30 minutes before baking. This helps the cookies maintain their shape and enhances the flavors. Use Fresh Strawberries: Always opt for fresh strawberries for the puree to achieve the best flavor and texture in your cookies. Frozen strawberries can add excess moisture. Check for Doneness: The cookies should be slightly underbaked in the center when you take them out of the oven. They will continue to cook on the baking sheet while cooling. Experiment with Toppings: Feel free to add a sprinkle of sea salt on top of the cookies before baking for a sweet and salty flavor profile that enhances the strawberry taste. {{image_4}} You can swap strawberries for other berries. Using raspberries or blueberries works great. Both fruits bring their own unique taste. For raspberries, you may need to adjust the sugar. They are tart, so a bit more sugar helps balance the flavor. Blueberries add sweetness and a juicy burst in each bite. You can use pureed fruit instead of strawberries. This keeps the cookies soft and adds fun flavors. If you need gluten-free cookies, use a gluten-free flour blend. This will not change the taste much. Make sure to check the blend for best results. For a vegan option, replace butter with coconut oil or vegan butter. Use flax eggs instead of regular eggs. To make a flax egg, mix 1 tablespoon of ground flaxseed with 3 tablespoons of water. Let it sit for a few minutes until it thickens. These swaps keep the cookies soft and tasty. To keep your soft strawberry sugar cookies fresh, you have a couple of options. - Room Temperature vs. Refrigeration: Store cookies in an airtight container at room temperature for up to five days. This keeps them soft and tasty. If you live in a hot or humid place, refrigeration might be a good idea. However, the cold can make them a bit harder. - Freezing for Longer Storage: For longer storage, freeze the cookies. Place them in a freezer-safe bag or container. They can last for up to three months. Make sure to separate layers with parchment paper to avoid sticking. Sometimes, cookies can lose their soft texture. Here’s how to bring them back to life. - Reheating Tips: Preheat your oven to 350°F (175°C). Place the cookies on a baking sheet and heat for about five minutes. This warms them up and softens them again. You can also use the microwave. Heat each cookie for about 10-15 seconds. - Keeping Cookies Soft: To keep cookies soft while stored, add a slice of bread in the container. The bread will keep moisture in, making your cookies stay soft longer. You can also use a piece of apple or a marshmallow for the same effect. Strawberry sugar cookies stay fresh for about five days at room temperature. To keep them soft, store them in an airtight container. If you want them to last longer, you can freeze them. Just wrap each cookie tightly in plastic wrap. They can last up to three months in the freezer. Yes, you can use frozen strawberries. Thaw and drain them first to remove extra water. Blend them until smooth, just like fresh ones. Keep in mind, frozen strawberries may change the cookie's texture a bit. They might be a little softer, but they’ll still taste amazing. You can serve strawberry sugar cookies with different drinks. Here are some great pairings: - Milk: A classic choice that complements the cookie's sweetness. - Tea: A light herbal or fruity tea enhances the strawberry flavor. - Coffee: A rich coffee balances the sweetness of the cookies. For serving ideas, try these: - Decorative Serving Ideas: Arrange cookies on a pretty plate. Add fresh strawberry slices around them for color. - Presentation: Dust a little powdered sugar on top for a nice touch. You can even drizzle melted white chocolate over them if you want to impress your guests. You learned how to make delicious strawberry sugar cookies. We covered the ingredients needed, from butter to pureed strawberries. I shared clear instructions for preparing the dough and baking. You now have tips for soft cookies, tasty variations, and best storage practices. These cookies are fun and easy to make. Try different flavors and enjoy! You will impress your friends and family. Happy baking!

Do you crave something sweet and fruity? You’ll love these Soft Strawberry Sugar Cookies! I promise they are soft, chewy, and bursting with fresh strawberry flavor. Whether you need a …

Read more

Categories Desserts

Healthy Chocolate Pumpkin Bread Simple Delightful Recipe

November 11, 2025February 15, 2025 by Chef Tavio
- 1 cup pure pumpkin puree - ½ cup unsweetened applesauce - ½ cup honey or maple syrup - 2 large eggs - 1 teaspoon vanilla extract - 1 ½ cups whole wheat flour - ½ cup unsweetened cocoa powder - 1 teaspoon baking soda - ½ teaspoon baking powder - ½ teaspoon salt - 1 teaspoon ground cinnamon - ½ teaspoon ground nutmeg - ½ cup dark chocolate chips This recipe combines simple, healthy ingredients to create a rich chocolate pumpkin bread. Each item plays an important role in flavor and texture. Pumpkin puree gives your bread moisture and a slight sweetness. Unsweetened applesauce adds more flavor and keeps the bread soft. You can use honey or maple syrup to sweeten it naturally. Both options work well in this recipe. The eggs bind everything together. They also help the bread rise. Vanilla extract adds a warm aroma that enhances the taste. Whole wheat flour brings fiber and a nutty flavor. Cocoa powder is what makes this bread chocolatey and delicious. Baking soda and baking powder help it rise, giving it a light texture. Salt balances the sweetness and enhances the flavors. Ground spices like cinnamon and nutmeg bring warmth and depth. Finally, dark chocolate chips add rich bursts of flavor. You can choose dairy-free chips if you prefer. These ingredients create a delightful bread that is both healthy and satisfying. {{ingredient_image_2}} - Preheat your oven to 350°F (175°C). - Grease a 9x5 inch loaf pan or line it with parchment paper. - In a large mixing bowl, combine: - 1 cup pure pumpkin puree - ½ cup unsweetened applesauce - ½ cup honey or maple syrup - 2 large eggs - 1 teaspoon vanilla extract - Whisk these ingredients until smooth and well mixed. - In another bowl, sift together: - 1 ½ cups whole wheat flour - ½ cup unsweetened cocoa powder - 1 teaspoon baking soda - ½ teaspoon baking powder - ½ teaspoon salt - 1 teaspoon ground cinnamon - ½ teaspoon ground nutmeg - Make sure there are no clumps in the dry mix. - Gradually add the dry mix to the wet mix. Stir gently until just combined. - Fold in ½ cup dark chocolate chips carefully. - Pour the batter into the prepared loaf pan. - Use a spatula to smooth the top evenly. - If you saved some chocolate chips, sprinkle them on top. - Bake for 50-60 minutes. - Check for doneness by inserting a toothpick in the center. It should come out clean. - If the top gets too brown, cover it with aluminum foil for the last 15 minutes. - Let the bread cool in the pan for about 10 minutes. - Carefully transfer it to a wire rack to cool completely. - To avoid overmixing, mix gently. Stir until ingredients just blend. - Use a spatula to fold in chocolate chips. This keeps your bread light. - Check your oven’s temperature. An oven thermometer can help. - Rotate the pan halfway through baking. This helps it bake evenly. - Serve slices with a dollop of Greek yogurt for creaminess. - Spread almond butter on warm bread for a nutty taste. - For decoration, lightly dust with cocoa powder or powdered sugar. - Place a few dark chocolate chips on top for a nice touch. - Use flax eggs or chia eggs for a vegan option. Mix 1 tablespoon with 3 tablespoons of water. Let it sit for 5 minutes. - Swap honey for agave syrup or coconut sugar for lower GI. - Try almond flour or oat flour for gluten-free bread. Adjust the amount as needed. Pro Tips Use Fresh Pumpkin Puree: For the best flavor, consider roasting your own pumpkin to make fresh puree instead of using canned. This will enhance the natural sweetness and depth of flavor in your bread. Mixing Technique: When combining wet and dry ingredients, mix until just combined. Overmixing can lead to a dense texture, so be gentle! Chocolate Chip Variation: Feel free to experiment with different types of chocolate chips, such as white chocolate or peanut butter chips, for a unique flavor twist. Storage Tips: Store the bread in an airtight container at room temperature for up to 3 days, or refrigerate it for up to a week. You can also freeze slices for longer storage. {{image_4}} You can easily adapt this recipe for different diets. For a gluten-free version, swap whole wheat flour with almond flour or a gluten-free blend. This keeps the bread moist and tasty. To reduce sugar, use less honey or maple syrup. You can also try a sugar substitute like stevia. This way, you can enjoy the bread without guilt. Want to add some crunch? Toss in chopped nuts or seeds. Walnuts or pecans work great. They add a lovely texture. You can also switch up the chocolate. Use milk chocolate, dark chocolate, or even white chocolate. Each choice gives the bread a unique flavor twist. Spices can change the mood of your bread. For fall, add more cinnamon and a pinch of cloves. In winter, try ginger or allspice. These spices make the bread feel warm and cozy. You can also add dried fruits. Cranberries or raisins add sweetness and chewiness. They are perfect for holiday gatherings or a cozy treat. To keep your healthy chocolate pumpkin bread fresh, store it in an airtight container. This prevents moisture loss and keeps it soft. You can also wrap it in plastic wrap before placing it in the container for extra protection. A glass or plastic container works best for this purpose. If you want to save some for later, freeze slices or whole loaves. Wrap each slice in plastic wrap, then place them in a freezer bag. For a whole loaf, wrap it well and label it with the date. To thaw, leave it in the fridge overnight or at room temperature for a few hours. This keeps the taste fresh and delicious. At room temperature, the bread lasts about 3 to 4 days. If you store it in the fridge, it can stay good for up to a week. Just remember to keep it in a container to maintain its moisture and flavor. Can I make this recipe in a muffin tin instead of a loaf? Yes, you can! Just fill each muffin cup about two-thirds full. Bake for 20-25 minutes, checking for doneness with a toothpick. Muffins will cook faster than the loaf. What can I substitute for pumpkin puree? You can use mashed bananas or applesauce. Both will keep the bread moist and add sweetness. How can I lower the calorie count in this recipe? To cut calories, use less honey or maple syrup. You can also reduce the chocolate chips or switch to a low-calorie sweetener. This bread is a great source of fiber and vitamins. Here are some key ingredients and their health benefits: - Pumpkin puree: High in vitamin A and antioxidants. - Whole wheat flour: Rich in fiber, helps digestion. - Cocoa powder: Contains flavonoids that may boost heart health. - Dark chocolate chips: Provide antioxidants and can improve mood. Caloric breakdown per serving: Each slice contains approximately 150 calories. This makes it a great snack or dessert option that won’t break your diet. What to do if the bread doesn’t rise? If your bread does not rise, check your baking soda and baking powder. Make sure they are fresh. Also, avoid overmixing the batter. How to fix bread that is too dry or too wet? If the bread is too dry, try adding a bit more pumpkin puree or applesauce next time. If it’s too wet, reduce the liquid ingredients a little. Check the baking time as well. This blog post covered a delicious pumpkin bread recipe. You learned about key ingredients, preparation, baking steps, and cooling methods. We also discussed tips, variations, storage, and common questions. Enjoy experimenting with flavors or substitutions to make this recipe your own. Proper storage will keep your bread fresh for days. Happy baking!

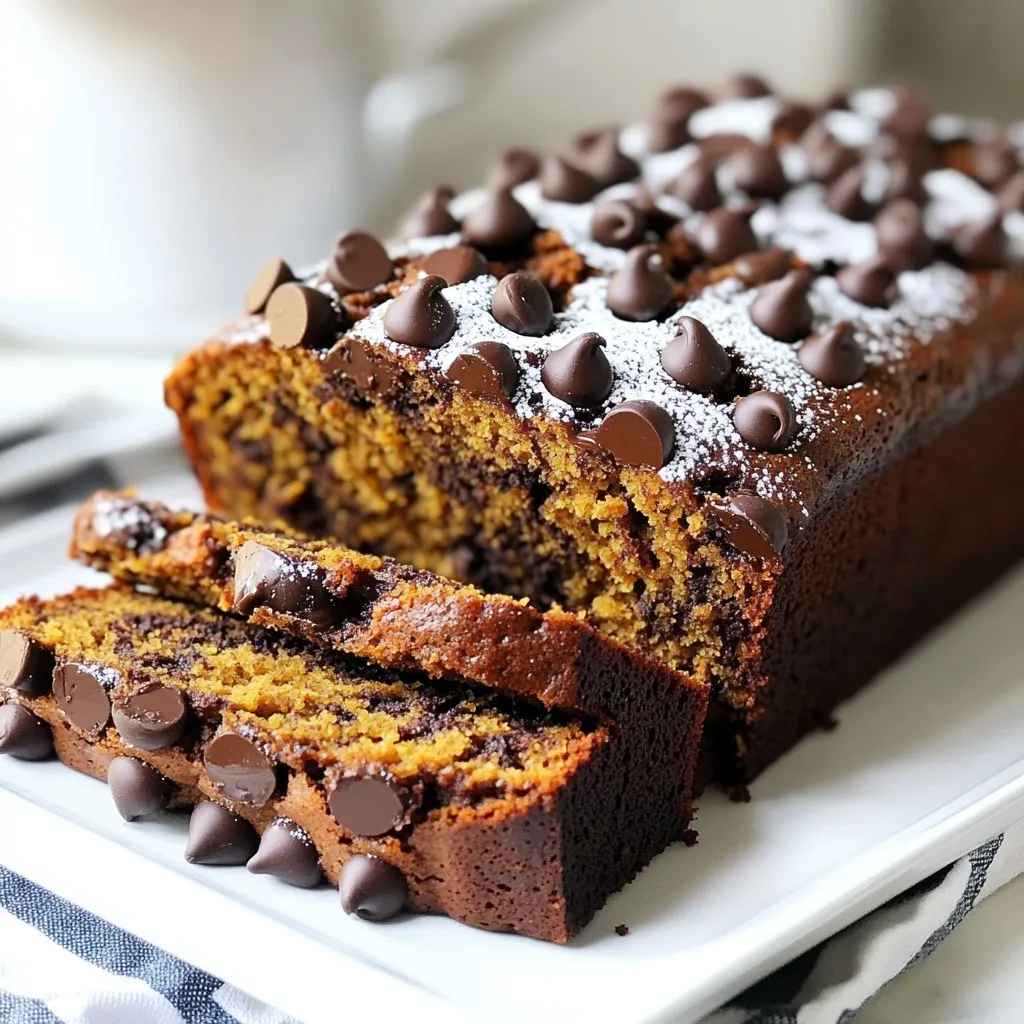
If you love the cozy flavors of fall, you’ll enjoy this Healthy Chocolate Pumpkin Bread recipe. It combines rich chocolate with nutritious pumpkin, making it a tasty treat you can …

Read more

Categories Desserts

No-Bake Cookie Butter Cheesecake Cups Delight

December 18, 2025February 15, 2025 by Chef Tavio
- 8 oz cream cheese, softened to room temperature - 1/2 cup creamy cookie butter - 1/2 cup powdered sugar, sifted - 1 teaspoon pure vanilla extract - 1 cup heavy whipping cream, chilled - 1/2 cup crushed graham crackers - 2 tablespoons unsalted butter, melted - Extra cookie butter for drizzling - Mini chocolate chips for a fun touch The main ingredients give our no-bake cheesecake cups a rich flavor. Cream cheese adds creaminess. Cookie butter brings a sweet, spiced taste. Powdered sugar sweetens the mix just right. Vanilla extract adds warmth that balances the flavors. Heavy whipping cream lightens the texture, making it fluffy. The crust is simple yet satisfying. Crushed graham crackers are the base. They provide a nice crunch. Unsalted butter binds the crumbs together. This mix forms a solid, tasty base for the cheesecake. You can add fun garnishes if you like. Extra cookie butter drizzled on top looks great. Mini chocolate chips add a sweet crunch. Both make the dessert even more exciting and delicious. {{ingredient_image_2}} - Blend cream cheese until smooth. - Mix in cookie butter and powdered sugar. Start by taking your room-temperature cream cheese. Use an electric mixer to whip it until it's smooth and creamy. This step is key for a nice texture. Next, add the cookie butter and powdered sugar. Blend these together until they are fully mixed. You want a creamy and lump-free mixture for the best results. This base is where the magic begins! - Beat heavy cream to stiff peaks. - Gently fold whipped cream into mixture. In a clean bowl, whip the chilled heavy cream. Use a mixer until it forms stiff peaks. This means the cream should hold its shape when you lift the beaters. Now, take this fluffy whipped cream and gently fold it into your cookie butter mixture. Use a spatula and be careful not to deflate the cream. This folding method keeps your cheesecake light and airy. - Combine crushed graham crackers with butter. - Mix until evenly coated. For the crust, grab some crushed graham crackers. In a bowl, mix them with melted butter. Stir until all the crumbs are coated. This step is vital for a tasty and sturdy base. The butter binds the crumbs together, making a great foundation for your cheesecake cups. - Add graham cracker mixture to cups. - Spoon cheesecake mixture on top. - Optional second layer. Now for the fun part: layering! Take about a tablespoon of the graham cracker mix and press it into the bottom of each cup. This creates a firm base. Next, spoon the cheesecake mixture on top, filling each cup almost to the brim. If you want more flavor, add another layer of graham cracker mix followed by more cheesecake. - Drizzle with cookie butter. - Add mini chocolate chips. To make it look special, drizzle extra cookie butter over each cup. This adds a nice touch of flavor too. If you like chocolate, sprinkle some mini chocolate chips on top. They add a sweet crunch that pairs perfectly with the creamy cheesecake. - Refrigerate for 2 hours. - Presentation tips. Finally, place your cheesecake cups in the fridge. Let them chill for at least 2 hours. This helps them set and makes them easier to serve. For a great presentation, arrange the cups on a nice platter. You can also add mini spoons for easy serving. A sprinkle of cinnamon or a dollop of whipped cream on top can impress your guests. Enjoy! To get the best texture, use softened cream cheese. It blends well and avoids lumps. Be sure to mix it until it's very smooth. Next, whip the cold heavy cream until it forms stiff peaks. This step gives the cheesecake its light and airy feel. A good crust holds the cheesecake together. Use enough melted butter to bind the crushed graham crackers. This mixture needs to stick well. Pack the crust tightly into your serving cups. This will keep it firm and prevent crumbling when you serve it. You can make your cheesecake even tastier. Try adding flavored extracts like almond or hazelnut. Spices like cinnamon or nutmeg can also add warmth and depth. Just a pinch can change the whole taste of your dessert, making it special. Pro Tips Use Room Temperature Cream Cheese: Ensuring your cream cheese is at room temperature will help achieve a smoother and creamier cheesecake mixture, preventing lumps. Chill the Whipping Cream: For the best results, make sure your heavy cream is thoroughly chilled before whipping. This helps it whip to stiff peaks more easily. Customize the Crust: Feel free to experiment with different types of cookies for the crust, such as Oreos or Biscoff cookies, for a unique flavor profile. Let It Set: Allow the cheesecake cups to chill for a full 2 hours or longer. This will ensure they set properly and hold their shape when served. {{image_4}} You can change the flavor of your cheesecake cups easily. Try using peanut butter or chocolate cookie butter instead of regular cookie butter. This swap adds a rich twist. You can also swirl in fruit preserves for a fruity layer. Jam like strawberry or raspberry brings a fresh taste. If you want a new crust, use Oreos or digestive biscuits. These options add a different flavor and texture. You can also mix in some chopped nuts, like almonds or walnuts, for a crunchy bite. This change gives a nice contrast to the creamy cheesecake. You can make mini cups or a full-sized cheesecake. If you want larger servings, just adjust the portions. For a full cheesecake, use a springform pan. The baking time will change if you decide to bake it. No matter the size, it will taste delicious! - Store in an airtight container. - Keep refrigerated to maintain freshness. When you make these No-Bake Cookie Butter Cheesecake Cups, you want them to last. An airtight container helps keep them fresh. It also prevents other fridge smells from sneaking in. Always remember to put them in the fridge right after making them. - These cheesecake cups are best when eaten within 3 to 5 days. - You can freeze them for later enjoyment. For the best taste, eat these cups within 3 to 5 days. If you want to save some for later, you can freeze them. Just make sure to wrap each cup tightly in plastic wrap. When you're ready to enjoy them, let them thaw in the fridge for a few hours. - Pair with fresh fruit or whipped cream for a tasty twist. - Enjoy with coffee or tea for a perfect dessert pairing. These cheesecake cups shine when you add fresh fruit or a dollop of whipped cream on top. They also go well with a hot cup of coffee or tea. This combo makes for a delightful treat any time of day. Yes, you can! For cream cheese, use a dairy-free cream cheese. Brands like Kite Hill or Tofutti work well. For heavy cream, try coconut cream or a dairy-free whipped topping. Both options keep the flavor rich and creamy. These cheesecake cups last about 3 days in the fridge. After day three, the texture may change. For the best taste and texture, enjoy them within two days. Yes, you can! To prepare non-crushed graham crackers, place them in a zip-top bag and crush them with a rolling pin. This will give you fine crumbs. Alternatively, you can use a food processor for a quicker method. This blog post shares an easy, fun recipe for cheesecake cups. We covered the key ingredients, like cream cheese and cookie butter, and how to make a perfect crust. I explained how to layer the cups and add tasty garnishes. You can also try various flavor add-ins and crust options. Remember to store your treats properly to keep them fresh. I hope you enjoy making and sharing these cheesecake cups as much as I do. Happy baking!

Are you ready to treat yourself to something sweet and easy? These No-Bake Cookie Butter Cheesecake Cups are a delightful dessert that anyone can make. With just a few simple …

Read more

Categories Desserts

Creamy Garlic Steak Tortellini Simple and Delicious Dish

December 8, 2025February 14, 2025 by Chef Tavio
- Cheese tortellini: You need 8 oz of cheese tortellini. It adds a rich flavor and fun texture. Look for fresh or dried tortellini at your store. - Steak options and cut details: Use 1 lb of steak. Sirloin or ribeye works best. Cut it into bite-sized pieces for quick cooking. These cuts are tender and full of flavor. - Garlic and seasoning specifics: You will need 4 cloves of garlic, minced. Garlic gives a strong taste. Add 1 teaspoon of Italian seasoning for warmth. Salt and pepper are key for seasoning, so don’t skip them. - Cream and cheese choices: For a creamy base, use 1 cup of heavy cream. It makes your sauce rich. Add 1 cup of grated Parmesan cheese for a cheesy finish. This will melt into the sauce and add depth. {{ingredient_image_2}} Start by filling a large pot with salted water and bring it to a boil. This step is key. Once the water boils, add 8 oz of cheese tortellini. Cook according to the package instructions, usually around 3-5 minutes. The goal is to achieve that perfect al dente bite. After cooking, carefully drain the tortellini in a colander and set it aside. Next, grab a large skillet and add 2 tablespoons of olive oil. Heat it over medium-high heat. While the oil heats, season 1 lb of steak with salt and pepper. Once the oil shimmers, place the steak pieces into the skillet. Sear the steak for about 3-4 minutes, turning them as needed. You want a nice brown crust. When done, remove the steak from the skillet and cover it to keep warm. Now, we’ll make the sauce. In the same skillet, lower the heat to medium and add 1 tablespoon of olive oil. Once hot, add 4 minced cloves of garlic. Sauté the garlic for about 30 seconds, stirring often. Be careful not to burn it, as burnt garlic is bitter. Next, gently pour in 1 cup of heavy cream. Stir while bringing it to a gentle simmer. Gradually add 1 cup of grated Parmesan cheese and 1 teaspoon of Italian seasoning. Mix until the cheese is melted and the sauce is creamy. It’s time to bring it all together! Add the seared steak back into the skillet. Then, fold in the cooked tortellini. Make sure each piece is well coated in that creamy garlic sauce. For the final touch, taste the dish and adjust the seasoning with more salt or pepper if needed. To cook tortellini perfectly, follow these steps: - Use a large pot of salted water. This adds flavor to the pasta. - Cook until al dente. This means it should be firm but not hard. - Drain it gently and do not rinse. Rinsing removes the starch that helps sauce stick. Common mistakes include: - Overcooking the pasta. This makes it mushy. - Not salting the water. This makes the pasta bland. Choosing the right steak makes a big difference. I recommend using: - Sirloin for a lean cut. - Ribeye for more flavor and fat. For ideal doneness, use these tips: - Sear for 3-4 minutes on each side for medium-rare. - Use a meat thermometer. Aim for 130°F for medium-rare, 140°F for medium. You want a creamy sauce that coats everything well. Here’s how to adjust the creaminess: - If too thick, add a splash of pasta water to loosen it. - If too thin, let it simmer longer to thicken. To add flavors or spices: - Try adding red pepper flakes for heat. - Fresh herbs like basil or thyme can brighten the dish. Pro Tips Choose the Right Steak: Opt for cuts like sirloin or ribeye for a tender and flavorful result. These cuts will sear beautifully and complement the creamy sauce perfectly. Don’t Overcook the Garlic: Sauté the garlic just until fragrant to avoid bitterness. Overcooking can ruin the delicate flavor of your sauce. Use Fresh Parmesan: Grate your Parmesan cheese fresh for the best flavor and texture. Pre-grated cheese often contains anti-caking agents that can affect the creaminess of your sauce. Garnish for Flavor: Fresh parsley not only adds a pop of color but also enhances the dish's flavor profile. Don’t skip this step for a fresh finish! {{image_4}} You can switch the steak for chicken or shrimp. Both options taste great with the creamy garlic sauce. Chicken cooks quickly, so slice it thin for even cooking. Shrimp adds a sweet flavor, perfect with garlic. For a vegetarian twist, use plant-based meat. It absorbs the sauce well and keeps the dish rich. Adding veggies can take this dish to the next level. Spinach wilts nicely and adds color. Mushrooms bring a lovely earthy taste. You might also try mixing in different cheeses. Gouda or mozzarella can create a fun flavor twist. Each cheese melts differently, so choose what you enjoy most. If you're gluten-free, use gluten-free tortellini. Many brands offer tasty options. For dairy-free needs, try coconut cream or a nut-based cheese. These swaps keep the dish rich without dairy. If you're watching carbs, use zucchini noodles instead of tortellini. It’s a fresh take that still feels hearty. Store your leftovers in the fridge. Use airtight containers to keep them fresh. Make sure the dish cools to room temperature first. This helps prevent moisture buildup. Label the container with the date. This way, you know when to eat it. Reheat creamy garlic steak tortellini on the stove. Use a medium heat setting. Add a splash of cream or broth to keep it moist. Stir continuously to avoid sticking. You can also use a microwave. Heat it in short bursts, stirring in between. This helps keep the dish creamy and delicious. You can freeze this dish for later. Use freezer-safe containers to avoid freezer burn. Let the tortellini cool completely before sealing. It can last for up to three months in the freezer. For reheating, thaw it in the fridge overnight. Then, warm it on the stove or microwave. Add cream to refresh the flavors after thawing. To make creamy garlic steak tortellini from scratch, you need a few key ingredients: - 8 oz cheese tortellini - 1 lb steak (sirloin or ribeye), cut into bite-sized pieces - 3 tablespoons olive oil, divided - 4 cloves garlic, minced - 1 cup heavy cream - 1 cup grated Parmesan cheese - 1 teaspoon Italian seasoning - Salt and pepper to taste - Fresh parsley, chopped (for garnish) Start by boiling salted water and cooking the tortellini until al dente. Drain and set aside. Next, heat two tablespoons of olive oil in a skillet. Season your steak with salt and pepper. Sear the steak for 3-4 minutes until browned. Remove the steak and keep it warm. In the same skillet, lower the heat and add the last tablespoon of olive oil. Sauté the minced garlic for about 30 seconds. Be careful not to burn it. Pour in the cream and let it simmer. Stir in the Parmesan cheese and Italian seasoning until it's creamy. Finally, add the steak and tortellini back into the skillet. Mix gently until every piece is coated in the sauce. Taste and adjust seasoning as needed. Yes, you can use frozen tortellini! If you choose frozen tortellini, cook it according to the package instructions. This usually takes a few minutes longer than fresh tortellini. Once cooked, drain it and add it to your creamy garlic sauce just like fresh tortellini. The sauce will still coat the frozen tortellini beautifully. Here are some great ideas for sides: - A fresh green salad with a light vinaigrette - Garlic bread for soaking up the creamy sauce - Steamed broccoli or asparagus to add some color For wine pairings, consider a light red wine like Pinot Noir or a crisp white wine like Sauvignon Blanc. Both will complement the rich flavors of the tortellini and steak. In this blog post, I covered how to make creamy garlic steak tortellini. We explored the key ingredients, cooking steps, and helpful tips for perfect results. Remember, choosing the right steak cut is crucial for flavor. Experiment with variations to suit your taste and dietary needs. Proper storage and reheating can help you enjoy leftovers without losing quality. Now, you have all the tools you need to create a delicious meal. Dive in and savor every bite of your homemade dish!

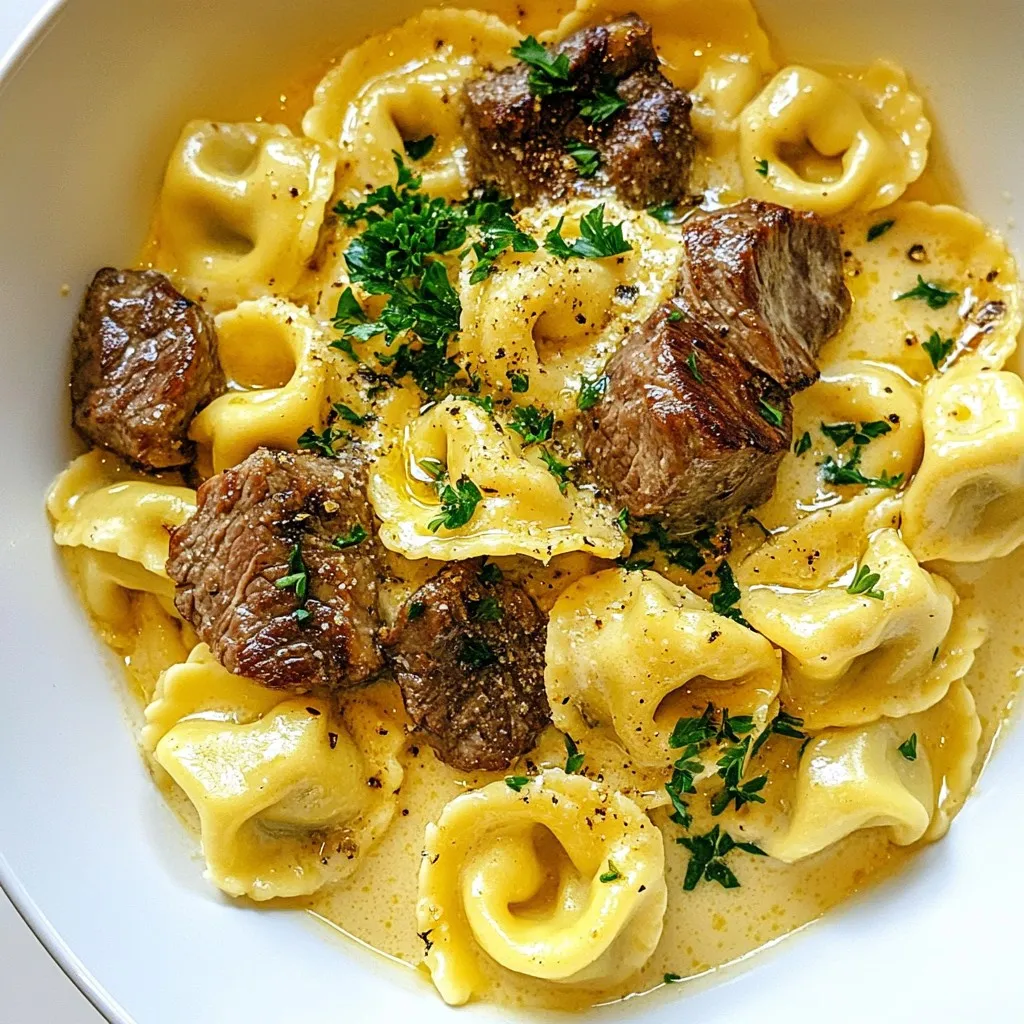
Craving a quick yet mouthwatering meal? Let me introduce you to Creamy Garlic Steak Tortellini! This simple dish combines tender steak, creamy sauce, and cheesy tortellini for a satisfying dinner. …

Read more

Categories Dinner

Crumbl Copycat Chocolate Chip Cookies Simple Treat

December 8, 2025February 13, 2025 by Chef Tavio
- 1 cup unsalted butter, softened to room temperature - 1 cup packed brown sugar - 1/2 cup granulated sugar - 1 teaspoon pure vanilla extract - 2 large eggs, at room temperature - 3 cups all-purpose flour, sifted - 1 teaspoon baking soda - 1/2 teaspoon baking powder - 1 teaspoon salt - 2 cups semisweet chocolate chips - 1 cup chopped walnuts (optional, for added texture) Gathering the right ingredients is key to making these cookies great. Start with unsalted butter. It should be soft but not melted. This helps create a light and fluffy dough. Brown sugar adds a rich flavor. Granulated sugar gives sweetness and crunch. You will need pure vanilla extract for aroma. Use large eggs, as they add moisture and structure. Sifting the flour helps to avoid lumps and gives a better texture. Baking soda and baking powder create the perfect rise. Salt balances the sweetness. Chocolate chips are a must. They give a gooey, melty center. If you like nuts, add chopped walnuts for crunch. These simple ingredients come together to create a treat everyone loves! {{ingredient_image_2}} Start by preheating your oven to 350°F (175°C). This step is key for even baking. While your oven warms up, line two baking sheets with parchment paper. This helps the cookies come off easily after baking. In a large mixing bowl, combine 1 cup of softened unsalted butter, 1 cup of packed brown sugar, and 1/2 cup of granulated sugar. Use an electric mixer to beat these ingredients until light and fluffy. This usually takes about 3 to 5 minutes. This step helps create a nice texture for your cookies. Add 2 large eggs to the butter-sugar mix, one at a time. Make sure to beat well after each egg. Then, stir in 1 teaspoon of pure vanilla extract. Mix until everything is well combined. This adds rich flavor to your cookies. In a separate bowl, whisk together 3 cups of all-purpose flour, 1 teaspoon baking soda, 1/2 teaspoon baking powder, and 1 teaspoon salt. Mixing dry ingredients separately helps them blend evenly into the dough later. Slowly add the dry mixture to the wet ingredients. Use a spatula or wooden spoon to mix until just combined. Be careful not to overmix, as this can make your cookies tough. You want a soft, sticky dough. Gently fold in 2 cups of semisweet chocolate chips and 1 cup of chopped walnuts, if you choose to use them. This gives your cookies a delightful texture and taste. Make sure every bite has chocolate! Using a cookie scoop or a tablespoon, scoop out balls of dough about 2 tablespoons each. Place them on the prepared baking sheets, leaving about 2 inches between each scoop. This ensures they have room to spread while baking. Place the baking sheets in the preheated oven. Bake for 10 to 12 minutes. Look for a light golden brown edge with soft centers. After baking, let the cookies cool on the sheets for 5 minutes. Then, transfer them to a wire rack to cool completely. The smell will be amazing! To get the best texture in your cookies, cream the butter and sugars well. This step adds air and gives your cookies that light and fluffy feel. Mix until the mixture looks pale and fluffy. The right mix time is about 3 to 5 minutes. Don't rush this step; it makes a big difference! Mixing too much can make your cookies tough. To avoid this, combine the dry ingredients first. When you add them to the wet mix, stir just until you see no dry flour. Use a spatula or wooden spoon for this. Gently fold in the chocolate chips. This keeps your cookies soft and chewy. For even baking, space your cookie dough balls well on the baking sheet. Leave about 2 inches between each ball. This allows them to spread out nicely. Use parchment paper on your baking sheets. It helps prevent sticking and makes cleanup easy. Bake at 350°F (175°C) for 10-12 minutes. Look for light golden edges. To impress your guests, arrange the cookies on a nice platter. You can sprinkle a bit of sea salt on top for extra flavor. It also adds a nice look! Serve them with a cold glass of milk. This classic pairing makes for a perfect treat. Enjoy the deliciousness! Pro Tips Use Room Temperature Ingredients: Make sure your butter and eggs are at room temperature to ensure they blend smoothly, resulting in a better cookie texture. Chill the Dough: For thicker cookies, chill the dough for at least 30 minutes before baking. This helps prevent spreading and enhances flavor. Don’t Overbake: Keep an eye on the cookies as they bake; they should look slightly underbaked in the center for that perfect chewy texture. Experiment with Mix-Ins: Feel free to add different types of chocolate chips, nuts, or even dried fruit to customize your cookies to your liking! {{image_4}} You can change up the flavors in your Crumbl copycat cookies. Try adding different mix-ins. Here are a few ideas: - Milk chocolate chips: For a sweeter bite. - Dark chocolate chips: Adds a rich depth. - Peanut butter chips: Perfect for nut lovers. - Dried fruits: Like cranberries or cherries for a fruity twist. - Toffee bits: Bring a buttery crunch. Mix and match to find your favorite combo! You can make these cookies gluten-free. Swap the all-purpose flour for a gluten-free blend. Check that the blend has a good balance of starch and protein. You can also add a bit of xanthan gum if the mix does not include it. This will help with the texture and hold. Your cookies will still taste great! You can switch up the flavors in your cookie dough. Here are some fun swaps: - Cocoa powder: Replace some flour with cocoa for chocolate cookies. - Almond extract: Use instead of vanilla for a nutty flavor. - Cinnamon: Add a teaspoon for warmth. - Zest from citrus fruits: Like lemon or orange for a fresh kick. Experiment and enjoy your cookie-making journey! To keep your cookies fresh, store them in an airtight container. This will help keep them soft and chewy. You can use plastic wrap or a cookie jar. For extra protection, add a slice of bread in the container. This will help maintain moisture. Do not stack cookies too high. This prevents them from breaking. You can freeze both cookie dough and baked cookies. For dough, scoop it into balls and freeze them on a baking sheet. Once frozen, place them in a freezer bag. They can last up to three months. To bake, you can cook them straight from the freezer. Just add a few extra minutes to the baking time. For baked cookies, let them cool completely. Then, wrap them tightly and place them in a freezer bag. They will stay fresh for about three months. To reheat cookies, use the microwave. Heat them for about 10 seconds. This will make them warm and soft again. You can also use an oven. Preheat it to 350°F (175°C). Place the cookies on a baking sheet for about 5 minutes. This will restore their soft, chewy texture. Enjoy your cookies warm, just like fresh out of the oven! These cookies are chewy because of a few key steps. First, we use a mix of brown and white sugars. Brown sugar adds moisture and chewiness. Next, the butter must be softened, not melted. This keeps the dough thick. Also, baking them until the edges are golden brown while the centers stay soft helps too. This balance gives you that perfect chewy cookie. Yes, you can use margarine instead of butter. However, it may change the taste and texture slightly. Butter adds a rich flavor and helps with chewiness. If you use margarine, choose a stick form, not a spread. This will help maintain the right consistency in your cookies. These cookies can last up to a week when stored correctly. Keep them in an airtight container at room temperature. For longer storage, you can freeze them. They stay fresh for about three months in the freezer. Just remember to thaw them before eating for the best taste. Yes, you can make these cookies without eggs. Use a substitute like applesauce or mashed banana. Use 1/4 cup of applesauce or half a mashed banana for each egg. This will help bind the ingredients together. The cookies may be a bit softer, but they will still taste great! You can add many flavors to the dough! Try mixing in peanut butter or butterscotch chips for a twist. Nuts like pecans or almonds also add great texture. You can even add spices like cinnamon or a splash of almond extract for extra flavor. Experiment to find your favorite mix! You now have the full recipe for delicious cookies. We covered the key ingredients, step-by-step instructions, and helpful tips. Don't forget about great variations and smart storage methods. Baking cookies is fun and rewarding. Experiment with flavors and enjoy the process. Keep these tips in mind for tasty results every time! Happy baking!

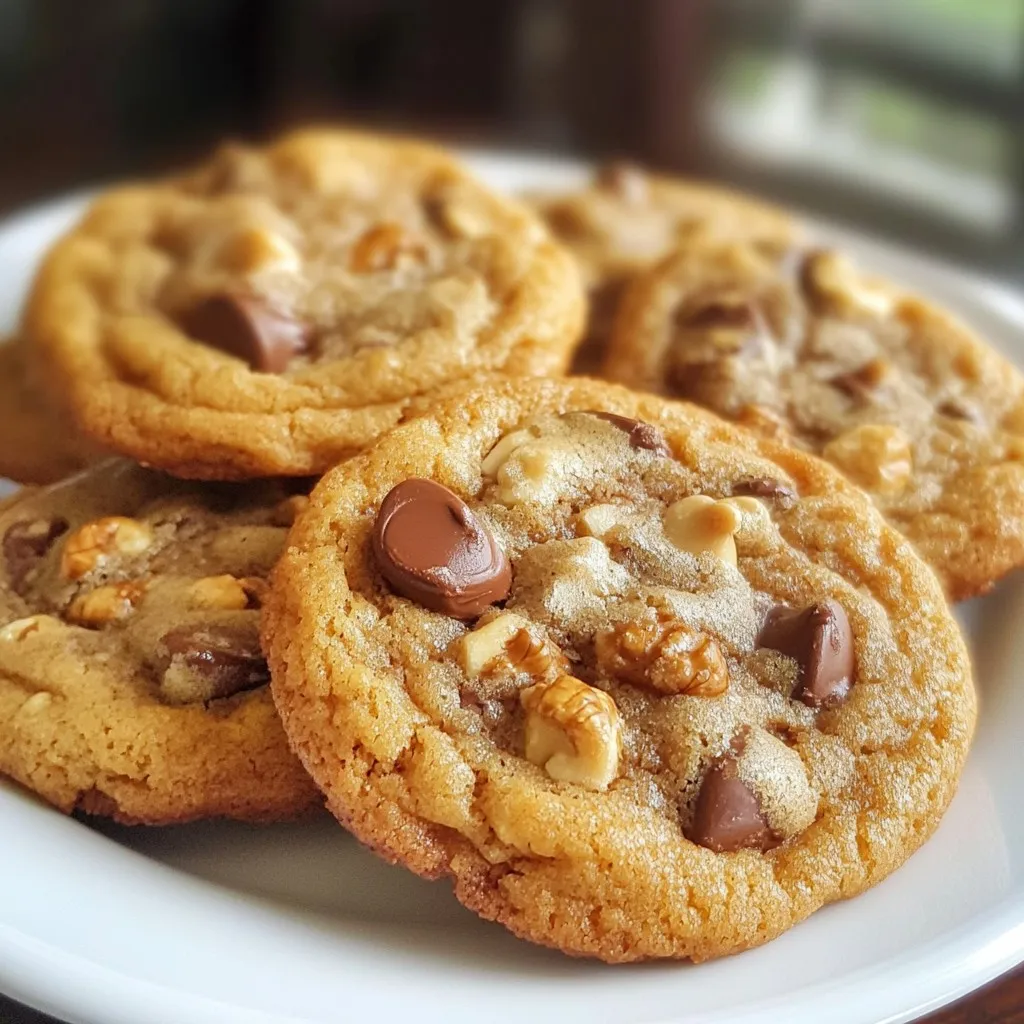
Do you crave the delicious taste of Crumbl cookies? You’re in the right place! I’ll show you how to make Crumbl Copycat Chocolate Chip Cookies in your own kitchen. With …

Read more

Categories Desserts

Cajun Smoked Sausage Alfredo Comforting and Simple Meal

November 26, 2025February 12, 2025 by Chef Tavio
- 8 oz fettuccine pasta - 1 lb smoked sausage, sliced - 2 tablespoons olive oil - 1 small onion, chopped - 3 cloves garlic, minced - 1 teaspoon Cajun seasoning - 1 cup heavy cream - 1 cup grated Parmesan cheese - 1/2 cup fresh parsley, chopped - Salt and pepper to taste To make Cajun Smoked Sausage Alfredo, you will need a few key ingredients. First, choose 8 oz of fettuccine pasta. This pasta holds the sauce well. For protein, use 1 pound of smoked sausage, sliced into rounds. This sausage adds a rich flavor to your dish. You also need 2 tablespoons of olive oil to sauté the sausage. For the base, have 1 small onion, chopped finely, and 3 cloves of garlic, minced. They add great depth to the dish. To spice it up, include 1 teaspoon of Cajun seasoning. This gives the dish its signature kick. Next, for creaminess, 1 cup of heavy cream is essential. Finally, you need 1 cup of grated Parmesan cheese to create a luscious sauce. Don’t forget 1/2 cup of fresh parsley for a pop of color and freshness. Season with salt and pepper to taste. - Extra Parmesan cheese for garnish - Paprika for garnish - Additional toppings or spices For those who want to elevate their dish, consider optional ingredients. Extra Parmesan cheese makes for a lovely garnish. A sprinkle of paprika adds a nice color and hint of flavor. You can also add other toppings or spices to fit your taste. {{ingredient_image_2}} - Boil salted water in a large pot. - Add 8 oz of fettuccine and cook until al dente, about 8-10 minutes. - Heat 2 tablespoons of olive oil in a large skillet. - Add 1 lb of sliced smoked sausage. Brown it for about 5-7 minutes, stirring often for even cooking. - Once browned, add 1 small chopped onion and 3 minced garlic cloves. - Sauté until the onion is soft and clear, about 3-4 minutes. - Sprinkle in 1 teaspoon of Cajun seasoning and mix it well. - Pour in 1 cup of heavy cream and stir as it simmers for 3-5 minutes. - Lower the heat and add 1 cup of grated Parmesan cheese. - Stir until the sauce is smooth. If too thick, add some reserved pasta water. - Toss the cooked fettuccine in the sauce until fully coated. - Before serving, stir in 1/2 cup of chopped fresh parsley for a touch of color. To get the right sauce thickness, you need to stir. Start with low heat and slowly add the cream. This helps it blend well. If it gets too thick, add a bit of pasta water. This keeps the sauce smooth and creamy. Using fresh ingredients makes a big difference. Fresh garlic and parsley add great flavor. Fresh Parmesan cheese melts better than the pre-grated kind. These small changes make your dish taste amazing. Pair your dish with a light salad. A simple green salad with vinaigrette works well. Garlic bread is another great choice. It soaks up the creamy sauce. For a nice presentation, use deep bowls. Serve the pasta and sprinkle extra cheese on top. A little paprika adds color, and a sprig of parsley makes it look fancy. One common mistake is overcooking the pasta. Cook it until it's al dente for the best texture. This keeps it firm and helps it hold onto the sauce. Not seasoning enough can also ruin the dish. Always taste before serving. Add salt and pepper as needed. Don’t skip this step; it makes a huge difference in flavor. Pro Tips Use Fresh Ingredients: Fresh parsley and high-quality Parmesan cheese can significantly enhance the flavor of your Alfredo sauce. Adjust the Spice Level: If you like it spicier, add more Cajun seasoning or a pinch of cayenne pepper to the sauce. Don’t Overcook the Pasta: Cook the fettuccine until just al dente, as it will continue to cook slightly when mixed with the hot sauce. Save Pasta Water: Keep a cup of the reserved pasta water handy to adjust the sauce's consistency if it becomes too thick. {{image_4}} You can change the sausage type. Try chicken or turkey for a lighter meal. These options keep your dish tasty. You can also use different pasta shapes. Penne or rigatoni work well and hold sauce nicely. Want more heat? Adjust your Cajun seasoning. Add more or less based on your taste. You can also include fresh peppers. Jalapeños or serranos can give your dish a spicy kick. A dash of hot sauce works too! For a vegetarian version, use plant-based sausage. Many brands offer tasty options that mimic meat. You can substitute heavy cream with plant-based cream too. This keeps the dish creamy and delicious without dairy. To keep your Cajun Smoked Sausage Alfredo fresh, store leftovers right. Use airtight containers to seal in moisture. Glass or BPA-free plastic containers work best. Before sealing, let the dish cool to room temperature. This step helps prevent condensation. Always label your containers with the date. Aim to eat leftovers within three days for best taste. For reheating, use a skillet on low heat. Add a splash of water or cream to help the sauce. Stir gently to avoid burning. This keeps the sauce creamy and smooth. If using a microwave, heat in short bursts. Stir after each burst to ensure even heating. Avoid overheating, as it can change the sauce's texture. You can freeze Alfredo, but it may change texture. To freeze, let the dish cool completely. Place it in freezer-safe containers. Leave some space for expansion. Label with the date and name. Thaw overnight in the fridge before reheating. For best results, reheat slowly on the stove. Add a little cream to restore its creaminess. To add heat, use more Cajun seasoning. You can also add crushed red pepper flakes. If you enjoy fresh heat, chop up jalapeños or add diced hot peppers. Incorporating spicy sausage can also boost the heat level. Remember to taste as you go, so you don’t overpower the dish. Cajun Smoked Sausage Alfredo pairs well with various side dishes. Here are some great options: - Garlic bread for a crunchy side - A fresh green salad with a tangy dressing - Roasted vegetables for extra flavor and nutrition - Steamed broccoli for a healthy crunch These sides will enhance your meal and balance the rich flavors of the Alfredo sauce. Yes, you can prepare Cajun Smoked Sausage Alfredo ahead of time. Cook the pasta and sauce, then store them separately in the fridge. When ready to serve, combine them in a skillet. Add a splash of cream or pasta water to refresh the sauce. For best results when reheating, use low heat on the stove. Stir gently to avoid sticking. You can also add a little cream to revive the sauce’s smooth texture. This recipe for Cajun Smoked Sausage Alfredo is easy and fun to make. We covered the key ingredients, step-by-step cooking tips, and common mistakes to avoid. Remember to adjust the spice level to suit your taste. You can experiment with different sausages or pasta types. Enjoy your meal fresh or store it for later. This dish is sure to impress anyone. With simple steps, you can create a tasty meal in no time. Dive into this recipe and enjoy every bite!

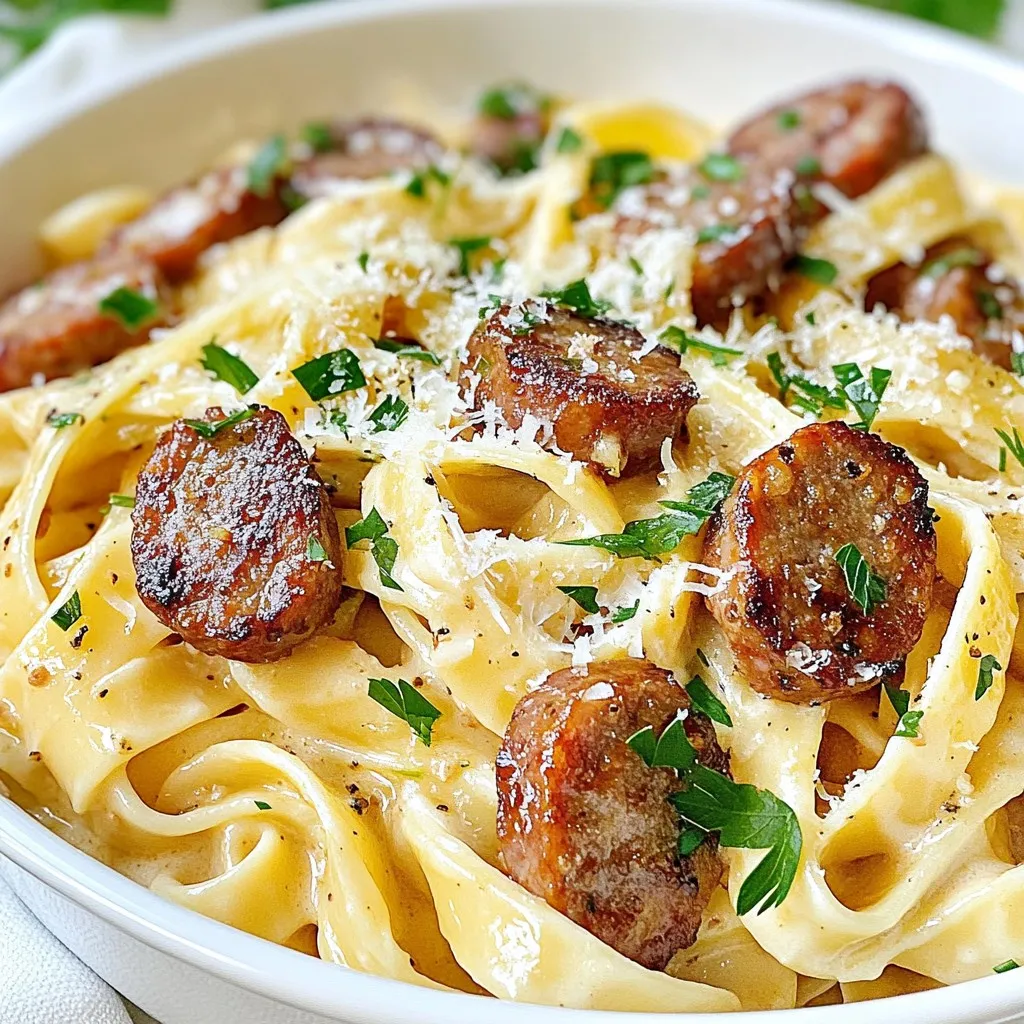
Are you craving a meal that’s both comforting and easy to whip up? Look no further than Cajun Smoked Sausage Alfredo! This creamy dish combines smoky sausage with flavorful fettuccine …

Read more

Categories Dinner
Older posts
Newer posts
← Previous Page1 … Page178 Page179 Page180 … Page191 Next →

TASTED NEST

Where Flavor Finds a Home 🍳🏡 — warm, simple, and crave-worthy recipes made for real life, from stovetop mornings to backyard dinners.

PAGES

Home About Contact Privacy Policy Terms & Conditions Cookie Policy GDPR Policy Copyright Policy Disclaimer

CATEGORIES

Appetizers Desserts Salads Breakfast Dinner
Copyright © 2026 Tasted Nest. All rights reserved.