Skip to content
Tasted Nest
  • Home
  • Appetizers
  • Desserts
  • Salads
  • Breakfast
  • Dinner
  • Privacy Policy
  • Contact
  • About

Chef Tavio

Chewy Snickerdoodle Blondies Delightful Easy Recipe

August 14, 2025 by Chef Tavio
To make chewy snickerdoodle blondies, you need these simple ingredients: - 1 cup unsalted butter, melted - 2 cups packed brown sugar - 2 large eggs - 1 teaspoon pure vanilla extract - 2 cups all-purpose flour - 1 teaspoon baking powder - 1 teaspoon cream of tartar - 1/2 teaspoon salt - 1/4 cup granulated sugar (for topping) - 2 teaspoons ground cinnamon (for topping) These ingredients blend well to create a soft and chewy dessert. The butter gives richness, while brown sugar adds a deep flavor. Eggs help bind everything together and add moisture. The cream of tartar is key for that classic snickerdoodle taste. The topping of cinnamon and sugar gives a sweet crunch. Gather these items before you start. This will make your baking process smooth and fun. I always find it helpful to measure everything out first. This way, you won’t miss a thing! - Preheat your oven to 350°F (175°C). - Line a 9x13 inch baking pan with parchment paper. Start by preheating the oven. This ensures your blondies bake evenly. Next, line your pan with parchment paper. Let it hang over the edges. This helps you lift the blondies out after baking. - Mix butter and brown sugar. - Incorporate eggs and vanilla. - Combine dry ingredients separately. In a large bowl, mix the melted butter and brown sugar. Use a whisk to get a smooth mix. This takes about 1-2 minutes. Next, add the eggs one by one. Mix well after each egg. Then stir in the vanilla extract until it’s smooth. In another bowl, whisk the flour, baking powder, cream of tartar, and salt. This keeps the dry mix even. - Fold dry ingredients into wet mixture. - Spread batter in the baking pan. Now, slowly add the dry mix to the wet mix. Use a spatula to fold them together. It’s fine if the batter has some lumps. Pour the blondie batter into your prepared pan. Use a spatula to spread it out evenly. This helps with even baking. - Prepare cinnamon sugar topping. - Bake for 20-25 minutes. In a small bowl, mix the granulated sugar with the ground cinnamon. Sprinkle this topping over the batter. This gives a nice snickerdoodle flavor. Place the pan in the oven and bake for 20-25 minutes. Check with a toothpick. It should come out with a few moist crumbs, not wet batter. To get that perfect chewy texture, your baking time matters. Bake the blondies for 20-25 minutes. Check them with a toothpick. It should come out with a few moist crumbs, not wet batter. This shows they are just right. Overmixing can ruin your blondies. When you mix the wet and dry ingredients, do it gently. Fold them together until just combined. It’s okay if the batter has some lumps. This will help keep them chewy. Want to boost the flavor? Try adding a bit more cinnamon. Just a half teaspoon can make a big difference. This enhances that warm, snickerdoodle taste. Using high-quality vanilla extract is key too. It adds depth to your blondies. Look for pure vanilla extract instead of imitation for the best flavor. Serving your blondies nicely can impress anyone. A great idea is to dust them with a little cinnamon sugar. This adds a lovely touch. Pair your blondies with ice cream or whipped cream. A scoop of vanilla ice cream on top makes a delightful treat. The creaminess balances the chewy texture perfectly. Enjoy! {{image_4}} You can change the flavor and texture of your blondies with fun add-ins. Try adding chocolate chips or nuts for a tasty crunch. They will give your blondies a sweet surprise. If you want a fruity twist, add dried fruits or coconut flakes. These mix-ins enhance the flavor and create a delightful treat. Want to explore different flavors? You can add coffee or mocha for a rich taste. This gives your blondies a more grown-up flavor. For a seasonal treat, try a pumpkin spice twist in the fall. Simply add pumpkin spice to the batter, and you'll have a cozy dessert perfect for autumn. If you need to make your blondies gluten-free, choose alternative flours like almond or oat flour. These options work well and maintain the chewy texture. For vegan substitutions, use flax eggs or applesauce instead of eggs. Swap the butter for coconut oil or a vegan butter. This way, everyone can enjoy your delicious blondies! To keep your chewy snickerdoodle blondies fresh, use an airtight container. A glass or plastic container works well. Line it with parchment paper to avoid sticking. Place the blondies in a single layer. This helps keep them soft and chewy. If the blondies stack, they may get squished. Store them at room temperature for up to three days. For longer freshness, refrigerate them. Just make sure to seal the container tightly. You can freeze blondies for up to three months. Start by letting them cool completely. Then cut them into squares. Wrap each square in plastic wrap. Then place them in a freezer bag. Be sure to remove as much air as you can. This helps prevent freezer burn. When you want to enjoy them, just take out a square. Let it thaw in the fridge overnight or at room temperature for a few hours. You can also warm them up in the oven. Preheat it to 350°F (175°C) and bake for about 10 minutes. This way, they taste fresh again! Yes, you can use margarine in place of butter. It will change the taste a bit. Margarine has more water, which can make the blondies less chewy. If you do use margarine, choose a stick form, not a tub. This helps keep the texture similar. You can tell if the blondies are ready by using a toothpick. Insert it into the center of the pan. If it comes out with a few moist crumbs, they are done. If it has wet batter, they need more time. Keep a close eye on them. Absolutely! You can make these blondies a day before. Just store them in an airtight container. They taste great the next day and even improve in flavor. If you want to keep them longer, freeze them. To get that chewy texture, do not overmix the batter. Mix until just combined. Also, bake them for the right time. Check them at 20 minutes. They should feel firm but still soft. This will give you the perfect chewy bite. This blog post shared a simple recipe for blondies with helpful tips. You learned about the ingredients, step-by-step instructions, and variations. We've covered how to achieve that perfect chewy texture and flavor. Storing and freezing your blondies is easy, ensuring you keep them fresh. Experiment with add-ins and flavors to make it your own. Enjoy baking these delicious treats! They’re sure to be a hit with your friends and family.

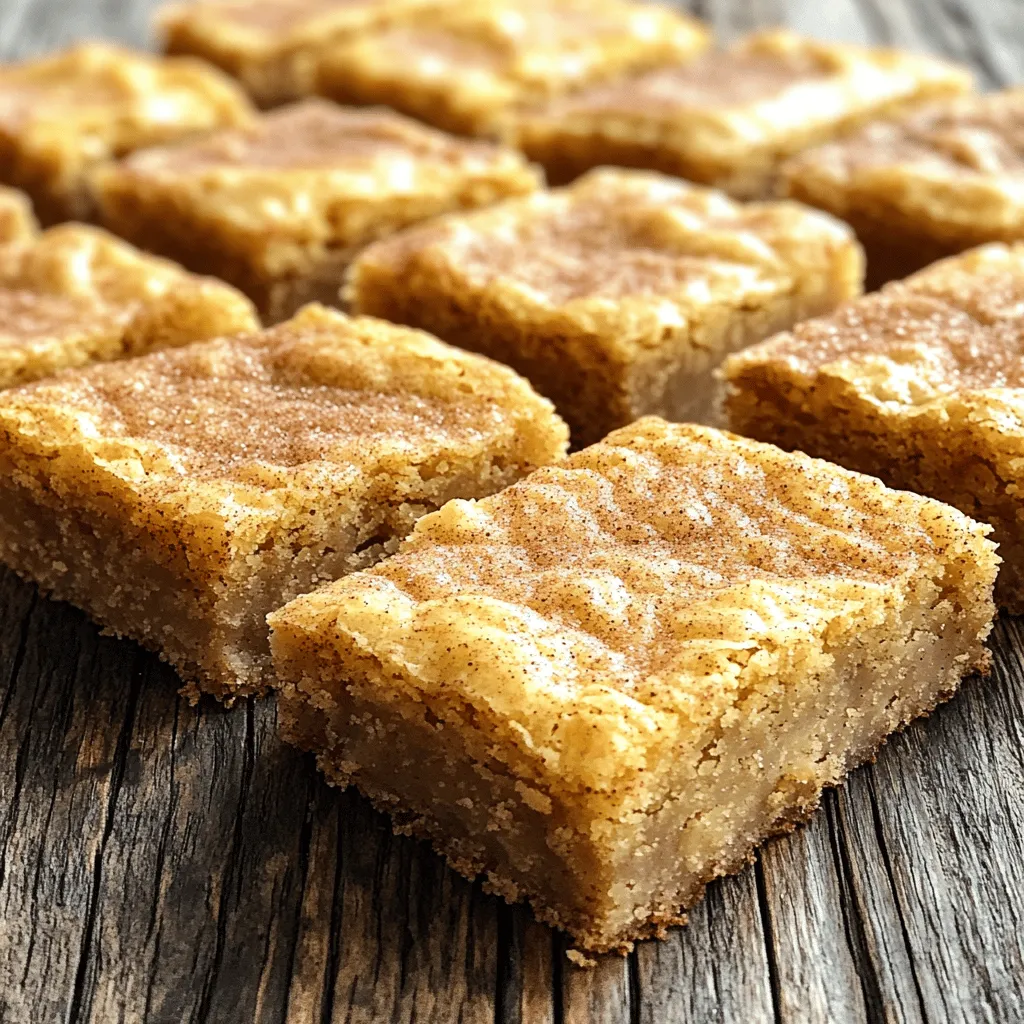
Do you crave a sweet treat that’s easy to make and utterly delightful? Look no further than these Chewy Snickerdoodle Blondies! With soft, buttery layers topped with gooey cinnamon sugar, …

Read more

Categories Desserts

Lemon Blueberry Bread Flavorful and Simple Recipe

August 14, 2025 by Chef Tavio
- 1 ½ cups all-purpose flour - 1 teaspoon baking powder - ½ teaspoon baking soda - ¼ teaspoon salt - ½ cup unsalted butter, softened to room temperature - 1 cup granulated sugar - 2 large eggs, at room temperature - 1 teaspoon vanilla extract - Zest of 1 lemon - ¼ cup freshly squeezed lemon juice - ½ cup Greek yogurt - 1 cup fresh blueberries (or frozen if necessary) - 2 tablespoons powdered sugar - 1 tablespoon lemon juice The ingredients for this lemon blueberry bread make it truly special. The all-purpose flour gives it structure. Baking powder and baking soda help it rise, while salt enhances the flavor. Unsalted butter adds richness, and granulated sugar adds sweetness. Using eggs at room temperature helps with mixing. Vanilla extract brings warmth, and lemon zest brightens the bread. Lemon juice adds a tangy kick, while Greek yogurt keeps it moist. Finally, blueberries burst with flavor and color, making each slice delightful. If you want to add a glaze, powdered sugar and lemon juice create a sweet finish. This step is optional but adds a nice touch. Each ingredient plays a role, making this bread a tasty treat everyone will love. Start by preheating your oven to 350°F (175°C). While it heats up, grab a 9x5-inch loaf pan. Grease it well with butter or line it with parchment paper. This makes it easy to take out the bread later. In a medium bowl, add 1 ½ cups of all-purpose flour, 1 teaspoon of baking powder, ½ teaspoon of baking soda, and ¼ teaspoon of salt. Use a whisk to mix them well. This step is crucial for even flavor and texture. In a large bowl, take ½ cup of softened unsalted butter and 1 cup of granulated sugar. Use an electric mixer to beat them together. Mix for 3 to 4 minutes until the mixture is light and fluffy. This creates a nice base for your bread. Next, add 2 large eggs to the butter mixture. Add them one at a time, mixing well after each. Then, stir in 1 teaspoon of vanilla extract, the zest of 1 lemon, and ¼ cup of freshly squeezed lemon juice. This adds great flavor to your bread. Now, it's time to combine everything. Gradually add the dry mixture to the wet mixture. Alternate with ½ cup of Greek yogurt. Start with dry, then wet, and end with dry. Mix until just combined to keep the bread soft. Once mixed, carefully fold in 1 cup of fresh blueberries. Transfer the batter to the prepared loaf pan. Smooth the top with a spatula. Bake in the oven for 50 to 60 minutes. A toothpick should come out clean when inserted in the center. After baking, take the bread out of the oven. Let it cool in the pan for about 10 minutes. Then, move it to a wire rack to cool completely. If you want a glaze, mix 2 tablespoons of powdered sugar with 1 tablespoon of lemon juice. Drizzle it over the cooled bread for a sweet finish. Using room temperature ingredients is key. Cold butter and eggs can make the bread dense. Softened butter blends better with sugar, creating a light texture. Room temperature eggs help the mixture rise well. Always take your butter and eggs out ahead of time. This small step can make a big difference. To fold in blueberries, use a gentle touch. Start with your batter in a bowl. Add the blueberries and use a silicone spatula to mix. Be careful not to smash the berries. This keeps them whole and juicy in your bread. The goal is to have blueberries spread throughout, not sunk to the bottom. If your bread is dense, it may be overmixed. Mix just until combined for the best rise. Dry bread can come from baking too long. Check for doneness with a toothpick inserted in the center. If it comes out clean, the bread is ready. Adjust your baking time based on your oven for future bakes. {{image_4}} You can make this bread gluten-free with a few simple swaps. Use gluten-free all-purpose flour instead of regular flour. Look for a mix that has xanthan gum. This will help give the bread structure. I also like to add a bit of almond flour for extra moisture and flavor. Just replace half of the gluten-free flour with almond flour. If you need a dairy-free version, swap the butter for coconut oil or a dairy-free butter substitute. For yogurt, try using a plant-based yogurt. Almond or coconut yogurt works well. This keeps the bread moist and tasty without dairy. You can change the flavor of your bread easily. Add nuts like walnuts or pecans for a nice crunch. You can also add spices like cinnamon or nutmeg to enhance the flavor. If you want to switch up the fruit, try raspberries or chopped strawberries instead of blueberries. This keeps your bread fun and fresh! To keep lemon blueberry bread fresh, wrap it well. Use plastic wrap or aluminum foil. This keeps moisture in and air out. You can also store it in an airtight container. Always place it at room temperature. Avoid the fridge, as this can dry it out. To freeze your lemon blueberry bread, first cool it completely. Then, wrap it tightly in plastic wrap. Next, place the wrapped bread in a freezer bag. Remove as much air as possible before sealing. You can freeze it for up to three months. To thaw, take it out of the freezer and leave it at room temperature overnight. For faster thawing, you can slice the bread and let the pieces sit at room temperature for 1-2 hours. Lemon blueberry bread stays fresh for about three to four days when stored properly. If you keep it sealed, the flavor will remain bright. For the best taste, try to eat it within the first two days. This is when it tastes its best! Yes, you can use frozen blueberries. They work well in this recipe. Just be aware that they may release extra juice. This can make your bread a bit more moist but still delicious. If using frozen, do not thaw them. Add them straight to the batter. This helps keep the berries intact and bright. To check if your bread is done, look for a few signs. First, the bread should be golden brown on top. Then, insert a toothpick into the center. If it comes out clean, your bread is ready. You can also gently press the top. If it springs back, it’s done. If it leaves an indent, it needs more time. If you don’t have Greek yogurt, there are good swaps. You can use regular yogurt, sour cream, or even apple sauce. Each option changes texture slightly. Use regular yogurt for a similar taste. Sour cream adds richness. Apple sauce makes the bread sweeter and moist. Just keep the same amount as the recipe calls for. There are many great ways to serve this bread. Slice it and place it on a nice platter. For a fun touch, dust with powdered sugar. You can also drizzle with the optional lemon glaze. Serve it with a cup of tea or coffee for a tasty snack. For breakfast, add a side of yogurt or fresh fruit. This article covered how to bake a delicious Lemon Blueberry Bread. You learned about key ingredients, step-by-step instructions, and tips for success. We explored tasty variations and storage tips to keep your bread fresh. Enjoy making this bread with fresh flavors. Remember, using the right ingredients and techniques ensures a moist treat every time. Happy baking!

Are you ready to bake something delightful? This Lemon Blueberry Bread recipe combines fresh flavors and a simple process. You’ll enjoy the zesty lemon and juicy blueberries in every bite. …

Read more

Categories Desserts

Spicy Honey Sriracha Shrimp Tacos Flavorful Treat

August 14, 2025 by Chef Tavio
To make Spicy Honey Sriracha Shrimp Tacos, gather these key ingredients: - 1 pound large shrimp, peeled and deveined - 2 tablespoons honey - 2 tablespoons Sriracha sauce - 1 tablespoon fresh lime juice (about 1 lime) - 1 tablespoon olive oil - 1 teaspoon garlic powder - 1 teaspoon smoked paprika - Salt and freshly cracked black pepper, to taste - 8 small corn or flour tortillas - 1 cup cabbage, finely shredded - 1 ripe avocado, thinly sliced - 1/4 cup fresh cilantro, roughly chopped - Lime wedges for serving These ingredients work together to create a perfect mix of sweet and spicy flavors. Feel free to add extras to your tacos for more flavor: - Diced tomatoes for freshness - Sliced jalapeños for extra heat - Crumbled feta cheese for creaminess - Sour cream or Greek yogurt for a cool touch These add-ins can take your tacos to a new level of enjoyment. Using good-quality ingredients makes a difference. Here are my top picks: - For shrimp, look for Wild American Shrimp or Fresh Frozen Shrimp. - Use local honey for the best flavor. - Try Huy Fong Sriracha for authentic taste. - For tortillas, Mission or La Tortilla Factory brands work well. Choosing quality ingredients ensures you get the best taste from your tacos. Start by grabbing a medium mixing bowl. In the bowl, whisk together 2 tablespoons of honey and 2 tablespoons of Sriracha sauce. Add 1 tablespoon of fresh lime juice and 1 tablespoon of olive oil. Then, sprinkle in 1 teaspoon of garlic powder and 1 teaspoon of smoked paprika. Don’t forget a pinch of salt and freshly cracked black pepper. This mixture will be your zesty marinade. Now, take 1 pound of peeled and deveined shrimp. Add them to the bowl with the marinade. Toss gently to coat each shrimp well. Cover the bowl and let it sit for at least 15 minutes. This lets the shrimp soak up all those bold flavors. You can even marinate them longer for more taste. While the shrimp marinates, preheat a non-stick skillet over medium-high heat. Once hot, lay the marinated shrimp in a single layer in the skillet. Cook them for about 2-3 minutes on each side. You want them to turn pink and opaque. When done, remove them from heat and set them aside. This quick cooking time keeps the shrimp juicy and tender. For perfect shrimp, cook them just right. Start with fresh, large shrimp. When you heat your skillet, make sure it's hot. Place the shrimp in a single layer. Cook for 2-3 minutes on each side. Once they turn pink and opaque, they're done. Overcooking makes shrimp tough, so watch closely. A touch of garlic powder and smoked paprika adds great flavor. Warming tortillas is easy and quick. You can use a skillet or microwave. For a skillet, heat each tortilla for 30 seconds on both sides. This keeps them soft and pliable. If you prefer the microwave, wrap the tortillas in a damp paper towel. Heat them for about 20 seconds. This method keeps them moist and tasty. Tacos are all about flavor and texture. Besides cabbage and avocado, try adding fresh toppings. Sliced jalapeños give a kick. A dollop of sour cream adds creaminess. You can also sprinkle feta cheese for a salty touch. Fresh cilantro brightens the dish. Lime wedges are perfect for squeezing over the tacos. Each topping adds a new layer of flavor. Enjoy mixing and matching to find your favorite combo! {{image_4}} You can easily make these tacos vegetarian. Swap the shrimp for marinated tofu or chickpeas. Both options soak up flavors well. Just marinate them like you do for the shrimp. Cook them until they are golden and crisp. You can also use grilled vegetables like bell peppers and zucchini. This gives your tacos a great texture and delicious flavor. Feel free to play with different sauces for your tacos. If you want a milder taste, try a sweet chili sauce instead of Sriracha. For a creamy touch, mix Sriracha with plain yogurt or sour cream. This adds a nice coolness to balance the heat. You could also try a mango salsa for a fruity twist. This adds sweetness and freshness to each bite. Want to change up how you serve these tacos? Try taco bowls! Use rice or quinoa as the base. Layer in cabbage, shrimp, and toppings like avocado and cilantro. This is a filling and fun way to enjoy the flavors. If you prefer something lighter, use lettuce wraps. Butter lettuce works great as it holds the filling well. This adds crunch and a fresh taste to your meal. Store leftover tacos in an airtight container. Keep shrimp and tortillas separate. This helps maintain freshness. Place the shrimp in the fridge for up to 2 days. If you mix them, the tortillas get soggy. To reheat shrimp, use a skillet. Heat over medium heat for about 2-3 minutes. Stir gently until warm. Avoid high heat to prevent rubbery shrimp. You can also use the microwave. Heat in short bursts for about 30 seconds. You can freeze the shrimp before cooking. Place them in a freezer-safe bag. Be sure to remove excess air. The shrimp can last for up to 3 months. Cooked shrimp do not freeze well, so it’s best to eat them fresh. If you freeze tortillas, wrap them tightly. They can last up to 2 months in the freezer. Yes, you can use frozen shrimp. Just make sure to thaw them first. Place the shrimp in cold water for about 20 minutes. Once they are thawed, peel and devein them if needed. The shrimp will still taste great in your tacos. If you don’t have Sriracha, try using another hot sauce. You might also mix chili paste with a bit of honey to mimic the sweet and spicy flavor. For a milder option, use sweet chili sauce. Each option will change the taste a little, but your tacos will still be delicious. To reduce the heat, use less Sriracha in the marinade. You can also add more honey to balance the spice. Another option is to use a mild sauce like barbecue or a yogurt-based sauce. Adding toppings like avocado or sour cream can also help cool down the spice. This article covered important steps for making shrimp tacos. We discussed essential ingredients and their quality brands. I shared how to prepare the marinade and cook shrimp perfectly. You learned tips for cooking and warming tortillas safely. We explored variations, like vegetarian options and different sauces. Lastly, I provided easy storage info and answered common questions. You now have all you need to create tasty shrimp tacos at home. Enjoy your cooking journey!

If you crave bold flavors, dive into my Spicy Honey Sriracha Shrimp Tacos! These tacos pack a sweet and spicy punch that elevates any meal. With simple ingredients and easy …

Read more

Categories Dinner

Caramel Apple Cheesecake Dip Smooth and Irresistible

August 13, 2025 by Chef Tavio
- 8 oz cream cheese, softened - 1/2 cup powdered sugar - 1 tsp pure vanilla extract - 1/2 cup sour cream - 1/2 tsp ground cinnamon - 1 cup diced apples (Granny Smith recommended) - 1/2 cup caramel sauce (store-bought or homemade) - 1/4 cup chopped walnuts - Serving suggestions: sliced apples, graham crackers, or vanilla wafers To make the cream cheese base, start with softened cream cheese. This helps it blend smoothly. Next, mix in the powdered sugar until fully combined. The sugar adds sweetness and a nice texture. Then, add vanilla extract and sour cream. This gives the dip its rich and creamy taste. For flavor enhancers, sprinkle in ground cinnamon. This spice adds warmth and depth. Diced apples give a fresh crunch. I love using Granny Smith apples for their tartness. Finally, drizzle in caramel sauce. It brings sweetness and sticky goodness. If you want extra texture, add chopped walnuts. They give a nice crunch and flavor. For serving, I suggest sliced apples, graham crackers, or vanilla wafers. Each option pairs well with the dip. Enjoy the mix of flavors and textures! - First, take 8 oz of softened cream cheese. Place it in a large bowl. - Use an electric mixer on medium speed. Whip the cream cheese until it's very smooth. - Next, add 1/2 cup of powdered sugar. Mix it gradually into the cream cheese. - Keep mixing until everything is creamy and there are no lumps. - Now, it's time to boost the taste. Add 1 tsp of pure vanilla extract. - Mix in 1/2 cup of sour cream. Blend it until smooth and creamy. - Then, sprinkle in 1/2 tsp of ground cinnamon. - Add 1 cup of diced apples. I love using Granny Smith for their tartness. - Gently fold the apples into the mix using a spatula. Make sure they are evenly spread. - Spoon the creamy mixture into a serving bowl. Smooth the top with a spatula. - Drizzle 1/2 cup of caramel sauce over the top. Let it run down the sides for a nice look. - If you like, sprinkle 1/4 cup of chopped walnuts on top. This adds a nice crunch. - Serve right away with sliced apples, graham crackers, or vanilla wafers for dipping. To make your dip smooth, start with cream cheese at room temperature. Cold cream cheese will not mix well. Use an electric mixer to whip it until creamy. Then, add powdered sugar slowly. This step helps avoid lumps and keeps the dip light. You can change the flavor of your dip by using different apple types. Try Fuji or Honeycrisp apples for a sweeter taste. For a deeper flavor, adjust the caramel sauce. Use less sauce if you prefer a less sweet dip. You can also add spices like nutmeg for a twist. Make your dip look great for serving. Arrange sliced apples, graham crackers, or vanilla wafers around the bowl. Garnish the dip with whole apple slices or a sprinkle of cinnamon. This adds beauty and invites people to dig in. {{image_4}} You can change the flavor of this dip to fit the season. For fall, add pumpkin spice. Just a teaspoon can create a warm, cozy taste. This twist makes the dip perfect for autumn gatherings. Another fun idea is a chocolate caramel version. Swap half of the caramel sauce for chocolate sauce. This makes the dip rich and sweet, perfect for chocolate lovers. You can make this dip healthier too. Swap the cream cheese for Greek yogurt. This change cuts calories and adds protein without losing creaminess. Another option is to use low-sugar caramel sauce. This keeps the sweet flavor but cuts down on sugar. It’s a great choice for those watching their sugar intake. If you need a nut-free version, just leave out the walnuts. The dip will still taste great without them. For a dairy-free option, use plant-based cream cheese. This way, everyone can enjoy the dip, even those who can’t have dairy. To store leftovers in the fridge, place the dip in an airtight container. This keeps it fresh and prevents any strong odors from other foods affecting it. It will stay good for up to three days. Always check for any changes in smell or texture before serving. Yes, you can freeze this dip, but it may change in texture. To freeze, transfer the dip to a freezer-safe container. Leave some space at the top for expansion. It can last for up to two months in the freezer. When ready to eat, thaw it overnight in the fridge. Mix well before serving to restore the creamy texture. Before serving, you may want to refresh the dip. If it seems thick, stir in a little sour cream. This helps with texture and flavor. For added appeal, drizzle more caramel sauce on top. This makes it look fresh and inviting, even after storage. Caramel Apple Cheesecake Dip stays fresh in the fridge for about 3 to 5 days. Store it in an airtight container to keep it from drying out. Make sure to cover it well to avoid any fridge odors. If you notice any off smells or changes in texture, it’s best to toss it. Yes, you can make this dip ahead of time. Prepare it a day or two before your event. After mixing it, store it in the fridge. Keep the caramel sauce separate until you're ready to serve. This way, the dip stays fresh and creamy. You can serve this dip with various dippers. Here are some fun ideas: - Sliced apples (Granny Smith are great) - Graham crackers - Vanilla wafers - Pretzels for a salty twist - Cinnamon sugar pita chips for extra flavor Feel free to mix and match! This blog post showed how to make a tasty caramel apple cheesecake dip. We covered the creamy base, flavor enhancers, and optional add-ons. I shared tips for perfect texture and customization options. You can even explore seasonal flavors and healthier alternatives. With the right storage tips, leftovers can stay fresh. This dip is easy to make and fun to serve. Enjoy making it for your next gathering or snack!

Get ready to dive into a creamy dessert that’s both sweet and tangy! My Caramel Apple Cheesecake Dip blends rich cream cheese with crisp apples and smooth caramel. Perfect for …

Read more

Categories Desserts

Sheet Pan Lemon Herb Shrimp & Veggies Delight

August 13, 2025 by Chef Tavio
- Shrimp Details: Use 1 pound of large shrimp. Make sure they are peeled and deveined. This size gives a nice bite and cooks evenly. - Fresh Vegetables: - 2 cups of fresh broccoli florets. Cut them into bite-sized pieces. - 1 red bell pepper, chopped into small pieces. This adds a sweet crunch. - 1 medium zucchini, sliced into half moons. It cooks quickly and adds soft texture. - 1 cup of cherry tomatoes, halved. They bring a burst of flavor. - Key Seasonings and Oils Used: - 4 tablespoons of extra virgin olive oil. This adds richness and depth. - 2 tablespoons of freshly squeezed lemon juice. It brightens the dish. - 2 teaspoons of freshly grated lemon zest. This gives a strong lemon flavor. - 3 cloves of garlic, finely minced. Garlic adds a savory kick. - 1 teaspoon of dried oregano and thyme. These herbs give a warm, earthy taste. - Salt and freshly cracked black pepper to taste. These enhance all the flavors. - Fresh Parsley: Chopped fresh parsley adds color and a fresh taste. It brightens the dish. - Lemon Wedges: Adding lemon wedges to the plate gives an extra citrus boost. They are perfect for squeezing over the shrimp and veggies. First, preheat your oven to 400°F (200°C). This helps cook the shrimp and veggies evenly. While the oven warms up, get your ingredients ready. In a big bowl, mix together 1 pound of large shrimp, 2 cups of broccoli florets, 1 chopped red bell pepper, 1 sliced zucchini, and 1 cup of halved cherry tomatoes. Make sure everything is cut into bite-sized pieces for even cooking. Now, let’s make the marinade. In a small bowl, whisk together 4 tablespoons of extra virgin olive oil, 2 tablespoons of freshly squeezed lemon juice, and 2 teaspoons of lemon zest. Add in 3 minced garlic cloves, 1 teaspoon of dried oregano, and 1 teaspoon of dried thyme. Season with salt and freshly cracked black pepper to taste. Mix until it’s all combined. This zesty blend will make your shrimp and veggies pop with flavor. Take your marinated shrimp and veggies and spread them out evenly on a large sheet pan. Make sure they lie in a single layer. This helps them roast properly. Place the pan in the preheated oven and bake for about 15-20 minutes. You’ll know they are done when the shrimp turn pink and opaque, and the veggies are tender but still colorful. Once cooked, carefully take the pan out of the oven. Let it cool slightly before serving. Add a sprinkle of freshly chopped parsley on top for a bright finish. Enjoy your tasty, healthy meal! - Monitoring cooking time: Watch the clock closely. Shrimp cook quickly. They usually need about 15-20 minutes at 400°F (200°C). - Ensuring shrimp don’t overcook: Perfect shrimp are pink and opaque. If they are gray or tough, they are overcooked. Remove them from the heat as soon as they change color. - Choosing the right vegetables: Use fresh, vibrant veggies. Broccoli, bell peppers, zucchini, and cherry tomatoes work great. Cut them evenly for uniform cooking. - Achieving optimal tenderness and color: Spread the veggies out in a single layer. This helps them roast evenly. They should be tender but bright in color when done. - Plating ideas: You can serve right from the sheet pan for a casual feel. Or transfer to a large platter for a family-style meal. - Pairing options with sides: This dish pairs well with rice or a fresh green salad. Add lemon wedges for extra zest on the side. {{image_4}} You can swap in different veggies for this dish. If you don’t have broccoli, try green beans or asparagus. Carrots add a nice crunch, too. You can even use cauliflower for a fun twist. Just make sure the veggies you choose cook well together. Want a bit more heat? Add red pepper flakes or cayenne to the marinade. For a fresh kick, try fresh basil or dill instead of oregano. You can mix and match herbs to suit your taste. A dash of soy sauce can also add a nice umami flavor. If shrimp isn’t your thing, consider using scallops or pieces of salmon. Chicken breast works great, too. Cut it into bite-sized pieces to ensure even cooking. You can also use tofu for a plant-based option, making this dish versatile and fun. To keep your Sheet Pan Lemon Herb Shrimp & Veggies fresh, use airtight containers. Glass or plastic containers work well. Store the meal in the fridge for up to three days. If you want to save it longer, freeze it for up to two months. Just remember to label the containers with the date. This way, you know when you made it. When reheating, keep the flavor and texture in mind. The best method is to use the oven. Preheat it to 350°F (175°C). Spread the shrimp and veggies on a baking sheet. Heat for about 10-15 minutes until warm. You can also use a microwave, but this may make the shrimp a bit rubbery. If you choose the microwave, heat in short bursts, stirring in between. Enjoy the bright flavors just like when it was fresh! To tell if shrimp are done, look for a few key signs. Cooked shrimp turn pink and opaque. They also curl into a C shape. If they stay straight and are gray, they need more time. For best results, cook shrimp for 15 to 20 minutes at 400°F. Always check the center to ensure it’s no longer translucent. Yes, you can prepare this dish ahead of time. Mix the shrimp and veggies with the marinade. Cover it and store it in the fridge for up to 24 hours. When you are ready to cook, spread it on the sheet pan and bake. This saves time and makes dinner easier. Just remember to check the cooking time, as chilled shrimp may need a minute longer. This dish pairs well with a variety of sides. Consider serving with rice or quinoa for a hearty meal. A fresh green salad adds a nice crunch. You can also enjoy it with crusty bread to soak up the juices. For drinks, a crisp white wine or sparkling water with lemon works great. These options enhance the zesty flavors of the dish. This blog post covered how to create a tasty Sheet Pan Lemon Herb Shrimp & Veggies. We discussed key ingredients like shrimp and fresh vegetables, plus essential seasonings. I shared clear steps for preparation, marinade, and cooking. You learned helpful tips for perfect shrimp and veggies. Don't forget to explore variations with different vegetables and proteins. For leftovers, proper storage and reheating methods will keep your meal delicious. Now, you can enjoy a simple, healthy dish that impresses! Dive into this recipe and make it your own!

Are you ready to transform your dinner routine? My Sheet Pan Lemon Herb Shrimp & Veggies Delight is the answer! This simple, tasty dish packs bright flavors and vibrant colors, …

Read more

Categories Dinner

Keto Everything Bagel Cheese Chips Easy Snack Recipe

August 13, 2025 by Chef Tavio
- 2 cups shredded sharp cheddar cheese - 1 tablespoon sesame seeds - 1 tablespoon poppy seeds - 1 teaspoon dried onion flakes - 1 teaspoon dried garlic flakes - 1/2 teaspoon coarse sea salt - 1/2 teaspoon freshly ground black pepper - Optional: 1 tablespoon nutritional yeast To make Keto Everything Bagel Cheese Chips, gather these ingredients. The key is sharp cheddar cheese. It gives the chips a strong flavor and nice texture. Use sesame seeds and poppy seeds for that classic everything bagel taste. They add crunch and flavor. Dried onion and garlic flakes boost the savory notes. Coarse sea salt and black pepper round it all out. If you love a cheesy flavor, add nutritional yeast. It brings a depth that makes these chips even better. With just a few simple ingredients, you create a tasty snack that fits right into a keto diet. Enjoy! - Set the oven temperature to 400°F (200°C). - Line the baking sheet with parchment paper. Start by preheating your oven. This step is key for getting those chips nice and crispy. The parchment paper helps prevent sticking and makes cleanup easy. - Thoroughly mix all ingredients in a medium bowl. In a medium bowl, mix together the shredded cheddar cheese, sesame seeds, poppy seeds, dried onion flakes, dried garlic flakes, coarse sea salt, and freshly ground black pepper. If you want a deeper cheesy flavor, add the nutritional yeast. Mix until everything is well combined. - Scoop and shape the cheese mixture into mounds. - Bake for 8-10 minutes until golden brown. Using a tablespoon, scoop out portions of the cheese mix. Place small mounds, about 2 inches apart, on your lined baking sheet. Flatten each mound slightly with the spoon. This helps them bake evenly. Bake them in the preheated oven for 8 to 10 minutes. Watch for the edges to turn golden brown and the centers to bubble. - Allow chips to cool on the baking sheet for 2 minutes. - Transfer to a wire rack for complete cooling. Once baked, take the chips out and let them cool on the baking sheet for about 2 minutes. This allows them to harden, giving you that perfect crunch. Then, transfer the chips to a wire rack. This step is important for letting air circulate, ensuring they stay crisp. Enjoy your tasty chips! To get the best crunch from your cheese chips, you need to cool them right. After baking, let them sit on the baking sheet for about 2 minutes. This cooling helps them harden. Next, move them to a wire rack. Air can flow around them, making them even crispier. When you scoop the cheese mixture, flatten the mounds well. Use the back of your spoon to create a thin disk. This allows even baking. If they are too thick, they may not crisp up properly. Want to spice things up? Try adding some extra flavors. You could sprinkle in some smoked paprika for a smoky twist. A pinch of cayenne can bring some heat. If you enjoy herbs, try adding dried oregano or thyme. These will add layers to your cheese chips. Also, consider using different types of cheese. Mixing in some parmesan can bring a nutty flavor. Experiment with what you like best! Presentation matters! Serve your cheese chips in a rustic bowl to make them look nice. A sprinkle of extra sesame seeds on top adds a great touch. Pair them with a keto-friendly dip, like guacamole or cream cheese. This makes for a tasty snack that looks good and pleases the palate. Enjoy your munching moments! {{image_4}} You can switch up the cheese for these chips. Try using mozzarella for a milder taste. Goat cheese adds a tangy kick. Parmesan brings a sharp flavor that pairs well with the seasonings. Each cheese adds a unique twist to the chips. Feel free to mix in different seasonings. Try adding chili flakes for heat. Italian herbs can give a nice herbal touch. Smoked paprika adds depth and a hint of smokiness. Experiment with what you love to find your favorite blend. Add seeds or nuts for extra crunch. Sunflower seeds give a nice nutty flavor. Chopped almonds can add a delightful crunch. You can also use flaxseeds for added health benefits. Just make sure to adjust the baking time if you add more ingredients. To keep your Keto Everything Bagel Cheese Chips fresh, store them in an airtight container. Using a container helps maintain their crunch. You can keep them at room temperature for 2 to 3 days. If you want to keep them even fresher, place a paper towel in the container. This absorbs any moisture that could make them soggy. For long-term storage, freezing is a great option. Place the cooled chips in a single layer on a baking sheet. Freeze them for about an hour. After they are solid, transfer the chips to a freezer bag. Remove as much air as possible before sealing. You can store them this way for up to 3 months. When you're ready to enjoy, take out only the amount you need. Let them sit at room temperature for about 10 minutes to thaw. For extra crispiness, pop them back in the oven at 350°F (175°C) for a few minutes. This will make them crunchy again! Yes, you can use different cheeses. Some great options are mozzarella or gouda. These cheeses melt well and give a nice flavor. You can mix and match to find your favorite blend. For more kick, try pepper jack cheese. It adds spice without much effort. Absolutely! These chips fit perfectly into a keto diet. They have low carbs and high fat. Here’s a quick breakdown: - Calories: About 150 per serving - Carbs: 1-2g - Protein: 10g - Fat: 12g These numbers may vary slightly based on cheese choice. Always check the labels if you're unsure. You can spice up your chips easily. Here are some ideas: - Add cayenne pepper or chili powder to the cheese mix. - Mix in crushed red pepper flakes for a crunch. - Serve with a spicy dip, like jalapeño cream cheese. These options will kick up the heat without changing the overall recipe. You can find pre-made keto cheese chips in many stores. Look for brands like Whisps or Parm Crisps. They offer various flavors too. Check local health food stores or online retailers. This saves time if you want a quick snack. You now have a tasty recipe for keto cheese chips. We covered the main ingredients, step-by-step instructions, and lots of tips to make them perfect. You can customize flavors and textures with different cheeses and seasonings. Remember to store your chips properly to keep them fresh. Enjoy these crunchy snacks with your favorite dips. Making these chips is easy and fun, giving you a satisfying treat that fits your diet. Try it out and savor the flavors!

Are you craving a crunchy snack that fits your keto diet? Look no further! In this post, I’ll show you how to make Keto Everything Bagel Cheese Chips. This easy …

Read more

Categories Appetizers

Minute TikTok Salmon Rice Bowl Quick and Easy Recipe

August 13, 2025 by Chef Tavio
- 1 cup sushi rice - 1 ½ cups water - 1 tablespoon rice vinegar - 1 teaspoon sugar - ½ teaspoon salt - 1 fresh salmon fillet (approximately 6 oz) - 1 teaspoon soy sauce (or tamari for a gluten-free option) - 1 teaspoon sesame oil - ½ ripe avocado, sliced into wedges - 1 small cucumber, julienned for added crunch - 1 tablespoon pickled ginger for a tangy kick - 1 teaspoon sesame seeds for garnish - 2 green onions, finely sliced - Sheets of nori (seaweed) for a delightful finish When making the Minute TikTok Salmon Rice Bowl, having the right ingredients is key. Each element adds to the tasty layers in this dish. First, you need sushi rice. It cooks up soft and sticky. It holds together well when you build your bowl. Next, the salmon fillet is the star of the show. Fresh salmon gives a rich taste. It cooks quickly and adds healthy fats. The seasonings and condiments elevate the dish. Rice vinegar, sugar, and salt create a tangy flavor for the rice. Soy sauce adds depth, while sesame oil gives a nutty aroma. Don’t forget the toppings! Avocado adds creaminess, while cucumber brings crunch. The pickled ginger adds a spicy bite. Sesame seeds and green onions finish it off with color and flavor. Lastly, the nori sheets add a unique touch. They bring a hint of the sea and a fun texture. Gather all these ingredients to create a delightful rice bowl that is quick and easy to make. To make the sushi rice, start by rinsing the rice. Place 1 cup of sushi rice in a fine mesh strainer. Rinse it under cold water until the water runs clear. This step is key. It removes extra starch, making your rice fluffy. Next, cook the rice. In a medium pot, add the washed rice and 1 ½ cups of water. Bring it to a boil over medium-high heat. Once boiling, reduce the heat to low. Cover the pot and let it simmer for 15 minutes. After that, turn off the heat, but keep the pot covered. Let it rest for 10 more minutes. This allows it to absorb the steam. Now, let's prepare the salmon. First, heat a non-stick skillet over medium heat. Season the salmon fillet with a pinch of salt. Sear it in the hot skillet for 2-3 minutes on each side. Cook it until it reaches your desired doneness. Remove the salmon and let it cool for a minute. Then, flake it into bite-sized pieces with a fork. It's time to build your rice bowl! Start by spooning a generous layer of sushi rice into a serving bowl. Next, add the flaked salmon on top of the warm rice. Then, elegantly arrange the sliced avocado and julienned cucumber. Now, drizzle soy sauce and sesame oil over the top. This adds rich flavor. Scatter pickled ginger around the bowl. Finish with sesame seeds and finely sliced green onions for color. For a nice touch, add torn pieces of nori sheets around the edges. This gives your bowl a fun, oceanic flavor. Enjoy your meal! - Rinse the sushi rice under cold water until it runs clear. This helps remove extra starch. Less starch means fluffier rice. - After cooking, let the rice rest for 10 minutes. This step helps the rice absorb steam and finish cooking. - Sear the salmon for 2-3 minutes on each side. This gives it a nice crust while keeping it tender. - You can season the salmon simply with salt. For more flavor, add a bit of soy sauce or sesame oil. - Arrange your salmon, avocado, and cucumber in neat layers on top of the rice. This makes the bowl more appealing. - Garnish with pickled ginger, sesame seeds, and green onions. These add color and a burst of flavor. {{image_4}} You can swap the salmon for other fish. Tuna works well in this dish. Just sear it like the salmon. Another great choice is shrimp. Cook them until they turn pink and firm. If you prefer a vegetarian option, try tofu. Use firm tofu for the best texture. Sear it until golden brown. You can also use tempeh for a nutty flavor. Adding toppings can change your rice bowl. Try sliced radishes for extra crunch. Seaweed salad also adds a nice touch. You can sprinkle some chili flakes for heat. For sauces, mix up the soy sauce. Try teriyaki for sweetness. You can also make a spicy mayo. Combine mayo with sriracha for a zesty kick. Using brown rice adds a nutty flavor. It is also healthier, with more fiber. Just cook it longer than sushi rice. You can also try quinoa as a base. It is high in protein and gluten-free. Another option is farro for a chewy texture. Each choice adds a unique taste to your bowl. To keep your salmon rice bowl fresh, store leftovers properly. Use a clean, airtight container. This will keep the flavors and textures intact. Place the rice and salmon in separate containers. This helps prevent the rice from becoming soggy. Make sure to refrigerate leftovers within two hours. The rice should be cooled to room temperature first. Store the bowl in the fridge for up to three days. After that, the quality may decline. When it’s time to enjoy leftovers, you have options. You can use a microwave or stove. If you choose the microwave, reheat the rice and salmon in short bursts. Stir in between to ensure even heating. If you prefer the stove, place the rice in a pan. Add a splash of water to keep it moist. Heat over low heat, stirring gently. This method helps retain freshness and avoids drying out the rice. Enjoy your meal just as you made it! It takes about 40 minutes to make this dish. The prep time is about 10 minutes. Cooking the rice and salmon takes an additional 30 minutes. Yes, you can use frozen salmon. Just thaw it first. Place the fillet in the fridge overnight or use cold water for quick thawing. Cook it the same way as fresh salmon. Just make sure it is cooked all the way through. Sushi rice is the best choice. It is short-grain rice that becomes sticky when cooked. This stickiness helps the rice hold together. Other types of rice, like long-grain, won't give you the right texture. Always rinse sushi rice before cooking to remove excess starch. In this blog post, we explored how to create a TikTok Salmon Rice Bowl. We covered the essential ingredients, including sushi rice and fresh salmon. You learned step-by-step instructions for preparing the rice and salmon, and I shared key tips for perfecting both. We also discussed delicious variations and important storage info. Remember, making this dish is easy and fun. Try different ingredients to suit your taste. Enjoy your tasty creation!

Looking for a quick meal that’s full of flavor? You’re in luck! The Minute TikTok Salmon Rice Bowl is both easy to make and delicious. In just a few simple …

Read more

Categories Dinner

No-Bake Biscoff Cheesecake Bars Smooth and Creamy Treat

August 13, 2025 by Chef Tavio
- 200g Biscoff cookies (plus extra for garnish) - 100g unsalted butter, melted - 400g cream cheese, softened to room temperature - 200ml heavy cream - 100g powdered sugar, sifted - 150g Biscoff spread - 1 teaspoon vanilla extract - A pinch of sea salt - Additional Biscoff cookies for garnish Each ingredient plays a vital role in making No-Bake Biscoff Cheesecake Bars a delight. Biscoff cookies form the base and add rich flavor. They give the bars a unique taste and a great crunch. Unsalted butter helps bind the cookie crumbs together, making a sturdy crust. Cream cheese is the heart of the cheesecake filling. It gives a rich and creamy texture that melts in your mouth. Heavy cream adds fluffiness to the filling. Whipped to stiff peaks, it makes the cheesecake light and airy. Powdered sugar sweetens the mix without adding graininess. It blends smoothly with the cream cheese. Biscoff spread enhances the flavor profile. Its caramel notes deepen the taste, making every bite a treat. Vanilla extract offers warmth and balance, rounding out the flavors beautifully. Sea salt elevates all the flavors and balances the sweetness, making the bars even more delicious. For garnishing, you can use additional Biscoff cookies. Crumbling them on top not only adds visual appeal but also extra crunch and flavor. Each ingredient contributes to making these bars smooth, creamy, and irresistible. Start by crushing the Biscoff cookies. You can use a food processor or place them in a plastic bag and crush them with a rolling pin. Aim for fine crumbs. Once crushed, pour the crumbs into a bowl. Next, add the melted butter to the crumbs. Stir until the mixture looks like wet sand. Take a 9x9-inch baking pan and line it with parchment paper. This helps with easy removal later. Pour the cookie mixture into the pan. Use the back of a measuring cup or your hands to press it down firmly. Make sure it is even and compact. Place the pan in the fridge to set while you make the filling. In a large bowl, beat the softened cream cheese with an electric mixer. Mix it until smooth and creamy. Gradually add the sifted powdered sugar and vanilla extract. Continue to beat until everything is mixed well and there are no lumps. This step is key for a smooth filling. Next, incorporate the Biscoff spread into the cream cheese mixture. Use a spatula to fold it in gently. Be careful not to overmix. We want to keep the light texture of the filling. In a separate bowl, whip the heavy cream until stiff peaks form. This adds airiness to your filling. Once whipped, carefully fold the whipped cream into the Biscoff mixture in three parts. Start with a third of the whipped cream to make it lighter. Then, gently fold in the rest until just combined. Pour the cheesecake filling over the chilled crust. Use a spatula to spread it evenly. Smooth the top for a nice finish. This step helps your bars look great when served. Cover the pan tightly with plastic wrap. Refrigerate it for at least four hours. For the best flavor, let it chill overnight. Once set, use a sharp knife to slice the cheesecake into bars. For a nice touch, crumble extra Biscoff cookies on top as a garnish. Enjoy your delicious creation! Using room temperature ingredients is key for a smooth cheesecake. Cold cream cheese mixes poorly and can lead to lumps. Let your cream cheese sit out for about 30 minutes before you start. This simple step makes a big difference. When it comes to folding whipped cream into your mixture, gently is the way to go. Use a spatula and a big bowl. Start by adding a third of the whipped cream to the cheesecake mix. This lightens it up. Then, fold in the rest in two more parts. Be careful not to stir too hard. You want to keep all that air you just whipped in. For a beautiful display, use a nice platter to serve your cheesecake bars. An attractive serving plate can really enhance your dessert. Drizzling melted Biscoff spread on top adds a lovely touch. It makes the bars look inviting and adds extra flavor. Sprinkle some crushed Biscoff cookies on top for a final flourish. This not only looks good but also gives a nice crunch with each bite. {{image_4}} You can easily change up the flavor of your No-Bake Biscoff Cheesecake Bars. Here are some fun ideas: - Adding chocolate or caramel swirls: Drizzle some melted chocolate or caramel on top of the cheesecake filling before it sets. Use a toothpick to swirl it in. This adds a rich taste and looks great. - Incorporating nuts for crunch: Try adding chopped walnuts or pecans to the crust. This gives a nice crunch and pairs well with the creamy filling. You can also sprinkle nuts on top for a finishing touch. If you have dietary needs, there are ways to adapt this recipe: - Gluten-free versions: Use gluten-free Biscoff cookies or any gluten-free cookie you like. Just check the labels to make sure they fit your needs. - Dairy-free substitutions: For a dairy-free cheesecake, swap the cream cheese for a dairy-free version. You can use coconut cream instead of heavy cream too. This keeps the creamy texture while making it suitable for dairy-free diets. To keep your No-Bake Biscoff Cheesecake Bars fresh, store them in an airtight container. This helps prevent the bars from drying out or absorbing other odors from your fridge. You can use a glass or plastic container with a tight lid. Make sure to place a layer of parchment paper between the bars and the lid. This way, they won't stick, and you can easily lift them out when serving. Stored this way, your cheesecake bars can last for up to a week in the fridge. If you want to save some bars for later, you can freeze them. First, cut the cheesecake into individual bars. Wrap each bar tightly in plastic wrap and then place them in a freezer-safe bag or container. This extra layer protects them from freezer burn. They can last in the freezer for up to three months. When you want to enjoy a bar, simply remove it from the freezer. Let it thaw in the fridge for several hours or overnight. This keeps the texture smooth and creamy. Serve chilled for the best taste. Yes, you can use other cookies. Graham crackers or Oreos work well. Just crush them fine and mix with melted butter. The taste will change, but it can still be delicious. These cheesecake bars last about five days in the fridge. Just keep them covered to stay fresh. They taste best within the first few days. Absolutely! You can prepare these bars a day or two ahead. Just let them chill well in the fridge. This waiting time helps the flavors blend beautifully. You don’t need to reheat these bars. They taste great cold. If you want them softer, take them out of the fridge for a few minutes before serving. Using heavy cream is key for a light texture. It helps make the filling fluffy. If you skip it, the cheesecake may be dense and less creamy. This blog post covered a delicious Biscoff cheesecake bar recipe. You learned about the key ingredients and each step to make the perfect bars. From mixing the crust to chilling the final product, you now know how to impress your friends and family. Consider the tips for making your cheesecake even better. Feel free to explore flavor variations and dietary options. Enjoy your sweet treat and have fun creating! These cheesecake bars are sure to delight everyone.

Looking for a dessert that’s rich, creamy, and unbelievably simple? You’ve hit the jackpot with these No-Bake Biscoff Cheesecake Bars! Made with your favorite Biscoff cookies and a few easy …

Read more

Categories Desserts

One-Pot Creamy Tuscan Gnocchi Delight Recipe

August 13, 2025 by Chef Tavio
To make this dish, you will need: - 1 package (16 oz) gnocchi (fresh or frozen) - 2 tablespoons olive oil - 3 cloves garlic, finely minced - 1 cup cherry tomatoes, halved - 2 cups fresh spinach, packed - 1 cup vegetable broth - 1 cup heavy cream (or substitute with a dairy-free alternative) - 1 teaspoon Italian seasoning - ½ cup grated parmesan cheese (or nutritional yeast for a vegan option) - Salt and pepper to taste - Fresh basil leaves, for garnish You can easily adapt this recipe. For a vegan dish, use nutritional yeast instead of parmesan cheese. You can also swap heavy cream for a dairy-free cream or coconut milk. If you need gluten-free options, look for gluten-free gnocchi. - Gnocchi: Choose fresh gnocchi if you can. It's softer and has better flavor. If you pick frozen gnocchi, check the package for quality. - Olive oil: Use extra virgin olive oil for the best taste. It adds richness and depth. - Tomatoes: Select ripe cherry tomatoes. They should feel firm and smell sweet. - Spinach: Fresh spinach should be dark green and crisp. Avoid any yellow or wilted leaves. - Parmesan cheese: If you can, buy block cheese and grate it fresh. It tastes better than pre-grated options. These tips will help you create a tasty and creamy dish. Enjoy the process and your meal! Start by gathering all your ingredients. You will need 1 package of gnocchi, olive oil, garlic, cherry tomatoes, spinach, vegetable broth, heavy cream, Italian seasoning, parmesan cheese, salt, and pepper. Prepare your garlic by mincing it finely. Halve the cherry tomatoes. Measure out your vegetable broth and cream. Heat 2 tablespoons of olive oil in a pot over medium heat. Once the oil shimmers, add the minced garlic. Sauté for about 1 minute. Be careful not to brown the garlic. Next, add the halved cherry tomatoes. Cook them for 3 to 4 minutes until they soften and release juices. Now, add your gnocchi to the pot. Pour in the vegetable broth, Italian seasoning, and a pinch of salt and pepper. Stir everything well. Increase the heat to bring the mix to a gentle simmer. Cover the pot and let it cook for 5 to 7 minutes. This will make the gnocchi tender and soak up some broth. After that, lower the heat to a simmer. Gradually stir in the heavy cream and grated parmesan cheese. Mix until you have a smooth, creamy sauce. Gently fold in the fresh spinach. Cook for an additional 2 minutes until the spinach wilts. Stir occasionally to combine all flavors. Taste your dish and adjust the seasoning. Add more salt and pepper if you like. Once done, remove the pot from the heat. Let the dish sit for a minute. This will help it thicken slightly. Serve the creamy gnocchi hot in shallow bowls. Drizzle with olive oil and garnish with fresh basil leaves for a lovely finish. To make this dish perfectly creamy, use heavy cream. If you want a lighter option, try a dairy-free cream. Stir the cream in slowly for a smooth sauce. Grating fresh parmesan adds rich flavor and creaminess. For a vegan version, use nutritional yeast instead of cheese. This will still give your dish a nice depth. One common mistake is overcooking the gnocchi. Keep an eye on them while they simmer. Check them after 5 minutes. If they become too soft, the dish may turn mushy. Another mistake is not seasoning well. Taste your dish before serving. Adjust salt and pepper to enhance the flavors. Lastly, avoid cooking the garlic too long. If it burns, the taste can become bitter. Here are some tools to make cooking easier: - Large pot or deep skillet - Wooden spoon for stirring - Measuring cups for liquids - Grater for cheese - Sharp knife for chopping tomatoes and garlic Using these tools will help you cook smoothly. They make prep and cooking faster and more fun. Enjoy your time in the kitchen! {{image_4}} You can easily add protein to your creamy gnocchi. Chicken, shrimp, and sausage are great choices. For chicken, cook bite-sized pieces until golden. Add them after sautéing the garlic. For shrimp, add them during the last few minutes of cooking. They cook quickly and keep their flavor. If you prefer sausage, slice it and brown it in the pot first, then follow the rest of the steps. Each protein brings a unique taste, making the dish your own. You can make this dish vegetarian or vegan with simple swaps. For a vegetarian option, use heavy cream and parmesan cheese. If you want it vegan, swap heavy cream for a dairy-free cream and use nutritional yeast instead of parmesan. These ingredients still give a creamy texture and rich flavor. Add more veggies like mushrooms or bell peppers to enhance the taste. They can make the dish more colorful and nutritious. Using seasonal ingredients can elevate your gnocchi. In spring, add fresh asparagus or peas for a pop of color and taste. Summer tomatoes are juicy and sweet, perfect for this dish. In fall, consider adding pumpkin or butternut squash for a warm flavor. Winter greens like kale or chard can also bring a hearty touch. Feel free to mix and match based on what you find fresh and available. Each season offers its own twist to keep the dish exciting. To store your creamy Tuscan gnocchi, let it cool down first. Use an airtight container to keep the flavors fresh. Place the leftovers in the fridge. They will last for about 3 days. If you want to enjoy it later, consider freezing some. When you reheat gnocchi, do it gently. Use a pan on low heat. Add a splash of vegetable broth or cream to keep it creamy. Stir it often. This helps to avoid drying out. You can also use the microwave. Heat in short bursts and stir in between. If you want to freeze gnocchi, pack it well. Use freezer bags or containers. Make sure to remove as much air as possible. It can stay frozen for up to 3 months. When you're ready to eat, thaw it in the fridge overnight. Then reheat as mentioned above. Yes, you can use different types of gnocchi. Fresh or frozen gnocchi works well. You can also try gluten-free gnocchi if you prefer. Just follow the cooking time on the package. This will help you get the best texture. To make this dish dairy-free, swap heavy cream for a plant-based cream. Options like coconut cream or almond milk work great. For cheese, use nutritional yeast instead of parmesan. This keeps the dish creamy and flavorful without dairy. Creamy Tuscan gnocchi pairs well with many sides. A fresh green salad is a great choice. You can also serve crusty bread to soak up the sauce. For a heartier meal, add grilled chicken or shrimp. This blog post covered key ingredients, step-by-step cooking, and helpful tips. I shared substitutions for dietary needs, ensuring anyone can enjoy this dish. You learned how to achieve perfect creaminess while avoiding common mistakes. I offered variations to cater to different proteins and preferences, plus storage tips for leftovers. In closing, adapting this recipe is easy. With some simple swaps, you can customize it to your tastes. Enjoy your cooking adventures and share your tasty results!

Welcome to your new favorite weeknight meal! This One-Pot Creamy Tuscan Gnocchi Delight is not just easy; it’s packed with flavor and warmth. You’ll skip the fuss of multiple pots …

Read more

Categories Dinner

Air Fryer Apple Chips Crunchy and Healthy Snack

August 13, 2025 by Chef Tavio
- 2 medium apples (Granny Smith or Honeycrisp) - 1 teaspoon ground cinnamon - 1 teaspoon granulated sugar (optional) - A pinch of sea salt - Cooking spray (optional) For this recipe, I love using Granny Smith or Honeycrisp apples. They give the best flavor and crunch. You need just a few simple ingredients. The cinnamon adds warmth, while the sugar brings sweetness if you choose to add it. A pinch of sea salt balances the flavors perfectly. You might wonder about the cooking spray. It helps prevent sticking, but it’s not a must-have. If you want easier cleanup, go for it! Just remember, the key to great apple chips is using fresh, crisp apples. The better the apples, the better the chips! - Wash and dry the apples. This step is key. You want to remove any dirt and wax. - Slice apples using a mandoline or a sharp knife. Aim for thin rounds, about 1/8 inch thick. Keep the skin on for extra nutrients. - Combine apple slices with cinnamon, sugar, and sea salt. Use 1 teaspoon of cinnamon and 1 teaspoon of sugar if you like it sweet. Mix well to coat every slice evenly. - Preheat your air fryer to 300°F (150°C) for about 3-5 minutes. This helps the chips cook evenly. - Arrange the apple slices in a single layer in the basket. Avoid overlap to get that perfect crisp. - Cook for 15-20 minutes. Shake the basket halfway through. Check for crispiness at the end. If they are golden and crunchy, they are done! To get those perfect apple chips, slice the apples thin. Aim for about 1/8 inch thick. This thickness helps them cook evenly. If they are too thick, they won’t get crunchy. Keep an eye on the cooking time. Cook them for 15 to 20 minutes. Shake the basket halfway through to ensure even cooking. At the end, check often to avoid burning. Using cooking spray can help with cleanup. Spray the basket lightly before adding the apple slices. This helps the chips not stick. For air fryer upkeep, always clean it after each use. Wipe down the basket and tray with warm, soapy water. This keeps your air fryer in great shape. You can serve apple chips in fun ways. Try using a bowl lined with parchment paper. This adds a rustic touch. You can also put them in small bags for easy snacking. Pair the chips with dips like yogurt or peanut butter. This gives a nice contrast to their crispness. Enjoy your crunchy snack! {{image_4}} You can easily change the taste of your apple chips. Try adding other spices like nutmeg or allspice. These spices give your chips a warm and cozy flavor. You can also drizzle honey or maple syrup on top. This sweet touch makes the apple chips even more tasty. Just remember to adjust the sugar in your recipe if you do this. Not all apples are the same, and that’s great for your snacks! You can explore different apple types like Fuji, Gala, or Braeburn. Each apple has its own taste and sweetness. Using different apples can give you a mix of flavors in your chips. Granny Smith apples are tart, while Honeycrisp apples are sweet and crunchy. Mixing apples can make your snack more fun and exciting. Plus, you get the health benefits of varied nutrients from different apples. To keep your apple chips crispy, store them in an airtight container. This helps block moisture, which can make them soggy. I like to use glass jars or plastic containers with tight lids. Avoid using paper bags, as they can let air in and cause the chips to lose their crunch. You can also add a silica gel packet to absorb any moisture. This is a simple trick to keep your snacks fresh longer. If stored well, your apple chips can last for up to two weeks. However, they taste best within the first few days. You’ll know your chips have gone bad if they smell off or feel chewy instead of crispy. Always do a quick check before snacking. If they look dull or have visible signs of moisture, toss them out. Enjoy your homemade snacks at their best! Yes, you can use many fruits! Popular options include bananas, pears, and strawberries. Each of these fruits works well when sliced thin. For bananas, aim for 1/4 inch slices to avoid mushiness. Pears can add a sweet twist. Strawberries provide a nice tart flavor. Just remember to adjust cooking times for different fruits. Cook your apple chips for 15-20 minutes at 300°F (150°C). Check them halfway through. If you want crispier chips, cook a few minutes longer. Each air fryer heats differently, so keep an eye on them. You don't want to burn your tasty snacks. When they turn golden brown, they are ready! Yes, air fryer apple chips are a healthy snack! They have less fat than fried snacks. Apples are full of vitamins and fiber. They can help keep you full longer. You can also control the sugar amount when you make them. This makes them a better choice than chips or candy. Enjoy a guilt-free treat! In this post, we explored how to make delicious air fryer apple chips. We covered the ingredients, from fresh apples to spices, and shared step-by-step instructions for perfect crispiness. I shared tips on slicing, cooking, and cleaning your air fryer, plus variations for added flavor. You can also store your chips right to maintain their freshness. With just a few ingredients and simple steps, you can enjoy a tasty snack that's both fun and healthy. So grab those apples and start air frying!

Are you craving a delicious, crunchy snack that won’t derail your health goals? Look no further! Making Air Fryer Apple Chips is a simple and tasty way to satisfy your …

Read more

Categories Desserts
Older posts
Newer posts
← Previous Page1 … Page17 Page18 Page19 … Page92 Next →

TASTED NEST

Where Flavor Finds a Home 🍳🏡 — warm, simple, and crave-worthy recipes made for real life, from stovetop mornings to backyard dinners.

PAGES

Home About Contact Privacy Policy Terms & Conditions Cookie Policy GDPR Policy Copyright Policy Disclaimer

CATEGORIES

Appetizers Desserts Salads Breakfast Dinner

Contact

  • Pinterest
  • Mail
Copyright © 2025 Tasted Nest. All rights reserved.