Skip to content
  • GDPR Privacy Policy
  • Copyright Policy
  • Disclaimer
  • Terms & Conditions
Tasted Nest
  • Home
  • Appetizers
  • Desserts
  • Salads
  • Breakfast
  • Dinner
  • Privacy Policy
  • Contact
  • About

Chef Tavio

Creamy Cajun Chicken Pasta Flavorful Dinner Delight

December 17, 2025February 12, 2025 by Chef Tavio
- 2 boneless, skinless chicken breasts - 8 oz fettuccine pasta - 1 tablespoon Cajun seasoning - 2 tablespoons olive oil - 1 onion, finely chopped - 3 cloves garlic, minced - 1 bell pepper, sliced - 1 cup heavy cream - 1 cup chicken broth - 1 cup cherry tomatoes, halved - ½ cup grated Parmesan cheese - Salt and pepper to taste - Fresh parsley for garnish To make creamy Cajun chicken pasta, gather these fresh ingredients. Start with chicken breasts. I prefer boneless and skinless for easy cooking. The fettuccine pasta adds a lovely texture. Cajun seasoning gives this dish its kick. I love using a well-balanced blend. Olive oil is a must for sautéing the chicken and veggies. Chop an onion finely; it adds great flavor. Garlic brings a wonderful aroma. I use three cloves for an extra kick. Bell pepper adds color and sweetness. Heavy cream makes the sauce rich and creamy. Chicken broth adds depth to the flavor. Cherry tomatoes bring freshness and a hint of sweetness. Grated Parmesan cheese enhances the taste. Adjust salt and pepper to suit your taste. Finally, fresh parsley gives a nice touch on top. With these ingredients, you’re on your way to a delicious meal. Enjoy the cooking process! {{ingredient_image_2}} 1. Boil the Fettuccine: Start by filling a large pot with water. Add a good amount of salt. Bring this water to a rolling boil. Carefully add the fettuccine and cook for 8-10 minutes. 2. Achieve Al Dente: You want your pasta to be firm but not hard. Test it a minute before the time is up. If it bites back, it’s perfect! Once done, drain the pasta but save a cup of the water. 1. Season the Chicken: Take two boneless chicken breasts. Slice them into strips. In a bowl, sprinkle one tablespoon of Cajun seasoning over the chicken. Toss well to coat every piece. 2. Cook the Chicken: Heat two tablespoons of olive oil in a large skillet over medium-high heat. Once hot, add the chicken strips. Cook them for about 5-7 minutes until they are browned and cooked through. 1. Sauté the Vegetables: Do not clean the skillet. Add one finely chopped onion. Sauté for 3 minutes until it’s soft. Then, add three minced garlic cloves and one sliced bell pepper. Cook for another 2-3 minutes until the pepper is tender. 2. Create the Creamy Sauce: Pour in one cup of heavy cream and one cup of chicken broth. Stir well to mix with the veggies. Let it simmer gently for about 5 minutes. This helps the sauce thicken. 1. Mix the Ingredients: Add the cooked chicken back to the skillet. Toss in one cup of halved cherry tomatoes. Stir everything together and let it simmer for 2-3 more minutes. This melds the flavors. 2. Toss with Pasta: Add the drained fettuccine to your skillet. Gently toss the pasta with the creamy sauce. Gradually mix in half a cup of grated Parmesan cheese. This will help make your sauce even creamier. If the sauce is thick, add a splash of reserved pasta water. 3. Serve and Garnish: Divide the creamy Cajun chicken pasta into bowls. For a touch of color, sprinkle fresh chopped parsley on top before serving. To get the best Cajun flavor, choose a good seasoning brand. I recommend brands like Tony Chachere's or Zatarain's. They offer a solid mix of spices. Adjust the spice level to fit your taste. If you like it spicy, add more seasoning. For a milder dish, use less. You can change the sauce's thickness easily. To make it thicker, add more cheese or let it simmer longer. If you want it thinner, stir in a bit of chicken broth or reserved pasta water. If you don’t have heavy cream, use half-and-half or a plant-based cream. These will still give you a nice, creamy texture. Use a large, heavy skillet for sautéing. Cast iron or stainless steel works best. These skillets heat evenly and help brown the chicken well. Cook the chicken on medium-high heat. This gives a nice sear without overcooking. Aim for an internal temperature of 165°F for safety. Pro Tips Perfectly Cooked Pasta: To ensure your fettuccine is cooked al dente, follow the package instructions closely and taste the pasta a minute or two before the recommended time. Season Your Chicken: Don't be afraid to generously season the chicken with Cajun seasoning. This will enhance the overall flavor of the dish, making it more vibrant and delicious. Adjusting Sauce Consistency: If the sauce becomes too thick after adding the pasta, use the reserved pasta water to loosen it up. This will help achieve the perfect creamy texture. Fresh Herbs for Garnish: Adding freshly chopped parsley at the end not only adds color but also enhances the flavor profile, making the dish more aromatic and appealing. {{image_4}} You can easily swap the chicken for shrimp or scallops. Both options add a lovely seafood twist. Just cook them until they turn opaque. For a vegetarian or vegan version, use firm tofu or chickpeas. These options absorb the sauce well and keep the dish filling. While fettuccine is a classic choice, you can use penne or bowtie pasta. They hold the sauce nicely, too. For a gluten-free diet, choose a gluten-free pasta brand. Whole grain pasta is another great option. It adds fiber and makes the dish a bit healthier. Want to boost the flavor? Add fresh spinach or mushrooms. They bring extra nutrients and taste. You can also mix in some fresh herbs like thyme or basil. These herbs brighten the dish and give it a wonderful aroma. To keep your creamy Cajun chicken pasta fresh, follow these steps: - Let the pasta cool to room temperature. - Place it in an airtight container. - Refrigerate within two hours of cooking. This method prevents bacteria from growing. Proper storage will keep it tasty for up to three days. You can reheat creamy Cajun chicken pasta in two ways: 1. Microwave: - Place your pasta in a microwave-safe bowl. - Add a splash of chicken broth or cream to add moisture. - Heat for 1-2 minutes, stirring halfway. 2. Stovetop: - Pour the pasta into a skillet over low heat. - Add a little chicken broth or cream. - Stir often for 5-7 minutes until warm. These methods help keep the sauce creamy and prevent it from drying out. Can you freeze creamy Cajun chicken pasta? Yes, you can! Here are the best practices: - Freezing: Place cooled pasta in an airtight container or freezer bag. Remove as much air as possible. - Thawing: To thaw, move it to the fridge overnight before reheating. This method helps maintain texture and flavor. Enjoy your creamy Cajun chicken pasta later without losing taste! You can use several options if you need a substitute for heavy cream. Here are some great choices: - Half-and-half: This mix of milk and cream works well for a lighter sauce. - Greek yogurt: Use plain Greek yogurt for a creamy texture and tangy flavor. - Coconut milk: This adds a hint of sweetness and is a good non-dairy choice. - Silken tofu: Blend it until smooth for a dairy-free option. These alternatives can change the flavor and texture slightly, but they still make a tasty dish. Yes, you can make this dish ahead of time! Here are some tips for meal prep: - Cook and refrigerate: Prepare the pasta and sauce, then store them separately in airtight containers. - Reheat gently: When ready to eat, reheat on low heat on the stove. Add a splash of broth or cream for creaminess. - Storage time: The pasta stays fresh in the fridge for about 3-4 days. This makes it easy to have a delicious meal ready in no time! Cajun seasoning can be spicy! The heat level depends on the brand and amount used. Here are some tips: - Mild versions: Look for blends labeled as mild if you're sensitive to spice. - Adjusting heat: Start with a smaller amount, then taste and add more if needed. - Adding sweetness: Balance spice by adding a little sugar or honey if it gets too hot. This way, you can enjoy the flavors without overwhelming heat. Absolutely! Creamy Cajun chicken pasta is great for meal prep. Here’s how to do it: - Make in batches: Cook a larger amount and divide it into portions. - Store properly: Keep each serving in an airtight container in the fridge. - Easy reheating: When you want to eat, just reheat in the microwave or on the stove. This dish tastes just as good the next day, making it perfect for busy weeks! In this post, I covered how to make creamy Cajun chicken pasta, from the ingredients needed to step-by-step instructions. You learned about cooking techniques, tips for perfect flavor, and even fun variations. Remember, you can customize the recipe to your taste. Enjoy experimenting with different ingredients! This dish is perfect for meals at home. I hope you find joy in cooking and sharing this tasty meal. Happy cooking!

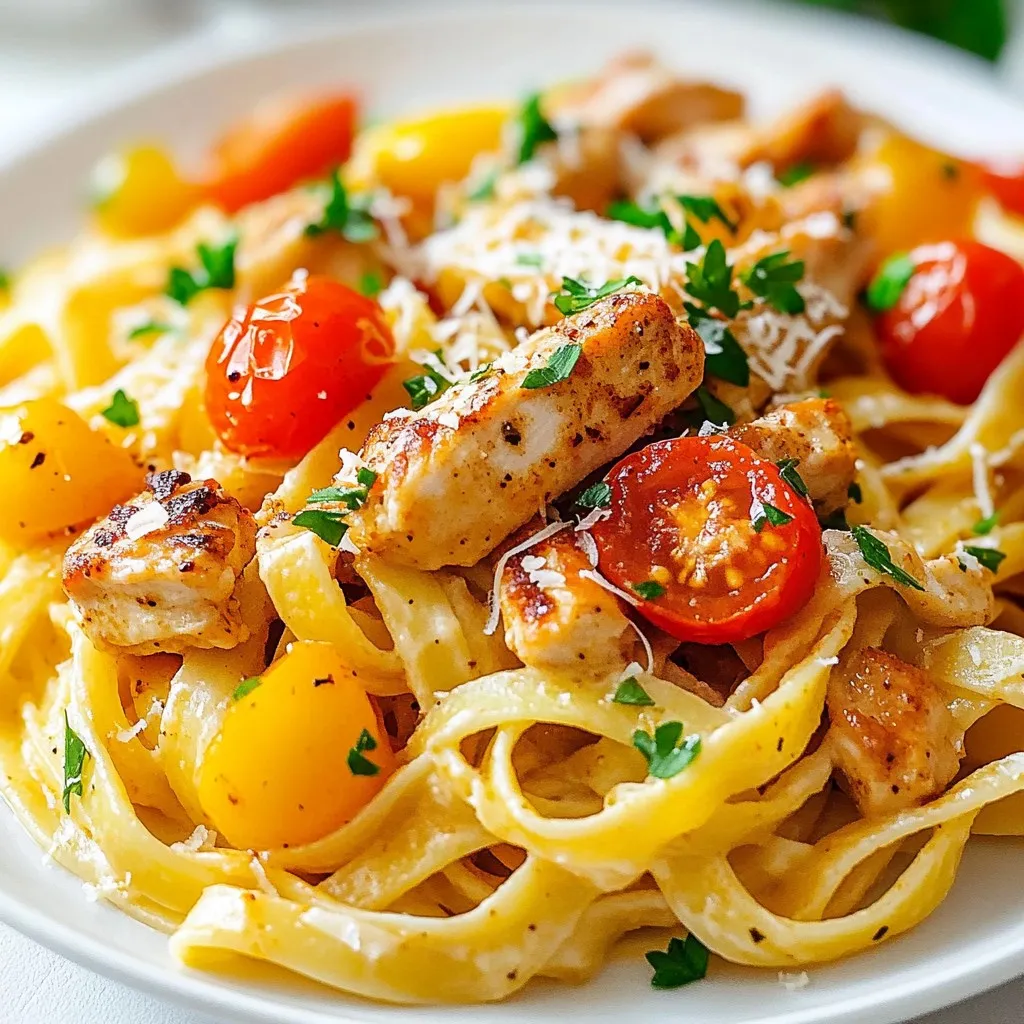
Are you ready to spice up your dinner routine? This Creamy Cajun Chicken Pasta is a burst of flavor that’s simple to make. With tender chicken, al dente fettuccine, and …

Read more

Categories Dinner

Creamy Garlic Tuscan Chicken Flavorful Dinner Idea

January 7, 2026February 10, 2025 by Chef Tavio
- 4 boneless, skinless chicken breasts - 2 tablespoons olive oil - 4 cloves garlic, finely minced - 1 cup heavy cream - 1 cup fresh spinach, roughly chopped - 1 cup sun-dried tomatoes, coarsely chopped (preferably packed in oil) - 1 teaspoon Italian seasoning blend - ½ cup grated Parmesan cheese - Salt and black pepper - Fresh basil leaves The main ingredients of this dish create a rich and tasty meal. The chicken breasts are your star. They soak up flavors and stay juicy. Olive oil helps to sear the chicken and adds healthy fats. Garlic brings a lovely aroma and a robust taste. Heavy cream makes the sauce creamy and smooth. Fresh spinach adds nutrients and a pop of color. Sun-dried tomatoes offer a sweet and tangy flavor, giving depth to the sauce. Italian seasoning brings herbs to life in every bite. Finally, Parmesan cheese adds a salty, nutty taste that ties it all together. When you season with salt and pepper, you lift the dish's taste. The fresh basil leaves are not just pretty; they add bright flavor and freshness. Each ingredient plays a role in making Creamy Garlic Tuscan Chicken a dish you'll want to share with friends and family. {{ingredient_image_2}} - First, season the chicken breasts. Use salt and pepper on both sides. This adds flavor. - Next, heat olive oil in a large skillet over medium-high heat. Wait until the oil is hot. - Carefully add the chicken to the skillet. Sear each side for 5-7 minutes. Look for a golden-brown crust. - Check the chicken's internal temperature. It should reach 165°F (75°C). Remove the chicken and set it aside. - In the same skillet, add minced garlic. Sauté for about 1 minute. The garlic should smell great but not burn. - Slowly pour in the heavy cream. Stir well and bring the mix to a gentle simmer. This helps it thicken. - Now, add the chopped spinach, sun-dried tomatoes, and Italian seasoning. Stir in the grated Parmesan cheese. - Keep stirring until the cheese melts and the sauce is creamy. - Return the seared chicken to the skillet. Spoon the creamy sauce over each piece. - Let everything simmer for another 2-3 minutes to heat the chicken through. - Taste the sauce. Adjust the seasoning with more salt or pepper if needed. - Serve the chicken on plates with the sauce on top. Garnish with fresh basil leaves for a nice touch. To make sure your chicken turns golden-brown, follow these simple steps: - Heat the skillet well: Warm your skillet over medium-high heat. A hot skillet helps the chicken sear nicely. - Avoid crowding: Cook the chicken in batches if needed. This gives each piece space to brown well. - Pat dry: Make sure your chicken breasts are dry before seasoning. This helps achieve that crispy crust. For the creamy sauce texture, here’s what to do: - Sauté garlic carefully: Cook the garlic just until fragrant. Aim for about one minute. This prevents any burnt taste. - Add cream slowly: When you pour in the heavy cream, mix gently. This helps create a smooth sauce. - Simmer gently: Allow the sauce to thicken on low heat. Stir often to keep it creamy and rich. To get the best flavor, avoid these pitfalls: - Overcooking the garlic: If you let garlic cook too long, it can taste bitter. Watch it closely! - Not seasoning properly: Don't skip the salt and pepper. They bring out the best in your dish. Taste as you go to get it just right. By following these tips and avoiding common mistakes, your Creamy Garlic Tuscan Chicken will shine on your dinner table! Pro Tips Use Fresh Ingredients: For the best flavor, opt for fresh garlic, spinach, and high-quality sun-dried tomatoes. Fresh ingredients elevate the dish significantly. Control the Heat: Searing the chicken on medium-high heat ensures a golden-brown crust without overcooking the inside. Keep an eye on the temperature! Thicken the Sauce: If you prefer a thicker sauce, let it simmer a little longer after adding the cream and cheese until it reaches your desired consistency. Garnish Wisely: Fresh basil not only adds color but also enhances the dish’s aroma. Consider adding a sprinkle of extra Parmesan for an indulgent finish. {{image_4}} You can switch up the meat in this dish. Chicken thighs work well and stay juicy. Shrimp offers a lighter option with a nice flavor. If you prefer a dairy-free version, use coconut cream. Nutritional yeast adds a cheesy taste without dairy. To amplify the dish, add mushrooms or bell peppers. They bring extra texture and taste. For a kick, try red pepper flakes or smoked paprika. These spices add warmth and depth to the creamy sauce. To keep your Creamy Garlic Tuscan Chicken fresh, store leftovers properly. Place the chicken in an airtight container. You can refrigerate it for up to three days. If you want to keep it longer, freeze the chicken. Wrap each piece tightly in plastic wrap and then place it in a freezer bag. It can last for about three months in the freezer. Thaw it in the fridge before reheating. When it's time to enjoy leftovers, reheating is key. The best way to reheat the chicken and sauce is on the stove. Heat a skillet over low heat. Add a splash of cream or broth to keep it moist. Stir gently to avoid overcooking. Check the chicken's temperature; it should reach 165°F (75°C) before serving. If you use the microwave, heat in short bursts. Stir in between to ensure even heating. This way, you will keep your creamy sauce smooth and delicious. You can pair this dish with many sides. Here are a few great options: - Pasta: Any kind works well. Try fettuccine or penne for a nice touch. - Rice: Creamy garlic chicken goes well with white or brown rice. - Vegetables: Steamed broccoli or sautéed green beans add color and crunch. These sides will soak up the creamy sauce and make your meal more filling. If you want more heat, you have options. Here are some easy ways to spice it up: - Red pepper flakes: Add them to the sauce while cooking. - Hot sauce: Drizzle some into the cream for an extra kick. - Jalapeños: Dice and sauté them with the garlic for a fresh heat. These ingredients will bring a fun twist to your creamy garlic chicken. Yes, you can prep this dish early! Here are some tips for meal prepping: - Cook the chicken ahead: Sear and store it in the fridge. - Make the sauce: Prepare it separately and keep it in an airtight container. - Reheat gently: Warm the chicken and sauce together on low heat. This way, you can enjoy a quick, tasty meal anytime! In this post, we explored how to make Creamy Garlic Tuscan Chicken. We covered ingredients, step-by-step instructions, and tips to enhance your dish. I shared ways to avoid common mistakes and offered storage advice. Remember, cooking can be fun and rewarding. This recipe lets you experiment with flavors and techniques. Enjoy the process, and don’t hesitate to make it your own. Happy cooking!

If you’re looking for a tasty dinner idea, Creamy Garlic Tuscan Chicken is a winner! This dish combines tender chicken, rich cream, and vibrant veggies for a meal that dazzles …

Read more

Categories Dinner

No Bake Peanut Butter Energy Bites Quick and Easy Treat

January 7, 2026February 10, 2025 by Chef Tavio
- 1 cup rolled oats - 1/2 cup creamy peanut butter - 1/3 cup honey or maple syrup - 1/2 cup mini chocolate chips or dark chocolate chunks - 1/4 cup ground flaxseed - 1/2 teaspoon vanilla extract - A pinch of sea salt To make these energy bites, you need simple ingredients. Rolled oats give a nice base. The creamy peanut butter adds rich flavor and good fat. Honey or maple syrup sweetens the mix. Mini chocolate chips give a fun crunch. Ground flaxseed boosts nutrition. Vanilla extract adds a lovely aroma. A pinch of sea salt balances the sweetness. - Dried fruits (raisins, cranberries) - Nuts or seeds (chopped almonds, chia seeds) You can add dried fruits for extra sweetness. Raisins or cranberries work well. Chopped nuts or seeds add crunch and healthy fats. Almonds or chia seeds are great choices. These extras can make your energy bites more fun and unique! - Calories per serving: About 100 calories - Macronutrient breakdown: - Proteins: 3g - Fats: 5g - Carbohydrates: 12g Each energy bite packs a punch of nutrition. They have about 100 calories, making them a smart snack. You get a mix of proteins, fats, and carbs. This balance gives you energy and keeps you full. Perfect for a quick pick-me-up during your day! {{ingredient_image_2}} 1. Start with a medium-sized bowl. Add 1 cup of rolled oats and 1/4 cup of ground flaxseed. Mix them well. 2. Next, pour in 1/2 cup of creamy peanut butter, 1/3 cup of honey (or maple syrup), 1/2 teaspoon of vanilla extract, and a pinch of sea salt. 3. Use a spatula or your clean hands to mix everything. The blend should feel sticky. 1. After mixing, fold in 1/2 cup of mini chocolate chips. Make sure they spread evenly. 2. Cover the bowl and chill the mix for 10-15 minutes. This helps it firm up for rolling. 3. Once chilled, take small portions and roll them into balls, about 1 inch in size. 4. Place the rolled bites on a parchment-lined sheet. Leave some space between each. 1. Put the sheet back in the fridge for 30 minutes to help them set. 2. After chilling, move the energy bites to an airtight container. Keep them in the fridge. 3. They stay fresh for about a week, though they might vanish fast! 4. For a fun look, add extra mini chocolate chips on top before serving or place them with colorful fruits. When making energy bites, it’s easy to make some small errors. Here are a few to watch out for: - Ingredient measurement errors: Always measure your ingredients carefully. Too much or too little can change the taste and texture. - Overmixing or undermixing: Mix just enough so everything blends well. If you mix too much, the bites can become tough. If you mix too little, they may fall apart. You can easily swap ingredients to match your taste or needs. Here are some options: - Healthier swaps: Try almond butter or sunflower seed butter. You can also switch honey for agave or maple syrup. - Gluten-free and vegan options: Use gluten-free oats to make these bites gluten-free. For a vegan option, simply use maple syrup instead of honey. To make your energy bites even better, consider these tips: - Adding spices: A dash of cinnamon or nutmeg can add warmth and depth. Just a pinch goes a long way. - Incorporating protein powder: Adding your favorite protein powder boosts nutrition. It also helps the bites stay together. With these tips, you can create energy bites that are even more delicious and fun to eat! Pro Tips Chill for Better Texture: Allow the mixture to chill in the refrigerator for at least 30 minutes after rolling into balls; this helps firm them up for the perfect bite. Customize Your Flavor: Feel free to add in your favorite mix-ins like dried fruits, nuts, or seeds for extra flavor and texture. Keep It Clean: Use wet hands when rolling the bites to prevent the mixture from sticking to your hands. Storage Tips: Store the bites in an airtight container in the refrigerator; they can last up to a week, but they might not last that long! {{image_4}} You can make these bites even more special by coating them in chocolate. Start by melting some chocolate chips in a bowl. Use a microwave or a double boiler. Once melted, dip each energy bite into the warm chocolate. Use a fork to lift them out and shake off excess chocolate. Place them on parchment paper to cool. The chocolate will harden and create a sweet shell. This adds a fun twist to your energy bites! Want to boost the protein in your energy bites? You can easily add protein powder. Mix in one to two scoops with the oats and flaxseed. Choose your favorite flavor, like vanilla or chocolate, for extra taste. You can also chop protein bars and fold them into the mixture. This adds texture and makes your bites even more filling. Great for a pre-workout snack! Get creative with flavors based on the seasons! For fall, try pumpkin spice energy bites. Just mix in some pumpkin puree and a teaspoon of pumpkin spice. It gives a warm, cozy taste. For a tropical twist, make coconut macadamia bites. Use chopped macadamia nuts and shredded coconut instead. These variations keep your energy bites exciting all year round! Store your energy bites in an airtight container. This keeps them fresh and tasty. I recommend glass containers for the best results. They do not absorb odors, and they last longer. You can keep them in the fridge for up to a week. Make sure they are well sealed to avoid drying out. You can freeze these bites for longer storage. To freeze, place them in a single layer on a baking sheet. Once they are frozen solid, transfer them to a freezer bag. Label the bag with the date. They will stay good for about three months. When ready to eat, thaw them in the fridge overnight. These energy bites are great on their own. But you can pair them with fruits too. Try serving them with apple slices or bananas. They also go well in smoothies. Just toss a few bites in for added flavor and energy. Enjoy them as a quick snack or a pre-workout boost. No Bake Peanut Butter Energy Bites will last about one week in the fridge. They stay fresh when stored in an airtight container. If you freeze them, they can last up to three months. Just make sure to separate them with parchment paper to avoid sticking. When you want to eat them, let them thaw in the fridge. Yes, you can easily make these energy bites vegan. Just replace honey with maple syrup. Use a natural peanut butter that has no added sugar or dairy. You can also use vegan chocolate chips instead of regular mini chocolate chips. These swaps keep the taste great while making the recipe vegan-friendly. These energy bites pack in great nutrition. Rolled oats provide fiber, which helps with digestion. Ground flaxseed adds healthy fats and fiber, making you feel full. Peanut butter gives protein, which helps build muscle. Overall, these bites offer a good mix of carbs, protein, and healthy fats. They make a tasty snack that fuels your day. No Bake Peanut Butter Energy Bites are tasty and easy to make. We covered the key ingredients, nutritional info, and simple steps to prepare them. You learned tips for perfect bites, fun variations, and storage ideas. Remember, these bites are great for quick energy and healthy snacking. Feel free to get creative with flavors and ingredients. Enjoy making these bites for you and your loved ones. They'll appreciate your yummy treats.

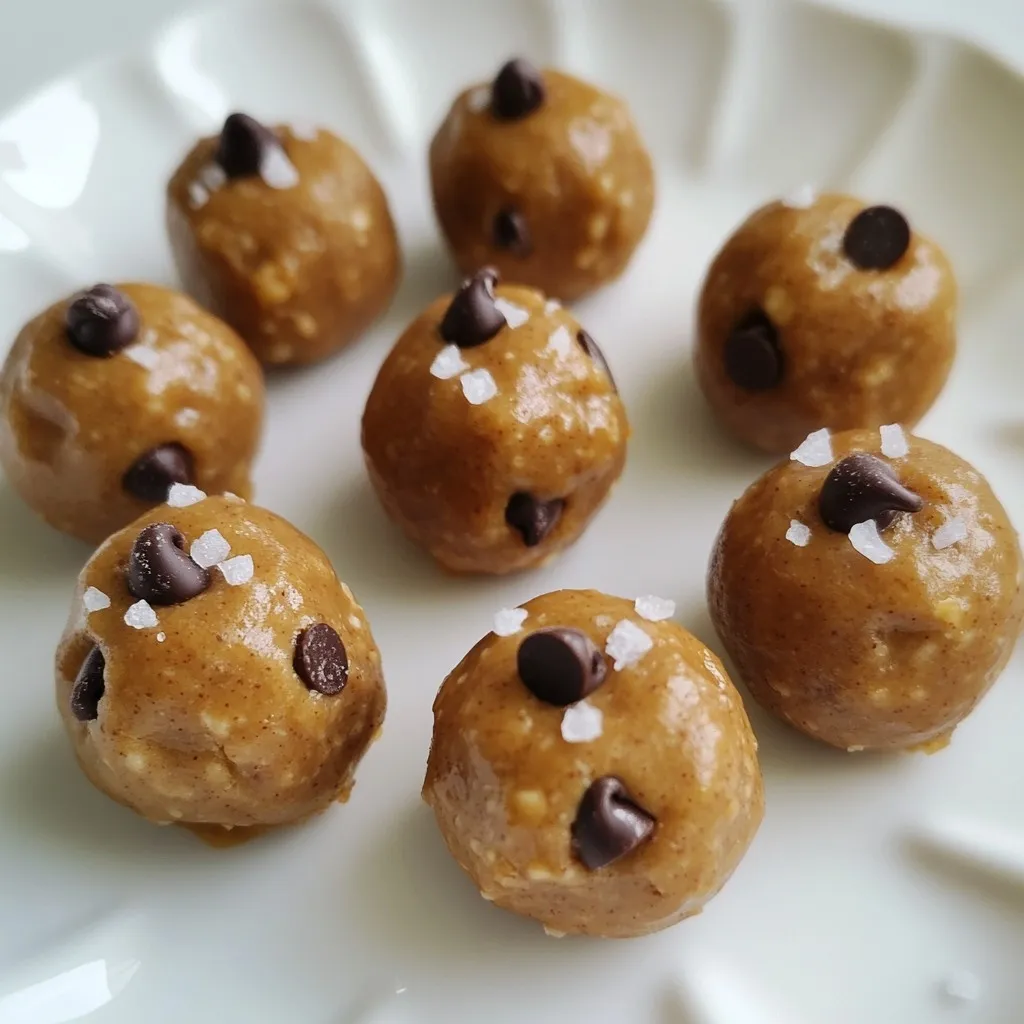
Looking for a quick, tasty treat that packs a nutritional punch? No Bake Peanut Butter Energy Bites are your answer! With simple ingredients like oats, peanut butter, and chocolate chips, …

Read more

Categories Desserts

Cheesy Garlic Chicken Wraps Simple and Tasty Meal

January 12, 2026February 9, 2025 by Chef Tavio
When I make Cheesy Garlic Chicken Wraps, I love gathering fresh ingredients. These ingredients create a tasty meal that everyone enjoys. - 2 cups cooked chicken, shredded - 1 cup cream cheese, softened - 1 cup shredded mozzarella cheese - 2 cloves garlic, minced - 1 tablespoon olive oil - 1 teaspoon Italian seasoning - 1/2 teaspoon black pepper - 1/4 teaspoon salt - 4 large tortillas - 1 cup fresh spinach leaves - Optional: Sliced tomatoes for added freshness Each ingredient plays a key role. The cooked chicken gives a hearty base. Cream cheese and mozzarella add creaminess and flavor. Garlic brings a punch of taste, while Italian seasoning adds warmth. Spinach offers a fresh crunch, and tomatoes can brighten the dish. Using high-quality ingredients makes a big difference. Fresh spinach and ripe tomatoes can elevate your wraps. Always choose what you enjoy the most! {{ingredient_image_2}} - In a medium bowl, combine: - 2 cups cooked chicken, shredded - 1 cup cream cheese, softened - 1 cup shredded mozzarella cheese - 2 cloves garlic, minced - 1 tablespoon olive oil - 1 teaspoon Italian seasoning - 1/2 teaspoon black pepper - 1/4 teaspoon salt Mix these ingredients with a fork. Keep mixing until the mixture is smooth and creamy. This is the heart of the wraps. - Lay 4 large tortillas flat on a clean surface. - Take a generous scoop of the cheesy chicken mixture and spread it across the center of each tortilla. - Leave about half an inch around the edges to avoid mess. - If you like, add a handful of fresh spinach leaves and some sliced tomatoes on top for extra crunch and color. - Roll each tortilla tightly from one side. Tuck in the filling as you roll. - Make sure the seam is on the bottom to keep everything inside. - Heat a skillet over medium heat. Add a drizzle of olive oil to coat the pan. - Place the wraps seam-side down in the skillet. Cook for about 3 to 4 minutes on each side. - Look for a golden brown and crispy finish. Adjust the heat as needed to avoid burning. - Once done, take them out and let them cool for a minute. Slice each wrap in half diagonally to show off that cheesy goodness inside. - Adjust heat as needed to prevent burning. - Use a non-stick skillet for best results. To get those perfect crispy wraps, watch the heat on your stove. If it’s too high, the outside may burn before the inside warms up. Keep it medium. A non-stick skillet helps too. You won’t have to worry about the wraps sticking or tearing. This makes flipping them easier and keeps them intact. - Consider adding spices or herbs for extra flavor. - Serve with dipping sauces like ranch or garlic aioli. To make your cheesy garlic chicken wraps pop, think about adding spices. A sprinkle of paprika or extra Italian herbs can boost the taste. Fresh herbs, like parsley or basil, add a nice touch too. And don’t forget the dips! A side of ranch or garlic aioli gives a creamy balance and extra flavor. It’s a fun way to enjoy your wraps even more! Pro Tips Use Rotisserie Chicken: For an even quicker preparation, use store-bought rotisserie chicken to save time on cooking and shredding. Experiment with Cheeses: Feel free to mix different types of cheese like cheddar or pepper jack for a unique flavor profile. Make Ahead: Prepare the cheesy chicken mixture in advance and store it in the fridge for up to 2 days for a fast meal option. Serve with Dips: Pair these wraps with your favorite dips like salsa, guacamole, or sour cream to enhance the flavor experience. {{image_4}} You can change the cheese in these wraps. Try using cheddar or pepper jack for a fun twist. Each cheese brings its own flavor. If you want to switch the chicken, you have options. Turkey or beef works well too. For a meat-free choice, try a vegetarian protein like tofu or tempeh. This keeps your meal tasty and flexible. Feel free to add more veggies. Bell peppers and onions add color and crunch. You can also include avocado for creaminess. A drizzle of BBQ sauce gives a nice touch of sweetness. These extras make your wraps even more delightful. Customize them to fit your taste and enjoy! To keep your tasty wraps fresh, place them in an airtight container. Store them in the refrigerator. They taste best when eaten within 2-3 days. This way, you can enjoy that cheesy goodness without any worries. When you want to enjoy your wraps again, reheat them in a skillet or microwave. If using a skillet, warm them over medium heat. Cook until they are hot all the way through. If using a microwave, heat them in short bursts until warm. This will keep the cheesy filling nice and gooey! Yes, you can freeze Cheesy Garlic Chicken Wraps. You can freeze them before or after cooking. If you freeze them raw, wrap each one in plastic. Place them in a freezer bag for easy storage. When you are ready to eat, just cook them from frozen. If cooked, let them cool first. Then wrap and store in a freezer bag. They will stay fresh for up to three months. To make the wraps spicier, add jalapeños or hot sauce to the chicken mix. You can chop fresh jalapeños and mix them in. If you prefer, drizzle hot sauce into the cream cheese mix. This gives a nice kick without overpowering the other flavors. You can also serve extra hot sauce on the side for dipping. You can pair these wraps with various sides for a complete meal. Salads are a great choice. Try a fresh green salad or a pasta salad. You can also serve fries for a fun twist. Dipping sauces work well too, like ranch or garlic aioli. These add extra flavor and make your meal more fun. In this blog post, we explored how to make Cheesy Garlic Chicken Wraps. We covered the ingredients needed and walked through each step, from mixing the filling to cooking the wraps. You learned tips for achieving crispy wraps and ways to customize your meal. Remember, you can swap ingredients or add new flavors to make these wraps your own. Enjoy your tasty creation, and don’t forget to try some fun sides with it for a full meal!

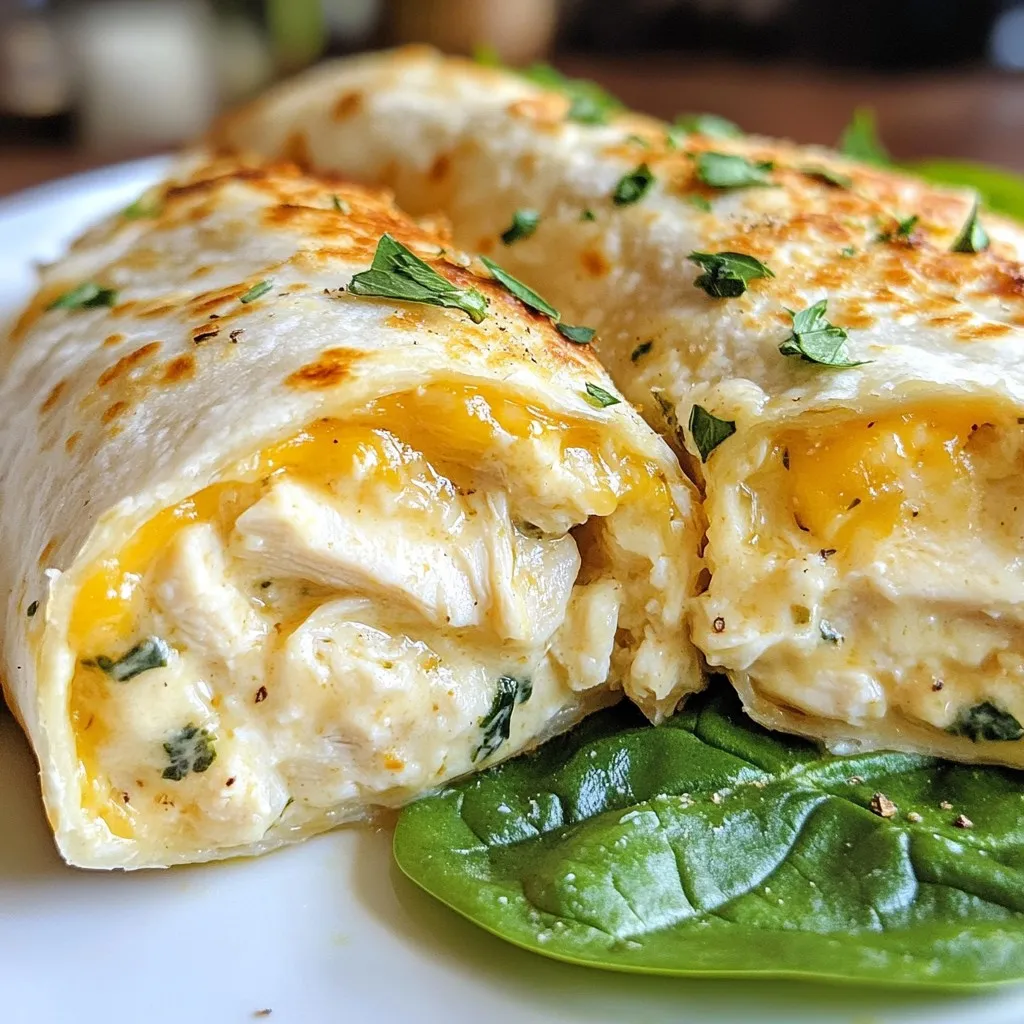
Looking for a quick, tasty meal? Cheesy Garlic Chicken Wraps are your answer! With simple ingredients like shredded chicken, cream cheese, and garlic, you’ll create a cheesy delight in no …

Read more

Categories Appetizers

Peanut Butter Protein Oatmeal Cups Nutritious Snack

December 24, 2025February 9, 2025 by Chef Tavio
To make Peanut Butter Protein Oatmeal Cups, you need these ingredients: - 2 cups rolled oats - 1/2 cup natural creamy peanut butter - 1/4 cup honey or maple syrup - 1 cup almond milk (or your milk of choice) - 1/2 cup vanilla protein powder - 1/4 cup chopped dark chocolate (or chocolate chips) - 1 teaspoon vanilla extract - 1/2 teaspoon ground cinnamon - Pinch of salt These ingredients blend well to create a tasty and protein-packed snack. You can make your oatmeal cups more delicious with these toppings: - Chopped nuts - Dried fruits - Seeds These options add texture and flavor. You can mix and match based on what you have at home. If you need to swap an ingredient, here are some ideas: - Use almond butter instead of peanut butter for a nut-free option. - Swap honey for agave syrup for a vegan treat. - Use any milk alternative if you want to avoid dairy. - Replace dark chocolate with dried fruits for a healthier option. These substitutions keep your oatmeal cups tasty while fitting your needs. {{ingredient_image_2}} First, set your oven to 350°F (175°C). While it heats, take a muffin tin and lightly grease it with cooking spray. You can also use muffin liners for easy removal later. This step is key to avoid sticking! In a large bowl, mix together 2 cups of rolled oats, 1/2 cup of vanilla protein powder, 1/2 teaspoon of ground cinnamon, and a pinch of salt. Stir these dry ingredients well until they are fully blended. This mix gives your oatmeal cups a hearty base. In another bowl, whisk together 1 cup of almond milk, 1/2 cup of creamy peanut butter, 1/4 cup of honey (or maple syrup), and 1 teaspoon of vanilla extract. Make sure everything is smooth and well combined. This mixture adds moisture and flavor to your cups. Now, pour the wet mixture into the dry ingredients. Stir gently until just combined. You want to avoid overmixing, which can make your cups tough. Fold in 1/4 cup of chopped dark chocolate or chocolate chips evenly into the batter for a sweet touch. Spoon the batter into each muffin cup, filling them about three-quarters full. This allows room for rising as they bake. Place the muffin tin in the oven and bake for 15 to 20 minutes. They are done when the edges turn golden brown and the centers feel firm. Once baked, take the muffin tin out of the oven. Let it cool for 5 minutes in the pan. Then, carefully transfer the oatmeal cups to a wire rack to cool completely. For serving, enjoy them warm. You can add a dollop of peanut butter, a drizzle of honey, and some chopped nuts for extra flair. Store leftovers in an airtight container. They make a great snack or breakfast option! To keep your oatmeal cups from becoming tough, mix gently. After adding the wet mix to the dry mix, stir just until you see no dry flour. This helps keep the texture soft. Overmixing makes the oats too dense. Remember, it’s okay if you see a few lumps. They will bake up just fine. Accurate measuring makes a big difference in baking. Use measuring cups for dry ingredients like oats and protein powder. For sticky items like peanut butter and honey, use a liquid measuring cup. Spray it lightly with cooking spray first for easier pouring. Always level off dry ingredients with a straight edge. This ensures you don’t add too much or too little. You can easily switch things up for more flavor. Here are some tips: - Add spices: Try nutmeg or ginger for a warm kick. - Use different nut butters: Almond or cashew butter can change the taste. - Change the sweetener: Maple syrup or agave gives a unique twist. - Add toppings: Mix in chopped nuts or dried fruits for extra texture and flavor. These small changes can make your oatmeal cups feel new each time! Pro Tips Adjust Sweetness: Feel free to adjust the amount of honey or maple syrup to suit your taste. You can also add a ripe banana for natural sweetness! Protein Powder Variations: Experiment with different flavors of protein powder such as chocolate or cookies and cream to change up the flavor profile of your oatmeal cups. Storage Tips: These oatmeal cups can be stored in an airtight container in the refrigerator for up to a week. They also freeze well for longer storage. Custom Toppings: Get creative with toppings! Try adding fresh fruit, yogurt, or even a sprinkle of cinnamon on top before serving for an added touch. {{image_4}} You can use many types of protein powder. Whey protein is a popular choice. It mixes well and adds creaminess. Plant-based protein powders work too. Options include pea, hemp, or rice protein. Each type gives a different taste and texture. Experiment to find your favorite! You can easily change the flavor of your oatmeal cups. Add cocoa powder for a rich chocolate taste. You can also mix in shredded coconut for a tropical twist. If you love spices, try adding a dash of nutmeg or ginger. Don't forget to sprinkle in some cinnamon for warmth. Each flavor twist makes your snack exciting! Making these oatmeal cups vegan is simple. Just swap honey for maple syrup. Use a plant-based milk like almond or oat milk. For gluten-free options, make sure your oats are certified gluten-free. This way, everyone can enjoy these tasty snacks! To keep your Peanut Butter Protein Oatmeal Cups fresh, store them in an airtight container. This helps maintain their moisture and flavor. Place the container in the fridge if you plan to eat them within a week. If you think you will eat them later, freezing is a great option. Freezing these oatmeal cups is simple. First, let them cool completely after baking. Then, wrap each cup in plastic wrap or foil. You can also place them in a freezer-safe bag. Label the bag with the date. They will stay fresh for up to three months in the freezer. When you're ready to enjoy your frozen cups, remove them from the freezer. Let them thaw in the fridge overnight for best results. To reheat, place them in the microwave for about 30 seconds. Check if they are warm enough. If not, heat in 10-second bursts until they reach your desired temperature. You can also reheat them in the oven at 350°F (175°C) for about 10 minutes. Enjoy them warm for a tasty snack! Yes, you can use chunky peanut butter. It adds a nice texture. The oatmeal cups will have little bits of peanut in each bite. Just keep in mind that chunky peanut butter may change the cup's overall consistency a bit. If you love that crunchy bite, go for it! These oatmeal cups last about five days in the fridge. Store them in an airtight container for best results. They make a great grab-and-go snack. If you want them to last longer, consider freezing them. You can make these without protein powder. Just add an extra half cup of oats to replace it. The cups may be less fluffy but will still taste great. They will still provide energy and nutrients without the protein boost. You can serve these oatmeal cups in many fun ways. Try topping them with: - A dollop of extra peanut butter - Slices of banana or strawberries - A sprinkle of chopped nuts or seeds - A drizzle of honey or maple syrup These toppings add flavor and make them more fun to eat! In this post, we explored making Peanut Butter Protein Oatmeal Cups. We covered main ingredients, optional toppings, and substitution ideas. You learned step-by-step instructions for baking, from preparing the oven to cooling tips. I shared useful tricks to improve your muffins and various ways to change flavors or meet dietary needs. Store your cups well to keep them fresh. These oatmeal cups are easy to make and tasty to enjoy. Try them out for a healthy snack or breakfast!

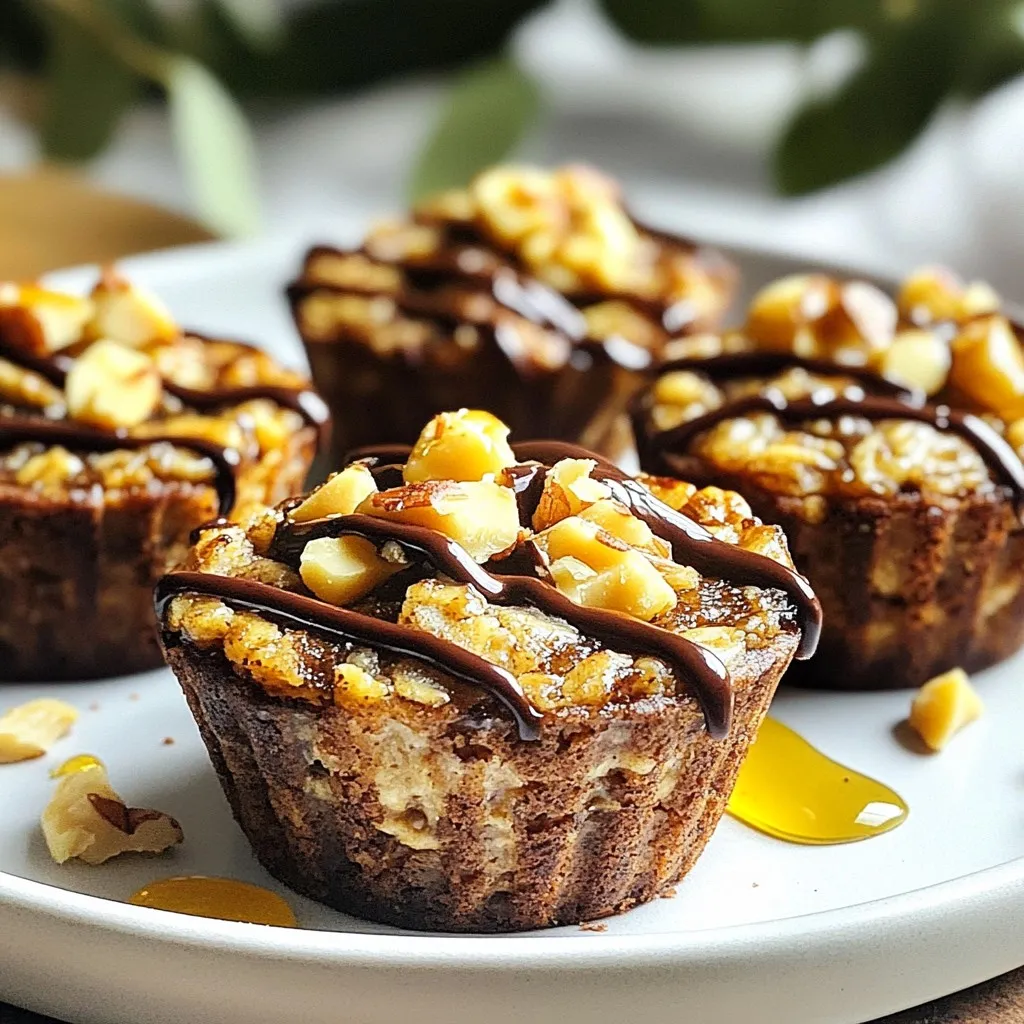
Looking for a tasty and healthy snack? Try my Peanut Butter Protein Oatmeal Cups! These little delights are packed with nutrients and flavor. They’re perfect for breakfast, a post-workout boost, …

Read more

Categories Breakfast

Ultimate Chicken Quesadillas Crispy and Flavorful Meal

January 12, 2026February 8, 2025 by Chef Tavio
- 2 cups cooked chicken, shredded - 1 cup shredded cheddar cheese - 1 cup shredded Monterey Jack cheese - 1/2 cup cream cheese, softened - 1 medium red bell pepper, diced - 1 medium green bell pepper, diced - 1/2 onion, finely chopped - 1 jalapeño, minced (optional for a spicy kick) The core of my ultimate chicken quesadillas is the filling. You need cooked chicken, shredded for easy mixing. I love using both cheddar and Monterey Jack cheeses. They melt beautifully and add a rich flavor. Cream cheese brings a creamy texture that binds everything together. The fresh crunch of diced bell peppers adds color and taste. Don’t forget the onion and optional jalapeño for some heat. - 1 teaspoon garlic powder - 1 teaspoon ground cumin - 1 teaspoon smoked paprika - Salt and pepper to taste Seasonings make a big difference. Garlic powder adds depth, while cumin gives a warm, earthy flavor. Smoked paprika adds a hint of smokiness. Salt and pepper enhance all the flavors. Mix these well into your filling for a full taste experience. - 4 large flour tortillas - 2 tablespoons olive oil For the quesadillas, I prefer large flour tortillas. They hold the filling well and get nice and crispy. Olive oil is essential for cooking. It helps achieve a golden, crunchy exterior. Just remember to coat your skillet with it before cooking. {{ingredient_image_2}} To make the filling, start by gathering all your ingredients. In a large bowl, combine the shredded chicken, cheddar cheese, Monterey Jack cheese, and softened cream cheese. Next, add the diced red bell pepper, green bell pepper, chopped onion, and minced jalapeño if you want some spice. Season this mixture with garlic powder, ground cumin, smoked paprika, and a pinch of salt and pepper. Mix it well until everything is creamy and evenly combined. Now, let’s cook! Heat 1 tablespoon of olive oil in a large skillet over medium heat until it shimmers. Once hot, lay one tortilla flat in the skillet. Evenly sprinkle half of the chicken and cheese mixture over one half of the tortilla. Gently fold the tortilla in half so it covers the filling completely. Cook for 3-4 minutes until the bottom turns golden brown and the cheese melts. After 3-4 minutes, use a spatula to carefully flip the quesadilla over. Cook for another 3-4 minutes on the other side until it is crispy and golden brown. Once done, transfer the quesadilla to a cutting board. Let it cool for a minute before slicing it into wedges. Repeat this process with the remaining tortillas and filling. Add more olive oil as needed to prevent sticking. Serve the quesadillas warm, garnished with fresh cilantro, and enjoy with sour cream or guacamole on the side. To cook your quesadilla just right, keep the heat on medium. This allows the cheese to melt without burning the tortilla. Cook each side for about 3-4 minutes. Look for a golden brown color. This means your quesadilla is ready to flip. For perfect cheese melt, mix both cheddar and Monterey Jack. They melt well and give great flavor. If you want to switch things up, try different cheeses. Pepper jack works well if you like spice. You can also use gouda for a unique taste. For veggies, swap bell peppers for spinach or mushrooms. If you want a milder dish, skip the jalapeño. Use sweet corn instead for a fresh touch. A non-stick skillet is best for making quesadillas. It helps prevent sticking and makes flipping easier. A spatula with a wide edge is great for lifting the quesadilla. You can also use a quesadilla maker if you have one. It cooks evenly and keeps the quesadillas perfectly shaped. Pro Tips Use Fresh Ingredients: Fresh vegetables and high-quality cheese make a significant difference in flavor. Opt for freshly shredded cheese for better melting and taste. Experiment with Fillings: Feel free to add other ingredients like black beans, corn, or different types of cheese to customize your quesadillas to your liking. Get the Right Heat: Ensure your skillet is preheated properly before cooking. This helps achieve that crispy golden crust without burning. Serve with Dips: Enhance your quesadilla experience by serving with a variety of dips like salsa, sour cream, or guacamole for extra flavor and fun. {{image_4}} You can switch chicken for other proteins. Beef works well, too. Use ground beef or steak strips. Shrimp gives a nice touch, especially with spices. For a vegetarian option, try black beans or mushrooms. These choices keep your quesadilla tasty and fun. Adding spices can change the game. Try chili powder for heat or oregano for a fresh taste. You can also add fruits. Pineapple brings a sweet twist that pairs well with savory flavors. Experimenting with herbs like cilantro adds freshness. These small changes can elevate your meal. Pair your quesadillas with side dishes for a complete meal. Rice and beans complement the flavors nicely. You can also serve a fresh salad. Adding toppings makes it festive. Try sour cream, guacamole, or salsa for dips. These will enhance your quesadilla experience. To keep your cooked quesadillas fresh, follow these tips: - Let the quesadillas cool completely. - Wrap each quesadilla in plastic wrap or aluminum foil. - Place wrapped quesadillas in an airtight container. - Store them in the fridge for up to 3 days. Ensure you label the container with the date. This way, you can track freshness. To enjoy crispy quesadillas again, try these methods: - Skillet Method: Heat a skillet over medium heat. Place the quesadilla in the skillet. Cook for 2-3 minutes on each side until crispy and hot. - Oven Method: Preheat your oven to 375°F (190°C). Place quesadillas on a baking sheet. Bake for 10 minutes or until crispy. - Air Fryer Method: Set your air fryer to 350°F (175°C). Cook quesadillas for about 5 minutes. This keeps them crispy and tasty. Avoid microwaving as it can make them soggy. Freezing quesadillas is easy! Here’s how: 1. Cook the quesadillas and let them cool. 2. Wrap each quesadilla tightly in plastic wrap. 3. Place wrapped quesadillas in a freezer bag. 4. Label the bag with the date and contents. 5. Freeze for up to 2 months. When you’re ready to eat them, thaw in the fridge overnight. Reheat using your favorite method for the best taste. To make crispy quesadillas, follow these tips: - Use medium heat to cook them. High heat can burn the outside. - Use enough oil; it helps the tortilla crisp up nicely. - Don’t overload with filling; it can make the tortilla soggy. - Cook each side for 3-4 minutes until golden brown. - Let them cool for a minute before slicing; this helps them stay firm. Yes, you can make quesadillas ahead of time. Here’s how: - Cook them fully, then let them cool. - Store them in an airtight container in the fridge. They stay good for 2-3 days. - To reheat, use a skillet over medium heat. This keeps them crispy. - You can also use an oven at 350°F for 10-15 minutes. For dipping sauces, here are some popular choices: - Sour cream adds a nice cool touch. - Guacamole brings great flavor and creaminess. - Salsa gives a fresh, zesty kick. - For something different, try a chipotle mayo or ranch dressing. These sauces are easy to make and pair perfectly with your quesadillas. In this post, we explored how to make delicious chicken quesadillas. We covered essential ingredients, seasonings, and cooking methods. I shared tips to achieve the perfect crispy texture and various ingredient substitutions to suit your taste. Remember, you can store and freeze leftovers for later meals. Enjoy experimenting with flavors, whether you prefer mild or spicy. With these steps and ideas, you can craft a tasty dish that satisfies everyone. Get cooking and have fun!

Craving a tasty meal that’s easy to make? Dive into my Ultimate Chicken Quesadillas recipe! These crispy, cheesy delights will satisfy your hunger and impress your friends. I’ll guide you …

Read more

Categories Appetizers

Creamy Chicken Penne Delightful and Easy Recipe

January 5, 2026February 8, 2025 by Chef Tavio
- 12 oz penne pasta - 1 lb boneless, skinless chicken breast, diced into bite-sized pieces - 1 cup heavy cream - 1 cup freshly grated Parmesan cheese - 2 tablespoons extra-virgin olive oil - 4 cloves garlic, minced - 1 medium onion, finely chopped - 1 teaspoon Italian seasoning blend - Sea salt and freshly cracked black pepper, to taste - Fresh basil leaves, for garnish - Extra Parmesan cheese for serving Gather these ingredients first. The penne pasta serves as the base and holds the creamy sauce well. Chicken breast gives protein and heartiness. Heavy cream adds richness while Parmesan cheese brings a savory depth. Next, olive oil, garlic, and onion build the flavor foundation. Italian seasoning gives a touch of classic Italian taste. Do not forget the sea salt and black pepper to taste. Lastly, fresh basil leaves offer a fragrant touch. Extra Parmesan cheese can enhance the dish's look and flavor. Each ingredient plays a key role in creating a dish that feels both comforting and gourmet. {{ingredient_image_2}} Start by boiling water in a large pot. Make sure to add a good amount of salt. This helps flavor the pasta. Once the water is boiling, add the 12 oz of penne pasta. Cook it according to the package instructions, usually around 10-12 minutes. You want the pasta to be al dente, which means it should have a slight bite to it. When done, drain the pasta in a colander and set it aside. Next, we’ll prepare the chicken. Heat 2 tablespoons of extra-virgin olive oil in a large skillet over medium-high heat. Once hot, add 1 lb of diced chicken breast. Sprinkle it with sea salt and freshly cracked black pepper. Sauté the chicken for about 5-7 minutes. You want it to turn golden brown and cook all the way through. Once finished, transfer the chicken to a plate and set it aside. Now it’s time to make the creamy sauce. In the same skillet, add 1 medium finely chopped onion and 4 cloves of minced garlic. Sauté them for 2-3 minutes until the onion is soft and clear. The garlic will smell wonderful. Next, pour in 1 cup of low-sodium chicken broth and bring it to a light simmer. Stir in 1 cup of heavy cream, 1 teaspoon of Italian seasoning, and 1 cup of freshly grated Parmesan cheese. Keep stirring until the cheese melts and the sauce is smooth and creamy. Now, let’s combine everything. Add the sautéed chicken back into the skillet along with the drained penne pasta. Toss gently to coat the pasta in the creamy sauce. Taste it and adjust seasoning if needed. You might want a bit more salt or pepper. Serve the creamy chicken penne in bowls. For a lovely touch, garnish with fresh basil leaves and a sprinkle of extra Parmesan cheese. Enjoy your meal! Achieving al dente pasta To get perfect penne, boil water with salt. Add the pasta and cook it for 10-12 minutes. Check it a minute early. You want it firm but not hard. Drain it well to avoid sogginess. Creaminess tips for the sauce For a rich sauce, use heavy cream and Parmesan cheese. Stir the cheese in slowly so it melts well. This makes the sauce smooth and creamy. If it's too thick, add a splash of chicken broth to loosen it. Additional seasonings or herbs to try You can add fresh herbs like basil or parsley. A pinch of red pepper flakes gives a nice kick. Try adding lemon zest for a fresh taste. Don't be afraid to experiment with your favorite spices. Suggested cheese variations While Parmesan is great, you can mix in mozzarella for extra stretch. Goat cheese adds a tangy twist. For a stronger flavor, consider using Pecorino Romano. Mixing cheeses gives depth to your dish. Prepping ingredients in advance Chop your garlic and onion ahead of time. Dice the chicken and store it in the fridge. This makes cooking faster and easier when you're ready to whip up the dish. Using rotisserie chicken For a quick meal, use store-bought rotisserie chicken. Just shred it and add it to the sauce. This saves time and adds great flavor. Plus, it makes this dish even easier to prepare! Pro Tips Use Fresh Ingredients: Always opt for fresh garlic and herbs to enhance the flavor of your dish. Fresh ingredients make a noticeable difference in taste. Cooking Chicken Perfectly: Ensure the chicken is not overcrowded in the skillet. This allows for even cooking and helps achieve that golden-brown color. Adjusting the Sauce Consistency: If the sauce is too thick, you can add a splash of chicken broth to reach your desired consistency. It helps maintain the flavor while adjusting texture. Make It Ahead: You can prepare the sauce ahead of time and store it in the fridge. Just reheat and add the chicken and pasta when ready to serve. {{image_4}} You can boost the nutrition of Creamy Chicken Penne by adding veggies. Think about mixing in fresh spinach or colorful bell peppers. Spinach wilts nicely in the creamy sauce. Bell peppers add a nice crunch and sweetness. You can easily make it a one-pan dish. Just throw your veggies in with the onions and garlic. Sauté until soft. Then add the chicken and continue with the sauce. This way, you cut down on dishes and keep all the flavors in one place. If you want a twist on this dish, try changing the protein. Shrimp makes a great swap for chicken. It cooks fast and adds a seafood touch. Tofu is a good choice for a veggie option. Just cube it and sauté until golden. You can also use leftover meats like rotisserie chicken. It saves time and adds extra flavor. Just toss your cooked meat into the sauce instead of fresh chicken. For those needing gluten-free options, choose gluten-free penne pasta. Many brands make it tasty and just as satisfying. If you want a lighter version, consider using lighter cream or dairy-free milk. Coconut milk works well for a unique flavor. You can also find non-dairy creamers that fit your needs. These swaps let you enjoy the dish while sticking to your diet. To keep your Creamy Chicken Penne fresh, follow these simple steps. First, let the dish cool to room temperature. This prevents condensation in the container. Next, use an airtight container to store your leftovers. Glass containers work great and do not absorb smells. You can also use plastic containers, but make sure they seal tightly. Store the dish in the fridge for up to three days. When you're ready to enjoy your leftovers, reheating is key. The best way to reheat Creamy Chicken Penne is on the stove. Place it in a skillet over medium heat. Add a splash of chicken broth or cream to keep it moist. Stir it gently until heated through. This method helps maintain the dish's creamy texture and flavor. You can also use the microwave. Just cover it with a lid or microwave-safe wrap. Heat in short intervals, stirring in between. Yes, you can freeze Creamy Chicken Penne! To freeze, let it cool completely. Then, portion it into airtight containers. Label the containers with the date. You can freeze it for up to three months. For defrosting, move it to the fridge overnight. Reheat following the methods above. If you notice the sauce is thick, add a little broth when reheating. This keeps the dish creamy and delicious! Creamy Chicken Penne lasts about 3 to 4 days in the fridge. Store it in an airtight container. Always check for signs of spoilage before eating. Yes, you can prep Creamy Chicken Penne in advance. Cook the pasta and chicken, then store them separately. This keeps them fresh. When you are ready to serve, combine them with the sauce. If you need a substitute for heavy cream, use half-and-half or full-fat Greek yogurt. You can also mix milk with butter. These options will keep the dish creamy. This recipe is great for meal prep. You can cook a big batch and divide it into portions. Store each portion in a container. When ready to eat, just heat it up. In this blog post, we explored the key ingredients and steps for making creamy chicken penne. From cooking the perfect pasta to creating a rich sauce, I shared tips to enhance flavor and texture. You can adapt the recipe with vegetables or different proteins. Remember to store leftovers properly and reheat them for the best taste. Enjoy this dish as a weeknight meal or a comforting treat. Now, get cooking and share your delicious results!

Are you ready to elevate your weeknight dinner with a dish that’s creamy, comforting, and quick to make? My Creamy Chicken Penne is just the recipe you need! With tender …

Read more

Categories Dinner

Healthy Sugar Free Apple Fritters Simple and Fun Recipe

November 27, 2025February 7, 2025 by Chef Tavio
To make these healthy sugar-free apple fritters, gather these key ingredients: - 2 large apples (preferably Granny Smith), peeled, cored, and diced - 2 cups almond flour - 1/2 cup rolled oats - 1 teaspoon ground cinnamon - 1/2 teaspoon ground nutmeg - 1 teaspoon baking powder - 1/4 teaspoon sea salt - 1/2 cup unsweetened applesauce - 1/4 cup almond milk (or any milk of your choice) - 1 large egg (or a flax egg for vegan version: mix 1 tablespoon ground flaxseed with 2.5 tablespoons water and let sit for 5 minutes) - 1 teaspoon pure vanilla extract - Optional: 1/4 cup chopped nuts (such as walnuts or pecans) for added texture For those who want extra sweetness, you can use several sugar-free options. Here are a few: - Stevia: A natural sweetener that adds great flavor without calories. - Erythritol: A sugar alcohol with a low glycemic index. - Monk fruit sweetener: A natural sweetener with zero calories. These alternatives work well without changing the taste of the fritters. You can make your fritters even more fun! Consider these add-ins: - Chopped nuts: Walnuts or pecans add crunch and flavor. - Dried fruit: Raisins or cranberries give a sweet twist. - Chocolate chips: Use sugar-free chocolate for a treat. Feel free to mix and match these options to create your perfect fritter! {{ingredient_image_2}} Start by preheating your oven to 375°F (190°C). This step is key to getting your fritters just right. Next, grab a baking sheet and line it with parchment paper. This helps prevent sticking and makes cleanup easier. In a big mixing bowl, add the following dry ingredients: - 2 cups almond flour - 1/2 cup rolled oats - 1 teaspoon ground cinnamon - 1/2 teaspoon ground nutmeg - 1 teaspoon baking powder - 1/4 teaspoon sea salt Whisk these together until they blend well. This mix forms a great base for your fritters. Now, in a separate bowl, mix your wet ingredients: - 1/2 cup unsweetened applesauce - 1/4 cup almond milk - 1 large egg (or a flax egg) - 1 teaspoon pure vanilla extract Whisk these ingredients until smooth. This mixture adds moisture and flavor to your fritters. Slowly pour the wet mixture into the dry mix. Stir gently until you see a thick batter. Be careful not to overmix; you want it just right. Next, fold in: - 2 large apples, peeled, cored, and diced - Optional: 1/4 cup chopped nuts Use a tablespoon to scoop out the batter. Shape each scoop into fritters on your baking sheet. Make sure they are evenly shaped for even cooking. Place the baking sheet in the oven and bake for 18-20 minutes. Keep an eye on them. You want them to turn golden brown. To check if they are done, insert a toothpick into a fritter. If it comes out clean, they are ready! Let them cool for a few minutes on the baking sheet before moving them to a wire rack. Enjoy the delightful smell wafting through your kitchen! To get the right fritter texture, focus on your batter. Use almond flour and oats as your base. These ingredients create a nice balance. If the batter feels too dry, add a little more almond milk. If it’s too wet, mix in a bit more flour. Shape the fritters gently. This keeps them light and airy. Bake until golden brown to ensure they are crisp outside and soft inside. You can easily adapt this recipe to suit your needs. For a gluten-free option, stick with almond flour and oats. Both are naturally gluten-free. To make it vegan, swap the egg for a flax egg. Just mix one tablespoon of ground flaxseed with two and a half tablespoons of water. Let it sit for five minutes until it thickens. This will bind your ingredients well, just like an egg. Adding flavor without sugar is fun! Use spices like cinnamon and nutmeg for warmth. They enhance the apple taste. You can also add pure vanilla extract for extra depth. If you want, mix in chopped nuts, like walnuts or pecans. They not only add crunch but also pack in healthy fats. Another great trick is to serve the fritters with sugar-free yogurt. This adds a creamy touch without the extra sugar. Pro Tips Choose the Right Apples: For the best flavor and texture, opt for tart apples like Granny Smith. They balance well with the sweetness of the applesauce. Don’t Overmix: When combining the wet and dry ingredients, mix just until combined. Overmixing can lead to dense fritters. Customize Your Fritters: Feel free to add spices like ginger or cloves for an extra flavor kick, or incorporate dried fruits like raisins or cranberries for added sweetness. Storage Tips: Store leftover fritters in an airtight container in the fridge for up to 3 days. Reheat in the oven for a few minutes to regain their crispiness. {{image_4}} You can mix things up with various fruits. Instead of apples, try pears or bananas. Both fruits add their unique flavors. For a tropical twist, use diced pineapple or mango. Each fruit will give a new taste to your fritters. You can even blend fruits for a delightful medley! Adding spices and extracts can make your fritters even better. You can use ground ginger for a warm kick. Nutmeg pairs well with apples, but cinnamon is a must. You might also add a splash of almond or coconut extract. These flavors can really brighten your fritters. Just remember to keep it balanced and not overpowering. Mini fritters are fun and easy to eat. Simply use a smaller scoop of batter. This way, you can make bite-sized treats perfect for sharing. They cook faster too, so keep an eye on them. You can serve them as snacks or at parties. Everyone will love these little bites! To keep your healthy sugar-free apple fritters fresh, store them in an airtight container. Line the bottom of the container with a paper towel to absorb moisture. Place the fritters in a single layer, adding more paper towels between layers. This method helps keep them crispy and tasty. You can store them in the fridge for up to three days. If you want to save fritters for later, freezing is a great option. First, let the fritters cool completely. Then, arrange them in a single layer on a baking sheet. Freeze for about an hour until they are firm. After that, transfer them to a freezer-safe bag or container. Remove as much air as possible to prevent freezer burn. These fritters can last up to three months in the freezer. When you're ready to enjoy your fritters again, reheating them properly is key. For best results, use an oven or air fryer. Preheat your oven to 350°F (175°C). Place the fritters on a baking sheet and heat for about 10-15 minutes. This will help keep them crispy. If you use the microwave, heat them for short bursts of 15-20 seconds. Be careful not to overheat, as this can make them soggy. Enjoy them warm for the best taste! Yes, you can use regular flour instead of almond flour. However, the fritters will not be sugar-free. Almond flour is lower in carbs and rich in healthy fats. It helps create a moist texture. If you choose regular flour, your fritters may have a different taste and texture. To make these fritters vegan, substitute the egg with a flax egg. To make a flax egg, mix 1 tablespoon of ground flaxseed with 2.5 tablespoons of water. Let it sit for 5 minutes until it thickens. This swap keeps the fritters moist and holds them together well. Using no sugar helps keep blood sugar levels steady. Almond flour is gluten-free and high in protein. It offers healthy fats that can support heart health. This recipe is also lower in calories compared to traditional fritters. You get a tasty treat that is better for your body! You learned about key ingredients for tasty fritters, along with step-by-step baking instructions. I shared tips to get the right texture and healthy options for everyone. You can experiment with different fruits and flavors to create your favorite versions. Plus, I covered how to store and reheat them best. Try making these fritters with fresh ideas. They can fit any diet and taste great!

Are you craving something sweet but want to keep it healthy? You’re in the right place! My Healthy Sugar Free Apple Fritters recipe is tasty, simple, and fun to make. …

Read more

Categories Desserts

Chicken Alfredo Flatbread Flavorful and Easy Recipe

December 15, 2025February 7, 2025 by Chef Tavio
To make Chicken Alfredo Flatbread, you need these key ingredients: - 1 large flatbread (store-bought or homemade) - 1 cup cooked chicken breast, shredded - 1 cup Alfredo sauce (store-bought or homemade) - 1 cup mozzarella cheese, shredded - 1/2 cup Parmesan cheese, grated - 1 cup fresh spinach leaves - 1 clove garlic, minced - 1 tablespoon olive oil - Salt and pepper to taste - Optional: Fresh parsley, chopped (for garnish) These ingredients combine to create a rich and creamy flavor that everyone will love. When picking Alfredo sauce, I recommend brands like Classico or Rao's. They have great taste and quality. For cheese, I love using Whole Foods' mozzarella and Parmigiano-Reggiano. These brands melt well and add depth to your dish. You can make some easy swaps for a healthier flatbread. Try using whole wheat flatbread instead of regular. For a lighter sauce, consider using Greek yogurt mixed with a bit of milk. You can also opt for low-fat cheeses to cut calories. If you want extra veggies, add bell peppers or mushrooms for more nutrition. {{ingredient_image_2}} Start by gathering your ingredients. You will need: - 1 large flatbread (store-bought or homemade) - 1 cup cooked chicken breast, shredded - 1 cup Alfredo sauce (store-bought or homemade) - 1 cup mozzarella cheese, shredded - 1/2 cup Parmesan cheese, grated - 1 cup fresh spinach leaves - 1 clove garlic, minced - 1 tablespoon olive oil - Salt and pepper to taste - Optional: Fresh parsley, chopped (for garnish) Preheat your oven to 400°F (200°C). This step is key for a great bake. While the oven heats, shred your cooked chicken and mince the garlic. Measure out your cheese and sauce. Having everything ready makes cooking smoother. Grab a medium skillet and add the olive oil over medium heat. Once the oil is warm, add the minced garlic. Sauté the garlic for about one minute. Watch it closely; you don't want it to brown. Next, add the shredded chicken to the skillet. Season it with salt and pepper. Pour in half of the Alfredo sauce and mix well. Cook this mixture for 2-3 minutes, stirring often. Your goal is to heat the chicken and coat it with that creamy sauce. Now, take a baking sheet and place your flatbread on it. Use a spoon to spread the remaining Alfredo sauce evenly on the flatbread. Leave a small border around the edges for a nice crust. Next, evenly distribute the chicken mixture over the sauce. Make sure every bite gets that rich flavor. Then, sprinkle the shredded mozzarella on top. Follow it with the grated Parmesan cheese for extra flavor. Finally, scatter the fresh spinach leaves on top. Press the spinach down slightly so it sticks to the cheese. Place the flatbread in the preheated oven and bake for 10-12 minutes. You want the cheese to melt and bubble, with the edges turning golden brown. Once baked, take the flatbread out and let it cool for a couple of minutes. This helps avoid burns. Slice it into wedges, and feel free to garnish with chopped parsley. Your Chicken Alfredo Flatbread is now ready to enjoy! To make a great Alfredo sauce, start with fresh ingredients. Use heavy cream for a rich taste. If you want, add butter for extra creaminess. Heat the cream gently and whisk in grated Parmesan cheese. This helps create a smooth sauce. Stir until the cheese melts completely. Taste and add salt and pepper as needed. Avoid high heat, as it can scorch the sauce. For more flavor, add a pinch of nutmeg or garlic powder. Baking your flatbread correctly gives it a nice crunch. Preheat your oven to 400°F (200°C) to get the heat right. Place the flatbread directly on the oven rack for more even baking. This allows the bottom to crisp up nicely. Bake for 10-12 minutes, but keep an eye on it. The edges should turn golden brown. If you prefer a crunchier base, you can pre-bake the flatbread for 5 minutes before adding your toppings. Presentation makes your meal more inviting. Serve the flatbread on a wooden board for a rustic look. Cut it into wedges for easy sharing. Garnish with fresh parsley for color and flavor. You can add a small bowl of marinara sauce for dipping. This adds a nice touch and extra flavor. Don't forget to enjoy it while it's warm! Pro Tips Use Fresh Ingredients: Opt for fresh spinach and quality cheeses to enhance the flavor and texture of your flatbread. Customize Your Sauce: Feel free to add herbs or spices to your Alfredo sauce for an extra kick of flavor. Experiment with Toppings: Try adding sun-dried tomatoes, artichokes, or even bacon bits for a unique twist on this classic dish. Perfectly Crispy Crust: For an extra crispy flatbread, bake it on a pizza stone or preheated baking sheet. {{image_4}} You can switch up the chicken for many other proteins. Try shredded turkey for a lighter option. If you love seafood, shrimp works great too. For a smoky touch, add some diced bacon or pancetta. These swaps keep the dish exciting while still being tasty. If you want a veggie version, skip the chicken. Use grilled zucchini or roasted bell peppers instead. You can also try artichoke hearts for a unique flavor. Add mushrooms for a hearty feel. These options keep the dish flavorful and filling without meat. To boost flavor, add fresh herbs like basil or oregano. A sprinkle of red pepper flakes adds heat. For a hint of freshness, squeeze some lemon juice on top. You can also mix in some Italian seasoning for depth. These simple changes take your flatbread to a new level! To keep your Chicken Alfredo Flatbread fresh, let it cool first. Wrap it tightly in plastic wrap or foil. You can also place it in an airtight container. Store it in the fridge for up to three days. This keeps the flavors intact and prevents drying out. When you’re ready to eat the leftovers, preheat your oven to 350°F (175°C). Place the flatbread on a baking sheet. Heat it for about 10 minutes, or until it is warm and the cheese melts slightly. You can also use a microwave. If using a microwave, place a damp paper towel over the flatbread. Heat for 1-2 minutes. This method helps keep it soft. If you want to save some for later, freezing is a great option. Wrap the flatbread tightly in plastic wrap and then in foil. This helps prevent freezer burn. Store it in the freezer for up to two months. When you want to eat it, thaw it overnight in the fridge. Then, reheat it in the oven as mentioned above. This way, you can enjoy a tasty meal anytime! Yes, you can use other types of bread. Try using naan, pita, or even a tortilla. Each bread type gives a unique taste and texture. Just make sure it can hold the toppings well. Thin crusts work best for a crispy bite, while thicker ones add a chewy texture. I love serving Chicken Alfredo Flatbread with fresh sides. Here are some great options: - Garden salad: A crisp, green salad balances the creamy flatbread. - Steamed veggies: Broccoli, green beans, or carrots offer a nice crunch. - Garlic bread: A classic side that complements the meal's flavors. - Marinara sauce: Perfect for dipping and adds a nice tang. Making Chicken Alfredo Flatbread is quick. It takes about 25 minutes in total: - Prep time: 10 minutes to gather and prepare your ingredients. - Cooking time: 10-12 minutes to bake it in the oven. This dish is great for a fast weeknight meal! In this blog post, I shared the key ingredients for Chicken Alfredo Flatbread. I provided step-by-step instructions and tips to perfect the dish. Variations allow for custom flavors, while storage tips ensure leftovers stay fresh. Keep these ideas in mind to create a meal that suits your taste. Chicken Alfredo Flatbread is simple to make and enjoy. You can easily adapt it for different diets. Cooking can be fun, and this dish showcases how creative you can be. Enjoy making your flatbread just the way you like it!

Are you ready to spice up your dinner routine? This Chicken Alfredo Flatbread recipe is a crowd-pleaser that’s packed with flavor and super easy to make. Imagine crispy flatbread topped …

Read more

Categories Dinner

Cinnamon Roll Overnight Oats Wholesome Breakfast Treat

December 16, 2025February 6, 2025 by Chef Tavio
- 1 cup rolled oats - 1 cup almond milk (or any milk of your choice) - 1 tablespoon chia seeds - 1 teaspoon pure vanilla extract - 1 teaspoon ground cinnamon - 2 tablespoons pure maple syrup (or honey) - ¼ cup Greek yogurt (optional for extra creaminess) - 2 tablespoons raisins or chopped pecans (for delightful texture) - A pinch of salt - Fresh apple slices and additional cinnamon for garnish You can add Greek yogurt to make the oats creamy. It gives a nice tangy taste. Chia seeds also help thicken the oats while adding nutrition. You can swap raisins for chopped pecans for extra crunch. Both add great flavor and texture. If you want more sweetness, add extra maple syrup or honey. Each serving contains about: - Calories: 300 - Protein: 10g - Carbohydrates: 50g - Fiber: 8g - Sugars: 12g - Fat: 7g This meal is filling and good for you. It fuels your day and keeps you satisfied. You get healthy fats, fiber, and protein all in one bowl. {{ingredient_image_2}} To start, grab a medium bowl. Add 1 cup of rolled oats. Pour in 1 cup of almond milk or your favorite milk. Next, mix in 1 tablespoon of chia seeds. Then, add 1 teaspoon of pure vanilla extract and 1 teaspoon of ground cinnamon. Drizzle in 2 tablespoons of pure maple syrup or honey. Finally, add a pinch of salt. Stir everything well until the oats soak up the liquid. Now, it's time to add some fun textures. You can use either 2 tablespoons of raisins or chopped pecans. If you choose raisins, they provide a sweet burst. If you prefer pecans, they add a nice crunch. Gently fold your choice into the oat mixture. Be careful not to overmix, as you want those lovely textures to shine. Once your mixture is ready, divide it into two jars or airtight containers. Seal them tightly and pop them in the fridge. Let the oats chill overnight or for at least 4 hours. This soaking time helps the oats soften and absorb all the yummy flavors. In the morning, stir the oats again. If they’re thick, add a splash of almond milk. Top with fresh apple slices and a sprinkle of cinnamon for a tasty treat! To get the right texture, use rolled oats. They soak up the liquid well. I like to mix oats with almond milk and chia seeds. This helps thicken the oats overnight. If the oats seem too thick in the morning, add a splash of milk. Stir well to blend. You want a creamy and smooth feel. For a pretty look, layer the oats in a clear jar. Add fresh apple slices on top for color. A sprinkle of cinnamon gives a warm touch. You can also add nuts for crunch. Serve chilled for a refreshing start to your day. You can change the flavor by adding different spices. Try nutmeg or ginger for a twist. Want more sweetness? Add an extra drizzle of maple syrup. You can swap raisins for dried cranberries or chopped apples. Get creative with toppings like shredded coconut or dark chocolate chips. Each choice makes your oats unique! Pro Tips Soak for Best Texture: Allowing the oats to soak overnight ensures they absorb the liquid fully, resulting in a creamy and delightful texture. Mix It Up: Feel free to customize your oats with different fruits, nuts, or seeds based on your preference for a unique flavor twist each time. Perfect Consistency: If your oats are too thick in the morning, just add a splash of almond milk or your preferred milk to achieve your desired creaminess. Presentation Matters: For an eye-catching breakfast, layer the oats with fresh fruit in a clear jar and top with a sprinkle of cinnamon. {{image_4}} You can easily change the milk in your oats. Almond milk works well, but you can try oat milk, coconut milk, or regular cow's milk. Each type of milk adds a unique flavor. For a creamier base, use whole milk. For a nutty touch, go for cashew milk. Just remember to keep the same amount of liquid, which is one cup. Adding fruits or nuts can make your oats extra special. You can mix in bananas, berries, or peaches. These fruits add sweetness and color. If you want crunch, add walnuts or sliced almonds. You can even swap out raisins for dried cranberries. The options are endless, so feel free to get creative! If you're looking for healthier sweeteners, there are many choices. Instead of maple syrup, use agave nectar or stevia. Honey is another tasty option. Just remember to start with a small amount and adjust to your taste. This way, you can enjoy your oats while keeping sugar levels in check. Cinnamon roll overnight oats stay fresh in the fridge for about 3 to 5 days. This time frame ensures you enjoy their taste and texture. After five days, they may start to lose flavor and freshness. Store your oats in airtight containers. This keeps them from absorbing odors and flavors from the fridge. Make sure to seal the jars tightly. If you add toppings like apples or nuts, store them separately. This keeps them crisp and fresh. You can freeze your overnight oats for longer storage. Use freezer-safe containers. Portion out the oats into individual servings. Leave some space at the top of the container. The oats will expand as they freeze. When ready, thaw the oats in the fridge overnight. You may need to stir in a splash of milk to restore the creaminess. Enjoy your easy and tasty breakfast! No, you cannot use steel-cut oats as a direct substitute. Steel-cut oats are denser and take longer to cook. They need more liquid and time to soften. If you want to try them, cook the oats first. Then, chill them before mixing with the other ingredients. To make these oats vegan, simply swap out Greek yogurt for a dairy-free yogurt. You can also use maple syrup instead of honey. All other ingredients in the recipe are already plant-based. This makes it easy to enjoy a delicious vegan breakfast. Yes, you can prepare these oats for a week. Simply follow the recipe and divide the mixture into jars. Seal them tightly and store them in the fridge. They will stay fresh for up to five days. Just remember to stir before eating and add a splash of milk if needed. Cinnamon roll overnight oats are easy, tasty, and fun. We covered the key ingredients, step-by-step instructions, and tips for a perfect dish. Don’t forget about the many ways to change flavors and add your favorite fruits or nuts. Proper storage extends their life, too. Enjoy experimenting with this recipe, and make it your own! You can have a delicious meal ready in no time and stay healthy at the same time. Happy cooking!

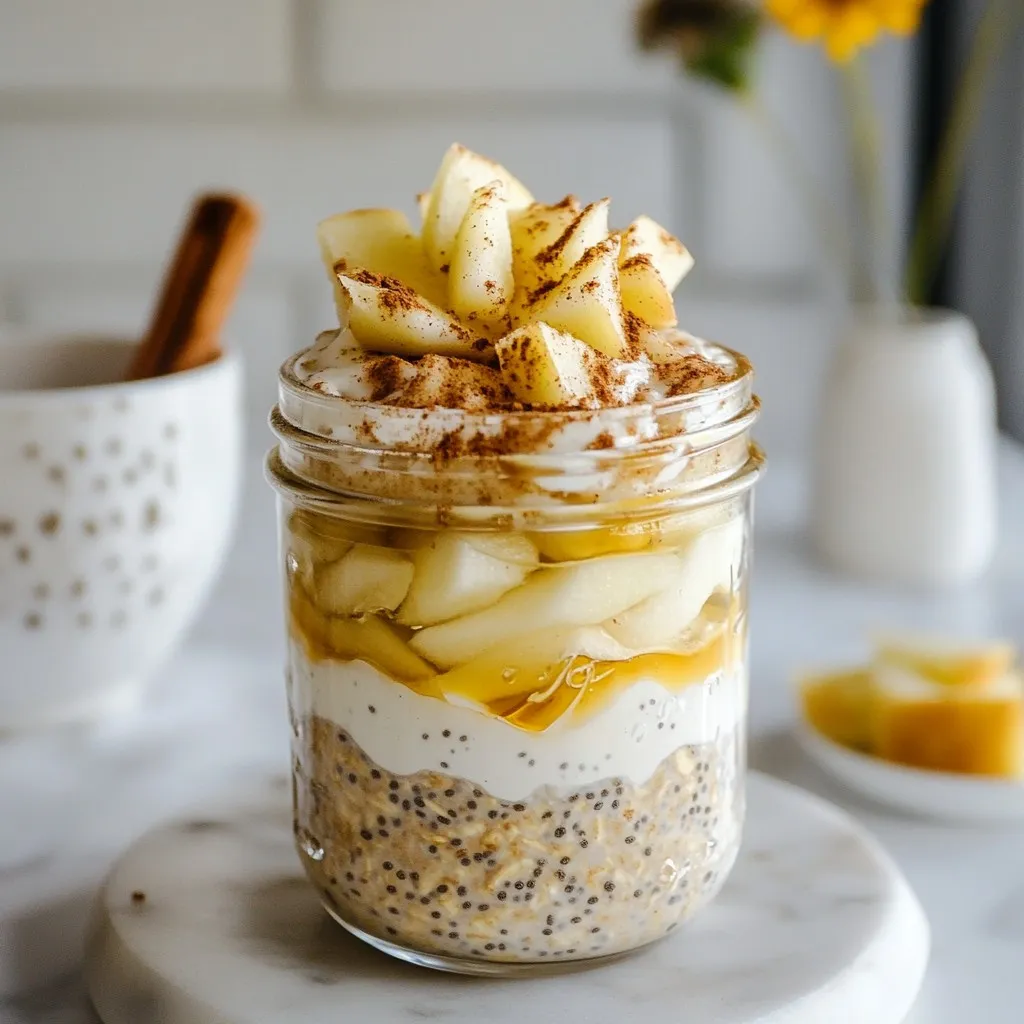
Start your day with a delightful twist by making Cinnamon Roll Overnight Oats. This wholesome breakfast treat combines comfort and nutrition seamlessly. You’ll enjoy the sweet, creamy taste of cinnamon …

Read more

Categories Breakfast
Older posts
Newer posts
← Previous Page1 … Page179 Page180 Page181 … Page191 Next →

TASTED NEST

Where Flavor Finds a Home 🍳🏡 — warm, simple, and crave-worthy recipes made for real life, from stovetop mornings to backyard dinners.

PAGES

Home About Contact Privacy Policy Terms & Conditions Cookie Policy GDPR Policy Copyright Policy Disclaimer

CATEGORIES

Appetizers Desserts Salads Breakfast Dinner
Copyright © 2026 Tasted Nest. All rights reserved.