Skip to content
  • GDPR Privacy Policy
  • Copyright Policy
  • Disclaimer
  • Terms & Conditions
Tasted Nest
  • Home
  • Appetizers
  • Desserts
  • Salads
  • Breakfast
  • Dinner
  • Privacy Policy
  • Contact
  • About

Chef Tavio

Churro Cheesecake Bars Irresistible Dessert Delight

December 10, 2025January 20, 2025 by Chef Tavio
To make these churro cheesecake bars, you will need: - 1 cup all-purpose flour - 1/4 cup granulated sugar - 1/2 teaspoon baking powder - 1/4 teaspoon salt - 1/2 cup unsalted butter, softened - 1 large egg - 8 oz cream cheese, softened - 1/2 cup powdered sugar - 1 teaspoon vanilla extract - 1 teaspoon ground cinnamon - 1/4 cup granulated sugar (for coating) - 1/4 cup caramel sauce (optional) You can swap some ingredients if needed. For a gluten-free option, use gluten-free flour instead of all-purpose flour. Coconut sugar can replace granulated sugar for a different flavor. If you don't have cream cheese, use ricotta cheese for a lighter texture. For a vegan version, try a vegan cream cheese and substitute the egg with a flax egg. Always use fresh ingredients for the best taste. Check the expiration dates on dairy products like cream cheese and butter. For flour, store it in a cool, dry place to keep it fresh. Use pure vanilla extract for a richer flavor rather than imitation. When it comes to cinnamon, fresh ground cinnamon adds a wonderful aroma and taste. {{ingredient_image_2}} Start by preheating your oven to 350°F (175°C). This temp helps the bars bake evenly and become golden. Grab an 8x8-inch baking pan. Grease it with non-stick spray or line it with parchment paper. This makes removing the bars easy later on. In a medium bowl, mix together 1 cup of all-purpose flour, 1/4 cup of granulated sugar, 1/2 teaspoon of baking powder, and 1/4 teaspoon of salt. This is your dry mix. In a large bowl, use an electric mixer to beat 1/2 cup of softened unsalted butter with 1 large egg. Mix until it is creamy. Gradually add the dry mix to the wet mix. Keep mixing until a soft dough forms. In another bowl, beat 8 oz of softened cream cheese with an electric mixer. Mix until it is smooth. Add in 1/2 cup of powdered sugar, 1 teaspoon of vanilla extract, and 1 teaspoon of ground cinnamon. Keep mixing until everything blends well and becomes creamy. Take half of the dough and press it into the bottom of your greased pan. This forms the base. Then, carefully spread the cream cheese mixture over this layer. Make sure it is even. Crumble the rest of the dough on top of the cream cheese. Spread it out to ensure a good mix of textures. Put the pan in the oven and bake for 25-30 minutes. Look for a golden top and make sure the cheesecake layer is set. Once done, take the pan out and let it cool completely on a wire rack. After it cools, slice it into squares. Finish by sprinkling a cinnamon-sugar mix over the top. If you want, drizzle some caramel sauce on the side when you serve. Enjoy your delicious churro cheesecake bars! To create a smooth filling, start with room-temperature cream cheese. Cold cream cheese can cause lumps. Beat it well until creamy. Gradually add the powdered sugar, vanilla, and cinnamon. Mix until all ingredients blend smoothly. If you see lumps, keep mixing until you achieve that perfect creamy texture. Taste your filling before spreading it on the dough. You may want it sweeter or less sweet. If you prefer a sweeter bar, add more powdered sugar, a tablespoon at a time. For a less sweet option, reduce the sugar by the same amount. Balance is key, so find what suits your taste best. Avoid overmixing the dough; this can make it tough. When you press the dough into the pan, don’t pack it too tightly. It should be smooth but not dense. Also, watch the baking time. Overbaking can dry out the cheesecake filling. Aim for a golden top and a slightly jiggly center for the best texture. Pro Tips Chill the Cream Cheese: For an extra smooth filling, make sure your cream cheese is well-chilled before mixing. This helps achieve a creamier texture in the cheesecake layer. Check for Doneness: Keep an eye on the cheesecake bars as they bake. The edges should be set, while the center may still have a slight jiggle when you take them out of the oven. Use Parchment Paper: Lining your baking pan with parchment paper not only makes removing the bars easier but also prevents them from sticking to the pan, ensuring a clean cut. Customize the Topping: Feel free to add your favorite toppings! Chopped nuts, chocolate chips, or an extra sprinkle of cinnamon-sugar can elevate the flavor and presentation. {{image_4}} You can add fun flavors to your churro cheesecake bars. Try mixing in chocolate chips or a swirl of Nutella. For chocolate chips, just fold in 1/2 cup before spreading the cream cheese layer. If you want Nutella, add 1/4 cup to the cream cheese mixture after beating it. This gives a rich, chocolatey twist. To make gluten-free churro cheesecake bars, swap the all-purpose flour for a gluten-free blend. Look for a blend that works well in baking. Follow the same recipe steps. This way, you can enjoy the same great taste without gluten. You can make these bars vegan with a few easy swaps. Use plant-based butter instead of regular butter. For the cream cheese layer, try vegan cream cheese. Replace the egg with a flaxseed egg. Mix one tablespoon of flaxseed meal with three tablespoons of water and let it sit for five minutes. This mixture works great as a binding agent. You still get a tasty treat while keeping it vegan! To keep your churro cheesecake bars fresh, place them in an airtight container. Make sure they cool completely before storing. You can stack them with parchment paper between layers to avoid sticking. These bars stay tasty for up to three days in the fridge. You can freeze churro cheesecake bars for up to two months. First, let them cool completely. Then, cut them into squares and wrap each piece in plastic wrap. Place the wrapped bars in a freezer-safe bag or container. This way, you can enjoy a sweet treat later! To reheat, remove the desired amount from the fridge or freezer. If frozen, let them thaw in the fridge overnight. For warm bars, place them in the microwave for about 15-20 seconds. You can also reheat them in an oven at 350°F for about 10 minutes. Enjoy them warm with a drizzle of caramel sauce! Yes, you can make these bars a day before serving. Just let them cool completely. Then, store them in an airtight container in the fridge. This helps the flavors blend well. When you are ready to serve, sprinkle some cinnamon-sugar on top for extra flair. Your bars are done when the top is golden brown. The cheesecake layer should look set and not jiggly. A toothpick inserted in the center should come out clean. This means the center is cooked well. Keep an eye on them in the last few minutes to prevent burning. These bars pair well with a drizzle of caramel sauce. You can also serve with whipped cream or ice cream. Fresh fruit like strawberries or raspberries adds a nice touch too. For a crunch, consider nuts or chocolate chips on the side. These bars contain gluten and dairy, so they are not gluten-free or vegan. However, you can adapt the recipe. Use gluten-free flour and dairy-free cream cheese. This way, you can make a version for those with dietary restrictions. Always check labels for allergens. We covered how to make Churro Cheesecake Bars, from choosing ingredients to storing leftovers. You learned about ingredient swaps, baking steps, and fun variations. Remember to strive for the perfect filling and avoid common mistakes. These bars can fit many diets and delight everyone. Enjoy sharing this tasty treat with friends and family!

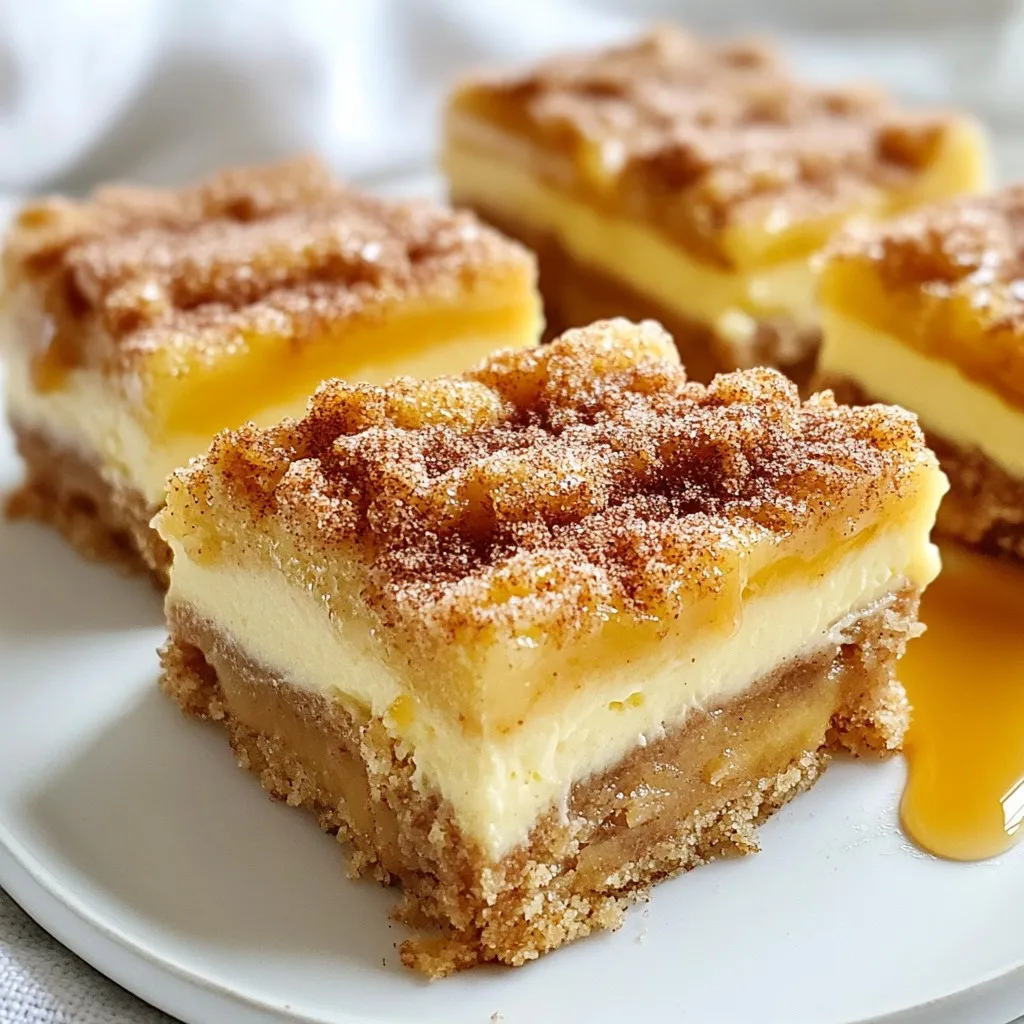
Are you ready for a dessert that combines creamy richness with a sweet cinnamon twist? Churro Cheesecake Bars are the perfect treat to impress your friends and family. In this …

Read more

Categories Desserts

Five Cheese Ziti Copycat Tasty and Satisfying Recipe

January 5, 2026January 19, 2025 by Chef Tavio
- 1 pound ziti pasta - 1 cup ricotta cheese - 1 cup mozzarella cheese, shredded - 1 cup parmesan cheese, grated - 1/2 cup gorgonzola cheese, crumbled - 1/2 cup cheddar cheese, shredded - 3 cups marinara sauce - 1 tablespoon olive oil - 2 cloves garlic, minced - 1 teaspoon dried oregano - 1 teaspoon dried basil - Salt and pepper to taste - Fresh basil leaves for garnish (optional) To make Five Cheese Ziti, you need a mix of cheeses. The ricotta gives a creamy base. Mozzarella provides stretch, while parmesan adds sharpness. Gorgonzola brings a tangy kick, and cheddar gives a rich flavor. Combine these with ziti pasta for a hearty dish. Marinara sauce ties it together, making it rich and flavorful. - Alternative cheese choices - Homemade versus store-bought marinara sauce - Additional herbs or spices You can switch up the cheeses to suit your taste. Go for Fontina or goat cheese for a twist. If you have time, try making your own marinara. It adds a fresh touch. You can also add herbs or spices like red pepper flakes for heat. These small changes can elevate your dish even more. {{ingredient_image_2}} - Preheat your oven to 375°F (190°C). This gets it hot for baking. - In a pot of boiling salted water, cook the ziti pasta. Aim for an al dente texture. Drain it and set aside in a large mixing bowl. - In a skillet, add 1 tablespoon of olive oil over medium heat. Once it shimmers, add 2 cloves of minced garlic. Sauté for about 1 minute until fragrant and golden. - In your large mixing bowl, combine the drained ziti, 1 cup of ricotta cheese, 1 cup of shredded mozzarella cheese, and ½ cup of grated parmesan cheese. - Pour in half of the marinara sauce from the skillet. Mix everything well to coat the pasta. - Spread a layer of the remaining marinara sauce in a large baking dish. This will be the base for your ziti. - Spoon half of the ziti mixture on top of the marinara. Spread it evenly. - Add half of the crumbled gorgonzola and ½ cup of shredded cheddar cheese on top for extra flavor. - Pour another layer of marinara sauce over this first ziti layer. Then add the remaining ziti mixture on top. Spread it evenly again. - Top this layer with the rest of the marinara sauce. Make sure the ziti is covered. Finally, sprinkle the last bits of mozzarella, gorgonzola, cheddar, and parmesan cheese on top. - Cover the baking dish tightly with aluminum foil. This keeps the moisture in. Bake it in the oven for 25 minutes. - After 25 minutes, remove the foil. Bake for another 15 minutes. This gives you a bubbly and golden-brown cheese top. - Let the ziti cool for a few minutes. Slice into portions and serve hot. If you like, garnish with fresh basil leaves for a nice touch. To get a great cheese melt, choose the right cheese blend. My favorite mix includes mozzarella, ricotta, and gorgonzola. These cheeses melt well and give great flavor. Bake your ziti at 375°F (190°C). This temperature helps all the cheeses blend nicely. Cover with foil for the first part of baking, then remove it for a bubbly top. Avoid overcooked ziti by cooking it just until al dente. This means it should be firm but not hard. Follow the package directions closely for the best results. Salting the water is key for flavor. Use about one tablespoon of salt per gallon of water. This simple step makes a big difference in taste. Feel free to add more herbs or spices to boost flavor. Basil and oregano work well, but try adding red pepper flakes for heat. You can also customize your marinara sauce. Consider adding sautéed onions or bell peppers for extra depth. These tweaks make your dish even more delicious and unique. Pro Tips Use Fresh Herbs: Fresh basil can elevate the flavor of your ziti. Add it just before serving to maintain its vibrant taste and color. Experiment with Cheeses: Feel free to mix and match different cheeses based on your preference. A blend of smoked gouda or fontina can add an interesting twist. Make Ahead: You can prepare the ziti in advance and store it in the refrigerator. Just bake it when you're ready to serve, adding a few extra minutes to the cooking time. Check for Doneness: Keep an eye on the cheese crust while baking. If it’s not browning as you’d like, you can broil it for a few minutes at the end for a golden finish. {{image_4}} You can swap cheeses in this recipe. Try gouda or fontina for a twist. These cheeses melt well and add a creamy texture. If you're vegan, use cashew cheese or a store-bought vegan blend. They work great and keep the dish tasty. Want to make it heartier? Add cooked ground beef, turkey, or sausage. Brown the meat in a pan and mix it in before baking. You can also add veggies like spinach, mushrooms, or bell peppers. This gives more flavor and nutrients to your meal. For a gluten-free version, choose gluten-free pasta. Rice or quinoa pasta works well. Just watch the cooking time, as these may cook faster. Check the package for details. This way, everyone can enjoy the cheesy goodness! After enjoying your Five Cheese Ziti, store any leftovers for the next day. Use an airtight container to keep it fresh. This helps prevent the pasta from drying out or absorbing other fridge smells. Your ziti can last in the fridge for about three to four days. Just make sure it’s cooled down before you store it. To freeze your Five Cheese Ziti, first let it cool completely. Then, transfer it to a freezer-safe container. You can also wrap it tightly in plastic wrap and then foil for added protection. This way, it stays fresh for up to three months. When you’re ready to enjoy it again, take it out and let it thaw in the fridge overnight. Reheat it in the oven at 350°F (175°C) until it’s hot throughout. If it's frozen, it may take about an hour. Cover it with foil to keep moisture in, then uncover for a nice crust at the end. Enjoy every cheesy bite! You can use cottage cheese instead of ricotta. It gives a similar texture. For a dairy-free option, try blended silken tofu. It will mimic the creaminess well. If you want a thicker mix, blend the tofu with a bit of lemon juice. This helps add a fresh flavor. Yes, you can prep it a day in advance. Just assemble the dish, cover it, and store it in the fridge. When you are ready to bake, let it sit at room temperature for 30 minutes. This helps with even cooking. For reheating, cover it with foil initially. Bake at 375°F (190°C) for 25 minutes, then uncover for 10 more minutes. This keeps the cheese nice and melty. Add red pepper flakes to the marinara sauce. You can also mix in some diced jalapeños for a kick. If you want a smoky flavor, try adding chipotle powder. Pair these spices with fresh herbs like cilantro for a unique taste. Five Cheese Ziti is a fun and easy dish to make. We covered the main ingredients, step-by-step instructions, and clever tips to help you succeed. You can mix different cheeses and customize the recipe. Storing leftovers is simple, and we even shared answers to common questions. I hope you feel ready to create your own cheesy ziti masterpiece. Enjoy every bite, and don’t hesitate to get creative!

Craving a cheesy feast? Look no further! My Five Cheese Ziti Copycat recipe brings rich flavors and comfort straight to your kitchen. With five types of cheese and a zesty …

Read more

Categories Dinner

High Protein Breakfast Burrito Easy and Tasty Meal

November 28, 2025January 19, 2025 by Chef Tavio
- 4 large eggs - 1/2 cup egg whites - 1/2 cup black beans, rinsed and drained - 1/2 cup diced bell peppers (a colorful mix of red and green) - 1/4 cup shredded low-fat cheese (choose cheddar or mozzarella based on preference) - 1 avocado, sliced into thin wedges - 1/4 cup salsa (your favorite variety) - 4 whole grain tortillas (10 inches in diameter) - 1 tablespoon olive oil - Salt and pepper, to taste - Fresh cilantro, finely chopped, for garnish I love how simple it is to make a high protein breakfast burrito. First, you'll need your main protein sources: eggs, egg whites, and black beans. These ingredients pack a protein punch that helps keep you full and ready for the day. Next, grab some colorful vegetables. I always use bell peppers for their sweetness and crunch. They brighten up the burrito and add a nice texture. Slice up an avocado, too. It adds creaminess and healthy fats. You can also choose to add low-fat cheese for extra flavor. Salsa is great for a zesty kick. Lastly, don’t forget your tortillas. Whole grain ones are my favorite because they add fiber to your meal. This combination makes every bite delicious and nutritious! {{ingredient_image_2}} 1. Whisking eggs and seasoning: Start with a medium bowl. Crack 4 large eggs and add 1/2 cup of egg whites. Season with salt and pepper. Whisk until the mix is frothy and well combined. 2. Sautéing bell peppers in olive oil: Heat 1 tablespoon of olive oil in a non-stick skillet. Once the oil is hot, add 1/2 cup of diced bell peppers. Sauté these for about 3-4 minutes. They should become slightly soft and fragrant. 3. Cooking the egg mixture with black beans and cheese: Reduce the heat. Pour the egg mixture into the skillet with the peppers. Stir gently for 4-5 minutes, until the eggs set. When curds form, add 1/2 cup of rinsed black beans and half of the 1/4 cup of shredded cheese. Mix until everything is combined and the cheese melts. 1. Distributing filling among tortillas: Prepare a clean surface. Place 4 whole grain tortillas flat on this surface. Spoon the egg and vegetable mix evenly onto the tortillas, leaving an inch space at the edges. 2. Adding toppings: avocado, salsa, and cheese: On the egg filling, add slices of 1 avocado. Top each with a generous tablespoon of 1/4 cup salsa and the rest of the shredded cheese. 1. Toasting the rolled burritos: Roll the tortillas tightly. Fold the sides in and roll from the bottom up. Place them seam-side down in the skillet over medium heat. Toast each side for 2-3 minutes, until golden brown and crispy. 2. Garnishing with cilantro before serving: After toasting, take the burritos out and let them cool a bit. Before serving, sprinkle fresh chopped cilantro on top for a burst of flavor. - To get the perfect egg texture, whisk the eggs well. Make them frothy by mixing air in. This step helps create light, fluffy eggs. - Use medium heat when cooking eggs. If the heat is too high, they can get tough. Stir gently as they cook to keep them soft. - When rolling burritos, start by folding the sides in. Then, roll from the bottom up. This method keeps all the filling inside. Aim for a snug fit to avoid spills. - For side dishes, pair your burrito with fresh fruit or a simple salad. A light side adds color and flavor. - To drink, try fresh juice, coffee, or herbal tea. These beverages complement the burrito well. - Enhance flavor with toppings like extra salsa, hot sauce, or fresh lime juice. A touch of heat can elevate your meal. - Add fresh herbs like cilantro or parsley for a burst of freshness. These herbs brighten the dish and add visual appeal. Pro Tips Use Fresh Ingredients: Fresh vegetables and ripe avocados will enhance the flavor and nutritional value of your burrito. Customize Your Filling: Feel free to add in other proteins such as cooked chicken or turkey for an extra protein boost. Perfectly Toasted Tortillas: Toasting the tortillas not only adds a crispy texture but also helps hold in the fillings without getting soggy. Make Ahead: You can prepare the filling in advance and store it in the fridge, making breakfast prep quick and easy on busy mornings. {{image_4}} You can switch out the eggs for tofu or turkey. Tofu gives a nice texture and protein boost. Turkey is lean and adds great flavor. Try different vegetables too! You can use spinach, zucchini, or mushrooms. Each choice brings a unique taste. Mixing colorful veggies not only looks good but also adds nutrients. To make this recipe vegetarian, skip the eggs and cheese. Use tofu with spices instead. For a vegan option, replace the eggs with chickpea flour mixed with water. This keeps the protein high. If you need a gluten-free option, choose corn tortillas. They hold the filling well and taste great too. Adjusting these ingredients makes the burrito fit many diets. To store your burritos, let them cool first. Wrap each burrito in plastic wrap or foil. This keeps them fresh and tasty. Place the wrapped burritos in an airtight container. Store them in the fridge for up to three days. If you want to keep them longer, consider freezing them. Properly wrapped, they can last up to three months in the freezer. When it's time to enjoy leftovers, use a few methods to reheat. The oven works well for keeping the burrito crispy. Preheat your oven to 350°F (175°C). Place the burrito on a baking sheet and heat for about 15-20 minutes. If you're in a hurry, use the microwave. Place the burrito on a microwave-safe plate. Heat it for 1-2 minutes. To avoid sogginess, cover the burrito with a paper towel. This helps absorb extra moisture. You can also reheat it in a skillet for a few minutes on each side. This gives it a nice, crispy texture. How to boost protein content further? You can boost the protein in your breakfast burrito by adding: - Greek yogurt: A dollop on top adds creaminess and protein. - Extra egg whites: Use more egg whites for a lighter texture. - Lean meats: Add cooked chicken, turkey, or lean sausage. - Quinoa: Mix in cooked quinoa for a protein punch. These options help you get more protein while keeping the meal tasty. Can I freeze high protein breakfast burritos? Yes, you can freeze these burritos! Here’s how: 1. Allow the burritos to cool completely after cooking. 2. Wrap each burrito in foil or plastic wrap. 3. Store them in a freezer-safe bag. They last up to three months in the freezer. Just reheat before eating! What are the nutritional benefits of this recipe? This breakfast burrito is packed with nutrients: - High protein: Eggs, egg whites, and beans provide protein. - Healthy fats: Avocado adds good fats for heart health. - Vitamins: Bell peppers offer vitamins A and C. - Fiber: Black beans and whole grain tortillas give fiber. This meal supports energy and keeps you full longer. How to prepare burritos in advance? To prepare burritos ahead of time: 1. Cook the filling as directed. 2. Assemble the burritos but do not cook them yet. 3. Wrap them in foil and store in the fridge. You can cook them just before serving, keeping them fresh and warm. Can I pack these burritos for lunch? Absolutely! These burritos are great for lunch. Just wrap them well to avoid spills. Add a small container of salsa for dipping. They make a filling and tasty meal on the go! This blog post explains how to make a tasty high-protein breakfast burrito. You learned about key ingredients like eggs, black beans, and colorful veggies. I shared easy steps for preparation and assembly, along with helpful cooking tips. You can also customize with substitutions for different diets. Remember to store leftovers properly and reheat for best taste. Enjoy your burrito with your favorite sides or drinks. Make this recipe your own, and have fun!

Start your day right with a high-protein breakfast burrito! This easy and tasty meal packs in flavor and nutrition. You’ll find a mix of eggs, black beans, and colorful veggies …

Read more

Categories Breakfast

Gluten Free Greek Yogurt Chocolate Chip Muffins Delight

December 15, 2025January 19, 2025 by Chef Tavio
Gathering the right ingredients is key to making these delicious gluten-free Greek yogurt chocolate chip muffins. Here’s what you need: - 1 cup gluten-free all-purpose flour - 1/2 teaspoon baking soda - 1 teaspoon baking powder - 1/4 teaspoon salt - 1/2 cup Greek yogurt (plain, full-fat recommended for richness) - 1/4 cup honey or maple syrup (for a touch of natural sweetness) - 1/4 cup unsweetened applesauce (adds moisture) - 1 large egg (at room temperature) - 1 teaspoon vanilla extract (for flavor depth) - 1/2 cup dark chocolate chips (ensure gluten-free) - 1/4 cup chopped walnuts (optional, for crunch) Using these ingredients ensures that your muffins are light, moist, and full of flavor. The Greek yogurt adds creaminess while keeping the muffins gluten-free and healthy. When you mix in the chocolate chips, they melt into pockets of sweetness that make each bite irresistible. If you like a bit of crunch, toss in some walnuts. They add texture and a nutty flavor that pairs well with chocolate. This mix of ingredients guarantees a treat everyone will love! {{ingredient_image_2}} First, preheat your oven to 350°F (175°C). This temperature is perfect for baking muffins. While the oven warms up, prepare your muffin tin. You can line it with paper liners or lightly grease each cup. This step helps keep your muffins from sticking. In a medium bowl, whisk together the gluten-free all-purpose flour, baking soda, baking powder, and salt. Use a whisk to mix them well. This technique ensures that all dry ingredients blend evenly. It helps the muffins rise nicely in the oven. In a large bowl, combine the Greek yogurt, honey or maple syrup, unsweetened applesauce, egg, and vanilla extract. Mix until the mixture is smooth and creamy. Make sure there are no lumps left. A smooth mixture makes for fluffy muffins. Gradually add the dry ingredients to the wet mixture. Use a spatula or wooden spoon to stir gently. It’s key to avoid overmixing. A few lumps are okay and will keep your muffins tender. Now, carefully fold in the dark chocolate chips. If you like, add the chopped walnuts for crunch. Use a gentle folding motion to ensure even distribution. This helps each muffin have a bit of chocolate and walnut in every bite. Spoon the muffin batter into the prepared cups, filling each about 3/4 full. This allows the muffins to rise without overflowing. Place the muffin tin in the oven and bake for 18-20 minutes. To check for doneness, insert a toothpick into the center of a muffin. It should come out clean or with a few moist crumbs. Once baked, let the muffins cool in the pan for about 5 minutes. Then, transfer them to a wire rack to cool completely. - Temperature considerations: Always preheat your oven to 350°F (175°C). This step helps your muffins rise and bake evenly. Make sure your egg is at room temperature for best results. - Avoiding common pitfalls: Do not overmix the batter. A few lumps are fine. Overmixing can lead to tough muffins. Fill your muffin cups about 3/4 full. This helps them rise beautifully. - Serving suggestions: Arrange the muffins on a bright platter. This makes them look more inviting. You can serve them with a dollop of Greek yogurt. A drizzle of honey adds sweetness and flair. - Garnishing ideas: Dust the muffins lightly with powdered sugar. This simple touch makes them look special. You can also sprinkle some chopped walnuts on top for added style and crunch. - Health benefits of Greek yogurt: Greek yogurt boosts protein in these muffins. It keeps them moist and adds a nice tang. This ingredient can support gut health too. - Substitute options for dietary needs: If you need a dairy-free option, use coconut yogurt. For egg-free muffins, try a flax or chia seed egg. Simply mix one tablespoon of seeds with three tablespoons of water. Let it sit for a few minutes until it thickens. Pro Tips Ingredient Quality: Use high-quality gluten-free flour blends for the best texture and flavor in your muffins. Room Temperature Egg: Ensure your egg is at room temperature for better incorporation into the batter, leading to a fluffier muffin. Do Not Overmix: Mix the batter until just combined to maintain lightness and avoid dense muffins. Storage Tips: Store leftover muffins in an airtight container at room temperature for up to 3 days, or freeze for longer freshness. {{image_4}} You can easily change the flavor of these muffins. Try different types of chocolate. Milk, semi-sweet, or white chocolate chips all work well. You can also use a mix of chocolates for a fun twist. Add-ins like peanut butter chips or butterscotch chips bring new flavors, too. Fruits can also add a great taste. Consider folding in blueberries, raspberries, or banana slices. These fruits not only add sweetness but also moisture. For a nutty crunch, swap in pecans or almonds instead of walnuts. Each choice gives your muffin a unique twist. If you want a vegan option, replace the egg with 1 tablespoon of ground flaxseed mixed with 2.5 tablespoons of water. Let the mixture sit for a few minutes to thicken. You can also use a plant-based yogurt instead of Greek yogurt. This keeps the muffins moist and tasty. For low-sugar modifications, use mashed bananas or extra applesauce instead of honey or maple syrup. You can also use a sugar substitute like stevia or monk fruit sweetener. These changes help make the muffins lower in sugar while still keeping them delicious. To keep your gluten-free Greek yogurt chocolate chip muffins fresh, store them in an airtight container. Place them at room temperature for up to three days. If you want to keep them longer, you can refrigerate them for about a week. Just remember, the fridge can dry them out a bit, so I recommend letting them come to room temperature before eating. Freezing these muffins is a great option for longer storage. Start by placing the cooled muffins in a single layer on a baking sheet. Freeze them for about two hours until solid. Once frozen, transfer them to a freezer-safe bag or container. They will stay fresh for up to three months. When you’re ready to enjoy, take a muffin out and let it thaw at room temperature. For the best texture, you can warm it in the microwave for about 15 seconds. This helps to bring back that fresh-baked taste! Can I use regular flour instead? No, you cannot use regular flour. This recipe is gluten-free. Regular flour has gluten, which gives baked goods their structure. Without gluten, your muffins may not rise or hold together well. What if I don't have Greek yogurt? If you lack Greek yogurt, you can use sour cream or regular yogurt. Both options add moisture and flavor. Just make sure they are plain and unsweetened for the best results. Why did my muffins not rise? Muffins may not rise due to old baking powder or baking soda. Check their expiration dates before use. Also, ensure your oven is hot enough, as an oven that’s too cool can lead to flat muffins. How to adjust for altitude in baking? At high altitudes, reduce baking powder slightly and increase liquid. This helps the muffins rise properly. You might also need to bake a bit longer. Test with a toothpick to ensure they are done. Are these muffins healthy? Yes, these muffins are a healthier choice. They use Greek yogurt, which adds protein and probiotics. The honey or maple syrup offers natural sweetness, and the dark chocolate chips provide antioxidants. How many calories per muffin? Each muffin has about 150 calories. This is a rough estimate and can vary based on specific brands of ingredients used. For a more accurate count, check the labels of your products. In conclusion, this article covers how to make delicious gluten-free muffins. We explored important ingredients, like gluten-free flour and Greek yogurt. I shared clear steps from mixing to baking, plus tips for perfect muffins. You can play with flavors and adapt for diets too. Store them well to keep them fresh and tasty. With these ideas, you’ll enjoy baking muffins that delight everyone. Happy baking!

If you crave a tasty treat without gluten, you’re in for a delight! My Gluten Free Greek Yogurt Chocolate Chip Muffins pack flavor and fun in every bite. Made with …

Read more

Categories Desserts

Strawberry Cheesecake Overnight Oats Simple Delight

November 16, 2025January 16, 2025 by Chef Tavio
For delicious Strawberry Cheesecake Overnight Oats, gather these ingredients: - 1 cup rolled oats - 1 cup unsweetened almond milk (or your favorite milk alternative) - ½ cup Greek yogurt (choose vanilla for sweetness or plain for a lighter taste) - 2 tablespoons maple syrup (or honey for natural sweetness) - 1 teaspoon pure vanilla extract - ½ cup fresh strawberries, diced into bite-sized pieces - 2 tablespoons cream cheese, softened to room temperature - 1 tablespoon chia seeds for added nutrition and texture - A pinch of salt to enhance flavors - Optional: Crushed graham crackers for an extra crunch on top You can swap some ingredients if needed: - Use coconut milk instead of almond milk for a creamier taste. - Substitute regular yogurt for Greek yogurt if you want a lighter option. - If you dislike maple syrup, honey works well as a sweetener. - Swap strawberries for blueberries or raspberries for a different fruit flavor. - For a dairy-free version, leave out cream cheese or use a plant-based option. Each ingredient brings great benefits: - Rolled oats are rich in fiber. They help keep you full and support digestion. - Greek yogurt is high in protein, good for muscle health and recovery. - Strawberries are full of vitamins and antioxidants, boosting your immune system. - Chia seeds provide omega-3 fatty acids and fiber, good for heart health. - Almond milk is low in calories, making it a great dairy alternative. These ingredients not only taste great but also nourish your body! {{ingredient_image_2}} Making strawberry cheesecake overnight oats is easy and fun. You need just ten minutes to prepare. Gather your ingredients first. This includes rolled oats, almond milk, Greek yogurt, strawberries, and more. 1. Start by taking a medium mixing bowl. Add the rolled oats and almond milk. 2. Next, mix in the Greek yogurt, maple syrup, vanilla extract, chia seeds, and a pinch of salt. Stir well. Ensure all oats soak up the liquid. 3. Now, gently fold in the diced strawberries and cream cheese. Be careful not to overmix. You want to keep those strawberry pieces intact. 4. Spoon the mixture into mason jars or airtight containers. Fill each jar about three-quarters full. This lets the oats expand in the fridge. 1. Secure the lids on your jars tightly. Place them in the fridge overnight. You can also let them sit for at least four hours. 2. When you’re ready to eat, take out the jars. Stir the oats gently. If they feel too thick, add a splash of almond milk. 3. Top with fresh strawberries and a sprinkle of crushed graham crackers for that cheesecake crunch. Enjoy! To make creamy overnight oats, start with rolled oats. They absorb liquid well and create a nice texture. Use enough liquid to soak the oats. I suggest one cup of almond milk for every cup of oats. Mixing in Greek yogurt adds creaminess and protein. Make sure to stir all ingredients well. This helps prevent clumping. Use a pinch of salt to enhance the flavors. You can boost flavor with a few simple add-ins. Try adding a tablespoon of peanut butter for a nutty twist. A sprinkle of cinnamon adds warmth and spice. For a sweet touch, mix in extra maple syrup or honey. Chia seeds not only add nutrition but also help thicken the oats. If you like crunch, sprinkle crushed graham crackers on top. This gives a nice texture, just like a cheesecake crust. One common mistake is not using enough liquid. This leads to dry oats. Always measure your ingredients carefully. Another mistake is overmixing, which can break down the strawberries. Gently fold them into the mixture to keep their shape. Finally, don’t skip the refrigeration step. Letting the oats soak overnight is key for flavor and texture. Enjoy your creamy, delicious strawberry cheesecake overnight oats! Pro Tips Use Rolled Oats: For the best texture, stick with rolled oats rather than instant oats, as they hold up better during soaking. Adjust Sweetness: Taste the mixture before refrigerating and adjust the sweetness by adding extra maple syrup or honey according to your preference. Chill for Flavor: Allowing the oats to soak overnight helps the flavors meld together, enhancing the overall taste of your breakfast. Experiment with Fruits: Feel free to mix in or substitute other fruits like blueberries or bananas to customize your overnight oats to your liking. {{image_4}} You can switch up the flavors to keep things fun. Want a chocolate twist? Add two tablespoons of cocoa powder to the mix. You can also stir in some chocolate chips for extra sweetness. If peanut butter is your jam, mix in two tablespoons of creamy peanut butter. This gives your oats a nutty taste and adds protein. You can easily change the flavors. The base recipe works well with many fun add-ins. Making these oats vegan is simple. Just swap Greek yogurt for a plant-based yogurt. Almond milk is already a great choice, but you can use soy or oat milk too. For a gluten-free option, check your oats to ensure they are certified gluten-free. This way, everyone can enjoy a yummy breakfast. Fresh fruit makes these oats taste great. You can use other fruits when strawberries are out of season. Blueberries, raspberries, or even diced peaches work well. Just keep the same amount of fruit. The oats will still be tasty and colorful. Think about adding bananas for a creamy texture. Seasonal fruit gives your overnight oats a fresh twist every time. To store your strawberry cheesecake overnight oats, use airtight containers. Mason jars work great. Fill each jar three-quarters full, so the oats have room to expand. Cover the jars tightly with lids. Keep them in the fridge until you are ready to eat. These oats stay fresh for up to five days in the fridge. For the best taste, eat them within three days. If you notice any change in smell or texture, it’s time to toss them. Always check for freshness before digging in. You can enjoy these oats cold right from the fridge. If you prefer them warm, heat them gently in the microwave. Add a splash of almond milk if they seem too thick. Stir well after heating to mix everything back together. This keeps every bite delicious and creamy! Yes, you can make these oats ahead of time. In fact, they taste better when they sit overnight. Prepare the oats the night before, and they will be ready in the morning. Just store them in the fridge in jars or containers. If you want a substitute for Greek yogurt, try plain yogurt or a dairy-free option. You can use coconut yogurt for a creamy texture. It adds flavor and keeps the oats moist. You can freeze the overnight oats, but they may change in texture. If you freeze them, make sure to use a freezer-safe container. Thaw them overnight in the fridge before enjoying. Just stir well after thawing to mix the ingredients. We covered a lot about making overnight oats. You learned about the ingredients, their health benefits, and how to mix them. I shared tips to make creamy oats and avoid common mistakes. Plus, I provided delicious variations and storage tips. Remember, these oats are versatile and easy to prepare. Enjoy finding your favorite flavors and combinations. With this knowledge, you can create a tasty, healthy meal any time. Now, it's time for you to start making your own delightful overnight oats.

Ever dreamed of a breakfast that tastes like dessert? Strawberry Cheesecake Overnight Oats are your answer! This simple delight combines creamy yogurt, fresh strawberries, and oats to create a delicious, …

Read more

Categories Breakfast

Cheesy Tater Tot Casserole Simple and Comforting Meal

December 3, 2025January 16, 2025 by Chef Tavio
To make a cheesy tater tot casserole, gather these items: - 1 bag (32 oz) frozen tater tots - 1 pound ground beef (or ground turkey) - 1 small onion, finely diced - 2 cloves garlic, minced - 1 can (10.5 oz) cream of mushroom soup - 1 cup sour cream - 2 cups shredded cheddar cheese - 1 teaspoon paprika - Salt and freshly ground black pepper - 1 cup frozen corn (optional) - Chopped green onions for garnish You can switch out some ingredients if needed: - Use ground turkey for a leaner dish. - Swap cream of mushroom soup with cream of chicken soup. - Replace sour cream with Greek yogurt for a tangy flavor. - Use a different cheese, like Monterey Jack or mozzarella, for variety. Want to make your casserole even better? Consider these fun add-ins: - Add 1 cup of cooked bacon for extra flavor. - Toss in chopped bell peppers for more crunch. - Mix in some jalapeños for a spicy kick. - Blend in some cooked veggies like broccoli or spinach for nutrition. These additions let you customize the dish to fit your tastes! {{ingredient_image_2}} First, you need to preheat your oven to 350°F (175°C). This step is key for cooking the casserole evenly. A hot oven helps create a crispy top and warm layers inside. Set your timer so you don’t forget. Next, grab a large skillet and place it over medium heat. Add 1 pound of ground beef or turkey. Cook until it’s brown, about 5-7 minutes. Use a spatula to break the meat into small pieces. If there’s extra grease, drain it out. This keeps your dish from being too greasy. After browning the meat, add 1 small diced onion and 2 minced garlic cloves. Stir them in and cook until the onion is soft, about 3-4 minutes. Then, lower the heat. Mix in 1 can of cream of mushroom soup and 1 cup of sour cream. Stir until it’s smooth. Season with 1 teaspoon of paprika, salt, and black pepper to taste. If you want, fold in 1 cup of frozen corn for a sweet touch. Now, take a 9x13-inch baking dish and grease it with oil or cooking spray. Spread the meat and soup mix evenly across the bottom. This base is full of flavor. Next, layer the frozen tater tots on top. Arrange them evenly so they cook well. Don’t be shy with the tater tots! Then, sprinkle 2 cups of shredded cheddar cheese over the top. This makes it cheesy and delicious. Cover the dish tightly with aluminum foil to keep moisture in. Place it in your preheated oven and bake for 30 minutes. After that, remove the foil and bake for another 15-20 minutes. You want the tater tots to be golden and the cheese bubbly. Once done, let it cool for a few minutes. Top with chopped green onions for color before serving. Enjoy your cheesy tater tot casserole! To get the right texture, use frozen tater tots. They bake up crisp and golden. Spread them in a single layer on top of the meat mixture. This helps them cook evenly. Cover the dish with foil during the first part of baking. This keeps moisture in. Remove the foil later to allow the tater tots to crisp up. For more flavor, add spices. Paprika gives a nice smoky touch. You can also try garlic powder or onion powder for extra flavor. If you like a bit of heat, add diced jalapeños. Mixing in frozen corn adds sweetness and nice texture. Fresh herbs like parsley or cilantro can brighten the dish, too. One common mistake is overcrowding the tater tots. Make sure they are in a single layer. If not, some will be soggy. Another mistake is not draining the beef. Greasy meat can make the casserole heavy. Finally, don’t skip the foil cover at first. It helps everything cook well. Pro Tips Use Fresh Ingredients: Whenever possible, opt for fresh garlic and onions instead of dried or powdered versions to enhance the flavor of your casserole. Customize Your Protein: Feel free to substitute the ground beef with shredded rotisserie chicken or a plant-based protein for a different twist on this classic dish. Extra Crispy Tater Tots: For a crunchier top layer, bake the tater tots for a few minutes before adding them to the casserole to give them a head start. Make-Ahead Option: Prepare the casserole ahead of time and refrigerate it before baking. Just add a few extra minutes to the baking time when you’re ready to cook it. {{image_4}} You can make a tasty vegetarian version of cheesy tater tot casserole. Simply swap the ground beef for a can of black beans or cooked lentils. Use a mix of colorful veggies, like bell peppers and zucchini, instead of meat. This adds flavor and nutrition. You can keep the cream of mushroom soup and sour cream for creaminess. Just like the original, layer the frozen tater tots on top and sprinkle cheese. For a spicy southwest twist, add diced jalapeños or green chilies to the meat mixture. You can also mix in taco seasoning instead of paprika for a kick. Use pepper jack cheese for extra heat. Consider adding corn and black beans to boost the flavor. This version pairs well with avocado and salsa as toppings for a fun meal. To make a loaded tater tot casserole, pile on the toppings. Start with the beef mixture, then layer crispy bacon bits and caramelized onions before adding the tater tots. Top it off with cheddar cheese and a drizzle of ranch dressing after baking. You can even add sliced olives or diced tomatoes for extra color and taste. This version is sure to impress at any gathering! To store your cheesy tater tot casserole, let it cool first. Place it in an airtight container. You can keep it in the fridge for up to four days. If you have a big batch, consider dividing it into smaller portions. This makes it easy to heat up later. When you are ready to eat your leftovers, preheat your oven to 350°F (175°C). Place the casserole in a baking dish. Cover it with foil to keep the moisture in. Bake it for about 20-25 minutes, or until it is hot all the way through. You can also reheat in the microwave. Just cover the dish and heat in 1-minute intervals until warm. If you want to freeze the casserole, let it cool completely first. Then, wrap it tightly in plastic wrap and foil. This helps prevent freezer burn. You can freeze it for up to three months. To reheat, thaw it overnight in the fridge and then bake as mentioned. Enjoy your warm, cheesy delight anytime! Yes, you can use fresh tater tots. Fresh tater tots will give a different texture, but they still work well. Just make sure to cook them according to the package directions. If you want a crispy top, you might need to bake them a little longer. To make this recipe dairy-free, swap the sour cream and cheese. Use a dairy-free sour cream, like cashew or coconut-based options. For cheese, try a dairy-free cheese blend. You may also add nutritional yeast for a cheesy flavor without dairy. Serve your Cheesy Tater Tot Casserole with a fresh salad or steamed veggies. A side of garlic bread works well too. For a light touch, consider a simple cucumber salad or coleslaw. These sides balance the rich flavors of the casserole. In this post, we explored all you need for an amazing Cheesy Tater Tot Casserole. We covered ingredients, cooking steps, and tips to achieve the best texture and flavor. You learned about variations, storage, and common questions to make your cooking easier. With these ideas and tricks, you’ll impress anyone who tastes this dish. Enjoy making it your own!

Craving a simple, comforting meal that’s also delicious? Look no further! My Cheesy Tater Tot Casserole combines the crispy goodness of tater tots with rich cheese and savory meat. This …

Read more

Categories Dinner

One-Pot Garlic Parmesan Chicken Pasta Delightful Meal

January 1, 2026January 15, 2025 by Chef Tavio
- 2 cups uncooked penne pasta - 1 lb boneless, skinless chicken breasts, diced into bite-sized pieces - 4 tablespoons extra virgin olive oil, divided - 4 cloves garlic, minced - 4 cups low-sodium chicken broth - 1 cup heavy cream - 1 teaspoon Italian seasoning blend - 1 cup freshly grated Parmesan cheese, plus extra for serving - Salt and freshly cracked black pepper, to taste - Fresh parsley, finely chopped (for garnish) To make this dish, you need some key ingredients. First, the uncooked penne pasta serves as the base. The chicken gives it a hearty touch. Use boneless, skinless chicken breasts for easy cooking. Extra virgin olive oil adds flavor and helps cook the chicken. Garlic brings a wonderful aroma and taste. Low-sodium chicken broth adds depth to the pasta. Heavy cream creates a rich, creamy sauce. Italian seasoning blend gives extra flavor. Parmesan cheese adds a cheesy finish. Don’t forget the salt, pepper, and fresh parsley for garnish! - Large pot - Spoon or spatula - Knife and cutting board - Measuring cups and spoons You will need some basic cooking tools. A large pot is essential for cooking everything in one place. A spoon or spatula helps stir the ingredients. Use a knife and cutting board to chop the chicken and garlic. Measuring cups and spoons ensure you get the right amounts. Having the right tools makes cooking easier and more fun! {{ingredient_image_2}} First, warm 2 tablespoons of olive oil in a large pot over medium heat. Add the diced chicken. Season it well with salt and pepper. Sauté the chicken until golden brown. This takes about 5-7 minutes. Stir occasionally until it is no longer pink. Once done, transfer the chicken to a plate and set it aside. In the same pot, add the remaining 2 tablespoons of olive oil. When the oil shimmers, add the minced garlic. Sauté the garlic for about 1 minute. You want it fragrant but not brown or burnt. This step is key to keeping the garlic sweet and mild. Next, pour in the chicken broth and bring it to a rapid boil. Stir in the uncooked penne pasta and Italian seasoning. Ensure all the pasta is well submerged in the broth. Reduce the heat to medium-low, cover, and let it simmer. This should take about 10-12 minutes. Stir occasionally until the pasta is al dente. Most of the broth will be absorbed by this time. Now, return the cooked chicken to the pot. Add the heavy cream and grated Parmesan cheese. Stir everything well. You want the cheese to melt and form a creamy sauce. Taste the dish and add more salt and black pepper if needed. Remove from heat and let it sit for a couple of minutes. This allows the sauce to thicken up nicely. To make this dish shine, you can adjust the seasoning to your taste. Start with salt and freshly cracked black pepper. Taste as you go, and add more if needed. I always use freshly grated Parmesan cheese. It melts better and gives a richer flavor than pre-grated cheese. Simmering time is key for a creamy sauce. Make sure you let the pasta cook until it’s al dente. After mixing in the cream and cheese, remove the pot from heat. Let the dish rest for a few minutes. This helps the sauce thicken nicely. Garnish your pasta with freshly chopped parsley for a pop of color. It adds a nice touch and fresh taste. You can also pair this meal with a simple salad or some crusty bread. These sides balance the rich flavors and make for a delightful meal. Pro Tips Use Fresh Ingredients: Always opt for fresh garlic and freshly grated Parmesan cheese to enhance the flavor and creaminess of the dish. Adjust the Creaminess: If you prefer a lighter sauce, reduce the amount of heavy cream and substitute with more chicken broth. Perfect Pasta Texture: Cook the penne until al dente for the best texture; it will continue to cook slightly after adding the sauce. Garnish for Presentation: A sprinkle of fresh parsley and a generous amount of Parmesan on top not only adds flavor but also a beautiful presentation. {{image_4}} You can change the chicken for other proteins. Try shrimp or tofu for a twist. Both options work well and add new flavors. You can also swap the penne pasta for any pasta shape you like. Fusilli or farfalle are great choices and will hold the sauce nicely. Adding vegetables makes this dish even better. Try spinach, broccoli, or bell peppers. They add color and nutrients. You can also mix in spices or herbs. A pinch of red pepper flakes brings heat. Fresh basil or thyme adds a nice touch. For gluten-free options, use gluten-free pasta. It cooks similarly, so your dish remains creamy. If you want a dairy-free version, swap the heavy cream for coconut milk. Nutritional yeast can replace Parmesan cheese for a cheesy flavor without dairy. These swaps keep the meal tasty for everyone. To store your One-Pot Garlic Parmesan Chicken Pasta in the fridge, let it cool first. Place it in an airtight container. This way, it stays fresh and tasty. You can keep it in the fridge for up to three days. Just make sure to reheat it well before serving! If you want to save some for later, you can freeze this dish. First, let it cool completely. Then, transfer it to a freezer-safe container. Seal it tightly to prevent freezer burn. You can freeze it for up to three months. When you’re ready to eat, take it out and thaw it in the fridge overnight. To reheat, warm it on the stove over low heat, adding a splash of chicken broth or cream for extra creaminess. This recipe takes about 30 minutes in total. You will spend around 10 minutes prepping. The cooking time is about 20 minutes. This quick meal is perfect for busy nights. Yes, you can make this dish in advance. To store it, let it cool first. Place it in an airtight container. Store it in the fridge for up to 3 days. When ready to eat, reheat it on the stove or microwave. Add a splash of cream if needed to bring back the creaminess. If the pasta is overcooked, it may become mushy. To avoid this, watch the cook time closely. Stir the pasta as it cooks. Test it a minute or two before the time is up. If you overcook it, you can try adding fresh herbs or a squeeze of lemon to boost flavor. This blog post covers how to make a delicious penne pasta dish. You learned about key ingredients like chicken, garlic, and cream, plus the tools you'll need. We discussed step-by-step cooking tips, variations for customization, and storage options for leftovers. With these insights, you can create a flavorful meal tailored to your taste. Enjoy experimenting with ingredients and make this recipe your own. The possibilities are endless, so get cooking!

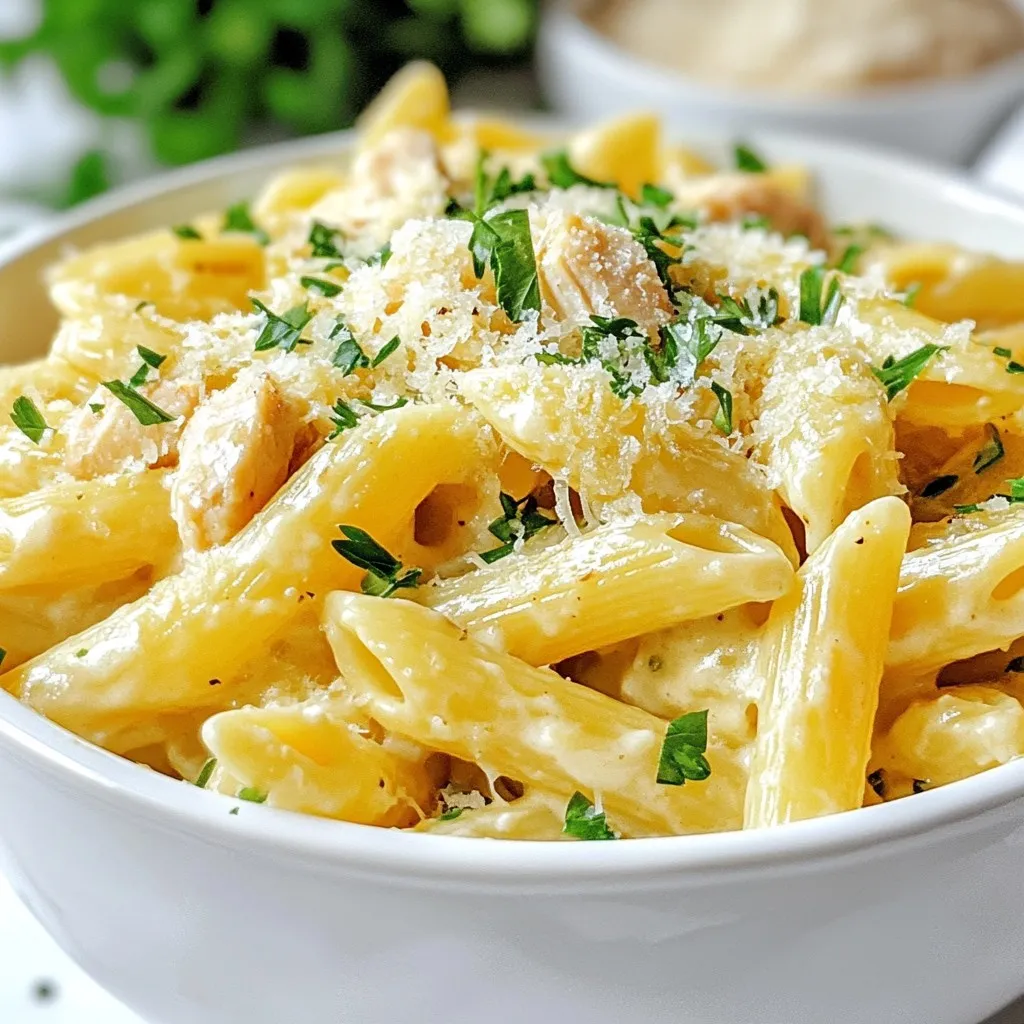
If you’re looking for a quick and tasty weeknight dinner, you’ve hit the jackpot! This One-Pot Garlic Parmesan Chicken Pasta is not only simple but also packed with flavor. Imagine …

Read more

Categories Dinner

Caramel Apple Dessert Cups Delightful and Simple Treat

December 5, 2025January 15, 2025 by Chef Tavio
- Apples - Caramel sauce - Whipped cream - Ground cinnamon - Chopped pecans - Extra caramel for drizzling - Mixing bowls - Serving cups or small bowls - Measuring cups and spoons Gathering the right ingredients is key to making these caramel apple dessert cups shine. Choose two large apples, like Granny Smith or Honeycrisp. They bring a nice tartness to balance the sweet caramel. You will also need one cup of caramel sauce, which can be store-bought or homemade if you’re feeling adventurous. For that creamy finish, grab one cup of whipped cream. To add a sprinkle of warmth, ground cinnamon is optional. If you want a nice crunch, consider chopped pecans. You can drizzle extra caramel on top for a sweet finish. Having the right tools makes the process easy. Get a few mixing bowls for combining your apple mixture. Serving cups or small bowls are perfect for layering the dessert. Don’t forget measuring cups and spoons for accurate portions. This setup will help you create the perfect treat with ease! {{ingredient_image_2}} Start by taking two large apples, like Granny Smith or Honeycrisp. Core and finely dice them. In a medium mixing bowl, combine the diced apples with one tablespoon of fresh lemon juice and one teaspoon of ground cinnamon. Toss them well to coat. This step keeps the apples from browning and adds great flavor. Set the apple mixture aside for a bit. Let the flavors meld for at least five minutes. Prepare your serving cups or small bowls. Begin each cup with about two tablespoons of crushed graham crackers. This makes a nice crunchy base. Over the graham cracker layer, drizzle about one tablespoon of caramel sauce. Let it pool on the crackers for extra flavor. Next, spoon a generous layer of the cinnamon apple mixture on top. Make sure each cup has an equal portion for a balanced taste. Repeat this layering. Add another two tablespoons of crushed graham crackers again, then top with a delightful dollop of whipped cream. This creates a lovely contrast. Now it’s time for the final touches. Drizzle more caramel sauce over the whipped cream. This makes the dessert look inviting. If you want, sprinkle chopped pecans on top for a nice crunch. Continue layering until your cups are filled to your liking. Be sure to finish with a generous dollop of whipped cream and a luscious drizzle of caramel. For a pretty display, present the dessert cups on a decorative platter. A light sprinkle of cinnamon and a thin apple slice on the rim adds an elegant touch. Enjoy your delicious Caramel Apple Dessert Cups! For the best flavor in your caramel apple dessert cups, I like using Granny Smith or Honeycrisp apples. These apples have a great balance of sweet and tart flavors. Their crisp texture also holds up well in the dessert. To prevent browning, toss your diced apples with fresh lemon juice. This simple step keeps them looking fresh and bright. Homemade caramel sauce is easy to make. Just combine one cup of sugar with half a cup of heavy cream in a saucepan. Heat it on medium, stirring until the sugar melts. Then, let it simmer for about five minutes. This will give you a smooth sauce. To get the perfect consistency, watch closely. If it’s too thick, add a bit more cream. If too thin, let it cook a bit longer. For a beautiful display, use a decorative platter for your dessert cups. You can garnish each cup with a light sprinkle of cinnamon. A thin slice of apple on the rim adds a nice touch too. This makes your dessert look even more inviting and fun! Pro Tips Choose the Right Apples: Opt for tart apples like Granny Smith or Honeycrisp; their crisp texture and tangy flavor complement the sweetness of the caramel perfectly. Layer Strategically: For a balanced flavor profile, ensure that each layer of your cups has a mix of textures and flavors, alternating between crunchy graham crackers, sweet caramel, and tart apples. Make It Ahead: You can prepare the apple mixture and graham cracker layer a few hours in advance to save time. Just assemble the cups right before serving for maximum freshness. Garnish for Presentation: A sprinkle of cinnamon or a thin apple slice on top not only enhances the look of your dessert cups but also adds a delightful aroma that will entice your guests. {{image_4}} You can easily change the taste of your caramel apple dessert cups. Adding spices makes a big difference. Try nutmeg or allspice for a warm flavor. You can mix these spices into the apple mixture for a cozy touch. Using flavored whipped cream also adds fun. Vanilla or caramel-flavored whipped cream can enhance the dessert. This small change can make your cups taste even better and more unique. Get creative with your toppings! Adding chocolate chips or sprinkles gives a sweet crunch. These toppings make your dessert cups look great and taste even better. You can sprinkle them on top of the whipped cream for a fun look. You can also use different nuts for crunch. Chopped walnuts or almonds work well. They add a nice texture and flavor. Just sprinkle these on top for that extra bite. You can make these dessert cups fit many diets. For gluten-free options, use gluten-free graham crackers. They give the same crunchy base without the gluten. If you want vegan substitutions, use plant-based whipped cream. You can also find vegan caramel sauce in stores. These swaps let everyone enjoy the treat without missing out. To keep your caramel apple dessert cups fresh, store them in the fridge. Use airtight containers to prevent moisture loss. The cups last up to three days in the fridge. Enjoy them cold for a nice treat or let them sit at room temperature for a few minutes before eating. You can freeze these dessert cups, but it's best to freeze the components instead. Freeze the apple mixture and whipped cream separately in airtight bags. When you're ready to serve, thaw them in the fridge overnight. For best taste, eat them within a month of freezing. Yes, you can make parts of this dessert ahead of time. Prepare the apple mixture and graham cracker base in advance. Just layer and assemble the dessert cups right before serving. This keeps everything fresh and tasty for your guests. Yes, you can use store-bought caramel. Look for brands like Kraft or Smucker's. They are thick and sweet, making them great for this recipe. If you want a richer taste, try a gourmet caramel sauce. Just heat it slightly to make it easy to drizzle. To make this dessert dairy-free, use coconut cream instead of whipped cream. For caramel, find a dairy-free version at the store or make your own with coconut milk and sugar. This way, you can still enjoy a creamy, sweet treat without dairy. Use small cups or bowls that hold about 4 ounces. This size is perfect for portion control. It also helps with presentation, making each dessert look cute and inviting. If you want larger servings, use 6-ounce cups, but remember to adjust the layers. This blog post covered a tasty apple dessert that mixes simple ingredients. We discussed key items like apples, caramel sauce, and whipped cream. You learned how to prepare layers and present them nicely. I shared tips for choosing apples and making homemade caramel. We even explored storage options and variations to suit different diets. In the end, crafting this dessert can be fun and flexible. You can impress anyone with a simple, tasty treat. Enjoy creating your own version!

Ready to indulge in a sweet treat that’s both fun and simple? Caramel Apple Dessert Cups will become your go-to dessert! With fresh apples, gooey caramel, and fluffy whipped cream, …

Read more

Categories Desserts

Blueberry Cottage Cheese Breakfast Bake Delight

November 26, 2025January 15, 2025 by Chef Tavio
- 2 cups cottage cheese - 1 cup rolled oats - 1 cup fresh or frozen blueberries Cottage cheese gives this bake its creamy base. It adds protein and a nice texture. Rolled oats provide fiber and help bind everything together. Blueberries add a burst of flavor and sweetness. - 3 large eggs - 1/3 cup honey or maple syrup - 1 teaspoon vanilla extract Eggs help the bake rise and stay fluffy. Honey or maple syrup sweetens the dish naturally. Vanilla extract adds warmth and enhances the overall flavor. - 1 teaspoon baking powder - 1 teaspoon ground cinnamon - 1/4 teaspoon salt Baking powder helps the bake rise, making it light. Ground cinnamon adds spice and depth. Salt balances the sweetness and brings out all the flavors. - Sliced almonds - Shredded coconut - Extra blueberries Toppings add texture and visual appeal. Sliced almonds give crunch, while shredded coconut adds chewiness. Extra blueberries make the dish look bright and fresh. This mix of ingredients creates a delicious start to your day. The combination of flavors and textures makes it a breakfast delight. {{ingredient_image_2}} 1. Preheat your oven to 350°F (175°C). This step is key for even baking. 2. Grease an 8x8 inch baking dish. Use butter or oil to avoid sticking. 1. In a large bowl, mix the cottage cheese, eggs, honey, and vanilla extract. Whisk until smooth. 2. Add rolled oats, baking powder, ground cinnamon, and salt to the bowl. Stir well to combine everything. 1. Gently fold in the blueberries. Be careful not to mash them as you mix. 2. Pour the mixture into your greased baking dish. Spread it out evenly with a spatula. 3. Bake in the oven for 30-35 minutes. Check for a golden top and clean toothpick to know it’s done. 4. Let it cool for about 5-10 minutes before slicing into squares. To get the right texture, use smooth cottage cheese. Look for one without big lumps. This makes your bake creamy. For egg incorporation, whisk the eggs well before mixing. This helps them blend with the cottage cheese easily. You can add spices for extra flavor. A pinch of nutmeg pairs well with cinnamon. If you want more sweetness, try adding a bit more honey or maple syrup. Just don’t overdo it, or it might become too sweet. Serve your breakfast bake warm for the best experience. It tastes great fresh from the oven. Top it with sliced almonds, shredded coconut, or some extra blueberries. You can also drizzle a bit of honey on top for a special touch. Pro Tips Fresh vs. Frozen Blueberries: If using frozen blueberries, do not thaw them before adding to the batter. This helps prevent excess moisture in the dish and keeps the blueberries intact during baking. Make It Ahead: This breakfast bake can be prepared the night before. Simply refrigerate the unbaked mixture, then bake it in the morning for a quick and easy breakfast option. Adjusting Sweetness: Depending on your preference, you can reduce the amount of honey or maple syrup for a less sweet version or add a little more if you enjoy a sweeter treat. Experiment with Toppings: Feel free to customize your toppings! Try adding chopped nuts, seeds, or a dollop of yogurt for added texture and flavor. {{image_4}} You can switch up the blueberries in this breakfast bake. Other berries like raspberries or strawberries work well. They add their own unique flavors. You can also mix in bananas or apples. Sliced bananas give a sweet touch. Apples add a nice crunch and flavor contrast. If you need gluten-free options, use gluten-free oats. They keep the texture and taste just right. For a dairy-free version, swap cottage cheese with a plant-based alternative. Look for options made from almonds or soy. These swaps keep your bake tasty while meeting dietary needs. Want to make more? You can easily adjust the portion sizes. Just double or triple the ingredients. Keep an eye on cooking times. Larger batches may need a few more minutes in the oven. Always check with a toothpick to see if it’s done. This way, you can enjoy it with friends or family! To store leftovers, let the bake cool down first. Then, slice it into squares. Place the squares in an airtight container. This helps keep it fresh. You can store it in the fridge for up to 5 days. To maintain freshness, cover the dish tightly with plastic wrap if you don't have a container. This keeps out air and moisture, which can spoil your bake. You can freeze the breakfast bake before or after baking. To freeze before baking, prepare the dish and cover it tightly. Place it in the freezer for up to 3 months. When you want to bake it, just thaw it overnight in the fridge. To freeze after baking, let it cool completely. Then, wrap each slice in plastic wrap and place them in a freezer bag. This way, you can enjoy a slice anytime! To reheat your breakfast bake, the oven is the best choice. Preheat the oven to 350°F (175°C). Place the squares on a baking sheet. Heat for about 10-15 minutes. This keeps the texture nice and fluffy. You can also use a microwave. Heat on medium for 30 seconds to 1 minute. Just watch it closely to avoid drying it out. Enjoy your delicious breakfast bake warm! Can I use frozen blueberries in the recipe? Yes, you can use frozen blueberries. They work great in this recipe. Just add them straight from the freezer. This keeps them firm and prevents them from turning mushy. How do I know when the breakfast bake is done? The bake is ready when the top turns golden brown. You can also use a toothpick. Insert it in the center. If it comes out clean, the bake is done. Is this recipe healthy? This recipe is quite healthy. It uses cottage cheese, oats, and blueberries. These ingredients provide protein, fiber, and vitamins. What are the calorie counts per serving? Each serving has about 180 calories. This can vary based on your choice of sweetener and toppings. Can I add nuts or seeds? Yes, nuts or seeds can be added. Walnuts or chia seeds work well. They add crunch and extra nutrition. How can I make this recipe low-sugar? To make it low-sugar, use less honey or maple syrup. You can also use a sugar substitute like stevia. Adjust to your taste! This blog post shared a simple breakfast bake recipe with cottage cheese, oats, and blueberries. You learned how to mix, bake, and serve this dish with tasty toppings. Remember, you can adjust the recipe to suit your taste. Try using different fruits or making it gluten-free. Storing leftovers properly will keep your bake fresh. Enjoy experimenting with flavors and make this breakfast your own. With just a few steps, you can create a delicious and healthy start to your day.

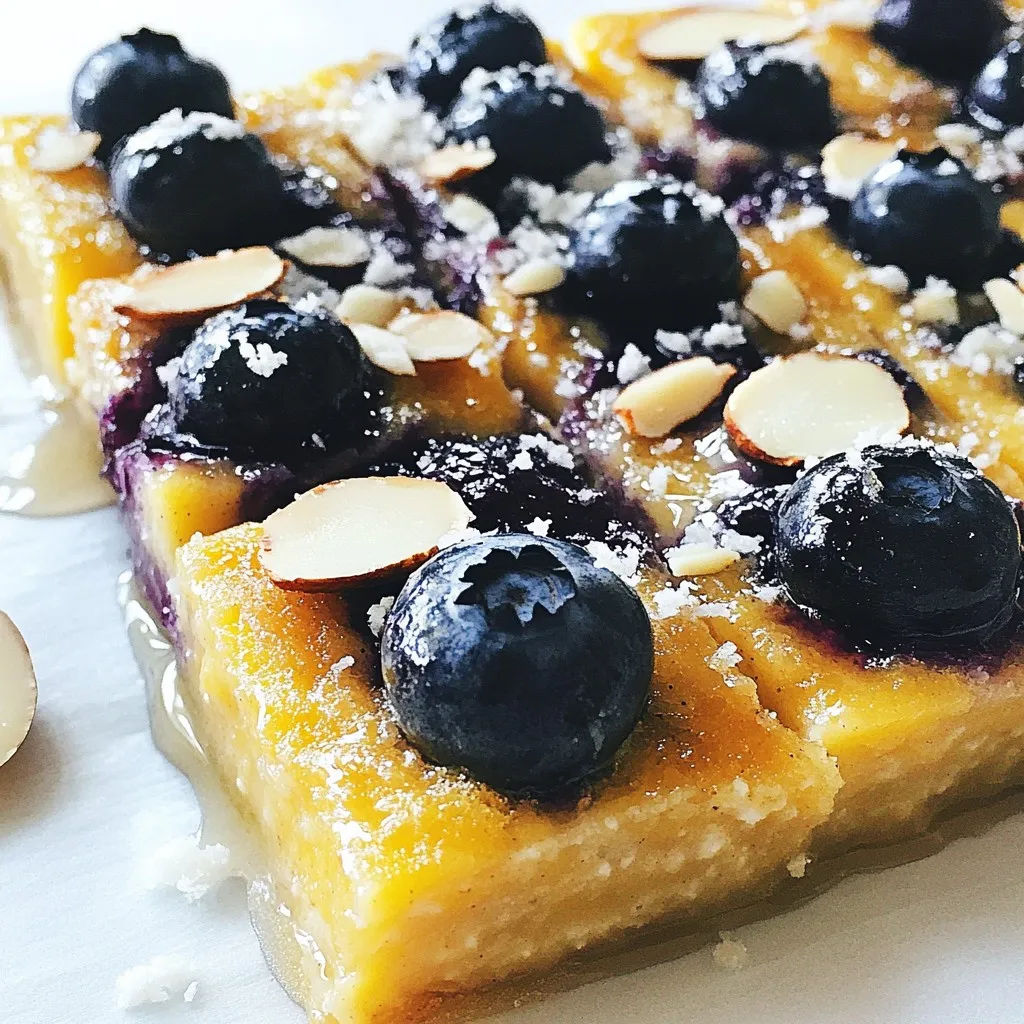
Start your day right with my Blueberry Cottage Cheese Breakfast Bake Delight! This wholesome meal combines the rich creaminess of cottage cheese with the natural sweetness of blueberries. Packed with …

Read more

Categories Breakfast

Vegan Mug Cinnamon Roll Gluten Free Delight Recipe

December 15, 2025January 14, 2025 by Chef Tavio
- 1/4 cup almond flour - 1/4 cup gluten-free oat flour - 1 tablespoon coconut sugar - 1/2 teaspoon baking powder - 1/4 teaspoon baking soda - 1/4 teaspoon ground cinnamon - Pinch of salt - 1/4 cup unsweetened almond milk - 1 tablespoon coconut oil, melted - 1 tablespoon pure maple syrup - 1 teaspoon vanilla extract These main ingredients give the roll its soft texture and sweet flavor. Almond flour adds protein and healthy fats. Gluten-free oat flour keeps it light and fluffy. Coconut sugar and maple syrup provide natural sweetness. - 1 tablespoon coconut sugar - 1 teaspoon ground cinnamon - 1 teaspoon coconut oil, softened The filling combines sweet coconut sugar with warm cinnamon. This mix creates that classic cinnamon roll taste. Softened coconut oil helps it spread easily. - Maple syrup drizzle - Powdered sugar sprinkle These toppings add extra sweetness and charm. A drizzle of maple syrup makes it feel special. A sprinkle of powdered sugar gives it a pretty finish. You can skip them if you want a lighter treat. {{ingredient_image_2}} Start by gathering your ingredients. In a microwave-safe mug, mix: - 1/4 cup almond flour - 1/4 cup gluten-free oat flour - 1 tablespoon coconut sugar - 1/2 teaspoon baking powder - 1/4 teaspoon baking soda - 1/4 teaspoon ground cinnamon - Pinch of salt Use a fork to combine these dry ingredients well. Make sure there are no lumps. This step sets the stage for a smooth dough. Next, add the wet ingredients to your dry mix. Pour in: - 1/4 cup unsweetened almond milk - 1 tablespoon melted coconut oil - 1 tablespoon pure maple syrup - 1 teaspoon vanilla extract Stir everything together with your fork. Keep mixing until you get a thick and smooth batter. This mixture brings moisture and flavor to your roll. Now, it’s time to create the filling. In a small bowl, combine: - 1 tablespoon coconut sugar - 1 teaspoon ground cinnamon - 1 teaspoon softened coconut oil Mix these until they form a smooth paste. This filling adds a sweet and spicy burst to your roll. To assemble, take half of the cinnamon dough and spoon it into your mug. Flatten it out gently with the back of a spoon. Next, spread the filling evenly over this layer. Cover the filling with the remaining dough. Press down gently to seal it in. This creates your delightful cinnamon roll. Place the mug in the microwave. Cook on high for 1 to 1.5 minutes. Microwaves vary, so start with 1 minute. Check if the dough has risen and is set. If it needs more time, add in 15-second increments. You want it fully cooked but still soft. Once it’s done, carefully take the mug out of the microwave. Let it cool for about a minute. Your vegan cinnamon roll delight is ready to enjoy! For an extra treat, drizzle some maple syrup or sprinkle powdered sugar on top. This adds a lovely finish to your sweet creation. To get the best texture, use fresh flour. Old flour can make your roll dense. Mix the dry ingredients well to avoid clumps. Stir until smooth for a light, fluffy roll. The batter should be thick but pourable. If it’s too dry, add a tiny splash of almond milk. If too wet, add a little flour. Microwave power varies, so check your roll often. Start with one minute. Look for a rise; it should look set. If it’s not ready, cook in 15-second bursts. Don’t overcook, or it will become rubbery. Let it cool for a minute before eating. This helps the flavor develop. You can swap almond flour for other gluten-free flours. Try coconut flour or rice flour if you like. For nut-free options, use sunflower seed flour. Coconut sugar can be replaced with brown sugar or maple sugar. Use non-dairy milk of your choice, like soy or oat milk. Just keep the same amounts to ensure good results. Pro Tips Use Room Temperature Ingredients: Make sure your almond milk and coconut oil are at room temperature for better mixing and a fluffier cinnamon roll. Customize Your Sweetness: Adjust the amount of coconut sugar and maple syrup to your taste preferences for a sweeter or less sweet roll. Experiment with Flavors: Feel free to add a pinch of nutmeg or a splash of almond extract in the batter for an extra flavor dimension. Check Microwave Power: Since microwaves can vary greatly in power, always start with the lowest recommended time to avoid overcooking. {{image_4}} You can make your vegan mug cinnamon roll even better. Adding nuts or dried fruits brings new flavors and textures. Try chopped walnuts, pecans, or almonds for crunch. If you like sweetness, go for raisins, cranberries, or chopped dates. Mix them in with the filling. This way, they blend well with the cinnamon and sugar. You can switch up the flavors in your cinnamon roll. Instead of just cinnamon, try adding vanilla or pumpkin spice. A splash of vanilla extract enhances the flavor. You can also use pumpkin spice for a cozy twist. Just mix these flavors into the dough or filling for a fun change. If you're looking for a sugar-free treat, I have options for you. Use a sugar substitute like stevia or erythritol. These sweeteners can replace coconut sugar in the recipe. Just make sure to adjust the amount based on the sweetness level of your chosen substitute. This way, you can enjoy a tasty cinnamon roll without added sugar. To store your vegan mug cinnamon roll, let it cool completely. Once cooled, cover it tightly with plastic wrap or place it in an airtight container. This helps keep it fresh. Store it in the fridge for up to three days. If you want to enjoy it later, make sure to check for any signs of spoilage before eating. When you're ready to enjoy your leftover cinnamon roll, you can reheat it easily. Place it back in the microwave for about 15 to 30 seconds. Check to see if it’s warm throughout. If it feels cold, heat it for another 10 seconds. You want it warm, not hot. This keeps the texture soft and pleasant. You can also freeze your vegan mug cinnamon roll for later! Wrap it well in plastic wrap, then place it in a freezer bag. This way, it stays fresh for up to two months. When you crave it, take it out and thaw it in the fridge overnight. Reheat it in the microwave as mentioned before. Enjoy your treat anytime! Yes, you can use other flours. Almond flour and gluten-free oat flour work well together. You might try coconut flour or tapioca flour, but you may need to adjust the amounts. Each flour has a unique texture and taste. Experiment to find what you enjoy best! Check the dough after 1 minute in the microwave. It should rise and look set. If it still looks wet, cook it for 15 more seconds. Be careful not to overcook it. The roll may become dry and tough if cooked too long. This recipe is best fresh, but you can prepare the dry ingredients ahead. Just store them in a sealed container. When you’re ready to enjoy, mix in the wet ingredients and cook. This method saves time and keeps your cinnamon roll delicious. This vegan mug roll has many benefits: - Gluten-Free: Great for those with gluten sensitivities. - Plant-Based: Uses almond and oat flour, which are rich in nutrients. - Low in Sugar: Uses coconut sugar and maple syrup for sweetness. - Healthy Fats: Coconut oil provides healthy fats for energy. Each ingredient brings its own benefits, making this treat both tasty and nutritious! This recipe gives you a quick and fun way to make vegan mug cinnamon rolls. You learned about the main ingredients, filling choices, and how to add tasty toppings. I shared step-by-step instructions and tips for great texture and microwave use. You can also try fun variations and your favorite flavors. Enjoy this sweet treat guilt-free, and share it with friends. You’ll impress them with your tasty skills!

Are you craving a warm, gooey cinnamon roll but need it to be vegan and gluten-free? You’re in luck! This Vegan Mug Cinnamon Roll Gluten Free Delight Recipe is super …

Read more

Categories Desserts
Older posts
Newer posts
← Previous Page1 … Page183 Page184 Page185 … Page191 Next →

TASTED NEST

Where Flavor Finds a Home 🍳🏡 — warm, simple, and crave-worthy recipes made for real life, from stovetop mornings to backyard dinners.

PAGES

Home About Contact Privacy Policy Terms & Conditions Cookie Policy GDPR Policy Copyright Policy Disclaimer

CATEGORIES

Appetizers Desserts Salads Breakfast Dinner
Copyright © 2026 Tasted Nest. All rights reserved.