Skip to content
  • GDPR Privacy Policy
  • Copyright Policy
  • Disclaimer
  • Terms & Conditions
Tasted Nest
  • Home
  • Appetizers
  • Desserts
  • Salads
  • Breakfast
  • Dinner
  • Privacy Policy
  • Contact
  • About

Chef Tavio

One-Pan Butter Parmesan Pasta Quick and Flavorful Meal

November 11, 2025January 7, 2025 by Chef Tavio
- 12 oz spaghetti or fettuccine - 4 cups vegetable broth - 4 tablespoons unsalted butter - 1 cup heavy cream - 1 cup freshly grated Parmesan cheese - 3 cloves garlic, minced - 1 teaspoon onion powder - 1/2 teaspoon red pepper flakes - Salt and freshly ground black pepper, to taste - Fresh parsley, chopped - Zest of 1 lemon When I make One-Pan Butter Parmesan Pasta, I love to gather all my ingredients first. Using high-quality pasta, like spaghetti or fettuccine, is key. Both types cook well and soak up the rich flavors. I use vegetable broth for a nice base, but you can swap it for chicken broth if you prefer. Butter adds a rich flavor to the dish. I always choose unsalted butter so I can control the salt. Heavy cream makes the sauce thick and creamy. It balances the saltiness of the Parmesan. I like to add garlic for taste. Freshly minced garlic gives a great aroma. Onion powder adds depth without needing to chop onions. Red pepper flakes add a gentle heat, but you can skip them if you want a milder dish. For garnish, I use freshly grated Parmesan. It melts well and enhances the dish. I also add freshly chopped parsley for color and flavor. If I want a bit of brightness, I zest a lemon. This optional step makes the dish pop! {{ingredient_image_2}} Start by melting 4 tablespoons of unsalted butter in a large skillet over medium heat. Once it melts and bubbles, add 3 minced garlic cloves. Sauté the garlic for about 1 minute until it softens and smells great. Next, pour in 4 cups of vegetable broth and stir it well. Bring this mixture to a gentle boil. Once the broth boils, add 12 ounces of spaghetti or fettuccine. Make sure the pasta is fully submerged in the liquid. Reduce the heat to medium-low and cover the skillet with a lid. Let the pasta cook for 10 to 12 minutes. Stir it occasionally until it is al dente and most of the broth is absorbed. After the pasta is done, stir in 1 cup of heavy cream, 1 teaspoon of onion powder, and 1/2 teaspoon of red pepper flakes. Allow it to simmer for another 2 to 3 minutes. This helps thicken the sauce a bit. Remove the skillet from heat and gradually mix in 1 cup of freshly grated Parmesan cheese. Stir until the cheese melts and the sauce becomes creamy. Season with salt and freshly ground black pepper to taste. If you want a zesty kick, add the zest of 1 lemon. Finally, garnish your pasta with freshly chopped parsley for a bright finish. To make your One-Pan Butter Parmesan Pasta shine, adjust the cooking time based on the pasta you use. For spaghetti, it takes about 10-12 minutes to reach al dente. If you use thicker fettuccine, add a couple of extra minutes. Always taste the pasta near the end to check for doneness. Next, for a creamy sauce, stir the heavy cream in slowly. This helps it mix well with the broth and cheese. Keep the heat low while stirring. If the sauce seems too thin, let it simmer a little longer. You want a silky texture that clings to the pasta. When serving, choose a large, deep bowl to showcase your pasta. This allows for a beautiful presentation. A sprinkle of extra Parmesan and a drizzle of olive oil adds a nice touch. Fresh parsley on top gives it a pop of color. Pair this dish with grilled chicken or shrimp for protein. A simple side salad or garlic bread complements the meal perfectly. These additions make your dinner even more delightful. To boost nutrition, consider adding vegetables. Spinach or cherry tomatoes blend well with the pasta. You can stir them in during the last few minutes of cooking. This way, they soften but still keep their color. For extra flavor, try adding fresh herbs like basil or thyme. These herbs can elevate the dish and bring in new tastes. You may also mix in different cheeses, like Pecorino, for a unique twist. Experimenting with these options can make the dish your own. Pro Tips Use Fresh Ingredients: Always opt for fresh garlic and freshly grated Parmesan cheese for the best flavor and texture in your pasta dish. Adjust the Creaminess: If you prefer a lighter sauce, reduce the amount of heavy cream or substitute it with half-and-half for a delicious alternative. Customize Your Pasta: Feel free to add vegetables like spinach or cherry tomatoes to the dish for added nutrition and color. Perfect Al Dente: Keep an eye on the cooking time for the pasta; you want it to be al dente, as it will continue to cook slightly after being removed from heat. {{image_4}} You can change the pasta to fit your needs. Try whole wheat for more fiber. Gluten-free pasta works for those avoiding wheat. Alternative grains like quinoa or chickpea pasta add unique flavors. Each type brings a new texture and taste. Just keep an eye on cooking times, as they may vary. Fresh herbs can brighten this dish. Try adding basil, thyme, or oregano for a fresh twist. You can also mix in spices like smoked paprika or Italian seasoning. Cheese can change the whole dish, too. Pecorino cheese gives a sharper flavor than Parmesan. Experimenting with cheese helps you find your perfect taste. If you want to make it vegan, swap the butter and cream for plant-based options. Use coconut cream or cashew cream for richness. Nutritional yeast can replace Parmesan for a cheesy taste. For lower calories, reduce the heavy cream or use a low-fat version. These tweaks keep the dish tasty without the extra calories. To store leftovers, place the pasta in an airtight container. This keeps it fresh and tasty. Make sure it cools completely before sealing. For reheating, use a skillet over low heat. Add a splash of broth or cream to keep it creamy. Stir gently until heated through. You can freeze One-Pan Butter Parmesan Pasta. First, let it cool fully. Then, place it in a freezer-safe container. This helps lock in the flavor and texture. When ready to eat, thaw it in the fridge overnight. Reheat it in a skillet with a bit of broth for best results. In the fridge, this pasta lasts for about 3 to 4 days. Look for signs of spoilage like an off smell or mold. If it looks dry or clumpy, it's best to throw it out. Always trust your senses when it comes to food safety. Can I use a different type of broth? Yes, you can use chicken broth or beef broth instead of vegetable broth. Each type of broth adds its own flavor. Chicken broth gives a richer taste, while beef broth is heartier. Feel free to experiment with what you have. What can I substitute for heavy cream? If you don’t have heavy cream, use half-and-half or a blend of milk with butter. For a lighter option, try using Greek yogurt or coconut cream. These swaps will change the flavor a bit, but they still work well. How do I make it spicier? To add heat, increase the amount of red pepper flakes. You can also add chopped jalapeños or a dash of hot sauce. Start small and taste as you go. You can always add more spice, but you can’t take it away! What if I don't have Parmesan cheese on hand? If you lack Parmesan, try Pecorino Romano or Grana Padano. Both bring a similar salty flavor. Nutritional yeast is a great vegan option that adds a cheesy taste. Can I make this recipe ahead of time? Yes, you can make it ahead. Just cook the pasta and sauce, then cool them down. Store in the fridge for up to three days. Reheat gently on the stove or in the microwave. You might need to add a splash of broth to loosen it up. Is this dish suitable for meal prep? Absolutely! This dish is perfect for meal prep. Just pack it in containers and enjoy it throughout the week. It holds up well, making it a great choice for lunch or dinner. This blog post showed you how to make a tasty One-Pan Butter Parmesan Pasta. We covered the key ingredients, step-by-step cooking instructions, and helpful tips for a perfect dish. You learned about variations, storage, and common questions. With this knowledge, you can easily customize the recipe to your taste. Enjoy cooking and make this dish your own! Each bite will be a rewarding experience.

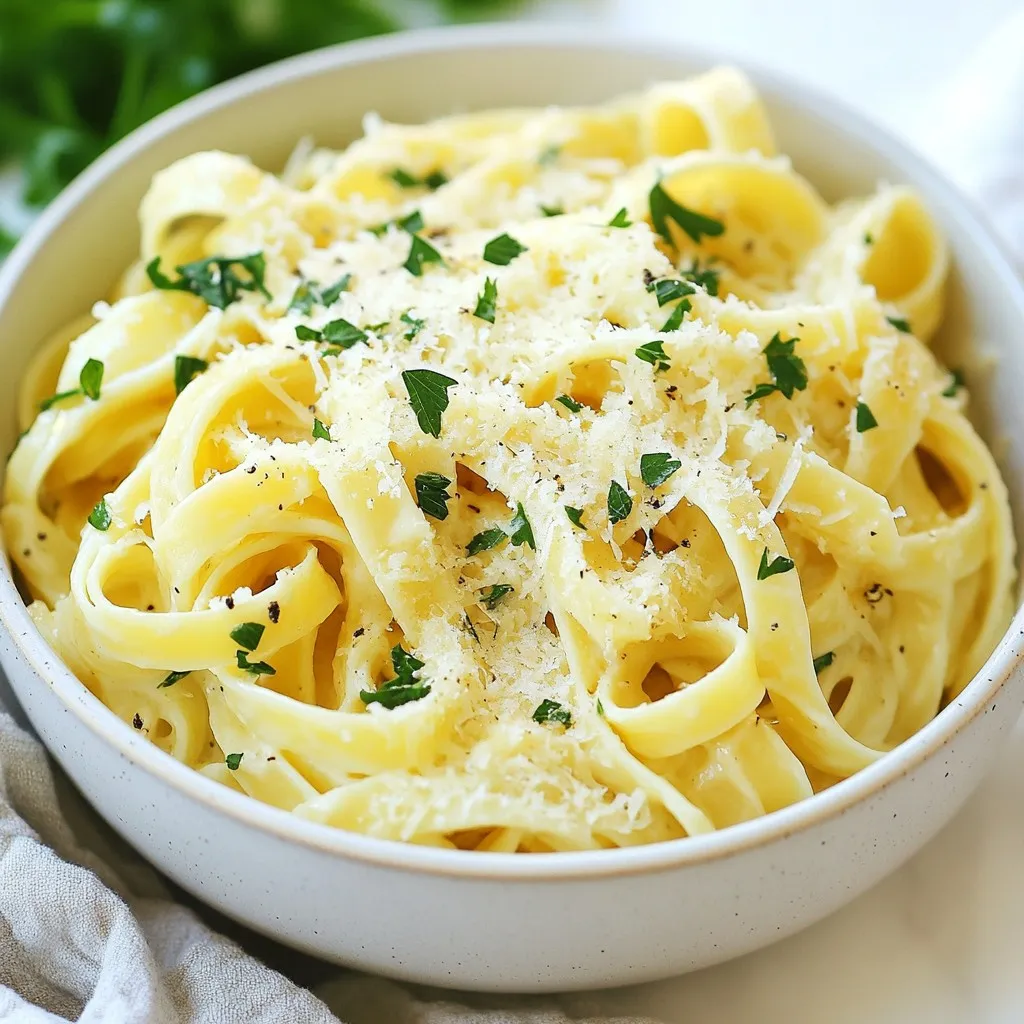
Looking for a quick and tasty meal? You’ve found it! This One-Pan Butter Parmesan Pasta is all about ease and flavor. With just a few ingredients and one pan, you’ll …

Read more

Categories Dinner

Cheesy Garlic Chicken Wraps Easy and Flavorful Meal

November 25, 2025January 6, 2025 by Chef Tavio
- 2 cups cooked chicken, shredded - 1 cup shredded mozzarella cheese - 1/2 cup cream cheese, softened - 4 large flour tortillas - 3 cloves garlic, minced - 1/2 cup fresh spinach, chopped - 1/4 cup sun-dried tomatoes, diced - 1/4 teaspoon red pepper flakes (optional) - Salt and pepper to taste - 2 tablespoons olive oil - Fresh parsley for garnish Gather these ingredients before you start. Having everything ready makes cooking easy and fun. The cooked chicken should be shredded well to mix nicely with the cheese. I love using mozzarella for its meltiness. Cream cheese adds a rich and creamy feel. Using fresh spinach not only adds color but also boosts nutrition. Sun-dried tomatoes bring a tangy flavor that pairs well with garlic. If you enjoy a bit of heat, add red pepper flakes. Don’t forget to season with salt and pepper to make the flavors pop. Olive oil helps achieve that perfect golden crust on the wraps. Finally, fresh parsley adds a nice touch when you serve. These simple ingredients come together to create a flavorful meal that's sure to impress! {{ingredient_image_2}} 1. First, grab a large mixing bowl. Combine 2 cups of cooked chicken with 1 cup of shredded mozzarella cheese. 2. Add in 1/2 cup of softened cream cheese, 3 cloves of minced garlic, 1/2 cup of chopped spinach, and 1/4 cup of diced sun-dried tomatoes. 3. Sprinkle in salt, pepper, and 1/4 teaspoon of red pepper flakes if you want some heat. 4. Mix everything well until the filling is creamy and evenly blended. 1. Heat a large skillet over medium heat. Add 2 tablespoons of olive oil and swirl it around to coat the pan. 2. Once the oil is shimmering, place a flour tortilla in the skillet. 3. Spoon a generous portion of the chicken mixture into the center of the tortilla. Don’t overfill it! 4. Fold the sides in and tightly roll the tortilla from the bottom up to make a secure wrap. 5. Cook the wrap for 2-3 minutes on each side until golden brown and crispy. Make sure the filling is heated through. 6. Repeat with the remaining tortillas and filling, adding more oil to the skillet as needed. 1. After cooking, let the wraps cool for about a minute on a cutting board. 2. Carefully slice each wrap in half diagonally for a nice look. 3. Garnish with freshly chopped parsley to add color and freshness. 4. Serve the wraps warm for the best taste and texture! Arrange them on a rustic wooden board or on individual plates. For extra flavor, serve with a dipping sauce like creamy ranch or zesty garlic aioli. A small side salad adds a colorful touch too! - Monitoring cooking time: Cook the wraps for 2-3 minutes on each side. This helps the tortillas get crispy and the filling warm. - Tips for crispy tortillas: Use medium heat and add oil to the skillet. This creates a nice crunch on the outside. - Customizing the filling flavors: Add your favorite spices or herbs. You can try cumin or cilantro for a fresh twist. - Overfilling the wrap: Less is more! If you add too much filling, the wrap may burst open while cooking. - Not heating through the filling: Ensure the chicken and cheese melt well. This gives the wrap its creamy texture. - Cooking at too high a temperature: High heat can burn the tortilla before the inside is warm. Keep it steady and moderate. - Ideal accompaniments: Serve with a side salad for freshness. A simple mix of greens works well. - Best dipping sauces: Try creamy ranch or zesty garlic aioli. These add extra flavor to each bite. - Side salad ideas: A bright tomato and cucumber salad pairs nicely. The crunch and coolness complement the warm wraps. Pro Tips Use Rotisserie Chicken: For a quick and easy option, consider using store-bought rotisserie chicken to save time on cooking and shredding. Customize Your Fillings: Feel free to add other vegetables like bell peppers or mushrooms, or substitute different cheeses based on your preferences. Check Your Tortilla Size: Ensure you are using large tortillas to accommodate a generous filling without tearing when rolling. Serve with Dipping Sauces: Elevate the dish by pairing the wraps with a variety of dipping sauces such as salsa, ranch, or a spicy aioli for enhanced flavor. {{image_4}} You can switch up the proteins in these wraps. Try using turkey or beef instead of chicken. This change can add a new taste. For those who want dairy-free options, vegan cheese works great. You can also use dairy-free cream cheese for a creamy texture. Adding different vegetables can boost the flavor. Consider bell peppers, zucchini, or mushrooms. These will add crunch and color to your wraps. Don’t forget to spice things up! You can add herbs like oregano or basil for extra flavor. If you want spicier wraps, toss in more red pepper flakes or add jalapeños. Experimenting with different cheeses can make your wraps unique. Try sharp cheddar or pepper jack for a fun twist. If you need gluten-free options, look for gluten-free tortillas. Many brands offer tasty alternatives that work well. For those on a low-carb diet, you can use lettuce wraps instead of tortillas. This keeps the flavor without the carbs. Vegetarian adaptations are also easy. Just replace the chicken with more veggies or beans. This keeps the dish filling and tasty without meat. To store your cheesy garlic chicken wraps, first let them cool. Place the wraps in an airtight container. This helps keep them fresh. You can store them in the fridge for up to three days. If you want to enjoy them later, you can also freeze them. The best way to reheat wraps is in a skillet. Heat the skillet over medium heat. Place the wraps in the skillet. Cook for about two to three minutes on each side. This method keeps the wraps crispy. You can also use a microwave, but it may make them soft. If you want to freeze the wraps, do it right after making them. Wrap each one in plastic wrap, then place them in a freezer bag. This keeps them fresh for up to three months. When you’re ready to eat, thaw them overnight in the fridge. Reheat them in a skillet for best results. To make Cheesy Garlic Chicken Wraps, start by mixing the filling. Combine shredded chicken, mozzarella cheese, cream cheese, minced garlic, chopped spinach, and diced sun-dried tomatoes in a bowl. Add salt and pepper to taste. Stir until everything blends well. Next, heat olive oil in a skillet over medium heat. Place a tortilla in the skillet, add a scoop of the chicken mixture, and roll it up. Cook for 2-3 minutes on each side until golden brown. Slice, garnish with parsley, and serve warm. Using raw chicken is possible but requires more time. Cook the raw chicken first. Season it with salt and pepper, then grill or bake until fully cooked. After it cools, shred it before mixing with the other ingredients. Pre-cooked chicken saves time and ensures a quick meal. It also gives you a creamy, flavorful filling without much fuss. These wraps pair well with many sides. Try serving them with a fresh side salad for crunch. You can also serve them with creamy ranch or zesty garlic aioli for dipping. A light soup can complement the meal too. For drinks, iced tea or sparkling water makes a refreshing choice. To make the wraps healthier, consider using whole wheat tortillas. You can also reduce cream cheese or choose a low-fat version. Adding extra veggies like bell peppers or cucumbers boosts nutrition. Using fresh herbs can also add flavor without extra calories. Swap mozzarella for a lighter cheese, or use less cheese overall for a tasty, lighter wrap. Our blog post covered tasty cheesy garlic chicken wraps. We explored the key ingredients, step-by-step instructions, and helpful tips. You learned how to avoid common mistakes and customize your wraps. We also touched on variations for different diets and storage methods for leftovers. These wraps are easy to make and fun to share. Enjoy experimenting with flavor and ingredients that fit your taste. Now, get cooking and make delicious wraps that everyone will love!

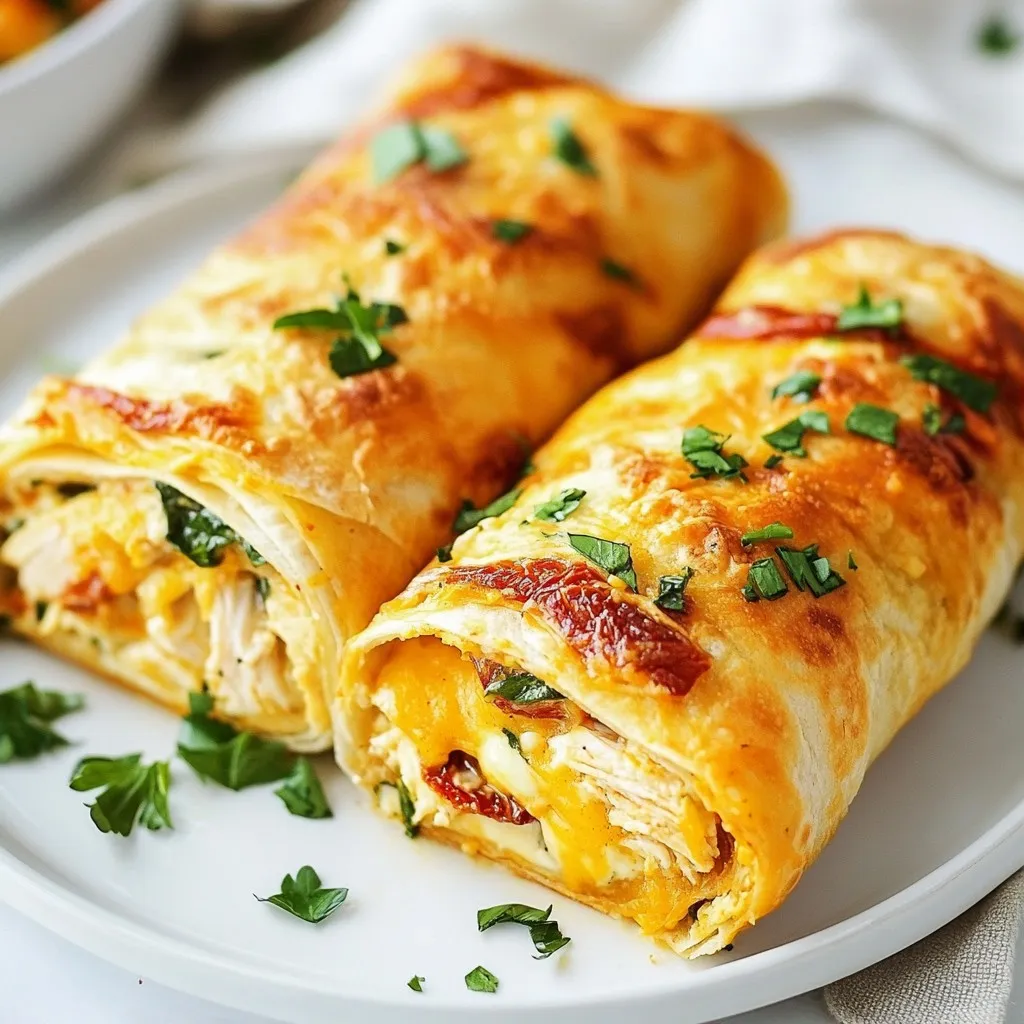
Looking for a quick and tasty meal? Cheesy garlic chicken wraps are your answer! These wraps are packed with shredded chicken, creamy cheese, and zesty garlic. They’re easy to make …

Read more

Categories Dinner

Edible Vegan Cookie Dough Simple and Tasty Recipe

December 17, 2025January 6, 2025 by Chef Tavio
- 1 cup almond flour - 1/4 cup coconut oil, melted - 1/3 cup pure maple syrup - 1 teaspoon vanilla extract - 1/4 teaspoon salt - 1/2 cup vegan chocolate chips - 2 tablespoons almond milk (or any plant-based milk) - 1/4 cup finely chopped nuts (optional) To make this edible vegan cookie dough, you need simple and wholesome ingredients. First, almond flour gives the dough a nice texture. It is gluten-free and adds a nutty flavor. Next, melted coconut oil keeps the dough moist and rich. Maple syrup sweetens the mix while adding a hint of caramel flavor. Vanilla extract brings a warm touch to the dough, making it smell great. A little salt enhances all the flavors. Vegan chocolate chips add sweetness and indulgence. They melt in your mouth and provide a nice contrast to the dough. Almond milk, or any plant-based milk, helps adjust the dough's texture. You can skip the nuts, but finely chopped ones add a nice crunch. These ingredients work together to create a tasty and safe treat. You can enjoy it right away or chill it for a firmer texture. {{ingredient_image_2}} First, take a large mixing bowl. Add 1 cup of almond flour. Sprinkle in 1/4 teaspoon of salt. Stir the mixture well with a spatula. This breaks any lumps and helps to mix the salt evenly. Next, pour in 1/4 cup of melted coconut oil. Add 1/3 cup of pure maple syrup and 1 teaspoon of vanilla extract. Mix these wet ingredients with the dry mix vigorously. You want a thick yet moist dough that holds together. If the dough feels too dry, it's time to adjust. Add 2 tablespoons of almond milk slowly, one tablespoon at a time. Mix well after each addition until the dough becomes easy to scoop. It should not be sticky, just soft enough to form. Now, fold in 1/2 cup of vegan chocolate chips. If you like, you can add 1/4 cup of finely chopped nuts too. Make sure everything is mixed evenly. This way, each bite is packed with flavor. Before you chill the dough, taste a small spoonful. If you want it sweeter, drizzle in a bit more maple syrup. Mix again to blend the flavors. This step is crucial for ensuring your dough is just right. When you are happy with the taste, scoop out the dough. Shape it into small balls or leave it in the bowl. Place the dough in the fridge for about 30 minutes. This helps to firm it up, making it easier to enjoy. Once chilled, dig in! You can eat it straight from the fridge. Or, use it as a topping for vegan ice cream or fresh fruit. For a nice touch, serve in small bowls and sprinkle extra chocolate chips on top. Drizzle with maple syrup for extra sweetness. How do you avoid dry or sticky dough? Start by measuring your almond flour correctly. Too much can make the dough dry. If it feels too dry, add almond milk a little at a time. Mix well after each addition. You want a dough that is moist but not sticky. For mixing to the right consistency, use a spatula to combine your ingredients. Mix until everything is well-blended. The dough should be thick enough to scoop but soft enough to bite into. What are some good mix-ins? You can add nuts, coconut flakes, or even dried fruit. These extras add texture and taste. Try some cinnamon or a pinch of sea salt for extra flavor! Choosing the right maple syrup is key. Use pure maple syrup for the best taste. Avoid imitation syrup as it has less flavor. The right syrup makes your cookie dough taste amazing. What are some creative serving suggestions? Serve your cookie dough in small bowls. Top with extra chocolate chips or nuts for a nice look. Drizzle some maple syrup on top for sweetness. How can you pair it with desserts or snacks? This cookie dough is great on its own or as a topping. Try it on vegan ice cream or fresh fruit. It makes a simple snack feel special! Pro Tips Storage Secrets: Keep your cookie dough in an airtight container in the fridge for up to 5 days, or freeze for longer storage. Just scoop out portions as needed! Flavor Variations: Experiment with different mix-ins like dried fruits, shredded coconut, or different types of vegan chips to create unique flavor combinations. Sweetness Adjustment: Always taste your dough before chilling. If you like it sweeter, add a bit more maple syrup to suit your palate. Serving Suggestions: For a fun twist, serve your cookie dough with fresh fruit skewers or spread it on whole grain toast for a delicious breakfast treat! {{image_4}} You can switch up the flavor of your edible vegan cookie dough easily. The classic chocolate chip is great, but try other vegan chips too. Dark chocolate or peanut butter chips can add a new twist. You can also play with spices. A sprinkle of cinnamon or nutmeg brings warmth and depth. These simple changes can make your cookie dough feel fresh and exciting. If you need gluten-free options, almond flour is a great base. You can swap it for oat flour or a gluten-free blend. For oils, coconut oil is fantastic, but you can use avocado oil or even applesauce for a lighter version. When it comes to sweeteners, maple syrup is perfect, but agave nectar or date syrup are good alternatives. These swaps help you customize your dough to fit your needs. Not everyone can enjoy nuts, and that's okay! You can simply leave them out of the recipe. Instead, try adding seeds like sunflower or pumpkin for crunch. You can also use dried fruits like raisins or cranberries for a sweet touch. These options keep your cookie dough safe for those with allergies while still tasting amazing. To keep your edible vegan cookie dough fresh, use airtight containers. Glass or plastic containers work well. Make sure the lid seals tightly. This keeps moisture out and flavors in. Store the dough in the fridge if you plan to eat it soon. The cool air helps it stay fresh and tasty. If you want to save some dough for later, freezing is a great option. First, scoop the dough into small balls. Place them on a baking sheet lined with parchment paper. Freeze them for about an hour until they are firm. After that, transfer the frozen balls into a freezer-safe bag. Remove as much air as possible. For the best quality, use them within three months. When you're ready to enjoy the dough, take it out of the freezer. Place it in the fridge for a few hours to thaw. If you're in a hurry, you can let it sit at room temperature for about 30 minutes. This way, it will still taste great! In the fridge, your edible vegan cookie dough stays fresh for about a week. Always check for signs of spoilage before eating. If you notice any off smells or a change in texture, it’s best to throw it away. Enjoy your cookie dough while it’s fresh for the best taste! Yes, edible vegan cookie dough is safe to eat. It uses almond flour instead of regular flour. Almond flour is safe to eat raw. We also avoid eggs. Eggs can carry harmful bacteria. The other ingredients, like coconut oil and maple syrup, are safe. You can enjoy this treat without worry. You can bake this cookie dough, but it may not be great. The texture may change, and it might not rise. If you want to bake it, use a higher oven temperature. Keep an eye on it while baking. It may also need a bit more flour to hold shape. You can use oat flour or coconut flour instead of almond flour. These options work well for gluten-free diets. If you have nut allergies, try sunflower seed flour. Always check for allergens when using substitutes. Each flour may change the taste and texture a bit. To make it sweeter, add more maple syrup. Just a drizzle will do the trick. Mix it well to blend the sweetness. You can also add a bit of brown sugar. Taste as you go, so you find your perfect sweetness balance. Yes, this recipe is gluten-free. Almond flour is naturally gluten-free. If you use other gluten-free flours, check their labels. Ensure they are certified gluten-free to avoid cross-contamination. Enjoy this safe and tasty treat! This blog post walks you through making delicious edible vegan cookie dough. We discussed key ingredients like almond flour, coconut oil, and vegan chocolate chips. You learned how to mix dry and wet ingredients for the perfect consistency and how to add flavor. We explored variations, storage tips, and answered common questions. Now, you can enjoy this tasty treat safely and easily. Get creative with flavors or share it with friends. Your sweet tooth will thank you!

If you’re craving a sweet treat without the guilt, look no further! This Edible Vegan Cookie Dough recipe is simple, tasty, and safe to eat. Packed with wholesome ingredients like …

Read more

Categories Desserts

Slow Cooker Honey Garlic Meatballs Flavorful Delight

November 13, 2025January 6, 2025 by Chef Tavio
- 1 lb ground beef (or chicken/turkey) - 1/2 cup breadcrumbs - 1/4 cup Parmesan cheese - 1/4 cup fresh parsley, chopped - 1 large egg - 2 cloves garlic, minced - 1/2 teaspoon salt - 1/4 teaspoon black pepper To make tasty meatballs, I use a mix of ground beef and breadcrumbs. The Parmesan cheese adds a rich flavor. Fresh parsley gives a nice touch, while garlic adds depth. The egg helps bind everything together. - 1/2 cup honey - 1/4 cup soy sauce (low sodium is best) - 2 tablespoons rice vinegar - 1 teaspoon sesame oil - 1 tablespoon cornstarch (optional) The sauce is where the magic happens. Honey brings sweetness, and soy sauce adds umami. Rice vinegar gives a tangy kick. Sesame oil adds a hint of nuttiness. If you want a thicker sauce, use cornstarch. - Cooked rice or noodles Serving your meatballs over rice or noodles makes the dish heartier. A drizzle of extra sauce adds flavor and keeps everything moist. You can also garnish with parsley or sesame seeds for a nice look. {{ingredient_image_2}} Start by gathering all your meatball ingredients. You need ground meat, breadcrumbs, cheese, parsley, garlic, egg, salt, and pepper. In a large bowl, mix them well. Use your hands to blend them, but don’t overdo it. This keeps the meatballs tender. The mixture should be sticky but hold together well. Next, shape the mixture into meatballs. Aim for about 1 inch in size. This size helps them cook evenly. You should make around 20 to 24 meatballs. Place them on a plate as you go. Try to keep them round and uniform for even cooking. Now, let’s prepare the sauce. In a separate bowl, combine honey, soy sauce, rice vinegar, and sesame oil. Whisk these together until smooth. If you want a thicker sauce, mix cornstarch with a bit of water first. Then stir it into the sauce mixture. This will make it nice and glossy. Time to cook the meatballs! Place them in the slow cooker, spreading them out evenly. Pour the honey garlic sauce over the top. Make sure each meatball gets coated. Cover with the lid and set your slow cooker. You can choose low for 4-6 hours or high for 2-3 hours. When they are done, the meatballs will be tender and full of flavor. Stir them gently in the sauce before serving. When making meatballs, I love using ground beef. It offers great flavor and tenderness. You can also use ground chicken or turkey for a lighter meal. Both options work well and keep the meatballs juicy. If you want extra flavor, try mixing different meats. A blend of beef and pork can make a tasty combination. The sauce is key to these meatballs. To make it just right, mix honey and soy sauce well. If you want a thicker sauce, add cornstarch. Mix it with water before adding it to the sauce. This helps it blend smoothly. Let the sauce simmer with the meatballs in the slow cooker. This ensures it thickens up nicely and clings to the meatballs. Presentation matters! For a beautiful dish, serve meatballs over fluffy rice or noodles. This adds a nice base and makes it look inviting. Drizzle some extra sauce on top for extra flavor. Finish with a sprinkle of chopped parsley or sesame seeds. This adds color and crunch, making your meal more appealing. Pro Tips Use Fresh Ingredients: Always use fresh garlic and herbs for the best flavor. Dried herbs can be a substitute, but fresh will elevate the dish significantly. Don’t Overmix: When combining the meat and other ingredients, mix just until combined to keep the meatballs tender and not dense. Make Extra Sauce: If you love extra saucy meatballs, consider doubling the sauce ingredients for a richer flavor to drizzle over rice or noodles. Experiment with Proteins: Feel free to substitute the ground beef with ground chicken, turkey, or even plant-based meat for a lighter or vegetarian option. {{image_4}} You can make these meatballs gluten-free. Use gluten-free breadcrumbs instead of regular ones. Many brands offer good options. Also, check that your soy sauce is gluten-free. There are many products available that taste great. For a vegetarian twist, swap the ground meat for plant-based options. You can use lentils or chickpeas as a base. Mix them with breadcrumbs and egg replacement. This way, you still get a nice texture. You can even add some chopped veggies for more flavor. Want to spice things up? Add some crushed red pepper for heat. A splash of ginger can give a nice zing. You can also mix in some chopped green onions for a fresh taste. If you love citrus, a bit of lime zest brightens the dish. After enjoying your slow cooker honey garlic meatballs, store leftovers in the fridge. Use an airtight container for best results. They can stay fresh for up to three days. Make sure to let the meatballs cool before sealing them up. This helps keep them moist and tasty. Want to save some meatballs for later? Freeze them for future meals! Place the cooled meatballs in a freezer-safe bag or container. They can last up to three months in the freezer. When you're ready to eat, just thaw them in the fridge overnight. This keeps the flavor intact and makes them easy to reheat. When it’s time to reheat, there are a few options. You can microwave the meatballs for a quick meal. Heat them on medium power for about 2-3 minutes. You can also use a stovetop pan. Just add a little sauce to keep them moist. Heat on low, stirring gently until warmed through. Enjoy them with rice or noodles for a delicious meal! You should cook meatballs in a slow cooker for about 4 to 6 hours on low. If you need them faster, use the high setting for 2 to 3 hours. Meatballs are done when they are cooked through and tender. Always check the meatball center for doneness. Yes, you can use different meats for this recipe. Ground chicken or turkey works well for a leaner option. If you prefer a richer taste, ground beef is perfect. Feel free to experiment with your favorite ground meats. Honey garlic meatballs pair well with many sides. You can serve them over cooked rice or noodles. Steamed veggies or a fresh salad also make a great side. Try to drizzle extra honey garlic sauce for more flavor. To thicken the sauce without cornstarch, try reducing it. Cook the sauce on the stove until it thickens. You can also add pureed vegetables like carrots or bell peppers. This adds flavor and nutrition, making your dish even better. This guide covered the main steps to make delicious honey garlic meatballs. You learned about key ingredients, cooking methods, and tips for success. We also explored variations and storage options, ensuring you can enjoy these meatballs later. Remember, you can customize flavors to suit your taste. With a little practice, you’ll serve a dish that will impress everyone. Enjoy making and sharing your honey garlic meatballs—your kitchen will smell amazing!

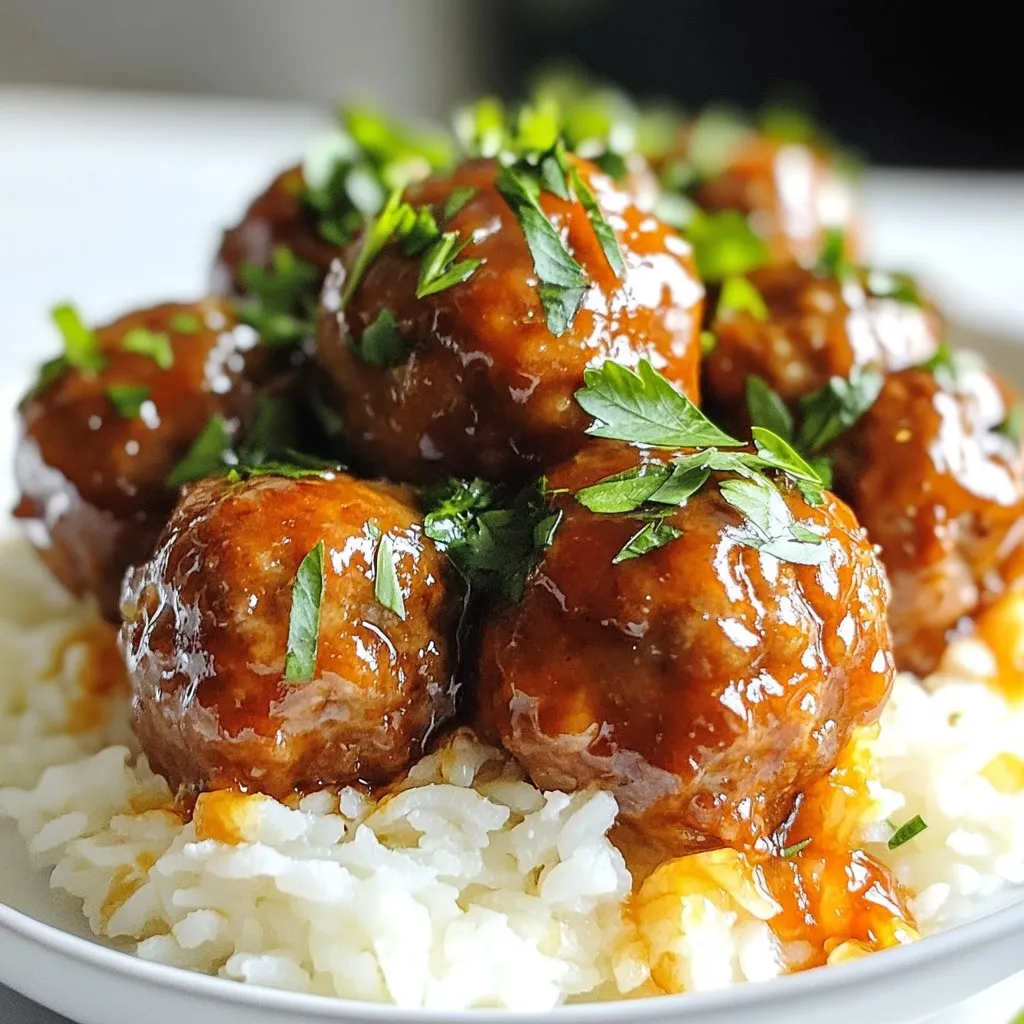
If you’re craving a simple yet delicious meal, you’ve come to the right place. Slow Cooker Honey Garlic Meatballs are packed with flavor and are easy to make. You’ll get …

Read more

Categories Dinner

Cookies and Cream Dessert Cups Indulge in Delight

December 2, 2025January 6, 2025 by Chef Tavio
- 1 cup heavy whipping cream - 1/2 cup powdered sugar - 1 teaspoon vanilla extract - 1 cup cookies-and-cream ice cream, slightly softened - 1 cup crushed chocolate sandwich cookies (like Oreos) - 1/2 cup mini chocolate chips - 1 cup whipped topping (like Cool Whip) for layering - Whole cookies for garnish - Extra crushed cookies for a crunchy top - Chocolate sauce for drizzling - Fresh mint leaves for a pop of color - Large mixing bowl - Electric mixer - Spatula - Serving cups or bowls - Measuring cups and spoons - Refrigerator for chilling Gather these ingredients and tools before you start. It makes the process smooth and fun! You can customize the garnishes to suit your mood or occasion. Enjoy the journey of making these delightful dessert cups! {{ingredient_image_2}} To start, grab a large mixing bowl. Add 1 cup of heavy whipping cream, 1/2 cup of powdered sugar, and 1 teaspoon of vanilla extract. Use an electric mixer on high speed. Whip the mixture for about 3 to 5 minutes. You want soft peaks to form. This creates a light and fluffy base for your dessert. Next, take another bowl. Add 1 cup of slightly softened cookies-and-cream ice cream. Gently fold this ice cream into your whipped cream mix. Use a spatula and fold carefully. This helps keep the whipped cream airy and light. Now, it’s time to layer your dessert. Start by spooning a generous layer of the cookies-and-cream mixture into the bottom of your serving cups. Spread it evenly for a nice base. Next, sprinkle 1/2 cup of mini chocolate chips over this layer. Follow that with a dollop of whipped topping. Smooth it out with a spatula. Continue layering in the same order until you fill the cups to the top. Make sure to finish with a layer of whipped topping for a pretty look. Finally, take the reserved crushed cookies and sprinkle them on top. This gives a nice crunch and makes it look great. For the finishing touch, place a whole cookie on top of each cup. After you finish this, chill the dessert cups in the refrigerator for at least 1 hour. This step helps the flavors meld and the dessert set. Enjoy your delicious creation! To make perfect whipped cream, start with cold ingredients. Chilled heavy whipping cream whips better and faster. Use an electric mixer on high speed for about 3-5 minutes. Watch for soft peaks to form. This means your cream is ready. Avoid overmixing, as it can become grainy. Creating layers adds visual appeal. Start with a generous spoonful of the cookies-and-cream mixture. Spread it evenly in your serving cups. Next, sprinkle mini chocolate chips over the first layer. Follow this with a smooth dollop of whipped topping. Repeat these steps until you reach the top. Finish with a layer of whipped topping for a polished look. For the best presentation, chill your dessert cups for at least one hour. This helps the layers set and flavors blend. Before serving, sprinkle the reserved crushed cookies on top. Adding a whole cookie as a garnish gives a fun touch. You can also drizzle chocolate sauce inside the cups for extra flair. These steps make your dessert cups not only tasty but also beautiful. Pro Tips Whip it Right: Make sure your mixing bowl and beaters are chilled before whipping the cream. This helps achieve stiffer peaks faster. Cookie Crunch: For added texture, consider mixing in different types of crushed cookies or even adding some chopped nuts. Layering Technique: Use a pastry bag to layer the whipped topping for a more professional look and to prevent mixing of the layers. Chill Out: Allow sufficient chilling time before serving; this enhances the flavors and helps the layers to set properly. {{image_4}} You can make these dessert cups gluten-free. Use gluten-free chocolate sandwich cookies. Brands like Glutino or Kinnikinnick work well. They taste similar to regular cookies. Your dessert will still be creamy and delicious. Just check labels to avoid cross-contamination. While cookies and cream is a classic, feel free to mix it up. Use chocolate or vanilla ice cream for new flavors. Add crushed peanut butter cookies for a tasty twist. You can also try mint chocolate chip ice cream for a fresh taste. The key is to keep the base creamy and rich. Seasonal flavors can add fun to your dessert cups. In fall, mix in pumpkin spice ice cream. For winter, try peppermint-flavored ice cream. You can add seasonal fruits as well. Fresh strawberries or raspberries can brighten the dessert. They add a nice touch and layer of flavor. To store leftovers, place your dessert cups in an airtight container. Cover them tightly to keep out air. This will help maintain their flavor and texture. You can keep them in the fridge for up to three days. If you plan to eat them later, layering will help keep them fresh. You can freeze these dessert cups if you want to save them for a later date. First, ensure they are in a freezer-safe container. Cover each cup with plastic wrap or a lid. They will store well in the freezer for about one month. When you are ready to enjoy them, move them to the fridge for a few hours to thaw. To keep the texture of your dessert cups, avoid refreezing them. Freezing can change the creamy layers and make them icy. Always store them in the fridge until you are ready to serve. If they have been frozen, let them thaw slowly in the fridge. This helps restore their creamy goodness and makes them taste fresh again. Yes, you can use regular whipped cream. However, it may not be as thick or rich. Heavy whipping cream whips up better, giving your dessert a fluffy texture. If you choose regular whipped cream, you might want to add more to get the same creaminess. You can keep these dessert cups in the fridge for up to 3 days. They will stay fresh and tasty. Be sure to cover them well to keep them from drying out. Enjoy them cold for the best taste! You can use any chocolate sandwich cookies for this recipe, but Oreos are a classic choice. Other brands work too, as long as they have a similar texture and flavor. Feel free to try your favorite cookies for a fun twist! We covered the key ingredients and tools for making delicious dessert cups. You learned step-by-step how to create whipped cream, mix in ice cream, and layer your dessert. I shared tips for perfect texture and beautiful presentation. You also explored variations for dietary needs and seasonal flavors. Finally, we reviewed storage tips to keep your dessert fresh. Enjoy creating your dessert and impressing your friends!

Get ready to indulge in a delicious treat like no other! Cookies and Cream Dessert Cups blend rich flavors and creamy textures that will make your taste buds dance. In …

Read more

Categories Desserts

Savory Angel Food Churro Bites Simple and Sweet Treat

December 15, 2025January 4, 2025 by Chef Tavio
- 1 angel food cake (store-bought or homemade) - 1 cup granulated sugar - 2 teaspoons ground cinnamon - ½ cup unsalted butter, melted - 1 cup chocolate sauce (for dipping) - Optional: powdered sugar for dusting To make these angel food churro bites, you need a few simple ingredients. The star is the angel food cake, which you can buy or bake yourself. You will also need sugar and cinnamon to create that classic churro taste. The butter helps the sugar stick, while the chocolate sauce adds a sweet dip. If you want, you can dust the bites with powdered sugar for extra sweetness. Using fresh ingredients makes a big difference. If you can, use a homemade angel food cake. It tastes better and feels special. The cinnamon and sugar mix gives a warm flavor that pairs perfectly with the light cake. Each ingredient plays a key role in making this treat tasty and fun. The cake is fluffy, the butter adds richness, and the chocolate sauce brings it all together. You can personalize this recipe by adding your favorite dips or toppings. Enjoy creating these delicious bites! {{ingredient_image_2}} - Preheat the Oven: Begin by preheating your oven to 350°F (175°C). - Slice the Angel Food Cake into Cubes: If you're using a store-bought cake, take it out of the packaging. Cut it into bite-sized cubes, about 1-2 inches. - Prepare the Cinnamon Sugar: In a small bowl, mix 1 cup of granulated sugar with 2 teaspoons of ground cinnamon. Stir well until combined. Set this aside for later. - Dip Cake Cubes in Melted Butter: Take each cake cube and dip it into ½ cup of melted unsalted butter. Make sure to coat all sides evenly. - Roll in Cinnamon Sugar: After buttering, roll each cube in the cinnamon sugar mixture until fully coated. This gives them that churro flavor. - Arrange on a Baking Sheet: Line a baking sheet with parchment paper. Place the coated cake bites on the sheet, spacing them about an inch apart for even baking. - Bake and Cool the Churro Bites: Bake in the preheated oven for 8-10 minutes until golden and crisp. Once done, let them cool for 3-4 minutes. - Serve with Chocolate Dipping Sauce: Serve the warm churro bites with a cup of chocolate sauce for dipping. Enjoy the mix of soft and crispy textures! - Use parchment paper to line your baking sheet. - Space your churro bites an inch apart. This helps them bake evenly. - Keep an eye on them after 8 minutes. They should be golden brown. - Serve churro bites in a fun bowl. - Drizzle extra chocolate sauce on top for flair. - Add fresh fruits like strawberries or raspberries. A sprinkle of mint adds color. - Try caramel or strawberry sauce for dipping. - Add a pinch of nutmeg to the cinnamon sugar. It gives a warm twist. - Experiment with other spices like cayenne for heat. Pro Tips Use Fresh Ingredients: Always opt for fresh angel food cake for the best flavor and texture. If making it at home, ensure all ingredients are at room temperature for optimal mixing. Perfect Your Cinnamon Sugar: For a more intense flavor, try adding a pinch of nutmeg or vanilla powder to your cinnamon sugar mixture. Monitor Baking Time: Keep an eye on the churro bites while baking; they can go from golden to overbaked quite quickly. Remove them as soon as they are lightly golden. Customize Your Dipping Sauce: Experiment with different dipping sauces such as caramel or a fruit puree to create unique flavor combinations. {{image_4}} You can switch up your angel food cake for a fun twist. Try using flavored angel food cakes. Lemon or almond flavors add a fresh taste. They make your churro bites even more special. For those who need gluten-free options, look for gluten-free angel food cakes. Many stores sell them, or you can make your own from gluten-free flour. The classic cinnamon sugar coating is great, but you can mix it up! Add crushed nuts, like almonds or pecans, to the coating for extra crunch. This gives each bite a unique texture. You can also try different sugar and spice combos. Try using brown sugar or adding cayenne for a spicy kick. The options are endless! These churro bites are perfect with a scoop of ice cream. Vanilla or chocolate ice cream pairs well with the warm bites. You can also present them on a dessert platter. Add fresh fruits like strawberries or raspberries. This not only looks pretty but also balances the sweetness. Don’t forget to drizzle some extra chocolate sauce over everything for a fun touch! To keep your churro bites fresh, let them cool completely. Place the bites in an airtight container. You can use glass or plastic containers. Line the bottom with paper towels to absorb moisture. This helps keep them crispy. You can freeze these churro bites for later. First, allow them to cool fully. Then, place them on a baking sheet in a single layer. Freeze until solid, about 1-2 hours. Once frozen, transfer the bites into a freezer-safe bag. Seal tightly to avoid freezer burn. To thaw, take out the desired amount and let them sit at room temperature for about 30 minutes. You can also reheat them in the oven at 350°F (175°C) for 5-7 minutes for a fresh taste. When stored properly, churro bites last for about 3-4 days in the fridge. If frozen, they can last up to 2 months. Check for signs of spoilage before eating. Look for changes in color, smell, or texture. If they seem off, it’s best to toss them. To make angel food cake, you need simple ingredients. Gather: - 1 cup egg whites (about 8-10 eggs) - 1 cup granulated sugar - 1 cup cake flour - 1 teaspoon vanilla extract - 1/4 teaspoon salt Start by beating the egg whites until they are fluffy. Gradually add sugar, mixing well. Then, sift flour and salt together. Gently fold this mixture into the egg whites. Add vanilla and mix gently. Pour into an ungreased pan and bake at 350°F (175°C) for 30-35 minutes. Let it cool upside down to keep its height. Yes, you can prepare churro bites ahead of time. Follow these steps: - Make the angel food cake a day before. - Store it in an airtight container to keep it fresh. - Cut the cake into cubes when ready to bake. - Coat and bake just before serving for the best taste. This way, you save time and can enjoy the bites warm. There are many great options for dipping sauces! Try these: - Caramel sauce for a sweet twist. - Cream cheese frosting for a rich taste. - Vanilla yogurt for a lighter choice. - Fruit puree like strawberry or raspberry for freshness. These sauces add fun flavors to your churro bites! Yes, churro bites can fit various diets. Here are some options: - For gluten-free, use a gluten-free angel food cake mix. - For dairy-free, substitute butter with a plant-based option. - To lower sugar, use a sugar substitute in the coating. These choices help more people enjoy this tasty treat! These churro bites are simple to make and full of flavor. In this blog, we covered the main ingredients, step-by-step instructions, and creative variations. You learned how to coat cake cubes and bake them for a tasty treat. Remember to store any leftovers properly to keep them fresh. I hope you try different flavors and sauces to make these churro bites your own. Enjoy experimenting and sharing these delightful desserts with family and friends!

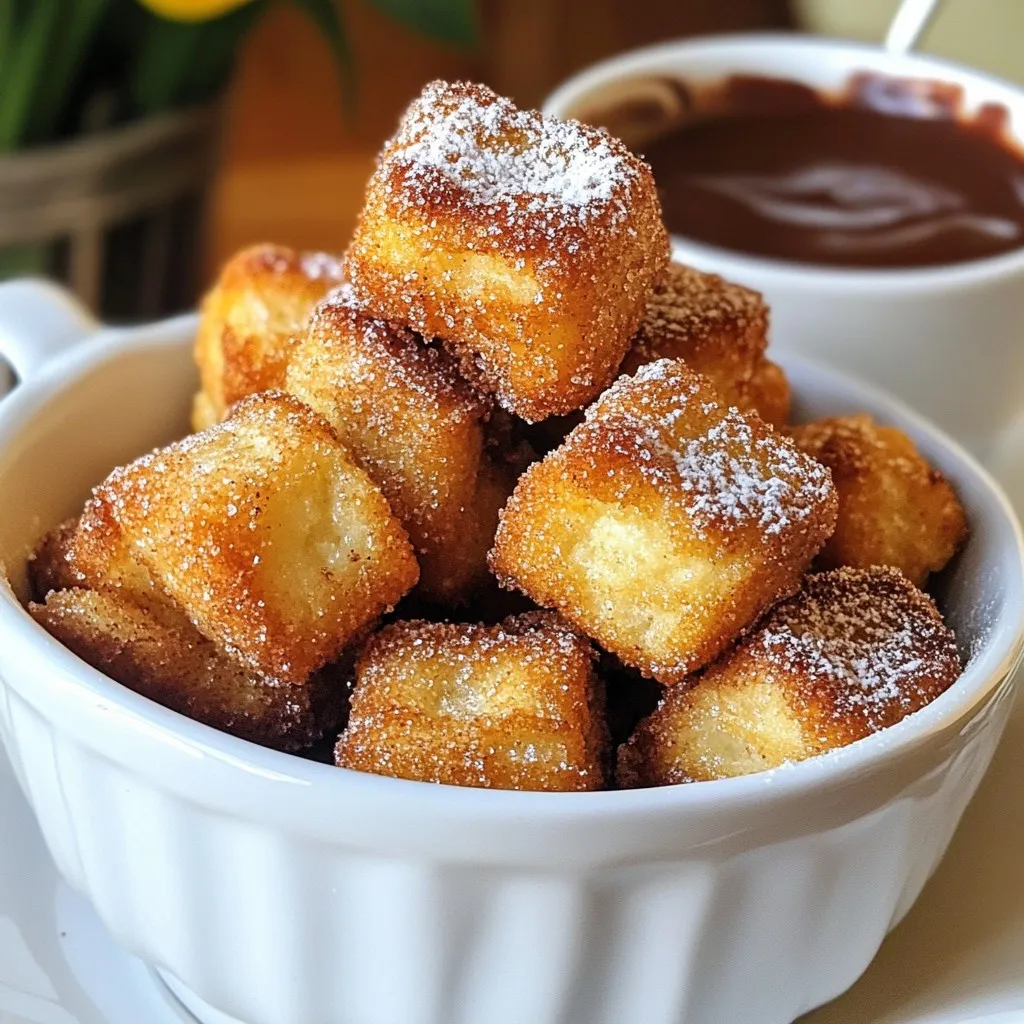
Get ready for a tasty twist on a classic dessert! These Savory Angel Food Churro Bites mix the lightness of angel food cake with the warm flavors of cinnamon and …

Read more

Categories Desserts

Loaded Taco Stuffed Peppers Flavorful and Easy Dish

November 13, 2025January 3, 2025 by Chef Tavio
- 4 large bell peppers (any color you love) - 1 lb ground turkey or beef (choose lean for a healthier option) - 1 cup cooked rice (your choice of white, brown, or even quinoa for a twist) - 1 can (15 oz) black beans, drained and rinsed thoroughly - 1 cup corn (freshly cut off the cob, canned, or thawed frozen corn) - 1 packet taco seasoning (or your homemade blend) - 1 cup salsa (choose your heat level!) - 1 cup shredded cheddar cheese (or a blend of your favorite cheeses) - 1/2 cup chopped fresh cilantro (for a vibrant touch) - 1 ripe avocado, diced (for topping) - Sour cream (for serving, optional) - Lime wedges (for serving, to brighten the dish) When you make loaded taco stuffed peppers, fresh ingredients are key. Start with large bell peppers; their colors make the dish pop. I love using red, yellow, and green ones. The choice of protein is simple. You can use ground turkey or beef. Lean meat keeps the dish healthier. Next, let's talk about the rice. You have options! White rice works well, but brown rice adds a nice texture. Quinoa is great too if you want a twist. Black beans are a must. They add protein and fiber. Drain and rinse them before mixing. Corn adds sweetness and crunch. You can use fresh corn, canned, or thawed frozen corn. The taco seasoning gives that classic flavor. You can buy a packet or make your own blend. Salsa adds moisture and zest. Choose a spicy or mild kind based on your taste. Finally, cheese brings it all together. I like shredded cheddar, but feel free to mix it up. Fresh cilantro adds a burst of color and taste. Don’t forget the avocado for topping! It adds creaminess. Sour cream and lime wedges are great for serving. They brighten the dish and make it even better. Enjoy your cooking adventure! {{ingredient_image_2}} Start by preheating your oven to 375°F (190°C). This step is key for cooking the peppers evenly. Next, take your large bell peppers. Slice the tops off and remove the seeds. This gives you little bowls to fill. Stand the peppers upright in a baking dish. Now, heat a large skillet over medium heat. Add 1 pound of ground turkey or beef. Cook it until browned, which takes about 5-7 minutes. After that, drain any excess fat from the skillet. Once the meat is browned, mix in the taco seasoning and 1/2 cup of salsa. Stir well and cook for another 2-3 minutes. This helps all the flavors blend together nicely. Remove the skillet from the heat. Add 1 cup of cooked rice, 1 can of black beans, and 1 cup of corn to the meat. Mix until everything is well combined. Use a spoon to fill each pepper with this hearty mixture, packing it down gently. Drizzle the remaining salsa over the top of each stuffed pepper. Cover the baking dish tightly with aluminum foil. Place it in the preheated oven and bake for 25-30 minutes. This will make the peppers tender. After that, remove the foil and sprinkle the remaining cheese on top. Return to the oven for another 10 minutes until the cheese melts and bubbles. When picking peppers, think about flavor and texture. I love using large bell peppers. They come in many colors: red, yellow, green, and orange. Each color has a different sweetness. Red peppers are the sweetest, while green ones are more bitter. Choose peppers that feel firm and heavy. Avoid soft spots or wrinkles. This helps ensure a tasty stuffed pepper. You can make this dish even healthier! Use lean ground turkey instead of beef. It cuts down on fat but keeps the flavor. You can also swap rice for quinoa. Quinoa adds protein and a unique texture. Black beans are great for fiber. They help balance the meal and add more nutrients. These small changes make a big difference for your health! To boost flavor, fresh herbs work wonders. Add chopped cilantro to the filling or as a garnish. Cilantro adds a fresh taste and bright color. You can also try different spices. Consider adding cumin or smoked paprika for a smoky kick. Don’t be afraid to experiment with your favorite herbs and spices. They can transform this dish into something special! Pro Tips Choose Colorful Peppers: Using a mix of bell pepper colors not only makes the dish visually appealing but also adds a subtle variation in flavor. Custom Spice Level: Adjust the amount of taco seasoning or salsa based on your preferred spice level to ensure the dish is perfect for your palate. Make Ahead: Prepare the filling a day in advance and store it in the fridge. This will save you time on a busy weeknight! Garnish for Freshness: Add toppings like diced tomatoes or a squeeze of lime just before serving for an extra layer of freshness. {{image_4}} For a tasty vegetarian version, replace the meat with beans or lentils. Both options pack protein and flavor. Black beans work well, adding creaminess. Lentils also give a nice texture while soaking up spices. You can mix in more veggies like zucchini or mushrooms for added nutrition. Cheese adds richness and flavor to your stuffed peppers. You can explore various cheese blends for variety. Try Monterey Jack for a creamy melt or pepper jack for a spicy kick. A mix of cheddar and mozzarella brings a nice balance. Experiment to find your favorite combination! To elevate your meal, serve the stuffed peppers with simple sides. Fresh salsa or guacamole pairs nicely. A light salad with lime dressing adds crunch and freshness. You can also serve tortilla chips for a fun crunch. Lime wedges brighten the dish, adding zest to every bite! To store your loaded taco stuffed peppers, first let them cool. Place them in a clean, airtight container. Make sure to cover them well to keep moisture in. They can stay fresh in your fridge for up to three days. If you want to save them longer, consider freezing. When you reheat your stuffed peppers, use the oven for the best flavor and texture. Preheat your oven to 350°F (175°C). Place the peppers on a baking sheet. Cover them with foil to keep them from drying out. Heat for about 20 minutes, or until warm. You can also use a microwave. Just be careful, as they may lose some texture. To freeze your stuffed peppers, first cool them completely. Wrap each pepper in plastic wrap or foil. Place them in a freezer-safe bag, removing as much air as you can. They can be frozen for up to three months. When you are ready to eat, let them thaw in the fridge overnight before reheating. This way, they will taste fresh and delicious! Yes, you can. Ground turkey and beef are great, but feel free to swap in ground chicken or pork. Each choice adds unique flavor. Use lean cuts to keep it healthy. If you want a plant-based option, try crumbled tempeh or lentils. These alternatives still pack a punch of protein and flavor. You have options! White or brown rice works well, but quinoa is a fun twist. Cauliflower rice is another great choice. It’s low in carbs and adds a veggie boost. If you want more texture, try using couscous or farro. Each option gives a new taste and keeps the dish exciting. The peppers should be tender yet firm. Bake them for about 25-30 minutes covered, then check. Remove the foil and sprinkle more cheese on top. Bake for an extra 10 minutes until the cheese is melted. A fork should easily pierce the peppers when they are ready. Let them rest a bit before serving. Enjoy! Stuffed peppers are a fun and versatile meal. We explored the key ingredients, like bell peppers and proteins. You learned step-by-step instructions for making them. I shared tips on choosing peppers and healthier options. You can even try variations with vegetarian filling or different cheeses. Remember to store leftovers properly for later enjoyment. With these insights, you're ready to create delicious stuffed peppers that suit your taste. Enjoy every tasty bite you make!

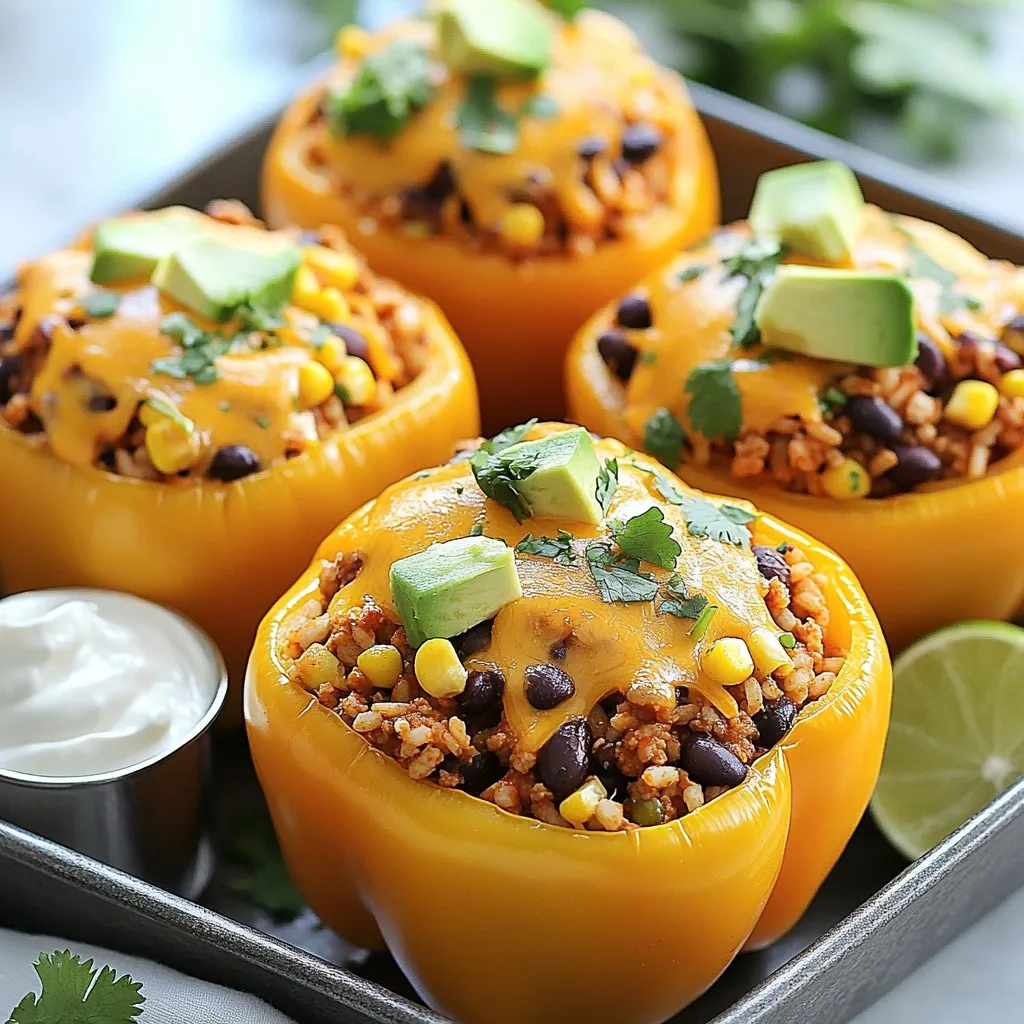
Are you ready to spice up your dinner table? Loaded Taco Stuffed Peppers are a fun twist on a classic favorite. This easy dish packs a punch of flavor while …

Read more

Categories Dinner

Savory Smashburger Quesadillas Easy and Delicious Meal

November 28, 2025January 3, 2025 by Chef Tavio
- 1 lb ground beef - 4 large flour tortillas - 1 cup shredded cheddar cheese - 1 cup shredded Monterey Jack cheese - 1 small red onion, thinly sliced - 1 cup shredded lettuce - ½ cup tomatoes, diced - ½ cup pickles, sliced - Salsa and sour cream for serving - 1 teaspoon garlic powder - 1 teaspoon onion powder - Salt and pepper to taste Smashburger quesadillas are fun to make and eat. You start with ground beef, which gives you that juicy, savory flavor. The flour tortillas are soft and hold everything together well. For cheese, I love using cheddar and Monterey Jack. They melt beautifully and add that creamy texture. Next, let’s add more flavor with some fresh veggies. I slice up red onions, and they give a nice crunch. Shredded lettuce, diced tomatoes, and pickles add freshness and a little tang. We can’t forget about seasoning! Garlic powder and onion powder bring out that rich taste in the beef. A sprinkle of salt and pepper enhances everything. With these ingredients, you get a tasty, satisfying meal perfect for any day. {{ingredient_image_2}} Start by heating a large skillet over medium-high heat. Add 1 pound of ground beef to the skillet. Sprinkle in 1 teaspoon of garlic powder and 1 teaspoon of onion powder. Season with salt and freshly ground pepper to taste. Cook the beef for about 6 to 8 minutes. Use a spatula to break it up as it cooks. You want it browned and fully cooked. If you see excess fat in the skillet, carefully drain it away. This keeps your quesadillas from being greasy. Grab 4 large flour tortillas. Lay them flat on a clean surface. On one half of each tortilla, add a generous scoop of the cooked ground beef mixture. Next, sprinkle 1 cup of shredded cheddar cheese and 1 cup of shredded Monterey Jack cheese over the beef. For extra flavor, add some thinly sliced red onion on top. This will add a nice crunch and sweetness. Now it’s time to cook the quesadillas. Carefully fold each tortilla in half to form a half-moon shape. Heat a small drizzle of oil in a clean skillet over medium heat. Place the folded quesadilla in the skillet. Cook for about 3 to 4 minutes on each side. You want the tortilla to turn golden brown and crispy. The cheese should melt perfectly inside. This step gives your quesadillas that delicious crunch. To make the best Smashburger quesadillas, choose a heavy skillet. A cast-iron skillet works well. It spreads heat evenly. Use a small amount of oil to prevent sticking. Olive oil or vegetable oil are great choices. Cook your quesadillas at medium heat. This helps the cheese melt without burning the tortilla. Aim for about 3-4 minutes on each side. You want a golden-brown color. This gives a nice crunch and flavor. When serving, cut your quesadillas into wedges. Arrange them in a circle on a platter. This makes them look inviting and fun. Place salsa and sour cream in small bowls in the middle. This adds color and makes it easy to dip. For a final touch, add fresh cilantro on top. It brightens the dish and adds a nice flavor. One common mistake is overfilling the quesadillas. If you add too much filling, they can be hard to cook. Stick to a good amount of beef and cheese. Another mistake is not letting the cheese melt fully. This can make your quesadillas chewy instead of gooey. Make sure to cook them long enough. The cheese should be hot and stretchy for the best taste. Pro Tips Use Fresh Ingredients: Always opt for fresh vegetables and herbs to enhance the flavors of your quesadillas. Don't Overfill: Be cautious not to overfill the quesadillas; this will make them difficult to flip and could lead to spills. Perfectly Melted Cheese: For the best melted cheese, cover the skillet with a lid while cooking to trap heat and ensure even melting. Experiment with Flavors: Feel free to add different spices or toppings, such as jalapeños or avocado, to customize your quesadillas to your taste. {{image_4}} You can change the ground beef for chicken or turkey. If you want a vegetarian option, use black beans or mushrooms instead. These swaps keep the flavors bold and fun. For cheese, try Pepper Jack for a spicy kick or use mozzarella for a milder taste. Both options melt well and add a creamy texture to your quesadilla. Want more heat? Add sliced jalapeños or a sprinkle of chili powder. You can also mix in spices like cumin for depth. If you prefer veggies, consider bell peppers, corn, or spinach. These choices add color and crunch to your meal. Serve your quesadillas with sides like Spanish rice or a fresh salad. A side of guacamole adds creaminess and taste. For dipping sauces, salsa and sour cream are classics. You can also try ranch dressing or a zesty chipotle sauce to switch things up. To store your quesadillas, place them in an airtight container. This keeps them fresh and prevents them from drying out. You can also wrap them tightly in plastic wrap or aluminum foil. They will stay good in the fridge for about 3 to 4 days. When you’re ready to enjoy them again, just pull them out and heat them up. You can freeze cooked quesadillas for longer storage. First, let them cool completely. Then, wrap each one in plastic wrap and place them in a freezer bag. They can last up to 3 months in the freezer. When you want to eat them, take them out and thaw overnight in the fridge. For quick heating, place them in a microwave for a minute or so. To keep your quesadillas crispy when reheating, use a skillet. Heat it over medium heat and add a little oil. Place your quesadilla in the skillet and cook for about 2-3 minutes on each side. This method helps avoid sogginess. You can also use an oven at 350°F (175°C) for about 10 minutes for a crispy finish. Always check if the cheese is melted and gooey before serving! To make your quesadillas crispy, use a hot skillet. Heat the skillet over medium heat and add a little oil. Use just enough oil to coat the bottom. This helps the tortilla become golden and crunchy. Cook each quesadilla for 3-4 minutes on each side. Keep an eye on them! Flip them carefully to avoid spilling the filling. You can also use a spatula to press down while cooking. This helps the cheese melt nicely and gives a good crunch. Yes, you can use corn tortillas. They have a different taste and texture than flour tortillas. Corn tortillas are more firm and have a slight sweetness. They can be a bit more fragile and may break when folding. If you choose corn, heat them in the skillet before adding the filling. This makes them easier to fold. The flavor of corn tortillas pairs well with the beef and cheese. It adds a nice twist to your quesadilla. The best toppings for Smashburger quesadillas include fresh lettuce, diced tomatoes, and sliced pickles. These add crunch and freshness. You can also try adding jalapeños for heat. Salsa and sour cream are great for dipping. They enhance the flavors and add creaminess. Feel free to get creative! Try using avocado or guacamole for a richer taste. These toppings make your meal fun and flavorful. Smashburger quesadillas are easy and fun to make. We covered key ingredients like ground beef and cheeses, plus tips for cooking and assembling. Don’t forget to avoid common mistakes like overfilling. You can swap out ingredients for exciting variations. Storing leftovers is simple; just follow the tips for freezing and reheating. Experiment with flavors and toppings to make these quesadillas your own. Enjoy the crunch and taste of your homemade creations!

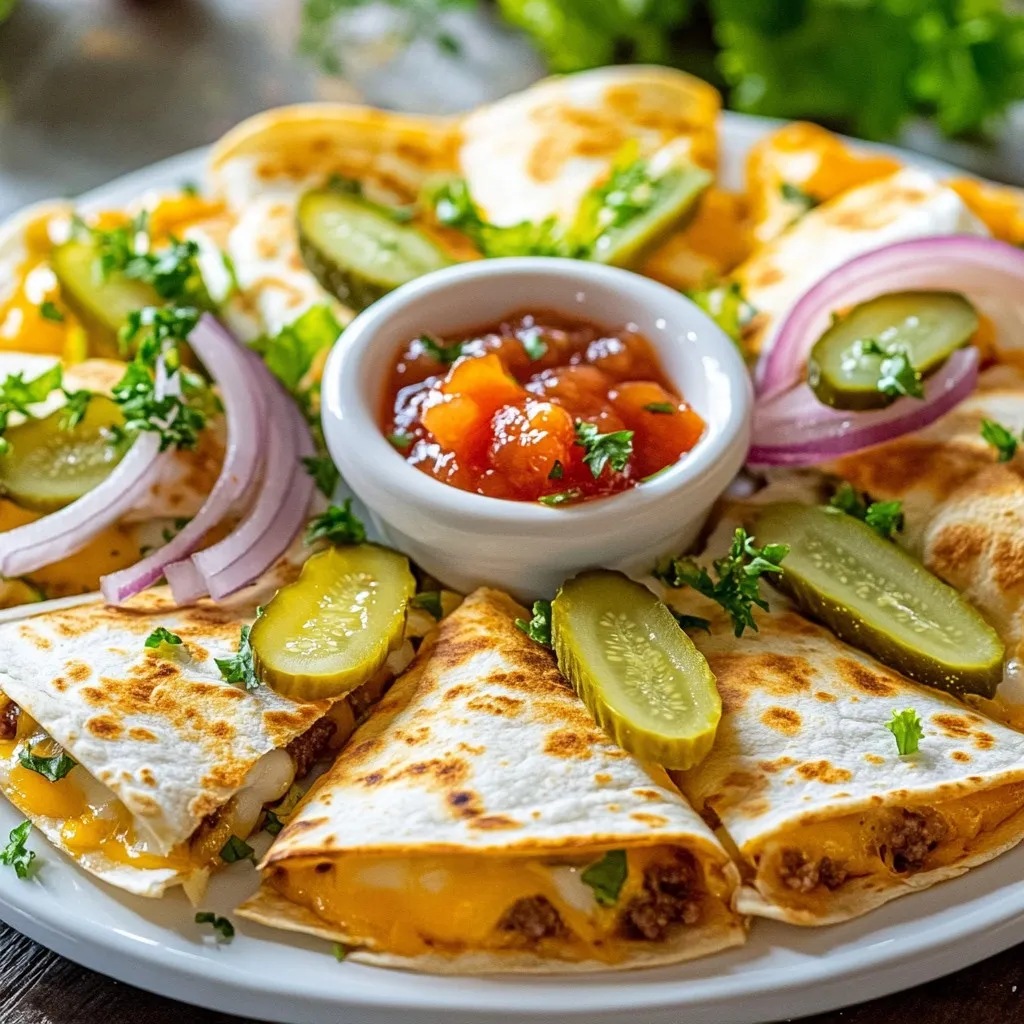
If you’re craving a quick, tasty meal, Smashburger Quesadillas are the perfect choice. They combine juicy ground beef, gooey cheese, and fresh veggies all in a crispy tortilla. With simple …

Read more

Categories Appetizers

Healthy Stovetop Beef and Broccoli Simple Meal Guide

December 28, 2025January 2, 2025 by Chef Tavio
- 1 lb beef sirloin, thinly sliced - 4 cups broccoli florets - Low-sodium soy sauce - Honey or maple syrup - Cornstarch - Beef broth - Garlic - Fresh ginger - Olive oil - Salt and pepper - Brown rice or quinoa for serving The main ingredients for this healthy stovetop beef and broccoli dish are simple. You need beef sirloin and broccoli florets. The sirloin should be thinly sliced against the grain. This helps make the beef tender. Fresh or frozen broccoli works well. I often use fresh for a nice crunch. Next, we add flavor with sauces and seasonings. Low-sodium soy sauce gives saltiness without extra sodium. Honey or maple syrup adds a touch of sweetness. Cornstarch helps thicken the sauce, giving it a great texture. Beef broth adds depth. Garlic and fresh ginger bring a lot of flavor. They are key in making the dish aromatic and tasty. For cooking essentials, use olive oil to sauté the beef and veggies. Season with salt and pepper to taste. I like to serve the beef and broccoli over brown rice or quinoa. This not only makes it filling but also adds fiber. These ingredients come together for a healthy and delicious meal you can enjoy any night of the week. {{ingredient_image_2}} Start by mixing the sauce. In a medium bowl, combine: - 1/4 cup low-sodium soy sauce - 2 tablespoons honey or maple syrup - 1 tablespoon cornstarch - 1/4 cup beef broth Whisk until smooth. Make sure the cornstarch dissolves completely. This sauce adds flavor and thickness. Next, heat 1 tablespoon of olive oil in a large skillet over medium-high heat. Once hot, add: - 1 lb beef sirloin, thinly sliced against the grain Sauté the beef for 3-4 minutes. Stir occasionally. Cook until browned and no longer pink. Transfer the beef to a plate and set aside. In the same skillet, add the remaining tablespoon of olive oil. Once it’s hot, add: - 3 cloves garlic, finely minced - 1 inch fresh ginger, grated or minced Sauté for about 30 seconds. Stir frequently until fragrant and the garlic starts to turn golden. Then, add: - 4 cups broccoli florets, fresh or frozen Stir to coat the broccoli in the garlic and ginger. Cook for 3-4 minutes until bright green and slightly tender, but still crisp. Return the cooked beef to the skillet. Pour the prepared sauce over the beef and broccoli. Stir well to coat everything in the sauce. Cook for another 2-3 minutes. This allows the sauce to thicken and the flavors to mix. Season with salt and pepper to taste. Enjoy your healthy meal! For this dish, I recommend using beef sirloin. Sirloin offers great tenderness and flavor. It's lean, so it cooks quickly. Look for beef that is bright red with some marbling. This marbling adds taste and keeps the meat moist. Slice the beef thinly against the grain. This keeps it tender when you chew. To keep your broccoli crisp, timing is key. Add the broccoli to the pan after the garlic and ginger. Cook for just 3 to 4 minutes. You want the broccoli to be bright green and slightly tender, not soggy. Stir it often to cook evenly. You can even blanch the broccoli first. This means quickly boiling it, then placing it in cold water. You can make this dish even healthier with a few swaps. Use low-sodium soy sauce to cut down on salt. Instead of honey, try maple syrup for a different sweetness. This keeps the flavor but lowers calories. If you want to avoid sugar, consider using a sugar-free sweetener. These small changes make a big difference in your meal. Pro Tips Slice Against the Grain: Slicing beef against the grain ensures a tender bite and enhances the overall texture of your dish. Fresh vs. Frozen Broccoli: Fresh broccoli offers a vibrant crunch, while frozen broccoli is convenient and can save time. Choose based on your preference and availability. Thickening the Sauce: If you prefer a thicker sauce, mix an extra teaspoon of cornstarch with a tablespoon of cold water and stir it into the sauce as it simmers. Flavor Boost: Add a splash of rice vinegar or a sprinkle of red pepper flakes to give your beef and broccoli an extra kick of flavor. {{image_4}} You can swap beef for chicken, tofu, or shrimp. Chicken gives a lighter taste. Tofu adds a plant-based option packed with protein. Shrimp cooks fast and has a nice flavor. Each choice changes the dish but keeps it tasty and healthy. Feel free to add bell peppers, snap peas, or carrots. Bell peppers bring a sweet crunch. Snap peas add a fresh, bright bite. Carrots add color and a slight sweetness. Mixing these veggies with broccoli makes the meal even better. Try different sauces like teriyaki or hoisin for new flavors. Teriyaki adds a sweet and savory taste. Hoisin gives a rich, bold flavor. Both sauces will change the dish but still keep it delicious. Experiment with your favorites for a fun twist! To keep your beef and broccoli fresh, store it in an airtight container. Glass or plastic containers work well. Make sure the dish is cool before sealing it. This helps prevent moisture build-up. You can store the leftovers for up to three days. Always check for any signs of spoilage before eating. When reheating, use a skillet on low heat. This helps keep the beef tender and the broccoli crisp. Add a splash of water or broth to help steam the dish. You can also use a microwave. Heat in short bursts of 30 seconds, stirring in between. This ensures even heating and maintains the flavor. To freeze, let the beef and broccoli cool completely. Use a freezer-safe container or bag to save space. Label the container with the date. This meal can be frozen for up to three months. When ready to eat, thaw it overnight in the fridge. Reheat it gently on the stove for the best texture and taste. Yes, you can use frozen beef. Just make sure to thaw it first. Thawing helps ensure even cooking. Fresh beef has a better taste and texture, though. If using frozen beef, slice it thinly while it is still slightly frozen. This makes cutting easier. Beef and broccoli pairs well with many sides. Here are a few ideas: - Cooked brown rice - Quinoa - Cauliflower rice - Noodles (like rice noodles or whole wheat) - A simple side salad These sides add more fiber and nutrients to the meal. To make this dish gluten-free, use gluten-free soy sauce. This option is widely available. You can also swap out cornstarch for rice flour if desired. Always check labels on sauces for hidden gluten. With these changes, you can enjoy a tasty meal that fits your diet. This blog post provided a detailed guide on making a delicious beef and broccoli dish. We covered the key ingredients like beef sirloin and fresh broccoli, along with the necessary sauces and cooking steps. Tips on choosing tender beef and keeping broccoli crisp were essential for great results. You can also explore variations with different proteins or vegetables to suit your taste. Remember, proper storage and reheating can keep your meal fresh and flavorful. With these instructions, you can enjoy a nutritious and tasty dish any time!

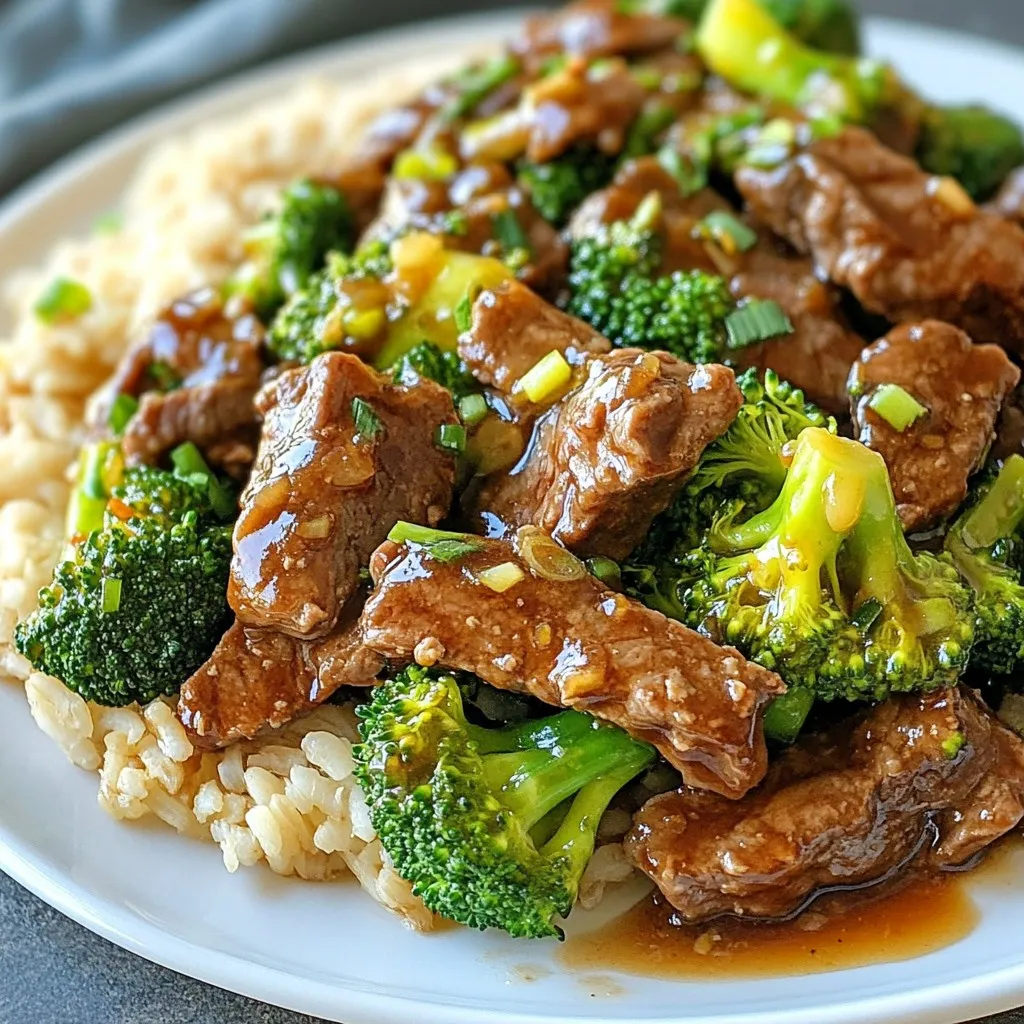
Looking for a quick, healthy dinner? This Healthy Stovetop Beef and Broccoli guide is just what you need! With tender beef and crisp broccoli, this meal is both nutritious and …

Read more

Categories Dinner

Grilled Chicken & Broccoli Bowls with Garlic Cream Sauce

December 3, 2025January 1, 2025 by Chef Tavio
- 2 boneless, skinless chicken breasts - 2 cups broccoli florets - 1 cup heavy cream - ½ cup grated Parmesan cheese - 1 tablespoon olive oil (plus extra for grilling) - 1 teaspoon garlic powder - 1 teaspoon smoked paprika - Salt and freshly ground black pepper, to taste - 3 cloves fresh garlic, minced - 1 tablespoon freshly squeezed lemon juice - Fresh parsley, chopped, for garnish Gather these ingredients before you start. Having everything ready makes cooking easier. The chicken and broccoli form the main part of your bowl. The heavy cream and Parmesan give richness to the sauce. This dish is not just tasty; it also looks great. Fresh parsley adds a pop of color and taste. Make sure to use fresh garlic for the sauce. It brings a strong flavor that pairs well with the cream. The marinade for the chicken is simple but effective. It helps keep the chicken juicy and flavorful. Don't skip the smoked paprika; it adds a nice, smoky taste. When you have all your ingredients, you are ready to create a meal that is both healthy and satisfying. Enjoy the process and the delicious flavors that come together in this dish! {{ingredient_image_2}} First, gather your marinade ingredients. In a medium bowl, mix together: - 1 tablespoon olive oil - 1 teaspoon garlic powder - 1 teaspoon smoked paprika - Salt and freshly ground black pepper, to taste Stir until everything blends well. Add the chicken breasts to the bowl. Make sure each piece gets coated in the marinade. Cover the bowl and let it sit for at least 20 minutes. This step adds flavor to the chicken. Next, preheat your grill to medium-high heat. Once hot, place the marinated chicken on the grill. Cook each side for about 6-7 minutes. You want the internal temperature to reach 165°F (74°C). After grilling, remove the chicken and let it rest for about 5 minutes. This keeps the chicken juicy when sliced. While the chicken grills, bring a pot of salted water to a boil. Once boiling, add the 2 cups of broccoli florets. Blanch the broccoli for 2-3 minutes. You want it bright green and still crunchy. Use a slotted spoon to transfer the broccoli to a colander to drain. Set it aside for later. Now, let’s create the garlic cream sauce. In a medium saucepan over medium heat, add another tablespoon of olive oil. Once hot, add 3 minced garlic cloves. Sauté for 1-2 minutes until fragrant, but don't let it brown. Lower the heat to medium-low and pour in 1 cup of heavy cream slowly. Stir continuously. Gradually add in ½ cup grated Parmesan cheese. Keep stirring until the cheese melts and the sauce is smooth. Finally, mix in 1 tablespoon of lemon juice and season with salt and pepper. To assemble your bowls, start with a generous layer of blanched broccoli at the bottom. Next, place sliced grilled chicken on top of the broccoli. Drizzle the creamy garlic sauce generously over the chicken. Finish each bowl by adding a sprinkle of freshly chopped parsley. This adds a nice pop of color. Serve your bowls right away to enjoy the fresh flavors. You can also suggest pairing them with rice or quinoa for a complete meal. - Use a clean grill: Start with a clean surface. This helps prevent sticking. - Preheat the grill: Heat to medium-high before placing chicken on it. This ensures even cooking. - Oil the grill grates: Brush olive oil on the grates. This will help achieve those perfect grill marks. - Don’t flip too soon: Let the chicken cook for 6-7 minutes before flipping. This helps create beautiful grill lines. - Don’t rush the garlic: Sauté garlic until fragrant, but not browned. This keeps the sauce from tasting bitter. - Add cream slowly: Pour in the heavy cream gradually. Stir constantly to create a smooth texture. - Taste as you go: Always taste your sauce. Adjust salt, pepper, or lemon juice to fit your preference. - Choose colorful bowls: Use bright bowls to make the dish pop visually. - Layer nicely: Place a generous amount of broccoli first, then top with chicken slices. - Drizzle sauce artfully: Use a spoon to create a beautiful swirl of garlic cream sauce on top. - Finish with parsley: A sprinkle of fresh parsley adds color and freshness, making the dish inviting. Pro Tips Marinate for Flavor: Allow the chicken to marinate for at least 20 minutes, or up to overnight, to enhance the flavors and tenderness. Perfectly Grilled Chicken: Use a meat thermometer to ensure the internal temperature of the chicken reaches 165°F (74°C) for safe consumption. Blanching Broccoli: Blanching the broccoli not only enhances its color but also helps to retain its nutrients and crunchiness. Make-Ahead Sauce: The garlic cream sauce can be made ahead and stored in the refrigerator for up to three days; just reheat gently before serving. {{image_4}} You can easily switch out the chicken for other proteins. Think about using grilled shrimp, turkey, or pork tenderloin. Each option brings its own flavor and texture. If you're looking for a vegetarian choice, try firm tofu or chickpeas. Just season these options well to match the dish's bold flavors. If you want a lighter sauce, swap the heavy cream for Greek yogurt or coconut milk. This change keeps the creaminess but cuts down on calories. You can also spice things up by adding herbs like basil or thyme. A pinch of red pepper flakes can add some heat too. Feel free to mix in seasonal veggies for variety. In spring, try asparagus or peas. In summer, add bell peppers or zucchini. You can also bring in flavors from other cuisines. Consider adding a splash of soy sauce for an Asian twist or using curry powder for a warm Indian flavor. To store leftovers, first let the dish cool to room temperature. Place the chicken and broccoli in an airtight container. Pour the garlic cream sauce separately into another container. This keeps the chicken and broccoli from getting soggy. You can store the leftovers in the fridge for up to three days. When you’re ready to eat, reheat the chicken and broccoli gently. Use the microwave or a skillet on low heat. For the sauce, gently warm it in a small saucepan over low heat. Stir often to avoid burning. This keeps the sauce creamy and smooth. If you want to freeze the dish, do so before adding the sauce. Wrap the chicken and broccoli tightly in plastic wrap and then place them in a freezer bag. The meal can freeze for up to three months. When you're ready to enjoy it, thaw the chicken and broccoli in the fridge overnight. Reheat as mentioned above, then add the garlic cream sauce before serving. This way, you keep the flavors fresh and delightful. Grilling chicken breasts takes about 6-7 minutes on each side. This is for breasts that are about one inch thick. If your chicken is thicker, add a few extra minutes to ensure it cooks through. The key is to check that the internal temperature reaches 165°F (74°C). This keeps your chicken safe to eat and helps it stay juicy. Yes, you can use frozen broccoli! Just remember to thaw it first. You can do this by placing it in warm water or letting it sit in the fridge overnight. After thawing, you can blanch it briefly in boiling water for 1-2 minutes. This keeps the bright green color and crunch. You can serve many sides with these bowls. A simple green salad pairs well. Quinoa or brown rice adds great texture. You might also try garlic bread for a tasty crunch. Each side complements the flavors of the chicken and sauce. Absolutely! To make the sauce dairy-free, try using coconut cream in place of heavy cream. You can also use a dairy-free cheese alternative to mimic the Parmesan. Nutritional yeast is another great option for a cheesy flavor without dairy. Just mix and adjust to your taste! In this blog post, I covered how to make delicious grilled chicken and broccoli bowls. We explored the key ingredients, from marinating the chicken to creating a creamy garlic sauce. You learned tips for grilling and how to present your dish beautifully. Plus, I shared variations to keep your meals exciting. Remember, cooking is about experimenting and having fun. Enjoy your tasty bowls that can please everyone!

Are you looking for a delicious and healthy meal packed with flavor? These Grilled Chicken & Broccoli Bowls with Garlic Cream Sauce are a perfect choice! In just a few …

Read more

Categories Dinner
Older posts
Newer posts
← Previous Page1 … Page185 Page186 Page187 … Page191 Next →

TASTED NEST

Where Flavor Finds a Home 🍳🏡 — warm, simple, and crave-worthy recipes made for real life, from stovetop mornings to backyard dinners.

PAGES

Home About Contact Privacy Policy Terms & Conditions Cookie Policy GDPR Policy Copyright Policy Disclaimer

CATEGORIES

Appetizers Desserts Salads Breakfast Dinner
Copyright © 2026 Tasted Nest. All rights reserved.