Skip to content
  • GDPR Privacy Policy
  • Copyright Policy
  • Disclaimer
  • Terms & Conditions
Tasted Nest
  • Home
  • Appetizers
  • Desserts
  • Salads
  • Breakfast
  • Dinner
  • Privacy Policy
  • Contact
  • About

Chef Tavio

Minute Keto Cookie Dough Quick and Tasty Treat

December 24, 2025January 1, 2025 by Chef Tavio
To make Minute Keto Cookie Dough, gather these ingredients: - 2 tablespoons almond flour - 1 tablespoon erythritol (or your favorite keto-friendly sweetener) - 1/2 tablespoon unsweetened cocoa powder (omit for classic flavor) - 1 tablespoon coconut oil, melted - 1/2 teaspoon vanilla extract - 1 tablespoon sugar-free chocolate chips (optional but recommended) - Pinch of salt If you need options, here are some great substitutes: - Almond flour can be swapped with coconut flour, but use less. - Erythritol can be replaced by monk fruit or stevia for sweetness. - Coconut oil can be changed to unsalted butter for a rich taste. These swaps keep your cookie dough keto-friendly while maintaining great flavor. To make your cookie dough even more delicious, consider these add-ins: - A sprinkle of cinnamon for warmth. - Chopped nuts for crunch. - Dried unsweetened coconut for tropical flair. - A few drops of almond extract for a nutty twist. Feel free to mix and match these add-ins to create your perfect treat! {{ingredient_image_2}} First, grab a small mixing bowl. Add the almond flour, erythritol, and cocoa powder if you like chocolate. Use a fork or whisk to mix them well. Make sure there are no clumps. This step gives you a smooth base. Next, pour in the melted coconut oil and the vanilla extract. Stir these wet ingredients into the dry mix. Keep stirring until a dough forms. It should feel soft and sticky. Want to make it extra special? Add sugar-free chocolate chips. Gently fold them into your dough. This adds a nice texture and flavor. Don't forget a pinch of salt! It balances the sweetness and enhances the taste. You can skip the chocolate chips if you prefer a classic cookie dough. After mixing, taste your dough. If it’s not sweet enough, add more erythritol or your favorite sweetener. Just sprinkle a little in and mix again. Keep tasting until it’s just right for you. Everyone has different sweetness levels, so make it yours. Enjoy your creation raw or warm it in the microwave for 30 seconds! To get the best texture, use fine almond flour. It helps the dough stay smooth. Make sure to mix the dry ingredients well first. This step breaks up any lumps. Then, add the melted coconut oil and vanilla. Mix until you form a soft dough. If it feels too dry, add a little more coconut oil. To avoid clumps, stir the dry ingredients thoroughly. A fork or whisk works well for this. If you see any lumps, press them down. You want a fine blend before adding wet items. After mixing, check the dough for any dry spots. If you find any, mix it again until it's smooth. If you want a warm treat, use the microwave! Place the dough in a microwave-safe bowl. Heat it on high for 30 seconds. Check the dough; it should feel warm and soft. If you want it warmer, microwave for another 10 seconds. Enjoy your warm cookie dough straight from the bowl! Pro Tips Use Fresh Ingredients: Always ensure your almond flour and cocoa powder are fresh for the best flavor and texture. Experiment with Flavors: Try adding different extracts like almond or coconut for a unique twist on your cookie dough. Adjust Sweetness to Taste: Don’t hesitate to adjust the sweetener to your preference; everyone's sweetness level varies! Store for Later: If you have leftover dough, store it in an airtight container in the fridge for a quick treat later on. {{image_4}} For a classic keto cookie dough, skip the cocoa powder. Just mix: - 2 tablespoons almond flour - 1 tablespoon erythritol - 1 tablespoon coconut oil, melted - 1/2 teaspoon vanilla extract - Pinch of salt This base keeps the treat sweet and simple. You will still get that chewy texture. The vanilla shines through, making it a delightful snack. You can also add sugar-free chocolate chips for extra fun! If you're allergic to nuts, you can use sunflower seed flour instead of almond flour. It gives a similar texture without the nuts. Replace the sweetener with your favorite keto-friendly option. This way, you can still enjoy a tasty treat while avoiding nuts. Just ensure your chocolate chips are also nut-free! Add a twist to your cookie dough by using different extracts or spices. Consider: - 1/2 teaspoon almond extract for a nutty flavor - 1/2 teaspoon cinnamon for warmth - A drop of peppermint extract for a refreshing taste These small changes can create a unique flavor experience. Feel free to mix and match to find your perfect dough! To store your Minute Keto Cookie Dough, place it in an airtight container. Make sure the lid is tight to keep moisture out. You can keep it in the fridge for up to three days. This way, you can enjoy fresh cookie dough whenever you want! Freezing is a great option if you want to save dough for later. Scoop the dough into small balls and place them on a baking sheet. Put the sheet in the freezer for about an hour. Once frozen, move the balls to a freezer bag. This method helps keep their shape. When stored correctly, prepared dough can last in the fridge for three days. If frozen, it can stay good for about two months. Just remember to label the bag with the date. This way, you know when to use it and can enjoy it at its best! Yes, you can eat Minute Keto Cookie Dough raw. This dough is safe because it uses almond flour. Almond flour is heat-treated and has no raw eggs. Many people love the taste of cookie dough raw. It's a quick and satisfying treat. If you want to replace almond flour, use coconut flour. Coconut flour is low in carbs, like almond flour. Remember, coconut flour absorbs more liquid. You may need to adjust the liquid in your recipe. Start with less coconut flour, about one tablespoon. Yes, this cookie dough is great for meal prep. You can make it in just five minutes. Store it in an airtight container in the fridge. It will last for a few days. You can also freeze it for later use. Yes, you can make this dough without coconut oil. You can use unsalted butter or ghee instead. Both options will give the dough a rich flavor. Just melt them before mixing. This will keep the texture smooth and tasty. You learned about the key ingredients for making Keto cookie dough, including safe substitutes and add-ins for flavor. I shared step-by-step instructions for mixing and customizing your dough. You also got tips on achieving the best texture and avoiding clumping. Finally, we explored variations to suit your tastes and the best ways to store your dough. With this knowledge, you can make tasty, Keto-friendly cookie dough that keeps well and shines with flavor. Enjoy your baking!

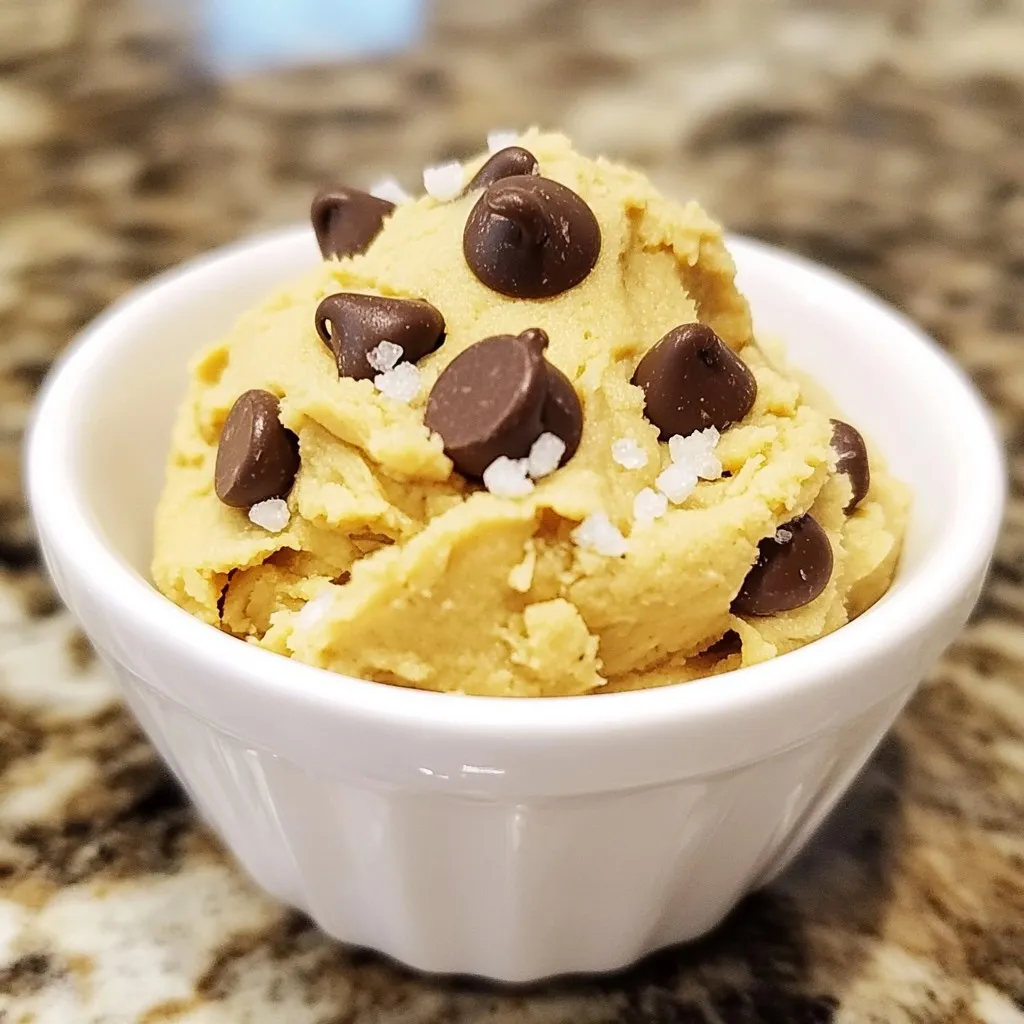
Are you craving something sweet but want to stay on track with your keto diet? I have the perfect solution for you: Minute Keto Cookie Dough! This quick and tasty …

Read more

Categories Desserts

Crispy Chicken Katsu Bowls Flavorful and Easy Meal

December 17, 2025December 31, 2024 by Chef Tavio
- 2 boneless, skinless chicken breasts - 1 cup panko breadcrumbs - 1/2 cup all-purpose flour - Salt and freshly cracked black pepper - 1 cup cooked jasmine rice - 1 cup shredded cabbage - 1 small carrot, julienned - 3 green onions, chopped - Tonkatsu sauce or a blend of ketchup and soy sauce - Sesame seeds for garnish Crispy chicken katsu bowls are fun to make and full of flavor. To start, I always choose fresh, boneless, and skinless chicken breasts. They cook evenly and taste great. For the crispy coating, I use panko breadcrumbs and all-purpose flour. Panko gives that perfect crunch. Seasonings are key. I sprinkle salt and black pepper all over the chicken. This basic seasoning brings out the best taste. Next, I prepare the accompaniments. Cooked jasmine rice serves as the base. It’s fluffy and fragrant. I love adding fresh veggies like shredded cabbage, julienned carrots, and chopped green onions. They add color and crunch. Lastly, no katsu bowl is complete without sauce. I use tonkatsu sauce, but a ketchup-soy blend also works well. A sprinkle of sesame seeds on top adds a nice touch. These ingredients come together to create a tasty meal that looks great too! {{ingredient_image_2}} To start, get your chicken breasts ready. Place each breast between two sheets of plastic wrap or parchment paper. Use a meat mallet or a heavy pan to pound the chicken. Aim for an even thickness of about 1/2 inch. This step helps the chicken cook evenly. After pounding, season both sides with salt and freshly cracked black pepper. This adds a nice flavor to the meat. Now, let’s set up your breading station. You need three shallow dishes. Fill the first dish with all-purpose flour. In the second dish, pour in the beaten eggs. The third dish should hold the panko breadcrumbs. This setup makes breading easy and neat. For breading, take a chicken breast and dredge it in the flour. Shake off any excess flour. Next, dip it in the beaten eggs, letting any drips fall back into the bowl. Finally, coat the chicken in panko breadcrumbs. Press down firmly to ensure the crumbs stick well. Repeat this with the second chicken breast. Next, it’s time to cook the chicken. In a large skillet, pour enough vegetable oil to create about 1/2 inch of depth. Heat the oil over medium heat. To check the temperature, drop in a small piece of breadcrumb. If it sizzles and bubbles, your oil is ready. Carefully place the breaded chicken breasts in the hot oil. Fry each side for about 4-5 minutes until golden brown. Flip the chicken and cook the other side for another 4-5 minutes. Ensure the internal temperature reaches 165°F (75°C). When done, transfer the chicken to a plate lined with paper towels to absorb excess oil. While the chicken cools, let’s assemble the bowls. Start by spooning warm jasmine rice into the bottom of each bowl. Next, arrange the shredded cabbage on one side. Add the julienned carrots and chopped green onions on top. Once the chicken has cooled a bit, slice it into strips. Place these strips artfully on top of the rice and vegetables in each bowl. This way, you showcase the beautiful golden crust of the chicken. To make your chicken katsu really crispy, use panko breadcrumbs. They are light and flaky. Panko gives a crunch that regular breadcrumbs can't match. For frying, use just enough oil. Aim for a depth of about 1/2 inch in your skillet. Heat the oil over medium heat. When it’s hot, a small piece of breadcrumb should sizzle and bubble right away. This heat helps create that golden crust. Avoid overcrowding the pan. Fry one or two pieces at a time. This keeps the oil hot and makes for an even cook. To make your bowls eye-catching, use colorful plates. Bright colors make the meal pop. Arrange the vegetables in a vibrant pattern. Place the shredded cabbage and julienned carrots next to each other. Add the chicken strips on top for height. Garnish with chopped green onions or a lime wedge. This adds a fresh look. A sprinkle of sesame seeds also enhances the dish's appeal. These small touches make a big difference in how your meal looks. Pro Tips Use Fresh Ingredients: Fresh chicken and vegetables enhance flavor and texture, making your Katsu bowls even more delicious. Maintain Oil Temperature: Keep the oil at a consistent temperature while frying to achieve that perfect crispy texture without overcooking the chicken. Experiment with Toppings: Feel free to add other toppings like sliced avocado or a drizzle of spicy mayo to customize your bowls to your taste. Make Ahead: You can bread the chicken ahead of time and store it in the refrigerator. Just fry it when you’re ready to serve for a quick meal. {{image_4}} You can switch out chicken for pork. Just follow the same steps. Thin pork chops work well. For a plant-based option, use tofu. Press the tofu to remove moisture, then slice it into thick pieces. Bread and fry it just like chicken. You’ll get a crispy delight that everyone will love. Spice things up by adding garlic powder or paprika to the flour. This gives your chicken a nice kick. You can also marinate the chicken in soy sauce or ginger for more flavor. As for sauces, try a sweet chili sauce or a homemade peanut sauce. These options add a unique twist to your meal. To store leftovers, let the chicken katsu cool first. Place it in an airtight container. You can keep it in the fridge for up to three days. If you need to reheat, use the oven instead of the microwave. This keeps the chicken crispy. Heat it at 350°F (175°C) for about 10-15 minutes. Check the internal temperature; it should be 165°F (75°C) when safe to eat. Yes, you can freeze crispy chicken katsu! Start by letting it cool completely. Place it in a freezer-safe bag or container. Be sure to remove as much air as possible. You can freeze it for up to three months. When ready to eat, thaw it in the fridge overnight. Reheat in the oven at 350°F (175°C) for about 15-20 minutes. This helps the texture stay nice and crispy. To make chicken katsu crispy, follow these steps: - Pound the Chicken: Use a meat mallet to pound the chicken. Aim for an even thickness of 1/2 inch. - Use Panko Breadcrumbs: Panko gives a light and crunchy texture. It's better than regular breadcrumbs. - Fry at the Right Temperature: Heat oil to medium. If it sizzles with a breadcrumb test, it's ready. - Don’t Rush the Frying: Cook for 4-5 minutes on each side until golden brown. These steps help ensure a crunchy, tasty katsu. The texture is key to this dish's appeal. Yes, you can bake chicken katsu. Here’s how: - Preheat Your Oven: Set your oven to 400°F (200°C). - Use a Baking Sheet: Line it with parchment paper for easy cleanup. - Spray with Oil: Lightly spray the breaded chicken with cooking oil before baking. - Bake for 20-25 Minutes: Flip halfway through for even cooking. Baking will yield a different texture. The chicken may not be as crunchy, but it's a healthier option. You can serve many great sides with chicken katsu bowls: - Steamed Vegetables: Broccoli or green beans add color and nutrients. - Pickled Radishes: These add a nice tang to balance flavors. - Miso Soup: A warm bowl of miso soup pairs well. - Cold Green Tea: This refreshing drink complements the richness of the katsu. These sides round out the meal and enhance your dining experience! This guide covered how to make delicious crispy chicken katsu bowls. We discussed the main ingredients, cooking steps, and tips for perfect presentation. You learned how to ensure your chicken is crispy and how to store leftovers properly. Experimenting with different proteins and flavors adds variety to your meal. Whether you fry or bake, these insights will help you create a dish that impresses everyone. Enjoy making and sharing your tasty chicken katsu bowls!

If you’re looking for a meal that’s both tasty and easy to make, Crispy Chicken Katsu Bowls are perfect for you! This dish brings together golden-brown chicken, fluffy rice, and …

Read more

Categories Dinner

Pumpkin Spice Oatmeal Bars Delightful and Simple Treat

December 16, 2025December 31, 2024 by Chef Tavio
- 1 cup rolled oats - 1 cup canned pumpkin puree - 1/2 cup almond butter (or your favorite nut butter) - 1/2 cup pure maple syrup - 1 teaspoon vanilla extract - 1 teaspoon pumpkin spice blend - 1/2 teaspoon baking soda - 1/4 teaspoon salt - 1/2 cup chopped walnuts (optional) - 1/2 cup dark chocolate chips (optional) Each ingredient plays a key role in the flavor and texture of the bars. You need one cup of rolled oats for a hearty base. The canned pumpkin puree adds moisture and a rich flavor. Almond butter gives a creamy texture; you can use any nut butter you like. Pure maple syrup serves as a natural sweetener. One teaspoon of vanilla extract enhances the overall taste. The pumpkin spice blend adds warmth and a hint of sweetness. Baking soda helps the bars rise, while salt enhances flavor. Walnuts add crunch, and dark chocolate chips offer a sweet touch. If you don’t have almond butter, try peanut butter or sunflower seed butter. For sweeteners, you can substitute maple syrup with honey or agave syrup. If you want a spice mix, blend 1/2 teaspoon cinnamon, 1/4 teaspoon nutmeg, and a pinch of ginger. If you prefer no nuts, simply leave out the walnuts. You can swap dark chocolate chips for white chocolate or dried fruit for a different flavor. {{ingredient_image_2}} Start by preheating your oven to 350°F (175°C). This helps your bars bake evenly. Grab an 8x8-inch baking dish. Line it with parchment paper, leaving some paper hanging over the sides. This makes it easy to lift the bars out after baking. In a large bowl, add 1 cup of rolled oats, 1 cup of canned pumpkin puree, and 1/2 cup of almond butter. Pour in 1/2 cup of pure maple syrup and 1 teaspoon of vanilla extract. Mix well until everything is smooth. You want no lumps in your batter. Next, sprinkle in 1 teaspoon of pumpkin spice blend, 1/2 teaspoon of baking soda, and 1/4 teaspoon of salt. Stir again until the mixture is thick and fully combined. If you like, fold in 1/2 cup of chopped walnuts and 1/2 cup of dark chocolate chips for added texture and flavor. Now it’s time to bake. Pour your mixture into the prepared dish. Spread it evenly with a spatula, making the top as flat as you can. Bake for 25-30 minutes. Keep an eye on it! The edges should turn golden brown when it’s ready. To check for doneness, insert a toothpick in the center. If it comes out clean, your bars are done! Once baked, let them cool in the pan for about 10 minutes. Use the parchment paper to lift the bars out and place them on a cooling rack. Allow them to cool completely before cutting them into squares. To make great pumpkin spice oatmeal bars, follow these tips. First, do not skip the parchment paper. It helps you lift the bars easily from the pan. Next, mix all the wet ingredients well before adding dry ones. This step ensures a smooth batter. Also, check your oven temperature. An oven that is too hot may burn the edges. Lastly, let the bars cool completely before cutting. This step helps them hold their shape. To store your oatmeal bars, place them in an airtight container. This keeps them fresh and tasty. You can layer the bars with parchment paper to prevent sticking. If you plan to eat them later, store them in the fridge. They stay fresh for about five days. For a long-term option, keep them at room temperature in a cool, dry place. You can freeze these bars for later use. First, let them cool completely. Then, wrap each bar in plastic wrap. Place the wrapped bars in a freezer bag. They will last for up to three months. When you want to enjoy them, take out the bars and let them thaw in the fridge overnight. For a warm treat, pop them in the microwave for about 15-20 seconds. Enjoy the cozy flavors! Pro Tips Use Fresh Spices: For the best flavor, use freshly ground spices instead of pre-ground. This enhances the aroma and taste of your pumpkin spice oatmeal bars. Adjust Sweetness: If you prefer a less sweet bar, reduce the amount of maple syrup or substitute with a sugar-free alternative. Taste as you go! Chill for Better Cutting: For cleaner slices, refrigerate the bars for a couple of hours after baking before cutting them into squares. Experiment with Mix-ins: Feel free to personalize your bars by adding different nuts, seeds, or dried fruits to the batter for extra flavor and texture. {{image_4}} You can change the flavor of these bars in fun ways. Try adding dried fruit like cranberries or raisins for sweetness. Chopped apples or pears mix well with the pumpkin spice. For a crunchy twist, use sunflower seeds or pumpkin seeds instead of walnuts. You can also swap the dark chocolate chips for white chocolate or butterscotch chips. This keeps the bars interesting! To make these bars vegan, use maple syrup and a nut butter like almond or cashew. Instead of eggs, the pumpkin puree helps bind the mix. For gluten-free bars, choose certified gluten-free oats. This way, you can enjoy your treat without worry. The texture and taste will remain great! If you have nut allergies, no worries! Replace nut butter with sunflower seed butter. This swap keeps the bars creamy and delicious. You can also skip the nuts entirely or use seeds like chia or flaxseed. These options ensure everyone can enjoy the bars without any risk. To keep your pumpkin spice oatmeal bars fresh, let them cool completely first. After they cool, slice them into squares. Stack the squares in a single layer if possible. This method helps prevent them from sticking together. If you have a lot of bars, use parchment paper between layers. This simple step makes it easy to grab a bar later. Use an airtight container to store your bars. A glass or plastic container works well. If you want to keep them extra fresh, wrap each bar in plastic wrap before placing them in the container. This keeps moisture and air out. You can also use freezer bags if you need to save space. Just make sure to squeeze out as much air as possible. When stored properly, your pumpkin spice oatmeal bars can last up to a week at room temperature. If you keep them in the fridge, they can last for two weeks. For longer storage, freeze them. They stay fresh in the freezer for up to three months. Just remember to thaw them in the fridge when you’re ready to enjoy! Yes, you can use fresh pumpkin. Simply cook and mash it first. This gives a nice texture. Fresh pumpkin may have a different taste, but it works well. If you choose fresh, use the same amount as canned. These bars are a healthy option. They contain oats, pumpkin, and nut butter. Oats offer fiber, which is good for digestion. Pumpkin is low in calories and high in vitamins. Nut butter adds healthy fats and protein. With maple syrup, they have natural sweetness without refined sugar. These bars pair well with many things. A warm cup of coffee or tea works great. You can also serve them with yogurt for extra creaminess. Try adding fresh fruit like apples or pears for a bright touch. For a fun treat, drizzle some chocolate sauce on top! You learned to make delicious pumpkin spice oatmeal bars with simple steps. We covered ingredients, their measurements, and alternatives. The process included prepping, mixing, and baking. Tips helped you avoid mistakes and store bars well. You can also try fun variations, including vegan and gluten-free options. Remember, these bars store well, lasting for days. You can use fresh pumpkin too. Enjoy your tasty treats and share them with friends!

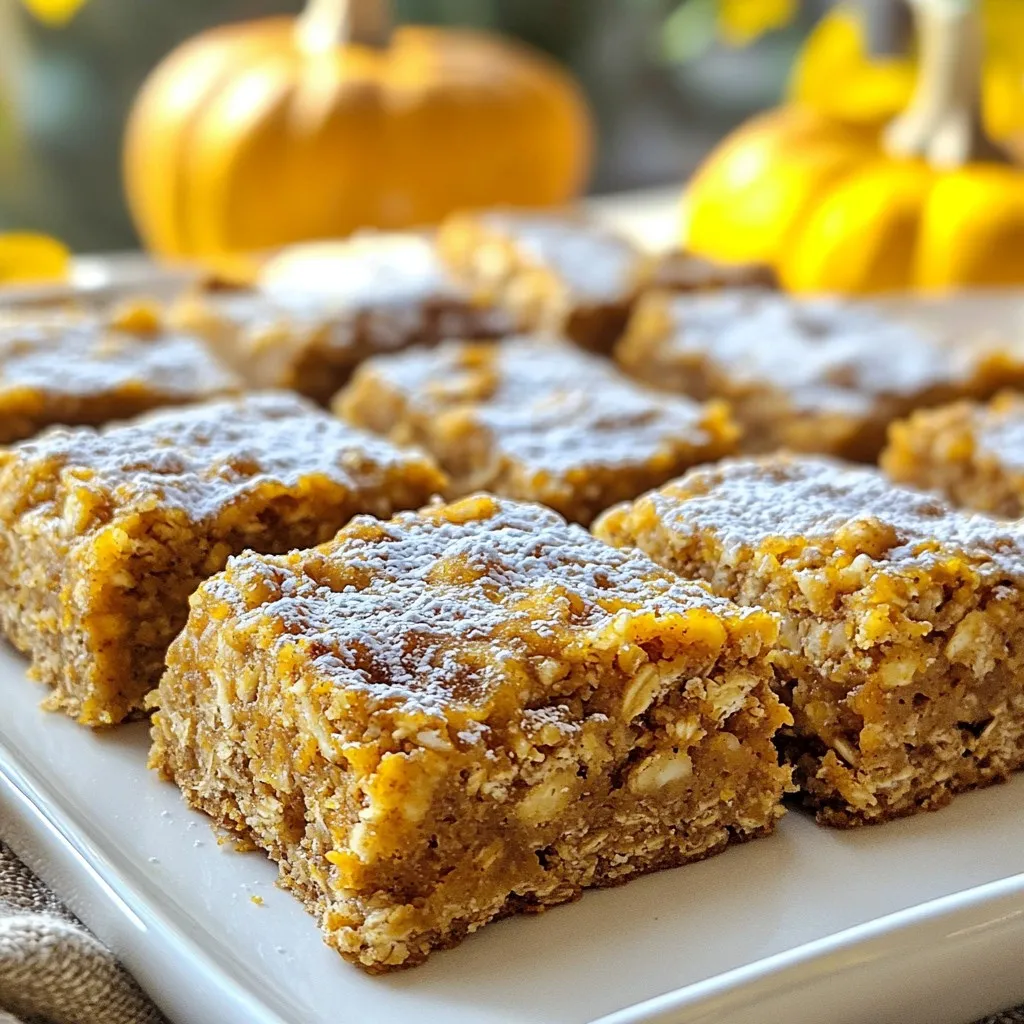
Do you love fall flavors and easy baking? You’re in for a treat! My Pumpkin Spice Oatmeal Bars are simple to make and packed with warm, cozy flavors. In just …

Read more

Categories Desserts

Minute Teriyaki Chicken and Broccoli Quick Meal

December 5, 2025December 31, 2024 by Chef Tavio
- 1 lb boneless, skinless chicken breast, cut into bite-sized pieces - 2 cups broccoli florets, fresh or frozen - 1/4 cup soy sauce (low-sodium recommended) - 2 tablespoons honey - 1 tablespoon sesame oil - 1 tablespoon cornstarch - 2 cloves garlic, finely minced - 1 teaspoon fresh ginger, grated - 2 tablespoons vegetable oil - 1 tablespoon sesame seeds (for garnish) - About 2 cups cooked jasmine rice (for serving) - Sliced green onions (for garnish) Gather these ingredients to create a delicious Minute Teriyaki Chicken and Broccoli. You can adjust the quantities based on your needs. The chicken provides protein, while broccoli adds color and nutrients. Soy sauce gives the dish its savory flavor, and honey adds a touch of sweetness. Using low-sodium soy sauce helps control salt intake. Sesame oil brings a nutty taste that enhances the dish. Cornstarch thickens the sauce, making it cling well to the chicken and broccoli. Garlic and ginger add depth and warmth to the flavor profile. For garnishing, sesame seeds and sliced green onions add a fresh crunch and bright finish. Serve this dish over jasmine rice for a complete meal. {{ingredient_image_2}} To start, grab a medium bowl. Mix these ingredients: - 1/4 cup soy sauce - 2 tablespoons honey - 1 tablespoon sesame oil - 1 tablespoon cornstarch - 2 cloves garlic, minced - 1 teaspoon fresh ginger, grated Whisk until smooth. Make sure there are no lumps from the cornstarch. This sauce is key for flavor. Next, take a large skillet. Heat 1 tablespoon of vegetable oil over medium-high heat. Once hot, add 1 lb of chicken breast cut into bite-sized pieces. Sauté the chicken for about 5-7 minutes. Stir often until it turns golden brown and is fully cooked. Then, remove the chicken and set it on a plate. Now, use the same skillet for the broccoli. Add another tablespoon of vegetable oil. Toss in 2 cups of broccoli florets. Cook for about 3-4 minutes. You want the broccoli to be bright green and tender-crisp. This keeps the texture fresh and appealing. Return the cooked chicken to the skillet with the broccoli. Pour the teriyaki sauce over everything. Stir well to coat the chicken and broccoli evenly. Cook for an extra 2-3 minutes. This allows the sauce to thicken and stick to the food. Remove the skillet from the heat. Let it rest for about one minute. This cooling helps the flavors settle. Now, divide about 2 cups of cooked jasmine rice into bowls. Layer the teriyaki chicken and broccoli mixture over the rice. Finally, sprinkle sesame seeds on top. Add sliced green onions for a nice burst of flavor. If you like, squeeze a lime wedge over the dish for a zesty kick. These small touches make your meal look and taste amazing! - To ensure chicken is cooked through, cut it into small pieces. This helps it cook evenly. Use a meat thermometer to check for a temperature of 165°F. - For the right broccoli texture, sauté it until bright green. It should be tender but still crisp. Avoid overcooking, or it may turn mushy. - You can add spices like red pepper flakes for a kick. Other veggies, like bell peppers or snap peas, also add nice flavors. - If you want more sweetness, add an extra drizzle of honey. Balance the flavor by using less soy sauce if needed. - Serve in colorful bowls to make the dish pop. Bright colors make meals more fun and inviting. - Arrange the chicken and broccoli in a neat layer over the rice. Add sesame seeds and green onions on top for a fresh touch. Pro Tips Marinate for More Flavor: Allow the chicken to marinate in the teriyaki sauce for at least 30 minutes before cooking. This enhances the flavor and tenderness of the meat. Perfectly Cooked Broccoli: To maintain a vibrant green color and crisp texture, blanch the broccoli in boiling water for 1-2 minutes before sautéing. Adjust Sauce Thickness: If you prefer a thicker sauce, simply increase the cornstarch or add a bit more honey to achieve your desired consistency. Serving Suggestions: For added nutrition, consider serving with a side of edamame or a simple salad dressed with sesame vinaigrette. {{image_4}} You can switch up the protein in your teriyaki dish. Shrimp makes a great choice. It cooks quickly and absorbs the sauce well. Tofu is another option for a plant-based meal. Use firm tofu for the best texture. You can also try beef or pork. Just slice them thinly and cook until tender. Each protein brings a unique taste to the dish. For a vegetarian twist, add more vegetables. Bell peppers, snap peas, or carrots work nicely. You can also replace the chicken with a plant-based alternative. Look for soy-based or pea protein options. This keeps the dish hearty while being meat-free. Mixing in extra veggies boosts nutrition and flavor. Feel free to experiment with the teriyaki sauce. You can try different recipes to find your favorite. Adding chili paste or sriracha gives it a spicy kick. If you like sweeter sauce, add more honey. These small changes transform the dish and keep it exciting. Enjoy creating your unique version! To keep your Minute Teriyaki Chicken and Broccoli fresh, store leftovers in an airtight container. Make sure the dish cools to room temperature before sealing. This helps prevent moisture buildup. Stored this way, the chicken lasts for up to three days in the fridge. Always check for any off smells or changes in color before eating. For long-term storage, freeze your teriyaki chicken and broccoli. Use a freezer-safe container or a resealable bag. Remove as much air as possible to avoid freezer burn. This dish can stay fresh in the freezer for about three months. When ready to enjoy, thaw it overnight in the fridge for best results. To reheat, place the chicken and broccoli in a skillet over low heat. Adding a splash of water or broth helps keep the chicken moist. You can also microwave it in short bursts, stirring in between. Heat until warmed through, but don’t overcook. This way, your meal stays juicy and flavorful. This dish takes about 20 minutes total. You need 10 minutes to prep. The cooking time is around 10 minutes. Yes, you can prep this meal ahead. Cook the chicken and broccoli, then store them in the fridge. Place them in an airtight container. They stay fresh for up to three days. Reheat before serving for the best taste. You can serve this with jasmine rice. Other great sides include stir-fried veggies or a fresh salad. For a fun twist, add some egg rolls or spring rolls. Absolutely! Frozen broccoli works well in this recipe. Just add it directly to the skillet. It may take a minute longer to cook, but it still tastes great. Fresh broccoli is nice too, so feel free to choose! This blog post covered how to make a delicious teriyaki chicken and broccoli dish. You learned about the key ingredients, step-by-step cooking methods, and helpful tips. The various options for proteins and sauces let you make this meal your own. Remember to store leftovers correctly to enjoy later. Cooking should be fun and easy, so feel free to experiment with flavors. Enjoy creating this tasty meal for you or your family!

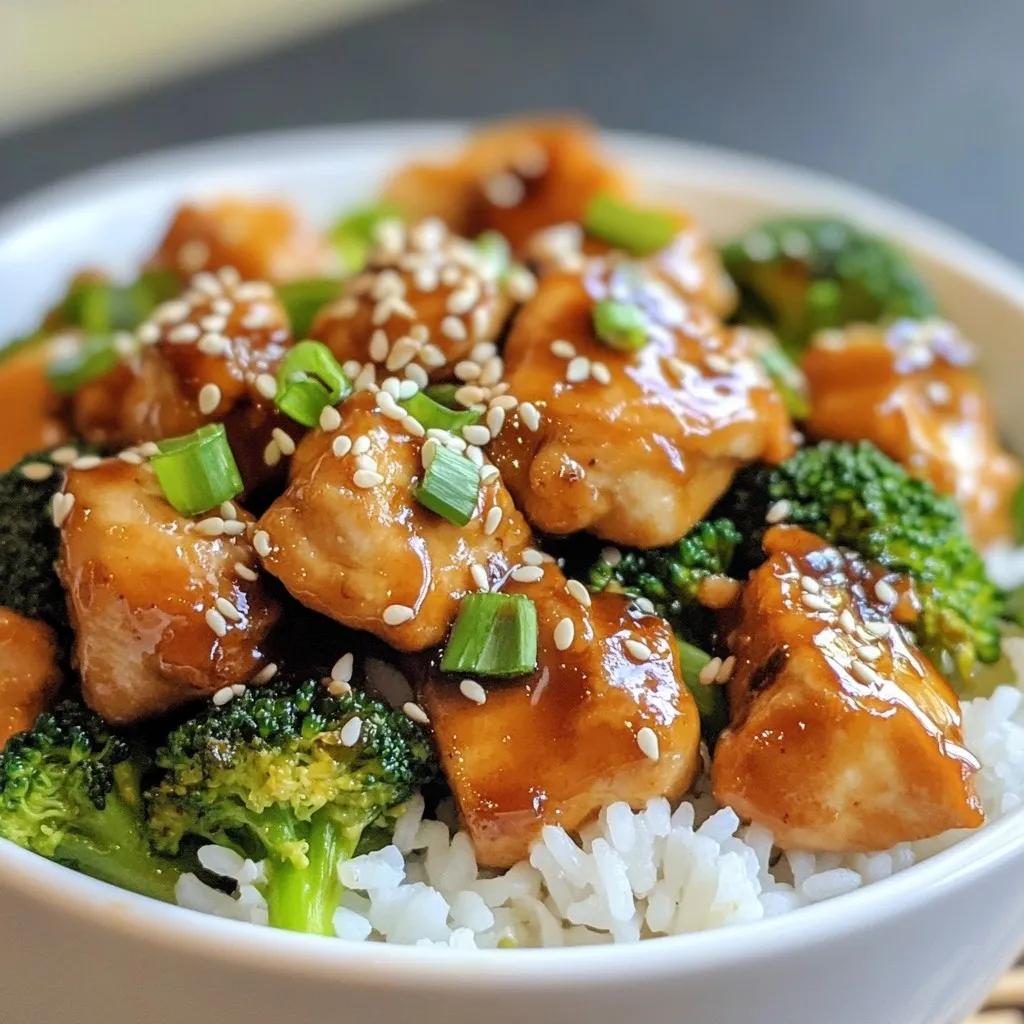
If you’re looking for a quick and tasty meal, Minute Teriyaki Chicken and Broccoli is your answer! This dish is not only easy to make, but it also packs a …

Read more

Categories Dinner

Healthy Frozen Yogurt Creamy and Delicious Treat

December 30, 2025December 31, 2024 by Chef Tavio
To make this tasty frozen yogurt, you need a few simple items: - 2 cups plain Greek yogurt - 1 ripe banana, sliced - 1 cup mixed berries (strawberries, blueberries, raspberries) - 2 tablespoons honey or maple syrup - 1 teaspoon pure vanilla extract - 1 tablespoon fresh lemon juice These ingredients blend to create a creamy and fruity treat. Greek yogurt gives it a smooth texture and packs in protein. The ripe banana adds natural sweetness and creaminess. Mixed berries bring flavor and color. You can make your frozen yogurt even better with fun toppings: - Chopped nuts (almonds or walnuts) - Chia seeds - Coconut flakes These toppings add crunch and extra flavor. You can mix and match to find your favorite combo. Get creative and enjoy! If you have special dietary needs, don't worry! Here are some swaps: - Use dairy-free yogurt for a vegan option. - Swap honey for agave syrup for a vegan sweetener. - Use lower-sugar fruit if you're watching your sugar intake. These simple changes let everyone enjoy the treat. No matter your diet, you can create a delicious frozen yogurt! {{ingredient_image_2}} Start by gathering your ingredients. You need: - 2 cups plain Greek yogurt - 1 ripe banana, sliced - 1 cup mixed berries (like strawberries, blueberries, and raspberries) - 2 tablespoons honey or maple syrup - 1 teaspoon pure vanilla extract - 1 tablespoon fresh lemon juice In a high-speed blender or food processor, add all the ingredients. Blend them on high until the mix is smooth and creamy. If it sticks, pause and scrape the sides. Taste it and add more honey if you want it sweeter. You have two choices for freezing your yogurt mix. Shallow Dish Method: - Pour the yogurt mixture into a shallow dish. - Spread it evenly and cover it tightly with plastic wrap. - Place it in the freezer to freeze. Check it every 30 minutes. Stir it gently with a fork for about 2-3 hours. This helps keep it creamy and prevents ice crystals. Ice Cream Maker Method: - Pour the mixture into your ice cream maker. - Churn it as per the maker's instructions. This usually takes 20-30 minutes. - Stop when it reaches a soft-serve texture. Once your yogurt is ready, scoop it into bowls or cones. Add your favorite toppings for extra flair. You can use chopped nuts, chia seeds, or coconut flakes. For a fun presentation, serve in bright bowls or waffle cones. Enjoy it right away for the best texture! You can easily change how sweet your frozen yogurt is. Start with the recipe's honey or maple syrup. After blending, taste it. If you want it sweeter, add a bit more sweetener. Blend again and taste. Everyone has different likes, so adjust until it’s just right for you. Ice crystals can make your frozen yogurt less creamy. To avoid this, stir the mixture every 30 minutes while it freezes. Use a fork to break up any ice that forms. This keeps it smooth and nice. If you have an ice cream maker, use it. Churning helps prevent ice crystals too. A creamy texture is key for great frozen yogurt. Use full-fat Greek yogurt for the best results. It has more fat, which gives it that creamy feel. Blend the mixture until it is really smooth. This helps mix air into the yogurt. This air makes it light and fluffy! Serve it right after making it for the best texture. Pro Tips Use Frozen Fruit: For an even creamier texture, consider using frozen mixed berries instead of fresh ones. This also helps to chill the yogurt mixture faster. Adjust Sweetness: The sweetness can vary based on the ripeness of your banana and berries. Always taste the mixture before freezing and adjust the honey or maple syrup accordingly. Prevent Ice Crystals: Stirring the mixture every 30 minutes while it freezes helps maintain a smooth texture by preventing ice crystals from forming. Experiment with Flavors: Feel free to add other flavorings such as almond extract or a pinch of cinnamon to customize your frozen yogurt to your taste! {{image_4}} You can mix and match fruits to create fun flavors. Try using mango for a tropical twist. Pineapple adds a bright, sweet taste. You can also use peaches or kiwi for a fresh, fruity flair. The key is to pick ripe fruits for the best taste. You can even blend different berries together for a berry blast. Each fruit adds its unique flavor and color. Get creative and find your favorite combinations! If you want a dairy-free treat, swap Greek yogurt with coconut yogurt. This gives a rich, creamy texture without dairy. Use almond milk or oat milk instead of yogurt for a lighter option. You can still add the same fruits and sweeteners. This makes a tasty vegan frozen yogurt. Enjoy your treat while keeping it plant-based! To boost nutrition, consider adding superfoods. You can mix in chia seeds for fiber and omega-3s. Flaxseeds are another great option. They add crunch and healthy fats. Try adding spinach or kale for a green twist. The flavor stays fruity, but you get some added vitamins. Cocoa powder can make your yogurt chocolatey and rich. These superfoods add health benefits while keeping your frozen yogurt delicious! To store healthy frozen yogurt, put it in a freezer-safe container. Make sure to seal it well. This helps keep the yogurt fresh and tasty. You can also use a shallow dish if you do not have a container. Cover it tightly with plastic wrap. The best containers are those made of glass or plastic. Look for containers that are airtight. This keeps out air and moisture. If using a shallow dish, ensure it is wide enough to hold the yogurt. Avoid using metal containers, as they may affect the taste. Frozen yogurt can last about 1 to 2 months in the freezer. After this time, it may lose flavor and texture. To enjoy it at its best, eat it within a month. When you want to eat some, take it out of the freezer. Let it sit for about 10 minutes before scooping. This helps it soften for easier serving. Healthy frozen yogurt is a great treat. It is often lower in fat than ice cream. One serving has about 150 calories. It provides protein from Greek yogurt. You also get vitamins from fruits like berries and bananas. The honey or maple syrup adds natural sweetness but also calories. The nuts and seeds add healthy fats and fiber. Overall, this dish can fit into a balanced diet. You can easily make healthy frozen yogurt without an ice cream maker. First, blend all your ingredients in a blender. Use plain Greek yogurt, banana, mixed berries, honey, vanilla, and lemon juice. Once it’s smooth, pour it into a shallow dish. Cover it with plastic wrap and freeze. Stir every 30 minutes for 2 to 3 hours. This helps keep it creamy and smooth. Yes, you can use low-fat yogurt for this recipe. Low-fat yogurt will still give you a tasty treat. It may change the texture a bit, making it less creamy. If you want a creamier yogurt, stick with full-fat Greek yogurt. Both options are healthy. Choose what you like best! You can now make delicious and healthy frozen yogurt at home. We covered key ingredients, step-by-step instructions, and helpful tips for the best results. Variations let you explore fun flavors and suit dietary needs. Remember to store it properly for freshness. Making frozen yogurt is simple and rewarding. Try different toppings and flavors to keep it exciting. Enjoy your tasty treat while knowing it's good for you!

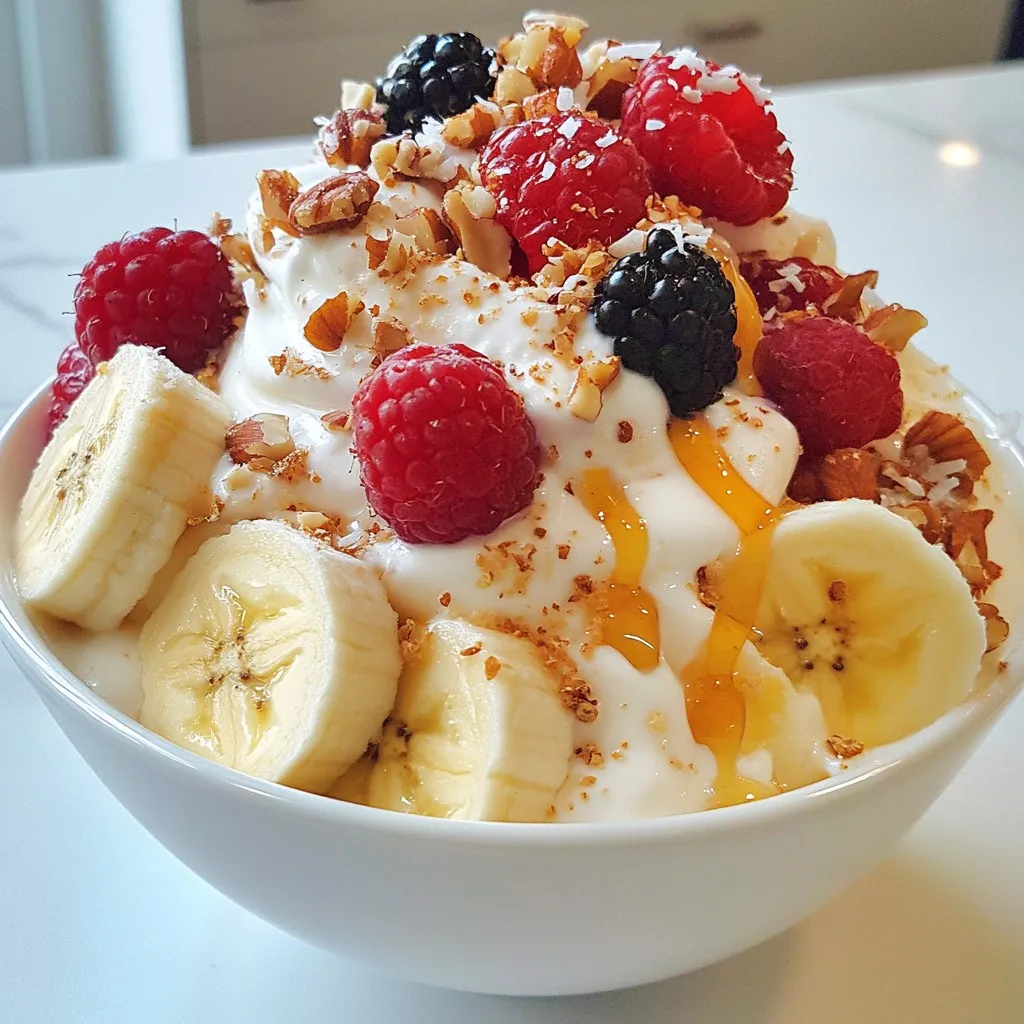
Are you craving a sweet treat that won’t ruin your healthy diet? I can help you make creamy and delicious healthy frozen yogurt right at home! This guilt-free dessert is …

Read more

Categories Desserts

Sausage Gravy Breakfast Pizza Quick and Tasty Recipe

November 22, 2025December 29, 2024 by Chef Tavio
- 1 pre-made pizza crust (store-bought or homemade) - 1 pound breakfast sausage, crumbled - 1 cup all-purpose flour - 4 cups whole milk - 1 teaspoon freshly ground black pepper - 1 teaspoon garlic powder - ½ teaspoon onion powder - 1 cup shredded sharp cheddar cheese - 2 large eggs - Fresh parsley, finely chopped, for garnish - Salt, to taste To make this tasty sausage gravy breakfast pizza, start with quality ingredients. The pizza crust is the base. You can use store-bought for speed or make your own if you prefer. Next, use one pound of crumbled breakfast sausage. This adds great flavor. You could also try turkey sausage for a leaner option. For the gravy, you'll need one cup of all-purpose flour and four cups of whole milk. This makes the sauce creamy and thick. Spices like one teaspoon of black pepper, one teaspoon of garlic powder, and half a teaspoon of onion powder give it a nice kick. Don't forget one cup of shredded sharp cheddar cheese for that melty goodness. You'll also need two large eggs and fresh parsley for garnish. Salt is used to taste. Gather these ingredients, and you are ready to create a delicious breakfast pizza that everyone will love! {{ingredient_image_2}} First, set your oven to 425°F (220°C). This temperature works well for crisping the crust. Let it heat up for about 10 minutes while you prepare the other ingredients. Next, take a large skillet and place it over medium heat. Add the crumbled breakfast sausage to the skillet. Stir it often until it turns brown, which takes about 5-7 minutes. Once cooked, use a slotted spoon to remove the sausage. Keep the drippings in the pan for extra flavor. Now, in the same skillet with the drippings, sprinkle 1 cup of flour evenly over the surface. Stir it well for 1-2 minutes, which helps create a roux. Slowly add 4 cups of whole milk while whisking. This helps avoid lumps. Cook it for about 5-7 minutes, stirring often. The mixture should thicken up. Add 1 teaspoon of black pepper, 1 teaspoon of garlic powder, and ½ teaspoon of onion powder. Mix in the cooked sausage and set the gravy aside. In a bowl, crack 2 large eggs and whisk them with a pinch of salt. Then, take a small skillet and place it over medium-low heat. Pour in the eggs and stir gently. Cook until the eggs are just set but still soft. Grab your pre-made pizza crust. Spread a nice layer of the sausage gravy over it. Make sure it covers the whole crust. Next, add the scrambled eggs on top of the gravy. Finally, sprinkle 1 cup of shredded sharp cheddar cheese over everything. Place your pizza in the preheated oven. Bake it according to the instructions on the crust package, usually around 10-15 minutes. You want the cheese to be bubbling and golden brown. After baking, let the pizza cool for 2-3 minutes. This makes it easier to slice. Before serving, sprinkle some chopped fresh parsley on top. This adds color and a fresh taste. Enjoy your delicious creation! To make the best sausage gravy, start with the right sausage. Use a good quality breakfast sausage. Crumble it well as it cooks for even browning. Cook for about 5-7 minutes until it's browned. Add flour to the drippings. Stir it for 1-2 minutes until golden. This creates a roux that thickens your gravy. Gradually add milk while whisking. This step helps avoid lumps. Cook it for about 5-7 minutes until it thickens nicely. Season your gravy well with black pepper, garlic powder, and onion powder. Adjust salt to taste. The gravy should be thick but smooth. For fluffy scrambled eggs, crack them into a bowl first. Whisk them with a pinch of salt until mixed. This adds flavor and helps them cook evenly. Use a small skillet over medium-low heat. Stir gently and continuously. Stop cooking when they are soft but not runny. This gives you the right texture for the pizza. If you have leftover pizza, store it properly. Let it cool down first. Then, wrap it in plastic wrap or foil. You can also use an airtight container. Keep it in the fridge for up to 3 days. To reheat, use the oven. This keeps the crust crispy. Avoid the microwave if you can, as it makes the crust soggy. Pro Tips Use Fresh Ingredients: Fresh breakfast sausage and whole milk make a significant difference in flavor and texture. Opt for high-quality ingredients whenever possible. Customize the Toppings: Feel free to add additional toppings like diced tomatoes, bell peppers, or even jalapeños for a spicy kick. Get creative with your pizza! Perfect Egg Scramble: Cook the scrambled eggs on low heat and remove them from the heat just before they are fully set. They will continue to cook slightly from residual heat. Let it Rest: Allow the pizza to cool for a few minutes after baking. This makes it easier to slice and helps the cheese set slightly for a better presentation. {{image_4}} You can switch up the sausage for other meats. Try using crumbled turkey sausage for a lighter option. If you love spice, consider chorizo for a kick. Ground beef or even ham can work too. Each meat brings its own flavor, so feel free to experiment. Cheese can change the whole pizza vibe. Cheddar is great, but you might enjoy mozzarella for a milder taste. Pepper jack cheese adds a nice heat. You could even use feta for a unique twist. Mix and match cheeses to find your favorite blend. Add some veggies to boost nutrition. Spinach or kale can pack in vitamins. Bell peppers add color and crunch. Sauté onions or mushrooms for extra flavor. Tomatoes can brighten the dish. Get creative with your favorite veggies to make it your own. To store leftover pizza, first, let it cool. Use an airtight container or wrap the pizza in foil. Place it in the fridge. It stays fresh for up to three days. If you want to enjoy it later, make sure to keep it tightly sealed. This helps prevent it from drying out. To freeze your pizza, first slice it into pieces. Wrap each slice in plastic wrap or foil. Then place the slices in a freezer bag. Make sure to remove as much air as possible. Label the bag with the date. You can freeze it for up to two months. When you're ready to eat it, just thaw it in the fridge overnight. To reheat the pizza, use an oven for best results. Preheat it to 375°F (190°C). Place the pizza on a baking sheet. Bake it for about 10 to 15 minutes. This keeps the crust crispy. You can also use a skillet. Heat it on medium-low and cover it. This warms the pizza and makes it nice and crispy. Enjoy! For sausage gravy breakfast pizza, a pre-made crust works great. You can use store-bought or homemade. Thin crusts give a crispy bite, while thick crusts add a soft chew. I prefer a hand-tossed crust for balance. It holds the toppings well and is easy to slice. A gluten-free crust is also an option if you need it. Yes, you can prepare this pizza ahead. Make the sausage gravy and store it in the fridge. You can also cook the sausage and scramble the eggs in advance. Just keep everything in separate containers. When ready to bake, assemble the pizza quickly. This saves time on busy mornings. You can customize sausage gravy easily. Try adding different spices like cayenne or red pepper flakes for heat. Fresh herbs like thyme or sage can enhance the flavor. If you prefer a creamier gravy, add more milk. For a thicker gravy, use a bit more flour when making the roux. This recipe is perfect for meal prep. You can make individual portions of the pizza. Just cut it into slices and store them in airtight containers. Reheat in the oven or microwave for quick meals later. This way, you enjoy delicious breakfast pizza any day of the week! This article shared a fun and easy recipe for sausage gravy breakfast pizza. We covered every step, from prepping the crust to baking and garnishing. You learned tips for perfect sausage gravy, egg texture, and storage. Don't forget the many ways to customize your pizza by swapping meats or adding veggies. This dish is not just tasty; it’s also adaptable. Enjoy creating your own version, and happy cooking!

Looking for a breakfast that’s quick, hearty, and full of flavor? You’ve found it! This Sausage Gravy Breakfast Pizza combines crispy crust, rich sausage gravy, and cheesy goodness. Perfect for …

Read more

Categories Breakfast

Blueberry French Toast Casserole Tasty Brunch Dish

December 8, 2025December 29, 2024 by Chef Tavio
- 1 loaf of brioche or challah bread - 2 cups fresh or frozen blueberries - 6 large eggs - 2 cups milk (whole or almond) - 1/2 cup pure maple syrup - Optional cream cheese The key to a great Blueberry French Toast Casserole starts with the right ingredients. You need a loaf of brioche or challah bread. This bread has a soft texture that soaks up the egg mix well. The blueberries add a burst of flavor and color. You can use fresh blueberries or frozen ones; both work great. You will also need six large eggs. Eggs bind everything together and give the dish its rich taste. Next, choose two cups of milk. Whole milk adds creaminess, but almond milk is a good choice too. You will need half a cup of pure maple syrup for sweetness. The syrup gives a nice flavor that pairs well with the blueberries. If you want an extra creamy touch, consider adding cream cheese. Cut it into small cubes and mix it in. This will make your casserole even more delicious. Gather these ingredients, and you are ready to start making this tasty dish! {{ingredient_image_2}} First, I preheat my oven to 350°F (175°C). This step is key for even baking. Next, I grease a 9x13 inch baking dish with butter or cooking spray. Greasing helps the casserole come out easily. In a large bowl, I whisk together six large eggs, two cups of milk, and half a cup of pure maple syrup. I also add one teaspoon of vanilla extract, one teaspoon of ground cinnamon, and half a teaspoon of salt. I mix until smooth and combined. This blend gives the dish a rich flavor. I cube a loaf of brioche or challah bread into one-inch pieces. Then, I add the bread to the egg mixture. I stir gently so every piece gets coated. I let the mixture sit for about ten minutes. This helps the bread soak up all that tasty goodness. After that, I carefully fold in two cups of fresh blueberries. If I want extra creaminess, I may add one cup of cream cheese cubes. I make sure to be gentle to keep the blueberries intact. To get the best flavor and texture, use brioche or challah bread. These breads are soft and slightly sweet. Their rich texture absorbs the egg mixture well. This helps create a creamy bite. If you want a more rustic feel, try a country loaf. Just make sure it is not too dry. A good bread choice makes all the difference. For a lovely presentation, cut the casserole into squares. Serve it warm on a nice plate. Add a sprig of mint on the side for a pop of color. You can also sprinkle powdered sugar on top for a sweet touch. If you want more flavor, drizzle maple syrup over each piece. This adds a nice shine and extra sweetness. To change the sweetness, play with the maple syrup amount. If you like it sweeter, add a little more syrup. For a less sweet dish, reduce the syrup by a couple of tablespoons. You can also use honey as a substitute if you prefer. Always taste the mixture before cooking. This way, you can find the perfect balance for your taste buds. Pro Tips Choose the Right Bread: Using brioche or challah adds a rich flavor and soft texture, perfect for soaking in the egg mixture. Let it Soak: Allowing the bread to soak in the egg mixture for at least 10 minutes ensures each piece absorbs the flavors, resulting in a creamier casserole. Fresh vs. Frozen Blueberries: Both fresh and frozen blueberries work well; however, frozen ones can add a slight burst of juice when baked, which can enhance the flavor. Serve Warm: This casserole is best served warm with a dusting of powdered sugar and a drizzle of maple syrup to complement the flavors. {{image_4}} You can change up the fruit in this dish. While blueberries are great, other berries work well too. Try raspberries, strawberries, or blackberries. You can even use diced apples or peaches for a fruity twist. Just think about what is in season for the best flavor. If you want to make this dish dairy-free, you can easily swap ingredients. Use almond or oat milk instead of regular milk. For the cream cheese, try coconut cream or a dairy-free cream cheese. These options still give you a creamy texture without the dairy. Want to make your casserole extra special? Add some mix-ins! Chopped nuts like pecans or walnuts add a nice crunch. You can sprinkle in some chocolate chips for a sweet touch. A dash of nutmeg or a bit of orange zest can also bring exciting new flavors. Be creative and try what you love! To keep your Blueberry French Toast Casserole fresh, store leftovers in the fridge. Place the cooled casserole in an airtight container. This will help prevent it from drying out. It’s best to eat it within three to four days for the best flavor and texture. When you're ready to enjoy the leftovers, reheat individual portions in the microwave. Use a microwave-safe plate and cover it with a damp paper towel. Warm it up in short bursts, about 30 seconds at a time, until it’s hot. This keeps the casserole moist and tasty. If you want to save some for later, freezing is a great option. First, let the casserole cool completely. Then, wrap it tightly in plastic wrap or foil. Place it in a freezer-safe bag. When you're ready to eat, thaw it overnight in the fridge. Reheat it in the oven at 350°F for about 25 to 30 minutes, or until heated through. Enjoy! Yes, you can prepare this dish in advance. I often do this for brunch gatherings. To make it ahead, simply follow the recipe up to the baking step. After mixing the bread and egg mixture, cover it with plastic wrap. Place it in the fridge overnight. This waiting time helps the bread soak up the flavors well. In the morning, just remove it from the fridge and bake it. You will know it’s done when the top is golden brown. Insert a knife into the center. If it comes out clean, your casserole is ready. You can also gently shake the dish. If the center is firm and does not jiggle, it’s perfect. Serve this casserole warm for the best taste. Cut it into squares and place them on plates. Dust with powdered sugar to make it look nice. You can also drizzle extra maple syrup on top. For a fun touch, add a sprig of mint to each plate. It makes the dish colorful and fresh! This blog post covered how to make a delicious blueberry bread casserole. We discussed the key ingredients, including brioche and blueberries, and shared simple steps for preparation. You learned tips for perfect texture and how to adjust sweetness. We also explored fun variations and best storage methods. In the end, this dish offers endless possibilities. It’s tasty, easy to make, and perfect for any occasion. Enjoy trying different flavors and impressing your family and friends!

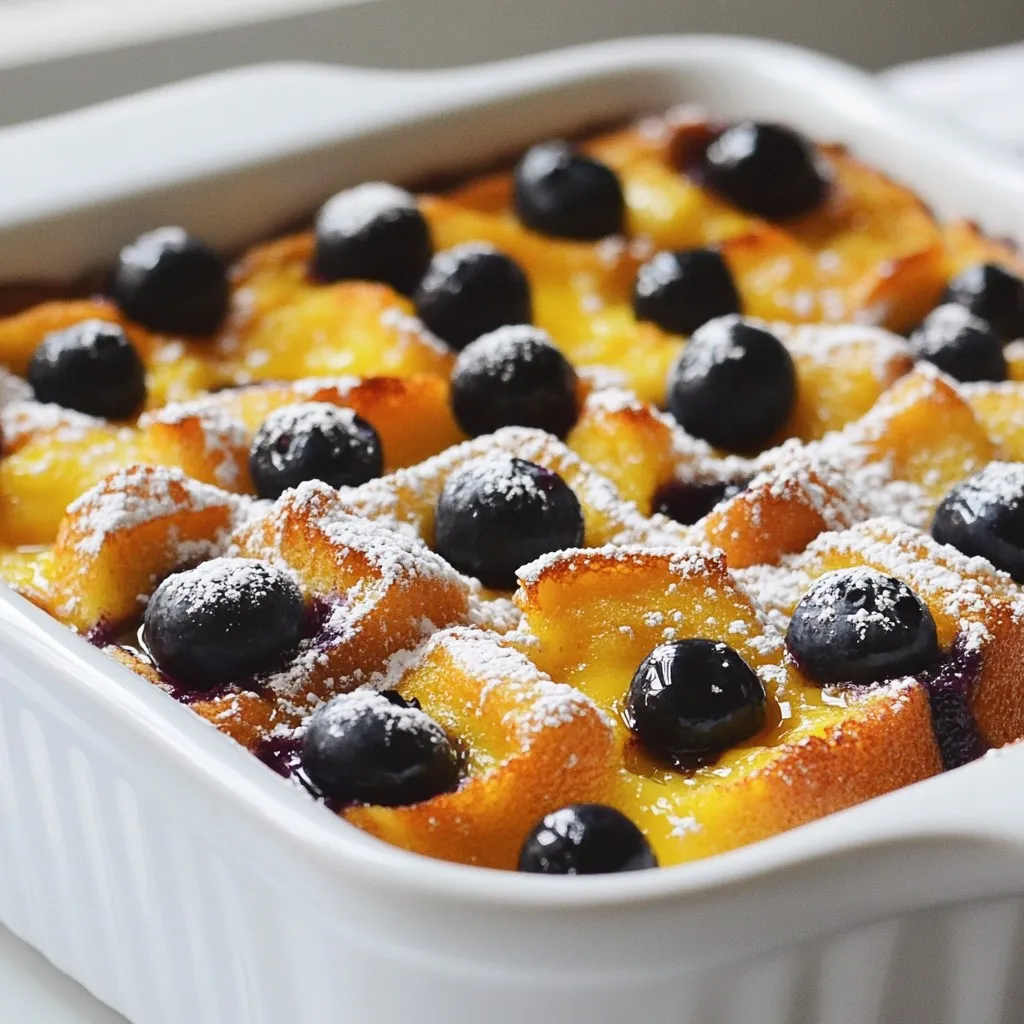
Looking for a simple yet delicious dish for your next brunch? Blueberry French Toast Casserole is here to impress! This sweet, creamy treat combines fluffy bread with juicy blueberries and …

Read more

Categories Breakfast

Cinnamon Sugar Pan Fried Bananas Delightful Treat

November 27, 2025December 29, 2024 by Chef Tavio
- 2 ripe bananas, sliced into 1/2-inch rounds - 2 tablespoons unsalted butter - 3 tablespoons packed brown sugar - 1 teaspoon ground cinnamon - A pinch of salt - Optional toppings: Whipped cream or vanilla ice cream To make Cinnamon Sugar Pan Fried Bananas, you need just a few ingredients. First, grab two ripe bananas. The riper the bananas, the sweeter they will be. Slice them into rounds that are about half an inch thick. Next, you need some unsalted butter. You will use two tablespoons to help cook the bananas and add richness. For sweetness and flavor, gather three tablespoons of packed brown sugar. This will caramelize beautifully when heated. You also need one teaspoon of ground cinnamon. This spice gives the dish its warm, comforting taste. Lastly, add a pinch of salt. This little bit enhances the flavors and balances the sweetness. If you want to take it up a notch, consider optional toppings. Whipped cream or vanilla ice cream pairs perfectly with the warm bananas. These ingredients come together to create a delightful treat that feels special and tastes amazing. {{ingredient_image_2}} In a small bowl, combine three tablespoons of brown sugar, one teaspoon of ground cinnamon, and a pinch of salt. Mix them well until they blend nicely. This mixture adds a sweet and spicy flavor to our dish. Next, place a large skillet over medium heat. Add two tablespoons of unsalted butter to the pan. Let it melt slowly, keeping an eye on it. You want the butter to foam slightly, but do not let it turn brown. That can change the taste. Once the butter is melted, add the sliced bananas to the skillet. Make sure to lay them out in a single layer. Cook them for about one to two minutes. You want them to soften but still hold their shape. Now, sprinkle half of your cinnamon sugar mixture over the bananas. Using a spatula, gently flip the bananas to coat them in sugar. Let them cook for another one to two minutes. This will help them caramelize and turn a lovely golden brown. Carefully take the bananas out of the skillet and place them on a serving plate. Sprinkle the remaining cinnamon sugar mixture over the warm bananas. This extra touch intensifies the flavor and makes them even more delicious. Enjoy your warm cinnamon sugar pan-fried bananas right away. For an extra treat, add a fluffy dollop of whipped cream or a scoop of vanilla ice cream. This makes your dessert even more special and fun to eat! For the best taste, use ripe bananas. They should be yellow with a few brown spots. This ripeness means they are sweet and soft. Overripe bananas will be mushy, while underripe bananas will not taste as good. You want bananas that are firm yet can be easily sliced. This balance gives your dish great flavor and texture. When cooking, keep the heat at medium. If the butter gets too hot, it will brown. Brown butter has a nutty taste, which can change the flavor of your dish. Watch the butter closely. When it foams but does not brown, it's ready. This careful step ensures your bananas cook perfectly without any burnt taste. Serve your pan-fried bananas warm. They are delicious on their own, but toppings can make them even better. Try adding a scoop of vanilla ice cream or a dollop of whipped cream. This adds creaminess and richness to the dish. You can also drizzle the leftover melted butter from the pan over the bananas for extra flavor. A sprinkle of extra cinnamon can make your dish look fancy and taste amazing! Pro Tips Choose the Right Bananas: Opt for ripe bananas that are slightly speckled for the best flavor and sweetness. Monitor the Heat: Keep the skillet on medium heat to avoid burning the sugar while caramelizing the bananas. Experiment with Spices: Try adding a pinch of nutmeg or vanilla extract to the cinnamon sugar for a unique twist. Serving Suggestions: For an extra indulgent experience, serve with a drizzle of chocolate sauce or a sprinkle of chopped nuts. {{image_4}} You can make your cinnamon sugar pan-fried bananas even better. Try adding nuts like walnuts or almonds. They give a nice crunch. You can also add other fruits. Sliced strawberries or apples can bring new flavors. Mix and match to find your favorite. Want to change up the taste? Try adding spices like nutmeg or allspice. A pinch can make a big difference. Nutmeg adds warmth, while allspice brings a hint of sweetness. Don't be afraid to play around. You might create your new favorite treat! You can make this treat a bit healthier. Use coconut oil instead of butter for a lighter option. For less sugar, try using honey or maple syrup. These swaps can lower calories while keeping the flavor. Enjoy a tasty dessert without the guilt! To keep your cinnamon sugar pan-fried bananas fresh, store them in an airtight container. Place them in the fridge. They will stay tasty for up to two days. Make sure to let them cool to room temperature before sealing them up. This way, you prevent extra moisture that can make them mushy. When you're ready to enjoy leftovers, reheat them on the stove for the best taste. Use a small pan over low heat. Add a little butter to the pan to help with flavor. Heat for about 2-3 minutes until warm. This keeps the bananas soft and tasty, without losing their charm. Can you freeze cinnamon sugar pan-fried bananas? Yes, but they may change in texture. If you want to freeze them, place the bananas in a single layer on a baking sheet. Freeze for a few hours, then transfer them to a freezer bag. They can last up to a month. When you’re ready to use them, thaw them in the fridge overnight. They may not be as firm, but they will still taste great! You can use frozen bananas, but they change texture. Fresh bananas keep their shape and firmness when cooked. Frozen ones become mushy. If you use frozen, thaw them first. Drain any extra liquid. This helps avoid a soggy dish. If you want a dairy-free option, use coconut oil or vegan butter. Both give a nice flavor. You can also use olive oil for a different taste. Just measure the same amount as butter. This still keeps your bananas rich and tasty. To cut the sweetness, reduce the brown sugar. Use just one tablespoon instead of three. You can also add a splash of lemon juice. This balances the flavors. If you like spice, try adding nutmeg or ginger for extra flavor without more sugar. This recipe for cinnamon sugar pan-fried bananas is easy and fun. You learned the key steps: sautéing ripe bananas and mixing in sugar and spice. Remember, picking ripe bananas makes a big difference. You can even try add-ins for more flavor. Storing leftovers is simple too. Whether you enjoy them warm or topped with ice cream, this treat satisfies. Happy cooking, and enjoy your sweet creation!

Looking for a quick and yummy dessert? Let me show you how to make Cinnamon Sugar Pan Fried Bananas! This simple treat uses just a few ingredients and requires little …

Read more

Categories Desserts

Strawberry Glazed Strawberry Bread Fresh and Flavorful

December 9, 2025December 29, 2024 by Chef Tavio
To make this delightful bread, gather these fresh ingredients: - 1 cup fresh strawberries, pureed - 1/2 cup unsalted butter, softened to room temperature - 1 cup granulated sugar - 2 large eggs, at room temperature - 1 teaspoon pure vanilla extract - 2 cups all-purpose flour - 1 teaspoon baking soda - 1/2 teaspoon salt - 1/2 cup buttermilk, at room temperature - 1/2 cup diced strawberries (for added texture) These ingredients come together to create a moist, flavorful bread that is bursting with strawberry goodness. For the sweet and tangy glaze, you will need: - 1 cup powdered sugar - 2 tablespoons fresh strawberry puree - 1-2 teaspoons milk (adjust as needed for desired consistency) This glaze adds a perfect finish, making your bread even more special. You can enhance your bread with some fun add-ins if you like: - Chopped nuts, such as walnuts or pecans - A sprinkle of cinnamon or nutmeg - Chocolate chips for a sweet twist - Zest from a lemon or orange for brightness These options allow you to customize your strawberry glazed strawberry bread to fit your taste perfectly. {{ingredient_image_2}} To start, preheat your oven to 350°F (175°C). This step warms the oven for even baking. Next, take a 9x5 inch loaf pan and grease it with butter. You can also dust it with flour or line it with parchment paper. This helps the bread come out easily later. In a medium bowl, mix 1 cup of pureed strawberries with 1/2 cup of softened butter and 1 cup of granulated sugar. I use an electric mixer to blend these until the mix is smooth and creamy. Then, add 2 large eggs one by one. Make sure each egg blends well before adding the next. Stir in 1 teaspoon of pure vanilla extract for flavor. In another bowl, whisk together 2 cups of all-purpose flour, 1 teaspoon of baking soda, and 1/2 teaspoon of salt. This mix is the dry part of your recipe. Gradually add this dry mix to the strawberry mix. Alternate adding the flour mix and 1/2 cup of buttermilk, starting and ending with the flour. Finally, gently fold in 1/2 cup of diced strawberries. Be careful not to overmix. Then, pour the batter into your prepared loaf pan, smoothing the top with a spatula. Now it's time to bake! Place the loaf pan in the preheated oven. Bake for 55 to 65 minutes. You'll know the bread is done when a toothpick inserted in the center comes out clean or with a few moist crumbs. Once baked, let the bread cool in the pan for about 10 to 15 minutes. Then, carefully move the loaf to a wire rack. Let it cool completely before adding the glaze. This cooling step is crucial; glazing a warm loaf can make it messy. While the bread cools, we can prepare the glaze. In a small bowl, whisk together 1 cup of powdered sugar, 2 tablespoons of fresh strawberry puree, and 1 to 2 teaspoons of milk. Keep adding milk until the glaze reaches a pourable consistency. Once the bread is cooled, drizzle the glaze over the top. Allow it to cascade down the sides for a beautiful finish. Let the glaze set before slicing into your delicious creation. To make the best strawberry bread, start with ripe strawberries. They add natural sweetness. Use fresh strawberries for the glaze too. Always measure your ingredients carefully. This keeps your bread light and fluffy. Room temperature eggs and buttermilk mix better. This helps create a smoother batter. The glaze needs to be smooth and pourable. Start with one cup of powdered sugar. Add two tablespoons of fresh strawberry puree. Mix well. Then, add milk one teaspoon at a time. Keep stirring until you like the thickness. If it’s too thin, add more sugar. If it's too thick, add more milk. Don’t skip cooling the bread before glazing. If it’s warm, the glaze will melt. Also, avoid overmixing the batter. This can make the bread dense. When adding the strawberries, fold them in gently. Finally, make sure to use a toothpick to test for doneness. If it comes out clean, your bread is ready. Pro Tips Use Ripe Strawberries: For the best flavor, make sure to use ripe, juicy strawberries. They will enhance the sweetness and overall taste of your bread. Don’t Overmix: When folding in the diced strawberries, be gentle. Overmixing can lead to a dense bread rather than a light and fluffy texture. Check for Doneness: Since oven temperatures can vary, check the bread a few minutes before the baking time is up. A toothpick should come out clean or with a few moist crumbs. Let It Cool Fully: Allow the bread to cool completely before glazing. This prevents the glaze from melting off and ensures a beautiful finish. {{image_4}} You can enjoy this bread without gluten. Use a gluten-free flour blend instead of regular flour. Look for blends made with almond flour or coconut flour. Make sure the blend has xanthan gum, which helps with texture. Follow the same steps as in the regular recipe. It will taste great and be safe for those with gluten issues. Feel free to mix in other fruits or nuts. Blueberries, raspberries, or chopped bananas work well. These fruits add different flavors and colors. For nuts, try walnuts or pecans. Chop them finely and fold them in at the end. This twist gives the bread a new layer of taste and a delightful crunch. You can change how sweet your bread is. If you prefer less sugar, cut the sugar by a third. You could also use honey or maple syrup as a natural sweetener. Just remember to adjust the liquid ingredients if you do. Taste the batter before baking; it should be sweet but not overpowering. This helps you create the perfect balance just for you. To keep your strawberry glazed bread fresh, wrap it tightly in plastic wrap. This keeps moisture in and prevents it from drying out. You can also place it in an airtight container. Store it at room temperature for up to three days. If you want to keep it longer, consider freezing it. To freeze leftover bread, slice it first. Wrap each slice in plastic wrap, then place them in a freezer bag. Remove as much air as possible to prevent freezer burn. Label the bag with the date. The bread will stay fresh for up to three months. Thaw slices at room temperature or pop them in the toaster for a warm treat. When you’re ready to serve, let the bread come to room temperature. If it was frozen, thaw it first. You can add a fresh glaze on top for a nice touch. Serve with whole strawberries for a pop of color. Enjoy it with a cup of tea or coffee for a perfect snack! Strawberry glazed bread stays fresh for about 3 to 5 days at room temperature. Store it in an airtight container. If you want it to last longer, keep it in the fridge, where it can last up to a week. To enjoy it at its best, eat it fresh! Yes, you can use frozen strawberries. Just make sure to thaw and drain them first. This helps get rid of extra moisture, which can change the bread's texture. After thawing, you can mash them into a puree or chop them for added texture. If you don’t have buttermilk, you can make a quick substitute. Mix 1/2 cup of milk with 1/2 tablespoon of lemon juice or vinegar. Let it sit for about 5 minutes. This will give you a similar tangy flavor and acidity that buttermilk provides. This blog post covered how to make strawberry glazed bread from start to finish. We went over the key ingredients, steps for preparation and baking, and tips for the best results. You also learned about variations, storage, and answered common questions. Strawberry glazed bread is a fun treat to make. It’s easy to customize and share. Enjoy the delicious flavors and use the tips to make your version perfect. I hope you feel excited to bake and enjoy this tasty recipe!

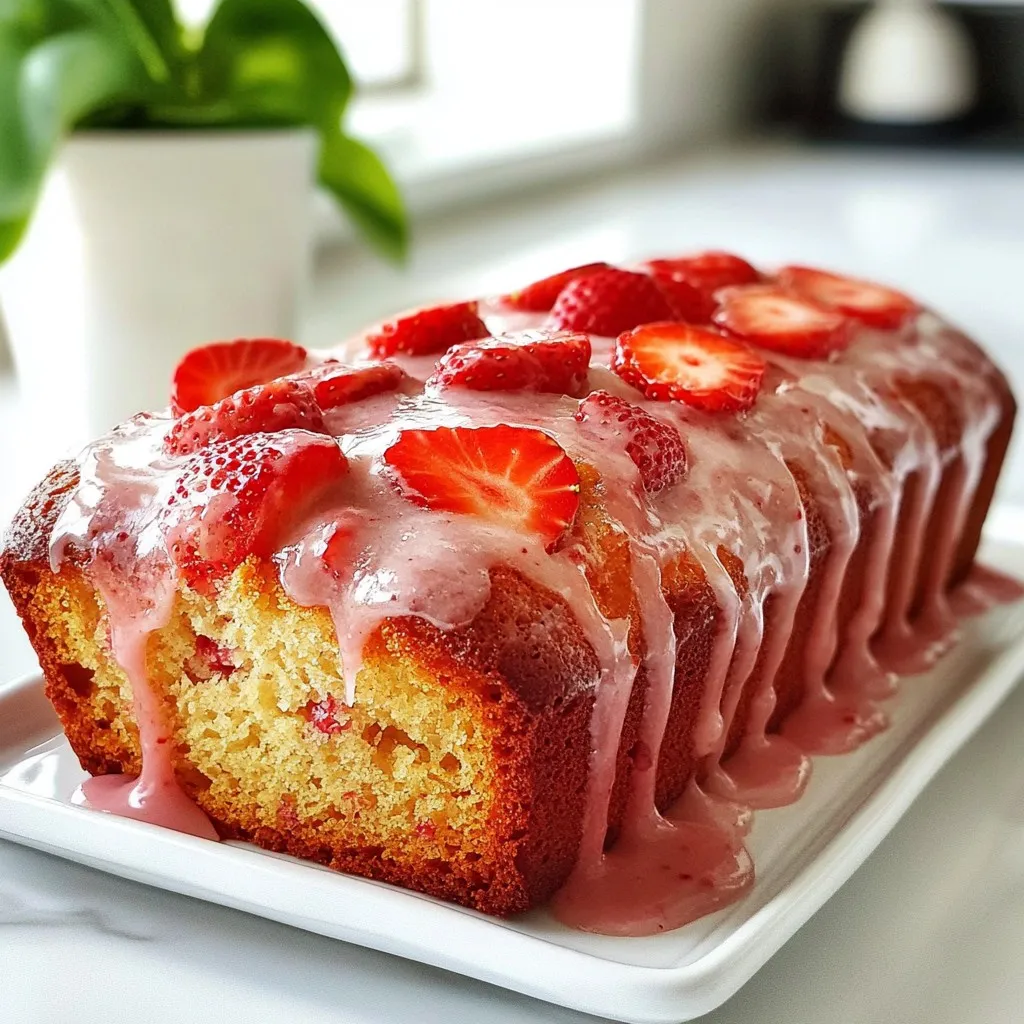
Craving a delicious and fresh treat? Let me show you how to make the most amazing Strawberry Glazed Strawberry Bread! This easy recipe is packed with juicy strawberries and topped …

Read more

Categories Desserts

Cannoli French Toast Delightful and Creamy Recipe

November 26, 2025December 26, 2024 by Chef Tavio
- 4 slices thick-cut Italian bread - 1 cup ricotta cheese - ½ cup powdered sugar - 1 teaspoon pure vanilla extract - ½ teaspoon ground cinnamon - 2 large eggs - ½ cup whole milk - 2 tablespoons unsalted butter - ¼ cup mini chocolate chips - Chopped pistachios (for garnish) To make Cannoli French Toast, you need some special ingredients. The main part is the thick-cut Italian bread. It holds up well and soaks up flavors. You also need ricotta cheese. This creamy cheese makes the filling rich and smooth. Powdered sugar adds sweetness. A touch of vanilla extract gives a nice flavor. For extra flavor, ground cinnamon adds warmth. Eggs and milk help bind everything together. The unsalted butter is key for cooking. It makes the toast golden and adds a rich taste. Mini chocolate chips give a fun surprise in each bite. Lastly, chopped pistachios add a nice crunch on top. Gather these ingredients to get ready for a delightful treat! {{ingredient_image_2}} - In a medium bowl, combine: - 1 cup ricotta cheese - ½ cup powdered sugar - 1 teaspoon pure vanilla extract - ½ teaspoon ground cinnamon - ¼ cup mini chocolate chips Mix these ingredients until they are smooth and creamy. This will be your tasty cannoli filling. The ricotta gives it a rich flavor, while the chocolate chips add a sweet surprise. - Take two slices of the thick-cut Italian bread. - Spread a generous amount of the ricotta mixture between the slices. - Make sure to spread evenly for the best taste. - Repeat this with the remaining bread slices to create more sandwiches. This step is key. The filling should be thick enough to stay in the middle while cooking. - In another bowl, whisk together: - 2 large eggs - ½ cup whole milk This creates the egg mixture for dipping. Whisk until it is blended and frothy. - Preheat a non-stick skillet over medium heat. Add: - 2 tablespoons unsalted butter Let it melt and coat the skillet. - Carefully dip each stuffed sandwich into the egg mixture. Soak for about 30 seconds on each side. - Once soaked, place the sandwiches in the skillet. Cook for about 3-4 minutes on each side. They should turn golden brown. Repeat with the remaining butter and sandwiches until all are cooked. The outside will be crispy while the inside stays creamy. The best heat for cooking French toast is medium. This way, the bread cooks evenly. If the heat is too high, the outside burns while the inside stays raw. I aim for a nice golden color, which takes about 3-4 minutes per side. You want that crispy outside and soft inside. To achieve this perfect color, use a non-stick skillet. Melt butter in the pan, but don’t let it brown. Dip the stuffed bread in the egg mix for about 30 seconds. Don't rush this step; soaking is key. You can make your French toast look great with simple garnishes. Dust it with powdered sugar for a sweet touch. A sprinkle of chopped pistachios adds color and crunch. Pair the French toast with fresh fruit. Berries or bananas make a tasty and colorful side. You could also add a drizzle of chocolate sauce for a fun twist. One big mistake is over-soaking the bread. If you soak too long, it gets soggy. Aim for just the right time. Another mistake is using the wrong bread. Thick-cut Italian bread works best. Avoid thin slices, as they won’t hold the filling well. Stick to the recipe for the best results. Pro Tips Use Day-Old Bread: Day-old bread is perfect for French toast as it absorbs the egg mixture better without falling apart. Customize Your Filling: Feel free to add other mix-ins to the ricotta filling, such as orange zest, or swap mini chocolate chips for dried fruit. Perfect Cooking Temperature: Keep the skillet or griddle at medium heat to ensure the outside cooks evenly while the inside stays creamy. Garnish Wisely: Adding a drizzle of chocolate sauce or a sprinkle of crushed nuts can enhance the flavor and presentation of your dish. {{image_4}} You can easily add fun flavors to your cannoli French toast. Try adding fruit or nuts to the filling. Fresh berries, like strawberries or blueberries, add a burst of flavor. Pecans or walnuts give a nice crunch. You can also use different types of bread. Brioche or challah adds sweetness and a fluffy texture. If you have dietary needs, I have some options for you. For a gluten-free version, use gluten-free bread. Make sure the filling ingredients are also gluten-free. For a vegan twist, swap ricotta for a plant-based cream cheese. Use flax eggs instead of regular eggs. These changes keep the dish tasty and inclusive. You can mix sweet and savory flavors for a fun twist. Try adding crispy bacon or sausage on the side. This gives a nice balance to the sweet filling. You can also introduce spices like nutmeg or cardamom. These spices add warmth and depth to the dish. Experiment with these ideas to find your favorite version! To keep your cannoli French toast fresh, place it in an airtight container. This helps seal in moisture. If you plan to eat it within two days, store it in the fridge. For longer storage, freeze it. Wrap each slice in plastic wrap, then place them in a freezer bag. This prevents freezer burn. To reheat your French toast, use a skillet on low heat. This warms it evenly and keeps it crispy. You can also use an oven. Preheat it to 350°F. Place the slices on a baking sheet and heat for about 10 minutes. This method keeps the texture nice. In the fridge, cannoli French toast lasts about two days. If frozen, it can last up to three months. Just remember to thaw it in the fridge before reheating. Enjoy your tasty treat anytime you want! Cannoli French toast is a sweet twist on the classic dish. It combines the rich flavors of cannoli filling with crispy French toast. You make a filling from ricotta cheese, powdered sugar, and chocolate chips. Then, you spread this filling between slices of thick-cut Italian bread. You dip the stuffed bread in a mixture of eggs and milk, then cook it in a skillet until golden brown. The result is creamy, sweet, and delicious! Yes, you can prepare some parts in advance. You can make the ricotta filling a day ahead and store it in the fridge. This saves time in the morning. You can also assemble the sandwiches the night before. Just keep them in the fridge to stay fresh. When you’re ready to eat, dip them in the egg mixture and cook them. It makes breakfast quick and easy! To make Cannoli French toast healthier, you can try some simple swaps. Use whole grain bread instead of thick-cut Italian bread. This adds fiber and nutrients. You can also reduce the sugar in the filling. Use a sugar substitute or less powdered sugar. If you want to cut calories, use egg whites instead of whole eggs. Lastly, add fresh fruit for extra flavor and vitamins. This keeps the dish tasty while making it a bit healthier! This blog post showed you how to make Cannoli French Toast. We covered ingredients, step-by-step instructions, and handy tips. You now know how to prepare, cook, and serve this tasty dish. Remember to avoid common mistakes like over-soaking the bread. Explore variations to fit your taste. Store leftovers with care to enjoy later. Cannoli French Toast is easy to make and delicious for breakfast or brunch. Enjoy making this dish for friends and family!

Imagine starting your day with a twist on a classic favorite! Cannoli French Toast combines the rich, creamy filling of cannoli with warm, golden-brown French toast. This delightful recipe is …

Read more

Categories Breakfast
Older posts
Newer posts
← Previous Page1 … Page186 Page187 Page188 … Page191 Next →

TASTED NEST

Where Flavor Finds a Home 🍳🏡 — warm, simple, and crave-worthy recipes made for real life, from stovetop mornings to backyard dinners.

PAGES

Home About Contact Privacy Policy Terms & Conditions Cookie Policy GDPR Policy Copyright Policy Disclaimer

CATEGORIES

Appetizers Desserts Salads Breakfast Dinner
Copyright © 2026 Tasted Nest. All rights reserved.