Skip to content
  • GDPR Privacy Policy
  • Copyright Policy
  • Disclaimer
  • Terms & Conditions
Tasted Nest
  • Home
  • Appetizers
  • Desserts
  • Salads
  • Breakfast
  • Dinner
  • Privacy Policy
  • Contact
  • About

Chef Tavio

Korean BBQ Steak Rice Bowls Flavorful and Simple Meal

November 17, 2025December 18, 2024 by Chef Tavio
- 1 lb flank steak - 3 tablespoons soy sauce - 2 tablespoons gochujang - 1 tablespoon sesame oil - 2 tablespoons brown sugar - 1 teaspoon minced garlic - 1 teaspoon minced ginger - 2 cups cooked jasmine rice - 1 cup cooked bok choy - 1 carrot - 2 green onions - Sesame seeds for garnish - Optional: Kimchi for serving In this recipe, the main ingredients bring the bold flavors of Korean BBQ to life. The flank steak forms the heart of the dish. It is a tender cut that soaks up the marinade well. The soy sauce adds saltiness, while gochujang gives a spicy kick. Sesame oil adds a nutty flavor that rounds everything out. The additional ingredients sweeten and enhance the marinade. Brown sugar balances the heat from the gochujang. Minced garlic and ginger add depth and warmth to the dish. Jasmine rice serves as a fluffy base that soaks up the steak juices. The vegetables and garnishes add color and crunch. Bok choy is mild and tender, while carrots add a nice bite. Green onions boost freshness and brightness. Sesame seeds provide a delightful texture. If you want a tangy touch, add kimchi on the side. All these ingredients come together to create a vibrant and tasty meal. {{ingredient_image_2}} - In a medium bowl, mix together soy sauce, gochujang, sesame oil, brown sugar, minced garlic, and minced ginger. This mix creates a rich marinade. - Add the thinly sliced flank steak to the marinade. Make sure every piece is coated well. Cover the bowl and set it in the fridge for at least 30 minutes. This helps the steak soak up all that tasty flavor. - Preheat your skillet or grill pan over medium-high heat. - Once hot, carefully add the marinated steak in a single layer. Avoid overcrowding the pan. Sear the steak for about 2-3 minutes on each side. Aim for medium-rare to medium for the best flavor. Remove the steak from the pan and let it rest on a plate for a few minutes before slicing. - If needed, add a splash of oil to the same skillet. - Quickly sauté the julienned carrots over medium heat for about 2-3 minutes. Stir them occasionally until they become tender but still colorful and crisp. - Start by placing a generous scoop of cooked jasmine rice at the bottom of each bowl. This rice makes a warm base. - Layer the seared steak on top of the rice. Next, add the sautéed carrots and chopped bok choy. - Finally, garnish each bowl with sliced green onions and a sprinkle of sesame seeds. Add kimchi on the side if you like extra flavor. Marinate the steak for at least 30 minutes. This time allows the meat to absorb all the flavors. If you want to change things up, try using a mix of soy sauce and orange juice. This gives a sweet and tangy taste. You can also use teriyaki sauce for a different spin. For the best results, set your stovetop to medium-high heat. This heat sears the steak quickly, locking in juices. You can use a grill or a skillet. If you choose a grill, the smoky flavor adds depth. A skillet is great for a quick cook and easy cleanup. To make your meal look amazing, arrange the rice in a mound. Fan the steak slices on top. Place the colorful vegetables next to the steak. This makes the dish pop. For garnish, sprinkle sesame seeds and add green onions. You can also add a side of kimchi for a vibrant touch. Pro Tips Marinate Longer for Enhanced Flavor: If time allows, marinate the steak for a few hours or even overnight. This will deepen the flavors and make the meat even more tender. Use a Meat Thermometer: To ensure perfect doneness, invest in a meat thermometer. Aim for 130-135°F for medium-rare and 140-145°F for medium. Customize Your Veggies: Feel free to add or substitute your favorite vegetables. Bell peppers, snap peas, or broccoli work wonderfully in this dish. Serve with a Side of Pickles: Enhance the meal by serving with pickled vegetables or kimchi, which adds a nice contrast to the savory steak. {{image_4}} You can switch flank steak for other meats. Chicken thighs or pork tenderloin work well too. Beef sirloin or ribeye is also great. If you prefer a plant-based option, try marinated tofu. Tempeh is another tasty choice. Both options soak up flavors and add protein. While jasmine rice is classic, you can use brown rice for more fiber. Quinoa is a nutritious swap too. If you want something different, try cauliflower rice for a low-carb option. To add flavor, mix in some coconut milk while cooking. You can also stir in herbs or spices like garlic powder for a tasty twist. You can add many veggies to your bowl. Bell peppers, snap peas, or zucchini are all great options. Mushrooms add a nice umami flavor. Don't forget seasonal veggies too! In spring, use asparagus; in fall, add butternut squash. Try whatever you have on hand to make it colorful. To store leftovers, let the dish cool first. Place the steak, rice, and veggies in separate containers. This keeps everything fresh. Use airtight containers for best results. They keep the flavors locked in. You can store it in the fridge for up to three days. Yes, this dish can be frozen. To freeze, pack the components in freezer-safe bags. Try to remove as much air as possible. This prevents freezer burn. You can freeze the steak and rice for about three months. The veggies are best eaten fresh, so use them soon. To reheat, the best method is to use the stove. Heat a pan over medium heat. Add a splash of water to keep it moist. Stir the mix until it’s hot. This takes about five to seven minutes. If using a microwave, heat in short bursts. Use a low power setting and cover to avoid drying out. This should take about two to three minutes. Enjoy your meal as if it was fresh! To get tender flank steak, follow these tips: - Slice against the grain: Cutting the steak against the grain makes each bite easy to chew. - Marinate well: Use a flavorful marinade. Ingredients like soy sauce and sesame oil work great. - Don't overcook: Aim for medium-rare to medium. This keeps the steak juicy and tender. - Let it rest: After cooking, let the steak sit for a few minutes. This helps the juices stay inside. By using these tips, you will have tender steak every time! Yes, you can prep many parts ahead of time! Here are some ideas: - Marinate the steak: You can marinate it the night before or even longer. This boosts the flavor. - Cook rice beforehand: Cook the jasmine rice a day early. Store it in the fridge for easy use. - Prepare veggies: Chop bok choy and julienne carrots ahead of time. Just store them in containers in the fridge. This makes it easy to put together your bowls quickly! Several side dishes pair well with these bowls: - Kimchi: This spicy fermented cabbage adds lots of flavor. - Korean pickled vegetables: These are tangy and crunchy, and they balance the meal. - Steamed broccoli: This simple side adds color and nutrition. - Sesame cucumber salad: The coolness of the cucumbers contrasts with the warm rice bowl. These sides will elevate your meal and make it even more enjoyable! Yes, you can make this dish gluten-free! Consider these alternatives: - Soy sauce: Use tamari instead of regular soy sauce. Tamari is gluten-free and tastes great. - Brown sugar: This is already gluten-free, so no changes needed there. - Gochujang: Check the label for gluten-free options, as some brands may add gluten. With these swaps, you can enjoy delicious Korean BBQ Steak Rice Bowls without worries! This blog post covered how to make delicious Korean BBQ Steak Rice Bowls. We explored the key ingredients like flank steak, soy sauce, and gochujang. I shared step-by-step instructions, tips for marinating, cooking techniques, and presentation ideas. You also learned how to customize this dish with variations and store it properly. Korean BBQ Steak Rice Bowls offer a tasty mix of flavors. Try your own twists to make it your favorite meal. Enjoy cooking and sharing this dish with friends and family!

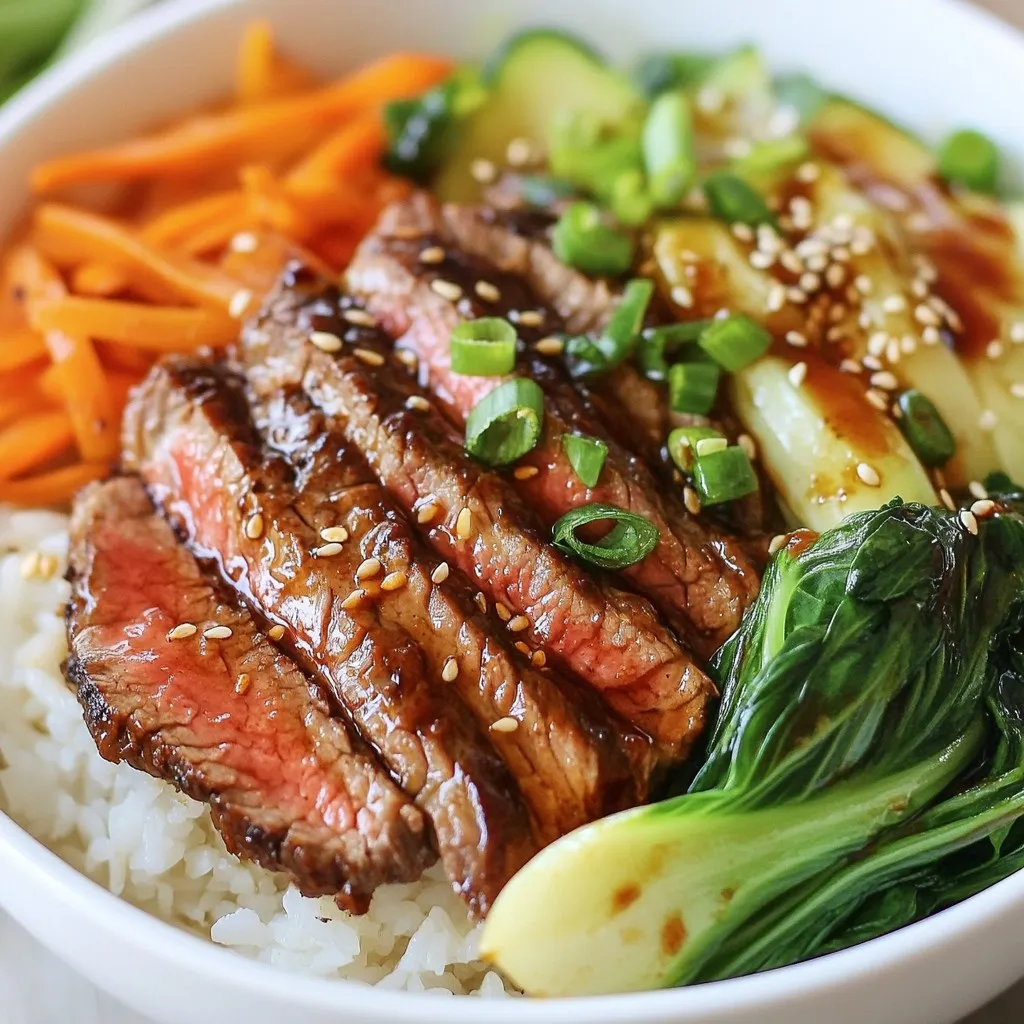
Are you ready to elevate your dinner game with Korean BBQ Steak Rice Bowls? This quick and tasty dish combines flavorful marinated steak, fresh veggies, and fluffy rice for a …

Read more

Categories Dinner

Skinny Chocolate Chip Banana Muffins Simple Recipe

November 22, 2025December 18, 2024 by Chef Tavio
Here is what you need for Skinny Chocolate Chip Banana Muffins: - 2 ripe bananas, mashed until smooth - 1/3 cup honey or maple syrup (your choice) - 1/4 cup unsweetened applesauce - 1 teaspoon pure vanilla extract - 1 cup whole wheat flour - 1/2 teaspoon baking soda - 1/2 teaspoon baking powder - 1/4 teaspoon fine sea salt - 1/2 cup dark chocolate chips or mini chocolate chips - Optional: 1/2 teaspoon ground cinnamon for an extra layer of flavor Each ingredient plays an important role. The ripe bananas bring natural sweetness and moisture. They also add fiber and potassium. Using honey or maple syrup gives a touch of sweetness while keeping it healthier. Applesauce works as a great fat substitute, keeping the muffins moist. Whole wheat flour adds fiber and nutrients compared to regular flour. Baking soda and baking powder help the muffins rise. The fine sea salt enhances the flavors, balancing the sweetness. The dark chocolate chips add rich flavor and a hint of indulgence. If you want more warmth, sprinkle in some ground cinnamon. This makes the muffins taste even better. With these simple ingredients, you can create a delicious treat that feels good to eat. These muffins are perfect for breakfast or a snack. Enjoy the process of baking and the tasty results! {{ingredient_image_2}} - Set the temperature to 350°F (175°C). - Prepare the muffin tin by lining it with paper liners or greasing it lightly. - In a large bowl, combine the mashed bananas, honey or maple syrup, applesauce, and vanilla. - Blend these wet ingredients until smooth using a whisk or spatula. - In another bowl, whisk together the whole wheat flour, baking soda, baking powder, and salt. - If you want, add 1/2 teaspoon of ground cinnamon for extra flavor. - Gradually mix the dry ingredients into the wet ones. - Stir gently with a spatula; a few lumps are okay. Don’t overmix! - Gently add the dark chocolate chips to the batter. - Make sure they are spread evenly without overworking the batter. - Use a spoon or ice cream scoop to divide the batter into the muffin tin. - Fill each cup about two-thirds full. Bake for 15-18 minutes. When you test the muffins with a toothpick, it should come out clean, with a few moist crumbs. Enjoy the warm muffins fresh out of the oven! Do not overmix your batter. Overmixing can make muffins tough. Mix just enough to blend the ingredients. For a softer texture, make sure to stir gently. A few lumps in the batter are okay. This helps keep the muffins light and fluffy. If you want to try something different, use stevia or agave instead of honey. These sweeteners can lower calories. You can also use gluten-free flour if you have dietary needs. Just ensure to follow the right ratio for a good rise. Ripe bananas and applesauce are key to moist muffins. Bananas add natural sweetness and moisture. Applesauce helps with texture without extra fat. Together, they keep your muffins soft and delicious. For best results, use very ripe bananas. They mash easily and enhance flavor. Pro Tips Use Overripe Bananas: The riper the bananas, the sweeter and more flavorful your muffins will be. Look for bananas with lots of brown spots for the best results. Mix Gently: When combining wet and dry ingredients, mix just until combined. Overmixing can lead to dense muffins; a few lumps are okay! Chocolate Chip Choices: For a healthier option, use dark chocolate chips or mini chocolate chips to reduce sugar content while still enjoying that chocolatey goodness. Storage Tips: Store any leftovers in an airtight container at room temperature for up to 3 days, or freeze them for longer storage. Just thaw and enjoy! {{image_4}} You can easily change the taste of your skinny chocolate chip banana muffins. Here are a few ideas: - Adding nuts or seeds: Walnuts or pecans give a nice crunch. Seeds like chia or flax add healthy fats. - Incorporating other fruits: Try mixing in blueberries or strawberries. They add sweetness and color. You can make these muffins fit different diets: - Vegan or dairy-free options: Replace honey with maple syrup. Use dairy-free chocolate chips for a vegan treat. - Lower sugar alternatives: Use stevia or erythritol instead of honey. This helps reduce sugar while keeping flavor. Muffins come in different sizes, and this recipe works for both: - Mini vs standard muffin sizes: Mini muffins make great snacks. Standard ones are perfect for breakfast. - Baking times for different sizes: Mini muffins bake for 10-12 minutes. Standard muffins take about 15-18 minutes. Always check with a toothpick. To keep your muffins fresh, place them in an airtight container. This helps prevent air from making them dry. Store them at room temperature for up to three days. If you want them to last longer, consider freezing them. To freeze your muffins, first make sure they are completely cool. Wrap each muffin in plastic wrap. Then, place the wrapped muffins in a freezer bag or container. This method keeps them fresh for up to three months. When you want to enjoy one, simply take it out and let it thaw at room temperature. Reheat your muffins by placing them in the microwave for about 10-15 seconds. This warms them up while keeping them moist. You can also use an oven set to 350°F (175°C). Just warm them for 5-7 minutes. This method restores their fresh-baked taste and texture. Yes, you can use frozen bananas. They work great! Frozen bananas are soft and sweet. They mash easily, which helps in making the muffins moist. Just make sure to thaw them first. This way, you get all the yummy banana flavor. You can make some smart swaps! Here are a few ideas: - Use Greek yogurt instead of applesauce for more protein. - Swap honey for a sugar-free sweetener, like stevia. - Choose almond flour for a gluten-free option. These changes keep them tasty while boosting nutrition. Absolutely! Kids love these muffins. They are sweet and chocolatey without being too rich. Plus, they are packed with nutrients. Bananas provide potassium, and whole wheat flour adds fiber. These muffins are a fun way to get kids to enjoy healthy food. These muffins last about 3-4 days at room temperature. If you store them in the fridge, they can last up to a week. Just keep them in an airtight container. This keeps them fresh and moist for longer! These banana muffins combine tasty ingredients and simple steps for a delightful treat. We covered each ingredient, from ripe bananas to dark chocolate chips. I shared the importance of mixing and baking for the best texture. Remember, you can customize these muffins to suit your taste. Try different fruits or sweeteners too. Store leftovers in airtight containers or freeze them for later. Enjoy the healthy and fun options these muffins offer. You’ll love making and sharing them with family and friends!

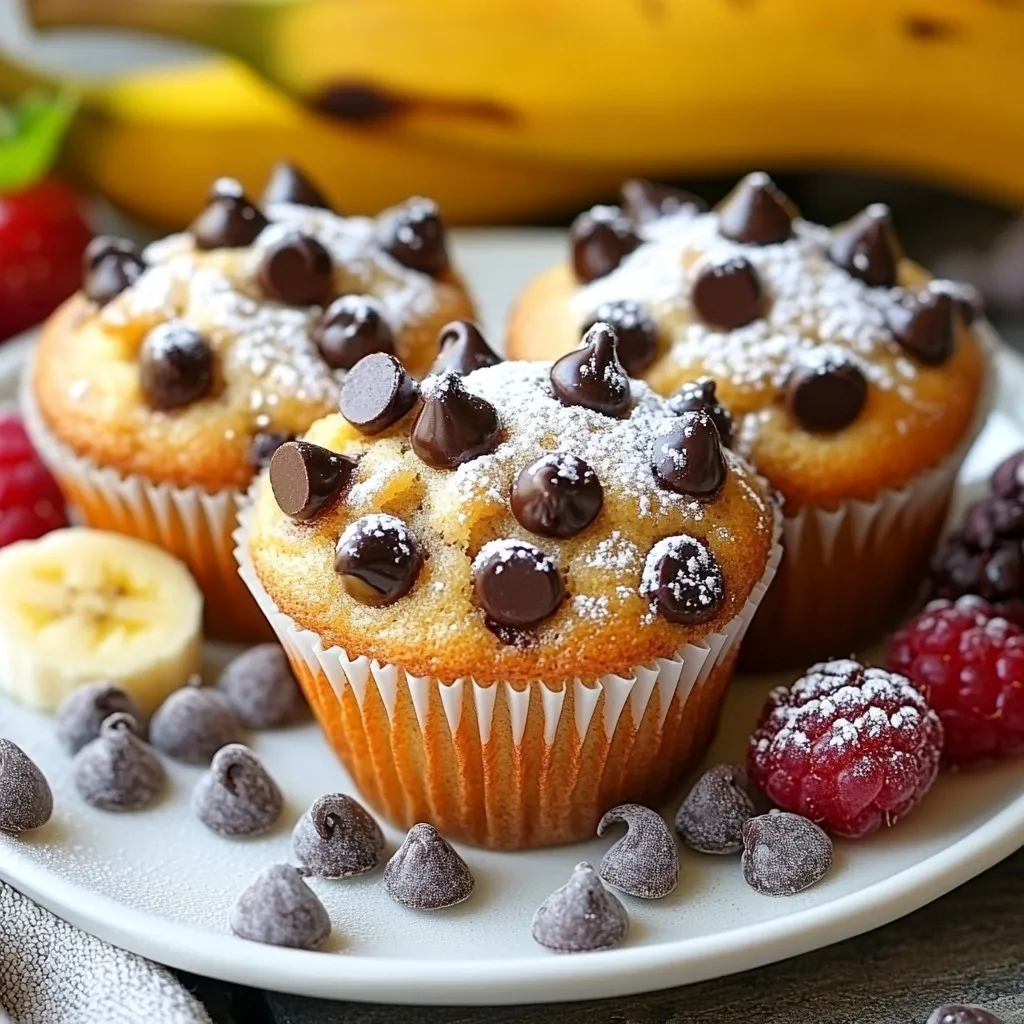
Want a tasty treat that won’t wreck your diet? Try these Skinny Chocolate Chip Banana Muffins! They’re simple to make and loaded with flavor. Using ripe bananas, honey, and dark …

Read more

Categories Desserts

Ultimate Garbage Bread Savory and Satisfying Treat

November 24, 2025December 17, 2024 by Chef Tavio
For the Ultimate Garbage Bread, you need these main ingredients: - 1 package (1 lb) refrigerated pizza dough - 1 cup shredded mozzarella cheese - 1 cup mixed vegetables (like bell peppers, onions, and mushrooms), diced - 1 cup cooked meats (choose from pepperoni, ham, or cooked chicken), finely chopped - 1/2 cup black olives, sliced - 1/4 cup grated Parmesan cheese - 2 tablespoons olive oil - 1 teaspoon garlic powder - 1 teaspoon Italian seasoning - Salt and pepper to taste - 1 egg, beaten (for egg wash) You can customize your garbage bread with these tasty options: - Spinach or kale for extra greens - Jalapeños for some heat - Different cheeses like cheddar or feta - Sun-dried tomatoes for a sweet touch Don’t have all the ingredients? Here are some easy swaps: - Use homemade pizza dough instead of store-bought - Try a different cheese if you’re out of mozzarella - Swap out the meats for veggies to make it vegetarian - Use any leftover cooked veggies you have on hand These ingredients will help you create a delicious and satisfying garbage bread that everyone will love. Feel free to mix and match to suit your taste! {{ingredient_image_2}} First, heat your oven to 400°F (200°C). This step is key for great baking. Next, take the pizza dough and place it on a lightly floured surface. Roll it out into a rectangle about ¼ inch thick. Make sure the dough is smooth and even. This will help your garbage bread cook evenly. In a mixing bowl, combine your filling ingredients. Start with 1 cup of shredded mozzarella cheese. Add 1 cup of diced mixed vegetables like bell peppers, onions, and mushrooms. Then, include 1 cup of cooked meats, like pepperoni, ham, or chicken. Next, mix in ½ cup of sliced black olives and ¼ cup of grated Parmesan cheese. Don’t forget to add 1 teaspoon of garlic powder and 1 teaspoon of Italian seasoning. Season with salt and pepper to taste. Stir until the filling is well combined. This mix adds flavor and texture to your bread. Now, spoon the filling onto the rolled-out dough. Leave about a 1-inch border all around. This space helps seal the filling inside. Carefully roll the dough from one end, forming it into a log shape. Pinch the edges to seal them and fold the ends under for a neat look. Place the seam side down on a baking sheet lined with parchment paper. Brush the top with the beaten egg to get a nice golden crust. Bake in your preheated oven for 20-25 minutes. Check for a golden brown color and ensure the dough is cooked through. Once the garbage bread is done, take it out of the oven. Let it cool for a few minutes before slicing. Serve it warm to enjoy its best flavor. For a fun twist, pair it with marinara sauce for dipping. You can also sprinkle some freshly chopped herbs on top for added color and taste. This makes your dish look great and taste even better! To get a great crust, follow these steps: - Preheat your oven to 400°F (200°C). - Roll the pizza dough to ¼ inch thick. - Make sure to brush the top with beaten egg. - Bake until golden brown, about 20-25 minutes. A golden crust should feel crisp. If you want it crunchier, bake it a bit longer. Store any leftovers in an airtight container. - Let the bread cool down first. - Place it in the fridge for up to three days. To reheat, pop it in the oven at 350°F (175°C) for about 10 minutes. This keeps the crust crispy. You can prepare the filling a day in advance. - Mix the cheese, veggies, and meats in a bowl. - Cover and refrigerate it. When you’re ready to bake, just roll out the dough, fill it, and bake as usual. This saves time and makes it easy to enjoy fresh garbage bread! Pro Tips Choose Your Fillings Wisely: Select a combination of meats and vegetables that you enjoy. This recipe is versatile, so feel free to experiment with different ingredients according to your taste! Perfect the Roll: When rolling the dough, ensure it’s tight enough to hold the filling but not so tight that it bursts during baking. A gentle but firm roll will yield the best results. Enhance the Flavor: Consider adding spices or herbs to the filling for an extra kick. A dash of red pepper flakes or some fresh basil can elevate the overall taste. Let It Rest: Allow the garbage bread to cool for a few minutes before slicing. This helps the cheese set slightly, making it easier to cut and serve without losing the filling. {{image_4}} You can make a tasty vegetarian garbage bread. Just skip the meats. Use more veggies instead. I suggest adding spinach, zucchini, or artichokes. These add great flavor and color. You can also use vegan cheese for a dairy-free option. This way, everyone can enjoy a slice! You can mix and match different meats in your garbage bread. Try using cooked sausage for a spicy kick. Diced ham works well for a smoky flavor. You can also use shredded chicken for a lighter option. The choice is yours! Each meat brings its own taste to the dish. Cheese is key in garbage bread. If you want a twist, try different cheeses. Cheddar adds sharpness, while pepper jack gives a spicy kick. Cream cheese can make it creamy and rich. Experiment with your favorites! The right cheese can elevate your garbage bread to the next level. To store leftover garbage bread, first let it cool. Wrap it in plastic wrap. Then, place it in an airtight container. This keeps it fresh for later. You can also use foil if needed. Make sure to store it in the fridge if you plan to eat it in a few days. Freezing garbage bread is simple. Wrap it tightly in plastic wrap, then in foil. This protects it from freezer burn. Label it with the date, so you remember when you froze it. To reheat, bake it at 350°F (175°C) for about 15-20 minutes. You can also microwave it, but the crust may not be crispy. When stored properly, leftover garbage bread lasts about 3-4 days in the fridge. If you freeze it, it can last up to 3 months. For the best taste, eat it within this time. Always check for any signs of spoilage before eating. Enjoy your delicious leftovers without worry! Ultimate Garbage Bread is a fun and tasty treat. It uses pizza dough as a base. You fill it with cheese, meats, and veggies. The mix of flavors makes every bite delightful. You bake it until golden brown for a crispy crust. This dish is great for parties or a cozy night in. Yes, you can use homemade pizza dough. It adds a personal touch to your bread. Just make sure it has a good rise. Roll it out to about ¼ inch thick. This thickness helps it bake evenly. Homemade dough can make your garbage bread even tastier. You can customize the filling in many ways. Here are some ideas: - Use different meats like sausage or bacon. - Add more veggies like spinach or zucchini. - Try different cheeses like cheddar or feta. - Spice it up with jalapeños or hot sauce. Mix and match to find your favorite flavors. This makes it fun and unique for everyone. Ultimate Garbage Bread pairs well with many sides. Here are some tasty options: - Serve with marinara sauce for dipping. - Add a fresh salad for a light meal. - Pair with a bowl of soup for warmth. - Offer pickles or olives for a crunchy side. These sides enhance the meal and make it more filling. In this post, you learned about the key ingredients for making Ultimate Garbage Bread, including the main ingredients and optional add-ins. I shared step-by-step instructions, tips for a perfect crust, and creative variations. Proper storage and reheating tips help keep leftovers fresh. Remember, you can customize your filling to suit your tastes. Enjoy making this fun dish; it’s a tasty treat for all!

Are you ready to dive into the world of Ultimate Garbage Bread? This savory treat is packed with flavors and can be customized to your liking. I’ll guide you through …

Read more

Categories Appetizers

Sweet Potato Hash Browns Flavorful and Easy Recipe

November 20, 2025December 16, 2024 by Chef Tavio
- 2 large sweet potatoes, peeled and grated - 1 small onion, finely chopped - 2 cloves garlic, minced - 1 tablespoon all-purpose flour (or gluten-free flour for gluten-free option) - 1 teaspoon paprika - 1/2 teaspoon salt - 1/4 teaspoon black pepper - 2 tablespoons olive oil - Fresh herbs (like parsley or chives), chopped, for garnish Sweet potatoes form the base of this dish. Their natural sweetness gives the hash browns a unique flavor. Using a small onion adds a nice bite while garlic brings depth. For the dry ingredients, flour helps bind everything together. Paprika adds warmth, while salt and pepper enhance the taste. Finally, olive oil is key for frying. It helps create that crispy outside we all love. Fresh herbs make a beautiful garnish and add a fresh flavor. This blend of ingredients makes a simple yet delicious dish. Each component plays a role in building the perfect sweet potato hash browns. {{ingredient_image_2}} First, grab two large sweet potatoes. Peel them and then grate them. You can use a box grater or a food processor. Once grated, you need to remove the moisture. This step is key for crispy hash browns. Take the grated sweet potatoes and place them in a clean kitchen towel. Twist the towel tightly and squeeze out as much moisture as you can. The drier the sweet potatoes, the crispier your hash browns will be! Now, it’s time to mix the ingredients. In a large mixing bowl, combine the drained sweet potatoes with a small, finely chopped onion. Add two minced garlic cloves for flavor. Sprinkle in one tablespoon of flour, one teaspoon of paprika, and half a teaspoon of salt. Don’t forget a quarter teaspoon of black pepper. Stir everything together until well blended. Make sure each ingredient is evenly distributed for the best taste. Heat two tablespoons of olive oil in a large skillet over medium heat. You want the oil to shimmer but not smoke. Take a handful of the sweet potato mixture and press it into a flat patty. Carefully place the patty into the hot skillet. Make sure to leave space between each patty. Cook them for about 4-5 minutes on each side. You want them to be golden-brown and crispy. Watch the heat closely to avoid burning. After cooking, place the hash browns on a plate lined with paper towels to soak up extra oil. Before serving, sprinkle some fresh herbs on top for added flavor and color. Enjoy your crispy sweet potato hash browns! To make your sweet potato hash browns crispy, start by removing moisture. After grating the sweet potatoes, place them in a kitchen towel. Twist the towel tightly to squeeze out excess water. This step is key to getting that golden-brown crunch. Cooking temperature also matters. Use medium heat for even cooking. If the heat is too low, the hash browns will become soggy. If it's too high, they may burn before cooking through. To boost the flavor of your hash browns, add spices or herbs. Spices like paprika, garlic powder, or cayenne can give a nice kick. Fresh herbs like parsley or chives add brightness and color. You can mix these in the batter or sprinkle them on top before serving. Experiment with flavors to find what you love best. For perfect hash browns, choose the right tools. A large non-stick skillet works wonders. It helps prevent sticking and allows for easy flipping. A spatula with a flat edge is also great for pressing down the patties. If you have a box grater or food processor, they can save time while grating sweet potatoes. Keep these tools handy to make your cooking experience smooth and enjoyable. Pro Tips Maximize Crispiness: Ensure you squeeze out as much moisture as possible from the grated sweet potatoes to achieve that desired crispy texture. Even Cooking: Avoid overcrowding the skillet; give each patty enough space to cook evenly without steaming. Flavor Boost: Experiment with spices such as cayenne pepper or cumin for an extra kick in flavor that complements the sweetness of the potatoes. Garnishing Options: Fresh herbs not only add color but also enhance the flavor; consider adding a squeeze of lemon juice for a zesty finish. {{image_4}} You can easily make sweet potato hash browns gluten-free. Just swap all-purpose flour for gluten-free flour. This keeps the same great taste without gluten. If you want a vegan option, skip the eggs and use a flaxseed mixture instead. Mix one tablespoon of flaxseed meal with three tablespoons of water. Let it sit until it thickens, then add it to your mix. This keeps the hash browns together and tasty. Feel free to get creative with flavors. Adding cheese makes the hash browns richer. Try cheddar for sharpness or mozzarella for a gooey touch. You can also add different veggies. Chopped bell peppers or spinach mix well. For a spicy kick, toss in some diced jalapeños. Just remember not to add too much moisture when you mix in extra vegetables. When serving sweet potato hash browns, think about toppings. A dollop of sour cream or Greek yogurt adds creaminess. Fresh herbs like parsley or chives give a nice pop of color. You can also serve them with a fried egg on top for extra protein. If you want a more filling meal, pair them with avocado slices or a side of salsa. Each bite will be a burst of flavor! To store leftover sweet potato hash browns, place them in an airtight container. Make sure they are completely cool before sealing. This helps keep them fresh. You can store them in the fridge for up to four days. If you want to save space, use a flat, shallow container. This allows for even cooling and easy access. For the best taste, reheat your hash browns in a skillet. Heat a little olive oil over medium heat. Add the hash browns and cook for about three to four minutes on each side. This helps them regain some crispiness. You can also use an oven. Preheat the oven to 375°F (190°C), then bake for about 10 minutes. This method keeps them warm without making them soggy. You can freeze cooked sweet potato hash browns for up to three months. Let them cool completely first. Then, place them in a freezer-safe bag. Make sure to remove as much air as possible before sealing. When you're ready to eat, you can reheat them straight from the freezer. Just add a few extra minutes to the cooking time. To make sweet potato hash browns crispy, you must remove moisture. After grating the sweet potatoes, wrap them in a clean kitchen towel. Twist and squeeze tightly to get rid of excess water. This step is key. Next, heat your skillet over medium heat. Add enough olive oil to coat the bottom. When the oil shimmers, it's ready. Form your sweet potato mixture into flat patties and place them in the hot oil. Ensure there is space between each patty. Cook for about 4-5 minutes on each side. Adjust the heat if they brown too fast. This method helps create that perfect crispy texture. Yes, you can prepare the sweet potato mixture ahead of time. After mixing the grated sweet potatoes with onion, garlic, and spices, store it in an airtight container. Refrigerate it for up to 24 hours. Just remember, don't add the flour until you're ready to cook. This keeps the mixture fresh and helps it hold together better when frying. When you're ready to cook, simply add the flour, mix, and fry as usual. Sweet potato hash browns pair well with many dishes. You can serve them with eggs for breakfast. They also make a great side for lunch or dinner. Try them with avocado slices, salsa, or sour cream for a tasty twist. For a heartier meal, add them to a breakfast burrito. They also work well in veggie bowls or alongside grilled meats. The options are endless! In this post, we explored making delicious sweet potato hash browns. We covered main and dry ingredients, cooking tips, and variations. Remember to remove moisture for crispiness and use the right tools. You can modify the recipe for special diets and enhance flavors with spices. Store leftovers properly to enjoy later. These sweet potato hash browns can be a tasty addition to any meal. Enjoy the process and get creative with your flavors!

If you love crispy, golden-brown hash browns but want a delicious twist, this Sweet Potato Hash Browns recipe is for you! Made with sweet potatoes, onion, and garlic, these hash …

Read more

Categories Breakfast

Soft Batch Chocolate Chip Cookies Deliciously Chewy Treat

December 1, 2025December 15, 2024 by Chef Tavio
To make these soft batch chocolate chip cookies, you need the right ingredients. Each one plays a key role in creating that perfect chewy texture and rich flavor. Here’s what you will need: - 1 cup unsalted butter, softened - 3/4 cup brown sugar, tightly packed - 1/4 cup granulated sugar - 1 large egg - 2 teaspoons pure vanilla extract - 2 cups all-purpose flour - 1/2 teaspoon baking soda - 1/2 teaspoon baking powder - 1/2 teaspoon fine sea salt - 1 1/2 cups chocolate chips - 1/2 cup walnuts or pecans, finely chopped (optional) When picking your ingredients, quality matters. Use fresh butter and real vanilla for the best taste. If you like nuts, feel free to toss in walnuts or pecans. They add a nice crunch and flavor contrast. The balance of sugars is also important. Brown sugar gives moisture and chewiness, while granulated sugar helps with structure. This blend leads to cookies that are soft and slightly crispy on the edges. Don’t skip the baking soda and baking powder. These help the cookies rise and stay soft. Lastly, choose your chocolate chips wisely. Milk chocolate is sweet and creamy. Dark chocolate offers a richer flavor. {{ingredient_image_2}} - Preheat your oven to 350°F (175°C). - Line your baking sheet with parchment paper. - In a large bowl, mix softened butter, brown sugar, and granulated sugar. - Use an electric mixer to blend until light and fluffy. - Crack one large egg into the bowl. - Add two teaspoons of pure vanilla extract. - Beat the mixture until the egg and vanilla blend well. - In another bowl, whisk together two cups of all-purpose flour, - 1/2 teaspoon baking soda, - 1/2 teaspoon baking powder, - 1/2 teaspoon fine sea salt. - Gradually add the dry mix to the wet ingredients. - Stir gently until just combined; a few flour streaks are fine. - Fold in one and a half cups of chocolate chips. - Add 1/2 cup of finely chopped walnuts or pecans if using. - Use a cookie scoop to drop rounded balls of dough onto the sheet. - Space them about two inches apart. - Bake for 10-12 minutes until edges are golden. - Let cookies cool on the baking sheet for about five minutes. - This helps them firm up before moving to a wire rack. To get that soft texture, do not overmix your dough. Mixing too much can make cookies tough. When you add the dry ingredients, mix just until combined. A few flour streaks are fine. Also, leave the centers slightly underbaked. This ensures they stay chewy and soft after cooling. The best type of cookie sheets are light-colored ones. Dark sheets can cook the edges too fast. Use parchment paper for easy removal and cleanup. I recommend using a cookie scoop. This helps you make uniform-sized cookies, which bake evenly. For a perfect treat, serve your cookies with a glass of cold milk. Ice cream is another great pairing. You can also arrange the cookies on a colorful platter for a nice look. A bright fabric underneath makes it pop even more. Pro Tips Use Room Temperature Ingredients: Ensure your butter and egg are at room temperature for better mixing and a softer cookie texture. Don’t Overmix the Dough: Mix until just combined to keep your cookies soft and chewy; overmixing can lead to tougher cookies. Chill the Dough: For even softer cookies, chill the dough for at least 30 minutes before baking to enhance flavor and control spread. Experiment with Mix-Ins: Customize your cookies by adding different types of chocolate or nuts to create unique flavor combinations. {{image_4}} You can use either dark or milk chocolate chips in these cookies. Dark chocolate gives a rich and deeper flavor. Milk chocolate is sweeter and adds a nice creaminess. I often mix them for a fun twist. This lets you enjoy the best of both worlds! When you try different types, you may find a new favorite. Adding nuts to your cookies can create a wonderful texture. You can use walnuts, pecans, or even almonds. Chop them finely and fold them into the dough. This small change makes a big difference. Nuts add crunch and flavor, balancing the sweet chocolate. For gluten-free cookies, swap all-purpose flour with almond or coconut flour. These flours work well and still give a tasty result. Just remember, the texture may change a bit. For vegan cookies, use coconut oil instead of butter. You can replace the egg with a flax or chia seed mixture. This keeps the cookies soft and chewy while meeting different diets. To keep your cookies fresh, use an airtight container. This helps them stay soft and chewy. You can stack them in layers with parchment paper in between. This way, they won't stick together. Freezing Cookie Dough: 1. Scoop the dough into balls and place them on a baking sheet. 2. Freeze the dough for about an hour. 3. Once frozen, transfer the dough balls to a freezer bag. 4. Seal the bag tightly, removing as much air as you can. Freezing Baked Cookies: 1. Let the cookies cool completely. 2. Place them in a single layer in a freezer-safe container. 3. Use parchment paper between layers if needed. 4. Seal the container tightly and label it with the date. At room temperature, these cookies will last about one week. If you want them to stay fresh longer, store them in the fridge. You can also freeze them to enjoy later. To make cookies chewy, focus on a few key points. First, use more brown sugar than white sugar. Brown sugar adds moisture and softness. Next, don’t overmix your dough. Mixing too much can make cookies tough. Finally, bake them just until the edges are golden, leaving the centers a bit underbaked. This keeps them soft and chewy. Yes, you can use salted butter. It will add a slight saltiness to your cookies. This can enhance the flavor of the chocolate. However, if you do use salted butter, reduce the added salt in your recipe. Unsalted butter gives you more control over the salt level. It’s often preferred in baking. If you don’t have brown sugar, you can make a simple substitute. Mix one cup of granulated sugar with one tablespoon of molasses. This will give you a similar flavor and moisture. If you don’t have molasses, you can use honey or agave syrup, but it may change the texture slightly. Absolutely! You can add different mix-ins to make your cookies unique. Consider using white chocolate chips, peanut butter chips, or dried fruit. You can also try nuts like almonds or hazelnuts. Each mix-in can give your cookies a new flavor and texture. Just keep the total amount of mix-ins around 1.5 cups. This blog post covered everything you need to bake delicious cookies. We discussed key ingredients, from butter to chocolate chips. You learned simple steps to prep and bake, plus tips for soft, chewy cookies. Variations let you get creative, and storage tips keep your cookies fresh. Baking cookies can be fun and easy. I hope you enjoy the process and share your tasty treats!

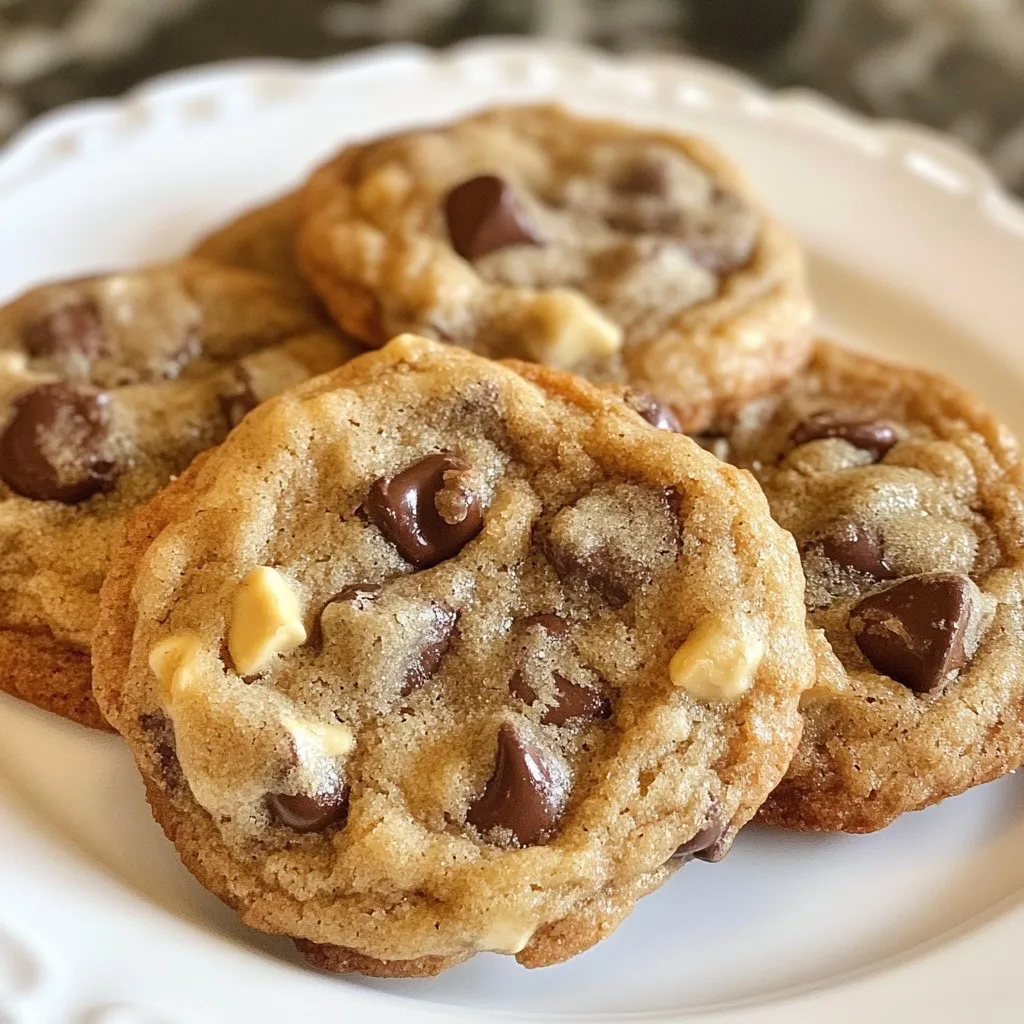
If you crave the softest, chewiest chocolate chip cookies, you’re in the right place! I’ll guide you through an easy recipe that yields cookies so good, they’ll vanish in minutes. …

Read more

Categories Desserts

Meal-Prep Breakfast Burrito Bowls Simple and Tasty

November 16, 2025December 15, 2024 by Chef Tavio
- 1 cup brown rice, cooked - 1 cup black beans, rinsed and drained - 4 large eggs - 1 cup cherry tomatoes, halved - 1 ripe avocado, diced - ½ medium onion, finely diced - 1 bell pepper, diced (choose any color that you prefer) - ½ cup corn kernels (fresh or frozen) - 1 teaspoon smoked paprika - 1 teaspoon ground cumin - Salt and pepper, to taste - ¼ cup fresh cilantro, chopped (optional) - Lime wedges for serving To make your meal-prep breakfast burrito bowls shine, start with these main ingredients. Brown rice serves as a hearty base. Black beans add protein and fiber. Eggs give you a rich, savory flavor. Cherry tomatoes and avocado bring freshness and creaminess. Now, let’s add some color and spice with the vegetables and seasonings. Onions and bell peppers provide sweetness when cooked. Corn kernels add a nice crunch. Smoked paprika and ground cumin bring warmth and depth to the dish. Salt and pepper enhance all these flavors. For the finishing touch, consider using optional garnishes. Fresh cilantro adds a bright taste. Lime wedges bring a zesty kick when you squeeze them over the bowl. These simple ingredients create a tasty and balanced meal that you can enjoy throughout your busy week. {{ingredient_image_2}} To cook brown rice, rinse one cup under cold water. This removes excess starch. In a pot, add the rice and two cups of water. Bring it to a boil over high heat. Once boiling, reduce the heat to low and cover. Let it simmer for about 45 minutes. Turn off the heat and let it sit for 10 minutes. Fluff the rice with a fork, then set it aside. For perfect sautéing, heat a skillet over medium heat. Add a drizzle of olive oil. Once hot, toss in the diced onion and bell pepper. Cook for about 5-7 minutes. Stir often, letting them soften and become fragrant. If you want extra flavor, add a pinch of salt while cooking. This helps draw out the moisture. Crack four large eggs into a mixing bowl. Add one teaspoon of smoked paprika, one teaspoon of ground cumin, and a pinch of salt and pepper. Whisk the mixture until it's blended well. Pour it into the skillet with the cooked vegetables. Stir gently with a spatula. Cook for about 3-4 minutes until the eggs are set but still moist. Start each bowl with a layer of cooked brown rice at the bottom. Next, add a layer of rinsed black beans. Then, scoop in the egg and vegetable mix. Top each bowl with halved cherry tomatoes, diced avocado, and corn kernels. Arrange these toppings in a colorful way. If you like, sprinkle chopped cilantro on top for extra flavor. After assembling, secure the lids on your meal-prep containers. Place the bowls in the refrigerator. They will stay fresh for up to four days. For easy meals, simply grab a bowl when you're hungry. Enjoy your healthy breakfast burrito bowls any day of the week! Efficient cooking saves time and energy. Start with cooking the brown rice first. It takes about 15 minutes. While it cooks, you can chop your veggies and prep the eggs. Sauté the onion and bell pepper in a skillet. This method uses one pan, which cuts down on cleanup. You can cook the eggs in the same skillet after the veggies. This keeps flavors together and makes your meal more tasty. These breakfast burrito bowls are not just delicious; they are also healthy. Each bowl has about 400 calories. The brown rice gives you fiber and energy. Black beans add protein and more fiber. Avocado provides healthy fats, while veggies add vitamins. These bowls are balanced and will keep you full through the morning. A colorful meal looks more appetizing. Layer your ingredients in the bowl to show each color. Start with rice, then add black beans, followed by eggs, and top it with tomatoes and avocado. This makes each layer visible and fun to eat. Adding lime wedges on the side gives a fresh look too. When you serve these bowls, guests will be impressed! Pro Tips Use Fresh Ingredients: Opt for fresh vegetables and ripe avocados for the best flavor and nutrition in your breakfast burrito bowls. Customize Your Spices: Feel free to adjust the spices according to your taste. Add chili powder for heat or oregano for an Italian twist. Storage Tips: Use airtight containers to keep your meal-prep bowls fresh. They can last up to 5 days in the refrigerator. Reheating Advice: When ready to eat, reheat in the microwave for about 1-2 minutes. Squeeze some lime juice on top for added flavor! {{image_4}} You can swap the eggs with protein like chicken or tofu. Tofu works well for a plant-based option. Simply cube and sauté it until golden. For chicken, use cooked, shredded pieces. Both choices keep the meal tasty and filling. To make it more veggie-friendly, add extra vegetables. You can include spinach, zucchini, or even kale. Legumes like lentils or chickpeas are also great to boost protein. They add texture and make the bowl heartier. You can change the spice level to suit your taste. Add chili powder for heat or cayenne for a kick. If you love smoky flavors, increase the smoked paprika. Experiment with herbs like oregano or cilantro for fresh notes. This way, you can create your perfect breakfast burrito bowl! To keep your breakfast burrito bowls fresh, use airtight containers. Glass or BPA-free plastic containers work well. Choose containers that can hold all your layers without squishing them. Make sure to leave some space at the top to prevent spills when you close the lid. Store your bowls in the fridge for easy grab-and-go meals. If you want to make burrito bowls ahead, freezing is a great option. Cool the bowls completely before freezing. This helps to prevent ice crystals. For best results, use freezer-safe containers or zip-top bags. Label each container with the date. You can store them for up to three months. When ready to eat, you can thaw overnight in the fridge for easy reheating. To reheat your burrito bowls, you can use the microwave or stovetop. If using a microwave, remove the lid and heat for 1-2 minutes. Stir halfway through to ensure even heating. For stovetop reheating, place the bowl in a skillet over low heat. Add a splash of water to keep it moist. Stir until everything is warm. Enjoy your tasty meal! Meal-prep breakfast burrito bowls last about 4-5 days in the fridge. They stay fresh when stored in airtight containers. If you want to freeze them, they can last up to 3 months. Just remember to let them cool before sealing and freezing. When you're ready to eat, thaw them overnight in the fridge. Yes, you can make this recipe vegan. Replace the eggs with scrambled tofu or chickpea flour. You can also add extra veggies for protein. Use nutritional yeast for a cheesy flavor. The rest of the ingredients work well, so feel free to mix and match. You can get creative with toppings for your burrito bowls. Here are some ideas: - Salsa or pico de gallo - Shredded lettuce - Jalapeños for heat - Sour cream or vegan yogurt - Cheese or vegan cheese - Hot sauce for extra flavor These toppings add variety and make your meals more exciting! This blog post detailed how to create delicious meal-prep burrito bowls. We covered the key ingredients like brown rice, black beans, and fresh veggies. I shared easy instructions for cooking, sautéing, and assembling. Then, we explored tips for meal prep and impressive presentations. You can customize these bowls with various proteins and spices, plus learn the best storage methods. Now, you can enjoy tasty burrito bowls any day of the week!

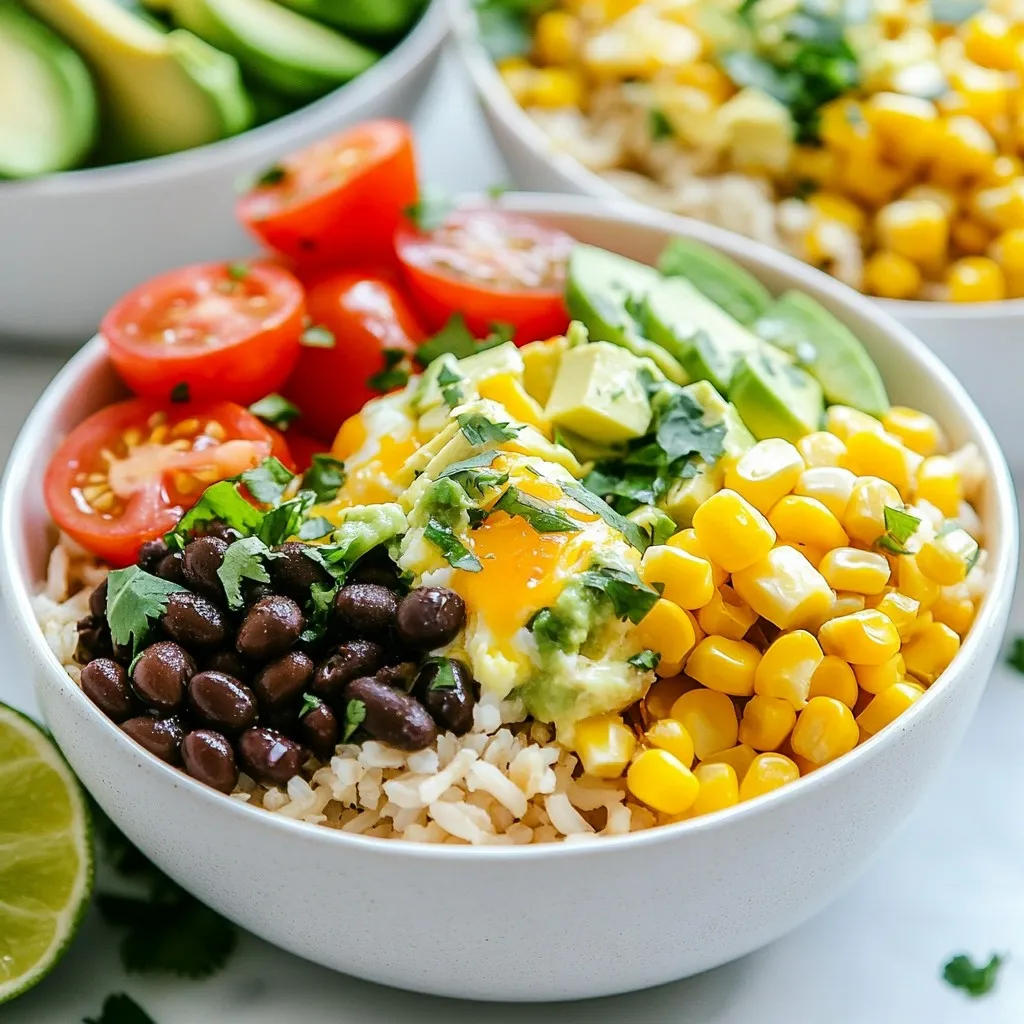
Are you ready to simplify your mornings with a tasty breakfast? Meal-prep breakfast burrito bowls are not only quick to make but also full of flavor and nutrients. In this …

Read more

Categories Breakfast

Protein Packed Greek Yogurt Blueberry Pancakes Treat

November 28, 2025December 14, 2024 by Chef Tavio
- 1 cup whole wheat flour - 1 tablespoon baking powder - 1/2 teaspoon salt - 1 cup Greek yogurt (plain, unsweetened) - 1/2 cup milk (dairy or non-dairy) - 2 large eggs - 2 tablespoons honey or maple syrup - 1 teaspoon vanilla extract - 1 cup fresh blueberries (or frozen if not in season) - Cooking spray or butter for greasing the pan Greek yogurt is a star ingredient in these pancakes. It packs protein, which helps build muscle. Each cup of Greek yogurt gives you about 20 grams of protein. This helps keep you full longer. It also has probiotics, which support gut health. Plus, it's lower in sugar than regular yogurt. This makes it a great choice for a healthy breakfast. When it comes to blueberries, both fresh and frozen work well. Fresh blueberries burst with flavor and color. They give your pancakes a nice pop. On the other hand, frozen blueberries are great when fresh ones are out of season. They are picked at peak ripeness, so they still taste sweet. Just toss them in the batter frozen to avoid mushiness. Either way, you’ll end up with tasty pancakes! {{ingredient_image_2}} First, gather your dry ingredients. In a large bowl, combine: - 1 cup whole wheat flour - 1 tablespoon baking powder - 1/2 teaspoon salt Whisk them together. Ensure there are no dry clumps. A good mix helps the pancakes rise. Now, it's time for the wet ingredients. In another bowl, blend: - 1 cup Greek yogurt (plain, unsweetened) - 1/2 cup milk (dairy or non-dairy) - 2 large eggs - 2 tablespoons honey or maple syrup - 1 teaspoon vanilla extract Use a whisk or fork. Mix until smooth and creamy. This blend gives the pancakes their rich taste. Heat a non-stick skillet over medium heat. Lightly grease it with cooking spray or butter. For each pancake, pour about 1/4 cup of batter onto the skillet. Cook until you see bubbles form. This takes about 2-3 minutes. Flip the pancake with a spatula. Cook for another 2-3 minutes until golden brown. Keep pancakes warm on a plate while you finish the rest. Enjoy your tasty breakfast! To make fluffy pancakes, don't over-mix your batter. Mix until just combined. A few lumps are okay. This keeps air in the batter. Air makes the pancakes light and fluffy. Let the batter rest for a few minutes before cooking. This helps with texture too. Use a non-stick skillet or griddle. It helps prevent sticking. A good spatula is vital for flipping. Consider a measuring cup for even pancake sizes. A whisk is great for mixing wet and dry ingredients. These tools will give you the best results. Avoid using cold ingredients straight from the fridge. Room temperature eggs and milk work best. This helps the batter mix more evenly. Don't cook on high heat; it can burn the pancakes. Also, resist the urge to flip too soon. Wait for bubbles to form on the surface. This ensures they cook properly. Pro Tips Use Fresh Blueberries: Opt for fresh blueberries when in season for the best flavor and texture. If using frozen, make sure to thaw and drain them to avoid excess moisture in the batter. Don’t Over-Mix: When combining wet and dry ingredients, mix just until combined. Over-mixing can lead to tough pancakes, so leave some small lumps in the batter for light, fluffy results. Keep the Heat Moderate: Cook your pancakes over medium heat to ensure they cook evenly without burning. If they brown too quickly, lower the temperature to give them time to cook through. Experiment with Add-Ins: Feel free to add other ingredients like chopped nuts or spices (like cinnamon) to the batter for a unique twist. Just be sure to adjust the liquid slightly if needed. {{image_4}} You can easily change this recipe to fit your diet. If you're gluten-free, use a gluten-free flour blend. For a dairy-free option, swap Greek yogurt and milk with coconut yogurt and almond milk. This keeps the pancakes soft and tasty. If you're vegan, try using flax eggs instead of regular eggs. Just mix one tablespoon of ground flaxseed with three tablespoons of water and let it sit for a few minutes. It thickens up nicely! Want to make your pancakes more exciting? Add-ins are a great way to boost flavor. You can sprinkle in some chopped nuts like walnuts or pecans for a crunchy bite. If you love chocolate, mix in some dark chocolate chips for a sweet twist. You can also try a hint of cinnamon or nutmeg for extra warmth. Just remember not to overmix when you add these extras! How you serve your pancakes can make a big difference. For a classic touch, drizzle warm maple syrup or honey over the top. Fresh fruit like sliced bananas or extra blueberries adds color and nutrition. You can also use yogurt as a topping for creaminess and protein. For a fun twist, sprinkle some powdered sugar on top for a sweet finish. Enjoying these pancakes with a side of scrambled eggs can make it a complete meal! After you make your protein-packed pancakes, let them cool down. Once cool, stack them with a piece of parchment paper between each pancake. This prevents them from sticking together. Place the stack in an airtight container. Store it in the fridge for up to three days. When you want to enjoy your leftover pancakes, you can use the microwave or a skillet. If using the microwave, heat them for about 20-30 seconds. Check if they are warm enough. For the skillet, heat over low heat for a few minutes until warm. Both methods keep the pancakes soft. To freeze your pancakes, follow the cooling and stacking method mentioned before. Place the stacked pancakes in a freezer-safe bag or container. They can last in the freezer for up to two months. When ready to eat, thaw them overnight in the fridge. Then reheat as mentioned above. Enjoy your tasty breakfast anytime! You can make pancakes without eggs by using alternatives. Common substitutes include mashed banana, applesauce, or flaxseed meal. For one egg, mix one tablespoon of ground flaxseed with three tablespoons of water. Let it sit for a few minutes until it thickens. This mixture helps bind the ingredients, similar to eggs. Yes, you can use other flours in this recipe. Almond flour, oat flour, or gluten-free blends work well. Each flour has a different taste and texture. Whole wheat flour gives a nutty flavor and more fiber. If you use a lighter flour, like all-purpose, your pancakes might be fluffier. Adjust the liquid in the recipe as needed, as different flours absorb moisture differently. These pancakes are high in protein mainly due to Greek yogurt. One cup of Greek yogurt has about 20 grams of protein. This is a great source for energy and helps build muscle. The eggs also add protein. Whole wheat flour contributes a bit as well, making these pancakes a healthy choice for breakfast. This blog post covered how to make great pancakes with Greek yogurt and blueberries. I shared ingredient lists, steps for mixing and cooking, and tips for fluffy results. You learned about variations for different diets and how to store leftovers. In my view, pancakes should be tasty and fun. Now, you can create delicious, protein-rich pancakes at home. Enjoy exploring all the options!

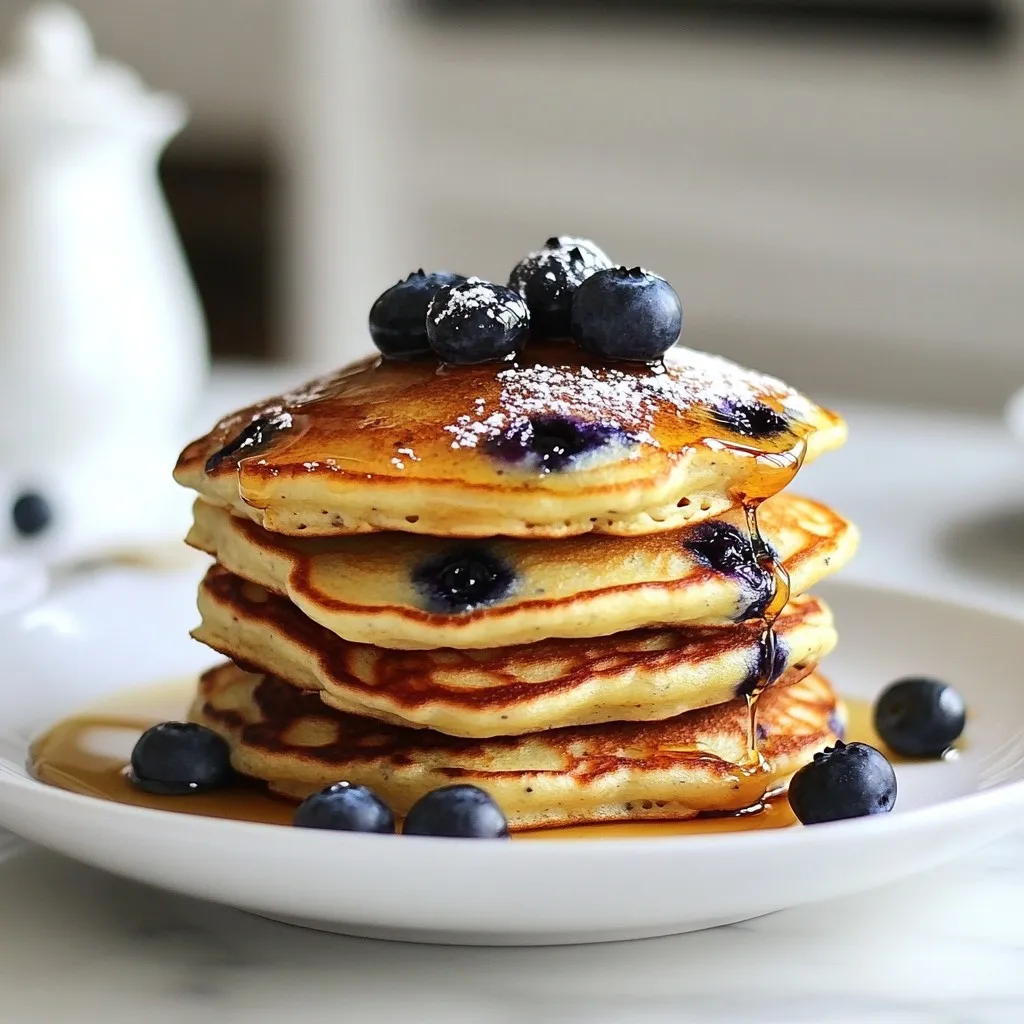
Start your day right with my Protein Packed Greek Yogurt Blueberry Pancakes! These tasty treats are not just delicious; they are a powerhouse of nutrition. Greek yogurt adds protein, while …

Read more

Categories Breakfast

Creamy Garlic Chicken Dinner Rich and Flavorful Meal

November 23, 2025December 14, 2024 by Chef Tavio
- 4 boneless, skinless chicken breasts - 1 tablespoon olive oil - 4 cloves garlic, minced - 1 cup heavy cream - 1 cup chicken broth - 1 teaspoon Dijon mustard - 1 teaspoon Italian seasoning - ½ cup grated Parmesan cheese - Salt and pepper to taste To make Creamy Garlic Chicken, you need key ingredients. First, you need chicken breasts. They serve as the main protein in your dish. Next, you’ll want heavy cream and chicken broth. These create a rich, creamy sauce. Garlic adds a strong flavor, making the dish pop. Don’t forget the seasonings! Dijon mustard and Italian seasoning enhance the taste. Salt and pepper finish off the flavor profile, making each bite delicious. - Fresh parsley - Suggested side dishes: steamed vegetables or garlic bread For a touch of color, use fresh parsley as a garnish. It adds a nice green contrast to the creamy sauce. You can also pair this dish with sides. Steamed vegetables bring freshness to the plate. Garlic bread complements the meal and is great for soaking up the sauce. These options make your dinner feel complete and satisfying. {{ingredient_image_2}} 1. Heat a large skillet over medium heat and add 1 tablespoon of olive oil. Let the oil warm up. 2. Season both sides of 4 boneless, skinless chicken breasts with salt and pepper. This adds flavor. 3. Once the oil is hot, carefully add the chicken to the skillet. Cook each side for 5-7 minutes. You want the chicken to be golden brown and cooked through. The inside should reach 165°F (75°C). 4. After cooking, remove the chicken from the skillet and place it on a plate. 1. In the same skillet, reduce the heat slightly. Add 4 minced garlic cloves and sauté for about 1 minute. Stir until the garlic smells good, but don’t let it burn. 2. Pour in 1 cup of chicken broth. Bring it to a gentle simmer. Use a wooden spoon to scrape the skillet. This gets all the tasty bits from the chicken into the sauce. 3. Now, stir in 1 cup of heavy cream, 1 teaspoon of Dijon mustard, and 1 teaspoon of Italian seasoning. Let this simmer for 3-4 minutes while stirring. This will thicken the sauce. 4. Gradually add ½ cup of grated Parmesan cheese. Keep stirring until the cheese melts into the sauce. Taste it, and add more salt and pepper if you like. 1. Return the cooked chicken to the skillet. Make sure each piece is covered in the creamy garlic sauce. Let it simmer for another 2-3 minutes. This helps the chicken soak up all the flavors. 2. To serve, place each chicken breast on a plate. Drizzle the creamy garlic sauce generously over the top. 3. For a nice touch, sprinkle finely chopped fresh parsley on top. This adds a pop of color and freshness. Enjoy your rich and flavorful creamy garlic chicken dinner! - To keep chicken juicy, use boneless, skinless breasts. They cook evenly. - Heat the skillet before adding the chicken. This helps sear the meat. - Season both sides with salt and pepper. This builds flavor from the start. - Cook the chicken for 5-7 minutes on each side. Check if it's golden brown. - Aim for an internal temperature of 165°F (75°C). A meat thermometer helps here. - To adjust flavor, try adding lemon juice for brightness. - Fresh herbs like thyme or rosemary can add depth. - If you want richness, consider adding a splash of white wine. - For a kick, a pinch of red pepper flakes works well. - You can also toss in sautéed mushrooms for extra texture. Pro Tips Resting the Chicken: Allow the chicken to rest for a few minutes after cooking to retain its juices, ensuring a moist and flavorful dish. Garlic Timing: Add garlic towards the end of the cooking process to prevent it from burning, which can make the sauce taste bitter. Cheese Quality: Use freshly grated Parmesan cheese for the best flavor and texture, as pre-packaged cheese often contains anti-caking agents that can affect melting. Flavor Enhancements: For an extra flavor boost, consider adding a splash of white wine to the sauce after sautéing the garlic, letting it reduce before adding the broth. {{image_4}} You can switch up the protein in this creamy garlic chicken dish. Turkey or pork works great. For turkey, use cutlets. They cook fast and stay moist. For pork, try thin chops. Cook them the same way as chicken. If you want a vegetarian option, use mushrooms or tofu. Both absorb flavors well. Sauté the mushrooms until they are golden. For tofu, press it first to get rid of extra water. Then, cook it until crispy. You can change the flavors in this dish easily. Different herbs and spices can add unique tastes. Try adding thyme or rosemary for an earthy touch. A pinch of red pepper flakes can give a nice kick. Adding vegetables can make the dish even better. You can toss in spinach, broccoli, or bell peppers. Cook them with the garlic for a few minutes. This adds color and nutrition to your meal. Plus, it makes the dish more filling. To keep your creamy garlic chicken fresh, follow these steps: - Refrigeration guidelines: Let the chicken cool to room temperature. Place it in an airtight container. Store in the fridge for up to 3 days. Always check for any signs of spoilage before eating. - Freezing instructions: If you want to keep it longer, freeze the chicken. Use a freezer-safe container or bag. This will keep it good for up to 3 months. For best results, freeze the chicken without the sauce. You can add the sauce later when you reheat. To enjoy your creamy garlic chicken again, reheating is key: - Best methods to reheat without losing flavor: The best way to reheat is on the stove. Place the chicken in a skillet over low heat. Add a splash of chicken broth or cream to keep it moist. Stir gently until heated through. You can also use the microwave, but be careful not to overcook it. Heat it in short bursts and check often. Enjoy your meal just like the first time! What can I substitute for heavy cream? You can use half-and-half or whole milk. If you want a lighter option, try Greek yogurt. Mix it with a little milk for a creamy texture. Coconut milk is also a great dairy-free choice. Each option will slightly change the taste but still create a tasty dish. How do I make the sauce thicker? To thicken the sauce, let it simmer longer. The longer it cooks, the thicker it will get. You can also add a cornstarch slurry. Mix one tablespoon of cornstarch with two tablespoons of cold water. Stir it into the sauce and cook for a few minutes until it thickens. Another option is to add more cheese, like Parmesan. How long should I cook the chicken? Cook the chicken for about 5-7 minutes on each side. The internal temperature should reach 165°F (75°C). This ensures it's safe to eat and juicy. Can I make this recipe ahead of time? Yes, you can! Cook the chicken and sauce, then store them in the fridge. Reheat gently on the stove when ready to serve. You may need to add a splash of broth or cream to bring back the sauce's creaminess. In this blog post, we explored how to make Creamy Garlic Chicken. We covered the main ingredients, including chicken breasts, heavy cream, and garlic. You learned step-by-step cooking instructions, tips for juicy chicken, and sauce ideas. Remember, you can switch proteins and add your favorite herbs. Storing leftovers correctly keeps your meal fresh. This dish is easy to master and full of flavor. Enjoy making it for your next meal!

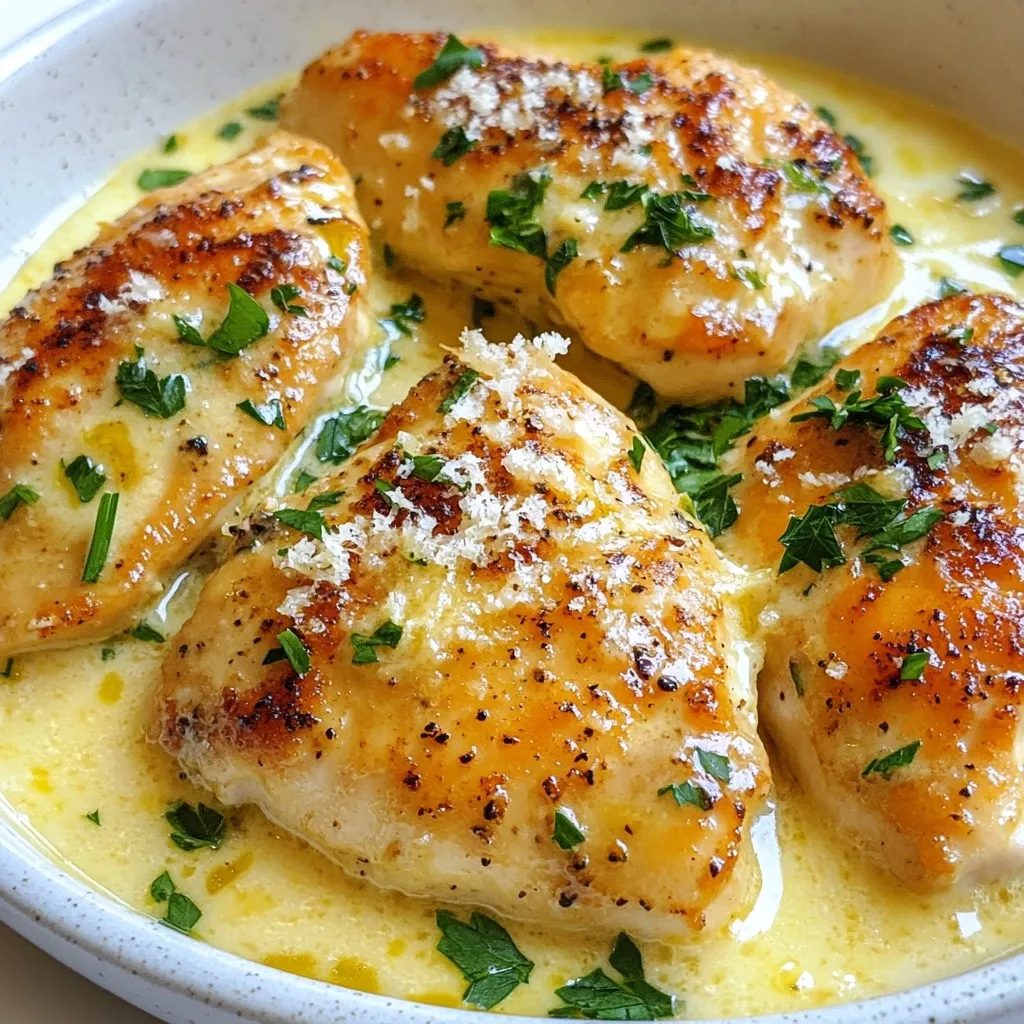
Looking for a meal that’s both rich and quick? My Creamy Garlic Chicken Dinner is your answer! This dish combines tender chicken breasts with a luscious garlic sauce made from …

Read more

Categories Dinner

Oven-Baked Chicken Taquitos Crispy and Flavorful Treat

November 24, 2025December 13, 2024 by Chef Tavio
- 2 cups cooked, shredded chicken - 1 cup shredded cheese (cheddar or Mexican blend) - 1/2 cup sour cream - 1/2 cup salsa The main ingredients are key to flavor. I love using cooked, shredded chicken. It adds great texture. Shredded cheese, like cheddar or a Mexican blend, melts well and adds creaminess. Sour cream gives a nice tang, and salsa adds spice and moisture. - Corn vs. flour tortillas - Size recommendations You can use corn or flour tortillas. Corn tortillas are gluten-free and have a nice taste. Flour tortillas are softer and easier to roll. I suggest using small tortillas. They fit well in your hand and are easy to eat. Aim for 6-inch size for the best results. - 1 teaspoon garlic powder - 1 teaspoon ground cumin - Salt and black pepper to taste - Fresh cilantro for garnish Seasoning makes a big difference. Garlic powder adds depth, and cumin gives warmth. A pinch of salt and black pepper balances the flavors. Fresh cilantro is a great garnish. It adds color and a fresh kick. {{ingredient_image_2}} Set your oven to 425°F (220°C). This temperature gives the best crisp. In a big bowl, mix these items: - 2 cups cooked, shredded chicken - 1 cup shredded cheese (cheddar or Mexican blend) - 1/2 cup sour cream - 1/2 cup salsa - 1 teaspoon garlic powder - 1 teaspoon ground cumin - Salt and black pepper, to taste Stir well until all parts blend evenly. This makes a yummy filling. To warm the tortillas, place them in the microwave. Heat them for 20-30 seconds. This makes them soft and easy to roll. Take a tortilla and put about 2-3 tablespoons of filling in the center. Roll it up tightly. Make sure the filling stays inside. Place the rolled taquito seam side down on a baking sheet. Put the baking sheet in the oven. Bake for 15-20 minutes. Look for a golden brown color. This shows they are crispy and ready. To make your taquitos crispy, the right oil matters. I prefer olive oil for brushing. It adds flavor and helps with browning. You can also use cooking spray for ease. Adjusting baking time is key, too. Every oven is different. Start with 15 minutes, but check for crispiness after that. Preventing tortilla cracking is easy. Warm them in the microwave for 20-30 seconds. This makes them flexible. When you fill the taquitos, use even amounts of filling. This helps them cook evenly. Too much filling can make rolling hard and lead to bursts. For sides, consider fresh guacamole and salsa. They pair well with taquitos. You can also serve them with a light salad. This adds freshness to your meal. Another option is to make a creamy dip with sour cream. It brings extra flavor to your dish. Pro Tips Warm Your Tortillas: Warming the tortillas makes them more pliable, preventing cracks when rolling your taquitos. Don’t Overfill: Be cautious not to overfill the tortillas; 2-3 tablespoons of filling is perfect for easy rolling and crispiness. Use Parchment Paper: Line your baking sheet with parchment paper for easy cleanup and to prevent the taquitos from sticking. Experiment with Fillings: Feel free to add your favorite ingredients like black beans, corn, or jalapeños for extra flavor and texture. {{image_4}} You can switch up the filling of your taquitos to suit your taste. For a vegetarian option, use black beans, corn, and bell peppers. Mix these with cheese for a hearty treat. If you want meat, beef or shredded turkey work well. You can also add pulled pork for a smoky flavor. Adding spices can make your filling pop. Try some chili powder or cayenne for heat. You can also mix in veggies. Diced jalapeños or spinach add color and crunch. Experiment with different cheeses. Monterey Jack or pepper jack give a nice twist to the flavor. You can serve taquitos in different ways. For a fun twist, create taquito bowls. Place your taquitos over a bed of rice or lettuce. Top with salsa and sour cream. If you prefer the classic style, stack them neatly on a plate. Garnish with cilantro for a fresh touch. To keep your taquitos fresh, place them in the fridge. Use an airtight container for best results. This helps to keep them moist and tasty. They can stay fresh for up to three days in the fridge. If you want to avoid sogginess, avoid stacking them. Instead, place parchment paper between layers. To reheat your taquitos, use an oven for best results. Preheat the oven to 350°F (175°C). Place the taquitos on a baking sheet. Heat for about 10 minutes until they are crispy again. You can also use an air fryer for a quicker option. Set it to 350°F and heat for about 5 minutes. This keeps them crunchy and warm. You can freeze taquitos before or after baking. If freezing before baking, roll them up and place them on a baking sheet. Make sure they don’t touch. Freeze them for about an hour, then transfer them to a freezer bag. They can last up to three months. If you freeze after baking, let them cool first. Wrap them tightly in foil or plastic wrap. Reheat directly from the freezer; add a few extra minutes to the bake time. Oven-baked chicken taquitos take 15-20 minutes to cook at 425°F (220°C). You want them to be golden and crispy. Keep an eye on them to avoid burning. Yes, you can make taquitos ahead of time. You can prepare the filling and roll the taquitos. Store them in the fridge for up to 24 hours. Just bake them when you’re ready to eat. Chicken taquitos pair well with salsa, guacamole, or sour cream. You can also try cheese dip for a creamy touch. These dips add extra flavor and fun to your meal. Yes, these taquitos are freezer-friendly! You can freeze them before or after baking. For freezing, wrap them tightly in plastic wrap. When you want to eat them, reheat in the oven for crispiness. Oven-baked chicken taquitos are simple to make and fun to eat. We covered ingredients, seasoning tips, and how to assemble and bake them just right. Remember to pick your tortillas and fillings wisely for the best flavor. Don’t forget to try different spices or dips. Enjoy your crispy taquitos, whether for a meal or a snack. These tasty bites are sure to please everyone. Now it’s time to cook and enjoy!

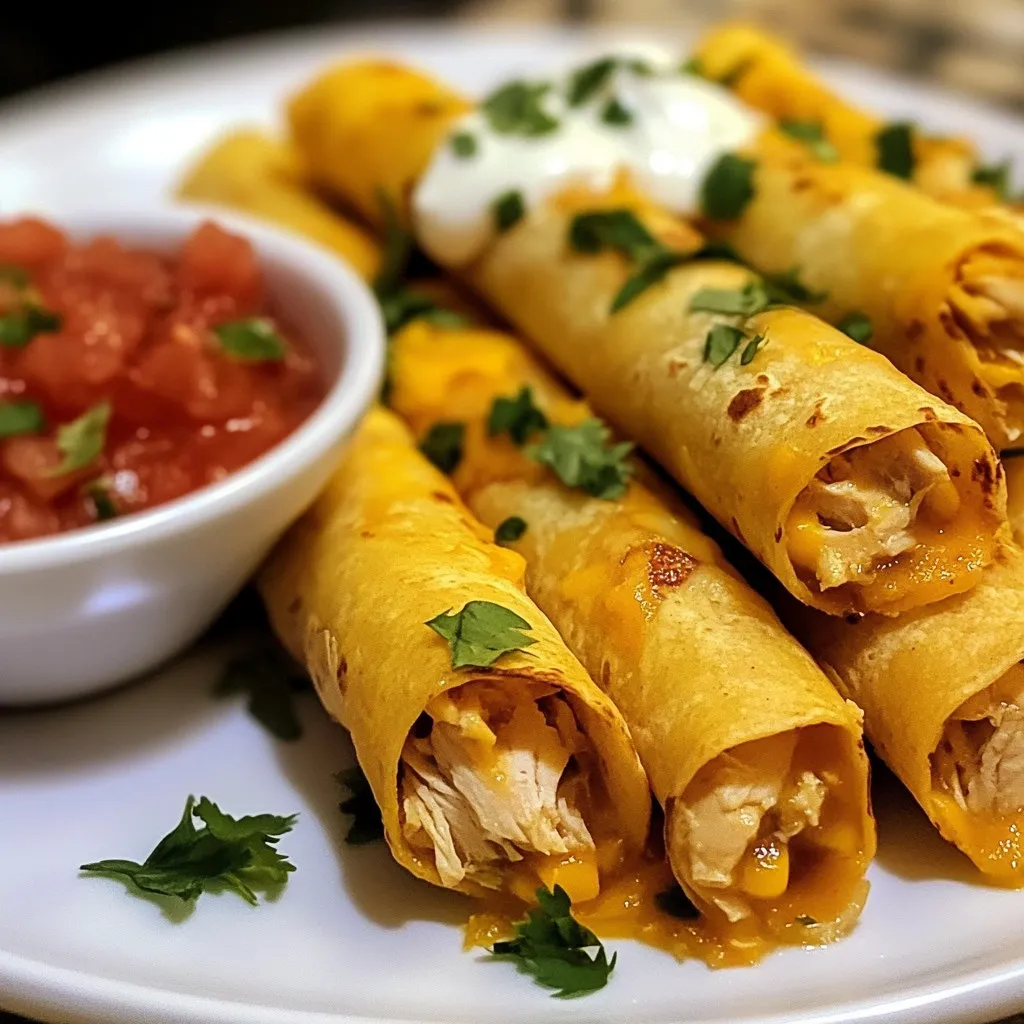
Looking for a tasty snack that’s both crispy and full of flavor? These Oven-Baked Chicken Taquitos hit the spot every time! In this guide, I’ll share the perfect blend of …

Read more

Categories Appetizers

Cheesy Dynamite Chicken Buns Flavorful and Fun Recipe

December 5, 2025December 12, 2024 by Chef Tavio
To make Cheesy Dynamite Chicken Buns, you need a few key ingredients: - 1 lb (450g) cooked chicken breast, shredded - 1 cup cream cheese, softened at room temperature - 1 cup shredded mozzarella cheese - 1/2 cup finely diced red bell pepper - 1/4 cup chopped green onions (scallions) - 2 tablespoons sriracha sauce - 8 to 10 burger buns or slider buns, split in half - 1 tablespoon melted butter These ingredients create a rich and creamy filling. The chicken adds protein, while the cream cheese and mozzarella bring that cheesy goodness. Spices can elevate this dish. Here are the essential ones: - 1 teaspoon garlic powder - Salt and pepper to taste Garlic powder gives a warm flavor. Salt and pepper enhance all the tastes and keep it balanced. Adjust the spices to match your taste. Garnishes make the dish pop. You can use: - Fresh cilantro leaves for garnish Adding cilantro brings a fresh touch. If you like spice, consider adding sliced jalapeños. They give the buns a fiery kick and a fun crunch. {{ingredient_image_2}} To start, grab a large mixing bowl. Add 1 pound of cooked shredded chicken. Next, add 1 cup of softened cream cheese. Then, mix in 1 cup of shredded mozzarella cheese. This gives the filling a nice cheesy flavor. After that, add 1/2 cup of finely diced red bell pepper for some crunch. Toss in 1/4 cup of chopped green onions for a fresh taste. Now, spice it up! Add 2 tablespoons of sriracha sauce. You can adjust this based on how spicy you like it. For a touch of flavor, sprinkle in 1 teaspoon of garlic powder. Don’t forget to add a pinch of salt and pepper to taste. Mix everything well until you have a smooth filling. Now it's time to prep the buns. Preheat your oven to 350°F (175°C). This will help the buns get nice and toasty. On a baking tray lined with parchment paper, place the bottom halves of 8 to 10 burger buns or slider buns. Take the cheesy chicken mixture you made and spoon it generously onto each bun bottom. Make sure to fill them well so you get that burst of flavor with every bite. This is where the fun starts! After filling the buns, place the tops back on. Brush 1 tablespoon of melted butter over the tops. This will help them turn a lovely golden color while baking. Now, place the tray in your preheated oven. Bake the buns for about 15-20 minutes. Keep an eye on them until the cheese is bubbling and the buns are lightly crisp. Once baked, take the tray out and let the buns cool for a few minutes. This will help you handle them better. Before serving, sprinkle freshly chopped cilantro on top for a pop of color and fresh flavor. Enjoy your Cheesy Dynamite Chicken Buns! To make the cheese mixture creamy, start with softened cream cheese. This helps it blend well with the other ingredients. Use a large bowl. Combine cooked chicken, cream cheese, mozzarella, red bell pepper, green onions, sriracha, garlic powder, and a pinch of salt and pepper. Mix until it looks smooth and colorful. If you want more heat, add extra sriracha. Taste as you go. This ensures you get the flavors just right. Preheat your oven to 350°F (175°C). This step is key for that golden brown color. When you place the buns on a baking tray, use parchment paper. It prevents sticking and makes cleanup easier. Brush melted butter on the tops of the buns before baking. This adds flavor and helps crisp them up. Bake for 15-20 minutes. Watch closely for bubbling cheese and lightly toasted buns. If they look good, they are done! Serve your Cheesy Dynamite Chicken Buns on a large platter. For a fun touch, add extra sriracha on the side for dipping. Garnish with fresh cilantro for a pop of green. You can also add sliced jalapeños for those who like extra spice. This not only looks great but also makes your dish more appealing. Enjoy the smiles when you serve these tasty buns! Pro Tips Adjust the Spice Level: Feel free to modify the amount of sriracha to suit your taste. If you prefer a milder flavor, start with less and add more as needed. Make Ahead of Time: Prepare the cheesy chicken filling in advance and store it in the refrigerator. Assemble the buns just before baking for a quick and easy meal. Use Fresh Ingredients: Fresh herbs like cilantro and green onions elevate the flavor. Opt for fresh rather than dried when possible for the best taste. Experiment with Cheese: While mozzarella adds a great stretchiness, feel free to mix in other cheeses like cheddar or pepper jack for additional flavor profiles. {{image_4}} You can make these buns spicier. Try adding sliced jalapeños or diced habaneros. Both pack a punch! You can also mix in extra sriracha if you love heat. Just remember to taste as you go. This way, you can control the spice level. Cheese can change the whole vibe of these buns. If you want a sharper taste, use aged cheddar. For something creamy, try goat cheese or even blue cheese. Mixing different cheeses can create unique flavors. Don't be afraid to experiment! Don't limit yourself to chicken. You can use shredded beef or pulled pork. For a lighter choice, shredded turkey works great too. If you want a vegetarian option, try black beans or lentils. These swaps keep the recipe fresh and fun! After you enjoy your Cheesy Dynamite Chicken Buns, cool them first. Place them in an airtight container. This keeps the buns fresh. Store them in the fridge for up to three days. If you want them to last longer, consider freezing. When you're ready to eat the leftovers, reheat them for the best taste. Preheat your oven to 350°F (175°C). Place the buns on a baking tray. Heat them for about 10-15 minutes. This makes them warm and crispy again. You can also use a microwave if you’re in a hurry. Just heat for about 1-2 minutes, but they may lose some crispness. Freezing is a smart way to save extra buns. Wrap each bun in plastic wrap first. Then, place them in a freezer-safe bag. They can stay frozen for up to three months. When you want to eat them, thaw in the fridge overnight. Then, reheat as mentioned above. Enjoy your tasty buns anytime! No, using raw chicken is not safe for this recipe. Cooked chicken gives the buns their flavor and texture. It’s best to shred leftover chicken or use rotisserie chicken. This saves time and ensures your dish is safe to eat. You can use Greek yogurt or ricotta cheese instead of cream cheese. Both options will keep the buns creamy. If you want a vegan option, try cashew cream or a dairy-free cream cheese. Each choice will add a unique twist to the flavor. To make these buns gluten-free, choose gluten-free burger or slider buns. Many stores offer great gluten-free options. Always check the labels to ensure they meet your needs. You can also make your own gluten-free buns at home for a fresh touch. We covered how to make Cheesy Dynamite Chicken Buns. You learned about the key ingredients, including spices and toppings. I shared steps for mixing the filling, prepping, and baking the buns. Helpful tips improved the cheese mix and crispiness. Variations let you customize flavors and proteins. Lastly, we discussed storage and reheating for future meals. With these details, you can create tasty buns anytime. Enjoy your cooking adventure!

Get ready to spice up your snack game with my Cheesy Dynamite Chicken Buns! This recipe is not just fun to make; it’s loaded with flavor that will delight your …

Read more

Categories Appetizers
Older posts
Newer posts
← Previous Page1 … Page188 Page189 Page190 Page191 Next →

TASTED NEST

Where Flavor Finds a Home 🍳🏡 — warm, simple, and crave-worthy recipes made for real life, from stovetop mornings to backyard dinners.

PAGES

Home About Contact Privacy Policy Terms & Conditions Cookie Policy GDPR Policy Copyright Policy Disclaimer

CATEGORIES

Appetizers Desserts Salads Breakfast Dinner
Copyright © 2026 Tasted Nest. All rights reserved.