Skip to content
Tasted Nest
  • Home
  • Appetizers
  • Desserts
  • Salads
  • Breakfast
  • Dinner
  • Privacy Policy
  • Contact
  • About

Chef Tavio

TikTok Baked Feta Pasta Flavorful and Easy Recipe

August 13, 2025 by Chef Tavio
To make TikTok baked feta pasta, you need simple and fresh ingredients. Here’s what you will need: - Creamy feta cheese - Cherry tomatoes - Garlic - Olive oil - Dried oregano - Crushed red pepper flakes - Salt and pepper - Pasta (penne or fusilli) - Fresh basil leaves - Parmesan cheese (optional) Each ingredient plays a key role in this dish. The creamy feta cheese gives a rich taste. Cherry tomatoes add sweetness and color. Garlic brings depth. Olive oil adds smoothness. Dried oregano gives an earthy note. Crushed red pepper flakes add a gentle heat, while salt and pepper enhance all the flavors. The pasta serves as the base, soaking up the tasty sauce. Fresh basil adds brightness at the end, and Parmesan cheese is a lovely finishing touch if you choose to use it. This dish is not just easy; it is also very satisfying. You can find most of these ingredients in your kitchen or local store. Gather them, and you are ready to create a meal that will impress! - Preheat the oven to 400°F (200°C). - In a large baking dish, mix 2 cups of halved cherry tomatoes, 3 minced garlic cloves, and 1/4 cup of olive oil. - Add 1 teaspoon of dried oregano, and sprinkle with salt and pepper to taste. - Make a well in the center of your tomato mix. - Place an 8 oz block of creamy feta cheese in the well. - Bake in the oven for 25-30 minutes. Look for blistered tomatoes and soft, golden feta. - While the feta and tomatoes bake, boil 12 oz of your favorite pasta. - Follow the package instructions until the pasta is al dente. - Drain the pasta and set it aside. - After baking, take the dish out of the oven. - Use a fork to mash the roasted feta and tomatoes together. - This creates a smooth, creamy sauce. - Add the cooked pasta to the baking dish. - Gently toss everything together to coat the pasta well. - Fold in 1/2 cup of torn fresh basil leaves. - For serving, dish the pasta into a large bowl. - Garnish with extra basil and grated Parmesan cheese, if you like. - Drizzle with a bit more olive oil for flavor. Enjoy! To make the sauce creamy, mash the feta and tomatoes well. Use a fork to break them apart. Mix until it is smooth and combined. This will help coat the pasta nicely. If the sauce is too thick, add a splash of pasta water. This will help it blend better. Adjust the seasoning to your taste. Start with salt and pepper. Taste the sauce, then add more if needed. If you want a kick, sprinkle in more red pepper flakes. This will add some heat to your dish. Timing is key when cooking the pasta. Boil the pasta according to the package instructions. Cook it just until it is tender but still firm. This is called al dente. If you overcook it, the pasta will be mushy. Remember, it will cook a bit more when mixed with the sauce. To add more depth to the dish, think about extra herbs and spices. Fresh herbs like parsley or thyme can brighten the flavor. You can also add a squeeze of lemon juice for some acidity. If you love garlic, toss in more minced garlic. Each addition can change the dish for the better! {{image_4}} You can customize this dish easily. For cheese, try goat cheese or ricotta. They both bring unique flavors to the table. If you want extra veggies, add spinach or bell peppers. They will add color and nutrition. If you need a gluten-free option, use gluten-free pasta. There are many great brands that taste just as good. For a vegan twist, swap feta for a plant-based cheese. You can also use nutritional yeast for a cheesy flavor. This dish pairs well with crusty bread. The bread soaks up the creamy sauce. A fresh salad is another great side. It adds crunch and balances the meal. Enjoy your pasta with these tasty sides for a complete dinner! To store leftovers, place your pasta in an airtight container. Make sure it cools down to room temperature first. This helps keep it fresh. Store it in the fridge for up to three days. When you reheat, use medium heat on the stove or in the microwave. Add a splash of water or olive oil to keep it moist. You can freeze this pasta dish, but it’s best to do so before adding the fresh basil. To freeze, place the cooled pasta in a freezer-safe container. It can last up to three months in the freezer. When ready to eat, thaw it overnight in the fridge. Reheat it gently, adding a bit of water or olive oil for creaminess. When stored properly, the baked feta pasta can stay fresh in the fridge for up to three days. If frozen, it can last for three months. Always check for signs of spoilage before eating. If it smells off or looks strange, don’t eat it. Enjoy your tasty dish knowing it can be safely enjoyed later! TikTok Baked Feta Pasta is a fun dish that went viral on TikTok. It combines creamy feta cheese, sweet cherry tomatoes, and pasta. The cheese and tomatoes bake together, creating a rich sauce. You then mix in cooked pasta and fresh basil. It's quick, easy, and super tasty. Plus, it only takes about 45 minutes to make! Yes, you can try different cheeses! Goat cheese works well for a tangy taste. Cream cheese can also be a good base for a smooth sauce. Mozzarella adds a nice stretch and creaminess. Experiment with what you like best. Each cheese gives a unique flavor twist! To make this dish vegan, swap the feta for vegan cheese. Many brands offer a tasty feta-style option. You can also use cashew cream for a creamy texture. Ensure your pasta is egg-free, and you're all set! This way, you can enjoy the same great taste without animal products. You can use many pasta shapes! Penne and fusilli are great choices. They hold the sauce well. Rotini and farfalle also work nicely. Spaghetti or linguine can be fun, too! Just pick what you love and enjoy this dish your way. Baked feta pasta is simple and fun to make. You need few ingredients like feta, tomatoes, and spaghetti. First, roast the feta and tomatoes. Then cook your pasta for the best taste. This dish is creamy and filled with flavor. You can adjust it for your diet or personal taste. Remember to store any leftovers well or freeze them for later. Enjoy this trendy meal alone or with friends. Happy cooking!

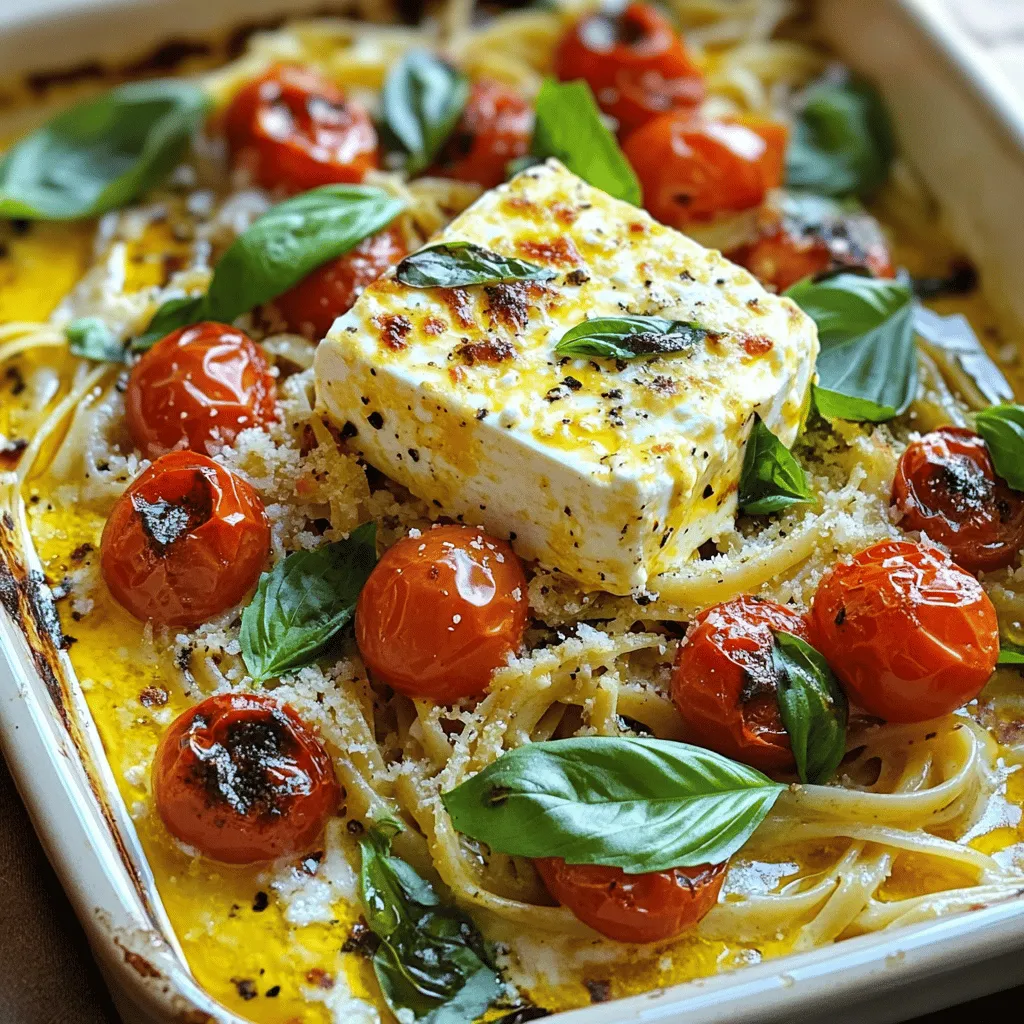
Are you ready to whip up a fun and tasty dish that took TikTok by storm? This TikTok Baked Feta Pasta is not only flavorful but also easy to make. …

Read more

Categories Dinner

No-Bake Peanut Butter Bars Easy and Delicious Treat

August 13, 2025 by Chef Tavio
- 1 cup creamy peanut butter - 1/2 cup honey or maple syrup - 2 cups rolled oats - 1/2 cup almond flour - 1/4 cup unsweetened cocoa powder - 1/4 cup chocolate chips (optional) - 1 teaspoon vanilla extract - A pinch of high-quality sea salt These ingredients come together to make a sweet and chewy treat. I love using creamy peanut butter for a smooth texture. Honey or maple syrup adds a nice sweetness that blends well. The rolled oats give the bars a hearty feel. Almond flour helps keep them soft and adds taste. Unsweetened cocoa powder gives a rich chocolate flavor without extra sugar. If you want more chocolate, toss in some chocolate chips. The vanilla extract brightens the flavors, while a pinch of sea salt rounds everything out. With these ingredients, you can create a delicious snack that’s easy to make. I find that having the right ingredients makes all the difference. You can mix and match based on your taste. Enjoy the journey of making your own no-bake peanut butter bars! Start by heating a medium pan on low. Add 1 cup of creamy peanut butter and 1/2 cup of honey or maple syrup. Stir it well with a spatula. Keep stirring until it melts and looks smooth. This takes about 3-5 minutes. Remove it from heat. Now, add 1 teaspoon of vanilla extract and a pinch of sea salt. Stir until mixed well. In a large bowl, combine 2 cups of rolled oats, 1/2 cup of almond flour, and 1/4 cup of unsweetened cocoa powder. Use a whisk or spatula to mix these dry ingredients. Make sure they blend evenly. This step is key for great flavor in every bite. Gradually pour the warm peanut butter mixture over the dry ingredients. Use a wooden spoon to mix everything together. Keep stirring until it is fully combined. If you want to add a treat, fold in 1/4 cup of chocolate chips now. This makes the bars extra rich and yummy. Get an 8x8 inch square baking dish. Line it with parchment paper. Leave some paper hanging over the sides. This helps lift the bars out later. Now, transfer the peanut butter mixture into the dish. Use your hands or a spatula to press it down firmly. Make sure the surface is smooth and even. Place the dish in the fridge. Let it chill for at least 1 hour. This helps the bars set up and become firm. After chilling, you can lift them out using the parchment paper. Cut them into squares or bars. Enjoy your tasty no-bake peanut butter bars! To get a smooth melting of peanut butter, use low heat. Stir gently and keep an eye on it. This helps avoid burning. If you want a creamier mix, choose creamy peanut butter. Mix the melted mix with dry ingredients until fully blended. Use a wooden spoon or spatula to combine them well. To present these bars nicely, serve them on a pretty platter. You can drizzle melted chocolate on top. Adding crushed peanuts can give a nice crunch. These small touches make your bars more appealing and fun to eat. You can change how sweet your bars are. If you like it sweeter, add more honey or maple syrup. If you want less, use less sweetener. Taste as you mix to find your perfect sweetness. This way, you can make the bars just how you like them! {{image_4}} You can easily make these bars vegan. Instead of honey, use maple syrup. Maple syrup adds a nice flavor. It also helps bind the bars just like honey does. For a nut-free option, swap out peanut butter for sunflower seed butter. Sunflower seed butter works well. It keeps the bars creamy and tasty without nuts. This option is perfect for schools or homes with nut allergies. You can make these bars even better with fun add-ins. Try mixing in dried fruit like cranberries or raisins. Seeds like chia or flax also add nutrition and crunch. Chocolate chips add sweetness, but you can skip them. Get creative and find your favorite mix! To keep your no-bake peanut butter bars fresh, store them in an air-tight container. Place parchment paper between layers to prevent sticking. This helps maintain their texture and flavor. Always keep them in a cool place, away from direct sunlight. If you live in a warm area, the fridge is best. Want to save some bars for later? Freezing is easy! First, cut the bars into pieces. Then, wrap each piece in plastic wrap. Place the wrapped bars in a freezer bag or container. They can stay in the freezer for up to three months. To enjoy, simply take them out and let them thaw in the fridge for a few hours. How long do these bars last? At room temperature, they stay fresh for about a week. If you store them in the fridge, they can last for about two weeks. Always check for any signs of spoilage before eating. Enjoy the rich taste and smooth texture for as long as possible! Yes, you can use crunchy peanut butter. It adds texture and flavor. The bars will still taste great. Just remember, the chunks will change the smoothness of each bite. To make these bars gluten-free, use certified gluten-free oats. Many brands offer oats without gluten. This simple swap ensures you enjoy your treat without worry. You can use oat flour or whole wheat flour instead of almond flour. If you need a nut-free option, try sunflower seed flour. Just make sure the texture remains similar for best results. Absolutely! You can make these bars up to a week ahead. Just store them in an airtight container. This way, you always have a tasty treat ready to enjoy. The bars are fully set when they feel firm to the touch. If they are still soft, chill them longer. They should hold their shape when you cut them. These no-bake bars are easy to make with just a few simple steps. You mix creamy peanut butter, honey, oats, and almond flour for a tasty treat. You can customize flavors and textures with variations like maple syrup or dried fruit. In the end, they are perfect for snacks, lunches, or quick desserts. Following these tips ensures your bars stay fresh and delicious. Enjoy making these treats your way!

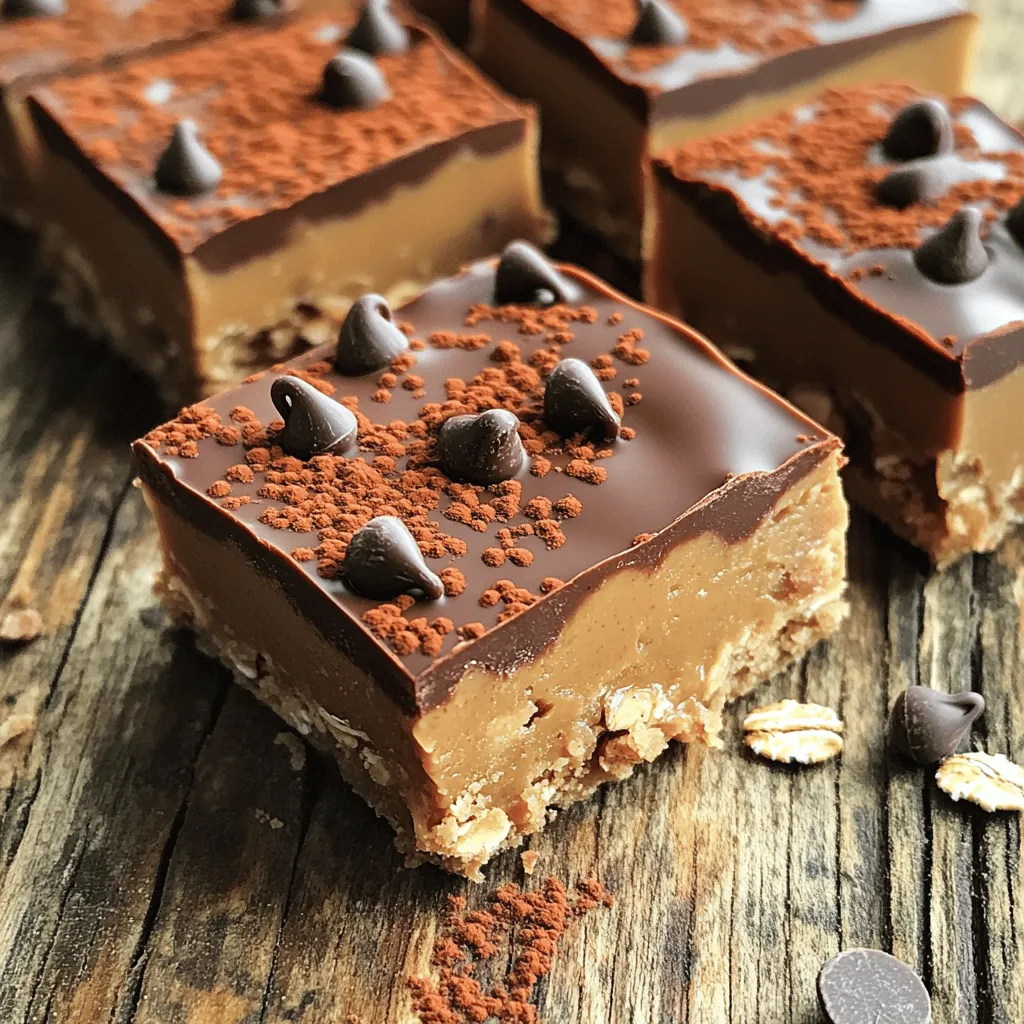
Craving a sweet treat that won’t heat up your kitchen? Let me introduce you to my No-Bake Peanut Butter Bars! This easy recipe combines creamy peanut butter, oats, and cocoa …

Read more

Categories Desserts

Vegan Pumpkin Muffins Rich in Flavor and Texture

August 13, 2025 by Chef Tavio
To make these vegan pumpkin muffins, gather the following ingredients: - 1 cup canned pumpkin puree - 1/2 cup almond milk - 1/3 cup pure maple syrup - 1/4 cup melted coconut oil - 1 teaspoon vanilla extract - 1 1/2 cups whole wheat flour - 1 teaspoon baking powder - 1/2 teaspoon baking soda - 1 teaspoon ground cinnamon - 1/2 teaspoon ground nutmeg - 1/2 teaspoon ground ginger - 1/4 teaspoon salt - Optional ingredients: 1/2 cup chopped pecans or walnuts, 1/4 cup vegan chocolate chips These ingredients blend to create a rich flavor and soft texture. The pumpkin puree adds moisture and a slight sweetness. Almond milk keeps the muffins plant-based without losing creaminess. Maple syrup sweetens and enhances the pumpkin taste. Coconut oil gives a nice richness. Whole wheat flour adds fiber and a nutty flavor. Spices like cinnamon, nutmeg, and ginger bring warmth and depth. The optional nuts and chocolate chips can add crunch and sweetness. These muffins are not just tasty; they are also good for you. Preheat your oven to 350°F (175°C). This step is key for even baking. Line a muffin tin with paper liners or grease it with melted coconut oil to help with easy removal. In a large bowl, add one cup of canned pumpkin puree. Next, pour in half a cup of almond milk, one-third cup of pure maple syrup, and a quarter cup of melted coconut oil. Add one teaspoon of pure vanilla extract. Whisk all these ingredients until they blend smoothly. In another bowl, mix one and a half cups of whole wheat flour, one teaspoon of baking powder, half a teaspoon of baking soda, one teaspoon of ground cinnamon, half a teaspoon of ground nutmeg, half a teaspoon of ground ginger, and a quarter teaspoon of salt. Whisk these dry ingredients well to ensure they are mixed evenly. Slowly add the dry mix to the wet mixture. Stir gently until just combined. Don’t worry about lumps; they help keep the muffins fluffy. Overmixing can make them tough. If you like, fold in half a cup of chopped pecans or walnuts and a quarter cup of vegan chocolate chips. This adds great texture and flavor. Spoon the batter into the muffin tin. Fill each cup about three-quarters full to allow space for the muffins to rise. This helps them become nice and tall. Place the muffin tin in the oven and bake for 18 to 20 minutes. To check if they are done, insert a toothpick into the center of a muffin. If it comes out clean, they are ready. After baking, take the muffins out of the oven. Let them cool in the pan for about five minutes. Then, move them to a wire rack to cool completely. Enjoy your tasty vegan pumpkin muffins! To get that soft and fluffy muffin, do not overmix your batter. When you mix the wet and dry ingredients, stop as soon as you see a few lumps. This keeps the muffins light. Also, filling the muffin cups three-quarters full allows them to rise well. Bake them at 350°F for 18-20 minutes; check with a toothpick. If you're allergic to nuts, swap almond milk for oat or soy milk. You can also skip the nuts in the batter. For gluten-free muffins, try using a gluten-free flour blend. If you need a sugar-free option, you can use mashed bananas or unsweetened applesauce in place of maple syrup. Want to add more flavor? Try adding a pinch of cloves or allspice to the mix. You can also experiment with add-ins like dried cranberries or chocolate chips. For a touch of fun, drizzle melted chocolate on top after cooling. This adds a sweet finish that pairs well with pumpkin. {{image_4}} You can boost the flavor of your vegan pumpkin muffins with seasonal fruits. Adding cranberries gives a nice tartness that pairs well with pumpkin. Dice up fresh apples for a sweet crunch. You can mix in about 1/2 cup of either fruit. This will add moisture and flavor to each muffin. While maple syrup is a great choice, you have options. Agave nectar or brown sugar can work well too. Each sweetener brings a unique taste. If you like it sweeter, add a little more. Try using a sugar substitute if you want to cut calories. Just remember to check the conversion ratios for the best results. If you need gluten-free muffins, swap the whole wheat flour. Use almond flour or a gluten-free blend instead. You will need to adjust the liquid slightly for the best texture. Adding a bit of xanthan gum can help with structure. This will keep your muffins soft and fluffy while still being gluten-free. To keep your vegan pumpkin muffins fresh, store them in an airtight container. This helps avoid moisture loss. Place the container in a cool, dry area. If you plan to eat them all within a few days, room temperature works fine. For longer storage, the fridge is a great choice. They will last about a week when refrigerated. Freezing muffins is easy and keeps them tasty. Start by letting the muffins cool completely. Once cooled, wrap each muffin tightly in plastic wrap. Next, place the wrapped muffins in a freezer bag. Try to remove as much air as possible to avoid freezer burn. You can freeze them for up to three months. When you're ready to enjoy a muffin, pull one from the fridge or freezer. For refrigerated muffins, simply warm them in the microwave for about 15-20 seconds. If frozen, you can either microwave them for about 30-40 seconds or let them thaw in the fridge overnight. Enjoy your warm, fluffy muffins! Yes, you can use any plant-based milk. Soy, oat, or coconut milk work well. Each milk adds its own flavor, so choose one you enjoy. Store the muffins in an airtight container. Keep them at room temperature for up to three days. For longer storage, use the fridge. These muffins last about three days at room temperature. In the fridge, they can last up to a week. Freezing them can extend their life to three months. Absolutely! Mini muffins are a fun twist. Bake them for about 12-15 minutes. Check with a toothpick to see if they are done. Yes! They use whole wheat flour and pumpkin puree. These ingredients add fiber and nutrients. The maple syrup is a natural sweetener, making them a healthier choice. We explored a simple recipe for vegan pumpkin muffins, starting with key ingredients. You learned to mix wet and dry items, bake, and enjoy their flavor. Tips offered ways to adjust the recipe and enhance the taste. Variations opened doors for seasonal twists, too. Remember, these muffins are easy to store and reheat. They can last days, offering you quick snacks. Enjoy baking and sharing these healthy treats with friends and family!

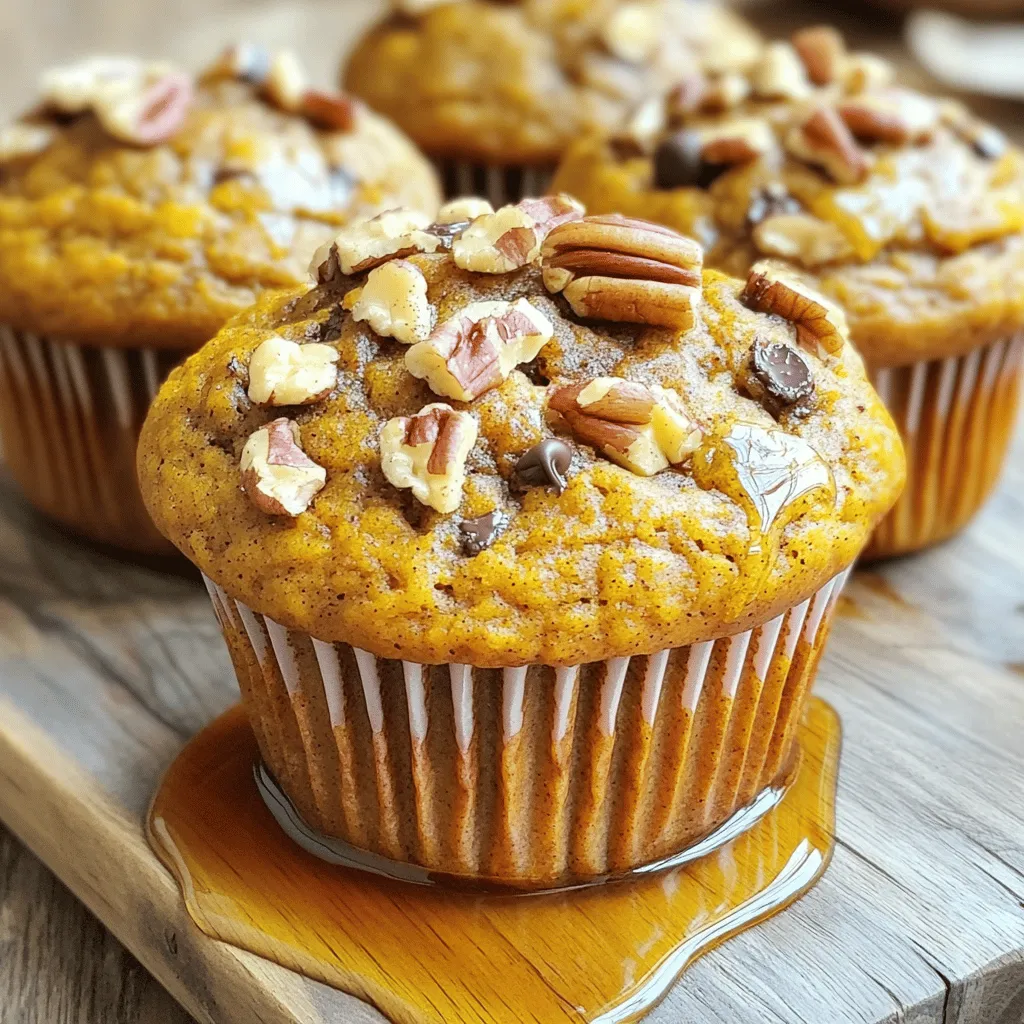
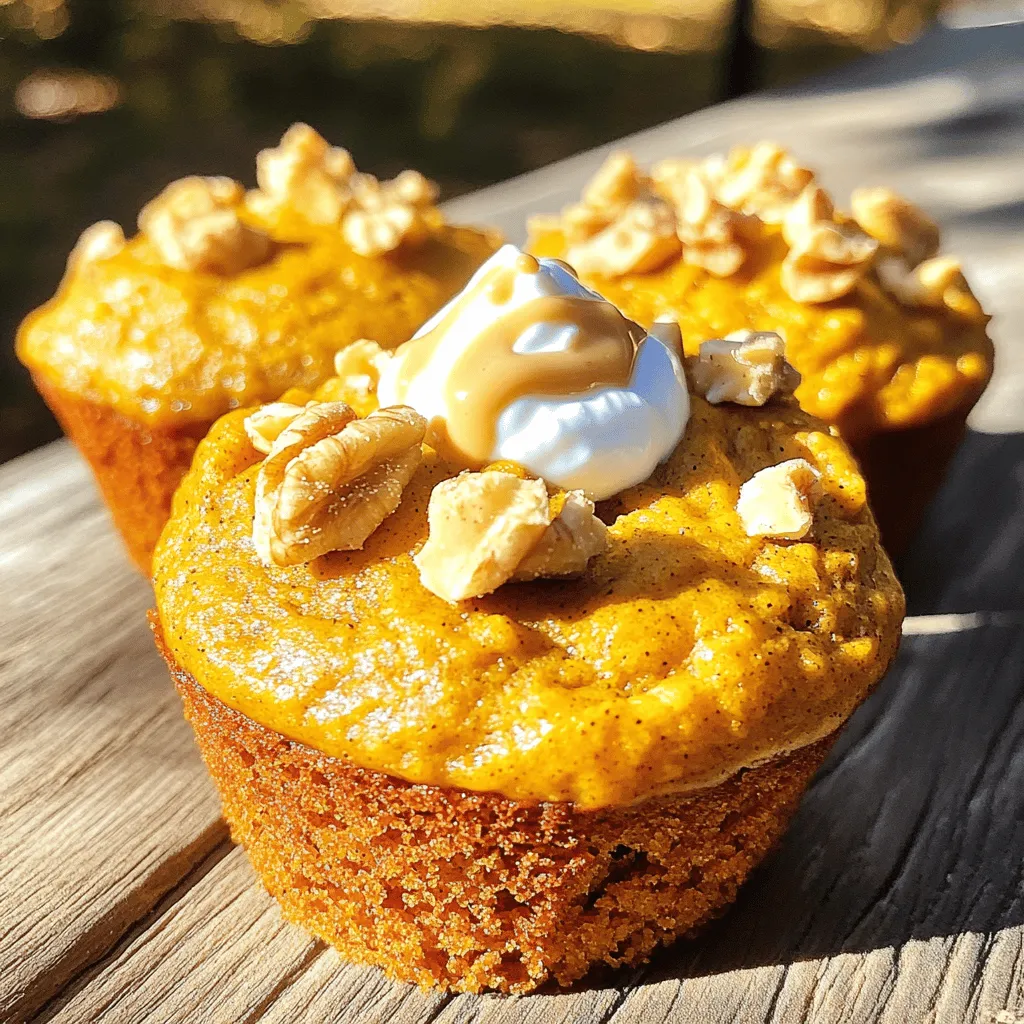
Looking for a tasty vegan treat? These Vegan Pumpkin Muffins are rich in flavor and perfect for fall! Packed with wholesome ingredients like pumpkin puree and spices, they are easy …

Read more

Categories Desserts

Caramelized Onion Dip Delightful and Creamy Recipe

August 13, 2025 by Chef Tavio
- 2 large onions, thinly sliced - 2 tablespoons olive oil - 1 teaspoon salt - 1 teaspoon sugar - 1 cup sour cream - 1 cup cream cheese, softened to room temperature - 2 tablespoons fresh chives, finely chopped - 1 tablespoon fresh thyme leaves, stripped from the stem - Freshly cracked black pepper, to taste - Calories per serving: About 150 - Protein: 3 grams - Fat: 13 grams - Carbohydrates: 5 grams Caramelized onion dip is rich and creamy. It has a sweet and savory taste. Each serving offers about 150 calories. The protein comes mainly from the sour cream and cream cheese. The fat content is higher, mainly due to the cream cheese. This dip is a great treat for sharing. Pair it with veggies or chips to balance the flavors. When you make this dip, you get a blend of smooth and rich ingredients. The onions add sweetness and depth. The herbs brighten the flavor and make it fresh. Enjoy this dip at parties or cozy nights in! 1. Heat 2 tablespoons of olive oil in a large skillet over medium heat. 2. Add 2 large, thinly sliced onions to the skillet. Stir them to coat in oil. 3. Sprinkle 1 teaspoon of salt over the onions. Sauté them for about 10 minutes. Stir often until they soften and release moisture. 4. Add 1 teaspoon of sugar to help caramelize the onions. This step adds sweetness to the dip. 5. Lower the heat and keep cooking the onions for 25-30 minutes. Stir occasionally. They will turn a deep golden brown and become sweet. 1. In a mixing bowl, combine 1 cup of softened cream cheese and 1 cup of sour cream. 2. Use a hand mixer or a spatula to blend them until smooth. 3. Gently fold in the cooled caramelized onions. Add 2 tablespoons of finely chopped chives and 1 tablespoon of fresh thyme leaves. 4. Season with freshly cracked black pepper to taste. Stir to mix the flavors well. 1. Transfer the dip into a decorative serving bowl. Cover it tightly. 2. Refrigerate the dip for at least 30 minutes. This helps the flavors blend. 3. Serve the dip with fresh vegetables, crispy pita chips, or crusty bread slices. 4. For a nice touch, garnish with extra chopped chives and a drizzle of olive oil. To get sweet, golden onions, start with medium heat. - Use a wide skillet. This helps onions cook evenly. - Stir often to stop them from burning. Once they soften, add sugar to boost sweetness. - Lower the heat to a gentle simmer after 10 minutes. - Cook for 25-30 more minutes. Watch closely for that rich brown color. If you want a different base, try these options. - Use Greek yogurt instead of cream cheese for a tangy twist. - For a lighter dip, reduce the sour cream by half. Experiment with other creamy bases like cottage cheese. Add more depth with herbs and spices. - Mix in garlic powder for a savory kick. - Try adding smoked paprika for a smoky flavor. You can also swap herbs. - Use fresh dill or parsley instead of chives. - Experiment with different cheeses like feta for a unique taste. These tips will help you create a dip that everyone loves! {{image_4}} You can change the herbs in this dip. Swap chives or thyme with other fresh herbs. Try fresh parsley for a bright flavor. Basil can add a sweet touch. Even dill brings a nice twist. Experiment to find your favorite mix. Want to add more flavor? Incorporate ingredients like crispy bacon or roasted garlic. Bacon gives a smoky taste that pairs well with the dip. Roasted garlic adds a rich and sweet flavor. Both add depth and excitement to your dish. You can make a lighter version of this dip. Use low-fat cream cheese and sour cream. Greek yogurt is a great substitute for sour cream too. These swaps keep the flavor while cutting some calories. Enjoy your dip guilt-free! To keep your caramelized onion dip fresh, store it in an airtight container. Glass or plastic containers work well. Make sure the lid seals tightly. This helps to keep air out, which can spoil the dip. If you plan to eat it within a few days, the fridge is fine. The dip stays good for about 5 days. You can freeze leftover dip for later use. To freeze, place the dip in a freezer-safe container. Leave some space at the top for expansion as it freezes. It can last up to 3 months in the freezer. To thaw, move the container to the fridge overnight. When ready to eat, stir the dip well. If it seems thick, add a little sour cream to restore creaminess. Reheat gently in the microwave if you prefer it warm. Enjoy the flavors again! To store caramelized onion dip, place it in an airtight container. This keeps the dip fresh. Make sure to seal it well to avoid any odors from your fridge. The dip lasts about 3-5 days in the fridge. Yes, you can make caramelized onion dip ahead. In fact, making it one day before serving enhances the flavor. Just store it in the fridge and cover it. Let it chill for at least 30 minutes before serving, so it’s ready to enjoy. You can serve caramelized onion dip with many tasty options. Here are some ideas: - Fresh veggies like carrots and bell peppers - Crispy pita chips - Crusty bread slices - Potato chips - Crackers These pairings add fun and flavor to your snack spread. Yes, you can make a dairy-free version of caramelized onion dip. Use a dairy-free cream cheese and a dairy-free sour cream. Both are widely available at stores. You can also try cashew cream for a creamy texture. Adjust the seasoning to taste for the best flavor. This blog post guided you through making a delicious caramelized onion dip. You learned about the key ingredients and their nutrition. I shared step-by-step cooking tips, and even variations to enhance flavor. Remember, the right techniques for caramelization and ingredient swaps can make your dip stand out. Enjoy creating your unique version of this dip. It's sure to impress your guests! Keep experimenting with herbs and flavors to find your favorite twist.

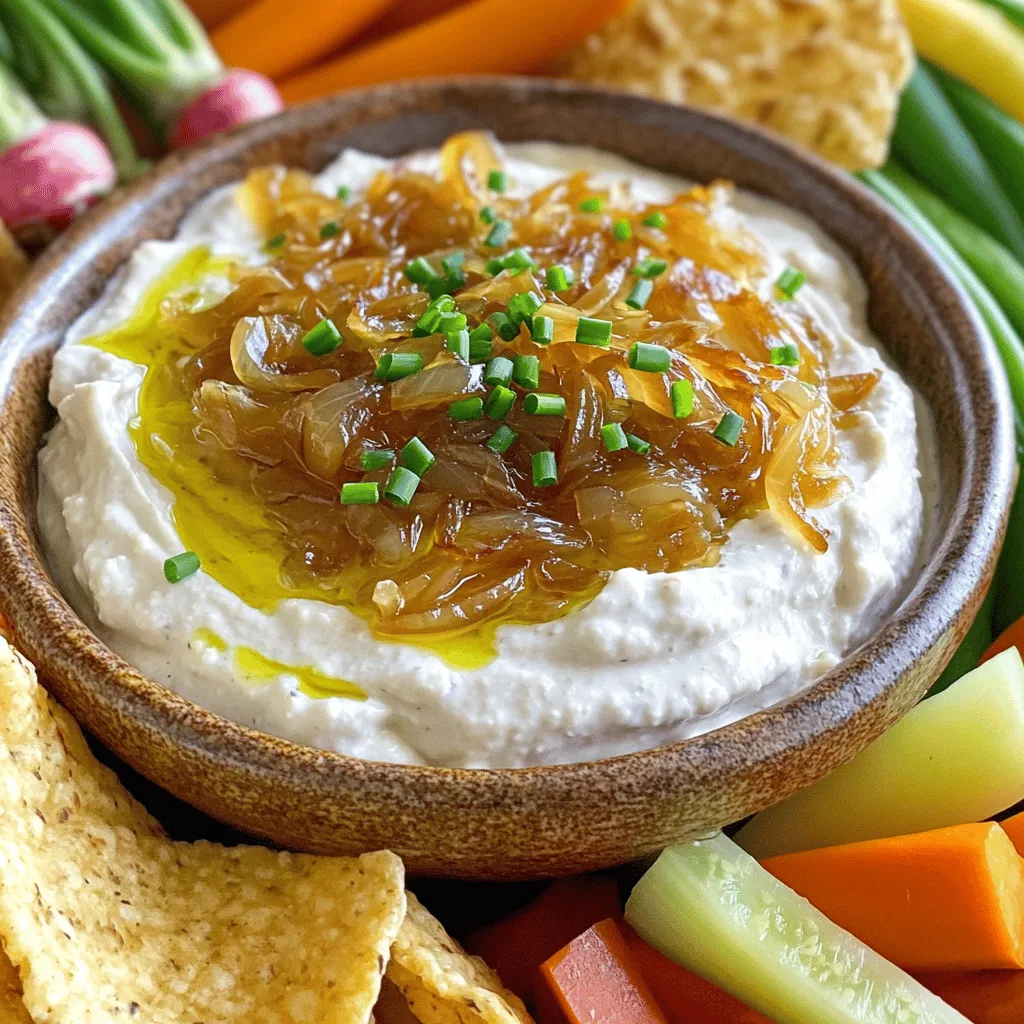
Want to elevate your snacks? This creamy and delightful caramelized onion dip will impress your friends and family. With just a few simple ingredients, you can create a rich, flavorful …

Read more

Categories Appetizers

Salted Honey Pie Simple and Delicious Recipe Guide

August 13, 2025 by Chef Tavio
- 1 ½ cups all-purpose flour - 1/3 cup granulated sugar - 1/2 teaspoon salt - 1/2 cup unsalted butter, cold and cubed - 1 large egg yolk - 2 tablespoons ice water - 1 cup clover honey - 3 large eggs - 1/2 cup heavy cream - 1 teaspoon vanilla extract - 1 teaspoon sea salt, for topping The key ingredients are simple but essential. All-purpose flour forms the crust. Granulated sugar sweetens the crust and pie filling. Unsalted butter gives the crust a rich flavor. Clover honey is the star, bringing sweetness. Large eggs help set the filling, while heavy cream adds creaminess. A touch of sea salt at the end enhances the sweetness. - Different sweeteners (e.g., agave syrup) - Flavorings (e.g., lemon zest, spices) You can swap sweeteners like agave syrup for honey. This change can add a different flavor. Adding lemon zest or spices can make the pie unique. Try cinnamon or nutmeg for warmth. - Mixing bowls - Rolling pin - Pie pan - Whisk - Pastry cutter To make this pie, you need a few tools. Mixing bowls help combine ingredients. A rolling pin is key for flattening the dough. A pie pan holds your crust and filling. A whisk mixes your wet ingredients well. A pastry cutter helps blend butter into flour for a perfect crust. Mixing dry ingredients In a large bowl, mix 1 ½ cups of all-purpose flour, 1/3 cup of granulated sugar, and 1/2 teaspoon of salt. Use a whisk to blend them well. Incorporating butter Add 1/2 cup of cold, cubed unsalted butter. Use your fingers or a pastry cutter to mix. You want the mix to look like coarse crumbs, similar to small pebbles. Chilling the dough Shape the dough into a disk. Wrap it in plastic wrap and chill it in the fridge for at least 30 minutes. This helps the butter firm up and makes for a tender crust. Whisking wet ingredients In a small bowl, whisk 1 large egg yolk with 2 tablespoons of ice water. Make it smooth. Combining honey and eggs In a mixing bowl, mix 1 cup of clover honey, 3 large eggs, 1/2 cup of heavy cream, and 1 teaspoon of vanilla extract. Whisk until the filling is smooth and well combined. Rolling out the dough On a lightly floured surface, roll out the chilled dough. Aim for about 1/8 inch thick and large enough for a 9-inch pie pan. Transfer it gently into the pan, pressing it into the edges. Trim any extra dough. Blind baking the crust Preheat your oven to 350°F (175°C). Bake the crust for 15-20 minutes, or until it's lightly golden. Let it cool for a bit. Pouring filling into crust Pour the silky honey mixture into the cooled pie crust. Make sure it spreads evenly across the surface. Cooling methods After baking, remove the pie from the oven. Let it cool to room temperature. This helps the filling set properly. Serving suggestions Slice the pie into wedges. Serve each slice on a plate. For a nice touch, add a dollop of whipped cream and drizzle extra honey on top. Garnish with fresh mint leaves for color. Enjoy the sweet and salty blend! To get a great pie crust, avoid overworking the dough. When mixing, use a light touch. This keeps your crust tender. I suggest using cold butter. It helps make the crust flaky. For a flakier crust, chill your dough before rolling it out. Let it sit in the fridge for at least 30 minutes. This allows the butter to firm up. Roll the dough out on a lightly floured surface. Aim for a thickness of about 1/8 inch. Getting the right balance of sweet and salty is key. You can adjust the amount of honey and sea salt. If you want a sweeter pie, add more honey. For a stronger salty taste, sprinkle extra sea salt on top. For toppings, I recommend lightly whipped cream. It adds a nice texture. A drizzle of extra honey also enhances the flavor. Garnishing your pie makes it look special. Top each slice with a dollop of whipped cream. This adds a creamy richness. You can also drizzle honey over the top for extra sweetness. For a pop of color, add fresh mint leaves. They make the pie look fresh and inviting. Serve slices on individual plates for a nice touch. Enjoy the beauty of your Salted Honey Pie! {{image_4}} You can change the crust to fit your taste. A graham cracker crust gives a sweet, crisp base. Just crush the crackers and mix them with melted butter and sugar. Press this mixture into the pie pan for a quick option. If you need a gluten-free crust, try almond flour or coconut flour. Mix these flours with some butter and a pinch of salt. Press this mixture into the pan too. Both options are easy and add a unique flavor. To make the filling even more exciting, think about adding chocolate or caramel. A swirl of melted chocolate can enhance the sweet honey taste. Try drizzling some warm caramel on top before serving for a lovely twist. You can also add fresh fruits like apples or pears. Their natural sweetness balances the honey perfectly. Chop the fruit into small pieces and mix them in before pouring the filling into the crust. When serving, ice cream pairs well with Salted Honey Pie. Vanilla or caramel flavors work best. A scoop on the side makes the dessert even more delightful. You can serve the pie warm or chilled. Warm pie offers a soft filling that melts in your mouth. Chilled pie gives a firmer texture, making it easier to slice. Choose what you like best! To keep your salted honey pie fresh, store it in the fridge. Wrap it tightly in plastic wrap or place it in an airtight container. This helps prevent it from drying out. If you leave it out at room temperature, it will only stay good for about two hours. If you want to freeze the pie, make sure it is fully cooled first. Wrap it tightly in plastic wrap and then in aluminum foil. This keeps it safe from freezer burn. When you’re ready to eat it, move it to the fridge for a day to thaw. You can reheat it in the oven at 350°F (175°C) for about 10-15 minutes. This warms it up nicely. In the fridge, your salted honey pie can last for about four to five days. Always check for signs of spoilage. If the pie smells off or the filling looks strange, it’s best to throw it away. Enjoy your pie while it’s fresh for the best taste! Salted Honey Pie is a sweet dessert that combines honey and cream. It has a rich, smooth filling that melts in your mouth. The pie has a buttery crust that adds a nice crunch. The unique twist comes from a sprinkle of sea salt on top. This salt balances the sweet honey, creating a delightful flavor. You will love how the sweet and salty mix works together! Yes, you can make Salted Honey Pie ahead of time. The pie keeps well in the fridge for a few days. To prepare, bake the pie and let it cool down. Then, cover it tightly and store it in the fridge. For the best taste, sprinkle the sea salt just before serving. This way, the salt stays fresh and crunchy. You can serve Salted Honey Pie with many tasty options. Here are some great pairings: - Whipped cream for a creamy touch - Fresh fruit like berries or slices of pear - A scoop of vanilla ice cream for added sweetness - A drizzle of extra honey for more flavor These options make the pie even more delicious and fun to eat! Yes, you can make a vegan version of Salted Honey Pie. Here are some easy swaps: - Use agave syrup instead of honey for sweetness. - Replace heavy cream with coconut cream or a plant-based cream. - Use flax eggs or a store-bought egg replacer in place of eggs. These changes let you enjoy the same sweet and salty taste in a vegan way! In summary, Salted Honey Pie combines simple ingredients for a delightful dessert. You can customize it with different sweeteners and add-ins for fun flavors. Use my tips to ensure a flaky crust and a perfect balance of sweet and salty. Finally, store your leftovers well to enjoy this treat longer. Whether you serve it chilled or warm, this pie is sure to impress. Your baking skills will shine, and you’ll create dessert memories to cherish!

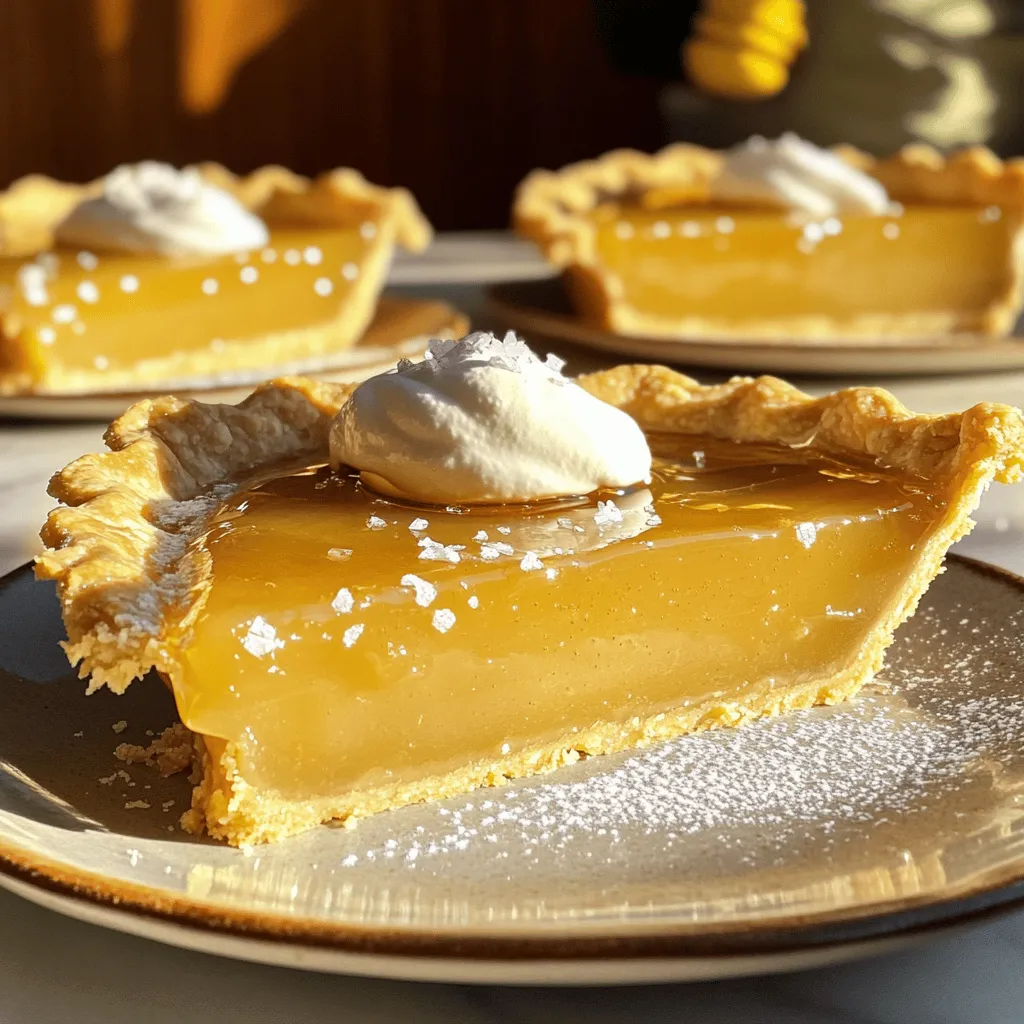
If you’re craving a dessert that’s both simple and delicious, look no further! This Salted Honey Pie recipe captures sweet and salty flavors perfectly. In this guide, I’ll share everything …

Read more

Categories Desserts

Dunkin Copycat Pumpkin Muffins Tasty and Simple Treat

August 13, 2025 by Chef Tavio
To make Dunkin Copycat Pumpkin Muffins, gather these simple ingredients: - 1 ½ cups all-purpose flour - 1 cup granulated sugar - 1 teaspoon baking soda - ½ teaspoon baking powder - ½ teaspoon salt - 1 teaspoon ground cinnamon - ½ teaspoon ground nutmeg - ½ teaspoon ground ginger - ½ cup vegetable oil - 2 large eggs - 1 cup canned pumpkin puree - 1 teaspoon vanilla extract - ½ cup chocolate chips (optional) - ¼ cup chopped pecans or walnuts (optional) You can swap some ingredients if needed. Here are a few ideas: - Use whole wheat flour for a healthier option. - Replace granulated sugar with brown sugar for a richer flavor. - If you lack eggs, try unsweetened applesauce (1/4 cup per egg). - For a dairy-free option, use almond or coconut oil instead of vegetable oil. - You can use pumpkin spice mix instead of individual spices. To make your muffins even better, consider these optional add-ins: - Fold in ½ cup of chocolate chips for a sweet touch. - Add ¼ cup of chopped nuts for a crunchy texture. - Toss in dried cranberries or raisins for extra flavor. - Experiment with a pinch of cloves or allspice for added warmth. Mix and match these options to create your perfect muffin! First, you need to preheat your oven to 350°F (175°C). This step warms the air, helping the muffins bake evenly. Next, prepare your muffin tin. You can line it with paper liners or spray it with non-stick spray. This will keep the muffins from sticking and make cleanup easy. In a large bowl, combine the dry ingredients. Add 1 ½ cups of all-purpose flour, 1 cup of granulated sugar, 1 teaspoon of baking soda, and ½ teaspoon each of baking powder and salt. Then, mix in 1 teaspoon of ground cinnamon, ½ teaspoon of ground nutmeg, and ½ teaspoon of ground ginger. Use a whisk to blend everything well. Make sure there are no lumps. In another bowl, whisk together the wet ingredients. Mix ½ cup of vegetable oil, 2 large eggs, 1 cup of canned pumpkin puree, and 1 teaspoon of vanilla extract. Whisk until the mixture is smooth and well combined. This will add moisture and flavor to your muffins. Pour the wet mixture into the bowl with the dry ingredients. Gently stir until just combined. Be careful not to overmix, as this can make your muffins tough. It’s okay if you see a few small lumps in the batter. Now, it’s time to fill the muffin tins. Use a spoon or an ice cream scoop to divide the batter evenly. Fill each cup about ¾ full. This allows the muffins to rise without overflowing while baking. Place the muffin tin in the preheated oven. Bake for 18 to 20 minutes. Check if they’re done by inserting a toothpick in the center; it should come out clean. The muffins will be a light golden color on top. Once baked, take them out and let them cool in the tin for about 5 minutes. After that, transfer the muffins to a wire rack to cool completely. Enjoy your tasty muffins warm! To get soft muffins, you need to mix the batter gently. Overmixing makes muffins tough. When you combine wet and dry ingredients, stop as soon as you see no dry flour. A few lumps are fine. Use room temperature eggs and pumpkin puree. This helps the batter mix smoothly. Also, be careful not to fill muffin cups too high. Filling them about ¾ full gives them room to rise nicely. One mistake is using old baking soda or baking powder. Always check their freshness. Expired leavening agents make muffins dense. Another common error is baking at the wrong temperature. Make sure your oven is preheated to 350°F (175°C). If the oven is too hot, the muffins can burn on the outside but stay raw inside. Finally, avoid opening the oven door too soon. This can cause muffins to sink. Wait until they have baked for at least 15 minutes before peeking. Muffins are done when they are golden brown. Insert a toothpick into the center; it should come out clean. If it has wet batter on it, they need more time. Also, gently press the tops with your finger. They should spring back. If they leave an imprint, they need another minute or two in the oven. {{image_4}} You can easily make these muffins gluten-free. Just swap the all-purpose flour with a gluten-free blend. Look for a blend that works well in baking. Make sure it has xanthan gum for better texture. Your muffins will still be soft and tasty! Want to mix it up? You can add different spices or flavors. Try adding: - 1 teaspoon of pumpkin pie spice for a richer flavor. - ½ cup of dried cranberries for a tart bite. - ½ cup of shredded coconut for a tropical twist. Feel free to play with flavors. Your taste buds will thank you! As the seasons change, so can your muffins. In fall, add chopped apples for a sweet crunch. In winter, try dried cranberries for a festive touch. You can also mix in nuts like pecans or walnuts for a nice texture. These simple changes can make your muffins special all year round! To keep your leftover muffins fresh, place them in an airtight container. This helps lock in moisture and flavor. Store them at room temperature for up to three days. If you want to keep them longer, consider freezing. Freezing muffins is easy and keeps them tasty. Allow the muffins to cool completely before freezing. Wrap each muffin tightly in plastic wrap. Place the wrapped muffins in a freezer bag or container. They can last up to three months in the freezer. When you’re ready to enjoy them, just take out what you need. To reheat your muffins, you have a few options. You can use the microwave for a quick fix. Heat each muffin for about 15-20 seconds. If you prefer a crispier texture, pop them in the oven at 350°F (175°C) for about 5-10 minutes. This warms them through and brings back some of that fresh-baked goodness. Yes, you can use fresh pumpkin. Just cook and mash it first. Make sure to drain excess water. This helps keep your muffins from being too wet. Fresh pumpkin gives a nice flavor, but canned is more convenient. These muffins can last about three days at room temperature. Keep them in an airtight container to stay fresh. If you want them to last longer, you can refrigerate them for up to a week. Yes, you can make these muffins in advance. They freeze well, too. Just bake, cool, and place them in a freezer bag. When ready to eat, thaw them on the counter or in the microwave. Serve these muffins warm for the best taste. A spread of butter or cream cheese works great. Pair them with your coffee for a cozy treat. You can even dust with powdered sugar for a nice touch. We explored all the key steps to make perfect muffins. From gathering your ingredients to choosing fun variations, I've covered it all. You learned how to avoid common mistakes and achieve the best texture. Remember to store your muffins right for lasting freshness. Whether you prefer classic flavors or seasonal twists, you can create a tasty treat. Now, it’s your turn to bake and enjoy muffins your way!

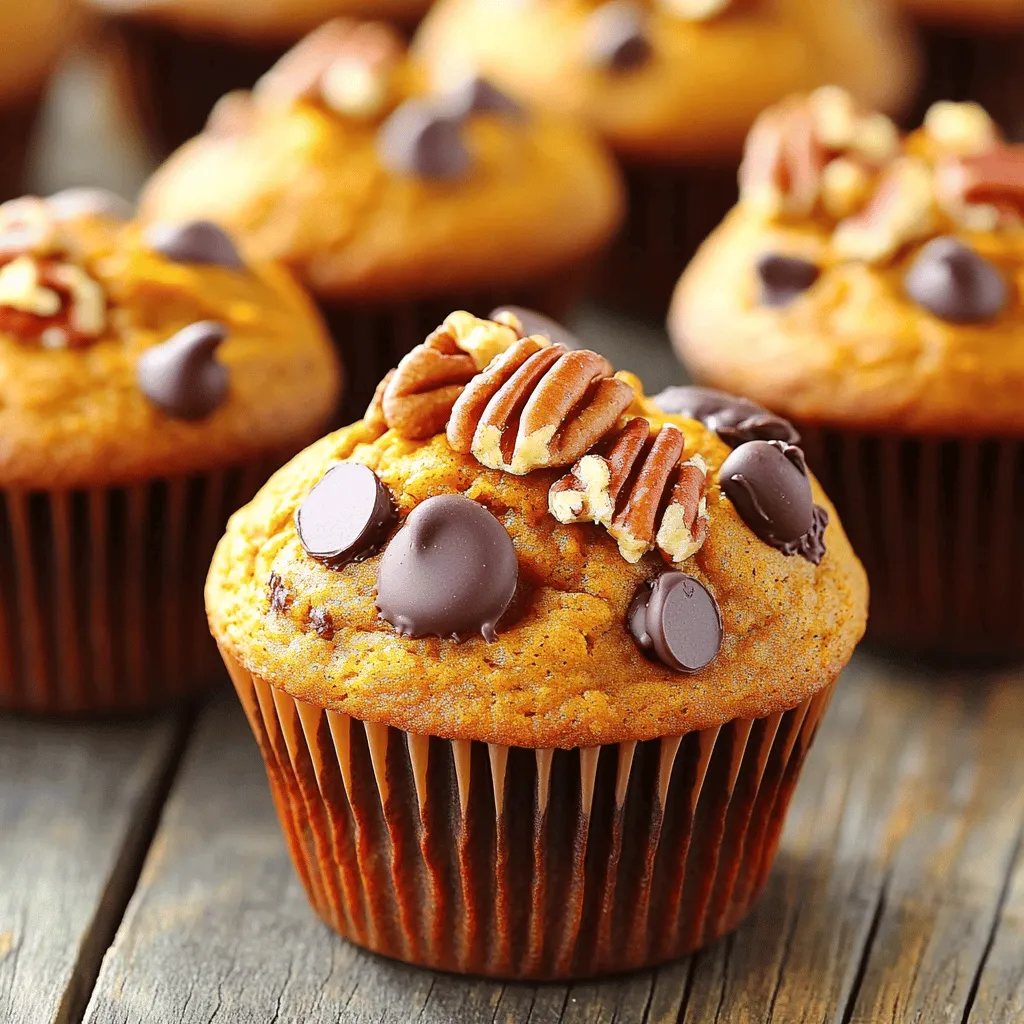
Are you ready to enjoy a warm, spiced treat that rivals Dunkin’s? These Dunkin Copycat Pumpkin Muffins are easy to make and taste amazing. In this guide, I’ll share simple …

Read more

Categories Desserts

Slow Cooker Ranch Chicken Flavorful and Easy Meal

August 11, 2025 by Chef Tavio
- 4 boneless, skinless chicken breasts - 1 packet ranch dressing mix - 1 cup chicken broth - 1 cup cream cheese, softened - 1 cup frozen sweet corn - 1 cup black beans, rinsed and drained - 1 cup diced tomatoes (canned or fresh) - 1 teaspoon garlic powder - 1 teaspoon onion powder - 1/2 teaspoon ground cumin - Salt and pepper, to taste - Fresh cilantro, chopped - Lime wedges for garnish You can swap chicken breasts for chicken thighs if you like dark meat. For a dairy-free option, use vegan cream cheese. Instead of ranch mix, try your favorite seasoning blend or homemade herbs. You can replace black beans with pinto beans or chickpeas. This recipe is flexible, so feel free to get creative. When choosing chicken, look for bright pink color and no strange odors. Fresh chicken should feel firm and not slimy. For produce, pick tomatoes that are firm and smell sweet. Choose corn that feels plump and fresh. Always check for any bruises or spots on vegetables to ensure they are at their best. Fresh ingredients make your dish even tastier! Start by gathering all your ingredients. You will need: - 4 boneless, skinless chicken breasts - 1 packet ranch dressing mix - 1 cup chicken broth - 1 cup cream cheese, softened - 1 cup frozen sweet corn - 1 cup black beans - 1 cup diced tomatoes - 1 teaspoon garlic powder - 1 teaspoon onion powder - 1/2 teaspoon ground cumin - Salt and pepper, to taste - Fresh cilantro and lime wedges for garnish Now, place the chicken breasts in your slow cooker. Lay them flat in a single layer. This helps them cook evenly. Sprinkle the ranch dressing mix over the chicken. Make sure each piece gets a good coating. Next, pour the chicken broth on top. You want the chicken to be well covered for great flavor. Take your softened cream cheese and place it gently on the chicken. It will melt and blend while cooking. Now, add the frozen sweet corn and rinsed black beans. Toss in the diced tomatoes, garlic powder, onion powder, and ground cumin. Season with salt and pepper. Use a wooden spoon to mix everything gently. Avoid breaking the chicken while mixing. Cover your slow cooker with the lid. Set it to cook. If you choose the low setting, let it cook for 6 to 7 hours. For the high setting, 3 to 4 hours works well. Check that the chicken is cooked through and can be shredded easily. When the cooking time is done, take two forks to shred the chicken right in the slow cooker. Mix it well with the tasty sauce. You can serve your ranch chicken in many ways. Dish it over fluffy rice, pile it into warm tortillas for tacos, or scoop it up with crispy tortilla chips. Don’t forget to garnish with chopped cilantro and lime wedges. This adds a fresh touch and bright flavor! To get the best slow cooker ranch chicken, start with good chicken. Use fresh, boneless, and skinless chicken breasts. They cook evenly and stay moist. Cut any large pieces in half for even cooking. Make sure the chicken is in a single layer. This helps it cook more evenly. You can boost the flavor of your ranch chicken with extra spices. Try adding a dash of smoked paprika for a nice kick. A pinch of cayenne pepper adds heat. You can also toss in some fresh herbs. Chopped parsley or thyme can brighten the dish. For a tangy twist, add a splash of lime juice or some diced jalapeños. To keep your chicken moist, always use enough broth. One cup is perfect, but feel free to add a bit more if you like. Cream cheese also helps with creaminess. Make sure it’s softened before adding. If you want a thicker sauce, do not lift the lid too often while cooking. This keeps the steam inside, ensuring your chicken stays juicy. When it's ready, shred the chicken right in the slow cooker. This allows it to soak up all the tasty sauce. {{image_4}} You can easily swap chicken for other proteins. Use pork chops or beef stew meat. They work great in the slow cooker. Just follow the same steps as the chicken. The ranch flavor mixes well with both. Adjust cooking time if needed. For beef, it may take longer to cook. For pork, it will be similar to chicken. If you want a vegetarian dish, try using mushrooms or cauliflower. They soak up the ranch flavor well. You can also use chickpeas for a protein boost. Replace the chicken with two cups of your chosen veggies. Keep the same seasonings and cooking time. You can even add more beans or lentils for texture. Toppings can change the whole meal. Consider adding avocado, cheese, or sour cream. Fresh cilantro adds color and flavor. You can also serve it with rice, tortillas, or chips. For a crunch, try adding crispy onions or jalapeños. Each topping brings a new taste. Mix and match to find your perfect combo! To store leftover Slow Cooker Ranch Chicken, let it cool first. Place it in an airtight container. Make sure to seal it well to keep out air. You can keep it in the fridge for up to 3 days. If you want to save it longer, consider freezing it. When you want to reheat the chicken, use the microwave or stovetop. If using the microwave, place the chicken in a bowl. Cover it with a lid or microwave-safe wrap. Heat it in short bursts, stirring in between, until warm. On the stovetop, heat it on low in a pan. Stir it often to avoid burning. Add a splash of chicken broth if it seems dry. Freezing is a great way to save Slow Cooker Ranch Chicken for later. Portion it into smaller containers. This makes it easier to thaw just what you need. Label each container with the date. You can freeze it for up to 3 months. When ready to eat, thaw it overnight in the fridge. Reheat as mentioned above for the best taste. Yes, you can use chicken thighs. They have more fat, which adds flavor. Thighs stay juicy during cooking. Just keep the same cooking time. You want them tender and easy to shred. You can serve it with many sides. Here are a few ideas: - Fluffy rice, which soaks up the sauce well. - Warm tortillas for tasty tacos. - Crispy tortilla chips for a fun snack. - A fresh salad for a light side. - Steamed veggies to add color and crunch. Slow cookers can vary in temperature. If yours cooks faster, check the chicken sooner. For newer models, the high setting is usually quicker. If your slow cooker runs hot, reduce the cooking time. Always make sure the chicken is cooked through and easy to shred. You learned how to make Slow Cooker Ranch Chicken with ease. We covered the right ingredients, cooking steps, and even variations. Remember the tips to enhance flavor and texture for a tasty meal. Don’t forget, you can customize it to fit any taste. Storing leftovers is simple, and reheating keeps it moist. Now, with this guide, you can whip up a great dish. Enjoy your cooking adventures and the delicious meals you create!

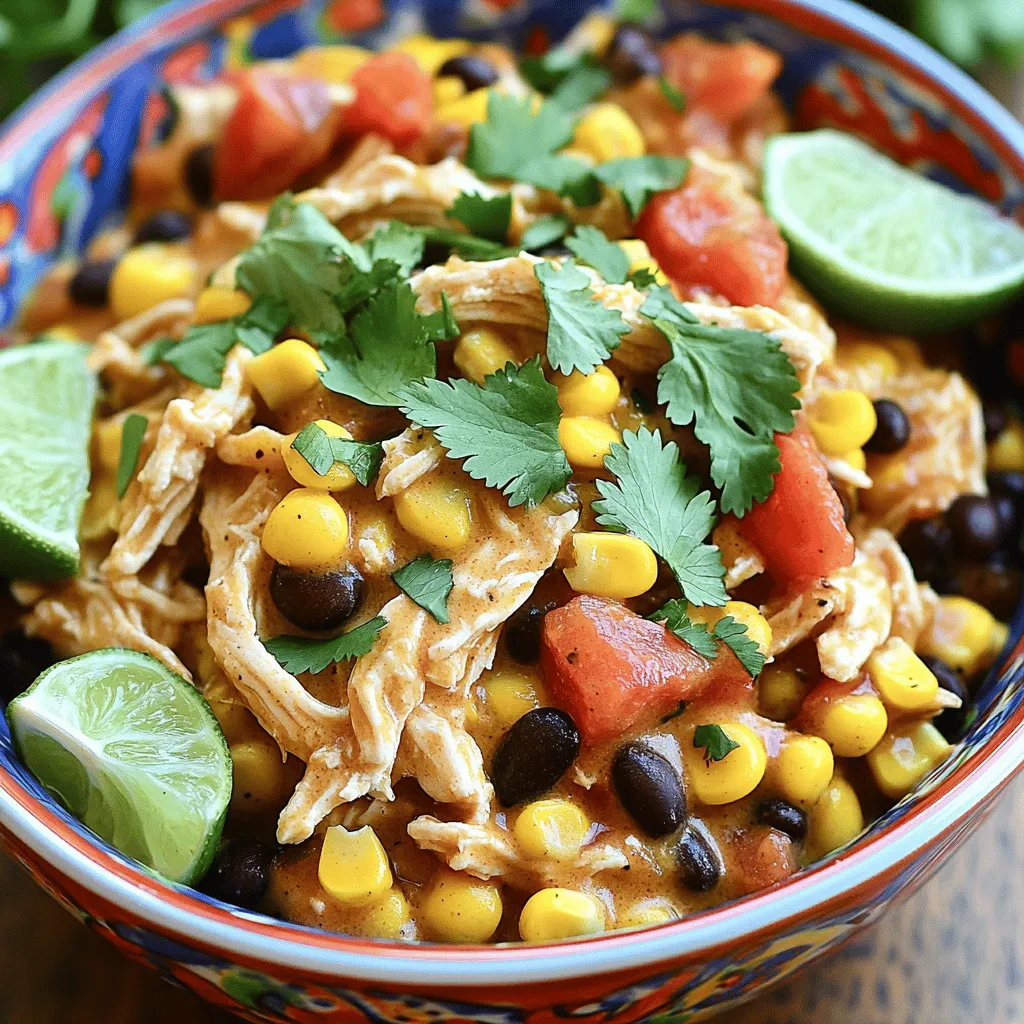
Are you looking for a simple dinner that packs a punch? Slow Cooker Ranch Chicken is the answer. This dish combines tender chicken and zesty ranch flavor, making it a …

Read more

Categories Dinner

Vanilla Spiced Pumpkin Bread Irresistible Fall Treat

August 11, 2025 by Chef Tavio
To make the perfect Vanilla Spiced Pumpkin Bread, you need to gather a few simple ingredients. Each one plays a key role in making this bread tasty and moist. Here’s the complete list: - 1 ¾ cups all-purpose flour - 1 teaspoon baking soda - ½ teaspoon baking powder - 1 teaspoon ground cinnamon - ½ teaspoon ground nutmeg - ¼ teaspoon ground ginger - ½ teaspoon salt - 1 cup pumpkin puree - ½ cup granulated sugar - ¼ cup brown sugar, packed - ½ cup vegetable oil - 2 large eggs - 1 teaspoon pure vanilla extract - ½ cup chopped pecans (optional) - ½ cup chocolate chips (optional) Each ingredient works together to create a soft, spiced bread that fills your home with a warm aroma. The pumpkin puree gives moisture while sugars add sweetness. The spices bring out the flavors of fall. You can also add nuts or chocolate for extra texture. - Preheat oven to 350°F (175°C) - Prepare a 9x5-inch loaf pan (grease with non-stick spray or butter) Start by preheating your oven to 350°F (175°C). This step is key for even baking. While the oven heats, prepare your loaf pan. Use non-stick spray or butter to grease it well. This makes it easy to remove the bread later. - Combine all-purpose flour, baking soda, baking powder, spices, and salt - Whisk until free of lumps In a medium bowl, mix the dry ingredients together. Combine 1 ¾ cups of all-purpose flour, 1 teaspoon of baking soda, ½ teaspoon of baking powder, 1 teaspoon of ground cinnamon, ½ teaspoon of ground nutmeg, ¼ teaspoon of ground ginger, and ½ teaspoon of salt. Whisk these ingredients until you see no lumps. This helps the bread rise well. - Blend pumpkin puree, sugars, and vegetable oil until smooth - Incorporate eggs one at a time and mix well - Add pure vanilla extract and combine In a large bowl, blend together 1 cup of pumpkin puree, ½ cup of granulated sugar, ¼ cup of packed brown sugar, and ½ cup of vegetable oil. Mix until smooth. Crack 2 large eggs into the bowl, adding one at a time. Stir well after each egg. Finally, add 1 teaspoon of pure vanilla extract and mix until everything is combined. - Gently fold dry ingredients into wet mixture until no flour streaks remain - Avoid overmixing for a lighter texture Now, it’s time to combine the wet and dry mixtures. Gently fold in the dry mix into the wet mix. Do this until you see no more flour streaks. Be careful not to overmix, as this can make the bread dense. A little mixing goes a long way. - Fold in chopped pecans and chocolate chips if desired If you want to add more texture, now is the time. Gently fold in ½ cup of chopped pecans or ½ cup of chocolate chips. This step is optional but adds great flavor and crunch to your bread. - Pour batter into prepared loaf pan - Bake for 55-65 minutes; check doneness with a toothpick Pour the batter into your prepared loaf pan. Use a spatula to smooth the top. Then, place the pan in the oven. Bake for 55-65 minutes. To check if it’s done, insert a toothpick into the center. If it comes out clean or with a few moist crumbs, your bread is ready! Mixing your batter just until combined is key. Overmixing can make your bread tough. It also creates a denser texture, which is not what we want. When you fold in the dry mix, stop when you see no more flour streaks. This helps keep your bread light and fluffy. Smoothing the batter helps it bake evenly. After pouring the batter into the loaf pan, use a spatula to spread it out. Make sure the top is flat. This promotes even heat distribution. If the batter is uneven, some parts may bake faster than others. You can boost the flavor with more spices. Try adding a pinch of allspice or cardamom. They pair well with pumpkin. Another fun idea is to use maple syrup instead of some sugar. It adds a warm sweetness. If you love nuts, consider adding walnuts for a different crunch. These small changes can make your bread even more delightful. {{image_4}} If you want a nut-free bread, skip the pecans. You can use sunflower seeds or pumpkin seeds instead. These seeds add crunch and a nutty taste without any allergens. For chocolate lovers, swap the chocolate chips for dried fruit. Raisins or cranberries work well and give a nice chewy texture. To make this bread gluten-free, replace all-purpose flour with a gluten-free flour blend. Look for a blend that includes xanthan gum for the best texture. You can also use almond flour, but adjust the amount to about 1 ½ cups. Almond flour adds a rich flavor but may change the bread's density. Want to change the flavor? Use butternut squash puree instead of pumpkin puree. It gives a sweet taste and works well in baked goods. For spices, try adding allspice or cardamom in place of cinnamon. Each spice brings a unique warmth that can make your bread even more special. To keep your vanilla spiced pumpkin bread fresh, wrap it well. Use plastic wrap or aluminum foil. You can also place it in an airtight container. Store it at room temperature for up to three days. If you want it to last longer, try refrigeration. This method can help the bread stay good for about a week. Just remember, it may get a bit dense in the fridge. To freeze your pumpkin bread, let it cool completely first. Once cool, slice the bread into pieces. Wrap each slice in plastic wrap to prevent freezer burn. Then, place the wrapped slices in a freezer bag. Remove as much air as possible before sealing. This way, the bread can stay fresh for up to three months. When you're ready to eat, just take out a slice. To enjoy leftovers warm, preheat your oven to 350°F (175°C). Place the slices on a baking sheet. Heat them for about 10 minutes. You can also use a microwave. Heat each slice for about 15-20 seconds. If you want extra warmth, top with butter or cream cheese. This makes each bite even more delicious! To make this pumpkin bread vegan, swap the eggs for flaxseed meal. Mix 1 tablespoon of flaxseed meal with 2.5 tablespoons of water. Let it sit for five minutes to thicken. You can also use a plant-based oil, like coconut or canola oil. Yes, you can use fresh pumpkin! Start by roasting a pumpkin until soft. Then, scoop out the flesh and blend it until smooth. This gives you a fresh flavor. Just make sure it’s well-drained to avoid excess moisture. Absolutely! You can add nuts, like walnuts or pecans, for crunch. Dried fruits, such as cranberries or raisins, can also add sweetness. If you want a chocolate kick, toss in some chocolate chips. Feel free to experiment with spices, too! Check for doneness with a toothpick. Insert it into the center of the bread. If it comes out clean or with just a few crumbs, it’s done. You can also gently press the top; it should spring back. This bread pairs well with whipped cream cheese. A drizzle of warm cream cheese glaze adds a nice touch. You can also serve it with coffee or tea for a cozy treat. Enjoy it warm or at room temperature! This post explored the key ingredients for a delicious Pumpkin Bread. It covered how to mix, bake, and even troubleshoot your bread. A few tips can help you avoid common mistakes. You can also try tasty variations like nut-free or gluten-free options. Remember, proper storage keeps your bread fresh longer. Enjoy experimenting with flavors and share your baking results! Happy baking!

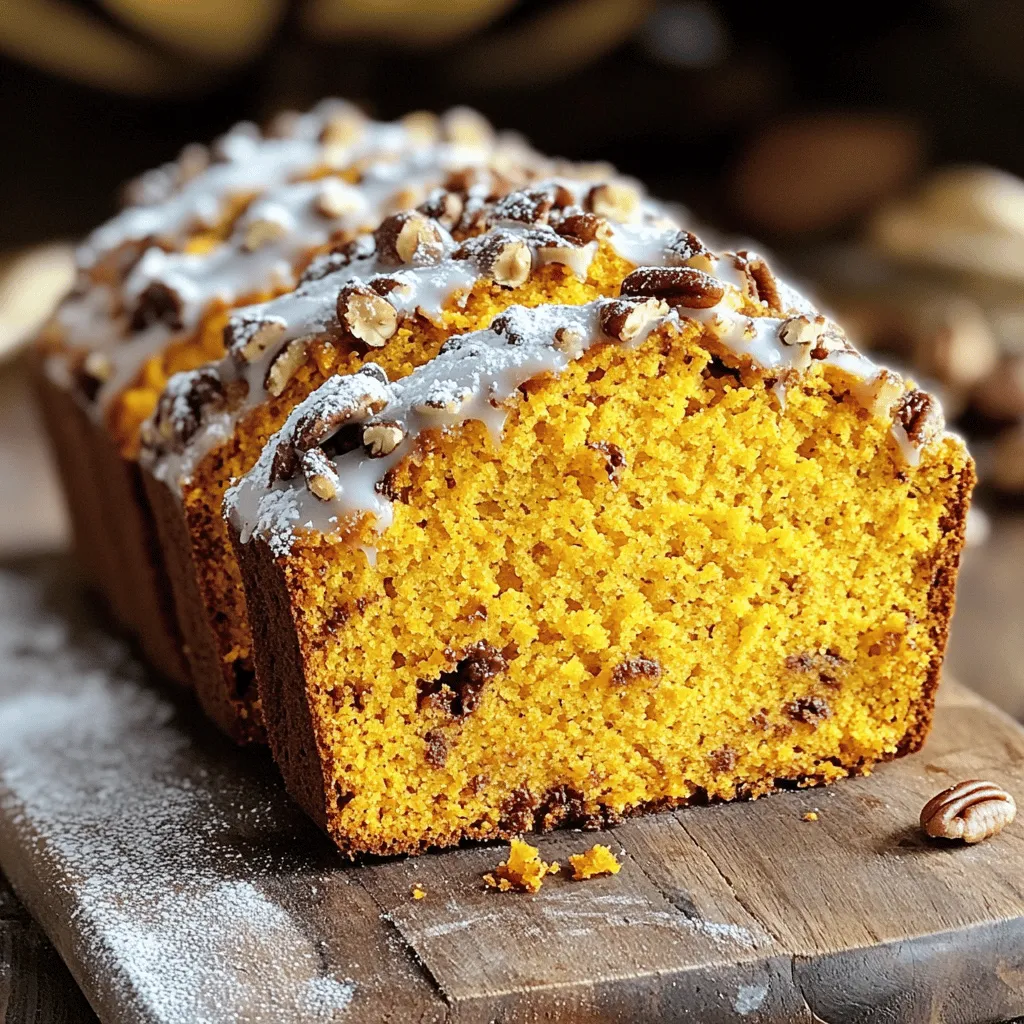
Fall is the perfect time to enjoy warm, soothing treats, and nothing beats Vanilla Spiced Pumpkin Bread. This easy recipe combines the rich flavors of pumpkin with a hint of …

Read more

Categories Desserts

Pumpkin Streusel Muffins Fluffy and Flavorful Treat

August 11, 2025 by Chef Tavio
- 1 cup canned pumpkin puree - 1/2 cup vegetable oil - 1/2 cup packed brown sugar - 1/2 cup granulated sugar - 2 large eggs, at room temperature - 1 teaspoon pure vanilla extract - 1 1/2 cups all-purpose flour - 1 teaspoon baking powder - 1 teaspoon baking soda - 1 teaspoon ground cinnamon - 1/2 teaspoon ground nutmeg - 1/4 teaspoon salt You need a few key items to make pumpkin streusel muffins. First, the main star is canned pumpkin puree. It gives the muffins rich flavor and moisture. Next, vegetable oil helps keep them light and fluffy. For sweetness, you will use both brown and granulated sugars. Brown sugar adds depth, while granulated sugar balances it out. You also need eggs for binding and vanilla extract to enhance taste. The base of the muffins is all-purpose flour, along with baking powder and baking soda for leavening. The spices, ground cinnamon and nutmeg, bring warmth and a cozy feel to every bite. Finally, a pinch of salt brings all the flavors together. - 1/2 cup all-purpose flour - 1/4 cup packed brown sugar - 1/4 teaspoon ground cinnamon - 1/4 cup cold unsalted butter, cubed - 1/4 cup pecans, chopped (optional) The streusel topping makes these muffins even better. You start with more all-purpose flour, brown sugar, and ground cinnamon. This mix adds sweetness and crunch. The cold unsalted butter gives the streusel its crumbly texture. You can add chopped pecans for extra flavor and crunch, but they are optional. The streusel creates a delicious contrast to the soft muffins. First, preheat your oven to 350°F (175°C). This heat will help your muffins rise perfectly. Next, prepare your muffin tin. You can use paper liners or spray the cups with a bit of non-stick spray. This step keeps the muffins from sticking, making it easier to enjoy them later. In a large bowl, combine the canned pumpkin puree, vegetable oil, packed brown sugar, granulated sugar, eggs, and pure vanilla extract. Use a whisk to mix these ingredients until smooth. This creates the base for your muffins and adds great flavor. In a different bowl, sift together the all-purpose flour, baking powder, baking soda, ground cinnamon, ground nutmeg, and salt. Mixing these dry ingredients helps distribute the leavening agents evenly. Gradually add this mixture to the wet ingredients. Stir gently until just combined. Over-mixing can make the muffins dense, so be careful. For the streusel topping, mix the remaining all-purpose flour, packed brown sugar, and ground cinnamon in a small bowl. Then, add the cold butter cubes. Use a fork or your fingers to blend until it looks like coarse crumbs. If you want a crunchy texture, fold in the chopped pecans. This topping adds a delightful crunch. Using a spoon or a scoop, fill each muffin cup about two-thirds full with the pumpkin batter. This allows room for the muffins to rise. Next, generously sprinkle the streusel topping over each muffin. Make sure every muffin has a good amount of topping for that delicious crunch. Bake the muffins in your preheated oven for 18-20 minutes. To check if they are done, insert a toothpick into the center of a muffin. If it comes out clean, they are ready. Keep an eye on them to avoid over-baking. Once baked, cool the muffins in the pan for about 5 minutes. Then, carefully transfer them to a wire rack to cool completely. This helps them stay soft and fluffy. To make perfect muffins, avoid over-mixing. When you mix too much, the muffins become dense. Just stir until the dry ingredients blend with the wet ones. This keeps the muffins light and fluffy. Using oil helps make muffins moist. I prefer vegetable oil for this recipe. It keeps the muffins tender and adds a nice texture. You can also try other oils like canola or melted coconut oil for a twist. Warm muffins taste best. Serve them fresh from the oven. Add a pat of butter on top for richness. You can also sprinkle a dash of cinnamon over the butter for extra flavor. Pair these muffins with warm drinks. Coffee, tea, or hot chocolate work well. The flavors of pumpkin and spices blend nicely with these beverages. Store your muffins in an airtight container. This keeps them fresh for longer. You can also use plastic wrap or a zip-top bag. If you want to reheat muffins, use an oven or microwave. In the oven, warm them at 350°F for about 5-10 minutes. This keeps the muffins fluffy and restores their warmth. If using a microwave, heat for 10-15 seconds. Enjoy your fluffy and flavorful pumpkin streusel muffins! {{image_4}} You can easily swap ingredients in pumpkin streusel muffins to fit your needs. - Alternative oils or sweeteners: Instead of vegetable oil, try coconut oil or applesauce for a lighter option. For sweeteners, maple syrup or honey can add a unique twist. - Gluten-free flour options: If you prefer gluten-free muffins, use a gluten-free flour blend. Just make sure it contains xanthan gum for better texture. Adding new flavors can make your muffins even more exciting. - Suggestions for spices or flavor extracts: Mix in a pinch of ginger or cloves for extra warmth. You can also add a splash of almond or orange extract for a fresh taste. - Other mix-ins like chocolate chips or dried fruit: Fold in dark chocolate chips, cranberries, or raisins for added sweetness and texture. Seasonal changes can inspire fun twists on this classic recipe. - Ideas for holiday ingredients or toppings: For a festive touch, add crushed candy canes or sprinkle with holiday-themed sprinkles. - Using different types of pumpkin or squash: Experiment with butternut squash or sweet potato puree for a different flavor profile. Each offers a lovely sweetness that complements the spices. To store muffins in the refrigerator, place them in an airtight container. This keeps them fresh for up to a week. Make sure to cool the muffins completely before sealing them. If you want to freeze muffins, wrap each one in plastic wrap. Then, place them in a freezer-safe bag. Label the bag with the date. Frozen muffins can last up to three months. When you're ready to eat, thaw them in the fridge overnight. The best containers for storage are glass or plastic airtight containers. These help keep moisture in while keeping air out. Use a container that fits the muffins snugly. This prevents them from moving around and getting squished. To prevent moisture loss, avoid using paper bags. They allow air to dry out your muffins quickly. In the refrigerator, muffins last about one week. In the freezer, they stay good for three months. When muffins spoil, they may look dry or moldy. A change in smell is also a sign. If they smell off, it’s best to toss them. Always check muffins before eating, especially if they've been stored for a while. Yes, you can use fresh pumpkin. Just cook and puree it first. Fresh pumpkin has a different texture and flavor than canned. You may need to adjust the moisture in your batter. If it's too wet, add a bit more flour. To check if your muffins are done, use a toothpick. Insert it into the center of a muffin. If it comes out clean, the muffins are ready. If it has batter on it, bake a few more minutes. Keep an eye on them to avoid over-baking. Yes, you can make the batter ahead of time! Simply mix all the wet and dry ingredients. Store the batter in the fridge for up to 24 hours. When you're ready to bake, just scoop it into the muffin tin and add the streusel topping. If you want a nut-free option, try sunflower seeds or pumpkin seeds. You can also use walnuts or almonds if you prefer other nuts. These will still add a nice crunch to your muffins. To keep your muffins moist, store them in an airtight container. You can also place a slice of bread in the container. The bread will help keep the muffins soft. If you want to freeze them, wrap each muffin well to prevent freezer burn. This blog outlined how to make delicious pumpkin muffins. We covered key ingredients, step-by-step instructions, and helpful tips. You’ve learned about the best methods for mixing and baking. Don't forget the fun variations you can try! Using this guide, you can create moist muffins that impress everyone. Enjoy baking and sharing your tasty treats. You have great options to explore for flavor and storage. Your pumpkin muffins will be a hit at any gathering!

Craving a cozy fall treat? Dive into the world of pumpkin streusel muffins! These fluffy, flavorful delights combine warm spices and creamy pumpkin to create the perfect breakfast or snack. …

Read more

Categories Desserts

Gluten-Free Pumpkin Protein Muffins Simple and Tasty

August 11, 2025 by Chef Tavio
To make gluten-free pumpkin protein muffins, you'll need the following simple ingredients: - 1 cup gluten-free oat flour - 1 cup canned pumpkin puree - 1/2 cup protein powder (choose vanilla or unflavored) - 1/2 cup almond milk (or your preferred milk) - 1/3 cup honey or pure maple syrup - 1/4 cup melted coconut oil - 2 large eggs - 1 teaspoon baking powder - 1/2 teaspoon baking soda - 1 teaspoon ground cinnamon - 1/2 teaspoon ground nutmeg - 1/4 teaspoon salt - Optional: 1/2 cup chopped walnuts or dairy-free chocolate chips These ingredients come together to create a tasty and nutritious muffin that packs a protein punch. The oat flour gives a nice texture, while the pumpkin puree adds moisture and flavor. You can choose your favorite protein powder to customize the taste. Almond milk keeps it dairy-free, and the coconut oil adds richness. You can also add walnuts or chocolate chips for extra flavor and crunch. Each ingredient plays a vital role in making these muffins both healthy and delicious. - Preheat the oven to 350°F (175°C). - Prepare the muffin tin with liners or coat it with coconut oil. - In a bowl, combine gluten-free oat flour, protein powder, baking powder, baking soda, ground cinnamon, ground nutmeg, and salt. - Whisk these dry ingredients well to mix them evenly. - In another bowl, blend together canned pumpkin puree, almond milk, honey or maple syrup, melted coconut oil, and eggs. - Stir until the mixture is smooth and well combined. - Carefully pour the wet ingredients into the dry mix. - Gently stir using a spatula until just combined. Do not overmix! This keeps the muffins soft. - Use a spoon or ice cream scoop to divide the batter into the muffin cups. - Fill each cup about two-thirds full to allow space for the muffins to rise. - Place the muffin tin in the oven. - Bake for 18-22 minutes. Check if they are done by inserting a toothpick into the center. It should come out clean or with a few moist crumbs. Not overmixing the batter is key. When you combine wet and dry ingredients, stir until just mixed. This helps keep your muffins light and fluffy. Overmixing can make them dense. You want a nice, airy texture for each bite! These muffins taste great warm. I love serving them with a dollop of Greek yogurt. You can also drizzle almond butter on top for extra creaminess. This adds protein and flavor. Enjoy them with a warm drink for a cozy treat! To keep your muffins moist, use canned pumpkin puree. It adds natural moisture and flavor. Coconut oil also helps make them rich and soft. If you want extra flavor, add chopped nuts or dairy-free chocolate chips. They not only taste good but also add texture! {{image_4}} To make these muffins vegan, you can swap the eggs with flaxseed meal or chia seeds. Use 1 tablespoon of flaxseed meal mixed with 2.5 tablespoons of water for each egg. Let this mix sit for a few minutes to thicken. For milk, use almond milk or any plant-based milk you prefer. Replace honey or maple syrup with agave syrup for a vegan sweetener. These changes keep the muffins moist and tasty. If you want a low-carb version, reduce the sugar by using a sugar substitute like erythritol or stevia. You can also use almond flour or coconut flour instead of oat flour. These alternatives lower the carbs and still give you great texture. Just remember, coconut flour absorbs more moisture, so you may need to adjust the liquid in your recipe. To take your muffins to the next level, add fun flavors. Chopped nuts, like walnuts or pecans, add crunch. You can also mix in dairy-free chocolate chips for a sweet treat. For spices, try adding a bit of ginger or cloves for depth. You can also mix in dried fruits like cranberries or raisins for a fruity twist. These add-ins will make each bite even more delightful! To keep your gluten-free pumpkin protein muffins fresh, store them in an airtight container. If you have extra muffins, freeze them for later. Wrap each muffin in plastic wrap or foil before placing them in a freezer bag. This helps keep them moist and tasty. In the fridge, these muffins last about 5-7 days. They stay fresh for up to 3 months in the freezer. Always check for signs of spoilage, like mold or an off smell, before eating. To reheat, you can use the microwave or the oven. For the microwave, place a muffin on a plate and heat for 15-20 seconds. If you prefer the oven, preheat to 350°F (175°C) and warm the muffins for about 5-10 minutes. This keeps them soft and fluffy. Enjoy your muffins warm! Yes, these muffins are gluten-free. I use gluten-free oat flour as the base. Oat flour comes from ground oats that are naturally gluten-free. However, make sure your oat flour is certified gluten-free. Some brands may process oats in facilities that handle gluten. This can lead to cross-contamination. Always check the label to be safe. You can use other flours, but results may vary. Almond flour works well for a nutty taste. Coconut flour is another option, but it absorbs more liquid. If you switch to coconut flour, use less and add extra liquid. Other gluten-free blends can work too. Just ensure the blend has a good structure to hold the muffins. To boost protein, you can add Greek yogurt or cottage cheese to the mix. These ingredients add creaminess and extra protein. You can also toss in some seeds, like chia or hemp seeds. They pack a protein punch without changing the flavor much. Another option is using more protein powder, but be careful not to dry the batter. If you need a different sweetener, use agave syrup or brown sugar. You can also use stevia for a low-calorie option. Just remember that each sweetener has a different sweetness level. Adjust the amount based on your taste. If you prefer no sweetener, try adding mashed bananas for natural sweetness. Yes, mini muffins are easy to make! Just fill the cups about halfway. Bake them for about 12-15 minutes instead of the full time. Keep an eye on them so they don’t overbake. Mini muffins are great for snacks or lunch boxes. They are fun for kids and so easy to grab! These muffins are packed with great flavors and healthy ingredients. We mixed gluten-free oat flour, pumpkin puree, and protein powder to create a tasty treat. I showed you step-by-step how to bake them and offered tips to perfect the texture. Whether you want a vegan option or low-carb twist, you can easily adapt this recipe. Store them well for freshness, and enjoy them warm. These muffins are a fun and healthy way to enjoy a snack!

Looking for a tasty, healthy treat? Try my Gluten-Free Pumpkin Protein Muffins! These muffins are packed with protein and flavor, making them perfect for breakfast or a snack. With simple …

Read more

Categories Breakfast
Older posts
Newer posts
← Previous Page1 … Page18 Page19 Page20 … Page92 Next →

TASTED NEST

Where Flavor Finds a Home 🍳🏡 — warm, simple, and crave-worthy recipes made for real life, from stovetop mornings to backyard dinners.

PAGES

Home About Contact Privacy Policy Terms & Conditions Cookie Policy GDPR Policy Copyright Policy Disclaimer

CATEGORIES

Appetizers Desserts Salads Breakfast Dinner

Contact

  • Pinterest
  • Mail
Copyright © 2025 Tasted Nest. All rights reserved.