Skip to content
Tasted Nest
  • Home
  • Appetizers
  • Desserts
  • Salads
  • Breakfast
  • Dinner
  • Privacy Policy
  • Contact
  • About

Chef Tavio

Cilantro Lime Slaw Fresh and Flavorful Salad Recipe

August 8, 2025 by Chef Tavio
- 4 cups green cabbage - 1 cup red cabbage - 1 large carrot - 1/2 red bell pepper - 1/4 cup fresh cilantro - 2 tablespoons lime juice - 1 tablespoon olive oil - 1 teaspoon honey - Seasoning options For this slaw, I love using fresh vegetables. The green cabbage brings a crisp texture. Red cabbage adds a pop of color. Carrots give it a slight sweetness. The red bell pepper adds crunch and flavor. Fresh cilantro is a must for that bright taste. Lime juice gives it zing, while honey adds a touch of sweetness. Olive oil keeps everything moist and flavorful. - Vegan options: Use agave syrup instead of honey. You can also skip the honey altogether. - Low-sodium alternatives: Choose low-sodium soy sauce if you like. These swaps make the slaw fit different diets. You can easily adjust it to your taste. - Calories: Approximately 100 calories - Macros breakdown: - Fat: 5g - Carbs: 12g - Protein: 2g Cilantro lime slaw is not just tasty; it's good for you too! Cabbage is high in fiber. It helps with digestion and keeps you full. Cilantro is rich in vitamins A and C. Lime juice boosts your immune system. Overall, this slaw is a crunchy, refreshing dish that adds nutrition to any meal. For the full recipe, check the link above. To start, we need to prepare the vegetables. First, take your green and red cabbage. Cut them into thin strips to make the slaw crunchy. Aim for four cups of green cabbage and one cup of red cabbage. Use a sharp knife or a mandoline for even cuts. Next, grab a large carrot. Use a box grater or a food processor to grate it. You want one large carrot for the best color and taste. The carrot adds a nice crunch and sweetness to the slaw. Finally, slice half a red bell pepper into thin strips. This adds a pop of color and flavor. Make sure the slices are even so they mix well with the other veggies. Now, let’s make the dressing. In a small bowl, squeeze the juice from fresh limes. You need two tablespoons of this lime juice. Add one tablespoon of extra virgin olive oil for richness. Next, stir in one teaspoon of honey or agave syrup if you want a vegan option. Then, add half a teaspoon of ground cumin. This spice gives a warm flavor to the dressing. Finish by adding a pinch of sea salt and freshly cracked black pepper. To mix, use a whisk. Whisk the ingredients well until the dressing is smooth. If you want a creamier texture, whisk a bit longer. Now it’s time to combine everything. In a large mixing bowl, add the shredded cabbage, grated carrot, and sliced bell pepper. Pour the dressing over the veggies. Don’t forget to sprinkle in the chopped cilantro for fresh flavor. Using tongs or two large forks, toss the mixture gently. Make sure all the veggies are coated with the dressing. This step is key to getting all the flavors together. Let the slaw rest for 10-15 minutes. This allows the flavors to blend and the veggies to soften slightly. After resting, serve it chilled or at room temperature. Enjoy your fresh and flavorful cilantro lime slaw with tacos or as a side dish. For the full recipe, check out the section above. To get the best taste from your cilantro lime slaw, marinate it for about 10 to 15 minutes. This time allows the flavors to blend well. If you serve it too soon, the taste will not be as vibrant. I also suggest serving the slaw chilled or at room temperature. It pairs wonderfully with tacos or grilled chicken. You can boost the flavor by adding more herbs or spices. Fresh mint or parsley works well. If you want to get creative, consider incorporating fruits like diced mango or pineapple. They add a nice sweetness that balances the tangy lime. One big mistake is overmixing the ingredients. If you mix too hard, the vegetables can become mushy. Also, avoid using stale or wilted vegetables. Freshness is key to a great slaw. Always pick crisp cabbage and bright peppers for the best results. For the full recipe, click here: [Full Recipe]. {{image_4}} Customizing your cilantro lime slaw can make it fit your taste and diet. You can add protein like chicken or tofu. Both options make the dish heartier. If you need gluten-free choices, this slaw is perfect as is. All the main ingredients are naturally gluten-free. For flavor variations, you can spice things up. Turn your slaw into a spicy cilantro lime slaw by adding diced jalapeños or a splash of hot sauce. Want to sweeten it? Try adding fruits like mango or pineapple for a twist. They bring a new level of freshness and sweetness. You can also adapt this slaw to different regions. A Southwest-style slaw could use black beans and corn. This adds a nice crunch and a hearty feel. For an Asian-inspired twist, include sesame oil and thinly sliced radishes. This gives a unique flavor that pairs well with Asian dishes. For more details, check out the Full Recipe for the base cilantro lime slaw. To keep your Cilantro Lime Slaw fresh, store it in the fridge. Use airtight containers to prevent moisture loss. Glass containers work well, but plastic ones are just fine too. Make sure the lid seals tightly to keep out air. This slaw lasts about three days in the fridge. After that, it may lose its crunch. Look for signs of spoilage. If you see wilting or an off smell, it’s best to toss it. Cilantro Lime Slaw is best served cold. If you need to refresh it, add a splash of lime juice or a drizzle of olive oil. Toss it lightly to mix. This revitalizes the flavors and keeps it tasty and bright. To make great slaw, you should shred the cabbage. Use a sharp knife or a box grater for this. Cut the cabbage in half first, then slice each half into thin strips. For a quick method, try a food processor with a shredding disk. This makes the process fast and easy, giving you nice, even pieces. Remember, the thinner the strips, the better the texture in your slaw. Yes, you can prepare the slaw ahead. It tastes even better after some time in the fridge. If you want to make it a day in advance, just keep the dressing separate until serving. This helps keep the cabbage crisp. If you mix it early, the veggies may get soggy. Aim to combine it about 30 minutes before serving for the best flavor. You can change the flavor easily. If you want it sweeter, add more honey or a splash of orange juice. For more zing, try extra lime juice or even vinegar. If you like spice, add a pinch of chili powder or diced jalapeños. Each change can bring a new twist to the slaw, making it truly your own. Cilantro lime slaw is easy to make and delicious. You learned about the key ingredients and steps for great taste. I shared tips to enhance flavor and avoid common mistakes. You can also customize this slaw for different diets and flavor preferences. Remember, freshness matters, so store leftovers well. With these ideas, you can enjoy this slaw any time. Dive in and make your own version!

Looking for a fresh and zesty side dish? My Cilantro Lime Slaw is the perfect addition to any meal. This vibrant salad blends crisp greens, colorful veggies, and a bright …

Read more

Categories Salads

Chicken Enchilada Soup Flavorful and Easy Recipe

August 8, 2025 by Chef Tavio
To make a tasty Chicken Enchilada Soup, gather these simple ingredients: - 1 lb (450g) boneless, skinless chicken breasts - 1 tablespoon olive oil - 1 medium onion, diced - 3 cloves garlic, minced - 1 can (14 oz) fire-roasted diced tomatoes - 1 can (15 oz) black beans, drained and rinsed - 1 can (15 oz) corn, drained - 4 cups chicken broth - 2 tablespoons enchilada sauce - 1 teaspoon chili powder - 1 teaspoon cumin - ½ teaspoon smoked paprika - Salt and pepper to taste - 1 cup shredded cheese (cheddar or Mexican blend) - Fresh cilantro, chopped (for garnish) - Avocado, diced (for garnish) - Tortilla strips (for garnish) If you need substitutions, there are many options. Use shredded rotisserie chicken for quick prep. You can swap black beans for pinto beans. If you prefer a vegetarian soup, replace chicken with more beans or lentils. Vegetable broth can replace chicken broth for a lighter flavor. For a spicier kick, add jalapeños or cayenne pepper. To make your soup even better, consider adding a few extra flavors. A squeeze of lime juice brightens the taste. Chopped green onions add freshness. For a smoky flavor, try adding chipotle in adobo. If you crave creaminess, stir in some sour cream or Greek yogurt before serving. Each of these will take your soup to the next level! For the full recipe, check out the details above. Start by gathering your ingredients. This will make the cooking process smooth. Here’s what you need: - 1 lb boneless, skinless chicken breasts - 1 tablespoon olive oil - 1 medium onion, diced - 3 cloves garlic, minced - 1 can fire-roasted diced tomatoes (14 oz) - 1 can black beans (15 oz), drained and rinsed - 1 can corn (15 oz), drained - 4 cups chicken broth - 2 tablespoons enchilada sauce - 1 teaspoon chili powder - 1 teaspoon cumin - ½ teaspoon smoked paprika - Salt and pepper to taste - 1 cup shredded cheese (cheddar or Mexican blend) - Fresh cilantro, chopped (for garnish) - Avocado, diced (for garnish) - Tortilla strips (for garnish) Make sure to wash and chop all fresh ingredients before you start cooking. It helps to have everything ready. 1. Sauté the Aromatics: Heat olive oil in a large pot over medium heat. Add the diced onion. Cook for about 5 minutes until it is soft and clear. 2. Add Garlic: Stir in minced garlic. Cook for another minute. This step adds a rich flavor to your soup. 3. Cook the Chicken: Place the chicken breasts in the pot. Add chicken broth to cover the chicken. Bring to a boil, then lower the heat. Cover and let it simmer for around 15 minutes. The chicken should be fully cooked. 4. Shred the Chicken: Carefully take the chicken out of the pot. Use two forks to shred it into small pieces. Set it aside for later. 5. Build the Soup: In the same pot, combine fire-roasted tomatoes, black beans, corn, enchilada sauce, chili powder, cumin, smoked paprika, salt, and pepper. Mix well. 6. Combine Chicken and Simmer: Add the shredded chicken back into the pot. Let the soup simmer for another 10 to 15 minutes. Stir occasionally to blend the flavors. 7. Add Cheese: Just before serving, stir in half of the shredded cheese until it melts. This makes your soup creamy. Ladle the warm soup into bowls. Top each bowl with the remaining cheese, fresh cilantro, diced avocado, and crunchy tortilla strips. For a lovely look, serve the soup in bright bowls. This adds to the fun colors of the dish. A squeeze of fresh lime juice can brighten the flavor even more. Enjoy your flavorful Chicken Enchilada Soup! For the full recipe, see the details above. To make your Chicken Enchilada Soup creamier, you can add a few simple ingredients. Start with cream cheese. Soften 4 ounces of cream cheese and stir it in just before serving. This will give your soup a rich texture. You can also use sour cream or Greek yogurt for creaminess. Stir in about ½ cup for a tangy flavor. If you want even more creaminess, blend part of the soup with an immersion blender. This breaks down some ingredients and thickens the soup. Using the right tools helps your soup turn out great. A large pot or Dutch oven is best for even cooking. This allows heat to spread evenly. A good knife is key for chopping your onion and garlic quickly. An immersion blender is a fun tool if you want to blend the soup. It saves you from transferring hot soup to a blender. A wooden spoon is great for stirring and scraping the bottom of the pot. One common mistake is overcooking the chicken. Remove it from the pot as soon as it’s no longer pink. Shredding it while hot helps keep it moist. Another mistake is skipping the seasoning. Taste your soup after adding ingredients. Adjust with salt, pepper, or spices to ensure full flavor. Lastly, don’t forget the toppings! They add texture and flavor. Use fresh cilantro, avocado, and tortilla strips to make each bowl pop. {{image_4}} You can easily make this soup vegetarian or vegan. Instead of chicken, use chopped mushrooms or zucchini. They add a nice texture. For the broth, swap chicken broth for vegetable broth. This keeps all the flavors while being meat-free. If you want a creamy base, add a cup of coconut milk for richness. Adjust the heat based on your taste. For a spicy version, add more chili powder or some diced jalapeños. You can also include a splash of hot sauce at the end. If you prefer it mild, cut back on the chili powder. You can even leave out the diced tomatoes with green chilies. This way, you control the spice level to fit your family’s taste. Feel free to switch ingredients for new flavors. Instead of black beans, try pinto or kidney beans. Corn can be swapped with diced bell peppers for a crunchy bite. You can also use different cheeses like Monterey Jack or pepper jack for a unique twist. If you want a smoky flavor, add some chipotle peppers in adobo sauce. Each change brings a new life to this classic soup. For the full recipe, check out the recipe section. To store your leftover chicken enchilada soup, let it cool first. Place the soup in an airtight container. Make sure to seal it tightly. You can keep it in the fridge for up to four days. This way, you can enjoy your soup later without losing flavor. When you're ready to eat the soup again, pour it into a pot. Heat it over medium heat. Stir it often to avoid burning. You can also use the microwave if you're short on time. Place the soup in a microwave-safe bowl. Heat in 1-minute intervals until it's hot. Be sure to stir between intervals for even heating. If you want to save the soup for longer, freezing is a great option. First, let it cool down completely. Then, pour it into freezer-safe bags or containers. Make sure to leave some space at the top, as the soup will expand when frozen. Label the bags with the date. You can freeze it for up to three months. When you're ready to eat, thaw it overnight in the fridge before reheating. This method preserves the taste and texture of your delicious soup. To thicken your soup, you can use a few methods. First, add extra black beans or corn. These ingredients will add texture and help thicken the broth. You can also blend part of the soup. Use an immersion blender and blend just enough to create a smoother base. Another option is to mix in a slurry. This slurry is made with cornstarch and water. Mix one tablespoon of cornstarch with two tablespoons of cold water. Stir it into the soup and simmer for a few minutes. This will thicken the soup nicely. Yes, you can use canned chicken in this recipe. Canned chicken is convenient and saves time. It also helps your soup come together faster. Just drain the chicken and add it to the pot during the last few minutes of cooking. This way, it heats through without becoming too mushy. The flavor will still be good, but fresh chicken gives a better taste and texture. I love serving Chicken Enchilada Soup with various toppings. Here are some great ideas: - Shredded cheese (cheddar or Mexican blend) - Fresh cilantro, chopped - Diced avocado - Crunchy tortilla strips - Sliced jalapeños for a kick - A squeeze of lime juice for freshness You can also serve the soup with warm tortillas or crusty bread. This makes a great meal even better. For a fun twist, consider serving it in a bread bowl. It adds flair and makes cleanup easy! Check out the Full Recipe for more ideas. You learned about making Chicken Enchilada Soup. We covered ingredients, from main items to swaps and flavor boosts. I shared step-by-step cooking and how to make your soup just right. Tips on creaminess and common mistakes will help you succeed. We also explored tasty variations and smart storage options. Now, you can whip up a delicious soup that fits your taste. Enjoy your cooking!

Are you craving a warm, hearty meal? My Chicken Enchilada Soup is both flavorful and simple to make. You don’t need chef skills to whip up this dish! With just …

Read more

Categories Dinner

Gluten-Free Pumpkin Donuts Flavorful Fall Treat

August 8, 2025 by Chef Tavio
To make gluten-free pumpkin donuts, start with key ingredients. Here’s what you need: - 1 cup gluten-free all-purpose flour - 1/2 cup pumpkin puree - 1/2 cup almond flour - 1/2 cup sugar (coconut sugar works well) - 1/4 cup pure maple syrup - 1 teaspoon baking powder - 1/2 teaspoon baking soda - 1 teaspoon ground cinnamon - 1/4 teaspoon ground nutmeg - 1/4 teaspoon ground cloves - 1/2 teaspoon salt - 2 large eggs - 1/4 cup melted coconut oil or unsalted butter - 1 teaspoon pure vanilla extract These ingredients create a moist and flavorful treat. The pumpkin puree brings warmth, while spices give that cozy fall vibe. If you want to mix things up, try different gluten-free flours. Here are some good options: - Oat flour - Brown rice flour - Cassava flour Each flour has its own taste and texture. Oat flour adds a nutty flavor, while cassava flour keeps it light and fluffy. You can take your donuts to the next level with these optional ingredients: - Chocolate glaze for a sweet touch - Maple glaze for a classic flavor - Chopped nuts for crunch These extras allow you to customize your donuts. I love adding a chocolate glaze for a rich taste. You can find the full recipe for these delicious gluten-free pumpkin donuts in the main article. Enjoy experimenting! Start with gathering all your ingredients. This makes cooking easier and more fun. Here’s what you need: - 1 cup gluten-free all-purpose flour - 1/2 cup pumpkin puree - 1/2 cup almond flour - 1/2 cup sugar - 1/4 cup pure maple syrup - 1 teaspoon baking powder - 1/2 teaspoon baking soda - 1 teaspoon ground cinnamon - 1/4 teaspoon ground nutmeg - 1/4 teaspoon ground cloves - 1/2 teaspoon salt - 2 large eggs - 1/4 cup melted coconut oil or unsalted butter - 1 teaspoon pure vanilla extract - Optional: Chocolate glaze or maple glaze for topping Make sure everything is fresh. Preheat your oven to 350°F (175°C). Grease your donut pan with coconut oil or baking spray. This step helps the donuts come out easily. In a large bowl, mix the dry ingredients first. Combine the gluten-free flour, almond flour, sugar, baking powder, baking soda, cinnamon, nutmeg, cloves, and salt. Whisk them until well blended. In a separate bowl, whisk the wet ingredients. Mix the pumpkin puree, maple syrup, eggs, melted coconut oil, and vanilla. Keep whisking until it is smooth and creamy. Now, pour the wet mixture into the dry ingredients. Stir gently. Be careful not to overmix; this keeps your donuts soft. Transfer your donut batter into a piping bag or a ziplock bag. Snip off one corner for easy filling. Pipe the batter into the donut pan, filling each cavity about 2/3 full. This allows space for the donuts to rise while baking. Place the pan in your preheated oven. Bake for 12-15 minutes. Check if they’re done by inserting a toothpick in the center. If it comes out clean, they are ready! Once baked, take the pan out and let the donuts cool for about 5 minutes. Then, move them to a wire rack to cool completely. If you want, dip the tops in chocolate or maple glaze for a tasty touch. Enjoy your flavorful fall treat! For the full recipe, check the earlier section. To get fluffy gluten-free pumpkin donuts, use a mix of flours. I suggest both gluten-free all-purpose flour and almond flour. This blend gives a nice balance of lightness and moisture. Make sure you measure your flour correctly. Too much flour can make your donuts dense. Always spoon flour into your measuring cup and level it off. One common mistake is overmixing the batter. Mix just until combined to keep the donuts light. Another pitfall is using too much pumpkin puree. Stick to a half cup for the best texture. Also, remember to check your oven's temperature. An oven that is too hot can cause donuts to bake too fast and become dry. Glazing adds an extra touch to your donuts. Let your donuts cool completely before glazing. This way, the glaze won't slide off. For a good glaze, dip the tops of the donuts into your chosen glaze. Move them quickly for a nice, even coat. You can even sprinkle some toppings right after glazing to make them more fun. For the full recipe, check out the complete instructions. {{image_4}} You can make these donuts even more fun with flavor add-ins. Here are a few ideas: - Chopped nuts: Walnuts or pecans add a nice crunch. - Chocolate chips: Dark or dairy-free chips bring a rich sweetness. - Dried fruit: Cranberries or raisins give a chewy texture. - Zest: Grated orange or lemon zest brightens the flavors. Try mixing in one or more of these for a unique twist! For a vegan version, you can easily swap a few ingredients. Use flax eggs instead of regular eggs. Mix 1 tablespoon of ground flaxseed with 3 tablespoons of water for each egg. You can also use plant-based milk in place of any dairy. This keeps the donuts soft and moist. Plus, use coconut oil or a vegan butter substitute for the fat. These swaps ensure everyone can enjoy these tasty treats. If you want bite-sized donuts, a mini donut pan is your friend. Simply follow the same recipe but fill the mini pan cavities only halfway. Bake for about 8-10 minutes instead of the longer time needed for regular donuts. Mini donuts are perfect for parties or snacks. They are easy to grab and eat, plus they look adorable on a platter! For the full recipe, check out the Spooky Gluten-Free Pumpkin Donuts section. To keep your gluten-free pumpkin donuts fresh, store them in an airtight container. This helps lock in moisture and flavor. Place a piece of parchment paper between layers to avoid sticking. You can keep them at room temperature for up to three days. If you want them to last longer, refrigerate them. Just make sure to let them cool before sealing. If you want to freeze your donuts, it’s best to do so without glaze. Allow them to cool completely, then wrap each donut tightly in plastic wrap. Place them in a freezer bag and label it with the date. They can last up to three months in the freezer. To reheat, take one out and let it thaw. You can warm it in the microwave for about 10-15 seconds. This brings back the soft texture. Homemade gluten-free donuts taste best when fresh. However, they can stay good for a few days. Check for any signs of spoilage before eating. If they start to smell off or have a strange texture, it’s best to toss them. Enjoy your donuts at their peak freshness for the best taste experience! For the full recipe, follow the link here: [Full Recipe]. Yes, you can use applesauce or mashed banana instead of pumpkin puree. Both options add moisture and sweetness. However, they will change the taste of the donuts. If you prefer a milder flavor, applesauce works well. You can also try butternut squash puree for a similar taste and texture. Your gluten-free donuts are ready when they are golden brown and spring back when touched. You can also use a toothpick to check. Insert it into the center of a donut. If it comes out clean, the donuts are done. Keep an eye on them during baking. Overbaking can make them dry. To frost your gluten-free donuts, wait until they cool completely. You can dip the tops in chocolate glaze or maple glaze. For a simple glaze, mix powdered sugar with a splash of milk or water until smooth. Drizzle the glaze on top for a fun look. Add sprinkles for extra flair! For more tips, check out the Full Recipe. These gluten-free pumpkin donuts are both fun and easy to make. We explored key ingredients, including fun flavor add-ins and different flours. We also discussed baking steps, ensuring the perfect texture, and avoiding common mistakes. Plus, you learned how to store your donuts for freshness. In the end, you can create tasty variations to fit your diet. Enjoy these sweet treats without worry! Try making them your own with simple tweaks.

Looking for a tasty fall treat? You’ll love these gluten-free pumpkin donuts! They combine the warm spices of autumn with a soft, fluffy texture that satisfies every craving. I’ll guide …

Read more

Categories Desserts

Savory 3-Ingredient Chocolate Chip Pumpkin Muffins

August 8, 2025 by Chef Tavio
- 1 cup canned pumpkin puree - 1 cup chocolate chip cookie mix - 1 cup mini chocolate chips - Spices (cinnamon, nutmeg) - Nuts (walnuts, pecans) - Sweeteners (honey, maple syrup) The main ingredients for these muffins are simple and easy to find. Canned pumpkin puree gives the muffins a rich flavor and moist texture. The chocolate chip cookie mix adds sweetness and structure. Mini chocolate chips bring extra chocolate goodness in every bite. You can also customize your muffins with optional ingredients. Adding spices like cinnamon or nutmeg can enhance the fall vibe. Nuts, such as walnuts or pecans, add a nice crunch. If you want more sweetness, consider honey or maple syrup. Feel free to experiment with these variations to make the muffins your own. You can find the full recipe for these delightful treats in the section above. First, preheat your oven to 350°F (175°C). This step is crucial for even baking. While the oven heats, line your muffin tin with paper liners or grease each cup with cooking spray. This helps the muffins come out easily after baking. In a large mixing bowl, combine the pumpkin puree and chocolate chip cookie mix. Stir until they blend well. You want a thick and slightly sticky mixture. Next, fold in the mini chocolate chips. Make sure they get mixed evenly throughout the batter. This ensures each muffin has sweet chocolate bits. Now it’s time to fill the muffin cups. Use a spoon or an ice cream scoop to fill each cup about two-thirds full. This allows space for the muffins to rise nicely. Place the muffin tin in the preheated oven and bake for 18-20 minutes. To check if they are done, insert a toothpick into the center of a muffin. If it comes out clean, they are ready. Enjoy the aroma of fresh muffins while they cool! For the full recipe, check the earlier section. To get the best texture for your muffins, keep a few things in mind. First, avoid over-mixing the batter. When you mix too much, muffins can turn tough. Just stir until the ingredients blend. It’s okay if there are a few lumps! Next, measure your ingredients accurately. Use measuring cups for dry ingredients and a liquid measuring cup for the pumpkin puree. This step helps ensure the right balance, which leads to perfect muffins every time. After baking, let your muffins cool for about five minutes in the tin. This helps them firm up a bit. Then, move them to a wire rack to cool completely. This step is key for a soft texture. For serving, arrange the muffins on a pretty platter. To make them look even more inviting, sprinkle a few mini chocolate chips on top. A small sprig of fresh mint adds a lovely touch of color. These simple steps make your muffins look as good as they taste! {{image_4}} To make these muffins even tastier, you can add spices. Cinnamon and nutmeg work great. These spices give a warm, cozy flavor. You can start with one teaspoon of each spice. Mix it into your batter for that fall vibe. You can also try different types of chocolate. Instead of mini chocolate chips, use dark chocolate or white chocolate. Chunks of chocolate can add a fun twist too. Choose your favorite kind and experiment with it. If you're gluten-free, you can still enjoy these muffins. Look for a gluten-free cookie mix. Many brands offer good options. Check the label to ensure it’s safe for your diet. For vegan muffins, swap the cookie mix for a vegan kind. You can also use flaxseed meal instead of eggs. To make flax eggs, mix one tablespoon of flaxseed meal with three tablespoons of water. Let it sit for a few minutes until it thickens. This gives the muffins the right texture without using eggs. For the full recipe, check the earlier sections. To keep your muffins fresh at room temperature, place them in a sealed container. Use a container that has a tight lid to keep air out. You can store them for up to three days this way. If you want them to stay soft, add a slice of bread to the container. The bread keeps the muffins moist. Do not store them in the fridge, as cold air can dry them out. If you want to enjoy your muffins later, freezing is a great option. To freeze, place the muffins in a freezer-safe bag. Try to remove as much air as possible before sealing. Label the bag with the date and freeze for up to three months. When you’re ready to eat them, take out the muffins and place them in the fridge overnight. To reheat, preheat your oven to 350°F (175°C). Place the muffins on a baking sheet and warm them for about 10 minutes. You can also use the microwave. Heat each muffin for about 15-20 seconds. This makes them soft and tasty again. Enjoy your muffins any time! For the full recipe, check the earlier section. To make these muffins, start by mixing the pumpkin puree and cookie mix. Stir until they blend well. Then, fold in the mini chocolate chips. This creates a thick, tasty batter. Next, fill the muffin cups two-thirds full. Bake them at 350°F (175°C) for 18-20 minutes. Check with a toothpick to see if they are done. Let them cool before enjoying. For the full recipe, refer to the section above. Yes! You can add spices like cinnamon or nutmeg for warmth. Nuts such as walnuts or pecans add crunch. If you want more sweetness, try honey or maple syrup. Each of these options can change the flavor and make the muffins even better. Get creative! Homemade muffins usually stay fresh for about 3-5 days at room temperature. Make sure to store them in a sealed container. If you want them to last longer, freeze them. They can stay in the freezer for up to 3 months. When ready to eat, just thaw them at room temperature or warm them in the oven. This blog post covered how to make easy and tasty chocolate chip pumpkin muffins. You learned the needed ingredients, key steps, and tips for great texture. We also explored ways to mix in flavors or adapt the recipe for your diet. Remember to store extra muffins properly to enjoy later. Baking should be fun and creative, so feel free to experiment. The kitchen is your space to make sweet treats that everyone will love. Enjoy baking and sharing your new muffin creations!

Do you love warm, sweet muffins? Let’s make 3-Ingredient Chocolate Chip Pumpkin Muffins! They’re easy, quick, and perfect for any time of year. With canned pumpkin, cookie mix, and mini …

Read more

Categories Desserts

Easy Pineapple Salsa Fresh and Flavorful Delight

August 7, 2025 by Chef Tavio
Making Easy Pineapple Salsa starts with fresh ingredients. Here’s what you’ll need: - Ripe pineapple, diced - Red bell pepper, chopped - Red onion, chopped - Jalapeño, minced - Fresh cilantro, chopped - Fresh lime juice - Salt - Honey (optional) Each ingredient plays a key role. The ripe pineapple adds sweetness and juiciness. The red bell pepper brings crunch and color. Red onion adds a mild bite, while jalapeño gives a little heat. Fresh cilantro adds brightness and freshness. Lime juice ties everything together with zesty flavor. A pinch of salt enhances all these tastes. If you like a touch of sweetness, honey is a great option. This combination creates a vibrant salsa that excites the taste buds. You can find the full recipe below to guide you through the steps. To make Easy Pineapple Salsa, follow these simple steps. It’s quick and fun! 1. Combine the diced pineapple, red bell pepper, and red onion. Start with a large bowl. Add the pineapple first. Next, toss in the chopped bell pepper and onion. Stir gently to mix. 2. Add minced jalapeño and mix. Carefully sprinkle in the minced jalapeño. You can adjust the heat to fit your taste. Mix well to spread the heat. 3. Fold in fresh cilantro. Take your chopped cilantro and gently fold it into the mix. This adds a fresh flavor that brightens the salsa. 4. Squeeze lime juice over the mixture. Roll the limes on the counter first to release more juice. Cut them in half and squeeze the juice over the salsa. This adds zing! 5. Season with salt and optional honey. Add a pinch of salt to enhance the flavors. If you like it sweet, drizzle in some honey. Mix everything well. 6. Allow the salsa to sit for at least 20 minutes before serving. This resting time helps the flavors blend. You will taste the difference! Now you have a vibrant and tasty salsa ready to enjoy. Check the Full Recipe for any extra details you may need. You can change the spice level by adding jalapeño. More jalapeño means more heat! If you prefer a milder salsa, use less or skip it. I love adding fresh herbs for extra flavor. Mint gives a nice twist, while cilantro adds brightness. You can mix and match to find your favorite. If you want your salsa sweeter, drizzle in honey or agave. This balance of sweet and tangy makes the salsa shine. Just add a little at a time until it’s perfect for you. I find this salsa best with grilled fish. The fresh flavors complement the smoky taste perfectly. You can also serve it with tortillas or tacos for a fun twist. For a creative presentation, use a colorful bowl. Garnish with a sprig of cilantro or a lime slice. This makes your dish look as good as it tastes! Check out the Full Recipe for all the details and enjoy your culinary adventure! {{image_4}} You can make your pineapple salsa even better with tropical fruits. Try adding diced mango for a sweet twist. Mango pairs well with pineapple's tartness. You can also include avocado. Its creamy texture balances the salsa nicely. Another great addition is diced tomatoes. They add a pop of color and freshness. This makes the salsa not only tasty but also visually appealing. Feel free to mix and match these fruits for a fun blend. To enhance the flavor, consider using flavored vinegar. A splash of balsamic or apple cider vinegar can add depth. You can also try infused oils like garlic or chili oil. These give your salsa an extra kick. Experimenting with different citrus juices can change the taste too. Instead of lime juice, try lemon or orange juice. Each citrus fruit brings a unique flavor. This means you can customize your salsa to fit your mood or dish. For the full recipe, check out the details above. Enjoy creating your own version of this fresh and flavorful delight! To keep your Easy Pineapple Salsa fresh, store it in an airtight container. This keeps air out and helps maintain its bright flavors. Make sure the lid fits tightly. Placing a piece of plastic wrap under the lid can add extra protection. Refrigerate the salsa right after making it. The cool temperature slows down spoilage and keeps the ingredients crisp. Always scoop out what you need, and avoid double-dipping. This keeps the salsa clean and fresh for longer. When stored properly, Easy Pineapple Salsa stays fresh for up to three days. After that, the taste and texture may change. Watch for signs of spoilage. If you see any discoloration or a watery layer on top, it’s best to toss it. Smell is also a good indicator. If the salsa has an off or sour smell, it’s time to say goodbye. Always trust your senses when it comes to food safety. Enjoy your salsa while it’s at its best! You can store Easy Pineapple Salsa in an airtight container in the fridge. This salsa stays fresh for up to three days. After that, the flavors may fade. Always check for signs of spoilage, like changes in color or smell. Yes, you can make this salsa ahead of time! It’s best to prepare it about one to two hours before serving. This gives the flavors time to blend beautifully. If you make it too far ahead, the pineapple may become mushy. I love serving pineapple salsa with grilled fish. It adds a bright, fresh kick. You can also pair it with crispy tortilla chips or use it as a taco topping. For a fun twist, serve it in a colorful bowl and garnish with cilantro or lime slices. For the full recipe, check out the details above! We covered how to make Easy Pineapple Salsa from start to finish. You learned about the fresh ingredients, step-by-step prep, and customization tips. I shared serving ideas and how to store leftovers. This salsa is bright and tasty, great with grilled meats or chips. Experiment with different elements to make it your own. Whether you enjoy it fresh or stored, this salsa will impress. Enjoy this fun dish and make it your go-to for gatherings!

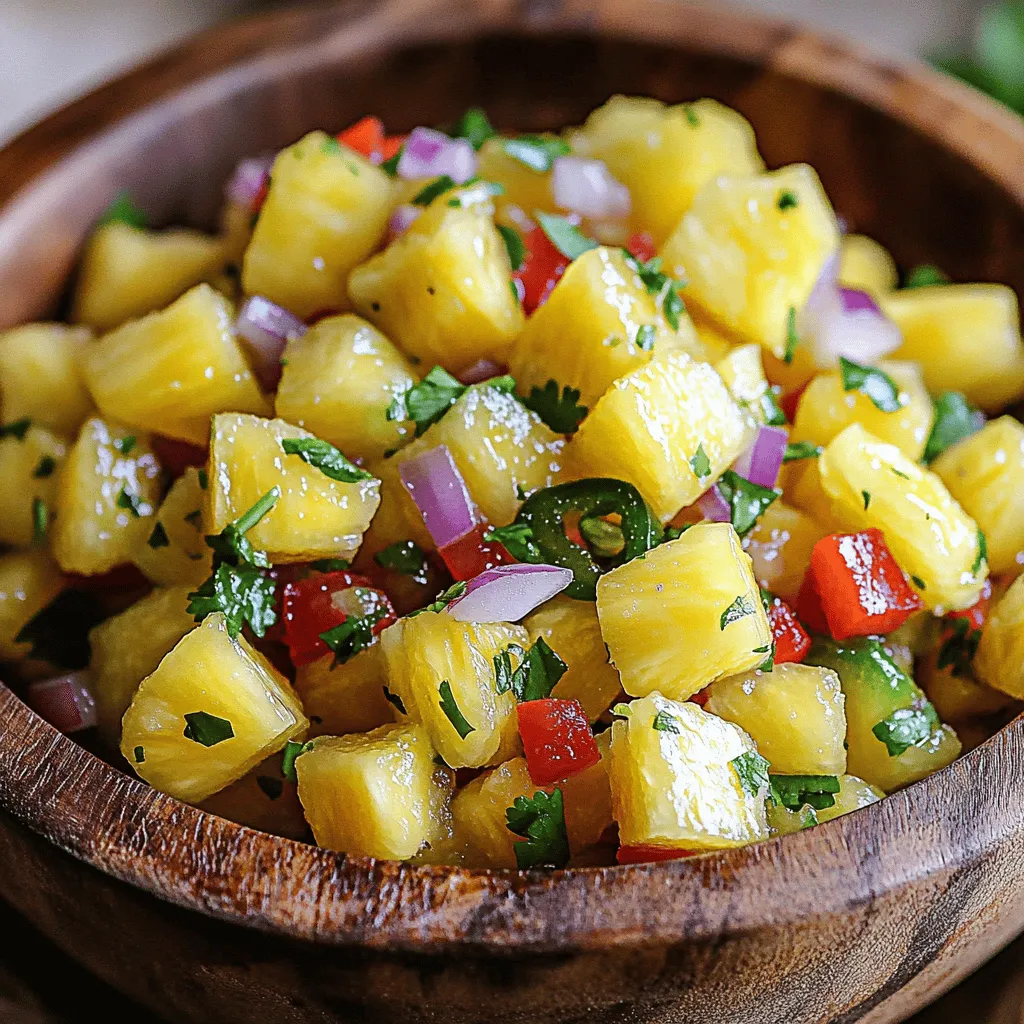
Looking for a fresh and tasty salsa that brightens up any meal? You’re in the right place! This Easy Pineapple Salsa combines juicy pineapple, crunchy veggies, and zesty lime juice …

Read more

Categories Appetizers

Easy Caramel Apple Cheesecake Dip Simple and Delicious

August 7, 2025 by Chef Tavio
- 1 package (8 oz) cream cheese, softened to room temperature - 1 cup powdered sugar - 1 cup sweetened whipped cream - 1 teaspoon pure vanilla extract - 1/2 cup caramel sauce, plus extra for drizzling - 1/4 cup nuts, finely chopped (peanuts, walnuts, or pecans) - Sliced apples - Graham crackers To make the Easy Caramel Apple Cheesecake Dip, you'll start with the main ingredients. Cream cheese is the base. It gives the dip a rich and creamy texture. Powdered sugar adds sweetness and smoothness. Sweetened whipped cream brings lightness. Together, these create a deliciously thick dip. Next, I love adding flavor enhancements. Pure vanilla extract gives depth to the taste. Caramel sauce adds that sweet, gooey element everyone loves. Chopped nuts give a nice crunch and extra flavor. You can pick your favorite nuts, like peanuts or pecans. Finally, let's talk about dippers. Sliced apples are perfect because they are crisp and slightly tart. Graham crackers add a fun crunch. Both are great for scooping up that yummy dip. For the full recipe, check the detailed steps to create this fun treat. To start, you need to beat the cream cheese. Take 8 oz of softened cream cheese. Place it in a medium mixing bowl. Using an electric mixer, mix it at medium speed. Keep mixing until it is smooth and creamy. You want it free of lumps. Next, it's time to incorporate the powdered sugar. Gradually add 1 cup of powdered sugar to the cream cheese. Mix well after each addition. This helps create a silky texture. Keep mixing until the mixture is completely smooth. Now, you’ll add the vanilla extract. Pour in 1 teaspoon of pure vanilla extract. Mix it until fully blended. The vanilla gives great flavor to the dip. After that, fold in the whipped cream. Use 1 cup of sweetened whipped cream. Gently fold it in using a spatula. Be careful not to over-mix. You want to keep the dip light and fluffy. First, create the base layer in a serving bowl. Spread the creamy cheesecake mixture evenly. This is the foundation of your dip. Then, add the apples and caramel. Dice 1 large sweet apple and sprinkle it over the cream layer. Drizzle half of the 1/2 cup of caramel sauce over the apples. Let some caramel seep into the layers below for extra flavor. Finally, add the nuts and a caramel drizzle. Sprinkle 1/4 cup of finely chopped nuts on top. This adds a delightful crunch. Finish by drizzling the remaining caramel sauce over the dip. This makes it look beautiful and inviting. Serve this dip right away with sliced apples and graham crackers for dipping. For the full recipe, see above. Softened cream cheese is key for a smooth dip. If it’s cold, your dip may be lumpy. Leave it out for 30 minutes before mixing. Use a hand mixer to beat the cream cheese until it’s creamy. Start slow, then speed up to mix well. This step is vital for a fluffy texture. For dipping, serve with sliced apples and crunchy graham crackers. Both add a great crunch and pair well with the dip's creaminess. Use a pretty bowl for the dip and surround it with colorful apple slices and crackers. A drizzle of caramel on top adds a nice touch. It makes the dip look even more delicious. You can add flavored whipped cream to change the taste. Try cinnamon or chocolate whipped cream for a fun twist. For toppings, consider mini chocolate chips, toffee bits, or even more nuts. Mix in some dried fruits for added sweetness. These small changes can make your dip unique and special. For the full recipe, check the section above. {{image_4}} You can easily make this dip healthier. Use low-fat cream cheese to cut calories but keep the taste. Natural sweeteners, like honey or maple syrup, can replace powdered sugar. These swaps help you enjoy a guilt-free treat without losing flavor. Want a festive touch? Add pumpkin puree for a cozy fall flavor. You can mix in seasonal fruits too. Pears or cranberries work great in this dip, giving it a fresh twist. The bright colors and tastes make it perfect for any gathering. Try a chocolate caramel apple version for a rich twist. Just mix cocoa powder with the cream cheese. For a nutty change, add peanut butter for a cheesecake dip twist. These options keep the dip exciting and satisfy different cravings. To keep your Easy Caramel Apple Cheesecake Dip fresh, store it in an airtight container. This helps prevent any odors from seeping in. If you don’t have an airtight container, wrap it tightly with plastic wrap. Always place it in the fridge right after serving. When stored properly, this dip stays fresh for about 3 to 5 days. After a few days, check for signs of spoilage. If you see any off smells, discoloration, or mold, it’s best to throw it out. Freshness is key for enjoying those yummy flavors. You usually don’t need to reheat this dip, as it’s best served cold. However, if you want it warmer, use a microwave. Heat it in short bursts of 10 to 15 seconds. Stir it well between heats to keep its smooth texture. Remember, the goal is to warm it slightly, not cook it. To make this dip, you start by beating cream cheese until it’s smooth. Then, mix in powdered sugar and vanilla extract. Next, gently fold in whipped cream to keep it fluffy. In a bowl, layer the cream cheese mix, diced apples, and caramel sauce. Top with chopped nuts for crunch. Drizzle extra caramel on top for a sweet finish. Serve it with apples and graham crackers for dipping. This recipe is quick and fun, perfect for gatherings or a sweet treat. Yes, you can prepare this dip in advance. Store it in an airtight container in the fridge. This dip stays fresh for about two to three days. Just remember to add the apples and caramel sauce right before serving. This keeps everything fresh and crunchy. If you plan to serve it later, hold off on any toppings until you are ready to enjoy it. If you need a cream cheese alternative, try Greek yogurt for a tangy flavor. Silken tofu also works well for a dairy-free option. You can use vegan cream cheese if you want a plant-based dip. Each substitute may change the flavor slightly, but it can still be delicious. Just choose what fits your needs best. Absolutely! Doubling this recipe is easy. Just double each ingredient on the list. This way, you will have plenty for a larger group. Make sure to use a bigger bowl to mix everything well. You can also adjust the amount of toppings based on how many people you serve. Enjoy sharing this tasty dip with friends and family! This blog post gave you the recipe for a yummy caramel apple cheesecake dip. You learned about the main ingredients, like cream cheese and whipped cream, and tips for making it smooth and fluffy. We also shared ideas for dippers and ways to customize your dip, like adding pumpkin or using low-fat cream cheese. Remember to store the dip in an airtight container to keep it fresh. Enjoy making this treat, and don't hesitate to experiment with flavors!

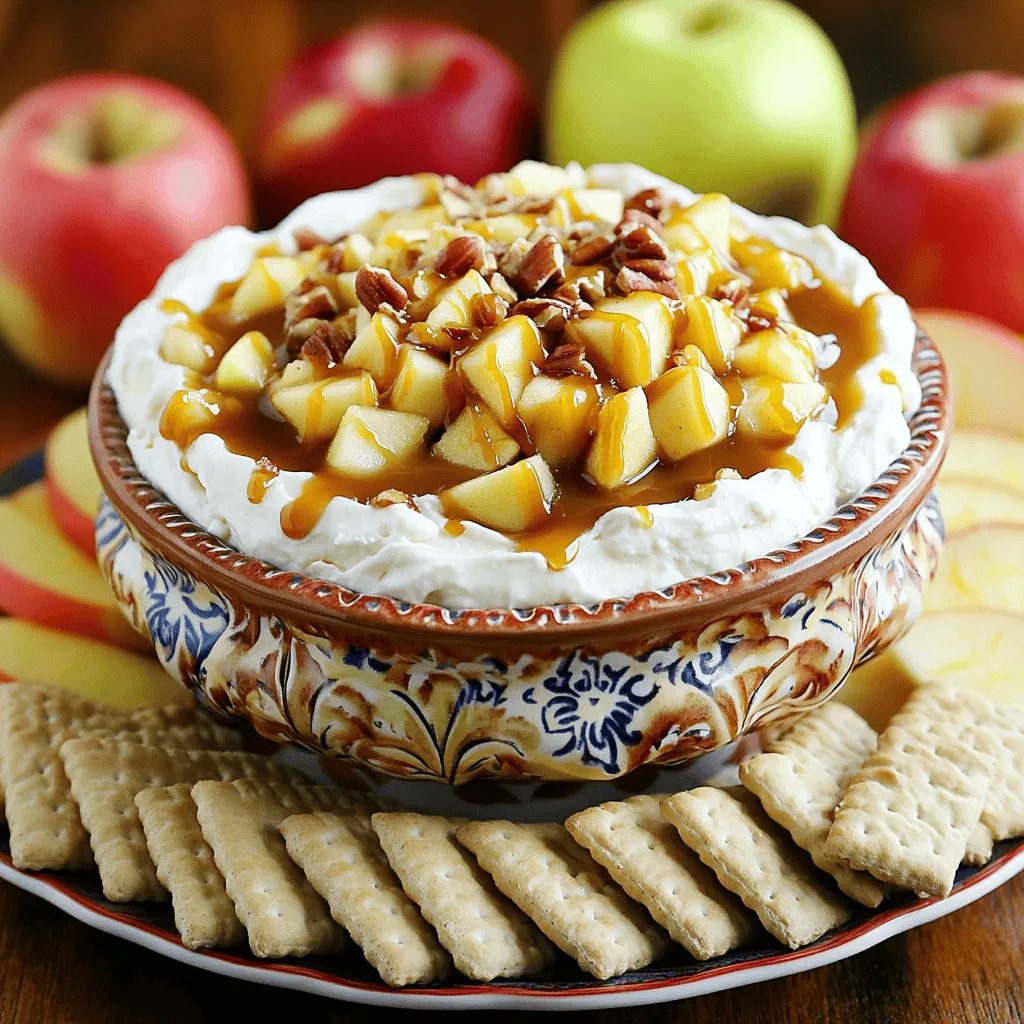
If you’re craving a creamy and sweet treat, look no further! My easy Caramel Apple Cheesecake Dip is the perfect choice for parties or cozy nights at home. Combining rich …

Read more

Categories Desserts

Perfectly Moist Pumpkin Bread Irresistible Recipe

August 7, 2025 by Chef Tavio
To make perfectly moist pumpkin bread, you'll need the following main ingredients: - 1 cup of pumpkin puree (canned or fresh) - 1/2 cup vegetable oil - 1 cup packed brown sugar - 1/2 cup granulated sugar - 3 large eggs - 1 teaspoon pure vanilla extract - 2 cups all-purpose flour - 1 teaspoon baking soda - 1/2 teaspoon baking powder - 1/2 teaspoon salt - 1 teaspoon ground cinnamon - 1/2 teaspoon ground nutmeg - 1/4 teaspoon ground ginger These ingredients work together to create a rich and flavorful bread. The pumpkin puree adds moisture, while the sugars provide sweetness. The oil keeps the bread tender, and the eggs help bind everything. Want to take your pumpkin bread to the next level? Consider these optional add-ins: - 1/2 cup chopped walnuts or pecans - 1/2 cup chocolate chips These add-ins bring texture and extra flavor. Nuts add a nice crunch, while chocolate chips offer a sweet surprise in each bite. You can customize this recipe to fit your needs. Here are some ideas: - Use applesauce instead of vegetable oil for a lower-fat option. - Substitute whole wheat flour for a healthier twist. - Try using almond or coconut flour for a gluten-free option. Feel free to mix and match based on what you have at home. The main goal is to make a delicious loaf that you and your loved ones will enjoy. For the complete recipe, check out the Full Recipe. First, preheat your oven to 350°F (175°C). This step ensures even baking. Next, grab a 9x5 inch loaf pan. Lightly grease it with butter or cooking spray. Then, dust it with flour to stop the bread from sticking. This simple step helps your bread come out perfectly. In a large bowl, add the pumpkin puree, vegetable oil, brown sugar, granulated sugar, eggs, and vanilla extract. Use a whisk to mix these until they blend well. The mixture should look smooth and creamy. This step adds moisture and flavor to your pumpkin bread. In another bowl, sift together the flour, baking soda, baking powder, salt, cinnamon, nutmeg, and ginger. This helps mix the dry ingredients and adds air for a light texture. Gradually add this dry mix to the wet ingredients. Use a spatula to fold them together gently. A few lumps are okay. If you want, fold in the chopped nuts or chocolate chips now for extra flavor. Pour the batter into your prepared loaf pan. Smooth the top with a spatula. Place it in the oven and bake for 60 to 70 minutes. Check if it’s done by inserting a toothpick into the center. It should come out clean or have a few moist crumbs. Once done, take it out and let it cool in the pan for about 10 minutes. Then, move the bread to a wire rack to cool completely. Enjoy your Perfectly Moist Pumpkin Bread! To make your pumpkin bread moist, use enough pumpkin puree. I recommend 1 cup. The oil also plays a key role; 1/2 cup of vegetable oil keeps it tender. Mixing wet and dry ingredients should be gentle. Overmixing can make the bread tough. Aim for a few lumps in the batter. Also, adding eggs helps with moisture. Three large eggs work best for this recipe. One common mistake is not measuring ingredients correctly. Use measuring cups and spoons for accuracy. Another pitfall is baking too long. Keep an eye on your bread after 60 minutes. If you open the oven too often, the temperature drops. Don't open the door until the last 10 minutes. Lastly, avoid using old spices. Fresh spices enhance flavor and aroma. To check if your pumpkin bread is done, insert a toothpick into the center. If it comes out clean or with a few moist crumbs, it’s ready. If the toothpick has wet batter on it, bake for a few more minutes. Make sure to let the bread cool in the pan for 10 minutes. This helps it set before transferring to a wire rack. For the best flavor, let it cool completely before slicing. {{image_4}} You can make pumpkin bread gluten-free. Use a gluten-free all-purpose flour blend. Check the blend has xanthan gum for better texture. Replace the regular flour with this blend in the recipe. This swap keeps your bread moist and tasty. If you want a vegan version, swap the eggs for flaxseed meal. Mix 1 tablespoon of flaxseed meal with 2.5 tablespoons of water. Let it sit for five minutes to thicken. For the oil, you can use unsweetened applesauce instead. This change keeps the bread moist while adding natural sweetness. You can spice up your pumpkin bread in many ways. Try adding a pinch of cloves or allspice for extra warmth. You can also mix in dried fruit like cranberries or raisins for a chewy texture. If you love nuts, add pecans or walnuts for crunch. Chocolate chips are always a hit, making every slice a sweet treat. Check the Full Recipe for more ideas! To keep your pumpkin bread fresh, store it in an airtight container. This helps seal in moisture. You can also wrap it in plastic wrap or foil. Make sure to let the bread cool completely before you store it. If you leave it warm, it can become soggy. For best taste, enjoy your bread within five days. Freezing is a great way to keep your pumpkin bread for longer. First, slice the bread if you want single servings. Wrap each slice tightly in plastic wrap. Then, place the wrapped slices in a freezer bag. Remove as much air as possible before sealing. Pumpkin bread can stay fresh in the freezer for up to three months. Just remember to label the bag with the date. To reheat your pumpkin bread, let it thaw in the fridge overnight if frozen. For quick warming, microwave a slice for about 15 to 20 seconds. If you prefer a crisp crust, toast it in a toaster or oven. Preheat your oven to 350°F (175°C) and warm the bread for about 10 minutes. Enjoy it warm for the best flavor! For more detailed instructions, check the Full Recipe. Yes, you can use fresh pumpkin. Just cook and puree it first. This gives your bread a fresh taste. Choose sugar pumpkins for the best flavor. They are sweeter and smoother than other types. Homemade pumpkin bread lasts about 3 to 4 days at room temperature. Keep it in an airtight container. For longer storage, you can freeze it. It stays fresh for up to 3 months in the freezer. You can serve pumpkin bread with cream cheese spread or butter. Warm it up for a cozy treat. Pair it with a cup of coffee or tea for a perfect snack. You can also add a sprinkle of cinnamon for extra flavor. To boost flavor, add spices like allspice or cloves. You can also mix in chocolate chips or nuts. Experiment with different extracts, like almond or maple. Each addition gives your bread a unique twist. Use a serrated knife for clean slices. Make sure the bread is cool before slicing. This prevents it from crumbling. Cut evenly to keep the slices uniform and nice-looking. Enjoy your perfectly moist pumpkin bread! For the full recipe, check out the recipe section above. You learned how to make moist pumpkin bread using simple steps and tips. Remember, the right ingredients and careful baking make all the difference. Don’t be afraid to experiment with flavors and substitutions. Store your bread properly to keep it fresh longer. Enjoy every slice with your favorite spreads or drinks. Keep these ideas in mind for a tasty treat that delights!

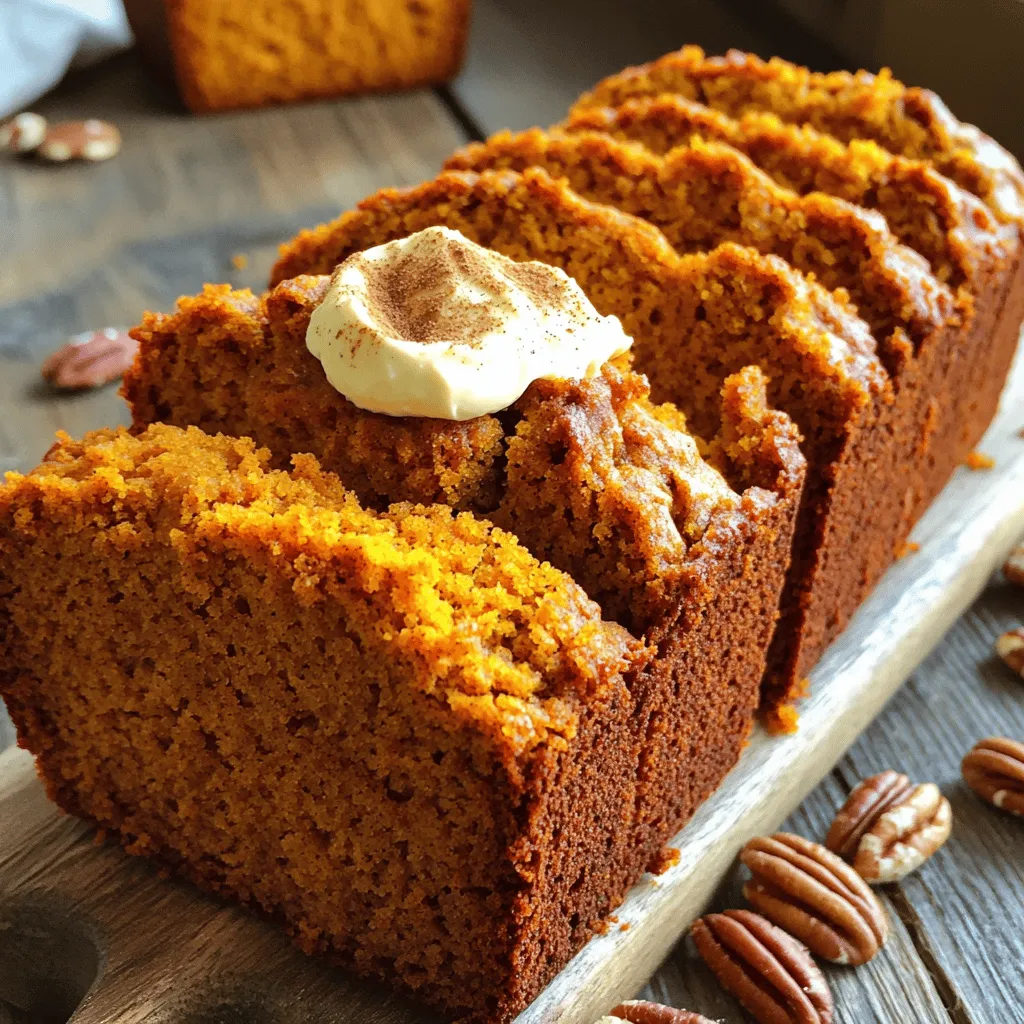
If you love pumpkin bread, you’re in for a treat! I’ll show you how to make the best pumpkin bread that is perfectly moist. This recipe is easy, fun, and …

Read more

Categories Desserts

Pumpkin Snickerdoodle Snack Cake Delightful Recipe

August 7, 2025 by Chef Tavio
To make a tasty Pumpkin Snickerdoodle Snack Cake, you need these simple ingredients: - 1 cup pumpkin puree - 3/4 cup granulated sugar - 1/2 cup brown sugar, packed - 1/2 cup vegetable oil - 2 large eggs - 1 teaspoon vanilla extract - 2 cups all-purpose flour - 1 teaspoon baking powder - 1 teaspoon baking soda - 1 teaspoon ground cinnamon - 1/2 teaspoon ground nutmeg - 1/4 teaspoon ground ginger - 1/4 teaspoon salt - 1 tablespoon cinnamon sugar (for topping: mix 1 tablespoon sugar with 1 teaspoon cinnamon) When measuring ingredients, use the right tools. For dry ingredients, use dry measuring cups. Fill the cup and level it off with a knife. For liquids, use a liquid measuring cup. Pour until you reach the desired line. This helps your cake rise and taste great. If you don't have all the ingredients, don't worry! Here are some swaps you can try: - Use applesauce instead of pumpkin for a different flavor. - Swap vegetable oil with melted coconut oil for a richer taste. - Replace eggs with flax eggs (1 tablespoon ground flaxseed + 2.5 tablespoons water) for a vegan option. - Use whole wheat flour in place of all-purpose flour for a healthier version. These swaps keep your cake delicious while fitting your needs. You can find the full recipe for the Pumpkin Snickerdoodle Snack Cake in this article. First, preheat your oven to 350°F (175°C). This step warms the oven, helping your cake bake evenly. Next, take a 9x13 inch baking pan. Grease it with some butter or oil, then add flour. This helps the cake come out easily. If you prefer, you can line the pan with parchment paper instead. In a large bowl, add 1 cup of pumpkin puree, 3/4 cup of granulated sugar, and 1/2 cup of brown sugar. Pour in 1/2 cup of vegetable oil, then mix it all together. You can use a whisk or an electric mixer to blend well until the mix is smooth. Now, crack in 2 large eggs and add 1 teaspoon of vanilla extract. Mix again until everything combines perfectly. In another bowl, add 2 cups of all-purpose flour, 1 teaspoon of baking powder, and 1 teaspoon of baking soda. Also, include 1 teaspoon of ground cinnamon, 1/2 teaspoon of ground nutmeg, 1/4 teaspoon of ground ginger, and 1/4 teaspoon of salt. Whisk this dry mix well. Next, slowly add this to your wet mix. Stir gently with a spatula until just combined. Don't overmix; the batter should be a bit lumpy. Now, pour the batter into your prepared pan. Spread it evenly. Then, sprinkle 1 tablespoon of cinnamon sugar on top of the batter. Bake for 25-30 minutes. Use a toothpick to check; it should come out clean when the cake is done. Let it cool in the pan for about 10 minutes. After that, move it to a wire rack to cool completely. For the full recipe, refer to the ingredients section. To keep your Pumpkin Snickerdoodle Snack Cake moist, use fresh pumpkin puree. Canned pumpkin will work, but fresh gives a deeper flavor. Always measure your ingredients carefully. Too much flour can make the cake dry. Mix well, but don’t overdo it. A few lumps in the batter are fine. They help keep the cake soft. One big mistake is not prepping the baking pan well. Grease and flour it, or use parchment paper. This step helps you lift the cake out easily. Avoid adding too much cinnamon sugar. Too much can burn while baking. Lastly, always test for doneness with a toothpick. If it comes out clean, your cake is ready. The topping is what makes this cake special. Mix one tablespoon of sugar with one teaspoon of cinnamon for the perfect blend. Sprinkle it evenly over the batter before baking. This adds a sweet crunch on top. You can also add a little extra cinnamon for a stronger flavor. This simple step makes your cake shine. For the full recipe, check the complete guide! {{image_4}} You can easily make this cake gluten-free. Use a gluten-free flour blend instead of all-purpose flour. It works well in most recipes. Just make sure to pick a blend that has xanthan gum. This helps your cake hold together. Follow the same steps in the Full Recipe. The taste will be just as good. For a fun twist, add chocolate chips or nuts to the batter. I love using semi-sweet chocolate chips. They add a sweet touch. If you prefer nuts, walnuts or pecans work great. Add about one cup to the batter before baking. This makes the cake richer and gives it a nice crunch. You can change the spices for new flavors. Try adding cardamom or allspice for a different taste. You could also use pumpkin pie spice if you want a quick option. These spices bring out the pumpkin flavor even more. Remember, small changes can make a big difference in your cake. To keep your Pumpkin Snickerdoodle Snack Cake fresh, store it in an airtight container. Make sure it cools completely before sealing it. This helps prevent sogginess. You can keep it at room temperature for up to three days. If you want to keep it longer, refrigerate it. It can last up to a week in the fridge. Just remember to cover it well! Freezing is a great option for this cake. First, let it cool completely. Then, cut the cake into individual squares. Wrap each piece tightly in plastic wrap. For extra protection, place the wrapped pieces in a freezer bag. This method helps avoid freezer burn. You can freeze the cake for up to three months. When you're ready to eat, simply thaw it in the fridge overnight. To enjoy the cake warm, you can reheat it easily. Preheat your oven to 350°F (175°C). Place the pieces on a baking sheet. Heat them for about 10–15 minutes, or until warm. You can also use a microwave. Heat one piece at a time for 15–20 seconds. Be careful not to overheat it, or it may dry out. Enjoy your delicious cake just like it was fresh! Yes, you can use canned pumpkin. It saves time and works well. Just make sure you choose pure pumpkin puree, not pumpkin pie filling. This helps keep your flavors balanced. Canned pumpkin gives you consistent results, which is great for every cook. The cake lasts about three days at room temperature. Store it in an airtight container to keep it fresh. If you want it to last longer, you can refrigerate it. In the fridge, it will stay good for about a week. Just remember to let it warm up a bit before serving. You can make this recipe vegan! Replace the eggs with flax eggs. Mix one tablespoon of ground flaxseed with three tablespoons of water. Let it sit for five minutes to thicken. Use this mix in place of the eggs. Also, ensure that the sugar you use is vegan-friendly. Enjoy your vegan treat! For the full recipe, check out the details above. You now have all you need to bake a delicious pumpkin snickerdoodle snack cake. We covered the key ingredients, tips for perfect mixing, and how to avoid common mistakes. You can even customize your cake with fun variations. Remember to store leftovers properly and enjoy them later. Baking is fun and rewarding. I hope you feel ready to start your own baking adventure!

Are you ready to dive into a sweet fall treat? This Pumpkin Snickerdoodle Snack Cake offers warmth and flavor in every bite. Packed with cozy spices and topped with a …

Read more

Categories Desserts

Crockpot Lasagna Soup Simple and Hearty Recipe

August 7, 2025 by Chef Tavio
To make this Crockpot Lasagna Soup, you need the following ingredients: - 1 pound ground beef or Italian sausage - 1 medium onion, diced - 3 cloves garlic, minced - 1 bell pepper, chopped - 1 can (28 oz) crushed tomatoes - 4 cups beef broth - 1 teaspoon Italian seasoning - 1/2 teaspoon red pepper flakes (optional) - 8 oz pasta (rigatoni or shells) - 2 cups fresh spinach - 1 cup ricotta cheese - 1 cup shredded mozzarella cheese - 1/2 cup grated Parmesan cheese - Salt and pepper to taste - Fresh basil for garnish You can change a few ingredients if needed. For meat, try ground turkey or chicken. For a veggie twist, skip the meat altogether. Use lentils or mushrooms instead. If you want a lighter soup, try low-fat cheese or replace ricotta with cottage cheese. Use vegetable broth instead of beef broth for a vegetarian option. Fresh ingredients really make this soup shine. Fresh spinach adds a pop of color and nutrients. Fresh garlic and onion provide a strong flavor base. When you use fresh herbs, like basil, the taste is bright and vibrant. Quality ingredients help create a comforting dish that everyone will love. Plus, they help you feel good about what you eat. Start by cooking the ground meat in a skillet. Use either ground beef or Italian sausage. Heat it over medium. Cook until it's browned and no longer pink. Break up the meat with a spatula as it cooks. Once it's done, drain any excess fat. Then, add the meat into your crockpot. Next, add the veggies to your crockpot. Toss in the diced onion, minced garlic, and chopped bell pepper. Mix them well with the meat. This gives the soup great flavor. Now, pour in the crushed tomatoes and beef broth. Add the Italian seasoning and red pepper flakes if you like spice. Sprinkle in some salt and pepper too. Stir everything together to combine. Cover your crockpot and set it to cook. You can choose low for 6-8 hours or high for 3-4 hours. This slow cooking makes the flavors blend well. About 30 minutes before serving, add your pasta. If the soup gets too thick, add a bit of extra broth or water. When the pasta is soft, stir in the fresh spinach, ricotta, and half the mozzarella. After 10 more minutes, it’s ready to serve. Ladle it into bowls and top with the rest of the mozzarella, Parmesan, and fresh basil if you like. Enjoy this simple and hearty dish! To get the best texture and flavor in your soup, follow these simple tips: - Brown the Meat: Always brown your ground beef or sausage before adding it to the crockpot. This adds depth to your soup. - Use Quality Broth: Choose low-sodium beef broth for a richer taste. You control the salt this way. - Add Pasta at the Right Time: Add pasta about 30 minutes before serving. This helps it stay firm and not mushy. - Stir Gently: When mixing in the cheeses and spinach, stir gently to keep the texture nice and creamy. Here are some common mistakes to steer clear of: - Skipping the Browning Step: Not browning the meat can make your soup taste bland. - Overcooking the Pasta: Adding pasta too early can lead to a soggy mess. Stick to the timing! - Ignoring Seasoning: Always taste your soup before serving. Adjust the salt and pepper to your liking. You can easily make this soup your own! Here are a few ways: - Change the Meat: Use ground turkey or chicken for a lighter option. - Add More Veggies: Toss in zucchini, mushrooms, or carrots for extra flavor and nutrients. - Spice It Up: If you like heat, add more red pepper flakes or a dash of hot sauce. - Try Different Cheeses: Swap mozzarella for provolone or gouda for a unique twist. For the full recipe, refer to the [Full Recipe]. {{image_4}} You can easily make this soup vegetarian. Replace the meat with lentils or mushrooms. Use vegetable broth instead of beef broth. For a vegan option, swap ricotta and mozzarella with plant-based cheese. Nutritional yeast adds a cheesy flavor too. This way, you keep all the rich taste while making it plant-based. The pasta you choose can change the soup’s texture. While rigatoni or shells work great, try any pasta you love. Small shapes like ditalini absorb the soup well. If you want more fun, use spiral pasta. Just be sure to add it in the last 30 minutes of cooking. Want to enhance the flavor? Add sliced olives or sun-dried tomatoes for a unique twist. Fresh herbs like thyme or parsley can brighten the taste. For a kick, toss in jalapeños or chili powder. You can also add veggies like zucchini or carrots for more nutrition. With these options, you can create a soup that fits your taste perfectly. For the full recipe, check out the detailed instructions above. After you enjoy your Crockpot Lasagna Soup, store leftovers in the fridge. Use airtight containers for the best results. Let the soup cool to room temperature before sealing. This helps keep it fresh longer. It can last about 3 to 4 days in the fridge. To reheat, pour the soup into a pot over medium heat. Stir often to heat evenly. You can also microwave it. Place a serving in a bowl and cover it loosely. Heat in short bursts, checking frequently to avoid overcooking. Add a splash of broth if it gets too thick. Want to save some for later? Freeze the soup in portions. Use freezer bags or containers, leaving some space for expansion. Label each bag with the date. It can stay good for up to 3 months in the freezer. When ready to eat, thaw in the fridge overnight and reheat as mentioned above. This keeps your meal easy and delicious! For the full recipe, check out the detailed instructions above. To thicken the soup, you can add more pasta. The pasta absorbs liquid and helps make it heartier. Another option is to mash some of the cooked beans or vegetables. This adds body without changing the flavor. If you want a creamier texture, stir in a little more ricotta cheese before serving. Yes, you can use frozen vegetables! They save time and still taste great. Just toss them in the crockpot with the other ingredients. Frozen veggies cook down well and blend nicely into the soup. They are also a good way to add more nutrients to your meal. To make this dish gluten-free, use gluten-free pasta. There are many options available, like rice or chickpea pasta. You can also check the labels on your broth and canned tomatoes. Some brands add gluten. By ensuring all your ingredients are gluten-free, you can enjoy this soup worry-free. This soup pairs well with a fresh salad or crusty bread. A simple green salad adds crunch and freshness. You can also try garlic bread for extra flavor. If you want a lighter side, consider steamed veggies. Each of these sides complements the rich flavors of the soup. You can store leftovers in the fridge for 3-4 days. Make sure to keep them in an airtight container. If you want to freeze it, do so within this time. It can last up to 3 months in the freezer. Just remember to thaw it overnight before reheating. We explored how to create a delicious soup from fresh, quality ingredients. I shared step-by-step instructions for cooking ground meat, adding veggies, and slow-cooking for rich flavor. You learned tips for perfect texture and how to avoid common mistakes. I also discussed variations, including vegetarian options and best practices for storing leftovers. Cooking is about finding joy in each step. Try these methods, and make your soup unique. You’ll enjoy every bite!

Are you ready to warm your soul with a delightful bowl of Crockpot Lasagna Soup? This simple and hearty recipe brings all the classic flavors of lasagna into an easy, …

Read more

Categories Dinner

Savory Pumpkin Coffee Cake Cookies Easy Festive Treat

August 7, 2025 by Chef Tavio
To bake these tasty cookies, you need some key ingredients. Here’s what you will need: - 1 cup canned pumpkin puree - 1/2 cup unsalted butter, softened to room temperature - 1 cup packed brown sugar - 1/2 cup granulated sugar - 1 large egg - 1 teaspoon pure vanilla extract - 2 cups all-purpose flour - 1 teaspoon baking powder - 1/2 teaspoon baking soda - 1/2 teaspoon salt - 2 teaspoons ground cinnamon - 1/2 teaspoon ground nutmeg - 1/2 teaspoon ground ginger - 1/2 cup chopped walnuts (optional) - 1/2 cup chocolate chips or butterscotch chips (optional) - 1/3 cup powdered sugar (for glaze) - 1 tablespoon milk (for glaze) These ingredients come together to create soft, flavorful cookies that remind you of fall. You can make your cookies even better by adding some fun extras. Here are some ideas: - Chopped walnuts for a crunchy texture - Chocolate chips or butterscotch chips for a sweet bite Feel free to mix and match these add-ins. They can change the taste and feel of your cookies! If you don’t have an ingredient, don’t worry! Here are some easy swaps: - Use margarine instead of butter if needed. - For a dairy-free option, choose a plant-based milk for the glaze. - If you want a gluten-free version, use a gluten-free flour blend. These substitutions help you make the cookies work for your needs. Just remember, they may change the taste a little. For the full recipe, check the detailed steps to create these delightful cookies. Start by preheating your oven to 350°F (175°C). This step is key for even baking. Next, line a baking sheet with parchment paper. This helps prevent sticking and makes cleanup easy. In a large bowl, mix together 1/2 cup of softened butter, 1 cup of brown sugar, and 1/2 cup of granulated sugar. Use an electric mixer or whisk. Beat until the mixture is light and fluffy. This should take about 3 to 5 minutes. Add in 1 cup of canned pumpkin puree, 1 large egg, and 1 teaspoon of pure vanilla extract. Mix well until the mixture is creamy. In another bowl, sift together 2 cups of all-purpose flour, 1 teaspoon of baking powder, 1/2 teaspoon of baking soda, and 1/2 teaspoon of salt. Also, add 2 teaspoons of ground cinnamon, 1/2 teaspoon of ground nutmeg, and 1/2 teaspoon of ground ginger. Sifting helps mix the dry ingredients well and removes lumps. Gradually mix the dry ingredients into the wet mixture. Stir until no dry flour is visible. If you want to add some flair, fold in 1/2 cup of chopped walnuts and 1/2 cup of chocolate or butterscotch chips. Using a spoon or cookie scoop, drop rounded tablespoons of dough onto your prepared baking sheet. Make sure to leave about 2 inches between each cookie. This space allows the cookies to spread while baking. Place the baking sheet in the oven and bake for 12 to 15 minutes. The cookies should look set and have slightly golden edges when they’re ready. Once baked, take the cookies out of the oven. Let them cool on the baking sheet for 5 minutes. After that, carefully transfer them to a wire rack. Allow them to cool completely so they firm up nicely. To make a simple glaze, whisk together 1/3 cup of powdered sugar and 1 tablespoon of milk in a small bowl. It should be smooth. Once the cookies are cool, drizzle this glaze over each one. This adds a sweet touch that makes them even better. For the full recipe, refer to the detailed instructions above. Enjoy your tasty pumpkin coffee cake cookies! To make your cookies soft and chewy, focus on a few key steps. First, use room temperature butter. This helps mix well with sugars. Second, do not overmix the dough. Mix just until you see no dry flour. Overmixing can lead to tough cookies. Finally, avoid baking too long. Cookies should look set but soft in the center. Gathering the right tools makes baking easier. Here’s what you need for these cookies: - Mixing bowls - Electric mixer or whisk - Measuring cups and spoons - Sifter (for dry ingredients) - Baking sheet - Parchment paper - Cookie scoop or spoon - Wire rack (for cooling) Even seasoned bakers can slip up. Here are some mistakes to watch for: - Using cold butter. It won't cream well with sugars. - Skipping the sifting step. This helps blend dry ingredients. - Overbaking cookies. They should cool on the sheet for a few minutes. - Forgetting to leave space on the baking sheet. Cookies need room to spread. These tips will help you create perfect Pumpkin Coffee Cake Cookies every time. For the full recipe, check out the details above! {{image_4}} You can easily add texture to your cookies by including nuts. Chopped walnuts or pecans work well. They add a nice crunch. Just mix the nuts in with the dough before baking. This will give each bite a delightful surprise. If you like, toast the nuts slightly for extra flavor. It makes a big difference! If you need a gluten-free version, swap out the all-purpose flour. Use a gluten-free flour blend instead. This blend usually has a mix of different flours. It helps keep the cookies soft. Make sure the blend contains some xanthan gum. This will help with texture. Follow the same steps in the recipe for a great result. You can boost the flavor with more spices or extracts. Add a little cardamom or allspice for warmth. A dash of orange or almond extract can brighten the taste. These small changes can turn a good cookie into an amazing one. Don't be afraid to experiment! Each twist can bring new joy to your baking. For more ideas, try looking at the Full Recipe for inspiration. To keep your cookies fresh, place them in an airtight container. Use parchment paper between layers to prevent sticking. Store them at room temperature for easy access. If you like, you can also refrigerate them, but this may change their texture. Freezing your cookies is a great way to save some for later. First, let the cookies cool completely. Then place them in a single layer on a baking sheet. Freeze until solid, about one hour. Afterward, transfer them to a freezer bag. Remove as much air as possible to prevent freezer burn. They can last up to three months in the freezer. When stored correctly, these cookies stay fresh for about a week at room temperature. If refrigerated, they can last up to ten days. Remember, the fresher they are, the better they taste! For the best flavor and texture, enjoy them within a few days of baking. For the full recipe, check out the earlier section. Yes, you can use fresh pumpkin. Just cook and puree it first. Fresh pumpkin adds great flavor. Make sure to drain any extra moisture. This keeps your cookies from getting too wet. You can use coconut oil or applesauce. Both options work well in cookies. Coconut oil adds a nice flavor. Applesauce makes the cookies moist and sweet. Look for golden edges and a set center. Cookies should not be shiny or wet. You can also do the toothpick test. Insert a toothpick in the center; it should come out clean. This means your cookies are done. For the best results, follow the baking time in the Full Recipe. Creating pumpkin coffee cake cookies is fun and easy. We covered essential and optional ingredients that make your cookies tasty. You learned step-by-step how to prepare, bake, cool, and glaze them. I shared tips for soft and chewy cookies, tools to use, and mistakes to avoid. You can try fun variations like adding nuts or spices. Storing and freezing cookies is simple, too. Remember, fresh cookies can brighten your day. Enjoy baking and sharing these treats with others!

Love the taste of fall? You’ll adore these Savory Pumpkin Coffee Cake Cookies! They combine the warm and cozy flavors of pumpkin spice with the soft texture of cake in …

Read more

Categories Desserts
Older posts
Newer posts
← Previous Page1 … Page21 Page22 Page23 … Page92 Next →

TASTED NEST

Where Flavor Finds a Home 🍳🏡 — warm, simple, and crave-worthy recipes made for real life, from stovetop mornings to backyard dinners.

PAGES

Home About Contact Privacy Policy Terms & Conditions Cookie Policy GDPR Policy Copyright Policy Disclaimer

CATEGORIES

Appetizers Desserts Salads Breakfast Dinner

Contact

  • Pinterest
  • Mail
Copyright © 2025 Tasted Nest. All rights reserved.