Easy Pumpkin Pie Truffles Delightful Fall Treat
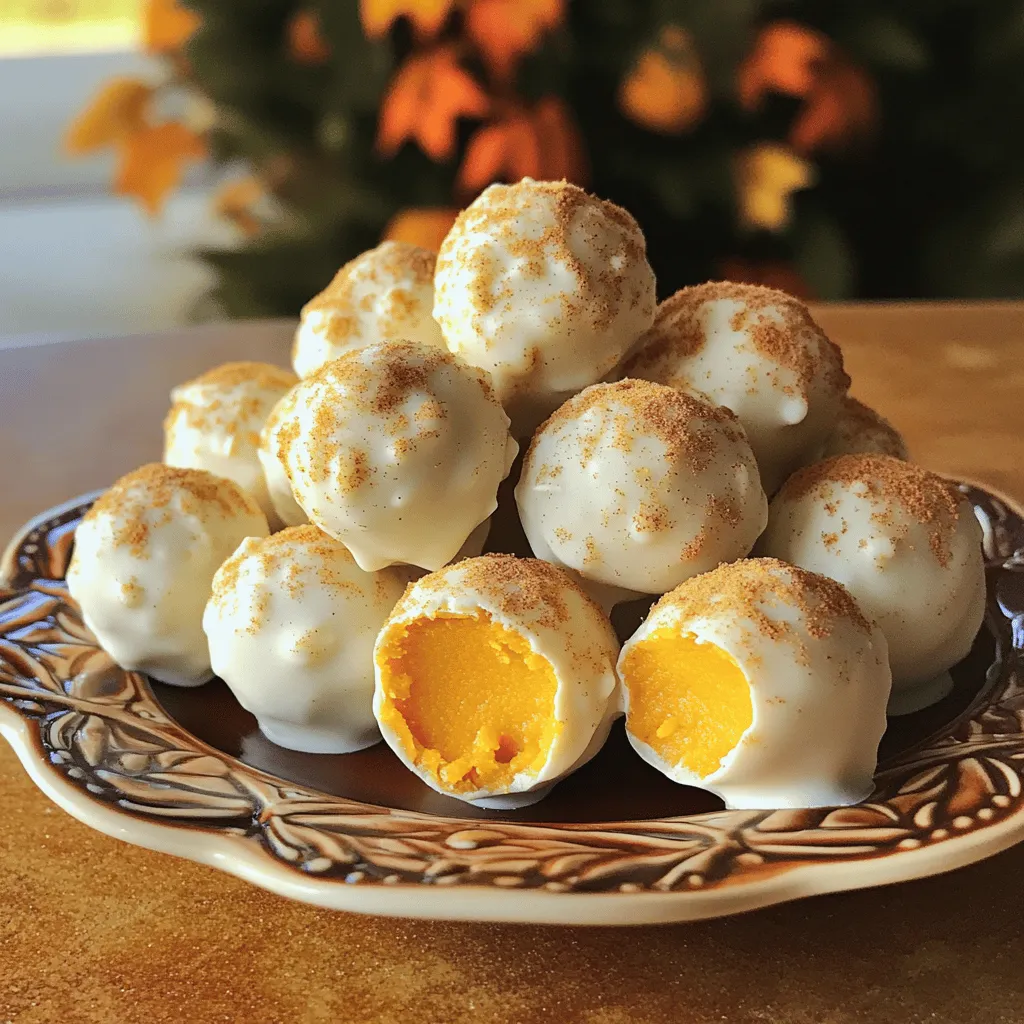
Fall is the perfect time to indulge in sweet treats, and these Easy Pumpkin Pie Truffles are a must-try! With creamy pumpkin and warm spices, they capture all the cozy …
Fall is the perfect time to indulge in sweet treats, and these Easy Pumpkin Pie Truffles are a must-try! With creamy pumpkin and warm spices, they capture all the cozy …
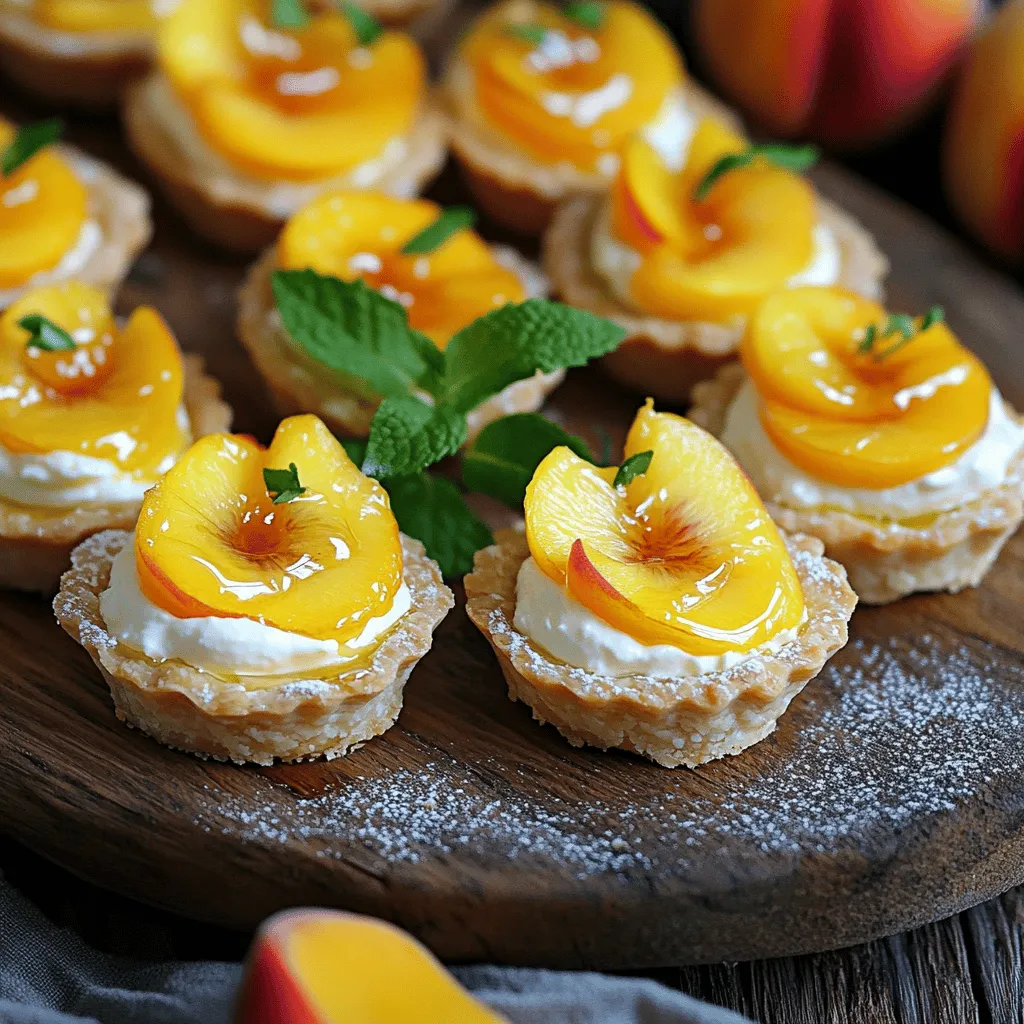
Get ready to wow your taste buds with my Mini Peach and Cream Cheese Tarts! These bite-sized delights are the perfect treat for any occasion. Imagine flaky crusts filled with …
![To make these delicious apple crisp mini cheesecakes, gather the following ingredients: - 1 ½ cups graham cracker crumbs - ½ cup unsalted butter, melted - 2 tablespoons packed brown sugar - 16 oz cream cheese, softened to room temperature - ¾ cup granulated sugar - 1 teaspoon pure vanilla extract - 2 large eggs, room temperature - 2 cups apples, peeled, cored, and diced into small pieces - 1 teaspoon ground cinnamon - ½ cup rolled oats - ¼ cup chopped walnuts (optional for added crunch) - ¼ cup powdered sugar (for garnish) If you have dietary needs or preferences, you can make some swaps: - Use gluten-free graham crackers instead of regular ones for a gluten-free option. - Swap cream cheese for a dairy-free cream cheese to make it vegan. - Replace granulated sugar with coconut sugar for a lower glycemic index. - Use almond flour instead of graham cracker crumbs for a nutty flavor. Each ingredient plays a key role: - Graham cracker crumbs create a tasty crust. - Unsalted butter helps bind the crumbs and adds richness. - Cream cheese gives that smooth, creamy texture we love in cheesecakes. - Fresh apples add a burst of flavor and moisture to the filling. - Cinnamon enhances the apple flavor, making it warm and cozy. - Walnuts add a nice crunch, but they are optional. This ingredient list gives you a solid foundation for crafting these mini delights. You can find the full recipe [here]. To make these apple crisp mini cheesecakes, you need to gather your ingredients. You will mix the crust and filling separately. This recipe takes about 20 minutes to prep and 3 hours to chill. 1. Preheat your oven to 325°F (160°C). Line a muffin tin with cupcake liners. 2. In a bowl, mix graham cracker crumbs, melted butter, and brown sugar. Stir until crumbly. 3. Press 1 tablespoon of the mixture into each cupcake liner. Bake for 10 minutes. Let them cool. 4. In another bowl, beat cream cheese, granulated sugar, and vanilla extract until smooth. 5. Add eggs one at a time, mixing well after each addition. 6. In a separate bowl, mix diced apples, cinnamon, oats, and walnuts. Gently fold this into the cream cheese mix. 7. Spoon the filling into the cooled crusts, filling them about ⅔ full. 8. Bake for 20-25 minutes. They should be set with a slight jiggle in the center. 9. Cool them in the muffin tin before transferring to the fridge. Chill for at least 2 hours. 10. Dust with powdered sugar before serving for a sweet touch. - Make sure your cream cheese is softened. This helps it blend smoothly. - Don't overmix when adding the apples. You want chunks for texture. - Allow enough time for chilling. This helps set the mini cheesecakes nicely. - For a fun twist, you can add a touch of nutmeg with the cinnamon. For the full recipe, you can refer back to the ingredient list. Enjoy your baking! To get the best cheesecake texture, start with room temperature cream cheese. This helps mix smoothly. Mix gently to keep air out. Too much air makes the cheesecake puff up and crack. Bake until slightly jiggly in the center. This means they are done but still creamy. Let them cool completely before chilling. This helps set the texture nicely. Serve these mini cheesecakes chilled for the best taste. They are great for parties or casual get-togethers. Place them on a nice platter to make them stand out. Pair them with coffee or tea for a lovely dessert break. Serve with fresh fruit on the side for a colorful touch. Garnish your cheesecakes for that extra wow factor. Use thin apple slices for a fresh look. A sprinkle of cinnamon adds warmth and flavor. You can also top with whipped cream for a rich taste. For a crunch, add chopped walnuts or granola on top. Enjoy these tasty treats with friends and family! Check out the Full Recipe for more details. {{image_4}} You can change the flavor of your mini cheesecakes easily. Try adding different fruits. Berries, peaches, or pears work well. You can also use pumpkin puree for a fall twist. Just mix it into the cream cheese base. Toppings can make your mini cheesecakes even better. Instead of the usual powdered sugar, try whipped cream or caramel sauce. A drizzle of chocolate syrup also adds flair. For crunch, sprinkle more chopped walnuts or pecans on top. You can adjust this recipe for different diets. For a gluten-free version, use gluten-free graham crackers. If you want a dairy-free option, try using vegan cream cheese. You can substitute eggs with flaxseed meal for a vegan choice. All these variations keep the taste delicious. For the full recipe, check out the details above. To keep your apple crisp mini cheesecakes fresh, store them in the fridge. Place them in an airtight container. This way, they stay moist and tasty for up to five days. If you made a large batch, you can also wrap them tightly in plastic wrap. Avoid stacking them to prevent damage. You can freeze these mini cheesecakes for later. First, let them cool completely. Then, place them in a single layer on a baking sheet. Freeze until firm, about one to two hours. After that, wrap each cheesecake in plastic wrap and place them in a freezer-safe bag. They can last up to three months in the freezer. Just remember to label the bags with the date. To enjoy your frozen cheesecakes, move them to the fridge a day before serving. This helps them thaw slowly. If you want to enjoy them warm, gently reheat them in the oven at 300°F for about 10-15 minutes. Serve them chilled or warm, topped with a dusting of powdered sugar. You can also add apple slices or a sprinkle of cinnamon for a lovely touch. For the full recipe, check the earlier sections. To prevent cracking, you should bake at a low temperature. Also, do not overmix the batter. This adds too much air, which can cause cracks. After baking, let the cheesecakes cool slowly in the oven with the door slightly open. This gradual cooling helps avoid sudden temperature changes that lead to cracks. Yes, you can make these mini cheesecakes ahead of time. They stay fresh in the fridge for up to three days. Just cover them well to avoid absorbing smells. You can also freeze them for up to three months. To enjoy, just thaw them in the fridge overnight before serving. If you want a substitute for cream cheese, use Greek yogurt or ricotta cheese. These options change the flavor slightly but still offer a creamy texture. You can also use vegan cream cheese if you prefer a dairy-free option. You can tell the cheesecakes are done when the tops are set but still slightly jiggly in the center. A toothpick inserted should come out mostly clean, with a few moist crumbs. This means they are perfectly baked, not overcooked. In this post, we covered everything you need for making cheesecake. You learned about the key ingredients and their alternatives, along with how to prepare and bake your treat step by step. We shared tips for the best texture, serving ideas, and how to add your twist. We also explained storage methods and answered common questions. Remember, the joy of cheesecake lies in its endless possibilities. Happy baking!](https://tastednest.com/wp-content/uploads/2025/08/c6d03e62-20d7-47ab-8582-9c34fe6db073.webp)
Are you ready to impress your friends and family with a tasty dessert? My Delicious Apple Crisp Mini Cheesecakes are the perfect blend of creamy goodness and crunchy apple topping. …
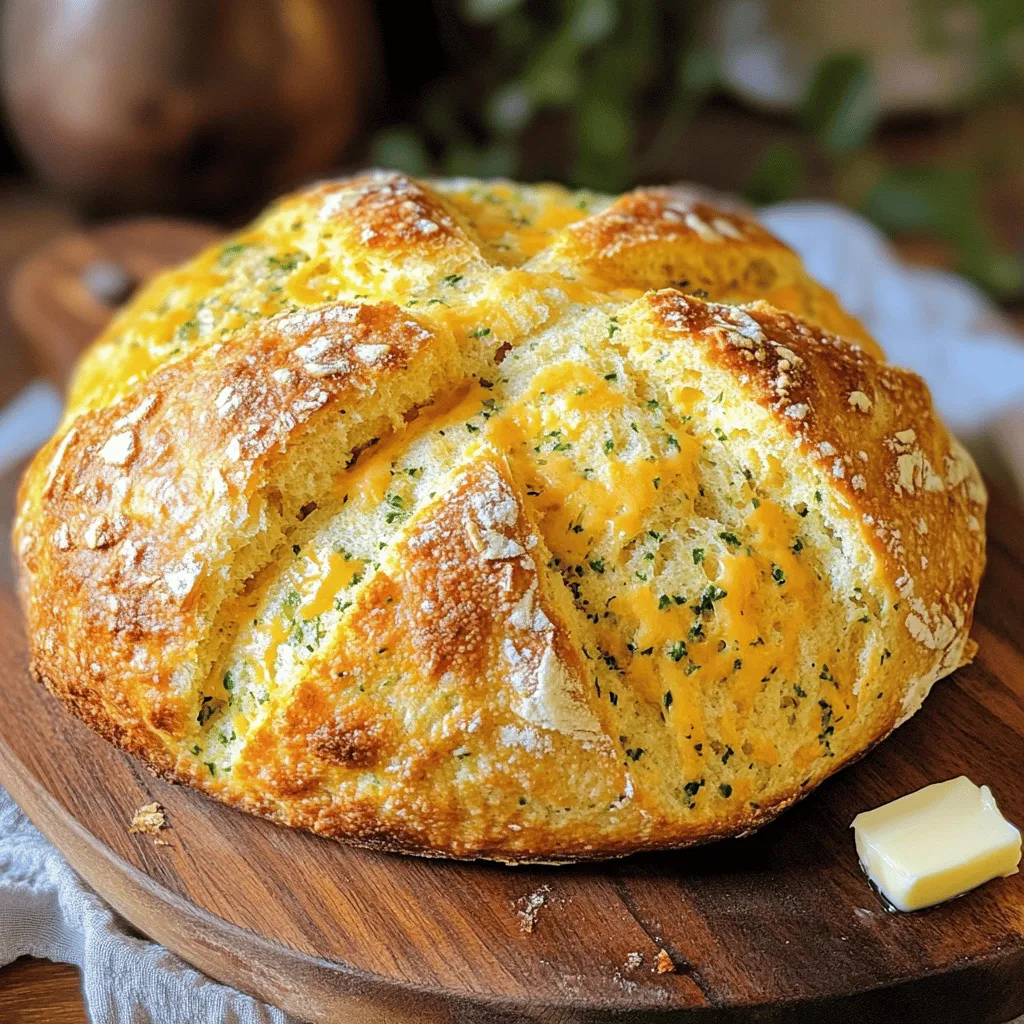
If you crave warm, cheesy bread straight from the oven, you’ll love this Cheddar and Herb Soda Bread recipe. It’s quick, simple, and uses everyday ingredients. I’ll show you how …
![- 1 cup all-purpose flour - 1 teaspoon baking powder - 1/2 teaspoon baking soda - 1/2 teaspoon ground cinnamon - 1/2 teaspoon ground nutmeg - 1/4 teaspoon ground ginger - 1/4 teaspoon salt For pumpkin cupcakes, the dry ingredients are key. All-purpose flour forms the base. Baking powder and baking soda help the cupcakes rise. Ground spices like cinnamon, nutmeg, and ginger give them that cozy fall flavor. Salt balances the sweetness and enhances the taste. - 1/2 cup granulated sugar - 1/2 cup packed brown sugar - 1/2 cup vegetable oil - 1 cup pumpkin puree (canned or homemade) - 2 large eggs - 1 teaspoon vanilla extract Next, we move to the wet ingredients. Granulated sugar adds sweetness. Brown sugar gives a deeper flavor. Vegetable oil keeps the cupcakes moist. Pumpkin puree is the star, adding flavor and texture. Eggs bind everything together, while vanilla extract adds extra warmth. - 8 ounces cream cheese, softened - 1/4 cup unsalted butter, softened - 1 cup powdered sugar - 1/4 cup caramel sauce (plus extra for garnish) - 1/2 teaspoon vanilla extract Now for the frosting! Cream cheese and butter make a rich base. Powdered sugar sweetens it up. Caramel sauce adds that heavenly flavor. The extra caramel on top gives a lovely finish. For the full recipe, you can check the details included above. 1. Preheat your oven to 350°F (175°C). Line a 12-cup muffin tin with colorful cupcake liners. This will make them fun and festive. 2. In a medium bowl, whisk together these dry ingredients: - 1 cup all-purpose flour - 1 teaspoon baking powder - 1/2 teaspoon baking soda - 1/2 teaspoon ground cinnamon - 1/2 teaspoon ground nutmeg - 1/4 teaspoon ground ginger - 1/4 teaspoon salt 3. Set the bowl aside. Next, in a large bowl, mix together: - 1/2 cup granulated sugar - 1/2 cup packed brown sugar - 1/2 cup vegetable oil 4. Stir until the mixture is smooth. Add in two large eggs, one at a time. Mix well after each egg. Then, add 1 cup pumpkin puree and 1 teaspoon vanilla extract. Whisk until the batter is smooth. 1. Now, gently fold the dry mix into the wet mix. Be careful not to overmix. The batter should be just combined and slightly lumpy. 1. Using a spoon or scoop, fill each cupcake liner about two-thirds full. This allows room for rising. 2. Bake in your preheated oven for 18-20 minutes. Check for doneness by inserting a toothpick into the center. If it comes out clean, they are done. Let the cupcakes cool in the tin for about 5 minutes, then transfer them to a wire rack to cool completely. 1. While the cupcakes cool, prepare the frosting. In a mixing bowl, beat together 8 ounces of softened cream cheese and 1/4 cup of softened unsalted butter. Mix until creamy and smooth. 2. Gradually add in 1 cup of powdered sugar, mixing well after each addition. Once smooth, pour in 1/4 cup of caramel sauce and 1/2 teaspoon of vanilla extract. Continue mixing until the frosting is light and fluffy. 1. Once the cupcakes are cool, use a spatula or piping bag to frost each cupcake. Make sure to be generous with the frosting. 2. For an extra touch, drizzle more caramel sauce over the tops of the frosted cupcakes. This adds sweetness and makes them look beautiful. For the full recipe, check [Full Recipe]. To make your pumpkin cupcakes perfect, focus on mixing. Preventing overmixing is key. Mix the dry and wet ingredients until just combined. The batter should look a bit lumpy. This step keeps the cupcakes fluffy and light. If you mix too much, the cupcakes can turn out dense. Next, let’s talk about ensuring moist texture. Use fresh pumpkin puree, as it adds rich flavor and moisture. You can also check the baking time closely. A toothpick should come out clean but with a few crumbs. This means your cupcakes are perfectly baked and moist. Frosting can change your cupcake game. Decide between using a piping bag vs. spatula. A piping bag gives a neat, professional look. If you use a spatula, go for a rustic touch. Both methods taste amazing! For tips for decorative garnishing, think about adding a sprinkle of chopped pecans or a drizzle of caramel. These add texture and make your cupcakes look stunning. You want them to be as tasty as they are pretty. To make your cupcakes even better, consider adding spices or extracts. A pinch of clove or extra cinnamon can boost the flavor. You can also try vanilla extract for a deeper taste. Finally, think about customizing sweetness level. You can adjust the sugar in the batter or frosting. If you like it sweeter, add a bit more caramel sauce to the frosting. For a less sweet touch, cut back on the sugar. For the Full Recipe, check the recipe section. Enjoy making your delicious pumpkin cupcakes! {{image_4}} You can change the flavor of your pumpkin cupcakes to keep things exciting. One fun option is chocolate pumpkin cupcakes. To make these, simply add cocoa powder to the batter. You can use about 1/3 cup of cocoa. This will give your cupcakes a rich, chocolaty taste that pairs well with pumpkin. Another tasty idea is nutty pumpkin cupcakes with pecans. Just fold in some chopped pecans into the batter before baking. The crunchy nuts add a great texture that contrasts nicely with the soft cupcake. When it comes to frosting, you have choices. Cream cheese frosting is a classic, but you might want to try whipped cream instead. Whipped cream gives a light and fluffy texture. It can be a nice change if you want a less sweet option. You can also switch to chocolate or maple frosting. Chocolate frosting adds a deep flavor that complements the pumpkin. For a sweeter touch, use maple frosting. This will give your cupcakes a warm, cozy taste that’s perfect for fall. If you want a healthier version, there are easy swaps. Use gluten-free flour to make your cupcakes gluten-free. This way, everyone can enjoy them! You can also try lower sugar alternatives. Using applesauce or honey instead of sugar can cut down on calories. These options keep your cupcakes sweet while adding extra flavor and moisture. These variations will make your pumpkin cupcakes even more fun and delicious! Check out the Full Recipe to try these ideas at home. To keep your pumpkin cupcakes fresh, store them in an airtight container. This helps keep out air and moisture. You can choose to refrigerate them or keep them at room temperature. If you live in a warm climate, it's best to refrigerate. Otherwise, room temperature works fine for a day or two. If you want to save your cupcakes for later, freezing is a great option. To freeze them, wrap each cupcake tightly in plastic wrap. Then, place them in a freezer bag. This keeps the flavor and texture intact. When you are ready to enjoy them, just take them out and let them thaw. Leave them at room temperature for about an hour. These pumpkin cupcakes are best enjoyed fresh. They last about 3 to 5 days in the fridge. If frozen, they can last up to 3 months. Look for signs that your cupcakes may have gone bad. If they smell off or have mold, it's time to toss them. Enjoy your pumpkin spice wonders while they are still fresh! For the full recipe, check here. Yes, you can use homemade pumpkin puree. To make it, roast a small pumpkin until soft, then scoop out the flesh and blend until smooth. Homemade puree often has a fresher taste but may be thinner than canned. If it's too watery, strain it using a cheesecloth. This helps keep your batter thick and rich. To check if your cupcakes are done, use the toothpick test. Insert a toothpick into the center of a cupcake. If it comes out clean or with just a few crumbs, your cupcakes are ready. If the toothpick has wet batter on it, bake a few more minutes and test again. Yes, you can make the frosting ahead of time. Store it in an airtight container in the fridge for up to three days. When ready to use, bring it to room temperature and whip it again for a smooth texture. Frosting can also be frozen for up to three months. Just thaw it in the fridge before using. If your cupcakes turn out too dry, you can fix them. Try brushing them with a simple syrup made from equal parts sugar and water. Also, ensure you're not overbaking them. Keep an eye on the time and use the toothpick test. Adding applesauce or yogurt in the batter can help add moisture next time. To boost the flavor, consider adding spices or extracts. A pinch of cloves or allspice adds warmth. For a richer taste, add a teaspoon of maple syrup or vanilla extract. You can even mix in some chocolate chips for a fun twist. Experiment to find your favorite flavor combinations. For the complete recipe, see the [Full Recipe]. In this article, we explored the key ingredients and steps to bake perfect pumpkin cupcakes. We covered everything from mixing dry and wet ingredients to crafting a delicious frosting. I shared tips for moist texture and flavorful variations to keep your cupcakes exciting. Remember, baking is all about experimenting and having fun. Enjoy the process and unleash your creativity with these recipes!](https://tastednest.com/wp-content/uploads/2025/08/6fd06142-7e1e-4a4a-ab0d-dd5a122f3928.webp)
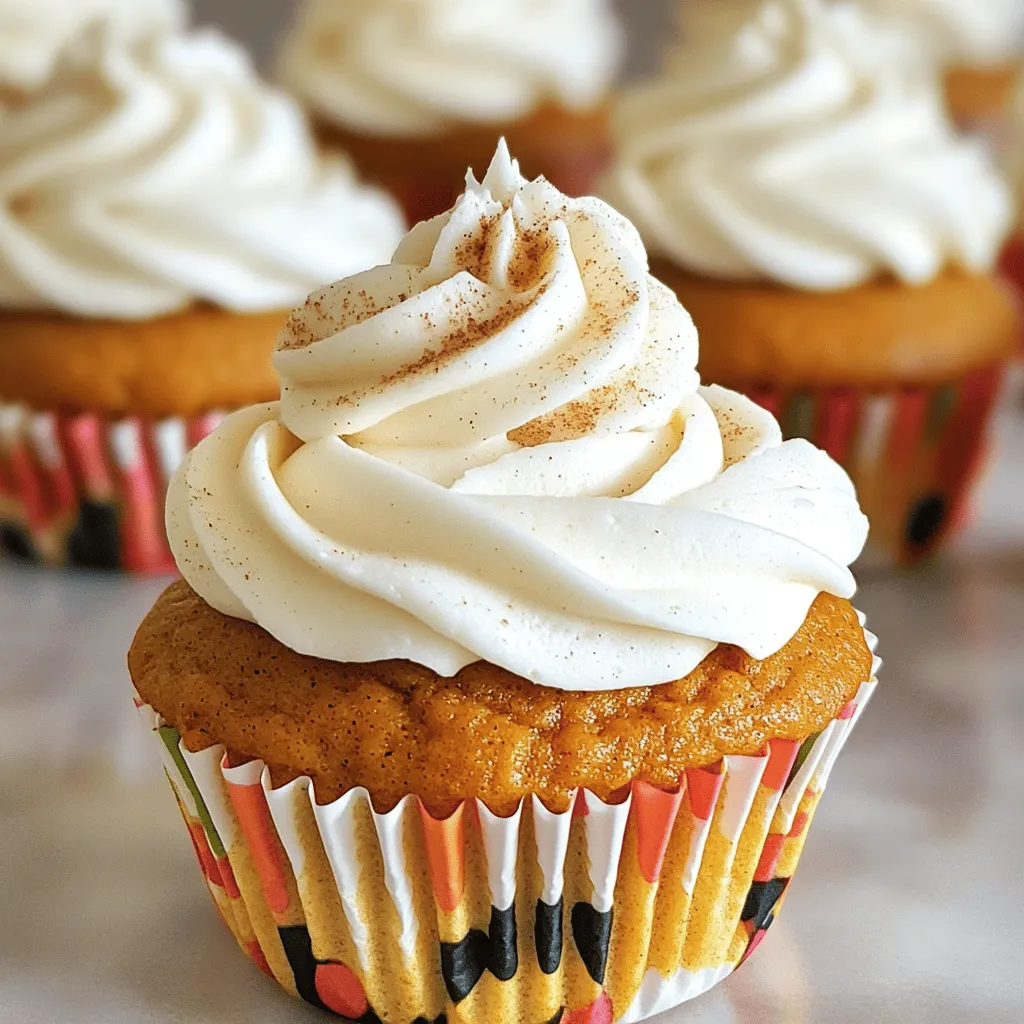
If you’re craving a perfect treat for fall, get ready to experience pure delight! These pumpkin cupcakes with caramel cream cheese frosting combine warm spices and the rich taste of …
Are you ready for the perfect fall treat? Vanilla Chai Pumpkin Latte Cupcakes combine warm spices, creamy frosting, and pumpkin goodness in each bite. Whether for a cozy gathering or …

If you’re craving a sweet, warm treat this fall, look no further! My Cinnamon Sugar Pumpkin Donut Holes are the perfect solution. These soft, fluffy bites blend the cozy flavors …
![- 2 cups cooked chicken, shredded - 1 can (10 oz) spicy enchilada sauce - 1 can (15 oz) black beans, drained and rinsed - 1 cup corn kernels (frozen or fresh) - 1 red bell pepper, diced - 1 small onion, finely chopped - 2 cups shredded cheese - 6-8 corn tortillas, cut into strips - 1 teaspoon ground cumin - 1 teaspoon chili powder - Salt and pepper to taste - Fresh cilantro for garnish - Sour cream for serving - Sliced avocados - Jalapeños I love using simple and fresh ingredients for my Hearty Crockpot Chicken Enchilada Casserole. It’s all about making a dish that warms your heart. The key is to start with good cooked chicken. You can roast it, grill it, or even use leftovers from another meal. Shredded chicken gives the dish a nice texture. The spicy enchilada sauce adds a kick. It’s the magic that brings everything together. I often use a can because it saves time. Black beans are a must. They add protein and fiber, making the dish filling. Don't skip the corn; it adds sweetness and color. Fresh veggies bring life to the casserole. Diced red bell pepper and chopped onions give crunch and flavor. I love the way they blend with the cheese and tortillas. Speaking of cheese, you can choose a tasty cheddar or a Mexican blend for that gooey goodness. Corn tortillas are a fun twist. Cut them into strips and layer them in the dish. They soak up the sauce and become soft and delicious. Seasoning is important, too. Ground cumin and chili powder add depth. A pinch of salt and pepper balances all the flavors. For serving, I like to add fresh cilantro. It brightens the dish and adds a burst of freshness. If you want to make it even richer, sour cream and sliced avocados work wonders. You can even add jalapeños for those who love heat. This recipe is simple and customizable. You can find the Full Recipe to make your own variation. So gather these ingredients, and let’s get cooking! - First, grab a large mixing bowl. - Combine all the ingredients from the recipe. - Mix until everything is well blended and coated. - Next, grease the inside of your crockpot. - Start by adding half of the chicken mixture to the crockpot. - Spread it evenly across the bottom. - Next, layer half of the tortilla strips over the chicken. - Sprinkle about 1 cup of cheese on top of the tortilla strips. - Repeat this with the remaining chicken mixture and tortilla strips. - Finish with another layer of cheese on top. - Secure the lid on the crockpot. - Set it to low for about 6 hours or high for 3 hours. - Cook until the casserole is hot and the cheese is melted. - When done, carefully lift the lid—watch out for steam! - Let it sit for 10 minutes before serving. This step-by-step guide makes your cooking easier. Enjoy the process and the delicious meal! For the complete recipe, check out the [Full Recipe]. To prevent sticking, always grease the crockpot. Use cooking spray or olive oil. This simple step helps your casserole come out easily. If you skip this, you may face a messy cleanup. For perfect cheese melt, choose a blend of cheeses. Cheddar and Mexican blend work well. Add cheese in layers for better melting. This makes every bite cheesy and delicious. Garnish your casserole for a vibrant look. Fresh cilantro adds color and taste. You can also add a dollop of sour cream on top. This gives the dish a creamy finish. Consider pairing it with side dishes. Sliced avocados or guacamole complement the flavors. A fresh salad also works well and adds crunch. Feel free to adjust ingredients. Swap black beans for pinto beans if you prefer. You can also use rotisserie chicken to save time. Spice level adjustments are easy too. Add jalapeños for heat or keep it mild. Taste as you cook to find your perfect level. {{image_4}} You can easily switch the chicken for beef or turkey. Ground beef works well and adds a rich flavor. Ground turkey is leaner and still tasty. For a vegetarian twist, use black beans, lentils, or mushrooms. These options keep the dish hearty and filling. Adding spices can kick up the taste. Try more chili powder or paprika for heat. You can also mix in garlic powder or onion powder for depth. Fresh herbs like cilantro or parsley add a fresh touch. Including veggies like zucchini or spinach boosts nutrition and color. You can serve this casserole as a taco filling. Just scoop it into taco shells and add your favorite toppings. For breakfast, turn it into a breakfast enchilada casserole. Add scrambled eggs and serve it with salsa. Each option offers a fun twist on the classic dish. For the full recipe, check out the details above. You can keep leftover Hearty Crockpot Chicken Enchilada Casserole in the fridge for about three to four days. Make sure to cover it tightly with plastic wrap or put it in an airtight container. This keeps the flavors fresh and prevents drying out. If you want to save some for later, freezing is a great option. Portion the leftovers into freezer-safe containers. Label each container with the date, so you know when to use it. This casserole can last for up to three months in the freezer. When you’re ready to eat, thaw it overnight in the fridge. For quick thawing, you can use the microwave on the defrost setting. To reheat, the best method is in the oven. Preheat it to 350°F (175°C). Place the casserole in an oven-safe dish, cover it with foil, and heat for about 20-30 minutes. This keeps the texture nice and prevents it from drying out. You can also reheat individual portions in the microwave for about 2-3 minutes. Just make sure to check that it’s heated all the way through before serving. Yes, you can use uncooked chicken. However, you must adjust the cooking time. Raw chicken needs longer to cook. If you use uncooked chicken, cook it on high for about 4 hours. Make sure it reaches an internal temperature of 165°F. This way, the chicken will be safe to eat and tender. To add heat, use spicy enchilada sauce. You can also add sliced jalapeños or extra chili powder. If you want more kick, try adding diced green chilies. You can also top the finished dish with hot sauce. Adjust to your taste for the perfect spice level. Yes! This casserole is great for meal prep. You can mix the ingredients a day ahead. Just store them in the fridge overnight. In the morning, layer them in the crockpot and start cooking. This saves time on busy days, making dinner easy and quick. This casserole pairs well with many sides. You can serve it with a fresh salad or some guacamole. Rice is also a good choice for a hearty meal. For a crunchy touch, add tortilla chips on the side. A dollop of sour cream on top adds creaminess too. This blog post explored how to make a tasty crockpot chicken enchilada casserole. We covered key ingredients, from shredded chicken and spicy enchilada sauce to optional toppings like sour cream. You learned step-by-step instructions for preparation and cooking. Tips helped you avoid sticking and perfect cheese melt. You can customize the dish with various proteins and spices. Enjoy this dish fresh, or store leftovers well for later meals. Cooking should be fun and easy. I hope you feel ready to make this delicious recipe!](https://tastednest.com/wp-content/uploads/2025/08/159f9d0e-6556-43f8-824e-333f5a5ebb64.webp)
Are you ready to spice up your dinner routine? My Hearty Crockpot Chicken Enchilada Casserole is a game-changer. It’s easy, delicious, and perfect for busy nights. Made with simple ingredients …
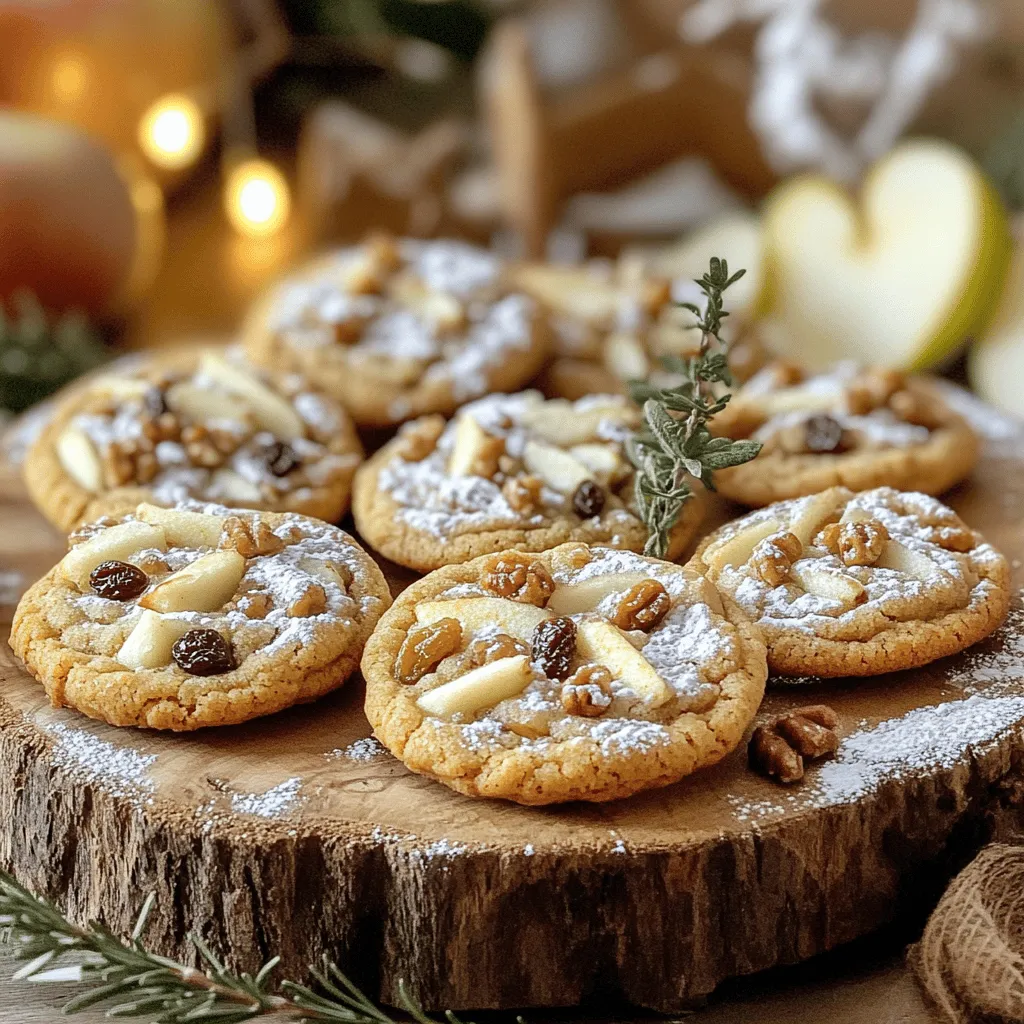
If you’re looking for a sweet treat that combines rich flavor with easy preparation, you’ve found it! My Apple Butter Cookies are a delightful way to enjoy apple goodness. These …
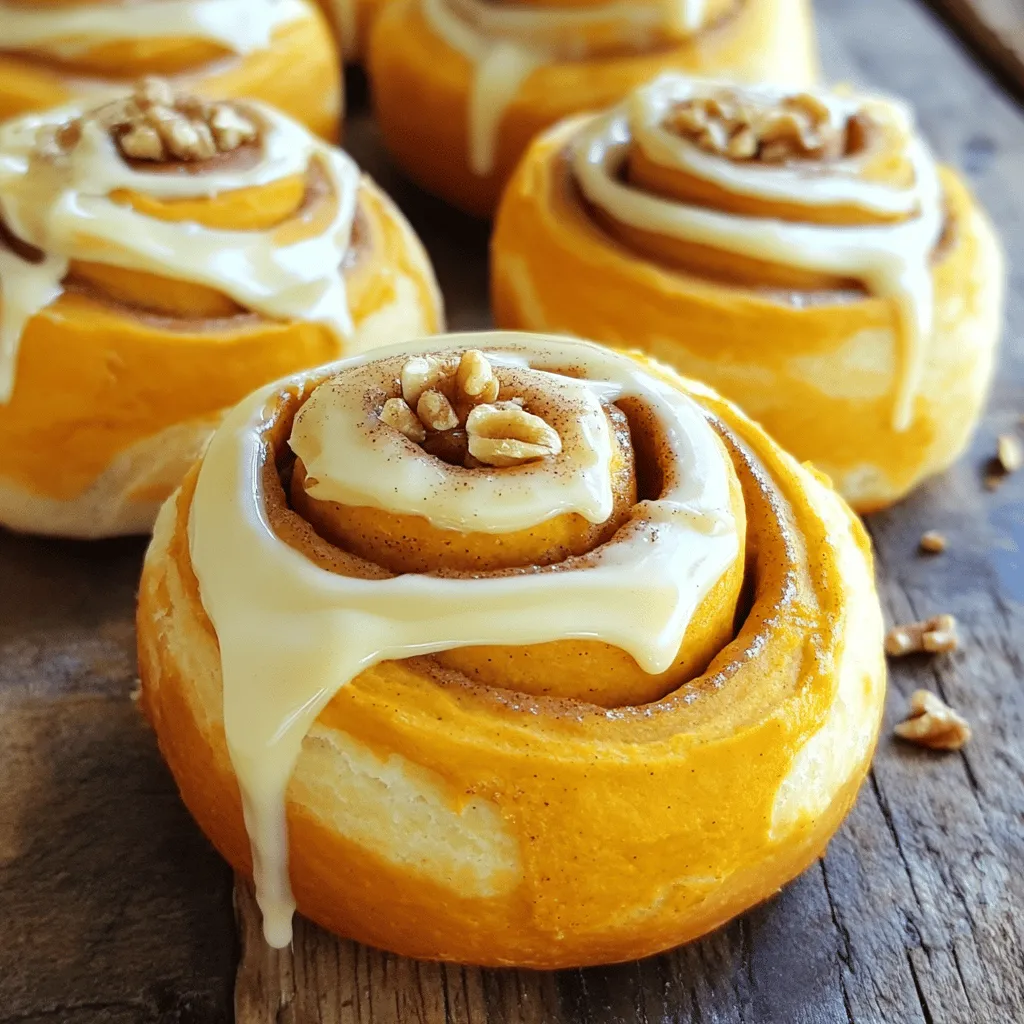
Craving a delicious fall treat? These Pumpkin Cinnamon Rolls are easy to make and full of flavor! With warm spices and a soft, fluffy dough, you can enjoy this comforting …