Skip to content
Tasted Nest
  • Home
  • Appetizers
  • Desserts
  • Salads
  • Breakfast
  • Dinner
  • Privacy Policy
  • Contact
  • About

Chef Tavio

Easy Peanut Butter Spider Cookies Delightful and Fun

August 6, 2025 by Chef Tavio
- 1 cup creamy peanut butter - 1 cup packed brown sugar - 1 large egg - 1 teaspoon baking soda - 1/2 teaspoon vanilla extract - 1 cup semi-sweet chocolate chips - 1 cup pretzel sticks (for spider legs) - 1 tube of black frosting (for decorating) You can swap brown sugar with maple syrup or honey if you want. This will change the taste a bit but still keep it sweet. For a gluten-free option, look for gluten-free pretzel sticks. These are easy to find at many stores. This way, everyone can enjoy the fun of making these cookies! Feel free to explore other options and don’t hesitate to get creative. You can even use different nut butters like almond or cashew butter. Just remember, each change will give a new twist to the flavor! To start, preheat your oven to 350°F (175°C). This step is key. A hot oven ensures your cookies bake evenly. While the oven heats, prepare your baking sheet. Line it with parchment paper. This prevents the cookies from sticking. It also makes cleanup easier. In a medium bowl, add 1 cup of creamy peanut butter, 1 cup of packed brown sugar, and 1 large egg. Stir these together until smooth. You want to mix well so every bite is tasty. Then, fold in 1 teaspoon of baking soda and 1/2 teaspoon of vanilla extract. Mix again until fully blended. Next, carefully add 1 cup of semi-sweet chocolate chips. Make sure they spread throughout the dough. This adds sweet bursts in each cookie. For baking, use the drop cookie method. Take a tablespoon of dough and drop it onto the baking sheet. Space each scoop about 2 inches apart. This space lets the cookies spread while baking. Bake them for 10-12 minutes. Look for the edges to set while the centers stay soft. They will firm as they cool. Once done, pull them from the oven. Let them cool on the baking sheet for about 5 minutes before moving to a wire rack. This helps them keep their shape. To make the best spider cookies, focus on their shape. First, roll the cookie dough into balls. Keep them about the size of a golf ball. This size helps them hold their shape while baking. When you place the dough on the baking sheet, press them gently to flatten slightly. This step makes it easier to decorate later. For the spider legs, use pretzel sticks. After baking and cooling the cookies, take two pretzel sticks for each cookie. Press them into the sides of the cookie at an angle. This gives the spider its creepy look. Make sure to press them in evenly so they look great. Now comes the fun part—decorating your spiders! Use black frosting for the eyes and details. You can make big, round eyes or tiny dots. It’s fun to let kids help with this part. They might have creative ideas! If you want to get even spookier, try adding candy eyes or using chocolate chips for the eyes. You can also sprinkle edible glitter on top. This makes your spider cookies shine and look more magical. For a Halloween twist, add some gummy worms or candy corn around them. These decoration tips will surely make your peanut butter spider cookies a hit! For the complete recipe, check the [Full Recipe]. {{image_4}} You can make your spider cookies even more exciting! Adding peanut butter chips or butterscotch chips gives a new taste. The sweet, creamy flavors mix well with peanut butter. You can also use other nut butters. Almond butter or cashew butter works great. They both have unique flavors that change the cookie's taste. Make your cookies fit any theme! For Halloween, use orange and black sprinkles. You can also shape them into pumpkins or ghosts. For other holidays, adapt your designs. Try snowflakes for winter or flowers for spring. Use your creativity to make your cookies fun and festive! The possibilities are endless. To keep your peanut butter spider cookies fresh, choose an airtight container. A glass jar or a plastic container works well. These containers keep moisture out and help the cookies stay soft. Store the cookies at room temperature. They last for about 5 days. You can freeze the unbaked dough for future fun! First, scoop the dough into balls on a baking sheet. Place the sheet in the freezer for about an hour. Once firm, transfer the dough balls to a freezer bag. Be sure to remove as much air as possible. They can stay frozen for up to 3 months. To bake frozen cookies, take them out and let them thaw on the counter for 15 minutes. Then, bake them as you normally would. This way, you get fresh cookies anytime! Yes, you can make spider cookies without eggs! To replace one egg, you can use: - 1/4 cup unsweetened applesauce - 1/4 cup mashed banana - 1 tablespoon ground flaxseed mixed with 2.5 tablespoons water These options keep your cookies moist and tasty. Applesauce adds sweetness while banana brings a nice flavor. Flaxseed is a great choice for extra nutrition. To achieve softer cookies, follow these tips: - Use room temperature ingredients. - Do not bake them too long. Bake until the edges are set. - Let them cool on the baking sheet for a few minutes before moving them. This helps keep them soft and chewy. Yes, you can make gluten-free spider cookies! Use gluten-free flour blends. You can also try: - Almond flour - Oat flour - Coconut flour Make sure that your pretzel sticks are gluten-free, too. This way, everyone can enjoy these fun treats! If your cookie dough is too sticky, you can: - Chill the dough in the fridge for 30 minutes. This makes it easier to handle. - Add a little more flour, one tablespoon at a time, until it feels right. - Use wet hands when shaping the dough. This helps the dough not stick to your hands. Remember, it’s all about having fun and creating tasty treats! For the full recipe, check out the [Full Recipe]. In this article, we've explored how to make fun and spooky spider cookies. You learned about the key ingredients and possible substitutes. I shared clear steps for mixing and baking the dough, along with tips for shaping and decorating. Remember, you can customize flavors and themes for any time of year. Proper storage will keep these treats fresh for longer. Enjoy making these cookies! They are a delightful way to bring fun into your kitchen. Happy baking!

Want a fun treat that’s easy to make? These Easy Peanut Butter Spider Cookies are perfect for any occasion! With just a few simple ingredients, you can whip up tasty …

Read more

Categories Desserts

Homemade Pumpkin Pecan Cobbler Simple and Delightful

August 6, 2025 by Chef Tavio
To make a tasty pumpkin pecan cobbler, gather these key ingredients: - 1 cup canned pumpkin puree - 1/2 cup packed brown sugar - 1/2 cup granulated sugar - 1 teaspoon pure vanilla extract - 2 large eggs - 1 teaspoon ground cinnamon - 1/2 teaspoon ground nutmeg - 1/4 teaspoon ground ginger - 1/4 teaspoon salt - 1 cup whole milk - 1 cup all-purpose flour - 1 teaspoon baking powder - 1/2 cup pecans, roughly chopped - 1/4 cup unsalted butter, melted These ingredients create a sweet and spiced dessert perfect for fall. The pumpkin adds moisture and flavor, while the pecans give a nice crunch. You can make your cobbler even better with these toppings: - Vanilla ice cream - Whipped cream - Caramel sauce - Extra chopped pecans Adding a scoop of vanilla ice cream on top makes the warm cobbler even more delightful. A drizzle of caramel sauce adds a sweet touch that pairs well with pumpkin. If you need to swap ingredients, here are some ideas: - Use maple syrup instead of brown sugar for a unique flavor. - Swap whole milk for almond milk for a lighter option. - Try using coconut oil instead of unsalted butter for a dairy-free version. These substitutions can help tailor the recipe to your needs while keeping it delicious. For the full recipe, check out the Autumn Pumpkin Pecan Cobbler. First, set your oven to 350°F (175°C). This temperature is key for our cobbler. While it heats, get a 9x9 inch baking dish. Grease it well with butter or use non-stick spray. This step helps the cobbler come out easily and ensures a nice crust. In a large bowl, add 1 cup of canned pumpkin puree. Next, mix in 1/2 cup of packed brown sugar and 1/2 cup of granulated sugar. Then, pour in 1 teaspoon of pure vanilla extract. Use a whisk and blend until smooth. This is the heart of your cobbler. In a separate bowl, combine 1 cup of whole milk, 1 cup of all-purpose flour, and 1 teaspoon of baking powder. Whisk this mix until it’s smooth and free of lumps. Now, take this dry mix and gently fold it into the pumpkin mixture. Stir until just combined. A few lumps are okay—don’t overdo it! Now, pour the batter into your greased baking dish. Use a spatula to even out the top. This helps it bake evenly and look nice. Next, drizzle 1/4 cup of melted unsalted butter over the top. Don’t mix it in; this will give a crunchy crust. Finally, sprinkle 1/2 cup of roughly chopped pecans over the butter. They will add a tasty crunch and flavor as it bakes. Now, you’re ready to bake! To get the best texture, focus on mixing just right. Stir until the ingredients blend, but don’t overmix. A few lumps are okay. This helps keep the cobbler light and fluffy. You want a soft center with a crispy top. Drizzling melted butter on the batter creates a nice, crunchy crust. This adds a lovely contrast to the soft middle. One common mistake is overbaking. Check your cobbler at 35 minutes. If a toothpick comes out clean, it’s ready. If you bake too long, the cobbler will become dry. Another mistake is not greasing the dish well. This can make it stick and hard to serve. Always grease the pan, so it comes out easily. Spices make this dessert shine. The mix of cinnamon, nutmeg, and ginger gives warmth. You can try adding more spices for a unique twist. A pinch of allspice or clove can add depth. For a fun twist, add a splash of maple syrup to the pumpkin base. This adds a rich sweetness that pairs well with the nuts. Check out the Full Recipe to see how these spices blend perfectly. {{image_4}} If you want to switch things up, try different nuts. Walnuts add a nice crunch and a rich flavor. Almonds can also work well, giving a light nutty taste. For a unique twist, use hazelnuts. They bring a sweet, earthy flavor that pairs well with pumpkin. You can easily make this cobbler gluten-free. Just replace all-purpose flour with a gluten-free blend. Look for a mix that contains xanthan gum. This helps keep the texture right. You can also use almond flour for a nutty flavor. Just remember to adjust the liquid since almond flour absorbs more moisture. Autumn is all about flavors. To bring in more seasonal tastes, add in some apples or pears. These fruits add sweetness and moisture. You could also mix in some cranberries for a tart kick. For spices, consider adding allspice or cloves. They give a warm, cozy touch that complements the pumpkin. To store leftover pumpkin pecan cobbler, let it cool completely. Cover the dish tightly with plastic wrap or aluminum foil. You can also transfer it to an airtight container. This keeps the cobbler fresh for up to three days in the fridge. If you prefer, you can slice the cobbler before storing. This makes it easy to grab a piece later. When you're ready to enjoy your leftover cobbler, preheat your oven to 350°F (175°C). Place the cobbler in an oven-safe dish. Heat for about 15 to 20 minutes until warm. If you're in a hurry, you can use the microwave. Just heat it in short bursts, about 30 seconds at a time. Keep checking to avoid overheating and drying it out. Freezing is a great way to keep pumpkin pecan cobbler longer. First, wrap the whole dish or slices tightly in plastic wrap. Then, place it in a freezer-safe bag. It will last up to three months in the freezer. To thaw, move the cobbler to the fridge for several hours or overnight. Once thawed, reheat it in the oven for the best taste and texture. Enjoy your cobbler anytime! For the full recipe, check out the complete guide above. Yes, you can make this cobbler ahead of time. Prepare it fully and let it cool. Then, cover it and store it in the fridge. You can keep it for up to three days. When ready to serve, simply reheat it in the oven until warm. This helps the flavors blend well. Serve your cobbler warm in bowls. Add a scoop of vanilla ice cream on top. This adds creaminess and balances the pumpkin flavor. You can also sprinkle extra chopped pecans for crunch. A drizzle of caramel sauce makes it even better. This simple serving method showcases the cobbler's beauty. Check your cobbler after 35 minutes. Insert a toothpick into the center. If it comes out clean, it’s ready. The top should look golden brown and firm. If it jiggles or is wet, give it more time. Remember, every oven is different, so keep an eye on it! To wrap it up, we explored how to make a delicious pumpkin pecan cobbler. We covered key ingredients, step-by-step instructions, and tips for perfecting the texture. We also looked at fun variations and easy storage tips. Homemade desserts can bring joy and warmth. This cobbler is a great choice for gatherings. Keep experimenting, and enjoy every bite!

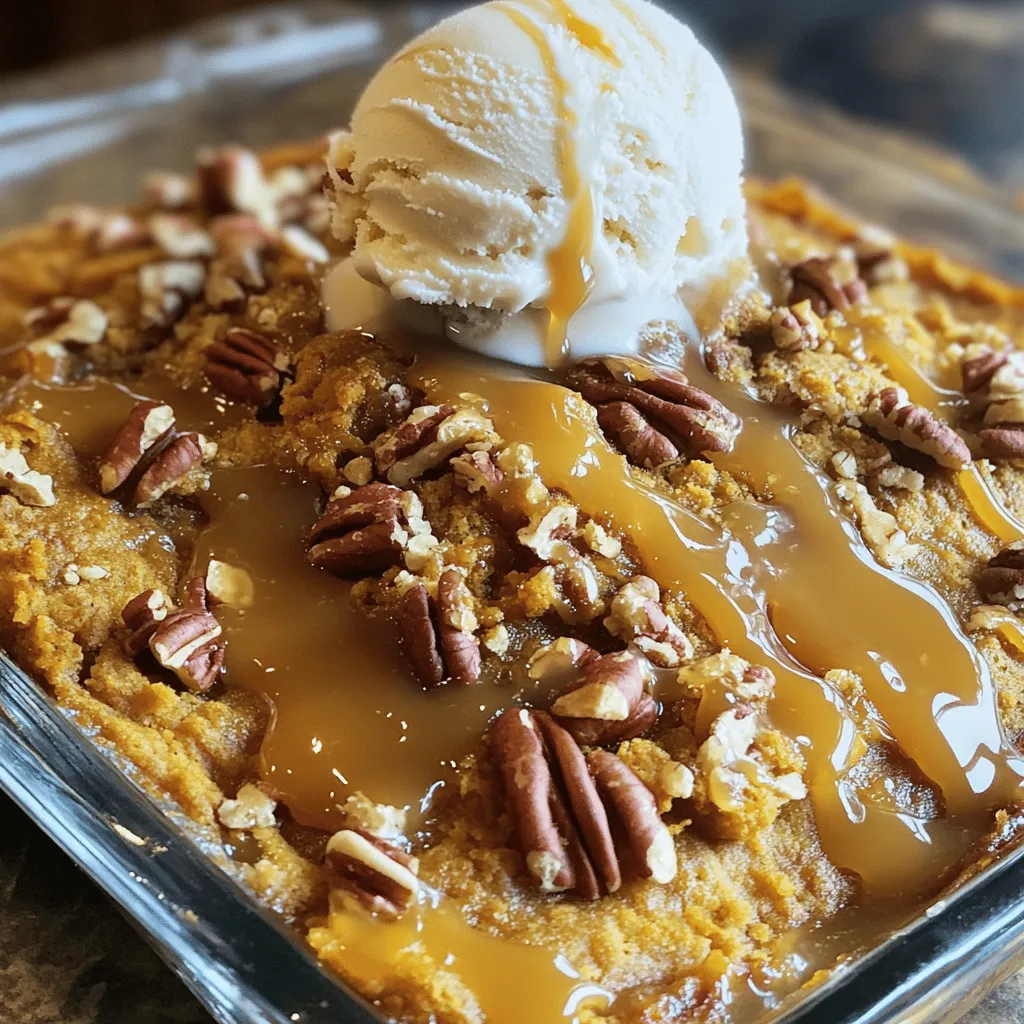
Get ready to treat yourself to something special with my Homemade Pumpkin Pecan Cobbler! This delightful dessert blends the classic flavors of fall into a warm, sweet treat. You’ll love …

Read more

Categories Desserts

The BEST Guacamole Fresh and Flavorful Recipe Guide

August 6, 2025 by Chef Tavio
- 3 ripe avocados, halved and pitted - 1 small red onion, finely diced - 2 roma tomatoes, seeded and diced - 1 jalapeño, seeds removed and minced finely - 2 cloves garlic, minced - Juice of 2 fresh limes - 1/4 cup fresh cilantro, chopped - Salt and freshly cracked pepper, to taste - Optional: 1/4 teaspoon smoked paprika To make the best guacamole, you need fresh, high-quality ingredients. Each one plays a key role in the flavor and texture. Ripe avocados create a creamy base. Red onion adds crunch and a bit of bite. Roma tomatoes give sweetness and moisture. Jalapeño brings heat, but you can adjust it based on your taste. Garlic adds depth, while lime juice keeps it bright and fresh. Cilantro offers a fresh herb taste. Salt and pepper round out the flavors perfectly. If you want a smoky twist, add smoked paprika. If you want to play around with flavors, I have some great swaps for you. - For avocados: You can use ripe mango for a sweet twist. - For red onion: Green onions work well for a milder taste. - For tomatoes: Diced bell peppers can add crunch without the juice. - For jalapeño: Try a pinch of cayenne if you like it spicy. - For garlic: Garlic powder is a quick substitute if you’re in a hurry. - For lime juice: Lemon juice can add a different zing. - For cilantro: Parsley gives a fresh green flavor, too. These swaps help make guacamole fit your taste or dietary needs. Whether you have allergies or just want to try something new, feel free to experiment! To make great guacamole, start with ripe avocados. Look for ones that yield gently when you press them. First, cut the avocado in half around the pit. Twist the two halves apart. Use a spoon or knife to carefully remove the pit. Scoop the green flesh into a large bowl. Be gentle to avoid bruising the avocado. Next, you need to decide how smooth you want your guacamole. For a creamy texture, use a fork or potato masher. If you prefer a chunky style, mash lightly. This keeps some pieces intact. Mix until you reach your desired consistency. Remember, it’s all about your taste! Now, it’s time to add flavor. Add your diced red onion, tomatoes, minced jalapeño, and garlic to the mashed avocado. Each ingredient adds a pop of flavor. Squeeze fresh lime juice over the mix. Lime adds brightness and helps keep the guacamole fresh. Sprinkle in chopped cilantro for an herbal touch. Taste your guacamole before serving. This is key! If it needs more zing, add more lime juice. For saltiness, sprinkle in salt and freshly cracked pepper. If you want a smoky flavor, add a pinch of smoked paprika. Mix gently to keep the texture nice. Adjust until it’s just right for your palate. For the full recipe, check out the Ultimate Guacamole section. Enjoy making this simple and delicious dip! To keep guacamole fresh and bright, use a few simple tricks. First, lime juice is key. The acidity helps slow browning. Next, cover your guacamole tightly. Press plastic wrap directly onto the surface to block air. This reduces oxidation. If you have leftover guacamole, store it in an airtight container. You can also add a layer of water on top. When ready to serve, just drain the water and mix it back. Guacamole is not just for chips! You can use it in many fun ways. Try spreading it on toast for a tasty breakfast. It also makes a great dip for fresh veggies like carrots and cucumbers. Use it as a topping for tacos or burritos. You can even mix it into pasta for a creamy twist. The options are endless! Guacamole pairs well with many foods and drinks. For a refreshing drink, serve it with a light beer or a margarita. You can also enjoy it with a crisp white wine. Foods like grilled chicken, fish, or roasted veggies complement guacamole nicely. For a snack, try it with crispy tortilla chips or crunchy pita chips. Each bite will be a delight! For the complete recipe, check out the Full Recipe. {{image_4}} To make your guacamole pop, try adding some new flavors. Here are some great ideas: - Spices: A pinch of smoked paprika adds depth. Cumin can also bring a warm note. - Fruits: Diced mango or pineapple gives a sweet twist. These fruits pair well with avocado. - Herbs: Fresh mint or basil can add a refreshing touch. Cilantro is a classic, but don't be afraid to try other herbs. Guacamole can fit many diets. Here’s how to make it vegan or gluten-free: - Vegan: The classic guacamole recipe is already vegan. Just avoid adding any dairy or animal products. - Gluten-Free: Guacamole itself is gluten-free. Use it with gluten-free chips or veggies for dipping. Guacamole varies by region. Here are some fun styles from around the world: - Mexican: The traditional version includes lime, cilantro, and jalapeño. This style focuses on fresh ingredients. - Peruvian: They often add a touch of lime and even pomegranate seeds for a unique taste. - California: This style may include ingredients like corn or black beans for added texture and flavor. Feel free to mix and match these ideas to create your own special blend. For the full recipe, check out The Ultimate Guacamole. To keep leftover guacamole fresh, store it in the fridge. Use an airtight container to seal it well. Press plastic wrap directly on the surface of the guacamole. This helps stop air from making it brown. Consume it within 1-2 days for the best taste. If you want to save guacamole for later, freezing works well. First, scoop the guacamole into a freezer-safe bag. Flatten it to remove extra air before sealing. This way, it takes up less space. You can freeze it for up to three months. When ready to eat, thaw it in the fridge overnight. How do you know if your guacamole has gone bad? Look for brown spots or a sour smell. If it tastes bitter or off, it's best to toss it. Always trust your senses when it comes to food safety. To stop guacamole from browning, keep air away. Use a tight lid on your bowl. You can press plastic wrap against the surface of the guacamole. This helps keep it fresh. Adding lime juice also slows browning. The acid in lime juice works like magic! Yes, you can make guacamole ahead of time! Just remember to store it right. Use an airtight container. Press plastic wrap on top to limit air exposure. The fresher the guacamole, the better it tastes. I suggest making it the same day if possible. Want spicier guacamole? Add more jalapeño or use a hotter pepper. You can also include some diced serrano peppers. For less heat, remove the seeds and ribs from the jalapeño. Use milder peppers or skip them entirely for a smooth taste. Guacamole is very healthy! Avocados are full of healthy fats. They help to lower bad cholesterol. Plus, they're packed with fiber, vitamins, and minerals. Enjoy guacamole as a dip or spread. It adds flavor and nutrition to your meals. You can serve guacamole with many foods! Try fresh veggies like carrots, cucumbers, or bell peppers. Use it as a topping for tacos, burritos, or salads. Spread it on sandwiches or burgers for rich flavor. The choices are endless! Guacamole comes from Mexico. It dates back to the Aztecs. They made a simple version using avocados and spices. Today, we enjoy many styles of guacamole, but the roots stay the same. It is a beloved dish around the world. For the full recipe, see [Full Recipe]. Guacamole is simple to make, using fresh ingredients for great flavor. We covered everything from selecting ripe avocados to mixing in spices and herbs. You learned how to store it properly to keep it fresh, and explored fun ways to enjoy your guacamole. Remember, you can customize it to fit your taste and diet. With these tips, you can create a delicious dip that enhances any meal or snack. Enjoy your homemade guacamole and share it with friends!

Are you ready to make the BEST guacamole? This fresh and flavorful recipe guide will show you how. With simple ingredients like ripe avocados, zesty lime juice, and crunchy veggies, …

Read more

Categories Appetizers

Tex-Mex Chopped Chicken Salad Flavorful and Fresh Dish

August 6, 2025 by Chef Tavio
- Chicken and Dressing Ingredients - 2 boneless, skinless chicken breasts - 1 tablespoon olive oil - 1 teaspoon chili powder - 1/2 teaspoon ground cumin - Salt and freshly cracked pepper to taste - Salad Components - 1 cup corn kernels (freshly cooked or canned and drained) - 1 red bell pepper, diced into small pieces - 1 cup cherry tomatoes, halved - 1 ripe avocado, diced - 1 cup black beans, drained and rinsed - 1/4 cup red onion, finely chopped - 1/4 cup fresh cilantro, chopped - Optional Garnishes - Juice of 2 juicy limes - 1/4 cup Greek yogurt (or sour cream, for a creamier texture) - 1 teaspoon honey (optional for a hint of sweetness) Creating this Tex-Mex chopped chicken salad is a joyful task. The combination of fresh vegetables, tender chicken, and zesty dressing makes every bite special. The salad bursts with flavor and color, making it a feast for both the eyes and the palate. Each ingredient plays a role in crafting a well-rounded dish. Don't hesitate to substitute items that you love or have on hand. The Full Recipe is a great guide to follow! Start by preheating your grill or stovetop grill pan to medium-high heat. This helps cook the chicken evenly. In a small bowl, mix olive oil, chili powder, ground cumin, salt, and pepper. Stir until combined. Brush this mix all over the chicken breasts. Make sure every side is covered well. Place the chicken on the grill. Cook for about 6-7 minutes on each side. You want it to reach an internal temperature of 165°F (75°C). Once done, take it off the heat and let it rest for 5 minutes. This keeps the juices inside the chicken. While the chicken rests, grab a large mixing bowl. Add the corn, diced red bell pepper, halved cherry tomatoes, diced avocado, rinsed black beans, chopped red onion, and fresh cilantro. This mix looks bright and colorful. Next, cut the grilled chicken into bite-sized pieces. Toss the chicken into the bowl with the veggies. This is where all the flavors come together. In a separate small bowl, whisk together lime juice, Greek yogurt, and optional honey. Keep whisking until the mixture is smooth. This dressing adds a zesty punch to your salad. Drizzle the dressing over your salad. Gently toss all the ingredients together. Make sure everything is coated well. Taste the salad and add more salt and pepper if you like. You can serve it right away for a fresh crunch. If you prefer, chill it in the fridge for about 30 minutes. This helps the flavors meld together nicely. For a beautiful presentation, serve the salad in individual bowls. Garnish with extra cilantro and lime wedges on the side for added flavor. Enjoy your Tex-Mex chopped chicken salad! You can find the Full Recipe in this article for more details. You can grill, bake, or pan-sear your chicken. Grilling gives a smoky flavor. Baking is easy and keeps it juicy. Pan-searing adds a nice crust. I recommend grilling for the best taste. Always check the chicken’s internal temperature. It should reach 165°F (75°C) to be safe to eat. To boost the taste, use fresh spices. Chili powder and cumin bring warmth. Adding lime juice brightens the dish. You can also sprinkle some smoked paprika for a deeper flavor. Don't forget to season well with salt and pepper. A touch of honey in the dressing adds a nice sweet note. Serve the salad in colorful bowls. This makes it pop on the table. Add lime wedges and extra cilantro on top. It not only looks great but also adds flavor. For a fun touch, try layering the ingredients in a mason jar. This keeps it fresh and makes for a lovely display. For more details on making this salad, check out the Full Recipe. {{image_4}} You can easily make this salad meat-free. Replace the chicken with grilled tofu or tempeh. These options add protein and hold flavor well. You can also use chickpeas for a different texture. Just rinse and drain them before mixing. This keeps the salad light and fresh. Feel free to swap ingredients based on what you have. Black beans can change to pinto beans or kidney beans. If you don’t have red bell pepper, green or yellow bell peppers work too. Use whatever veggies you love or have on hand. You can even add some shredded carrots for crunch. If you enjoy heat, add jalapeños or diced serrano peppers. You can mix them in with the salad or top it. For an extra kick, try a splash of hot sauce in the dressing. This adds flavor and spice to every bite. To store leftovers, place the salad in an airtight container. Make sure to keep the dressing separate. This helps the salad stay fresh and crisp. You can store it in the fridge for up to three days. If you mix the salad with the dressing, it may become soggy faster. If you have leftover chicken, you can reheat it easily. Place the chicken in a skillet over medium heat. Add a splash of water or broth to keep it moist. Cover the pan to trap heat and steam. Heat for about five minutes, or until warm. You can also use a microwave for quick reheating. Just be careful not to overheat, as it can dry out. Most ingredients in Tex-Mex chopped chicken salad last well. Cooked chicken stays fresh in the fridge for about three to four days. Fresh veggies like bell peppers and tomatoes last for about a week. Black beans can last up to three to four days once opened. Avocados should be eaten within one to two days after cutting. Remember, freshness helps keep your salad flavorful and safe to eat! Tex-Mex Chopped Chicken Salad is packed with nutrients. It includes lean chicken, which provides protein. Protein helps build and repair muscles. The black beans add fiber, keeping you full longer. Fiber also aids digestion. Fresh veggies like tomatoes and bell peppers bring vitamins. Avocado adds healthy fats, which are good for your heart. The lime juice boosts vitamin C, which helps your immune system. Overall, this salad supports a balanced diet and promotes good health. Yes, you can make this salad ahead of time. It tastes even better after sitting for a while. Prepare all the ingredients and store them separately. Keep the dressing in a jar in the fridge. This way, the salad stays fresh and crunchy. When you're ready to eat, simply mix everything together. Letting the flavors meld enhances the taste. Just remember to add the avocado last to avoid browning. If you don’t have Greek yogurt, sour cream works well. It has a similar creamy texture and taste. You can also use plain yogurt for a lighter option. For a dairy-free choice, try avocado or a nut-based yogurt. These alternatives keep the dish creamy and delicious. Each substitute offers a unique flavor, so feel free to experiment! Just ensure you adjust the quantity to your taste. This blog post covered how to make a tasty Tex-Mex Chopped Chicken Salad. We explored the key ingredients and gave you clear steps to prepare the dish. I shared tips on cooking chicken, boosting flavors, and presenting your salad well. We also looked at fun variations and storage advice. In cooking, creativity and choice matter. Don’t hesitate to make this salad your own. Enjoy every bite while benefiting from its flavors and nutrition!

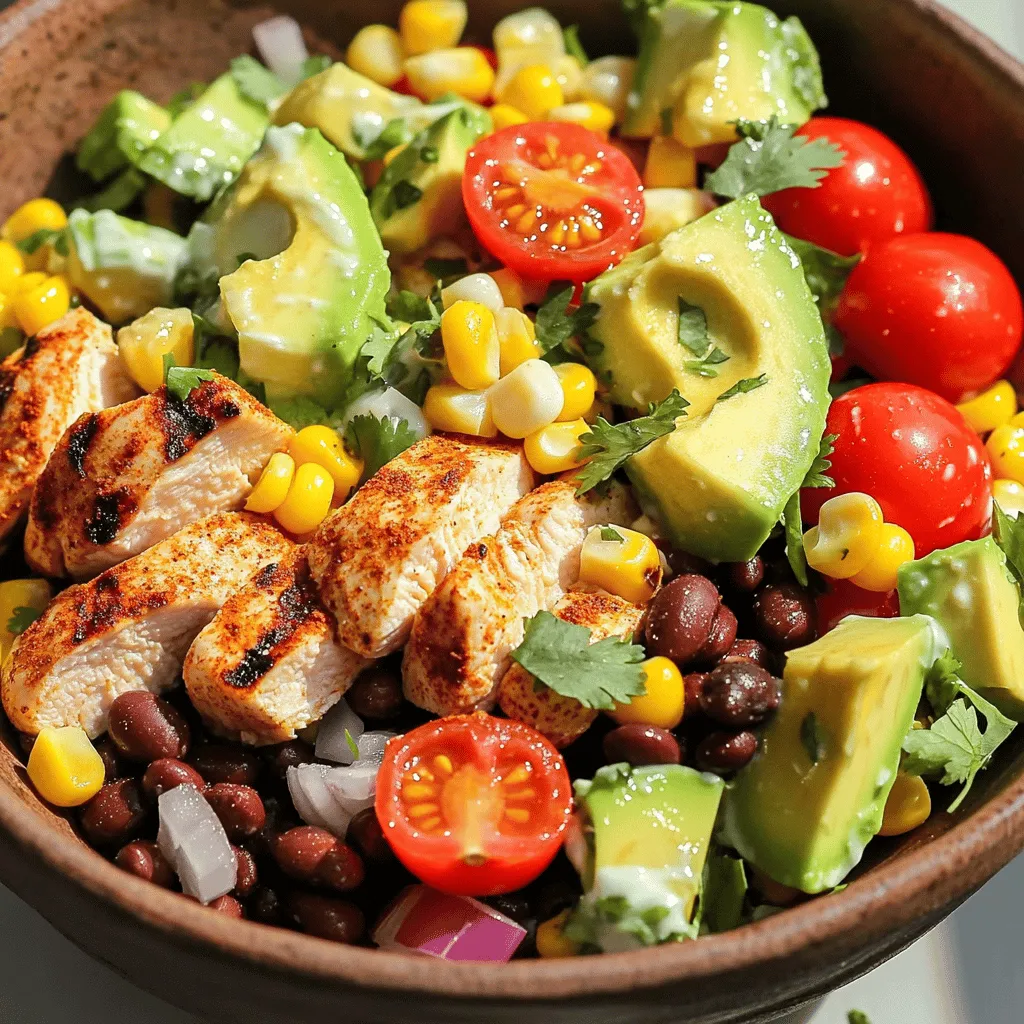
If you’re looking for a salad that is both tasty and easy to make, you’re in luck! This Tex-Mex Chopped Chicken Salad is packed with vibrant flavors and fresh ingredients. …

Read more

Categories Salads

Mexican Corn Salad Fresh and Flavorful Delight

August 6, 2025 by Chef Tavio
To make this tasty Mexican corn salad, you need: - 4 cups fresh corn kernels (about 6 ears of corn) - 1 cup cherry tomatoes, halved - 1/2 cup red onion, finely chopped - 1 ripe avocado, diced - 1/2 cup fresh cilantro, chopped - 1 jalapeño, finely chopped (remove seeds for less heat) - Juice of 2 limes - 1 tablespoon extra virgin olive oil - 1 teaspoon smoked paprika - Sea salt and freshly ground black pepper to taste - Crumbled cotija cheese for garnish (optional) You can change some ingredients if needed. For corn, you can use frozen corn. It’s quick and easy! Cherry tomatoes can be swapped for diced regular tomatoes. If you want heat but no jalapeño, try a dash of hot sauce. For a vegan option, skip the cotija cheese. You can add nutritional yeast for a cheesy flavor. Measuring ingredients helps keep the flavors just right. Use a measuring cup for liquids and a food scale for solids if you have one. When chopping, keep your knife sharp for safe and easy cutting. Grill the corn until it’s lightly charred. This adds a nice smoky flavor. After grilling, let the corn cool before cutting off the kernels. This will keep your fingers safe! Grilling corn is easy and fun. First, preheat your grill to medium-high heat. Place the corn on the grill and cook for about 10 minutes. Turn the corn often. You want it to be lightly charred and smell great. After grilling, let the corn cool for a few minutes. Then, carefully cut the kernels off the cob and put them in a big mixing bowl. Now, it's time to mix! In the bowl with the corn, add the halved cherry tomatoes, finely chopped red onion, diced avocado, chopped cilantro, and jalapeño. The jalapeño gives a nice kick, but you can leave it out if you want a milder taste. Gently stir everything together so each ingredient is mixed well. Next, let's make the dressing. Grab a small bowl and whisk together the juice of two limes, extra virgin olive oil, smoked paprika, and a pinch of sea salt and black pepper. This dressing adds a refreshing zing to your salad and makes it pop! Pour the dressing over the corn and veggie mix. Use a gentle folding motion to combine everything. Be careful not to mash the avocado, as you want it to stay chunky and delicious. Taste your salad. If you need more salt, pepper, or lime juice, feel free to add it. Now, transfer the salad to a nice serving platter or bowl. For a special touch, sprinkle crumbled cotija cheese on top. This adds a creamy flavor that everyone will love. To make it look extra nice, add some cilantro sprigs and lime wedges around the platter for guests to squeeze on their portions. Enjoy this flavorful delight! To grill corn well, pick fresh ears. Look for bright green husks and plump kernels. Preheat your grill to medium-high heat. Grill the corn for about 10 minutes. Turn it often to get even charring. This gives the corn a sweet, smoky flavor. Once it’s done, let it cool before cutting the kernels off. This method brings out the best taste. Taste as you go! After mixing the salad, try a bite. If it needs more flavor, add a pinch of sea salt or black pepper. Want more zing? Squeeze in extra lime juice. If you like heat, toss in more jalapeño. Each person’s taste is unique, so adjust until it’s perfect for you. Make your salad look great! Use a colorful bowl to show off the bright ingredients. Garnish it with fresh cilantro sprigs. Add lime wedges around the platter for a pop of color. If you use cotija cheese, sprinkle it on top just before serving. This adds a nice touch and extra flavor to your dish. For full details on making this salad, check out the Full Recipe. {{image_4}} You can make a vegan Mexican corn salad easily. Simply leave out the cotija cheese. Use more fresh herbs or add avocado for creaminess. You can also include ingredients like bell peppers or radishes for crunch. Adding protein makes this dish more filling. Black beans are a great choice for a plant-based option. They add fiber and nutrients. If you prefer meat, grilled chicken works well. Just chop it into bite-size pieces and mix it in. Want to spice things up? Try adding more jalapeños or a dash of hot sauce. For a fresh twist, mix in herbs like dill or basil. These flavors brighten the dish and keep it interesting. You can find the full recipe for more ideas! To store leftover Mexican corn salad, first let it cool down. Next, transfer the salad into a clean container. Cover it tightly with a lid or plastic wrap. This keeps the flavors fresh and prevents drying out. I suggest using glass or BPA-free plastic containers. These materials help maintain the salad's taste and texture. Choose a container that fits the amount of salad you have. If you have a large batch, a bigger container is better. For smaller portions, use smaller containers. Mexican corn salad lasts about 3 to 4 days in the fridge. After this time, it may lose its crunch and flavor. Always check for any strange smells or changes in color before eating. If you want to enjoy it longer, consider freezing the salad. However, some fresh ingredients, like avocado, may not freeze well. For the best taste, enjoy the salad fresh. If you need the full recipe, check [Full Recipe]. Yes, you can use frozen corn. Just thaw it first and drain excess water. Fresh corn gives the best flavor, but frozen corn works well in a pinch. The key is to ensure the corn is dry before mixing it into the salad. To spice it up, add more jalapeños or include diced serrano peppers. You can also mix in some hot sauce or cayenne pepper for an extra kick. Adjust the heat to your liking for a bold flavor. Mexican Corn Salad pairs nicely with grilled meats like chicken or steak. It also goes well with tacos, quesadillas, or burritos. For a lighter option, serve it with a simple green salad or grilled fish. Yes, you can make this salad in advance. Prepare it a few hours ahead of time and keep it in the fridge. Just wait to add the avocado until right before serving. This keeps it fresh and prevents browning. For the full recipe, check out the details above. This Mexican corn salad is easy and fun to make. You learned about ingredients, preparation tips, and serving ideas. You also saw ways to adapt the dish for your taste. Whether you go vegan or add proteins, there’s a version for everyone. Store any leftovers well to keep them fresh. With these tips, your salad will shine at any meal. Enjoy making this bright and tasty dish!

If you crave a dish bursting with flavor and freshness, you’re in the right place! In this blog post, I’ll share my favorite recipe for Mexican Corn Salad. You’ll learn …

Read more

Categories Salads

Pumpkin Cream Cheese Muffins Tasty and Simple Recipe

August 6, 2025 by Chef Tavio
- 1 ½ cups all-purpose flour - 1 teaspoon baking soda - ½ teaspoon baking powder - 1 teaspoon ground cinnamon - ½ teaspoon ground nutmeg - ¼ teaspoon ground ginger - ½ teaspoon salt - ½ cup granulated sugar - ½ cup packed brown sugar - 1 cup canned pumpkin puree - ½ cup vegetable oil - 2 large eggs - 1 teaspoon vanilla extract - 4 oz cream cheese, softened - 2 tablespoons powdered sugar - 1 tablespoon lemon juice (optional) You can switch some ingredients if needed. For gluten-free muffins, use a gluten-free flour mix. If you want a dairy-free option, try a dairy-free cream cheese. You can also cut the sugar if you prefer less sweetness. - Muffin tin - Mixing bowls - Whisk and spatula Having the right tools makes the process easier. A good muffin tin helps your muffins bake evenly. Mixing bowls in different sizes keep things organized. A whisk blends your wet ingredients well. A spatula helps mix everything gently to avoid lumps. 1. Preheat the Oven: Start by preheating your oven to 350°F (175°C). This step is key for even baking. 2. Prepare the Muffin Tin: Line your muffin tin with paper liners or grease it lightly with oil. This keeps the muffins from sticking. 1. Combining Flour and Spices: In a medium bowl, whisk together these dry ingredients: - 1 ½ cups all-purpose flour - 1 teaspoon baking soda - ½ teaspoon baking powder - 1 teaspoon ground cinnamon - ½ teaspoon ground nutmeg - ¼ teaspoon ground ginger - ½ teaspoon salt Mix until all the dry ingredients blend well. Set this bowl aside. 1. Blending Pumpkin Puree and Sugars: In a large bowl, mix these wet ingredients: - ½ cup granulated sugar - ½ cup packed brown sugar - 1 cup canned pumpkin puree - ½ cup vegetable oil - 2 large eggs - 1 teaspoon vanilla extract Use a whisk or an electric mixer. Blend until smooth. 1. Folding Dry Ingredients into Wet: Slowly add the dry mixture to the wet bowl. Stir gently with a spatula. Mix just enough until combined; some lumps are fine. 1. Preparing the Cream Cheese Mixture: In a small bowl, beat together: - 4 oz cream cheese, softened - 2 tablespoons powdered sugar - 1 tablespoon lemon juice (optional) Mix until creamy and smooth. 1. Filling the Muffin Cups: Spoon the pumpkin batter into each muffin cup until halfway full. 2. Add Cream Cheese: Place a teaspoon of the cream cheese mixture in the center. Cover with more pumpkin batter, filling each cup to about ¾ full. 3. Bake the Muffins: Put the muffin tin in the oven. Bake for 18-20 minutes. Check for doneness with a toothpick; it should come out clean. Follow the [Full Recipe] for more details on prep time and yields. To ensure your muffins are fluffy and moist, follow these steps: - Use room temperature ingredients: Let your eggs and cream cheese sit out for about 30 minutes. - Don’t overmix: When combining the dry and wet ingredients, mix until just combined. A few lumps are okay. - Use fresh leavening agents: Make sure your baking soda and baking powder are fresh. This helps the muffins rise well. Proper cooling is key for great muffins. Here’s how: - Cool in the pan: After baking, let your muffins cool in the pan for about 5 minutes. This helps them set. - Transfer to a wire rack: Move them to a wire rack to cool completely. This prevents sogginess. - Serve warm: Muffins taste best warm. You can reheat them slightly in the microwave if needed. Make your muffins look as good as they taste: - Dust with powdered sugar: A light dusting on top adds a beautiful touch. - Serve on a rustic board: This adds charm and brings out the fall vibe. - Garnish with leaves: A few colorful autumn leaves can make your muffins pop on the table. For the full recipe, check out the detailed instructions above. Enjoy your tasty Pumpkin Cream Cheese Muffins! {{image_4}} You can easily change up the flavors in these muffins. Adding nuts gives a nice crunch. Try walnuts or pecans for a warm taste. Chocolate chips also make a sweet addition. They add a rich flavor that complements the pumpkin well. If you need a gluten-free version, use a gluten-free flour mix. This keeps the muffins tasty while fitting your needs. For a dairy-free option, swap the cream cheese with a vegan cream cheese. This makes the muffins friendly for more diets. You can spice things up with seasonal flavors. Add a pinch of cloves or allspice for a warmer taste. You could also mix in some orange zest for a bright citrus note. This gives your muffins a fresh twist, perfect for fall. For the full recipe, check the details above. Enjoy making your muffins! To store your pumpkin cream cheese muffins at room temperature, place them in an airtight container. This keeps them fresh for up to three days. Make sure they cool completely before sealing them. You can also use plastic wrap for individual muffins. This way, you can grab a treat anytime. For long-term storage, freezing is your best option. Wrap each muffin tightly in plastic wrap, then place them in a freezer bag. They can last up to three months in the freezer. When you’re ready to enjoy them, pull them out and let them thaw at room temperature. You can also warm them in the oven for a few minutes. This brings back their soft and fluffy texture. If you want more details on making these muffins, check out the Full Recipe. Now you have all you need to bake delicious pumpkin cream cheese muffins. We covered ingredients, equipment, and step-by-step instructions. You learned tips for perfect muffins, flavor variations, and how to store them. Remember, baking is about trying new things. Use the tips to make these muffins your own. Enjoy your baking journey! Happy snacking!

Are you ready to bake something delicious? Pumpkin Cream Cheese Muffins are the perfect fall treat! This simple recipe combines rich pumpkin flavor with a creamy filling, making each bite …

Read more

Categories Desserts

Easy Huckleberry Muffin Recipe to Savor Every Bite

August 4, 2025 by Chef Tavio
To make these easy huckleberry muffins, gather the following ingredients: - 1 cup fresh huckleberries (or frozen, thawed) - 1 ½ cups all-purpose flour - ½ cup granulated sugar - 2 teaspoons baking powder - ½ teaspoon baking soda - ½ teaspoon salt - 1 large egg, lightly beaten - ½ cup milk (whole or your choice) - ⅓ cup vegetable oil (or melted coconut oil for a unique twist) - 1 teaspoon pure vanilla extract - Zest of 1 lemon (for a burst of freshness) You can swap some ingredients for different options. For flour, try using whole wheat flour for a healthier muffin. If you want less sugar, use honey or maple syrup instead. You can replace vegetable oil with melted butter for a richer flavor. If you're out of eggs, try using applesauce or mashed banana as a binder. They work well in muffins and keep them moist. For the best taste, I recommend using fresh huckleberries if you can find them. They have a sweet and tart flavor that shines in muffins. If fresh ones are not available, frozen huckleberries are a great choice. Just be sure to thaw and drain them first. This way, you won’t have excess moisture in your batter. Both options will give you delicious muffins you’ll want to savor. Start by preheating your oven to 375°F (190°C). Grab your muffin tin and line it with paper liners. You can also grease the cups with cooking spray. In a large bowl, mix the dry ingredients first. Combine 1 ½ cups of all-purpose flour, ½ cup of sugar, 2 teaspoons of baking powder, ½ teaspoon of baking soda, and ½ teaspoon of salt. Whisk them together well. Now, in a separate bowl, combine the wet ingredients. Whisk together 1 beaten egg, ½ cup of milk, ⅓ cup of vegetable oil, 1 teaspoon of vanilla extract, and the zest of 1 lemon. Mix until smooth. Carefully pour this wet mix into the dry ingredients. Stir gently until just combined. Remember, a few lumps are okay! Next, fold in 1 cup of fresh or thawed huckleberries. Be gentle to keep them whole. Finally, fill each muffin cup about ¾ full with the batter. Place the muffin tin into your preheated oven. Bake for 18 to 20 minutes. You’ll know they are done when the tops are golden brown. Insert a toothpick into the center of a muffin. If it comes out clean, they’re ready! Once baked, remove the muffins from the oven. Let them cool in the tin for about 5 minutes. Then, transfer them to a wire rack to cool completely. To make your muffins extra special, arrange them on a wooden board. Dust the tops with powdered sugar for sweetness. Add fresh huckleberries around them for color. Enjoy each bite of your huckleberry heaven muffins! To make your muffins moist and fluffy, start with room temperature ingredients. This includes your egg and milk. Use fresh huckleberries when possible, but if you use frozen ones, let them thaw first. Do not overmix the batter; mix until just combined. This keeps air in the batter, which helps with fluffiness. One common mistake is overmixing the batter. This can lead to tough muffins. Another error is not measuring your flour correctly. Too much flour can dry out your muffins. Always spoon flour into your measuring cup, then level it off. Lastly, avoid opening the oven door too soon. This can cause your muffins to sink. To boost the flavor of your huckleberry muffins, try adding a dash of cinnamon. This spice pairs well with the sweetness of huckleberries. You can also add chopped nuts for crunch. Walnuts or pecans work nicely. For a fun twist, mix in a few chocolate chips. They add richness and contrast to the muffins. To get the full details on how to make these muffins, check out the Full Recipe. {{image_4}} You can make huckleberry muffins gluten-free. Swap the all-purpose flour for a gluten-free mix. Look for blends that have xanthan gum. This helps mimic the texture of regular flour. Use 1 ½ cups of the gluten-free mix instead. Your muffins will still be soft and tasty. Adding nuts or chocolate chips makes muffins even better. Chopped walnuts or pecans give a nice crunch. Or, try semi-sweet chocolate chips for a sweet twist. Stir in about ½ cup of either before baking. This adds flavor and texture to each bite. You can mix in other fruits with huckleberries. Try blueberries or raspberries for a fun change. If you want to use apples, chop them small. About 1 cup of any fruit works well. Each fruit adds its own unique taste. You can create a whole new muffin experience! For the full recipe, check out the Huckleberry Heaven Muffins section. After baking, let your huckleberry muffins cool to room temperature. This helps keep them soft. Once cool, store them in an airtight container. They can stay fresh for about three days on your kitchen counter. If you want to keep them longer, consider freezing. To freeze your muffins, wrap each one tightly in plastic wrap. Place the wrapped muffins in a freezer-safe bag. This keeps out air and moisture. They can be frozen for up to three months. When you’re ready to enjoy them, just take out how many you need. For the best taste, reheat frozen muffins in the oven. Preheat your oven to 350°F (175°C). Place the muffins on a baking sheet and cover them with foil. Heat for about 10-15 minutes. This keeps them moist and warm. You can also use the microwave. Heat each muffin for about 20-30 seconds. Enjoy your huckleberry muffins just like they were fresh out of the oven! To make dairy-free muffins, replace the milk with a plant-based option. Almond milk or oat milk works well. You can also swap the egg with a flaxseed egg. Mix one tablespoon of ground flaxseed with three tablespoons of water. Let it sit for five minutes to thicken. This change keeps the muffins moist and tasty. Yes, you can use frozen huckleberries! Just make sure to thaw them first. Pat them dry with a paper towel to remove excess moisture. This way, your muffins won’t get soggy. Frozen huckleberries can still provide that sweet burst of flavor. The best way to check for doneness is to use a toothpick. Insert it into the center of a muffin. If it comes out clean or with a few crumbs, they are ready. You can also look for a golden-brown top. The edges should pull away slightly from the muffin tin. These signs show that your muffins are perfectly baked. This huckleberry muffin recipe is easy and fun to make. Start with fresh or thawed huckleberries. You need 1 cup for the perfect burst of flavor. The dry mix includes 1 ½ cups of all-purpose flour, ½ cup of granulated sugar, 2 teaspoons of baking powder, ½ teaspoon of baking soda, and ½ teaspoon of salt. These create the base for your muffins. For the wet ingredients, gather 1 large beaten egg, ½ cup of milk, ⅓ cup of oil, 1 teaspoon of vanilla extract, and the zest of 1 lemon. These give the muffins moisture and taste. First, preheat your oven to 375°F. Prepare your muffin tin with liners or grease it. In one bowl, mix the dry ingredients. In another bowl, whisk the wet ingredients until smooth. Combine the two, mixing gently to avoid lumps. Then, fold in the huckleberries carefully. Fill the muffin cups about ¾ full and bake for 18-20 minutes. Check with a toothpick to see if they are ready. Let them cool for a bit in the pan, then transfer to a wire rack. These muffins are a tasty treat. Each muffin has about 150 calories. They contain 3 grams of protein, 20 grams of carbs, and 7 grams of fat. Huckleberries add fiber and vitamins. Enjoy them as a snack or breakfast option! We covered all you need to know about huckleberry muffins. We explored the ingredients, substitutions, and the best huckleberries to use. The step-by-step guide helped you prepare and bake your muffins. Tips revealed how to keep them moist and fluffy. You learned about tasty variations and proper storage methods. I hope this inspires you to try making your own huckleberry muffins at home. There's joy in baking, and these muffins are a great start. Enjoy your baking, and share these yummy treats with others!

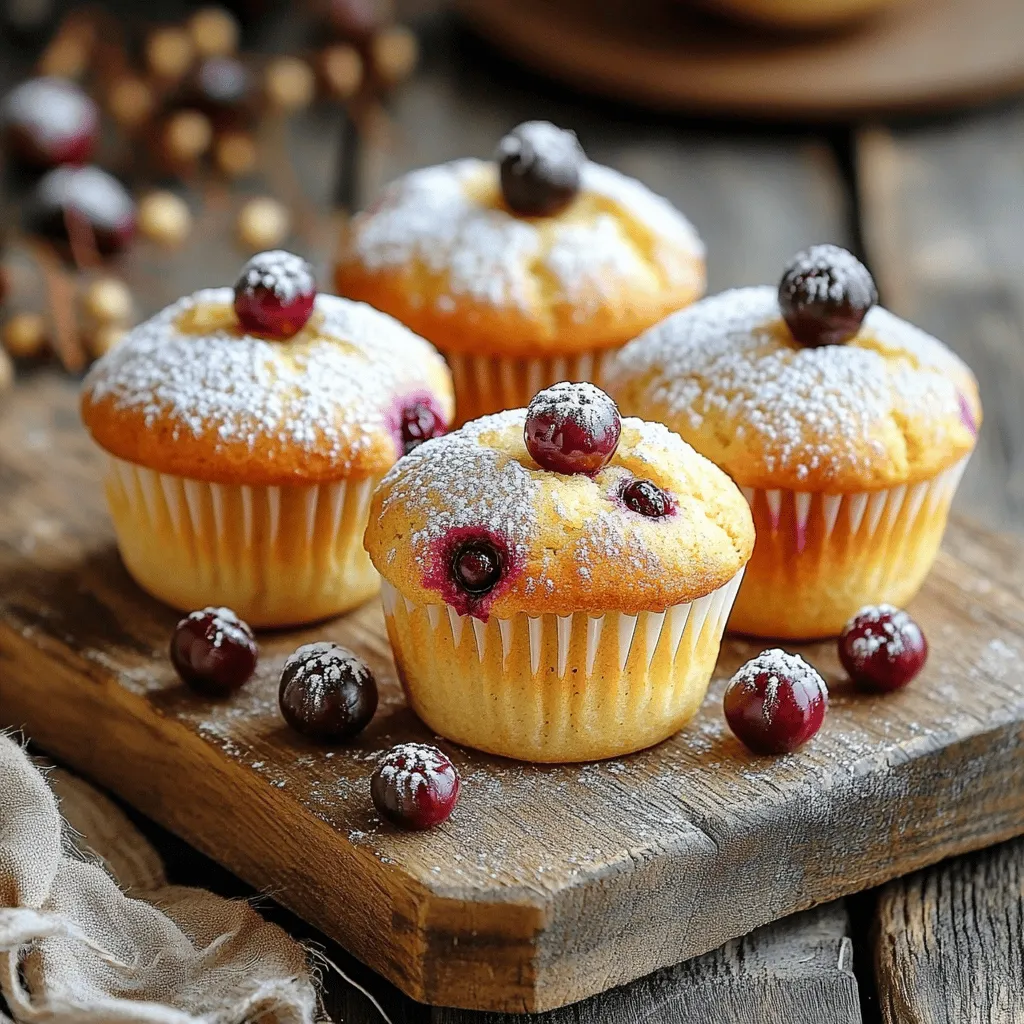
Are you ready to delight your taste buds with a simple, tasty treat? This easy huckleberry muffin recipe is perfect for any skill level. With sweet huckleberries and a soft, …

Read more

Categories Desserts

Creamy Cookie Butter Iced Chai Tea Latte Delight

August 4, 2025 by Chef Tavio
To make a Creamy Cookie Butter Iced Chai Tea Latte, you need a few key ingredients. Here’s what you will need: - 2 cups brewed chai tea, cooled - 1/4 cup creamy cookie butter (like speculoos) - 1 cup milk (dairy or non-dairy) - 1 tablespoon honey or maple syrup - 1/2 teaspoon pure vanilla extract - Ice cubes - Whipped cream (optional) - Pinch of ground cinnamon (for garnish) Each ingredient plays a role in creating that perfect blend of flavors. The chai tea gives a warm spice, while the cookie butter adds a sweet and creamy touch. For cookie butter, I suggest a few trusted brands. These brands offer great taste and texture: - Biscoff (speculoos) - Trader Joe’s Cookie Butter - Nutella Cookie Butter These brands provide a rich flavor that pairs well with the chai. I find that Biscoff has the perfect balance of sweetness and spice. If you prefer different options, here are some substitutes for milk and sweeteners: - Milk: Use almond milk, oat milk, or coconut milk for a dairy-free version. These alternatives maintain creaminess. - Sweeteners: Instead of honey or maple syrup, try agave syrup or stevia. Adjust the amounts based on your taste. These substitutions can help tailor the drink to your dietary needs, while still keeping the flavor profile delicious. You can find the full recipe [Full Recipe]. Start by brewing your chai tea. Use tea bags or loose leaf, whichever you like best. You need two cups. Let the tea cool to room temperature or chill it in the fridge. This makes your drink refreshing. While you wait, gather all your ingredients. You’ll need cookie butter, milk, honey or maple syrup, vanilla extract, ice, and optional whipped cream and cinnamon. Once your tea is cool, it’s time to blend. Add the cooled chai tea, cookie butter, milk, honey or maple syrup, and vanilla extract into a blender. Blend on high speed. You want a smooth and creamy mixture. Taste it and adjust the sweetness if needed. Add more honey or syrup for more sweetness. Grab two tall glasses and fill them halfway with ice. Pour the blended chai mixture over the ice. If you want, leave some space at the top for whipped cream. If you like a bit of extra fun, add a swirl of whipped cream and sprinkle ground cinnamon on top. Serve your creamy cookie butter iced chai tea lattes right away. Enjoy the treat with a straw or spoon! To make your creamy cookie butter iced chai tea latte even better, focus on your spices. Think about adding nutmeg or cardamom. These spices can bring warmth and depth to your drink. You can also experiment with flavored milk, like oat or almond. They add a unique twist. For a fun touch, drizzle caramel sauce on top of your whipped cream. It adds sweetness and looks beautiful. One common mistake is using hot chai tea instead of cooled tea. Warm tea can melt your ice too fast, making it watery. Also, don’t skip blending the cookie butter fully. If it's not smooth, you’ll get clumps instead of a creamy drink. Finally, taste before you serve! Adjust the sweetness to your liking. This step is key for a great drink. When hosting a gathering, serve your iced chai tea lattes in clear glasses. This lets everyone see the layers of color and whipped cream. Set up a toppings bar with extra cookie butter, whipped cream, and spices. Guests can customize their drinks. You can also serve them with cookies that match the cookie butter flavor. This pairing will delight your friends and family. For a fun twist, use festive straws or drink stirrers. They add charm to your serving style. {{image_4}} You can easily change the taste of your creamy cookie butter iced chai tea latte. Just add different spices like nutmeg or cardamom. A pinch of nutmeg gives a warm, cozy feel. Cardamom adds a sweet, floral note that delights the senses. Try adding ginger for a spicy kick. Each spice can bring a new twist to your drink. If you want a dairy-free or vegan option, there are great substitutes. Use almond milk, coconut milk, or oat milk instead of dairy. These options work well in the recipe. For sweeteners, maple syrup is a great choice. It’s plant-based and adds a nice flavor. You can still enjoy this drink without dairy. Seasonal flavors can also make your latte fun. For fall, add pumpkin spice to your drink. Just mix in a little pumpkin puree and pumpkin spice blend. This will give it a festive taste. You can also try peppermint extract for a winter twist. Each season brings a chance to play with flavors, so get creative! To store leftover chai mix, pour it into an airtight container. Make sure to cool it first. Seal the container tightly to keep out air and moisture. Store it in the fridge for up to three days. When you're ready to enjoy it again, simply shake or stir well before serving. You can freeze cookie butter if you have leftovers. Place it in a freezer-safe container. Leave some space at the top since it may expand. It can last up to three months in the freezer. To use it, thaw in the fridge overnight. You can also warm it slightly in the microwave for easier mixing. To keep your chai mix fresh, cover it tightly in the fridge. Avoid leaving it out at room temperature. If you notice any changes in smell or color, it’s best to discard it. Cookie butter should stay in a cool, dry place. Check the label for best-by dates. Use it within a few months for the best taste. Cookie butter is a sweet spread made from ground cookies. It often has a smooth, creamy texture. The most popular type is speculoos, which is made from spiced cookies. It tastes like a mix of ginger and cinnamon, making it rich and delightful. You can use it on toast, in recipes, or straight from the jar! Yes, you can make this drink hot. Just skip the ice and blend the ingredients with hot chai tea. Heat the chai tea before mixing in the cookie butter, milk, and sweetener. Blend until smooth and serve hot in your favorite mug. It’s a cozy twist for chilly days! You can find cookie butter at many grocery stores. Look in the international aisle or the peanut butter section. If you want something special, check online stores. Popular brands like Lotus or Trader Joe's have great options. You can also try homemade versions for a personal touch. This blog post covered everything you need to know about cookie butter and its many uses. We explored the ingredients, detailed step-by-step instructions, and shared helpful tips and tricks. You can enhance flavors and avoid common mistakes for the best results. With the right storage methods, you can keep your cookie butter fresh. Remember, experimenting with variations can lead to delicious discoveries. Enjoying cookie butter is simple and fun!

If you love chai tea and cookie butter, you’re in for a treat! This Creamy Cookie Butter Iced Chai Tea Latte brings together warm spices and sweet, creamy goodness. It’s …

Read more

Categories Desserts

Pumpkin Delight Dessert Creamy and Flavorful Treat

August 4, 2025 by Chef Tavio
- 1 cup pumpkin puree - 1 cup heavy cream - 1/2 cup powdered sugar These three ingredients form the base of the Pumpkin Delight dessert. The pumpkin puree gives a rich flavor and smooth texture. The heavy cream adds a creamy touch that makes every bite melt in your mouth. Powdered sugar sweetens the mixture without making it grainy. - 1 teaspoon vanilla extract - 1 teaspoon ground cinnamon - 1/2 teaspoon ground nutmeg - 1/4 teaspoon ground ginger These spices enhance the dessert's flavor. The vanilla extract adds warmth, while cinnamon, nutmeg, and ginger bring a cozy aroma. Together, they create a perfect fall vibe that makes this dessert special. - 1 cup crushed gingersnap cookies - 1/2 cup chopped pecans (optional) - Fresh mint leaves for garnish Garnishes take the dessert to another level. Crushed gingersnap cookies add a sweet crunch. Chopped pecans give a nutty flavor, while fresh mint leaves make the dish look beautiful. These touches make the Pumpkin Delight not just tasty, but also a feast for the eyes. For the full recipe, check the detailed steps outlined above. To start, take a large mixing bowl. Add 1 cup of pumpkin puree. Next, gently whisk in 1 cup of heavy cream. Then, add 1/2 cup of powdered sugar. Mix until smooth. You want no lumps in your pumpkin mixture. It should feel creamy. Now, enhance the flavor! Stir in 1 teaspoon of vanilla extract. Next, add 1 teaspoon of ground cinnamon, 1/2 teaspoon of ground nutmeg, and 1/4 teaspoon of ground ginger. Mix until all spices blend well. The aroma will fill your kitchen! In a separate bowl, combine 1 cup of crushed gingersnap cookies. If you like nuts, add 1/2 cup of chopped pecans. Mix well. Reserve about two tablespoons of this mixture for later. Now, grab your serving glasses. Start with a layer of the pumpkin mixture. Spoon it in generously. Then, add a layer of the gingersnap mixture. Alternate layers until you reach the top. Aim to finish with the creamy pumpkin layer on top for a lovely look. Now, cover the glasses with plastic wrap. It’s time to chill! Refrigeration is key. This helps the flavors meld together. I recommend chilling for at least 2 hours. This waiting time is crucial for the best taste. Before you serve, sprinkle the reserved gingersnap and pecan mixture on top. This adds a nice crunch. Garnish with fresh mint leaves for a pop of color. Enjoy your Pumpkin Delight Dessert! You can find the complete steps in the Full Recipe. To avoid lumps in the pumpkin mixture, start with a smooth pumpkin puree. Use a whisk to mix the pumpkin puree and heavy cream well. This step is key for a creamy texture. If you notice lumps, keep whisking until it’s smooth. For the right consistency, you want it creamy but not too thick. If it feels too thick, add a bit more heavy cream. Mix until you achieve a light and fluffy texture. Use clear glassware for serving. It shows off the pretty layers of your dessert. A parfait glass or small mason jars work well. The clear sides let everyone see the colorful layers. For garnishing, get creative! Sprinkle crushed gingersnap cookies on top for crunch. You can also add chopped pecans for a nutty flavor. A sprig of fresh mint adds a pop of color and freshness. Store the dessert in the fridge for up to two days. This keeps it fresh and tasty. Cover each glass with plastic wrap to prevent drying. To maintain flavor and texture, do not freeze this dessert. Chilling it helps the flavors meld. Just remember to let it chill for at least two hours before serving. For the best experience, serve it cold. For the full recipe and more tips, check out the Full Recipe. {{image_4}} You can change the cookie base for this dessert. Try using chocolate cookies for a rich taste. You can also use vanilla wafers for a lighter flavor. If you need a gluten-free option, use gluten-free gingersnap cookies. These work well and keep the same great taste. Want to mix it up? Add some chocolate or caramel to the layers. A drizzle of chocolate sauce can bring a new twist to the dessert. You can also try adding different spices like cardamom or allspice. These spices will give your Pumpkin Delight a unique flavor. If you follow a vegan diet, you can replace heavy cream with coconut cream. This keeps it creamy and rich. Use maple syrup instead of powdered sugar for a low-sugar option. These swaps make the dessert healthier without losing taste. For the full recipe, check out the complete guide and get cooking! Keep your Pumpkin Delight Dessert in the fridge. Use a tight lid to cover it. A glass container works best. This keeps the dessert fresh and tasty. Your dessert stays good for up to four days in the fridge. Look for changes in color or smell. If it looks watery or has a sour scent, throw it away. You can freeze this dessert for up to two months. Use an airtight container to avoid freezer burn. Before you serve it, move it to the fridge for a few hours. Let it thaw slowly to keep it creamy and rich. For the best taste, enjoy it fresh, but freezing works well in a pinch. For the full recipe, check the section above. Yes, you can use fresh pumpkin. Fresh pumpkin gives a bright taste. However, it takes more time to prepare. You need to cook and mash it. Canned pumpkin is easy and quick. It is already cooked and pureed. Just open the can, and you are ready to go! Benefits of fresh pumpkin: - It has a fresher taste. - You control the quality. Drawbacks of fresh pumpkin: - It takes more time to prep. - It may not be as smooth as canned. To make this dessert gluten-free, you can swap out some ingredients. Use gluten-free gingersnap cookies instead of regular ones. These cookies add the same sweet and spicy taste. You should check the label to ensure they are gluten-free. Gluten-free options: - Use gluten-free gingersnap cookies. - Ensure all other ingredients are gluten-free. This dessert pairs well with warm drinks. A cup of spiced chai or hot apple cider works great. You can also serve it with whipped cream on top for extra creaminess. Side dish ideas: - Warm apple pie - Cinnamon rolls Drink pairings: - Spiced chai - Hot apple cider In this post, we explored how to make a delicious Pumpkin Delight Dessert. We covered key ingredients like pumpkin puree and spices that make it special. You learned step-by-step instructions for preparing and assembling the dish. I shared tips for perfect texture and serving ideas, alongside variations to fit your needs. Remember, this dessert shines when chilled and can surprise your guests. Enjoy this sweet treat and feel free to make it your own!

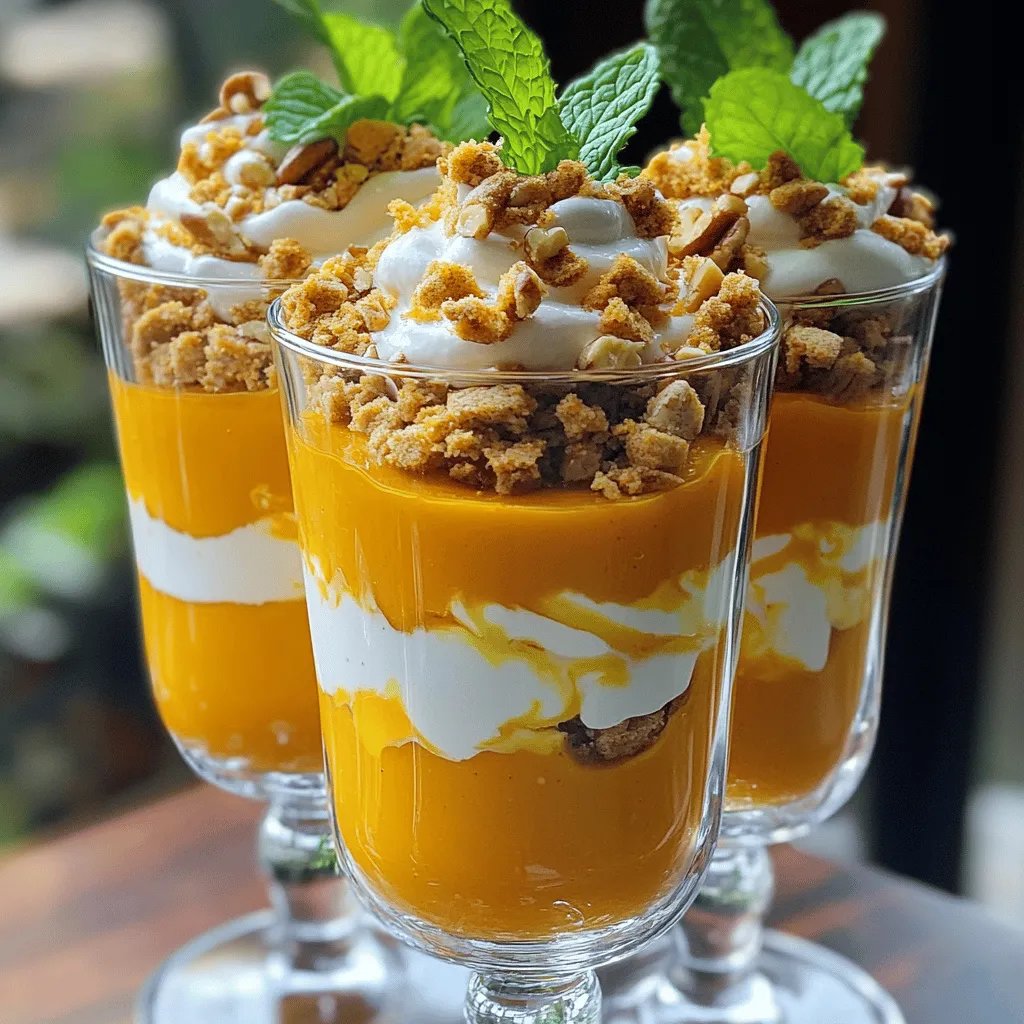
If you love fall flavors, you’ll adore my Pumpkin Delight Dessert! This creamy and flavorful treat combines rich pumpkin puree with spices, sweetened heavy cream, and a hint of vanilla. …

Read more

Categories Desserts

Gingerbread Donuts with Cinnamon Sugar Delight

August 4, 2025 by Chef Tavio
To make the best gingerbread donuts with cinnamon sugar, gather these essential ingredients: - 1 cup all-purpose flour - 1/2 cup brown sugar, packed - 1 tsp baking powder - 1/2 tsp baking soda - 1/2 tsp salt - 1 tsp ground ginger - 1 tsp ground cinnamon - 1/4 tsp ground nutmeg - 1/4 tsp ground cloves - 1/2 cup molasses - 1/4 cup buttermilk (or substitute with milk plus 1 tsp vinegar) - 1 large egg - 1/4 cup unsalted butter, melted For the cinnamon sugar coating, you will also need: - 1/4 cup granulated sugar - 1 tsp ground cinnamon Each ingredient plays a key role. The all-purpose flour gives structure. Brown sugar adds sweetness and moisture. Baking powder and soda help the donuts rise. The spices create that warm, cozy flavor. Molasses adds depth and richness, while buttermilk makes the donuts soft. The egg binds everything together, and melted butter adds a rich taste. The cinnamon sugar mix is simple but crucial. It gives the donuts a sweet, crunchy finish. Make sure to coat them while they're warm. This way, the sugar sticks well. You can find the full recipe in the article. Enjoy the delightful process of creating these delicious treats! 1. First, preheat your oven to 350°F (175°C). Prepare your donut pan by spraying it with non-stick spray. This will help your donuts come out easily. 2. In a large bowl, mix the dry ingredients. Combine 1 cup of all-purpose flour, 1/2 cup of packed brown sugar, 1 tsp of baking powder, 1/2 tsp of baking soda, and 1/2 tsp of salt. Add in 1 tsp of ground ginger, 1 tsp of ground cinnamon, 1/4 tsp of ground nutmeg, and 1/4 tsp of ground cloves. Whisk until smooth. 3. In another bowl, mix the wet ingredients. Combine 1/2 cup of molasses, 1/4 cup of buttermilk, 1 large egg, and 1/4 cup of melted unsalted butter. Whisk until everything blends together well. 1. Now, pour the wet mixture into the dry ingredients. Stir gently using a spatula or a wooden spoon. Do not over-mix; a few lumps are fine. 2. To fill the donut cavities, use a piping bag or a zip-top bag with a corner cut. Fill each cavity about 2/3 full. This ensures even baking. 1. Place the filled donut pan in your preheated oven. Bake for 10 to 12 minutes. To check if they are done, insert a toothpick into a donut. It should come out clean. 2. After baking, let the donuts cool in the pan for about 5 minutes. Then, transfer them to a wire rack to cool completely. For the full recipe, be sure to check out the details above! To create the best gingerbread donuts, you must avoid over-mixing the batter. Mixing too much makes the donuts tough. Gently stir until just combined. It’s okay if some lumps remain. Even baking is also key. Fill each donut cavity about two-thirds full. This helps them rise evenly. If you want a perfect shape, try to be consistent with the batter amount in each cavity. Applying the cinnamon sugar is a fun step. After brushing the warm donuts with melted butter, dip them in a bowl of cinnamon sugar. Make sure to coat them well. This gives them a sweet and spicy kick. You can enhance the flavor by adding toppings. Try chopped nuts or drizzled chocolate for extra yum. You can also sprinkle some extra cinnamon sugar on top for a striking look. These gingerbread donuts pair well with coffee or tea. The warmth of the drink complements the spices in the donuts. For presentation, use a nice plate to display your donuts. Arrange them in a circle and sprinkle some cinnamon sugar around the plate. This adds a festive touch that makes them great for sharing. For more delicious ideas, check out the Full Recipe for Gingerbread Donuts with Cinnamon Sugar. {{image_4}} You can spice up your gingerbread donuts by trying different flavors. Cardamom and allspice add warmth and depth. Just swap them for some of the ginger or cinnamon in the recipe. You could also add chocolate chips or nuts. Chocolate brings a rich flavor that pairs well with spice. Nuts add crunch and texture. These small changes can make your donuts unique. If you want to add a glaze, I have a simple cinnamon glaze recipe. Mix powdered sugar with milk and a teaspoon of cinnamon. Adjust the milk for your desired thickness. You can also try caramel or chocolate glazes. They add a sweet touch and enhance the flavors of the donuts. Drizzle the glaze over warm donuts for a lovely finish. For those needing gluten-free options, substitute all-purpose flour with a gluten-free blend. Make sure it works well for baking. If you want a vegan version, use flaxseed meal instead of egg and almond milk instead of buttermilk. These swaps keep the texture and flavor intact while meeting dietary needs. To keep your gingerbread donuts fresh, use an airtight container. Glass or plastic containers work well. Place a paper towel at the bottom to absorb any moisture. Store them at room temperature for up to three days. If you want them to last longer, place them in the fridge. They will stay fresh for about a week in the fridge. To enjoy these donuts warm, use an oven or a microwave. For the oven, preheat it to 350°F (175°C). Place the donuts on a baking sheet and heat for about 5-7 minutes. This will help keep them soft. If you use a microwave, heat them for about 10-15 seconds. Be careful not to overheat them, as this can make them tough. Always check the texture after reheating to ensure they remain delightful. How long do gingerbread donuts last? Gingerbread donuts stay fresh for about three days at room temperature. Store them in an airtight container. This keeps them soft and flavorful. Can I freeze gingerbread donuts? Yes, you can freeze gingerbread donuts. Wrap each donut tightly in plastic wrap and place them in a freezer-safe bag. They can last for up to three months. When ready to eat, thaw them at room temperature or warm them in the oven. What can I substitute for buttermilk? You can use regular milk mixed with vinegar as a buttermilk substitute. Just add one teaspoon of vinegar to a quarter cup of milk. Let it sit for about five minutes to thicken. Best recipes for holiday baking Try classic gingerbread cookies or spiced apple cider muffins. Both are great for festive gatherings. They bring warmth and joy during the holidays. Easy homemade donuts variations Experiment with different flavors like chocolate or pumpkin. You can also try adding nuts or fruit. Each twist makes for a fun twist on the classic donut. Local bakeries to check for freshly made donuts Visit your nearby bakery for fresh gingerbread donuts. Many local spots offer unique flavors and homemade goodies. This gives you a chance to support local businesses. Online stores for pre-made options You can find gingerbread donuts from several online stores. Check dessert delivery services or specialty food websites. They often have seasonal treats available for shipping. Gingerbread donuts are a fun treat to make. We covered the ingredients, steps, and tips for perfecting them. You can also explore variations and storage methods for your creations. These donuts are easy to adapt for different tastes and diets. Remember to enjoy them fresh with your favorite drink. Get creative with toppings and flavors. With practice, you'll master these delightful treats. Now, it’s time to gather your ingredients and start baking!

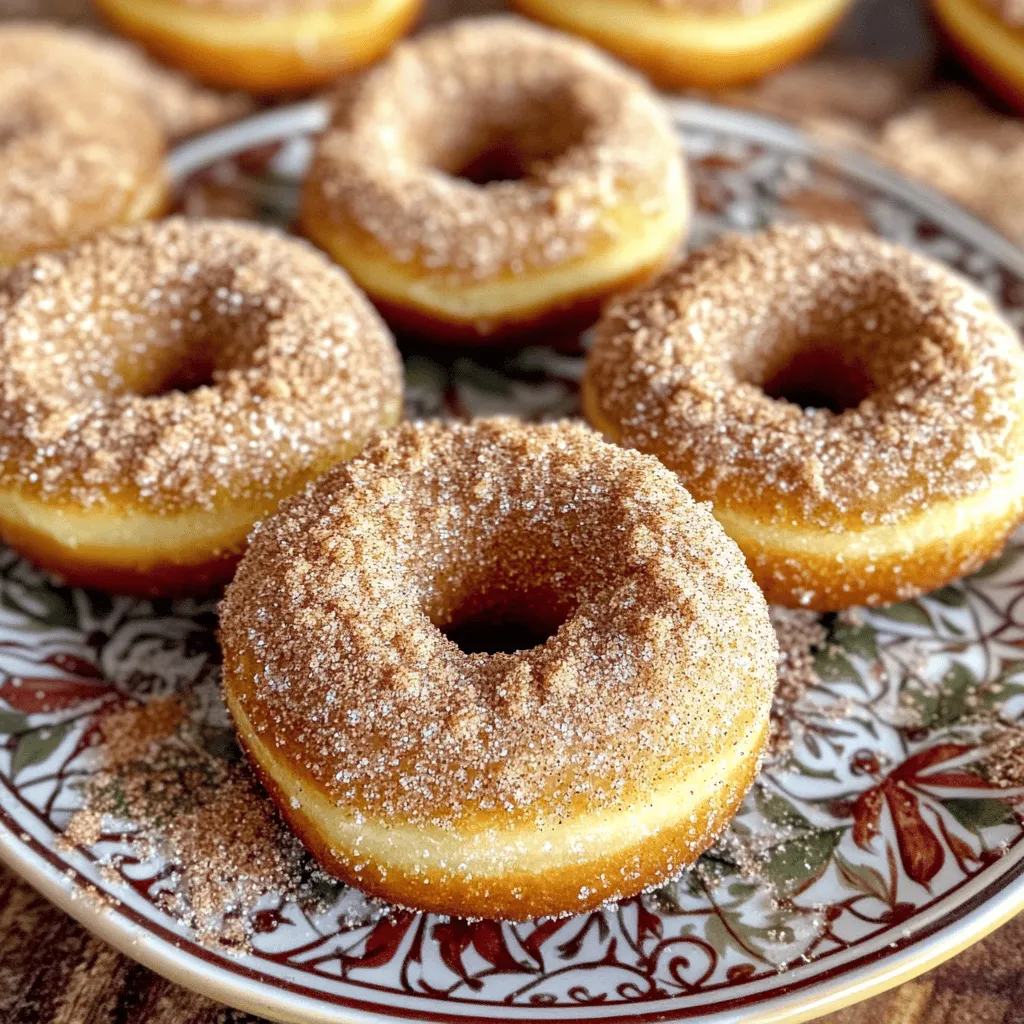
Get ready to spice up your dessert game with my Gingerbread Donuts with Cinnamon Sugar Delight! These soft, moist donuts combine the warmth of ginger, cinnamon, and nutmeg with a …

Read more

Categories Desserts
Older posts
Newer posts
← Previous Page1 … Page23 Page24 Page25 … Page92 Next →

TASTED NEST

Where Flavor Finds a Home 🍳🏡 — warm, simple, and crave-worthy recipes made for real life, from stovetop mornings to backyard dinners.

PAGES

Home About Contact Privacy Policy Terms & Conditions Cookie Policy GDPR Policy Copyright Policy Disclaimer

CATEGORIES

Appetizers Desserts Salads Breakfast Dinner

Contact

  • Pinterest
  • Mail
Copyright © 2025 Tasted Nest. All rights reserved.