Skip to content
Tasted Nest
  • Home
  • Appetizers
  • Desserts
  • Salads
  • Breakfast
  • Dinner
  • Privacy Policy
  • Contact
  • About

Chef Tavio

Pumpkin Muffins with Maple Cream Cheese Filling Delight

August 4, 2025 by Chef Tavio
- 1 ¾ cups all-purpose flour - 1 teaspoon baking soda - ½ teaspoon baking powder - ½ teaspoon salt - 1 teaspoon ground cinnamon - 1 teaspoon ground nutmeg - ½ teaspoon ground ginger - 1 cup pumpkin puree (canned or freshly made) - ½ cup granulated sugar - ½ cup brown sugar, packed tightly - ½ cup vegetable oil - 2 large eggs - 1 teaspoon vanilla extract - 8 oz cream cheese, softened to room temperature - ¼ cup pure maple syrup - 1 teaspoon vanilla extract (for the cream cheese filling) You can swap all-purpose flour for whole wheat flour. This change adds fiber and nutrients. If you're avoiding sugar, try using honey or maple syrup. You can replace granulated sugar with coconut sugar for a healthier touch. For a dairy-free option, use vegan cream cheese. Fresh ingredients matter. They make a big difference in taste and texture. When you use fresh pumpkin, the flavor shines. Seasonal produce offers the best taste. You enjoy the rich flavors of fall in every bite. Always choose ripe and high-quality ingredients for the best results. 1. Preheat the oven and prepare the muffin tin: First, set your oven to 350°F (175°C). While it heats, get your muffin tin ready. You can line it with paper liners or spray it lightly with cooking spray. This helps prevent sticking. 2. Mixing dry and wet ingredients correctly: In one bowl, grab your medium mixing bowl. Whisk together 1 ¾ cups of all-purpose flour, 1 teaspoon of baking soda, ½ teaspoon of baking powder, ½ teaspoon of salt, 1 teaspoon of ground cinnamon, 1 teaspoon of ground nutmeg, and ½ teaspoon of ground ginger. Make sure everything is well combined. In a larger bowl, mix 1 cup of pumpkin puree, ½ cup of granulated sugar, ½ cup of brown sugar, ½ cup of vegetable oil, 2 large eggs, and 1 teaspoon of vanilla extract. Whisk until smooth. Combine the dry ingredients with the wet ingredients gently. Stir just until mixed; don’t overdo it! 1. Combining ingredients for a smooth filling: In another bowl, take 8 oz of softened cream cheese and mix it with ¼ cup of pure maple syrup and 1 teaspoon of vanilla extract. Beat the mixture until it’s creamy and smooth. This will be your delicious filling. 2. Tips for achieving the right consistency: To get the best filling, ensure your cream cheese is at room temperature. This helps it mix well. If it’s too stiff, it won’t blend easily. If needed, you can microwave it for about 10 seconds to soften it, but watch closely to avoid melting. 1. Filling the muffin tins: Start by adding a spoonful of pumpkin batter into each muffin cup, filling them about one-third full. Next, drop about one teaspoon of your cream cheese filling in the center. Finally, add more pumpkin batter until each cup is two-thirds full. 2. Baking time and checking for doneness: Place your muffin tin in the preheated oven. Bake for 18-20 minutes. To check if they’re done, insert a toothpick into the pumpkin part of a muffin. It should come out clean or have just a bit of cream cheese on it. Once baked, let the muffins cool for about 5 minutes in the pan. Then, transfer them to a wire rack to cool completely. These steps will help you make delicious pumpkin muffins with a delightful maple cream cheese filling. For the full recipe, you can refer to the earlier sections. Enjoy your baking! To get tender muffins, avoid overmixing. When you mix the batter, stir gently. You want to see some lumps. This keeps the muffins soft and light. Check if your muffins are done by using a toothpick. Insert it into the center of a muffin. If it comes out clean or has a few bits of cream cheese, they are ready. To boost flavor, try adding extra spices. Consider using allspice or cloves for a warm kick. A pinch of cardamom can also add depth. For the cream cheese filling, mix in a touch more maple syrup. This enhances the sweetness. You can also add a bit of lemon juice for a tangy twist. For a beautiful presentation, dust the tops with powdered sugar. Place the muffins on a rustic platter. Add a few small pumpkins or autumn leaves for a festive look. Another idea is to serve them in cute paper liners. This adds charm and makes for easy cleanup. Enjoy your muffins with style! For the full recipe, check out the complete instructions above. {{image_4}} You can change up the flavors of your pumpkin muffins in fun ways. Adding chocolate chips gives a sweet burst in every bite. You can also mix in chopped nuts for a crunchy texture. Pecans or walnuts work well here. For a deeper fall taste, consider adding more spices like cloves or allspice. These spices blend perfectly with pumpkin's natural sweetness. If you want a vegan version, swap the eggs with flaxseed meal and water. Use a plant-based cream cheese for the filling. For a gluten-free option, replace all-purpose flour with a gluten-free blend. You can also cut down on sugar by using applesauce or mashed bananas. These options keep the muffins moist while reducing added sugars. Change the fillings to match the season or holiday. For a festive touch, try a cranberry filling for Thanksgiving. During Christmas, peppermint cream cheese can add a fun twist. You can also play with frostings. Top with vanilla icing for a sweeter bite or a simple glaze for a light finish. Each twist offers a fresh way to enjoy your pumpkin muffins. To keep your pumpkin muffins fresh, store them in an airtight container. This helps maintain their moisture and flavor. Use a plastic or glass container with a tight lid for the best results. You can also wrap each muffin in plastic wrap. This adds an extra layer of protection from air. Avoid storing them in the fridge as this can make them dry out. Freezing your muffins is a great way to enjoy them later. To freeze, let the muffins cool completely. Place them in a freezer-safe bag or container. Make sure to remove any extra air to prevent freezer burn. These muffins can last up to three months in the freezer. When you're ready to eat, thaw them overnight in the fridge. For a warm treat, reheat them in the microwave for about 20 seconds. When stored properly, pumpkin muffins can last about four days at room temperature. Look for signs of spoilage, like mold or a sour smell. If the muffins feel dry or crumbly, it’s time to toss them. Always trust your senses; if they don’t smell or taste good, don’t eat them. Can I make pumpkin muffins without cream cheese? Yes, you can. Just skip the cream cheese filling. You can add more spices or nuts for flavor. Try adding chopped walnuts or chocolate chips for a tasty twist. How can I make these muffins more moist? You can add applesauce or yogurt to the batter. Both keep muffins soft and moist. Make sure not to overbake them, as this can dry them out. What to do if the muffins are too dense? If your muffins are too dense, check your baking powder and soda. Make sure they are fresh. Also, mix the batter gently. Overmixing can lead to a heavy texture. Can I use fresh pumpkin instead of canned? Absolutely! Fresh pumpkin is great. Just roast or steam it until soft, then puree. Make sure to measure it the same as canned pumpkin. What's the best way to serve these muffins? Serve them warm or at room temperature. You can also drizzle extra maple syrup on top for added sweetness. Pair with coffee or tea for a cozy treat. Are pumpkin muffins healthy? Pumpkin muffins can be a healthy choice. They are rich in fiber and vitamins from the pumpkin. Just watch the sugar and oil amounts to keep them lighter. This blog post covered how to make delicious pumpkin muffins. We explored key ingredients like flour, spices, and cream cheese filling. You learned about fresh ingredients' impact on flavor and how to substitute for dietary needs. We walked through step-by-step instructions for preparation and baking. You also found tips for texture and flavor, and variations to try. Lastly, we discussed storage tips and common FAQs. Enjoy baking these muffins, and don't hesitate to experiment with flavors!

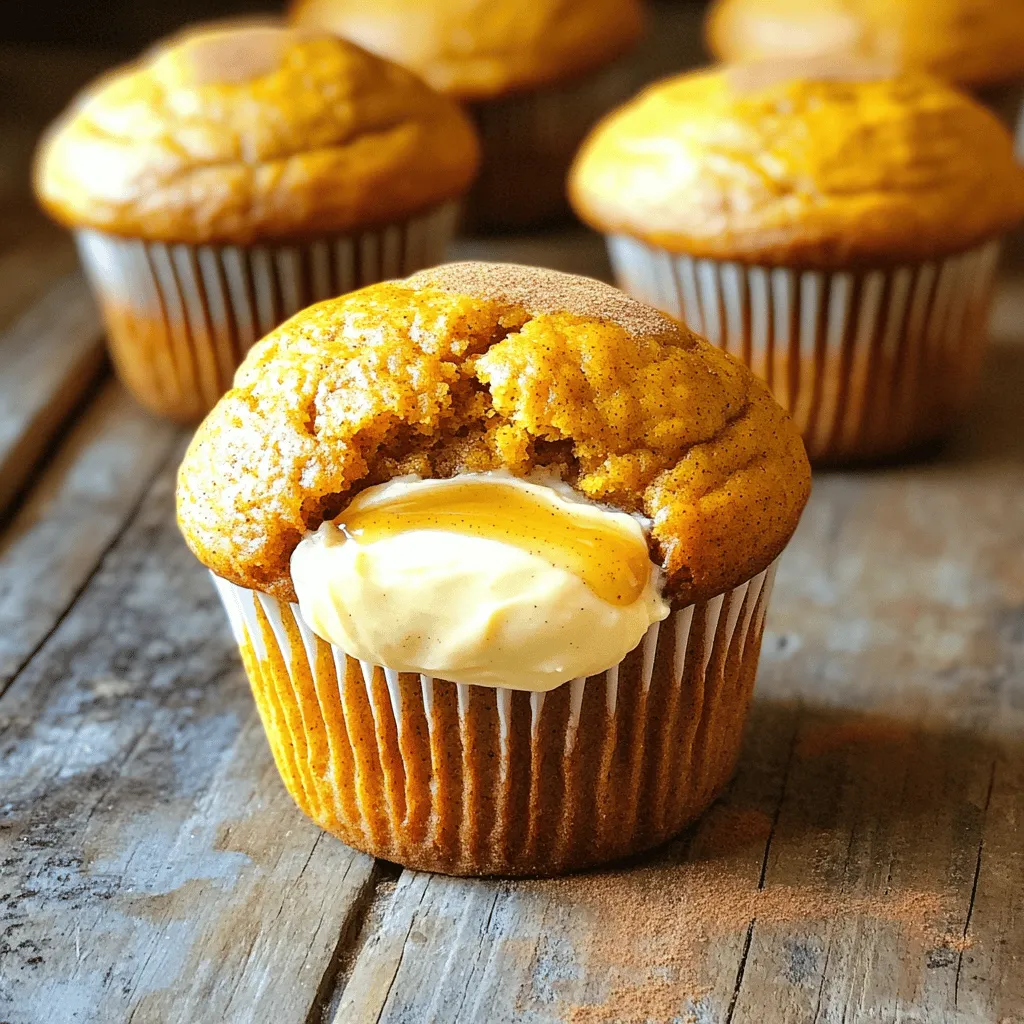
Get ready to fall in love with baking! These Pumpkin Muffins with Maple Cream Cheese Filling are the perfect blend of spice and sweetness. Imagine moist muffins with a creamy …

Read more

Categories Desserts

Apple Crisp Macchiato Delightful Fall Beverage Recipe

August 3, 2025 by Chef Tavio
To make this warm drink, gather these ingredients: - 1 cup strong brewed coffee or espresso - 1/2 cup milk (use dairy or your favorite non-dairy alternative) - 1/4 cup apple cider - 1 tablespoon pure maple syrup - 1/2 teaspoon ground cinnamon - 1/4 teaspoon ground nutmeg - 1/4 cup granola (preferably flavored with apple or cinnamon) - Fresh apple slices, for garnish - Whipped cream (optional but recommended) If you need to make changes, here are some easy swaps: - Milk: Use almond, oat, or soy milk for a non-dairy option. - Maple Syrup: Honey or agave syrup can replace maple syrup. - Granola: Any crunchy topping works, like crushed nuts or cereal. - Cinnamon and Nutmeg: You can skip these spices if you want a milder flavor. This drink offers a cozy treat without too many calories. Here's a rough breakdown: - Calories: About 250 - Protein: 7g - Fat: 7g - Carbohydrates: 40g - Fiber: 2g - Sugar: 25g This information helps you enjoy your Apple Crisp Macchiato while keeping an eye on your diet. For the full recipe, check out the instructions later. Start by brewing your coffee or espresso. Use a strong brew for the best taste. I like to use a dark roast to give it depth. Once brewed, set it aside to cool down a bit. This will help keep the milk from curdling later. Next, grab a small saucepan and add the apple cider, maple syrup, ground cinnamon, and ground nutmeg. Place the pan over medium heat. Stir the mix often to stop it from sticking. After a few minutes, the mixture will start to simmer and smell amazing. Remove it from heat and stir in the milk. This creates a smooth, creamy base for your drink. Now, it’s time to put everything together. First, pour the brewed coffee or espresso into your favorite mug. The rich flavor should fill the bottom. Next, carefully pour the frothed milk mixture over the coffee. Let it layer nicely on top. Then, spoon the warm apple cider mix over the frothy milk. This adds a fun flavor burst. Finally, sprinkle some granola on top for that crunchy apple crisp touch. You can also garnish with fresh apple slices and whipped cream if you like. Enjoy your Apple Crisp Macchiato! Frothing milk adds creaminess to your drink. To froth without a frother, you can use a few simple methods. First, heat your milk in a saucepan. Make sure it is warm but not boiling. Then, pour the warm milk into a jar with a lid. Shake it up for 30 seconds. This will create a nice foam. You can also use a whisk. Vigorously whisk the warm milk until it is frothy. Both methods work well for your Apple Crisp Macchiato. To get the best taste, balance the sweet and spicy flavors. The maple syrup adds sweetness. The cinnamon and nutmeg give warmth and spice. Adjust the maple syrup to your taste. If you like it sweeter, add more. If you prefer less sweet, use less syrup. Also, make sure to use a strong coffee or espresso. It adds depth and richness to your drink. The apple cider brings a refreshing twist. This combination creates a cozy, fall-inspired flavor. How you serve your Apple Crisp Macchiato matters. Use a clear glass to show off the layers. Start with the dark coffee at the bottom. Then, pour in the frothed milk carefully. This creates a beautiful contrast. Top it with the warm apple cider mixture. Finally, sprinkle granola on top. Add apple slices for a pop of color. If you like, add whipped cream for extra indulgence. This not only tastes great but also looks amazing. Your friends will love it! For the full recipe, check the details above. {{image_4}} You can make an iced version of this drink. Start by brewing your coffee or espresso, then let it cool. Instead of hot milk, use cold milk or a non-dairy alternative. Pour the chilled coffee over ice. Add the apple cider mixture and stir well. This drink is refreshing for warm days. You can customize your Apple Crisp Macchiato by adding flavors. Caramel syrup gives a sweet touch that pairs well with apple. A splash of vanilla extract adds warmth and depth. You could also try adding a pinch of ginger for a spicy kick. Mix and match to find your favorite! Sweetness is key in this drink. If you prefer a sweeter taste, add more maple syrup. For less sweetness, skip the syrup or reduce it. You can also use unsweetened apple cider for a lighter flavor. Taste as you go to find your perfect balance. For the full recipe, check out the complete details above. To keep your ingredients fresh, store them separately. Place leftover apple cider in an airtight container in the fridge. It should last about five days. If you have extra milk, seal it tightly too. Milk can stay good for about a week, depending on freshness. Granola should go in a cool, dry place. It can last for several weeks if sealed well. You can prepare some parts ahead of time. Brew your coffee or espresso in advance and store it in the fridge. This makes morning prep quicker. You can also make the apple cider mixture ahead. Just heat it up when you're ready to serve. This method keeps flavors fresh and allows you to enjoy your drink faster. Once made, enjoy your Apple Crisp Macchiato right away for the best taste. If you must store it, keep it in the fridge and drink it within 24 hours. The layers may mix, but it will still taste good. Reheat gently on the stove or microwave. Avoid boiling it, as this can change the texture. For more details on how to make this drink, check the full recipe. Yes, you can use decaf coffee. This drink still tastes great with decaf. The apple and spices shine through, giving you that cozy fall flavor. Just brew your favorite decaf coffee or espresso as you would normally. Yes, the Apple Crisp Macchiato is gluten-free. None of the ingredients contain gluten. Just ensure your granola is gluten-free if you choose to add it. Most brands offer gluten-free options. You can find the Apple Crisp Macchiato in many popular cafes. Big coffee chains often serve seasonal drinks like this. Check your local menu or ask the barista. They might have their own version of this cozy drink. If you want to recreate it at home, you can follow the [Full Recipe]. In this blog post, we explored the Apple Crisp Macchiato from ingredients to variations. You learned how to brew coffee, prepare flavors, and arrange the drink nicely. I shared tips for perfecting taste and presentation. You can even try different flavors or make it iced. Remember to store leftovers properly to keep things fresh. Enjoy making this drink at home. You'll impress your friends and family with your skills!

Looking for the perfect fall drink? The Apple Crisp Macchiato is a warm hug in a mug! This delightful beverage combines the cozy flavors of apples, spices, and creamy coffee. …

Read more

Categories Breakfast

Pumpkin Cheesecake Cookies Irresistible Fall Treat

August 3, 2025 by Chef Tavio
- 1 cup all-purpose flour - 1/2 teaspoon baking powder - 1/4 teaspoon baking soda - 1/4 teaspoon ground cinnamon - 1/4 teaspoon ground nutmeg - 1/4 teaspoon salt - 1/2 cup unsalted butter, softened - 3/4 cup brown sugar, firmly packed - 1/4 cup granulated sugar - 1 large egg - 1 teaspoon pure vanilla extract - 1/2 cup canned pumpkin puree - 1/2 cup cream cheese, softened - 1/4 cup powdered sugar - 1 teaspoon pumpkin spice (optional) Each ingredient plays a key role in making these cookies tasty. All-purpose flour gives the right structure. You can swap it with a gluten-free blend if needed. Baking powder and baking soda help the cookies rise. Ground cinnamon and nutmeg add warm fall flavors. Unsalted butter keeps the cookies rich. You could use coconut oil or vegan butter for a dairy-free option. Brown and granulated sugar sweeten the mix and add moisture. The egg binds ingredients. For a vegan choice, use a flax egg instead. Pure vanilla adds depth, while pumpkin puree brings moisture and flavor. Cream cheese adds a creamy filling. You can use a vegan cream cheese for a dairy-free treat. The powdered sugar sweetens the filling, and pumpkin spice adds extra warmth. Start with softened butter and cream cheese. This helps them blend well. Let them sit at room temperature for about 30 minutes before using. Measure all ingredients accurately for best results. Use a kitchen scale for precision. When mixing dry ingredients, whisk them together to avoid clumps. This ensures even distribution of flavors. For the pumpkin puree, make sure it’s pure pumpkin. Avoid pie filling, as it contains added sugars and spices. When combining wet and dry ingredients, mix until just blended. Overmixing can result in tough cookies. Following these tips will help you create perfect pumpkin cheesecake cookies every time. For the full recipe, refer back to the beginning of this article. Start by preheating your oven to 350°F (175°C). This step is vital for even baking. While the oven warms, line a baking sheet with parchment paper. This keeps the cookies from sticking and helps with easy cleanup. In a medium bowl, gather your dry ingredients. Combine 1 cup of all-purpose flour, 1/2 teaspoon of baking powder, and 1/4 teaspoon each of baking soda, ground cinnamon, ground nutmeg, and salt. Whisk them together until they are mixed well. This blend adds flavor and structure to your cookies. In a large bowl, cream together 1/2 cup of softened unsalted butter, 3/4 cup of packed brown sugar, and 1/4 cup of granulated sugar. Use a hand mixer or a stand mixer for this step. Mix until the mixture becomes light and fluffy, which should take 2-3 minutes. This process adds air and makes the cookies soft. Next, add 1 large egg and 1 teaspoon of pure vanilla extract to the creamed mixture. Mix until everything is fully combined and smooth. This step enhances the flavor and richness of your cookies. Now, gently fold the dry ingredients into the pumpkin mixture. Do this in two batches, stirring gently after each addition. You want to mix until just combined. Be careful not to overmix, as this can make your cookies tough. In a separate small bowl, mix together 1/2 cup of softened cream cheese with 1/4 cup of powdered sugar. If you like, add 1 teaspoon of pumpkin spice for extra flavor. Stir until it’s smooth and free of lumps. This filling adds a delicious surprise to each cookie. Using a cookie scoop or a tablespoon, drop rounded spoonfuls of cookie dough onto the prepared baking sheet. Leave space between each for spreading. Create an indentation in the center of each dough mound using your thumb. Fill each indent with a small dollop of the cream cheese mixture. This step ensures a creamy center. Place the baking sheet in your preheated oven. Bake for 12-15 minutes, or until the edges are lightly golden and the centers are set. Once done, let the cookies cool on the baking sheet for 5 minutes. After that, transfer them to a wire rack to cool completely. This cooling time helps the cookies firm up and improves the texture. To get soft and chewy cookies, do not overmix the dough. Mix until just combined. Chilling the dough for 30 minutes helps too. It makes the cookies thicker and prevents spreading. Also, use room temperature butter and cream cheese. This helps create a smooth batter. One common mistake is using pumpkin pie filling instead of pure pumpkin. This changes the flavor and texture. Another mistake is not measuring flour correctly. Too much flour makes the cookies dry. Always spoon flour into the measuring cup and level it off. Lastly, don’t skip cooling the cookies. Letting them cool on a wire rack gives them the right texture. To boost the flavor, add a teaspoon of pumpkin spice to the dough. You can also mix in a bit of clove or ginger for extra warmth. If you love cinnamon, sprinkle some on top before baking. These spices make the cookies taste like fall. For a unique twist, consider adding a dash of nutmeg to the cream cheese filling. This enhances the overall taste and makes them even more delicious. For the full recipe, check out the Pumpkin Cheesecake Cookies section above! {{image_4}} You can make these cookies even better by adding chocolate chips or nuts. Chocolate chips give a sweet touch. Try semi-sweet or dark chips for a rich flavor. If you prefer nuts, walnuts or pecans work great. Just fold in a half cup of either option into the dough before baking. This makes each bite even more exciting! For a gluten-free version, swap all-purpose flour with a gluten-free blend. Many blends work well. Just make sure it includes xantham gum. This will help keep your cookies soft and chewy. You can also check the labels on your baking powder and baking soda to ensure they are gluten-free. If you want to change up the cream cheese filling, you have options! You can mix in flavored extracts like maple or almond for a twist. Another idea is to add a bit of lemon zest for a fresh taste. This will give the filling a nice brightness and pairs well with pumpkin. You can also use Greek yogurt instead of cream cheese for a lighter option. Try these variations to make your Pumpkin Cheesecake Cookies unique and tasty! For the full recipe, check the recipe section above. To keep your pumpkin cheesecake cookies fresh, store them in an airtight container. This helps prevent them from drying out. You can keep them at room temperature for up to three days. If you want to enjoy them longer, refrigerate them. Just remember to let them cool completely before sealing them up. You can freeze these cookies for future enjoyment. First, let the cookies cool down completely. Then, place them in a single layer on a baking sheet. Freeze them for about an hour until firm. After that, transfer them to a freezer-safe bag or container. They can stay frozen for up to three months. When you're ready to eat them, you can thaw them in the fridge overnight. To reheat your cookies, preheat the oven to 300°F (150°C). Place the cookies on a baking sheet and warm them for about 10 minutes. This helps restore their soft texture. You can also use the microwave. Just heat them for about 10-15 seconds. Enjoy your warm pumpkin cheesecake cookies right away! For the full recipe, check out the [Full Recipe]. You can tell if the cookies are done by looking at their edges. They should be lightly golden brown. The centers will look set but might still seem soft. You can also gently press the top with your finger. If it springs back, they are ready. Remove them from the oven and let them cool. Yes, you can use fresh pumpkin! Just make sure to cook and puree it first. You want it smooth and not too watery. Fresh pumpkin gives a nice taste, but canned is easier. It saves time and is still delicious. To make these cookies vegan, replace the egg with a flax egg. Mix 1 tablespoon of ground flaxseed with 2.5 tablespoons of water. Let it sit for a few minutes to thicken. Use vegan butter instead of regular butter, and choose dairy-free cream cheese for the filling. These cookies stay fresh for about a week at room temperature. Store them in an airtight container to keep them soft. If you want them to last longer, you can freeze them. Just make sure they cool completely first. You can serve these cookies with a warm cup of tea or coffee. They also taste great with a scoop of vanilla ice cream. For a festive touch, pair them with whipped cream or a drizzle of caramel sauce. Enjoy these treats with friends and family! For the full recipe, check out the earlier sections. This blog post covered everything you need to make perfect Pumpkin Cheesecake Cookies. We looked at the ingredients, preparation steps, and tips to avoid common mistakes. You also learned about variations and how to store your cookies for later. In the end, with these easy steps, you can bake delicious cookies that impress anyone. So, gather your ingredients and start baking today!

Fall is here, and it’s time to indulge in cozy treats! If you love pumpkin and cheesecake, you’re in for a delight. I’m excited to share my Pumpkin Cheesecake Cookies …

Read more

Categories Desserts

Mini Caramel Apple Bites Irresistible Sweet Treat

August 3, 2025 by Chef Tavio
- 2 medium-sized apples (Granny Smith or Honeycrisp recommended) - 1 cup caramel sauce (store-bought or homemade) - 1/2 cup crushed nuts (such as walnuts, pecans, or peanuts) - 1/4 cup mini chocolate chips (optional) - 1/4 teaspoon sea salt - 1 tablespoon coconut oil (optional) To make the best mini caramel apple bites, start with fresh apples. Granny Smith apples give a nice tartness, while Honeycrisp adds a sweet crunch. Both work well. You will also need caramel sauce. You can buy it or make your own if you prefer. Crushed nuts add a lovely crunch. Walnuts, pecans, or peanuts are great choices. For a sweet touch, mini chocolate chips can be added. A sprinkle of sea salt on top brings out all the flavors. Coconut oil is optional but helps the caramel drizzle smoothly. It makes the bites look pretty, too! - Small saucepan or microwave-safe bowl - Parchment paper - Baking sheet - Sharp knife or apple corer Gather your tools before you start. A small saucepan or a microwave-safe bowl works for melting caramel. Parchment paper keeps things neat. You’ll need a baking sheet to set your apple bites on. A sharp knife or an apple corer makes cutting easy and safe. With these ingredients and tools in hand, you are ready to create these sweet treats! For the full recipe, check out the details above. Start by washing the apples in cool water. Make sure to dry them with a clean towel. Next, cut each apple into quarters. Remove the core carefully. Then slice each quarter into 1-inch cubes. This size makes it easy for everyone to enjoy. You can melt the caramel in a small saucepan or the microwave. If you use a saucepan, mix the caramel sauce with coconut oil, if desired. Heat it over low heat. Stir constantly until it is smooth. Be careful not to burn it! If you choose the microwave, heat in 30-second bursts. Stir in between bursts until melted. Now, take each apple cube and dip it into the warm caramel. Make sure to cover each piece well. Allow any extra caramel to drip off back into the saucepan. This keeps the bites neat. Next, roll or sprinkle the caramel-coated apple bites with crushed nuts and mini chocolate chips, if you like. Place the coated bites on a parchment-lined baking sheet. This step prevents sticking. Chill the baking sheet in the refrigerator for about 15-20 minutes. This helps the caramel set properly. Once they are set, take them out and sprinkle a little sea salt on top. This adds a great flavor contrast. Serve the mini caramel apple bites on a platter or in cute cups. They look fun and are easy to grab! For the full recipe, you can check the details provided earlier. For the best mini caramel apple bites, choose crisp apples. I recommend Granny Smith or Honeycrisp apples. Granny Smith adds a nice tartness, while Honeycrisp offers sweet, juicy bites. Both types hold up well when dipped in caramel, making them perfect for this treat. Making homemade caramel sauce can be fun and easy. Start with granulated sugar in a heavy pot. Heat it slowly on low. Stir gently until it melts into a smooth golden liquid. Add butter and cream off the heat for a rich taste. Watch out for these common mistakes: - Burning the sugar: Always stir and heat slowly. - Too thick or too thin: Adjust with more cream for a thinner sauce. Using store-bought caramel is a quick option too. Just warm it up before dipping the apples. To wow your guests, think about how you serve these bites. Use colorful cupcake liners for individual portions. Arrange the bites on a festive platter. For a final touch, add a sprig of mint or edible flowers. These small details make your treats pop and look inviting! {{image_4}} You can make mini caramel apple bites even more fun with different toppings. Here are some ideas: - Sprinkles: Add a burst of color with rainbow or seasonal sprinkles. - Crushed cookies: Use crushed Oreos or graham crackers for a tasty crunch. - Flavored caramel sauces: Try chocolate, cinnamon, or even peanut butter caramel for a twist. If you want a dairy-free treat, you can easily adapt this recipe. - Dairy-free caramel: Use coconut cream or agave nectar to make a vegan caramel. - Healthier sweeteners: Substitute regular sugar with maple syrup or honey for a healthier touch. Make your mini caramel apple bites festive with seasonal flavors. - Spices: Add a sprinkle of cinnamon or nutmeg for warmth and depth. - Dried fruits: Incorporate chopped dried cranberries or raisins for extra sweetness and texture. These variations make your mini caramel apple bites fun for any occasion. Check the Full Recipe for detailed steps! To keep your mini caramel apple bites fresh, store them in an airtight container. Use a container that is large enough so the bites do not touch each other. This helps the caramel stay smooth and the apples crisp. Line the bottom of the container with parchment paper to avoid sticking. These tasty bites stay fresh in the fridge for about 3 to 5 days. The caramel may start to lose its shine after a couple of days, but they will still taste great. You can freeze them, but the texture might change. If you freeze them, enjoy them within a month for the best taste. If you stored your bites for a while, you might want to revive their texture. To do this, let them sit at room temperature for about 10 minutes before serving. If they feel too firm, you can microwave them for 5 to 10 seconds. This helps the caramel soften a bit. Enjoy them fresh for the best experience. For the full recipe, check out the earlier section! Yes, you can use different apple types. However, I recommend Granny Smith or Honeycrisp apples. These apples are crisp and tart. They balance well with the sweet caramel. Their firm texture holds up nicely when dipped in caramel. Try to avoid soft apples like Red Delicious. They may not give the same crunch or flavor. Yes, you can make mini caramel apple bites ahead. Store them in an airtight container in the fridge. They will stay fresh for about three days. If you prepare them a day early, they will still taste great. Just make sure the caramel is set before storage. This keeps them from getting sticky. Absolutely! Making caramel sauce from scratch is simple. Here's a basic recipe: - Ingredients: - 1 cup sugar - 1/4 cup water - 1/2 cup heavy cream - 2 tbsp butter - Instructions: 1. Combine sugar and water in a saucepan. 2. Heat over medium until the sugar dissolves. 3. Stop stirring and let it boil until golden. 4. Remove from heat and slowly stir in cream and butter. 5. Let it cool before using. This homemade caramel adds a personal touch. Mini caramel apple bites fit many events. They are great for birthday parties, Halloween, and Thanksgiving. You can serve them at picnics or family gatherings too. Their bite-sized shape makes them fun and easy to share. Add a festive touch by using colorful plates or sprinkles. You can find pre-made mini caramel apple bites at many grocery stores. Look for them in the bakery or snack aisle. Some brands offer them in convenient packs. Check stores like Target or Walmart for a variety. You may also find them at local farmers' markets, especially in fall. Mini caramel apple bites are fun and easy to make. You need just a few simple ingredients and tools. Start with fresh apples and creamy caramel. Follow the steps to prepare, coat, and chill them. Add your favorite toppings for a twist. Store them properly to enjoy later. Remember, these bites are great for parties or a sweet snack. Experiment with flavors and toppings to make them your own. Enjoy the crunchy, salty, and sweet blend that these treats offer.

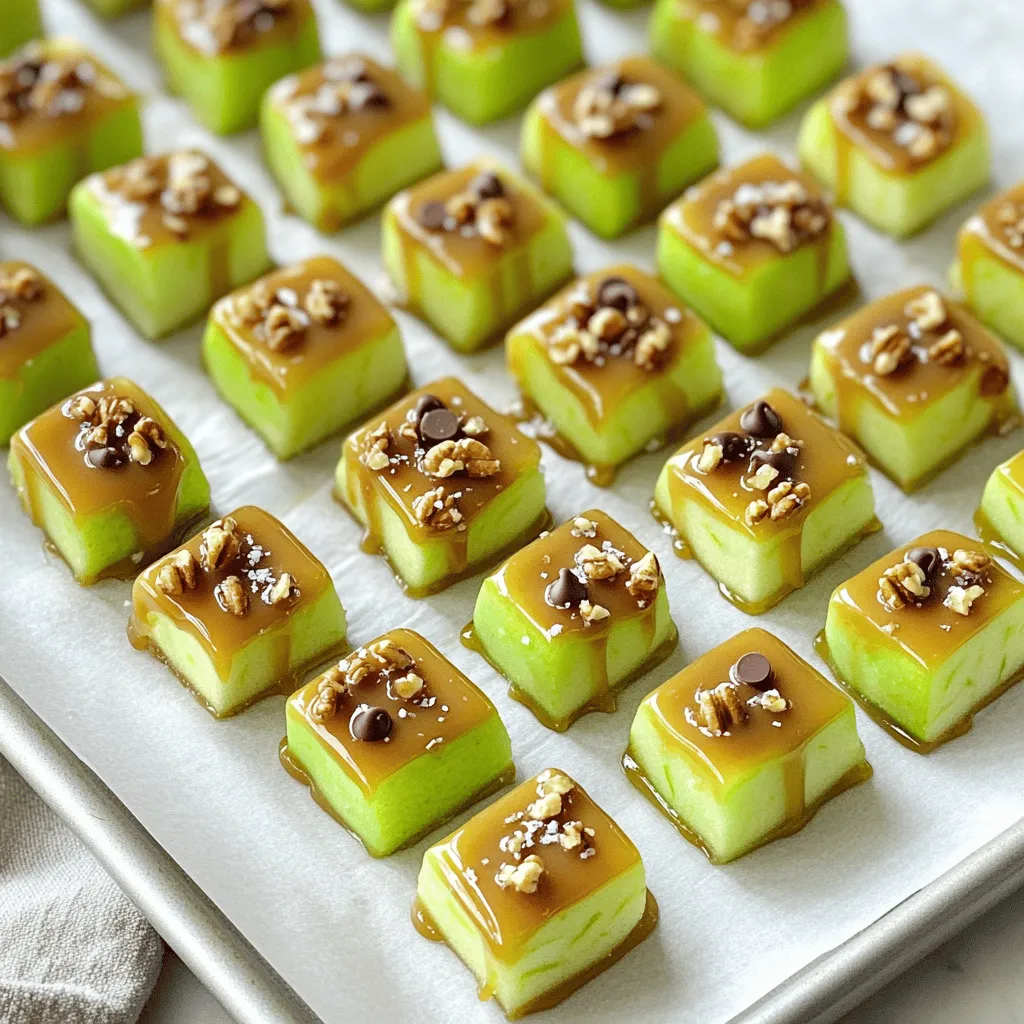
If you’re craving a sweet and tasty treat, Mini Caramel Apple Bites are the answer! These bite-sized delights combine fresh, crunchy apples with rich caramel that will make your taste …

Read more

Categories Desserts

Savory Butternut Squash Gnocchi Soup Delight

August 3, 2025 by Chef Tavio
To create the perfect savory butternut squash gnocchi soup, gather these ingredients: - 1 medium butternut squash, peeled and cut into 1-inch cubes - 2 tablespoons olive oil, divided - 1 small onion, finely diced - 2 garlic cloves, minced - 4 cups vegetable broth - 1 teaspoon dried thyme - 1 teaspoon dried sage - 1/2 teaspoon ground nutmeg - Salt and freshly ground black pepper to taste - 1 package (16 oz) potato gnocchi - 1 cup kale, chopped into bite-sized pieces - 1/2 cup heavy cream (optional for a creamier soup) - Fresh parsley, chopped, for garnish You can easily customize this recipe. Here are some substitutions: - Instead of butternut squash, use pumpkin or sweet potato for a different flavor. - Swap olive oil with coconut oil for a hint of sweetness. - Use chicken broth instead of vegetable broth for a richer taste. - If you lack fresh herbs, dried herbs work well too. Just reduce the amount slightly. - For a dairy-free option, skip the heavy cream or use coconut cream. Choosing fresh ingredients makes a big difference. Here’s how to pick the best: - Butternut Squash: Look for a firm squash with a smooth skin. It should feel heavy for its size. - Onion: Select onions that feel heavy and firm with dry, papery skin. - Garlic: Fresh garlic should have tight skin and no sprouting. - Kale: Choose vibrant green leaves. Avoid any that are wilted or yellow. - Gnocchi: Check the expiration date and choose packages that are sealed tightly. These tips will help you make a delicious soup that everyone will love. For the complete recipe, refer to the full recipe section. To start, gather all your ingredients. You'll need butternut squash, olive oil, onion, garlic, vegetable broth, thyme, sage, nutmeg, salt, pepper, gnocchi, kale, and optionally, heavy cream. Having everything ready makes cooking smoother. 1. Roast the Squash: Preheat your oven to 400°F (200°C). Take the butternut squash, peel it, and cut it into 1-inch cubes. In a bowl, mix the squash with 1 tablespoon of olive oil, salt, and pepper. Toss it well to coat. Spread the cubes on a baking sheet and roast for 25-30 minutes. They should be tender and slightly caramelized. 2. Prepare the Soup Base: In a large pot, heat the remaining tablespoon of olive oil over medium heat. Add the diced onion and cook it for about 5 minutes. The onion should turn translucent. Then, add minced garlic and stir for about a minute. You want to release its lovely aroma. 3. Add Broth and Spices: Carefully pour in the vegetable broth. Then, add the roasted butternut squash. Sprinkle in thyme, sage, nutmeg, salt, and pepper. Increase the heat and bring it to a gentle simmer. Let it cook for 10 minutes, mixing the flavors. 4. Blend the Soup: Use an immersion blender to purée the soup until it’s smooth. If you lack one, carefully transfer batches to a countertop blender. For texture, blend only half the soup, leaving some squash pieces. 5. Cook the Gnocchi: Pour the blended soup back into the pot and bring it to a simmer. Gently add the gnocchi and cook according to the package instructions, usually 2-3 minutes. They will float when done. 6. Add Kale and Cream: Stir in the chopped kale. If you want it creamier, add heavy cream now. Allow the soup to simmer for another 2 minutes. The kale should be tender. 7. Serve and Garnish: Ladle the warm soup into bowls. Garnish with fresh parsley for color. Enjoy this cozy dish hot! For the full recipe, check the details above. To boost the taste of your soup, try these simple tips: - Use fresh herbs. They add a bright touch to the dish. - Toast the spices in the pot before adding broth. This brings out their best flavors. - Add a splash of lemon juice. It brightens the soup and balances the sweetness of the squash. - Top with a sprinkle of cheese for a rich finish. Parmesan or feta works well. Avoid these common errors to ensure your soup shines: - Don’t rush the roasting. Roasting the squash enhances its natural sweetness. - Skip the blending step at your own risk. Blending creates a smooth texture that elevates the soup. - Forgetting to season properly can dull the flavors. Always taste as you go. - Overcooking the gnocchi can turn them mushy. Watch them closely; they cook fast. Cooking gnocchi is easy with these best practices: - Use plenty of water for boiling. This keeps the gnocchi from sticking together. - Add salt to the water. It enhances the gnocchi's flavor. - Wait for them to float. This means they are ready to eat. - Always check the package for specific cooking times. Different brands may vary. For a delicious experience, follow this advice as you make your Savory Butternut Squash Gnocchi Soup. For the complete process, refer to the Full Recipe. {{image_4}} You can easily make this soup vegan. Simply skip the heavy cream. Use coconut milk instead for a creamy texture. It adds a nice sweetness that pairs well with the squash. If you want to add protein, consider cooked chicken or sausage. Cook the protein separately, then add it to the soup before serving. This adds flavor and makes the soup heartier. You can also use plant-based sausage for a meatless option. To spice things up, add red pepper flakes or diced jalapeños. You can mix these in while cooking the soup. This adds a nice kick and balances the sweetness of the squash. Adjust the amount based on your heat preference. For the full recipe, check the details above. To store leftovers, let the soup cool down first. Then, pour it into an airtight container. You can keep it in the fridge for about three days. Make sure to seal it well to keep the flavors fresh. If you want to save some for later, freezing is a great option. To freeze the soup, let it cool completely before transferring it to freezer-safe containers. You can also use freezer bags to save space. When freezing, leave some room at the top of the container. This allows for expansion as the soup freezes. You can store it for up to three months. Just label the container with the date for easy tracking. When you’re ready to enjoy your soup again, thaw it in the fridge overnight. For quick reheating, you can microwave it. Stir it every minute to heat evenly. If you prefer, heat it on the stove over low heat. Add a splash of vegetable broth or water if it seems too thick. That will help restore the creamy texture. Enjoy your warm and delicious soup just like the first time! You can pair the soup with warm bread. A crusty baguette or soft rolls work well. A light salad also complements the dish nicely. Try a simple arugula salad with lemon vinaigrette for a fresh touch. For a heartier meal, serve it alongside roasted vegetables or a cheese platter. Yes, you can! Acorn squash or pumpkin can work as great substitutes. Both will add unique flavors. Just prepare them in the same way as butternut squash. Keep in mind that the taste may change slightly. Experiment with different squashes to find your favorite combo. To thicken the soup, you have a few options. You can blend more of the soup until smooth. Adding a small amount of cornstarch mixed with water can also help. Alternatively, include more roasted squash to enhance the thickness. If you like a creamy texture, consider adding more heavy cream. Make sure to taste and adjust the seasonings as you go. In this blog post, we explored the key ingredients and step-by-step instructions for making savory butternut squash gnocchi soup. I shared tips for selecting fresh ingredients and advice on flavor enhancement. We also discussed variations like vegan options and protein additions. Remember, cooking is about fun and trial. Avoiding common mistakes can make a big difference. Enjoy trying this recipe, and don’t hesitate to customize it to fit your taste. Ultimately, cooking brings joy to the table.

Looking for a warm, comforting dish to brighten your day? Let me introduce you to Savory Butternut Squash Gnocchi Soup. This creamy, rich soup combines the sweet notes of butternut …

Read more

Categories Dinner

Air Fryer Apples Simple and Flavorful Snack Recipe

August 3, 2025 by Chef Tavio
- 4 medium apples (preferably Granny Smith or Honeycrisp), cored and sliced into wedges - 2 tablespoons brown sugar - 1 teaspoon ground cinnamon - 1 tablespoon freshly squeezed lemon juice - 1 tablespoon olive oil or melted coconut oil - Optional: a pinch of ground nutmeg - Optional: chopped nuts (such as walnuts or pecans) for an added crunch To make air fryer apples, you need a few simple ingredients. Start with fresh apples. I love using Granny Smith for their tartness or Honeycrisp for sweetness. Make sure to core and slice them into wedges. This helps them cook evenly. Next, you will want to sweeten them up. Brown sugar adds a rich flavor. Ground cinnamon brings warmth, and lemon juice adds brightness. The lemon juice also keeps the apples from turning brown. You can add olive oil or coconut oil to help with cooking. It adds a touch of flavor and helps the apples get crispy. If you like a little extra spice, a pinch of nutmeg works well. For a crunchy finish, consider adding chopped nuts like walnuts or pecans. They give your snack a nice texture. This simple list of ingredients makes for a fun and tasty treat. Check out the Full Recipe to see how to put it all together! Start by picking the best apples for this recipe. I love using Granny Smith or Honeycrisp. They are crisp and sweet. Next, core the apples. Cut them into thin wedges, about 1/4 inch thick. Place all slices in a large bowl. This makes seasoning easier. Now, let's keep those apple slices nice and fresh. Squeeze some lemon juice over them. This helps stop browning. After that, sprinkle brown sugar and ground cinnamon on top. If you want a little extra warmth, add a pinch of nutmeg. Pour in olive oil or melted coconut oil. This helps the spices stick to the apples. Preheat your air fryer to 350°F (175°C). Let it warm for about 5 minutes. This step is key for getting crispy apples. Arrange the apple slices in a single layer in the basket. Avoid overcrowding. If needed, cook in batches. Air fry for 10-12 minutes. Shake the basket halfway through cooking. Your apples are done when they are tender with a crispy edge. Enjoy this simple and flavorful snack! For a detailed list of steps, check the Full Recipe. To get that perfect crunch, choose firm apples. I recommend using Granny Smith or Honeycrisp apples. They hold their shape well and have great flavor. Avoid overcrowding your air fryer. This helps the hot air flow around the apples and makes them crispier. If you pile them up, they might steam instead of fry. You can spice things up! Try adding a pinch of nutmeg or even some ginger. They add warmth and depth to the flavor. If you want a sweeter taste, use maple syrup or honey. For a fun twist, top your apples with chopped nuts like walnuts or pecans. They add a nice crunch and extra flavor. Serve air-fried apples warm. They are great on their own or as a side dish. You can also top them on pancakes for breakfast. For a sweet treat, try them with vanilla ice cream. The warm apples and cold ice cream make a perfect pair. Check out the Full Recipe for more details on how to make this delightful snack! {{image_4}} You can change up the flavor of your air fryer apples easily. Try adding vanilla extract for a sweet twist. A pinch of allspice adds warmth and depth. Both options make your apples even more delightful. Experiment with these spices until you find your perfect mix! To make your air fryer apples even richer, consider adding a homemade caramel sauce. It’s simple! Melt sugar in a pan until golden, then stir in cream. Drizzle this over your apples for a sweet finish. The warm caramel pairs perfectly with the cinnamon apples. If you have nut allergies, don’t worry! You can still enjoy these apples. Try topping your air-fried apples with seeds, like pumpkin or sunflower. You can also use shredded coconut for a different texture. These options keep your snack safe and tasty! Explore these variations to find what you love best. For the full recipe, check the earlier section. To keep your air-fried apples fresh, store them in an airtight container. Place the cooled apples in the container and seal it tight. They will stay good in the fridge for up to three days. Just be sure to let them cool down before storing. This helps keep them crisp and tasty. When you want to enjoy your leftovers, I recommend reheating them in the air fryer. Set the air fryer to 350°F (175°C). Heat the apples for about 3 to 5 minutes. This will help them regain their crispiness. Avoid using the microwave, as it can make them soggy. If you want to save some apples for later, freezing works well! First, let the apples cool completely. Then, place them in a single layer on a baking sheet. Freeze them for about 1 to 2 hours until firm. Once frozen, transfer them to a freezer-safe bag. Make sure to squeeze out the air before sealing. To thaw, leave them in the fridge overnight or let them sit at room temperature for a while. Enjoy these with your favorite toppings later! For the full recipe, check out the Crispy Cinnamon Air Fryer Apples! Air-fried apples can last about 3 to 5 days in the fridge. Store them in an airtight container. This keeps them fresh and safe to eat. If they start to look brown or mushy, it’s best to toss them. Enjoy them while they’re still tasty! Yes, you can use frozen apples! Just thaw them first and drain any excess liquid. Frozen apples may not crisp up as well as fresh ones. You might want to cook them for a few extra minutes to get a nice texture. They still taste great and make for a quick snack. Air-fried apples have several health benefits. They use less oil than traditional frying. This lowers the fat and calorie content. Apples are rich in fiber, vitamins, and antioxidants. Air-frying keeps many nutrients intact. You get a tasty treat that is sweet, healthy, and satisfying! In this post, we showed you how to make air-fried apples. You learned about the key ingredients, cooking steps, and useful tips for perfect apples. Remember, the right apples and correct cooking time are key to great results. Don't forget to try different spices or toppings to find your favorite flavor. Enjoy your sweet treat hot or cold, any way you like. Now, you can impress friends and family with this easy, tasty recipe. Enjoy your cooking adventure!

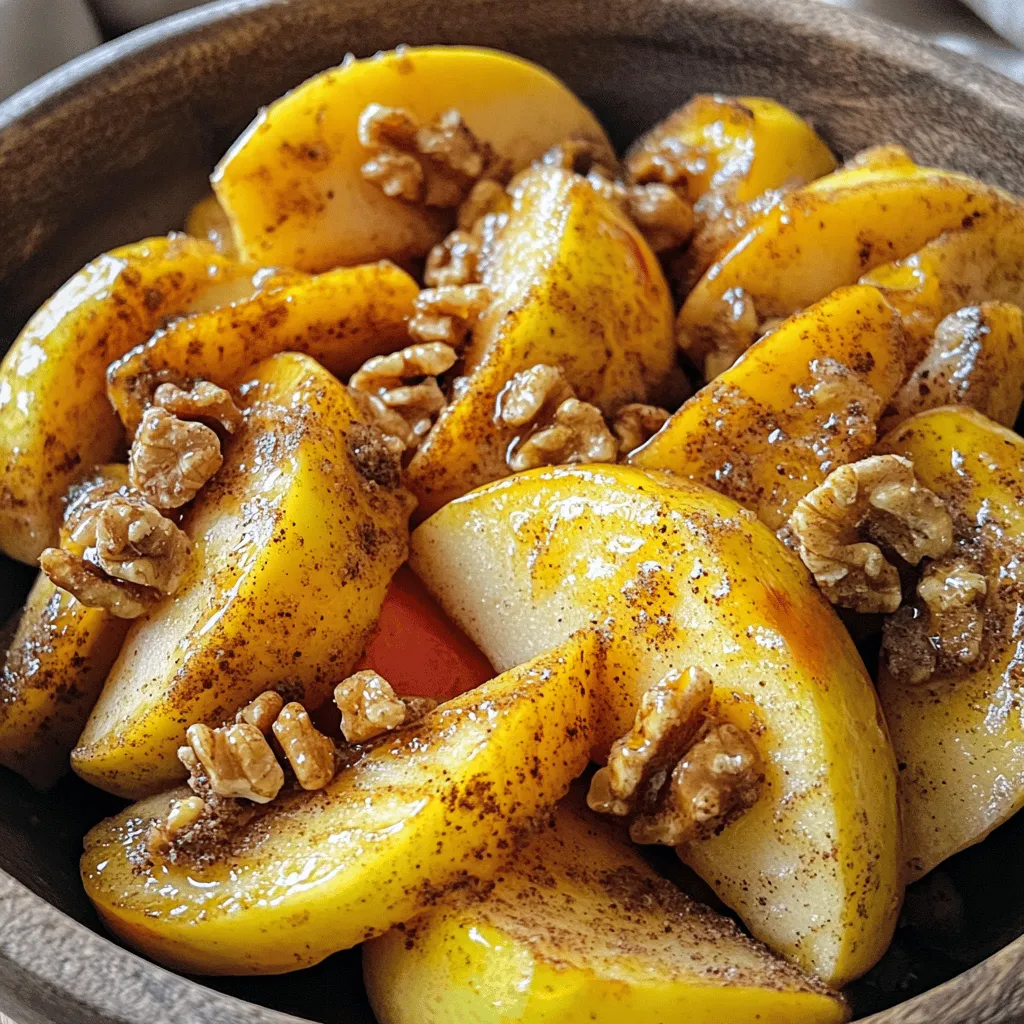
Are you looking for a quick and tasty snack? Try air fryer apples! This recipe is simple, healthy, and packs a sweet punch. In just a few steps, you can …

Read more

Categories Desserts

Pumpkin Spice Oatmeal Latte Cozy and Creamy Delight

August 3, 2025 by Chef Tavio
- 1 cup rolled oats - 2 cups water or milk - 1/2 cup pumpkin puree - 1 teaspoon pumpkin spice blend - 1 tablespoon maple syrup - 1/2 teaspoon vanilla extract - A pinch of salt In this delightful recipe, I use simple yet essential ingredients. The rolled oats serve as a hearty base. They add fiber and keep you full. Using water or milk changes the texture. Milk gives a creamier feel, while water keeps it light. Pumpkin puree is the star of the show. It adds rich flavor and a beautiful color. The pumpkin spice blend brings warmth and that cozy fall vibe. Maple syrup adds natural sweetness. If you prefer honey, that works too! Lastly, a pinch of salt balances the flavors. It enhances the sweetness and brings out the pumpkin taste. - Whipped cream - Cinnamon dusting - Toasted pumpkin seeds Topping your Pumpkin Spice Oatmeal Latte makes it even better! Whipped cream adds a luxurious touch. A dash of cinnamon on top gives it visual appeal and extra warmth. Toasted pumpkin seeds add crunch. They provide a nice contrast to the creamy latte. You can mix and match these toppings based on your taste. For full details on how to make this cozy drink, check the Full Recipe. - First, combine 1 cup of rolled oats, 2 cups of water or milk, and a pinch of salt in a saucepan. - Heat the mixture over medium heat until it starts to boil. - Once boiling, reduce the heat to low and let it simmer for about 5 minutes. - Stir occasionally to keep the oats from sticking. They should become creamy and fully cooked. - Next, add 1/2 cup of pumpkin puree, 1 teaspoon of pumpkin spice, 1 tablespoon of maple syrup, and 1/2 teaspoon of vanilla extract. - Stir everything well to mix the flavors. - Let it heat for 1-2 minutes. This helps the flavors blend nicely. - For a frothy latte-like texture, grab an immersion blender. - Blend the mixture until it becomes light and airy. - If you like a hearty oatmeal, you can skip this step. Now your pumpkin spice oatmeal latte is ready to enjoy! For the full recipe, refer to the beginning of this article. To make your Pumpkin Spice Oatmeal Latte extra creamy, use milk instead of water. Milk adds a rich texture that makes every sip delightful. If you prefer a lighter version, stick with water. Next, adjust the water-to-oat ratio. Using more milk will give you a creamier feel. For a heartier dish, keep the original ratio. When it comes to sweetness, you can choose maple syrup or honey. Maple syrup gives a rich flavor that pairs well with pumpkin spice. Honey adds a floral note but can be sweeter. If you want natural sweeteners, try agave syrup or coconut sugar. These will add a different taste but continue the healthy vibe of the dish. To take your latte to the next level, add more spices or flavors. Consider adding a little extra cinnamon or nutmeg for warmth. A splash of vanilla extract can also deepen the flavor. You can substitute pumpkin puree with other fruits like mashed banana or applesauce. These fruits will change the flavor but still keep things cozy and delicious. Try these tips to make your Pumpkin Spice Oatmeal Latte exactly how you like it! For the full details, check out the Full Recipe. {{image_4}} You can easily make this Pumpkin Spice Oatmeal Latte without dairy. Using almond or oat milk works great. These options give it a nice flavor and keep it creamy. Coconut milk adds a tropical twist too. It brings extra richness and a hint of sweetness. Just swap the milk in the recipe with your choice. Adding seasonal spices can change the taste. Try incorporating apple pie spice for a fun fall twist. This spice blend brings warmth and sweetness. You can also add cocoa for a mocha version. This gives a nice chocolate flavor that pairs well with pumpkin. It makes your latte feel special and different. Want a chilled drink? You can adapt the recipe for a cold brew. Start by making the pumpkin oatmeal as usual. Once it's cool, pour it over ice. You might want to blend it again for a smooth texture. This way, you keep the creamy taste while sipping on something refreshing. Enjoy it on a hot day or whenever you want a cool treat! To store leftover pumpkin spice oatmeal latte, let it cool first. Transfer it to an airtight container. It can stay fresh in your fridge for up to three days. When you're ready to enjoy it again, simply reheat it on the stove or in the microwave. If using the microwave, heat in short bursts, stirring in between for even warming. This keeps the texture nice and creamy. You can freeze portions of your pumpkin spice oatmeal latte for later use. Pour the cooled oatmeal into freezer-safe containers. Leave some space at the top, as the mixture will expand when frozen. It can last for about one month in the freezer. When you're ready to eat, take it out and let it thaw in the fridge overnight. Reheat it on the stove or in the microwave, adding a splash of water or milk to restore creaminess. This latte keeps well for about 3 to 5 days in the fridge. Make sure to store it in an airtight container. When you are ready to enjoy it again, just reheat it on the stove or in the microwave. Stir well to mix everything together again. Yes, you can use instant oats if you prefer. Instant oats cook faster and will make your latte smoother. However, they may lose some texture and creaminess. Rolled oats give a heartier feel, which many people love. If you can't find pumpkin puree, you can use sweet potato puree or butternut squash puree. Both options give a similar flavor and texture. You could also mash cooked carrots for a sweet twist, but it will change the taste a bit. To make this latte vegan, use plant-based milk like almond or oat milk. Replace honey with maple syrup or agave nectar for sweetness. Ensure your pumpkin spice and any toppings are also dairy-free to keep it vegan-friendly. You learned how to make a delicious pumpkin spice oatmeal latte. We covered key ingredients, smooth preparation steps, and helpful tips to achieve the best flavors. You can tweak this recipe with various toppings, dairy-free options, or even seasonal twists to fit your taste. Remember to store leftovers properly for future enjoyment. This warm drink is not just tasty; it's also flexible. Enjoy making this cozy treat that can warm up any day!

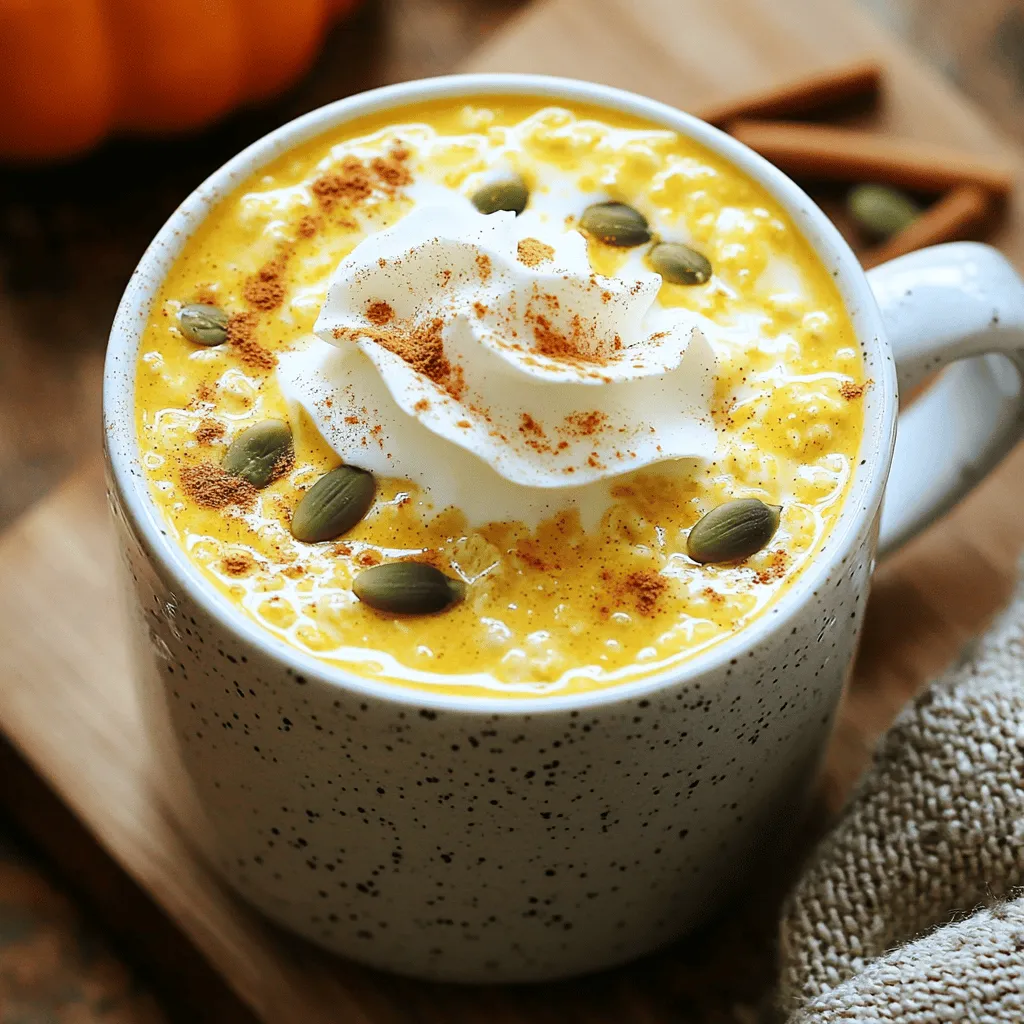
As the leaves change and fall settles in, there’s nothing cozier than a warm drink. Enter the Pumpkin Spice Oatmeal Latte! This creamy delight mixes the comfort of oatmeal with …

Read more

Categories Breakfast

Creamy Cafeteria Noodles Simple and Tasty Recipe

August 3, 2025 by Chef Tavio
To make creamy cafeteria noodles, you need the following main ingredients: - 8 oz egg noodles - 1 tablespoon olive oil - 1 small onion, finely chopped - 2 cloves garlic, minced - 1 cup heavy cream - 1 cup freshly grated Parmesan cheese - 1 cup frozen peas - 1 teaspoon dried Italian herbs (oregano, basil, thyme) - Salt and freshly ground black pepper to taste - Fresh parsley, finely chopped (for garnish) These ingredients create a rich and creamy dish. The egg noodles provide a nice base. Heavy cream and Parmesan cheese add a delightful creaminess that makes this recipe special. You can enhance the flavors of your creamy noodles with these optional add-ins: - Cooked chicken or shrimp - Sliced mushrooms - Fresh spinach - Sun-dried tomatoes Adding these ingredients can elevate the dish. For example, cooked chicken adds protein and makes it more filling. Fresh spinach brings a pop of color and nutrition. If you need to make substitutions, here are some ideas: - Use whole wheat noodles instead of egg noodles for a healthier option. - Swap heavy cream with half-and-half or milk for a lighter sauce. - Try nutritional yeast in place of Parmesan for a vegan twist. - Use fresh herbs instead of dried for a fresher taste. These substitutions can fit your dietary needs while maintaining flavor. I often experiment with these options to keep the dish exciting. For the full recipe, check out the details and enjoy your cooking adventure! Start by filling a large pot with water. Add a good amount of salt to it. Bring the water to a boil. Once boiling, add 8 oz of egg noodles. Cook them based on the package instructions. You want them to be al dente, which means firm to the bite. After they are done, drain the noodles in a colander. Set them aside for later. Next, use the same pot for the next steps. Reduce the heat to medium and drizzle in 1 tablespoon of olive oil. Once the oil is hot, add 1 small finely chopped onion. Sauté the onion for about 3-4 minutes. You want it to become soft and clear. Then, add 2 minced garlic cloves. Cook for another minute, stirring often. The garlic should smell great but not burn. Now, it’s time to make the creamy sauce. Pour in 1 cup of heavy cream. Stir the mixture gently as it heats. Bring it to a gentle simmer, not a boil. Gradually add in 1 cup of freshly grated Parmesan cheese. Keep stirring until the cheese melts into a rich sauce. This is where the magic happens! Add 1 cup of frozen peas and 1 teaspoon of dried Italian herbs. Mix everything well and let it cook for 2-3 minutes. You want the peas to warm up and turn bright green. Now it’s time to fold in the cooked egg noodles. Toss them gently in the creamy sauce. Make sure all the noodles are coated well. Finally, season with salt and freshly ground black pepper. Cook everything together for another 2-3 minutes. Serve your creamy cafeteria noodles hot, and enjoy the delightful flavors! For the full recipe, check the details above. To get the best texture, cook your egg noodles until they are al dente. This means they should have a slight bite. After boiling, drain them well but do not rinse. Rinsing can wash away the starch, which helps the sauce stick. When you combine the noodles with the sauce, let them cook together for a few minutes. This helps the noodles soak up the creamy goodness. To boost flavor, use fresh garlic instead of dried. Fresh herbs can also elevate the dish. Try adding fresh basil or chopped chives. For a little heat, sprinkle in some red pepper flakes. You can also mix in a splash of lemon juice. This adds a bright note and balances the creaminess. Don’t forget to taste as you go. Adjust salt and pepper to suit your palate. Make your creamy noodles look appealing. Serve them in deep bowls for a cozy feel. A drizzle of olive oil on top adds shine. You can also add extra shavings of Parmesan for a gourmet touch. A sprinkle of fresh parsley brightens the dish and adds color. For a fun twist, serve with a side of toasted garlic bread. This will make your meal feel complete. For the full recipe, check the earlier section. {{image_4}} You can easily make creamy cafeteria noodles vegetarian. Just skip the meat and use vegetable broth instead of chicken stock. Add more veggies like bell peppers, spinach, or mushrooms. These ingredients give extra flavor and color. They also boost nutrition. Toss in some cherry tomatoes for a sweet pop. You can switch up the noodles too. Try using whole wheat noodles for a healthier choice. Gluten-free pasta is great if you have dietary needs. Even rice noodles work well for a unique twist. Just cook them according to the package. The creamy sauce will still blend perfectly. To add more protein, consider chicken or shrimp. Cook chicken pieces in the pot before adding onions. For shrimp, add them after sautéing the garlic. They cook quickly and soak up the sauce's flavors. Tofu is another great option for a plant-based protein. All these choices keep your dish delicious and filling. For the full recipe, check out the Creamy Cafeteria Noodles Delight. You can store leftover creamy cafeteria noodles in the fridge. Use an airtight container to keep them fresh. They will last for about three to four days. Make sure to let them cool down before placing them in the fridge. This helps keep the texture nice and creamy. If you want to save them longer, freezing is a great option. Place the cooled noodles in a freezer-safe container. You can also use freezer bags. Be sure to remove as much air as possible. They will keep well for up to three months. When ready to eat, just thaw them in the fridge overnight. Reheating creamy cafeteria noodles is simple. You can use the microwave or the stove. For the microwave, place the noodles in a bowl and cover with a damp paper towel. Heat for two to three minutes, stirring halfway through. On the stove, add a splash of cream or water to a pan. Heat over low heat, stirring gently. This keeps the noodles moist and creamy. Creamy cafeteria noodles are a comforting dish made with egg noodles and a rich sauce. The sauce contains heavy cream, Parmesan cheese, and sautéed onions and garlic. The result is a creamy, cheesy, and flavorful meal that many remember from school lunches. You can add peas for a pop of color and sweetness, too. Yes, you can make creamy cafeteria noodles ahead of time. Prepare the dish, then cool it down before storing. Keep it in an airtight container in the fridge. When you're ready to eat, reheat it on the stove or in the microwave. Add a splash of cream to keep it creamy and fresh. Several side dishes pair well with creamy noodles. Here are a few ideas: - Garlic bread - Steamed broccoli - Mixed green salad - Roasted vegetables These sides add flavor and nutrition to your meal. You can make creamy cafeteria noodles healthier with simple swaps. Try these tips: - Use whole grain or gluten-free noodles for extra fiber. - Substitute heavy cream with Greek yogurt or low-fat milk. - Add more veggies like spinach, bell peppers, or zucchini. - Use less cheese or choose a lower-fat cheese. These changes keep the dish tasty while making it a bit lighter. For the full recipe, check out the complete details shared earlier. Creamy cafeteria noodles are simple and tasty. We covered the main ingredients and optional add-ins. You learned step-by-step cooking, from noodles to sauce. Helpful tips for texture and flavor make this dish shine. You can even try different noodles or a vegetarian version. Remember how to store and reheat them for later. Enjoy making your creamy noodles unique. With these tips, you’ll impress everyone at your table!

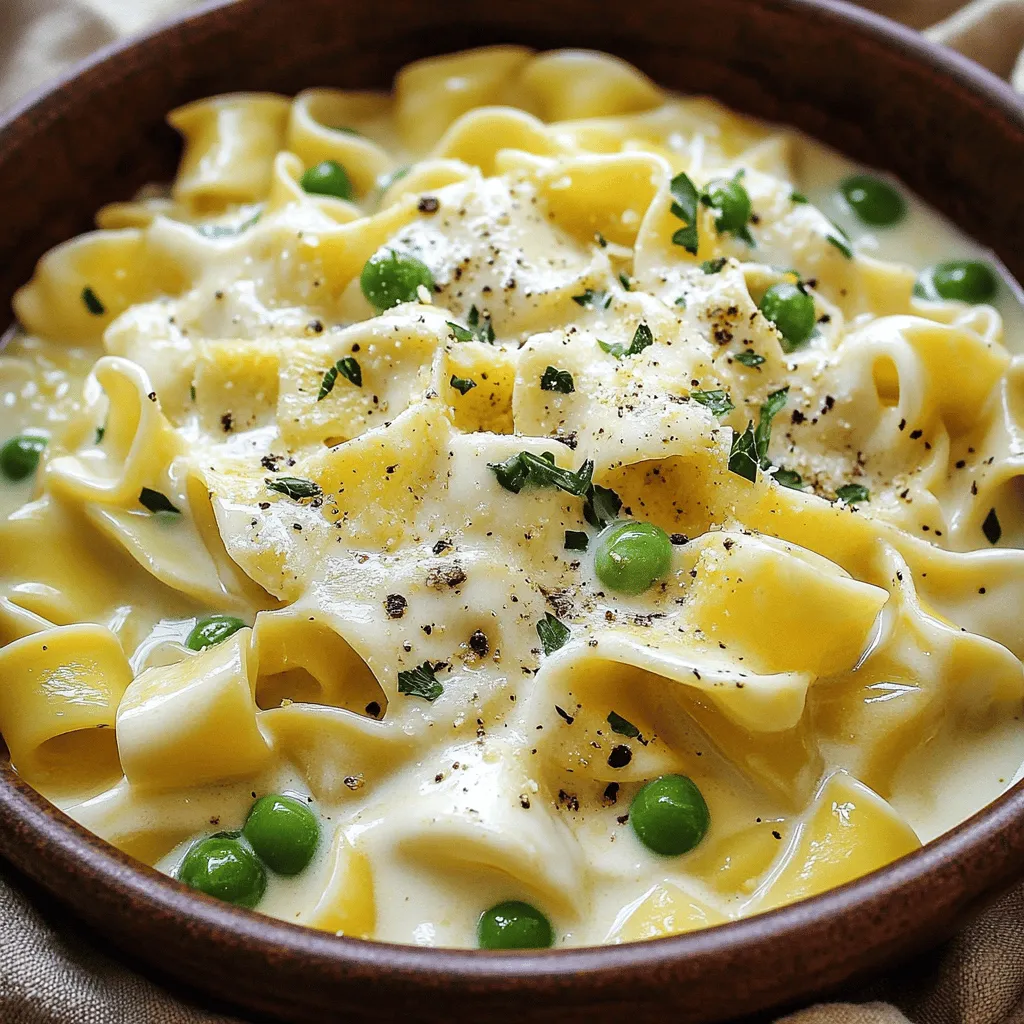
Calling all noodle lovers! If you crave a rich and tasty dish, you’re in the right place. Today, I’ll share my simple recipe for creamy cafeteria noodles that’s easy to …

Read more

Categories Dinner

Caramel Apple Cider Cookies Tasty Fall Dessert Recipe

August 2, 2025 by Chef Tavio
Here is what you need for caramel apple cider cookies: - 1 cup unsalted butter, softened to room temperature - 1 cup packed brown sugar - 1/2 cup granulated sugar - 1 large egg, at room temperature - 2 tablespoons apple cider - 1 teaspoon pure vanilla extract - 2 1/2 cups all-purpose flour - 1 teaspoon baking soda - 1 teaspoon ground cinnamon - 1/2 teaspoon ground nutmeg - 1/2 teaspoon salt - 1 cup caramel bits or chopped soft caramel candy - Optional: 1/2 cup chopped walnuts or pecans These ingredients bring together the flavors of fall in every bite. The butter makes the cookies soft, while the sugars add sweetness. The apple cider gives a nice tang, and the spices create warmth. If you like, add nuts for a crunchy twist. To make these cookies, gather these tools: - Mixing bowls - Electric mixer - Cookie scoop or tablespoon - Baking sheet - Parchment paper You need these items to mix, scoop, and bake your cookies. The parchment paper helps the cookies not stick to the pan. - Prep Time: 20 minutes - Total Time: 30 minutes - Servings: Approximately 24 cookies You can whip up these cookies in no time. In just 30 minutes, you’ll have a tasty treat to enjoy. For the full recipe, check the detailed instructions above. - Preheat the oven to 350°F (175°C). - Line a large baking sheet with parchment paper. - Cream the butter and sugars until fluffy. - Incorporate the egg, apple cider, and vanilla extract. Mix until smooth. - Prepare the dry ingredients. Whisk together flour, baking soda, cinnamon, nutmeg, and salt. - Gradually add the dry mix to the creamed mixture. Stir gently until just combined. - Fold in caramel bits and nuts, if using. Make sure they are evenly mixed in. Now you're ready to scoop the dough and bake those delicious caramel apple cider cookies! - Ensure the butter is at room temperature. Room temperature butter blends well with sugar, creating a fluffy mix. It helps the cookies rise and stay soft. - Avoid overmixing the dough. Mix until just combined. Overmixing can lead to tough cookies, which we want to avoid. - For soft and chewy cookies, use brown sugar. Brown sugar adds moisture, giving cookies their chewy texture. - To achieve a crisp edge, bake until edges are light golden. The centers can be slightly underbaked. They will firm up as they cool. - Alternatives for spices include ginger or cloves. These can add unique flavors that fit the fall theme. - Using different types of caramel can change the taste. Try sea salt caramel for a sweet and salty twist. You can check the full recipe to explore these tips in action! {{image_4}} You can make these cookies gluten-free by swapping regular flour with a gluten-free blend. Most blends work well for baking. Look for ones that have xanthan gum. This helps mimic the texture of wheat flour. To make these cookies vegan, use plant-based butter instead of regular butter. You can also replace the egg with a flaxseed egg or applesauce. Mix one tablespoon of flaxseed meal with three tablespoons of water. Let it sit for five minutes. This will help bind the cookies without eggs. If you love chocolate, add chocolate chips or chunks to the dough. It adds a rich flavor and makes the cookies even more special. Mix in half a cup of chocolate chips when you fold in the caramel. The warm chocolate will melt slightly, making each bite delightful. For the Full Recipe, check out the detailed instructions to bake these tasty treats! To keep your cookies fresh at room temperature, place them in an airtight container. This helps maintain moisture and flavor. You can store them for up to a week this way. If you prefer to refrigerate them, a container will still work. The cookies can last about two weeks in the fridge. However, they may lose some of their original texture. You can freeze unbaked cookie dough for future baking. Just scoop the dough into balls and place them on a baking sheet. Freeze the balls for about two hours until solid. Then, transfer the frozen dough to a freezer bag. When you're ready to bake, no need to thaw! Just bake them for an extra minute or two. To thaw baked cookies, take them out of the freezer and let them sit at room temperature for about 15 minutes. This helps them regain their softness. You can also warm them gently in the microwave for a few seconds. At room temperature, your caramel apple cider cookies will remain tasty for about one week. Keep an eye out for signs of spoilage. If they start to harden or the smell changes, it's time to toss them. Proper storage is key to enjoying every bite! Yes, you can easily make these cookies without nuts. Just skip the nuts in the recipe. Your cookies will still taste great! If you want some crunch, try adding oats or more caramel bits. This keeps the texture fun while keeping it nut-free. To prevent cookies from spreading, keep the dough cold. After mixing, chill the dough for at least 30 minutes. This helps the cookies hold their shape. Also, make sure your oven is preheated properly. Bake them on parchment paper, which helps them stay in place while baking. If you don’t have apple cider, you can use apple juice or even white grape juice. Both options give a sweet flavor. You can also add a splash of vinegar for a bit of tang. This helps mimic the taste of apple cider in your cookies. You can easily make delicious cookies with just a few simple steps. We covered the ingredients needed, the essential equipment, and provided clear instructions. Remember to keep your butter soft and avoid overmixing for the best texture. Feel free to try various options, like gluten-free or vegan versions. Storing cookies properly ensures they stay fresh longer. With these tips, you can enjoy baking and sharing these treats. Happy baking!

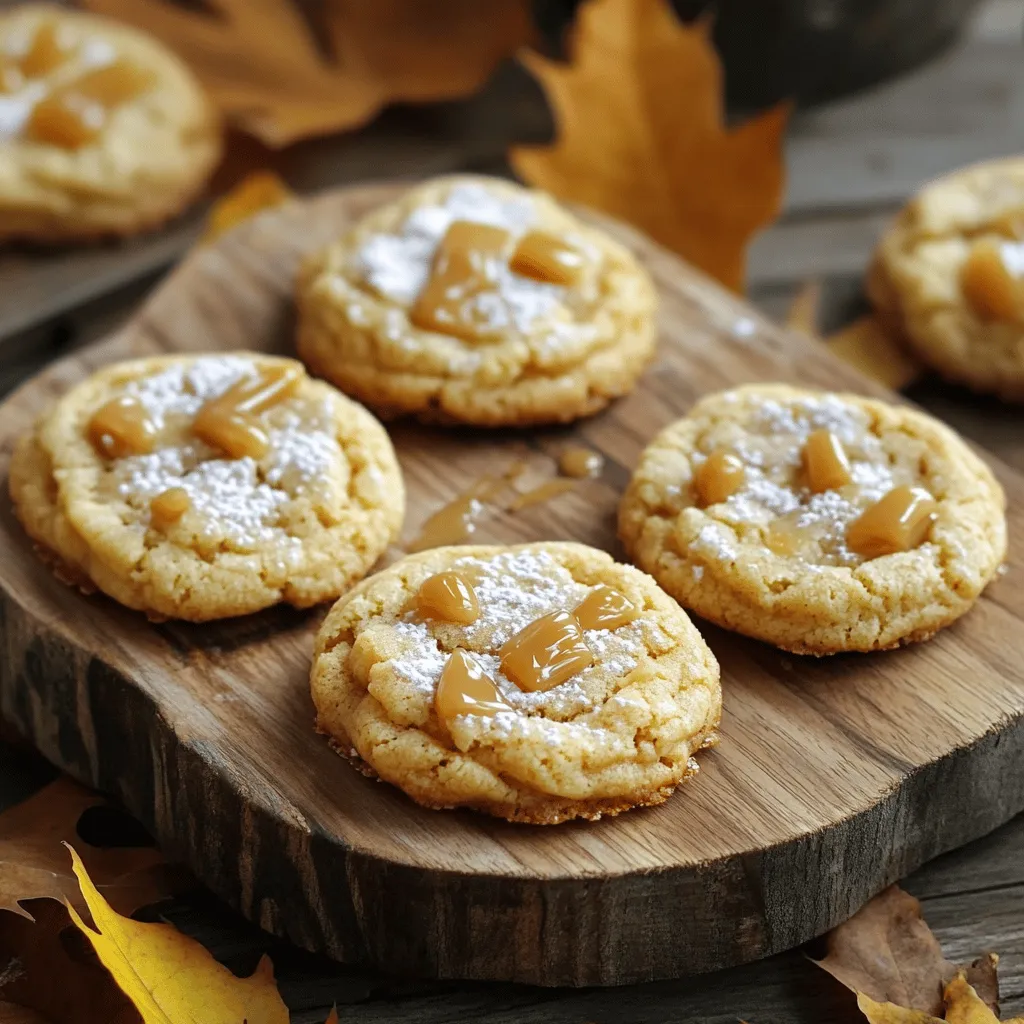
Fall is here, and what better way to celebrate than with warm, delicious Caramel Apple Cider Cookies? This tasty treat combines the cozy flavors of apple cider and caramel for …

Read more

Categories Desserts

White Chocolate Pumpkin Snickerdoodles Delight

August 2, 2025 by Chef Tavio
- 4 cups all-purpose flour, sifted - 1 teaspoon baking soda - 1 teaspoon cream of tartar - 1 teaspoon ground cinnamon - 1/2 teaspoon ground nutmeg - 1/2 teaspoon ground ginger - 1/4 teaspoon salt The dry ingredients create a solid base for our cookies. All-purpose flour gives structure and chew. Baking soda and cream of tartar help the cookies rise. The spices add warmth and flavor, making them perfect for fall. - 1 cup unsalted butter, softened to room temperature - 1 cup granulated sugar - 1 cup packed brown sugar, preferably light or dark - 1 cup pumpkin puree (canned or homemade) - 2 large eggs The wet ingredients bring moisture and sweetness. Softened butter is key for a fluffy texture. The sugar mix caramelizes during baking. Pumpkin puree makes the cookies moist and adds a touch of earthiness. Eggs bind everything together and help with the rise. - 1 cup white chocolate chips - 1/4 cup granulated sugar (for rolling the cookies) - 1 tablespoon ground cinnamon (for rolling the cookies) White chocolate chips give a creamy sweetness that balances the spices. The cinnamon-sugar coating adds a delightful crunch and extra flavor. Each bite will be a cozy blend of sweet and spiced sensations. For the complete guide, check out the [Full Recipe]. Enjoy baking these White Chocolate Pumpkin Snickerdoodles! 1. Start by preheating your oven to 350°F (175°C). This is key for even baking. 2. While the oven warms up, line two baking sheets with parchment paper. This helps cookies not stick. 3. In a large bowl, cream together 1 cup of softened butter, 1 cup of granulated sugar, and 1 cup of brown sugar. Use a hand mixer or stand mixer. Mix until fluffy and light, about 3-4 minutes. 1. Next, carefully add 1 cup of pumpkin puree and 2 large eggs to the butter-sugar mix. Beat until smooth. 2. In another bowl, whisk together 4 cups of sifted all-purpose flour, 1 teaspoon of baking soda, 1 teaspoon of cream of tartar, and spices: 1 teaspoon of ground cinnamon, 1/2 teaspoon of nutmeg, 1/2 teaspoon of ginger, and 1/4 teaspoon of salt. 3. Gradually mix the dry ingredients into the wet mix. Stir gently with a spatula. Be careful not to overmix. You want a soft and smooth dough. 4. Fold in 1 cup of white chocolate chips, ensuring they spread evenly without overworking the dough. 1. In a small bowl, mix 1/4 cup of granulated sugar and 1 tablespoon of ground cinnamon for rolling. 2. Use a cookie scoop or tablespoon to portion the dough. Roll each piece into a smooth ball. 3. Coat each ball in the cinnamon-sugar mix, covering it well. 4. Place the dough balls on the prepared sheets, leaving about 2 inches between them. 5. Bake the cookies for 10-12 minutes. Look for lightly golden edges and soft centers. They will firm up while cooling. 6. Once baked, let the cookies cool on the sheets for 5 minutes. After that, move them to a wire rack to cool completely. For the complete recipe, visit [Full Recipe]. To make great cookies, avoid overmixing the dough. Overmixing can make your cookies tough. Mix until just combined. This keeps the dough soft and fluffy. Next, ensure you use the right oven temperature. Preheat your oven to 350°F (175°C). A hot oven helps the cookies rise and bake evenly. If your oven runs hot or cold, check with an oven thermometer. To boost flavor, you can adjust the spices. If you love cinnamon, add a bit more. Some people like a kick; try adding a pinch of cayenne pepper for warmth. If you want alternatives for white chocolate chips, use dark or milk chocolate chips. You can also try butterscotch chips for a unique taste. This change can create a whole new cookie experience. For a lovely display, use a decorative platter. Arrange the cookies in a circle or stack them high. You can garnish with fresh cinnamon sticks for a cozy look. Sprinkle extra white chocolate chips on top to make them pop. A light dusting of powdered sugar can add a nice touch, too. These simple ideas can help your cookies shine at any gathering. For the full recipe, refer to the complete instructions above. {{image_4}} You can change the chocolate in these cookies. Try dark or milk chocolate instead of white chocolate. Each type brings a new taste profile. Dark chocolate adds richness. Milk chocolate offers sweetness. Adding nuts or seeds can also enhance texture. Pecans or walnuts give a nice crunch. Sunflower seeds add a fun twist. Experiment with your favorites to find the best mix. If you need a gluten-free option, use almond flour or a gluten-free blend. These work well in cookies. You can still enjoy these treats without gluten. For vegan cookies, swap butter with coconut oil or vegan butter. Use flax eggs instead of regular eggs. These changes keep the cookies tasty and plant-based. If you want to cut sugar, try using applesauce or stevia. These swaps can help reduce calories. The cookies will still taste great with these options. For a fun twist, add dried cranberries or chopped pecans. They bring a festive flair to your cookies. These ingredients work well for Thanksgiving and Christmas. You can also adapt these cookies for other holidays. Add peppermint for a winter treat. Use lemon zest for a bright summer cookie. The options are endless, so have fun! For the full recipe, check out the detailed instructions above. To keep your White Chocolate Pumpkin Snickerdoodles fresh, store them at room temperature. Place the cookies in an airtight container. This helps to seal in moisture and keeps them soft. Make sure to layer parchment paper between the cookies to prevent sticking. If you want to save cookies for later, freezing is a great option. You can freeze both the dough and baked cookies. For dough, scoop and roll the balls, then freeze them on a baking sheet. Once frozen, transfer them to a zip-top bag. For baked cookies, let them cool completely, then place them in a freezer-safe container. To thaw, leave the cookies out at room temperature for about 30 minutes. For dough, bake straight from the freezer, adding a minute or two to the bake time. When stored correctly, these cookies stay fresh for about a week at room temperature. Look for signs of spoilage, such as hard texture or off smells. If they feel dry or crumbly, it’s time to toss them. For the best taste, enjoy them fresh, but they can last longer with proper storage. For the full recipe and more details, check out the Full Recipe. How do I make White Chocolate Pumpkin Snickerdoodles from scratch? To make these cookies, start by mixing butter and sugars until fluffy. Then, add pumpkin puree and eggs. In a separate bowl, combine flour, baking soda, cream of tartar, and spices. Mix the dry and wet ingredients gently. Fold in white chocolate chips and roll the dough in cinnamon-sugar before baking. For the full recipe, refer to the detailed steps above. Why are my cookies spreading too much during baking? Cookies may spread if your butter is too warm or if you use too much sugar. Make sure to measure your ingredients accurately. Chilling the dough for 30 minutes can help prevent excess spreading. Also, ensure the oven is set to the correct temperature. Can I replace pumpkin puree with applesauce? You can use applesauce instead of pumpkin puree. This swap will change the flavor and texture slightly. Applesauce adds moisture but lacks the warm spice notes from pumpkin. If you prefer, you can also use sweet potato puree for a similar taste. What can I use instead of white chocolate chips? If you don’t have white chocolate chips, you can use dark chocolate or milk chocolate chips. You can also try butterscotch chips for a different flavor. Just remember that these swaps will change the overall taste of the cookies. What is the best way to know when cookies are done? To check if your cookies are done, look for golden edges and soft centers. The edges should set, while the centers may still seem soft. They will firm up as they cool. If they look too wet, give them a minute more in the oven. How can I make my cookies soft and chewy? To achieve soft and chewy cookies, avoid overmixing the dough. Use brown sugar for moisture and flavor. Also, try underbaking them slightly. Removing them from the oven when they are still soft ensures they stay chewy as they cool. In this post, I covered how to bake delicious White Chocolate Pumpkin Snickerdoodles. We explored key ingredients like flour, pumpkin puree, and spices. I shared step-by-step instructions for mixing and baking, along with tips for perfecting your cookies. You can try variations to suit your taste and learn smart storage methods to keep them fresh. Now, you’re ready to impress friends and family with these amazing cookies. Enjoy the process and make it your own!

If you love fall flavors, the White Chocolate Pumpkin Snickerdoodles are a must-try! These soft and chewy cookies blend pumpkin’s richness with sweet white chocolate. In this post, I’ll share …

Read more

Categories Desserts
Older posts
Newer posts
← Previous Page1 … Page24 Page25 Page26 … Page92 Next →

TASTED NEST

Where Flavor Finds a Home 🍳🏡 — warm, simple, and crave-worthy recipes made for real life, from stovetop mornings to backyard dinners.

PAGES

Home About Contact Privacy Policy Terms & Conditions Cookie Policy GDPR Policy Copyright Policy Disclaimer

CATEGORIES

Appetizers Desserts Salads Breakfast Dinner

Contact

  • Pinterest
  • Mail
Copyright © 2025 Tasted Nest. All rights reserved.