Skip to content
Tasted Nest
  • Home
  • Appetizers
  • Desserts
  • Salads
  • Breakfast
  • Dinner
  • Privacy Policy
  • Contact
  • About

Chef Tavio

Harvest Puppy Chow Tasty Treat for Your Dog

August 1, 2025 by Chef Tavio
- 6 cups rice Chex cereal - 1 cup pumpkin purée - 1/2 cup natural peanut butter - 1/4 cup pure maple syrup - 1 teaspoon ground cinnamon - 1/2 teaspoon pure vanilla extract - 1 cup powdered sugar - 1 cup mini dog-safe chocolate chips (optional) - 1/2 cup finely chopped pecans (optional) - 1/2 cup dried cranberries or raisins (unsweetened) This treat is both tasty and nutritious for your dog. Each serving contains a good mix of calories and nutrients. For example, pumpkin adds fiber and vitamins. It helps with digestion and keeps your dog healthy. Peanut butter is a great source of protein and healthy fats. Just make sure it has no xylitol, as it is toxic for dogs. Cranberries can also be beneficial. They offer antioxidants and support urinary health. Overall, Harvest Puppy Chow fits well into a balanced diet. It provides energy while still being a fun treat. Always check your dog's response to new foods. If any issues arise, consult your vet. This treat can make your dog feel special while keeping health in mind. You can find the full recipe above for detailed steps to make this delightful snack! 1. Start with 6 cups of rice Chex cereal in a large mixing bowl. This is the base for your Harvest Puppy Chow. 2. In a medium saucepan, combine 1 cup of pumpkin purée, 1/2 cup of natural peanut butter, 1/4 cup of pure maple syrup, 1 teaspoon of ground cinnamon, and 1/2 teaspoon of pure vanilla extract. 3. Heat this mixture on low. Stir it often until it becomes smooth, which takes about 3-5 minutes. Keep an eye on it to prevent burning. 4. Once everything is smooth, take it off the heat. Slowly pour it over the rice Chex cereal. Use a spatula to mix gently, ensuring each piece gets coated. 1. Let the coated cereal cool for about 10 minutes at room temperature. This helps the mixture set a bit. 2. Take a large zip-top bag. Add 1 cup of powdered sugar and any optional ingredients you want, like mini dog-safe chocolate chips, chopped pecans, or dried cranberries. 3. Add the cooled cereal mixture into the bag. Seal it tightly and shake it well. This coats all the cereal pieces in powdered sugar. 1. Spread the Harvest Puppy Chow onto a parchment-lined baking sheet. Make sure it’s in an even layer. Let it cool completely for about 15-20 minutes. 2. Once it’s cool, break it into bite-sized clusters. Store these in an airtight container to keep them fresh. For the full recipe, check the earlier section. Enjoy making this tasty treat for your furry friend! To ensure even coating of the cereal, start with dry rice Chex. Pour the cereal into a large bowl. When you warm the pumpkin mixture, stir it often. This keeps it smooth and prevents burning. Once heated, pour it over the cereal slowly. Use a spatula to fold the cereal carefully. This way, every piece gets coated without breaking. To prevent the mixture from burning, keep the heat low. Stir continuously and watch closely. If it starts to stick, lower the heat more. You want a warm mix, not a hot one. This method will give you a perfect blend without any burnt spots. For freshness, use an airtight container. Glass jars or plastic bins work well. Just make sure they're sealed tight. This keeps your Harvest Puppy Chow crunchy for longer. For a fun presentation, serve it in a cute dog bowl. You can also package it in treat bags. This makes a great gift for dog lovers! Add a little ribbon for a nice touch. Your furry friends will love their tasty treat! {{image_4}} You can get creative with your Harvest Puppy Chow by trying different nut butters. Almond butter adds a nice twist. Cashew butter can also work well. Just make sure they are safe for dogs. You can also add various dried fruits to the mix. Try chopped apples or blueberries for a fruity kick. These fruits offer extra vitamins and make the treat more fun. Make sure the dried fruits do not have added sugar. If you want a gluten-free version, use gluten-free rice Chex cereal. Many brands make safe options. Check the label to be sure. For a low-sugar treat, reduce the amount of maple syrup. You might also skip the powdered sugar coating. Your dog will still enjoy the yummy flavors! Store your Harvest Puppy Chow in an airtight container. This keeps it fresh and safe. Place the container in a cool, dry area. Avoid direct sunlight and heat. Harvest Puppy Chow lasts about 1-2 weeks. Look for changes in smell or texture. If it feels stale or has a strange odor, it's time to toss it. Always check for mold, especially if you added dried fruit. Keeping an eye on freshness ensures your pup enjoys tasty treats! Yes, Harvest Puppy Chow can work for most dog breeds. However, smaller breeds may need smaller portions. Larger breeds may want more. Always watch your dog's response to new foods. Some dogs have allergies or sensitivities. If your dog has special needs, check with your vet first. Yes, you can enjoy a version of this recipe! Just adjust the flavors. You can add a pinch of salt or use more spices. Swap the dog-safe chocolate chips for regular ones. You can also use sugar instead of powdered sugar. This way, you can share the treat with your friends too! You can find most ingredients at local grocery stores. Look for rice Chex cereal and pumpkin purée in the cereal or canned goods aisle. Natural peanut butter is usually in the nut butter section. For pure maple syrup, check the baking aisle. If you want specialty items, try online stores like Amazon. They often have organic options too. In this blog post, we explored how to make Harvest Puppy Chow, a fun treat for your dog. We discussed all the key ingredients, including rice Chex cereal and pumpkin purée, and shared easy step-by-step instructions. I also highlighted nutritional benefits and offered tips on storage and variations. As you create this dog-friendly snack, remember to have fun and be creative. Your dog will love these tasty bites! Enjoy making puppy chow, and keep your furry friend happy and healthy.

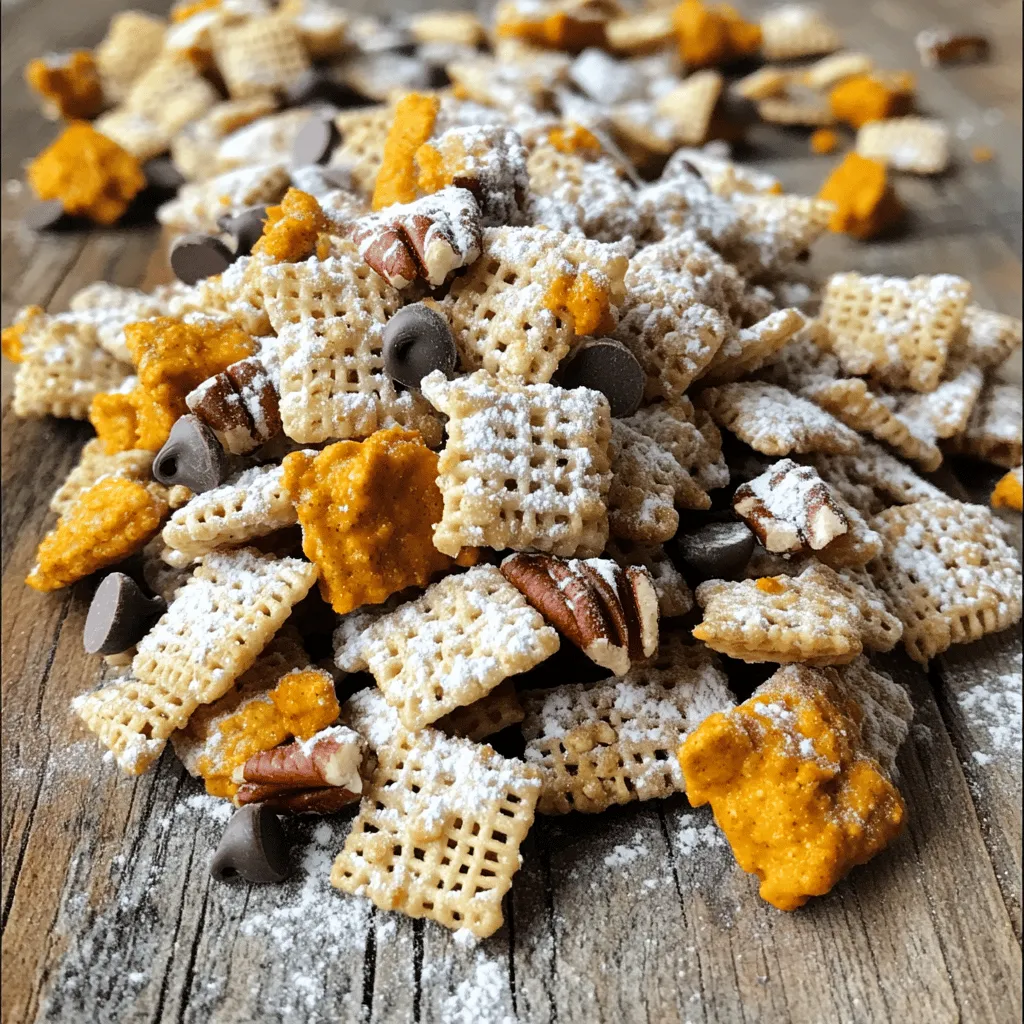
Looking for a delightful way to treat your furry friend? Harvest Puppy Chow is a tasty, healthy snack that’s easy to make! Packed with nutritious ingredients like pumpkin and peanut …

Read more

Categories Desserts

Pumpkin Cream Cheese Swirl Muffins Irresistibly Cozy

August 1, 2025 by Chef Tavio
- 1 ½ cups all-purpose flour - 1 teaspoon baking powder - ½ teaspoon baking soda - ½ teaspoon salt - 1 teaspoon ground cinnamon - ½ teaspoon ground nutmeg - ½ teaspoon ground ginger - 1 cup canned pumpkin puree - ¾ cup granulated sugar - ½ cup brown sugar, packed - 2 large eggs - ½ cup vegetable oil - 1 teaspoon vanilla extract For the Cream Cheese Swirl: - 8 oz cream cheese, softened - ¼ cup granulated sugar - 1 egg - 1 teaspoon vanilla extract Pumpkin puree is key in these muffins. It gives that rich, cozy flavor. The cream cheese adds a creamy, tangy touch that makes each bite special. You can make these muffins gluten-free by using a gluten-free flour blend. For a sweeter taste, try honey or maple syrup instead of regular sugar. These options keep the muffins tasty and friendly for different diets. If you need to avoid eggs, use flaxseed meal instead of eggs for a vegan option. Just mix 1 tablespoon of ground flaxseed with 2.5 tablespoons of water for each egg. First, preheat your oven to 350°F (175°C). This step ensures even baking. Next, prepare your muffin tin by lining it with paper liners or greasing it with cooking spray. This makes it easy to pop out the muffins later. Accurate measuring of ingredients is key. It helps create the perfect texture and flavor in your muffins. Start mixing by grabbing two bowls. In one bowl, combine 1 ½ cups of flour, 1 teaspoon of baking powder, ½ teaspoon of baking soda, ½ teaspoon of salt, 1 teaspoon of cinnamon, ½ teaspoon of nutmeg, and ½ teaspoon of ginger. Whisk these dry ingredients well. In a second bowl, mix 1 cup of pumpkin puree, ¾ cup of granulated sugar, ½ cup of brown sugar, 2 eggs, ½ cup of vegetable oil, and 1 teaspoon of vanilla. Blend until smooth. Gradually add the dry mix to the pumpkin mix. Stir gently with a spatula until just combined. A few lumps are okay. For the cream cheese swirl, beat together 8 oz of softened cream cheese, ¼ cup of granulated sugar, 1 egg, and 1 teaspoon of vanilla until creamy. Now, fill each muffin cup halfway with the pumpkin batter. Add a dollop of cream cheese mix on top, then cover with more pumpkin batter until each cup is about ¾ full. Use a toothpick to swirl the cream cheese into the pumpkin batter. This creates a lovely marbled look. Place the muffin tin in your preheated oven. Bake for 18-20 minutes. To check if they are done, insert a toothpick into the center. If it comes out clean, your muffins are ready. Once baked, let the muffins cool in the tin for about 5 minutes. Then, move them to a wire rack to cool completely. Enjoy the cozy scent while they cool! To make your muffins fluffy, use room temperature ingredients. This helps the batter mix well, creating air pockets that rise. When mixing the wet and dry ingredients, stop as soon as you see no dry flour. Overmixing can lead to dense muffins. You want a few lumps, not a smooth batter. For a stunning presentation, sprinkle some pumpkin seeds on top before baking. This adds crunch and color. Once baked, arrange the muffins on a beautiful platter. Lightly dust them with powdered sugar for a sweet touch. At gatherings or holiday events, serve these muffins with warm apple cider or a spiced latte. They look cozy and inviting, perfect for sharing. For the full recipe, check the [Full Recipe]. {{image_4}} You can easily change the flavor of your muffins. Add spices like clove or allspice for a warm, cozy taste. These spices blend well with pumpkin. You can also toss in mix-ins like chocolate chips or nuts. Chocolate adds richness, while nuts give crunch. Experiment and find your favorite combination! If you want a vegan version, swap the eggs for flaxseed meal or applesauce. Replace the cream cheese with a vegan cream cheese. For a low-sugar option, use less sugar or substitute with maple syrup. You can also change the muffin size. Make mini muffins for cute bites or stick to the standard size for a hearty treat. Adjust the baking time slightly for mini muffins, checking for doneness at around 15 minutes. For the full recipe, check the detailed instructions above! To keep your Pumpkin Cream Cheese Swirl Muffins fresh, store them in an airtight container. This helps preserve their soft texture. If you want them to last longer, consider freezing them. Wrap each muffin in plastic wrap and place them in a freezer bag. They will stay fresh for up to three months. When it’s time to enjoy your muffins again, reheating is key. I suggest using the microwave. Heat them for about 10-15 seconds. This warms them up without making them dry. You can also reheat in the oven. Set it to 350°F (175°C) and warm them for about 5-7 minutes. These muffins make a great snack or breakfast. Enjoy them with a cup of coffee or tea. You can also spread a bit of cream cheese on top for extra flavor. For the full recipe, check the main section of this article. How long do Pumpkin Cream Cheese Swirl Muffins last? These muffins stay fresh for about three days at room temperature. Store them in an airtight container. If you want to keep them longer, freeze them for up to three months. Just ensure they are well-wrapped to avoid freezer burn. Can I make the batter in advance? Yes, you can make the batter in advance. Mix it and store it in the fridge for up to 24 hours. Just remember to give it a good stir before baking. This can save time on busy mornings! What to do if muffins sink in the middle? If your muffins sink, it may be due to too much moisture or underbaking. Ensure you follow the measurements carefully. Always check for doneness using a toothpick. If it comes out clean, your muffins are ready. How to fix dry muffins? Dry muffins can happen if you overmix or bake too long. To fix dry muffins, add a bit of milk or cream cheese frosting on top. This adds moisture and flavor. Next time, keep an eye on baking time and mix just until combined. Best accompaniments for serving (beverages, toppings) These muffins pair well with a hot cup of coffee or spiced tea. You can top them with a drizzle of maple syrup or a sprinkle of powdered sugar. They also taste great with a dollop of whipped cream. Ideas for using muffins in recipes or breakfast spreads You can cut these muffins in half and toast them for a warm treat. They also work well as a base for French toast. Try adding them to a breakfast spread alongside yogurt and fruit for a balanced meal. Enjoy the cozy vibes! This blog post guides you through making Pumpkin Cream Cheese Swirl Muffins. We covered the key ingredients, unique substitutions for allergens, and detailed steps for mixing and baking. You learned tips for perfecting texture and ways to make your muffins visually appealing. We also explored flavor and dietary variations, along with storage and reheating methods. Now, you're ready to bake delicious muffins that impress everyone. Enjoy experimenting, and make these recipes your own!

Are you ready for the ultimate fall treat? Pumpkin Cream Cheese Swirl Muffins are here to warm your heart and your kitchen. With a rich blend of pumpkin puree and …

Read more

Categories Desserts

Easy Pumpkin Donuts Recipe that Delivers Delight

August 1, 2025 by Chef Tavio
- 1 cup pumpkin puree - 1/2 cup granulated sugar - 1/4 cup packed brown sugar - 1/4 cup vegetable oil - 2 large eggs - 1 teaspoon vanilla extract - 2 cups all-purpose flour - 1 teaspoon baking powder - 1/2 teaspoon baking soda - 1 teaspoon ground cinnamon - 1/2 teaspoon ground nutmeg - 1/2 teaspoon salt The main ingredients are the heart of your pumpkin donuts. I love using pumpkin puree because it adds moisture and flavor. The sugars balance the spices and create sweetness. Vegetable oil keeps the donuts tender. Eggs help bind everything, while vanilla adds a lovely aroma. The flour gives structure, and the baking powder and baking soda help the donuts rise. Cinnamon and nutmeg give the donuts their warm, cozy flavor. Lastly, salt enhances all the other flavors. - 1/2 cup powdered sugar - 1-2 tablespoons milk - Optional: Chopped pecans or walnuts for topping For the glaze, powdered sugar makes it sweet and smooth. Milk thins it out to the right consistency. You can sprinkle chopped pecans or walnuts on top if you like a crunchy texture. This glaze adds a fun finish to your donuts. Ready to whip up these tasty treats? Follow the [Full Recipe] for step-by-step guidance! - Preheat the oven to 350°F (175°C). - Grease the donut pan with non-stick spray or oil. - In a large bowl, combine pumpkin puree, granulated sugar, brown sugar, oil, eggs, and vanilla. - Whisk until smooth. - In another bowl, whisk together flour, baking powder, baking soda, spices, and salt. - Gradually add the dry mix to the wet mix. - Stir gently until just combined. Do not overmix. - Fill each mold about two-thirds full with batter. - Bake for 10-12 minutes. The donuts are done when a toothpick comes out clean. - Cool in the pan for 5 minutes, then transfer to a wire rack. - In a small bowl, mix powdered sugar with 1-2 tablespoons of milk. - Whisk until smooth. - Once cooled, dip the tops of the donuts into the glaze. - Allow excess glaze to drip off. For extra crunch, add chopped nuts on top. Follow these steps to create delightful pumpkin donuts. You can find the full recipe [here]. Enjoy the process and the tasty results! To keep your donuts light, avoid overmixing the batter. Mix just until combined. If you mix too much, the donuts can become tough. Also, make sure not to overfill the donut pan. Filling each mold two-thirds full allows the donuts to rise without spilling over. The glaze can make or break your donuts. Adjust the glaze's thickness to your liking. If it seems too thick, add a bit more milk. If it's too runny, add more powdered sugar. After glazing, allow the donuts to set before serving. This helps the glaze stick better and adds to the look. Want to kick up the flavor? Experiment with spices. Adding more cinnamon or nutmeg gives a warm kick. You can also add chocolate chips to the batter for a sweet surprise. Mixing flavors can make these pumpkin donuts even more fun and tasty. For the full recipe, check out the complete details above! {{image_4}} To give your donuts a warm, cozy flavor, add more cinnamon and nutmeg. These spices bring out the rich taste of the pumpkin. I recommend using one tablespoon of cinnamon and three-quarters of a teaspoon of nutmeg. This change makes your donuts even more delightful! For a twist, try making chocolate pumpkin donuts. Just mix in some cocoa powder into the batter. Use about a quarter cup of cocoa powder. It gives the donuts a deep, rich flavor that pairs well with pumpkin. You won't believe how tasty they are! You can choose between glazing your donuts or coating them in sugar. Glazing gives a sweet, shiny finish. To coat in sugar, simply roll the warm donuts in granulated sugar. It adds a nice crunch. Either way, they are sure to please! Store leftover donuts in an airtight container at room temperature. This keeps them fresh and soft. Avoid leaving them in open air, as they may dry out quickly. Enjoy them within a few days for the best taste. You can freeze unglazed donuts for up to 2 months. Place them in a freezer-safe bag or container. Make sure to remove as much air as possible. Label the bag with the date, so you remember when you made them. To enjoy your donuts again, warm them in the oven or microwave. For the oven, preheat it to 350°F (175°C). Place the donuts on a baking sheet and heat for about 5 minutes. For the microwave, heat them one at a time for about 15-20 seconds. Enjoy them warm for the best taste! You can easily make these donuts gluten-free. Just substitute all-purpose flour with a gluten-free blend. This change works well, and you keep the same great taste. Fresh donuts are best consumed within 2-3 days. After that, they may lose their soft texture. Store them in an airtight container to keep them fresh. Yes, you can use fresh pumpkin. Make sure it is fully cooked and pureed. This ensures the right moisture and flavor in your donuts. These donuts pair well with coffee or tea. They make a great afternoon snack too. Enjoy them as a sweet treat at any time of the day! You can make delicious pumpkin donuts with simple ingredients and easy steps. We covered the main ingredients, how to mix and bake, and tips for perfect results. Remember to experiment with flavors and toppings for fun variations. Store extras in an airtight container or freeze them for later. Enjoy these treats with coffee or tea for a cozy snack. Now, it’s time to get baking and savor the joy of homemade treats!

Fall is here, and what better way to celebrate than with warm, homemade pumpkin donuts? In this article, I’ll share my easy pumpkin donuts recipe that delivers delight. Packed with …

Read more

Categories Desserts

15 Easy Non-Sandwich Lunch Ideas for Busy Days

July 31, 2025 by Chef Tavio
- Ingredients: - 4 large bell peppers (any color) - 1 cup cooked quinoa - 1 cup black beans, rinsed and drained - 1 cup corn (frozen or fresh) - 1 cup shredded cheddar cheese - 1 teaspoon cumin - 1 teaspoon paprika - 1 tablespoon olive oil - Salt and pepper to taste - Fresh cilantro, chopped, for garnish 1. Preheat your oven to 375°F (190°C). 2. Slice the tops off the bell peppers and remove the seeds. 3. In a bowl, mix cooked quinoa, black beans, corn, half of the cheese, cumin, paprika, olive oil, salt, and pepper. 4. Stuff each pepper with the mixture, packing it well. 5. Place the peppers upright in a baking dish. Cover with foil. 6. Bake for 25 minutes. Remove the foil and add the remaining cheese on top. 7. Bake for another 10 minutes until cheese is melted. 8. Garnish with fresh cilantro before serving. - Nutritional Information: - Servings: 4 - Prep Time: 15 min - Total Time: 40 min This dish is full of flavor and nutrients. The peppers are colorful and fun to eat. They are perfect for busy days. You can prepare them ahead and reheat for a quick lunch. Enjoy the cheesy goodness along with the healthy quinoa and beans. This recipe is a true delight! For the full details, check the [Full Recipe]. - 1 can chickpeas, rinsed and drained - 1 cup cherry tomatoes, halved - 1 cucumber, diced into small pieces - 1/2 red onion, finely chopped - 1/2 cup feta cheese, crumbled - 1/4 cup Kalamata olives, pitted and halved - 2 tablespoons olive oil - 1 tablespoon red wine vinegar - 1 teaspoon dried oregano - Salt and pepper to taste 1. In a large bowl, combine the rinsed chickpeas, cherry tomatoes, cucumber, red onion, crumbled feta cheese, and Kalamata olives. 2. In a small bowl, whisk together the olive oil, red wine vinegar, dried oregano, and a pinch of salt and pepper. 3. Pour the dressing over the salad and toss gently to mix. 4. For the best flavor, let the salad sit for about 10 minutes before serving. - Prep Time: 10 min - Total Time: 10 min - Servings: 2 servings This Mediterranean chickpea salad is bright and fresh. It packs great flavors and is easy to make. Perfect for a busy day, it offers a healthy balance of protein and veggies. You can enjoy it alone or pair it with your favorite dish. For a full recipe, check out the Cheesy Quinoa Stuffed Peppers. - 6 large eggs - 1 cup fresh spinach, chopped - 1/2 cup bell pepper, diced finely - 1/2 cup cherry tomatoes, halved - 1/2 cup cheese (choose between cheddar or feta) - Salt and pepper to taste - Olive oil spray or a light brush of oil for greasing To make savory egg muffins, you start by preheating your oven to 350°F (175°C). Lightly grease a muffin tin with olive oil spray. This helps to prevent sticking and makes clean-up easier. In a medium mixing bowl, whisk the eggs until well combined. Add a pinch of salt and pepper to taste. Then, fold in the chopped spinach, diced bell pepper, and cherry tomato halves. If you love cheese, mix in your choice of cheddar or feta. Stir everything until evenly mixed. Next, pour the egg mixture into the muffin cups. Fill them about 3/4 full to leave room for rising. Bake in the preheated oven for 20 to 25 minutes. You know they’re ready when they are firm and lightly golden on top. Once done, let the muffins cool for a few minutes in the tin. Then, gently remove them and serve warm. These muffins are great for breakfast or lunch. They also store well in the fridge for a quick snack. You can enjoy these savory egg muffins on their own or pair them with a fresh side salad. They make a fun and tasty option for busy days. For a complete recipe, check the Full Recipe section. {{image_4}} - 1 cup sushi rice, cooked and seasoned - 4 sheets nori (seaweed) - 1 cucumber, julienned - 1 carrot, julienned - 1 avocado, sliced - Soy sauce, for dipping - Pickled ginger, for serving - Wasabi, optional To make sushi rolls, you need to use sushi rice. It is sticky and holds together well. You should cook it according to the package instructions. Once done, let it cool slightly. 1. Place a bamboo mat on a flat surface. Lay a sheet of nori on top, shiny side down. 2. Wet your hands with water to prevent sticking. Grab a handful of sushi rice and spread it evenly over the nori, leaving a 1-inch gap at the top. 3. Lay cucumber, carrot, and avocado in a line across the rice, about an inch from the bottom edge. 4. Start rolling from the bottom, using the mat to help you. Roll tightly but not too tight to avoid squishing. 5. Once rolled, use a sharp knife to cut the sushi into bite-sized pieces. Wipe the knife with a damp cloth between cuts for clean slices. Serve your sushi rolls with soy sauce for dipping. Add pickled ginger on the side for a fresh taste. If you enjoy a kick, try a bit of wasabi too. These rolls are fun to eat and look great on a plate. They are perfect for lunch or a light snack. For a full recipe, check out Cheesy Quinoa Stuffed Peppers. Prepping lunches ahead of time saves you stress. You can enjoy healthy meals without a rush. Here are some best practices I use for prepping lunches. Storing prepped meals for freshness: - Use airtight containers to keep food fresh. - Label containers with the date. This helps you track freshness. - Store meals in the fridge for up to four days. For longer storage, freeze them. Containers and tools to consider: - Choose glass or BPA-free plastic containers. They are safe and durable. - Invest in good-quality freezer bags. They take up less space and are easy to label. - Use meal prep trays for easy portioning of meals. - Keep a set of measuring cups handy. This ensures you have the right amounts. With these tips, you can prep delicious dishes like Cheesy Quinoa Stuffed Peppers. This meal is easy to make and perfect for busy days. Enjoy your lunch! You can enjoy many quick lunch options without using bread. Here are a few: - Wraps: Use lettuce leaves or tortillas to wrap meats, veggies, and sauces. - Salads: Combine greens with proteins like chicken, beans, or eggs. - Rice Bowls: Top brown rice or quinoa with your favorite proteins and veggies. - Stuffed Peppers: Fill bell peppers with grains, beans, and cheese (like my cheesy quinoa stuffed peppers). - Egg Muffins: Make egg muffins for a protein-packed, easy meal. These options are quick to prep and full of flavor. You can mix and match ingredients to keep things fresh. Making lunch nutritious is simple. Here are some tips: - Add Vegetables: Include a variety of colorful veggies for vitamins and minerals. - Choose Whole Grains: Opt for whole grains like quinoa or brown rice instead of white rice. - Incorporate Protein: Use lean meats, beans, or nuts to keep you full. - Healthy Fats: Include foods like avocado or olive oil to promote heart health. - Stay Hydrated: Drink water or herbal teas to complement your meal. These steps make meals more balanced and satisfying. Yes, many non-sandwich lunch ideas freeze well. Here are some that do: - Stuffed Peppers: Prepare them, then freeze before baking. Bake when you're ready. - Egg Muffins: Make a batch and freeze them. Reheat in the microwave for a quick meal. - Chickpea Salad: This salad is best fresh but can last a few days in the fridge. - Rice Bowls: Prepare and freeze individual portions for easy reheating. Freezing meals saves time and helps reduce waste. Always use airtight containers to keep food fresh. This article shares 15 easy non-sandwich lunch ideas. You learned about cheesy quinoa stuffed peppers, Mediterranean chickpea salad, and savory egg muffins. Delicious veggie sushi rolls add fun to your meals. I also covered meal prep tips to save you time. These ideas offer variety and nutrition. Use them to keep lunchtime exciting and simple. Adventure awaits in your kitchen, so try these tasty recipes today!

Are you tired of the same old sandwich routine? I have the answer! In this blog post, I’ll share 15 easy non-sandwich lunch ideas perfect for your busy days. From …

Read more

Categories Dinner

Strawberry Poppyseed Salad Dressing Fresh and Flavorful

July 31, 2025 by Chef Tavio
- Sliced strawberries - Creamy Greek yogurt - Pure honey Fresh ingredients bring life to your dressing. I always choose ripe strawberries for the best flavor. Sliced strawberries add a burst of sweetness and color. Creamy Greek yogurt gives a rich texture. Pure honey adds natural sweetness, balancing the tang of vinegar. - Apple cider vinegar - Poppy seeds - Extra virgin olive oil - Fine sea salt - Freshly cracked black pepper Pantry staples are essential for depth. Apple cider vinegar adds a tangy kick. Poppy seeds provide a nice crunch and a hint of nuttiness. Extra virgin olive oil helps emulsify the dressing, creating a smooth texture. Fine sea salt and freshly cracked black pepper enhance all the flavors. - Unique flavor enhancers - Sweetness adjustments You can personalize your dressing with optional add-ins. Try adding fresh herbs like basil or mint for a new twist. If you want more sweetness, just add a little more honey. You can also mix in a splash of orange juice for a fruity zing. For the full recipe, check out the details above! First, you need to prepare the strawberries. Start by hulling them. This means removing the green tops and any white parts. After hulling, slice the strawberries into thin pieces. This helps them blend well and adds flavor. Next, gather your liquid ingredients. Measure out the Greek yogurt, honey, and apple cider vinegar. Use a measuring cup for accuracy. Having everything ready makes the blending easy and quick. Now, it’s time to blend. Place the sliced strawberries, Greek yogurt, honey, apple cider vinegar, poppy seeds, sea salt, and black pepper in a blender. Make sure to close the lid tightly. Blend the mixture on high speed. Watch for clumps and stop to scrape the sides if needed. You want a smooth and creamy texture. This is the base of your dressing. While blending, slowly drizzle in the olive oil. This helps mix everything together perfectly. Keep blending until it all combines smoothly. After blending, taste your dressing. You might want to adjust the flavor. If it needs sweetness, add more honey. If you want it tangier, splash in a bit more vinegar. Finally, transfer the dressing to a clean jar or container. Make sure it is airtight. Cover it and refrigerate for at least 30 minutes. This chilling time lets the flavors blend even more. Now, you're ready to enjoy your strawberry poppyseed salad dressing! For the full recipe, check out the details above. To get a creamy texture, you need to emulsify your dressing well. Emulsifying means mixing two liquids that usually don't blend. For this, I suggest adding olive oil slowly while blending. This method helps create a smooth dressing. The importance of olive oil cannot be overstated. It adds richness and depth. Use extra virgin olive oil for the best flavor. Its fruity notes enhance the strawberries. When it comes to balancing flavors, honey and apple cider vinegar play key roles. Start with the amounts listed in the Full Recipe. If you want a sweeter taste, feel free to add more honey. For a tangy kick, squeeze in extra apple cider vinegar. Just remember to taste as you go! Adding herbs or spices can elevate your dressing. Consider fresh basil or mint for a refreshing twist. A pinch of garlic powder adds depth, too. Don't be afraid to experiment! Each addition can make your dressing unique and delicious. {{image_4}} You can make this dressing lighter. One option is to use low-fat yogurt instead of creamy Greek yogurt. This swap cuts calories while still keeping a nice texture. The flavor remains bright and fresh. Another way to lighten up the dressing is by substituting sweeteners. Instead of honey, you can use agave syrup or stevia. These options add sweetness with fewer calories. Just remember to adjust the amount to taste, as they can be sweeter than honey. To make your dressing even more special, try adding citrus zest. A little lemon or orange zest brings a zesty brightness. It complements the strawberries nicely. Just a teaspoon can make a big difference. You can also incorporate other berries for extra flavor. Adding blueberries or raspberries gives your dressing a new twist. Blend them in with the strawberries for a berry explosion. Each berry adds its own unique taste. This dressing pairs well with different greens. You can use arugula, spinach, or romaine lettuce. Each green brings its own crunch and flavor. Experiment to find your favorite mix. You can also use this dressing to complement main dishes. Drizzle it over grilled chicken or fish for a tasty twist. The dressing adds a fresh and vibrant touch to your meal. For the best taste, always store your strawberry poppyseed dressing in the fridge. Keep it in a clean jar or an airtight container. This keeps the dressing fresh and prevents it from absorbing other fridge smells. Make sure to seal it tightly after each use. This dressing stays fresh for about one week in the fridge. After that, the flavors may fade. If you notice any off-smells or changes in texture, it’s best to toss it. You can freeze the dressing for future use. Pour it into an ice cube tray or a freezer-safe container. Leave some space at the top, as liquids expand when frozen. When you're ready to use it, thaw the dressing in the fridge overnight. Avoid using a microwave, as it may change the texture. After thawing, give it a good shake or stir before serving. Enjoy the fresh taste of your strawberry poppyseed dressing later! For the full recipe, check out the Strawberry Poppyseed Bliss Dressing. Strawberry poppyseed salad dressing lasts about one week in the fridge. Store it in a sealed jar. Always check for any off smells or changes in color before use. Yes, you can use frozen strawberries. Just thaw them first and drain excess water. This helps keep the dressing from being too watery. Fresh strawberries give a brighter flavor, but frozen works well too. You can find pre-made strawberry poppyseed salad dressing at most grocery stores. Check the salad dressing aisle or the organic section. Some stores may also have it in their deli section. This dressing pairs well with mixed greens, spinach, or arugula. Add fresh fruits, nuts, and cheese for extra flavor. It also tastes great on salads with grilled chicken or shrimp. To make this dressing vegan, replace Greek yogurt with a plant-based yogurt. Use maple syrup instead of honey for sweetness. These swaps keep the flavor while meeting vegan needs. This blog post covered how to make a tasty Strawberry Poppyseed Salad Dressing. We looked at the fresh ingredients, pantry staples, and optional add-ins to enhance the flavor. I shared step-by-step instructions for preparation, blending, and final touches. We also discussed tips for creaminess, adjusting sweetness, and suggested variations to fit your taste. Storing your dressing properly will help it last longer. Remember, you can easily adapt this recipe to match your needs. Enjoy creating your perfect salad dressing!

Looking for a fresh and flavorful dressing to elevate your salads? You’re in the right spot! My Strawberry Poppyseed Salad Dressing combines sweet strawberries, creamy Greek yogurt, and zesty poppy …

Read more

Categories Salads

Cozy Gingerbread Latte Easy Recipe for Chilly Days

July 31, 2025 by Chef Tavio
To make the perfect Cozy Gingerbread Latte, you need a few key items: - 1 cup milk (choose your favorite: dairy or non-dairy) - 1 cup strong brewed coffee or freshly pulled espresso - 2 tablespoons gingerbread syrup (store-bought or homemade) - 1/4 teaspoon ground cinnamon - 1/4 teaspoon ground ginger - 1/8 teaspoon ground nutmeg These ingredients work together to create a warm, spicy drink. The gingerbread syrup adds sweetness and rich flavor. The spices bring warmth and depth. You can add some fun touches to your latte with optional garnishes: - 1 tablespoon whipped cream (for a creamy treat) - A sprinkle of ground cinnamon - Crushed graham crackers These garnishes not only look pretty but also enhance the flavor. Whipped cream makes it feel extra special. The graham crackers add a nice crunch. If you want a dairy-free option, try these milk alternatives: - Almond milk - Oat milk - Coconut milk Each milk type gives a different taste and texture. Almond milk is light and nutty. Oat milk is creamy and smooth. Coconut milk adds a tropical twist. Choose what you like best for your Cozy Gingerbread Latte. For the full recipe, check the section above! To start, grab a small saucepan and pour in your milk. You can use dairy or any non-dairy milk you like. Heat the milk over medium heat. Watch it carefully and stir it often. You want it warm but not boiling. When the milk starts to steam, it’s ready! Now, use a milk frother or a whisk to froth the milk. Make it creamy and foamy. This gives your latte a nice touch. While the milk heats, it’s time to brew your coffee or espresso. You want it strong and fresh. If you're using coffee, brew one cup. If you have an espresso machine, pull a fresh shot. The rich aroma will fill your kitchen and make you excited for your cozy drink. In a large mug, mix your brewed coffee with two tablespoons of gingerbread syrup. Add in your ground cinnamon, ground ginger, and nutmeg. Stir well to blend all the flavors. This mix brings warmth and spice to your latte. Next, pour the frothed milk into this mixture. Use a spoon to hold back the foam until the end. This way, you’ll have a lovely layer of froth on top. If you want to treat yourself, add a tablespoon of whipped cream on top. Finish it with a sprinkle of ground cinnamon or crushed graham crackers. Serve your gingerbread latte warm and enjoy every sip! For the complete guide, check the Full Recipe. Frothing milk adds a special touch to your latte. To froth like a pro, heat your milk first. Use a small saucepan. Heat it on medium, stirring often. Aim for steaming hot, not boiling. Once heated, use a milk frother or a whisk. Move it up and down quickly. This creates bubbles and makes the milk creamy. The goal is a nice foam on top. Practice makes perfect, so don't worry if it takes time. Spices can make your gingerbread latte shine. Start with ground cinnamon, ginger, and nutmeg. These spices bring warmth and depth. They also give the drink that cozy feel. You can adjust the amounts to suit your taste. If you like it spicier, add more ginger or cinnamon. For a fun twist, try adding a pinch of cloves or allspice. This will give your latte a unique flavor that stands out. Sweetness is key to a great gingerbread latte. Use gingerbread syrup for that signature taste. You can make your own or buy it from a store. Start with two tablespoons and taste it. If you want it sweeter, add more. You can also use sugar or honey as alternatives. Just remember to stir well. This ensures that the sweetness blends nicely with the spices and coffee. Enjoy adjusting the flavors until you find your perfect balance. For the complete detailed preparation, check the Full Recipe. {{image_4}} You can enjoy a gingerbread latte without dairy. Use almond, oat, or coconut milk instead. Each choice adds a unique taste. Almond milk gives a nutty flavor. Oat milk is creamy and thick. Coconut milk adds a tropical twist. Select what you love most to make it your own. If you want to mix things up, try different spices. Instead of ginger or nutmeg, use cardamom or allspice. A pinch of clove also works well. These spices give a warm, cozy taste. Experiment with the amounts until you find your favorite blend. This way, every sip feels special. An iced version is perfect for warmer days. Start with cooled coffee or espresso. Use cold milk or your favorite dairy-free option. Mix in gingerbread syrup and spices just like the hot latte. Pour it over ice in a tall glass. For extra fun, add whipped cream on top. Enjoy this refreshing twist on a classic drink! For the full recipe, refer back to the Cozy Gingerbread Latte section. Store any leftover gingerbread syrup in a clean jar. Make sure the lid is tight. Keep it in the fridge for up to two weeks. This will keep the syrup fresh and tasty. You can use it for other drinks or desserts too. If you have extra milk or coffee, store them in separate containers. Seal the milk tightly and keep it in the fridge. The coffee can go in a jar or a pitcher. Use it within a few days for best flavor. To reheat your gingerbread latte, pour it back into a pot. Heat it gently over low heat. Stir it often to avoid burning. You can also use a microwave, but do it in short bursts. Heat it for about 30 seconds at a time. Stop when it's warm enough for you. Add fresh whipped cream and a sprinkle of cinnamon for a treat! A gingerbread latte has a few simple ingredients. It includes strong brewed coffee or espresso, milk, and gingerbread syrup. You can make your syrup or buy it from the store. Spices like cinnamon, ginger, and nutmeg add warmth. The drink is often topped with whipped cream and a sprinkle of cinnamon or crushed graham crackers. Each sip brings cozy holiday flavors. Yes, making gingerbread syrup at home is easy! You need sugar, water, and spices. Combine equal parts sugar and water in a pot. Heat until the sugar dissolves. Then, add ginger, cinnamon, and nutmeg. Let it simmer for a few minutes. Cool the mixture before using it in your latte. This homemade syrup adds a personal touch to your drink. You can adjust the sweetness based on your taste. Start by adding less gingerbread syrup. Taste your latte and add more if you like. You can also use a different sweetener like honey or maple syrup. Each option gives a unique flavor. Experiment until you find the perfect balance for your cozy gingerbread latte. Enjoy it just the way you like! In this blog post, we explored how to create a cozy gingerbread latte. We looked at key ingredients, step-by-step instructions, and tips for frothing milk. You learned about fun variations and how to store your syrup and latte. My final thought? Making a gingerbread latte at home can bring warmth and joy to your day. Try out your favorite flavors and enjoy!

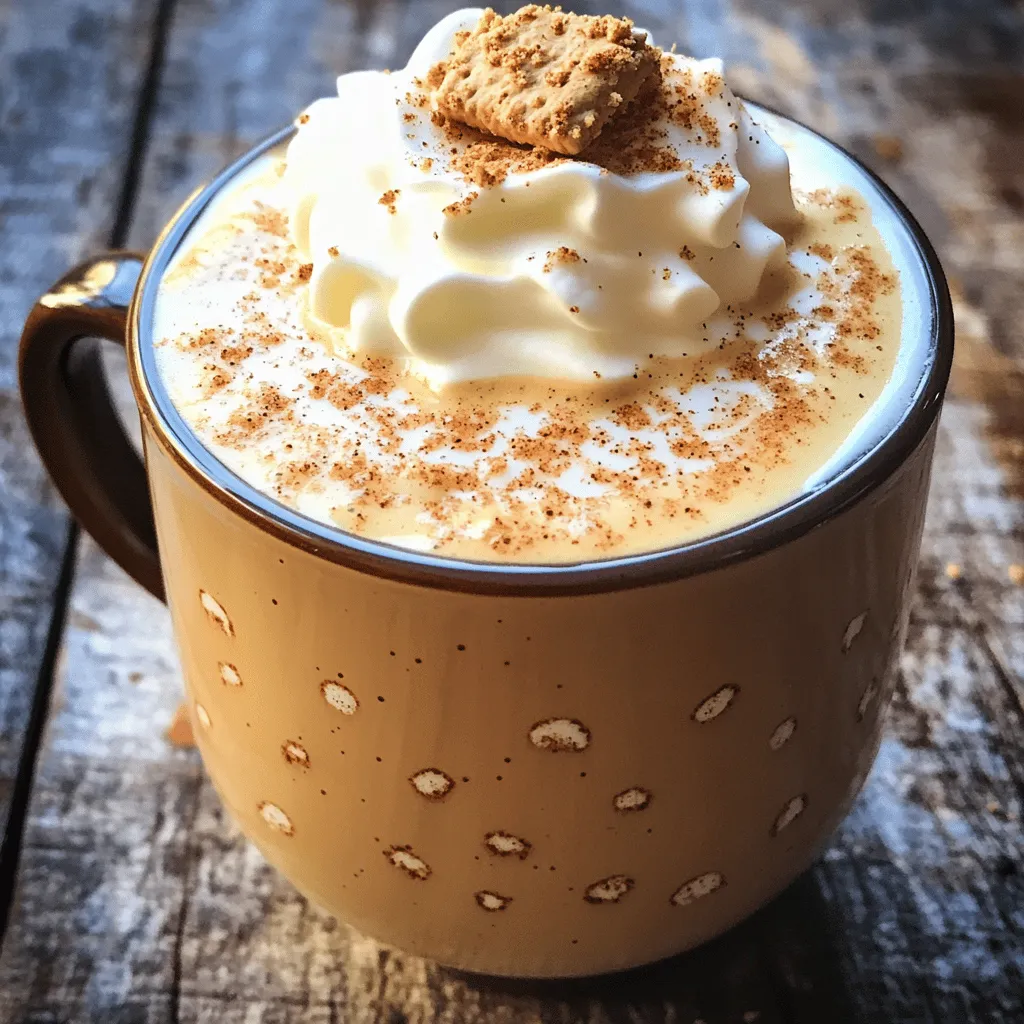
When the chill of winter sets in, there’s nothing quite like a cozy gingerbread latte to warm you up. This easy recipe combines rich coffee, creamy milk, and delightful gingerbread …

Read more

Categories Breakfast

Pumpkin Streusel Muffins Irresistible and Simple Recipe

July 31, 2025 by Chef Tavio
To make these tasty muffins, you need some key ingredients. Here’s what you will use: - 1 cup canned pumpkin puree - 1/3 cup vegetable oil - 1/2 cup brown sugar, packed - 1/4 cup granulated sugar - 2 large eggs - 1 teaspoon vanilla extract - 1 1/2 cups all-purpose flour - 1 teaspoon baking powder - 1 teaspoon baking soda - 1 teaspoon ground cinnamon - 1/2 teaspoon ground ginger - 1/4 teaspoon ground nutmeg - 1/4 teaspoon salt This mix creates a moist, flavorful muffin with the perfect balance of spices. You can add some extras to your muffins. Here’s a fun option: - 1/2 cup chopped walnuts Adding walnuts gives your muffins a crunchy texture and nutty flavor. You can skip them if you prefer a smoother bite. The streusel topping makes these muffins extra special. You’ll need: - 1/4 cup all-purpose flour - 1/4 cup brown sugar, packed - 2 tablespoons cold butter, cubed - 1/2 teaspoon ground cinnamon This topping adds a sweet, crumbly layer that pairs perfectly with the pumpkin. For the full recipe, check out the cooking guide! Start by preheating your oven to 350°F (175°C). This step ensures even baking. Next, prepare your muffin pan. You can line it with paper liners or grease the cups. This will help the muffins pop out easily later. In a large bowl, mix the following ingredients: - 1 cup canned pumpkin puree - 1/3 cup vegetable oil - 1/2 cup brown sugar, packed - 1/4 cup granulated sugar - 2 large eggs - 1 teaspoon vanilla extract Use a whisk or mixer to blend until smooth. In a separate bowl, whisk together these dry ingredients: - 1 1/2 cups all-purpose flour - 1 teaspoon baking powder - 1 teaspoon baking soda - 1 teaspoon ground cinnamon - 1/2 teaspoon ground ginger - 1/4 teaspoon ground nutmeg - 1/4 teaspoon salt Combine the dry ingredients into the wet mixture. Stir gently until just mixed. A few lumps are okay. If you want walnuts, fold them in now. In a small bowl, mix these ingredients for the streusel topping: - 1/4 cup all-purpose flour - 1/4 cup brown sugar, packed - 2 tablespoons cold butter, cubed - 1/2 teaspoon ground cinnamon Use your fingers or a fork to mix until it looks crumbly. This adds a nice crunch on top. Spoon the muffin batter into your prepared pan, filling each cup about three-quarters full. This is key for good rise. Then, sprinkle the streusel topping generously over each muffin cup. Bake in your preheated oven for 18-20 minutes. To check if they are done, insert a toothpick. If it comes out clean, they are ready. Once baked, let the muffins cool in the pan for 5 minutes. Then, transfer them to a wire rack to cool fully. Now, you can enjoy your Pumpkin Streusel Muffins. For the full recipe, check the details above. To get the best muffin texture, mix wet and dry ingredients separately. This helps avoid overmixing, which can make muffins tough. Combine the wet mix until smooth. Then, add the dry mix gently. You want a few lumps to remain; this keeps muffins fluffy. Remember, the oven should be preheated. This helps muffins rise well and bake evenly. You can change up the flavor of your muffins. Try adding chocolate chips for a sweet twist. Dried cranberries or raisins add a nice chew. For a spicy kick, add a dash of cayenne pepper. You can also switch nuts; pecans or almonds work well too. Toppings can vary too. Instead of streusel, try a glaze made of powdered sugar and milk for a sweet finish. Use a good muffin pan; a non-stick one helps with easy removal. Paper liners are great for keeping muffins moist and clean. A whisk is perfect for mixing batter. If you have a rubber spatula, it's excellent for folding ingredients gently. A toothpick helps check if your muffins are done. These tools make the baking process smoother and more fun. For the full recipe, check out the details above. {{image_4}} To make gluten-free pumpkin streusel muffins, swap all-purpose flour for a gluten-free blend. Look for one that works well in baking. This mix often has rice flour, tapioca starch, and xanthan gum. You may need to adjust the liquid slightly to get the right batter texture. The muffins will still taste great and be moist. For vegan pumpkin muffins, replace eggs with flaxseed meal. Mix one tablespoon of flaxseed meal with three tablespoons of water. Let it sit until it thickens. Use a plant-based oil, like coconut or avocado oil, instead of vegetable oil. Replace the butter in the streusel with coconut oil or a vegan butter substitute. These muffins will be just as tasty and plant-friendly. You can switch up the nuts in the recipe. Try pecans or almonds instead of walnuts. Each nut gives a different flavor and texture. You can also play with spices. Add a pinch of allspice or cloves for a unique twist. If you want a sweeter touch, mix in some chocolate chips. These variations make the muffins fun and exciting every time you bake. Check out the Full Recipe for more details! To keep your leftover muffins fresh, place them in an airtight container. You can keep them at room temperature for up to three days. If you want them to last longer, store them in the fridge. Just remember to let them cool completely before sealing them up. This helps to prevent sogginess. Freezing muffins is a great way to enjoy them later. First, wrap each muffin in plastic wrap or aluminum foil. Then, place them in a freezer bag. They can stay fresh in the freezer for up to three months. When you're ready to eat, just take out the muffins and let them thaw overnight in the fridge. To enjoy your muffins warm, preheat the oven to 350°F (175°C). Place the muffins on a baking sheet for about 5 to 10 minutes. You can also microwave them for about 15 to 20 seconds. Just be careful not to overheat, or they might get dry. For a special treat, add a pat of butter on top before warming them up. Enjoy the flavors of these delicious Pumpkin Streusel Muffins! You can make these muffins healthier by using whole wheat flour instead of all-purpose flour. This adds fiber and nutrients. You can also cut down on sugar. Try using half the amount of brown and granulated sugar. Adding applesauce can replace some of the oil, keeping the muffins moist. You could also add flaxseed or chia seeds for extra nutrition. Yes, you can use fresh pumpkin. Just make sure to cook and puree it first. Slice the pumpkin, bake it until soft, then scoop out the flesh. Blend it until smooth. Fresh pumpkin gives a great flavor, but it can be slightly more watery. So, drain any excess liquid if needed. These muffins pair well with warm drinks like coffee or tea. You could also serve them with butter or cream cheese for added richness. For a festive touch, serve them with maple syrup or honey. Fresh fruit or a dollop of whipped cream also makes a lovely side. Yes, these muffins freeze very well. After cooling, wrap them tightly in plastic wrap or foil. Place them in a freezer bag to prevent freezer burn. They can stay fresh for up to three months. When ready to eat, just thaw them at room temperature or warm them in the oven. You now know how to make delicious pumpkin streusel muffins. We covered the key ingredients, step-by-step instructions, and helpful tips. You can even try variations for gluten-free or vegan options. Store extra muffins properly, and they’ll stay fresh. Remember, you can adapt the recipe to make it healthier or use fresh pumpkin. Enjoy baking and sharing these tasty treats with friends and family!

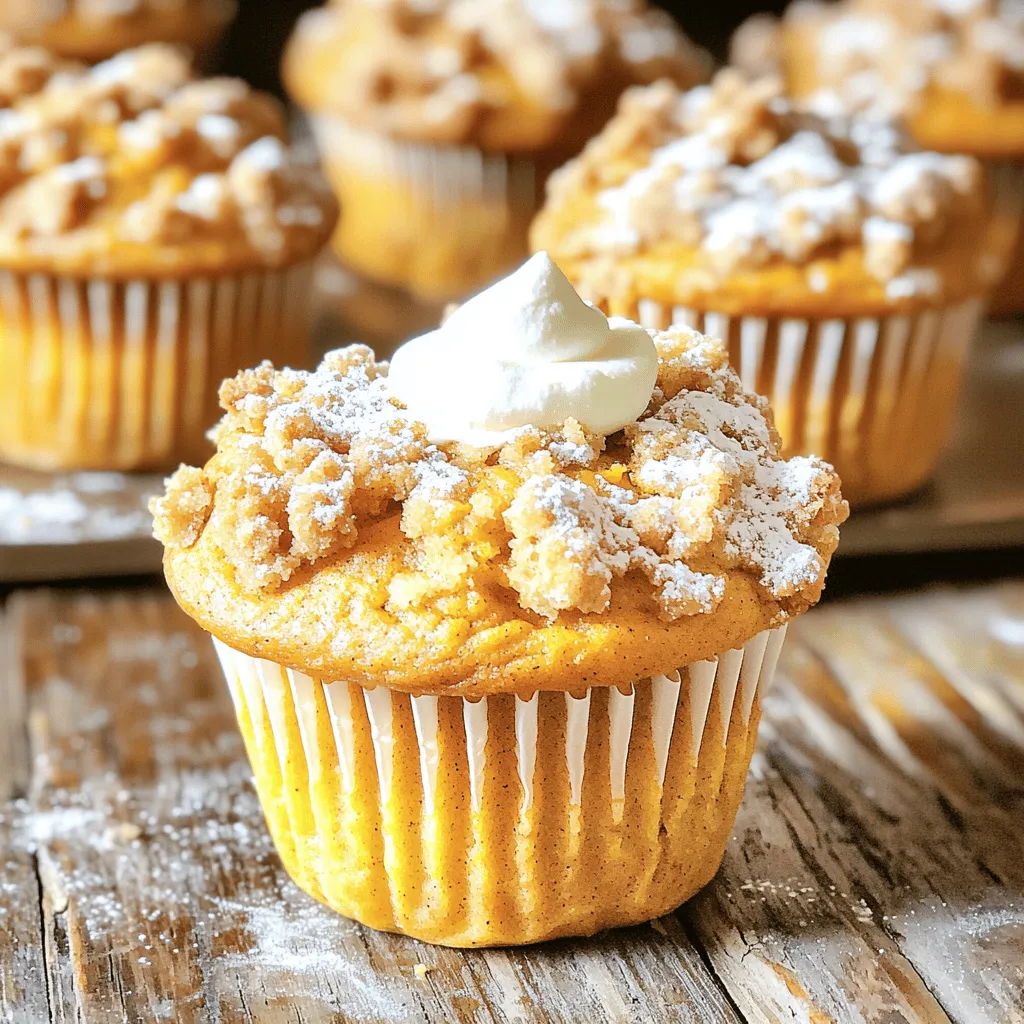
Are you ready for an autumn treat? My Pumpkin Streusel Muffins are the perfect blend of sweet and spice. This simple recipe brings out that cozy fall flavor, making your …

Read more

Categories Breakfast

Chewy Maple Brown Sugar Cookies Irresistible Delight

July 31, 2025 by Chef Tavio
Baking these chewy maple brown sugar cookies starts with gathering the right ingredients. Each element plays a key role in the flavor and texture. Here’s what you need: - 2 ¼ cups all-purpose flour - 1 teaspoon baking soda - ½ teaspoon salt - ¾ cup unsalted butter, softened - 1 cup brown sugar - ½ cup granulated sugar - 1 large egg - 2 tablespoons pure maple syrup - 1 teaspoon vanilla extract - ½ teaspoon ground cinnamon - 1 cup chopped pecans or walnuts (optional) Using high-quality maple syrup is crucial. It adds a rich flavor that sets these cookies apart. The brown sugar gives them a nice chewiness. If you like nuts, chopped pecans or walnuts add a delightful crunch. Make sure your butter is soft. It helps create a better texture. Room temperature ingredients mix better, leading to a smoother dough. Once you have everything, you are ready to create these delicious cookies. For the full recipe, refer back to the beginning. Enjoy the process of baking! 1. Preheat your oven to 350°F (175°C). This step ensures even baking. 2. Line a large baking sheet with parchment paper. This keeps cookies from sticking. 3. In a medium bowl, whisk together the flour, baking soda, salt, and ground cinnamon. Make sure it is well mixed and set aside. 1. In a large bowl, cream the softened butter, brown sugar, and granulated sugar. Use an electric mixer on medium speed for about 2-3 minutes until light and fluffy. 2. Crack the egg into the bowl. Add the maple syrup and vanilla. Mix until smooth and combined. 3. Gradually add the dry ingredient mix to the wet mixture. Stir gently until just combined. Avoid overmixing to keep cookies chewy. 4. If you want, fold in the chopped pecans or walnuts for extra crunch. 1. Use a cookie scoop or tablespoon to drop rounded dough onto the prepared baking sheet. Leave about 2 inches between each cookie. 2. Place the baking sheet in the oven and bake for 10-12 minutes. The edges should be lightly golden while the centers stay soft. 3. When done, remove cookies from the oven. Let them cool on the baking sheet for about 5 minutes. Then, transfer them to a wire rack to cool completely. Enjoy making these chewy maple brown sugar cookies with my full recipe! To make chewy maple brown sugar cookies, focus on these key points: - Ensuring perfect texture: Use room temperature butter. This helps create a fluffy dough. Mix until just combined to keep cookies chewy. - Managing oven temperature: Preheat your oven to 350°F (175°C). An accurate oven temperature is key. Use an oven thermometer if needed. - Avoiding overmixing: When adding dry ingredients, stir gently. Overmixing can lead to tough cookies. Stop mixing as soon as no flour remains visible. Present your cookies beautifully to impress your family and friends: - Creative serving ideas: Stack cookies on a colorful plate. Use a tiered dessert stand for a fun display. - Adding a maple syrup drizzle: Drizzle warm maple syrup on top. This adds a sweet touch and enhances the flavor. - Using themed dishware: Serve cookies on seasonal or festive plates. A fun plate can make your cookies even more inviting. For the full recipe, visit the [Full Recipe] section. {{image_4}} You can make chewy maple brown sugar cookies even more fun! Here are some great ideas: - Adding chocolate chips: Fold in 1 cup of semi-sweet chocolate chips for a rich taste. The sweet chocolate pairs nicely with the maple flavor. - Different types of nuts: Instead of pecans or walnuts, try almonds or hazelnuts. Each nut brings its own crunch and flavor twist. - Incorporating oats: Mix in 1 cup of rolled oats for a chewier texture. Oats add heartiness and a nice bite to your cookies. You can also adjust the recipe to fit different diets. Here are some options: - Gluten-free substitutes: Use a gluten-free flour blend in place of all-purpose flour. This keeps the cookies soft and chewy. - Vegan options: Swap the egg for 1/4 cup of applesauce. Use vegan butter and maple syrup to keep the flavor strong. - Adjusting sweetness levels: If you prefer less sweetness, cut down the granulated sugar. You can also use less maple syrup for a milder taste. Experimenting with these variations can lead to delightful surprises in your chewy maple brown sugar cookies. For the full recipe, check out the earlier sections! Storing your Chewy Maple Brown Sugar Cookies is easy. For short-term storage, keep them at room temperature. Place the cookies in a single layer on a plate or in a container. Make sure to cover them with a clean kitchen towel or plastic wrap. This helps keep them soft and fresh for about a week. For long-term storage, freezing is best. Let the cookies cool completely first. Then, place them in a freezer-safe bag or container. You can stack them, but use parchment paper between layers to avoid sticking. They will stay fresh for up to three months in the freezer. Just thaw them at room temperature when you're ready to enjoy! Using airtight containers is key to keeping your cookies fresh. Choose a container that fits the cookies snugly. This reduces air exposure, which can make them stale. To maintain freshness, add a slice of bread to the container. The bread will absorb excess moisture and keep the cookies soft. Remember to check the bread every few days and replace it as needed. These small steps make a big difference in your cookie experience. Enjoy your delicious treats! For the full recipe, check out the [Full Recipe]. How to make chewy cookies? To make chewy cookies, use more brown sugar than white sugar. Brown sugar adds moisture and a soft texture. Also, underbake them slightly. This keeps the centers soft. Can I substitute ingredients? Yes, you can swap ingredients. Use coconut oil for butter or maple sugar for brown sugar. Just keep in mind that flavors may change. How do I know when cookies are done baking? Cookies are done when the edges are lightly golden. The centers should look soft and puffy. They will firm up while cooling. What is the best way to store cookies? Store cookies in an airtight container at room temperature. This keeps them fresh and chewy. For longer storage, freeze them in a sealed bag. For the full recipe, visit the earlier section. Enjoy your baking! We covered a lot about making cookies in this post. You learned the right ingredients, how to mix them, and bake your treats. I shared tips for perfect texture and fun ways to serve them. You also found variations to suit your taste and dietary needs, plus storage tips for fresh cookies. With these steps, your cookies will delight everyone. Enjoy baking, and remember to have fun experimenting with flavors!

If you crave a sweet treat that bursts with flavor, you’ll love these Chewy Maple Brown Sugar Cookies. These cookies are soft, chewy, and perfectly sweetened with rich maple syrup. …

Read more

Categories Desserts

Warm & Spicy Orange Cinnamon Milk Tea Delight

July 31, 2025 by Chef Tavio
To make Warm & Spicy Orange Cinnamon Milk Tea, gather these simple ingredients: - 2 cups milk (dairy or plant-based) - 1 cup water - 1 medium-sized orange (zest and juice) - 2 teaspoons loose black tea or 2 tea bags - 1 whole cinnamon stick - 1-2 teaspoons honey or maple syrup - 1/4 teaspoon ground ginger - 1/4 teaspoon ground cloves or allspice - A pinch of nutmeg - Fresh orange slices and extra cinnamon sticks for garnish These ingredients come together to create a warm hug in a mug. The milk adds creaminess, while the orange brings a bright, zesty flavor. The spices, like cinnamon and ginger, give the tea a cozy warmth. You can adjust sweetness to your taste. Using fresh orange juice and zest really enhances the flavor. This tea is not just a drink; it’s an experience you’ll love. For the full recipe, check out the recipe section. Enjoy! - Start by taking a medium saucepan. - Combine 1 cup of water, the zest from your orange, and the whole cinnamon stick. - Heat the mixture over medium heat. - Watch for it to reach a gentle boil. - Once boiling, add 2 teaspoons of loose black tea or 2 tea bags. - Let the tea steep for 4 to 5 minutes. - This time lets the flavors grow strong. - Remove the tea bags or strain out the tea leaves. - Now, add 2 cups of milk and the fresh orange juice. - Stir in sweeteners like honey or maple syrup to taste. - Mix in a 1/4 teaspoon of ground ginger, ground cloves, and a pinch of nutmeg. - Warm your tea gently, but don’t let it boil. - Stir often to keep it from sticking. - When it's warm enough, pour it into mugs. - Garnish with a fresh orange slice and a cinnamon stick. For the full recipe, check out the complete details. Enjoy this warm and cozy drink! Choosing milk for your tea matters. You can use dairy or plant-based milk. If you want creaminess, whole milk is great. For a lighter choice, try almond or oat milk. Always pick the freshest spices. Fresh spices give more flavor than dry ones. If you can, get whole spices and grind them at home. Sweetness can change your drink. Start with one teaspoon of honey or maple syrup. Taste, then add more if you like it sweeter. Spice levels also matter. If you love heat, add more ginger or a dash of cayenne. Steeping tea properly is key. Steep for 4-5 minutes for a strong flavor. Longer steeping can make it bitter, so keep an eye on time. Garnishing makes your tea look fancy. Use fresh orange slices and a cinnamon stick for each mug. You can also sprinkle a bit of nutmeg on top. Serve in clear glasses to show off the warm color. This drink is perfect for guests, especially on cold nights. Pair it with cookies or pastries for a lovely treat. {{image_4}} You can switch up the milk in this recipe. Almond milk gives a nutty flavor. Oat milk adds creaminess without dairy. Coconut milk offers a tropical twist. Each choice changes the taste slightly, so try them all and find your favorite! If you're looking for healthier options, consider stevia. It has no calories and is sweet. Agave syrup is another great choice. It’s sweeter than sugar, so use less. Date syrup is rich in nutrients and adds a deep flavor. Each sweetener gives a unique touch to your drink. To make this drink even better, add spices like cardamom or star anise. They add warmth and depth. You can also use seasonal flavors. For fall, try a splash of pumpkin spice. In spring, fresh mint could brighten it up. Experiment with flavors to find what you love! This Warm & Spicy Orange Cinnamon Milk Tea is all about personal taste. Feel free to mix and match options from above! For the full recipe, check out the Warm & Spicy Orange Cinnamon Milk Tea section. How long can leftover tea be stored? You can store leftover Warm & Spicy Orange Cinnamon Milk Tea in the fridge for up to 3 days. After that, the flavors may fade, and the milk could spoil. Best containers for storage Use an airtight container to keep your tea fresh. Glass jars or BPA-free plastic containers work well. Make sure to cool the tea before sealing it up. Safest methods to reheat tea Reheat your tea gently on the stove over low heat. Stir it often to prevent burning. You can also use a microwave. Heat it in short bursts, stirring in between. Maintaining flavor after storage To keep the flavor strong, avoid boiling the tea after storage. Instead, warm it slowly, and consider adding a pinch of fresh spices to boost the taste. Can you freeze Warm & Spicy Orange Cinnamon Milk Tea? Yes, you can freeze this tea! Freezing is a great way to keep it longer if you have extra. Instructions for freezing and thawing Pour the cooled tea into ice cube trays or freezer-safe containers. When ready to enjoy, thaw it in the fridge overnight. Reheat as mentioned earlier to bring back the warmth and flavors. Cinnamon and orange both have health perks. Cinnamon helps with blood sugar control. It is also good for digestion and may lower cholesterol. Orange is rich in vitamin C. It boosts your immune system and keeps skin healthy. Together, they create a tasty drink that supports wellness. Yes, you can make this tea without sugar. You can skip the honey or maple syrup. The orange juice adds natural sweetness. If you like, you can also use a sugar substitute. This way, you can enjoy the flavor without added sugar. To make this recipe vegan, simply choose plant-based milk. Almond, soy, or oat milk works well. Use maple syrup instead of honey for sweetness. This keeps the drink tasty and vegan-friendly. You still get all the warm flavors without any animal products. You can enjoy this tea any time of day. It is great for breakfast or a cozy afternoon treat. Drinking it at night can help you relax. The spices and warmth make it perfect for chilly evenings. It’s a nice drink to unwind with. Yes, you can use different types of tea. Green tea or chai can add unique flavors. Herbal teas like rooibos also work well. Just adjust the steeping time to suit the tea you choose. This gives you many ways to enjoy this warm drink. In this blog post, we explored how to make warm and spicy orange cinnamon milk tea. We covered all the key ingredients and provided a clear step-by-step guide. You learned tips for the best flavor and how to display your drink for guests. We also discussed variations to fit your taste and ways to store leftovers. Enjoy making your tea and experiment with your unique touches. Now, share your delightful creations with friends and family!

Warm up your day with my Warm & Spicy Orange Cinnamon Milk Tea Delight! This cozy drink blends rich flavors of orange, cinnamon, and warm spices, making it the perfect …

Read more

Categories Breakfast

Bento Lunches for Kids Simple and Fun Solutions

July 31, 2025 by Chef Tavio
To make Bento Bliss, you'll need these simple ingredients: - 1 cup jasmine rice, cooked according to package instructions - 1/2 cup cooked chicken breast, diced into bite-sized pieces - 1/4 cup sweet corn, either canned or cooked fresh - 1/2 cup cucumber, thinly sliced into rounds - 1/2 cup cherry tomatoes, halved - 1/4 cup baby carrots, cut into sticks - 2 tablespoons low-sodium soy sauce - 1 tablespoon sesame oil - 1 tablespoon sesame seeds - 2 hard-boiled eggs, peeled and cut in half - 1/2 cup shelled edamame - Optional: sheets of seaweed for decorative elements Bento lunches can be nutritious and fun. Each ingredient offers health benefits. For example, jasmine rice gives energy. Chicken breast adds protein for strong muscles. Veggies like cucumber and carrots provide vitamins. Sweet corn is a good source of fiber. Eggs are great for healthy fats. This mix helps kids stay focused and full through the day. Using fresh ingredients makes a big difference. Fresh veggies taste better. They also have more nutrients. When you use fresh chicken, it’s safer and tastier. Kids notice when food looks and smells good. Fresh ingredients make bento lunches colorful and exciting. You can also talk to your kids about where food comes from. This helps them appreciate healthy eating even more. Try to shop local and seasonal. It’s good for you and the planet! To create a tasty Bento Bliss lunch, start with the rice. Cook 1 cup of jasmine rice as per the package instructions. After cooking, fluff it gently with a fork. Add 1 tablespoon of sesame oil and 1 tablespoon of sesame seeds to give it flavor. Let it cool to room temperature. Next, prepare the chicken. In a small bowl, mix 1/2 cup of diced cooked chicken with 2 tablespoons of low-sodium soy sauce. Let it sit for about 10 minutes. This helps the chicken soak in the flavor. While the chicken marinates, hard-boil the eggs. Put 2 eggs in boiling water for 10 minutes. When done, transfer them to cold water to cool. After they cool, peel and slice them in half. Now it’s time for the vegetables. Wash and slice 1/2 cup of cucumber into thin rounds. Halve 1/2 cup of cherry tomatoes and cut 1/4 cup of baby carrots into sticks. If using fresh corn, cook it until tender and cool it. For the rice, remember to fluff it well. This prevents clumping and helps with serving. Always use fresh chicken for the best taste. If you want extra flavor, grill the chicken before dicing it. When boiling eggs, use older eggs for easier peeling. If your kids love crunch, add some toasted nuts or seeds. Fresh vegetables add color and nutrients. Aim for a mix of textures—crunchy, soft, and chewy. Grab your bento box and start with the rice. Place a generous scoop of the seasoned jasmine rice in one section. Next, add the marinated chicken beside the rice. In another section, arrange the cucumber slices, halved cherry tomatoes, sweet corn, and carrot sticks. Make it colorful; kids love that! Nestle the halved hard-boiled eggs next to the chicken. Finally, add a portion of shelled edamame for protein. For fun, use sheets of seaweed to create shapes or faces. This makes the meal exciting and personal for your kids. They’ll love looking forward to lunchtime with this Bento Bliss: Colorful Kids’ Lunchbox. To create a fun bento lunch, focus on colorful ingredients. Use red cherry tomatoes, bright orange carrots, and green cucumber. Mix shapes, like slices and sticks, for variety. You can also use fun food picks or small molds to make shapes. For added flair, sprinkle sesame seeds or use seaweed to create faces. Kids love fun, and a vibrant box makes lunch exciting! To keep your bento lunches fresh, use small containers or silicone cups. These help separate foods and prevent sogginess. Pack foods that stay fresh, like cucumbers and carrots. Avoid packing items that wilt easily. If you use rice, let it cool before packing. This keeps it fluffy and tasty. For protein, like chicken or eggs, ensure they are well-cooked and stored properly. You can save time by preparing bento lunches in advance. Cook rice and protein a day before. Chop veggies and store them in the fridge. In the morning, simply assemble the box. Use the full recipe for Bento Bliss to make it easier. You can mix and match items from your fridge for variety. This way, your kids enjoy fresh meals every day! {{image_4}} If your child is a picky eater, make bentos fun! Use familiar foods in creative ways. For example, cut sandwiches into fun shapes using cookie cutters. Add colorful fruits like strawberries or blueberries in cute cups. You can also create kabobs with cheese cubes, grape tomatoes, and turkey slices. These fun shapes can make them more appealing. Using seasonal ingredients can keep your bentos fresh and exciting. In spring, add bright asparagus and fresh peas. In summer, include juicy watermelon and sweet bell peppers. Fall is great for apple slices and roasted squash. Winter calls for hearty foods like roasted carrots and warm grains. Seasonal foods can also boost nutrition and flavor. Not all kids love chicken or eggs. Offer different proteins like tofu, beans, or nut butter. Try chickpeas for a crunchy option or lentils for a hearty addition. You can also use hard cheese or yogurt for a protein boost. Mixing these proteins keeps lunches varied and helps kids try new tastes. For creative ideas, check out the Full Recipe for Bento Bliss. It gives you a great start for creating fun meals! To keep your bento lunches fresh, use airtight containers. These help stop air from spoiling the food. Store your prepared bento in the fridge until it’s time to eat. If you use rice, keep it separate from wet foods. That way, the rice stays fluffy and dry. Bento boxes come in many shapes and sizes. You can find boxes with sections, which help keep foods apart. This prevents flavors from mixing. Some boxes are insulated to keep food warm or cool. Choose one that fits your child’s lunch needs. For example, a larger box works well for a fuller meal. If you have leftovers, heat them up safely. Use a microwave-safe dish to warm meals. Cover the dish with a lid or a microwave-safe wrap to keep moisture in. Heat in short bursts, checking often. This way, you won’t overcook your food. It's best to eat leftovers within three days for freshness. Enjoy those tasty bento lunches! To keep bento lunches cool, use an insulated lunch bag. You can also add a small ice pack. Place it next to your bento box. This will help keep your food fresh until lunchtime. Another idea is to freeze a water bottle. It can double as a drink and keep your food cool too. Yes, you can make bento lunches the night before. This saves time in the morning. Prepare and pack your food in the bento box. Store it in the fridge overnight. Just make sure to use ingredients that stay fresh. Foods like cooked chicken and rice work well. Easy dessert options for bento boxes include: - Sliced fruits like apples or strawberries - Mini muffins or cookies - Yogurt cups with granola - Small pieces of dark chocolate - Dried fruits like apricots or raisins These choices add sweetness without needing much prep. They fit well in any bento box, making lunchtime fun. For more details, check the Full Recipe for Bento Bliss. Bento lunches offer a fun, tasty way to eat well. We covered the key ingredients, cooking steps, and tips to keep meals fresh and appealing. You can adapt these ideas for picky eaters or different seasons. Remember to store your bento boxes properly for the best flavor. With a little planning, you can enjoy delicious meals that excite your taste buds. Try these tips to make your bento experience enjoyable and easy!

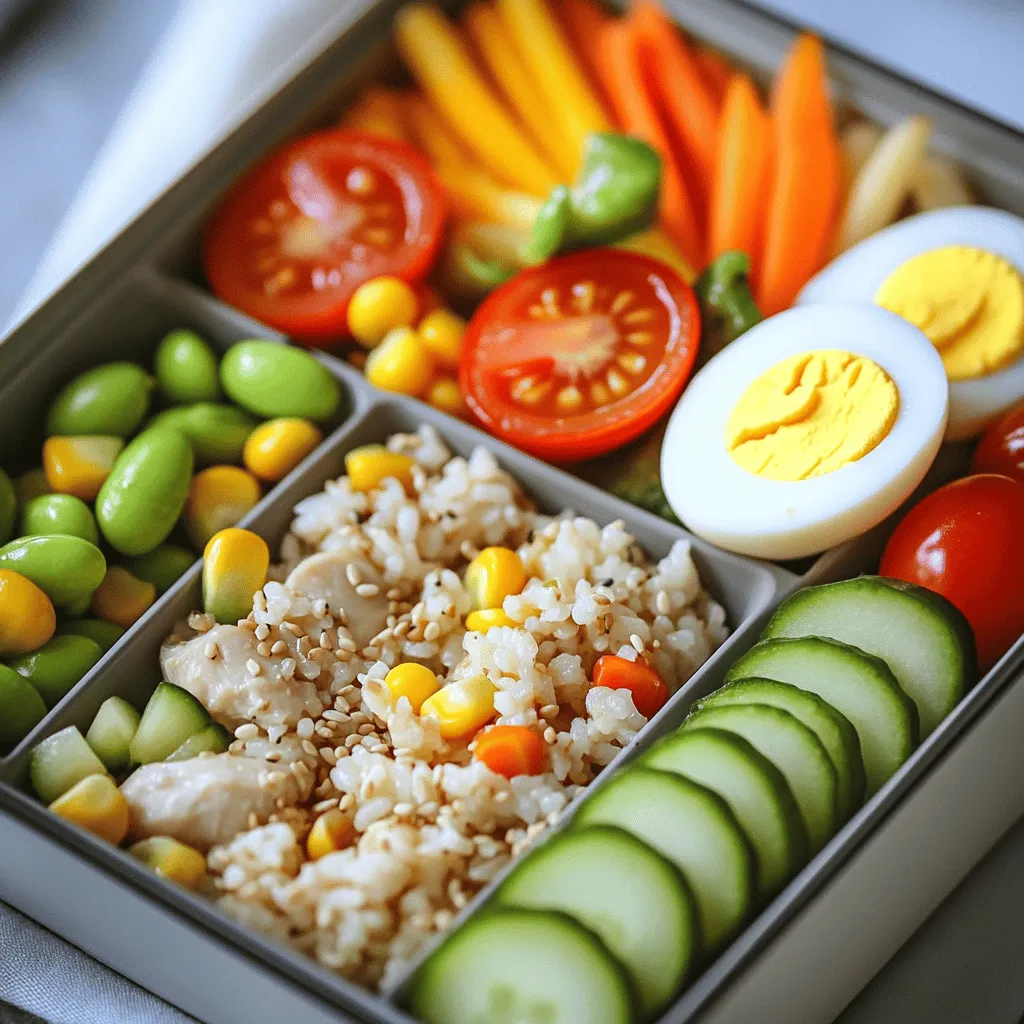
Are you looking for fun and easy bento lunches for your kids? You’ve come to the right place! I’ll show you how to create tasty, fresh, and colorful meals that …

Read more

Categories Dinner
Older posts
Newer posts
← Previous Page1 … Page26 Page27 Page28 … Page92 Next →

TASTED NEST

Where Flavor Finds a Home 🍳🏡 — warm, simple, and crave-worthy recipes made for real life, from stovetop mornings to backyard dinners.

PAGES

Home About Contact Privacy Policy Terms & Conditions Cookie Policy GDPR Policy Copyright Policy Disclaimer

CATEGORIES

Appetizers Desserts Salads Breakfast Dinner

Contact

  • Pinterest
  • Mail
Copyright © 2025 Tasted Nest. All rights reserved.