Skip to content
Tasted Nest
  • Home
  • Appetizers
  • Desserts
  • Salads
  • Breakfast
  • Dinner
  • Privacy Policy
  • Contact
  • About

Chef Tavio

Pumpkin Chai Latte Rich and Flavorful Fall Drink

July 27, 2025 by Chef Tavio
- 1 cup brewed chai tea - 1/2 cup unsweetened pumpkin puree - 1 cup milk (dairy or non-dairy) - 2 tablespoons maple syrup - 1/2 teaspoon pumpkin pie spice - 1/2 teaspoon vanilla extract - Whipped cream (optional) A serving of this Pumpkin Chai Latte has about 180 calories. It includes about 6 grams of fat, 30 grams of carbohydrates, and 4 grams of protein. The chai tea adds strong flavors and antioxidants. Pumpkin puree is a great source of vitamin A. Maple syrup provides natural sweetness and minerals. You can swap maple syrup for honey or agave syrup if you prefer. For non-dairy milk, try almond, oat, or coconut milk. If you like more spice, feel free to add extra pumpkin pie spice or even cinnamon. Adjust these to match your taste. This section gives you a clear view of what you'll need. For the full recipe, check the earlier part of the article. Enjoy crafting your perfect cup of Pumpkin Chai Latte! To make a great Pumpkin Chai Latte, start by brewing the chai. Use either tea bags or loose leaf chai. I suggest using a robust blend for the best flavor. - Boil water and pour it over the tea. - Let it steep for about 5 minutes. - After steeping, remove the tea bags or strain out the leaves. For the best chai, look for blends that contain spices like cardamom, ginger, and cinnamon. These spices give the chai its warm and cozy flavor. Next, combine the chai with pumpkin and sweetener. - Pour the brewed chai into a small saucepan. - Add 1/2 cup of unsweetened pumpkin puree and 2 tablespoons of maple syrup. Use a whisk to mix it all together. It’s key to ensure there are no lumps. Heat this mixture on medium heat for about 2-3 minutes. Stir frequently until it is warm. Now, let’s prepare the milk. You can use dairy or any non-dairy milk you like. - Heat the milk in a separate saucepan. - Watch it closely to avoid boiling. If you have a milk frother, use it to froth the milk until it doubles in volume. If you don’t have one, a whisk works well too. Frothing adds a nice lightness to the drink, making it even more delightful. Once your chai and pumpkin mixture is ready, add the frothed milk. This process will create a lovely layered effect. You can find the full recipe to guide you through the steps to enjoy this rich and flavorful fall drink. To make your Pumpkin Chai Latte pop, add spices like cinnamon and nutmeg. These spices add warmth and depth. Start with 1/4 teaspoon of each spice, then taste and adjust as needed. You want a balance that suits your taste buds. If you like it sweeter, add more maple syrup. Always taste as you go to find your perfect mix. Your latte deserves a beautiful finish. Try drizzling caramel on top for sweetness and flair. You can also sprinkle chocolate shavings for a fun twist. Choose a cozy, colorful mug to serve your drink. A clear glass can showcase the layers of colors, too. Make it visually stunning for that extra special touch. Many people overheat milk, which can ruin the texture. Keep the milk steaming but not boiling. Always watch it closely. Another mistake is not blending the pumpkin puree well. Lumps can spoil the creamy texture you want. Use a whisk to blend thoroughly until smooth. These small steps make a big difference in taste and texture. {{image_4}} You can change your Pumpkin Chai Latte in fun ways. Consider adding different flavors like vanilla or caramel. These will make your drink sweeter and richer. If you want a thicker latte, use less milk. For a lighter drink, add more milk or use a frother. Pumpkin Chai Lattes fit well with fall holidays. For Halloween, add spooky sprinkles or a dash of cinnamon. At Thanksgiving, top it with whipped cream and a sprinkle of nutmeg. These small touches make your latte festive and fun. Many cafés serve their own versions of Pumpkin Chai Lattes. Starbucks offers a popular one, rich in pumpkin flavor but sweet. Local coffee shops may have unique twists, like using fresh spices or local pumpkin puree. Try different ones to find your favorite taste. After making your Pumpkin Chai Latte, you might have some left. To store it, pour the latte mixture into an airtight container. This helps keep it fresh and prevents other smells from mixing in. You can keep it in the fridge for up to three days. After that, the taste may fade. You can freeze pumpkin chai lattes if you want to save some for later. Pour the cooled mixture into freezer-safe containers or ice cube trays. This keeps it from getting freezer burn. The lattes can last frozen for up to one month. When you're ready to enjoy, take them out of the freezer and let them thaw in the fridge overnight. To warm up your latte, use a microwave or a saucepan. If using a microwave, heat it in short bursts. Stir after each burst to avoid hot spots. If you choose a saucepan, heat over low heat and stir often. This gentle warming keeps the texture smooth and creamy. Enjoy every sip! A Pumpkin Chai Latte is a cozy drink that blends spicy chai tea with pumpkin puree. This drink stands out because it offers a warm, rich flavor profile. The chai spices, like cinnamon and ginger, mix perfectly with the creamy pumpkin. Together, they create a comforting fall treat that warms your heart and soul. To make your Pumpkin Chai Latte vegan, you need to swap a few ingredients. Use non-dairy milk, like almond or oat milk, instead of regular milk. Also, replace maple syrup with agave syrup if you prefer. This way, you keep all the flavors without using any animal products. You can find ready-made Pumpkin Chai Lattes in many coffee shops and cafes during fall. Look for brands like Starbucks and Dunkin' for popular options. Some grocery stores also sell bottled versions in the dairy aisle. When shopping, check the labels for taste and ingredients that suit your needs. Yes, you can make this recipe in bulk! Simply multiply each ingredient by the number of servings you need. For example, if you want to serve 8 people, double the chai, pumpkin, and milk amounts. Keep the same cooking steps, but use a larger pot. Enjoy your Pumpkin Chai Latte with friends and family! This blog post covered how to make a delicious Pumpkin Chai Latte. You learned about the key ingredients and their health benefits. We also explored ways to customize flavors and avoid common mistakes. Remember, your drink can be as unique as you are. Adjust sweetness or try new spices to find your perfect blend. Enjoy creating this warm treat and share it with friends for a cozy fall experience.

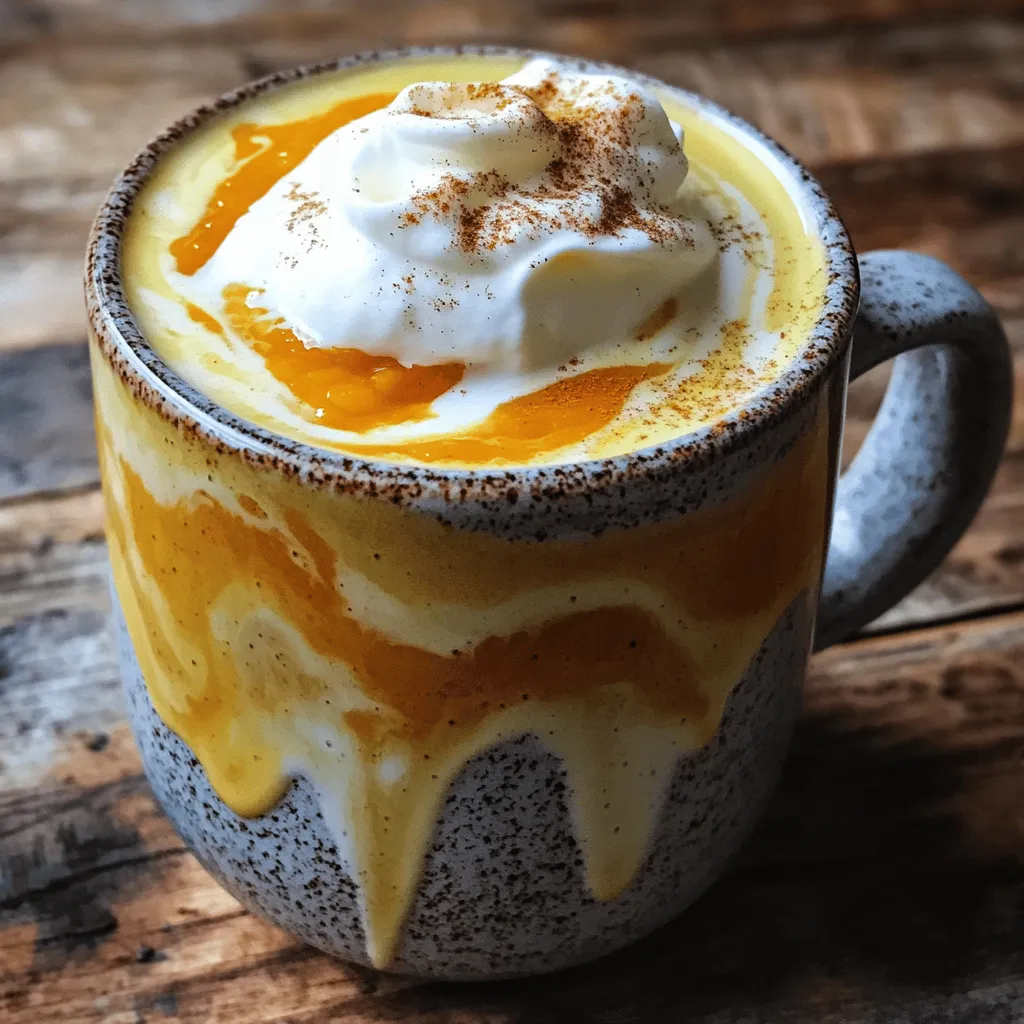
As fall settles in, there’s nothing quite like a warm Pumpkin Chai Latte to cozy up your day. This rich and flavorful drink combines spicy chai with creamy pumpkin, creating …

Read more

Categories Breakfast

Caramel Apple Trifles Irresistible Fall Dessert Delight

July 27, 2025 by Chef Tavio
- 3 medium apples, peeled and diced - 1 cup packed brown sugar - 1/4 cup unsalted butter - 1 teaspoon ground cinnamon - 1 cup caramel sauce (store-bought or homemade) - 1 1/2 cups heavy whipping cream - 1/4 cup powdered sugar - 1 teaspoon vanilla extract - 1 box of vanilla sponge cake or ladyfinger cookies - Chopped pecans or walnuts for garnish Using the right measurements is key for this dessert. Make sure to use medium apples. This size gives a nice balance of flavor and texture. When measuring brown sugar, pack it tightly in the cup. It helps create a rich caramel flavor. For the butter, use unsalted to control the saltiness. Heavy whipping cream should be chilled for best results when whipping. If you want to change things up, consider these swaps: - For apples, use pears for a softer taste. - Maple syrup can replace brown sugar if you want a different sweetness. - Coconut oil can substitute for butter, giving a unique flavor. - If you need a dairy-free option, use coconut cream instead of heavy cream. - For a gluten-free treat, try gluten-free ladyfinger cookies or cake. Using these tips, you can make this fall dessert your own. Enjoy creating your own version of caramel apple trifles! First, take three medium apples. Peel and dice them into small cubes. In a medium saucepan, melt 1/4 cup of unsalted butter over medium heat. Once the butter melts, add the diced apples, 1 cup of packed brown sugar, and 1 teaspoon of ground cinnamon. Stir gently to coat the apples evenly. Cook this mixture for 5-7 minutes. Stir occasionally until the apples get soft and caramelized. Remove the pan from heat and mix in half of the caramel sauce. Let this apple mixture cool to room temperature. Next, grab a large mixing bowl. Add 1 1/2 cups of heavy whipping cream, 1/4 cup of powdered sugar, and 1 teaspoon of vanilla extract. Use a hand mixer or whisk to whip this mixture until soft peaks form. Be careful not to over-whip it. This whipped cream will make your dessert light and fluffy. Set this aside for later use. Now, take clear glasses or dessert cups. Start layering your ingredients. Begin with a layer of vanilla sponge cake or ladyfinger cookies. Break them up if they don’t fit. Next, add a layer of the cooled caramelized apple mixture. Spread it evenly. Then, top this layer with a generous amount of whipped cream. Continue layering until you fill the glasses to the top. Usually, two to three layers work best. But feel free to adjust this based on your cups. After layering, drizzle the remaining caramel sauce over the top of each trifle. Finish with a sprinkle of chopped pecans or walnuts. This adds a nice crunch and makes it look great. Cover the trifles with plastic wrap and chill them for at least 1 hour. This helps the flavors blend well. For the full recipe, make sure to check the details above. Enjoy your delicious creation! To make your caramel apple trifles look great, use clear glasses. This way, everyone can see the layers. Garnish each trifle with a thin slice of apple or a whole pecan on top. This adds a nice touch and makes it more fun to eat. Serve them chilled to keep the flavors fresh and enjoyable. Layering is key to a good trifle. Start with the sponge cake or ladyfingers at the bottom. Break them if needed to fit the cup. Next, add a layer of the caramelized apples. Make sure the apples are evenly spread. Finally, top with whipped cream. Repeat these layers until the cups are full. Two or three layers usually work best. Feel free to adjust the layers based on your taste. You can add more apples for extra flavor or more whipped cream for a creamy touch. If you want a lighter trifle, use less cake and more fruit. Each layer can be unique, so have fun with it. Remember, the goal is a balance of sweet, creamy, and crunchy in each bite. For the full recipe, check out the detailed instructions in the earlier section. {{image_4}} You can mix up the flavors in your caramel apple trifles. Try adding different fruits. Pears or berries can give a fun twist. You can also use flavored whipped cream. Consider adding a hint of maple or nutmeg. For a chocolatey touch, sprinkle cocoa powder between layers. You can even swap the caramel sauce for a chocolate sauce. Each variation brings a new taste that keeps it exciting. If you want to change the recipe for dietary needs, it’s easy. For a dairy-free option, use coconut cream instead of heavy cream. You can find dairy-free caramel sauces at stores. For a gluten-free twist, use gluten-free cookies or cake. These swaps keep the dessert tasty while fitting different diets. Fall gives us great ingredients to use. You can add pumpkin puree for a seasonal flavor. Chopped cranberries also add a nice tartness. In winter, consider using citrus zest for brightness. In spring, swap apples for fresh strawberries or rhubarb. Each season brings new ideas. Your trifles can change with the seasons, keeping them fresh and fun. To keep your caramel apple trifles fresh, store them in the fridge. Use an airtight container or cover them with plastic wrap. This helps keep moisture in and prevents them from drying out. If you layered them in individual cups, it’s best to cover each one. This way, they stay fresh and tasty. When stored correctly, your trifles will last for 3 to 4 days in the fridge. After that, the layers may start to blend. The apples could lose their crunch, and the whipped cream might become watery. It’s best to enjoy them within the first few days for the best flavor and texture. I do not recommend freezing caramel apple trifles. The whipped cream does not freeze well and can change texture. If you must freeze them, store the apple mixture and whipped cream separately. You can freeze the apple mixture for up to 3 months. Thaw it in the fridge before using it again. Prepare the whipped cream fresh when you assemble the trifles for the best results. Yes, you can make caramel apple trifles a day before. Assemble the trifles, cover them, and store them in the fridge. This allows the flavors to blend nicely. Just remember to add any toppings right before serving for the best crunch. If you need a lighter option, use half-and-half or coconut cream. Both will work well in the whipped cream. For a dairy-free version, coconut cream is a great choice. It adds a nice flavor that pairs well with caramel. Yes, you can use gluten-free cake mix or ladyfinger cookies. Many brands offer gluten-free options that taste great. Just check the labels to ensure they fit your needs. This way, everyone can enjoy a tasty dessert. Making homemade caramel sauce is simple! Here’s how: - Ingredients: - 1 cup granulated sugar - 6 tablespoons unsalted butter, cut into pieces - 1/2 cup heavy cream - Instructions: 1. In a saucepan, heat the sugar over medium heat. Stir until it melts and turns a golden brown. 2. Carefully add the butter and stir until melted. 3. Slowly pour in the cream while stirring. Be cautious; it will bubble. 4. Cook for another minute until smooth. Let it cool before using in your trifles. This sauce adds a rich flavor that elevates your dessert. You learned the key ingredients for making delicious caramel apple trifles. I shared step-by-step instructions, from preparing apples to making whipped cream. You have tips for great presentation and best layers. I covered flavor options and dietary swaps too. Lastly, you know how to store your trifles properly. Now, you can create your own tasty treats with confidence. Enjoy the making, sharing, and tasting!

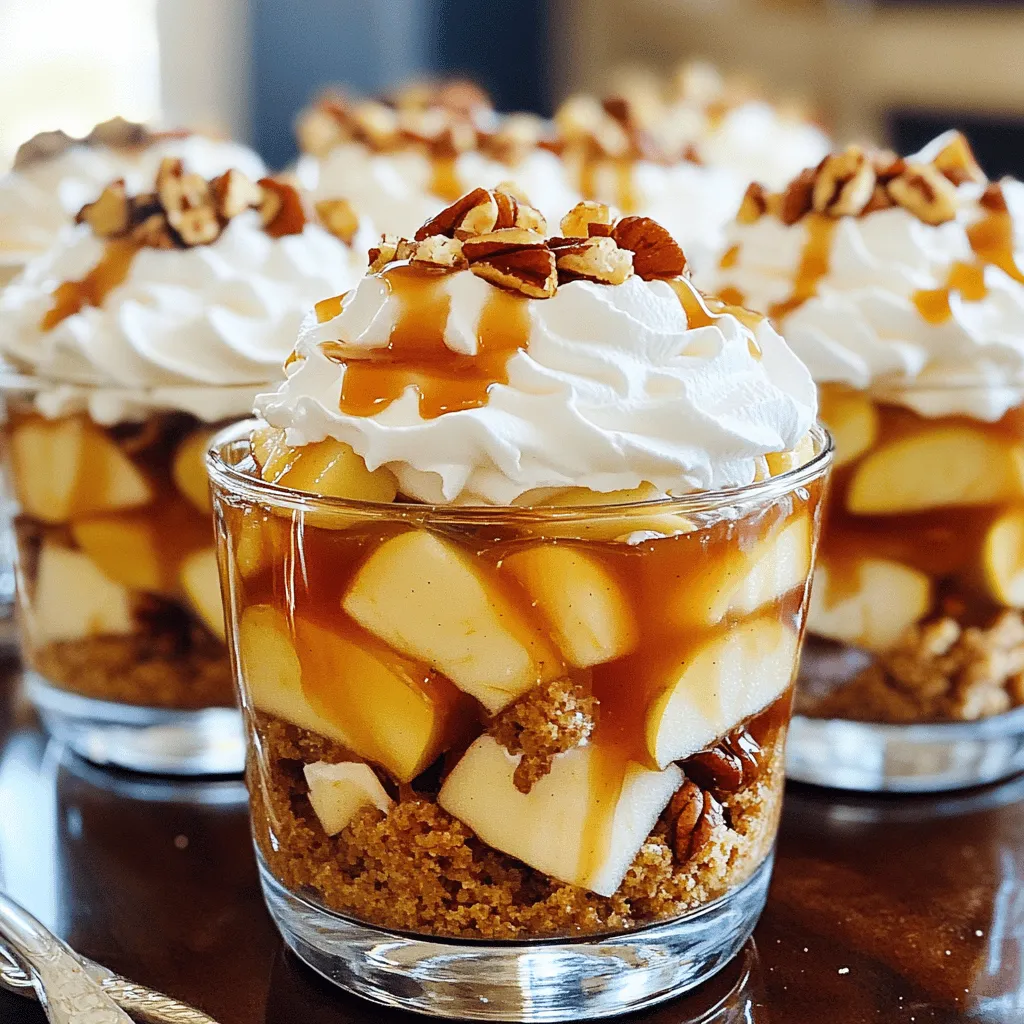
Fall has arrived, and it’s time for a sweet treat that screams cozy evenings! My Caramel Apple Trifles are perfect for gatherings or a cozy night in. With layers of …

Read more

Categories Desserts

Apple Cider Cheesecake Cookies Tasty Fall Treat

July 27, 2025 by Chef Tavio
When making apple cider cheesecake cookies, using the right ingredients is key. Each one plays an important role in creating that perfect fall flavor. - 3 cups all-purpose flour, sifted - 1 teaspoon baking powder - 1/2 teaspoon baking soda - 1/2 teaspoon ground cinnamon - 1/4 teaspoon ground nutmeg - 1/2 teaspoon salt - 1 cup unsalted butter, softened to room temperature - 1 cup cream cheese, softened to room temperature - 1 cup granulated sugar - 1/2 cup packed brown sugar - 2 large eggs, at room temperature - 1 teaspoon pure vanilla extract - 1 cup apple cider (preferably non-alcoholic) - 1 cup chopped apples (like Granny Smith) - 1/2 cup caramel sauce (for drizzling) These ingredients blend together to create a rich, creamy cookie. The butter and cream cheese provide a smooth base. The sugars give it sweetness, while the apple cider and chopped apples bring in that fresh, fruity taste. The spices, like cinnamon and nutmeg, add warmth and depth, making these cookies perfect for fall. For the full recipe, you can check the detailed instructions on how to combine these ingredients into a delightful treat. 1. Preheat oven temperature and prepare baking sheets: Start by preheating your oven to 350°F (175°C). This temperature is perfect for baking cookies. Line two baking sheets with parchment paper. This helps the cookies not stick. 2. Creaming butter and cream cheese with sugars: In a large bowl, combine 1 cup of softened butter and 1 cup of softened cream cheese. Use an electric mixer on medium speed. Cream these until smooth and fluffy. Next, add in 1 cup of granulated sugar and 1/2 cup of brown sugar. Mix well until it is fully combined. 3. Mixing in eggs and vanilla: Now, beat in 2 large eggs, one at a time. Make sure each egg is mixed well before adding the next one. After that, add in 1 teaspoon of pure vanilla extract. Keep mixing until the mixture is smooth. 1. Sifting dry ingredients for even distribution: In a separate bowl, sift together 3 cups of all-purpose flour, 1 teaspoon of baking powder, 1/2 teaspoon of baking soda, 1/2 teaspoon of ground cinnamon, 1/4 teaspoon of ground nutmeg, and 1/2 teaspoon of salt. Sifting helps blend the dry ingredients evenly. 2. Combining wet and dry mixtures: Gradually add the dry mixture into the wet mixture. Alternate with 1 cup of apple cider. Start and end with the flour mix. Mix until just combined. Be careful not to overmix, or your cookies may become tough. 1. Shaping cookie dough and spacing on baking sheets: Use a tablespoon or a cookie scoop to drop tablespoon-sized portions of dough onto the prepared baking sheets. Make sure to leave about 2 inches of space between each cookie. This allows them to spread while baking. 2. Baking time and indicators for doneness: Place the baking sheets in the oven and bake for 12-15 minutes. The cookies are done when the edges are lightly golden and the centers look set. 3. Cooling and finishing touches with caramel drizzle: After baking, take the cookies out of the oven. Let them cool on the baking sheets for about 5 minutes. Then, transfer them to a wire rack to cool completely. Once cooled, drizzle caramel sauce over the top of each cookie. This adds a sweet touch to your fall treat. For the complete recipe, check the [Full Recipe]. To get the best texture, start with room temperature ingredients. This means letting your butter and cream cheese sit out for about 30 minutes. When they are warm, they blend better. This helps your cookies turn out soft and chewy, just like you want. Next, be careful not to overmix the dough. Mixing too much can make your cookies tough. Once you combine the wet and dry ingredients, mix until just combined. You want a bit of flour still visible. You can make these cookies even tastier. Consider adding extra spices like ginger or allspice. A few drops of almond extract can also add a nice touch. Each of these options brings warmth and depth to your cookies. Using different types of apples can change the flavor too. Granny Smith apples are tart and add a nice zing. You can also try Honeycrisp or Fuji apples for a sweeter taste. For serving, stack the cookies on a pretty plate. This makes them look inviting. Drizzle extra caramel sauce on the side for dipping. A light sprinkle of ground cinnamon on top adds a festive touch. Pair these cookies with warm apple cider or a cup of tea. Both drinks complement the flavors well. You can also serve them with vanilla ice cream for a delicious dessert twist. For the full recipe, check out the link! {{image_4}} You can make these apple cider cheesecake cookies gluten-free. Use a mix of almond flour and coconut flour. This will keep the texture light and tasty. For vegan options, try using coconut oil instead of butter. You can replace eggs with unsweetened applesauce or flaxseed meal mixed with water. These swaps maintain the cookie's rich flavor while catering to different diets. To spice things up, consider adding chopped nuts or chocolate chips. Walnuts or pecans add a nice crunch. If you love chocolate, semi-sweet or dark chocolate chips work well. Seasonal spices like ginger or allspice give a warm twist to the flavor. You could also use pumpkin spice for an extra autumn kick. Thinking of a fun twist? Make sandwich cookies by adding a layer of cream cheese frosting in between two cookies. This creates a creamy center that is delightful. You can also serve these cookies warm with a scoop of vanilla ice cream. Drizzling dessert sauces, like caramel or chocolate, makes them even more special. Each bite will be a tasty treat. For the full recipe, visit [Full Recipe]. To keep your apple cider cheesecake cookies fresh, store them in an airtight container. This helps prevent them from drying out. You can use a cookie jar or a sealed plastic bag. If you want to freeze the cookies, first let them cool completely. Then, place them in a single layer on a baking sheet. Freeze them for about an hour, then transfer them to a freezer-safe bag. This way, they won't stick together. At room temperature, these cookies stay fresh for about five days. Keep them away from heat and sunlight. To tell if cookies have gone bad, check for any mold or unusual smells. If they feel very hard or dry, they might not taste good anymore. To reheat cookies, set your oven to 350°F (175°C). Place the cookies on a baking sheet and heat them for about 5 minutes. This warms them up and keeps them soft. For a warm treat, serve the cookies with a drizzle of caramel sauce. It adds a sweet touch and makes them even more delicious. For the full recipe, check out the Apple Cider Cheesecake Cookies 🥮 section above. What can I substitute for apple cider? If you don't have apple cider, you can use apple juice. It will give a sweet taste, but the flavor will be milder. You can also mix apple juice with a splash of vinegar for a tangy twist. Can I use a different type of cheese in the recipe? Yes, you can swap cream cheese with mascarpone cheese. This change will make your cookies richer and creamier. Just make sure the cheese is soft for easy mixing. How do I know when my cookies are done baking? Your cookies are done when the edges are lightly golden. The centers should look set but might still seem a bit soft. They will firm up as they cool. What to do if cookies spread too much or not at all? If your cookies spread too much, try chilling the dough for 30 minutes before baking. If they don’t spread, it may be due to overmixing. Use a gentle hand when combining ingredients. How to fix cookies that are too dry or too wet? For dry cookies, add a little more butter or cream cheese next time. If your cookies are too wet, add a bit more flour. This will help achieve the right dough consistency. Is it possible to reduce sugar without affecting the flavor? You can cut down the sugar by 25%. The cookies will still taste great, but they may be less sweet. Using spices like cinnamon can help enhance the flavor. Can these cookies be made ahead of time? Yes, you can make the dough ahead. Chill it in the fridge for up to three days. When ready to bake, just scoop and bake as usual. You can also freeze the dough for later use. Check the Full Recipe for details. This blog post detailed how to make delicious apple cider cheesecake cookies. We covered the key ingredients, from flour to spices. You learned step-by-step instructions and helpful tips for perfect cookies. We also discussed storage methods and answered common questions. With these insights, you can create great cookies for any occasion. Remember to have fun and explore variations. Your kitchen is now ready for tasty treats!

Fall is the perfect time to indulge in rich flavors and cozy treats, and what could be better than Apple Cider Cheesecake Cookies? These tasty cookies combine the warmth of …

Read more

Categories Desserts

Peanut Butter Coffee Latte Easy and Flavorful Recipe

July 27, 2025 by Chef Tavio
- Coffee: Use 1 cup of brewed coffee. You can serve it hot or cold. I prefer a strong brew for the best flavor. - Peanut Butter: Grab 2 tablespoons of creamy peanut butter. Creamy blends best with the milk. - Sweetener: Add 1 tablespoon of maple syrup or honey. Adjust to your taste for sweetness. - Milk Options: Use 1/2 cup of your choice of milk. Dairy, almond, or oat milk all work well. - Flavor Enhancements: Add 1/2 teaspoon of vanilla extract for depth. A pinch of ground cinnamon is also nice for extra warmth. Whipped cream and crushed peanuts are great for garnishing. This simple Peanut Butter Coffee Latte recipe is easy to make at home. Check out the Full Recipe for more details. First, you need to brew your coffee. You can use any method you like. Some popular methods are drip, French press, or pour-over. Each method gives a unique taste, so try them all! I recommend a medium roast coffee. It has a nice balance of flavor and strength. Next, let’s make the peanut butter milk. Start by melting the peanut butter. You can do this by using a small saucepan. Add the peanut butter and your milk of choice. Heat it on medium. Stir it well until the peanut butter blends smoothly with the milk. This step makes it creamy and delicious. Now it’s time to blend everything. In a blender, pour in the brewed coffee, the peanut butter milk, maple syrup, and vanilla extract. For fun, you can add a pinch of cinnamon. Blend this mixture until it’s frothy and well combined. The order of ingredients is key for the best flavor. Your Peanut Butter Coffee Latte is almost ready! Pour it into a large mug and enjoy. If you want, you can add whipped cream and crushed peanuts on top for extra fun. Follow the Full Recipe for more details on each step! - Sweetness Adjustments You can change how sweet your latte is. Start with one tablespoon of maple syrup. Taste it after blending. If you want it sweeter, add more syrup or honey. This way, you get the perfect balance for your taste. - Adding Spices A pinch of ground cinnamon adds warmth. Nutmeg or cocoa powder can also work well. Just a little can make a big difference. Experiment with these spices to find your favorite mix. - How to Make it Creamy To make your latte creamy, use whole milk or a nut milk blend. Heat the milk and peanut butter slowly. Stir well to blend them smoothly. This creates a rich, velvety texture for your drink. - Frothing Techniques You can froth the milk with a whisk or a frother. If you don’t have a frother, shake it in a jar. This adds air and gives your latte a fluffy top. Frothing makes your drink feel special. - Creative Garnishes Whipped cream makes your latte look fancy. Top it with crushed peanuts or a sprinkle of cinnamon. You can even add a drizzle of chocolate syrup for a fun twist. Make it pretty to enjoy it even more. - Serving Suggestions Serve your latte in a big mug to show off the layers. Pair it with a cookie or a slice of cake. This makes for a nice snack or dessert. Enjoy your Peanut Butter Coffee Latte with friends for a great treat. {{image_4}} You can use different types of milk in your Peanut Butter Coffee Latte. Dairy milk gives a rich taste. Non-dairy milk, like almond or oat, adds unique flavors. Each choice changes the drink's texture and taste. I often switch between almond and oat for variety. Almond milk is nutty, while oat milk is creamy and smooth. You can customize your latte with fun flavors. Adding chocolate or caramel makes it sweeter and richer. Just swirl in some chocolate syrup or drizzle caramel on top. Seasonal flavors also work great. In fall, try adding pumpkin spice. For summer, a touch of mint can refresh your drink. If you want a healthier option, try low-calorie sweeteners. Stevia or monk fruit can replace sugar without extra calories. Sugar-free syrups are another way to sweeten your latte. They come in many flavors and keep the taste good. You can adjust the sweetness based on your taste. This way, everyone can enjoy their own perfect Peanut Butter Coffee Latte. For the complete Peanut Butter Coffee Latte recipe, check the Full Recipe. To keep your Peanut Butter Coffee Latte fresh, store it in the fridge. Use an airtight container. This helps prevent the flavors from mixing with other foods. Try to use it within two days for the best taste. If you notice any separation, just give it a good shake before serving. When reheating, use a microwave or stovetop. If using a microwave, heat it in short bursts. Stir in between to ensure it warms evenly. If using the stovetop, heat it on low and stir constantly. This keeps the latte creamy and delicious. Avoid boiling, as it may alter the taste and texture. The best flavor of your Peanut Butter Coffee Latte lasts about two days in the fridge. After that, it may lose its rich taste. For the best experience, always check for freshness before drinking. If it smells off or has an unusual texture, it’s best to toss it. Enjoy your latte at its peak! For the best Peanut Butter Coffee Latte, use a medium roast coffee. This blend gives you a smooth taste. Dark roasts can overpower the peanut butter flavor. Light roasts may lack depth. Brew your coffee strong to balance the peanut butter and sweetener. Yes, you can easily make a vegan Peanut Butter Coffee Latte. Simply use plant-based milk like almond, soy, or oat milk. Replace honey with maple syrup, as it is vegan-friendly. This keeps the drink delicious without any animal products. To adjust sweetness, start with one tablespoon of maple syrup. Taste the latte after blending. If you prefer it sweeter, add more syrup little by little. You can also use honey if you are not vegan. Remember, sweetness can enhance the peanut flavor. You can use crunchy peanut butter if you like texture. It adds a fun crunch to each sip. Just ensure it blends well with the milk. If it doesn’t mix smoothly, you may need to stir more. Keep in mind, a creamier version blends better. Absolutely! To make an iced Peanut Butter Coffee Latte, brew your coffee and let it cool. Mix the peanut butter with cold milk instead of warming it. Pour the mixture over ice. Blend it just like the hot version for a refreshing treat. Enjoy your drink chilled! In this blog post, we explored how to make a delicious Peanut Butter Coffee Latte. We covered key ingredients like coffee, peanut butter, and various milk options. You learned step-by-step instructions, from brewing to blending. I shared tips for enhancing flavor and achieving the perfect consistency. We also discussed variations, storage methods, and common questions. Remember, you can customize your latte to fit your taste. Enjoy experimenting with flavors and ingredients to create your ideal drink!

If you love coffee and peanut butter, you’ll want this Peanut Butter Coffee Latte recipe! It’s easy to make and bursting with flavor. Whether you’re a busy morning person or …

Read more

Categories Breakfast

Easy Sweet Potato Soup Quick and Flavorful Delight

July 26, 2025 by Chef Tavio
To make this soup, you will need a few key items. Here’s what to gather: - 2 medium sweet potatoes, peeled and diced into 1-inch cubes - 1 tablespoon extra-virgin olive oil - 1 medium onion, finely chopped - 2 cloves garlic, minced (about 1 teaspoon) - 1 inch fresh ginger, peeled and grated - 4 cups vegetable broth (low-sodium recommended) These ingredients form the base of your soup. Sweet potatoes give it a lovely sweetness, while the onion, garlic, and ginger add depth and warmth. You can take your soup to the next level with a few extras. Consider adding: - 1/2 cup full-fat coconut milk for creaminess - 1 teaspoon ground cumin for warmth - 1 teaspoon ground cinnamon for sweetness Coconut milk will make your soup rich and smooth. The spices will bring a nice balance to the sweet potatoes. Garnishing can make your soup look even more appealing. Try these options: - Fresh cilantro leaves, roughly chopped - A sprinkle of roasted pumpkin seeds - A drizzle of olive oil These garnishes add color and a bit of crunch. They also enhance the flavor, making your soup a true delight. You can find the full recipe in the article to create this warm, cozy dish. Start by heating the olive oil in a large pot. Use medium heat until the oil shimmers. Add the chopped onion. Sauté for about 5 to 7 minutes. Stir often until the onion is soft and clear. Next, add the minced garlic and grated ginger. Cook for one more minute. This step makes your kitchen smell amazing! Now, it’s time for the sweet potatoes! Add the diced sweet potatoes to the pot. Sprinkle in the ground cumin and ground cinnamon. Stir well to coat the sweet potatoes with the spices. Pour in the vegetable broth and bring it all to a boil. Once it bubbles, reduce the heat to low. Let it simmer for 20 to 25 minutes. The sweet potatoes should be fork-tender when done. After the sweet potatoes are cooked, grab your immersion blender. Puree the soup until it is silky smooth. If you don’t have one, use a regular blender. Just be careful and blend in small batches. Finally, stir in the coconut milk if you want extra creaminess. Season with salt and pepper to taste. To make your soup silky smooth, use an immersion blender. This tool helps blend the soup right in the pot. If you don’t have one, pour the soup into a regular blender in small batches. Blend each batch until it’s smooth. This step is key! You want to avoid any chunks for a lovely texture. You can adjust the flavor with spices! If you like heat, add some chili powder or a pinch of cayenne. Start with a little, then taste. You can always add more if you want it spicy. Other spices like nutmeg or smoked paprika can also give your soup a unique twist. If you want creaminess without dairy, try cashew cream. Just blend soaked cashews with water until smooth. This adds a rich taste and texture. You can also use almond or oat milk for a lighter option. Both choices keep the soup plant-based while adding creaminess. {{image_4}} You can change up the flavor of your sweet potato soup. A Thai-inspired version is a fun twist. Use coconut milk for creaminess and add curry paste for spice. This will give your soup a rich, warm taste. It’s easy to make and fun to try! Adding veggies boosts the nutrition of your soup. Carrots add sweetness and color. Spinach or kale can add a nice green touch. You can toss these in while the sweet potatoes cook. They will soften and blend well with the soup. The extra nutrients will make your meal even better! Garnishing your soup makes it look fancy and tasty. You can use croutons for crunch. Seeds like pumpkin or sunflower add a nutty flavor. Fresh herbs like cilantro give a bright finish. Choose what you love, and enjoy your beautiful bowl of soup. Remember, presentation is key! For the full recipe, check out Cozy Sweet Potato Bliss Soup! To keep your sweet potato soup fresh, use airtight containers. This helps to prevent any air from getting in. Make sure to let the soup cool down before sealing it. Store it in the fridge if you plan to eat it soon. It is best to consume leftovers within three days for the best taste. If you want to save your soup for later, freezing is a great option. Pour the cooled soup into freezer-safe containers, leaving some space at the top. This allows the soup to expand when it freezes. You can also use ice cube trays for smaller portions. When you want to eat it, thaw it in the fridge overnight. Reheat it on the stove or in the microwave until hot. In the fridge, sweet potato soup lasts about three to five days. If you freeze it, it stays good for up to three months. Always check for off smells or changes in color before eating. Keeping track of dates helps you enjoy your soup at its best. The total cooking time for sweet potato soup is about 40 minutes. You will spend 10 minutes prepping the ingredients. The cooking phase takes around 30 minutes. This includes sautéing the onions and garlic, simmering the sweet potatoes, and blending everything together. Yes, you can easily make this soup vegan. The main ingredients are already plant-based. Use vegetable broth and skip the coconut milk if you prefer. You can also add extra spices or veggies to enhance the flavor while keeping it vegan. Sweet potato soup pairs well with many sides. Here are some great ideas: - Crusty bread for dipping - A fresh green salad for crunch - Grilled chicken or chickpeas for protein - Roasted veggies for added flavor These options will make your meal more complete and enjoyable. For the full recipe, check out the Cozy Sweet Potato Bliss Soup. In this post, we covered how to make easy sweet potato soup. We discussed essential ingredients like sweet potatoes, onion, and garlic, plus tips for enhancing flavor and presentation. I shared simple steps for cooking and blending the soup to perfection, along with helpful tips for consistency and customization. Don't forget to explore variations and storage tips for future meals. This soup is not just delicious; it is also healthy and easy to make. Enjoy trying different flavors and garnishes to find your favorite!

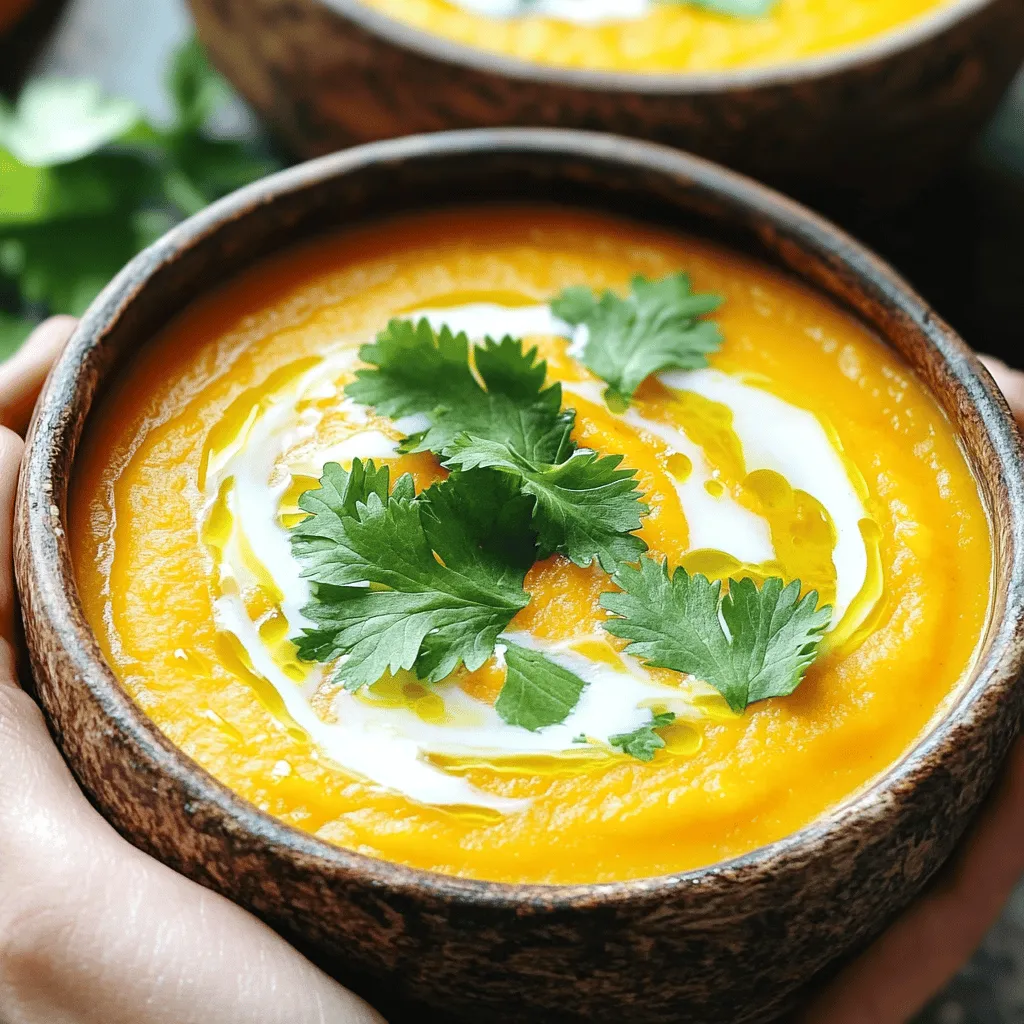
Are you ready to whip up a comforting bowl of Easy Sweet Potato Soup? This quick recipe packs a burst of flavor and warms you from the inside out. With …

Read more

Categories Dinner

Healthy Pumpkin Muffins Tasty and Nutritious Treat

July 26, 2025 by Chef Tavio
- 1 cup pumpkin puree - 1/2 cup Greek yogurt - 1/2 cup honey or maple syrup - 2 large eggs - 1 teaspoon vanilla extract - 1 1/2 cups whole wheat flour - 1 teaspoon baking powder - 1 teaspoon baking soda - 1 teaspoon ground cinnamon - 1/2 teaspoon ground nutmeg - 1/4 teaspoon ground ginger - 1/4 teaspoon salt - 1/2 cup chopped walnuts or pecans - Optional: 1/4 cup chocolate chips Each ingredient offers unique health benefits. Pumpkin puree is rich in vitamins A and C, giving you a boost for your immune system. Greek yogurt adds protein and calcium, which helps keep bones strong. Honey or maple syrup provides natural sweetness and antioxidants. Whole wheat flour adds fiber, promoting good digestion. Finally, nuts offer healthy fats and protein, keeping you full longer. If you want a healthier option for sugar, consider using stevia or agave. Both sweeteners can lower calories without losing flavor. For those needing gluten-free options, almond flour or oat flour works well as a substitute for whole wheat flour. These options maintain a nice texture while ensuring everyone can enjoy these muffins. To make these muffins, you need a standard muffin tin. A non-stick or silicone muffin tin works best. You’ll also need mixing bowls—one large for wet ingredients and one medium for dry ingredients. A whisk helps mix the batter smoothly, while a spatula or wooden spoon is perfect for folding the ingredients together. 1. Start by preheating your oven to 350°F (175°C). This warms it up for baking. 2. Line your muffin tin with liners or spray it lightly with cooking oil. This helps prevent sticking. 3. In a large bowl, mix together pumpkin puree, Greek yogurt, honey (or maple syrup), eggs, and vanilla extract. Whisk until smooth. 4. In a separate bowl, combine whole wheat flour, baking powder, baking soda, cinnamon, nutmeg, ginger, and salt. Whisk these dry ingredients well. 5. Slowly add the dry mix to the wet mix. Gently fold until just combined. Don't overmix; it can make the muffins dense. 6. If you want nuts or chocolate chips, fold them in now. Spread them evenly in the batter. 7. Spoon the batter into the muffin tin. Fill each cup about three-quarters full for the best rise. 1. Place the muffin tin in the preheated oven. Bake for 18 to 22 minutes. 2. To check if they are done, insert a toothpick in the center of a muffin. It should come out clean. 1. Let the muffins cool in the tin for about 5 minutes after baking. 2. Carefully transfer them to a wire rack. This allows air to cool them completely. 3. For a tasty touch, serve the muffins warm. You can add a light dusting of powdered sugar or sprinkle cinnamon on top. 4. These muffins taste great with herbal tea or coffee. To make the best healthy pumpkin muffins, avoid overmixing the batter. Mix until just combined. This keeps the muffins light and fluffy. If you want extra flavor, add spices like cardamom or allspice. A drop of almond extract can also enhance the taste. Serve your muffins warm with a cup of coffee or tea. They pair well with spreads like almond butter or cream cheese. For a lovely presentation, dust the top with powdered sugar. Arrange them on a platter for guests to admire. To cut calories, use less honey or maple syrup. You can also replace half of the flour with almond flour for more nutrients. If you have dietary restrictions, try using flax eggs instead of regular eggs for a vegan option. The full recipe provides great flexibility for your needs. {{image_4}} You can play with flavors in your healthy pumpkin muffins. Adding fruits like cranberries or raisins can give a sweet twist. They add color and extra nutrients. Try using savory ingredients too. Cheese or herbs can create a unique taste. Imagine a pumpkin muffin with a hint of feta or rosemary. This adds depth and makes them special. If you want to make a vegan version, swap the eggs with flaxseed meal mixed with water. Use plant-based yogurt instead of Greek yogurt. For a low-carb option, you can use almond flour and a sugar-free sweetener. These choices keep the muffins tasty while fitting different diets. You can also make your muffins festive for the holidays. Add spices like cloves or allspice for a warm flavor. Chopped apples or pears can bring a fall vibe. Use seasonal produce to keep things fresh and exciting. By changing a few ingredients, you can create a muffin that feels new and special every time. Try out these variations to find your favorite way to enjoy healthy pumpkin muffins. For the full recipe, check out the Healthy Pumpkin Muffins section. To keep your healthy pumpkin muffins fresh, use an airtight container. This will help prevent moisture loss and keep them soft. If you want to store them for longer, wrap each muffin in plastic wrap. This will seal in their flavors and keep them moist. To freeze your muffins, place them in a single layer on a baking sheet. Once they are frozen solid, transfer them to a freezer-safe bag. Make sure to remove as much air as possible from the bag. When you're ready to eat one, take it out and let it thaw at room temperature. You can also heat it in the microwave for about 20 seconds for a warm treat. These muffins stay fresh for about a week when stored properly. If you notice any mold, softness, or an off smell, it’s best to toss them. Always check for these signs to ensure your muffins are safe to eat. Remember, good storage helps keep your healthy pumpkin muffins yummy! Can I use fresh pumpkin instead of canned? Yes, you can use fresh pumpkin. First, cook the pumpkin until soft. Then, mash it well. Fresh pumpkin can add a brighter flavor and is a great way to use seasonal produce. Make sure to measure it the same as the canned pumpkin. How can I make these muffins gluten-free? To make gluten-free muffins, swap whole wheat flour for a gluten-free blend. Look for a blend that includes xanthan gum, which helps with texture. You may also use almond flour or oat flour for a different taste. Why are my muffins dense? Dense muffins often come from overmixing the batter. Mix just until combined. Another cause may be using too much flour. Be sure to measure flour correctly by spooning it into the cup and leveling it off with a knife. How do I know when my muffins are fully baked? Insert a toothpick into the center of a muffin. If it comes out clean, the muffins are done. You can also look for a golden top and a slight spring when you press gently. Caloric content and macronutrients per muffin Each muffin has about 150 calories. They contain around 4 grams of protein, 5 grams of fat, and 25 grams of carbs. Health benefits of the ingredients used Pumpkin is high in fiber and vitamin A. Greek yogurt adds protein and calcium. Using honey or maple syrup gives natural sweetness and antioxidants. Whole wheat flour adds more fiber than white flour. Nuts provide healthy fats and crunch. Enjoy these muffins knowing they are both tasty and nutritious! In this blog post, we explored how to make delicious muffins. We covered ingredients, substitutes, and the tools you need. You learned step-by-step instructions, tips for perfect muffins, and fun flavor variations. We also shared smart storage practices and tackled common questions. By following these guidelines, you can enjoy baking muffins with ease. Let your creativity shine by trying new flavors and health options. Happy baking!

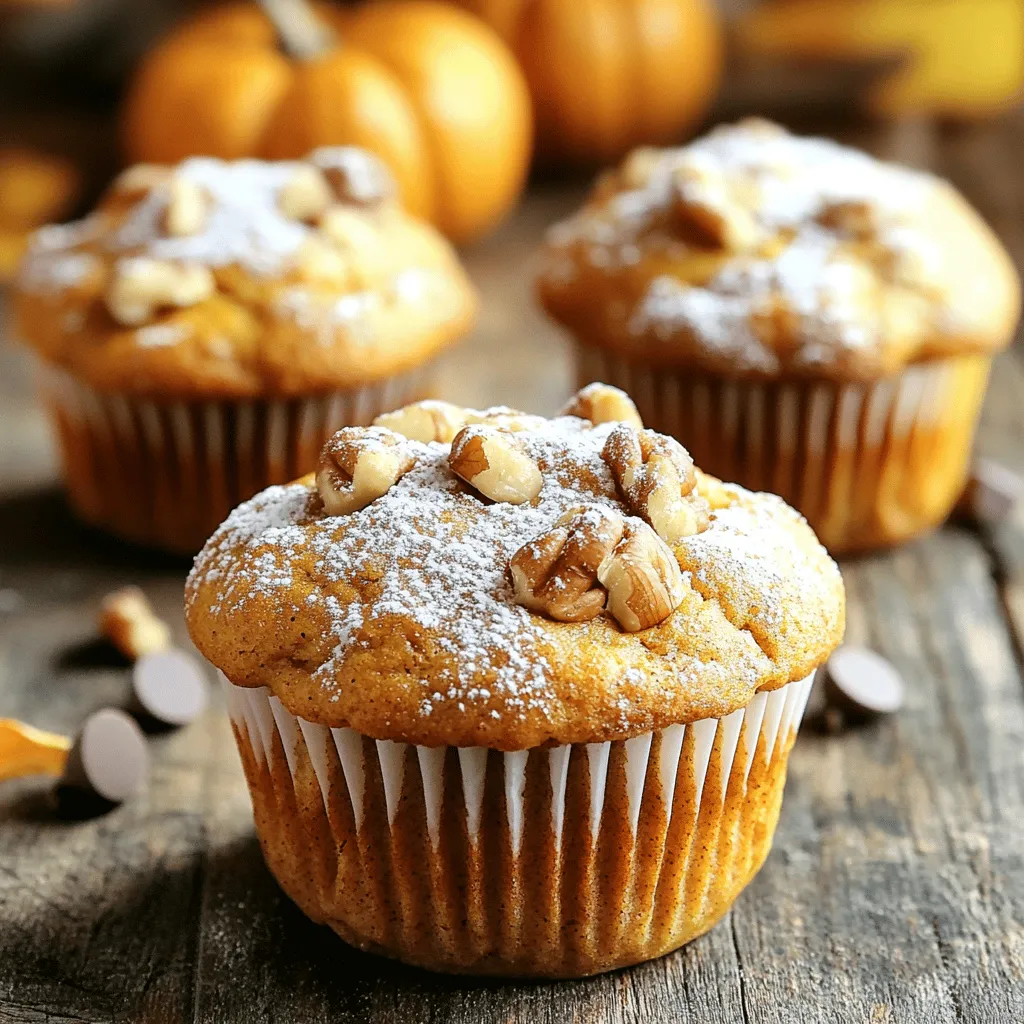
Are you ready to enjoy a treat that’s both tasty and good for you? These Healthy Pumpkin Muffins are packed with flavor and nutrients to satisfy your cravings. In this …

Read more

Categories Breakfast

Applesauce Cake with Cinnamon Cream Cheese Frosting Delight

July 26, 2025 by Chef Tavio
To make a tasty applesauce cake, gather these main ingredients: - 2 cups unsweetened applesauce - 1 cup packed brown sugar - 1/2 cup granulated sugar - 1/2 cup vegetable oil - 3 large eggs, at room temperature - 2 cups all-purpose flour - 1 teaspoon baking powder - 1 teaspoon baking soda - 2 teaspoons ground cinnamon - 1/2 teaspoon salt - 1 teaspoon pure vanilla extract These ingredients mix well to create a moist, flavorful cake. The applesauce adds natural sweetness and keeps the cake tender. The brown sugar gives a rich flavor, while the spices bring warmth. For the creamy frosting that tops our cake, you need: - 8 ounces cream cheese, softened to room temperature - 1/2 cup unsalted butter, softened to room temperature - 2 cups powdered sugar, sifted - 1 teaspoon ground cinnamon - 1-2 tablespoons milk (as needed for desired consistency) This frosting is rich and smooth. The cream cheese adds tanginess, while the cinnamon gives a warm, sweet flavor that pairs perfectly with the cake. Want to make your cake even better? Consider these optional add-ins: - 1/2 cup chopped walnuts or pecans - 1/2 cup raisins or dried cranberries - 1/2 teaspoon nutmeg for extra spice These add-ins can boost flavor and texture. Nuts add crunch, while dried fruits offer sweetness. You can mix and match based on what you like! For the complete recipe, refer to the Full Recipe. Start by preheating your oven to 350°F (175°C). This step is important for even baking. While the oven heats, prepare your baking pan. Grease a 9x13 inch pan with butter or oil. Then, dust it with flour to prevent sticking. This ensures your cake comes out perfectly. In a large bowl, mix the wet ingredients. Combine 2 cups of unsweetened applesauce, 1 cup of brown sugar, and 1/2 cup of granulated sugar. Add 1/2 cup of vegetable oil for moisture. Stir these together until they are creamy. Next, add 3 large eggs one at a time. Mix well after each egg. Lastly, stir in 1 teaspoon of pure vanilla extract for flavor. In another bowl, whisk together the dry ingredients. Combine 2 cups of all-purpose flour, 1 teaspoon of baking powder, 1 teaspoon of baking soda, 2 teaspoons of ground cinnamon, and 1/2 teaspoon of salt. Mix these well. Now, gently add the dry mixture to the wet mixture. Stir just until combined. Be careful not to overmix. Pour the batter into your prepared pan. Use a spatula to smooth the top. Place the pan in the oven. Bake for 30-35 minutes. Check if it’s done by inserting a toothpick in the center. If it comes out clean, the cake is ready. Let it cool in the pan for 10 minutes. Then, move it to a wire rack to cool completely. For the frosting, beat 8 ounces of softened cream cheese and 1/2 cup of unsalted butter. Use an electric mixer for about 2-3 minutes. Mix until creamy and smooth. Gradually add 2 cups of sifted powdered sugar and 1 teaspoon of ground cinnamon. Keep mixing until well combined. If the frosting is too thick, add 1-2 tablespoons of milk. This helps achieve a smooth spreading consistency. Once the cake is cool, it’s time to frost. Use a spatula to spread the cinnamon cream cheese frosting over the top. Aim for an even layer for a beautiful look. For extra flair, sprinkle a bit of ground cinnamon on top. Serve the cake by cutting it into generous squares. Enjoy your delightful applesauce cake! For the complete recipe, check the Full Recipe section. To get a great texture for your applesauce cake, use unsweetened applesauce. This gives the cake a natural sweetness. Make sure your eggs are at room temperature for better mixing. Mix the wet ingredients well, but don’t overmix when adding the dry ingredients. This keeps the cake light and fluffy. Avoid using cold eggs or overmixing the batter. Cold eggs can make the cake dense. Overmixing introduces too much air, leading to a tough texture. Always check your oven temperature with an oven thermometer. An oven that’s too hot can burn the cake. Always use a toothpick to test doneness. For the best frosting, your cream cheese and butter must be soft. Beat them together until creamy and smooth. Add the powdered sugar slowly to prevent lumps. If it’s too thick, add milk one tablespoon at a time. This helps you get the perfect spreading consistency for the cake. For more in-depth instructions, refer to the Full Recipe. {{image_4}} To make a gluten-free applesauce cake, swap regular flour for a gluten-free blend. Use a mix with xanthan gum for the best texture. This change keeps the cake moist and delicious. You might want to check the blend's package for the right ratio. Follow the same steps in the full recipe for mixing and baking. You can switch up the frosting for a new twist. For chocolate frosting, add cocoa powder to the cream cheese mix. Start with 1/4 cup and adjust to taste. If you prefer vanilla, just omit the cinnamon and add more vanilla extract. Each frosting choice makes the cake unique and fun to serve. To enhance the cake's texture, consider adding fruits or nuts. Chopped walnuts or pecans work well. You can also fold in raisins or diced apples for extra flavor. Mix these in after combining the wet and dry ingredients. This small change makes each bite exciting and adds a delightful crunch. Store leftover applesauce cake in an airtight container. This keeps it fresh and moist. Place the cake at room temperature for up to three days. If you want to keep it longer, consider refrigerating it. Just remember to let it cool completely before wrapping it. You can freeze applesauce cake for future enjoyment. First, let it cool down. Then, wrap it tightly in plastic wrap. Next, place the wrapped cake in a freezer bag. It can last up to three months in the freezer. To enjoy later, simply thaw it in the fridge overnight. To reheat the cake, preheat your oven to 350°F (175°C). Place the cake in an oven-safe dish. Warm it for about 10-15 minutes or until it’s heated through. If you prefer, you can also use the microwave. Just heat individual slices for 15-20 seconds. Be careful not to overheat, as this can dry the cake out. For detailed steps and exact measurements, check the Full Recipe. Yes, you can use sweetened applesauce in the cake. However, this may make your cake sweeter. If you do, you might want to reduce the added sugars in the recipe. To make your applesauce cake more moist, use extra applesauce or add some plain yogurt. Both add moisture and keep the cake tender. Another tip is to not overmix the batter. Overmixing can lead to a dry cake. If you want to swap out cream cheese, use mascarpone cheese or Greek yogurt. Both options will give you a creamy texture. You can also try using whipped butter and powdered sugar for a lighter frosting. Your applesauce cake can last about three days at room temperature. Just make sure to cover it well with plastic wrap or store it in an airtight container. If you keep it in the fridge, it can last up to a week. For long-term storage, check the Full Recipe for freezing tips. We covered the key steps to create a delicious applesauce cake with rich frosting. You learned about the main ingredients, from applesauce to cream cheese, and optional add-ins that boost flavor. We explored tips for perfect texture and common baking mistakes to avoid. We even looked at gluten-free options and storage ideas. Bake this cake and enjoy every bite. You now have the tools to make it great!

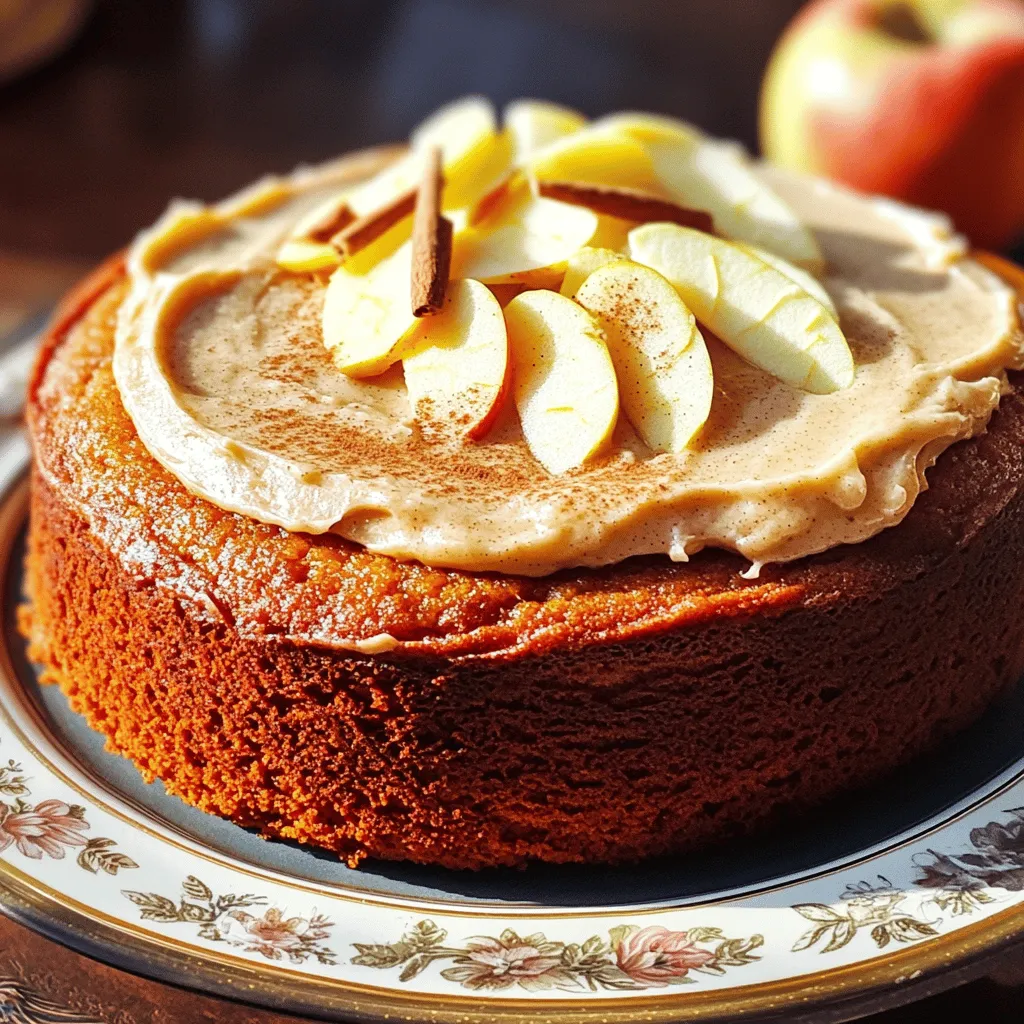
Ready to savor a slice of homemade goodness? This Applesauce Cake with Cinnamon Cream Cheese Frosting is a warm hug in dessert form. With simple ingredients and easy steps, you’ll …

Read more

Categories Desserts

Savory Slow Cooker Hatch Green Chile Verde Recipe

July 26, 2025 by Chef Tavio
- 2 lbs boneless, skinless chicken thighs - 4 cups Hatch green chiles, roasted and finely chopped - 1 medium onion, diced - 4 cloves garlic, minced - 1 tablespoon ground cumin - 1 tablespoon dried oregano - 1 teaspoon smoked paprika - Salt and pepper, to taste - 2 cups vegetable broth - 2 tablespoons fresh lime juice - Fresh cilantro, chopped (for garnish) - Warm tortillas, for serving When I make Slow Cooker Hatch Green Chile Verde, I always start with good chicken. I prefer boneless, skinless chicken thighs for their rich flavor. They stay tender and juicy. Next, I reach for Hatch green chiles. These chiles are special. They have a unique, smoky taste that adds depth to my dish. Chopping the onion and garlic is next. They bring sweet and savory notes that balance the heat. For spices, I add ground cumin, oregano, and smoked paprika. These spices enhance the flavors and make the dish pop. Then, I pour in vegetable broth to keep everything moist. The fresh lime juice adds brightness, while cilantro gives a nice finish. Finally, I serve it with warm tortillas. It’s perfect for scooping up that flavorful chile verde. For the complete details, check out the Full Recipe. - Layer chicken thighs in the cooker. - Add diced onion and minced garlic. To start, get your slow cooker ready. Place the chicken thighs at the bottom. Make sure they spread evenly. This helps them cook well. Next, add the diced onion. The onion will give a sweet flavor. Now, add the minced garlic. This adds a nice aroma and taste. - Spoon roasted and chopped Hatch green chiles. - Mix layers evenly. Now, it's time for the star of the dish: Hatch green chiles. Spoon them over the chicken and onions. You want to use roasted and chopped chiles for the best flavor. Once you add them, mix everything gently. This helps all the flavors blend together. - Whisk together vegetable broth and spices. - Pour broth mixture over the ingredients. Next, grab a bowl. Whisk together the vegetable broth, ground cumin, dried oregano, and smoked paprika. This mix adds depth to your dish. Don't forget a pinch of salt and pepper. Once it’s well combined, pour it over the chicken and chiles. The broth will keep everything moist and tasty. - Set slow cooker to low for 6-8 hours or high for 3-4 hours. - Shred chicken prior to serving. Now, cover the slow cooker. Set it to low for 6 to 8 hours. If you’re in a hurry, you can set it to high for 3 to 4 hours. When it’s done, the chicken will be very tender. Use two forks to shred the chicken into bite-sized pieces. Mix it back into the sauce for extra flavor. - Stir in fresh lime juice. - Adjust seasoning as needed. To finish, stir in fresh lime juice. This brings a bright taste to the dish. Taste your Chile Verde and adjust the seasoning. Add more salt, pepper, or lime juice if needed. For the full recipe, check the section above. Selecting the right chiles is key to making great Hatch green chile verde. Fresh Hatch green chiles have a bright flavor. They can be found at local markets when in season. If fresh chiles are not available, canned chiles are a good option. They still provide a good taste, but fresh is best. To roast Hatch chiles at home, follow these steps: - Preheat your oven to 450°F (232°C). - Place whole chiles on a baking sheet. - Roast for about 10-15 minutes, turning once, until the skin blisters. - Once cooled, peel off the skin and remove the seeds. For even cooking, place chicken thighs in a single layer in your slow cooker. Avoid overcrowding to help the chicken cook through. If you have large chicken pieces, adjust the cooking time. Larger pieces may need an extra hour. Always check for tenderness to ensure they are ready. When serving your chile verde, presentation matters. Use deep bowls to showcase the dish's color. Garnish with fresh cilantro for a pop of green. Warm tortillas are great on the side. They let guests scoop the chile verde or make their own tacos. Consider pairing it with rice or beans for a full meal. {{image_4}} You can switch the chicken for pork or beef. Both meats pair well with the Hatch chiles. If you choose pork, a shoulder cut works best. For beef, I recommend chuck roast for tenderness. You can also make a vegetarian version. Use mushrooms or jackfruit for a hearty texture. Both options are tasty and satisfying. Want more heat? Add extra spices like cayenne pepper or crushed red pepper flakes. You can also mix in different vegetables. Bell peppers, zucchini, or corn add color and flavor. Another idea is to include beans. Black beans or pinto beans make the dish more filling. You can serve the chile verde in tacos or over rice. Tacos are fun and easy for everyone to build their own. If you serve it over rice, it becomes a cozy bowl meal. If you have leftovers, try them in quesadillas or as a topping for nachos. You can even use it as a filling for burritos. The options are endless! For the full recipe, check out the Slow Cooker Hatch Green Chile Verde section. To store your Slow Cooker Hatch Green Chile Verde in the fridge, let it cool first. Place it in an airtight container. This helps keep the flavors fresh. Make sure to eat it within three to four days. To maintain flavor and texture, reheat gently. Use the stove or microwave until hot. Stir it well to mix the flavors. To freeze the Chile Verde, let it cool completely. Transfer it to a freezer-safe container. Leave some space at the top since it expands when frozen. Seal it tightly and label with the date. You can freeze it for up to three months. When ready to eat, thaw it in the fridge overnight. Reheat it on the stove or in the microwave until it's hot all the way through. In the fridge, your dish stays fresh for three to four days. In the freezer, it lasts up to three months. Watch for signs of spoilage. If you see mold or a strange smell, throw it away. If it looks or smells off, it’s best not to eat it. Keeping these tips in mind ensures you enjoy your delicious Slow Cooker Hatch Green Chile Verde at its best. Hatch green chiles are a special type of pepper. They grow in Hatch, New Mexico. They have a rich, smoky flavor with a hint of sweetness. Their heat level varies, making them great for many dishes. I love using them in my recipes. They add depth and warmth to meals. Yes, you can prep this dish ahead of time. To do this, chop the onion and garlic. You can also roast and chop the chiles. Store these in the fridge until you are ready to cook. This saves time on busy days. Just layer everything in the slow cooker when you are ready. The heat level of Hatch green chiles can vary. Some are mild, while others pack more heat. If you prefer less spice, choose milder chiles. You can also remove seeds to lower the heat. This way, everyone can enjoy this delicious dish without worry. If you want a thicker sauce, there are easy options. You can mix a tablespoon of cornstarch with water and stir it in. Let it cook for a bit longer to thicken. Alternatively, mash some of the beans or chicken in the sauce. This will also help create a thicker texture. There are many great sides to serve with hatch green chile verde. Warm tortillas are perfect for making tacos. You can also serve it over rice for a filling meal. Add a fresh salad or guacamole on the side for a nice touch. These options will complement the savory flavors well. For the full recipe, check out the detailed instructions above. This recipe for Slow Cooker Hatch Green Chile Verde is simple and tasty. We covered the key ingredients like chicken thighs, Hatch green chiles, and spices. I shared tips on cooking, serving, and even variations to try. Remember, use fresh chiles for the best flavor. You can easily adjust this dish to your taste and dietary needs. Enjoy crafting a delicious meal that warms both your heart and your home.

Are you ready to elevate your dinner game? This Savory Slow Cooker Hatch Green Chile Verde recipe will transform your meals into something remarkable. With tender chicken, roasted Hatch green …

Read more

Categories Dinner

Caramel Pear Upside Down Cake Delightful Recipe Guide

July 26, 2025 by Chef Tavio
To make a delicious Caramel Pear Upside Down Cake, you will need the following ingredients: - 3 ripe pears, peeled, cored, and sliced - 1 cup brown sugar - 1/2 cup unsalted butter (1 stick) - 1 cup all-purpose flour - 1 teaspoon baking powder - 1/4 teaspoon salt - 1/2 cup granulated sugar - 2 large eggs - 1 teaspoon vanilla extract - 1/2 cup milk - 1 teaspoon ground cinnamon - Optional: whipped cream for serving To create this delightful cake, gather these tools and equipment: - 9-inch round cake pan - Medium saucepan - Mixing bowls - Whisk - Knife for slicing pears - Spatula for mixing - Toothpick for testing doneness You can add your own twist to the cake with these optional ingredients: - A pinch of nutmeg for warmth - Chopped nuts for crunch - Dried fruit for added sweetness - Different fruits like apples or peaches for variety - A drizzle of honey or maple syrup on top for extra flavor This list helps you prepare for a delightful baking experience. For the complete process, check out the Full Recipe. To make the caramel, start with a medium saucepan. Place it over medium heat, then add 1/2 cup of unsalted butter and 1 cup of brown sugar. Stir the mixture continuously. It should melt, mix, and become smooth. This will take just a few minutes. Once ready, pour the warm caramel into your greased 9-inch round cake pan. Now, let’s focus on the pears. Take 3 ripe pears and peel, core, and slice them. Artfully arrange these slices in the pan over the caramel. Make sure they slightly overlap. This will create a lovely pattern. It’s all about the presentation here, so take your time! Next, we’ll mix the batter. In a bowl, whisk together 1 cup of all-purpose flour, 1 teaspoon of baking powder, 1/4 teaspoon of salt, and 1 teaspoon of ground cinnamon. This is your dry mix. In a larger bowl, cream together 1/2 cup of granulated sugar and the remaining 1/2 cup of butter. Beat until fluffy, which takes about 3-5 minutes. Add 2 eggs one at a time, mixing well after each. Finally, stir in 1 teaspoon of vanilla extract. Now, it’s time to bake! Preheat your oven to 350°F (175°C). Gradually add the dry mix to the wet ingredients, alternating with 1/2 cup of milk. Start and end with the flour mix. Be gentle; you don’t want to overmix. Pour this batter over the pears in the pan. Bake for 35-40 minutes. Check with a toothpick to see if it comes out clean. After baking, let your cake cool in the pan for about 10 minutes. This helps it set. Run a knife around the edges to loosen it. Then, flip the cake onto a serving plate. You should see the beautiful pears on top, all glistening in the caramel. Enjoy this delightful treat warm or at room temperature! For a special touch, add whipped cream on the side. You can find the full recipe [Full Recipe]. To make the best Caramel Pear Upside Down Cake, avoid common mistakes. First, melt the butter and brown sugar slowly. If you rush, the caramel may burn. Stir the mixture well until it's smooth. This helps blend the flavors. Next, when you arrange the pears, overlap them nicely. This makes the cake look pretty. If the pears are uneven, they may not cook well. When mixing the batter, don’t overmix. Stir just until you see no more flour. This keeps the cake light and fluffy. To check if your cake is ready, use a toothpick. Insert it into the center. If it comes out clean, your cake is done. If it has batter on it, bake a few more minutes. Another method is to gently press the top of the cake. If it springs back, it’s ready. If not, give it some more time in the oven. This cake shines with a scoop of vanilla ice cream. The cold ice cream pairs well with the warm cake. You can also serve it with whipped cream. A sprinkle of cinnamon on top adds extra flavor. For a fun twist, top it with chopped nuts. They add a nice crunch. Enjoy your lovely cake with good company! {{image_4}} You can swap pears for other fruits. Apples work great in this cake. Their firm texture holds up well when baked. Try using ripe peaches for a sweet twist. Cherries or plums can also be fun. Each fruit adds its own flavor and charm to the cake. If you need a gluten-free cake, you can use gluten-free flour. Many brands offer a one-to-one substitute. Just make sure it has a good blend of starches. This will keep the cake light and fluffy. You can also use almond flour for a nutty taste. Just mix it with a little coconut flour for the best results. For extra flavor, you can add nuts to the cake. Chopped walnuts or pecans add a nice crunch. You might also want to mix in some chocolate chips for a sweet touch. Adding a pinch of nutmeg or cardamom can elevate the spices. These small changes can make your cake unique and delightful. To keep your cake fresh, you can cover it tightly with plastic wrap. If you have a cake dome, that works great too. Store the cake at room temperature for up to two days. If you need to keep it longer, the fridge is a good option. Just remember that cold can change the texture a bit. Freezing is a smart way to save extra cake. First, let the cake cool completely. Then, slice it into pieces for easy thawing. Wrap each piece in plastic wrap, then place them in a freezer bag. Make sure to remove as much air as possible. You can freeze the cake for up to three months. When you want to eat it, move a piece to the fridge for a few hours or overnight to thaw. To enjoy your cake warm, you can reheat it easily. Preheat your oven to 300°F (150°C). Place a slice of cake on an oven-safe plate. Cover it with foil to stop it from drying out. Heat for about 10-15 minutes. You can also use the microwave, but be careful. Heat in short bursts of 10-15 seconds. This keeps the cake moist and tasty. Enjoy your delicious treat warm! You can use apples, peaches, or plums as substitutes. Each fruit brings a unique taste. Apples add crunch, while peaches offer sweetness. Use fruits that are ripe but firm to avoid mushiness. Yes, you can prepare this cake a day in advance. Just store it in an airtight container. If you make it early, the flavors will blend nicely. This way, you save time on serving day. To prevent sticking, grease the cake pan well with butter. You can also line the bottom with parchment paper. This extra step helps the cake release easily after baking. Serve this cake warm or at room temperature. For a special touch, add whipped cream on top. A scoop of vanilla ice cream also makes it delightful. The cake stays fresh for about 2-3 days at room temperature. Just keep it covered. For longer storage, consider refrigerating it. This keeps the cake moist and tasty. In this article, we covered how to make Caramel Pear Upside Down Cake. We discussed the needed ingredients like pears and brown sugar. I shared tips for tools and equipment, plus ideas for tasty variations. You learned step-by-step instructions, common mistakes to avoid, and serving suggestions. Baking is fun, and this cake is a treat! Enjoy experimenting with flavors and techniques. Happy baking!

Get ready to impress your friends with a Caramel Pear Upside Down Cake that’s as easy to make as it is delicious! In this guide, I’ll share all the ingredients, …

Read more

Categories Desserts

Savory Pumpkin Cinnamon Rolls with Brown Butter Frosting

July 26, 2025 by Chef Tavio
To make the perfect pumpkin cinnamon rolls, you need a mix of simple, tasty ingredients. Here’s what you will need: - 2 cups all-purpose flour - 1/2 cup pumpkin puree - 1/4 cup granulated sugar - 1/4 cup brown sugar - 1/2 teaspoon salt - 1 teaspoon baking soda - 1 teaspoon baking powder - 1 teaspoon ground cinnamon - 1/2 teaspoon ground nutmeg - 1/2 teaspoon ground ginger - 1/2 cup warm milk (around 110°F) - 1/4 cup unsalted butter, melted - 1 large egg These ingredients blend to create a soft, flavorful dough. The pumpkin gives it a lovely color and taste. The brown butter frosting adds a rich, nutty flavor to the rolls. You’ll need: - 1/2 cup unsalted butter - 1 cup powdered sugar - 1 teaspoon vanilla extract - 1 tablespoon milk (or more to adjust consistency) This frosting is creamy and smooth, making it a perfect topping for warm rolls. You can make your rolls even more special with some tasty add-ins. Consider these options: - 1/4 cup finely chopped pecans - 1/4 cup raisins or dried cranberries These add-ins bring extra flavor and texture. Feel free to mix and match based on your favorites. For the full recipe, check the details above. To start, gather your ingredients. In a large mixing bowl, whisk together the flour, granulated sugar, brown sugar, salt, baking soda, baking powder, cinnamon, nutmeg, and ginger. This mix sets the stage for your rolls. In another bowl, blend the warm milk, melted butter, and egg. Whisk until smooth. Add the pumpkin puree and mix well. Gradually pour the wet mix into the dry mix while stirring. Knead the dough on a floured surface for about five minutes. It should feel smooth and a bit sticky. Now it's time for the filling. In a small bowl, blend softened butter, brown sugar, and cinnamon. Mix until you get a spreadable paste. If you like a crunch, fold in the finely chopped pecans. This filling adds rich flavor to your rolls, making them extra special. After the dough has risen, roll it out on a floured surface into a rectangle about 14x10 inches. Spread the cinnamon filling evenly over the dough, leaving a small border. Starting from one long edge, roll the dough tightly into a log shape. Use a sharp knife or string to slice the log into 12 even pieces. Place the rolls in a greased baking dish with space in between. Cover with a towel and let them rise for another 30 minutes. While they rise, preheat your oven to 350°F (175°C). Bake the rolls for 20 to 25 minutes until golden brown. While the rolls bake, prepare the frosting. In a small saucepan, melt unsalted butter over medium heat. Watch closely as it turns golden brown and releases a nutty aroma. Remove it from the heat and let it cool slightly. In a mixing bowl, combine the cooled brown butter with powdered sugar, vanilla extract, and milk. Whisk until smooth. Adjust the milk to get your desired frosting thickness. When the rolls are out of the oven, drizzle the brown butter frosting over the warm rolls for added flavor. For the full recipe, check out the link provided. Enjoy making these delicious pumpkin cinnamon rolls! To get the best dough, keep it slightly sticky but manageable. If the dough feels too dry, add a bit of warm milk. If it’s too wet, sprinkle in a little flour. Knead the dough for about five minutes. You want it smooth and elastic. Let it rise in a warm spot. It should double in size, which takes about one hour. For the frosting, start by browning the butter. This gives a deep, nutty flavor. Once browned, let it cool slightly. Mix it with powdered sugar and vanilla. If the frosting is too thick, add a teaspoon of milk. If it’s too thin, add more sugar. Aim for a creamy, spreadable texture. Avoid over-kneading the dough. This can make the rolls tough. Don’t rush the rising times, as they are key for fluffiness. Lastly, when making frosting, ensure the butter isn’t super hot. Hot butter can melt the sugar, making it runny. Following these tips ensures your pumpkin cinnamon rolls turn out amazing! For a full recipe, check the [Full Recipe]. {{image_4}} You can make these pumpkin cinnamon rolls a bit healthier. Try using whole wheat flour instead of all-purpose flour. Whole wheat adds fiber and nutrients. You can also swap out some sugar for natural sweeteners like honey or maple syrup. This change keeps the sweetness while reducing refined sugars. There are many fun ways to change the flavor of your rolls. Adding chocolate chips gives a sweet twist. You can also mix in dried fruits like cranberries or raisins for extra texture. Spice lovers can add cardamom or cloves to the filling. These spices bring warmth and depth. Serve your pumpkin cinnamon rolls warm for the best taste. They pair well with a cup of coffee or tea. You can also add a side of cream cheese or vanilla ice cream. For a festive touch, garnish with extra pecans or a sprinkle of cinnamon. For the full recipe, check out the details above. Store your leftover pumpkin cinnamon rolls in an airtight container. Keep them at room temperature for up to two days. If you want to keep them longer, move them to the fridge. They will last for about a week in the fridge. Make sure they are wrapped well to avoid drying out. To reheat your rolls, preheat your oven to 350°F (175°C). Place the rolls on a baking sheet. Cover them with foil to keep them moist. Heat for about 10-15 minutes until warm. You can also use the microwave. Heat each roll for about 20-30 seconds. This method is quicker but may make them a bit chewy. If you want to freeze the rolls, let them cool completely first. Place them in a freezer-safe bag or container. They can be frozen for up to three months. When you are ready to eat them, thaw in the fridge overnight. Reheat them using the tips above for the best taste. Enjoy your delicious pumpkin cinnamon rolls again later! You can find the Full Recipe in the article above. Yes, you can make the dough ahead. Just prepare it and let it rise. Once it doubles in size, shape the rolls. Then, wrap them tightly in plastic wrap and store them in the fridge. You can also freeze the dough. Just let it thaw in the fridge overnight before baking. To make these rolls vegan, swap out the egg for a flax egg. Mix 1 tablespoon of ground flaxseed with 2.5 tablespoons of water. Let it sit for five minutes to thicken. Use almond milk or oat milk instead of regular milk. Lastly, choose a vegan butter for the dough and frosting. If you don't have brown butter, you can use regular unsalted butter. Just melt it and mix it with the other frosting ingredients. You can also add a touch of vanilla or maple syrup for flavor. This way, you still get a tasty frosting. These rolls last for about three days at room temperature. Keep them in an airtight container to stay fresh. If you want them to last longer, store them in the fridge for about a week. You can also freeze them for up to three months. Just make sure to wrap them well! You now know how to make pumpkin cinnamon rolls from scratch. We covered essential ingredients, step-by-step baking, and tips for success. You can try variations to make them your own and learn how to store leftovers. Remember, homemade treats bring joy. Don't hesitate to share these rolls with family and friends. Enjoy the process and the outcome!

Get ready to indulge in the warmth of fall with my Savory Pumpkin Cinnamon Rolls with Brown Butter Frosting. These soft, sweet rolls pair rich pumpkin flavor with cozy spices, …

Read more

Categories Desserts
Older posts
Newer posts
← Previous Page1 … Page31 Page32 Page33 … Page93 Next →

TASTED NEST

Where Flavor Finds a Home 🍳🏡 — warm, simple, and crave-worthy recipes made for real life, from stovetop mornings to backyard dinners.

PAGES

Home About Contact Privacy Policy Terms & Conditions Cookie Policy GDPR Policy Copyright Policy Disclaimer

CATEGORIES

Appetizers Desserts Salads Breakfast Dinner

Contact

  • Pinterest
  • Mail
Copyright © 2025 Tasted Nest. All rights reserved.