How to Make Gourmet Caramel Apples Effortlessly
![To make gourmet caramel apples, you need a few key ingredients: - 4 medium-sized Granny Smith apples - 2 cups granulated sugar - 1 cup light corn syrup - 1/2 cup unsalted butter - 1 cup sweetened condensed milk - 1 teaspoon pure vanilla extract - 1/2 teaspoon fine sea salt - 4 popsicle sticks (one for each apple) These Granny Smith apples give a nice tartness that pairs well with the sweet caramel. You can get creative with toppings to make your apples even better. Some great options include: - Crushed nuts (like pecans or walnuts) - Mini chocolate chips - Colorful sprinkles - Shredded coconut Choose toppings that you love. This adds fun flavors and textures to each bite. When picking apples, look for firm, fresh ones. They should have a nice color and no blemishes. Granny Smith apples are great for this recipe, but you can try others too. Just make sure they are crisp. For caramel, homemade is best. It tastes rich and creamy. However, you can use store-bought caramel if you’re short on time. If you do, check the label to ensure it melts well. Follow these tips for delicious results. You can find the Full Recipe above for all the steps! Start by washing the apples well. This removes any wax or dirt. After washing, dry each apple with a clean paper towel. Next, take a popsicle stick and insert it into the stem end of each apple. Push it in halfway. This helps the apple stay steady when you dip it. To make the caramel, grab a medium-sized saucepan. Combine the granulated sugar, light corn syrup, unsalted butter, and sweetened condensed milk in it. Place the saucepan over medium heat. Stir the mix constantly as it heats. You want it to come to a gentle boil. Keep stirring for about 5-7 minutes. Watch as the caramel turns a deep golden color. This means it is ready. Once it reaches that color, remove the pan from heat. Carefully stir in the vanilla extract and fine sea salt. Be cautious; the mix may bubble up a bit. Stir until everything is well combined. Now it’s time to dip. Take each prepared apple and dip it into the warm caramel sauce. Rotate the apple to cover it evenly. Let any extra caramel drip back into the pan. After that, transfer the apple to the baking sheet. While the caramel is still warm, add your favorite toppings. You can use crushed nuts, mini chocolate chips, or colorful sprinkles. Be creative with your choices! Once all the apples are coated, let them cool at room temperature for about 30 minutes. They are ready when the caramel is no longer tacky. For the full recipe, check the [Full Recipe]. To avoid burning your caramel, use a heavy-bottomed saucepan. This helps distribute heat evenly. Always stir the mixture constantly as it heats. When the caramel starts to bubble, lower the heat slightly. Keep a close eye on the color. You want a deep golden hue, not dark brown. When adding toppings, do it while the caramel is warm. The warmth helps the toppings stick better. Use your hands or a spoon to press toppings onto the caramel. Be creative! You can mix and match toppings like nuts, chocolate chips, and sprinkles. Try to cover the apple evenly for a nice look. If your caramel is too thick, add a splash of water and stir. If it’s too runny, let it cook a bit longer. If the caramel doesn’t stick to the apple, it might be too cold. Warm the apple slightly before dipping. If you have leftover caramel, pour it onto wax paper to set. You can break it into pieces later for treats. For the complete recipe, check the Full Recipe section. {{image_4}} You can mix flavors to make your caramel apples special. Try adding spices like cinnamon or nutmeg to your caramel. For a fruity twist, add orange or lemon zest. You can also infuse your caramel with coffee or espresso for a rich taste. Pairing caramel with sea salt and dark chocolate creates a sweet and salty balance. Each bite will surprise your taste buds! Seasonal toppings can make your caramel apples festive. For Halloween, use crushed Oreos for a spooky look. In fall, sprinkle pumpkin spice and chopped pecans. For winter, try white chocolate drizzle and crushed candy canes. Around Valentine's Day, add pink sprinkles or heart-shaped candies. Each season brings a chance to be creative and enjoy new flavors! If you follow a special diet, you can still enjoy caramel apples. For vegan options, use coconut cream and maple syrup instead of butter and cream. For sugar-free caramel, try using erythritol or monk fruit sweetener. These alternatives keep the sweet flavor while fitting your needs. Cooking for different diets means everyone can join in the fun of enjoying gourmet caramel apples! To store your gourmet caramel apples, place them in a cool, dry area. Use a tray lined with parchment paper or wax paper. Avoid stacking them to prevent sticking. If you have leftovers, wrap each apple in plastic wrap. This keeps them fresh and helps avoid moisture. Keep your caramel apples away from heat and sunlight. A fridge can help, but wrap them well. Use a container that allows airflow. This keeps the caramel from becoming too hard or sticky. For extra crunch, store them with a paper towel to absorb moisture. Homemade caramel apples last about 2 to 3 days at room temperature. In the fridge, they can stay fresh for up to a week. After this time, the apples may start to lose their crispness. The caramel can also become too hard if stored too long. Enjoy them while they are fresh for the best taste! To make caramel for your apples, you need a few basic ingredients. You will mix granulated sugar, light corn syrup, unsalted butter, and sweetened condensed milk. Heat them in a medium saucepan over medium heat. Stir constantly until combined. Allow the mixture to boil gently. Keep stirring until it turns a deep golden color, about 5-7 minutes. This color shows it's ready for dipping. Remove it from heat and mix in vanilla extract and sea salt. That's how you create rich, smooth caramel. Yes, you can use store-bought caramel. It saves time and is easy to use. Look for caramel candies that melt well. Simply follow the package instructions to melt the caramel. This option works well if you want a quick treat. However, homemade caramel adds a richer flavor that many prefer. To prevent caramel apples from sticking, allow them to cool on a parchment-lined baking sheet. Make sure the caramel sets for at least 30 minutes. If you plan to stack them, place a piece of wax paper between each apple. This keeps them from touching. Storing them in a cool, dry place also helps maintain their shape. Avoid humid areas to keep the caramel firm. Gourmet caramel apples are fun to make and enjoy. We covered the key ingredients and optional toppings, plus tips for the best apples and caramel. I shared step-by-step instructions for preparation and decoration. You learned tricks to prevent burning and common issues. Explore variations, seasonal toppings, and recipes to suit different diets. Finally, we looked at how to store your treats properly. Enjoy making and sharing these delicious caramel apples!](https://tastednest.com/wp-content/uploads/2025/07/a3652f7d-57a8-40ea-91f1-79605c299fe1.webp)
If you crave the sweet joy of gourmet caramel apples, you’re in the right place! I’ll show you how to make these tasty treats easily. With the right apples and …
If you crave the sweet joy of gourmet caramel apples, you’re in the right place! I’ll show you how to make these tasty treats easily. With the right apples and …
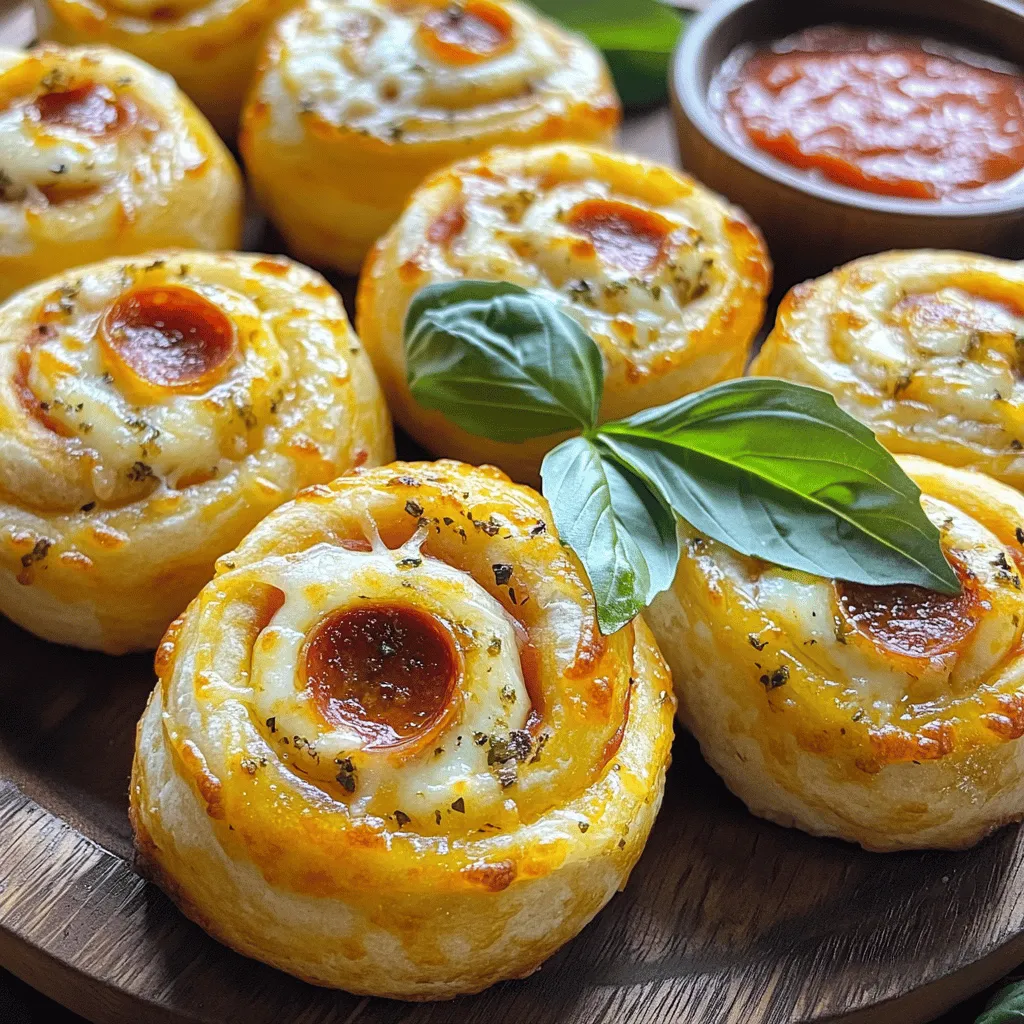
Pizza rolls are a fantastic snack that fits any occasion! They are easy to make and full of flavor. In this guide, I’ll share the best ingredients, step-by-step instructions, and …
![- 1 cup apple cider - 2 cups all-purpose flour - 1 cup granulated sugar (divided) - 2 teaspoons baking powder - 1 teaspoon baking soda - 1 teaspoon ground cinnamon (plus additional for rolling) - 1/2 teaspoon ground nutmeg - 1/2 teaspoon salt - 1/2 cup unsweetened applesauce - 1 large egg, at room temperature - 1 teaspoon vanilla extract - 1/4 cup unsalted butter, melted and cooled slightly - 1/2 cup granulated sugar (for rolling) - 1 tablespoon ground cinnamon (for rolling) Apple cider is the star here. It gives flavor and moisture to the doughnut holes. Reducing it concentrates the taste, making each bite a burst of apple goodness. All-purpose flour provides the base structure. It helps the doughnut holes rise and stay fluffy. Granulated sugar adds sweetness and helps achieve that lovely cinnamon sugar crust. Baking powder and baking soda are leaveners. They create bubbles when heated, making the doughnut holes light and airy. Other important players include ground cinnamon and nutmeg. They add warmth and spice, perfect for fall. Applesauce keeps the doughnut holes moist without adding extra fat. The egg binds everything together, while vanilla extract gives a lovely aroma. Lastly, melted butter enriches the doughnut holes, making them tender. If you don’t have apple cider, you can use apple juice. It won’t be as rich but works in a pinch. For a gluten-free option, try a gluten-free flour blend. You can swap unsweetened applesauce with mashed banana or yogurt for a different flavor. If you’re out of granulated sugar, brown sugar can add a deeper flavor. Lastly, for a dairy-free version, use coconut oil instead of butter. First, you need to set your oven to 350°F (175°C). This step is key for even baking. Lightly grease a mini muffin pan or use a silicone mold. This helps the doughnut holes pop out easily after baking. Next, pour your apple cider into a small saucepan. Heat it over medium heat until it gently boils. Once it boils, lower the heat and let it simmer for about 10-15 minutes. You want the cider to reduce to about 1/2 cup. Afterward, remove it from the heat and let it cool a bit. In a large bowl, whisk together the flour, 1 cup of granulated sugar, baking powder, baking soda, ground cinnamon, nutmeg, and salt. Make sure they blend well. In another bowl, mix the applesauce, egg, vanilla extract, and melted butter. Once the reduced apple cider cools slightly, add it to the wet ingredients. Mix everything until it is well combined. Now, gradually pour the wet mixture into the dry ingredients. Stir gently with a spatula, but don't overmix. A few lumps are perfectly fine. Use a small cookie scoop or spoon to fill each mold about two-thirds full. Bake them for 10-12 minutes. To check for doneness, insert a toothpick. If it comes out clean, they are ready. Let the doughnut holes cool in the pan for about 5 minutes, then move them to a wire rack. While the doughnut holes cool, mix the remaining 1/2 cup of sugar with 1 tablespoon of cinnamon in a shallow bowl. While the doughnut holes are still warm, roll each one in the cinnamon-sugar mixture. This adds a sweet touch. Serve them warm or let them cool. Enjoy every bite of these baked cinnamon sugar apple cider doughnut holes! For the full recipe, refer back to the main section. For the best doughnut holes, use fresh apple cider. It adds a rich taste. Reduce the cider well for a concentrated flavor. I often let it simmer until it thickens slightly. This gives your doughnut holes a delightful apple punch. Mix dry ingredients thoroughly to ensure even flavor. When mixing wet and dry, stir gently. Overmixing makes them tough, which we want to avoid. To bake evenly, fill each mold two-thirds full. This helps them rise properly. If you use a mini muffin pan, rotate it halfway through baking. This step ensures even heat. A toothpick test is key. Insert it in the center; it should come out clean. If it’s sticky, give them a few more minutes. Store any leftover doughnut holes in an airtight container. They stay fresh for a few days at room temperature. If you want them crispy again, warm them briefly in the oven. You can also freeze them for later. Just place cooled doughnut holes in a freezer bag. They can last up to three months. When ready, thaw and warm them. Enjoy them fresh like the day you made them! For the full recipe, check it out [Full Recipe]. {{image_4}} You can make these doughnut holes even sweeter with a tasty glaze. A simple glaze of powdered sugar and milk works well. Just mix one cup of powdered sugar with two tablespoons of milk until smooth. Drizzle this over your doughnut holes for a lovely finish. You can also add vanilla or almond extract for extra flavor. If you prefer frosting, a cream cheese frosting pairs nicely. Just blend cream cheese, powdered sugar, and a splash of vanilla for a rich topping. Feel free to get creative with flavors! Try adding a teaspoon of orange zest to the batter for a citrus twist. You can also use other spices like cardamom or ginger for a unique taste. Another option is to mix in chocolate chips or nuts, like walnuts or pecans. These additions can make your doughnut holes more exciting and personal. If you need gluten-free doughnut holes, use almond or coconut flour instead of all-purpose flour. Make sure to adjust the liquid as needed since these flours absorb moisture differently. For vegan options, you can replace the egg with a flaxseed egg. Just mix one tablespoon of ground flaxseed with three tablespoons of water and let it sit for a few minutes. Replace the butter with coconut oil or a vegan butter substitute. These swaps help everyone enjoy these delicious treats! For the full recipe, check out the section above. To make your baked cinnamon sugar apple cider doughnut holes shine, choose a beautiful bowl or plate. Arrange the doughnut holes in a circle or pyramid shape. This adds a nice touch. Dust them with extra cinnamon sugar to catch the eye. Add fresh apple slices around the doughnuts for color and freshness. These doughnut holes go well with many drinks. Hot apple cider enhances the apple flavor. A cup of coffee or chai tea also pairs nicely. For a fun twist, serve with a scoop of vanilla ice cream. It creates a tasty dessert combo that everyone will love. At your next party, serve these doughnut holes in mini paper bags. This makes for a cute, grab-and-go treat. You can also create a doughnut hole bar. Offer different toppings like chocolate sauce or sprinkles. Encourage guests to personalize their doughnut holes for added fun. You can make the doughnut holes in advance. After baking, let them cool completely. Store them in an airtight container. They stay fresh for about two days at room temperature. If you want to keep them longer, put them in the fridge for up to a week. You can reheat them in the oven for a few minutes before serving. Leftover apple cider has many uses. You can make a warm apple cider drink by heating it with spices. Use it in pancakes or waffles for added flavor. You can also add it to marinades for meats. Another fun idea is to freeze it in ice cube trays. These cubes can spice up your drinks later! Yes, you can freeze baked doughnut holes. Allow them to cool down first. Place them in a single layer on a baking sheet. Freeze them for about an hour, then transfer to a freezer bag. They can last for up to three months. To enjoy, thaw them in the fridge overnight and warm them up in the oven. Yes, this recipe contains common allergens. It has wheat (from flour), eggs, and dairy (from butter). If you are allergic to any of these, you can make swaps. Use gluten-free flour for wheat, applesauce for eggs, and a dairy-free butter alternative. Always check labels for hidden allergens. To check if the doughnut holes are baked, insert a toothpick into the center. If it comes out clean, they are done. The doughnut holes should feel firm to the touch. If they are still doughy, bake them for an extra minute or two. Keep an eye on them to avoid overbaking. This article covered how to make tasty apple cider doughnut holes. You learned about the key ingredients, preparation steps, and useful tips for great texture. We explored fun variations and serving ideas, ensuring every bite is special. Now, you have all the tools to create your own delicious treats. Enjoy baking and sharing your doughnut holes with friends and family!](https://tastednest.com/wp-content/uploads/2025/07/024060b6-4695-41a0-ad28-0873c574a821.webp)
If you love the taste of fall, grab your apron! Baked Cinnamon Sugar Apple Cider Doughnut Holes are easy to make and full of flavor. With a soft, warm interior …
![Spooky food can be fun and creative. You can turn regular dishes into items that fit the Halloween theme. Think of using shapes, colors, and names that scare or delight. For example, you can make bloody spaghetti or monster sandwiches. These ideas get everyone excited for the big day. Presentation is key to making Halloween food stand out. A simple dish can look amazing with the right touch. Use bright colors, unique shapes, and fun garnishes. Serve food in creative ways, like in pumpkin bowls or on spooky platters. The goal is to make your food look fun and inviting. This makes your table a feast for the eyes. Include a mix of sweet and savory dishes. Here are some ideas: - Witch's Cauldron Soup - Monster meatballs - Ghost-shaped cookies - Pumpkin bread - Mummy hot dogs Each dish can have a fun name and a spooky look. Don't forget to check the [Full Recipe] for Witch's Cauldron Soup. This soup is great for warming up on a chilly Halloween night. Making food fun and festive can bring everyone together. - 1 tablespoon olive oil - 1 medium onion, finely chopped - 2 cloves garlic, minced - 2 medium carrots, diced into small cubes - 2 celery stalks, diced - 4 cups vegetable broth (homemade or store-bought) - 1 cup green peas (fresh or frozen) - 1 medium zucchini, diced - 1 cup kale, roughly chopped - 1 teaspoon dried thyme - Salt and freshly ground black pepper to taste - 1 tablespoon freshly squeezed lemon juice - Spider-shaped crackers, for garnish 1. Heat the olive oil in a large pot over medium heat. Add the chopped onion and minced garlic. Cook for 3-4 minutes until the onion is soft. 2. Add the diced carrots and celery. Stir and cook for 5 minutes until they soften. 3. Pour in the vegetable broth and bring it to a boil. Reduce the heat and add the green peas, zucchini, and kale. 4. Sprinkle thyme over the mix and add salt and pepper. Cover the pot and simmer for 15-20 minutes until veggies are tender. 5. Stir in the lemon juice to brighten the flavors. Taste and adjust seasoning if needed. 6. Serve hot in bowls. Garnish with spider-shaped crackers for a spooky touch. - Prep Time: 15 min - Total Time: 35 min - Servings: 4 For a festive look, use black bowls and sprinkle with chopped herbs. This adds a fun touch to your Halloween feast! Enjoy making this Witch's Cauldron Soup for your spooky gathering. Try the Full Recipe for more details! Get creative with how you serve your Halloween food. Use dark plates to make bright colors pop. Try using cobwebs made of spun sugar or whipped cream. For a spooky touch, carve spooky faces into your fruit or veggies. You can also use cookie cutters to shape food into ghosts, bats, or pumpkins. For garnishes, try adding fake spider rings on top of your dishes. This adds a fun and creepy element. You could also use edible flowers or herbs to give a splash of color. A sprinkle of black sesame seeds can look like dirt. This adds both flavor and a spooky vibe. Seasoning is key to making your Halloween dishes shine. Use fresh herbs like basil or parsley to bring brightness. You can switch regular salt for flavored salts like garlic or smoked salt. This can add depth to your meals. If you want a twist, try adding unexpected ingredients. For example, mix in a splash of apple cider vinegar for tang. You can also add a dash of hot sauce for some heat. If you're making soup, add a touch of cream or coconut milk for richness. Halloween can be busy, so prep ahead. Chop your veggies a day before and store them in the fridge. This makes cooking faster. You can also make your soup, like Witch's Cauldron Soup, the day before. It tastes even better when flavors meld overnight. Use store-bought items when you’re short on time. Pre-cut vegetables and ready-made pie crusts can save you effort. If you're baking, use a box mix for cakes or cookies and decorate them to match the theme. This allows you to focus on fun, not fuss. {{image_4}} For sweet treats, ghost cupcakes are a hit. You can make these fun by using white frosting for a spooky look. Pipe ghost shapes and add chocolate chips for eyes. Another favorite is monster cookies. Use bright colors with candy eyes. These cookies are fun and easy to make. Savory snacks can be just as fun. Try making pumpkin-shaped cheese balls. Use orange cheese and mold it into a pumpkin shape. Add pretzel sticks for the pumpkin stem. Another idea is to make witch's fingers using breadsticks. Use sliced almonds for the nails, and paint them with food coloring. These snacks will make your guests smile! Drinks can also join the Halloween fun. A great option is witch's brew drinks. Mix green punch with lemon-lime soda for fizz. Add gummy worms or eyeballs for extra flair. Serve in black cups for a spooky touch. You can also create hot chocolate with ghost marshmallows. Just add mini marshmallows shaped like ghosts to your cocoa. For more delicious ideas, check out the [Full Recipe] for Witch's Cauldron Soup. It’s a perfect dish to warm up your Halloween night! For those with dietary needs, we can make simple swaps. To make this soup vegan, replace the vegetable broth with a homemade version. You can use water and add more herbs for flavor. If you need a gluten-free option, ensure your broth is gluten-free. Also, use gluten-free crackers for garnish. These swaps keep the soup delicious for everyone. You can customize the soup with different spices and veggies. Try adding cumin for warmth or smoked paprika for a deeper flavor. If you like heat, a pinch of cayenne pepper works well. You can also mix in other vegetables like sweet potatoes or bell peppers. Each choice adds a fun twist to the classic recipe. Serve your Witch's Cauldron Soup with fun sides. Pair it with spider-shaped crackers for a festive touch. A simple green salad with a tangy dressing complements the soup well. You can also serve warm bread or breadsticks on the side. These options will enhance your meal and make it even more enjoyable. For the complete recipe, check out the [Full Recipe] for detailed steps. You can make food look spooky by using fun shapes and colors. Use cookie cutters to cut food into ghost, bat, or pumpkin shapes. Add food coloring to drinks and dips to create eerie effects. For example, you can use green food coloring in a dip and serve it in a skull bowl. Garnish dishes with creepy items like plastic spiders or gummy worms. Present your food on dark plates to enhance the spooky vibe. Yes, you can prepare Halloween food in advance! Many dishes taste better when made ahead. Soups, like Witch's Cauldron Soup, can be made a day before. Just store them in the fridge and reheat before serving. You can also chop veggies and mix dips earlier in the day. This saves time on the party day. Just remember to keep everything covered and chilled until you’re ready to serve. Easy recipes for a Halloween party include spooky snacks and fun drinks. Here are some ideas: - Mummy Hot Dogs: Wrap crescent dough around hot dogs to look like mummies. Bake until golden. - Pumpkin Cheese Ball: Shape cheese into a pumpkin and use herbs for leaves. - Ghostly Bananas: Dip bananas in yogurt and add chocolate chips for eyes. - Witch's Cauldron Soup: A fun and healthy soup that looks festive and tastes great. Check out the Full Recipe for details. These recipes are simple and sure to please your guests! In this article, we explored fun and spooky Halloween food ideas. We covered creative dishes, focusing on how presentation enhances enjoyment. I shared the Witch's Cauldron Soup recipe, complete with an ingredient list and easy steps. We also discussed tips for quick prep and flavor enhancing. Make this Halloween both tasty and festive with your food. Enjoy expressing your creativity and sharing good times with friends and family. Happy cooking!](https://tastednest.com/wp-content/uploads/2025/07/d8330bfc-bf15-40ac-9da5-1449a1ee069a.webp)
Get ready to elevate your Halloween celebrations with creative food ideas that wow! In this article, I’ll share fun, spooky concepts that make dishes not just tasty but also a …
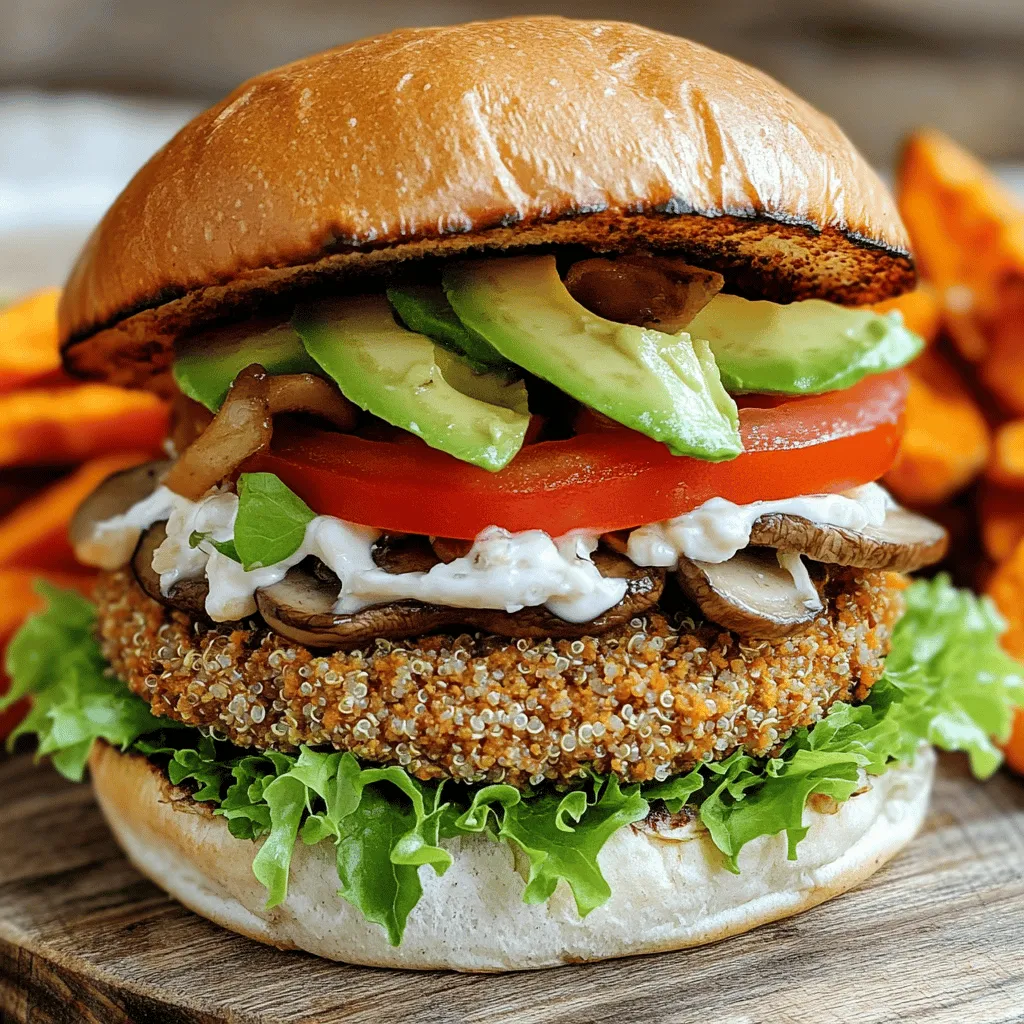
Are you ready to dive into the world of delicious plant-based meals? Today, I’m sharing my favorite recipe for vegan and gluten-free mushroom burgers that are packed with flavor and …
. First, preheat the oven to 350°F (175°C). This step is key for even baking. While it heats up, grab a 9x5-inch loaf pan. You can grease it with butter or use parchment paper. Parchment helps with easy removal later. In a large bowl, mash 1 cup of ripe bananas. You need about 2 to 3 medium bananas. Next, add 1 cup of pumpkin puree, 1/2 cup of granulated sugar, 1/2 cup of brown sugar, and 1/2 cup of vegetable oil. Mix these well using a whisk or spatula until everything is smooth. Then, add 2 large eggs one at a time. Mix well after each egg. Finally, stir in 1 1/2 teaspoons of pure vanilla extract until the batter is creamy. In another bowl, whisk together 1 3/4 cups of all-purpose flour, 1 teaspoon of baking soda, 1/2 teaspoon of baking powder, 1 teaspoon of ground cinnamon, 1/2 teaspoon of ground nutmeg, and 1/4 teaspoon of salt. This mix gives the bread its structure and flavor. Gradually add the dry mix into the wet ingredients, using a spatula. Stir gently just until no flour pockets are left. Be careful not to overmix. Now, fold in 1 cup of chocolate chips. You can also add 1/2 cup of chopped walnuts or pecans if you like. Pour the batter into your prepared loaf pan. Smooth the top with a spatula. Place the pan in the oven and bake for 60 to 70 minutes. To check if it's done, poke the center with a toothpick. If it comes out clean, the bread is ready. Let it cool in the pan for about 10 minutes. Then, move it to a wire rack to cool fully before slicing. For the full recipe, refer to the top of this section. To make great banana chocolate chip pumpkin bread, avoid overmixing the batter. Overmixing can make your bread tough. Mix just enough to combine the ingredients. When you add the flour, stop as soon as no dry spots remain. Ripe bananas are key to rich flavor. They should have brown spots and feel soft. This means they are sweet and ready to use. The ripe bananas add moisture and natural sweetness to the bread. Oven calibration can affect baking time. Not all ovens are the same. Check your bread after 60 minutes. A toothpick should come out clean when it is done. If it isn’t ready, bake a bit longer. Cooling time is also important. Let the bread cool in the pan for 10 minutes. Then, transfer it to a wire rack to cool completely. This step helps the bread set and makes slicing easier. For a beautiful serving, slice the bread carefully. Use a sharp knife to get clean cuts. Aim for even slices for a nice look. Garnish ideas can make your presentation pop. Dust the slices with powdered sugar for a sweet touch. You can also add a scoop of vanilla ice cream or a dollop of whipped cream on the side. These extras make the bread even more delicious. For the full recipe, check out the detailed instructions above to make this treat! {{image_4}} You can make this banana chocolate chip pumpkin bread even better. Adding spices like cloves or ginger gives it a warm kick. Just a pinch can change the whole taste. If you like nuts, try different ones. Swap walnuts for pecans or add almonds. You can also change the chocolate. Dark chocolate adds richness, while milk chocolate gives sweetness. Mixing these flavors offers fun twists to the classic recipe. Need to change the recipe? You can use gluten-free flour instead of all-purpose flour. This makes it friendly for those with gluten issues. Many brands offer great gluten-free options that work well. If you prefer vegan, use flax eggs instead of regular eggs. To make one flax egg, mix one tablespoon of ground flaxseed with three tablespoons of water and let it sit until it thickens. This swap keeps the bread moist and delicious. How you serve this bread can make it special. Spread butter or cream cheese on warm slices for a tasty treat. You can also try it with nut butter for added flavor. Some like it cold, while others enjoy it warm from the oven. It tastes great either way! Serving it warm brings out the chocolate’s gooeyness, while cold gives a nice texture. The choice is yours! For the full recipe, check out the complete cooking instructions. To keep your banana chocolate chip pumpkin bread fresh, store it properly. If you plan to eat it within a few days, place it in an airtight container at room temperature. This keeps the bread soft and tasty. Make sure to store it away from direct sunlight. If you want to keep it longer, refrigerate it. Wrap the bread in plastic wrap and place it in the fridge. This helps prevent mold and keeps it fresh for a week. You can also freeze banana chocolate chip pumpkin bread. To do this, let the loaf cool completely first. Then, wrap it tightly in plastic wrap. After that, place the wrapped loaf in a freezer bag. Be sure to squeeze out as much air as possible. This helps prevent freezer burn. You can freeze it for up to three months. When you want to enjoy your bread again, simply remove it from the freezer. Let it thaw in the fridge overnight. To warm it up, slice the bread and heat each piece in a toaster or microwave. This way, you get that fresh-baked taste anytime! For the full recipe, just check the earlier section. To tell if your bread is done, look for a few signs. The top should be golden brown and firm. You can also check with a toothpick. Insert it into the center of the loaf. If it comes out clean or with a few crumbs, your bread is ready. The edges may start to pull away from the pan. This is another good sign. Let it cool in the pan for about 10 minutes before moving it to a wire rack. Yes, you can use different flours. Here are some options: - Whole wheat flour: Adds more fiber and a nutty taste. - Almond flour: Great for a gluten-free option, but adjust the liquid. - Oat flour: Adds a mild flavor and is gluten-free if made from certified oats. - Coconut flour: Very absorbent, so you need to change the liquid ratios. Always remember to check how each flour affects the texture. Some flours may make your bread denser or dry. If you want to skip the chocolate chips, there are many tasty options. Here are a few ideas: - Dried fruit: Raisins or cranberries add sweetness and chewiness. - Nuts: Chopped walnuts or pecans add a nice crunch. - Spices: Add extra cinnamon or a bit of ginger for more flavor. - Zest: Orange or lemon zest can brighten the taste. These swaps keep the bread delicious while changing the flavor profile. Don't be afraid to get creative! Check out the Full Recipe for more guidance. This blog post shared a complete guide to making Banana Chocolate Chip Pumpkin Bread. We discussed key ingredients like ripe bananas and pumpkin puree, along with helpful baking tips. I included ways to enhance flavors and some great storage ideas, too. In the end, this bread is perfect for any time of day. Enjoy baking and try your own twists on this classic recipe! Your kitchen will smell amazing, and you’ll get a tasty treat to enjoy.](https://tastednest.com/wp-content/uploads/2025/07/0134b4e2-90c4-4659-81da-1c63a8df866f.webp)
Are you ready to bake something delicious? This banana chocolate chip pumpkin bread is a perfect blend of flavors. Ripe bananas and pumpkin puree come together with sweet chocolate chips …
![- 1 cup all-purpose flour - 1 tablespoon baking powder - 1 tablespoon granulated sugar - 1/2 teaspoon ground cinnamon - 1/4 teaspoon ground nutmeg - 1/4 teaspoon salt - 1 cup milk (preferably whole) - 1 large egg - 2 tablespoons unsalted butter, melted (plus extra for cooking) - 1 teaspoon vanilla extract - 1 medium apple (like Granny Smith), peeled, cored, and diced - 1/2 cup packed brown sugar I love combining simple ingredients to make something amazing. First, let’s gather your dry ingredients. You need flour, baking powder, sugar, cinnamon, nutmeg, and salt. Each adds flavor and helps the pancakes rise. Next, for the wet ingredients, grab whole milk, a large egg, melted butter, and vanilla extract. These make your batter rich and smooth. The egg binds everything together while the milk and butter add moisture. Now, let’s talk about the main add-ins. You will need a medium apple, diced small, and brown sugar. The apple gives freshness, and brown sugar adds a deep sweetness. For the full recipe, follow my detailed steps, and enjoy a delightful breakfast that feels like a warm hug! - Combine 1 cup of flour, 1 tablespoon of baking powder, 1 tablespoon of sugar, 1/2 teaspoon of cinnamon, 1/4 teaspoon of nutmeg, and 1/4 teaspoon of salt in a large mixing bowl. - In a separate bowl, mix 1 cup of milk, 1 large egg, 2 tablespoons of melted butter, and 1 teaspoon of vanilla extract until smooth. - Gradually pour the wet ingredients into the dry mixture. Stir gently until just combined. A few lumps are okay; don’t overmix. - Fold in 1 diced apple and 1/2 cup of brown sugar. Make sure everything is mixed well. - Preheat a non-stick skillet over medium heat. Add a small pat of butter to melt and coat the pan. - Pour 1/4 cup of batter onto the skillet for each pancake. Cook until bubbles form on the surface, about 2-3 minutes. - Flip the pancake carefully and cook for another 2 minutes until golden brown. - Repeat with the remaining batter, adding more butter to the skillet as needed. - Stack the pancakes high on a plate. Drizzle with maple syrup for sweetness. - Add optional toppings like whipped cream and apple slices for extra flavor and fun. For the full recipe, refer to the detailed steps above. Enjoy your cooking! To make the best apple pie pancakes, avoid overmixing the batter. Mix just until the ingredients blend. A few lumps are okay; they help keep your pancakes fluffy. Cooking at the right temperature is also key. Medium heat works well. If it’s too hot, the outside cooks too fast. If it’s too cool, the pancake won’t cook evenly. Stack your pancakes high for a stunning look. You can add diced apple slices on top. A sprinkle of cinnamon makes it even better. You might want to drizzle maple syrup over the stack. It adds sweetness and flavor. Always use room temperature ingredients. Cold milk or eggs can lead to dense pancakes. Not properly preheating the skillet is another mistake. If the pan is cold, the pancakes won't brown nicely. Follow these tips for perfect apple pie pancakes. For the full recipe, check the section above. {{image_4}} You can easily make gluten-free pancakes. Use a gluten-free flour blend instead of all-purpose flour. This keeps the texture nice and fluffy. For a vegan version, swap the egg with a flaxseed meal or a banana. Use almond milk or oat milk in place of regular milk. These changes help everyone enjoy this tasty breakfast. There are many ways to boost the flavor of your pancakes. Adding nuts like walnuts or pecans gives a nice crunch. You can also mix in raisins for a sweet touch. Spice it up by adding ginger or cardamom for a unique twist. Experimenting with flavors helps you find your perfect combination. Every season brings new flavor ideas. In fall, add pumpkin puree to the batter for a cozy taste. For summer, try using fresh fruits like peaches or berries. These seasonal fruits add brightness and freshness to your pancakes. Each variation keeps breakfast exciting and fresh. For the complete recipe, refer to the [Full Recipe]. To keep your apple pie pancakes fresh, store them in an airtight container. Place a piece of parchment paper between the pancakes to prevent sticking. They last in the fridge for about three to five days. If you want them to stay fresh longer, consider freezing them. You can reheat pancakes in several ways. The microwave is quick and easy; just place a pancake on a microwave-safe plate and heat for 20-30 seconds. For a crispier texture, use the stovetop. Heat a skillet over medium heat, add a little butter, and warm the pancakes for about one minute per side. Freezing pancakes is simple. First, let them cool completely. Then, stack them with parchment paper in between. Wrap the stack tightly in plastic wrap and place it in a freezer bag. To thaw, leave them in the fridge overnight or microwave for 30-45 seconds. Reheat on the stovetop for the best taste. Enjoy your apple pie pancakes any time! For the complete recipe, check out the Full Recipe. Yes, you can use other apple types. The best apples for pancakes are: - Honeycrisp: Sweet and crisp, great for flavor. - Fuji: Juicy and sweet, adds a nice texture. - Braeburn: Tart and sweet, perfect for balance. - Gala: Mildly sweet, good for a softer bite. These apples will change the taste, but they all work well in pancakes. You can easily double the recipe! Here are some tips: - Use a larger bowl for mixing. - Make sure to adjust cooking time. Cook in batches to avoid crowding the skillet. - Keep the pancakes warm in the oven while you cook the rest. This way, you can serve more people without a fuss. Look for these signs to know when pancakes are done: - Bubbles form on the surface. - Edges start to look set and dry. - The bottom turns golden brown when flipped. If you see these signs, your pancakes are cooked and ready to enjoy! In this post, we covered key ingredients and steps for making tasty pancakes. We explored dry and wet ingredients, add-ins, and smart cooking tips. I shared variations to suit different diets and flavors. Remember, avoiding cold ingredients and overmixing your batter leads to better pancakes. With proper storage techniques, your leftovers can last and taste great. Enjoy making these pancakes, and don’t hesitate to try different flavors or toppings. Happy cooking!](https://tastednest.com/wp-content/uploads/2025/07/eb1d9d88-9e02-4872-8e52-2ebdc1308ac3.webp)
Are you ready to elevate your breakfast game? These Apple Pie Pancakes are not just a treat; they are a flavor explosion that brings warm, cozy vibes to your table. …
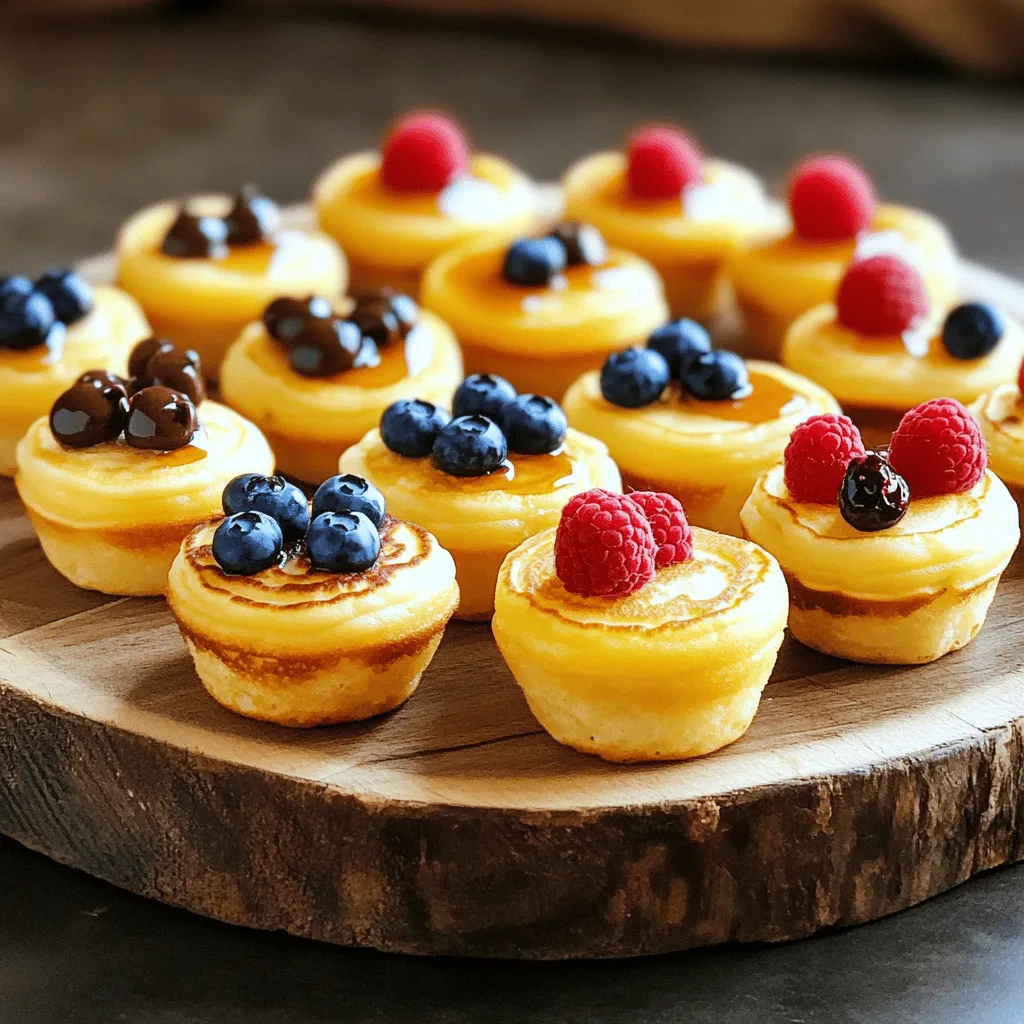
Are you ready to turn your morning routine into a delicious feast? Pancake mini muffins are the perfect blend of fluffy pancakes and bite-sized treats. They are easy to make …
![- 1 cup pure pumpkin puree - 1/2 cup granulated sugar - 1/4 cup brown sugar, tightly packed - 2 large eggs - 1/4 cup vegetable oil The main ingredients create the base of your mini pumpkin donuts. Pumpkin puree adds moisture and flavor. Granulated and brown sugars bring sweetness and depth. Eggs help bind the mix, while oil keeps the donuts soft. - 1 1/2 cups all-purpose flour - 1 teaspoon baking powder - 1/2 teaspoon baking soda - 1 teaspoon ground cinnamon - 1/2 teaspoon ground nutmeg - 1/4 teaspoon ground ginger - 1/4 teaspoon kosher salt Dry ingredients give the donuts structure. All-purpose flour forms the base. Baking powder and baking soda help them rise. Spices add warmth and that classic fall flavor. Salt enhances all these tastes. - 1/2 cup powdered sugar - 1-2 tablespoons milk - Optional: Colorful sprinkles for decoration The glaze is where the fun begins! Powdered sugar makes it sweet and smooth. Milk helps achieve the right consistency. You can add sprinkles for a festive touch, making them even more fun to eat. For the full recipe, check [Full Recipe]. First, preheat the oven to 350°F (175°C). This step is key for even baking. While the oven heats, prepare your mini donut pan. Lightly grease it with cooking spray to prevent sticking. A well-prepped pan will give you perfect donuts every time. In a large bowl, combine the pumpkin puree, granulated sugar, brown sugar, eggs, oil, and vanilla. Whisk these together until smooth. This mix is the base of your donuts. The pumpkin adds flavor and moisture, while the sugars give sweetness. In a separate bowl, sift together the all-purpose flour, baking powder, baking soda, cinnamon, nutmeg, ginger, and salt. Sifting helps ensure that all dry ingredients mix evenly. This step ensures your donuts will rise properly and taste great. Now, gently fold the dry ingredients into the wet mixture. Use a spatula or a wooden spoon for this. Mix until just combined. Be careful not to overmix. Overmixing can make the donuts dense rather than light and airy. Transfer the batter into the donut pan. You can use a piping bag or a spoon. Fill each cavity about 3/4 full. This allows space for the donuts to rise. Place the pan in your preheated oven and bake for 10-12 minutes. They are ready when a toothpick comes out clean. After baking, let the donuts cool in the pan for 3-5 minutes. Then transfer them to a wire rack to cool completely. While they cool, prepare your glaze. Whisk together powdered sugar with enough milk to reach your desired thickness. Once the donuts are cool, dip the tops into the glaze. If you like, add colorful sprinkles before the glaze sets. Enjoy your delicious mini pumpkin donuts! For the full recipe, check out the details above. To make the best mini pumpkin donuts, avoid overmixing the batter. When you mix too much, the donuts can become tough. Stir just until you see no dry flour. Also, use room temperature ingredients. This helps the batter blend smoothly, creating a light and airy texture. You can adjust spice levels based on your taste. If you love warmth, add more cinnamon or nutmeg. You can also add extracts for extra flavor. A bit of almond or maple extract can elevate the taste and surprise your guests. One common mistake is not preheating the oven. This can lead to uneven baking. Always set your oven to 350°F (175°C) before mixing your ingredients. Another mistake is using stale baking powder or baking soda. Check the expiration date; fresh leavening agents help your donuts rise beautifully. For the full recipe, check out the Mini Pumpkin Donuts Delight section. {{image_4}} You can enhance your mini pumpkin donuts with seasonal flavors. A pumpkin spice glaze adds a warm, cozy touch. Just mix powdered sugar with pumpkin spice and a splash of milk. This glaze makes each bite rich and flavorful. Another option is a chocolate drizzle. Melt some chocolate and drizzle it over the cooled donuts. The sweet chocolate pairs well with the pumpkin flavor. You can even mix in spices for a twist! If you need gluten-free options, use a gluten-free flour blend. This works well with the recipe. You can also add a bit of xanthan gum to help with texture. For vegan substitutions, replace eggs with flax eggs. Mix one tablespoon of flaxseed meal with three tablespoons of water. Let it sit for five minutes. Use plant-based milk instead of regular milk for the glaze. These swaps keep the donuts tasty and friendly for different diets. Get creative with your toppings! You can add nuts, shredded coconut, or seasonal fruits to the glaze. Chopped pecans or walnuts add crunch. Fresh apples or pears can give a nice touch of fruitiness. Different sprinkles also make your donuts fun. Use colorful sprinkles for a festive look. Try fall-themed sprinkles for a seasonal vibe. These toppings not only add flavor but also make your mini pumpkin donuts visually appealing. For the full recipe, check out the link provided! To keep your mini pumpkin donuts fresh, store them at room temperature. Place them in an airtight container. This will help prevent them from drying out. If you plan to eat them within a few days, this method works great. For longer storage, refrigerate them. Wrap each donut in plastic wrap or foil. Then, place them in an airtight container. This will keep them from absorbing odors from your fridge. Freezing is a smart way to save extra donuts. Let them cool completely before freezing. Then, wrap each donut in plastic wrap. Place the wrapped donuts in a freezer bag. Squeeze out as much air as possible. This will help avoid freezer burn. When you want to enjoy them, take the donuts out of the freezer. Let them thaw at room temperature. You can also warm them in the microwave for a few seconds. Mini pumpkin donuts last about 2 to 3 days at room temperature. In the fridge, they last about a week. If frozen, they will stay fresh for up to 3 months. Look for signs of spoilage. If the donuts smell off or have mold, discard them. Enjoy your sweet treats while they are still fresh! For the full recipe, check out the complete guide. Yes, just ensure it's pure pumpkin puree. Canned pumpkin works great in this recipe. It saves time and still gives you that rich pumpkin flavor. Look for the label that says "100% pure pumpkin." Avoid pumpkin pie filling, as it has added sugars and spices. You can store leftover glaze in an airtight container. Keep it in the fridge for up to a week. To use it later, warm it slightly in the microwave. You can also drizzle it on other treats, like cookies or cakes, for added sweetness. If you don’t have a mini donut pan, you can use a muffin tin. Just fill the cups about halfway with batter. Bake at the same temperature, but for a longer time. Check with a toothpick until it comes out clean. Yes, you can bake them ahead of time. Let the donuts cool, then store them in an airtight container. Keep them at room temperature for a day or in the fridge for a few days. To reheat, pop them in the microwave for a few seconds. Mini pumpkin donuts can be a treat. They have pumpkin, which adds some nutrients. If you want a healthier option, try reducing the sugar. You can also use whole wheat flour or substitute applesauce for some oil in the mix. Mini pumpkin donuts are simple and fun to make. We explored key ingredients, like pumpkin puree and spices, for flavor. The detailed steps, from mixing to baking, help ensure success. I shared tips to achieve perfect texture and delicious variations. You can even customize these treats to fit your dietary needs. Remember to store them correctly to keep them fresh. Now, it's time for you to enjoy these tasty donuts and share them with friends! Happy baking!](https://tastednest.com/wp-content/uploads/2025/07/cdd505e8-c5d7-4b7f-b16b-8c4e476fe462.webp)
Fall has arrived, and it’s time to enjoy warm, delicious treats like mini pumpkin donuts! These soft, sweet bites are perfect for any autumn gathering or cozy night in. With …
![To make these apple cinnamon roll cupcakes, you need a few key ingredients: - 1 cup all-purpose flour - 1/2 cup granulated sugar - 1 large egg - 1/2 cup unsalted butter, melted - 1/2 cup buttermilk (you can mix 1/2 cup milk with 1/2 teaspoon vinegar) These ingredients form the base of your cupcakes. The flour gives structure, while sugar adds sweetness. The egg binds everything together, and the melted butter brings richness. Buttermilk adds a soft texture and light tang. You can add extra flavor with these optional items: - 1/4 cup chopped walnuts - Additional spices for flavor enhancement Chopped walnuts give a nice crunch and earthiness. You can also add spices like nutmeg or ginger to enhance the flavor. These additions make your cupcakes unique and special. For the creamy topping, you will need: - 1/2 cup cream cheese, softened - 1/4 cup powdered sugar The cream cheese frosting is rich and smooth. It balances the sweetness of the cupcakes. Mix them well until there are no lumps. This frosting adds a delightful finish to your treats. For the [Full Recipe], check out the detailed instructions to create these tasty cupcakes! Start by preheating your oven to 350°F (175°C). While it heats, prepare your muffin tin. Line it with cupcake liners to make removal easy. Next, mix the dry ingredients in a large bowl. Combine 1 cup of all-purpose flour, 1/2 cup of granulated sugar, 1 teaspoon of baking powder, 1/2 teaspoon of baking soda, 1/4 teaspoon of salt, and 1 teaspoon of ground cinnamon. Whisk them well to blend evenly. In a separate bowl, mix your wet ingredients. Pour in 1/2 cup of melted butter, crack in 1 large egg, and add 1/2 cup of buttermilk. Stir until the mixture is smooth and well combined. Now, it's time to combine the mixtures. Gently pour the wet ingredients into the dry ingredients. Stir until just mixed, being careful not to overmix. A light texture is key for the cupcakes. Next, fold in 1 cup of peeled and diced apples. If you want some crunch, add 1/4 cup of chopped walnuts too. For the filling, mix 1/2 cup of packed brown sugar with 1 tablespoon of ground cinnamon in a small bowl. This blend will add a sweet surprise inside your cupcakes. Divide half of the batter into each prepared cupcake liner. Fill them about halfway. Then, sprinkle about a teaspoon of your cinnamon sugar filling on top. Add the remaining batter on top to fill each liner almost full. Finally, sprinkle any leftover cinnamon sugar mixture over the tops for extra flavor. Bake your cupcakes in the preheated oven for 18-20 minutes. To check if they are done, insert a toothpick into the center of a cupcake. If it comes out clean, they are ready! Let the cupcakes cool in the tin for about 5 minutes. Then, transfer them to a wire rack to cool completely. For the cream cheese frosting, beat 1/2 cup of softened cream cheese with 1/4 cup of powdered sugar until smooth. Once your cupcakes are cool, spread or pipe the frosting on top. Enjoy your delicious Apple Cinnamon Roll Cupcakes! For the full recipe, check the previous section! To avoid overmixing, mix your batter just until the dry and wet ingredients blend. If you see dry spots, that is okay. Overmixing can make your cupcakes tough. Keep it gentle! For even baking, make sure to preheat your oven fully. Place your cupcake tin in the center of the oven. This helps heat circulate well. Rotate the tin halfway through baking for uniform results. When applying cream cheese frosting, use a piping bag for a nice look. You can also spread it with a knife for a more rustic feel. For toppings, consider a light sprinkle of cinnamon. Thin apple slices on top add a fresh touch. Chopped nuts can also give a nice crunch. Pair these delightful cupcakes with hot cider or coffee. The flavors blend well and make a cozy treat. For a festive presentation, place the cupcakes on a colorful platter. Add a few extra apple slices around them. This makes your dessert table pop! {{image_4}} If you want to make gluten-free apple cinnamon roll cupcakes, you can use gluten-free flour. Look for blends that have a mix of rice flour, potato starch, and tapioca flour. This mix keeps the cupcakes soft and tasty. Make sure to add a bit of xanthan gum to your mix. This will help the cupcakes rise and hold together, giving them a nice texture. To make these cupcakes vegan, swap out the butter for coconut oil or a plant-based butter. For buttermilk, mix soy milk with lemon juice. This creates a similar flavor and texture. You can replace the egg with a flaxseed meal. Just mix 1 tablespoon of flaxseed with 3 tablespoons of water. Let it sit for a few minutes until it gets thick. Try using different fruits to change the taste. Pears or peaches can add a sweet twist to your cupcakes. You can also add nuts like pecans or walnuts for extra crunch. If you love chocolate, feel free to mix in chocolate chips. This adds a rich flavor that pairs well with the cinnamon. These variations can make your cupcakes unique and exciting. To keep your Apple Cinnamon Roll Cupcakes fresh, you have some good choices. You can store them at room temperature or in the fridge. Room temperature is best if you eat them in a few days. Just place them in an airtight container. For longer storage, put them in the fridge. This helps keep the cream cheese frosting fresh. Make sure to cover them well so they do not dry out. These cupcakes can stay fresh for about 3 days at room temperature. If you keep them in the fridge, they can last up to a week. If the cupcakes have frosting, they might not last as long. Cupcakes without frosting can last a bit longer. Always check for any signs of mold or spoilage before eating. Freezing is a great way to save these tasty treats for later. To freeze, first let the cupcakes cool completely. Then, wrap each cupcake in plastic wrap. After that, place them in a freezer bag. This helps keep out air and moisture. You can freeze them for up to 3 months. When you are ready to enjoy them, take the cupcakes out of the freezer. Let them thaw in the fridge or at room temperature. Once they are soft, frost them if you want. Then, enjoy your delicious cupcakes again! For the full recipe, check the section above. Yes, you can use other fruits! Apples add great flavor, but pears and peaches work too. Just make sure to dice them small. You want them to cook well in the cupcakes. If you use berries, like blueberries, cut down on the sugar a bit. They are sweeter than apples. Try mixing fruits for a fun twist. Always remember to keep the fruit fresh for the best taste. If you don’t have buttermilk, don’t worry! You can easily make a substitute. Just mix 1/2 cup of milk with 1/2 teaspoon of vinegar. Let it sit for about five minutes. This will give you a similar tangy flavor. You can also use plain yogurt or sour cream mixed with water. Both options will keep your cupcakes moist and tasty. To boost the cinnamon flavor, try adding more cinnamon to the batter. You can increase it to 1.5 teaspoons. Another great trick is to sprinkle cinnamon directly on the apples before folding them in. This adds a nice kick. You can also mix cinnamon into your cream cheese frosting for an extra burst. Don't be shy with your spices; they make these cupcakes truly special. For the full recipe, check out the details above! This blog post covered key ingredients for delicious cupcakes, from flour to optional spices. I detailed step-by-step instructions, from mixing to baking. We also explored helpful tips for perfect results and fun decoration options. Don't forget the variations for gluten-free or vegan diets! Lastly, I provided storage tips to keep your treats fresh. Bake with confidence! Enjoy experimenting with flavors, and remember to share your creations. Your perfect cupcakes await!](https://tastednest.com/wp-content/uploads/2025/07/f11a35de-58d1-4b7d-b749-1ea9efdbd094.webp)
Get ready to savor a sweet twist on a classic! In this blog post, I’ll guide you through making Apple Cinnamon Roll Cupcakes that are sure to impress. This delightful …