Chili Mac Delightful Recipe for Comfort Food Lovers
![- 1 pound elbow macaroni - 1 tablespoon olive oil - 1 onion, finely diced - 2 cloves garlic, minced - 1 bell pepper, finely diced - 1 pound ground turkey or ground beef - 2 cans (15 oz each) kidney beans, drained and rinsed - 1 can (28 oz) diced tomatoes (with juices) - 2 tablespoons chili powder - 1 teaspoon ground cumin - 1 teaspoon smoked paprika - 2 cups beef or vegetable broth - Salt and black pepper to taste - 1 cup shredded sharp cheddar cheese - ½ cup fresh cilantro, chopped (for garnish) - Additional veggies (zucchini, corn, etc.) - Hot sauce or chili flakes for extra heat Chili mac has a mix of carbs, protein, and fats. Each serving has about 400-500 calories. It brings together healthy ingredients and hearty flavors. You get protein from the meat and beans. The cheese adds a creamy touch. You can adjust the recipe to fit your needs. More veggies can boost the vitamins. Use the [Full Recipe] for a tasty meal that warms the heart. 1. Boil the Water: Fill a large pot with water and add salt. Bring it to a rolling boil. 2. Add the Macaroni: Once boiling, add 1 pound of elbow macaroni. 3. Cook to Al Dente: Follow the package instructions, usually around 7 to 9 minutes. You want it firm but not hard. 4. Strain the Pasta: After cooking, pour the macaroni into a colander to drain. Set it aside. 1. Heat the Oil: In the same pot, add 1 tablespoon of olive oil and heat over medium. 2. Add Onions: Dice 1 onion and add it to the pot. Sauté for about 2 minutes. 3. Add Garlic and Bell Pepper: Mince 2 cloves of garlic and finely dice 1 bell pepper. Add these to the pot. 4. Sauté for Flavor: Cook for about 5 minutes until the onion is soft and translucent. This step is key for great taste. 1. Brown the Meat: Increase the heat and add 1 pound of ground turkey or beef. Break it up with a spoon. 2. Cook Until Brown: Cook for about 7 to 10 minutes. Make sure the meat is fully browned and no longer pink. 3. Drain Excess Fat: If there’s too much fat, carefully drain it from the pot. 1. Add Beans and Tomatoes: Stir in 2 cans of kidney beans and 1 can of diced tomatoes, juices included. 2. Season the Mix: Add 2 tablespoons of chili powder, 1 teaspoon of cumin, and 1 teaspoon of smoked paprika. 3. Add Broth: Pour in 2 cups of beef or vegetable broth. Season with salt and black pepper to taste. 4. Simmer for Flavor: Bring to a gentle simmer for about 10 minutes. This helps the flavors mix well. 1. Mix in Macaroni: Add the reserved macaroni to the pot. Stir well to combine everything. 2. Melt the Cheese: Sprinkle 1 cup of shredded sharp cheddar cheese on top. Cover the pot for 2-3 minutes to melt the cheese. 3. Serve: Serve the chili mac hot, adding cilantro for a fresh touch. Follow these steps for a hearty meal that warms the heart. For the complete process, check the Full Recipe. To avoid mushy macaroni, cook it just until al dente. This means it should still have a firm bite. When you strain it, do not rinse the pasta. This keeps the starch on the surface. Starch helps the sauce stick better. Next, you want to ensure your meat is cooked just right. Brown it well in the pot. This adds a rich flavor to your chili mac. Use a wooden spoon to break up the meat as it cooks. Make sure there's no pink left. If there's too much fat, drain it off carefully. For spices, I suggest using chili powder and cumin. These add warmth and depth. Smoked paprika gives a nice smoky flavor. You should also try adding garlic powder or onion powder for extra taste. Fresh herbs, like cilantro, are very important. They add a fresh burst of flavor. Toss some in right before serving for the best taste. When serving chili mac, use shallow bowls. This allows for a nice view of the food. You can sprinkle more cheese on top for a cheesy finish. Adding whole cilantro leaves as a garnish makes it look vibrant and fresh. Pairing it with tortilla chips adds a nice crunch. You can also serve it with a side salad for a complete meal. Try out these tips to make your chili mac even more delightful! For the full recipe, check out the Full Recipe section above. {{image_4}} You can make a tasty vegetarian chili mac by skipping the meat. Use plant-based ingredients instead. Good options include mushrooms, eggplant, or tempeh. Beans and lentils work well for protein. They also add fiber and flavor. Try using black beans or chickpeas for a twist. This version remains hearty and satisfying. If you need a gluten-free chili mac, select gluten-free pasta. Look for brands that mimic the texture of elbow macaroni. You can find options made from rice or lentils. Adjust the seasoning to enhance the flavor. Gluten-free pasta may absorb more sauce, so add a bit more broth as needed. For those who love heat, consider adding jalapeños or cayenne pepper. This turns your dish into a spicy chili mac. Start with a small amount to avoid overwhelming the flavor. You can always add more if you want extra kick. Tailor the heat level to match your taste. It's all about making it your own and enjoying the thrill of spice! To store leftovers properly, let your chili mac cool down first. Then, scoop it into an airtight container. This helps keep it fresh. You can keep it in the fridge for about 3-4 days. Make sure it stays in a spot where it won’t get squished. Freezing is a great way to save chili mac for later. Once cooled, place it in a freezer-safe container. You can also use freezer bags. Make sure to squeeze out as much air as you can. It will last up to 3 months in the freezer. To reheat, let it thaw in the fridge overnight. To keep your mac and cheese creamy, add a splash of milk or broth when reheating. Stir it well to mix the liquid with the chili mac. You can heat it in a pot on the stove or in the microwave. If using the microwave, cover it and stir every minute. This will help avoid a dry texture. Keep it covered to trap the steam. Enjoy your chili mac just like it was fresh! Chili mac lasts about 3 to 4 days in the fridge. Store it in an airtight container. This keeps it fresh and tasty. If you want to keep it longer, consider freezing it. Yes, you can make chili mac ahead of time. Cook the chili and pasta separately. Mix them together just before serving. This way, the pasta stays firm. You can also store portions in the fridge for easy meals later. Chili mac pairs well with several side dishes. Consider these options: - Cornbread - Garlic bread - A fresh green salad - Tortilla chips for crunch These sides add variety and balance to your meal. Absolutely! Adding more vegetables boosts nutrition. Good choices are: - Zucchini - Spinach - Carrots - Corn Just chop them small so they blend in well. This keeps the texture nice and tasty. Yes, chili mac is kid-friendly! To make it even better for kids: - Use mild spices - Add cheese on top Kids enjoy the creamy texture and cheesy flavor. Plus, it’s a fun way to eat pasta and chili! Chili mac is a warm, hearty dish made with simple ingredients like pasta, beans, and meat. We covered how to cook perfect macaroni, sauté flavorful veggies, and mix in spices for the best taste. Consider adding more veggies or spices to make it your own. This meal is great for families and easy to store. With these tips, you can create a delicious chili mac that everyone will love. Enjoy your cooking!](https://tastednest.com/wp-content/uploads/2025/06/c576ff38-557d-4887-be1d-a1b9d2c94d9d.webp)
Are you craving a warm, hearty dish that brings comfort to your table? Look no further than my Chili Mac Delightful Recipe. This simple and tasty meal combines creamy macaroni …
Are you craving a warm, hearty dish that brings comfort to your table? Look no further than my Chili Mac Delightful Recipe. This simple and tasty meal combines creamy macaroni …
![Chicken and Marinade - 2 boneless, skinless chicken breasts - 2 tablespoons chipotle sauce - 1 teaspoon ground cumin - 1 teaspoon garlic powder - 1 teaspoon onion powder - Salt and freshly ground black pepper, to taste The chicken is the star of the dish. I love using boneless breasts for their quick cooking time. The marinade gives it a smoky and spicy kick. Chipotle sauce adds depth, while cumin, garlic, and onion bring warmth. Don’t forget the salt and pepper for balance. Rice, Beans, and Corn - 1 cup cooked brown rice - 1 cup black beans, drained and rinsed - 1 cup corn kernels (fresh or frozen) Brown rice serves as a hearty base. It adds fiber and nutty flavor. Black beans are great for protein and texture. Corn adds sweetness and color, making the bowl bright and inviting. Toppings and Garnishes - 1 ripe avocado, sliced - 1 cup cherry tomatoes, halved - 1/2 cup shredded cheese (cheddar or Mexican blend recommended) - Fresh cilantro leaves, for garnish - Lime wedges, for serving Toppings make this bowl fun. Sliced avocado adds creaminess. Cherry tomatoes give freshness and a juicy bite. Shredded cheese adds richness. A sprinkle of cilantro brightens the dish. Lime wedges offer a zesty finish. You can find the complete recipe in the [Full Recipe]. Preparing the Marinade To start, mix the chipotle sauce, ground cumin, garlic powder, onion powder, salt, and black pepper in a bowl. Stir until smooth. This mix brings out a rich flavor in the chicken. Coating the Chicken Breasts Take your chicken breasts and coat them well with the marinade. Make sure every part is covered. This step is key for infusing flavor. Recommended Marinating Time Let the chicken marinate for at least 30 minutes. For the best taste, marinate overnight in the fridge. The longer it sits, the better the flavor. Grilling or Sautéing Preheat your grill or skillet to medium heat. Place the marinated chicken on it and cook for about 6-7 minutes on each side. This gives a nice sear and keeps it juicy. Checking for Doneness The chicken is ready when it reaches 165°F (75°C) inside. Use a meat thermometer for accuracy. Once done, let it rest for 5 minutes before slicing. This keeps the juices inside. Layering the Base Start with a layer of cooked brown rice in a large bowl. Spread it evenly across the bottom for a solid base. Adding Ingredients On top of the rice, add black beans and corn. Then, place the sliced grilled chicken neatly over these layers. This creates a colorful and tasty foundation. Final Touches Next, add avocado slices and halved cherry tomatoes. These fresh ingredients brighten the bowl. Finish with a sprinkle of shredded cheese and fresh cilantro leaves. Serve warm with lime wedges for a zesty kick. Try this [Full Recipe] to make your Chipotle Chicken Bowl at home! Suggested Cooking Techniques You can grill or sauté the chicken. Grilling gives it a nice smoky taste. Sautéing keeps it juicy. Always preheat your grill or skillet. This helps get a great sear. Cook the chicken for about 6-7 minutes on each side. This ensures even cooking. Check the internal temperature. It should reach 165°F (75°C). Marinating Recommendations Marinating is key to tasty chicken. Mix chipotle sauce, cumin, garlic powder, onion powder, salt, and pepper. Coat the chicken well in this mix. Let it sit for at least 30 minutes. For best results, marinate overnight in the fridge. This lets the flavors soak in. Recommended Seasonings Use cumin and chipotle sauce for depth. Garlic and onion powders add warmth. Salt and pepper brighten the dish. You can also add paprika for a smoky twist. Experiment with different herbs like oregano or thyme. Tips for Customizing Spice Levels Control the heat with chipotle sauce. Add more for a spicy kick. For milder flavor, reduce the sauce. You can also add fresh jalapeños for heat. Alternatively, use bell peppers for a sweet crunch. Structuring the Bowl Start with a base of brown rice. This gives a hearty foundation. Layer black beans and corn next. Place sliced chicken on top. Add avocado and cherry tomatoes last. This creates a colorful and appealing look. Ideas for Serving Enhancements Serve in colorful bowls for a fun vibe. Garnish with fresh cilantro for brightness. Add lime wedges on the side. This lets guests add a zesty touch. Use a variety of toppings to make it fun! {{image_4}} What are good protein options for a Chipotle Chicken Bowl? You can swap chicken for other meats or even go vegetarian. - Vegetarian Options: Try grilled tofu or tempeh. Both soak up flavor well. You can also use chickpeas for a hearty boost. - Different Types of Meat: Consider using steak, shrimp, or pork. Each brings a unique taste to your bowl. What can I use instead of rice and beans? Many tasty substitutes exist. - Using Quinoa or Cauliflower Rice: Quinoa is a protein-rich choice. It adds a nice crunch. Cauliflower rice is low-carb and light. It works great for a fresh bite. - Other Bean Choices: If you want variety, try pinto beans or kidney beans. They add different textures and flavors. What toppings can make my bowl special? Get creative with your toppings. - Fresh Vegetable Additions: Consider adding bell peppers, radishes, or jalapeños. They add color and crunch. - Creative Sauce Options: Use salsa, guacamole, or a drizzle of ranch dressing. Each sauce can make your bowl pop with flavor. For a full recipe, check out the Spicy Chipotle Chicken Bowl recipe above. To keep your Chipotle Chicken Bowl fresh, store leftovers in a sealed container. Allow the dish to cool before sealing it. This helps prevent moisture buildup. You can keep it in the fridge for up to three days. I recommend eating the bowl within three days for the best taste. After that, the ingredients may lose their texture and flavor. Best Practices for Freezing You can freeze the chicken and rice separately. Cool them first, then place them in airtight bags. This helps keep them fresh for up to three months. Avoid freezing the fresh toppings, like avocado and tomatoes, as they do not freeze well. Thawing Techniques To thaw, place the frozen chicken and rice in the fridge overnight. This keeps them safe and tasty. If you are in a hurry, you can use the microwave. Just use the defrost setting to avoid cooking them. Microwave vs. Oven You can reheat your bowl in the microwave or the oven. For the microwave, heat on high for 1-2 minutes. Stir halfway for even heating. For the oven, preheat it to 350°F (175°C) and heat for about 10-15 minutes. Maintaining Freshness Add fresh toppings like avocado and cilantro after reheating. This keeps them crisp and bright. Enjoy your Chipotle Chicken Bowl, even after storage! A Chipotle Chicken Bowl is a tasty dish full of layers. It includes marinated chicken, rice, beans, and fresh toppings. The flavor profile is bold and smoky. Chipotle sauce gives it a nice kick. The chicken is juicy, while the rice adds a soft texture. Black beans and corn bring a sweet crunch. Fresh avocado and tomatoes add a creamy and juicy bite. Together, these ingredients create a well-balanced meal. A typical Chipotle Chicken Bowl has around 650 calories. This number can change based on your choices. The main components include chicken, rice, and beans, which give protein and carbs. The cheese and avocado add healthy fats. To make it lighter, you can skip cheese or use less rice. Always check the serving size to manage calorie intake. Yes, you can customize your Chipotle Chicken Bowl! At Chipotle, you can pick your rice, beans, and toppings. You can add or skip ingredients based on your taste. For homemade bowls, try different bases like quinoa or cauliflower rice. You can also swap chicken with shrimp or tofu. Create your own flavor by mixing sauces and spices. If you want to skip chicken, there are many great options. You can use grilled shrimp or steak for a different taste. Tofu or tempeh works well for a vegetarian bowl. For a plant-based choice, use black beans or lentils. Each option still delivers protein while adding its unique flavor. You now have all the details to create a tasty Chipotle chicken bowl. We covered the key ingredients, cooking steps, and tips for perfecting your dish. You learned about variations, storage, and even some FAQs. Experiment with flavors, try different proteins, and customize to your liking. Cooking should be fun and rewarding. Enjoy your bowl and share it with friends. Happy cooking!](https://tastednest.com/wp-content/uploads/2025/06/f04457fd-0bbe-4df9-b8cd-68b7312d1233.webp)
Craving a flavorful Chipotle Chicken Bowl that’s quick and easy to make? You’re in the right place! In this guide, I’ll share my simple recipe that lets you enjoy all …
![- 1 ½ cups graham cracker crumbs - ½ cup unsalted butter, melted - ¼ cup granulated sugar - 16 oz cream cheese, softened to room temperature - ¾ cup granulated sugar - 2 large eggs, at room temperature - 1 tsp pure vanilla extract - ½ cup sour cream - 1 tsp ground cinnamon - ⅓ cup packed brown sugar - 1 tbsp ground cinnamon - 2 tbsp unsalted butter, melted - ½ cup powdered sugar - 1-2 tbsp milk (adjust for desired consistency) When making my cinnamon roll cheesecake, I love to start with the crust. The crust is a mix of graham cracker crumbs, melted butter, and sugar. It gives the cheesecake a sweet and crunchy base. The filling is the star of the show. Cream cheese, sugar, eggs, vanilla, sour cream, and cinnamon blend into a rich, creamy delight. Next, we create the cinnamon swirl. This blend of brown sugar, cinnamon, and butter gives that classic cinnamon roll flavor. Finally, the topping is simple but sweet. Just powdered sugar and milk make a lovely glaze. These ingredients come together to create a dessert that looks as good as it tastes. For the full details, check out the Full Recipe. - Preheat the oven to 325°F (160°C). - In a medium bowl, mix graham cracker crumbs, melted butter, and sugar. Press this into a 9-inch springform pan. Bake for 10 minutes. Let it cool. - In a small bowl, combine brown sugar, cinnamon, and melted butter. Whisk until crumbly. Set aside for later. - In a large bowl, beat softened cream cheese until smooth. Gradually add sugar, mixing well. Add eggs one at a time. Then, mix in vanilla extract, sour cream, and ground cinnamon until creamy. - Pour half of the cheesecake filling over the cooled crust. Sprinkle half of the cinnamon mixture on top. Pour the rest of the filling over that. Finally, sprinkle the rest of the cinnamon mixture and swirl with a knife. - Place the pan in the oven. Bake for 50-60 minutes. It should jiggle slightly in the center. Turn off the oven and crack the door. Let it cool inside for 1 hour. - After cooling, move the cheesecake to the fridge. Chill for at least 4 hours, or overnight for the best texture. For the full experience and to make your own, check out the full recipe! Using room temperature ingredients helps your cheesecake mix well. Cold cream cheese can create lumps. Before mixing, let the cream cheese sit out for an hour. This simple step makes a big difference. When you beat the cream cheese, start slow. Gradually increase the speed until it’s creamy. This helps avoid air bubbles that can cause cracks later. Cracks often happen when cheesecake cools too fast. After baking, turn off the oven but leave the door ajar. This allows the cheesecake to cool slowly. Let it sit in the oven for about an hour. This gentle cooling helps keep the surface smooth. After that, chill the cheesecake in the fridge for at least four hours. Overnight is even better for a perfect texture. Swirling the cinnamon mixture into the cheesecake is fun but needs care. Use a butter knife or a skewer to create the swirl. Don’t overmix! Just a few gentle turns will do. You want to see the cinnamon mix, not blend it all in. This way, you get beautiful swirls and great flavor. Enjoy the process—it's all part of the fun! {{image_4}} You can make this cheesecake even more fun. Add chocolate chips for a sweet twist. Fresh fruit like strawberries or blueberries also works great. These add color and flavor. You can mix in your favorite goodies to create your own version. Think outside the box with your crust. Instead of the classic graham cracker, try an Oreo crust. The chocolate flavor pairs well with the cheesecake. A gingersnap crust gives a spicy kick. Experiment with different cookie types to find your favorite. Toppings can take your cheesecake to the next level. Drizzle warm caramel sauce over each slice for extra sweetness. Whipped cream adds a light, fluffy touch. For a crunchy element, sprinkle crushed nuts on top. These toppings make the dessert look fancy and inviting. For the Full Recipe, check the detailed steps above. Enjoy creating your own delicious Cinnamon Roll Cheesecake! To keep your cheesecake fresh, always store it in the fridge. Wrap it well with plastic wrap. This helps prevent it from drying out. You can also use an airtight container. The cheesecake is best when enjoyed within 3 to 5 days after making it. If you want to enjoy this treat later, freezing is a great option. First, let the cheesecake cool completely. Then, slice it into pieces. Wrap each slice in plastic wrap. After that, place the slices in a freezer-safe bag. This helps keep them fresh. You can freeze them for up to 3 months. When you want to eat them, let them thaw in the fridge overnight. In the fridge, your cinnamon roll cheesecake lasts about 5 days. In the freezer, it can last up to 3 months. Just remember, the sooner you eat it, the better it will taste. Enjoy your delightful treat whenever you can! Yes, you can make this cheesecake ahead of time. It stores well in the fridge. - Meal Prep Tips: Prepare the cheesecake a day or two in advance. - Storage: Cover it tightly with plastic wrap. This keeps it fresh and moist. The key signs of doneness are the edges and the center. - Signs of Doneness: Look for set edges and a slight jiggle in the center. - Perfect Texture: A gentle shake should show movement, but the center should not be runny. If you need an alternative, there are several options. - Alternatives for Dietary Restrictions: Use ricotta cheese or Greek yogurt. - Vegan Option: Try a vegan cream cheese or blended tofu for a dairy-free version. Chilling overnight is very important for this cheesecake. - Importance of Chilling: It helps set the flavors and texture. - Flavor and Texture: Longer chilling allows the flavors to meld and improves the overall taste. For the full recipe, check out the [Full Recipe]. Enjoy making this special dessert! This blog shared a simple and tasty cheesecake recipe. We discussed the crust, filling, and cinnamon swirl. I included tips for avoiding cracks and perfecting the swirl. You can try fun variations, like adding chocolate or fruit. Proper storage will keep your cheesecake fresh for longer. Remember to chill it well for the best taste. Enjoy making this dessert and share it with friends. With these steps, you’ll impress anyone who tries your cheesecake. It’s a fun treat that everyone will love!](https://tastednest.com/wp-content/uploads/2025/06/fa8e0297-3714-4cb3-8c3c-bd897969f51a.webp)
Craving a dessert that blends two favorites? Enter the Cinnamon Roll Cheesecake! This fantastic treat pairs creamy cheesecake with warm cinnamon swirls, creating a delightful flavor explosion. With simple ingredients …
![- 1 lb ground beef - 1 tablespoon olive oil - 1 small onion, finely chopped - 2 cloves garlic, minced - 1 bell pepper, diced (any color) - 1 teaspoon ground cumin - 1 teaspoon chili powder - ½ teaspoon smoked paprika - 1 cup cooked rice (white or brown) - 1 cup shredded cheddar cheese - ½ cup sour cream - 4 large flour tortillas - Fresh cilantro, chopped (for garnish) - Sliced jalapeños (optional for heat) In this recipe, I use ground beef as my main protein. It gives a rich flavor to the burritos. The olive oil helps cook the meat and veggies without sticking. I love adding onions and garlic for that strong aroma and taste. Bell peppers add a nice crunch and sweetness. For spices, I keep it simple. Cumin and chili powder add warmth. Smoked paprika gives a hint of smokiness. Cooked rice makes the filling hearty, while cheddar cheese brings that melty goodness. Sour cream is my secret for extra creaminess. Flour tortillas are perfect to wrap everything up. To finish, I like adding fresh cilantro and jalapeños for color and some heat. You can find the full recipe at the end. - Sauté the onion: Start by heating olive oil in a large skillet over medium heat. Add the finely chopped onion. Cook it for about 3-4 minutes until it turns translucent. This step brings out the onion's sweet flavor. - Add garlic and bell pepper: Next, mix in minced garlic and diced bell pepper. Cook for another 2-3 minutes. You want the bell pepper to soften and the garlic to become fragrant. This mix will add depth to your burrito's taste. - Brown the ground beef: Increase the heat to medium-high. Now, add the ground beef to the skillet. Use a spatula to break it apart as it cooks. Brown it evenly for about 5-7 minutes. If there is excess fat, drain it responsibly to keep the burrito filling light. - Spice it up with seasonings: Once browned, sprinkle in ground cumin, chili powder, smoked paprika, and salt and pepper to taste. Mix it all together. Let it cook for another 2 minutes. This step layers the flavor and makes the beef really tasty. - Mix in cooked rice and cheese: Lower the heat and gently stir in the cooked rice. After the rice, add the shredded cheddar cheese. Stir well until the cheese melts and blends into the mixture. This creates a creamy filling. - Assembly of the burritos: Lay out a large flour tortilla on a clean surface. Spoon a good amount of the beef and cheese filling into the center. Top it with a dollop of sour cream for added creaminess. - Toasting for a crispy finish: For a crispy burrito, heat a clean skillet over low heat. Place the wrapped burritos seam-side down in the skillet. Cook them for about 2 minutes on each side until golden and crisp. This adds a nice crunch. - Garnishing and serving: Once toasted, remove the burritos from the skillet. You can slice them in half if you wish. Garnish with freshly chopped cilantro and sliced jalapeños for an extra kick. This makes the dish look and taste amazing. Enjoy your flavorful cheesy beef burritos! For the complete recipe, check [Full Recipe]. To make your cheesy beef burritos even tastier, use fresh herbs. Chopped cilantro adds a bright touch. You can also try fresh oregano or parsley for a new flavor. Adjust the spice levels to suit your taste. If you want heat, add sliced jalapeños or more chili powder. For a milder burrito, use less spice and more cheese. Rolling burritos may seem tricky, but I have some tips. Start with a large flour tortilla. Place your filling in the center, leaving space on the sides. Fold in the sides first to hold the filling. Then, roll from the bottom up tightly. This helps keep everything inside. For even cooking, place the burritos seam-side down in the skillet when toasting. This prevents them from unrolling. Using the right tools makes cooking easier. A non-stick skillet is great for cooking your burritos. It helps prevent sticking and makes clean-up simple. A spatula is essential for flipping the burritos. Use a sharp knife for cutting them in half. These tools make preparing and enjoying your cheesy beef burritos a breeze. For more details, check the Full Recipe for additional tips. {{image_4}} You can switch up the beef in your burritos. Ground turkey or chicken works well. These options are lean and still tasty. For a veggie twist, use a bean filling. Black beans or pinto beans offer great protein. You can mix beans with spices for extra flavor. Cheese makes these burritos extra special. While cheddar is a classic choice, feel free to explore different types. Monterey Jack adds creaminess, while pepper jack brings heat. If you need a dairy-free option, try vegan cheese. Many brands melt nicely and taste great. Adding sauces makes each bite fun. Consider spicy sauces like hot salsa or chipotle sauce. These can boost flavor and heat. You can also customize your burritos with toppings. Fresh guacamole, diced tomatoes, or shredded lettuce add freshness. Don't forget to sprinkle some cilantro for a burst of flavor. For the full recipe, check out the Cheesy Beef Burritos section. To store your cheesy beef burritos, let them cool first. Place them in an airtight container. You can put them in the fridge for up to three days. To keep them fresh, wrap each burrito tightly in foil or plastic wrap. This helps prevent them from drying out. If you want to save burritos longer, freezing is a great option. Wrap each burrito in foil, then place them in a freezer-safe bag. You can freeze them for up to three months. To avoid freezer burn, try to remove as much air as you can from the bag. When it's time to eat your leftovers, you have a few good options for reheating. Using the oven or skillet gives you the best results. Preheat your oven to 350°F (175°C). Place the burritos on a baking tray. Heat them for about 15-20 minutes, or until they’re hot all the way through. If you choose a skillet, heat it on low with a little oil. Cook the burritos for about 5-7 minutes on each side. This will make them crispy and delicious. For a quick option, you can use the microwave. Place one burrito on a microwave-safe plate. Heat for about 1-2 minutes, checking every 30 seconds. This method is fast but may not keep the burrito crispy. In the fridge, cheesy beef burritos last for about three days. After that, they may start to spoil. Look for any changes in smell or color. If they smell off or look weird, it’s best to throw them away. If stored in the freezer, they can last up to three months. However, for the best taste, try to eat them within one month. Always check for signs of freezer burn, like ice crystals on the burritos. If you see these, the flavor might not be great. For the full recipe, check out the detailed instructions above. Enjoy your delicious cheesy beef burritos! To make cheesy beef burritos gluten-free, use gluten-free tortillas. You can find these in most stores. Check the labels to ensure they are certified gluten-free. The rest of the recipe remains the same. Enjoy the same great flavor without gluten! Yes, you can prepare cheesy beef burritos ahead of time. You can cook the filling in advance and store it in the fridge. Just assemble the burritos when you're ready to eat. This saves time and brings quick, tasty meals to your table. Cheesy beef burritos pair well with many sides. Consider serving them with: - Mexican rice - Refried beans - Fresh guacamole - Salsa or pico de gallo - A simple salad with lime dressing These sides enhance the meal and add more flavor. To create a vegetarian version, replace the ground beef with black beans or lentils. You can also add more veggies like zucchini or corn. Use the same spices to keep the flavor rich. This way, you keep the hearty taste without meat. In this article, we explored how to make cheesy beef burritos. You learned about the key ingredients like ground beef, garlic, and spices. We also covered the step-by-step cooking process and shared tips for perfecting your burrito-folding skills. To make it even better, we discussed variations and storage tips. Creating these burritos can be fun and rewarding. With these techniques and ideas, you can make tasty meals that suit your taste. Enjoy the process and get creative in the kitchen!](https://tastednest.com/wp-content/uploads/2025/06/64b919c4-8285-4f68-96f7-89c2fe967a0d.webp)
Looking for a quick and tasty meal? I’m excited to share my easy recipe for Cheesy Beef Burritos! Packed with juicy ground beef, fresh veggies, and melted cheese, these burritos …
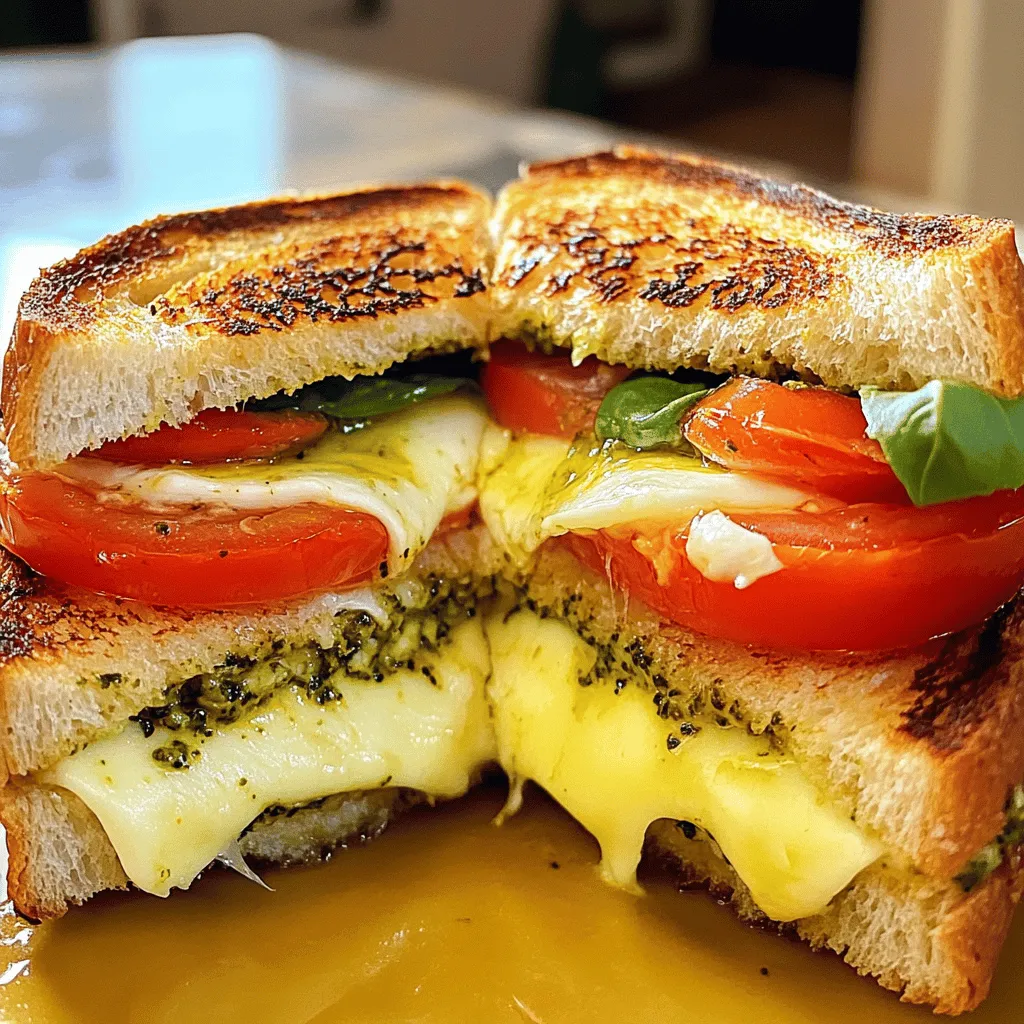
Are you ready to elevate your grilled cheese game? This Italian Grilled Cheese Sandwich recipe is bursting with flavor and super easy to make. Using fresh herbs, your favorite cheeses, …
![- 1 cup fresh spinach, finely chopped - 1 cup canned artichoke hearts, drained and coarsely chopped - 1 cup cream cheese, softened to room temperature - 1 cup sour cream - 1 cup finely grated Parmesan cheese - 1 cup shredded mozzarella cheese - 2 cloves garlic, minced - 1 teaspoon fresh lemon juice - 1/2 teaspoon red pepper flakes (optional, for heat) - Salt and black pepper, to taste When I make spinach artichoke Parmesan dip, I stick to these simple but tasty ingredients. Fresh spinach gives a bright flavor. Canned artichoke hearts add a nice texture. Cream cheese and sour cream make the dip rich and creamy. Parmesan and mozzarella provide a delicious cheesy taste. Garlic adds depth and flavor, while lemon juice brightens everything up. - Cream Cheese Alternatives: If you want a lighter option, use Greek yogurt or cottage cheese. These give a similar creaminess with fewer calories. - Low-fat Options: Choose low-fat cream cheese and sour cream. This keeps the taste but cuts some fat. - Dairy-Free Variations: Use vegan cream cheese and coconut yogurt for a dairy-free dip. You can also use nutritional yeast for a cheesy flavor. - Choosing Fresh Spinach: Look for dark green leaves. They should be crisp and not wilted. Avoid any yellow or slimy leaves. - Selecting Quality Artichokes: Choose artichoke hearts that are firm and smell fresh. If you can, pick ones packed in water or brine over oil. First, preheat your oven to 375°F (190°C). This step gives you a warm dip in the end. An even oven temperature ensures perfect cooking. Place the oven rack in the middle. This helps the dip cook evenly. Next, choose a medium-sized baking dish. You want something that fits all the dip. A glass or ceramic dish works best. It helps you see the dip browning nicely. Start by making the cheese mixture. In a large bowl, add the softened cream cheese and sour cream. Use a spatula or mixer to blend them until smooth. You want no lumps at all. Then, add the grated Parmesan and shredded mozzarella cheese. Mix until everything is well combined. This is key for a creamy dip. Now, it’s time to fold in the spinach and artichokes. Add the chopped spinach, artichoke hearts, and minced garlic. If you like heat, toss in the red pepper flakes too. Make sure each ingredient spreads through the mixture. Don’t forget to season it! Add salt and black pepper to taste. Stir well so the flavors blend nicely. Now, it’s baking time! Transfer the creamy mixture to your prepared baking dish. Spread it out evenly for nice cooking. Bake in the preheated oven for 25-30 minutes. You want the edges to bubble and the top to turn golden brown. Keep an eye on it, especially in the last few minutes. To check if it’s done, look for bubbling edges and a golden top. Once baked, take it out and let it cool for about 5 minutes. This helps the dip thicken a bit. For the full recipe, click [Full Recipe]. - Adding Spices for Extra Flavor Try adding a pinch of garlic powder or onion powder. These spices boost the flavor without overpowering it. A dash of cayenne gives a nice kick too! Adjust the spices to your taste for that perfect bite. - Perfecting the Creamy Texture Make sure your cream cheese is soft. If it’s too cold, you’ll end up with lumps. Mixing it well with sour cream helps create that smooth, creamy dip we all love. If the dip seems thick, add a splash of milk to reach your desired consistency. - Overmixing the Ingredients Mixing too much can make the dip tough. Stir until everything is just combined. This keeps the textures light and enjoyable. You want to feel the bits of spinach and artichoke, not just a smooth paste. - Not Baking Long Enough Baking for the right time is key. If you pull it out too soon, the dip may be too runny. Look for golden edges and bubbling sides. This means it's ready to enjoy. - Best Pairings for Serving Serve this dip warm with toasted baguette slices or crispy pita chips. Fresh veggies like carrots and cucumbers also make great dippers. They add a nice crunch that contrasts well with the creamy dip. - Garnishing Ideas for Presentation For a pop of color, sprinkle extra Parmesan on top. Fresh herbs like parsley or chives can brighten the dish too. A drizzle of olive oil adds richness and shine, making it look even more inviting. For the full recipe, check out Spinach Artichoke Parmesan Dip. {{image_4}} You can change up your dip easily. Adding different cheeses can give new flavors. - Adding Different Cheeses: Try using goat cheese or cream cheese mixes. They add tanginess and creaminess. You can also use cheddar for a sharp taste. Mixing cheeses can enhance your dip’s richness. - Spinach Artichoke Dip with Crab: Adding crab meat is a fun twist. It makes the dip feel fancy. Just fold in 1 cup of cooked crab meat. The crab adds a wonderful depth to the dip. Making this dip fit your needs is simple. You can modify it for different diets. - Vegan Spinach Artichoke Dip: To make a vegan version, swap cream cheese with cashew cream. Use nutritional yeast instead of cheese. This keeps the flavor while being dairy-free. - Gluten-Free Options: All ingredients in this dip are gluten-free. Just make sure any chips or bread you serve are also gluten-free. This makes sharing easy for everyone. You can boost flavor with seasonal ingredients. Fresh herbs and veggies can make a big difference. - Incorporating Herbs: Fresh basil or dill can brighten your dip. Just chop them finely and mix them in. They add a fresh taste that pairs well with the creamy base. - Seasonal Veggies to Boost Flavor: Try adding roasted red peppers or sun-dried tomatoes. These add sweetness and color. You can mix in chopped zucchini or asparagus in spring. These seasonal veggies give your dip a tasty twist. For the full recipe, check out Spinach Artichoke Parmesan Dip. Enjoy creating your own version! To keep your spinach artichoke parmesan dip fresh, follow these steps: - Best Practices for Refrigeration: Place the dip in an airtight container. It seals in moisture and flavor. Store it in the fridge right after it cools. This helps it stay tasty for later. - Freezing the Dip: If you want to save it for a longer time, you can freeze it. Use a freezer-safe container and leave some space at the top. The dip expands as it freezes. It can last up to three months in the freezer. When you're ready to enjoy the dip again, reheating is key. - Best Methods for Reheating: The oven works best. Preheat it to 350°F (175°C). Place the dip in an oven-safe dish and cover it with foil. Heat for about 20 minutes or until warm. You can also use a microwave for quick reheating, but the oven keeps it creamy. - Maintaining Creaminess After Storage: To keep the dip creamy, add a splash of cream or sour cream while reheating. Stir it well before serving. This helps restore the dip’s smooth texture. Knowing how long your dip lasts is important. - How Long It Lasts in the Fridge: When stored properly, the dip stays good for about 3 to 5 days. - Signs the Dip Has Gone Bad: Check for any off smells or mold. If it smells sour or has changed color, throw it away. Always trust your senses to keep things safe. You can prepare this dip a day before. Mix the ingredients as the recipe states. Then, store it in the fridge. When ready, just bake it right before serving. This saves you time and keeps flavors fresh. This dip pairs well with many foods. Here are some great options: - Toasted baguette slices - Crispy pita chips - Fresh vegetable sticks - Tortilla chips These choices add crunch and flavor to the warm dip. Yes, you can use a slow cooker for this dip. Mix all the ingredients and place them in the slow cooker. Set it on low for about two hours. Stir once or twice to keep it creamy. Yes, spinach artichoke dip can be healthier. It uses fresh veggies and lower-fat dairy options. Spinach adds vitamins and minerals, making it a better choice. Just be mindful of the cheese and cream. Absolutely! Feel free to add more veggies. Chopped bell peppers, mushrooms, or zucchini work great. Just make sure to adjust the creaminess by adding a bit more cheese. This keeps the dip rich and tasty. If your dip is runny, you can thicken it easily. Bake it a bit longer to reduce moisture. Alternatively, mix in a bit of grated cheese or a spoon of cream cheese. This will give it a thicker texture. For the full recipe, check the details above. This blog post covered key ingredients for the perfect Spinach Artichoke Dip. We explored substitutions for dietary needs and tips for selecting fresh items. I gave step-by-step instructions on preparing and baking, plus advice on flavor enhancement and common mistakes. The variations section opened doors to creative swaps and seasonal updates. Finally, we discussed storage and reheating tips to keep your dip fresh. Enjoy experimenting with this dish. It’s simple, tasty, and perfect for any gathering!](https://tastednest.com/wp-content/uploads/2025/06/cb346ab3-4554-4b90-8e4d-5a9bfd7189d6.webp)
Are you ready to impress your guests with a delicious dip? My Spinach Artichoke Parmesan Dip recipe is flavorful, simple, and perfect for any gathering. Packed with creamy cheese, tender …
![To make the best unstuffed pepper skillet, gather these key items: - 1 pound ground turkey or ground beef - 3 bell peppers (1 red, 1 yellow, 1 green), diced into bite-sized pieces - 1 can (15 oz) diced tomatoes, including all juices These ingredients form the hearty base of your dish. The ground meat gives protein, while the bell peppers add crunch and sweetness. The tomatoes bring moisture and flavor. To elevate the taste, add these flavor boosters: - 1 teaspoon Italian seasoning blend - 1 teaspoon smoked paprika - 1 cup shredded cheese (cheddar, Monterey jack, or your favorite) The Italian seasoning adds a herbaceous note. Smoked paprika gives it a warm, smoky flavor. Cheese melts beautifully on top, making every bite gooey and delicious. This dish can fit many diets. Here are some ideas: - Use quinoa instead of rice for a gluten-free option. - For a vegetarian alternative, swap meat with lentils or black beans. - To lower carbs, skip the rice or use cauliflower rice. These swaps make this dish versatile for everyone. You can enjoy it without worry, no matter your dietary needs. Check the full recipe for further guidance on these substitutions. Start by chopping your vegetables. Dice one large onion and three bell peppers. I like to mix colors for a fun look. Use one red, one yellow, and one green bell pepper. Next, cook your rice or quinoa. If you want to save time, use leftover rice. You need one cup of cooked rice or quinoa for this dish. Heat a good amount of olive oil in a large skillet over medium heat. Once the oil is hot, add the diced onion. Sauté for about three to four minutes until it turns translucent. Add two minced garlic cloves to the skillet. Stir for one minute until you smell the garlic's aroma. Now, turn up the heat to medium-high. Add one pound of ground turkey or beef. Cook it while breaking it up with a spatula. This should take about seven to eight minutes until the meat is brown and cooked all the way through. Toss in the diced bell peppers. Cook them for another three to four minutes. They should soften and gain some color. Next, stir in one can of diced tomatoes, including all the juices. Add your cooked rice or quinoa, one teaspoon of Italian seasoning, one teaspoon of smoked paprika, and salt and pepper to taste. Mix everything well to spread the flavors evenly. Lower the heat and let the mixture simmer for about five minutes. This time allows the flavors to meld beautifully. Evenly sprinkle one cup of shredded cheese on top. Cover the skillet with a lid and let it sit for two to three minutes. This helps the cheese melt into gooey perfection. When the cheese is melted and bubbly, remove it from heat. Garnish with fresh parsley or basil before serving hot. For the full recipe, check out the complete instructions above. To prevent overcooking, keep an eye on the heat. Use medium heat while cooking the meat. This will help it stay juicy and tender. If you cook it on high heat, the meat can dry out. For the perfect cheese melt, cover the skillet after adding the cheese. This traps heat and helps the cheese melt evenly. Let it sit for a few minutes before serving. You want that gooey, stretchy cheese! Serve your unstuffed pepper skillet with a side of crusty bread. The bread helps soak up the tasty sauce. A fresh green salad also pairs well with this dish. It adds crunch and freshness. If you want to make this a meal prep option, divide it into containers. It keeps well in the fridge for up to four days. You can reheat it easily for quick meals. Using fresh herbs can really boost the flavor. Chopped parsley or basil adds a bright taste. You can sprinkle them on top before serving. For spice lovers, try adding red pepper flakes or cayenne pepper. This gives your dish a nice kick. You can also switch up the spices to match your taste. {{image_4}} You can change the protein in this dish easily. Ground turkey or beef is great, but you can use chicken or even plant-based options. If you want a meat-free meal, try lentils or chickpeas. Both add protein and texture. For grains, I suggest rice or quinoa. Quinoa is a healthful choice and cooks fast. You can also use farro or barley. Each grain brings a unique taste to the dish. To spice things up, add chili powder or cayenne pepper. This makes a spicy unstuffed pepper skillet that really wakes up your taste buds. You can also mix in jalapeños for an extra kick. If you're in the mood for something different, try a Mediterranean twist. Add olives, feta cheese, and a splash of lemon juice. These ingredients brighten the dish and offer a fresh flavor change. Incorporate seasonal vegetables for a fresh taste. In spring, use asparagus or peas. In fall, add squash or sweet potatoes. These veggies not only taste good but also make the dish colorful. Don't forget fresh summer herbs! Basil, parsley, or cilantro can enhance the flavors. Just sprinkle them on top before serving. They add freshness and a pop of color to your unstuffed pepper skillet. For the full recipe, check out the Ultimate Unstuffed Pepper Skillet Delight! To keep your unstuffed pepper skillet fresh, store it in an airtight container. Place it in the fridge if you plan to eat it within three days. Make sure it cools down first to avoid condensation. For longer storage, you can freeze it. Divide the dish into smaller portions for easy thawing later. This way, you can enjoy it whenever you want! When it’s time to enjoy leftovers, the best method is using the stove. Heat it in a pan over low heat, stirring often. This keeps the flavors rich and the texture nice. If you’re short on time, the microwave works, too. Heat it in short bursts, stirring in between. This helps avoid hot spots and keeps the dish tasty. In the fridge, your unstuffed pepper skillet lasts about three to four days. If you freeze it, it can last up to three months. Always check for signs of spoilage before eating. If you see mold or an off smell, it’s best to throw it away. Keeping an eye on your leftovers ensures you enjoy them safely! How to make this dish vegetarian? To make this dish vegetarian, swap the ground turkey or beef for plant-based meat. You can use lentils, black beans, or crumbled tofu. These options add protein and texture. Keep the rest of the recipe the same. Can I use frozen vegetables instead? Yes, frozen vegetables are a great time saver. Use a mix of frozen bell peppers and onions. Just add them directly to the skillet. They will cook down nicely and still taste great. Why is my unstuffed pepper skillet watery? A watery dish usually means too much liquid. Make sure to drain the canned tomatoes well. Also, if you use fresh peppers, they add water. Cook them a bit longer to reduce the moisture. Adjustments for a thicker consistency To thicken the dish, add a bit more rice or quinoa. You can also let it simmer longer to cook off excess liquid. Another option is to stir in a spoonful of tomato paste. It thickens and enhances the flavor. How to alter serving sizes To change the serving size, adjust the main ingredients. For example, use half a pound of meat for two servings. You can double everything for eight servings. Just keep the ratios the same. Quantity adjustments for meal prep For meal prep, make a large batch. Use full amounts of ingredients and store in portions. This way, you have ready meals for the week. Just reheat when you are ready to eat. Check the [Full Recipe] for exact measurements. This blog post covered how to make a tasty unstuffed pepper skillet. We explored the key ingredients like ground turkey, bell peppers, and diced tomatoes. You learned methods for preparation and cooking, along with helpful tips for serving. We shared variations and ways to store leftovers effectively. In summary, this dish is flexible and easy to make. You can adjust it to fit your needs. Try different flavors and ingredients to keep it exciting. Enjoy your cooking adventure with this recipe!](https://tastednest.com/wp-content/uploads/2025/06/e5810796-e06a-41f8-9b8e-7eb68da968a6.webp)
Looking for a quick, tasty dinner? My Unstuffed Pepper Skillet recipe packs all the flavors of stuffed peppers without the hassle. You’ll love the mix of ground meat, fresh peppers, …
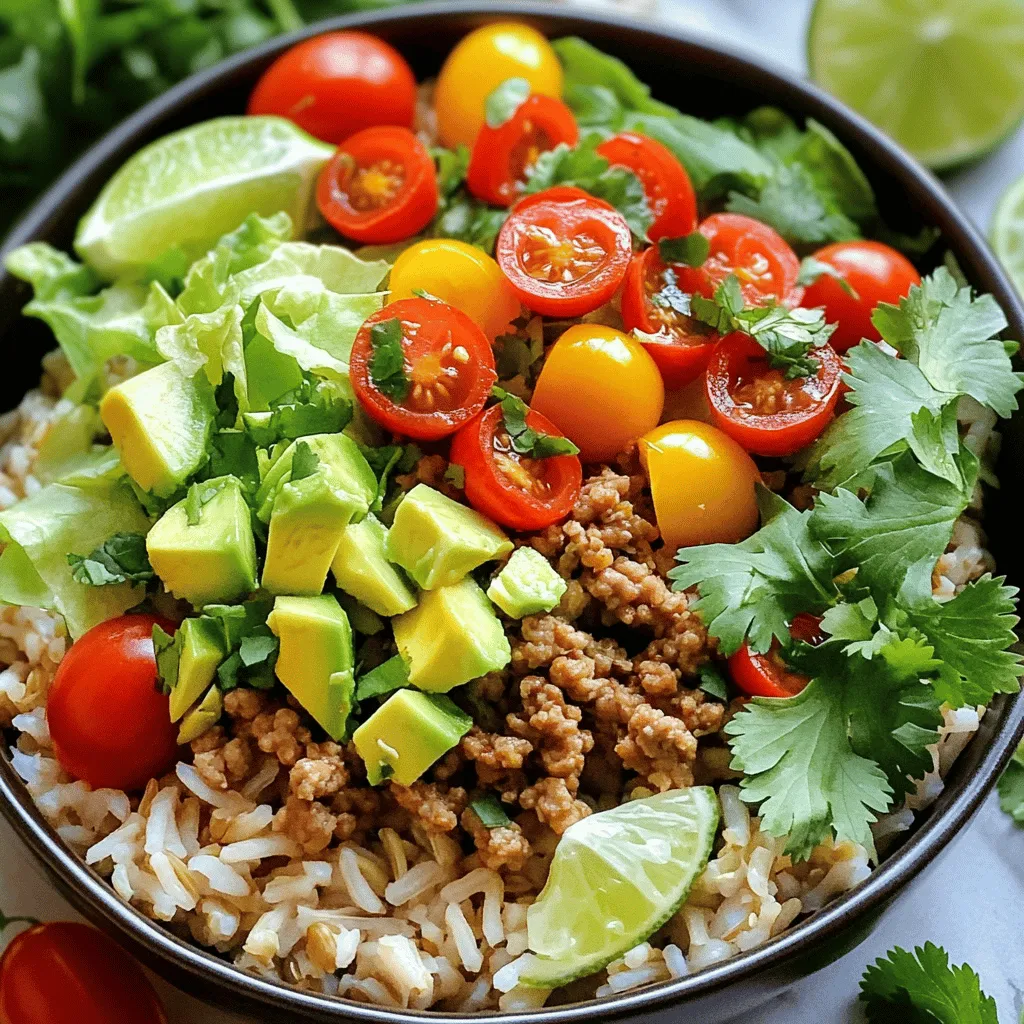
Looking for a quick and healthy meal that packs a punch? The Healthy Turkey Taco Bowl checks all the boxes—it’s flavorful, nutritious, and easy to make. In just a few …

Are you ready to indulge in a sweet twist on breakfast? These Best Cinnamon Roll French Toast Bites are your perfect treat! Imagine soft, warm bites packed with cinnamon flavor, …
![- 20 jumbo pasta shells - 1 pound ground beef - 1 cup ricotta cheese - 1 cup mozzarella cheese, shredded - 1/2 cup parmesan cheese, grated To make the best stuffed shells with ground beef, start with jumbo pasta shells. These shells are large and perfect for holding the filling. Ground beef adds a rich flavor and protein. For the cheese, use a mix of ricotta, mozzarella, and parmesan. These cheeses create a creamy and cheesy filling. - 1 teaspoon Italian seasoning - Salt and pepper, to taste - 3 cups marinara sauce Seasonings are key to tasty stuffed shells. Italian seasoning brings warmth and depth. Salt and pepper balance the flavors. Marinara sauce adds moisture and a tangy taste. Use a good quality marinara for the best results. - Fresh basil for garnish - Additional vegetables like spinach or bell peppers You can customize your stuffed shells. Fresh basil adds a bright touch and flavor. Chopped spinach or diced bell peppers can boost nutrition. These add-ins make your dish unique and colorful. For the full recipe, check out the instructions in the recipe section. - Preheat the oven to 375°F (190°C). This step is key for even cooking. - Cook 20 jumbo pasta shells according to the package. Make sure they are al dente. Drain them and put them on a greased baking sheet to avoid sticking. - In a large skillet, heat over medium. Add 1 pound of ground beef, 1 small chopped onion, and 2 minced garlic cloves. Cook until the beef is browned and the onion is clear, about 7-8 minutes. Drain any extra fat. - In a mixing bowl, combine 1 cup ricotta cheese, 1 cup shredded mozzarella, 1/2 cup grated parmesan, 1 large egg, 1 teaspoon Italian seasoning, and a pinch of salt and pepper. Mix until smooth and creamy. - Stir in the cooked beef mixture into the cheese blend. Make sure it is well combined for maximum flavor. - Carefully fill each cooked shell with the beef and cheese mixture. Don’t overfill, but make them generous. - In a large baking dish, spread 1 cup of marinara sauce. Place the stuffed shells on top. Pour the rest of the marinara sauce over them, ensuring they are covered well. - For extra cheesy goodness, sprinkle more mozzarella on top. Cover the dish tightly with aluminum foil. This prevents the cheese from browning too fast. - Bake in the oven for 25 minutes. Remove the foil and bake for another 10 minutes, until the cheese is bubbly and golden. - Let the dish cool for a few minutes before serving. Garnish with fresh basil leaves for a lovely touch. For the full recipe, check [Full Recipe]. To stuff the shells without a mess, use a small spoon. A piping bag also works well. Fill each shell until it is just full. Don't overstuff them. This keeps the filling inside while baking. For a creamy filling, mix the ricotta cheese with the egg and spices. Use fresh mozzarella for a rich taste. Blend these together until smooth. This will help the filling stay soft and delicious. Cover the baking dish with foil while it bakes. This stops the cheese from browning too fast. After 25 minutes, take off the foil. Bake for another 10 minutes to get that golden color. To ensure cheesy goodness, add extra mozzarella on top before baking. This melts into a tasty, gooey layer. For serving, place the stuffed shells on individual plates. Drizzle extra marinara sauce around each plate. This adds color and flavor. Garnish with fresh basil leaves for a bright touch. You can also sprinkle some parmesan cheese on top. These small details make your dish look and taste great. {{image_4}} You can swap ground beef with turkey or sausage for a lighter meal. This change keeps the dish tasty while cutting down on fat. If you want to go fully vegetarian, try using mushrooms or lentils. You can also stuff the shells with spinach and ricotta for a fresh take. Both options add a nice twist and flavor. Adding spices can boost the taste. Try red pepper flakes for heat or smoked paprika for depth. You might also mix in chopped bell peppers for a crunchy texture. Switching up the cheese types can change things too. Use goat cheese for tang or feta for a salty kick. These small tweaks can make your dish unique and exciting. If you’re short on time, use an Instant Pot. Just layer the shells and sauce, and let it work its magic. A slow cooker is great for a set-and-forget meal. Simply combine everything and let it cook low and slow. If you want to save some for later, freezing works well. Stuff the shells, cover them with sauce, and freeze before baking. This way, you can enjoy a homemade meal anytime. To store your stuffed shells, let them cool first. Place them in an airtight container. This keeps them fresh and tasty. You can store them in the fridge for up to three days. If you want them to last longer, freezing is a great option. You can freeze stuffed shells both before and after baking. If you freeze them before baking, place them in a single layer on a baking sheet until firm. Then, pack them in a freezer-safe bag. If they are baked, allow them to cool completely before freezing. For the best taste, use them within three months. When it comes to reheating, you can use a microwave or an oven. The oven gives the best results, keeping the shells crispy. Preheat the oven to 350°F (175°C). Cover the dish with foil to keep them moist. Heat for about 20 minutes. If using a microwave, place a damp paper towel over the shells. This helps keep them from drying out. Remember to be gentle when handling the shells, so they stay intact. For more details on making these stuffed shells, refer to the Full Recipe. Can I make stuffed shells ahead of time? Yes, you can! Prepare the stuffed shells up to a day before. Just cover them tightly and store them in the fridge. When you are ready to bake, add a few extra minutes to the cooking time. What can I serve with stuffed shells? Stuffed shells pair well with a simple salad. A green salad with vinaigrette works great. You can also serve garlic bread on the side for a complete meal. Why did my stuffed shells break? Stuffed shells may break if they are overcooked. Cook the shells until they are just al dente. Also, be gentle when handling them. How do I keep the filling from leaking out? Make sure to fill the shells carefully. Overstuffing can cause leaks. Also, cover the shells with sauce before baking. This keeps the filling moist and secure. Are stuffed shells healthy? Stuffed shells can be part of a balanced diet. They provide carbs from pasta, protein from beef, and calcium from cheese. However, watch your portion size. Can I make a gluten-free version? Absolutely! Use gluten-free pasta shells. Most fillings are already gluten-free. Always check your sauce and cheese labels to ensure they match your needs. Stuffed shells are a fun and tasty dish. We covered the key ingredients like jumbo pasta, ground beef, and different cheeses. You learned how to prepare, fill, and bake them perfectly. Tips for storing and reheating help you enjoy leftovers later. You can even try variations to fit your taste. Remember, cooking is all about experimenting. Don’t be afraid to make it your own! Enjoy the process and share your stuffed shells with family and friends. Happy cooking!](https://tastednest.com/wp-content/uploads/2025/06/8b52d81e-f0fa-46d3-a68e-e65e92bc5409.webp)
Are you ready to impress your family with a delicious meal? My Best Stuffed Shells with Ground Beef Delight Recipe will do just that! This dish combines jumbo pasta shells, …