Skip to content
Tasted Nest
  • Home
  • Appetizers
  • Desserts
  • Salads
  • Breakfast
  • Dinner
  • Privacy Policy
  • Contact
  • About

Chef Tavio

Mediterranean Chicken Wraps Flavorful and Easy Recipe

June 3, 2025 by Chef Tavio
- Chicken and Seasonings - 2 boneless, skinless chicken breasts - 1 teaspoon garlic powder - 1 teaspoon dried oregano - 1 teaspoon paprika - 1 tablespoon extra virgin olive oil - Salt and freshly cracked black pepper, to taste - Wraps and Spreads - 4 whole wheat wraps - 1 cup creamy hummus - Fresh Vegetables and Cheese - 1 cup mixed greens (arugula and baby spinach) - 1 cucumber, thinly sliced - 1 bell pepper, thinly sliced (red or yellow) - ½ red onion, finely sliced - ¼ cup feta cheese, crumbled - 10 Kalamata olives, pitted and sliced - Juice of 1 fresh lemon - Suggested Add-Ins for Flavor - Cherry tomatoes for sweetness - Avocado slices for creaminess - Fresh herbs like parsley or dill - Alternative Spreads - Tzatziki sauce for a fresh twist - Greek yogurt mixed with herbs for a creamy option These ingredients create a burst of flavor and freshness. The chicken brings protein and pairs well with the spices. The wraps hold it all together, while fresh veggies and cheese add crunch and creaminess. Optional ingredients allow you to make the recipe your own; feel free to mix and match! You can find the Full Recipe to guide you through the cooking process. Spice Rub Preparation To start, I mix the spices in a small bowl. I use garlic powder, dried oregano, and paprika. Then, I add olive oil, salt, and black pepper. This rub will make the chicken taste great. Coating the Chicken Breasts Next, I coat the chicken breasts with the rub. I make sure to cover every part. This helps the flavor stick and ensures a tasty bite. Grilling Techniques I preheat my grill pan over medium-high heat. Once it's hot, I place the chicken breasts on it. I cook each side for about 6-7 minutes. This gives them a nice char. Checking for Doneness To know if the chicken is done, I check the internal temperature. It should reach 165°F (75°C). After cooking, I let the chicken sit for 5 minutes. This keeps it juicy. Spreading the Hummus On a flat surface, I lay out the wraps. I spread about ¼ cup of hummus on each. I leave a little edge clear for easy wrapping. Layering Ingredients I start adding the fillings. First, I place some mixed greens on the hummus. Then, I add cucumber, bell pepper, and red onion slices. I sprinkle on Kalamata olives and the sliced chicken. Finally, I finish with feta cheese. Folding and Rolling the Wraps To wrap, I fold in the sides of the wrap first. Then, I start rolling from the bottom. I keep it tight to hold the filling inside. Presentation Tips I cut the wraps in half diagonally for a nice look. They can be served right away or wrapped for later. Either way, they always look and taste delicious! For the full recipe, check out the details above. - Ensuring Juiciness To keep chicken juicy, use a meat thermometer. Cook until it hits 165°F (75°C). Letting it rest for five minutes helps keep the juices inside. This step is key to great flavor. - Flavor Enhancements Use garlic powder, dried oregano, and paprika for a tasty spice mix. Olive oil adds moisture and flavor. Adjust the salt and pepper to your taste. You can also marinate the chicken for a few hours for more depth. - Best Practices for Layering Start by spreading hummus on the wrap. Leave space around the edge for easy folding. Layer mixed greens first. Then, add cucumber, bell pepper, and onion. Place the chicken strips last, topped with feta. This keeps the wrap neat and tasty. - Making It a Meal Add a side salad or some fruit to make it a full meal. You can also serve these wraps with a yogurt dip or extra hummus. This adds variety and makes your meal more filling. For the full recipe, check out the Mediterranean Chicken Wraps recipe. {{image_4}} What can you use instead of chicken? You can try turkey, shrimp, or lamb. Each option brings a unique taste. For a vegetarian twist, use chickpeas or grilled tofu. These will make your wraps hearty and full of flavor. How can you make your wraps spicy or sweet? Add some chili flakes or a dash of hot sauce for heat. If you prefer sweet, try adding honey or a sweet chili sauce. Both will change the flavor profile nicely. What herbs or spices can you swap? Instead of oregano, use thyme or basil for a different taste. You can also try cumin or coriander for a warm, earthy flavor. Mixing these spices can take your wraps to the next level. Check out the Full Recipe for more ideas on making your Mediterranean chicken wraps unique and exciting! To keep your Mediterranean chicken wraps fresh, follow these simple steps: - Refrigeration Guidelines: Place any leftover wraps in an airtight container. They can last in the fridge for up to 3 days. If you want to enjoy them later, make sure to store them without the toppings to maintain their crunch. - Freezing Instructions: If you plan to store them for a longer time, wrap each one in plastic wrap and then in foil. Place the wrapped wraps in a freezer bag. They can stay frozen for up to 2 months. When you’re ready to eat, thaw them in the fridge overnight. To enjoy your wraps again, here are the best ways to reheat: - Best Methods for Retaining Texture: The oven works great for reheating. Preheat your oven to 350°F (175°C). Place the wrap on a baking sheet and cover it with foil. Heat for about 10-15 minutes. This method keeps the wrap crispy. You can also use a non-stick skillet over low heat. Cook for about 3-4 minutes on each side. This way, the chicken stays juicy and the wrap doesn't get soggy. Using these storage and reheating tips will help you enjoy your Mediterranean chicken wraps longer and keep them delicious! If you're looking for the full recipe, check out the full recipe section above. You can use several spreads if you lack hummus. Here are some great options: - Tzatziki sauce: This creamy, yogurt-based dip adds a nice tang. - Baba ganoush: A smoky eggplant spread that pairs well with chicken. - Avocado spread: Creamy and rich, it offers healthy fats and flavor. - Cream cheese: For a different angle, try a flavored cream cheese. These spreads can bring their own unique taste to your wraps. Yes, you can prep these wraps ahead. Here’s how: - Assemble the wraps, but do not add lemon juice yet. - Wrap them tightly in plastic wrap or foil. - Place them in the fridge for up to 24 hours. This method keeps the wraps fresh. When you're ready to eat, add the lemon juice just before serving. This keeps the flavors bright and tasty. To make a complete meal, consider these tasty side dishes: - Greek salad: Fresh veggies and feta make for a crunchy side. - Roasted vegetables: Zucchini, eggplant, or bell peppers work well. - Quinoa salad: A light, protein-packed option with herbs and lemon. - Pita chips with dip: Crunchy chips with tzatziki or baba ganoush add flavor. These sides complement the wraps and enhance your meal experience. For the full recipe, check the details above. This blog post covered how to make tasty Mediterranean chicken wraps. You learned about essential and optional ingredients, step-by-step cooking instructions, helpful tips for perfecting your wraps, and how to store leftovers. Experiment with different proteins and flavors to make these wraps your own. Finally, enjoy these easy wraps as a quick meal or snack. Now, go ahead and make your wraps delicious!

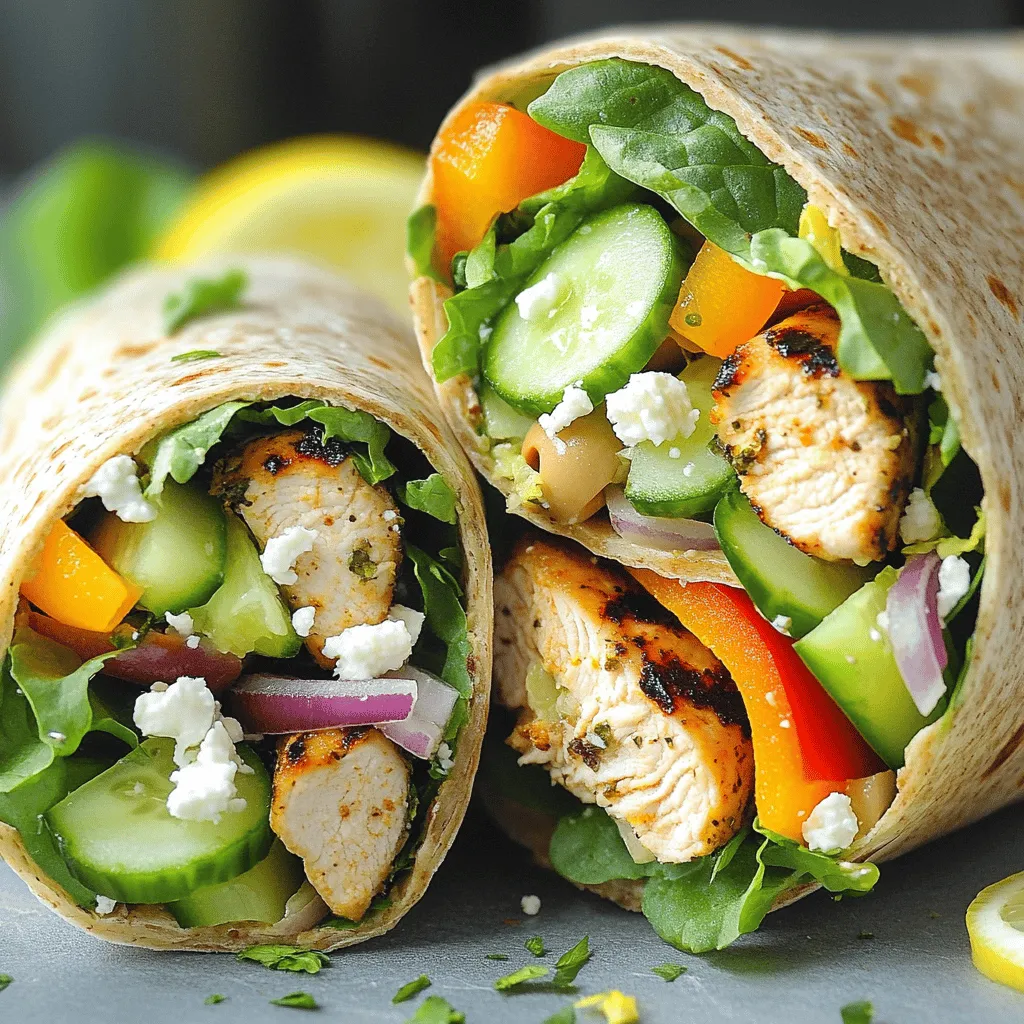
If you’re craving a quick, tasty meal, look no further than these Mediterranean Chicken Wraps! This easy recipe packs bold flavors into each bite. Fresh chicken, vibrant veggies, and smooth …

Read more

Categories Dinner

Easy Frito Corn Salad Quick and Tasty Recipe

June 3, 2025 by Chef Tavio
To make a tasty Frito Corn Salad, gather these simple ingredients: - 2 cups fresh corn (or canned, drained) - 1 cup cherry tomatoes, cut in half - 1 cup mixed-color bell peppers, diced - 1 small red onion, finely chopped - 1 cup shredded sharp cheddar cheese - 1 cup Fritos corn chips - 1/2 cup sour cream - 1/4 cup mayonnaise - 1 tablespoon lime juice - 1 teaspoon chili powder - Salt and freshly cracked pepper to taste - Fresh cilantro, chopped (for garnish, optional) These ingredients blend together to create a fresh and crunchy salad. You can use fresh corn when it's in season for the best flavor. Canned corn works too and saves time. I love adding cherry tomatoes for a sweet touch. Mixed bell peppers add color and crunch, while red onion gives a slight bite. Cheddar cheese makes it rich and creamy. The Fritos add a fun crunch that contrasts with the soft veggies. The dressing combines sour cream and mayonnaise for creaminess, with lime juice and chili powder for zing. You can adjust salt and pepper to taste. If you want, sprinkle cilantro on top for a fresh finish. For the full recipe, check back on the instructions later. Enjoy creating this delightful dish! - Step 1: Mixing the Fresh Ingredients Start with a large bowl. Add 2 cups of fresh corn, or canned corn if you prefer. Next, add 1 cup of halved cherry tomatoes, 1 cup of diced bell peppers, and 1 small chopped red onion. Mix them gently with a spatula until everything is well combined. - Step 2: Adding Cheese to the Mixture Now, sprinkle 1 cup of shredded sharp cheddar cheese on top of your mixture. Stir it again to ensure the cheese spreads evenly throughout the salad. This adds a creamy texture and a rich flavor. - Step 3: Creating the Creamy Dressing In a separate bowl, mix together 1/2 cup of sour cream, 1/4 cup of mayonnaise, 1 tablespoon of lime juice, and 1 teaspoon of chili powder. Add a pinch of salt and some freshly cracked pepper. Whisk these until smooth. This dressing ties all the flavors together. - Step 4: Folding in the Dressing Pour your creamy dressing over the corn and veggie mix. Use a spatula to fold it in gently. Make sure every bit of the salad gets coated in that delicious dressing. - Step 5: Adding Fritos Right Before Serving Just before you serve, add 1 cup of Fritos corn chips to the salad. Toss them lightly to mix. This keeps them crunchy and adds a fun texture to your dish. - Step 6: Final Seasoning Adjustments Taste your salad. If it needs more flavor, add a little more salt, pepper, or lime juice. Adjust it to your liking for the best taste. - Step 7: Garnishing Options For a pretty finish, garnish your salad with freshly chopped cilantro, if you like. It adds a pop of color and a fresh flavor. Serve it right away for the best texture and taste! You can find the full recipe for Fabulous Frito Corn Salad in the earlier sections of this article. Enjoy making this quick and tasty dish! - Alternatives for Fresh Corn If you can't find fresh corn, use canned corn. Just drain it well. Frozen corn is another good choice. Thaw it and drain before using. Both options keep the salad tasty. - Vegan Dressing Options For a vegan salad, swap sour cream with cashew cream or vegan mayo. Use a splash of lime juice for a fresh kick. These options still make the salad creamy and delicious. - Best Pairings for Frito Corn Salad This salad pairs well with grilled meats, like chicken or steak. It also goes great with tacos or burgers. The crunch of Fritos adds a fun texture to any meal. - Ideal Serving Dishes Serve your salad in a big, clear bowl. This shows off the colorful veggies. A rustic wooden bowl adds a nice, homey touch. - Making Ahead of Time You can prepare the salad a few hours before serving. Just mix everything but the Fritos. Add them right before serving to keep them crunchy. - Quick Serving Ideas For a fast meal, serve this salad in wrap sandwiches. Just scoop some salad onto a tortilla and wrap it up. It's a fun way to eat! {{image_4}} You can make your Frito corn salad spicy by adding jalapeños or hot sauce. Just chop fresh jalapeños and mix them in. If you prefer, drizzle some hot sauce into the creamy dressing. This will give your salad a nice kick without overpowering the other flavors. Adjust the amount based on how spicy you like your food. For a Southwest twist, add black beans and avocado. Black beans add protein and fiber, making the salad heartier. Diced avocado brings creaminess that pairs well with the crunch of Fritos. This variation not only tastes great but also boosts the nutrition of the dish. You can enhance your salad with other crunchy snacks or different cheeses. Try adding tortilla chips for extra crunch. You can also use feta or pepper jack cheese instead of cheddar for a different flavor. Experiment with what you have on hand. Each addition can bring a new taste to this fun salad. For the full recipe, check out the [Full Recipe]. To keep your Frito Corn Salad fresh, store it in an airtight container. This helps keep moisture out and flavor in. Place the salad in the fridge right after serving. Make sure the Fritos are added only when you serve it. This keeps them crunchy and tasty. Frito Corn Salad lasts about 3 days in the fridge. After that, it may lose its flavor and texture. If you notice any odd smells or changes in color, it’s best to throw it away. Always trust your senses! You don’t need to reheat Frito Corn Salad. If you want it warm, heat the corn separately. Mix it back into the salad once it cools down. Remember, keep the Fritos out until you are ready to eat. This keeps them crunchy and fun to munch! Can I use frozen corn instead of fresh? Yes, you can use frozen corn. Just thaw it before mixing. Frozen corn tastes sweet and works well. How do I make this recipe gluten-free? To make it gluten-free, use gluten-free Fritos. Check the label to be sure. The rest of the ingredients are naturally gluten-free. Can I prepare this salad a day in advance? You can prepare the salad a day ahead, but add Fritos right before serving. This keeps them crunchy and fresh. Is Frito Corn Salad healthy? Frito Corn Salad has some healthy ingredients, like corn and veggies. However, it is rich in calories due to cheese and dressing. What are the nutritional benefits of this salad? This salad provides fiber from corn and vitamins from veggies. It also has protein from cheese. Enjoy it in moderation for balanced nutrition. How many people does this recipe serve? This recipe serves about 4 to 6 people. Perfect for a small gathering or side dish. Can I adjust the serving size easily? Yes, you can easily double or halve the recipe. Just keep the ingredient ratios the same for best results. For the full recipe, check above. In this blog post, we explored how to make a delicious Frito Corn Salad. We covered essential ingredients, step-by-step instructions, and helpful tips. You can enjoy this dish with many variations, ensuring everyone loves it. Remember to store leftovers properly for the best taste. With simple swaps and smart preparation, you can make this salad a hit at any gathering. Dive in and share your culinary creations!

Looking for a quick and tasty dish that everyone will love? You’ve found it! My Easy Frito Corn Salad is perfect for parties, picnics, or just a simple meal at …

Read more

Categories Salads

Delicious Mississippi Mud Potatoes Simple and Tasty Dish

June 3, 2025 by Chef Tavio
- 4 large russet potatoes - 1 cup sour cream - 1 cup shredded sharp cheddar cheese - 4 tablespoons unsalted butter, melted - 1/2 cup green onions, finely chopped - 1/4 cup crispy bacon bits (optional) - 1/2 teaspoon garlic powder - 1/2 teaspoon smoked paprika - Salt and freshly ground black pepper to taste - 1 cup mini marshmallows - 1/2 cup semi-sweet chocolate chips The main star of this dish is the russet potatoes. Their starchy texture makes them perfect for baking. Sour cream gives a tangy taste and creamy texture. Sharp cheddar cheese adds a rich, bold flavor. Green onions bring a fresh crunch, while crispy bacon bits add savory goodness. The mini marshmallows and chocolate chips create that famous "mud" aspect. They melt beautifully, adding sweetness and richness. Each bite combines creamy, savory, and sweet flavors. This dish is a fun twist on traditional baked potatoes. When choosing russet potatoes, look for ones that feel firm and heavy. Avoid any with soft spots or blemishes. For green onions, select bright green tops and crisp stems. Check that there is no wilting or yellowing. For sour cream, go with a brand you trust; fresh is key. The cheddar cheese should be sharp for the best flavor. If you opt for bacon, choose a brand that offers good quality. When it comes to mini marshmallows and chocolate chips, select ones that have no added colors or flavors. Fresh ingredients make this dish truly shine! First, wash and scrub the russet potatoes. You want to get all the dirt off. Next, use a fork to poke holes in each potato. This lets steam escape while they bake. Now, set your oven to 375°F (190°C) to preheat. Place the potatoes directly on the oven rack. Bake them for 45 to 60 minutes. You know they are ready when they feel soft when poked with a fork. While the potatoes bake, prepare the topping mixture. In a bowl, whisk together the sour cream, melted butter, shredded cheese, and chopped green onions. Add bacon bits if you like. Stir in garlic powder, smoked paprika, salt, and pepper. Once the potatoes cool for about 5-10 minutes, cut each one in half lengthwise. Scoop out the inside, leaving a thin layer. Mix the scooped potato with your topping. Spoon it back into the skins. Finally, sprinkle mini marshmallows and chocolate chips on top. Place the filled potatoes back in the oven for 15 to 20 minutes. This gives the marshmallows a golden brown look. For the full recipe, you can check back at the top. Enjoy your tasty Mississippi Mud Potatoes! To make your Mississippi Mud Potatoes shine, focus on the texture. The potatoes should be soft on the inside but have a slight crisp on top. Bake them until they are tender. You want to scoop the flesh gently, leaving a thin layer. This keeps them sturdy for filling. When mixing the potato flesh with the other ingredients, blend until smooth. This blend creates that creamy, dreamy texture. I see a few common mistakes when people make these potatoes. First, don’t skip piercing the potatoes before baking. This step helps steam escape. If you forget, they can burst in the oven. Second, make sure you let the potatoes cool before scooping. Hot potatoes can be hard to handle. Lastly, don’t skip the final bake. That step gives a nice finish to the marshmallows and chocolate. Serve your Mississippi Mud Potatoes warm for the best taste. You can dress them up with fresh chives or a drizzle of balsamic glaze. This adds a nice pop of color and extra flavor. For a fun twist, pair them with a side salad or crispy vegetables. They make a great dish for gatherings or family dinners. You can find the full recipe at the end to try these tips today! {{image_4}} You can easily make Mississippi Mud Potatoes vegetarian or vegan. To go vegetarian, simply leave out the bacon bits. For a vegan twist, swap the sour cream with a plant-based yogurt. Use vegan cheese to keep the creamy texture. This way, you can enjoy the same rich flavors without any animal products. Toppings can change the whole dish. Instead of mini marshmallows, try using crushed graham crackers for a crunch. You can also add chopped nuts or a drizzle of caramel sauce. These toppings give a new twist and keep things exciting. Feel free to mix and match different toppings to find your favorite combo. Changing spices can add a new flavor layer to your potatoes. For a spicy kick, add some diced jalapeños or a dash of cayenne pepper. If you want a smoky flavor, try smoked cheese instead of cheddar. Adding herbs like thyme or rosemary can also enhance the taste, bringing a fresh note to the dish. Explore these tweaks to create a Mississippi Mud Potato dish that’s truly your own. For the full recipe, check out the complete guide. To store your Mississippi Mud Potatoes, let them cool completely first. Place any leftovers in an airtight container. This helps keep the dish fresh. Store them in the fridge for up to three days. If you want to enjoy them later, freezing is a great option. When you're ready to eat your leftovers, preheat your oven to 350°F (175°C). Place the potatoes on a baking sheet. Cover them with foil to keep them moist. Bake for about 20-25 minutes, or until they are heated through. You can also use a microwave for quicker reheating. Heat each potato half for about 1-2 minutes. Check if they are warm enough before serving. If you want to freeze the Mississippi Mud Potatoes, do this right after they cool. Wrap each potato tightly in plastic wrap before placing them in a freezer bag. They can last up to three months in the freezer. To use, thaw them in the fridge overnight. Then follow the reheating instructions to enjoy them again! Mississippi Mud Potatoes are a fun and tasty dish. They are baked potatoes filled with creamy toppings. You mix sour cream, cheese, and green onions with the potato flesh. Then, you top them with mini marshmallows and chocolate chips. The result is a sweet and savory treat that many love. This dish adds a twist to the classic potato, making it a hit at gatherings. Yes, you can prepare Mississippi Mud Potatoes ahead of time. Bake the potatoes and prepare the filling. Once cooled, fill the potato halves and cover them. Store them in the fridge for up to two days. When ready to serve, just bake them again to warm and toast the toppings. This makes it easy to enjoy a delicious meal without much fuss. Adjusting the serving size is simple. If you want to make more or fewer potatoes, change the number of russet potatoes. For example, use two potatoes for two servings or eight for eight servings. Also, adjust the other ingredients based on the number of potatoes you use. Keep the proportions the same for the best flavor. This way, you can easily serve your guests or family. For the complete recipe, check out the Full Recipe section. This post covered everything you need for Mississippi Mud Potatoes. We talked about ingredients, step-by-step instructions, and storage tips. I shared tricks to perfect the texture and avoid common mistakes. You can also explore variations for different diets. These choices make the dish fun and flexible. Now, you can confidently prepare and enjoy this recipe. Keep these tips in mind for tasty results. Happy cooking!

If you’re craving a dish that’s simple yet bursting with flavor, you’ll love Mississippi Mud Potatoes. This recipe combines creamy potatoes with rich toppings to create a hearty meal your …

Read more

Categories Dinner

Greek Chicken Gyro Flavorful and Simple Recipe Guide

June 3, 2025 by Chef Tavio
- 2 large chicken breasts, thinly sliced - 2 tablespoons olive oil - 2 teaspoons dried oregano - 1 teaspoon garlic powder - 1 teaspoon smoked paprika - Salt and freshly ground pepper to taste - 4 whole wheat pita breads - 1 cup Greek yogurt - 1 tablespoon fresh lemon juice - 1 tablespoon fresh dill, finely chopped - 1 cucumber, diced - 1 ripe tomato, diced - 1/2 red onion, thinly sliced The base of the gyro starts with chicken breasts. I like to slice them thin to help them cook quickly. Marinating the chicken in olive oil, dried oregano, garlic powder, and smoked paprika adds great flavor. Don't forget to season with salt and pepper. This mix makes the chicken juicy and tasty. Whole wheat pita breads are essential. They hold everything together and give a nice chewy texture. Next, we need toppings. Fresh veggies like cucumber, tomato, and red onion add crunch and color. Tzatziki sauce is a must-have. Made with Greek yogurt, lemon juice, dill, and cucumber, it cools down the spices in the chicken. It’s creamy and refreshing. - Crumbled feta cheese - Fresh parsley leaves, for garnish For extra flavor, consider adding feta cheese. It offers a nice salty kick. Fresh parsley makes a great garnish. It adds a pop of color and freshness. Check out the Full Recipe for more details on how to put this all together. To start, you need to prepare the chicken marinade. Take 2 large chicken breasts and slice them thinly. In a mixing bowl, add the chicken slices. Then, pour in 2 tablespoons of olive oil, 2 teaspoons of dried oregano, 1 teaspoon of garlic powder, and 1 teaspoon of smoked paprika. Add salt and pepper to taste. Mix until the chicken is well coated. Cover the bowl and refrigerate for at least 30 minutes. Marination is key. It makes the chicken flavorful and tender. Now, it’s time to cook the chicken. Preheat your grill or grill pan over medium-high heat. Once hot, place the marinated chicken on the grill. Cook each side for about 5-7 minutes. You want a lovely golden brown color. This char adds flavor. After cooking, let the chicken rest on a plate. Resting helps the juices stay inside, making each bite juicy. While the chicken rests, let's make the tzatziki sauce. In a small bowl, mix 1 cup of Greek yogurt, 1 tablespoon of fresh lemon juice, and 1 tablespoon of finely chopped dill. Add a pinch of salt. Now, dice 1 cucumber and mix it in. Taste the sauce and adjust the seasoning if needed. The tzatziki should be creamy and refreshing. To assemble your gyros, warm 4 whole wheat pita breads. You can heat them on the grill for about 1 minute on each side. This makes them pliable. Take a warm pita and layer grilled chicken slices in the center. Add diced tomatoes, thinly sliced red onions, and a dollop of tzatziki sauce. If you like feta, sprinkle some crumbled feta on top. Garnish with fresh parsley leaves for color. Fold the pita over the filling to create a pocket. Wrap it in parchment paper for easy handling. Enjoy your Greek Chicken Gyro! For the full recipe, check the earlier section. Grilling chicken for gyros is simple. Here are some best practices: - Marinate the chicken: Let it soak in flavors for at least 30 minutes. - Use medium-high heat: This helps the chicken cook evenly and get nice grill marks. - Avoid overcrowding: Cook in batches if needed, so the chicken sears instead of steaming. If you want alternatives, try pan-searing or baking the chicken. Use a heavy skillet for pan-searing. Bake it at 400°F (200°C) until cooked through, about 20-25 minutes. Spices can elevate your gyro's taste. Here’s how: - Use dried oregano: It’s a classic for Greek dishes. It packs a punch of flavor. - Add smoked paprika: This gives a subtle smokiness that enhances the chicken. - Salt: Don't skip it! It elevates all the flavors. Fresh herbs also boost taste. Use chopped dill in your tzatziki. Add parsley for garnish. Both add bright notes that balance the richness of the chicken. Plating is key to making your gyros look appealing. Here are some tips: - Layer the ingredients: Start with chicken, then add veggies and tzatziki. - Use colorful plates: A vibrant plate makes the meal pop. - Serve on a wooden board: This adds a rustic touch. For sides, pair with Greek salad or roasted veggies. These add color and nutrition, completing your meal beautifully. For an extra touch, serve with extra tzatziki and lemon wedges. For the full recipe, check out the [Full Recipe]. {{image_4}} You can switch up the protein in your Greek chicken gyro easily. Instead of chicken, try using lamb or beef. Both meats bring rich flavors and pair well with the spices. This change can give your gyro a whole new twist. If you want a vegetarian option, falafel works great. These crispy chickpea balls are full of flavor. They make a tasty and filling gyro. Simply swap the grilled chicken for falafel. You won’t miss the meat! Tzatziki is a star in this dish, but you can customize it. For those who need dairy-free options, try using cashew or coconut yogurt. These alternatives still give a creamy texture. They add a unique twist to the traditional sauce. You might also explore regional variations. Some areas in Greece add mint or garlic to tzatziki. Each version has its charm, so feel free to experiment. This sauce is all about personal taste! To make your meal complete, pair your gyro with sides. A fresh Greek salad adds crunch and color. Roasted vegetables also make a great side. Their warm flavors complement the gyro. Think about creating a full Mediterranean meal. Serve hummus and pita on the side for a fun touch. You could also add some olives for a briny bite. Each side enhances the flavors of your gyro, making it a feast! For the complete recipe, check out the Full Recipe section. To keep your gyros fresh, store them properly. Place the leftover chicken and toppings in separate airtight containers. This way, the pita stays soft, and the toppings stay crisp. - For chicken, use it within 3 to 4 days in the fridge. - Tzatziki sauce lasts about 3 days too. Always check for any signs of spoilage before eating. Reheating gyros takes care. Use the oven or stovetop for the best results. The microwave can make the pita tough, which we want to avoid. - To reheat chicken, place it in a skillet over low heat. Stir occasionally until heated through. - For extra safety, ensure the chicken reaches 165°F again before serving. Remember, the goal is to keep the tasty texture while enjoying your meal again! A Greek Chicken Gyro is a popular dish from Greece. It features grilled chicken served in pita bread. The word "gyro" means "turn" in Greek and refers to the rotation of meat on a vertical rotisserie. Traditionally, it can use lamb or pork, but chicken is a lighter option. Gyros are often topped with fresh vegetables and a creamy sauce called tzatziki. This dish is loved worldwide for its bold flavors and ease of eating. Yes, you can make Greek Chicken Gyros in advance. Marinate the chicken the night before for best flavor. Cook the chicken and store it in the fridge. You can also prepare the tzatziki sauce ahead of time. Just keep it in an airtight container. When you're ready to serve, warm the pita and assemble the gyros. This makes mealtime quick and easy! You can add many tasty toppings to your gyros. Here are some popular options: - Diced cucumbers - Chopped tomatoes - Sliced red onions - Crumbled feta cheese - Fresh parsley - Sliced olives Feel free to mix and match based on your taste! This customization adds fun and flavor. You can lighten up this recipe without losing flavor. Here are some tips: - Use skinless chicken breasts for less fat. - Replace regular yogurt with low-fat Greek yogurt. - Add more veggies for crunch and nutrition. - Opt for whole wheat pita for added fiber. These simple changes keep your gyros tasty and healthy. You can find authentic Greek Chicken Gyros at many places. Look for local Greek restaurants or food trucks. They often serve gyros made with traditional methods. If you travel, Greece has many street vendors selling gyros. They make delicious, fresh gyros right before your eyes. Check online reviews to find popular spots near you! To sum up, we explored how to make delicious Greek Chicken Gyros. You learned about the key ingredients, including chicken, pita, and tzatziki. I shared cooking steps, tips for flavor, and how to present your meal. We discussed protein options and storage tips. With this knowledge, you can easily create an impressive dish. Enjoy your cooking journey, and don't hesitate to get creative!

Are you ready to dive into the delicious world of Greek cuisine? My simple guide to making Greek Chicken Gyros is here to help you create this flavorful dish right …

Read more

Categories Dinner

Easy Cheesy Chicken Garlic Wraps Quick and Tasty Meal

June 3, 2025 by Chef Tavio
To make these tasty wraps, you need a few key ingredients. These include: - 2 cups cooked chicken, thoroughly shredded - 1 cup sharp cheddar cheese, finely shredded - 1/2 cup cream cheese, softened to room temperature - 2 cloves fresh garlic, finely minced - 1/4 cup fresh parsley, finely chopped - 1 teaspoon smoked paprika - 4 large flour tortillas (8-10 inches in diameter) - Salt and freshly ground black pepper to taste - Olive oil, for grilling These ingredients blend well, creating a rich, cheesy flavor. You can change the taste with some optional ingredients. Here are a few ideas: - Diced bell peppers for crunch - Jalapeños for heat - Spinach for added nutrients - Different herbs, like basil or cilantro Feel free to mix and match based on what you like. Choosing the right tortilla makes a big difference. I recommend: - Large flour tortillas for a soft wrap - Whole wheat tortillas for a healthy twist - Spinach or sun-dried tomato tortillas for extra flavor Using different tortillas can make your wraps more fun. Try what you enjoy best. If you want the complete recipe, check out the Full Recipe section. To make Easy Cheesy Chicken Garlic Wraps, start by gathering your ingredients. You need cooked chicken, cheddar cheese, cream cheese, garlic, parsley, smoked paprika, and tortillas. 1. Mix the Filling: In a large bowl, combine the shredded chicken, cheddar cheese, cream cheese, minced garlic, chopped parsley, and smoked paprika. 2. Season It: Add salt and pepper to taste. Mix well until all ingredients blend together nicely. Now, it’s time to wrap and cook. This part is easy and fun! 1. Prepare the Tortilla: Lay one flour tortilla flat. Spoon about 1/4 of the chicken mixture into the center. 2. Wrap It Up: Fold the sides inward and roll from the bottom to the top. Make sure the filling stays inside. 3. Repeat: Do this for the rest of the tortillas and filling. Place them seam-side down on a plate. 4. Heat the Skillet: In a non-stick skillet, drizzle a bit of olive oil and heat it over medium. 5. Cook the Wraps: Place each wrap seam-side down. Cook for 3-4 minutes until golden brown. Flip and cook the other side. Serving is just as important as cooking. Here’s how to make your wraps look great: - Slice the Wraps: After resting for a minute, slice each wrap in half diagonally. - Garnish: Arrange the slices on a colorful platter. - Add Dips: Serve with ranch dressing or garlic dip for extra flavor. This will make your meal not just tasty, but also beautiful. For the full recipe, check out the other sections of this article! To keep your wraps crispy, use a few simple tricks. First, make sure your chicken is fully cooked and cooled before mixing it with the cheese and other ingredients. Warm or hot chicken can create steam, making the wraps soggy. Also, avoid adding too much cream cheese or liquid ingredients. A thick chicken mixture will hold together better. Finally, when grilling, use medium heat. High heat can burn the wraps before they become crispy. Meal prep can save time and make cooking easy. Prepare the chicken mixture in advance and store it in the fridge for up to three days. You can also assemble wraps and freeze them. Wrap each one tightly in plastic wrap or foil to prevent freezer burn. When ready to eat, just thaw and grill them as needed. This method makes it easy to enjoy a quick meal any day. Want to kick up the flavor? Here are a few ideas. Add spices like cayenne pepper or chili powder for heat. Mix in chopped sun-dried tomatoes or olives for a tasty twist. For a fresh touch, try adding fresh spinach or arugula. You can also switch cheeses; pepper jack adds a nice kick, while mozzarella gives a milder taste. Each of these options can bring new life to your Easy Cheesy Chicken Garlic Wraps. {{image_4}} If you want a veggie option, use cooked mushrooms or roasted veggies instead of chicken. You can also try black beans or chickpeas for protein. These choices keep the dish hearty and satisfying. Adding spinach or kale can boost the nutrients too. These swaps help everyone enjoy the wraps. Cheese makes these wraps cheesy and delicious. If you want something different, try mozzarella for a milder taste. You can also use pepper jack for a spicy kick. Creamy goat cheese adds a unique flavor, while feta brings a tangy twist. Mixing different cheeses can create fun flavors. To change the heat, add more spices. Use cayenne pepper or chili powder for a spicy version. If you prefer mild, stick with the smoked paprika in the recipe. Fresh herbs, like basil or cilantro, can brighten the wraps. Experiment with garlic powder or onion powder for depth. These adjustments let you make the wraps your own. For the full recipe, check out the [Full Recipe] section. To keep your leftover wraps fresh, wrap them tightly in plastic wrap or foil. You can also use an airtight container. Store them in the fridge for up to three days. This helps maintain their taste and texture. Reheat your wraps in a skillet for the best results. Heat a non-stick skillet over medium-low heat. Place the wrap in the skillet for about 3-4 minutes on each side. This method keeps them crispy. You can also use a microwave, but they may turn soggy. If you use the microwave, heat for 30 seconds at a time until warm. You can freeze the wraps for quick meals later. First, let them cool completely. Wrap each one in plastic wrap, then place them in a freezer-safe bag. They can last up to three months in the freezer. When you're ready to eat, thaw them in the fridge overnight and reheat as described above. This way, you always have a tasty meal on hand! For the full recipe, check the details above. You can serve these wraps with many sides. Try fresh salad for crunch. Chips or fries add a nice touch. A bowl of salsa or guacamole adds flavor. You can also pair them with a creamy ranch dressing or a homemade garlic dip. These sides make the meal even more fun! Yes, you can prepare these wraps ahead of time. Just assemble them but don’t cook yet. Wrap them in plastic wrap and store in the fridge. They stay fresh for up to 24 hours. When you’re ready, just grill them until golden brown. This saves time on busy days. You can swap the chicken for cooked turkey or shredded beef. If you want a vegetarian option, try beans or roasted veggies instead. Use any cheese you like, such as mozzarella or pepper jack. Adjust the spices based on your taste. These changes keep the recipe fun and fresh. Absolutely! Kids usually love cheesy wraps. They are easy to hold and eat. You can adjust the garlic to be less strong if needed. Add extra cheese or their favorite veggies for more flavor. This makes it a great meal for the whole family. You can get creative with the filling! Add chopped bell peppers, spinach, or corn for extra veggies. Try different herbs like basil or cilantro for a fresh taste. You can also add different spices, like cumin or chili powder, for a kick. Make it your own! You can find the full recipe in the article above. It has all the details you need to make these Easy Cheesy Chicken Garlic Wraps. Enjoy the cooking process and the tasty results! In this article, we explored simple recipes for Easy Cheesy Chicken Garlic Wraps. We covered essential ingredients, cooking steps, and tips to avoid soggy wraps. You learned how to customize flavors and store leftovers. These wraps are quick, tasty, and perfect for anyone. Remember, you can change them to fit your taste and needs. Enjoy making and sharing these delicious wraps!

Looking for a quick and tasty meal? Easy Cheesy Chicken Garlic Wraps are perfect! You can whip them up in no time, using simple ingredients you probably already have. In …

Read more

Categories Dinner

White Chocolate Brownies Delightful Dessert Recipe

June 3, 2025 by Chef Tavio
To make white chocolate brownies, you need some key ingredients. Here’s what you’ll need: - 1 cup (226g) unsalted butter - 1 cup (200g) granulated sugar - 2 large eggs - 1 teaspoon pure vanilla extract - 1 cup (125g) all-purpose flour - 1/2 teaspoon baking powder - 1/4 teaspoon salt - 1 cup (180g) white chocolate chips - 1/2 cup (75g) chopped macadamia nuts (optional) Each ingredient plays a big role. The butter adds richness. Sugar gives sweetness. Eggs bind everything together. Vanilla adds flavor. Flour gives structure. Baking powder helps the brownies rise. Salt enhances taste. White chocolate chips bring creaminess. Macadamia nuts add crunch. If you don’t have an ingredient, don’t worry! Here are some easy substitutes: - Use margarine or coconut oil for butter. - Brown sugar can replace granulated sugar. - Flax eggs or applesauce can replace regular eggs for a vegan version. - Almond flour works as a gluten-free option for all-purpose flour. - You can use any chocolate chips if you don’t have white ones. These swaps can change the taste and texture, so try them out! Want to make your brownies even better? Consider these add-ins: - Chopped walnuts or pecans for added crunch. - Dried cranberries or cherries for a fruity twist. - A pinch of sea salt on top for contrast. - Swirls of peanut butter or Nutella for a rich flavor. These options let you personalize your brownies. Get creative and have fun! For the full recipe, check out the next section. To bake white chocolate brownies, start with some simple steps. First, preheat your oven to 350°F (175°C). Grab an 8x8-inch baking pan. Lightly grease it and line it with parchment paper. Leave some paper hanging over the edges. This will help you lift the brownies out later. Next, melt 1 cup of unsalted butter in a medium saucepan. Do this over low heat. Stir it often until it melts completely. Once melted, take it off the heat. Now, add 1 cup of granulated sugar to the melted butter. Stir it well until the mixture looks smooth. This helps the sugar dissolve, making your brownies nice and chewy. Crack two large eggs into the bowl, one at a time. Mix well after each egg. Add 1 teaspoon of pure vanilla extract and stir until everything is blended. In another bowl, sift together 1 cup of all-purpose flour, 1/2 teaspoon of baking powder, and 1/4 teaspoon of salt. Slowly mix the dry ingredients into the wet ones. Use a spatula and be gentle. Don’t overmix or you might end up with tough brownies. Fold in 1 cup of white chocolate chips. If you want, add 1/2 cup of chopped macadamia nuts for some extra crunch. Make sure they are spread evenly in the batter. Pour the brownie batter into the prepared pan. Use your spatula to smooth the top. This makes them bake evenly. Put the pan in your preheated oven. Bake for about 25-30 minutes. To check if they are done, insert a toothpick in the center. It should come out with a few moist crumbs. This means they are perfectly baked. Let the brownies cool in the pan for about 15 minutes. After cooling, use the parchment paper to lift them out. Place them on a wire rack to cool completely. Using parchment paper is key for easy brownie removal. It also helps to line the pan. This way, you won’t need to grease it too much. Just a light coat on the bottom and sides will do. Make sure to leave some paper sticking out. This gives you a handle to pull the brownies out. Mixing is crucial for the texture of your brownies. When combining wet and dry ingredients, fold gently. This keeps them from getting tough. Use a spatula to mix in the flour. Do not mix too much. You just want to see no dry flour. When adding chocolate chips, fold them in carefully. This ensures they distribute evenly without breaking apart. Enjoy the process, and soon you’ll have delicious white chocolate brownies to share! One mistake I see often is overmixing the batter. This can make the brownies tough. Mix until just combined for a light texture. Another issue is not measuring ingredients correctly. Use a scale for precision. Also, don’t skip preheating your oven. Baking in a cold oven can ruin your brownies. For soft, chewy brownies, use good quality white chocolate. Melted butter helps create a rich flavor. Let the brownies cool in the pan before cutting. This helps them set properly. If you want a fudgier texture, bake for a shorter time. Aim for that perfect balance of soft and firm. Store your brownies in an airtight container. This keeps them fresh for up to a week. You can also refrigerate them to extend their life. If you want to freeze them, wrap each piece in plastic wrap. Then place them in a freezer bag. They can last for up to three months this way. {{image_4}} You can change the flavor of your white chocolate brownies easily. Think about using dark chocolate instead of white. This swap brings a rich, deep taste. You might also add a splash of orange or almond extract for a twist. Try mixing in flavored chocolate chips, like raspberry or mint, for fun surprises in every bite. Want gluten-free brownies? Use a gluten-free flour blend in place of all-purpose flour. Check the label to ensure it works in baking. For a vegan version, replace the eggs with 1/4 cup unsweetened applesauce or flax eggs. Use dairy-free white chocolate chips to keep it vegan. These options let everyone enjoy this sweet treat. Mix-ins can make your brownies unique. Try adding chopped fruit like strawberries or cherries for a burst of flavor. Nuts, like walnuts or pecans, add crunch and richness. For toppings, drizzle melted chocolate on top or sprinkle sea salt for a sweet-salty mix. You can even add shredded coconut for a tropical touch. Explore different combinations to find your favorite mix. You can store white chocolate brownies in an airtight container. Keep them at room temperature for up to three days. If you want them to last longer, place them in the fridge, where they can stay fresh for up to a week. Just remember to let them warm up a bit before enjoying! Yes, you can freeze white chocolate brownies! First, cut them into squares. Wrap each piece tightly in plastic wrap. Then, place them in a freezer bag or an airtight container. They can stay frozen for up to three months. When you're ready to eat them, let them thaw in the fridge overnight. If you need a substitute for white chocolate, you can use butterscotch chips. They add a sweet flavor similar to white chocolate. You can also try using vanilla-flavored candy melts for a different twist. If you want to skip chocolate entirely, try adding chopped dried fruits or nuts for a tasty texture! For the full recipe, check out the detailed instructions above. These brownies are rich and creamy. They melt in your mouth. You will love how simple they are to make. Here is the list of ingredients: - 1 cup (226g) unsalted butter - 1 cup (200g) granulated sugar - 2 large eggs - 1 teaspoon pure vanilla extract - 1 cup (125g) all-purpose flour - 1/2 teaspoon baking powder - 1/4 teaspoon salt - 1 cup (180g) white chocolate chips - 1/2 cup (75g) chopped macadamia nuts (optional) First, you preheat your oven to 350°F (175°C). Prepare an 8x8-inch pan with grease and parchment paper. Melt the butter in a saucepan over low heat. Mix in the sugar until smooth. Add the eggs one at a time and stir. Then, blend in the vanilla extract. In another bowl, sift the flour, baking powder, and salt. Gently fold this into the wet mix. Next, add the white chocolate chips and nuts if you want them. Pour the batter into your pan and smooth the top. Bake for 25-30 minutes. Check with a toothpick for doneness. Let them cool before cutting into squares. For a lovely touch, sprinkle powdered sugar on top. You can serve these brownies on a nice platter. Adding a white chocolate chip or a macadamia nut on top makes them more special. Everyone will love how they look and taste! White chocolate brownies are a tasty treat you can easily make at home. We covered essential ingredients, substitutes, and fun add-ins to boost the flavor. I shared step-by-step instructions for baking them perfectly, along with tips to avoid common mistakes. You can also explore gluten-free, vegan options and creative mix-ins. Remember to store them right to keep them fresh. With this guide, you can enjoy or share your delicious brownies anytime. Embrace your baking skills and have fun!

Are you ready to indulge in a sweet treat that’s both rich and creamy? White chocolate brownies are a delightful dessert that will satisfy any sweet tooth. In this guide, …

Read more

Categories Desserts

Grinder Salad Fresh and Flavorful Veggie Dish

June 3, 2025 by Chef Tavio
To make a delicious Grinder Salad, you need a mix of fresh veggies. Here’s what you need: - 1 cup romaine lettuce, chopped into bite-sized pieces - 1 cup arugula, roughly chopped - ½ cup cherry tomatoes, halved for sweetness - ½ cucumber, diced into small cubes - ½ red onion, thinly sliced for a sharp flavor - 1 small bell pepper (any color), diced for crunch and color - 1 carrot, grated for a hint of sweetness - ½ cup provolone cheese, cubed for creaminess - ¼ cup pepperoncini, sliced for a tangy kick - ¼ cup Kalamata olives, pitted and halved for richness - ⅓ cup Italian dressing (your choice of store-bought or homemade) - Salt and pepper to taste - Fresh basil leaves, torn for garnish Each of these ingredients brings a unique taste and texture to the salad. The romaine and arugula form a crisp base, while the tomatoes and cucumbers add freshness. The cheese and olives enhance the flavor, making every bite delightful. When it comes to dressing, you have options. You can use store-bought Italian dressing for ease. Or, if you have time, try making your own. A homemade dressing can elevate your salad with fresh herbs and spices. For a full recipe, check out the Grinder Salad Delight 🥗. You’ll enjoy every step of making this fresh and colorful dish! Start by grabbing a large salad bowl. Combine 1 cup of chopped romaine lettuce and 1 cup of roughly chopped arugula. These greens form the base of your Grinder Salad. Their crispness adds a nice crunch to each bite. Next, gently fold in ½ cup of halved cherry tomatoes, ½ diced cucumber, ½ thinly sliced red onion, and 1 small diced bell pepper. Take care when mixing these veggies. You want to keep their shape and texture for a fresh salad experience. Now, add 1 grated carrot, ½ cup of cubed provolone cheese, ¼ cup of sliced pepperoncini, and ¼ cup of halved Kalamata olives. This mix brings a burst of flavor to your salad. Drizzle ⅓ cup of Italian dressing over everything. Toss lightly to coat each ingredient. Finally, season with salt and pepper to your taste. Toss again gently to blend the flavors. Top your salad with torn fresh basil leaves for a lovely finish. For the full recipe, check out my Grinder Salad Delight. To keep your Grinder Salad fresh, mix the ingredients gently. This prevents the greens from getting bruised. Start by combining romaine lettuce and arugula as your base. Then, fold in the other veggies one by one. This method helps maintain their crunchiness and bright colors. Want to boost the flavor? Add more herbs like parsley or dill. You can also sprinkle some oregano for an Italian twist. A little red pepper flake can give it a nice kick. These small adjustments can make a big difference. For a stunning display, serve your salad in a clear glass bowl. This way, everyone can see the colorful layers. You can also top it with extra provolone cheese or whole pepperoncini. This adds charm and makes it more inviting. Don't forget to arrange the basil leaves on top for a lovely finish. For the full method, check out the Full Recipe. {{image_4}} You can switch out romaine and arugula for other greens. Try using spinach for a softer texture. Kale adds a hearty crunch, while mixed greens bring a variety of flavors. Each green creates a new taste and look for your salad. Feel free to experiment with different combinations until you find your favorite mix. Adding protein can make your Grinder Salad more filling. Grilled chicken provides a nice smoky flavor. For a plant-based option, chickpeas or black beans work well, too. They add creaminess and a protein boost. You can also try diced hard-boiled eggs for extra richness. Choose what fits your taste or dietary needs best. The dressing plays a big role in flavor. You can use different vinaigrettes to change the taste. A balsamic vinaigrette gives a sweet twist, while a lemon-herb dressing adds brightness. You can even mix Greek yogurt with herbs for a creamy option. Experiment with what you have on hand to find your favorite combination. For more ideas, check out the Full Recipe. To keep your Grinder Salad fresh, store leftovers in an airtight container. Make sure to put it in the fridge right away. This salad stays good for about three days. If you see any wilting or browning, it’s best to toss those parts. You can enjoy the flavors for lunch or dinner again! For long-term storage, freezing the entire salad isn’t ideal. However, you can freeze individual ingredients like diced bell peppers and olives. Just chop them and place them in freezer bags. When you’re ready to use them, let them thaw in the fridge overnight. This way, you can make a fresh salad anytime. To keep greens crisp, store them separately from wet ingredients. Put romaine lettuce and arugula in a sealed container with a paper towel. The towel absorbs moisture, helping the greens stay fresh. Keep diced veggies and cheese in separate containers too. This keeps everything tasting great until you serve your tasty Grinder Salad! Grinder Salad is a fresh and colorful dish made with crisp greens and veggies. The main ingredients include romaine lettuce and arugula, which give a nice crunch. You will find juicy cherry tomatoes, cool cucumbers, and crunchy bell peppers in this salad. The addition of provolone cheese and Kalamata olives adds creamy and salty notes. Finally, a tangy Italian dressing ties all the flavors together. This salad is perfect for summer picnics or a light lunch. To make Grinder Salad vegetarian, simply skip the cheese if it contains animal rennet. You can add protein options like chickpeas or black beans instead. Another great choice is to use grilled tofu, which adds a nice texture. If you want more flavor, try adding roasted veggies or nuts for crunch. These swaps keep your salad tasty and filling. Yes, you can prepare Grinder Salad ahead of time! To do this, chop the veggies and keep them in a sealed container in the fridge. I suggest mixing the dressing separately. When it’s time to serve, combine everything and toss with the dressing. This method keeps the greens crisp and fresh. You can also make a large batch for gatherings, making it easy to feed your guests without stress. In this blog post, we explored the vibrant world of Grinder Salad. We covered essential ingredients like romaine, cherry tomatoes, and provolone cheese. You learned step-by-step instructions to build this salad with the right texture and taste. We shared tips for flavor enhancements and creative presentation ideas. Variations like protein add-ins and dressing swaps keep it exciting. Finally, we discussed storage tips to keep leftovers fresh. Enjoy making this salad your own, and savor every bite!

Looking for a fresh and tasty side dish? Meet Grinder Salad, a veggie delight that bursts with flavor! Packed with crunchy greens, colorful veggies, and zesty cheese, this salad is …

Read more

Categories Salads

Savory Southwest Chicken Wrap Easy Meal Recipe

June 3, 2025 by Chef Tavio
For a tasty Southwest Chicken Wrap, gather these key ingredients: - 2 cups cooked chicken, shredded - 1 cup black beans, drained and rinsed - 1 cup corn (fresh, frozen, or canned) - 1 red bell pepper, diced into small pieces - 1 ripe avocado, sliced - ½ cup shredded cheddar cheese - ½ cup creamy Greek yogurt - 2 tablespoons fresh lime juice - 1 teaspoon chili powder - 1 teaspoon ground cumin - 4 large whole wheat tortillas - Salt and freshly ground black pepper to taste - Fresh cilantro leaves for garnish (optional) Using fresh and high-quality ingredients makes a big difference. Fresh chicken adds flavor. Ripe avocados bring creaminess. Quality cheese enhances taste and texture. You can also add optional toppings. Consider sliced jalapeños for heat or a sprinkle of fresh lime juice. Guacamole or salsa can boost flavor too. A dollop of Greek yogurt adds creaminess and tang. This blend of ingredients creates a wrap that bursts with flavor. For the full recipe, check the details provided earlier. Enjoy crafting your delicious Southwest Chicken Wrap! 1. Start by mixing the main ingredients. In a large bowl, add the shredded chicken, black beans, corn, and diced red bell pepper. Mix gently to combine. 2. Next, make the zesty dressing. In a smaller bowl, whisk together the Greek yogurt, lime juice, chili powder, cumin, and a pinch of salt and pepper. This dressing adds a great kick! 3. Pour the dressing over the chicken mixture. Toss gently to coat all ingredients evenly. This ensures every bite is packed with flavor. 4. Now, lay each tortilla flat. This is where you will fill them. 5. Divide the chicken mixture among the tortillas. Be careful not to overfill. This makes wrapping easier. 6. Layer a few avocado slices and shredded cheddar cheese on top. These add creaminess and flavor! 7. Fold the sides of the tortilla over the filling. Then, roll from the bottom up. Tuck the filling in as you roll for a snug wrap. 1. Heat a skillet over medium heat. Grill each wrap for about 2-3 minutes on each side. This gives them a nice golden-brown finish. 2. For the perfect texture, press down gently while grilling. This helps the wrap crisp up nicely. 1. To serve, arrange the wraps on a bright plate. This makes them look appealing. 2. Pair the wraps with a small bowl of salsa or guacamole for dipping. 3. Garnish the platter with lime wedges and fresh cilantro. This adds extra color and flavor! For more details, check out the Full Recipe. To keep your wraps from getting soggy, use dry ingredients. Drain beans and corn well. You can also pat the chicken dry with a paper towel. A nice, firm tortilla helps too. Heat your tortillas in a pan to soften them. This makes them easier to wrap and less likely to tear. For flavoring the chicken, season it well. Use salt, pepper, and spices like chili powder and cumin. Toss the chicken in these spices before mixing in the other ingredients. This gives every bite a burst of flavor. You can swap chicken for other proteins. Try tofu, shrimp, or beef for a twist. For beans, use pinto or kidney beans if you prefer. Fresh veggies like spinach, zucchini, or mushrooms work well too. You can also add fruits like mango or pineapple for sweetness. For dietary needs, you can use gluten-free tortillas. Lettuce wraps are great for low-carb diets. Make sure your beans are low-sodium if you're watching your salt. This way, you can enjoy a tasty wrap that fits your lifestyle. To elevate your wrap, add spices like smoked paprika or garlic powder. A sprinkle of cayenne can give it a nice kick. You can also mix fresh herbs like cilantro or parsley for a fresh taste. If you want heat, use jalapeños or chipotle peppers. Hot sauce is another great option. A dash of lime juice can also brighten up the flavors. Experiment to find your perfect balance of spice! For the full recipe, check out the detailed instructions above. {{image_4}} For a meatless wrap, swap the chicken for grilled tofu or tempeh. You can also use chickpeas for protein. This adds a nice texture and keeps it filling. Use the same seasonings for flavor. Add extra veggies like spinach or zucchini for more nutrition. Nutritionally, this veggie option remains high in protein and fiber. It also offers healthy fats from avocado. This makes it a balanced meal. Plus, it’s perfect for anyone looking for plant-based dishes. Instead of tortillas, try lettuce wraps. Use large leaves of romaine or butter lettuce. They hold fillings well and add a nice crunch. You can also use cabbage leaves as a sturdy option. To keep flavor, use the same chicken mixture. Just add more spices if you like it spicy. This way, you enjoy all the taste without the carbs. Making wraps ahead of time saves you time during busy days. Prepare the filling and store it in the fridge. You can assemble the wraps when you’re ready to eat. For storage, wrap each completed wrap in parchment paper. This keeps them fresh. When you want to eat, just reheat in a skillet for a few minutes. This way, you get that delicious crunch back. For the full recipe, check out my detailed guide! To keep your Southwest Chicken Wraps fresh, store them in the fridge. Wrap each one tightly in plastic wrap. This helps to seal in moisture and flavor. You can also place them in a sealed container. Make sure the container is airtight. This will help prevent them from drying out. Always refrigerate leftovers within two hours of cooking. If you want to freeze your wraps, first let them cool completely. Then, wrap each one in plastic wrap, followed by aluminum foil. This double layer protects them from freezer burn. To reheat, remove the foil and plastic wrap. Place the wrap in the microwave on a microwave-safe plate. Heat it for about 1-2 minutes or until warm. Southwest Chicken Wraps stay fresh in the fridge for up to three days. If frozen, they can last for up to three months. Look for signs of spoilage. If the wrap smells off or has a strange texture, it’s best to toss it. Always trust your senses when it comes to food safety. A Southwest Chicken Wrap is a tasty meal that combines bold flavors. It comes from the Southwest region of the United States. This wrap usually has shredded chicken, black beans, corn, and fresh veggies. You can also add creamy dressing for extra flavor. The wrap is made with tortillas that hold all the yummy ingredients together. Yes, you can use rotisserie chicken! It saves time and effort. Pre-cooked chicken is moist and packed with flavor. You can shred it quickly and mix it into your wrap. This way, you can enjoy your meal in less time. To add kick, try these ideas: - Add sliced jalapeños or diced serrano peppers. - Use hot sauce in the dressing. - Mix in cayenne pepper or red pepper flakes. These options will make your wrap have a fun spicy twist! Yes, you can prepare them ahead! Here are some tips: - Assemble the wraps but do not grill them. - Wrap them tightly in plastic wrap or foil. - Store them in the fridge for up to 2 days. When you're ready, just grill them to heat through. Definitely! You can use gluten-free tortillas made from rice or corn. These wraps taste great and hold your filling well. Always check the labels to ensure they are gluten-free. This way, everyone can enjoy a delicious Southwest Chicken Wrap! For the complete cooking process, check the Full Recipe. You now have all the tools to create a delicious Southwest Chicken Wrap. Remember to use fresh, quality ingredients to enhance flavor. Follow the step-by-step instructions for perfect wraps every time. Don’t forget the tips for customizing and storing. Experiment with variations to keep it exciting. Enjoy making this dish your own while exploring all the tasty options. Trust me, your taste buds will thank you for it!

Looking for a quick and tasty meal? The Savory Southwest Chicken Wrap is your answer! Packed with juicy chicken, fresh veggies, and flavorful spices, this wrap is easy to make …

Read more

Categories Dinner

Bang Bang Cauliflower Crisp and Flavorful Treat

June 3, 2025 by Chef Tavio
- 1 large head of cauliflower, cut into bite-sized florets - 1 cup all-purpose flour - 1/2 cup cornstarch - 1 teaspoon garlic powder - 1 teaspoon onion powder - 1/2 teaspoon smoked paprika - 1/4 teaspoon cayenne pepper (adjust to taste for spiciness) - Salt and black pepper to taste - 1 cup cold water - Vegetable oil (for frying) - 1 cup mayonnaise - 2 tablespoons sweet chili sauce - 1 tablespoon sriracha (add more for extra heat) - 1 tablespoon honey or maple syrup - 2 green onions, thinly sliced - Sesame seeds (for garnish, optional) Bang Bang Cauliflower is a treat that packs a punch. The crisp cauliflower gets a flavorful kick from the sauce. You can easily adjust the spice level to fit your taste. The ingredients are simple but create a dish that feels special. When you gather these items, you set the stage for an amazing cooking adventure. - Blanching Techniques Start by filling a large pot with water. Add a generous pinch of salt and bring it to a boil. Once boiling, add the cauliflower florets. Blanch them for about 2-3 minutes. You want them slightly tender but still crisp. After blanching, drain the florets in a colander. Let them cool completely before moving on. - Cooling Process Cooling is key. If you don’t cool the florets, the batter won't stick well. Spread them out on a clean kitchen towel for quick cooling. This step keeps the cauliflower from steaming and helps it stay crispy when fried. - Combining Dry Ingredients In a large mixing bowl, whisk together the all-purpose flour, cornstarch, garlic powder, onion powder, smoked paprika, cayenne pepper, salt, and black pepper. Make sure all the dry ingredients mix well. This blend adds depth to the flavor. - Achieving the Right Consistency Gradually pour in cold water while stirring. Keep mixing until the batter is smooth and lump-free. You want it to be thick enough to coat the cauliflower but not so thick that it clumps. Adjust with more water if needed. - Heating the Oil Pour about 1-2 inches of vegetable oil into a large skillet. Heat the oil over medium-high heat. Aim for a temperature of 350°F (175°C). To test, drop a small spoonful of batter into the oil. It should bubble and sizzle right away. - Frying Process Carefully dip each cauliflower floret into the batter. Let the excess batter drip off. Gently place it into the hot oil. Fry in batches to avoid overcrowding. Cook for 4-5 minutes until golden brown and crispy. Flip them occasionally for even cooking. - Removing Excess Oil Once fried, use a slotted spoon to take the cauliflower out. Place them on a plate lined with paper towels. This helps absorb any excess oil and keeps them crunchy. - Mixing Ingredients In a small bowl, combine mayonnaise, sweet chili sauce, sriracha, and honey or maple syrup. Stir until fully mixed. This sauce adds a nice kick, balancing the crunch of the cauliflower. - Adjusting Spice Levels Taste your sauce. If you like more heat, add extra sriracha. For a milder flavor, reduce the amount. This step lets you personalize the dish to your taste. - Tossing with Sauce Place the crispy cauliflower into a large mixing bowl. Drizzle the Bang Bang sauce over them. Gently toss the cauliflower to coat each piece evenly. This step ensures every bite is flavorful. - Ensuring Even Coverage Make sure all the pieces have sauce. You want that delicious flavor on every floret. If needed, add more sauce until you reach your desired coating. - Suggested Presentation Transfer the sauced cauliflower to a serving platter. For a nice touch, garnish with sliced green onions and sesame seeds. This makes the dish look appealing and inviting. - Additional Serving Ideas You can serve this dish as an appetizer or a side. Pair it with extra Bang Bang sauce in a small bowl for dipping. It’s a perfect snack for gatherings or movie nights. For the complete recipe, check the Full Recipe. - Temperature Control: Keep your oil hot, around 350°F (175°C). This helps the batter cook fast and stay crispy. If the oil is too cool, the cauliflower absorbs oil and becomes soggy. - Frying Techniques: Fry in small batches. Overcrowding the pan lowers the oil temperature. This can lead to uneven cooking. Frying just a few pieces at a time helps each floret get that golden color. - Spice Adjustments: Want a kick? Add more cayenne to the batter. If you like it milder, cut back. Taste the batter and adjust to your liking before frying. - Alternative Sauces: Try different sauces for variety. A yogurt-based sauce can add creaminess. Or, mix in peanut sauce for an Asian twist. - Best Frying Pan or Skillet: Use a deep skillet or a heavy pot. This ensures even heat distribution. A non-stick surface helps the cauliflower cook without sticking. - Essential Cooking Tools: Have a slotted spoon ready. This helps drain excess oil after frying. A thermometer is also handy for checking oil temperature. It ensures perfect frying every time. For more detailed steps, check the [Full Recipe]. {{image_4}} You can easily make Bang Bang Cauliflower vegan. Just swap the mayonnaise for plant-based options. Many brands offer creamy vegan mayo that works well. You can also use blended silken tofu. It gives a nice texture and flavor. If you need gluten-free options, replace all-purpose flour with a gluten-free blend. You can use almond flour or rice flour too. They help achieve a crispy batter. To make your Bang Bang Cauliflower stand out, try different flavors. You can add Asian-inspired ingredients like sesame oil or ginger. These will enhance the taste and make it more exciting. Experiment with spice mixes too. Try curry powder for a warm twist or smoked chili for a smoky flavor. These changes can add depth and fun to your dish. Bang Bang Cauliflower shines when paired with tasty dipping sauces. Sweet chili sauce or a tangy ponzu sauce works well. You can also serve it with a creamy ranch dip for a twist. For a hearty meal, create a cauliflower bowl. Start with a base of rice or quinoa. Top it with the saucy cauliflower, fresh veggies, and a drizzle of your favorite sauce. This makes for a colorful and satisfying dish. Check out the Full Recipe for more details on how to make this dish shine! Refrigerator Storage Tips After enjoying your Bang Bang Cauliflower, store leftovers in an airtight container. This keeps them fresh for up to three days. Make sure the cauliflower cools down first. If you want to keep the crispiness, store the sauce separately. Freezing Options You can freeze Bang Bang Cauliflower for longer storage. Place the cooled, cooked florets on a baking sheet. Ensure they do not touch each other. Freeze them for about an hour, then transfer to a freezer-safe bag. They stay good for about three months. When ready to eat, thaw in the fridge overnight before reheating. Best Practices for Crispiness To keep your cauliflower crispy, use the oven. Preheat it to 400°F (200°C). Spread the florets on a baking sheet in a single layer. Heat for about 10-15 minutes until they are hot and crispy again. Microwave vs. Oven The microwave is faster but can make the cauliflower soggy. If you are in a hurry, use it for quick reheating. Place the florets on a microwave-safe plate. Heat in 30-second bursts until warm. For the best taste and texture, the oven is the better choice. Now you're ready to store and enjoy your Bang Bang Cauliflower at any time! For the full recipe, check out the complete guide. Bang Bang Cauliflower is a tasty dish made with fried cauliflower. It has a crispy texture and a spicy, creamy sauce. The key flavors are savory, spicy, and a bit sweet. The sauce combines mayonnaise, sweet chili sauce, and sriracha for a burst of flavor. Yes, you can prep this recipe ahead of time. Blanch the cauliflower earlier in the day. Store it in the fridge until you are ready to fry. The sauce can also be made in advance. Just mix the ingredients and keep it in a sealed container. You can use broccoli or Brussels sprouts instead of cauliflower. They both work well in this recipe. Adjust cooking times based on the size of the pieces. Smaller pieces will cook faster, while larger ones may need more time. Bang Bang Cauliflower can be a healthy choice. Cauliflower is low in calories and high in fiber. The dish does use oil for frying, which adds calories. You can also bake the cauliflower for a lighter option. Use the sauce sparingly to keep it healthier. For the complete cooking instructions and ingredient list, check out the Full Recipe. This blog post covered how to make Bang Bang Cauliflower from scratch. We explored the list of ingredients, detailed the step-by-step preparation, and shared useful tips for the perfect dish. You learned about flavor variations and how to store leftovers. Remember, this dish is versatile and can fit many diets. Enjoy experimenting with spices and sauces. Try serving it in fun ways to impress others. Creating tasty meals can be easy and rewarding. Happy cooking!

Looking for a crunchy, flavorful treat that won’t derail your diet? Bang Bang Cauliflower is the answer! This dish packs a punch with its crispy coating and zesty sauce. I’ll …

Read more

Categories Appetizers

Savory Shrimp and Asparagus Stir-Fry Recipe

May 30, 2025 by Chef Tavio
- 1 pound large shrimp, peeled and deveined - 1 bunch of asparagus, trimmed and cut into 2-inch pieces - 2 tablespoons vegetable oil - 4 cloves garlic, finely minced - 1 inch fresh ginger, finely minced - 1 red bell pepper, thinly sliced - 3 tablespoons soy sauce (or tamari for gluten-free) - 2 tablespoons honey - 1 tablespoon sesame oil - 1 teaspoon cornstarch mixed with 1 tablespoon water - Salt and freshly ground black pepper to taste - Toasted sesame seeds for garnish - Chopped green onions for garnish - Large skillet or wok - Mixing bowls - Wooden spatula Fresh ingredients make this dish shine. Use shrimp that smell like the sea. Choose bright green asparagus that snaps when bent. For garlic and ginger, fresh is best for strong flavors. If you're missing any ingredients, here are some substitutes: - Use chicken instead of shrimp. - Try snap peas or broccoli in place of asparagus. - Honey can swap for maple syrup for a different taste. When you use fresh ingredients, your stir-fry will taste amazing. Always aim for the best! For more delicious ideas, check out the Full Recipe. 1. First, heat a large skillet or wok. Pour in 1 tablespoon of vegetable oil. 2. Set the heat to medium-high. Wait until the oil shimmers. 3. Next, add the shrimp. Season them with a pinch of salt and pepper. 4. Stir-fry for about 2-3 minutes. The shrimp should turn pink and opaque. 5. Once cooked, remove the shrimp from the skillet. Place them on a plate. 1. In the same skillet, add the other tablespoon of vegetable oil. 2. Heat the oil again. Add minced garlic and ginger. Stir continuously for 30 seconds. 3. You want to release their strong and tasty flavors. 4. Now, add the asparagus and sliced red bell pepper to the skillet. 5. Stir-fry for 4-5 minutes. The veggies should look bright and stay crisp. 1. Return the cooked shrimp to the skillet with the veggies. 2. In a small bowl, mix soy sauce, honey, and sesame oil. 3. Pour this mixture over the shrimp and vegetables in the skillet. 4. Add the cornstarch mixed with water. Stir well for another 1-2 minutes. 5. This will help the sauce thicken and coat everything nicely. 6. Taste for seasoning. Adjust with salt and pepper if needed. 7. Serve hot, garnished with toasted sesame seeds and chopped green onions. For the full details of this recipe, refer to the Full Recipe above. To achieve crisp vegetables, keep these tips in mind: - Use high heat: This cooks the veggies fast. - Cut evenly: Chop vegetables in the same size. This helps them cook evenly. - Don’t crowd the pan: Stir-fry in batches if needed. This avoids steaming. For shrimp, ensure they don’t overcook: - Cook quickly: Shrimp need just 2-3 minutes. - Watch for color change: They should turn pink and opaque. - Remove early: They continue cooking from heat after you take them out. For seasoning adjustments, consider these ideas: - Add more soy sauce: This boosts umami flavor. - Mix in some citrus: A splash of lemon or lime brightens the dish. - Try different sweeteners: Swap honey for maple syrup or brown sugar. If you like spice or heat, try these options: - Add red pepper flakes: Just a pinch can add warmth. - Include sliced chili peppers: Fresh or dried both work. - Use sriracha or chili sauce: These add bold flavor and heat. To plate the dish beautifully, follow these tips: - Use a large shallow bowl: This shows off the colors. - Layer ingredients: Place veggies first, then shrimp on top. For garnishing ideas, consider these options: - Sprinkle toasted sesame seeds: This adds crunch and a nutty flavor. - Add chopped green onions: They provide a fresh look and taste. - Use a slice of lime: Placing it on the side adds color and zest. Feel free to explore the full recipe for Shrimp and Asparagus Stir-Fry for more details! {{image_4}} You can swap shrimp for chicken or tofu. Chicken adds a hearty bite, while tofu offers a plant-based option. - Chicken: Use boneless, skinless chicken breast. Cut it into small pieces. Cook for about 5-7 minutes until no longer pink. - Tofu: Use firm or extra-firm tofu. Press it to remove excess water. Cut it into cubes and sauté for about 4-5 minutes until golden. Feel free to mix in other veggies for fun. Broccoli, snap peas, or carrots work well. They add flavor and crunch. - Seasonal Ideas: Use fresh veggies based on the season. In spring, try peas or baby bok choy. In fall, add sliced mushrooms or squash. Change up the sauce for new tastes. You can use teriyaki or sweet chili for a twist. - Teriyaki Sauce: This adds a sweet and savory flavor. Use it in the same amount as soy sauce. - Adjustments: If you want more sweetness, add extra honey. For more savory, add more soy sauce. Explore these variations to find your perfect shrimp and asparagus stir-fry! For a full recipe, see the [Full Recipe]. For short-term storage, keep your shrimp and asparagus stir-fry in the fridge. Use an airtight container to keep it fresh. Let the dish cool down before sealing it. This helps prevent moisture build-up. You can store it in a glass or plastic container. Make sure to label it with the date so you know when you made it. If you want to save your stir-fry for longer, you can freeze it. Place the cooled dish in a freezer-safe bag or container. Squeeze out as much air as you can before sealing. This helps avoid freezer burn. To thaw, move it to the fridge overnight. Reheat it in a skillet over medium heat. Stir well to ensure it heats evenly. In the fridge, your stir-fry lasts about 3 to 4 days. In the freezer, it can last up to 3 months. Always check for signs of spoilage before eating. If it smells bad or looks off, it's best to toss it. Freshness is key for a great taste! Yes, you can make this dish ahead of time. To prep, cook the shrimp and veggies. Then, store them in an airtight container in the fridge. When you’re ready to eat, heat them in a skillet. Add the sauce and mix it well. This keeps the flavors fresh. You can serve this stir-fry with rice or noodles. Here are some ideas: - Steamed jasmine rice - Fried rice - Egg noodles - Quinoa These sides add a nice touch to your meal. To tell if shrimp is cooked, look for these signs: - The shrimp turns pink. - The shrimp curls into a C shape. - The flesh is opaque, not clear. These cues show that the shrimp is safe to eat. Yes, this stir-fry can be gluten-free. Use tamari instead of soy sauce. Check labels on other sauces too. Many brands offer gluten-free options. This way, you enjoy great flavors safely. This recipe for shrimp and asparagus stir-fry is simple and full of flavor. You learned about essential ingredients, cooking tools, and step-by-step instructions. I shared tips for perfect texture and presentation. With variations, you can switch proteins and try different sauces. Proper storage tips help keep your dish fresh. Remember, fresh ingredients make the best meals. Enjoy creating this delicious stir-fry!

Are you ready to whip up a quick and delicious meal? This Savory Shrimp and Asparagus Stir-Fry is not only packed with flavor but also super easy to make. With …

Read more

Categories Dinner
Older posts
Newer posts
← Previous Page1 … Page38 Page39 Page40 … Page57 Next →

TASTED NEST

Where Flavor Finds a Home 🍳🏡 — warm, simple, and crave-worthy recipes made for real life, from stovetop mornings to backyard dinners.

PAGES

Home About Contact Privacy Policy Terms & Conditions Cookie Policy GDPR Policy Copyright Policy Disclaimer

CATEGORIES

Appetizers Desserts Salads Breakfast Dinner

Contact

  • Pinterest
  • Mail
Copyright © 2025 Tasted Nest. All rights reserved.