Cherry Tomato and Cheese Galette Savory Delight
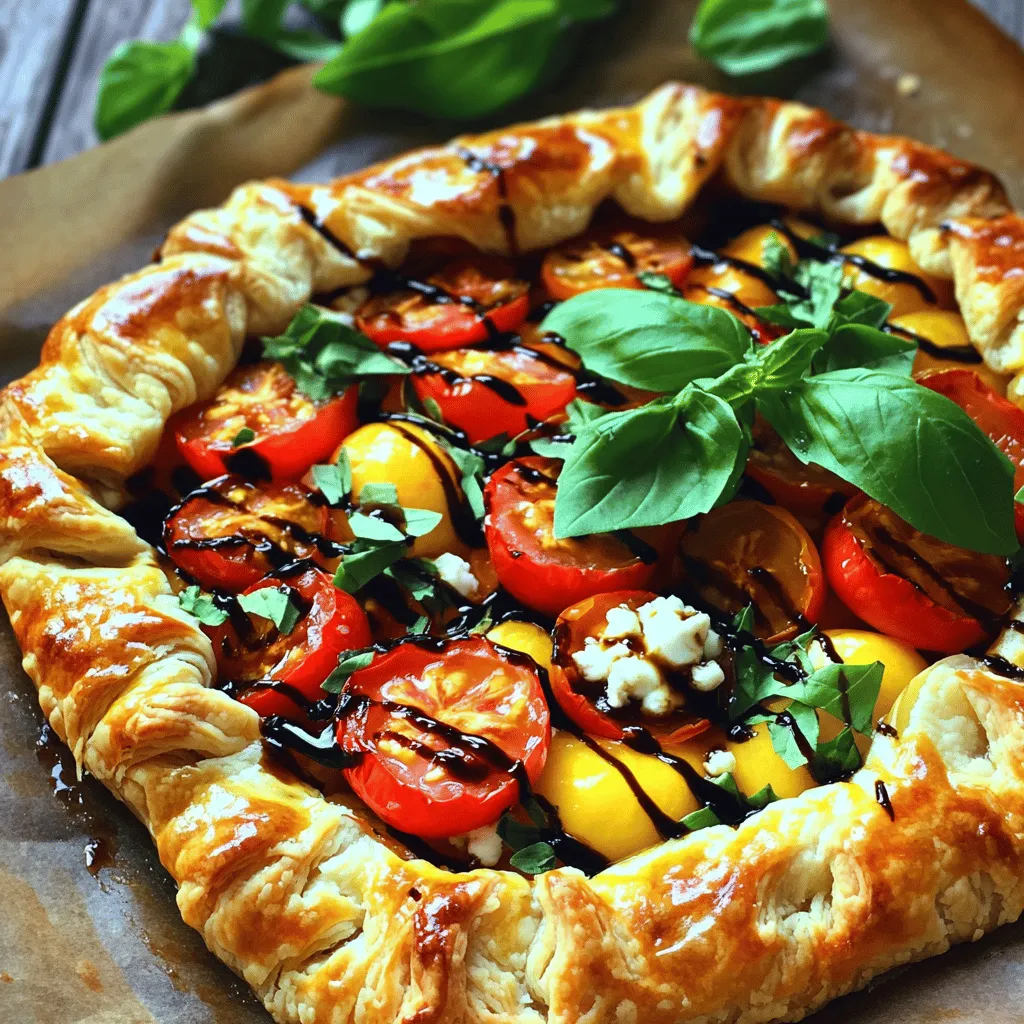
Are you ready to impress your guests with a delicious Cherry Tomato and Cheese Galette? This savory delight combines fresh tomatoes and rich cheese in a crisp pastry. It’s simple …
Are you ready to impress your guests with a delicious Cherry Tomato and Cheese Galette? This savory delight combines fresh tomatoes and rich cheese in a crisp pastry. It’s simple …
. For the best taste, coat the corn evenly with the garlic butter. This step is key. If you miss spots, some bites may taste plain. Use a brush for a smooth application. Let the butter soak in for a few minutes. This helps the flavors meld together. Make sure your grill is hot enough. If it's too cool, the corn won’t cook well. Aim for a steady heat between 375°F and 450°F. This range gives you a nice char and soft kernels. When wrapping the corn in foil, seal it tightly. This keeps the moisture in. Be careful when unwrapping it. The steam can burn you. Open it away from your body to stay safe. Garlic butter grilled corn is great with dips or toppings. Try adding crumbled feta or a sprinkle of chili powder. This gives a nice kick to each bite. Serve it with fresh salads or grilled meats for a complete meal. Pair it with a cold drink to balance the flavors. If you want a twist, check out the Full Recipe for more ideas. {{image_4}} To make your garlic butter grilled corn even better, try adding spices. Chili powder gives a nice kick. Paprika adds a smoky flavor that pairs well with the butter. You can also use herb-infused butter. Mix in fresh herbs like basil or thyme for extra taste. If you want to switch things up, try alternative grilling methods. Using a grill basket can make cooking easier. It keeps the corn from falling through the grates. If you can't grill outside, you can bake the corn in the oven. Wrap it in foil and bake at 375°F for about 25-30 minutes. For those who are vegan, you can swap out regular butter for plant-based options. Coconut oil or vegan butter works great. If you need a gluten-free option, this recipe is already safe. Just be sure to check any added ingredients for gluten. For the full recipe, check the earlier section of this article. To store leftover garlic butter grilled corn, let it cool first. Wrap each ear in plastic wrap or foil. Place them in an airtight container. This helps keep them fresh for about three to five days in the fridge. Make sure to label the container with the date. When reheating, you want to keep the corn juicy and tasty. The best way is to use your grill or stovetop. Preheat the grill to medium heat. Grill the corn for about five minutes, turning it often. If you use the stovetop, wrap the corn in foil with a bit of water. Heat it on medium until warm. You can also use a microwave, but this may change the texture. Heat on high for 1-2 minutes, checking often. Freezing grilled corn is easy and great for future meals. First, let the corn cool completely. Next, wrap each ear in plastic wrap. Then, place the wrapped corn in a freezer bag. Make sure to squeeze out as much air as possible. Label the bag and freeze for up to six months. When you are ready to eat it, thaw in the fridge overnight. Then, reheat as mentioned above for the best flavor. This way, you can enjoy that delicious garlic butter taste anytime! For more details, check the Full Recipe. You can tell corn is done when it feels tender. Use a fork to pierce a kernel. If the juice runs clear, it's ready. Another sign is the bright yellow color. The corn should look glossy and fresh after grilling. Cooking time is about 15-20 minutes on the grill. Turn it every five minutes for even cooking. Yes, you can prepare it ahead of time. Husk the corn and make the garlic butter. Coat the corn, then wrap it in foil. Store it in the fridge for up to 24 hours. When ready to cook, just place it on the grill. You can also cook it in advance. Reheat it on the grill or in the oven before serving. This corn pairs well with many sides. You can serve it with grilled meats, like chicken or steak. It also goes great with salads, like coleslaw or a fresh green salad. For a fun twist, serve it with dips like sour cream or guacamole. You can even add it to a taco bar for extra flavor. To serve more people, simply scale up the recipe. You can use more ears of corn, butter, and garlic. Just keep the same ratios. If you have a large grill, you can cook several at once. Wrap each ear in foil and place them on the grill. This method keeps them warm while you cook more. This blog post helps you master garlic butter grilled corn on the cob. We covered the key ingredients, like fresh corn and garlic. You learned how to grill it perfectly while avoiding common mistakes. Plus, we shared tricks for great flavor and storage tips. You now have ideas for serving and variations that suit your taste. Enjoy grilling delicious corn that will impress friends and family. Remember, the right preparation makes all the difference! Happy grilling!](https://tastednest.com/wp-content/uploads/2025/06/9217476a-3c26-41f1-88ef-75d06ad0ca12.webp)
Get ready to elevate your summer BBQ with my Garlic Butter Grilled Corn on the Cob! This simple yet mouthwatering dish bursts with flavor from fresh garlic, creamy butter, and …
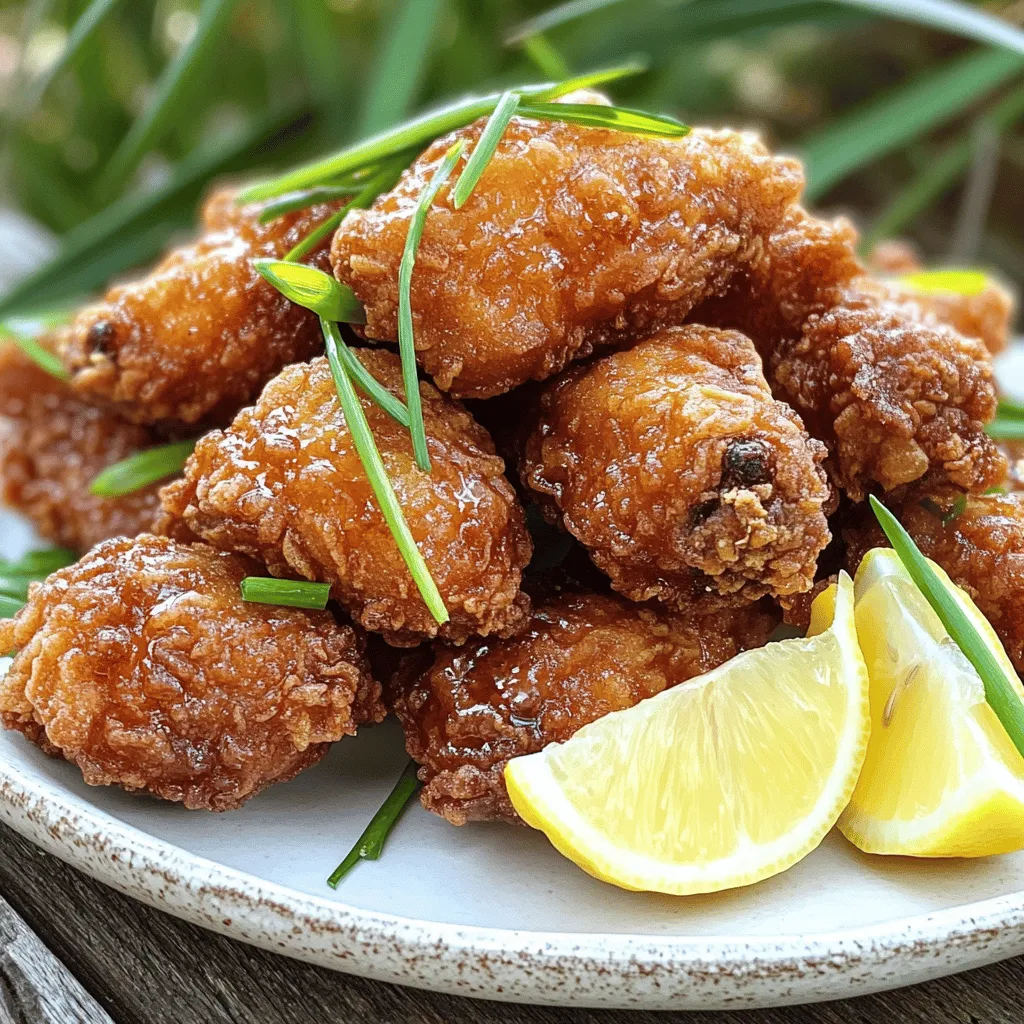
If you’ve ever craved a dish that’s crispy, juicy, and packed with flavor, look no further than Japanese Fried Chicken, or Karaage! In this post, I’ll walk you through my …
. First, you need to preheat the oven to 350°F (175°C). This step makes sure your cobbler bakes evenly. While the oven heats, grab a 9x13-inch baking dish. Lightly grease it with butter or cooking spray. This helps the cobbler come out easily after baking. Next, let’s work with the peaches. Peel and slice about 4 cups of fresh peaches. In a large bowl, toss the sliced peaches with 1/2 cup of granulated sugar, a teaspoon of ground cinnamon, and 1 tablespoon of lemon juice. This mix needs to sit for 10-15 minutes. The sugar draws out the peach juices and makes them sweeter. Now, let’s get our dry ingredients ready. In a separate bowl, combine 1 cup of all-purpose flour, the remaining 1/2 cup of sugar, 2 teaspoons of baking powder, and 1/2 teaspoon of fine sea salt. Whisk these ingredients together until they are well mixed. Then, add 1 cup of whole milk, 1/2 cup of melted butter, and 1 teaspoon of vanilla extract. Stir until just combined. It’s okay if the batter has a few lumps. Carefully pour the batter into your greased baking dish. Spread it out evenly to cover the bottom. Now, take your marinated peach mixture, including all its juices, and spoon it over the batter. Do not stir! The magic happens while baking, blending the flavors beautifully. Place the baking dish in the preheated oven. Bake for 45-50 minutes. You’ll know it’s done when the top turns a lovely golden brown. To check, insert a toothpick in the center. It should come out clean or with a few moist crumbs. Once it's baked to perfection, take it out and let it cool for a few minutes before serving. For the full recipe, see the details provided above. Enjoy your easy old fashioned peach cobbler! When picking peaches, look for fresh, ripe ones. They should be firm but slightly soft. A sweet smell is a good sign. Freestone peaches are easy to slice and work best for this cobbler. If you're unsure, ask at the market. They can help you pick the best ones. To get the right texture, do not over-mix the batter. A few lumps are okay; they help keep it light. Let the peaches sit with sugar and lemon juice for about 10-15 minutes. This helps them soften and release juices, which makes the cobbler juicy. Serve your cobbler warm in bowls. Add a scoop of vanilla ice cream on top. The cold ice cream pairs well with the warm cobbler. Drizzle some of the peach juices over the ice cream for extra flavor. For a nice touch, add a mint sprig on top to make it look pretty. You can find the Full Recipe for further details. {{image_4}} You can switch peaches for other fruits. Try using ripe cherries, blueberries, or apples. Each fruit brings a new flavor. Adjust the sugar based on the fruit's sweetness. For tart fruits, add a bit more sugar. This keeps the cobbler tasty and balanced. If you need a gluten-free version, swap regular flour for a gluten-free blend. Many blends work well in baking. Check that your baking powder is also gluten-free. Keep the other steps the same. The cobbler will still turn out soft and yummy. Changing spices can add a unique twist. Try nutmeg or cardamom for a different taste. You can even add a pinch of ground ginger for warmth. Mix these spices with the sugar before you combine them with the fruit. This will help spread the flavor throughout the cobbler. For more ideas, check the Full Recipe! After you enjoy your peach cobbler, store any leftovers in an airtight container. Place the container in the fridge. Your cobbler will stay fresh for about three to four days. To keep the topping crisp, cover it loosely with plastic wrap. This helps it breathe and avoids sogginess. When you want to enjoy your cobbler again, preheat your oven to 350°F (175°C). Place a slice of cobbler in an oven-safe dish. Heat it for about 15 to 20 minutes. This warms it through and keeps the crust nice. You can also use the microwave if you're in a hurry. Heat it for 30 seconds to one minute. Just be careful, as it may get a bit soft. If you want to save some cobbler for later, freezing is a great option. Let the cobbler cool completely. Then, slice it and wrap each piece in plastic wrap. Place the wrapped slices in a freezer bag. It’s best to eat frozen cobbler within three months for the best taste. When you’re ready to eat, thaw it in the fridge overnight. Then, reheat it as described above. For the full recipe, check out the Classic Peach Cobbler Delight. Yes, you can make this cobbler ahead of time. Just prepare it as normal. After baking, let it cool down completely. Then, cover it tightly and store it in the fridge for up to three days. When you’re ready to serve, reheat it in the oven. This way, it stays warm and tasty. You can tell your cobbler is done by checking its color. It should be a nice golden brown on top. Use a toothpick to check the center. If it comes out clean or with just a few moist crumbs, it's ready. You can also gently shake the pan. If it jiggles slightly and looks set, it is done. Yes, you can use canned or frozen peaches in this recipe. If using canned peaches, make sure to drain them well. If you use frozen peaches, let them thaw and drain excess water. This keeps your cobbler from getting too watery. Either option can still give you a delicious cobbler! For the full recipe, check out the Classic Peach Cobbler Delight. In this post, we explored how to make a delicious peach cobbler. You learned about fresh peaches, toppings, and baking essentials. We went through each step to help you prepare and bake with ease. I shared handy tips for texture and serving ideas. You also discovered fun variations and storage options. Now you can impress friends and family with your baking skills. Enjoy every bite of your homemade peach cobbler!](https://tastednest.com/wp-content/uploads/2025/06/d998cb6d-2b7f-4531-9c5d-4094200580c8.webp)
Are you ready to whip up a warm and tasty dessert? My Easy Old Fashioned Peach Cobbler is just what you need! It’s a simple dish that brings out the …
. This will give you all the details you need to create this tasty dessert! This blog post covered the basics of making a delicious peach cobbler. We discussed the key ingredients and kitchen tools, step-by-step instructions, as well as important tips to get the best texture. You also learned about variations for gluten-free or dairy-free diets and how to store your cobbler. Making this dessert can bring joy to any gathering. Enjoy your baking and share it with others!](https://tastednest.com/wp-content/uploads/2025/06/51abd898-d271-442c-b819-d5459d11e099.webp)
If you’re craving a dessert that captures the essence of summer, look no further! This Classic Southern Peach Cobbler is the ultimate treat that will have you reminiscing about warm, …
If you love bold flavors, you’ll enjoy making Sweet & Spicy Peach Pickles. This easy recipe brings together juicy peaches, zesty spices, and a hint of sweetness for a taste …
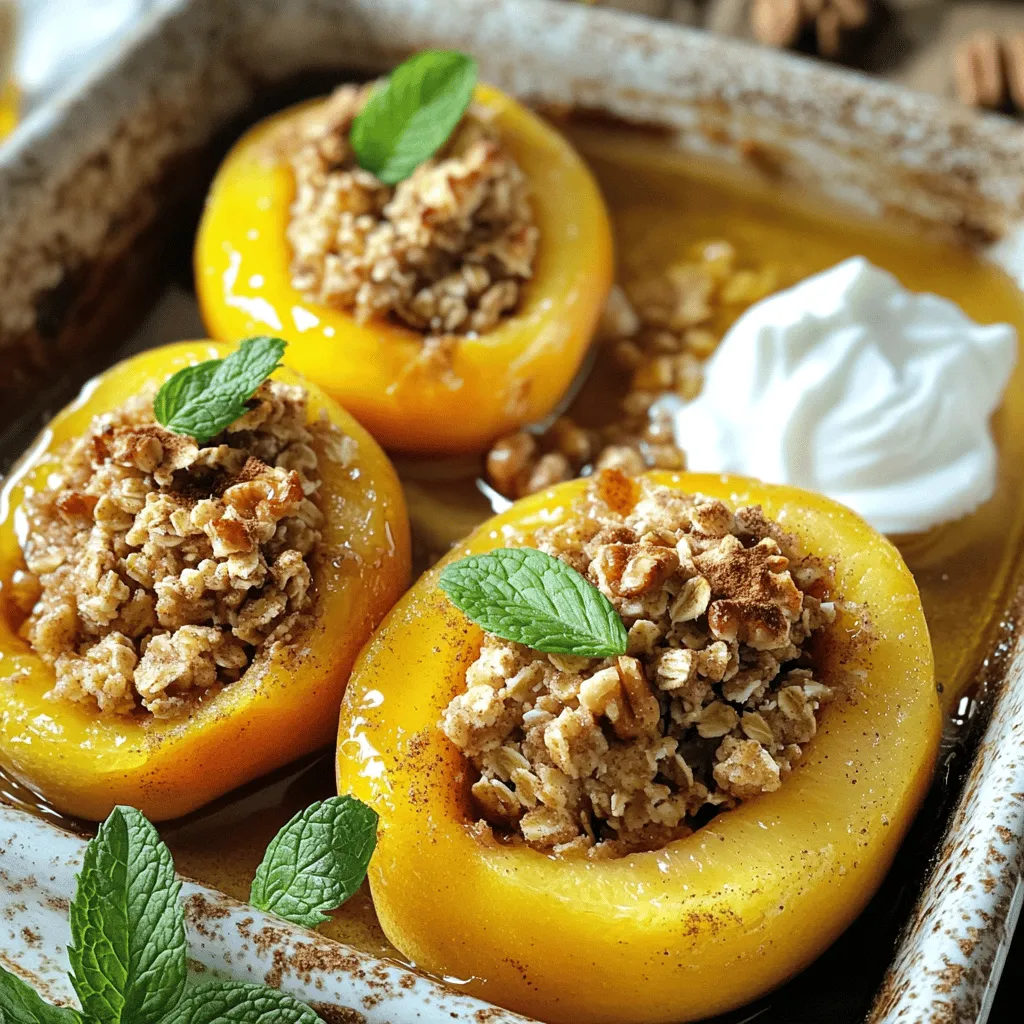
Get ready to indulge in a sweet treat that’s as simple as it is delicious! My Stuffed Baked Peaches recipe combines ripe peaches with a delightful oat filling, creating a …
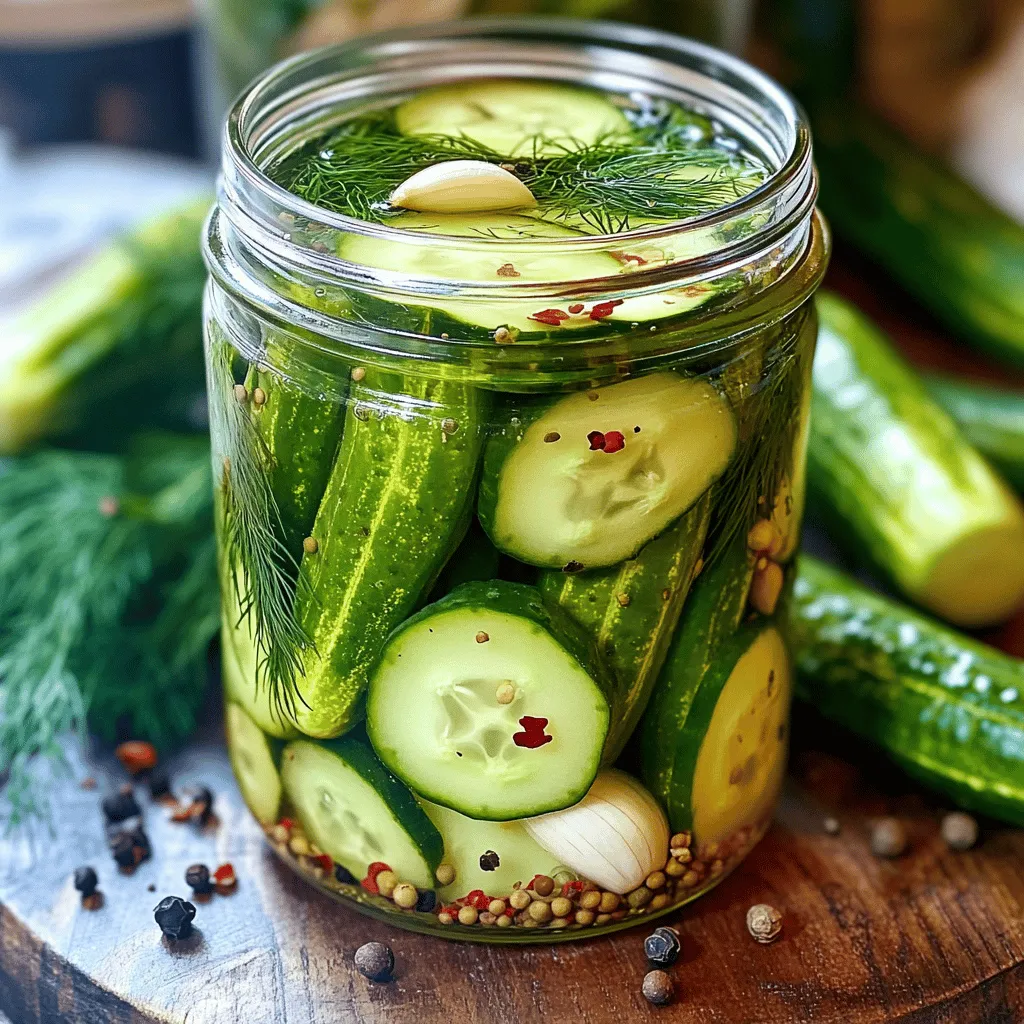
Are you ready to crunch into a flavorful world of homemade garlic dill pickles? These tangy bites are not just snacks; they’re a perfect addition to any dish! In this …
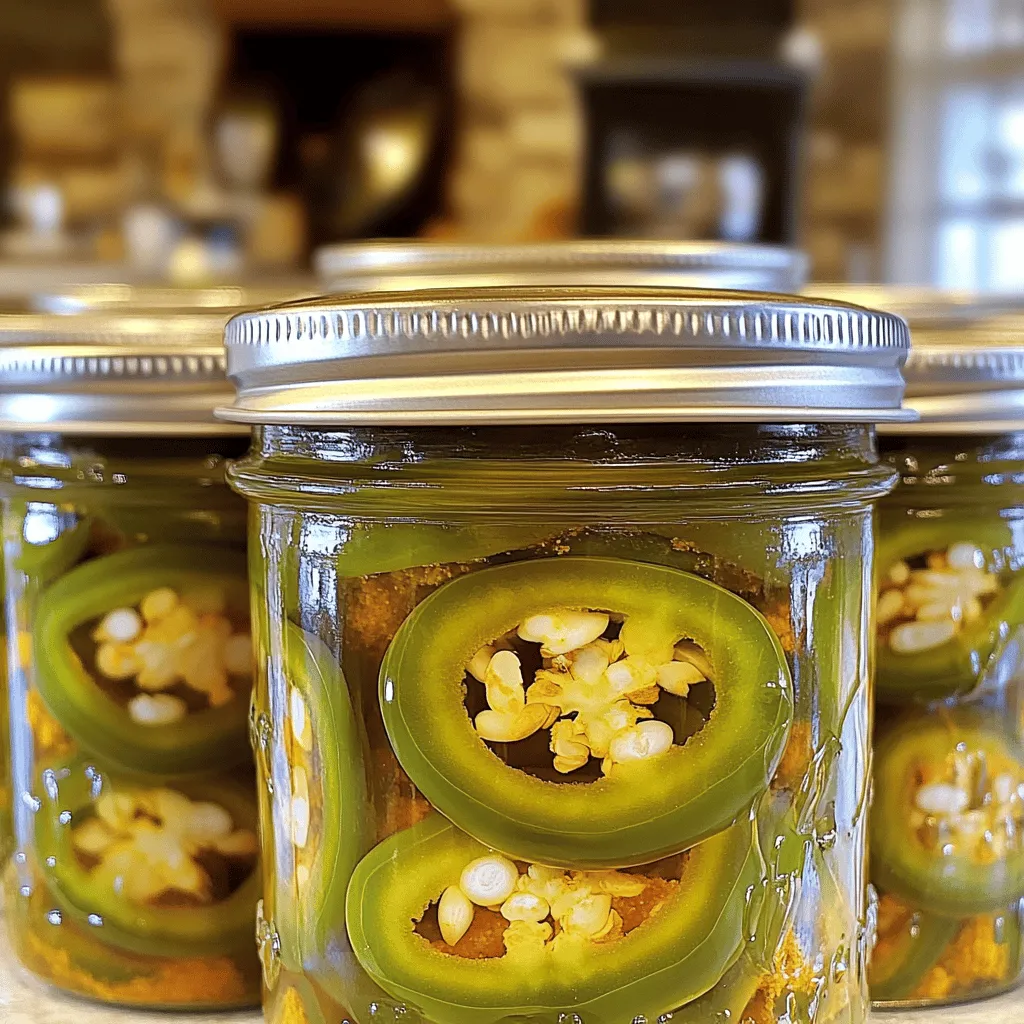
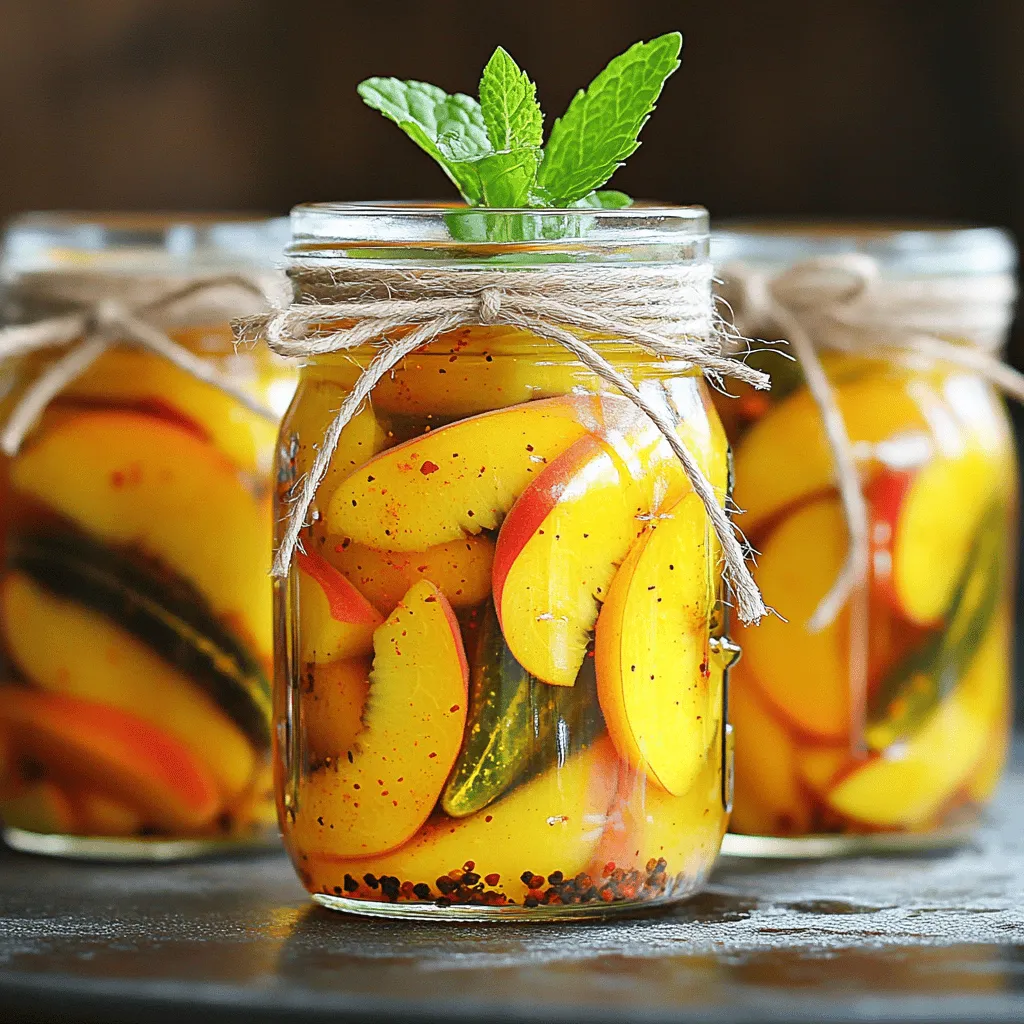
Canning candied jalapeños is a fun and tasty project. You can create sweet and spicy treats that add zest to any meal. In this guide, I will walk you through …
![- 4 ripe peaches, peeled and sliced - 1 tablespoon freshly squeezed lemon juice - 1 cup granulated sugar, divided (1/2 cup for the peaches, 1/2 cup for the batter) - 1 cup all-purpose flour - 1 tablespoon baking powder - 1/2 teaspoon fine sea salt - 1 teaspoon ground cinnamon - 1/2 teaspoon ground nutmeg - 1 cup whole milk - 1/4 cup unsalted butter, melted and slightly cooled - 1 teaspoon pure vanilla extract - Vanilla ice cream (optional, for serving) When I make peach cobbler, I love using fresh, ripe peaches that burst with flavor. The lemon juice adds a little zing that balances the sweet. I divide the sugar to coat the peaches and sweeten the batter. For the dry mix, I use all-purpose flour, baking powder, salt, and spices. The cinnamon and nutmeg give a warm flavor. The milk and melted butter create a rich batter. A splash of vanilla makes it even better. I often serve this cobbler warm with a scoop of vanilla ice cream. The hot and cold mix is pure joy. For the full recipe, check out the Peach Cobbler Delight. - Step 1: Preheat your oven to 350°F (175°C). Grease a 9x13 inch baking dish with butter. This helps the cobbler come out easily. Set the dish aside. - Step 2: In a large bowl, combine the sliced peaches with 1/2 cup of sugar, lemon juice, and vanilla extract. Toss gently until the peaches are coated. Let this sit for about 10 minutes. This allows the peaches to release their juices and form a sweet syrup. - Step 3: In another bowl, mix the flour, remaining 1/2 cup of sugar, baking powder, salt, cinnamon, and nutmeg. Stir until well combined. - Step 4: Gradually add the milk to the dry mixture. Stir well until you have a smooth batter. Next, pour in the melted butter, mixing until fully combined. - Step 5: Pour the batter into your greased baking dish. Use a spatula to spread it evenly across the bottom. - Step 6: Carefully spoon the peach mixture over the batter. Make sure the peaches and juices are evenly spread without stirring. The peaches will sit on top of the batter. - Step 7: Bake the cobbler in the preheated oven for 40-45 minutes. It should turn golden brown, and a toothpick inserted should come out clean. - Step 8: Once baked, remove the cobbler from the oven. Allow it to cool for about 10 minutes before serving. For a treat, serve it warm with a scoop of vanilla ice cream. This combo is a delight! You can find the full recipe for this delicious peach cobbler in the earlier sections. Enjoy your cooking! For a perfect peach cobbler, use freestone peaches. They are easy to slice and have great flavor. Yellow peaches are a classic choice, but white peaches work well too. When picking peaches, look for ones that are firm but yield slightly to gentle pressure. They should have a sweet smell and a golden hue. Avoid peaches with green spots or bruises. The batter should be smooth and a bit thick. Start with the dry ingredients and mix them well. Then, add milk slowly while stirring. This helps avoid lumps. If you do see lumps, just whisk the batter a little more. It's okay if it’s not perfect, but a smoother batter gives a better texture. To check if your cobbler is done, look for a golden top. Insert a toothpick into the center; it should come out clean. Every oven is different, so you might need to adjust the baking time. If your oven runs hot, check it a few minutes early. For a perfect peach cobbler, follow the [Full Recipe]. {{image_4}} You can easily change up the flavors in your peach cobbler. Try adding spices like ginger or cloves. These spices bring warmth and depth. You can also mix in other fruits. Blueberries or raspberries add a burst of color and flavor. This makes your cobbler even more exciting. If you want to cut back on sugar, use honey or maple syrup. These natural sweeteners add unique tastes. They can make your cobbler healthier too. To reduce sugar, try cutting the amount in half. You might not even miss the extra sweetness. For those who need gluten-free options, you can swap regular flour for gluten-free flour. Just make sure to use a blend that works well for baking. Pay attention to texture when you make this swap. Some flours may make the cobbler too dense. Experiment until you find the right fit. For the full recipe, follow the instructions provided earlier. Enjoy your peach cobbler with these fun twists! To keep leftover cobbler fresh, let it cool first. Cover it with plastic wrap or foil. Store it in the fridge. The ideal fridge temperature is 40°F (4°C). This way, your cobbler stays tasty for a few days. To freeze peach cobbler, first let it cool completely. Cut it into portions for easy serving. Wrap each piece tightly with plastic wrap. Then, place them in a freezer bag. Remove as much air as possible to prevent freezer burn. When you're ready to eat, take it out and let it thaw in the fridge overnight. Reheat frozen cobbler in the oven at 350°F (175°C) for about 20-25 minutes. This keeps it warm and delicious. Peach cobbler lasts about 3 to 4 days in the fridge. If you freeze it, it can last up to 6 months. Always check for signs of spoilage. Look for mold, off smells, or a change in color. If you see these signs, it’s best to toss it. Enjoy your peach cobbler at its best! What is the best way to peel peaches? The best way to peel peaches is to blanch them. Start by boiling water in a pot. Once the water is boiling, add the peaches for about 30 seconds. Then, immediately transfer them to ice water. The skins will loosen and peel off easily. Can I use frozen peaches instead of fresh? Yes, you can use frozen peaches. Thaw them first and drain excess juice. This keeps the cobbler from becoming too watery. Frozen peaches are a great option when fresh ones are out of season. Can I replace whole milk with a dairy-free alternative? Yes, you can replace whole milk with almond milk, oat milk, or soy milk. These options will keep your cobbler moist and delicious. Just make sure to choose an unsweetened version to control the sugar. What can I use instead of butter? If you need a butter substitute, try using coconut oil or applesauce. Both options will add moisture to the batter. Choose unsalted coconut oil for a neutral flavor. What to serve with peach cobbler? Peach cobbler tastes great with vanilla ice cream or whipped cream. You can also serve it with a dollop of yogurt for a lighter touch. Fresh mint leaves add a nice pop of color and flavor. Is it better served warm or cold? Peach cobbler is best served warm. The warm cobbler pairs perfectly with cold ice cream. However, it can also be enjoyed cold as a tasty snack. In this blog post, I covered how to make a delicious peach cobbler. We started with fresh peaches, sweeteners, and a simple batter. I shared step-by-step instructions and provided tips for success. Different variations and storage tips were also discussed. Baking this cobbler can be fun and rewarding. Enjoy experimenting with flavors and ingredients. Remember, the best cobbler brings joy to those who share it. Dive in, and create your perfect dessert today!](https://tastednest.com/wp-content/uploads/2025/06/1dd60b6f-d958-4c6f-8a47-e46484fc2b0b.webp)
Peach cobbler is a classic dessert that’s loved by many. In this simple and delicious recipe, I’ll guide you through creating a warm, sweet treat bursting with fresh peach flavor. …