Skip to content
Tasted Nest
  • Home
  • Appetizers
  • Desserts
  • Salads
  • Breakfast
  • Dinner
  • Privacy Policy
  • Contact
  • About

Chef Tavio

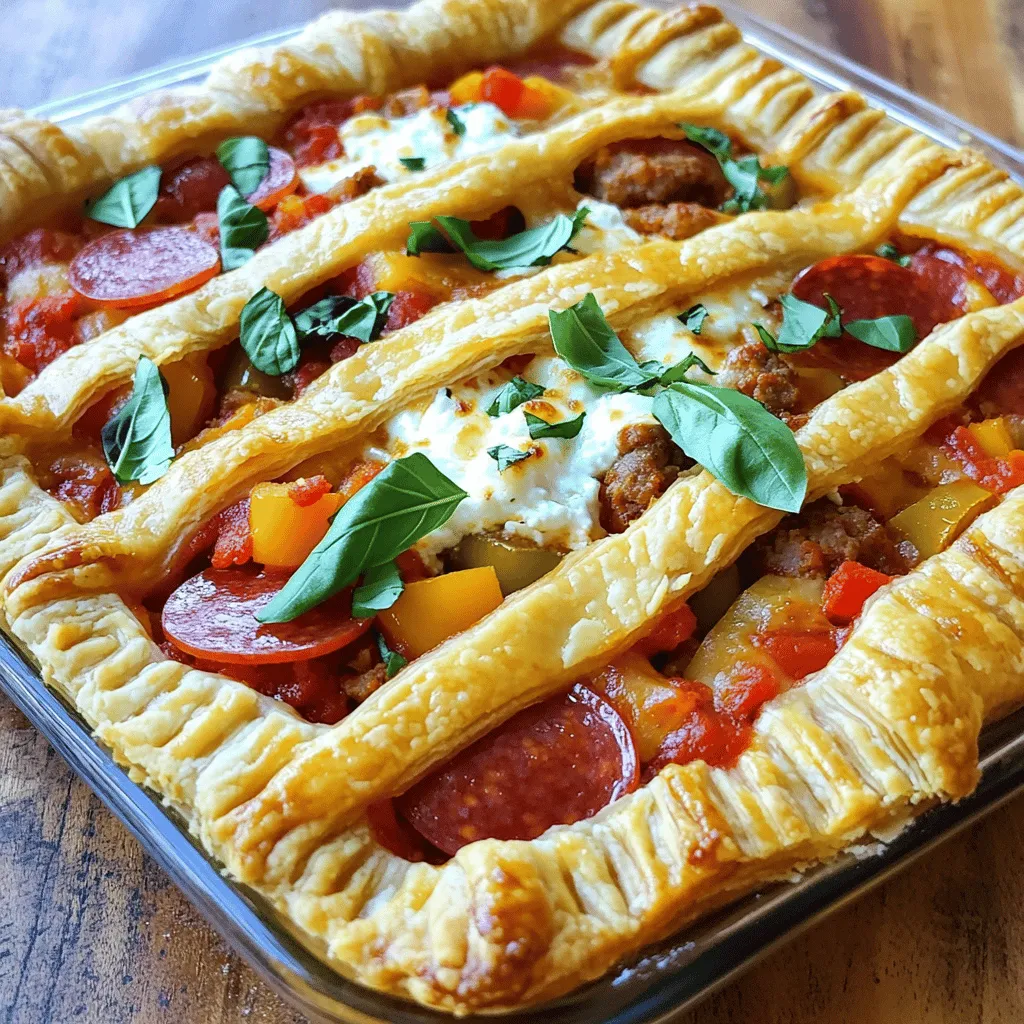
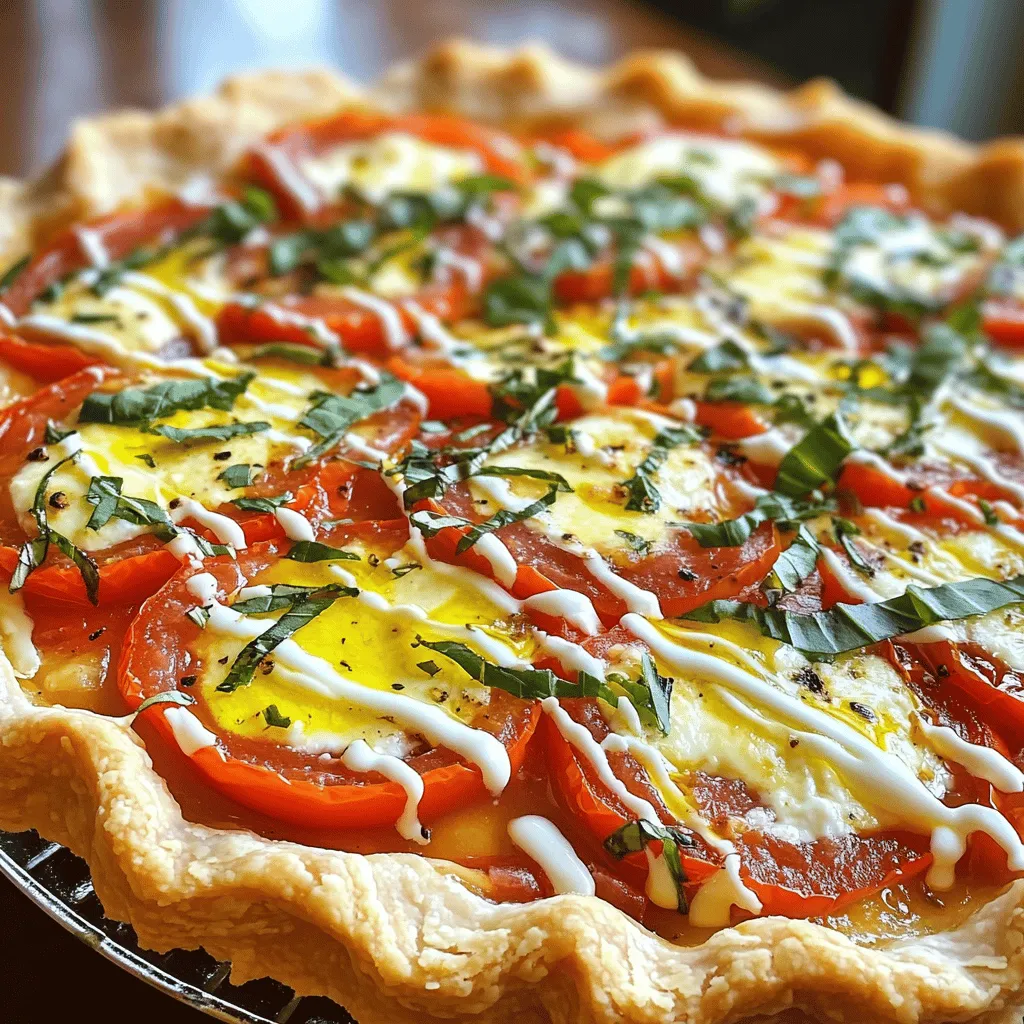
Savory Tomato Galette Simple and Flavorful Recipe

June 23, 2025 by Chef Tavio
- 1 ½ cups all-purpose flour - ½ teaspoon salt - ¼ teaspoon black pepper - ½ cup unsalted butter, chilled and cut into small cubes - 5-6 tablespoons ice water - 4 medium ripe tomatoes, thinly sliced - 1 cup fresh mozzarella cheese, torn into bite-sized pieces - ¼ cup fresh basil leaves, finely chopped - 1 tablespoon balsamic glaze - Salt and pepper to taste - 1 egg, beaten (to brush the crust) To make a savory tomato galette, you need a mix of simple ingredients. First, you’ll need flour, salt, and pepper for the crust. The butter gives it a flaky texture. Ice water helps bring the dough together. For the filling, ripe tomatoes are key. They add juiciness and flavor. Fresh mozzarella gives creaminess, while basil adds a fresh touch. Balsamic glaze brings a sweet tang. Don't forget to season with salt and pepper to enhance all the flavors. - Large mixing bowl - Pastry cutter or fork - Rolling pin - Parchment paper - Baking sheet Using the right tools makes cooking easier. A large mixing bowl is great for combining your dough ingredients. A pastry cutter or fork helps mix the butter into the flour. A rolling pin is essential for rolling out the dough evenly. Parchment paper keeps your galette from sticking to the baking sheet. A sturdy baking sheet ensures even cooking. With these tools, you can create a beautiful and tasty tomato galette. If you want to see how to make it, check the Full Recipe for detailed steps. - Whisk together 1 ½ cups flour, ½ teaspoon salt, and ¼ teaspoon black pepper. - Cut in ½ cup chilled butter until the mixture resembles coarse crumbs. - Gradually mix in 5-6 tablespoons of ice water until a dough forms. - Shape the dough into a disk. - Wrap it in plastic and refrigerate for 30 minutes. - Lay out 4 sliced tomatoes and sprinkle with salt. - Roll the chilled dough on a floured surface to about 12 inches wide. - Layer 1 cup mozzarella and the tomatoes, then fold the edges over the filling. - Preheat your oven to 400°F (200°C). - Brush the edges with 1 beaten egg. - Bake for 30-35 minutes until golden brown. For the full recipe, check out the detailed instructions above! To make a great crust, start with cold butter. This helps create a flaky texture. Cut the butter into small cubes and mix it with the flour. The colder the butter, the better. Rest the dough in the fridge for at least 30 minutes. This makes it easier to roll out. Soggy crusts can ruin your galette. To avoid this, use paper towels. Lay the sliced tomatoes on them to absorb extra moisture. Sprinkle a little salt on the tomatoes and let them sit for 10 minutes. This step improves flavor and reduces sogginess. You can also pre-bake the crust for a short time. This gives the crust extra crispness before adding the filling. Don't be afraid to play with flavors! Try using different herbs like thyme or oregano. You can also switch up the cheese. Goat cheese adds a nice tang. Seasonings like garlic powder or red pepper flakes can bring extra kick. These small changes can elevate your tomato galette and make it your own. For the full recipe, check out the section above. {{image_4}} You can make your galette even better by adding vegetables. Consider using zucchini, bell peppers, or spinach. These veggies add color and extra flavor. Zucchini brings a bit of crunch, while bell peppers add sweetness. Spinach offers a nice, earthy taste. You can mix and match these options to find your favorite combo. Just remember to slice them thinly, like the tomatoes. This way, they cook evenly and blend well with the other flavors. Switching up the cheese can give your galette a fresh twist. Goat cheese or feta works great here. Goat cheese is creamy and tangy, which pairs nicely with sweet tomatoes. Feta adds a salty bite that contrasts well with the crust. You can crumble either cheese on top of the tomatoes. This will create a rich, savory flavor that takes your dish to the next level. Don’t limit yourself to just tomatoes. In fall, you can swap tomatoes for fresh peaches or apples. Peaches add a sweet, juicy twist, making the galette feel like dessert. Apples offer a tart flavor that balances well with cheese. This change keeps your galette exciting throughout the year. Each season brings new tastes to explore, so feel free to experiment! For more details on making your galette, check out the Full Recipe. To keep your galette fresh, let it cool completely. Once cooled, wrap it tightly in plastic wrap. You can also store it in an airtight container. This will keep it from drying out and maintain its flavor. If you want to save some for later, freeze the galette before baking. Wrap it well and store it for up to three months. When you're ready to bake, just pop it in the oven straight from the freezer. Just add a few extra minutes to the cooking time. To enjoy your galette again, reheat it in the oven. Set your oven to 350°F (175°C). Heat it until warmed through. This method keeps the crust crisp and the filling tasty. For more details on making this dish, check the Full Recipe. A tomato galette is a rustic pastry. It features a flaky crust filled with fresh tomatoes and cheese. The open-faced style makes it simple and beautiful. This dish highlights the flavors of ripe tomatoes, basil, and cheese. The crust is golden and crisp, making it a perfect treat for any meal. Yes, you can make the dough ahead of time. Prepare the dough and shape it into a flat disk. Wrap it tightly in plastic wrap. Store it in the fridge for up to two days. You can also freeze the dough for up to three months. Just remember to thaw it in the fridge before using. I suggest pairing your tomato galette with a simple salad. A green salad with mixed greens and a light vinaigrette works well. You can also serve it with a side of hummus or a yogurt dip. For a heartier option, try roasted veggies or a bowl of soup. Your galette is done when the crust is golden brown. The tomatoes should be tender and juicy. You can check the crust by looking for a deep color. If the edges are crisp and golden, you are all set to enjoy your dish! This blog post covered making a delicious tomato galette. You learned about the key ingredients, equipment, and step-by-step instructions. I shared helpful tips to perfect your crust and avoid sogginess. You even discovered variations and storage methods. In the end, cooking should be fun and easy. Try this recipe, and enjoy the tasty results. Cooking brings people together, and sharing this galette would surely delight your friends and family.

Ready to impress your dinner guests? This savory tomato galette is simple and bursting with flavor! Imagine a crispy, buttery crust filled with fresh, ripe tomatoes and melty mozzarella cheese. …

Read more

Categories Dinner

Tomato Pie Delight Flavorful Recipe You’ll Love

June 23, 2025 by Chef Tavio
To make a delicious Tomato Pie Delight, you need fresh and simple ingredients. Here’s what you will need: - 2 cups ripe fresh tomatoes, sliced - 1 cup mozzarella cheese, freshly shredded - 1 cup creamy ricotta cheese - 1/2 cup grated Parmesan cheese - 1/4 cup fresh basil leaves, finely chopped - 1 tablespoon extra virgin olive oil - 1 garlic clove, finely minced - 1 teaspoon dried oregano - 1 teaspoon sea salt - 1/2 teaspoon freshly cracked black pepper - 1 ready-made 9-inch pie crust (store-bought or homemade) Each ingredient plays a key role. The fresh tomatoes give a juicy base. Mozzarella and ricotta add creaminess, while Parmesan gives depth. Basil brightens the dish, and the spices enhance the flavors. The pie crust holds everything together. This recipe is perfect for summer when tomatoes are at their best. If you want to know how to make the pie, check the Full Recipe. - Preheat oven to 375°F (190°C). - Prepare the pie crust. If it is store-bought, simply place it in your pie dish. If homemade, roll it out to fit. Bake the crust for about 10-12 minutes until lightly golden. Let it cool for a bit. - In a medium bowl, mix together: - 1 cup creamy ricotta cheese - 1 garlic clove, minced - 1 teaspoon sea salt - 1/2 teaspoon freshly cracked black pepper - 1 teaspoon dried oregano - Stir until everything blends well into a smooth mix. - Start by layering half of the sliced tomatoes at the bottom of the pie crust. - Spread the creamy ricotta mixture on top of the tomatoes. - Sprinkle on half of the shredded mozzarella and grated Parmesan cheese. - Add the rest of the sliced tomatoes. - Finally, top with the remaining mozzarella and Parmesan cheese, making sure to cover it all. - Drizzle the pie with 1 tablespoon of extra virgin olive oil. - Bake in the oven for 30-35 minutes. Watch for the cheese to melt and bubble. It should turn a lovely golden brown. - Once done, let it cool for about 10 minutes before slicing. For the full details, check the Full Recipe. Enjoy your Tomato Pie Delight! For the best flavor, I recommend using a mix of cheeses. Mozzarella gives a nice stretch, while ricotta adds creaminess. Parmesan adds a rich taste. This trio creates a dreamy cheese layer that melts perfectly. You can also try adding some goat cheese for a tangy twist. To get a golden crust, bake it before adding the filling. Pre-bake it for 10-12 minutes at 375°F. This helps the crust stay crisp and not soggy. Make sure to watch it closely. You want it golden, not burnt. A little olive oil brushed on top can also help with browning. When serving your Tomato Pie Delight, I like to garnish with fresh basil leaves. They add a pop of color and flavor. Pair it with a simple green salad for a fresh contrast. You can also serve it with a drizzle of balsamic glaze. This adds a sweet tang that enhances the flavor. Enjoy your creation! {{image_4}} You can easily make your Tomato Pie Delight even better by adding more vegetables. Spinach and zucchini work great here. Spinach adds a nice green color and boosts the nutrients. Just sauté it lightly first to get rid of extra water. Zucchini gives a nice crunch and sweetness. Slice it thin and layer it with the tomatoes. Both veggies blend well with the cheese and spices. If you need a gluten-free crust, it’s simple to make one at home. Use almond flour or rice flour as a base. Mix it with a little butter and egg to bind it. Press the mix into a pie dish. Pre-bake it like you would with a regular crust. This way, you keep the flavor while sticking to gluten-free needs. To kick up the flavor, try adding different herbs or spices. Fresh thyme or rosemary can bring a lovely aroma. You can also use smoked paprika for a bit of warmth. Mix these into the ricotta cheese or sprinkle them on top. Each herb will give your Tomato Pie Delight a unique twist. Don't hesitate to play around; cooking should be fun! For the full recipe, check out the detailed instructions above. To keep your Tomato Pie Delight fresh, store it in the fridge. First, let it cool down. Then, cover it tightly with plastic wrap or foil. This helps to prevent it from drying out. Make sure to eat it within 3-4 days for the best taste. Reheating your pie properly keeps its tasty texture. Preheat your oven to 350°F (175°C). Place slices on a baking sheet. Cover them with foil. Heat for about 15-20 minutes. This method warms the pie evenly without making it soggy. Yes, you can freeze Tomato Pie Delight! Wrap it tightly in plastic wrap and then in foil. This keeps it safe from freezer burn. It can stay fresh for up to 3 months. When ready to eat, thaw it in the fridge overnight. Then, reheat it in the oven to enjoy! You can use cottage cheese or cream cheese. Both options give a creamy texture. If you want less fat, try Greek yogurt. This will also add a nice tang. Each choice will change the taste slightly. Yes, fresh tomatoes add a bright flavor. They also bring more texture to the pie. Fresh tomatoes keep the dish light and vibrant. Make sure they are ripe for the best taste. You can slice them thin to layer nicely. Tomato Pie Delight lasts about 3 to 5 days in the fridge. Store it in an airtight container. To keep it fresh, cover the pie tightly. If you see any mold or it smells off, throw it away. You can make it vegan-friendly! Replace ricotta with cashew cream or tofu. Use vegan cheese instead of mozzarella and Parmesan. This way, you keep the creamy and cheesy taste without dairy. This blog post covered how to make a delicious Tomato Pie Delight. You learned about key ingredients, step-by-step instructions, and useful tips for success. We also explored variations for different diets, ways to store leftovers, and answers to common questions. Tomato Pie Delight is an easy dish that can impress your friends and family. Try making it your own with different flavors or toppings. Enjoy your cooking adventure!

Looking for a delicious dish that’s both easy to make and packed with flavor? Tomato Pie Delight is your answer! With fresh tomatoes, creamy cheeses, and a golden crust, it’s …

Read more

Categories Dinner

Italian Frittata Simple and Flavorful Recipe Guide

June 23, 2025 by Chef Tavio
To make a great Italian frittata, you need the following ingredients: - 6 large eggs - 1/2 cup milk - 1 cup fresh spinach, chopped - 1 cup cherry tomatoes, halved - 1/2 cup red bell pepper, diced - 1/2 cup onion, finely chopped - 1/2 cup grated Parmesan cheese - 1 teaspoon dried oregano - Salt and pepper to taste - 2 tablespoons olive oil - Fresh basil leaves for garnish These ingredients come together to create a dish that is rich in flavor and texture. The eggs form the base, while the veggies add color and nutrients. You can customize your frittata with optional add-ins. Here are some ideas: - Mushrooms for an earthy flavor - Zucchini for extra greens - Feta cheese for a tangy kick - Fresh herbs like parsley or thyme If you don't have some ingredients, don’t worry. You can swap out fresh spinach with kale or use any cheese you like. Each serving of this frittata is packed with nutrients. Here’s a rough breakdown: - Calories: 250 - Protein: 15g - Fat: 18g - Carbohydrates: 8g - Fiber: 2g This frittata is not just tasty but also offers a balanced meal. You can feel good serving it for breakfast, lunch, or dinner. For the full recipe, check out the details above. To start, gather a large mixing bowl. Crack 6 large eggs into the bowl. Pour in 1/2 cup of milk. Whisk these two together until smooth. This step is key; it gives the frittata a fluffy texture. Add salt, pepper, and 1 teaspoon of dried oregano for flavor. Mix again to blend everything well. Next, grab a large, oven-safe skillet. Heat 2 tablespoons of olive oil over medium heat. When hot, add 1/2 cup of finely chopped onion and 1/2 cup of diced red bell pepper. Sauté for about 3 minutes. Stir occasionally until the onion turns translucent. Add 1 cup of chopped spinach and 1 cup of halved cherry tomatoes. Cook for another 2 minutes. The spinach should wilt, and the tomatoes should soften. Now, carefully pour the egg mixture over the sautéed veggies. Make sure to cover all the vegetables evenly. Sprinkle 1/2 cup of grated Parmesan cheese on top. Let it cook on the stovetop for about 5 minutes. The edges should start to set. Now, transfer the skillet to your preheated oven at 375°F (190°C). Bake for 15-20 minutes. Check if it’s done by inserting a toothpick in the center. It should come out clean. After baking, let it cool for a few minutes, then slice it into wedges. Garnish with fresh basil leaves before serving. Enjoy the tasty frittata! For the full details, check the Full Recipe. To get the best frittata, timing is key. Start by cooking your frittata on medium heat for 5 minutes on the stovetop. This helps set the edges. Then, move it to the oven for 15-20 minutes. The oven cooks evenly, so the frittata puffs up nicely. Check it with a toothpick; it should come out clean when done. The perfect frittata should be fluffy, not dry. To achieve this, whisk the eggs with milk well. This adds air and lightness. When pouring the egg mixture over the veggies, make sure it covers them evenly. Also, don’t overcook it in the oven. A slight jiggle in the center is okay; it will set while cooling. To boost flavor, use fresh herbs like basil or parsley. You can also add spices like paprika or chili flakes for a kick. Experiment with different cheeses, too. Feta or goat cheese can add a nice tang. Don’t forget to season well with salt and pepper. These small changes can make your Italian frittata truly special. For the full recipe, check out the complete guide above. {{image_4}} You can create many tasty frittatas with different veggies. For a fun twist, try using zucchini or mushrooms. Broccoli and cauliflower also work well. Use what you have and mix colors for a vibrant dish. The key is to chop them small so they cook evenly. You can even use leftover roasted vegetables for added flavor. Each combo brings a new taste to your frittata. Cheese adds a creamy touch to your frittata. Parmesan is a classic choice, but don’t stop there. Try using mozzarella for a mild flavor or feta for a salty kick. Goat cheese can also add tanginess. Mix and match cheeses to discover your favorite blend. Just remember to adjust the amount based on how rich you want the dish. Adding meat can make your frittata heartier. Cooked bacon or sausage adds great flavor. You can also use ham or turkey for a lighter option. Just make sure to chop the meat into small pieces. This way, it spreads well in the egg mixture. Meat adds protein and makes the frittata perfect for any meal. For the full recipe, check out the Italian Frittata Delight. After cooking, let your frittata cool down to room temperature. Cut it into slices for easy storage. Place the slices in an airtight container. You can keep it in the fridge for up to three days. This helps keep it fresh and tasty. If you want to enjoy it later, storing it right is key. To reheat the frittata, you have a few options. The microwave is quick, but it can make the frittata a bit soggy. Instead, try using an oven or a skillet. Preheat your oven to 350°F (175°C). Place the frittata slices on a baking sheet. Heat for about 10-15 minutes. If using a skillet, warm it on low heat and cover it. This keeps the moisture in, so it stays fluffy. If you want to save your frittata for a long time, freezing works well. First, let it cool completely. Wrap each slice in plastic wrap. Then, place the wrapped slices in a freezer bag. Don't forget to label the bag with the date. You can freeze it for up to three months. When you’re ready to eat, thaw it in the fridge overnight before reheating. This method keeps the flavors intact and makes for a quick meal later. For the full recipe, check the main article. A frittata and an omelette are both egg dishes, but they differ in how they cook. An omelette cooks quickly in a pan and is folded over. A frittata cooks slowly and is often finished in the oven. The frittata mixes in more ingredients, like vegetables and cheese, making it heartier. This dish is great for using leftovers. Frittatas can serve more people, too. Yes, you can make a frittata ahead of time. It stores well in the fridge for up to three days. Simply cover it tightly with plastic wrap. When you’re ready to eat, you can reheat it. Just warm it in the oven or microwave until hot. This makes it a perfect meal prep option. You can enjoy it hot or cold. Serving an Italian frittata is simple and fun. Cut it into wedges for easy sharing. You can serve it warm or at room temperature. A fresh salad pairs nicely. Drizzle extra olive oil on top for added flavor. Garnish with fresh basil leaves for a pop of color. For more ideas, try serving it with crusty bread or a side of roasted veggies. For the full recipe, check out the Italian Frittata Delight section. You’ve learned how to make a tasty Italian frittata from start to finish. We discussed key ingredients and how to prep them right. I shared tips for perfect cooking, different flavor options, and storage ideas. I hope you feel confident to try this dish. With practice, you’ll make a frittata that impresses everyone! Enjoy exploring your kitchen and customizing your recipe.

Are you ready to whip up a delicious Italian frittata? This simple and flavorful recipe guide will show you how to create a dish that’s packed with taste and nutrition. …

Read more

Categories Breakfast

Garlic Cheddar Chicken Breast Flavorful and Easy Dish

June 22, 2025 by Chef Tavio
- 4 boneless, skinless chicken breasts - 1 cup sharp cheddar cheese, shredded - 4 cloves garlic, finely minced - 1 teaspoon smoked paprika - 1 teaspoon dried thyme - 1 tablespoon extra virgin olive oil - 1/2 teaspoon salt - 1/2 teaspoon freshly ground black pepper - Fresh parsley, finely chopped (for garnish) When picking ingredients, choose fresh chicken and high-quality cheese. You can swap sharp cheddar for mild if you prefer less flavor. For the garlic, fresh cloves are best, but jarred minced garlic works too. To cook this dish, you need some basic tools: - A baking dish - A mixing bowl - A spoon or brush for the marinade - A sharp knife for chopping These tools make it easy to prepare and serve Garlic Cheddar Chicken Breast. The right ingredients and tools help you create a tasty dish that impresses your family and friends. Check the Full Recipe for a detailed guide on how to bring this meal to life! Preheating the oven is key for great chicken. It helps cook the chicken evenly. Set your oven to 375°F (190°C) before you start. This ensures it’s hot enough when the chicken goes in. Mixing garlic and spices creates depth in flavor. In a bowl, combine minced garlic, smoked paprika, dried thyme, olive oil, salt, and black pepper. This marinade adds a tasty kick to the chicken. For even cooking, place the chicken breasts in a single layer in a baking dish. Pour the marinade over them. Use a spoon or brush to coat each piece well. This step makes sure every bite is full of flavor. Cover the dish with aluminum foil for the first part of baking. This keeps the chicken moist. Bake for 25 minutes. After that, remove the foil to let the cheese brown. Bake for another 10-15 minutes. Check the chicken's internal temperature; it should be 165°F. This ensures it’s safe to eat. When done, let the chicken rest for 5 minutes before serving. This helps keep it juicy and tender. For the full recipe, check the previous section. To boost the taste of your garlic cheddar chicken, you can add more spices or herbs. Here are some ideas: - Oregano: Adds a lovely earthy taste. - Rosemary: Offers a fragrant touch. - Cayenne pepper: Gives a nice kick of heat. - Lemon zest: Brightens the flavor with citrus notes. Mix and match these options with your garlic and cheese for a fun twist. You can choose between baking and grilling to change the texture. - Baking keeps the chicken moist and tender. It also melts the cheese evenly. - Grilling gives a nice char and smoky flavor. It works well for those who like a crispy outside. Try both methods to see which you prefer! Letting the chicken rest is key. After cooking, let it sit for about five minutes. This allows the juices to flow back into the meat. A juicy chicken breast tastes much better! When serving, place the chicken on a big platter. Drizzle any leftover juices over the top. Pair it with some steamed veggies or a fresh salad to make a complete meal. For the full recipe, check out the Garlic Cheddar Chicken Breast recipe! {{image_4}} To make this dish keto-friendly, swap some ingredients. You can use chicken thighs instead of breasts. They stay moist and add flavor. For cheese, use a low-carb option, like mozzarella. You can also replace olive oil with butter for a richer taste. This keeps the dish low in carbs while still delicious. If you like heat, add jalapeños to the mix. Slice them thin and sprinkle them on top of the chicken before baking. You can also mix some hot sauce into the marinade. This boosts the flavor and gives a spicy kick. Adjust the amount based on your spice level. It’s a fun way to change the taste of the dish. For a richer sauce, add cream to the mix. After mixing the spices and garlic, stir in half a cup of heavy cream. This creates a smooth and creamy texture. Pour it over the chicken before adding the cheese. The cream makes the dish feel more indulgent and adds depth to the flavor. You can find the full recipe [here](link). To keep your Garlic Cheddar Chicken Breast fresh, follow these tips. First, let the chicken cool to room temperature. This prevents steam from building up, which can make the chicken soggy. Next, store leftovers in an airtight container. This keeps moisture in and odors out. You can refrigerate the chicken for up to three days. If you want to keep it longer, freeze it. Wrap each piece tightly in plastic wrap, then place it in a freezer bag. This helps prevent freezer burn. Frozen chicken can last for up to three months. When you’re ready to enjoy your stored chicken, reheating is key. The best method is to use the oven. Preheat it to 350°F (175°C). Place the chicken in a baking dish and cover it with foil. This keeps the chicken moist as it warms up. Heat it for about 15-20 minutes, or until it reaches an internal temperature of 165°F (74°C). You can also use a microwave for quicker reheating. Just place the chicken on a microwave-safe plate and cover it. Heat in short bursts, checking often to avoid overcooking. This way, you enjoy the tasty flavors of Garlic Cheddar Chicken again. For the full recipe, check above. Use a meat thermometer to check the chicken's temperature. Insert it into the thickest part of the breast. When it reads 165°F, the chicken is safe to eat. This method is the most reliable way to ensure your chicken is cooked through. Undercooked chicken can be unsafe and lead to foodborne illness, so it's crucial to check. Yes, you can prepare this dish in advance. To do this, marinate the chicken and add the cheese. Then, cover it tightly and store it in the fridge. You can keep it there for a day or two. Just remember to bake it before serving. This makes dinner stress-free and allows the flavors to develop. This chicken pairs well with many side dishes. Here are some ideas: - Steamed broccoli or green beans - Mashed potatoes or sweet potatoes - A fresh garden salad - Rice or quinoa for a light option These sides will balance the rich flavors of the chicken. Absolutely! This recipe is perfect for meal prep. You can make a big batch and pack it in containers. Store it in the fridge for quick meals during the week. It reheats well, so you can enjoy it for lunch or dinner. Plus, the flavors get better as it sits, making it even tastier! This post covers a simple and tasty garlic cheddar chicken recipe. You learned about the key ingredients, their quality, and necessary kitchen tools. I provided step-by-step baking instructions, cooking tips, and variations like low-carb options. Remember to let the chicken rest before slicing for better flavor and texture. Proper storage and reheating practices ensure your leftovers taste great. With these insights, you can create a delicious meal that fits your needs and preferences. Enjoy this dish and make it your own!

If you’re craving a quick and tasty dinner, you’ve come to the right place! Garlic Cheddar Chicken Breast is simple to make and packed with flavor. This dish combines tender …

Read more

Categories Dinner

Cheesecake Dip with Strawberries Perfect for Parties

June 22, 2025 by Chef Tavio
To make a tasty cheesecake dip, you need these key ingredients: - 8 oz cream cheese, softened to room temperature - 1/2 cup powdered sugar, sifted to avoid lumps - 1 teaspoon pure vanilla extract - 1/4 cup sour cream for tanginess - 1/2 cup heavy whipping cream, chilled - 1 tablespoon freshly squeezed lemon juice for brightness - Fresh strawberries, hulled and halved (for dipping) - Graham cracker crumbs (for garnish and crunch) Each ingredient plays a big role. The cream cheese gives a rich base. The powdered sugar adds sweetness. The sour cream and lemon juice create a nice tang. Chilled heavy cream makes the dip light and fluffy. To whip up this dip, you will need some simple tools: - A spacious mixing bowl - An electric mixer or a stand mixer - A rubber spatula for folding - A second chilled bowl for whipping cream - A serving bowl for the final dip These tools help you mix and whip the ingredients well. They ensure a creamy and fluffy texture for your dip. Preparing strawberries is easy and fun! Here are my tips: - Choose ripe strawberries for the best flavor. - Rinse them gently under cool water. - Hull and halve the strawberries for easy dipping. Fresh strawberries add a pop of color and sweetness. They pair perfectly with the creamy dip. Plus, they make your dish look extra inviting! Enjoy this fun dessert at your next party. For the full recipe, check out the details above! First, gather your ingredients. You will need cream cheese, powdered sugar, vanilla extract, sour cream, and lemon juice. In a large bowl, beat the softened cream cheese until smooth. This usually takes 1-2 minutes. Make sure there are no lumps. Next, slowly add the powdered sugar. Keep mixing until the mixture is light and fluffy, which takes about 2-3 minutes. Now, it's time to whip the heavy cream. Pour it into a separate chilled bowl. Use a hand mixer or stand mixer to whip it. You want soft peaks to form, which should take around 3-4 minutes. Be careful not to over-whip. Soft peaks will make your dip light and airy, which is key for a great texture. Once your cream is ready, gently fold it into the cream cheese mixture. Use a rubber spatula for this step. Fold slowly to keep the air in the whipped cream. You want a smooth, uniform dip. After mixing, transfer the cheesecake dip to a serving bowl. Smooth the top with your spatula. Finally, sprinkle graham cracker crumbs on top for a nice crunch. Arrange halved strawberries around the dip for easy dipping and a colorful look. For the full recipe, check out the recipe section above. To create the best texture for your cheesecake dip, start with softened cream cheese. Let it sit out for about 30 minutes. This step helps mix it easily. Beat the cream cheese until it is smooth. Adding sifted powdered sugar gradually will keep it light. After mixing in the vanilla, sour cream, and lemon juice, the dip should be creamy. When whipping the heavy cream, stop at soft peaks. This keeps the dip airy. Gently fold the whipped cream into the mixture. This keeps the texture fluffy and smooth. When serving the cheesecake dip, presentation matters. Use a bright bowl to catch the eye. Surround the bowl with fresh strawberries for color. You can also add graham cracker crumbs on top for crunch. Set out extra strawberries for guests. They will love dipping them in the creamy dip. If you want, include some fun dipping items like pretzels or mini cookies. This variety keeps things exciting and fun. Garnishing adds a nice touch. A sprig of mint on top looks great and tastes fresh. You can also sprinkle more graham cracker crumbs on the dip. This adds sweetness and texture. Consider adding a drizzle of chocolate or caramel over the top for flair. Arrange the strawberries neatly around the bowl. This makes everything look more inviting. For a lovely touch, use a colorful platter. A beautiful setup makes your cheesecake dip even more enjoyable. For the full recipe, check out the Decadent Cheesecake Dip with Fresh Strawberries. {{image_4}} You can easily change the flavor of your cheesecake dip. For a rich chocolate taste, add 1/4 cup of cocoa powder or melted chocolate. Stir it in after mixing the cream cheese and sugar. If you want a sweet twist, drizzle in caramel sauce. This adds a lovely sweetness and a soft texture. You can even mix in a spoonful of hazelnut spread for a nutty flavor. If you have dietary needs, don’t worry! You can make this dip fit your lifestyle. For a dairy-free option, use vegan cream cheese and coconut whipped cream. This keeps the creaminess while being plant-based. If you prefer a low-sugar version, swap the powdered sugar for a sugar alternative like Stevia or erythritol. Just remember to check the sweetener's conversion rates for the best results. While strawberries are a classic choice, you can try many other dippers. Fresh fruits like apple slices, banana chunks, or even pineapple work well. For crunch, use graham crackers, pretzels, or cookie sticks. You can even serve it with mini waffles for a fun twist. Each option adds a new flavor and texture to your cheesecake dip experience. To store leftover cheesecake dip, place it in an airtight container. This keeps it fresh and tasty. Make sure to seal the container tightly. Store it in the fridge for up to three days. The cream cheese will stay creamy, and the flavors will blend nicely. You can freeze cheesecake dip, but it may change texture. To freeze, spoon the dip into a freezer-safe container. Leave some space at the top for expansion. Seal the container well. It can last up to two months in the freezer. Label the container with the date for easy tracking. When ready to use, thaw the dip in the fridge overnight. Avoid thawing at room temperature to keep it safe. Once thawed, stir the dip gently to revive its creamy texture. You may need to add a bit of heavy cream if it seems too thick. Serve it with fresh strawberries for a delightful treat. For the full recipe, check out the complete details. Yes, you can make this cheesecake dip ahead of time. I recommend preparing it a few hours before your event. This gives the flavors time to blend and develop. Just keep it in the fridge until you are ready to serve. For the best taste, serve it fresh. If you want to replace sour cream, use Greek yogurt. It has a similar tangy flavor and creamy texture. You can also try cream cheese mixed with a little milk. This keeps the dip smooth and tasty. This dip lasts about 3 to 5 days in the fridge. Make sure to store it in an airtight container. Always check for freshness before serving. If it looks or smells off, it's best to toss it. For the best taste, eat it sooner rather than later. Find the full recipe for this creamy treat and enjoy! Cheesecake dip is easy and fun to make. We covered main ingredients and tools. I shared tips for prepping strawberries and whipping cream. Then, I explained how to combine them for the perfect dip. Remember the tricks to get the best texture and presentation for parties. Explore flavor variations and alternatives for dips. Don’t forget storage tips to keep it fresh. This cheesecake dip will impress your guests and make any gathering sweeter. Get ready to enjoy this tasty treat!

Looking for the perfect party treat? This Cheesecake Dip with Strawberries is your answer! It’s creamy, sweet, and easy to make. You can whip it up in no time and …

Read more

Categories Desserts

Peach Cobbler Cheesecake Salad Fresh and Flavorful Treat

June 22, 2025 by Chef Tavio
To make Peach Cobbler Cheesecake Salad, you need these key items: - 2 cups fresh peaches, diced into bite-sized pieces - 1 cup cream cheese, softened to room temperature - 1/2 cup Greek yogurt, plain or vanilla - 1/2 cup powdered sugar, sifted for smoothness - 1 teaspoon pure vanilla extract - 1/2 teaspoon ground cinnamon, plus extra for garnish - 1 cup granola (cinnamon-flavored recommended for added warmth) - 1/4 cup pecans, toasted and chopped (optional) - Whipped cream, for topping each serving Using fresh, ripe peaches makes a big difference. They add sweetness and flavor. Choose firm peaches with a slight give when pressed. For cream cheese, pick a high-quality brand for a creamy texture. Greek yogurt should be plain or vanilla for the best taste. Use fresh ground cinnamon for a warm, rich flavor. Granola should be crunchy and not too sweet. If you opt for pecans, toasting them enhances their nutty flavor. You can swap fresh peaches for other fruits like berries or apples. If you want a lighter option, use low-fat cream cheese. You can also use dairy-free yogurt for a vegan choice. If you don’t have granola, crushed cookies can work too. For a nut-free version, simply skip the pecans. Each swap can bring a new twist to this tasty salad. For the complete recipe, check out the Full Recipe. To make Peach Cobbler Cheesecake Salad, start by mixing the cream cheese and yogurt. I use a large bowl for this. Add the powdered sugar, vanilla extract, and ground cinnamon. Beat this mixture with an electric mixer on medium speed. Keep mixing until it is smooth and creamy. You want no lumps in your mix. Next, fold in the diced peaches using a spatula. Be gentle so the peaches don't break apart. You want to keep the fruit whole and pretty. Mix until the peaches are evenly spread throughout the creamy mixture. Now, it’s time to layer the salad. Grab a clear serving bowl or individual cups. Start with a layer of the peach cheesecake mixture. Then, add a layer of granola on top. I recommend using cinnamon-flavored granola for extra warmth. Repeat these layers until you run out of ingredients. Finish with a generous scoop of the cheesecake mixture on top. If you like, sprinkle some chopped toasted pecans over the top layer. This adds a nice crunch. Right before serving, add a dollop of whipped cream on each serving. This makes it look and taste even better. For a lovely touch, garnish each serving with a fresh slice of peach. A sprinkle of ground cinnamon on top adds to the flavor and looks great too. Enjoy your Peach Cobbler Cheesecake Salad with friends or family! To get the creamiest texture in your Peach Cobbler Cheesecake Salad, start with room-temperature cream cheese. Cold cream cheese can make lumps. Use an electric mixer to blend your cream cheese and yogurt well. Mix until smooth and fluffy. This ensures a rich and creamy base. Be gentle when folding in the peaches. You want them to stay intact and add a nice bite. Flavor is key in this salad. Use ripe, fresh peaches for the best taste. Sweet and juicy peaches will shine in this recipe. Ground cinnamon adds warmth, so don’t skip it! You can also add a splash of lemon juice to brighten the flavors. If you like more sweetness, adjust the powdered sugar to your taste. Avoid over-mixing your cream cheese mixture. This can lead to a dense texture. Also, don’t forget to sift the powdered sugar. This keeps it smooth and clump-free. When layering, be careful not to pack the granola too tightly. It should remain crunchy. Lastly, serve this salad cold. It tastes best when chilled for a bit before serving. For the full recipe, check out the link provided! {{image_4}} You can switch up the fruit based on what’s in season. Try fresh strawberries, juicy blueberries, or ripe plums. Each fruit brings a new twist to your Peach Cobbler Cheesecake Salad. They add unique flavors and colors that make the dish even more fun. You can even mix different fruits for a bright and vibrant salad. Toppings can change the whole vibe of the salad. Instead of granola, try crushed cookies or nuts for crunch. You can also add mini chocolate chips for a sweet surprise. If you want more flavor, mix in some coconut flakes or dried fruit. Each choice adds a special touch to your Peach Cobbler Cheesecake Salad. If you want to make this salad vegan or dairy-free, it’s easy! Swap the cream cheese and yogurt for cashew cream or a dairy-free yogurt. Use maple syrup instead of powdered sugar to keep it sweet. You can still enjoy the creamy and fruity goodness without any dairy. This way, everyone can savor this tasty treat. To keep your Peach Cobbler Cheesecake Salad fresh, store it in the fridge. Use an airtight container. This helps prevent the salad from drying out or absorbing other smells in the fridge. Make sure to layer the salad gently to keep the texture. If you have leftovers, it’s best to store the granola separately. This way, it stays crunchy. When stored properly, your Peach Cobbler Cheesecake Salad lasts about 3 to 5 days in the fridge. The longer it sits, the more the granola may get soggy. Check for any signs of spoilage before enjoying leftovers. If the salad looks or smells off, it's best to toss it. I don’t recommend freezing this salad. Freezing can change the texture of the cream cheese and peaches. If you must freeze it, consider only freezing the peach mixture. Place it in a freezer-safe container. When ready to eat, thaw it in the fridge overnight. Then, mix it back with fresh granola and whipped cream for a better texture. Peach cobbler cheesecake salad is a fun twist on dessert. It combines fresh peaches, cream cheese, and yogurt. The result is a creamy, fruity dish with a hint of cinnamon. This salad has layers of flavor and texture, thanks to the granola. It's like eating peach cobbler but in a light and easy way. Yes, you can make this salad ahead of time. It tastes great when chilled. Prepare it a few hours or even a day before serving. Just keep it covered in the fridge. This allows the flavors to blend nicely. To serve more people, simply double or triple the ingredients. Keep the same ratios for the cream cheese, yogurt, and peaches. This will help maintain the flavor and texture you love. Use a larger bowl or dish for mixing and layering. You can find the Full Recipe for peach cobbler cheesecake salad in the main article. This recipe gives you all the steps and tips to make it perfect. Enjoy making this delightful treat! In this post, we covered key ingredients and how to use them well. I shared step-by-step instructions to help you layer and serve your dish. You learned tips for a creamy texture and how to avoid common mistakes. We explored tasty variations and how to store your peach cobbler cheesecake salad properly. To sum up, this dessert is simple and fun. Enjoy experimenting to make it your own!

If you’ve ever craved the sweet, juicy taste of summer, you’re in for a treat. Peach Cobbler Cheesecake Salad combines the best parts of a cobbler and cheesecake into one …

Read more

Categories Desserts

Parmesan Crusted Chicken Crispy and Flavorful Dinner

June 22, 2025 by Chef Tavio
- 4 boneless, skinless chicken breasts - 1 cup freshly grated Parmesan cheese - 1 cup breadcrumbs (preferably panko for a delightful crunch) - 2 teaspoons garlic powder - 1 teaspoon dried oregano - 1 teaspoon smoked paprika - Salt and freshly ground black pepper to taste - 2 large eggs - 2 tablespoons Dijon mustard - Olive oil spray or 2 tablespoons melted unsalted butter for a golden finish The main ingredients for Parmesan crusted chicken are simple yet powerful. You start with chicken breasts, which are lean and easy to cook. The grated Parmesan adds a salty, nutty flavor that pairs perfectly with the chicken. Using panko breadcrumbs gives it a crisp texture that makes every bite enjoyable. For seasoning, garlic powder, oregano, and smoked paprika bring depth to the dish. Each adds a unique flavor that elevates the chicken. Don't forget the salt and pepper; they enhance all the other tastes. To bind everything together, we use eggs and Dijon mustard. The eggs help the breadcrumbs stick, while the mustard adds a hint of tanginess. Finally, a light spray of olive oil or melted butter ensures the crust turns golden and crispy. You can find the full recipe in the linked section, which will guide you step-by-step through this tasty dish. - Preheat the oven to 400°F (200°C). - Prepare a baking sheet with parchment or a silicone mat. - In a bowl, combine 1 cup of grated Parmesan cheese, 1 cup of breadcrumbs, 2 teaspoons of garlic powder, 1 teaspoon of dried oregano, 1 teaspoon of smoked paprika, salt, and freshly ground black pepper. Stir until mixed well. - In a separate bowl, whisk 2 large eggs with 2 tablespoons of Dijon mustard until smooth. - Take a chicken breast and dip it into the egg mixture. Let excess egg drip off, then dredge it in the breadcrumb mixture, pressing gently so crumbs stick well. Repeat for all chicken breasts. - Arrange the coated chicken on the baking sheet, spaced apart for even cooking. Lightly spray the tops with olive oil or drizzle melted butter for a golden finish. - Bake for 25-30 minutes. Chicken is done when it reaches an internal temperature of 165°F (74°C) and the crust is golden and crispy. - Remove the chicken from the oven and let it rest for 5 minutes. This helps keep the chicken juicy. - Before serving, sprinkle with finely chopped parsley for freshness. For the best crunch, use panko breadcrumbs. These breadcrumbs are lighter and crispier than regular ones. They make a big difference in texture. Before baking, lightly spray or drizzle the chicken with olive oil or melted butter. This extra fat helps the crust turn golden brown and adds flavor. Resting the chicken is key. After baking, let it sit for five minutes. This step allows the juices to settle back into the meat. Resting keeps the chicken juicy and tender, making each bite enjoyable. For a lovely presentation, serve the chicken on a warm platter. Add lemon wedges for a zesty touch. Garnish with finely chopped parsley to add color. Pair it with a fresh green salad or steamed vegetables for a balanced meal. For the full recipe, check out the details above. {{image_4}} To elevate your Parmesan crusted chicken, you can add fresh herbs. Basil and thyme work wonders. Chop them finely and mix them into your breadcrumb blend. This adds depth and freshness to every bite. You can also play with spices. For some heat, try adding a pinch of cayenne pepper. If you want a smoky taste, consider using smoked paprika. Each variation makes the dish unique and exciting. Looking for healthier options? You can air fry the chicken! This method gives you a crispy crust without much oil. Preheat your air fryer to 375°F (190°C) and cook the chicken for about 15-20 minutes. Flip halfway for even crispiness. Another great method is grilling. Grilling adds a smoky flavor. Just be sure to watch the chicken closely to avoid drying it out. Both methods bring new life to this classic dish. Side dishes can make your meal complete. A fresh green salad pairs well with the chicken. Toss mixed greens with a light vinaigrette for balance. Steamed seasonal vegetables are another great choice. They add color and nutrients to your plate. For a heartier option, serve with mashed potatoes or rice. Each side enhances the flavors of the Parmesan crusted chicken. Error: Error code: 429 - {'error': {'message': 'Rate limit reached for gpt-4o-mini in organization org-zFeAnX8gJvsCtEtJubNX3NN3 on tokens per min (TPM): Limit 200000, Used 199021, Requested 2270. Please try again in 387ms. Visit https://platform.openai.com/account/rate-limits to learn more.', 'type': 'tokens', 'param': None, 'code': 'rate_limit_exceeded'}} You can use gluten-free breadcrumbs instead of regular ones. Look for brands that offer panko-style gluten-free breadcrumbs for a great crunch. Almond flour or crushed gluten-free crackers also work well. Ensure the chicken does not touch any gluten to avoid cross-contamination. Yes, you can use frozen chicken breasts. Just make sure to thaw them first. This helps the chicken cook evenly. If you forget to thaw, cook the chicken longer at a lower temperature. Aim for 30-35 minutes at 375°F (190°C) until it reaches 165°F (74°C). It takes about 25-30 minutes to bake at 400°F (200°C). Always check the internal temperature to ensure it reaches 165°F (74°C) for safety. This timing gives a golden crust while keeping the chicken juicy inside. This dish pairs well with many sides. Try a fresh green salad to add crunch and color. Roasted vegetables or creamy mashed potatoes also make great choices. For a lighter option, serve with steamed broccoli or green beans. To keep your chicken juicy, marinate it for at least 30 minutes. Use olive oil, lemon juice, or yogurt as a base. Avoid overcooking; use a meat thermometer to check for doneness. Let the chicken rest for 5 minutes after baking before serving. This allows the juices to settle. For the full recipe, check out the [Full Recipe]. This blog post covered how to make delicious Parmesan Crusted Chicken. We explored key ingredients, step-by-step instructions, and tips for success. You learned about crust variation and how to serve it. Remember, using panko makes the crust crispy. Letting the chicken rest keeps it juicy. Whether you bake or grill, this dish delights. Try new flavors and enjoy sharing it with loved ones. Happy cooking!

Looking for a quick and tasty dinner? My Parmesan Crusted Chicken is both crispy and packed with flavor. With just a few simple ingredients, you can create a meal that …

Read more

Categories Dinner

Easy Elote Recipe Simple and Flavorful Delight

June 22, 2025 by Chef Tavio
To make elote, you need some key items. Here’s what to gather: - 4 ears of fresh corn, thoroughly husked - 1/2 cup creamy mayonnaise - 1/2 cup cotija cheese, crumbled - 1 teaspoon chili powder - 1 teaspoon smoked paprika - 1 juicy lime, freshly juiced - Salt and pepper, to taste These ingredients create a rich and tasty sauce that makes the corn shine. You can add more flavors to your elote if you like. Consider these options: - Fresh cilantro, finely chopped (for garnish) - Additional crumbled cotija cheese - Extra chili powder for more spice - A dash of garlic powder for depth These extras can really take your elote to the next level. Having the right tools makes cooking easier. Here are some helpful gadgets: - Grill or grill pan - Mixing bowl - Brush for applying sauce - Wooden skewers (optional, for easy handling) With these tools, you’ll make cooking elote a breeze. For the full recipe, check out the details above. Start by husking your corn. Remove all the green leaves and silk. Fresh corn is key for this dish. You want it sweet and tender. Rinse the corn under cold water to clean it well. If you choose, soak wooden skewers in water for 30 minutes. This step helps prevent burning on the grill. In a bowl, mix the creamy mayonnaise with the crumbled cotija cheese. Add chili powder and smoked paprika for spice. Squeeze in the juice of one juicy lime. This gives the sauce a fresh zing. Season with salt and pepper to taste. Stir everything until it’s well combined. The sauce is creamy and packed with flavor. Preheat your grill to medium-high heat. Once hot, place the corn directly onto the grates. Grill for about 10-15 minutes. Turn the corn often for even cooking. Look for tender, slightly charred kernels. After grilling, let the corn cool a bit. If you used skewers, insert them now for easy handling. Brush the elote sauce generously over the corn. Don’t be shy—cover every side! For extra flavor, sprinkle more cotija cheese and chili powder on top. Finish with a sprinkle of fresh cilantro for a bright touch. Enjoy your elote! For the complete recipe, check out the Full Recipe. To get the best grilled corn, start with fresh corn. Look for bright green husks and firm kernels. Here’s how to grill it right: - Preheat your grill to medium-high heat. - Place the husked corn directly on the grill. - Turn the corn every few minutes. - Grill for about 10 to 15 minutes. - Watch for a nice char on the kernels. This method gives you sweet, smoky flavors. You want your corn tender and slightly charred for the best taste. You can make elote your own with simple changes. Here are some ideas: - Spice it up: Add more chili powder for heat. - Herbs: Try fresh basil or parsley instead of cilantro. - Cheese: Use feta or parmesan for a twist. - Squeeze: Add more lime juice for extra zing. These options help you create a unique flavor. Mix and match to find what you love. Serving elote can be fun! Here are some great ideas: - Serve it as a side dish at barbecues. - Pair it with tacos or grilled meats. - Use wooden skewers for easy eating. - Garnish with extra cheese and cilantro for a pop. These tips make elote a hit at any meal. You will impress your friends with this tasty dish. For the full recipe, check out the Elote Fiesta Corn details. {{image_4}} Do you love heat? Try the spicy elote! Just add extra chili powder to the sauce. You can also mix in diced jalapeños for a fresh kick. This will bring a new layer of flavor. It’s perfect for those who crave a bit of spice. Want a vegan option? Replace mayonnaise with plant-based yogurt or cashew cream. Use nutritional yeast instead of cotija cheese for a cheesy taste. You can still enjoy all the rich flavors of elote without dairy. This makes it a great choice for vegans and lactose-intolerant folks. Get creative with your toppings! Try adding crumbled bacon for a smoky crunch. For a twist, use fresh avocado slices. You can also sprinkle some pomegranate seeds for a burst of color and sweetness. Mixing and matching toppings can make your elote special. Each bite can offer something new and exciting! You might have some elote left after a tasty meal. To keep it fresh, wrap each ear in plastic wrap or place it in an airtight container. Store it in the fridge. Leftover elote can last for up to three days. When you want to enjoy your leftover elote, there are easy ways to reheat it. You can use a grill or a stovetop. If using a grill, heat it to medium and grill for about 5 minutes. If using a stovetop, wrap it in foil and heat it in a pan over low heat until warm. This keeps the corn juicy. If you want to save elote for longer, freezing is a good option. First, let the corn cool completely. Then, wrap each ear tightly in plastic wrap. Place them in a freezer bag or container. It can last for up to three months in the freezer. When ready to eat, thaw it overnight in the fridge and reheat as mentioned above. Enjoy your elote again! Elote is a popular Mexican street food. It consists of grilled corn on the cob. The corn is typically slathered with a mix of mayonnaise, cheese, and spices. This tasty treat offers a burst of flavor in every bite. You can customize it with different toppings. Many love it for its creamy texture and smoky notes. Yes, you can use frozen corn. Just thaw it before cooking. The flavor will differ slightly from fresh corn. However, it will still taste great. You can boil or sauté the corn instead of grilling. This keeps it simple while still delicious. You can easily make elote without a grill. Try boiling the corn first. After boiling, brush it with the elote sauce. You can also use a broiler. Place the corn on a baking sheet and broil for a few minutes. Keep an eye on it to prevent burning. Elote pairs well with many dishes. It complements grilled meats, tacos, or salads. You can also serve it as a snack at parties. Its bright flavors can uplift any meal. Add some fresh fruit or chips for a complete spread. For the full recipe, check out the Elote Fiesta Corn section. This blog post covered how to make elote, the tasty corn dish. We reviewed key ingredients, tools needed, and easy steps to prepare it. You learned great tips for grilling and customizing your elote. Plus, we explored fun variations and how to store leftovers. Now, you can enjoy elote at home. Try your favorite twist on this classic dish. It’s simple and fun to make! Enjoy your grilled corn adventure!

Craving a delicious, easy snack? This Easy Elote Recipe is just what you need! Elote combines sweet corn with creamy sauce for a perfect treat. Not only is it simple …

Read more

Categories Appetizers

Blueberry Swirl Yogurt Bites Easy and Delicious Treat

June 22, 2025 by Chef Tavio
When making Blueberry Swirl Yogurt Bites, using fresh and simple ingredients makes all the difference. Here’s what you’ll need: - 2 cups Greek yogurt (plain or vanilla) - 1 cup fresh blueberries - 2 tablespoons honey or maple syrup - 1 teaspoon vanilla extract - 1 tablespoon freshly squeezed lemon juice - A pinch of salt - Mini muffin tin or silicone mold These ingredients come together to create a tasty and healthy treat. Greek yogurt gives a nice creamy texture. Fresh blueberries add sweetness and color. Honey or maple syrup provides that extra touch of sweetness. Vanilla extract enhances the flavor, while lemon juice brightens it up. The pinch of salt balances all the flavors perfectly. You can easily find these ingredients at your local grocery store. I always recommend using fresh blueberries for the best taste. If you want to make this recipe simpler, you can use plain Greek yogurt. However, vanilla yogurt adds a nice vanilla flavor that many enjoy. For storage, you will need a mini muffin tin or silicone mold. Silicone molds work great because the yogurt bites pop out easily after freezing. Now you're ready to gather your ingredients and start making these delightful yogurt bites! Check the Full Recipe for detailed steps. First, take a small saucepan. Add 1 cup of fresh blueberries, 2 tablespoons of honey or maple syrup, and 1 tablespoon of freshly squeezed lemon juice. Heat this mixture over medium-low heat. Stir gently for about 5 minutes. Watch closely as the blueberries start to burst and let out their juices. Once you see this, remove the saucepan from the heat. Allow the sauce to cool completely before using it. In a medium mixing bowl, add 2 cups of Greek yogurt. You can use plain or vanilla yogurt. Then, mix in 1 teaspoon of vanilla extract and a pinch of salt. Stir until the yogurt is smooth. Make sure there are no lumps left in the mixture. This step creates a creamy base for your bites. When your blueberry sauce has cooled, set aside about 1/4 of it for later. Gently fold the remaining sauce into the yogurt mixture. Be careful not to mix too hard. You want to create a marbled look, not a single color. This swirl adds a fun touch to your yogurt bites. Now it’s time to fill the molds. Use a spoon or a small spatula to scoop the yogurt mixture. Fill each cavity of the mini muffin tin or silicone mold about 3/4 full. This will give the yogurt bites enough room to expand a little while freezing. Take the reserved blueberry sauce and drizzle it over the top of each yogurt bite. This makes them look nice and adds extra blueberry flavor. The drizzle will make your treats even more tempting! Place your filled muffin tin or mold into the freezer. Let them freeze for about 4 to 6 hours. Check that they are completely set and firm before you take them out. This step is important for the best texture. When the yogurt bites are fully frozen, pop them out of the molds. Store them in an airtight container in the freezer. They will stay fresh this way. Enjoy these yogurt bites as a healthy snack or a sweet treat. You can even serve them with fresh fruits or crushed nuts for added flavor and crunch. For the full recipe, check out the section above! To get that stunning swirl in your yogurt bites, you need to fold the blueberry sauce carefully. Start by mixing the yogurt with vanilla and salt. When the blueberry sauce is cool, gently fold it into the yogurt. Use a spatula to cut through the yogurt and sauce. This creates a beautiful marbled effect. Avoid stirring too much; you want to see those blue swirls! You can add more flavor to your yogurt bites. Try mixing in a pinch of cinnamon or a dash of nutmeg for warmth. For a tropical twist, consider adding coconut flakes or pineapple chunks. You can also use flavored yogurt, like strawberry or peach, for extra taste. These small changes can make your bites even more fun and exciting. Freezing is key to the texture of your yogurt bites. Aim for about 4 to 6 hours in the freezer. This time allows them to set properly without becoming too hard. Once frozen, you can easily pop them out of the molds. Store them in an airtight container to keep them fresh. If you want a softer bite, you can let them sit out for a few minutes before enjoying them. For the full recipe, check out the details above! {{image_4}} You can switch the blueberries for other fruits. Raspberries, strawberries, or blackberries work well. Each berry brings a unique taste. Simply follow the same steps in the recipe. Using different fruits can change the look and flavor. This makes your yogurt bites fun and fresh! If you want to try something new, use flavored yogurts. Strawberry or peach yogurts add a nice twist. You can also use dairy-free options. Almond or coconut yogurt keeps it tasty for everyone. Just remember to check the flavor and sweetness. It helps to match with the fruit you use. Not a fan of honey or maple syrup? Try agave syrup or stevia. Both are great for adding sweetness without strong flavors. You can even skip sweeteners if your fruit is sweet enough. Taste as you mix to find your perfect balance. Your yogurt bites can be just how you like them! To keep your blueberry swirl yogurt bites fresh, store them in an airtight container. A good option is to use a freezer-safe container. This helps to prevent freezer burn. Make sure to label the container with the date. This way, you always know when you made them. These yogurt bites can last in the freezer for about two to three months. After that, they may lose some taste and texture. They are still safe to eat but won’t taste as fresh. For the best flavor, try to eat them sooner rather than later. If you take out some yogurt bites but do not eat them all, you can refreeze them. Just make sure they stay cold while you decide. If they start to melt, it is best to eat them right away. Refreezing partially thawed yogurt bites can change their texture, making them less creamy. For the best experience, enjoy them fresh! To make these yogurt bites sugar-free, you can skip the honey or maple syrup. Instead, use a sugar-free sweetener like stevia or erythritol. Adjust the amount based on your taste preference. Remember, taste is key, so try small amounts first. This way, you can still enjoy the berry flavor without added sugar. Yes, you can use frozen blueberries! Just keep in mind that they may release more juice. To use them, thaw the blueberries and drain any excess liquid. This keeps your yogurt bites from being too watery. You can also heat them like fresh blueberries to create a sauce. This helps to maintain the flavor and texture in your yogurt bites. Absolutely! These yogurt bites are perfect for kids. They are healthy and full of protein from Greek yogurt. Blueberries add vitamins and antioxidants, which are great for growing bodies. Plus, kids love the fun shape and sweet taste. They make a great snack or dessert option for little ones. Yes, you can prepare these yogurt bites ahead of time. They store well in the freezer for up to two months. Just make sure to keep them in an airtight container. This helps prevent freezer burn. You can enjoy them any time, making them perfect for busy days. You can enjoy these yogurt bites in many ways. They are great on their own as a snack or dessert. Try pairing them with fresh fruit for extra flavor. You can also serve them with a drizzle of honey or a sprinkle of granola for added texture. For a fun twist, roll them in crushed nuts before serving! This blog post outlined a simple way to make yogurt bites with blueberries. We discussed ingredients, steps, helpful tips, and variations. These bites are easy to make and fun to enjoy. You can mix in your favorite fruits or flavors. Remember to store them well to keep them fresh. Whether for a snack or dessert, these yogurt bites are a tasty choice. Enjoy making them and share them with friends!

Looking for a fun and tasty treat? You’ll love these Blueberry Swirl Yogurt Bites! They’re easy to make and perfect for snacking. With creamy Greek yogurt and sweet blueberries, these …

Read more

Categories Desserts

Pizza Pot Pie Flavorful Comfort in Every Bite

June 22, 2025 by Chef Tavio
To make the perfect Pizza Pot Pie, gather these tasty ingredients: - 1 store-bought pie crust (or homemade for a personal touch) - 1 cup marinara sauce - 1 cup cooked Italian sausage, crumbled - 1 cup sliced pepperoni - 1 cup bell peppers, diced (choose your favorite colors) - 1 cup shredded mozzarella cheese - 1 cup ricotta cheese - 1 teaspoon Italian seasoning - 1 teaspoon garlic powder - Salt and pepper to taste - 1 egg (for egg wash) These ingredients create layers of flavor. The pie crust gives a nice crunch, while the marinara sauce adds rich taste. You can use any meats you like. I suggest cooked Italian sausage and pepperoni for a classic touch. The bell peppers add color and a fresh crunch. For the cheese, mozzarella melts beautifully, while ricotta adds creaminess. Italian seasoning and garlic powder bring out the best flavor. Don’t forget to season with salt and pepper. This balance makes each bite enjoyable. Want to elevate your dish? Try using fresh herbs as a garnish. They add a pop of color and flavor. My favorite is chopped basil. It pairs well with the pizza flavor. Follow this detailed list, and you’re set for a delicious Pizza Pot Pie. For a complete cooking experience, check the Full Recipe. 1. Preheating the oven: Start by preheating your oven to 400°F (200°C). This step is key for a nice, crispy crust. 2. Preparing the pie crust: If you use a store-bought crust, gently unroll it and fit it into a 9-inch pie dish. Let some of the edges hang over the rim. If you make your own crust, roll it out to the right size. 1. Mixing the sauce and meat: In a medium bowl, combine 1 cup of marinara sauce with 1 cup of cooked Italian sausage and 1 cup of sliced pepperoni. Stir to mix well. 2. Adding veggies and cheese: Next, toss in 1 cup of diced bell peppers, 1 cup of shredded mozzarella, and 1 cup of ricotta cheese. Add 1 teaspoon of Italian seasoning and 1 teaspoon of garlic powder. Season with salt and pepper to taste. Mix again until everything is evenly combined. 1. Pouring in the filling: Carefully pour the filling into the pie crust. Use a spatula to spread it out evenly. Be careful not to overfill. 2. Sealing the edges: Fold the overhanging crust edges over the filling. Place the second pie crust on top. Crimp the edges to seal them well. Cut a few slits in the top crust for steam to escape. 1. Egg wash application: In a small bowl, beat 1 egg. Brush this egg wash over the top crust. This gives it a lovely golden color. 2. Baking time and temperature: Place the pie on a baking sheet to catch drips. Bake in the preheated oven for 30-35 minutes. Look for a golden-brown and flaky crust. Now, you’re ready to enjoy your Pizza Pot Pie with comfort in every bite. For the full recipe, you can refer back to the beginning. To get the best crust, use an egg wash. An egg wash gives the crust a golden color. Just beat one egg and brush it over the crust. This simple step adds a nice shine. Preventing sogginess is key. To do this, pre-bake the crust for a few minutes. This helps it stay crisp. You can also sprinkle some breadcrumbs on the bottom before adding the filling. This absorbs extra moisture. Adding spices can boost the taste. Try adding red pepper flakes for heat or dried oregano for a classic touch. A pinch of smoked paprika can add so much depth. Don’t be afraid to mix it up! If you have dietary needs, look at ingredient swaps. Use ground turkey instead of sausage for a leaner option. You can also choose vegan cheese for a dairy-free version. The pizza pot pie will still taste amazing! Pair your pizza pot pie with sauces. A side of warm marinara sauce makes for a great dip. You can also serve it with ranch or garlic sauce for extra flavor. For sides, consider a simple salad. A fresh green salad adds a nice crunch. You can also serve garlic bread to soak up the delicious sauce. These sides will make your meal even more satisfying. {{image_4}} You can mix up the filling for your Pizza Pot Pie. There are many options. For a vegetarian twist, use veggies like mushrooms, zucchini, and spinach. You can also add tofu or tempeh for protein. These choices keep the dish hearty and tasty. If you prefer a vegan option, swap the cheese for vegan cheese. Use a plant-based sauce too. This way, everyone can enjoy this comfort food. For meat lovers, try different meats. Ground beef or chicken works great. You can also use turkey or ham. Each meat adds its own flavor. Mix and match to find your favorite filling. Different regions have unique pizza styles. For example, a Chicago deep-dish pizza has a thick, buttery crust. This style makes a rich and filling pot pie. The layers of cheese and sauce create a gooey center. If you like heat, add spicy sausage or red pepper flakes. This gives your pot pie a kick. On the other hand, if you want a milder taste, keep it simple. Use classic Italian herbs like basil and oregano. You can also try different cheeses. Using sharp cheddar or creamy goat cheese can change the taste. These small changes make each pot pie special. For the full recipe, be sure to check out the complete instructions and tips. After enjoying your Pizza Pot Pie, store leftovers in the fridge. Let the pie cool to room temperature. Wrap it tightly with plastic wrap or store it in an airtight container. It will stay fresh for up to three days. When you're ready to enjoy it again, preheat your oven to 350°F (175°C). Place slices on a baking tray and heat for about 15-20 minutes. This will make the crust crispy once more. If you want to save your Pizza Pot Pie for later, freezing is a great option. First, let it cool completely. Wrap the pie tightly in plastic wrap, then cover it with aluminum foil. This helps prevent freezer burn. It can last in the freezer for up to three months. When you're ready to eat it, remove the foil and plastic. Thaw it in the fridge overnight. To reheat, preheat your oven to 350°F (175°C). Bake for about 25-30 minutes until heated through. Enjoy your flavorful comfort in every bite! For the full recipe, check back for more details. Can I make the pie crust ahead of time? Yes, you can make the pie crust ahead. Prepare it a day before. Wrap it tightly in plastic wrap and keep it in the fridge. This saves time on baking day. How do I know when the pot pie is done? The pot pie is done when the crust turns golden brown. The filling should bubble slightly around the edges. Use a knife to check if the filling is hot. If it is, your pot pie is ready. What can I use instead of ricotta cheese? If you don’t have ricotta, try cottage cheese. You can also use cream cheese for a richer taste. Another option is blending tofu for a dairy-free choice. Can I use a different sauce for the filling? Absolutely! If you prefer a different flavor, use pesto or Alfredo sauce. These can add a unique twist to your pizza pot pie, enhancing the overall taste. In this guide, I shared how to make a delicious pizza pot pie. We covered the ingredients, from crust to filling, and explored tips for perfecting each step. Don't forget to try different flavors that fit your taste. Always save any leftovers for future meals. Keeping these basics in mind, you can easily wow your family and friends with this tasty dish. Enjoy creating your own pizza pot pie!

Are you ready to experience the ultimate comfort food? Pizza Pot Pie combines two favorites into one delicious dish. Imagine a warm, flaky crust filled with your favorite pizza toppings …

Read more

Categories Dinner
Older posts
Newer posts
← Previous Page1 … Page56 Page57 Page58 … Page92 Next →

TASTED NEST

Where Flavor Finds a Home 🍳🏡 — warm, simple, and crave-worthy recipes made for real life, from stovetop mornings to backyard dinners.

PAGES

Home About Contact Privacy Policy Terms & Conditions Cookie Policy GDPR Policy Copyright Policy Disclaimer

CATEGORIES

Appetizers Desserts Salads Breakfast Dinner

Contact

  • Pinterest
  • Mail
Copyright © 2025 Tasted Nest. All rights reserved.