Skip to content
Tasted Nest
  • Home
  • Appetizers
  • Desserts
  • Salads
  • Breakfast
  • Dinner
  • Privacy Policy
  • Contact
  • About

Chef Tavio

Creamy Korean Spicy Ramen Bold and Flavorful Dish

June 20, 2025 by Chef Tavio
- 2 packs of instant ramen noodles (avoid using flavor packets) - 4 cups vegetable broth - 1 cup coconut milk - 2 tablespoons gochujang (Korean chili paste) - 1 tablespoon soy sauce - 1 tablespoon sesame oil - 1 tablespoon minced garlic - 1 teaspoon grated ginger - 1 medium carrot, julienned - 1 cup baby spinach - 2 eggs (optional, for soft-boiled) - Chili flakes for extra heat - Sesame seeds - Sliced green onions For this creamy Korean spicy ramen, I love using fresh and vibrant ingredients. The instant ramen noodles make it quick, while the vegetable broth adds depth. Gochujang brings the heat, and coconut milk gives it that rich creaminess. If you want a protein boost, soft-boiled eggs are great. Don't forget the chili flakes if you like it fiery! For a lovely finish, sesame seeds and green onions not only add flavor, but they also make your dish look appealing. When preparing this dish, remember that the key is in the balance of flavors. The combination of spicy, creamy, and fresh ingredients makes this ramen special. For step-by-step instructions, check out the Full Recipe. First, we need to build a flavorful base. Heat 1 tablespoon of sesame oil in a large pot over medium heat. Add 1 tablespoon of minced garlic and 1 teaspoon of grated ginger. Sauté these for about one minute. The aroma will fill your kitchen. Be careful not to burn the garlic. Next, pour in 4 cups of vegetable broth. Increase the heat until this mixture simmers gently. Now, it's time to layer in the flavors. Stir in 2 tablespoons of gochujang and 1 tablespoon of soy sauce. Mix it well to dissolve the gochujang into the broth. This will give your ramen that spicy kick. Then, slowly add 1 cup of coconut milk to the pot. Stir constantly to blend everything together. Take a moment to taste the broth. If you want it spicier, add more gochujang to fit your taste. Next, we’ll add some vegetables and the noodles. Toss in 1 medium carrot, julienned, and let it simmer for about 3-4 minutes. This will soften the carrot just right. Now, add 2 packs of instant ramen noodles. Cook the noodles according to the package instructions, usually 3-4 minutes. Stir them often to keep them from sticking. In the last minute of cooking, add 1 cup of baby spinach. Stir until it wilts, keeping its bright green color. For a rich finish, serve the ramen in bowls. Add optional soft-boiled eggs on top. Garnish with sliced green onions, sesame seeds, and optional chili flakes for extra heat. Enjoy your creamy Korean spicy ramen! For a complete guide, refer to the Full Recipe. - Adjust spice levels to taste. If you want more heat, add more gochujang. - Use fresh ingredients for more depth. Fresh garlic and ginger boost flavor. - Monitor noodle cook time closely. Overcooked noodles turn mushy. Check them often. - For perfect soft-boiled eggs, cook for 6-7 minutes. Then, cool them in cold water. This helps with peeling. By following these tips, you can elevate your Creamy Korean Spicy Ramen from good to great. Whether you want more kick or perfect noodles, these tricks make it easy. Try out the [Full Recipe] to get started! {{image_4}} You can make your ramen even better by adding protein. Here are some options: - Chicken: Use cooked, shredded chicken for a heartier meal. - Tofu: For a plant-based choice, add cubed, firm tofu. - Shrimp: Fresh or frozen shrimp cooks quickly and adds a nice touch. Adding vegetables boosts flavor and nutrition. Consider these delicious options: - Mushrooms: Shiitake or button mushrooms add umami and texture. - Bok Choy: This leafy green adds crunch and a mild flavor. Make your ramen as spicy as you like! Here are two great ways: - Customize with different chili pastes: Try a mix of gochujang and Sriracha for a unique kick. - Use spicy broth options: Look for spicy vegetable or chicken broth for extra heat. These variations let you personalize your creamy Korean spicy ramen. Check out the Full Recipe for complete cooking details! After enjoying your creamy Korean spicy ramen, you may have some leftovers. To keep them fresh, store any leftovers in an airtight container. This will help prevent moisture loss and keep the flavors intact. Make sure to cool the ramen to room temperature before sealing it up. When you're ready to enjoy your ramen again, you can reheat it on the stove or in the microwave. For the stove, pour the ramen into a pot and heat it over low to medium heat. Stir often to keep it from sticking. This helps maintain the creamy texture. If you use the microwave, place the ramen in a bowl and cover it with a damp paper towel. Heat it in 30-second intervals, stirring in between, until it's hot. This method keeps the ramen from drying out. Enjoy your delicious meal once more! The best gochujang is the one that suits your taste. I recommend using a high-quality brand that features natural ingredients. Look for gochujang with a good balance of spice and sweetness. Some brands even offer mild or spicy options. You can find it in most Asian grocery stores or online. Yes, you can easily make this ramen vegetarian. Simply replace the vegetable broth with a rich, homemade vegetable stock. Ensure your gochujang and soy sauce are free from animal products. You can also add more veggies like mushrooms or tofu to boost flavor and texture. If you want to skip coconut milk, use heavy cream or a dairy-free alternative like cashew cream. Both options will give you that creamy texture. You can also blend silken tofu with a bit of broth for a healthier choice. Adjust the seasoning to maintain flavor. Absolutely! This ramen is great for meal prep. Cook the soup base and store it in the fridge for up to three days. Just add the noodles and spinach when you’re ready to eat. This way, you can enjoy a fresh bowl of ramen anytime. Check out the Full Recipe for detailed steps. This blog post showed you how to make tasty ramen with simple steps. We started with the key ingredients, like instant ramen and gochujang. I shared how to prepare the broth and cook the noodles perfectly. There are many ways to customize this ramen with proteins and veggies. I hope you feel inspired to try this easy recipe. With a few tweaks, you can make it your own. Enjoy your delicious bowl of homemade ramen!

Are you ready to spice up your dinner with a bowl of creamy Korean spicy ramen? This dish bursts with bold flavors and satisfying textures that will make your taste …

Read more

Categories Dinner

Old Fashioned Peach Cobbler Delicious and Simple Recipe

June 20, 2025 by Chef Tavio
- 4 cups fresh peaches, peeled and sliced - 1 tablespoon freshly squeezed lemon juice - 1 teaspoon pure vanilla extract - 1 cup granulated sugar, divided - 1/2 teaspoon ground cinnamon - 1 cup all-purpose flour - 1 tablespoon baking powder - 1/2 teaspoon fine sea salt - 1 cup whole milk - 1/2 cup unsalted butter, melted - 1 teaspoon ground nutmeg (optional) When it comes to making the perfect old fashioned peach cobbler, fresh and high-quality ingredients are key. Start with ripe peaches. Look for fruits that are firm yet slightly soft to the touch. This means they are juicy and ready for use. The lemon juice brightens the flavor of the peaches. It adds a nice tang that balances the sweetness. For the dry ingredients, use granulated sugar and flour that are fresh. Old flour can affect the texture of your cobbler. Baking powder is essential for a light and fluffy batter. The ground cinnamon gives warmth and depth, enhancing the overall flavor. The wet part of the recipe includes whole milk and melted butter. Whole milk keeps your cobbler moist. The melted butter adds richness and flavor that makes every bite irresistible. If you choose to add nutmeg, it offers a unique twist and extra warmth. Gather all these ingredients to create a classic dessert that everyone will love. For the full recipe, check out the detailed steps to make your old fashioned peach cobbler a success! - Preheat the oven to 375°F (190°C). - In a bowl, combine 4 cups of sliced peaches with 1/2 cup of sugar. Add 1 tablespoon of lemon juice, 1 teaspoon of vanilla extract, and 1/2 teaspoon of cinnamon. Stir gently until the peaches are coated. This step is vital. The sugar draws out the peach juices, creating a sweet sauce. The lemon juice brightens the flavor, while vanilla adds warmth. Let this mixture sit for about 10 minutes. - In a separate bowl, whisk together 1 cup of flour, 1/2 cup of sugar, 1 tablespoon of baking powder, and 1/2 teaspoon of salt. - Gradually add 1 cup of milk to the dry mix, stirring until smooth. - Finally, mix in 1/2 cup of melted butter. Creating a smooth batter is key here. The melted butter helps the cobbler rise and gives it a rich taste. If lumps form, don’t worry; just keep mixing gently. - Pour the batter evenly over the peach mixture in your baking dish. - Do not stir! The batter will rise during baking and create a lovely crust. - Bake for 40-45 minutes. Check for doneness by inserting a toothpick into the batter. It should come out clean. The cobbler will turn golden brown, and the smell will be heavenly. For the full recipe, refer back to the earlier section. - Serve warm with vanilla ice cream or whipped cream. - Add a sprinkle of cinnamon for enhanced flavor. - Let the cobbler cool slightly for better serving. - Use ripe, fresh peaches for the best result. - Don't stir the batter and peach filling together. - Ensure proper measuring for accuracy. When serving your Old Fashioned Peach Cobbler, I find that warmth makes a big difference. Enjoy it fresh from the oven, paired with a scoop of vanilla ice cream. The melting ice cream mixes perfectly with the warm cobbler. If you want more flavor, toss on a little cinnamon. For the best taste, let your cobbler cool for a few minutes. This small wait helps the flavors blend. Always use ripe peaches. Their sweetness and juiciness bring your dessert to life. Watch out for common mistakes! One big one is mixing the batter with the peach filling. This ruins the layers you want. Also, careful measuring is key. If you use too much or too little of an ingredient, it can change the whole dish. Follow these tips, and your cobbler will shine! Check out the Full Recipe for more details. {{image_4}} You can switch up the fruit in this cobbler. Use berries like blueberries or raspberries. Apples also work well if you want a different taste. Mixing fruits can create a unique flavor. Try combining peaches with blackberries for a fun twist. If you need a gluten-free version, it's easy to make. Just swap regular flour for a gluten-free blend. Many brands offer great options that work well in baking. This way, everyone can enjoy this tasty treat. For a special touch, add spices to the mix. Cardamom or ginger can enhance the flavor. A splash of bourbon can make it richer and more complex. Just a little goes a long way, so add carefully. These tweaks can take your cobbler to the next level. For the full recipe, check out the Southern Delight Peach Cobbler 🥧. To keep your cobbler fresh, store it in an airtight container at room temperature. If you plan to keep it for more than two days, refrigerate it. This will help maintain its flavor and texture. For a quick warm-up, heat individual portions in the microwave. If you want the whole cobbler warm and crispy, reheat it in the oven. Set the temperature to 350°F (175°C) and bake for about 15 minutes. If you have leftovers, freeze them in a tightly sealed container. This way, you can enjoy your cobbler later. When you're ready to eat it, thaw the container overnight in the fridge. Then, reheat as desired for a tasty treat. A toothpick should come out clean from the batter when inserted in the center. This means the batter has set well and is ready to serve. If the toothpick has wet batter on it, give it a few more minutes in the oven. Keep an eye on the top; it should be golden brown and bubbly. Yes, but reduce the sugar since canned peaches are often syrupy. You want the right balance of sweetness. Drain the syrup well before using the peaches. This helps avoid a soggy cobbler. Fresh peaches yield the best flavor, but canned peaches can be a quick and easy substitute. Serve with vanilla ice cream, whipped cream, or sweetened yogurt. The cold creaminess contrasts nicely with the warm cobbler. You can even add a sprinkle of cinnamon on top. It elevates the flavor and adds a lovely touch. Moderation is key; enjoy as a treat within a balanced diet. Peach cobbler contains sugar and butter, so it’s best as an occasional dessert. The fresh fruit does provide some vitamins, which is a positive. Just remember to savor each bite! This blog post covered how to make a delicious peach cobbler. We discussed fresh ingredients, step-by-step instructions, and helpful tips. You can explore variations and proper storage methods to keep your cobbler tasty. Remember to avoid common mistakes for the best results. Whether you serve this warm with ice cream or experiment with flavors, I hope you enjoy making this dessert as much as I do. It's simple, fun, and so rewarding!

Get ready to dive into the sweet, warm comfort of old fashioned peach cobbler! This easy, classic recipe is a perfect way to showcase fresh peaches. With just a few …

Read more

Categories Desserts

Garlic Butter Steak and Potatoes Skillet Delight

June 20, 2025 by Chef Tavio
- Sirloin steak - Baby potatoes - Unsalted butter - Garlic - Dried herbs (rosemary and thyme) - Olive oil - Salt and freshly ground black pepper - Fresh parsley Heat a large skillet over medium-high heat. Once hot, add olive oil. Carefully place the sirloin steak pieces in the skillet. Season them with salt and black pepper. Cook for about 4-5 minutes, turning until browned. When done, move the steak to a plate. Without cleaning the skillet, add the halved baby potatoes. Stir them well to coat in the flavors. Cook the potatoes for 10-15 minutes. Stir occasionally for even cooking. Check if they are tender inside and golden outside. If they cook slowly, cover the skillet to speed things up. When the potatoes are tender, lower the heat. Add minced garlic, dried rosemary, and dried thyme. Stir everything together for 1-2 minutes. Watch closely to avoid burning the garlic. Return the cooked steak to the skillet. Add the unsalted butter. Gently stir to mix, coating everything in the melting butter. The garlic flavor should infuse nicely. Taste the dish and adjust the seasoning if needed. Add more salt and pepper. Let everything simmer for another 1-2 minutes. This helps the flavors meld. Once ready, remove the skillet from heat. Sprinkle fresh parsley over the top. For a rustic look, serve straight from the skillet. You can also plate the steak and potatoes on individual dishes. A lemon wedge adds a nice touch of flavor. For the full recipe, check out the details above! For this dish, I recommend using sirloin steak. It has great flavor and cooks well. Here are some tips for picking the best steak: - Look for marbling: Marbling means fat in the meat. This adds flavor and keeps it juicy. - Choose a fresh cut: Fresh meat will taste better. Ask your butcher for help if you are unsure. - Let it rest: After cooking, let the steak sit for a few minutes. This keeps it tender. Selecting the right potatoes is key to a great texture. I suggest using baby potatoes. They cook evenly and taste great. Here are some tips for perfect potatoes: - Pick waxy potatoes: Waxy potatoes hold their shape well. They make a nice contrast to the steak. - Cut them evenly: Halve the potatoes so they cook at the same rate. - Check for doneness: You want them tender but not mushy. A fork should go in easily. Garlic butter brings a rich taste to this dish. You can try different seasonings to change it up: - Add herbs: Experiment with fresh herbs like thyme or parsley. They brighten the flavor. - Enhance garlic: If you love garlic, add more cloves or try garlic powder for a stronger kick. - Use flavored butter: Try herb butter or chili butter for a unique twist. For the full recipe, check out the Garlic Butter Steak and Potatoes Skillet. You can make this meal even better by adding vegetables. Try bell peppers, green beans, or zucchini. These veggies add color and nutrition. You can also toss in some spinach for a fresh touch. Consider adding sauces or extras for more flavor. A splash of soy sauce or Worcestershire sauce can work wonders. Add a drizzle of balsamic vinegar for a tangy kick. You can cook this dish in two ways: oven-baked or skillet techniques. For oven-baking, sear the steak first, then roast everything in a preheated oven at 400°F. This method gives the steak a nice crust. Grilling steak is another great option. Grill the steak to your liking, then add the potatoes and garlic on the grill. This adds a smoky flavor that is hard to beat. If you need a gluten-free option, skip the soy sauce. Use gluten-free broth instead. This keeps the flavor without any gluten. For low-carb alternatives, swap baby potatoes for cauliflower. Cauliflower roasts nicely and absorbs flavors well. You can still enjoy all the taste without the carbs. {{image_4}} Store any leftover Garlic Butter Steak and Potatoes in an airtight container. This helps keep the meal fresh. You can also use plastic wrap or aluminum foil. The dish lasts for about 3 to 4 days in the fridge. Always check for any signs of spoilage before eating. To freeze leftovers, let the dish cool completely. Then, place it in a freezer-safe container or bag. Press out as much air as possible to avoid freezer burn. You can freeze this meal for up to 3 months. When ready to eat, thaw it overnight in the fridge. Reheat the dish slowly to keep its flavor and texture. Use a skillet over low heat for the best results. Stir occasionally to heat evenly. You can add a little extra butter or oil to enhance flavor. Aim for an internal temperature of 165°F for safety. To cook steak well, start with a hot skillet. Use medium-high heat for the best sear. Make sure your steak is dry. This helps it brown better. Season it with salt and pepper. Place it in the skillet without crowding. Cook for about 4-5 minutes per side. Use a meat thermometer for perfect doneness. Aim for 130°F for medium-rare. Let the steak rest before cutting. This keeps it juicy. Yes, you can use many types of potatoes. Yukon Golds work great for their creamy texture. Red potatoes add a nice color and taste. Sweet potatoes are a tasty option too. They will add a sweet flavor to the dish. Just cut them into similar sizes for even cooking. To spice things up, add red pepper flakes. Mix them in with the garlic and herbs. You can also use cayenne pepper for more heat. If you like it hot, try diced jalapeños. They add a fresh kick. For a smoky flavor, include smoked paprika. You can prep some parts in advance. Cut the steak and potatoes the night before. Store them in the fridge in separate bags. You can also cook the potatoes ahead. Just heat them back up in the skillet before adding steak. This saves time on busy nights. Yes, this recipe is great for meal prep. Portion out the steak and potatoes into containers. Let them cool before sealing. Store them in the fridge for up to four days. To reheat, use the microwave or skillet. Add a little butter to keep it moist. You now have a clear and delicious recipe for steak and baby potatoes. With the right ingredients, you can create a tasty meal in just a few steps. Remember to use fresh herbs and seasonings for the best flavor. If you want to switch things up, try adding vegetables or different cooking methods. And if you have leftovers, proper storage will keep them fresh. Enjoy experimenting with this dish, and make it your own!

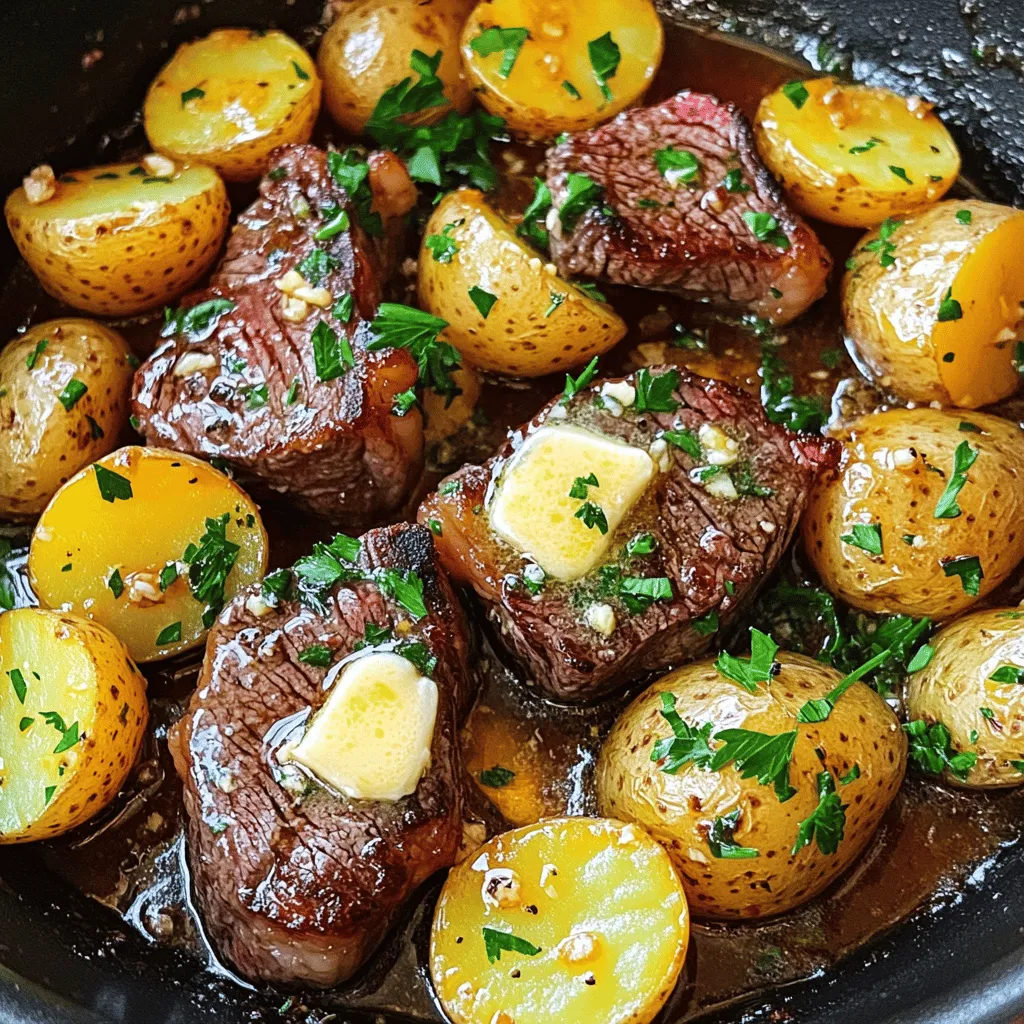
Welcome to your new favorite meal! This Garlic Butter Steak and Potatoes Skillet is a simple yet mouthwatering dish that delivers flavor in every bite. With tender sirloin, baby potatoes, …

Read more

Categories Dinner

One-Pan Cajun Chicken Sausage & Rice Flavorful Dish

June 20, 2025 by Chef Tavio
- 1 lb Cajun chicken sausage, sliced - 1 cup long-grain white rice, rinsed - 1 medium bell pepper, diced - 1 large onion, finely diced - 2 cloves garlic, minced - 1 can diced tomatoes (14.5 oz) - 2 ½ cups low-sodium chicken broth - Cajun seasoning, smoked paprika, dried oregano - Olive oil, salt, and black pepper Gather these ingredients before you start cooking. The Cajun chicken sausage brings a rich taste and a bit of spice. The bell pepper adds sweetness and color. Rinsing the rice helps remove excess starch, ensuring fluffy grains. For the seasonings, low-sodium chicken broth keeps the dish light. Cajun seasoning gives it that classic kick. You can adjust the spice level by adding more or less. Olive oil helps cook the sausage and veggies nicely, while salt and pepper enhance the flavors. You can find the full recipe [here](#). This dish packs a punch and is perfect for a busy weeknight dinner. First, you need to heat the olive oil. Pour the olive oil into a large skillet. Turn the heat to medium. Wait until the oil shimmers. Next, add the sliced Cajun chicken sausage to the hot skillet. Sauté it for about 5-7 minutes. You want it to brown nicely on the edges. Stir often to cook evenly. Now it's time for the veggies! Add the diced bell pepper, onion, and minced garlic. Cook these for 3-4 minutes. Stir frequently until the vegetables soften and the onion turns clear. Sprinkle in the Cajun seasoning, smoked paprika, and dried oregano. Stir well for about 1 minute. This lets the spices wake up and coat the sausage and veggies. Then, add the rinsed long-grain rice. Mix everything well and toast the rice for 1-2 minutes. Now, pour in the diced tomatoes and chicken broth. Make sure to include all the juices from the tomatoes. Season with salt and black pepper to your liking. Stir thoroughly to combine all the flavors. Bring the mixture to a boil over high heat. Once it bubbles, reduce the heat to low. Cover the skillet and let it simmer for 20-25 minutes. Check that the rice is tender and has soaked up most of the liquid. After that, remove the skillet from heat but keep it covered for 5 more minutes. Fluff the rice gently with a fork and mix in the sausage and veggies. Garnish with chopped parsley. Enjoy this flavorful dish from the Full Recipe! Adjust the simmering time to get the rice just right. If you want softer rice, let it simmer a bit longer. The rice should be tender and absorb most of the liquid. Keep the lid on during cooking. This helps the steam cook the rice evenly. Want more kick? You can increase the Cajun seasoning or add hot sauce. This dish is all about taste, so make it your own. Spice can really bring out the flavors of the sausage and veggies. Taste as you go to find your perfect balance. Using images or videos can help you follow the steps. Seeing how each stage looks can make cooking easier. If you can, check out visual guides for tips on chopping or cooking times. This can boost your confidence in the kitchen. For the full recipe, check out the link provided. {{image_4}} You can swap the Cajun chicken sausage for shrimp, chicken, or vegetarian sausage. Each option gives a new taste. Shrimp cooks fast, adding a light touch. Chicken offers a milder flavor, perfect for picky eaters. Vegetarian sausage works well for a plant-based meal, keeping the dish hearty. Long-grain white rice is great, but you can also use brown rice or quinoa. Brown rice adds fiber and nutrients, making it a healthy choice. Quinoa cooks faster and is packed with protein. Both options can change the dish’s texture and flavor while keeping it delicious. Feel free to add other veggies like zucchini or corn. Zucchini brings a fresh crunch, while corn adds sweetness. You can also try peas or carrots for extra color and nutrition. Mixing in more veggies makes this dish even more vibrant and nutritious. Explore what you love! To store leftovers, let the dish cool. Transfer it into an airtight container. Make sure to seal it well. You can keep it in the fridge for up to three days. When you want to eat it again, just take it out and reheat. If you want to freeze the dish, follow these steps. First, cool it completely. Then, place it in a freezer-safe container. You can also use freezer bags, removing as much air as possible. This method helps prevent freezer burn. It will last up to three months in the freezer. To reheat, you have a few options. The best way is to use the stove. Pour the dish into a pan and add a splash of chicken broth or water. Heat it over low to medium heat, stirring often. This keeps the rice fluffy and moist. You can also use the microwave. Place the dish in a microwave-safe bowl, cover it, and heat it in short bursts. Stir in between to make sure it warms evenly. For the best taste, I recommend reheating it on the stove. For the full recipe, check out One-Pan Cajun Chicken Sausage & Rice. Yes, you can make this dish ahead of time. It is great for meal prep. To do this, cook the One-Pan Cajun Chicken Sausage & Rice, then cool it quickly. Store it in an airtight container in the fridge. It stays fresh for about 3 days. You can also freeze it for up to 3 months. To reheat, just warm it in a pan or microwave. This dish can be gluten-free! The main ingredients are all gluten-free. Ensure the chicken sausage and chicken broth you choose are gluten-free. Some brands may add gluten as a filler. Always check the label to be safe. You can also use gluten-free rice if you want to be extra careful. If you want a milder dish, you can adjust the spice level. Start with less Cajun seasoning, maybe half a tablespoon. You can add more later if needed. Another option is to skip the smoked paprika, as it adds some heat. You can also use sweet bell peppers for a milder flavor. Adding more tomatoes can also help tone down the spice. This blog post covered a simple yet tasty dish with Cajun chicken sausage, rice, and veggies. You learned how to prepare the ingredients, cook them step by step, and make it your own with various tips. Remember, adjusting spices and cooking times is key to your perfect meal. You can store leftovers easily and even make this dish ahead of time. Enjoy the cooking process and share your creations with others. Cooking is about fun and flavor, so dive in and make it yours!

Are you ready to spice up your dinner with a simple, one-pan meal? My One-Pan Cajun Chicken Sausage & Rice is not just packed with flavor, it’s also easy to …

Read more

Categories Dinner

Quick Pickled Carrots Crisp and Flavorful Recipe

June 20, 2025 by Chef Tavio
- 4 medium carrots, peeled and cut into strips or rounds - 1 cup distilled white vinegar - 1 cup water - 2 tablespoons granulated sugar - 1 tablespoon salt - 1 teaspoon black peppercorns - 1 teaspoon mustard seeds - 2 cloves garlic, peeled and lightly smashed - 1 small piece of fresh ginger, thinly sliced (optional) - Red pepper flakes, to taste (optional) To make quick pickled carrots, gather these ingredients. The carrots give a nice crunch. The vinegar adds the tangy flavor we love. Sugar balances the taste, while salt enhances it. The spices bring warmth and depth. Garlic and ginger add extra zest. Feel free to adjust the red pepper flakes for heat. This mix creates a bright and tasty pickle that can liven up any dish. You can find the full recipe for a complete guide to making these delightful pickles. Start by peeling the carrots. Use a vegetable peeler for a clean look. Next, choose how you want to cut them. You can slice them into thin rounds or julienne them into matchstick strips. Rounds give a nice bite, while julienne offers a delicate touch. Both look great in a jar! In a medium saucepan, combine the following ingredients: - 1 cup distilled white vinegar - 1 cup water - 2 tablespoons granulated sugar - 1 tablespoon salt - 1 teaspoon black peppercorns - 1 teaspoon mustard seeds Heat the mixture over medium heat. Stir it occasionally until the sugar and salt dissolve fully. This step is key for a balanced flavor. Once the sugar and salt dissolve, remove the pan from heat. Add two smashed garlic cloves and optional sliced ginger to the warm brine. Let the brine cool to room temperature. This cooling allows the flavors to blend well. Now, it’s time to pack your jar. Place the carrot slices into a clean glass jar. Pack them tightly for the best flavor absorption. If you like some heat, sprinkle in red pepper flakes to your taste. Pour the cooled brine over the carrots. Ensure they are fully submerged. Press down gently to remove any air bubbles. Seal the jar tightly with a lid. For quick pickling, let it sit at room temperature for 30 minutes to an hour. If you want deeper flavor, refrigerate for up to 24 hours. While they taste great after one hour, the flavors become richer overnight. Enjoy making these quick pickled carrots! For the full details, check out the [Full Recipe]. For great pickled carrots, start with a clean jar. Sterilize your jar by boiling it for a few minutes. This step keeps your pickles fresh. Next, measure your ingredients carefully. A small mistake can change the taste. Use a kitchen scale or measuring cups. Precision matters in pickling. To boost flavor, think about adding spices. Dill, coriander, or cumin can give a unique twist. You can also try herbs like thyme or rosemary. Experiment with different types of vinegar, too! Apple cider vinegar offers sweetness, while rice vinegar brings a light taste. Each vinegar changes the final flavor. When serving, think about color and style. Place your pickled carrots in a bright bowl. This makes them pop on the table. They pair well with salads, grain bowls, or cheese platters. Add them to sandwiches for crunch. Their vibrant colors and tangy flavor will impress guests. {{image_4}} You can use radishes or cucumbers for pickling. Both add a nice crunch. Radishes give a spicy kick, while cucumbers stay refreshing. Mixing with other root vegetables like turnips or beets can also work well. Each vegetable brings its own taste and texture. Want some heat? Add chili peppers to your recipe. Slice fresh chilies or use dried ones for spice. Adjust the amount based on your heat preference. A little goes a long way, so start small. You can always add more if needed! If you prefer sweetness, you can change the sugar levels. Adding more sugar will make your carrots sweeter. You can also include fruits like apple slices for a fun twist. This adds a fruity flavor and makes the dish even more enjoyable. For the full recipe, check out my recipe details. To keep your quick pickled carrots fresh, use glass jars with tight lids. They help seal in flavor and prevent spoilage. Make sure the jars are clean and dry before filling them. After packing the carrots, pour in the brine, ensuring they are fully submerged. This keeps them crisp and flavorful. Store the jars in the refrigerator right away. Quick pickled carrots last about 2 to 4 weeks in the fridge. For the best taste, try to eat them within two weeks. Signs of spoilage include mold, an off smell, or changes in color. If you see any of these, it's best to toss them out. Freshness is key for great flavor. You can reuse your pickling brine to pickle other veggies! Just strain out the old carrots and add new sliced vegetables. Cucumbers, radishes, or onions work well. To make the most of your leftover brine, consider adding fresh spices or herbs. This gives each batch a unique flavor. It’s a fun way to experiment in the kitchen! Quick pickled carrots last about two weeks in the fridge. Keep them in a sealed jar. Make sure the carrots stay fully submerged in the brine. If you see any mold or off smell, discard them right away. Yes, you can use different vinegars. Apple cider vinegar gives a fruity taste. Rice vinegar offers a milder flavor. Each type of vinegar will change the pickled carrots' taste. Experiment to find your favorite! Yes, quick pickled carrots are healthy. They are low in calories and high in fiber. Carrots are rich in vitamins A and K. The vinegar can aid digestion, and the spices may add antioxidants. Enjoy them guilt-free! You can add many spices to enhance the taste. Try coriander seeds for a warm flavor. Dill adds a fresh touch, while cumin gives a smoky note. Feel free to adjust based on your taste preferences! Yes, this recipe is already vegan! It uses no animal products. You can enjoy quick pickled carrots without worrying about dietary restrictions. Feel free to share them with anyone who loves plant-based food! In this blog post, we explored how to make quick pickled carrots. We covered essential ingredients, step-by-step instructions, and useful tips. You learned how to enhance flavors and present them well. You also discovered variations and proper storage techniques to keep your pickles fresh. Remember, pickling is a fun way to add flavor to your meals. With these simple methods, you can enjoy crunchy, tasty carrots in no time. Happy pickling!

Are you ready to add a crunchy, zesty kick to your meals? Quick pickled carrots are the answer! In just a few simple steps, you can transform vibrant carrots into …

Read more

Categories Appetizers

Peach Crumble Delightfully Simple and Tasty Recipe

June 20, 2025 by Chef Tavio
- 4 ripe peaches, peeled and sliced - 1 tablespoon fresh lemon juice - 1 cup old-fashioned rolled oats - 1/2 cup all-purpose flour - 1/2 cup packed brown sugar - 1/2 teaspoon ground cinnamon - 1/4 teaspoon fine sea salt - 1/2 cup unsalted butter, melted - Creamy vanilla ice cream for serving - Fresh mint leaves for presentation When you make peach crumble, the ingredients matter. Fresh peaches create a sweet base. I use ripe peaches for the best flavor. The lemon juice brightens the fruit and adds a nice zing. The topping is where the magic happens. Old-fashioned rolled oats give it a chewy texture. The flour and brown sugar blend to form a sweet crumb. Cinnamon adds warmth, while sea salt balances the sweetness. Melted butter ties everything together. This mixture creates a crunchy topping over the soft peaches. If you want to elevate your dish, top it with creamy vanilla ice cream. The cold ice cream melts and creates a delightful finish. Fresh mint leaves add a pop of color and flavor. For the full recipe, check out the instructions above. Enjoy your peach crumble, and let the flavors shine! - Preheat your oven to 350°F (175°C). This helps the crumble bake evenly and brown nicely. - Prepare the peach filling by mixing 4 ripe peaches, 1 tablespoon of fresh lemon juice, 1/3 cup of granulated sugar, and 1 teaspoon of pure vanilla extract in a bowl. Toss gently until the peaches are well coated. - In another bowl, mix 1 cup of old-fashioned rolled oats, 1/2 cup of all-purpose flour, 1/2 cup of packed brown sugar, 1/2 teaspoon of ground cinnamon, and 1/4 teaspoon of fine sea salt. This mixture will be the delicious topping. - Pour 1/2 cup of melted unsalted butter over the dry mix. Stir gently until you see a crumbly texture. Aim for small, even crumbs that will bake well. - Transfer the peach mixture into a greased 9-inch pie dish. Spread it out evenly for even cooking. - Evenly distribute the crumbly topping over the peaches. Make sure every bit of fruit is covered. - Place the dish in the preheated oven. Bake for 30-35 minutes until the top is golden brown and the peaches bubble. - Once baked, take the crumble out and let it cool for a few minutes. This helps the filling set. For a treat, serve it warm with creamy vanilla ice cream on top. For the full recipe, check the details provided above. Choosing the right peaches Use ripe, fresh peaches for the best taste. Look for ones that are slightly soft to the touch. They should smell sweet and fragrant. Yellow peaches work well, but you can also try white peaches. Don’t use overripe peaches, as they can make the crumble soggy. Adjusting sweetness to taste Sweetness is key for a great peach crumble. Taste the peaches before adding sugar. If they are very sweet, use less sugar. If they are tart, add more sugar to balance the flavors. Lemon juice helps brighten the taste and keeps the peaches fresh. Factors affecting baking time Baking time can change based on your oven and dish. A glass dish may cook faster than a metal one. The size of your peach slices also matters. Smaller pieces cook quicker than larger ones. Keep an eye on the crumble as it bakes. Checking for doneness Look for a golden-brown top and bubbling fruit. Insert a fork or knife into the topping. It should be crisp and crumbly. If you see juices bubbling around the edges, the crumble is ready. Let it cool slightly before serving. Best additions to your peach crumble Serve your peach crumble warm for the best flavor. Add a scoop of creamy vanilla ice cream on top. It melts and makes the dish extra special. You can also drizzle caramel sauce for a sweet touch. Creative serving ideas for impressing guests For a fun twist, serve the crumble in individual ramekins. Top each with a mint leaf for color. You can also add a dollop of whipped cream. This makes it look fancy while keeping it simple. Try these ideas to wow your guests with your peach crumble. {{image_4}} You can make this peach crumble gluten-free. Start by substituting regular flour with gluten-free flour. Look for blends that work well in baking. They will help keep the crumble light and tasty. Next, make sure to use certified gluten-free oats. This ensures no gluten has touched your oats during processing. You will still get that lovely, chewy texture from the oats. To make a vegan peach crumble, you can easily replace the butter. Use plant-based butter or coconut oil instead. Both options provide a rich flavor without any dairy. Also, consider adjusting the sweeteners. Instead of regular sugar, try coconut sugar or maple syrup. These options add a unique taste and keep it vegan-friendly. While peaches are delicious, you can mix in other fruits. Consider adding berries, like blueberries or raspberries. They will add a burst of color and flavor to your crumble. You might also create seasonal variations. In fall, try adding apples or pears. This keeps your dessert fresh and exciting all year round. To keep your peach crumble fresh, store it in the fridge. Use an airtight container to prevent it from drying out. It stays good for about 3 to 5 days. If you cover it well, the flavors will stay nice. When you want to enjoy your crumble again, you can reheat it in the oven or microwave. For the oven, set it to 350°F (175°C) and warm it for about 15 minutes. This method keeps the topping crispy. If you use the microwave, heat it in short bursts. This way, you avoid making the topping soggy. You can freeze peach crumble before or after baking. If you freeze it before, wrap it tightly in plastic wrap. This way, it stays fresh. To freeze after baking, let it cool completely first. Then, store it in an airtight container. Thaw it in the fridge overnight before reheating. For best results, reheat in the oven to keep that nice crunch. Enjoy every bite! Choose ripe, sweet peaches for the best flavor. Look for peaches that yield slightly to gentle pressure. They should have a warm, golden hue. Avoid hard peaches, as they won’t soften enough in baking. Freestone peaches work well since the pit releases easily. You can also use clingstone peaches, but be careful when slicing. Yes, you can prepare the filling a day in advance. Mix the sliced peaches, lemon juice, sugar, and vanilla, then store it in the fridge. When you are ready to bake, make the topping fresh. This keeps it crunchy. You can also assemble it the night before and bake it in the morning. To achieve a crunchy topping, ensure your butter is melted but not hot. Mix the dry ingredients and butter until it resembles coarse crumbs. Adding nuts like almonds or pecans can also enhance crunchiness. Bake until the topping is golden. If it seems soft, a few extra minutes in the oven can help. Yes, peach crumble can be made vegan! Use plant-based butter instead of regular butter. You can also swap granulated sugar for coconut sugar or other vegan-friendly options. Ensure your vanilla extract is pure and not flavored. This way, everyone can enjoy the dessert! Peach crumble lasts about 3 to 5 days in the fridge. Store it in an airtight container to keep it fresh. To avoid sogginess, don't cover it too tightly. If you want to keep it longer, consider freezing portions. Just reheat in the oven for the best texture. For the full recipe, check out the Peach Paradise Crumble above! In this post, we covered how to make a delicious peach crumble. We discussed the fresh ingredients needed, from ripe peaches to tasty toppings. I shared step-by-step instructions, tips for perfect baking, and variations like gluten-free and vegan options. Remember, choose the right peaches and adjust sweetness for your taste. Whether you enjoy it warm with ice cream or explore different fruits, your peach crumble will impress. Enjoy creating this tasty treat and sharing it with others!

Get ready to indulge in the warm, sweet goodness of peach crumble with my simple recipe! You’ll love the juicy peaches paired with a crunchy topping that’s quick to make. …

Read more

Categories Desserts

Baked Spaghetti and Meatballs Savory Dinner Delight

June 20, 2025 by Chef Tavio
- 12 oz (340g) spaghetti - 1 lb (450g) ground beef - 2 cups marinara sauce I always start with the main ingredients. The spaghetti forms the base of your dish. Choose a good quality brand. The ground beef gives the meatballs their flavor and texture. I prefer 80/20 ground beef for a juicy bite. The marinara sauce adds richness and depth to the dish. You can use store-bought or homemade sauce, depending on your time. - 1/2 cup breadcrumbs - 1/4 cup finely grated Parmesan cheese - 1 large egg The meatball mixture is crucial for taste. Breadcrumbs help bind the meat together. They also ensure the meatballs stay moist. Parmesan adds a nice cheesy flavor. It makes the meatballs special. The egg acts as a binder. It holds everything together, preventing crumbling. - 2 cloves garlic, minced - 1 teaspoon dried Italian herbs - Fresh basil leaves for garnish Seasonings elevate your dish. Garlic offers a strong, tasty punch. I always use fresh or minced garlic. Dried Italian herbs bring warmth and depth. They add a classic Italian flavor. Fresh basil leaves serve as a bright garnish. They add color and freshness to your meal. When you plate your dish, a sprinkle of basil makes it look lovely. For the complete cooking steps, check the Full Recipe. - Preheat your oven to 350°F (175°C). - Cook spaghetti until al dente, about 8-10 minutes in boiling water. - In a bowl, combine ground beef, breadcrumbs, Parmesan, egg, minced garlic, and herbs. - Mix well, then form into small meatballs, about 1 inch wide. - Arrange meatballs on a baking sheet lined with parchment paper. - Bake for 20 minutes until browned and cooked through. - In a large dish, mix spaghetti, marinara sauce, and baked meatballs. - Top with mozzarella cheese and bake again for 15-20 minutes until bubbly. Follow the Full Recipe for detailed cooking steps and exact measurements! To make moist meatballs, use a mix of ground beef and breadcrumbs. The breadcrumbs soak up moisture and keep the meatballs tender. Always add an egg to bind the mixture. This keeps them from falling apart. When you season the mixture, don’t hold back! Use salt, pepper, and Italian herbs. You can also mix in grated cheese for extra flavor. You can boost your marinara sauce with spices or herbs. Try adding a dash of red pepper flakes for heat. Fresh basil or oregano can brighten up the sauce too. Different cheeses can change the taste. Mozzarella gives a gooey texture, while Parmesan adds a nutty flavor. Mix and match cheeses to find your favorite combo. When plating, use a large spoon to create a nest of spaghetti. Place meatballs on top for a lovely look. Drizzle some sauce around the plate for color. For garnish, fresh basil leaves add a nice touch. A sprinkle of grated cheese over the top can make it even fancier. To make it pop, serve with a side salad or garlic bread. For more detailed steps and a complete list of ingredients, check out the Full Recipe. {{image_4}} You can switch out the ground beef for ground turkey or chicken. These options are leaner and still tasty. If you prefer a meat-free meal, try using plant-based meat. Many brands offer great taste and texture. Both choices keep your meal light while still being filling. For those who need gluten-free options, use gluten-free pasta instead of regular spaghetti. This swap keeps the dish safe for gluten-sensitive diets. You can also find gluten-free breadcrumbs and marinara sauces. These small changes keep the flavors intact while fitting dietary needs. Want to mix up the taste? Add colorful veggies like bell peppers or mushrooms. They boost both flavor and nutrition. If you like heat, sprinkle in some red pepper flakes. This simple addition can bring a spicy kick to your dish. Adjust the amount based on your heat preference. To store baked spaghetti and meatballs, let it cool first. Use an airtight container for best results. Place your leftovers in the fridge. They can stay fresh for up to three days. If you want to keep them longer, freezing is a great option. Divide the dish into smaller portions. Use freezer-safe containers or bags. Make sure to label them with the date. Baked spaghetti and meatballs can last up to three months in the freezer. When ready to enjoy again, reheat your baked spaghetti and meatballs in the oven. Preheat the oven to 350°F (175°C). Place the dish in a baking pan. Add a splash of marinara sauce to keep it moist. Cover it with foil to avoid dryness. Heat for about 20 minutes. You can also use the microwave. Heat in short bursts of one to two minutes. Stir the dish in between to ensure even heating. Baked spaghetti and meatballs can last in the fridge for three to four days. Check for signs of spoilage before eating. Look for any strange smells or changes in color. If the cheese appears hard or the sauce looks watery, it's best to toss it. When stored properly, this dish remains fresh and delicious. Enjoy those leftovers safely! For the full recipe, check the earlier section. You can pair baked spaghetti and meatballs with a fresh garden salad. A crisp Caesar salad also works well. Garlic bread is a classic side that everyone loves. It adds crunch and flavor. For drinks, a nice red wine like Chianti complements the dish. If you prefer non-alcoholic, try sparkling water with lemon. To make this dish ahead, cook the spaghetti and meatballs first. Mix them with sauce and cheese, then store in the fridge. Cover it tightly to keep it fresh. You can also freeze it for later. Just make sure to use a freezer-safe dish. When ready to eat, thaw overnight in the fridge. Then, bake until heated through. Yes, store-bought sauce can save time. Look for a brand with simple ingredients and no added sugar. A good marinara should taste fresh and rich. To boost its flavor, add fresh herbs or a pinch of red pepper flakes. This makes the dish even tastier! Baked spaghetti and meatballs is a simple and tasty meal. We covered ingredients, step-by-step instructions, and helpful tips to make it great. Remember, you can customize this dish with different proteins or flavors. Storing leftovers properly will keep your meal fresh. Whether you make it for yourself or share with friends, this dish is sure to please. Enjoy your cooking, and have fun with it!

Looking for a cozy dinner that warms the heart? Baked Spaghetti and Meatballs is your answer! This dish combines tender spaghetti, juicy meatballs, and rich marinara sauce, all topped with …

Read more

Categories Dinner

Mongolian Ground Beef Noodles Easy and Flavorful Meal

June 20, 2025 by Chef Tavio
When making Mongolian Ground Beef Noodles, you’ll need a few simple items. Gather the following ingredients: - 1 lb ground beef - 8 oz egg noodles - 1 large onion, thinly sliced - 2 cloves garlic, minced - 1-inch piece of fresh ginger, grated - 1 cup broccoli florets - 1/2 cup green bell pepper, sliced - 1/4 cup soy sauce - 2 tablespoons hoisin sauce - 1 tablespoon sesame oil - 1 tablespoon vegetable oil - 1 tablespoon brown sugar - 1/2 teaspoon crushed red pepper flakes (optional) - Chopped green onions for garnish - Toasted sesame seeds for garnish Each ingredient plays a key role in the dish's taste. The ground beef gives a rich flavor, and the egg noodles provide a hearty base. Aromatics like onion, garlic, and ginger add depth. The vegetables bring color and nutrition, while the soy sauce and hoisin sauce create a savory sauce. Brown sugar balances the flavors, and crushed red pepper offers a kick. Garnishing with green onions and sesame seeds adds a lovely finish. For detailed cooking steps, check out the Full Recipe. To cook the egg noodles, start by boiling water in a large pot. Add a pinch of salt to the water for flavor. Once the water boils, add the noodles. Cook them for about 5-7 minutes, or until they are soft but still firm. Drain the noodles in a colander and rinse them with cold water to stop the cooking. This helps keep them from getting mushy. Set the noodles aside while you prepare the other ingredients. In a large skillet or wok, heat vegetable oil over medium-high heat. When the oil is hot, add the ground beef. Break it apart with a spatula as it cooks. Cook for about 5-7 minutes until the beef is brown. You want it to be fully cooked and crumbly. This browning adds deep flavor to your dish. Once your beef is browned, it’s time to add flavor. Stir in the thinly sliced onion, minced garlic, and grated ginger. Cook these for 2-3 minutes until the onion is soft and fragrant. Next, add the broccoli florets and sliced green bell pepper. Sauté all of these together for 3-4 minutes. This order builds layers of flavor that make your dish taste amazing. In a small bowl, mix together the soy sauce, hoisin sauce, sesame oil, brown sugar, and crushed red pepper flakes (if you like heat). Stir well until the sugar dissolves. This sauce will give your dish a rich and savory taste. Be sure to taste it and adjust to your liking before adding it to the skillet. Pour the sauce over the beef and vegetable mixture in the skillet. Stir everything well so that the sauce coats all the ingredients. Let it cook for an additional 2 minutes. This allows the flavors to blend together. After that, gently add the cooked egg noodles. Toss everything together until the noodles are fully mixed in and coated with the sauce. When serving your Mongolian ground beef noodles, remove the skillet from heat. Use a large spoon to scoop the noodles onto plates. For a beautiful look, garnish each serving with chopped green onions and toasted sesame seeds. This adds color and a nice crunch. Serve hot and enjoy your flavorful meal! For the complete cooking steps, refer to the Full Recipe. You can switch up the protein in your Mongolian ground beef noodles. Try ground turkey or chicken for a leaner option. If you want a vegetarian meal, use tofu or tempeh. You can also add more veggies like bell peppers, carrots, or snap peas. These changes keep the dish fresh and exciting. To give your dish a flavor boost, try adding fresh herbs. Chopped cilantro or basil can brighten the meal. You can also mix in some lime juice for a tangy twist. For a deeper taste, sprinkle in more crushed red pepper flakes for extra heat. Don’t shy away from experimenting with different sauces like teriyaki or chili garlic sauce. One common mistake is overcooking the noodles. Follow the package instructions closely to keep them firm. If they get too soft, they may break apart in the dish. Another mistake is making the sauce too watery. Ensure you measure your liquids carefully. A thick sauce clings better to the noodles and beef. {{image_4}} If you want a meat-free meal, try using tofu instead of ground beef. Firm tofu works best. Just press it to remove water, then crumble it into small pieces. You can also add more vegetables. Try mushrooms, bell peppers, or zucchini for extra flavor and texture. These swaps keep the dish hearty and satisfying. For those who love heat, make a spicy version of Mongolian ground beef noodles. You can add more crushed red pepper flakes or try a dash of hot sauce. Sriracha or chili paste works well. Mixing in fresh sliced chili peppers can also bring the heat. Adjust the spice to your taste, and enjoy the kick! If you need a gluten-free meal, choose gluten-free noodles. Rice noodles or gluten-free pasta are great choices. For the sauce, use tamari instead of soy sauce. This option keeps the flavor rich and bold without gluten. You can still enjoy all the taste of Mongolian ground beef noodles without worry! For the complete recipe, check out the [Full Recipe]. To store leftovers, let the Mongolian ground beef noodles cool. Place them in an airtight container. This keeps them fresh and safe. Store the container in the fridge. Use the leftovers within three to four days for the best taste. When you reheat, add a splash of water or broth. This helps prevent the noodles from drying out. If you want to freeze the dish, first cool it completely. Transfer it to a freezer-safe container. Label the container with the date. You can freeze Mongolian ground beef noodles for up to three months. To reheat, thaw overnight in the fridge. Then, warm it in a skillet over low heat. Add a little water if needed to keep it moist. Mongolian ground beef noodles last about three to four days in the fridge. If frozen, they stay good for three months. Always check for any off smells or changes in texture before eating. Freshness is key for the best flavor! Mongolian Ground Beef Noodles is a quick and tasty dish. It features ground beef and egg noodles. The dish has roots in Mongolian cuisine, but it’s popular worldwide. The blend of soy sauce, hoisin sauce, and vegetables brings bold flavors to this meal. It’s great when you want something filling and easy to make. Yes, you can prepare the ingredients ahead of time. Chop the vegetables and store them in the fridge. Cook the ground beef and noodles in advance, too. Just mix everything together when you are ready to eat. This saves time and helps with busy nights. You can serve this dish with a side of steamed vegetables. A simple salad also works well. For a fun twist, try adding spring rolls or dumplings. These sides will balance the rich flavors of the noodles. To adjust the spice level, you can add crushed red pepper flakes. If you want more heat, increase the amount. For a milder dish, skip the red pepper flakes. You can also serve hot sauce on the side for those who like it spicy. Yes, this recipe is kid-friendly! Kids usually love the mix of noodles and beef. You can make it more appealing by cutting the vegetables smaller. You might even let kids help in the kitchen for a fun cooking time. Add a little sweetness with extra brown sugar if needed. Check out the Full Recipe for more tips! In this post, we covered the key ingredients and steps to make Mongolian Ground Beef Noodles. You learned how to cook the noodles, sauté the beef, and prepare a delicious sauce. I shared tips for flavor enhancement and common mistakes to avoid. Remember, you can customize the dish with variations for vegetarian or gluten-free options. Enjoy making this dish and impress your family or friends. Keep experimenting with flavors, and don’t forget to have fun in the kitchen!

Are you ready to spice up your dinner routine? Mongolian Ground Beef Noodles are easy to make and packed with flavor. With ground beef, fresh veggies, and a savory sauce, …

Read more

Categories Dinner

Snickerdoodle Zucchini Bread Tasty and Easy Recipe

June 20, 2025 by Chef Tavio
To make this tasty Snickerdoodle Zucchini Bread, you need basic yet key ingredients. Here’s what you'll gather: - 1 cup grated zucchini (about 1 medium zucchini) - 1 ½ cups all-purpose flour - 1 teaspoon baking soda - ½ teaspoon baking powder - 1 teaspoon ground cinnamon - ½ teaspoon ground nutmeg - ¼ teaspoon salt - ½ cup unsalted butter, softened to room temperature - 1 cup brown sugar, packed tightly - 2 large eggs, at room temperature - 1 teaspoon vanilla extract These ingredients create a moist, flavorful loaf that everyone will love. The spices play a big role in the flavor of your bread. Ground cinnamon gives warmth and sweetness. Ground nutmeg adds depth and a hint of earthiness. Together, they help create that classic snickerdoodle taste. Don't forget the vanilla extract! It brings a lovely aroma that enhances the overall flavor. You can also add fun twists to your Snickerdoodle Zucchini Bread. Here are some ideas: - Chopped nuts: Walnuts or pecans add crunch. - Chocolate chips: For a sweet surprise in every bite. - Dried fruit: Raisins or cranberries add sweetness and texture. Feel free to mix and match these options to make the recipe your own. For the full recipe, check out the details above. First, preheat your oven to 350°F (175°C). This temperature ensures that your bread bakes evenly. Next, grab a 9x5 inch loaf pan. Grease it thoroughly or line it with parchment paper. This step helps the bread come out easily after baking. In a medium bowl, whisk together the dry ingredients. Combine 1 ½ cups all-purpose flour, 1 teaspoon baking soda, ½ teaspoon baking powder, 1 teaspoon ground cinnamon, ½ teaspoon ground nutmeg, and ¼ teaspoon salt. Mixing these dry ingredients well gives your bread a solid base and great flavor. Take a large mixing bowl and add ½ cup of softened unsalted butter and 1 cup of packed brown sugar. Use an electric mixer to cream them together. Mix for 3 to 4 minutes until the mixture is light and fluffy. This step is key as it adds air to your batter. Next, add 2 large eggs, one at a time, to the butter-sugar mix. Make sure to mix well after each egg. Then, stir in 1 teaspoon of vanilla extract. This adds sweetness and a nice flavor to your bread. Now, slowly add the dry ingredients to the wet mix. Stir gently until just combined. Be careful not to overmix, as this can make the bread dense. The batter should look a bit lumpy, and that’s okay! Grate 1 medium zucchini to get about 1 cup. Use a spatula to fold the grated zucchini into the batter gently. The zucchini helps keep your bread moist and adds a subtle flavor. Pour your batter into the prepared loaf pan, smoothing the top with the spatula. Then, sprinkle a mixture of ½ cup granulated sugar and 1 teaspoon ground cinnamon on top. This creates a sweet crust. Bake in the oven for 50 to 60 minutes. To check if it's done, insert a toothpick in the center; it should come out clean. If the top browns too fast, cover it loosely with aluminum foil. Let the bread cool in the pan for 10 minutes before transferring it to a wire rack to cool completely. Enjoy the delightful aroma as it cools! To keep your Snickerdoodle Zucchini Bread moist, use fresh zucchini. Grate it without peeling. Measure it firmly packed. Too much moisture can make your bread soggy. You can also squeeze out excess liquid using a clean cloth. This step helps prevent a watery batter. For a sweet crunch, use sugar and cinnamon for the topping. Blend ½ cup granulated sugar with 1 teaspoon ground cinnamon. Sprinkle it on top before baking. This forms a crunchy crust that contrasts with the soft bread. Remember, this step is key to that classic snickerdoodle flavor. Avoid overmixing your batter. This can make the bread dense and tough. Mix just until combined. Also, check your oven temperature. An oven that is too hot can burn the top too quickly. If this happens, cover it with foil. Lastly, don’t skip cooling time. This helps the bread set and slice better. For more specific details, check the Full Recipe. {{image_4}} You can make this snickerdoodle zucchini bread gluten-free. Use a gluten-free all-purpose flour blend. Look for one that has xanthan gum added. This helps mimic the texture of regular flour. The bread will still be soft and delicious. To make this recipe vegan, swap the eggs for flax eggs. Mix 1 tablespoon of ground flaxseed with 2.5 tablespoons of water for each egg. Let it sit for a few minutes until it thickens. Also, replace the butter with coconut oil or vegan butter. This keeps the bread moist and tasty. Want to jazz up your bread? Add nuts or chocolate chips. Chopped walnuts or pecans add a great crunch. If you love chocolate, mix in some dark or milk chocolate chips. Just fold them in gently with the zucchini. This makes each slice even more fun and flavorful. For the full recipe, check the detailed instructions above. To keep your Snickerdoodle Zucchini Bread fresh, store it in a cool place. Wrap it tightly in plastic wrap or foil. This helps retain moisture. Place it in an airtight container for added protection. If you cut the bread, cover the cut side well. This prevents it from drying out. If you want to keep the bread longer, freezing is a great option. Ensure the bread is completely cool before freezing. Wrap it tightly in plastic wrap. Then wrap it again in foil or place it in a freezer bag. It can last up to three months in the freezer. When ready to eat, thaw it in the fridge overnight. To enjoy your Snickerdoodle Zucchini Bread warm, preheat your oven to 350°F (175°C). Slice the bread and place the pieces on a baking sheet. Heat for about 10-15 minutes. You can also microwave individual slices for about 20-30 seconds. This will keep it soft and tasty. Enjoy it fresh like it just came out of the oven! Yes, you can use frozen zucchini in this recipe. Make sure to thaw and drain it first. This will help avoid excess moisture in the bread. Frozen zucchini can still add great flavor and texture. Just remember to squeeze out the water after thawing to keep the bread from getting soggy. You can check if your bread is done by using a toothpick. Insert it into the center of the loaf. If it comes out clean, your bread is ready. If it has wet batter on it, bake for a few more minutes. The top should also be golden brown. Snickerdoodle zucchini bread is great on its own. You can serve it warm with butter. It pairs well with a cup of coffee or tea. You can also add a light drizzle of honey or maple syrup for extra sweetness. When stored properly, this bread lasts about 3-4 days at room temperature. Keep it in an airtight container. For longer storage, you can freeze it for up to 3 months. Just make sure to wrap it tightly in plastic wrap before freezing. Enjoy your delicious Snickerdoodle Zucchini Bread! For the complete method, check out the Full Recipe. Snickerdoodle zucchini bread combines sweet flavors with healthy zucchini. You learned about key ingredients, like spices and options for customization. I shared step-by-step instructions to bake it perfectly. Plus, I offered tips for moistness and crunch. Don't forget to try variations, like gluten-free or vegan. Proper storage helps keep it fresh, so remember those tips. Enjoy every slice and share this fun recipe with others!

Are you ready to transform your kitchen into a baking wonderland? Today, I’m excited to share my easy and delicious Snickerdoodle Zucchini Bread recipe. This treat combines the classic flavor …

Read more

Categories Desserts

One Pot Cheesy Chicken and Broccoli Orzo Delight

June 19, 2025 by Chef Tavio
- 1 lb boneless, skinless chicken breasts, diced - 1 cup orzo pasta - 3 cups broccoli florets - Salt - Pepper - Paprika - Garlic powder - 1 cup shredded cheddar cheese - 1/2 cup grated Parmesan cheese - 1 medium onion, diced - 3 cloves garlic, minced - 4 cups low-sodium chicken broth - 2 tablespoons olive oil Gathering fresh and simple ingredients is key. The chicken gives you protein and flavor. Orzo pasta adds a nice, chewy texture. Broccoli brings in color and nutrients. For seasonings, I use salt, pepper, paprika, and garlic powder. These spices make the dish pop. Cheddar and Parmesan cheese bring creaminess and richness. Onion and garlic add depth to the mix. For cooking liquids, I choose low-sodium chicken broth. It keeps the dish tasty without too much salt. Olive oil adds healthy fats and flavor. All these ingredients come together to create a one-pot meal that is easy and delicious. You can find the full recipe to guide you through the cooking process. 1. Heat the olive oil in a large pot over medium heat. 2. Add the diced chicken. Season it with salt, pepper, paprika, and garlic powder. 3. Cook for about 5-7 minutes. Stir occasionally until the chicken is browned and cooked through. 4. Remove the chicken from the pot. Leave the juices in the pot for flavor. 1. In the same pot, add the diced onion and minced garlic. 2. Sauté for 2-3 minutes. Stir often until the onion is soft and the garlic smells great. 1. Pour in the orzo pasta and the chicken broth. 2. Bring the mix to a strong boil. 3. Lower the heat and let it simmer gently for about 10 minutes. Stir now and then until the orzo is almost tender. 1. Add the broccoli florets to the pot. Stir them in well. 2. Simmer for another 3-4 minutes. The broccoli should turn bright green and be tender. 1. Return the cooked chicken to the pot. 2. Gradually stir in the shredded cheddar cheese and grated Parmesan. 3. Keep stirring until the cheese melts completely, making a creamy sauce. Taste and add more salt or pepper if needed. 1. Take the pot off the heat. 2. Use a ladle to serve the cheesy chicken and broccoli orzo into bowls. 3. Sprinkle fresh parsley on top for color. For the full recipe, refer to the earlier section. - Cooking Orzo to Perfection: Start with plenty of boiling broth. Add the orzo and stir well. Cook it for about 10 minutes. Check it often. You want it tender but firm. This way, it holds its shape in the dish. - Avoiding Overcooked Broccoli: Add broccoli in the last few minutes. This keeps it bright green and crunchy. Cook it for about 3-4 minutes. If you cook it too long, it gets mushy and loses flavor. - Suggestions for Extra Seasonings: You can spice it up! Try adding Italian herbs, like basil or oregano. A pinch of red pepper flakes adds some heat. Mix and taste as you go. - Using Different Cheeses: Cheddar is great, but don’t stop there! Gouda or mozzarella can work well too. Mixing cheeses gives a richer flavor. Experiment until you find your favorite combo. - Make-Ahead Options: You can cook this dish ahead of time. Just prepare it and cool it down. Store it in the fridge for up to three days. When ready, just reheat it. - Freezing the Dish: This dish freezes well! Store it in an airtight container. It stays good for about two months. Thaw it overnight in the fridge before reheating. This keeps the flavors fresh. For the complete recipe, check out the [Full Recipe]. {{image_4}} You can swap in many vegetables for a fun twist. Here are some great options: - Cauliflower: It adds a nice crunch. - Carrots: Slice them thin for quick cooking. - Spinach: Toss it in at the end for bright color. - Peas: They add sweetness and a pop of color. These choices keep the dish fresh and exciting. Mix and match based on what you have or love! If chicken isn't your favorite, there are many other proteins to try: - Shrimp: Cook them quickly for a seafood kick. - Turkey: Ground turkey is a leaner option. - Tofu: Perfect for a vegetarian choice. Press it, then sauté until golden. - Beans: Chickpeas or black beans add protein and fiber. These substitutions can change the whole flavor while keeping it delicious! Need to adjust for dietary needs? Here are some simple swaps: - Gluten-Free: Use gluten-free orzo or rice instead. - Dairy-Free: Try plant-based cheese or skip the cheese altogether. Nut milk can replace broth if needed. These changes help make the dish fit your lifestyle while keeping it tasty. For the full recipe, check out One Pot Cheesy Chicken and Broccoli Delight! To store leftovers of your one pot cheesy chicken and broccoli orzo, let it cool first. Once cool, transfer it to an airtight container. This dish can stay fresh in the fridge for up to three days. When you're ready to eat, check for any off smells or colors before reheating. You can freeze this dish for longer storage. First, cool it completely. Then, place it in freezer-safe bags or containers. Make sure to remove as much air as possible. You can freeze it for up to three months. When you're ready to enjoy it, thaw it in the fridge overnight. For the best results, reheat your cheesy chicken and broccoli orzo on the stove. Add a splash of chicken broth or water to keep it moist. Heat it over medium-low heat, stirring often. You can also use a microwave, but be sure to heat it in short bursts. Stir in between to ensure even warmth. Enjoy your meal again! To make this dish, it takes about 25 minutes in total. You will spend 10 minutes prepping ingredients. The cooking time is roughly 15 minutes. This quick recipe makes it easy to enjoy a tasty meal any night. Yes, you can use frozen chicken for this recipe. Just make sure to thaw it first. You can soak it in cold water for a quick thaw. Once thawed, dice it into bite-sized pieces and follow the recipe as you would with fresh chicken. You can prepare this dish in advance and store it for later. It works well for meal prep. Just let it cool, then place it in an airtight container. You can keep it in the fridge for about 3-4 days. For longer storage, freeze it in portions. Reheat it in a pot or microwave when you're ready to enjoy it again. For the full recipe, check the earlier section. In this blog post, we covered how to make One Pot Cheesy Chicken and Broccoli Orzo. We discussed the main ingredients like chicken, orzo pasta, and broccoli. I shared tips on cooking, storage, and variations for your dish. Remember, cooking can be simple and fun. By following these steps, you can create a delicious meal. Enjoy experimenting with flavors and make it your own. Happy cooking!

Get ready to whip up a comforting dish that brings joy to your table! One Pot Cheesy Chicken and Broccoli Orzo Delight is a simple, delicious recipe that combines tender …

Read more

Categories Dinner
Older posts
Newer posts
← Previous Page1 … Page57 Page58 Page59 … Page91 Next →

TASTED NEST

Where Flavor Finds a Home 🍳🏡 — warm, simple, and crave-worthy recipes made for real life, from stovetop mornings to backyard dinners.

PAGES

Home About Contact Privacy Policy Terms & Conditions Cookie Policy GDPR Policy Copyright Policy Disclaimer

CATEGORIES

Appetizers Desserts Salads Breakfast Dinner

Contact

  • Pinterest
  • Mail
Copyright © 2025 Tasted Nest. All rights reserved.