Skip to content
Tasted Nest
  • Home
  • Appetizers
  • Desserts
  • Salads
  • Breakfast
  • Dinner
  • Privacy Policy
  • Contact
  • About

Chef Tavio

Crispy Bang Bang Chicken Flavorful and Easy Recipe

June 17, 2025 by Chef Tavio
- 1 pound chicken breast, cut into bite-sized pieces - 1 cup all-purpose flour - 1 cup panko breadcrumbs - 1 cup mayonnaise - 2 tablespoons sweet chili sauce - 1 tablespoon sriracha - 1 teaspoon garlic powder - Fresh cilantro, finely chopped Crispy Bang Bang Chicken starts with simple ingredients. The chicken breast is the star. It cooks up tender and juicy. The flour and panko breadcrumbs give it a crunchy outer layer. For the sauce, I use mayonnaise for creaminess. Sweet chili sauce adds a nice sweetness. Sriracha brings the heat. You can adjust the sriracha to fit your taste. I always add garlic powder for depth of flavor. Fresh cilantro on top brightens the dish. It also adds a pop of color. When you gather these ingredients, you set the stage for a fantastic meal. You can find the Full Recipe for more details on preparation. This dish is not only easy but also packed with flavor. To start, you need to season the chicken. In a large bowl, mix the chicken pieces with: - 1 teaspoon salt - 1/2 teaspoon black pepper - 1 teaspoon garlic powder - 1 teaspoon paprika Make sure every piece is well coated. This adds flavor. Let the chicken marinate for 15 minutes. This time helps the chicken soak in the spices. Next, set up your breading station. You will need three shallow bowls. In the first bowl, add: - 1 cup all-purpose flour (add a pinch of salt) In the second bowl, beat 2 large eggs. In the third bowl, fill it with 1 cup panko breadcrumbs. This setup is crucial. It makes breading easy and quick. You will dip the chicken in this order: flour, eggs, and then breadcrumbs. Now, it’s time to cook the chicken. In a large skillet, pour enough oil to cover 1/2 inch of the bottom. Heat it on medium-high until it shimmers. Add the breaded chicken pieces in batches. Avoid overcrowding the pan. Each piece needs space to fry properly. Cook for about 4-5 minutes on each side. They should turn golden brown and crispy. Once cooked, place the chicken on paper towels. This step helps remove extra oil. For the full recipe, follow the instructions closely to get that perfect crispy texture! To get your chicken nice and crispy, marinating is key. Marinating adds flavor and moisture to the chicken. I like to let mine soak for about 15 minutes. This small step makes a big difference in taste and texture. Another critical point is the oil temperature. You want your oil hot enough to cook the chicken quickly. Aim for around 350°F (175°C). If the oil is too cool, your chicken will soak up oil and become greasy. If it’s too hot, it can burn. Use a thermometer if you have one to check the temperature. To make your Bang Bang sauce stand out, play with the spice levels. I recommend starting with one tablespoon of sriracha. You can always add more for heat. Taste your sauce as you go. Adjusting the spice lets you tailor the dish to your liking. Don’t stop with just sriracha. Consider adding garlic powder or even a pinch of cayenne for extra depth. These small touches can elevate your dish to new heights. Coating your chicken properly is vital for that crunch. Start with flour, then dip in egg, and finally, coat with panko breadcrumbs. Make sure to press the breadcrumbs firmly onto the chicken. This step helps ensure a thick, crispy layer. If you prefer a healthier version, you can bake the chicken instead of frying it. Preheat your oven to 400°F (200°C). Place the breaded chicken on a baking sheet lined with parchment paper. Bake for 20-25 minutes, flipping halfway through. This method gives you a crispy texture without the extra oil. For more tips, check the Full Recipe for suggestions and detailed steps! {{image_4}} You can get creative with sauces. If you want something different, try a creamy ranch or a spicy buffalo sauce. Both pair well with crispy chicken. You can mix honey and mustard for a sweet and tangy twist. For a kick, blend in some chipotle sauce. This adds a unique flavor that will surprise your taste buds. You don’t have to stick with chicken. Shrimp or tofu can work well too. Both options cook quickly and soak up flavors, just like chicken. If you're going gluten-free, swap the all-purpose flour with almond flour. For the breadcrumbs, use gluten-free panko. These swaps keep your meal enjoyable without sacrificing taste. Different regions have their own flavors. In Asian cuisine, add sesame oil or ginger for a fresh twist. If you love Mexican food, try adding cumin and chili powder to your breading. You can even top your chicken with salsa or guacamole for a fun fusion. These adaptations make every bite exciting and unique. For the full recipe, don’t forget to check out the detailed instructions. To store leftover Bang Bang Chicken, first let it cool to room temperature. Place it in an airtight container. This keeps it fresh and safe to eat. The best container types are glass or plastic with tight lids. These prevent air from getting in and making the chicken soggy. When reheating, I recommend using the oven. This helps keep the chicken crispy. Preheat your oven to 375°F. Place the chicken on a baking sheet. Heat it for about 10 to 15 minutes, turning halfway through. Check that it warms evenly and stays crispy. Yes, you can freeze Crispy Bang Bang Chicken! To do this, let it cool completely. Then, wrap each piece in plastic wrap. Place the wrapped pieces in a freezer bag. This helps avoid freezer burn. When ready to eat, thaw it in the fridge overnight. Reheat in the oven as mentioned before for best results. You can serve Crispy Bang Bang Chicken with several tasty sides. Here are my favorites: - Steamed rice: It absorbs the sauce well. - Stir-fried veggies: Add color and crunch. - Crispy fries: Perfect for dipping in extra sauce. - Salad: A fresh side balances the richness of the chicken. - Dips: Try ranch dressing or extra Bang Bang sauce for extra flavor. These sides can enhance your meal and make it more fun. Yes, you can prepare Bang Bang Chicken in advance. Here are some tips: - Marinate the chicken: Do this a few hours ahead. It makes the chicken tastier. - Bread the chicken: You can bread it and store it in the fridge. Just cover it tightly. - Make the sauce: Prepare the Bang Bang sauce early and keep it in the fridge. When you are ready to eat, simply fry the chicken and mix it with the sauce. It will taste fresh and delicious! To keep your chicken crispy, follow these tips: - Drain properly: After frying, let the chicken sit on paper towels. This removes extra oil. - Serve right away: Crispy chicken tastes best fresh from the pan. - Avoid covering: Don’t cover the chicken after frying. This traps steam and makes it soggy. These steps will help you keep that perfect crunch! For the full recipe, check out the [Full Recipe]. In this article, we explored how to make Crispy Bang Bang Chicken. We covered main ingredients like chicken breast and panko breadcrumbs. You learned how to prepare, bread, and cook the chicken for the best crunch. We also discussed alternative sauces and ingredient swaps for variety. To sum it up, this dish is versatile and fun to make. Whether you enjoy it fresh or reheated, Bang Bang Chicken can elevate any meal. Enjoy your cooking journey!

Are you ready to make a mouthwatering Crispy Bang Bang Chicken that will impress everyone? This dish brings together crunchy chicken and a spicy, creamy sauce in a quick and …

Read more

Categories Appetizers

Classic Oven-Baked Peach Cobbler Simple and Tasty

June 17, 2025 by Chef Tavio
The star of this dish is fresh peaches. You need four cups of peaches, peeled and sliced into thin wedges. Choose ripe, juicy peaches for the best flavor. They should be sweet and fragrant. If you can’t find fresh peaches, look for frozen ones. Just make sure they are unsweetened. Next, gather your dry ingredients. You will need: - 1 ½ cups all-purpose flour - 1 tablespoon baking powder - ½ teaspoon salt - 1 teaspoon ground cinnamon, plus extra for garnish - 1 cup granulated sugar, divided into two ½ cup portions These ingredients create the base of your cobbler. The flour and baking powder give it a nice rise. The sugar adds sweetness, while salt enhances all the flavors. Finally, gather your wet ingredients. For this, you need: - 1 cup whole milk - ½ cup unsalted butter, melted and slightly cooled - 1 teaspoon pure vanilla extract - 1 teaspoon freshly squeezed lemon juice These ingredients blend into a smooth batter. The milk and butter keep the cobbler moist. Vanilla adds a warm flavor, while lemon juice brightens the dish. For the full recipe, check the complete instructions above. Start by preheating your oven to 350°F (175°C). This helps the cobbler cook evenly. Take 4 cups of fresh peaches, peel, and slice them into thin wedges. In a large bowl, mix the peaches with ½ cup of granulated sugar, 1 teaspoon of vanilla extract, and 1 teaspoon of lemon juice. Toss gently to coat the peaches. Let this sit for about 10 minutes. This step enhances the flavor and helps release juices. In a different bowl, whisk together 1 ½ cups of all-purpose flour, 1 tablespoon of baking powder, ½ teaspoon of salt, and the other ½ cup of sugar. Make sure all the dry ingredients blend well. Grab a 9x13-inch baking dish and lightly grease it with butter or cooking spray. This step prevents sticking. Pour the batter evenly into the dish. Now, carefully spoon the marinated peaches over the batter. Make sure to spread them evenly. Do not stir; the peaches will sink while baking. Sprinkle 1 teaspoon of ground cinnamon over the peach layer. This adds warmth and a lovely spice to your cobbler. Place the baking dish in the oven and bake for 40-45 minutes. Look for a golden brown crust. Test the center with a toothpick; it should come out clean when done. Once baked, allow the cobbler to cool for a few minutes before serving. This lets the flavors meld together beautifully. Enjoy it warm, with ice cream or whipped cream if you like. To get a great crust, use room temperature butter. Mix the dry and wet ingredients well but do not over-mix. This keeps the batter light and airy. Pour the batter into a greased dish. The batter should not be too thick. A thin layer helps it rise nicely. If your oven runs hot, check the cobbler a few minutes early. A golden top shows it’s ready. For the best flavor, choose ripe, fresh peaches. They should feel soft but not mushy. Peel and slice them thinly for even cooking. Toss them with sugar, vanilla, and lemon juice. Let them sit for about 10 minutes. This draws out their juices and boosts their taste. If peaches are out of season, try using frozen peaches. Just thaw and drain them before use. Serve the cobbler warm for the best experience. A scoop of vanilla ice cream on top makes it extra special. Whipped cream also pairs well. For a nice touch, sprinkle some cinnamon on top. You can add fresh peach slices to make it look fancy. Enjoy it as a dessert or at brunch with friends. Get creative and make it your own! Check out the Full Recipe for detailed steps and tips. {{image_4}} You can switch up the fruit in this classic recipe. Try using fresh blueberries, raspberries, or apples. Each fruit adds its own sweet and tart taste. Mix peaches with blackberries for a fun twist. Feel free to use frozen fruit too. Just thaw and drain them before adding to the mix. This way, you keep the same great peach cobbler vibe but with new flavors. If you want a healthier peach cobbler, consider using less sugar or honey. You can also swap white flour for whole wheat flour. This adds fiber and nutrients. For a lighter option, replace whole milk with almond or oat milk. You could even add a scoop of protein powder to the batter. This gives your dessert a nutritional boost. For those who need gluten-free choices, use almond flour or a gluten-free blend. Make sure your baking powder is gluten-free too. This will keep the cobbler fluffy while avoiding gluten. You can also add a bit of cornstarch to help with texture. These swaps mean everyone can enjoy this tasty treat without worry. For the full recipe, check out the details above! To keep your peach cobbler fresh, let it cool down first. Once cool, cover it with plastic wrap or foil. You can also store it in an airtight container. Place it in the fridge. It stays good for about three to five days. When you are ready to enjoy it again, preheat your oven to 350°F (175°C). Place the cobbler in an oven-safe dish. Warm it for about 15-20 minutes until it is hot. This helps refresh the crust and flavors. You can also use the microwave. Heat it in short bursts of 30 seconds, checking often. If you want to save it for later, freezing is a great option. Let the cobbler cool completely. Wrap it tightly in plastic wrap, then in aluminum foil. Label it with the date. You can freeze it for up to three months. When ready to eat, thaw it overnight in the fridge. Bake it at 350°F (175°C) for about 25-30 minutes to warm through. Enjoy your delicious dessert with the added bonus of convenience! For the full recipe, check back to the beginning. Peach cobbler lasts about 3 to 4 days when stored in the fridge. Make sure you cover it well to keep it fresh. If you want to keep it longer, you can freeze it. Just wrap it tightly in plastic wrap and then foil. It can last for up to 3 months in the freezer. Yes, you can use canned peaches. They work well in a pinch. Just drain the syrup before adding them to the recipe. Canned peaches are softer, so your cobbler may be a bit different in texture. Fresh peaches give a bright, fresh taste, while canned peaches add sweetness and ease. Serve peach cobbler warm for the best taste. Add a scoop of vanilla ice cream or a dollop of whipped cream on top. This contrast of warm cobbler and cold cream is truly delightful. You can also sprinkle some cinnamon for extra flavor. If your cobbler is too runny, you can try a few fixes. First, let it cool for a bit. This helps the juices thicken. If it’s still runny, add a little cornstarch mixed with water. Bake it for a few more minutes to help set the filling. In this article, we explored how to make peach cobbler. We covered fresh and dry ingredients, along with step-by-step instructions. You learned how to prepare peaches, create a tasty batter, and bake your dish. Remember, the perfect crust and flavorful peaches make all the difference. Enjoy experimenting with variations or healthier options. Storing and reheating your cobbler will keep it fresh, so don’t waste a bite. You now have all the tools to make this delicious dessert. Happy baking!

Craving a sweet, fruity treat? You’ve come to the right place! My Classic Oven-Baked Peach Cobbler is simple and oh-so-tasty. With fresh peaches and a golden crust, it’s perfect for …

Read more

Categories Desserts

Delicious Cajun Chicken Sloppy Joes Easy Dinner Idea

June 17, 2025 by Chef Tavio
- 1 lb ground chicken - 1 small onion, finely chopped - 1 bell pepper (any color), diced - 2 cloves garlic, minced - 1 can (15 oz) diced tomatoes with green chilies - 2 tablespoons Cajun seasoning The main ingredients in this dish create a bold flavor. Ground chicken cooks quickly and stays moist. Fresh vegetables like onion and bell pepper add sweetness and crunch. Garlic adds depth and aroma. The diced tomatoes with green chilies bring spice and juiciness. Cajun seasoning gives it that classic kick. - 1 tablespoon Worcestershire sauce - 1 tablespoon olive oil - 1 tablespoon brown sugar - Salt and pepper to taste - 4 hamburger buns - Fresh parsley, chopped (for garnish) Condiments and extras round out the dish. Worcestershire sauce adds umami and tang. Olive oil helps cook the veggies and chicken perfectly. Brown sugar balances the spice with a hint of sweetness. Salt and pepper elevate the flavors. Hamburger buns hold all the goodness together. Fresh parsley adds color and freshness as a final touch. For the full details on how to prepare these delicious Cajun chicken sloppy joes, check the [Full Recipe]. Start by heating olive oil in a large skillet over medium heat. Once it shimmers, add the finely chopped onion and diced bell pepper. Sauté them for about 5 minutes until they become soft and fragrant. This step builds a great base for your dish. Next, add minced garlic to the skillet. Stir it for about 1 minute until it becomes aromatic. Be careful not to let it burn, as that can change the flavor. Now, incorporate 1 pound of ground chicken into the skillet. Use a spatula to break it into small pieces. Cook the chicken for about 6-8 minutes, stirring often. You want it browned and no longer pink. Once the chicken is ready, pour in a can of diced tomatoes, including all the juices. Add 2 tablespoons of Cajun seasoning, 1 tablespoon of Worcestershire sauce, and 1 tablespoon of brown sugar. Don’t forget to season with salt and pepper. Stir well until everything mixes together. Reduce the heat to low and let the mixture simmer for 10-15 minutes. This helps the flavors blend. While it simmers, toast your hamburger buns in another skillet or toaster until golden brown. When the chicken mixture has finished simmering, use a ladle to spoon it onto the bottom half of each toasted bun. Make sure to serve a generous amount. Top each bun with the other half and sprinkle fresh parsley on top for a pop of color. Your Cajun chicken sloppy joes are now ready to enjoy! For the full recipe, check out the details above. To boost flavor, consider adding a pinch of cayenne pepper for heat. A dash of smoked paprika gives a nice smokiness. You can also mix in a tablespoon of hot sauce for extra spice. If you want to swap out ground chicken, try ground turkey or lean ground beef. Both will add a different taste but keep it tasty. If you want a vegetarian option, use lentils or chopped mushrooms instead. Cajun chicken sloppy joes pair well with crispy sweet potato fries. A fresh green salad also makes a great side. These sides balance the richness of the sloppy joes. For presentation, serve the sloppy joes on a bright platter. Add a sprinkle of fresh parsley on top for color. You can also place chips or extra fries around the plate for a fun look. {{image_4}} You can swap ground chicken for other meats. Try using ground turkey or beef. Both options work well in this dish. They add a unique flavor and texture. For toppings, get creative! You can use different cheeses like cheddar or pepper jack. Add sliced avocado or jalapeños for a spicy kick. A drizzle of ranch or hot sauce can also enhance the taste. If you want to make this dish easier, try a slow cooker. Just mix all the ingredients in the slow cooker. Set it on low for 6-8 hours. You’ll have a tasty meal waiting for you. Another option is the oven-baked version. Preheat your oven to 350°F (175°C). After mixing everything, transfer it to a baking dish. Cover it with foil and bake for about 25 minutes. Remove the foil for the last 10 minutes to brown the top. For the full recipe, check out the instructions above. You’ll love these fun variations! To store your Cajun chicken sloppy joes, place leftovers in an airtight container. Let the mixture cool down before sealing the container. This helps keep the flavors fresh. In the fridge, your dish will last for about 3 to 4 days. Always check for any signs of spoilage before serving. For longer storage, you can freeze the sloppy joe mixture. Pack it in a freezer-safe container, leaving some space for expansion. It can stay good in the freezer for up to 3 months. To reheat, thaw the mixture in the fridge overnight. You can then warm it up on the stove over low heat, stirring occasionally. This way, it will taste just as good as when you made it. Can I use frozen chicken for this recipe? Yes, you can use frozen chicken. Just thaw it first. It is best to use the microwave or leave it in the fridge overnight. Once thawed, you can cook it just like fresh chicken. This makes meal prep easy if you're short on time. What can I add for extra spice? If you want more heat, try adding hot sauce or red pepper flakes. You can also mix in diced jalapeños for a fresh kick. Adjust the spice level to your taste, and feel free to experiment! What to do if the mixture is too watery? If your mixture is too watery, cook it a bit longer. Allow it to simmer on low heat until some liquid evaporates. If you still find it too runny, you can add a bit of cornstarch mixed with water. This will help thicken the sauce quickly. How to adjust the seasoning to taste? Start by tasting your mixture. If it needs more flavor, add salt, pepper, or more Cajun seasoning. Mix in small amounts and taste after each addition. This way, you can find the perfect balance for your dish. This blog post covered a tasty ground chicken recipe. We looked at key ingredients like fresh veggies, Cajun seasoning, and delicious condiments. I shared step-by-step instructions for cooking and serving this dish. Tips for enhancing flavor and making swaps were also included. Remember, you can store the leftovers well, either in the fridge or freezer. Experiment with different meats or cooking methods to find your favorite version. Enjoy making this dish your own with tasty toppings and pairings!

Looking for a fun twist on a classic dinner? Try my Delicious Cajun Chicken Sloppy Joes! This recipe is packed with flavor, using simple ingredients like ground chicken, fresh veggies, …

Read more

Categories Dinner

Greek Yogurt Zucchini Bread Savory and Moist Recipe

June 17, 2025 by Chef Tavio
- 2 cups grated zucchini (approximately 2 medium zucchinis) - 1 cup Greek yogurt (plain and unsweetened) - 3 large eggs (at room temperature) - 1/2 cup vegetable oil (or melted coconut oil) - 1 cup granulated sugar (or coconut sugar) - 1 teaspoon pure vanilla extract - 2 cups all-purpose flour (or whole wheat flour) - 1 teaspoon baking soda - 1/2 teaspoon baking powder - 1 teaspoon ground cinnamon - 1/2 teaspoon salt - 1/2 cup chopped walnuts or pecans (optional) - 1/2 cup raisins or chocolate chips (optional) Greek yogurt is a star in this recipe. It adds moisture and protein. This yogurt makes the bread tender and fluffy. Greek yogurt also reduces the need for extra fat. It provides a tangy flavor that pairs well with zucchini. Plus, it's a great source of probiotics, which help digestion. Using Greek yogurt boosts the health factor of your zucchini bread. You can easily swap ingredients to fit your needs. For the Greek yogurt, try a dairy-free yogurt if you're vegan. You can use almond milk or coconut milk as a lighter option. Instead of granulated sugar, coconut sugar offers a richer taste. Whole wheat flour adds more fiber than all-purpose flour. For flavor, consider adding lemon zest or nutmeg. You can also choose different nuts or dried fruits for variety. Enjoy experimenting with these alternatives! To make Greek yogurt zucchini bread, follow these steps closely. First, preheat your oven to 350°F (175°C). Grease a 9x5-inch loaf pan or use parchment paper. Next, grate two medium zucchinis until you have about two cups. Squeeze out the extra moisture with a clean towel. This step is key to avoid sogginess. Then, mix your wet ingredients. In a large bowl, combine one cup of Greek yogurt, three large eggs, half a cup of vegetable oil, one cup of granulated sugar, and one teaspoon of vanilla extract. Whisk until smooth. In another bowl, whisk together two cups of all-purpose flour, one teaspoon of baking soda, half a teaspoon of baking powder, one teaspoon of cinnamon, and half a teaspoon of salt. Now, add the dry mix to the wet mix. Use a spatula to combine gently without overmixing. Finally, fold in the drained zucchini and any optional nuts or chocolate chips. Pour the batter into your prepared loaf pan. Smooth the top with a spatula. Place it in the preheated oven and bake for 50 to 60 minutes. To check for doneness, insert a toothpick in the center. If it comes out clean, your bread is ready. Keep an eye on the bread in the last few minutes. If it browns too much, cover it loosely with foil. This helps ensure even baking without burning the top. After baking, take the bread out of the oven. Let it cool in the pan for about 10 minutes. This helps it set up and makes removal easier. Then, transfer the bread to a wire rack to cool completely. Once cooled, slice the bread into 10 to 12 pieces. For a tasty treat, serve it warm. You can top it with honey, more Greek yogurt, or fresh fruit. This adds a special touch to your delicious and moist zucchini bread. Check out the full recipe for more details! To get the best texture for your Greek yogurt zucchini bread, use finely grated zucchini. This helps the zucchini blend well in the batter. Squeeze out excess moisture from the zucchini with a clean kitchen towel. This step is key to avoid a heavy bread. Mix the wet and dry ingredients separately before combining them. This ensures even distribution of flavors. When you mix them, do it gently. Overmixing can make your bread tough, which we want to avoid. Sogginess can ruin your delicious zucchini bread. To keep it moist but not wet, draining the zucchini is vital. If you skip this step, your bread will turn out dense. Another tip is to bake the bread until it is golden brown. A toothpick test helps here. Insert a toothpick into the center; if it comes out clean or with a few crumbs, it's ready. This way, you know it’s not undercooked. Greek yogurt adds a rich flavor to your bread. It also keeps it moist. You can boost flavors by adding spices like cinnamon or nutmeg. These spices blend beautifully with the zucchini. Consider mixing in nuts or chocolate chips for an extra crunch or sweetness. Walnuts or pecans work well. You can also add a splash of vanilla extract for a warm, inviting aroma. For the full recipe, check out the details above. Enjoy your baking! {{image_4}} You can easily change the flavor of your Greek yogurt zucchini bread. Adding spices can make a big difference. Try using: - Nutmeg: Just a pinch adds warmth. - Allspice: This spice gives a unique taste. - Ginger: Fresh or ground ginger adds a nice zing. You can also use extracts. Vanilla is classic, but almond or lemon extract works great too. Just swap out or add a teaspoon to the wet mixture for fun flavors. Adding fruits or nuts can change the texture and taste of your bread. Here are some ideas: - Fruits: Swap raisins for dried cranberries or chopped apples. Bananas add moisture too. - Nuts: Chopped pecans or almonds give a nice crunch. Walnuts work well, too. Feel free to mix and match your favorites. Just keep the total amount to about one cup for best results. If you need a gluten-free version, it is simple to make a swap. Use gluten-free flour blends instead of all-purpose flour. Look for options with xanthan gum. This helps the bread rise and stay soft. For a low-carb option, try almond flour or coconut flour. Both add flavor and keep the bread moist. Just adjust the liquid since these flours absorb more moisture. For more ideas, check the full recipe for specific measurements and tips! To keep your zucchini bread fresh, store it in an airtight container. This helps maintain its moisture. If you don't have a container, wrap the bread in plastic wrap or foil. Keep it at room temperature for up to three days. For longer storage, the fridge can keep it fresh for a week. However, this may make the bread a bit dry. If you want to save your zucchini bread for later, freezing is a great option. First, let the bread cool completely. Then, slice it into individual pieces. Wrap each slice in plastic wrap and place them in a freezer bag. Squeeze out as much air as possible before sealing. You can freeze it for up to three months. When you are ready to eat it, just take out a slice. To reheat your zucchini bread, preheat your oven to 350°F (175°C). Place the slices on a baking sheet. Heat them for about 10 minutes, or until warm. You can also use a microwave. Just heat a slice for 15-20 seconds. For a crispy edge, try toasting it in a pan for a minute on each side. Enjoy your warm, moist bread again! Yes, you can use other types of yogurt. Regular plain yogurt works well in this recipe. You can also try non-dairy yogurt, like almond or coconut, if you want a dairy-free option. Keep in mind that the flavor and texture may change slightly, but the bread should still turn out delicious. To make this recipe vegan, replace the eggs with flax eggs. Mix one tablespoon of ground flaxseed with three tablespoons of water for each egg. Let it sit until it thickens. Use a non-dairy yogurt, like almond or coconut yogurt, instead of Greek yogurt. You can also switch the vegetable oil with melted coconut oil if you want. Zucchini bread has many health benefits. Zucchini is low in calories and packed with vitamins. It has vitamin C, which boosts your immune system. The fiber in zucchini aids digestion and keeps you full longer. Greek yogurt adds protein and probiotics, which are good for gut health. This recipe can be a healthier treat when made with whole wheat flour and less sugar. We covered the essential ingredients, steps, and tips for making delicious zucchini bread. Key ingredients like Greek yogurt boost texture and flavor, while simple swaps cater to your needs. Remember to focus on achieving the right texture and enhancing flavors with spices or fruits. Store leftovers properly to enjoy them later. Making zucchini bread is fun and healthy. Experiment with variations to find what you love most. Enjoy the process and savor every slice!

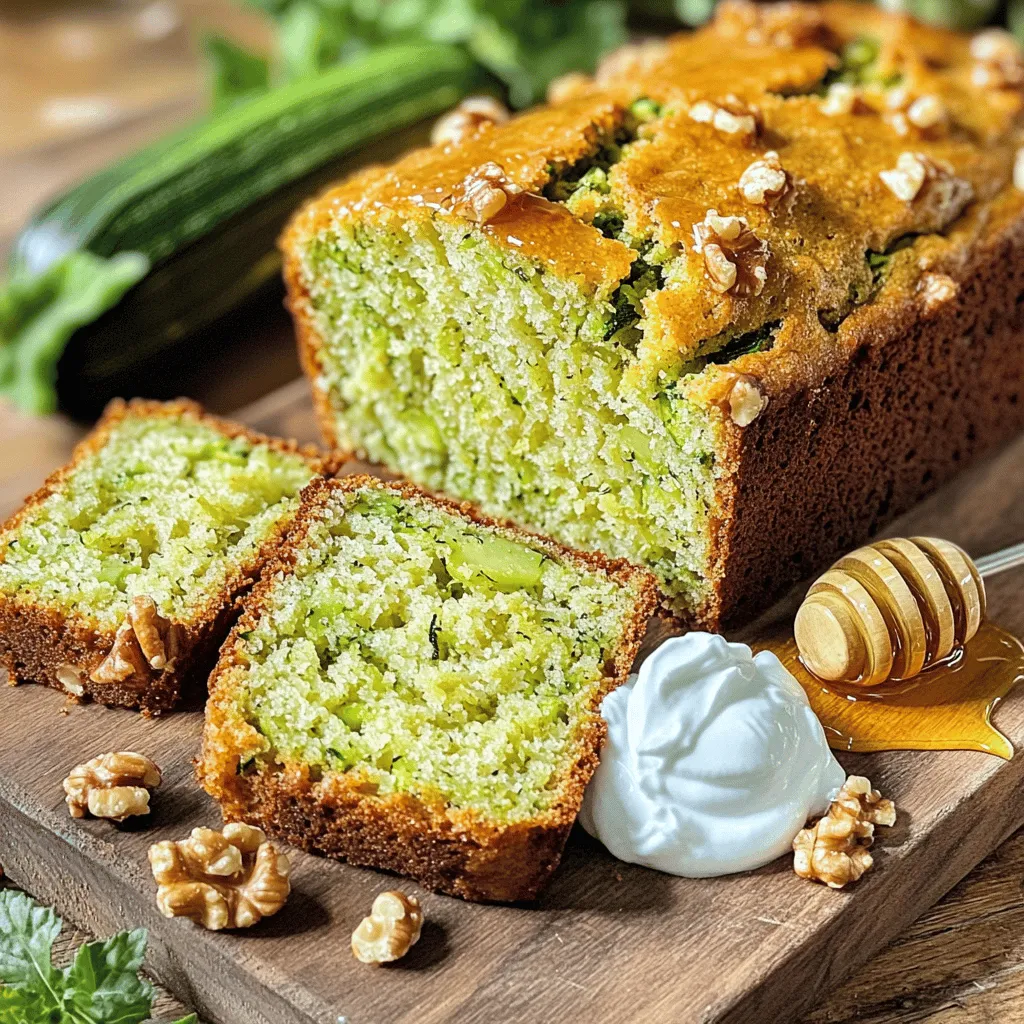
If you’re looking for a delicious, moist treat that packs a healthy punch, you’ve found it! This Greek Yogurt Zucchini Bread is not only easy to whip up, but it’s …

Read more

Categories Breakfast

The BEST Pickled Sweet Peppers Flavorful and Easy Recipe

June 17, 2025 by Chef Tavio
- 4-5 medium sweet bell peppers, preferably a mix of red, yellow, and orange for color - 1 cup apple cider vinegar - 1 cup water - 1/4 cup honey or agave syrup (to sweeten) - 2 cloves garlic, crushed - 1 teaspoon black peppercorns - 1 teaspoon mustard seeds - 1 teaspoon coriander seeds - 1 bay leaf - Salt, to taste These ingredients create a bright and tangy flavor. The sweet bell peppers add crunch and color. The apple cider vinegar gives the pickles a nice tartness. Honey or agave syrup balances the acidity with sweetness. Garlic and spices infuse the pickles with depth. Using a mix of colored peppers makes your dish pop. Gather these items before you start. Fresh ingredients will yield the best results. You can find sweet bell peppers at any local market. Make sure they are firm and shiny. Experiment with the spices if you like, but this mix works great. For the full recipe, check out the detailed instructions. You will enjoy making these pickled sweet peppers! Start by giving your sweet bell peppers a good wash. Rinse each pepper under cold water to remove dirt. Next, slice each pepper in half lengthwise. This step helps you see inside and makes it easy to remove the seeds. Use a small knife to scoop out the seeds and white membranes. These parts can make the peppers taste bitter. After that, cut the peppers into strips or rings, whichever you like best. Now, let’s make the pickling liquid. In a medium saucepan, mix these ingredients: - 1 cup apple cider vinegar - 1 cup water - 1/4 cup honey or agave syrup - 2 cloves garlic, crushed - 1 teaspoon black peppercorns - 1 teaspoon mustard seeds - 1 teaspoon coriander seeds - 1 bay leaf - Salt, to taste Stir everything together well. It’s important to bring this mix to a gentle boil over medium heat. Stir occasionally to help the honey dissolve. Once it boils, reduce the heat to low and let it simmer for about 5 minutes. This helps the spices share their flavors with the liquid. Before packing, you need to sterilize your jars. You can do this by boiling them in water for 5-10 minutes. This step keeps your pickled peppers safe. Once they are clean, tightly pack the sliced sweet peppers into the jars. Leave some space at the top. After the pickling liquid has simmered, carefully pour it over the peppers in the jars. Make sure the peppers are fully covered, but leave about half an inch at the top for expansion. While the liquid is still hot, seal the jars with their lids. Let them cool to room temperature before putting them in the fridge. For the best flavor, wait at least 24 hours before tasting. The peppers will taste even better after 3-5 days. Enjoy your homemade pickled sweet peppers! Check out the Full Recipe for more details. When choosing sweet peppers, look for bright colors. Red, yellow, and orange peppers have great flavors. Each color brings its unique taste. Red peppers are sweet and fruity. Yellow peppers add a mild, grassy note. Orange peppers offer a balance of both. Pick fresher peppers for the best taste. Check for firm skin and no soft spots. Fresh peppers will give your pickles a crisp crunch. To tweak the sweetness, you can use more or less honey. If you want a sweeter pickle, add more sweetener. For a less sweet option, cut back on the honey or agave syrup. To add heat, try including red pepper flakes or sliced jalapeños. You can also use spicy mustard seeds. This way, you can create a kick that suits your taste. When serving, present the pickled peppers in a nice bowl. You can use toothpicks for easy snacking. This makes it fun for guests. Pickled peppers are great on sandwiches or burgers. They also add color to salads. You can serve them as a quick snack on their own, too. They are versatile and bright, perfect for any meal. For the full recipe, check out the earlier section. Enjoy your pickled sweet peppers! {{image_4}} You can choose different sweeteners for your pickled sweet peppers. Honey and agave syrup are both great choices. Honey gives a rich taste, while agave syrup offers a lighter flavor. If you want to try alternative sweeteners, think about using maple syrup or stevia. These options can add unique notes to your pickles. If you like some heat, add jalapeños or chili flakes to your pickled sweet peppers. This gives your recipe a spicy kick that contrasts nicely with the sweet peppers. You can also infuse different spices like smoked paprika or crushed red pepper. This adds layers of flavor that make your pickles exciting and fun. To create unique flavors, try adding fresh herbs like dill or thyme. These herbs can brighten your pickles and add freshness. You can also experiment with citrus peels. Lemon or orange peels bring a zesty twist to your pickles. Remember, the goal is to have fun and explore flavors that you love! For the complete process of making these delightful pickles, check out the Full Recipe. For the best pickled sweet peppers, use glass jars. They keep flavors fresh. Make sure the jars are clean and dry before filling them. Seal the jars tightly with their lids. Refrigeration is key. It slows down spoilage and keeps the peppers crisp. In the fridge, pickled sweet peppers can last about 2 to 3 months. Always check for any signs of spoilage. If you see mold or a strange smell, toss them out. A color change can also mean they are past their prime. Freezing pickled peppers is simple. Start by packing them in airtight containers. Leave some space at the top for expansion. To thaw, place them in the fridge overnight. This keeps their taste and texture intact. Avoid microwaving, as it can make them mushy. For the complete recipe, refer to [Full Recipe]. Pickled sweet peppers need time to develop flavor. I recommend waiting at least 24 hours. For the best taste, let them sit for 3 to 5 days. This allows the spices and vinegar to soak in well. Yes, you can use many types of peppers. Banana peppers add a nice tang. Cherry peppers bring a sweet bite. Feel free to mix different types for unique flavors. Experimenting makes pickling fun and tasty! Pickled sweet peppers fit well in many dishes. They brighten up sandwiches and salads. Try them in tacos or on pizza for a pop of flavor. You can also enjoy them as a snack. Their crunch and tang make every bite exciting! You can find good pickled sweet peppers at many grocery stores. Look for brands that use fresh ingredients. Specialty stores often carry homemade or artisanal options. Online shops also offer a wide selection. Check reviews to find the best quality. For a delightful homemade option, don't forget to check [Full Recipe]. In this article, we explored how to make pickled sweet peppers. We covered the key ingredients, detailed step-by-step instructions, and shared helpful tips. You'll find options for sweetness and heat, along with creative presentation ideas. We also discussed variations and proper storage methods to ensure freshness. Pickling is fun and offers tasty rewards. Get creative in your kitchen and enjoy the flavors of your homemade pickles!

Do you crave a burst of flavor in your meals? Look no further! In this guide, I’ll share my easy and delicious recipe for the best pickled sweet peppers. With …

Read more

Categories Appetizers

Korean BBQ Meatballs Savory and Simple Recipe

June 17, 2025 by Chef Tavio
- 1 pound ground beef or turkey - 1/2 cup panko breadcrumbs - 1/4 cup green onions, finely chopped - 1/4 cup toasted sesame seeds - 2 cloves garlic, minced - 1-inch piece ginger, freshly grated - 1/4 cup low sodium soy sauce - 2 tablespoons brown sugar - 1 tablespoon gochujang - 1 tablespoon rice vinegar - 1 teaspoon sesame oil - Salt and pepper to taste - Fresh cilantro and additional sesame seeds for garnish Each ingredient plays a key role. Ground beef or turkey gives the meatballs their base. Panko breadcrumbs add a crispy texture. Green onions bring a fresh, mild flavor. Toasted sesame seeds add crunch and richness. Garlic and ginger give a warm, aromatic taste. Low sodium soy sauce adds saltiness while brown sugar balances it with sweetness. Gochujang adds a spicy kick. Rice vinegar brightens the mix, and sesame oil rounds it out with depth. You can adjust the seasoning with salt and pepper. Garnishing with cilantro and sesame seeds makes the dish pop. For the full recipe, check out the details to ensure you get each step right! - Preheat the oven to 400°F (200°C). - Prepare a baking sheet with parchment paper. - Combine all ingredients in a mixing bowl thoroughly. - Use hands to mix for even consistency. - Form meat mixture into 1-inch balls. - Arrange on the baking sheet evenly spaced. - Bake for 20-25 minutes until browned and cooked through. - Use a meat thermometer to check for 165°F (74°C). - Combine soy sauce, gochujang, and rice vinegar for dipping. - Allow meatballs to cool, then garnish with cilantro and sesame seeds. This Korean BBQ meatball recipe is simple and fun. Follow each step closely for the best results. Enjoy the savory flavors and share with friends! For the full recipe, check the link. To get the best flavor in your Korean BBQ meatballs, adjust the gochujang. If you like spice, add more. If you want it milder, use less. Freshly grated ginger makes a huge difference too. It adds brightness and depth to the dish. Always use fresh ingredients for the best taste. When forming your meatballs, moisten your hands. This simple step keeps the meat from sticking to your fingers. It makes shaping them easier. Also, use parchment paper on your baking sheet. This ensures the meatballs release easily after baking. For a crispy exterior, broil the meatballs during the last few minutes of cooking. This technique gives them a nice crunch without drying them out. Just watch them closely to prevent burning. You want that perfect golden color for the best look and taste. {{image_4}} You can switch up the meat in your Korean BBQ meatballs. Ground chicken or pork adds a unique flavor. If you want a healthier option, try plant-based ground meat. This choice is great for vegetarians and still tastes amazing. To make your meatballs stand out, add fresh herbs. Mint or basil gives a bright taste. You can also chop up bell peppers or carrots. These veggies add crunch and nutrition to your dish. How you cook your meatballs changes their texture. If you want a crispy bite, pan-fry them instead of baking. For that smoky BBQ flavor, grill the meatballs. Both methods enhance the taste and make them fun to eat. If you're ready to dive into the full experience, check out the [Full Recipe]. Store leftover meatballs in an airtight container for up to 3 days. Keeping them sealed helps retain moisture and flavor. You can enjoy them as a quick snack or add them to a salad for lunch. Freeze uncooked meatballs on a baking sheet before transferring them to a freezer bag. This method keeps them from sticking together. You can also freeze cooked meatballs. Just ensure they cool down first. Reheating them later makes for an easy meal. Reheat in the oven at 350°F (175°C) for best results. This way, they warm evenly and stay juicy. If you need a faster option, you can use a microwave, but the oven gives a better texture. Yes, you can substitute ground turkey, chicken, pork, or meat alternatives. Each type of meat brings its own taste and texture. Ground turkey is leaner, while pork offers a richer flavor. Feel free to get creative based on what you have at home. To make the meatballs less spicy, reduce the amount of gochujang or omit it altogether. You can also add a bit more brown sugar to balance the heat. Taste as you go, and adjust until it suits your palate. Serve with steamed rice, pickled veggies, or a fresh salad for balance. The rice helps soak up the flavors, while pickled veggies add a nice crunch. A salad can lighten the meal and bring freshness. Present the meatballs with a dipping sauce and garnish for a colorful platter. Use a nice dish to catch the eye. Adding fresh cilantro and sesame seeds on top makes everything pop. The dipping sauce adds an extra layer of flavor. They can last refrigerated for up to 3 days when stored properly. Keep them in an airtight container to maintain freshness. Reheat them gently to enjoy later. These Korean BBQ meatballs are simple to make and full of flavor. You learned about the key ingredients and steps needed to create them. I shared tips to enhance taste and texture, as well as variations to keep things interesting. Storing and reheating options were also highlighted, ensuring you can enjoy your meatballs later. With this knowledge, you can cook up a tasty dish that pleases everyone. Dive into your kitchen and try making these meatballs for a quick and satisfying meal. Enjoy cooking!

Craving a delicious dish that’s both savory and simple? Look no further than these Korean BBQ meatballs! Made with juicy ground beef or turkey and packed with rich flavors, they …

Read more

Categories Appetizers

Japanese Katsu Bowls Tasty and Easy Comfort Food

June 17, 2025 by Chef Tavio
- 2 boneless, skinless chicken breasts - Salt and freshly ground black pepper, to taste - 1 cup all-purpose flour - 2 large eggs, thoroughly beaten - 2 cups panko breadcrumbs - Vegetable oil, for frying (enough to fill the pan about 1/2 inch deep) - 2 cups jasmine rice - 2 cups water - 1 cup finely shredded cabbage (for garnish) - 1 small carrot, peeled and grated (for garnish) - 2 green onions, thinly sliced (for garnish) - Tonkatsu sauce (for drizzling) - Sesame seeds (optional, for garnish) - Meat mallet or rolling pin - Skillet for frying - Rice cooker or saucepan When I make katsu bowls, I love using chicken breasts. They cook well and stay juicy. I use panko breadcrumbs for that perfect crunch. Jasmine rice is my choice because it’s fluffy and pairs well with the katsu. Toppings make a big difference in flavor and look. I always add shredded cabbage for freshness. Tonkatsu sauce, a sweet and tangy sauce, brings everything together. A sprinkle of sesame seeds adds a nice touch. To prepare, I grab a meat mallet to pound the chicken. A skillet helps fry until golden brown. I also use a rice cooker or saucepan for cooking the rice just right. For the full recipe, check out the details above. Enjoy the process and the tasty results! To prepare the chicken, start by placing the chicken breasts between two sheets of plastic wrap. This keeps things tidy. Use a meat mallet or rolling pin to pound the chicken to an even thickness of about 1/2 inch. This helps it cook evenly and stay juicy. Next, season both sides of the chicken breasts with salt and freshly ground black pepper. This simple step adds a lot of flavor. Now, let's create a breading station. You need three bowls: - The first bowl for all-purpose flour. - The second bowl for two large, beaten eggs. - The third bowl for panko breadcrumbs. Begin the breading process by dredging each chicken breast in the flour. Make sure to shake off the excess flour. Next, dip the floured chicken into the beaten eggs. Fully coat it on both sides. Finally, press the chicken into the panko breadcrumbs. This gives it a nice, crunchy coating. For the rice, combine 2 cups of jasmine rice and 2 cups of water in a medium saucepan. Bring it to a boil over high heat. Once it starts boiling, reduce the heat to low. Cover the pan tightly and let it simmer for about 15 minutes, or until the rice absorbs all the water. After cooking, let it sit for another 5 minutes to steam. Next, let's fry the chicken. Pour enough vegetable oil into a large skillet to reach about 1/2 inch deep. Heat the oil over medium heat until it shimmers but does not smoke. Carefully place the breaded chicken into the hot oil. Make sure not to overcrowd the skillet. Fry each piece for about 5-7 minutes on each side, or until golden brown and cooked through. Check the internal temperature; it should reach 165°F (75°C). Once cooked, transfer the chicken to a plate lined with paper towels to absorb any excess oil. Now you are ready to slice the chicken. Let it rest on the paper towel plate for a few minutes. Use a sharp knife to slice each chicken breast into strips against the grain. This makes the chicken tender and easy to eat. For the perfect finishing touch, check out the Full Recipe for detailed steps on assembling your delicious katsu bowl! To get the best crispy texture, you must follow a few key steps. First, make sure your chicken is pounded evenly. This helps it cook uniformly. The coating also plays a big role. Use panko breadcrumbs instead of regular ones for an extra crunch. The optimal frying temperature is crucial too. Heat your oil to around 350°F (175°C). If the oil is too cool, your katsu will absorb more oil. If it's too hot, the outside will burn before the inside cooks. A thermometer helps you check the oil's temperature. Layering ingredients in your bowl makes a big difference. Start with a scoop of jasmine rice at the bottom. Place the sliced chicken katsu on top of the rice. Then, add shredded cabbage, grated carrot, and green onions. This not only looks appealing but also balances flavors and textures. For side dishes, consider serving miso soup or pickled vegetables. These add variety and complement the katsu well. If you have leftovers, store them properly to keep the katsu fresh. Place the chicken in an airtight container. Store rice separately to avoid sogginess. This keeps the textures nice. To reheat, use the oven for the chicken. Set it to 350°F (175°C) and heat for about 10-15 minutes. This helps maintain crispiness. For the rice, a quick microwave reheat is best. Add a splash of water to keep it moist while warming. For the full experience, check out the Full Recipe. {{image_4}} You can switch up the protein in your katsu bowl. The classic choice is pork katsu. Just replace the chicken with pork loin or pork chops. The cooking method stays the same. For a tasty vegan twist, try using tofu. Press firm tofu to remove water. Then, slice it and coat it like chicken. This gives you a crispy, plant-based version. To make your katsu even better, add spices to the panko. Try garlic powder or paprika for a kick. You can also mix in some dried herbs like oregano or basil. These little changes will bring a new flavor. For sauce, tonkatsu is a classic, but you can try others. Sweet chili sauce or spicy mayo works well too. When making katsu bowls, think about seasonal veggies. In summer, add fresh cucumbers or radishes for crunch. In fall, use roasted sweet potatoes or pumpkin. These veggies not only add taste but also color. Adjusting your ingredients with the seasons keeps your dish exciting and fresh. To find the best katsu bowls, start with local Japanese restaurants. Look for places that focus on authentic dishes. Popular spots often have long lines, which is a good sign. Some well-known chains serve tasty katsu, but small family-owned places offer a unique touch. Ask locals for their favorites; they often know hidden gems. Food markets also serve great katsu bowls. Check out places with food stalls. You can find fresh katsu made right in front of you. If you prefer staying in, delivery apps offer katsu bowls too. Easy-to-use apps let you browse various restaurants. You can filter your search for Japanese cuisine. Look for high ratings and positive reviews. These tips help you choose the best options. When ordering online, check the estimated delivery time. This helps you avoid long waits. Also, don't forget to add extra tonkatsu sauce for dipping! Making katsu bowls at home has many perks. First, you can control the ingredients. You choose fresh chicken and quality breadcrumbs. This way, you know what goes into your meal. Plus, it’s often cheaper than dining out. With the right recipe, like my full recipe for crispy chicken katsu bowls, you can create a delicious dish. Cooking at home also allows you to customize flavors. Want more spice? Add some chili flakes! A katsu bowl is a Japanese dish. It features breaded and fried meat, usually chicken or pork. The meat sits atop a bed of rice. You often add vegetables and drizzle a rich sauce on top. A classic katsu bowl uses tonkatsu sauce, which adds a sweet and tangy flavor. The dish is comforting and satisfying, making it a popular choice for many. Yes, you can make katsu in an air fryer. This method is healthier and less messy. To air fry katsu, follow these steps: - Preheat your air fryer to 380°F (193°C). - Prepare the chicken as described in the full recipe. - Instead of frying, place the breaded chicken in the air fryer basket in a single layer. - Spray a light coat of oil over the chicken. - Cook for about 10-12 minutes, flipping halfway through, until golden brown and crisp. This way, you still enjoy crispy chicken without as much oil. To make your katsu less greasy, try these tips: - Use a paper towel to pat the chicken dry before breading. - Make sure the oil is hot enough before adding the chicken. This helps seal the breading. - Avoid overcrowding the skillet. Fry in batches if needed. - After frying, place the chicken on a plate lined with paper towels. This helps absorb extra oil. These steps will help keep your katsu crispy and light. Tonkatsu sauce is a thick, dark brown sauce. It has a sweet and tangy flavor. The sauce typically includes: - Soy sauce - Worcestershire sauce - Sugar - Ketchup - Dijon mustard - Garlic powder This sauce pairs perfectly with katsu, enhancing its taste. Drizzle it generously over your katsu bowl for a burst of flavor. In this article, we covered how to make delicious katsu bowls. We explored key ingredients like chicken breasts and panko breadcrumbs. I shared step-by-step instructions for preparing, breading, and cooking your katsu. I also offered tips for perfecting the dish, including serving suggestions and storage advice. Katsu bowls are easy to make at home, giving you control over flavor and cost. Whether you enjoy classic chicken or want to try vegan options, katsu is a dish that delights everyone. Enjoy experimenting with this fun and tasty recipe!

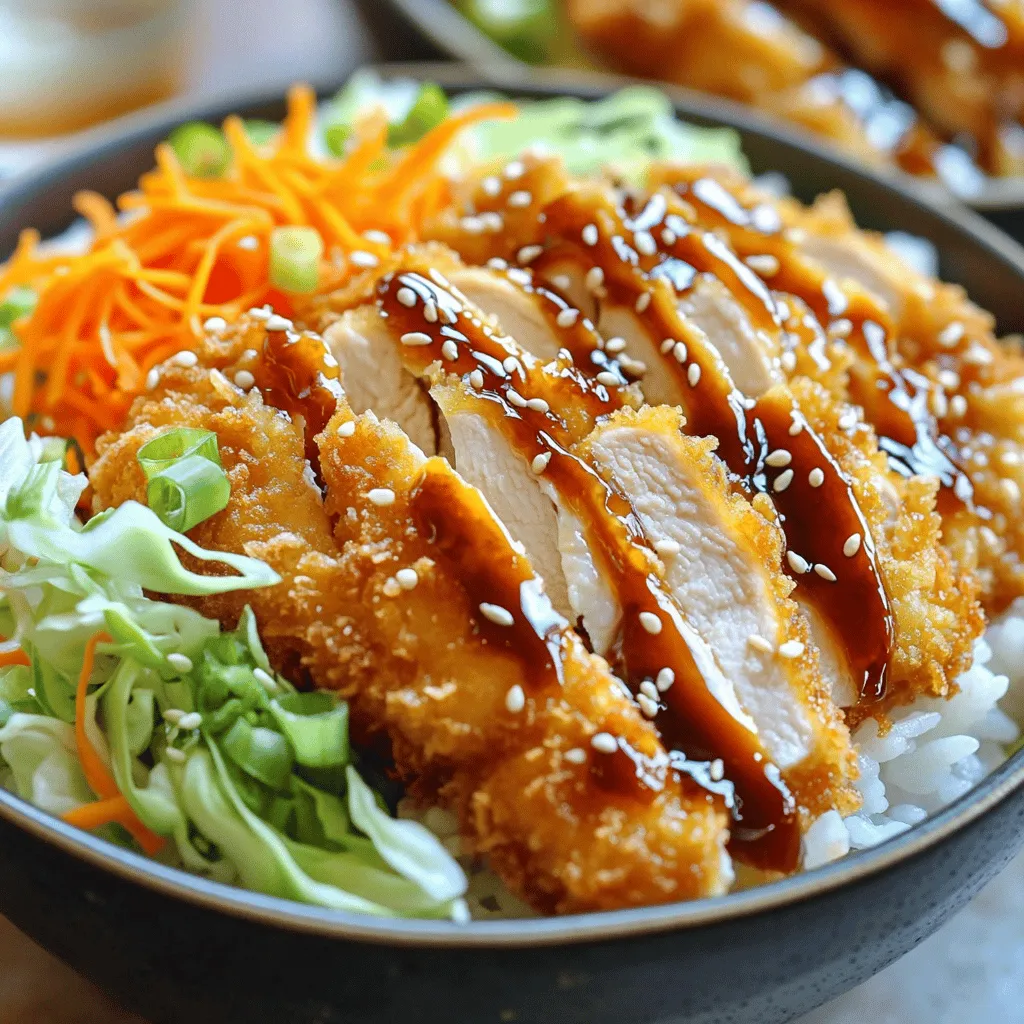
Japanese Katsu Bowls are the ultimate comfort food that everyone loves. With crispy chicken, fluffy rice, and tasty sauces, you can create a meal that warms your soul. In this …

Read more

Categories Dinner

Cottage Cheese and Chickpea Salad Bowl Fresh Delight

June 13, 2025 by Chef Tavio
- 1 cup creamy cottage cheese - 1 cup canned chickpeas, meticulously rinsed and drained - 1 medium cucumber, diced into bite-sized pieces - 1 crisp red bell pepper, diced - 1/4 of a red onion, finely chopped for flavor - 1 cup vibrant cherry tomatoes, halved - 1 tablespoon extra virgin olive oil - 2 tablespoons zesty lemon juice - 1 teaspoon aromatic cumin powder - Salt and freshly cracked pepper to taste - Optional: 1/4 teaspoon red pepper flakes for an added kick - 1/4 cup fresh parsley, chopped for garnish - Extra vegetables or nuts When I create a salad bowl, I focus on fresh, quality ingredients. Cottage cheese gives a creamy base, while chickpeas add protein and texture. Fresh vegetables bring crunch and flavor. Use your favorite veggies, but I love cucumber, red bell pepper, and cherry tomatoes. For the dressing, I keep it simple and bright. Extra virgin olive oil and lemon juice provide a rich and zesty flavor. Cumin adds warmth, and salt and pepper enhance it all. If you like heat, red pepper flakes give a nice kick. Don't forget optional garnishes! Fresh parsley adds color and taste. You can also add more veggies or nuts for extra crunch. This salad is not just healthy; it’s a delight for your taste buds. Check out the Full Recipe for all the details. - Start with a large mixing bowl. Combine 1 cup of creamy cottage cheese and 1 cup of rinsed and drained chickpeas. Mix them well until they form a smooth base. - Next, add in 1 medium diced cucumber, 1 diced red bell pepper, and 1/4 finely chopped red onion. Stir gently to blend the flavors. - Finally, fold in 1 cup of halved cherry tomatoes and 1/4 cup of fresh chopped parsley. This adds color and freshness to your salad. - In a small bowl, whisk together 1 tablespoon of extra virgin olive oil, 2 tablespoons of lemon juice, 1 teaspoon of cumin, salt, and pepper. - If you like a bit of heat, toss in 1/4 teaspoon of red pepper flakes. Mix until everything is well combined. - Drizzle the dressing over your salad mix. Toss gently so every piece is coated. - For the best taste, let your salad rest for at least 10 minutes. This helps the flavors blend nicely. You can find the full recipe for this dish in the earlier section. Enjoy your fresh and tasty cottage cheese and chickpea salad bowl! To get the best texture for your salad, start with creamy cottage cheese. This makes every bite smooth and delicious. Next, you need to rinse the chickpeas well. This step removes any excess salt and makes them taste fresh. Drain them carefully to avoid excess water in your salad. Flavor is key in this dish. Adjust the seasoning to your taste. If you like it spicy, add more red pepper flakes. I suggest letting the salad rest for about 10 minutes before serving. This time helps the flavors mix and develop. If you want to make this salad in advance, it’s easy! You can prepare the ingredients a day ahead. Just store the cottage cheese and chickpeas together. Keep the vegetables separate until you are ready to serve. This keeps everything fresh and crunchy. For the best taste, mix them together right before eating. You will love how easy meal prep can be! For more details, check the Full Recipe. {{image_4}} You can swap cottage cheese for Greek yogurt. It adds creaminess and tang. If you prefer a dairy-free option, try silken tofu. It blends well and keeps the salad light. For vegetables, you can use carrots or zucchini. They add crunch and color. You can also mix in some spinach or kale for more greens. Change up the dressing to keep things exciting. A balsamic vinaigrette can bring a sweet touch. You might also like a tahini dressing for a nutty flavor. Herbs can make your salad pop. Fresh basil or mint adds brightness. A sprinkle of dill offers a fresh taste that pairs well with chickpeas. Pair your salad with grains like quinoa or farro. These add heartiness and nutrients. If you want protein, grilled chicken or shrimp works great too. For serving, try using mason jars for a fun look. You can also layer the salad in a bowl for a colorful display. Don’t forget to drizzle extra dressing on top for added flavor. For the full recipe, check out Cottage Cheese and Chickpea Delight Bowl. To keep your cottage cheese and chickpea salad fresh, use airtight containers. Glass containers work well, as they do not retain odors. Plastic containers are also fine, but ensure they seal tightly. Place the salad in the fridge right after serving. This keeps it cool and safe to eat. This salad stays fresh for about three days in the fridge. After three days, check for spoilage. If you see any mold or an off smell, it's best to toss it. A slimy texture is also a clear sign that the salad has spoiled. You can freeze this salad, but some textures may change. To freeze, store it in a freezer-safe container. Let out as much air as possible to prevent freezer burn. When you're ready to eat it, thaw in the fridge overnight. Avoid refreezing it after thawing, as this can affect the taste and quality. Yes, you can make this salad vegan. To do this, simply swap the cottage cheese for a plant-based alternative. Options include vegan cream cheese or silken tofu blended until smooth. This keeps the creamy texture without using dairy. This salad bowl pairs well with various dishes. You can serve it with grilled chicken or fish for a protein boost. It also goes great with quinoa or brown rice for a hearty meal. Consider adding pita bread or whole-grain crackers on the side for extra crunch. The salad lasts about three days in the fridge. Store it in an airtight container to keep it fresh. If the salad has tomatoes, they may make it soggy over time. You can prep the salad base and dressing separately to keep it fresh longer. Yes, you can use dried chickpeas. Start by soaking them overnight in water. After soaking, drain and rinse them. Then, cook them in boiling water until tender, which can take about 1 to 2 hours. Once cooked, let them cool before adding to the salad. This gives you great texture and flavor. For the full recipe, check out the Cottage Cheese and Chickpea Delight Bowl. This blog post guides you through making a fresh and tasty salad bowl. You learned about the key ingredients, step-by-step preparation, and useful tips for the best flavor and texture. I shared easy variations and storage tips, so your salad stays fresh longer. Now, you can create a healthy meal that fits your taste. Enjoy trying different ingredients and flavors tailored to you. Get ready to impress yourself and others with your salad-making skills!

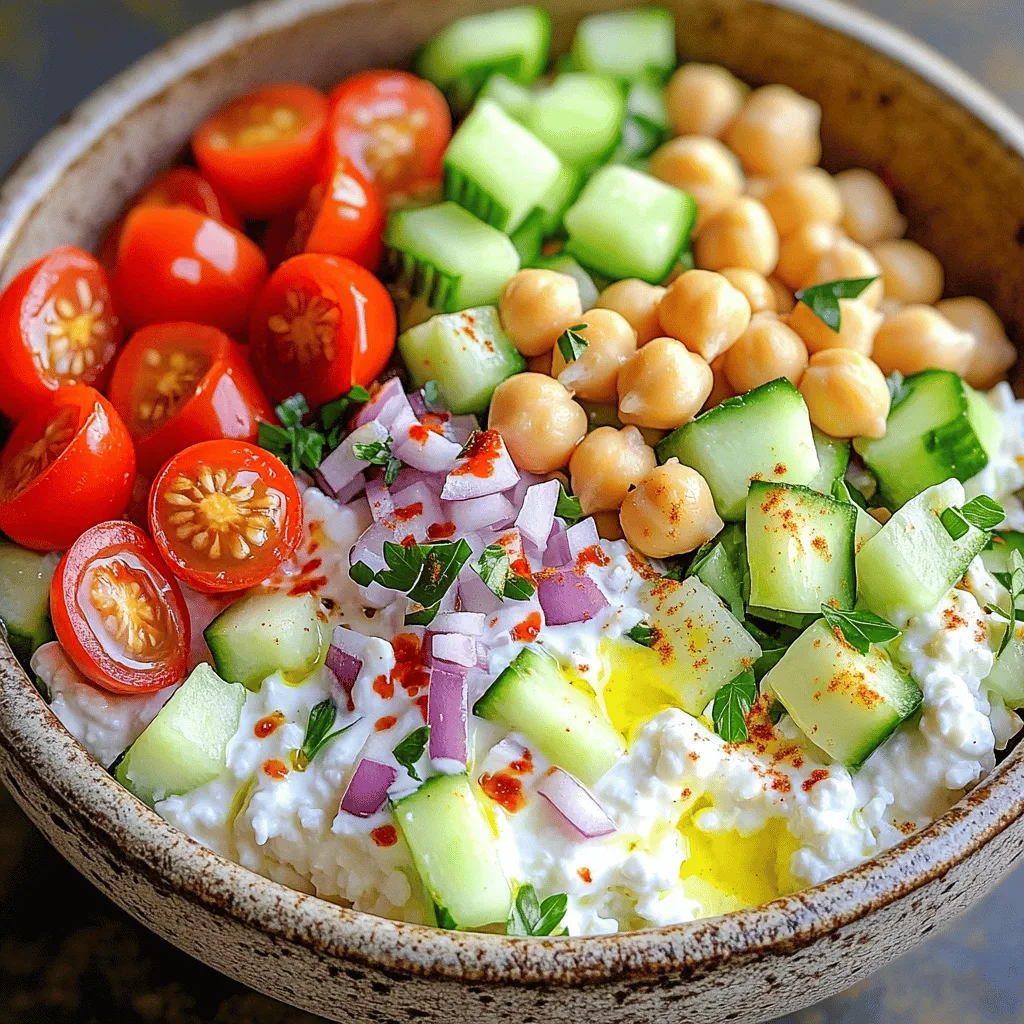
Looking for a fresh, tasty, and healthy meal? Look no further! The Cottage Cheese and Chickpea Salad Bowl brings together protein-packed goodness and vibrant veggies in one delightful dish. This …

Read more

Categories Salads

Chicken Breast with Roasted Corn and Avocado Delight

June 13, 2025 by Chef Tavio
To make Chicken Breast with Roasted Corn and Avocado, you will need: - 2 boneless, skinless chicken breasts - 1 cup fresh corn kernels (or 1 can of corn, drained) - 1 ripe avocado, diced - 1 red bell pepper, diced - 1 small red onion, finely chopped - 2 tablespoons olive oil - 1 teaspoon smoked paprika - 1 teaspoon ground cumin - Salt and freshly ground black pepper to taste - Juice of 1 lime - Fresh cilantro, chopped (for garnish) You can easily swap some ingredients if needed: - Use frozen corn if fresh is not available. - Substitute the red bell pepper with yellow or green for a different taste. - Try lime juice with lemon juice for a similar zing. - If you don’t have cilantro, parsley makes a nice alternative. - Chicken thighs can replace chicken breasts for more flavor and juiciness. To prepare this dish, you will need: - A sharp knife for chopping - A cutting board for prep work - A large mixing bowl for the corn mixture - A baking sheet lined with parchment paper - A skillet for searing the chicken - An oven set to 400°F (200°C) These tools help make the cooking process smooth and enjoyable. Enjoy the journey of making this tasty dish! If you want the full recipe, check the link above. 1. Preheat your oven to 400°F (200°C). This sets the stage for roasting. 2. In a bowl, mix the corn, diced red bell pepper, red onion, and lime juice. 3. Add half of the olive oil, a pinch of salt, pepper, smoked paprika, and cumin. 4. Stir until everything is well combined and coated. 1. Spread the corn mixture on a lined baking sheet. 2. Roast in the oven for 15-20 minutes. Look for a light char on the corn. 3. While the corn roasts, season the chicken with salt and pepper. 4. Rub the chicken with the rest of the olive oil. 5. Heat a skillet over medium-high heat and add the chicken. Sear for 5 minutes on each side. 6. Transfer the chicken to the oven with the corn. Bake for another 10-15 minutes. 7. Check that the chicken reaches 165°F (74°C). 8. Remove both from the oven. Let the chicken rest for a few minutes. 1. Slice the rested chicken breasts and arrange them on a serving plate. 2. Top with the roasted corn mixture and the diced avocado. 3. Finish with a sprinkle of fresh chopped cilantro for added flavor. This recipe, known as Sizzling Chicken Delight with Corn & Avocado, is a feast for the eyes and the taste buds! To keep your chicken juicy, start with high-quality chicken breasts. Choose fresh, boneless, and skinless cuts. Season them well before cooking. I recommend using salt and pepper to enhance the flavor. Searing the chicken in a hot skillet locks in moisture. After searing, bake the chicken until it reaches 165°F (74°C). Let it rest for a few minutes before slicing. This resting time allows the juices to redistribute, keeping the meat tender. Roasting corn enhances its natural sweetness. Use either fresh corn or canned corn. If fresh, remove the kernels from the cob for even roasting. Spread the corn in a single layer on a baking sheet. Make sure to preheat your oven to 400°F (200°C). Roast for 15-20 minutes until the corn is slightly charred. Stir halfway through to ensure even cooking. This technique brings out a rich flavor and gives a nice texture. Seasoning is key to making this dish shine. I suggest using smoked paprika and ground cumin for a warm, earthy flavor. A pinch of salt and black pepper enhances the overall taste. Don’t forget the lime juice! It adds a bright, fresh note to the corn mixture. For a finishing touch, sprinkle fresh cilantro on top before serving. This adds a burst of color and flavor. For the full recipe, check out the details above. {{image_4}} You can add more flavor by using spicy peppers. Jalapeños or serranos work well. Dice them finely and mix them into the corn mixture. This will give your dish a nice kick. If you prefer mild heat, use sweet bell peppers. They add color and flavor without too much spice. If you want to switch up the protein, you can use turkey or pork. Turkey breast will cook similarly to chicken. Just watch the cooking time. Pork tenderloin also tastes great with roasted corn and avocado. Cut it into medallions and follow the same cooking steps. For a vegan twist, replace chicken with grilled tofu or tempeh. Cut them into cubes and marinate them with lime juice and spices. You can also use chickpeas for protein. They add a nice texture and flavor. Mix them with the corn, avocado, and peppers for a full dish. Feel free to explore these variations to make your Chicken Breast with Roasted Corn and Avocado delight even more exciting! For the full recipe, check the earlier section. After cooking, let the chicken cool. Place the chicken and corn mixture in separate airtight containers. Store them in the fridge for up to three days. Always label your containers with the date. This helps you keep track of freshness. You can freeze the chicken and corn mixture for later use. Wrap the chicken tightly in plastic wrap and place it in a freezer bag. Store the corn mixture in a freezer-safe container. Both can last up to three months in the freezer. To avoid freezer burn, remove as much air as possible. To reheat, first, thaw the chicken and corn in the fridge overnight. You can use an oven or a microwave. If using an oven, preheat it to 350°F (175°C). Place the chicken and corn in a baking dish, cover it with foil, and heat for about 15-20 minutes. If using a microwave, heat in short intervals, stirring often, until warmed through. This keeps the chicken juicy and the corn flavorful. Enjoy your delicious Chicken Breast with Roasted Corn and Avocado Delight! For the Full Recipe, check out the earlier sections. Cook chicken breasts for about 10-15 minutes after searing. Use a meat thermometer to check. The chicken should reach 165°F (74°C) to be safe to eat. This way, the chicken stays juicy and cooked perfectly. Yes, you can use frozen corn! Make sure to thaw it first. Drain any excess water before mixing it with the other veggies. This will keep the dish from becoming too watery. You can serve this dish with tortilla chips for a nice crunch. A fresh green salad also works well. Both options add different textures and flavors, making your meal even better. In this blog post, we covered key ingredients, cooking steps, and delicious tips. You learned how to keep chicken moist and make corn perfect. We discussed various ways to spice up your dish and options for vegan meals. Remember the storage tips for fresh meals later. Cooking can be fun and simple. Try these ideas to impress your family and friends!

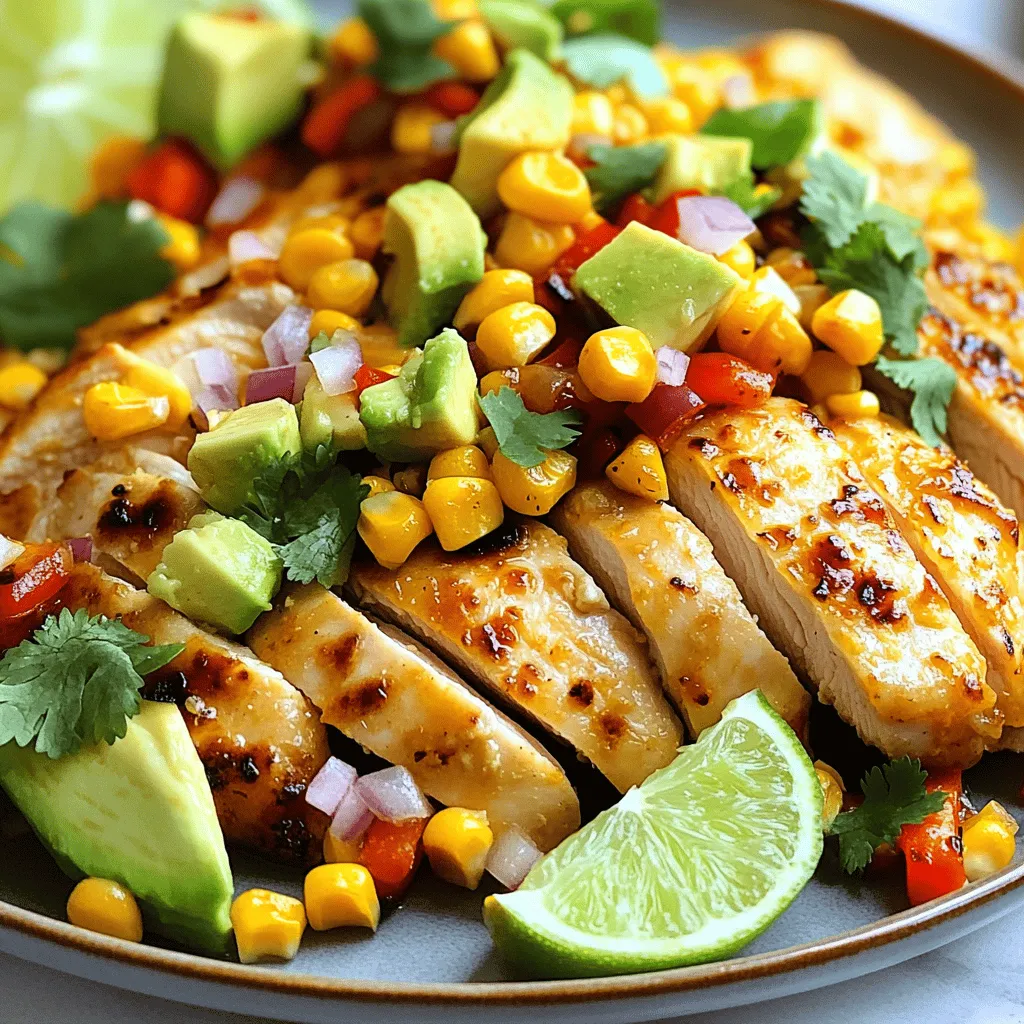
Are you ready to transform your dinner routine? This Chicken Breast with Roasted Corn and Avocado Delight is a fresh and tasty dish you can whip up in no time. …

Read more

Categories Dinner

Baked Stuffed Salmon with Spinach & Feta Delight

June 13, 2025 by Chef Tavio
- 4 salmon fillets (about 6 oz each) - 2 cups fresh spinach, roughly chopped - 1 cup feta cheese, crumbled - 1/4 cup cream cheese, softened - Salt and freshly ground black pepper, to taste For this dish, salmon fillets are the star. Their rich flavor pairs perfectly with the creamy filling. Fresh spinach adds color and nutrients. Feta cheese brings a salty bite, while cream cheese adds smoothness. Seasonings like salt and pepper enhance the dish's overall taste. - 2 cloves garlic, finely minced - 1/2 teaspoon crushed red pepper flakes - 1 tablespoon extra virgin olive oil - Zest of 1 medium lemon You can add garlic for a strong flavor boost. Red pepper flakes give the dish some heat. Olive oil keeps the filling moist during baking. Lemon zest adds a fresh, bright note that balances the richness of the salmon. - Suggested side dishes: roasted vegetables, a light salad, or garlic mashed potatoes - Best wine pairings for salmon: Sauvignon Blanc or a light Pinot Noir To round out the meal, pair your salmon with roasted veggies or a crisp salad. Garlic mashed potatoes add a comforting touch. For drinks, a chilled Sauvignon Blanc or a light Pinot Noir complements the flavors beautifully. This will make your meal memorable and enjoyable. For the full recipe, check out the section above. First, preheat your oven to 375°F (190°C). This helps your salmon cook evenly. Next, prepare your workspace by gathering all your ingredients. Now, let’s sauté the garlic. In a medium skillet, warm 1 tablespoon of olive oil over medium heat. Add 2 minced garlic cloves. Sauté for about 1 minute until it smells great. Be careful not to burn the garlic. Next, add 2 cups of roughly chopped spinach to the skillet. Cook it for 3-5 minutes until it's wilted and tender. Once done, take the skillet off the heat and let it cool a bit. In a mixing bowl, combine the cooked spinach, 1 cup of crumbled feta cheese, and 1/4 cup of softened cream cheese. Add some flavor with 1/2 teaspoon of crushed red pepper flakes and the zest of 1 medium lemon. Don’t forget to season with a pinch of salt and pepper. Mix everything until it's a creamy filling. Now, let’s prepare the salmon fillets. Take 4 salmon fillets and lay them skin side down on a parchment-lined baking sheet. Using a sharp knife, carefully slice a pocket into the side of each fillet. Be sure not to cut all the way through. Next, generously fill each salmon pocket with your spinach-feta mixture. Press it in gently but don’t overpack it. Once stuffed, season the tops of the fillets with salt and freshly ground black pepper. Now, it's time to bake! Put the baking sheet into the preheated oven and bake for 20-25 minutes. The salmon should flake easily with a fork when done. If you like a crispier top, switch the oven to broil for the last 2 minutes. Keep a close eye on it to avoid burning. Serve your delicious stuffed salmon with lemon wedges on the side for a fresh burst of flavor. Enjoy! For the full recipe, check out the details in the previous section. Achieving the perfect flakiness in salmon is key. I recommend cooking it at a steady temperature. Aim for 375°F (190°C). This allows the fish to cook evenly. Overcooked salmon can become dry and tough. To avoid this, check it around 20 minutes. Salmon is done when it flakes easily with a fork. To make your stuffed salmon even better, consider adding spices. Fresh dill or oregano works wonders. You can also add fresh lemon juice for brightness. For a creamier filling, blend in more cream cheese. A touch of sour cream can add richness too. Plating can elevate your dish. Place the salmon on a white plate for contrast. A simple bed of greens can add color. For garnishing, try fresh herbs like parsley or dill. A lemon wedge on the side adds a pop of color. It also gives a fresh burst of flavor. For the full recipe and step-by-step instructions, be sure to check out the Full Recipe. {{image_4}} You can change the filling for your stuffed salmon to explore new tastes. Instead of feta, try goat cheese or mozzarella. Each cheese brings its own flavor and texture. For vegetables, consider using sun-dried tomatoes or artichokes. They add a unique twist to the dish. You can also add fresh herbs like dill or parsley. They make the filling taste bright and fresh. A sprinkle of fresh basil can also add a lovely aroma. Experimenting with different combinations keeps things exciting. If you need gluten-free options, this recipe is already safe. Just double-check the cheese labels. For a dairy-free version, use vegan cream cheese and a dairy-free feta. This way, you can still enjoy the dish without sacrificing flavor. To boost nutrition, add superfoods like quinoa or flaxseeds to the filling. This adds a crunchy texture and extra health benefits. You can also add chopped nuts for a different flavor and texture. Baking is a popular method for this dish, but grilling offers a smoky flavor. Just be careful not to overcook the salmon on the grill. Cooking it on medium heat helps keep it moist. Another fun method is using an Instant Pot. This technique cooks the salmon quickly while keeping it tender. Set the pot on high pressure for just a few minutes. This method is great for busy nights when you want a healthy meal fast. For the full recipe, check the instructions above. Enjoy your cooking adventure! To keep your baked stuffed salmon fresh, follow these easy steps: - Refrigeration: Store leftovers in an airtight container. They stay good for up to 3 days. - Freezing: You can freeze cooked salmon for up to 2 months. Wrap it tightly in plastic wrap, then place it in a freezer bag. For the best flavor when reheating, try these methods: - Oven: Preheat to 350°F (175°C) and place the salmon on a baking sheet. Heat for about 15 minutes. - Microwave: Use a microwave-safe dish and cover it with a damp paper towel. Heat in short intervals to avoid drying out. - Safety tips: Always check that the salmon reaches an internal temperature of 145°F (63°C) for safe eating. Baked stuffed salmon can last in the fridge for up to 3 days. Look for these signs of spoilage: - Off smell, which indicates it may have gone bad. - Discoloration or a slimy texture means it’s time to toss it out. Keeping track of these details ensures you enjoy your delicious meal safely! How to make salmon skin crispy? To make salmon skin crispy, start with dry skin. Pat it dry with paper towels. Season with salt. Use a hot pan with oil, and place the skin side down. Cook until golden and crispy, about 4-5 minutes. For extra crispiness, finish under the broiler briefly. Can I use frozen salmon fillets? Yes, you can use frozen salmon fillets. Thaw them in the fridge overnight for best results. If you’re in a hurry, place them in cold water for about 30 minutes. Ensure they are patted dry before stuffing to avoid excess moisture. Caloric content per serving Each serving of baked stuffed salmon has about 400 calories. This can vary based on the size of the fillet and the amount of cheese used. Overview of micronutrients in the dish This dish is rich in vitamins and minerals. You get a good amount of vitamin A from spinach. Feta cheese adds calcium for strong bones. Salmon provides omega-3 fatty acids, which support heart health. Each serving gives you a blend of protein and essential nutrients. What to serve with baked stuffed salmon? Baked stuffed salmon pairs well with many sides. You can serve it with a fresh salad for crunch. Roasted vegetables add color and flavor. A fluffy quinoa or rice pilaf makes a hearty side. Ideal side dishes for a complete meal Consider these options for a complete meal: - Lemon herb rice - Garlic mashed potatoes - Steamed asparagus - Roasted Brussels sprouts - A light cucumber salad For the full recipe, check out the detailed instructions above. Enjoy your cooking! Baked stuffed salmon offers a delightful mix of flavors and textures. We explored essential and optional ingredients to enhance your dish. I shared step-by-step instructions, tips for perfect cooking, and creative variations. Remember, presentation matters, so garnish your plate well. Proper storage ensures you enjoy leftovers safely. With this guide, you can impress anyone at your next meal. Enjoy your culinary adventure with baked stuffed salmon!

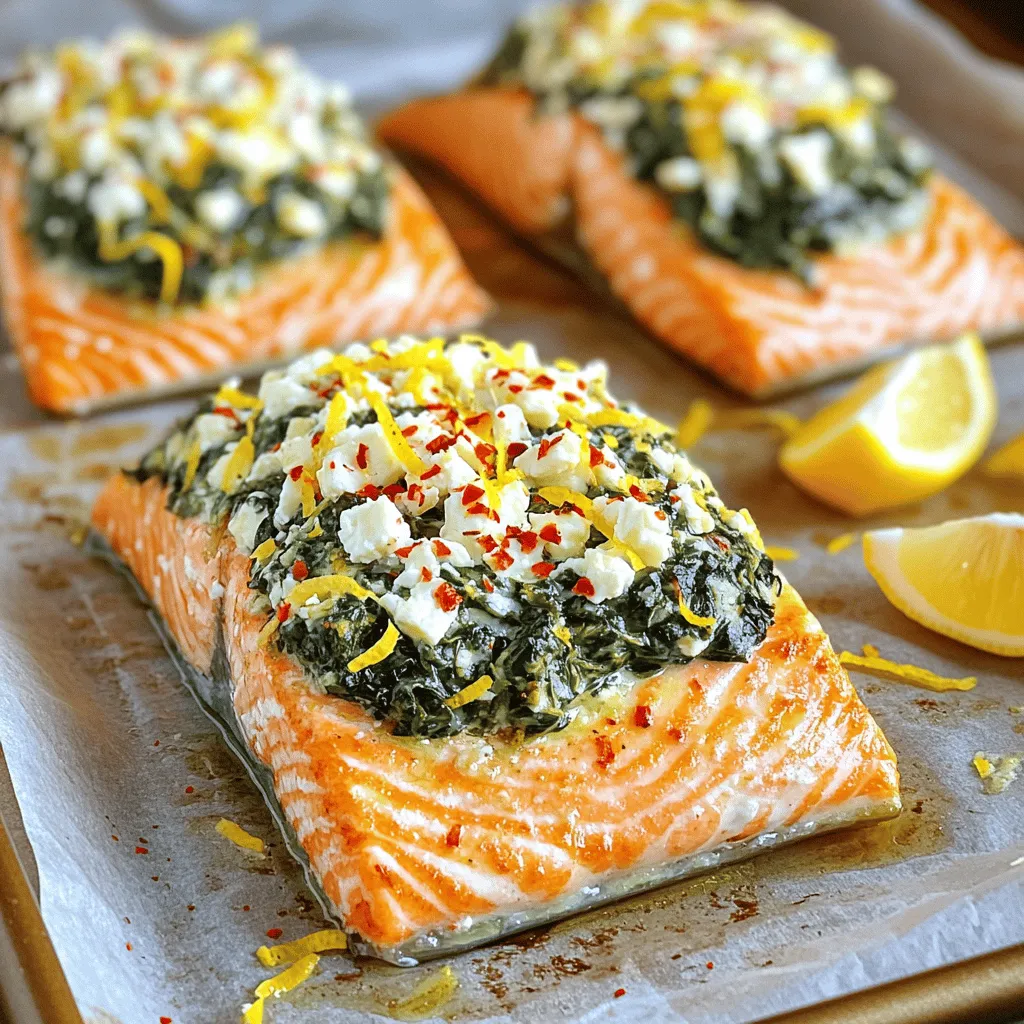
If you’re ready to impress at your next meal, then listen up! I’m sharing my delicious Baked Stuffed Salmon with Spinach & Feta recipe. This dish combines tender salmon with …

Read more

Categories Dinner
Older posts
Newer posts
← Previous Page1 … Page59 Page60 Page61 … Page91 Next →

TASTED NEST

Where Flavor Finds a Home 🍳🏡 — warm, simple, and crave-worthy recipes made for real life, from stovetop mornings to backyard dinners.

PAGES

Home About Contact Privacy Policy Terms & Conditions Cookie Policy GDPR Policy Copyright Policy Disclaimer

CATEGORIES

Appetizers Desserts Salads Breakfast Dinner

Contact

  • Pinterest
  • Mail
Copyright © 2025 Tasted Nest. All rights reserved.