Skip to content
Tasted Nest
  • Home
  • Appetizers
  • Desserts
  • Salads
  • Breakfast
  • Dinner
  • Privacy Policy
  • Contact
  • About

Chef Tavio

Crispy Baked Zucchini Chips Perfectly Seasoned Snack

June 11, 2025 by Chef Tavio
- 2 medium zucchinis - 1 cup panko breadcrumbs - 1/2 cup freshly grated Parmesan cheese The main ingredients are simple yet key for flavor and texture. Zucchini gives a fresh taste. Panko breadcrumbs add the crunch we all love. Parmesan cheese brings a savory note that enhances each bite. - 1 teaspoon garlic powder - 1 teaspoon onion powder - 1/2 teaspoon smoked paprika - 1/2 teaspoon fine salt - 1/4 teaspoon ground black pepper - 2 large eggs - Olive oil spray For seasoning, I love garlic and onion powders. They create a nice base flavor. Smoked paprika adds a hint of smokiness, while salt and pepper balance everything. Eggs help the crumbs stick, ensuring a crisp coating. A light spray of olive oil boosts crunchiness and flavor, making these chips irresistible. For the full recipe, check out the detailed steps to create your perfect snack! 1. First, preheat your oven to 225°F (110°C). This low temp helps the chips get crispy. 2. Prepare two baking sheets by lining them with parchment paper. This step keeps the zucchini from sticking. 3. Now rinse the zucchinis under cold water and dry them well. 4. Using a sharp knife or mandoline slicer, slice the zucchinis into thin rounds, about 1/8 inch thick. Uniform slices ensure even cooking. 1. In a large bowl, crack the two large eggs. Whisk them until the yolks and whites mix well. 2. In another bowl, mix the panko breadcrumbs, grated Parmesan cheese, garlic powder, onion powder, smoked paprika, salt, and black pepper. This mix adds great flavor to the chips. 1. Take each zucchini slice and dip it into the egg mixture. Let any extra egg drip back into the bowl. 2. Next, coat the slice in the breadcrumb mix. Press gently to help the crumbs stick. 3. Arrange the coated slices in a single layer on the prepared baking sheets. They should not overlap. 4. Lightly spray the tops of the slices with olive oil for extra crunch. 5. Bake in the oven for about 2 hours. Flip the zucchini chips halfway through for even crispiness. 6. Keep an eye on them during the last few minutes. You want them golden brown and crispy. 7. Once done, let the chips cool for a few minutes on the baking sheets before serving. To get your zucchini chips nice and crispy, slice them thin. Aim for about 1/8 inch thick. Thinner slices bake better and turn crispier. Use a mandoline slicer if you have one; it makes even slices easy. Now, let’s talk about breadcrumbs. I prefer panko breadcrumbs. They are larger and airier than regular breadcrumbs. This means they give more crunch and texture to your chips. Regular breadcrumbs can work, but they may not give that perfect crunch. To boost the flavor of your zucchini chips, feel free to add different seasonings. Garlic powder and smoked paprika are great, but you can try others too. Consider adding Italian herbs like oregano or basil. Want some heat? Add red pepper flakes for a kick. You can also mix in different cheese varieties. Try cheddar or a spicy pepper jack for a fun twist. Each cheese gives a unique taste, so experiment until you find your favorite. Presentation matters, especially for snacks. Serve your crispy zucchini chips in a cute cone made of parchment paper. This adds a fun touch to your meal. You can also use a small basket for a rustic look. Pair them with yummy dipping sauces for extra flavor. Homemade ranch or marinara sauce is a great choice. Not only do these dips taste good, but they also look great next to your chips. For the full recipe, check out the link provided! {{image_4}} You can swap zucchini for other veggies. Try carrots, sweet potatoes, or eggplant. Each one gives a unique taste and texture. When changing veggies, adjust the cooking times. Thicker veggies need more time to bake. For example, sweet potato chips might need an extra 10 to 15 minutes. Keep an eye on them to avoid burning. If you want a gluten-free snack, use gluten-free breadcrumbs. Many brands make tasty options. You can also use crushed nuts or seeds for a crunchy coating. Almond flour or coconut flour are great choices too. Just make sure you season them well. Flavor is key to a great snack! Want some spice? Add red pepper flakes to your breadcrumb mix. This gives an exciting kick to your chips. If you love herbs, try using dried oregano or thyme. You could even mix in some fresh herbs for a brighter taste. Experiment with different flavors to find your favorite combo! For the full recipe, check out Crispy Baked Zucchini Chips. To keep your zucchini chips crisp, store them in an airtight container. Place a paper towel in the container to absorb moisture. This will help maintain their crunch. Keep the container in a cool, dry place, away from sunlight. Avoid refrigerating them, as that can cause sogginess. When you want to enjoy your leftover zucchini chips, reheating is key. The oven method is best for crispiness. Preheat your oven to 350°F (175°C). Spread the chips out on a baking sheet and heat for about 10 minutes. This will help restore their crispness. If you’re in a hurry, you can use the microwave. Place the chips on a microwave-safe plate. Heat them for 30 seconds at a time until warm. However, this may not keep them as crispy. Yes, you can freeze zucchini chips! Lay them out in a single layer on a baking sheet and freeze until solid. This helps them not stick together. After freezing, transfer them to a freezer bag. Remove as much air as possible before sealing. For successful freezing and reheating, it’s best to bake them first. When you're ready to eat, bake from frozen at 375°F (190°C) for about 15-20 minutes. This will give them a fresh-from-the-oven taste. Enjoy your crispy baked zucchini chips anytime! For the full recipe, check out the section above. To keep your zucchini chips crispy, moisture is the enemy. Follow these steps: - Slice Thin: Cut zucchini into thin rounds, about 1/8 inch thick. Thin slices cook better. - Dry Well: After washing, dry the zucchini slices thoroughly with paper towels. Moisture leads to soggy chips. - Low Temperature: Bake at 225°F (110°C). A low heat helps remove moisture slowly. - Flip Halfway: Turn the chips halfway through baking. This helps them crisp evenly. - Watch Closely: Keep an eye on them during the last minutes. Ovens can vary, and you want them golden, not burnt. Yes, you can! Here’s how to adapt the recipe for an air fryer: 1. Preheat Air Fryer: Set it to 375°F (190°C). 2. Prepare Zucchini: Follow the same slicing, drying, and coating steps. 3. Air Fry: Place the zucchini chips in a single layer in the air fryer basket. Cook for 12-15 minutes, shaking halfway. 4. Check Crispiness: Make sure they are golden brown before removing. Zucchini chips taste great with many dips. Here are some popular options: - Ranch Dressing: A classic choice for a cool, creamy dip. - Marinara Sauce: Perfect for a tangy twist. - Salsa: Adds a fresh and zesty flavor. For homemade dips, try this easy ranch recipe: - Easy Ranch Dip: Mix 1 cup of sour cream with 1 teaspoon of garlic powder, 1 teaspoon of dried dill, and a pinch of salt. Adjust to taste! For the full recipe of crispy baked zucchini chips, check it out in the earlier sections. Enjoy your cooking! In this blog post, I shared how to make crispy baked zucchini chips. We covered the key ingredients, the step-by-step process, and tips for the best results. You learned about seasoning options and how to store your leftover chips. Don’t forget, you can even swap zucchini with other veggies. Explore flavors and try different dips to make it fun. Enjoy making your chips crispy, tasty, and satisfying!

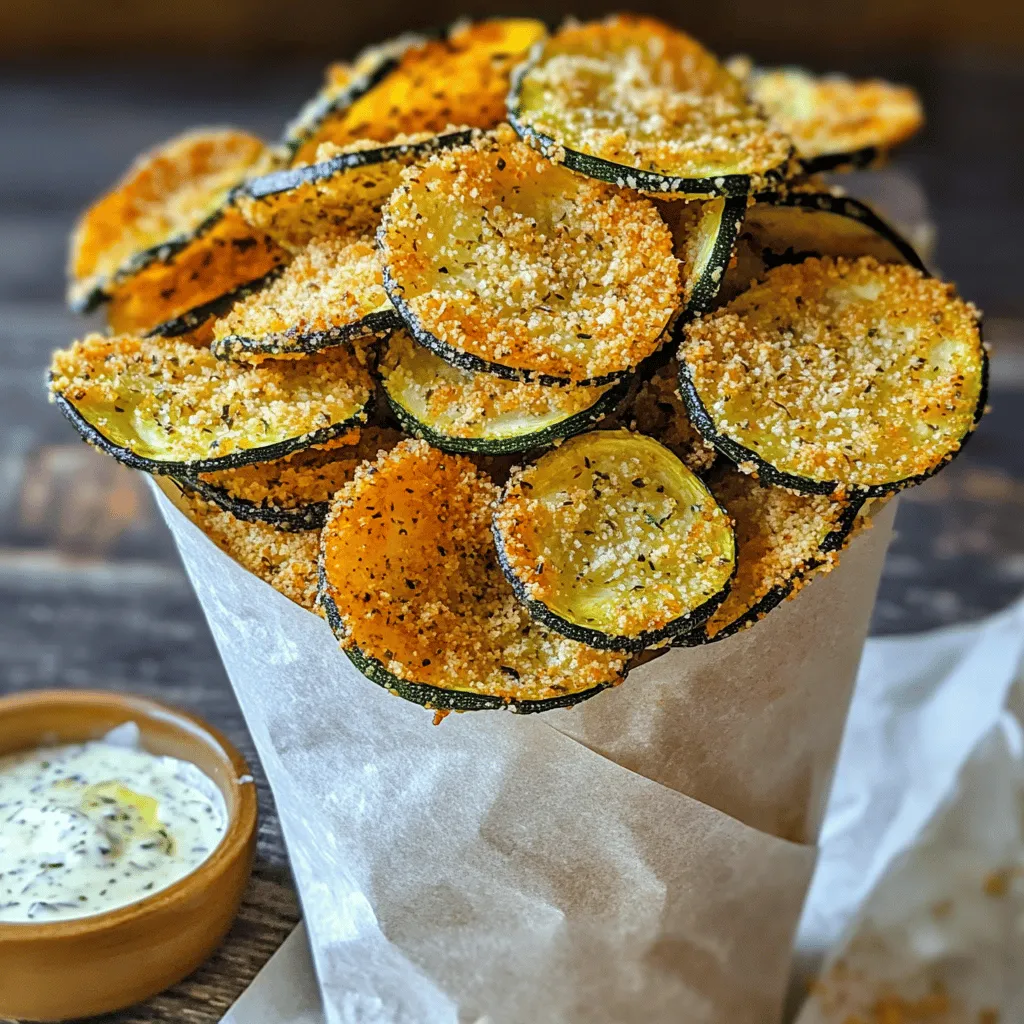
Looking for a delicious, healthy snack? You’ve come to the right place! These Crispy Baked Zucchini Chips are easy to make and perfectly seasoned for maximum flavor. With just a …

Read more

Categories Appetizers

Caramelized Leek and Mushroom Gruyere Pasta Delight

June 11, 2025 by Chef Tavio
- 300g pasta of your choice (fettuccine, tagliatelle, etc.) - 3 medium leeks, thinly sliced - 250g mushrooms, sliced - 2 cloves garlic, minced - 1 teaspoon fresh thyme leaves - 1 cup vegetable broth - 200g Gruyere cheese, grated - 1/2 cup heavy cream - Fresh parsley for garnish Gathering the right ingredients is key to making this dish shine. First, choose 300g of pasta. You can use fettuccine, tagliatelle, or any pasta you love. The right pasta adds texture and holds the sauce well. Next, leeks are essential. You need three medium leeks, sliced thinly. They bring a sweet, mild flavor. Clean them well to avoid grit. Now, let’s talk mushrooms. You need 250g of sliced mushrooms. Cremini or button mushrooms work best. They add depth and earthiness to the dish. For seasoning, grab two cloves of minced garlic. It adds a lovely aroma and flavor. A teaspoon of fresh thyme gives a nice herbal note. Don't forget the vegetable broth! A cup of it adds moisture and richness. Lastly, for the creamy sauce, you need 200g of grated Gruyere cheese. It melts beautifully. Add half a cup of heavy cream for extra creaminess. Finish with fresh parsley to garnish. Check out the Full Recipe for more details on how to combine these tasty ingredients! To start, fill a large pot with water and add a good amount of salt. This helps the pasta taste better. Bring the water to a boil. Once boiling, add 300g of your favorite pasta. Cook according to the package instructions until it is al dente, which means it should still be firm when you bite it. After cooking, reserve about 1/2 cup of the pasta water. This water is starchy and will help our sauce later. Drain the pasta and set it aside. Next, we’ll caramelize the leeks. In a large skillet, heat 2 tablespoons of olive oil over medium heat. Add the thinly sliced leeks along with a pinch of salt. Stir them well. Cook for about 10 to 15 minutes. Stir frequently to avoid burning. You want the leeks to become soft and golden brown. This caramelization brings out their sweet flavor, making your pasta extra tasty. Now it’s time to add the mushrooms. Once the leeks are caramelized, add 250g of sliced mushrooms to the skillet. Cook for an additional 5 to 7 minutes. Stir occasionally until the mushrooms are tender and their moisture has evaporated. Then, add 2 minced garlic cloves and 1 teaspoon of fresh thyme. Cook for one more minute, just until the garlic smells good but not burnt. This adds a lovely depth of flavor to our dish. For the full recipe, check out the complete instructions that guide you through every step! To boost flavor, add a pinch of crushed red pepper. This gives a nice kick. You can also try fresh basil or oregano. These herbs work well with leeks and mushrooms. For creaminess, stir in the heavy cream slowly. This keeps the sauce smooth. If it thickens too much, just add a splash of reserved pasta water. This helps keep it silky. For plating, use shallow bowls. This makes the dish look fancy. Top each bowl with extra Gruyere cheese and fresh thyme. A drizzle of olive oil adds a nice shine. Pair this pasta with a crisp white wine. A Sauvignon Blanc or a light Chardonnay works well. It balances the rich flavors of cheese and leeks. To avoid overcooked pasta, check it often. Cook it just until it’s al dente. If you do overcook it, the sauce will not cling well. If the cheese clumps, lower the heat. Stir continuously as you add it. This ensures a creamy sauce without lumps. Follow these tips to make your dish a delight. For the full recipe, check out the details above. {{image_4}} If you want to switch things up, you can choose different pasta. Try using whole wheat pasta for added fiber. If you need gluten-free options, brown rice pasta works well. For the cheese, Gruyere gives a rich flavor, but you can use a blend of mozzarella and parmesan instead. For a dairy-free option, try vegan cheese or nutritional yeast. Instead of heavy cream, use coconut milk or cashew cream for a lighter sauce. Using seasonal veggies adds flavor and freshness. In spring, add asparagus or peas for a bright touch. In summer, cherry tomatoes or zucchini can enhance the dish. You can also add leafy greens like spinach or kale. These greens cook quickly and add a nice color. Sun-dried tomatoes can give a burst of flavor too. For a crispy top, consider baking your pasta. After mixing the pasta with the sauce, transfer it to a baking dish. Top it with extra cheese and bake at 375°F (190°C) for about 15 minutes. This gives a tasty, gratin-like finish. You can also choose between skillet and stovetop cooking. Skillet cooking allows for more caramelization and flavor. Stovetop cooking is easier and requires less monitoring. Both methods can create a delicious meal, so choose what works best for your kitchen! For the full recipe, check out the link provided. To keep your Caramelized Leek and Mushroom Gruyere Pasta fresh, store it in an airtight container. Place it in the fridge as soon as it cools down. The dish stays fresh for about three days. If you want to keep it longer, consider freezing. When it’s time to enjoy leftovers, reheating without drying out is key. Use the stovetop for the best results. Simply add a splash of water or broth to the pan and heat over low until warm. If you’re using a microwave, heat in short bursts. Stir in between to help it heat evenly. To freeze the pasta, let it cool completely before packing. Use a freezer-safe container or bag, and remove as much air as possible. It can stay frozen for up to two months. When you're ready to eat, thaw it overnight in the fridge. Reheat in a skillet with a little liquid to bring back that creamy texture. For the full recipe, check the link provided. Gruyere cheese comes from Switzerland. It has a firm texture that melts well. The flavor is rich, nutty, and slightly sweet. When you cook with Gruyere, it adds a creamy depth to dishes. It pairs great with leeks and mushrooms in this pasta. Yes, you can prepare this pasta dish in advance. Cook the pasta and make the sauce separately. Let them cool, then store them in the fridge. When you are ready to serve, combine them in a skillet. Heat gently and add a splash of pasta water to keep it fresh. This pasta pairs well with a light salad. A simple arugula salad with lemon works great. You can also serve it with garlic bread. Roasted vegetables can add color and flavor to the meal. To make it vegetarian, just skip any meat. For a vegan option, use plant-based cheese. You can replace heavy cream with coconut cream or silken tofu blended until smooth. You can find the full recipe [here](#). It includes all the steps and tips for a perfect dish. In this article, I shared how to make a delicious pasta dish with caramelized leeks and mushrooms. You learned the key ingredients, step-by-step cooking tips, and variations to keep it fresh. Always remember to store leftovers properly for the best taste. Whether you choose to swap ingredients or try new cooking methods, the goal is to enjoy this meal. I hope you feel ready to impress with your new skills! Enjoy cooking and explore new flavors in your kitchen.

Are you ready to indulge in a warm, creamy bowl of comfort? This Caramelized Leek and Mushroom Gruyere Pasta is the perfect blend of savory flavors and rich textures that …

Read more

Categories Dinner

Sweet and Savory Pineapple Chicken and Rice Delight

June 11, 2025 by Chef Tavio
To create this sweet and savory dish, gather these ingredients: - 2 cups cooked jasmine rice - 1 lb chicken breast, cut into bite-sized pieces - 1 cup fresh pineapple, diced - 1 red bell pepper, diced - 1 medium onion, diced - 3 cloves garlic, minced - 1 tablespoon fresh ginger, grated - 1/4 cup low-sodium soy sauce - 2 tablespoons honey - 1 tablespoon rice vinegar - 1 tablespoon cornstarch mixed with 2 tablespoons cold water - 2 tablespoons sesame oil - 1/4 teaspoon freshly ground black pepper - Fresh cilantro, chopped (for garnish, optional) You can make this dish your own with some easy swaps: - Use brown rice instead of jasmine rice for a nuttier flavor. - Swap chicken breast for tofu or shrimp to cater to your taste. - If you don’t have fresh pineapple, use canned pineapple in juice. Just drain it well. - Honey can be replaced with maple syrup for a vegan option. - Use regular soy sauce if low-sodium is not on hand. To make your meal shine, try these serving ideas: - Serve the dish on a big platter for a beautiful table display. - Add a sprinkle of fresh cilantro on top for color and flavor. - Pair it with a side of steamed broccoli or snap peas for crunch. - For extra zest, offer lime wedges on the side for squeezing over. This recipe is not just tasty but also a fun way to mix flavors. For the full recipe, check the earlier section. Enjoy your cooking! To make Sweet and Savory Pineapple Chicken and Rice, you need to gather all your ingredients first. This makes cooking easier and faster. You will need jasmine rice, chicken breast, pineapple, a bell pepper, an onion, garlic, ginger, soy sauce, honey, rice vinegar, cornstarch, sesame oil, and black pepper. Chop the onion, bell pepper, and pineapple into bite-sized pieces. Mince the garlic and grate the ginger. Start by heating the sesame oil in a large skillet over medium-high heat. When the oil shimmers, add the diced onion, minced garlic, and grated ginger. Stir these for about 2-3 minutes. This makes your kitchen smell great and softens the onion. Next, add the chicken pieces. Sprinkle with black pepper. Cook the chicken for about 6-8 minutes, stirring often. You want it to brown and cook through. Now, toss in the red bell pepper and fresh pineapple. Keep stir-frying for 3-4 minutes. The bell pepper should soften a bit. In a small bowl, mix the soy sauce, honey, and rice vinegar. Pour this mixture over the chicken and pineapple. This step adds a lovely sweet and salty flavor. Let it simmer gently. Add the cornstarch mixed with cold water. Stir continuously for about 2 minutes. The sauce will thicken and cling to the chicken and veggies. Finally, fold in the cooked jasmine rice. Toss everything together until the rice is well mixed and coated in the sauce. Taste the dish and adjust the seasoning if needed. Once it’s just right, remove the skillet from heat. For serving, transfer your pineapple chicken and rice to a large platter. Garnish with fresh cilantro and extra pineapple chunks for color. You can follow the Full Recipe for more details and tips. Enjoy your delicious meal! To get juicy chicken, use high heat. Start by heating sesame oil until it shimmers. This step adds flavor and helps brown the chicken well. Cut chicken into small pieces for even cooking. Stir occasionally and watch closely. You want it fully cooked, not dry. Use a meat thermometer to check. The internal temp should reach 165°F. Layer flavors for a delightful taste. Fresh ginger and garlic add warmth. Sauté them with onion to build a base. Use low-sodium soy sauce for a savory touch. Honey balances the saltiness with sweetness. Rice vinegar gives a slight tang. Add black pepper for a hint of spice. Feel free to adjust these flavors to suit your taste. Make your dish visually appealing. Start by using a large serving platter. Transfer the pineapple chicken and rice mixture onto it. Garnish with fresh cilantro for a pop of color. Add extra pineapple chunks for that tropical vibe. Serve with lime wedges to brighten the dish. This simple touch makes your meal look gourmet. For more details, check the Full Recipe. {{image_4}} You can switch up the flavors in Sweet and Savory Pineapple Chicken and Rice easily. Try using different proteins like shrimp or tofu. They both add unique tastes. You can also change the vegetables. Swap in some snap peas or broccoli for a crunchy bite. If you want a zestier flavor, add lime juice or zest. This brightens the dish and enhances the pineapple taste. Making this dish gluten-free is simple. Just use tamari instead of soy sauce. It tastes great and keeps the savory flavor. To make it vegetarian, replace chicken with chickpeas or mushrooms. These options provide protein and texture. You can also use vegetable broth instead of water for cooking your rice. This adds more depth to the dish. You can add a regional flair to the dish. For a Thai twist, include coconut milk and basil. This will give your dish a creamy texture and a fragrant aroma. For a Caribbean vibe, use jerk seasoning and red beans. This adds a spicy kick and a hearty feel. You can explore different spices and herbs to match your favorite cuisine. Experimenting with flavors will make this dish your own. For the full recipe, visit the [Full Recipe] page and dive into the deliciousness! To keep your Sweet and Savory Pineapple Chicken and Rice fresh, store it in an airtight container. This helps prevent spoilage and keeps the flavors intact. Make sure to cool the dish to room temperature before refrigerating. It can stay good in the fridge for up to four days. Always label the container with the date, so you know when to enjoy it! If you have leftovers, freezing is a great option. First, let the dish cool completely. Then, portion it into freezer-safe bags or containers. Remove any extra air to avoid freezer burn. This dish can last for up to three months in the freezer. When you are ready to eat it, thaw it overnight in the fridge for best results. Reheating this dish can be simple. Use a microwave or stovetop. If using a microwave, place the food in a bowl and cover it with a damp paper towel. Heat it in short bursts, stirring in between. On the stovetop, add a splash of water to a pan and warm it slowly over low heat. Stir until it's hot throughout. This keeps the rice from drying out and helps the flavors shine. For the best taste, enjoy it soon after reheating! To add heat, try these options. Use fresh chili peppers, such as jalapeños. You can also add red pepper flakes for a quick kick. If you want a sauce, mix sriracha with the soy sauce for a spicy twist. Be careful not to overdo it. Start small and taste as you go. Yes, you can use canned pineapple. It saves time and is easy to find. Make sure to drain it well to avoid excess juice. Canned pineapple is sweeter and softer than fresh. This can change the texture slightly, but it will still taste great in the dish. Jasmine rice is the best choice for this recipe. It has a lovely aroma and soft texture. It absorbs flavors well and pairs nicely with the sweet and savory sauce. You can also try basmati rice if you prefer a nuttier flavor. Both options work well in this dish. For the full recipe, check out the complete details. This post covered a tasty recipe for Sweet and Savory Pineapple Chicken and Rice. We talked about key ingredients, cooking steps, and useful tips. You can swap ingredients for different flavors and adjust for diets. Storage and reheating tips ensure you enjoy leftovers too. In conclusion, try this dish. It's easy to make and fun to share. You’ll impress your family and friends with great taste and simple steps. Enjoy your cooking!

Are you ready to bring a burst of flavor to your dinner table? In Sweet and Savory Pineapple Chicken and Rice Delight, I’ll guide you through a simple and tasty …

Read more

Categories Dinner

Easy White Chicken Chili Flavorful and Simple Recipe

June 11, 2025 by Chef Tavio
To make Easy White Chicken Chili, you need a few key ingredients. Here’s what you’ll need: - 1 pound cooked chicken breast, shredded - 1 can (15 oz) white beans, thoroughly drained and rinsed - 1 can (4 oz) diced green chilies, including juices - 1 medium onion, finely diced - 2 cloves garlic, minced - 4 cups rich chicken broth - 1 teaspoon ground cumin - 1 teaspoon chili powder - ½ teaspoon dried oregano - 1 cup heavy cream (or coconut milk for a lighter option) - 1 cup corn kernels (fresh or frozen) - Sea salt and freshly cracked pepper, to taste - Fresh cilantro, chopped, for garnish - Lime wedges, for serving These ingredients create a warm, tasty chili. The chicken adds protein, while beans bring fiber. Green chilies give a zesty kick that everyone loves. You can add optional ingredients to make the chili your own. Here are a few ideas: - Sliced jalapeños for heat - Bell peppers for sweetness - Avocado for creaminess - Shredded cheese for richness - A dash of hot sauce for extra spice Feel free to mix and match these options. Adding different items can change the flavor profile and make it more exciting. Not all ingredients are set in stone. Here are some swaps you can try: - Use turkey instead of chicken for a leaner option. - Swap white beans for black beans or chickpeas if you prefer. - Replace heavy cream with Greek yogurt for a tangy taste. - Use vegetable broth instead of chicken broth for a vegetarian version. These substitutions can help you adjust the recipe to your taste or dietary needs. Enjoy the flexibility while making this delicious dish. For the full recipe, click [Full Recipe]. First, gather all your ingredients. You will need: - 1 pound cooked chicken breast, shredded - 1 can (15 oz) white beans, thoroughly drained and rinsed - 1 can (4 oz) diced green chilies, including juices - 1 medium onion, finely diced - 2 cloves garlic, minced - 4 cups rich chicken broth - 1 teaspoon ground cumin - 1 teaspoon chili powder - ½ teaspoon dried oregano - 1 cup heavy cream (or coconut milk) - 1 cup corn kernels (fresh or frozen) - Sea salt and freshly cracked pepper, to taste - Fresh cilantro, chopped, for garnish - Lime wedges, for serving Next, dice the onion and mince the garlic. This adds a strong flavor base. You can use cooked chicken from a rotisserie or leftovers to save time. In a large pot, heat a drizzle of olive oil over medium heat. Add the diced onion and sauté for about 5 minutes. You want it soft and clear. Then, add the minced garlic and stir for about one minute. You should smell the garlic but not let it brown. Now, stir in the shredded chicken, drained white beans, diced green chilies, corn, chicken broth, cumin, chili powder, and oregano. Mix everything well. This ensures each bite is packed with flavor. Increase the heat and bring the mix to a gentle simmer. Cook uncovered for about 20 minutes. This step is key for blending the flavors. After that, lower the heat to minimum. Gradually stir in the heavy cream. Heat this gently for around 5 minutes. Avoid boiling to keep the cream smooth. Taste your chili and add sea salt and pepper as needed. Don’t be shy to adjust the seasoning. Serve your chili hot, garnished with chopped cilantro. The lime wedges on the side add a zesty kick. This dish is perfect for any meal. For the full recipe, check the details above. Enjoy! To get the chili just right, you want it creamy but not too thick. Start with the heavy cream. This gives your chili a silky finish. If you want a lighter option, use coconut milk. If your chili is too thick, add more chicken broth. A little bit at a time works best. Keep stirring as you add broth. This will help mix it well. You can also adjust the cooking time. Letting it simmer longer can thicken your chili, but check often. To make your chili burst with flavor, think about adding extra spices. A pinch of smoked paprika can add depth. You may also try a dash of cayenne pepper for heat. Fresh herbs like cilantro enhance the taste too. Squeeze a lime wedge right before you eat. It adds a refreshing zest. You can also top your chili with avocado or cheese. These toppings bring a creamy texture that complements the dish. Serve your white chicken chili hot in bowls. This dish pairs well with rice or cornbread. You could also offer tortilla chips for crunch. For a fun twist, set up a toppings bar. Let guests add their favorite extras, like diced tomatoes or jalapeños. Don't forget about drinks! A light beer or iced tea works well. The right drink can make your meal even better. For full details on making this dish, check the Full Recipe. {{image_4}} You can easily make this dish vegetarian. Just swap the chicken for firm tofu. Use vegetable broth instead of chicken broth. This keeps the flavor strong and rich. You can also add more veggies like bell peppers or zucchini. For a creamier texture, use coconut milk in place of heavy cream. This gives a nice taste and fits vegan diets. If you love heat, add fresh jalapeños. You can also use hotter green chilies. Just mix them in with the other ingredients. For extra spice, sprinkle in cayenne pepper or hot sauce. Start with a little, then taste as you go. This way, you can control the spice level. A spicier chili can wake up your taste buds and make every bite exciting. While white beans are great, you can try other beans too. Black beans or pinto beans bring different tastes and colors. You can even mix beans for more texture. Just remember to rinse and drain them well. This keeps your chili from getting too thick. Choose the beans that you enjoy the most for a personal touch. The Full Recipe allows for these fun swaps! To keep your chili fresh, let it cool first. Then, transfer it to an airtight container. This way, it stays tasty for up to three days in the fridge. Always label the container with the date. This helps you know how long it has been stored. If you have extra chili, freezing is a great option. Pour the cooled chili into freezer-safe bags or containers. Remove as much air as possible before sealing. It lasts well for up to three months in the freezer. When you're ready to eat it, just thaw it in the fridge overnight. Reheat your chili gently on the stove over low heat. Stir it often to keep it from sticking. You can also use the microwave if you're in a hurry. Just cover the bowl and heat it in short bursts, stirring in between. Add a splash of chicken broth if it looks too thick. Enjoy your flavorful chili just like the first time! Yes, you can make Easy White Chicken Chili in a slow cooker. Just add all the ingredients to the slow cooker. Set it on low for about 6 to 8 hours or high for 3 to 4 hours. This method gives the flavors time to blend well. You can shred the chicken right in the pot for ease. There are many great sides for white chicken chili. Here are a few ideas: - Cornbread: Sweet and fluffy, it pairs perfectly. - Tortilla Chips: Crunchy and great for dipping. - Rice: A simple side that soaks up the chili. - Salad: A fresh green salad adds a nice crunch. - Sour Cream: A dollop on top adds creaminess. Easy White Chicken Chili lasts about 3 to 4 days in the fridge. Store it in an airtight container. You can also freeze it for up to 3 months. To reheat, just warm it on the stove or in the microwave. Enjoy the rich flavors even days later! For the complete recipe, check the Full Recipe. Easy White Chicken Chili is simple and tasty. You learned about key ingredients, cooking steps, and tips. I shared variations for everyone, from vegans to spice lovers. You also got advice on storage and reheating methods. In summary, this chili offers many options to match your taste. Try it your way, and enjoy every bite. Happy cooking!

If you’re craving a warm, hearty meal without the fuss, this Easy White Chicken Chili recipe is for you! I’ll guide you through simple steps, using easy-to-find ingredients. Whether you’re …

Read more

Categories Dinner

Grilled Chicken Caprese Flavorful Summer Delight

June 11, 2025 by Chef Tavio
- 2 boneless, skinless chicken breasts - 1 cup cherry tomatoes, halved - 8 oz fresh mozzarella, sliced - 1 cup fresh basil leaves - 3 tablespoons balsamic glaze - 2 tablespoons olive oil - 2 cloves garlic, minced - Salt and pepper to taste - Side dish suggestions: Grilled veggies, garlic bread, or a light salad - Wine pairings: A crisp white wine or a light red complements the dish To make Grilled Chicken Caprese a true summer delight, you need fresh and high-quality ingredients. The chicken breasts should be tender and juicy. Cherry tomatoes add a sweet burst of flavor. Fresh mozzarella brings creaminess, while basil provides a fragrant touch. The balsamic glaze ties all the flavors together with its tangy sweetness. For the marinade, olive oil and minced garlic create a rich base. Salt and pepper enhance the chicken’s natural taste. You can adjust these seasonings to your preference. If you want to elevate your meal, consider adding grilled veggies as a side. They add color and nutrition. A light salad can be refreshing too. Pair your dish with a crisp white wine, like Sauvignon Blanc. Or choose a light red, such as Pinot Noir, for a nice balance. These ingredients combine to create a beautiful and tasty dish. You can find the full recipe to guide you through the steps for this delightful meal. 1. Preheat your grill to medium-high heat. This step helps you get a nice sear on the chicken. 2. In a small bowl, mix 2 tablespoons of olive oil, 2 cloves of minced garlic, salt, and pepper. This makes a tasty marinade. 3. Coat each chicken breast with the marinade. Let it sit for about 15 minutes. This time helps the chicken soak up flavors. 1. Place the marinated chicken on the grill. Grill each side for 6-7 minutes. 2. Check the internal temperature. It should reach 165°F (75°C) for safe eating. This ensures juicy and well-cooked chicken. 1. In a bowl, toss 1 cup of halved cherry tomatoes with a pinch of salt and a drizzle of olive oil. This enhances their sweetness. 2. After grilling, let the chicken rest for a few minutes. This keeps the juices inside. 3. Slice the chicken into thick strips. Arrange them nicely on a serving platter. 4. Layer fresh mozzarella slices and the seasoned cherry tomatoes over the chicken. 5. Top with fresh basil leaves and drizzle balsamic glaze over the dish. This adds a burst of flavor. You can find the full recipe to explore all the details. Enjoy your Grilled Chicken Caprese! To get those perfect grill marks, heat your grill well. Start with medium-high heat for about 10 minutes. This helps create a nice sear. Place the chicken on the grill without moving it for about 6-7 minutes. This gives it time to form those beautiful marks. To avoid overcooking your chicken, use a meat thermometer. The chicken should reach 165°F (75°C). If you don't have a thermometer, cut into the thickest part. The juices should run clear, not pink. Letting the chicken rest for a few minutes after grilling keeps it juicy. For attractive plating, use a large white plate. White plates make colors pop. Arrange the chicken slices in a fan shape. Layer the mozzarella and tomatoes on top. This creates a colorful, eye-catching dish. For garnishing, use fresh basil leaves. They add color and a fresh scent. Drizzle balsamic glaze on top for a classy finish. You can also put a small bowl of extra glaze on the side. This gives your guests a chance to add more if they like. To enhance flavor, try adding herbs like oregano or thyme. These add depth to your dish. A sprinkle of crushed red pepper can bring some heat. You can also experiment with glazes and sauces. Try a honey mustard glaze for sweetness. A garlic-lemon sauce can add a zesty kick. These small changes can elevate the dish even more. For the full recipe, be sure to check the detailed instructions above. {{image_4}} You can switch the chicken for other proteins. Turkey breasts work well. They have a similar taste and texture. Pork tenderloin is another great choice. It adds a nice flavor. For a vegetarian twist, try grilled eggplant. Cut it into thick slices and grill until soft. It gives a great texture and absorbs flavors well. Feel free to swap cheeses for variety. Burrata offers a creamy touch to your dish. Goat cheese can also add a tangy flavor. For veggies, use seasonal picks. Zucchini or bell peppers can add color and taste. They grill well and blend nicely with the dish. Caprese can go beyond the plate. Try it as a pasta dish. Toss cooked pasta with grilled chicken, tomatoes, and cheese. Drizzle with olive oil and herbs for a fresh meal. You can also make a Caprese salad. Layer sliced chicken, tomatoes, and cheese on a bed of greens. Drizzle with balsamic glaze for extra flavor. Another fun idea is to add different dressings. A lemon vinaigrette can brighten the dish. To store leftover Grilled Chicken Caprese, use airtight containers. Glass or BPA-free plastic containers work well. Let the dish cool down before sealing it. This helps to keep moisture in and prevents sogginess. Store the leftovers in your fridge for up to three days. When reheating grilled chicken, the safest way is in the oven. Preheat your oven to 350°F (175°C). Place the chicken on a baking tray and cover it with foil. Heat for about 15-20 minutes. This keeps the chicken moist. To keep the Caprese fresh, add the mozzarella and basil after reheating. This way, they stay nice and flavorful. If you want to store Grilled Chicken Caprese for longer, freezing is a great option. Wrap each chicken piece tightly in plastic wrap. Then, place them in a freezer-safe bag. Label with the date, and they can last for up to three months. When ready to eat, thaw the chicken overnight in the fridge. For reheating, use the oven again to keep the taste and texture just right. Grill chicken breasts for 6 to 7 minutes per side. The goal is to reach an internal temperature of 165°F (75°C). This time ensures your chicken stays juicy and tender. Use a meat thermometer for accuracy. If you don't have one, check that the juices run clear. Overcooking can dry out the chicken, so keep an eye on it. Yes, you can prep the Caprese ahead of time. Marinate the chicken and store it in the fridge for up to 2 hours. This will enhance the flavor. You can also cut the tomatoes and mozzarella earlier in the day. Just keep them in the fridge until you're ready to assemble. Fresh basil should be added just before serving to keep it vibrant. Great sides include a light salad or garlic bread. A simple arugula salad with lemon dressing pairs well. Grilled vegetables, like zucchini and bell peppers, add a nice touch too. If you want something heartier, serve with pasta tossed in olive oil and herbs. These sides will complement your Grilled Chicken Caprese perfectly. Check the Full Recipe for more inspiration. You learned how to make a delicious Grilled Chicken Caprese. We covered the key ingredients, like fresh basil and mozzarella, and the important steps to grill chicken perfectly. I also shared tips for presentation and ways to swap ingredients for variety. As you cook this dish, remember to have fun with it. Feel free to experiment with flavors and sides. Enjoy each bite of this fresh meal with family and friends!

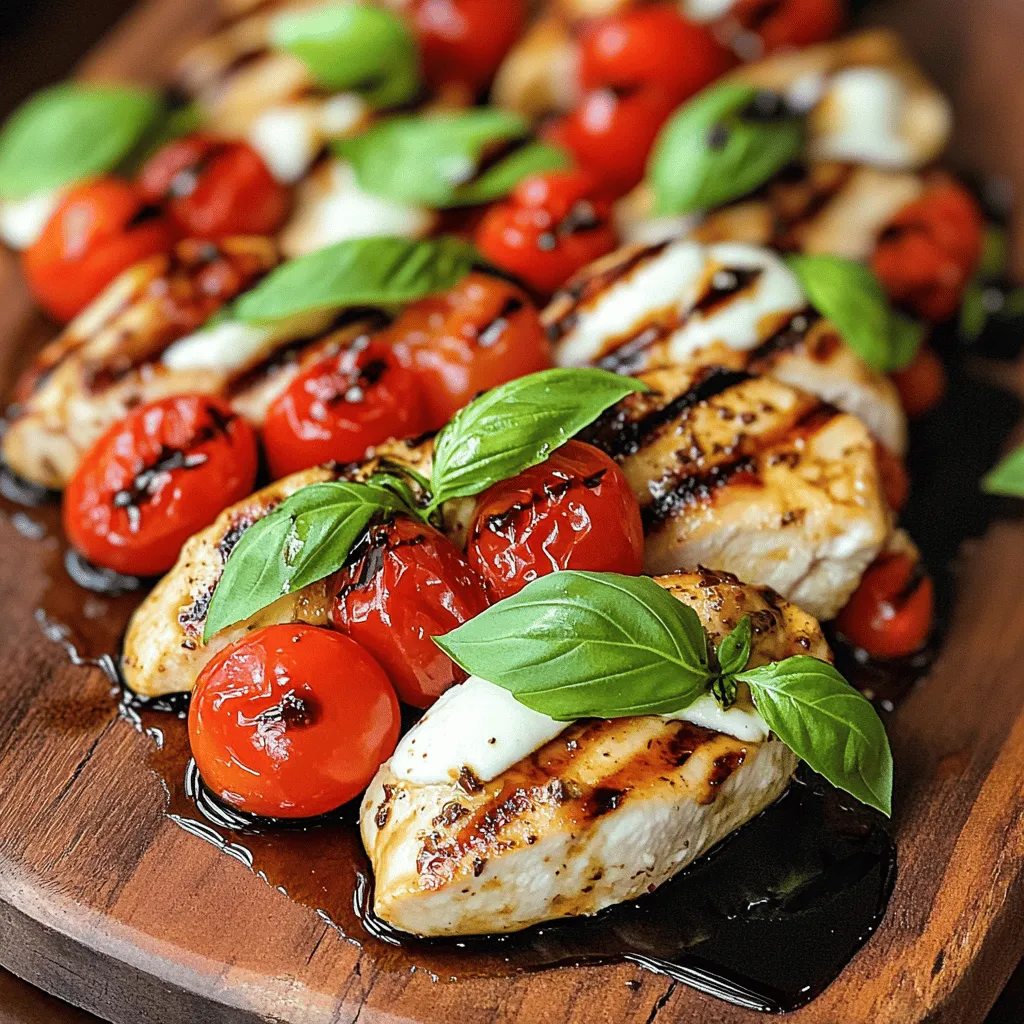
When summer sizzles, I crave a dish that’s fresh and flavorful. Enter Grilled Chicken Caprese, a meal bursting with juicy tomatoes, creamy mozzarella, and aromatic basil. This recipe captures all …

Read more

Categories Dinner

Cajun Garlic Butter Steak Bites Flavorful Dinner Treat

June 11, 2025 by Chef Tavio
- 1 lb sirloin steak, cut into 1-inch cubes - 4 tablespoons unsalted butter - 4 cloves garlic, minced - 1 tablespoon Cajun seasoning - 1 teaspoon smoked paprika - Salt and freshly ground black pepper to taste - 2 tablespoons fresh parsley, finely chopped (for garnish) - Optional: Lemon wedges (for serving) Gathering the right ingredients makes all the difference. Start with 1 pound of sirloin steak. Cut it into 1-inch cubes. This size helps the steak cook evenly and allows for a great texture. Next, use 4 tablespoons of unsalted butter. This adds richness and flavor. You will also need 4 cloves of garlic, minced for that bold taste. For seasoning, you want 1 tablespoon of Cajun seasoning. This gives the steak its signature kick. Add 1 teaspoon of smoked paprika for a touch of smokiness. Don’t forget salt and freshly ground black pepper to taste. These spices enhance the meat's natural flavor. Finally, for a fresh touch, chop 2 tablespoons of parsley. This brightens up the dish and adds color. You can serve it with lemon wedges if you like a zesty kick. This mix of ingredients creates a rich and flavorful experience. You can find the full recipe to guide you through the cooking process. First, gather your ingredients. You need sirloin steak, Cajun seasoning, smoked paprika, salt, and pepper. In a large bowl, toss the steak bites with the Cajun seasoning, smoked paprika, salt, and pepper. Make sure to coat each piece evenly. This step is key. An even coating gives the steak bites a rich flavor. Next, heat your skillet. Set it over medium-high heat. Add two tablespoons of unsalted butter. Let it melt until it bubbles. Now, carefully add the seasoned steak cubes to the skillet. Cook for about 2-3 minutes on each side. This cooking time will give you a nice medium-rare steak. If you want it more cooked, adjust the time. Be sure not to crowd the pan. If needed, cook in batches for even results. Once the steak bites are cooked to your liking, take them out and set them aside. In the same skillet, pour in the remaining butter. Lower the heat to medium. Add the minced garlic and sauté gently. Stir constantly for about one minute. You want to release the garlic's nice aroma without letting it brown. After that, add the cooked steak back into the skillet. Toss the steak in the garlic butter mixture for one to two minutes. This helps infuse the steak with great flavor. To get your steak bites just right, timing is key. For medium-rare steak, cook each side for 2-3 minutes. Use a meat thermometer if you want to check the inside temperature. It should read 130°F for medium-rare. If you like it more done, add a minute or two. Cooking in batches can help too. If your skillet is crowded, the heat drops. This can lead to uneven cooking. Cook the steak bites in smaller groups. It makes sure they get that nice brown crust. Want to kick up the flavor? Try adding more spices. A pinch of cayenne can add heat. You can also use fresh herbs like thyme or rosemary. They add a nice touch to the garlic butter. When it comes to sides, think simple. A fresh salad or roasted veggies pairs well. You might also serve these steak bites with rice or mashed potatoes. They soak up the garlic butter nicely. For a fun twist, squeeze some lemon juice over the top. It brightens the dish and cuts through the richness. For the full process, check the Full Recipe. {{image_4}} You can switch up the protein in this dish. Chicken and shrimp work great! For chicken, cut it into 1-inch pieces. Use the same Cajun seasoning and follow the same steps. Cook it for about 5-7 minutes or until it’s no longer pink. For shrimp, use large, raw shrimp. Cook them for about 2-3 minutes on each side until they turn pink and opaque. Both options will taste fantastic with the garlic butter sauce. Adjust cooking times as needed to ensure everything is done just right. If you want to make your dish unique, try different seasonings. You can create your own Cajun blend with common spices. Mix paprika, onion powder, garlic powder, and cayenne pepper. You can also explore other flavors. For example, use Italian herbs like oregano and basil for an Italian twist. Or use a taco seasoning for a fun twist. The options are endless! Each blend will give your steak bites a new and exciting taste. To keep your Cajun Garlic Butter Steak Bites fresh, follow these steps: - Cool the Bites: Let the steak bites cool down to room temperature. This step helps prevent condensation in the container. - Choose the Right Container: Use an airtight container to store your leftovers. Glass containers work well, but plastic ones are fine too. - Refrigerate Promptly: Place the container in the fridge within two hours of cooking. This keeps the steak safe to eat. - Temperature Guidelines: Keep your fridge at 40°F (4°C) or lower to ensure food safety. These practices help maintain the flavor and texture of the steak bites, allowing you to enjoy them again later. When it comes to reheating, you want to keep the flavor and texture intact. Here are some effective methods: - Skillet Method: Heat a skillet over low heat. Add a bit of butter or oil, then add the steak bites. Heat for about 5 minutes, stirring often. This keeps them juicy. - Microwave Method: Place the steak bites in a microwave-safe dish. Cover it with a damp paper towel. Heat in 30-second bursts until warm, checking often to avoid drying out. If you have leftovers, consider repurposing them: - Steak Salad: Toss the bites on a bed of greens, adding your favorite dressing. - Tacos: Wrap them in tortillas with toppings like cheese and salsa for a quick meal. These ideas help you enjoy your Cajun Garlic Butter Steak Bites in new ways while reducing food waste. To make Cajun Garlic Butter Steak Bites spicy, you can adjust the seasoning. Here are some tips: - Add more Cajun seasoning to the steak bites. - Include crushed red pepper flakes for extra heat. - Use a spicy hot sauce in the garlic butter mix. - Try adding minced jalapeños or serrano peppers. Each option will bring out more heat. Just remember, start small. You can always add more spice, but you can't take it away. Yes, you can prepare Cajun Garlic Butter Steak Bites ahead of time. Here’s how: - Season the steak cubes and keep them in the fridge for up to 24 hours. - Cook the steak bites and let them cool, then store them in an airtight container for up to 3 days. - To reheat, warm them in a skillet over low heat. Add a bit of butter or oil to keep them juicy. This way, you save time when you’re ready to eat. For a great meal, consider these side dishes to go with your Cajun Garlic Butter Steak Bites: - Creamy mashed potatoes for a comforting touch. - Steamed green beans or broccoli for a fresh crunch. - A simple salad with mixed greens and vinaigrette for balance. - Rice or quinoa to soak up the garlic butter. These sides bring out the flavors of the steak bites and make your meal complete. Cajun Garlic Butter Steak Bites are easy and quick to make. You start with tender sirloin and flavorful spices. Cooking with butter and garlic adds rich taste. Remember to adapt cooking times for different proteins. Store leftovers properly and consider flavor upgrades for variety. These bites are great for any meal and easy to reheat. Enjoy your cooking adventure! You now have all the tips you need for success.

Looking for a quick and tasty dinner idea? You’ll love my Cajun Garlic Butter Steak Bites! These juicy, flavorful bites are full of rich spices and buttery goodness. Perfect for …

Read more

Categories Dinner

Honey Vanilla Banana Bread Delightfully Simple Recipe

June 11, 2025 by Chef Tavio
To make a delicious Honey Vanilla Banana Bread, you need a few key ingredients: - 3 ripe bananas, thoroughly mashed - 1/2 cup honey, preferably raw for a richer flavor - 1/4 cup unsalted butter, melted until slightly cooled - 1 large egg, beaten to incorporate air for fluffiness - 1 teaspoon pure vanilla extract - 1 teaspoon baking soda - 1/2 teaspoon sea salt - 1 1/2 cups all-purpose flour, sifted for lightness - 1/2 teaspoon ground cinnamon (optional for warmth) - 1/2 cup chopped walnuts or pecans (optional for crunch) Each ingredient plays a special role. The ripe bananas add natural sweetness and moisture. Honey enriches the flavor with its floral notes. Butter gives a tender texture, while the egg provides lift. Baking soda helps the bread rise, and salt balances the sweetness. You can customize your banana bread with fun add-ins. Here are some great options: - Chocolate chips for sweetness - Dried fruit like raisins or cranberries - Shredded coconut for a tropical twist - Spices like nutmeg for extra warmth These choices can change the flavor profile and texture of your bread. Feel free to mix and match based on what you enjoy! If you need to swap some ingredients, here are a few ideas: - Use maple syrup instead of honey for a different sweetness. - Coconut oil can replace unsalted butter for a dairy-free option. - Substitute the all-purpose flour with whole wheat flour for a heartier loaf. These swaps keep the recipe flexible. You can still enjoy great taste while catering to dietary needs. For the complete process, check out the Full Recipe. Start by preheating your oven to 350°F (175°C). This temperature helps the bread rise evenly. Next, grab a 9x5-inch loaf pan. You can grease it with butter or line it with parchment paper. Lining the pan makes it easy to remove the bread later. In a large bowl, take three ripe bananas and mash them well. You want a smooth mix with only tiny lumps. Then, add a half-cup of honey. I recommend using raw honey for a richer taste. Pour in a quarter-cup of melted butter and stir. Next, add one beaten egg and one teaspoon of vanilla extract. Mix everything until it is smooth and well combined. In another bowl, mix your dry ingredients. Combine one teaspoon of baking soda, half a teaspoon of sea salt, and one and a half cups of all-purpose flour. If you like, add half a teaspoon of ground cinnamon for flavor. Whisk these together until they are evenly mixed. Gradually fold your dry mix into the wet banana mix. Use a spatula and stop when you see no dry flour. Be careful not to overmix; this keeps the bread light and fluffy. If you want some crunch, fold in half a cup of chopped walnuts or pecans. Now, pour the batter into your prepared pan and smooth the top. For the full recipe, follow the other steps to bake this delightful banana bread! To get that ideal texture in your honey vanilla banana bread, follow these steps. Use ripe bananas; they should be soft and brown. The more ripe your bananas are, the sweeter and moister your bread will be. Mash them well to break down the fibers. This ensures a smooth batter. Avoid overmixing after adding the flour. Stir just until combined. This keeps your bread light and fluffy. Need ripe bananas fast? Here’s a simple trick. Place your bananas in a brown paper bag. Close the bag and let them sit for one or two days. The ethylene gas they release helps them ripen faster. If you're in a hurry, you can also bake them. Place unpeeled bananas on a baking sheet at 300°F (150°C) for about 15-20 minutes. Check them often so they don’t burn. To keep your banana bread fresh, store it at room temperature in an airtight container. It will stay good for about three days. For longer storage, wrap it tightly in plastic wrap and freeze it. It freezes well for up to three months. To reheat, slice a piece and warm it in the microwave for about 15 seconds. You can also toast it for a crispy edge. Enjoy your Honey Vanilla Banana Bread warm! For the full recipe, check out the earlier section. {{image_4}} You can easily make healthy changes to this banana bread. Use whole wheat flour instead of all-purpose flour. This swap adds fiber and nutrients. You can also replace honey with maple syrup for a different sweet touch. A quarter cup of unsweetened applesauce will cut down on fat. You still keep the moisture and sweetness. Adding flavors makes banana bread even more fun! You can mix in 1/2 cup of chocolate chips for a sweet twist. Another great choice is adding 1/2 cup of canned pumpkin. This change gives a nice fall flavor. You can also add spices like nutmeg or cardamom to enhance the taste. Try adding about 1/4 teaspoon of each. If you need a gluten-free option, use almond flour or a gluten-free blend. Make sure to check that all your ingredients are gluten-free. For nut-free bread, skip the walnuts or pecans. You can use seeds like sunflower seeds instead. They add crunch without the nuts. For more details on the recipe, check the Full Recipe. To keep your Honey Vanilla Banana Bread fresh, store it in an airtight container. This helps maintain moisture and flavor. You can also wrap it in plastic wrap before placing it in the container. For best results, keep it at room temperature if you plan to eat it within a few days. If you want it to last longer, refrigeration is an option, though it may dry out slightly. If you want to save some for later, freezing is a great choice. Slice the banana bread before freezing for easy servings. Wrap each slice tightly in plastic wrap, then place them in a freezer bag. Label the bag with the date. To thaw, simply take out a slice and leave it at room temperature for about an hour. For a warm treat, you can also microwave it for about 15 seconds. When stored properly, your banana bread can last up to four days at room temperature. If refrigerated, it may last a week. In the freezer, it can stay good for up to three months. Just remember to check for any signs of spoilage before enjoying, like an off smell or mold. Enjoy your homemade delight as it stays fresh and tasty! Yes, you can use frozen bananas. Just thaw them first. Frozen bananas often mash easily, helping make a moist bread. This method works well and does not alter the taste. If you have overripe bananas, freeze them for later use in this recipe. To check if your banana bread is done, use a toothpick. Insert it into the center. If it comes out clean or with a few moist crumbs, your bread is ready. You can also look for a golden-brown crust. The bread should spring back when gently pressed. You can serve banana bread with many tasty options. Try a light drizzle of honey for added sweetness. Softened butter also pairs well, adding richness. Fresh banana slices can enhance the flavors. A sprinkle of cinnamon makes it even better. Enjoy it with tea or coffee for a delightful treat. For the complete recipe, refer to the Full Recipe. This article covered how to make delicious honey vanilla banana bread. We explored key ingredients, tasty add-ins, and easy step-by-step instructions. I shared tips for perfect texture and how to ripen bananas fast. You learned about variations and storage to keep your bread fresh. In closing, enjoy experimenting with the recipe. Don’t hesitate to make it your own. Happy baking!

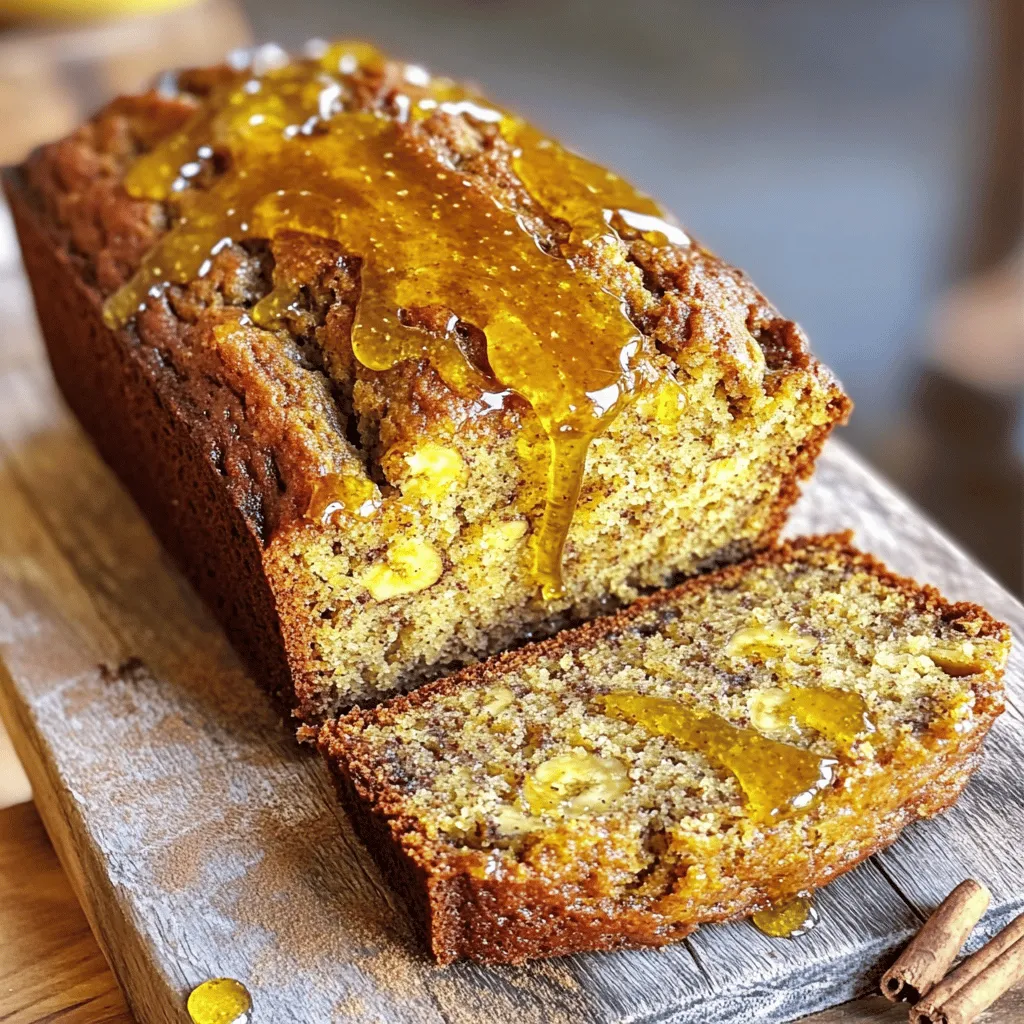
Looking for a simple and delicious way to use those ripe bananas? You’ve come to the right place! In this blog, I’ll share my delightful Honey Vanilla Banana Bread recipe. …

Read more

Categories Desserts

Baked Crunchy Hot Honey Chicken Irresistible Delight

June 11, 2025 by Chef Tavio
- 4 boneless, skinless chicken thighs - 1 cup buttermilk (or substitute with 1 cup milk mixed with 1 tablespoon vinegar) - 1 cup panko breadcrumbs - 1/2 cup all-purpose flour The main ingredients form the base of our dish. Chicken thighs give great flavor and stay juicy. Buttermilk tenderizes the meat and adds taste. Panko breadcrumbs create the perfect crunch. Flour helps the breadcrumbs stick well. - 1 teaspoon garlic powder - 1 teaspoon onion powder - 1 teaspoon smoked paprika - 1 teaspoon cayenne pepper (adjust to taste) - Salt and pepper to taste Spices add depth to the chicken. Garlic and onion powders bring a savory kick. Smoked paprika adds warmth and color. Cayenne gives a spicy touch, but you can adjust it. Salt and pepper are key to enhancing all flavors. - 1/4 cup honey - 2 tablespoons hot sauce (like Sriracha) - 1 tablespoon apple cider vinegar - Fresh parsley for garnish (optional) The hot honey sauce is a star. Honey adds sweetness, while hot sauce gives heat. Apple cider vinegar balances flavors. If you want, fresh parsley adds color and a hint of freshness. This dish shines with these ingredients. For the full recipe, check out the complete guide! - In a medium bowl, mix buttermilk, garlic powder, onion powder, smoked paprika, cayenne, salt, and pepper. - Add the chicken thighs to the bowl. Make sure they are fully coated. - Cover the bowl with plastic wrap and refrigerate for at least 1 hour. For best flavor, marinate overnight. - Preheat your oven to 400°F (200°C). - In a shallow dish, combine panko breadcrumbs and all-purpose flour. - Add a pinch of salt and pepper. Mix well to ensure even distribution. - Remove the marinated chicken from the fridge. Let excess marinade drip off. - Dredge each thigh in the breadcrumb mixture. Make sure they are well coated. - Arrange the breaded chicken on a wire rack set over a baking sheet. - Bake in the preheated oven for 25 to 30 minutes. The chicken should reach 165°F (75°C) and look golden brown. This recipe is a fun way to create a tasty meal. Enjoy the crunch and sweet heat! For the complete recipe, check out the full recipe section. To get that extra crunch in Baked Crunchy Hot Honey Chicken, panko breadcrumbs are key. Panko gives a light and airy texture that regular breadcrumbs can't match. They create a crispier crust. When you coat your chicken, make sure every inch is covered with panko. This is vital for crunch. Another important tip is to use a wire rack. By placing the chicken on a wire rack over a baking sheet, hot air moves all around the chicken while it cooks. This method helps the chicken cook evenly and keeps the coating crunchy. No soggy bottoms here! You can boost flavor in your marinade with some fun options. Try adding a tablespoon of Dijon mustard for a unique taste. You can also mix in some fresh herbs, like thyme or rosemary, for more depth. These small tweaks can make a big difference. For those who want more heat, adjust your spices. Increase the cayenne pepper to suit your taste. If you like a sweeter, spicier kick, add more hot sauce to the honey glaze. Find the right balance that excites your taste buds! When serving Baked Crunchy Hot Honey Chicken, think about tasty sides. Coleslaw adds a nice crunch and freshness. You can also pair it with roasted veggies or a crisp salad. These sides balance the dish nicely. For dipping, ranch dressing works great. It cools the heat and pairs well with the flavors. A side of extra hot honey is perfect for those who want an extra kick. These simple additions make your meal even more enjoyable! {{image_4}} If you want to switch things up, you can use different proteins instead of chicken. Tofu is a great choice for a plant-based option. It absorbs flavors well and can be crispy too. Simply press the tofu to remove excess moisture before marinating. Turkey works well too, especially turkey thighs. Just make sure to adjust cooking times for the different meat. You can cook this dish in different ways. Air frying is a popular method for achieving a crunchy texture without much oil. Set your air fryer to 380°F (193°C) and cook for about 20 minutes. Traditional baking works great too. Bake at 400°F (200°C) for a golden crust. Grilling adds a smoky flavor. Just marinate the chicken and grill it until cooked through, about 6-8 minutes per side. This hot honey sauce is easy to tweak. You can adjust the sweetness by adding more or less honey. If you like heat, increase the hot sauce. For a flavor twist, try adding lime juice or zest. Garlic can also enhance the sauce, giving it a rich taste. Mix and match until you find your perfect blend. For the full recipe, check out the Baked Crunchy Hot Honey Chicken! After enjoying your Baked Crunchy Hot Honey Chicken, let it cool down. Place the chicken in an airtight container. This helps keep it fresh. In the fridge, your chicken will last for about 3 to 4 days. If you notice any odd smells or changes in color, it’s best to toss it out. Freezing is a great way to keep your chicken longer. Wrap each piece tightly in plastic wrap, then place it in a freezer bag. This prevents freezer burn. You can freeze the chicken for up to 3 months. When you’re ready to eat it, take it out and let it thaw in the fridge overnight. To maintain that crunchy texture, reheating is key. Preheat your oven to 375°F (190°C). Place the chicken on a baking sheet. Bake for about 10 to 15 minutes. This keeps it crispy. You can also use an air fryer at 350°F (175°C) for about 8 to 10 minutes. Enjoy your tasty chicken just like the first time! To make your chicken spicier, you have a few fun options. First, you can add more cayenne pepper to the marinade. Start with an extra half teaspoon and taste it. You can also mix in some chili powder for a different heat. If you want a kick, add sliced jalapeños to the honey sauce. Another idea is to swap the hot sauce for a hotter brand. Just remember, heat builds up, so add slowly! Yes, you can use skin-on chicken. It will change the texture and flavor. The skin adds extra crispiness and moisture. However, it may take longer to cook. Check the internal temperature. It should reach 165°F (75°C) for safety. Cook it for about 35 to 40 minutes instead of the standard 25 to 30 minutes. Marinating the chicken for at least one hour works great. If you want more flavor, marinate it overnight. This gives the spices a chance to soak in. Just be careful not to marinate too long. Over-marinating can make the chicken tough and mushy. If you lack buttermilk, you can make an easy substitute. Mix one cup of regular milk with one tablespoon of vinegar. Let it sit for five minutes. This quick fix gives you a similar tangy flavor. You can also use plain yogurt or sour cream, thinned down with a little water. In this blog post, we explored making Baked Crunchy Hot Honey Chicken. We covered the main ingredients, spices, and the hot honey sauce. I provided step-by-step instructions for marinating, breading, and baking the chicken. You learned tips for extra crunch and flavor enhancements, along with variations and storage info. This dish is simple and fun to make. Enjoy it with your favorite sides or dips! Now, get cooking and savor the deliciousness.

Are you ready to transform your dinner table with a dish that’s both crispy and sweet? Baked Crunchy Hot Honey Chicken combines tender chicken thighs with the thrilling crunch of …

Read more

Categories Dinner

Flourless Pumpkin Muffins Tasty and Healthy Snack

June 11, 2025 by Chef Tavio
To make these tasty muffins, you will need: - 1 cup canned pumpkin puree - 3 ripe bananas, thoroughly mashed - 3 large eggs - 1/2 cup almond butter (or your preferred nut butter) - 1/4 cup honey or maple syrup - 1 teaspoon pure vanilla extract - 1 teaspoon baking soda - 1 teaspoon ground cinnamon - 1/2 teaspoon ground nutmeg - 1/4 teaspoon fine sea salt - 1/2 cup dark chocolate chips (optional, for a sweeter touch) You can easily swap ingredients if needed: - Use peanut butter instead of almond butter for a different flavor. - Maple syrup can replace honey for a vegan option. - If you lack ripe bananas, unsweetened applesauce works well. - You can also use any nut-free butter like sun butter for allergies. Each muffin is packed with nutrients: - Calories: 120 - Protein: 4g - Fat: 4g - Carbohydrates: 20g - Fiber: 2g - Sugar: 6g These muffins are a great snack for any time of day. They have healthy fats, natural sweetness, and a boost of fiber, making them both tasty and nutritious. For the full recipe, check out the details above. First, you need to get your oven ready. Preheat it to 350°F (175°C). Next, grab a muffin tin. You can line it with paper liners or use cooking spray to stop the muffins from sticking. This is key for easy removal later. Now, let’s mix the wet ingredients. In a big bowl, combine the pumpkin puree, mashed bananas, eggs, almond butter, honey or maple syrup, and vanilla extract. Stir until it’s smooth. In a separate bowl, whisk together the baking soda, ground cinnamon, ground nutmeg, and fine sea salt. Once mixed, slowly add the dry ingredients to the wet mix. Be careful not to overmix. Just stir until no dry spots remain. If you like, you can fold in dark chocolate chips for extra sweetness. When your batter is ready, it’s time to fill the muffin cups. Spoon the mix into each cup, filling about 3/4 full. This allows them to rise nicely. Place the muffin tin in the oven and bake for 18-20 minutes. Check for doneness with a toothpick; it should come out clean or with a few crumbs. After baking, let the muffins cool in the pan for about 5 minutes. Then, transfer them to a wire rack to cool completely. Enjoy your healthy snack! You can find the full recipe [here]. To help your muffins rise well, use fresh baking soda. Old baking soda can lose its power. Also, mix the wet and dry ingredients gently. Overmixing can make the muffins tough. Fill each muffin cup about three-quarters full. This gives them space to rise. Lastly, bake them right away. Letting the batter sit too long can lead to flat muffins. To keep your muffins fresh, store them in an airtight container. You can place a slice of bread inside to keep them moist. If you want to store them longer, freeze the muffins. Wrap each muffin in plastic wrap and place them in a freezer bag. When you want to eat one, just take it out and let it thaw at room temperature. One big mistake is not measuring ingredients correctly. Use measuring cups and spoons for accuracy. Another mistake is opening the oven door too often. This can cause the temperature to drop, affecting the muffins. Also, make sure your oven is preheated. Baking in a cold oven can lead to uneven results. Remember to check for doneness with a toothpick. If it comes out clean, your muffins are done! For a full recipe of these delightful muffins, check out the [Full Recipe]. {{image_4}} Flourless pumpkin muffins are tasty as they are, but you can mix it up! Try adding chocolate chips for a sweet twist. You can also switch to spices like ginger or allspice for a warm flavor. If you love nuts, fold in some chopped walnuts or pecans. You can even add dried fruits like cranberries or raisins for a fruity surprise. These changes keep your muffins exciting and fun! You can easily make these muffins vegan. Instead of eggs, use flax seeds. Mix 1 tablespoon of ground flaxseed with 2.5 tablespoons of water. Let it sit for 5 minutes to thicken. Also, swap honey with maple syrup. This keeps the muffins sweet and plant-based. Your vegan pumpkin muffins will still taste amazing! If you have dietary restrictions, you can adjust the recipe. For nut allergies, use sunflower seed butter or tahini in place of almond butter. To make them sugar-free, try using a sugar substitute safe for baking. If you want a lower-carb option, consider using pumpkin puree with protein powder. These changes allow everyone to enjoy the muffins without worry. For the full recipe, check out the detailed steps above! To keep your flourless pumpkin muffins fresh, store them in an airtight container. This helps keep them moist. You can keep them at room temperature for about 3 days. If you want them to last longer, refrigerate them for up to a week. For best taste, let them cool completely before storing. Freezing muffins is simple. Wrap each muffin in plastic wrap. Then place them in a freezer bag. This way, they stay fresh and tasty. You can freeze them for up to 3 months. To enjoy, just take out how many you need and let them thaw at room temperature. Reheating your muffins brings back their soft texture. For the best results, use an oven or toaster oven. Preheat it to 350°F (175°C). Place the muffin on a baking sheet for about 5-7 minutes. If you're in a hurry, you can use the microwave. Heat for about 15-20 seconds. Just be careful not to overheat them. Enjoy your muffins warm! Yes, you can use other nut butters. Peanut butter works great. Cashew and sunflower butter are good options too. Just keep in mind that the taste may change a bit. Each nut butter adds a unique flavor. Experiment to find what you like best. To make these muffins more like dessert, add chocolate chips. They give a sweet surprise in every bite. You can also mix in some dried fruit. Try raisins or cranberries for extra sweetness. For a richer flavor, consider adding a bit of cocoa powder. If you want to swap bananas, try applesauce. It adds moisture and sweetness without changing the taste much. Another option is to use pumpkin puree instead of some bananas. This will keep the muffins moist and tasty. Yes, these muffins are gluten-free! Since they don’t use any flour, they are safe for those with gluten issues. All the ingredients are naturally gluten-free. Enjoy these muffins without worry if you need to avoid gluten. You now know how to make Flourless Pumpkin Muffins. We covered the key ingredients, tips for baking, and storage methods. These muffins are tasty and easy to adapt for different diets. Remember to avoid common mistakes for the best results. Don't be afraid to try new flavors or substitutes. Enjoy your baking journey! You’ll impress family and friends with these healthy treats.

Looking for a tasty and healthy snack? These Flourless Pumpkin Muffins are perfect! I’ll show you how to make pumpkin muffins that are easy to whip up and packed with …

Read more

Categories Dinner

Flavorful Broccoli and Cheese Casserole Recipe Guide

June 11, 2025 by Chef Tavio
- 4 cups fresh broccoli florets - 2 cups cooked quinoa - 1 cup shredded sharp cheddar cheese - 1 cup creamy Greek yogurt - 1/2 cup milk (or almond milk) - 1/2 teaspoon garlic powder - 1/2 teaspoon onion powder - 1/2 cup whole wheat breadcrumbs - 1 tablespoon olive oil - 1/2 teaspoon paprika - 1/4 cup grated Parmesan cheese (optional) Quinoa packs a protein punch in this dish. Each serving offers a good amount of protein. If you want a dairy-free option, use almond milk and a plant-based yogurt instead. For low-calorie choices, opt for reduced-fat cheese and yogurt. You can also skip the breadcrumbs or use a lighter version. These tips help you enjoy the casserole while sticking to your dietary goals. The combination of broccoli and quinoa makes this dish filling and nutritious. To start, you need fresh broccoli florets. I like to wash them well and cut them into bite-sized pieces. Next, bring a large pot of water to a rolling boil. Once boiling, add the broccoli. Steam the florets for just 3 to 4 minutes. You want them bright green and slightly tender, not mushy. Overcooking can ruin the texture. After steaming, drain the broccoli and let it cool. In a big mixing bowl, combine your cooled quinoa, shredded sharp cheddar cheese, creamy Greek yogurt, and milk. Add garlic powder, onion powder, salt, and pepper. Stir everything well until it's fully blended. Now, gently fold the steamed broccoli into this cheesy mix. Be careful not to break the florets. You want a uniform consistency, with the broccoli evenly spread throughout the mixture. First, preheat your oven to 350°F (175°C). While it heats, spoon the broccoli and cheese mixture into a greased 9x13-inch baking dish. Spread it out evenly. In a small bowl, mix whole wheat breadcrumbs with olive oil, paprika, and optional grated Parmesan cheese. Sprinkle this topping over the casserole. Bake for 25 to 30 minutes. You’ll know it’s done when it bubbles and the top is golden brown. Let it cool for about 5 to 10 minutes before serving. For the full recipe, check out the details above. To avoid mushy broccoli, steam it for just 3-4 minutes. This keeps it bright and tender. After steaming, let the broccoli cool. Then, fold it gently into the cheese mixture. This helps maintain its shape and crunch. For the ideal cheesy consistency, mix shredded cheese with creamy Greek yogurt. This creates a rich base. If the mixture feels too thick, add a splash of milk. This ensures every bite is creamy without being runny. To add new dimensions to your casserole, consider spices. A pinch of nutmeg or a hint of cayenne can brighten the dish. Fresh or dried herbs work well too. Try thyme or rosemary for a fresh taste. When it comes to cheese, feel free to switch it up. Mozzarella gives a mild flavor. Gouda adds a nice smokiness. Mixing different cheeses can create a richer taste. Experiment to find your favorite combo! Garnishing can elevate your casserole. A sprinkle of fresh parsley or chives adds color. You can also drizzle a bit of olive oil for shine. For serving, pair the casserole with a light salad or roasted veggies. This balances the meal and adds freshness. You can even serve it with a slice of crusty bread for a cozy touch. For the full recipe, check out the Cheesy Broccoli Bliss Casserole. {{image_4}} You can easily make this casserole fit your diet. For gluten-free options, switch the breadcrumbs for gluten-free ones. You can also use cornmeal or crushed rice crackers. For a vegan dish, swap the cheese and yogurt with plant-based versions. Nutritional yeast adds a cheesy taste, while coconut yogurt gives creaminess. Want to boost the nutrition? Add protein like cooked chicken or tofu. Both mix well and make the dish heartier. You can also toss in other veggies like bell peppers or carrots for extra color and vitamins. Just chop them small to blend well with the broccoli. If you prefer slow cooking, just combine all ingredients in the slow cooker. Cook on low for 4 to 6 hours. For an Instant Pot version, use the sauté function to cook the broccoli and mix all ingredients. Then, seal the pot and cook on high pressure for 5 minutes. Both methods give you a warm, tasty casserole. Check the [Full Recipe] for detailed steps and ingredient amounts. To keep your broccoli and cheese casserole fresh, use airtight containers. Glass or plastic containers work well. Let the casserole cool before you store it. This helps prevent moisture buildup. For short-term storage, place it in the fridge. It will stay good for about three to four days. If you want to keep it longer, freezing is a great option. Cut the casserole into portions for easy reheating later. Wrap each portion tightly in plastic wrap, then place them in a freezer-safe bag. This will help keep the flavors intact. When you’re ready to enjoy leftovers, reheating correctly is key. The best method is to use the oven. Preheat it to 350°F (175°C). Place the casserole in an oven-safe dish. Cover it with foil to keep it from drying out. Heat for about 20-25 minutes. If you prefer quicker methods, you can use the microwave. Place a portion on a microwave-safe plate. Heat for 2-3 minutes, stirring halfway through. This helps maintain the texture of the cheese and broccoli. In the fridge, your casserole will last about three to four days. In the freezer, it can last up to three months. However, for the best taste, try to eat it within one month. Always check for signs of spoilage before eating. Look for changes in color or an off smell. If the casserole looks or smells odd, it’s best to throw it away. Enjoy your flavorful broccoli and cheese casserole with these storage tips! For the full recipe, refer to the earlier section. Yes, you can use frozen broccoli! It saves time and is easy to find. Just remember to thaw it before using. Drain any excess water to avoid a soggy casserole. Some tips for using frozen broccoli include: - Cooking Time: Frozen broccoli may need a bit less time when steaming. Check for tenderness after 2-3 minutes. - Flavor: The taste might differ slightly, but it will still be good. - Texture: Frozen broccoli can be softer. Use it if you prefer a creamier casserole. If you want to swap Greek yogurt, there are many options. Here are some great substitutes: - Sour Cream: It has a similar tangy flavor. - Cottage Cheese: Blend it for a smooth texture. - Cream Cheese: Use it for a richer taste, but thin it with milk. - Plant-based Yogurt: Great for a dairy-free option. Look for unsweetened varieties for the best flavor. Spicing up your casserole is easy! Here are some ideas: - Add Red Pepper Flakes: Start with 1/4 teaspoon and adjust to taste. - Hot Sauce: Mix in a few drops to the cheese base. - Jalapeños: Chop fresh or pickled jalapeños for heat. - Spicy Cheese: Use pepper jack cheese instead of cheddar for extra kick. Enjoy your cooking adventure with the Full Recipe! This blog post covered how to make a tasty broccoli casserole. We explored key ingredients like fresh broccoli, quinoa, and sharp cheddar. I shared tips for perfect texture and baking methods. You learned about variations, storage tips, and how to keep it fresh longer. Incorporating these tips will help you create a delicious dish. Enjoy experimenting with flavors and ideas. Your casserole will impress everyone at the table. Cook with confidence and savor every bite!

Do you crave a warm, cheesy dish that’s packed with healthy greens? Look no further! My Flavorful Broccoli and Cheese Casserole Recipe Guide will help you create a creamy, delicious …

Read more

Categories Dinner
Older posts
Newer posts
← Previous Page1 … Page62 Page63 Page64 … Page88 Next →

TASTED NEST

Where Flavor Finds a Home 🍳🏡 — warm, simple, and crave-worthy recipes made for real life, from stovetop mornings to backyard dinners.

PAGES

Home About Contact Privacy Policy Terms & Conditions Cookie Policy GDPR Policy Copyright Policy Disclaimer

CATEGORIES

Appetizers Desserts Salads Breakfast Dinner

Contact

  • Pinterest
  • Mail
Copyright © 2025 Tasted Nest. All rights reserved.