Skip to content
Tasted Nest
  • Home
  • Appetizers
  • Desserts
  • Salads
  • Breakfast
  • Dinner
  • Privacy Policy
  • Contact
  • About

Chef Tavio

Sweet Chili Chicken Recipe Savory and Simple Dish

May 23, 2025 by Chef Tavio
- 4 boneless, skinless chicken breasts - 1/2 cup sweet chili sauce - 2 tablespoons soy sauce - 1 tablespoon rice vinegar - 1 tablespoon honey - 2 cloves garlic, finely minced - 1 tablespoon fresh ginger, freshly grated - 1 tablespoon olive oil - 1 bell pepper, thinly sliced - 1 small zucchini, sliced - Green onion and sesame seeds for garnish - Salt and pepper to taste To make sweet chili chicken, gather these ingredients. The chicken is key; it should be fresh and tender. Sweet chili sauce adds a sweet and spicy flavor. Soy sauce gives it depth, while rice vinegar adds brightness. Honey balances the heat with sweetness. Garlic and ginger add zest and aroma. Use a bell pepper for crunch and color. Zucchini provides a lovely texture. Green onions and sesame seeds make great garnishes. They add taste and a nice look. Always have salt and pepper on hand to season. This list is simple yet effective. Each ingredient plays a role in creating a tasty dish. Feel free to check the Full Recipe for more details on preparation. To start, gather a small mixing bowl. In it, combine the following: - 1/2 cup sweet chili sauce - 2 tablespoons soy sauce - 1 tablespoon rice vinegar - 1 tablespoon honey - 2 cloves garlic, finely minced - 1 tablespoon fresh ginger, freshly grated Whisk these ingredients well. This mixture becomes your marinade, adding a sweet and tangy flavor to your chicken. Next, take your chicken breasts. Place them in a resealable bag or a shallow bowl. Pour the marinade over the chicken. Make sure every piece gets good coverage. Seal the bag or cover the bowl. Refrigerate for at least 30 minutes, or up to 2 hours. This step helps the chicken soak up all those great flavors. Get a large skillet and heat 1 tablespoon of olive oil over medium-high heat. Remove the chicken from the fridge. Take the chicken out of the marinade but save the marinade for later. Season the chicken with salt and pepper on both sides. Add the chicken to the hot skillet. Cook for about 6-7 minutes on each side. Look for a golden-brown crust. Ensure the chicken is cooked all the way through. When the chicken is almost done, it’s time for veggies. Introduce a thinly sliced bell pepper and one small zucchini, sliced into half-moons. Stir-fry these in the skillet for about 3-4 minutes. You want them tender but still crisp and colorful. Now, take the reserved marinade and pour it over the chicken and veggies in the skillet. Let it come to a gentle simmer for 2-3 minutes. This thickens the sauce and coats everything nicely. Afterward, remove the skillet from heat. Let the chicken rest for a couple of minutes. Slice the chicken into strips and it’s ready for serving. For the full recipe, you can refer to the initial section. Enjoy your delicious sweet chili chicken! To make your sweet chili chicken even better, think about adding lime juice. A squeeze of fresh lime gives a bright, zesty taste. You can also sprinkle in chili flakes. They add heat and depth. Adjust these additions to fit your taste. Experiment and find what you love. Achieving the perfect sear on chicken is key. Make sure your skillet is hot before adding the chicken. This step helps create a nice crust. Dry the chicken with paper towels. This helps it sear better. Avoid moving the chicken too much while it cooks. Let it sit for about 6-7 minutes on each side. This time allows the crust to form. Presentation makes your dish shine. After slicing the chicken, arrange it on a platter with vegetables. Scatter chopped green onions and sesame seeds on top. This adds color and a touch of crunch. Serve it hot for a stunning meal. For extra flair, you can add lime wedges on the side. This way, guests can add more zest if they want. {{image_4}} You can cook sweet chili chicken in different ways. You can bake it in the oven or grill it for a smoky flavor. - Oven-Baked: Preheat your oven to 400°F. Place the marinated chicken on a baking sheet. Bake for 20-25 minutes, or until it’s cooked through. This method keeps the chicken juicy and makes clean-up easy. - Grilling: Heat your grill to medium-high. Grill the chicken for about 6-7 minutes per side. This adds a nice char and depth of flavor. You can grill the bell pepper and zucchini too for extra taste. You can change some ingredients to make this dish your own. - Sweet Chili Sauce: If you can't find sweet chili sauce, use a mix of honey and hot sauce. This gives a similar sweet and spicy flavor. - Vegetables: Feel free to swap out the bell pepper and zucchini for broccoli, snap peas, or carrots. Each vegetable will add a unique taste and texture. - Proteins: You can use tofu or shrimp instead of chicken. Tofu is great for a vegetarian option, while shrimp cooks quickly and is full of flavor. What you serve with sweet chili chicken can change the meal. - Rice: Serve it over jasmine or brown rice. The rice soaks up the sauce well and adds a hearty base. - Noodles: Toss the chicken with rice noodles or soba noodles for a fun twist. Add some extra sauce for a tasty coating. - Salads: Pair it with a fresh salad for a lighter option. A simple green salad with a tangy dressing balances the sweet flavors nicely. Feel free to explore these variations and make this sweet chili chicken your own! For the complete recipe, refer to [Full Recipe]. To store leftover sweet chili chicken, let it cool first. Place it in an airtight container. This helps keep it fresh. The chicken can last in the fridge for up to four days. Always cover it well. This prevents it from drying out. You can freeze sweet chili chicken too! Use freezer-safe bags or containers. Make sure to remove as much air as possible. This helps prevent freezer burn. The chicken will keep well for up to three months. When you’re ready to eat, defrost it in the fridge overnight. This keeps it safe and tasty. For reheating, I recommend using the stovetop. Place the chicken in a skillet. Add a splash of water or broth to keep it moist. Heat it over medium heat. Stir occasionally until it's warmed through. You want to keep the flavor and texture just right. If using a microwave, cover it with a damp paper towel. This helps it heat evenly without drying out. Enjoy your sweet chili chicken again! Sweet chili chicken is a dish that blends flavors well. It uses sweet chili sauce, soy sauce, and garlic. The chicken gets marinated in this tasty mix, which gives it a rich, savory taste. You can serve it with rice or noodles. This dish is popular in Asian cuisine and is loved for its balance of sweet and savory notes. You can enjoy it on busy weeknights or special occasions. Yes, you can prepare sweet chili chicken ahead of time. Marinate the chicken in the sauce for a few hours or overnight. This adds more flavor. After cooking, let the chicken cool, then store it in an airtight container. It stays fresh in the fridge for up to three days. You can also freeze it for later use. Just remember to defrost it in the fridge before reheating. Sweet chili chicken is not very spicy. The sweet chili sauce brings a mild heat, making it enjoyable for many. If you prefer more heat, you can add chili flakes or hot sauce. The sweetness balances the heat, creating a lovely taste. Each bite is full of flavor without overwhelming spice. This recipe for sweet chili chicken is simple and full of flavor. We mixed a tasty marinade and marinated the chicken to soak in all that goodness. Cooking the chicken until it's golden brown made every bite fantastic. Adding bell pepper and zucchini brought in great textures. Remember, you can switch up ingredients and try different cooking methods too. With proper storage, you can enjoy this meal for days. Experiment and make this dish your own; it’s a crowd-pleaser!

If you’re looking for a simple yet tasty dish, you’ve come to the right place. This Sweet Chili Chicken recipe is easy to follow and packed with flavor. With a …

Read more

Categories Dinner

Cheesy Garlic Chicken Wraps Flavorful and Simple Meal

May 23, 2025 by Chef Tavio
To make Cheesy Garlic Chicken Wraps, you need some simple ingredients: - 2 boneless, skinless chicken breasts - 1 cup shredded mozzarella cheese - 1 tablespoon olive oil - 4 cloves garlic, finely minced - 1 teaspoon dried oregano - 1 teaspoon smoked paprika - Salt and freshly ground black pepper, to taste - 4 large flour tortillas (whole wheat for a healthier option) - 1 cup mixed greens (a blend of lettuce, spinach, and arugula) - ½ cup cherry tomatoes, halved - ¼ cup ranch dressing or your choice of sauce These ingredients come together to create a tasty and satisfying meal. You will need a few tools to make the cooking process smooth: - A medium-sized skillet for cooking chicken - A medium oven-safe dish for melting the cheese - A cutting board and knife for slicing chicken and veggies - A spatula for flipping the chicken - A measuring cup and spoons for accurate ingredient amounts Having these tools ready makes prep easy and fun. You can easily swap some ingredients based on your taste or what you have: - Use chicken thighs instead of breasts for a juicier option. - Try different cheese, like cheddar or pepper jack, for a new flavor. - If you want a healthier wrap, use lettuce leaves instead of tortillas. - For a creamier sauce, swap ranch dressing for Greek yogurt or hummus. These substitutions let you customize the wraps to your liking. For the full recipe, check out the details provided earlier! To make these cheesy garlic chicken wraps, start by preheating your oven to 375°F (190°C). This heat helps melt the cheese just right. Next, heat olive oil in a medium skillet over medium heat. Once it’s hot, add minced garlic and cook it for one minute. It should smell great but not burn. Now, season both sides of the chicken breasts with salt, pepper, oregano, and smoked paprika. This adds flavor. Place the chicken in the skillet and cook for 5-7 minutes on each side. Make sure the chicken is golden brown and cooked through, reaching 165°F (75°C) inside. After cooking, let the chicken rest for a few minutes. Slice it into thin strips. In a medium oven-safe dish, layer the sliced chicken evenly on the bottom. Then, sprinkle shredded mozzarella cheese generously over the chicken. Place the dish in the oven and bake for about 10 minutes. You want the cheese to melt and bubble. This step makes the wraps extra cheesy and tasty. While the chicken bakes, prepare your tortillas. Lay each one flat on a clean surface. Add a handful of mixed greens to the center of each tortilla. Then, place a few halved cherry tomatoes on top for a fresh burst of flavor. Once the cheesy chicken is ready, take it out of the oven. Layer the cheesy chicken strips over the greens and tomatoes in each tortilla. Drizzle ranch dressing or your favorite sauce on top. Fold in the sides of the tortillas and roll them up tightly from the bottom. This keeps all the tasty filling inside. Arrange the wraps on a platter, and for a nice touch, cut each wrap in half at a slight angle to show off the gooey cheese. To get juicy chicken, start with good seasoning. Use salt, pepper, and herbs like oregano. Sear the chicken on medium heat to lock in moisture. Cook until the inside reaches 165°F. Letting it rest for a few minutes helps keep juices in. Slice it thin for easy wrapping. For gooey cheese, use fresh mozzarella. Shredded cheese melts better, so sprinkle it on right before baking. Bake at 375°F for about 10 minutes. Look for bubbly, golden edges to know it's just right. This brings out the cheese's flavor and makes your wraps extra delicious. Presentation makes a big difference. Arrange the wraps on a platter and cut them in half to show off the filling. Add halved cherry tomatoes for color. A bowl of ranch dressing on the side invites dipping. Fresh herbs like parsley or basil can brighten the dish. For more ideas, check the full recipe! {{image_4}} You can easily make Cheesy Garlic Chicken Wraps healthier. I love using whole wheat tortillas. They add more fiber and nutrients. You can also add extra veggies to boost the nutrition. Try adding spinach, bell peppers, or zucchini. These veggies not only taste great but also add color and crunch. Want to change the flavor? You can switch up the spices and sauces. Add some cayenne pepper for heat or use garlic powder for extra garlic flavor. Try a sprinkle of Italian herbs for a new twist. For sauces, you can replace ranch with barbecue or hot sauce. Each option gives a different taste experience. If you prefer a meat-free meal, I have great ideas. You can replace chicken with grilled portobello mushrooms or chickpeas. Both options are hearty and filling. Add in some roasted vegetables for added flavor and texture. With these swaps, you still get a delicious wrap without the meat. For the full recipe, check the detailed instructions provided. Enjoy experimenting with these variations! To keep your cheesy garlic chicken wraps fresh, store them in an airtight container. Place parchment paper between layers if you stack them. This helps avoid sogginess. Store in the fridge for up to three days. If you plan on keeping them longer, consider freezing them. When you want to enjoy your leftovers, heat them in the microwave for about 30 seconds. If you prefer a crispy wrap, use an oven or toaster oven. Set the oven to 350°F (175°C) and heat for about 10 minutes. This warms them nicely and melts the cheese again. To freeze your wraps, wrap each one tightly in plastic wrap. Then place them in a freezer bag. They can last up to three months in the freezer. When you’re ready to eat, take them out and thaw in the fridge overnight. Heat as mentioned above for the best taste. For the full recipe, refer to the instructions above. Yes, you can make Cheesy Garlic Chicken Wraps in advance. Just prepare the chicken and cheese, then store them in the fridge. Wraps will stay fresh for up to two days. When ready to eat, assemble the wraps with greens and sauce. This saves time on busy days. These wraps taste great with many sides. Here are a few ideas: - Crunchy coleslaw - Crispy sweet potato fries - Fresh fruit salad - Simple green salad - Veggie sticks with dip Each of these complements the cheesy flavor of the wraps and adds variety. You can easily change the spice level. To make it milder, reduce or skip the smoked paprika. If you like heat, add red pepper flakes or hot sauce. You can also try spicy cheese blends for a kick. Adjust to your taste for the perfect balance. Cheesy garlic chicken wraps bring a tasty mix of flavors and textures. We covered the key ingredients and tools you need. I shared easy steps to prepare and bake the wraps. You also learned tips for juicy chicken and perfect cheese. Don't forget about tasty variations to suit your needs or preferences. Finally, proper storage and reheating will keep your wraps fresh. Enjoy making these delicious wraps with your own twist!

Looking for a quick and tasty meal? Let me show you how to make Cheesy Garlic Chicken Wraps! This easy recipe is packed with flavor and uses simple ingredients. You’ll …

Read more

Categories Dinner

Savory Shrimp and Asparagus Stir-Fry Recipe

May 23, 2025 by Chef Tavio
- 1 pound large shrimp, peeled and deveined - 1 bunch asparagus, trimmed and cut into 2-inch pieces - 1 red bell pepper, sliced - 3 cloves garlic, minced - 1 inch fresh ginger, grated - Salt and pepper to taste - 2 tablespoons soy sauce (or tamari for gluten-free) - 1 tablespoon sesame oil - 1 tablespoon olive oil - 1 tablespoon honey (or maple syrup for a vegan option) - 1 teaspoon cornstarch mixed with 2 tablespoons water - 2 green onions, chopped - Sesame seeds When I make this shrimp and asparagus stir-fry, I always start with fresh ingredients. The shrimp is the star. Large, peeled, and deveined shrimp make the dish special. Then, I grab a bunch of crisp asparagus. I cut it into 2-inch pieces, which cook just right. I also like to add a red bell pepper for color and sweetness. Next, I focus on the aromatics. Minced garlic and grated ginger make a fragrant base. Salt and pepper add a touch of flavor. I keep these on hand in my kitchen. For the sauces and oils, I use soy sauce, sesame oil, and olive oil. The honey adds a sweet balance, while cornstarch mixed with water helps thicken the sauce. Finally, I finish the dish with green onions and sesame seeds. They add crunch and a pop of color. This recipe is easy and quick, making it perfect for any night. For the full recipe, check out the instructions above. - Rinse the shrimp thoroughly under cold running water. - Pat them dry using paper towels. - Season lightly with salt and pepper. - Heat olive oil in a large skillet over medium-high heat. - Sauté minced garlic and grated ginger for 30 seconds. - Add the shrimp to the skillet, spreading them out. - Cook for 2-3 minutes until they turn pink and opaque. - Add asparagus and sliced red bell pepper to the skillet. - Stir-fry for about 4-5 minutes until tender-crisp. - Drizzle sesame oil, soy sauce, and honey over the veggies. - Toss everything to mix and cook for one more minute. - Add the cooked shrimp back into the skillet and stir gently. - Introduce the cornstarch and water mixture to the skillet. - Stir until the sauce reaches your desired thickness. For the full recipe, check out the detailed instructions above. To make shrimp just right, check these tips: - Avoid overcooking: Cook shrimp for 2-3 minutes on each side. They turn pink when done. - Use fresh shrimp for better flavor: Fresh shrimp gives a sweet taste that frozen may lack. Want to boost flavor? Here are some ideas: - Experiment with additional spices: Try adding red pepper flakes or black pepper for a kick. - Consider adding a splash of citrus: A squeeze of lemon or lime brightens the dish. Make your meal look great with these ideas: - Serve over rice or quinoa: These grains soak up the sauce well and add texture. - Use colorful garnishes: Top with green onions and sesame seeds for a fun look. For a full recipe, check out the [Full Recipe]. {{image_4}} You can switch shrimp for chicken or tofu. Chicken should be cut into small pieces. Cook chicken for about 5-7 minutes until it is no longer pink. Tofu needs to be firm and cut into cubes. Sauté tofu for about 4-5 minutes until golden. This way, you can enjoy the same flavors with different proteins. Feel free to mix in other veggies. Broccoli, snap peas, or carrots work well here. You can also use seasonal vegetables like zucchini or bell peppers. This keeps the dish fresh and exciting. Each season brings a new chance to try different flavors. If you need this dish to be gluten-free, use tamari instead of soy sauce. You can also try coconut aminos for a different taste. Make sure to check all labels for hidden gluten. Adapting for dietary needs allows everyone to enjoy this tasty meal. To store leftovers, place the shrimp and asparagus stir-fry in an airtight container. This keeps the dish fresh and tasty. You can refrigerate it for up to three days. Remember to let it cool before sealing. This helps avoid excess moisture inside the container. If you want to save the stir-fry for later, you can freeze it. Use a freezer-safe container or a resealable freezer bag. Squeeze out as much air as possible to prevent freezer burn. The stir-fry can last up to three months in the freezer. When you are ready to eat, thaw it overnight in the fridge. To reheat the stir-fry, use a skillet over medium heat. This method helps retain the texture of the shrimp and veggies. Stir gently and add a splash of water or broth to keep it moist. Avoid microwaving as it may make the shrimp rubbery. If you do use the microwave, reheat in short bursts and stir in between. This helps prevent sogginess. Yes, you can use frozen shrimp. Just thaw them before cooking. Rinse them under cold water until they are no longer icy. Pat them dry to remove excess water. This step helps the shrimp cook evenly and keeps them from steaming. If you don't have asparagus, try broccoli, snap peas, or bell peppers. These veggies cook well and add nice color and crunch. They also pair nicely with shrimp, enhancing the dish's flavor and texture. To add heat, include chili flakes or sriracha sauce. You can mix these into the sauce for a spicy kick. If you like fresh heat, slice fresh jalapeños or add a dash of hot sauce at the end for extra flavor. Yes, this dish is great for meal prep. Cook the shrimp and veggies, then store them in airtight containers. They can last in the fridge for up to three days. When ready to eat, just reheat in a pan or microwave until hot. Absolutely! You can add carrots, zucchini, or even baby corn. Just make sure to cut them into small pieces for even cooking. More veggies will add nutrients and flavor, making your stir-fry even more delicious. For the full recipe, refer to the main article. This blog post outlined the simple steps to make a delicious Shrimp and Asparagus Stir-Fry. We discussed key ingredients, cooking methods, and tips to enhance flavor. Remember, fresh shrimp and vibrant veggies make a big difference. Feel free to switch proteins and veggies to suit your taste. Storing and reheating tips ensure you enjoy leftovers without losing quality. By following these steps, I hope you create a satisfying meal that impresses everyone. Enjoy experimenting with your own spins on this dish!

Are you ready to create a quick and flavorful meal? My Savory Shrimp and Asparagus Stir-Fry is perfect for busy days. This dish combines juicy shrimp with crisp asparagus and …

Read more

Categories Dinner

Easy Buffalo Chicken Bowls Flavorful and Quick Meal

May 23, 2025 by Chef Tavio
To make Easy Buffalo Chicken Bowls, you will need a few simple ingredients. Here’s a list that will help you gather everything: - 2 cups cooked chicken, shredded (using rotisserie chicken is a quick and tasty option) - 1/2 cup buffalo sauce (feel free to adjust to your desired level of heat) - 1 cup brown rice, cooked according to package instructions - 1 cup corn, drained and rinsed to remove excess sodium - 1 cup black beans, drained and rinsed thoroughly - 1 ripe avocado, diced for creaminess - 1/2 cup diced tomatoes for freshness and color - 1/4 cup green onions, finely sliced - 1/2 cup shredded cheddar cheese, or your cheese of choice - Fresh cilantro, roughly chopped, for garnish - Salt and pepper to taste Each ingredient plays a role in making the dish flavorful and appealing. The chicken gives you a hearty base. The buffalo sauce adds a spicy kick. Brown rice brings fiber and makes it filling. Corn and black beans add texture and nutrition. Avocado and tomatoes offer a fresh taste, while cheese and cilantro finish it off with creaminess and color. For the full recipe, check out the detailed instructions to bring this dish to life! Start by shredding the cooked chicken. I often use rotisserie chicken for ease. Place the shredded chicken in a medium bowl. Pour in the buffalo sauce. Mix well until the chicken is fully coated. If you like it spicier, add more sauce. Adjust the spice to fit your taste. Grab some serving bowls. Place a scoop of cooked brown rice at the bottom of each bowl. This rice will be your hearty base. Then, generously spoon the buffalo chicken mixture on top. Spread it evenly for a good mix of flavors. Now, let’s make these bowls colorful! Add a layer of drained corn and black beans over the chicken. This adds texture and taste. Next, gently nestle diced avocado into the mixture. Then, sprinkle diced tomatoes on top for freshness. Finish by adding a heap of shredded cheddar cheese. Green onions will add crunch and flavor. Season with salt and pepper to taste. For the full recipe, check out the detailed instructions. Enjoy your meal! For the best look, garnish your bowls with lime wedges and fresh cilantro. You can also drizzle extra buffalo sauce for those who crave more heat. Arranging ingredients in layers is key. Start with brown rice, then add buffalo chicken, corn, and black beans. This way, each bite stays colorful and appetizing. To save time, use pre-cooked chicken like rotisserie. It cuts your prep time in half. While the rice cooks, mix the chicken and buffalo sauce. You can chop veggies and prepare toppings at the same time. This multitasking keeps your meal quick and stress-free. Want to elevate your dish? Add spices like garlic powder or smoked paprika for extra depth. You can also try ranch dressing drizzled on top. For a complete meal, serve with a side salad or some crunchy veggies. Each bite can offer a new taste, making it fun and satisfying. {{image_4}} You can change the protein in your buffalo chicken bowls easily. Try using shredded turkey or even tofu for a twist. If you want a vegetarian option, use chickpeas or lentils. Both choices pack protein and flavor. You can also substitute the chicken with seitan for a tasty meat-like texture that fits a plant-based diet. If you want to switch up the base, there are great options. Instead of brown rice, try quinoa for a nutty flavor and good protein. Cauliflower rice is another fantastic choice. It’s low in carbs and adds a nice crunch. Each option gives a different taste and texture to your bowl. Toppings can change your dish completely. Instead of cheddar cheese, try feta or pepper jack for a different kick. You can also add diced bell peppers, jalapeños, or olives. This way, you add color and extra flavor. Mixing and matching toppings keeps your bowls exciting every time you make them. To keep your buffalo chicken bowls fresh, store them in the fridge. Use airtight containers to prevent moisture loss. This method keeps the flavors intact and avoids spoilage. Make sure to cool the bowls completely before sealing them. This helps avoid condensation, which can make your meal soggy. When it's time to enjoy your leftovers, reheat them with care. The microwave is quick and easy. Place the bowl in the microwave and cover it loosely with a paper towel. Heat in short bursts of 30 seconds, stirring in between, until warm. This keeps the chicken moist and the rice fluffy. If you prefer the oven, preheat it to 350°F. Transfer the bowl to an oven-safe dish, cover with foil, and heat for about 15-20 minutes. This method helps revive the texture. Add a splash of buffalo sauce if the chicken seems dry. You can freeze buffalo chicken bowls for later. First, separate the components. Freeze chicken, rice, and veggies in individual bags. This keeps everything fresh and makes it easy to reassemble. When ready to eat, thaw overnight in the fridge. You can also use the microwave's defrost setting. After thawing, reheat as mentioned above. This way, your meal stays tasty and enjoyable. You can easily make Buffalo Chicken Bowls ahead of time. First, cook the chicken and mix it with buffalo sauce. Store this mixture in an airtight container. Prepare the rice and other ingredients separately. When you are ready to eat, just combine everything in a bowl. - Cook chicken and mix with buffalo sauce. - Store chicken mixture in a container. - Cook rice and prepare other ingredients. - Combine ingredients when ready to serve. If you want to swap chicken, there are many options. You can use cooked turkey for a similar flavor. Tofu or tempeh work great for a plant-based choice. Try chickpeas for a hearty, protein-packed option. - Use cooked turkey for a similar taste. - Tofu or tempeh are great plant-based options. - Chickpeas add protein and texture. Absolutely! If you like heat, add more buffalo sauce to the chicken. You can also mix in some hot sauce or diced jalapeños. For extra heat, sprinkle crushed red pepper flakes on top. - Add more buffalo sauce for heat. - Mix in hot sauce or jalapeños. - Sprinkle crushed red pepper flakes on top. To make low-carb Buffalo Chicken Bowls, swap the brown rice for cauliflower rice. You can replace corn with zucchini or bell peppers. Lastly, skip the cheese or use a low-carb cheese option. - Replace brown rice with cauliflower rice. - Use zucchini or bell peppers instead of corn. - Skip cheese or choose a low-carb version. In this article, we covered how to make delicious Buffalo Chicken Bowls. You learned about key ingredients like chicken, brown rice, and fresh toppings. I shared step-by-step instructions to help you build the perfect bowl. You now have tips for great presentation and managing cooking time. By exploring variations, you can customize the bowls to fit your taste and diet. Finally, I provided storage info to keep leftovers fresh. Enjoy making your own bowls that are tasty, fun, and easy to prepare!

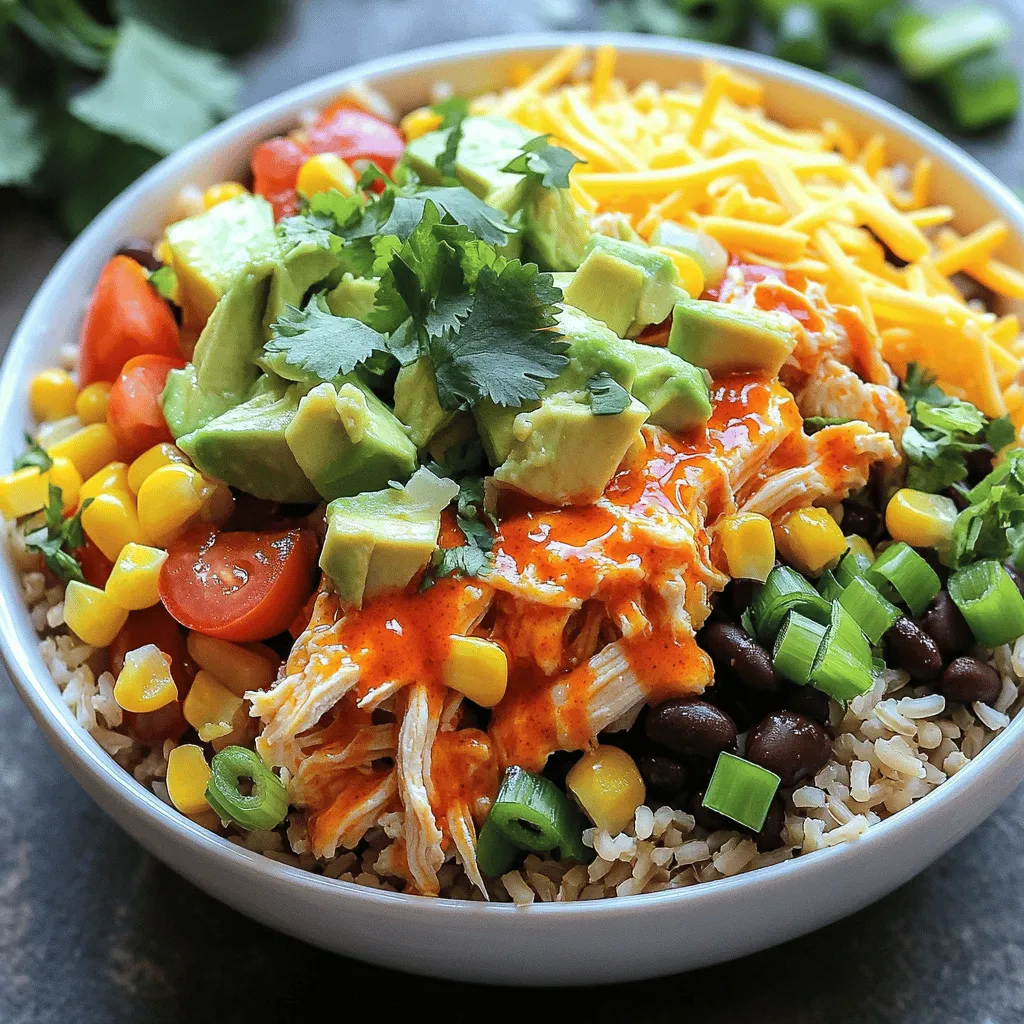
Looking for a quick, tasty meal? Try these Easy Buffalo Chicken Bowls! They’re packed with flavor, easy to make, and perfect for busy weeknights. With just a few simple ingredients, …

Read more

Categories Dinner

Creamy Beef and Bowtie Pasta Delightful Dinner Dish

May 23, 2025 by Chef Tavio
To make creamy beef and bowtie pasta, gather these items: - 12 oz bowtie pasta - 1 lb ground beef - 1 cup heavy cream - 1 cup beef broth - 1 cup cherry tomatoes, halved - 1 medium onion, finely chopped - 2 cloves garlic, minced - 1 tablespoon Italian seasoning - 1 teaspoon red pepper flakes (optional) - Salt and black pepper to taste - 1 cup freshly grated Parmesan cheese - Fresh basil leaves for garnish If you need to swap ingredients, here are some ideas: - Use whole wheat or gluten-free bowtie pasta for a healthier option. - Swap ground beef for turkey or chicken for a leaner dish. - You can replace heavy cream with half-and-half or coconut milk for a lighter sauce. - If you don't have cherry tomatoes, diced canned tomatoes work well too. Using fresh ingredients makes a big difference in flavor. Fresh tomatoes add sweetness and brightness. Fresh basil brings a lovely aroma. Good quality beef enhances the dish's richness. Always choose fresh over canned when possible. This decision elevates your meal and makes it more enjoyable. Plus, fresh ingredients are often more nutritious. So, don’t overlook their importance in your cooking! For the full recipe, you can refer to the earlier notes. Start by boiling a large pot of water. Add salt to the water for flavor. Once it boils, add the bowtie pasta. Cook it for about 8-10 minutes until it is al dente. Stir it occasionally to prevent sticking. After cooking, drain the pasta and set it aside. In a large skillet, heat it over medium heat. Add the ground beef and break it apart with a wooden spoon. Cook the beef until it turns brown. This should take about 5-7 minutes. Drain any extra fat to keep it from being greasy. Next, add the chopped onion and minced garlic to the skillet with the beef. Sauté for about 3-4 minutes until the onion is soft. Then, add the halved cherry tomatoes and cook for 2 more minutes. Pour in the beef broth and heavy cream. Bring the mixture to a gentle simmer. Stir in the Italian seasoning and red pepper flakes if you like spice. Season with salt and black pepper. Let it simmer for 5-7 minutes until the sauce thickens. Now, add the cooked bowtie pasta to the sauce in the skillet. Toss the pasta gently so each piece gets coated. Remove the skillet from heat and mix in the grated Parmesan cheese. Stir until the cheese melts and blends into the sauce. Taste and adjust seasoning if needed. Serve it warm, garnished with fresh basil leaves. Enjoy your creamy beef and bowtie pasta dish! For more details, check the Full Recipe. To get that silky smooth sauce, use heavy cream. It blends well with the beef broth. Make sure to simmer the sauce gently. If it boils too hard, it might separate. Stir often as it cooks. This keeps the sauce creamy and rich. Mixing in the Parmesan cheese at the end adds extra creaminess. It melts nicely and thickens the sauce. For a tasty boost, add some garlic and onion early on. They build a great base flavor. Cherry tomatoes add sweetness and color. Toss in red pepper flakes for heat if you like. Fresh basil at the end gives a bright taste. You can also try adding mushrooms or spinach for extra depth. Watch the heat when cooking the beef. Cooking too fast can lead to dry meat. Always drain excess fat to keep the dish light. When adding the pasta, coat it well in the sauce. If it seems too dry, add a splash of beef broth. Taste as you go! Adjust salt and pepper for the best flavor. This helps ensure your dish is perfect every time. For a complete guide, don’t forget to check out the Full Recipe. {{image_4}} You can lighten this dish while keeping it tasty. Swap ground beef for ground turkey or chicken. These options cut the fat but keep the flavor. Use low-fat cream or even Greek yogurt to reduce calories. This still gives a creamy feel without the heaviness. Boost nutrition by adding vegetables. Try bell peppers, spinach, or zucchini. Chop them small and add when you sauté the onions. This way, they cook down nicely and blend into the sauce. You’ll get extra color and crunch in every bite. Bowtie pasta is fun, but you can mix it up! Penne, fusilli, or rotini work well too. Each shape holds the sauce differently. Rotini grabs more sauce, while penne offers a hearty bite. Feel free to choose your favorite shape for a new twist on this creamy dish. For the full recipe, check out Bowtie Bliss: Creamy Beef Pasta. After enjoying your creamy beef and bowtie pasta, store any leftovers in an airtight container. This keeps the dish fresh for up to three days. Let the pasta cool down before sealing it. This way, it won't trap steam, which can make the pasta soggy. To reheat, you have a few options. The best way is to use the stove. Place the pasta in a skillet over low heat. Add a splash of beef broth or cream to keep it creamy. Stir often until heated through. You can also use a microwave. Just cover the dish and heat it in short bursts, stirring in between. If you want to save some for later, you can freeze the pasta. Use a freezer-safe container and leave some space at the top. The pasta will expand as it freezes. It can last up to three months. When you're ready to eat, thaw it in the fridge overnight. Then, reheat it on the stove as mentioned earlier. This way, your creamy beef and bowtie pasta stays tasty and fun! You can use whole milk or half-and-half. For a lighter option, try Greek yogurt. These swaps change the texture a bit but still taste great. If you're looking for a non-dairy choice, coconut cream works well too. Just remember, each substitute will change the flavor slightly. To add heat, mix in red pepper flakes. Start with one teaspoon and adjust based on your taste. You can also add diced jalapeños or hot sauce for an extra kick. Experiment with spices to find the perfect level of spice for you. Yes! Ground turkey or chicken are excellent choices. For a richer taste, try ground lamb. If you prefer beef chunks, cut them into small pieces and adjust cooking times. Each meat will create a unique flavor experience, so feel free to explore. For a vegetarian dish, swap the beef for mushrooms or lentils. Use vegetable broth instead of beef broth. Add extra veggies like bell peppers, zucchini, or spinach for more flavor. This version keeps the creamy texture while being plant-based. Check out the Full Recipe for more tips! This blog post covered the key ingredients and step-by-step instructions for a creamy pasta dish. We explored important substitutions and the value of fresh ingredients. I shared tips to enhance flavor and avoid common mistakes. Plus, we looked at healthy variations and proper storage methods. Remember, cooking is fun and personal, so make this dish your own. Enjoy the process, and don’t hesitate to get creative with your meals! Keep experimenting to find what you love most.

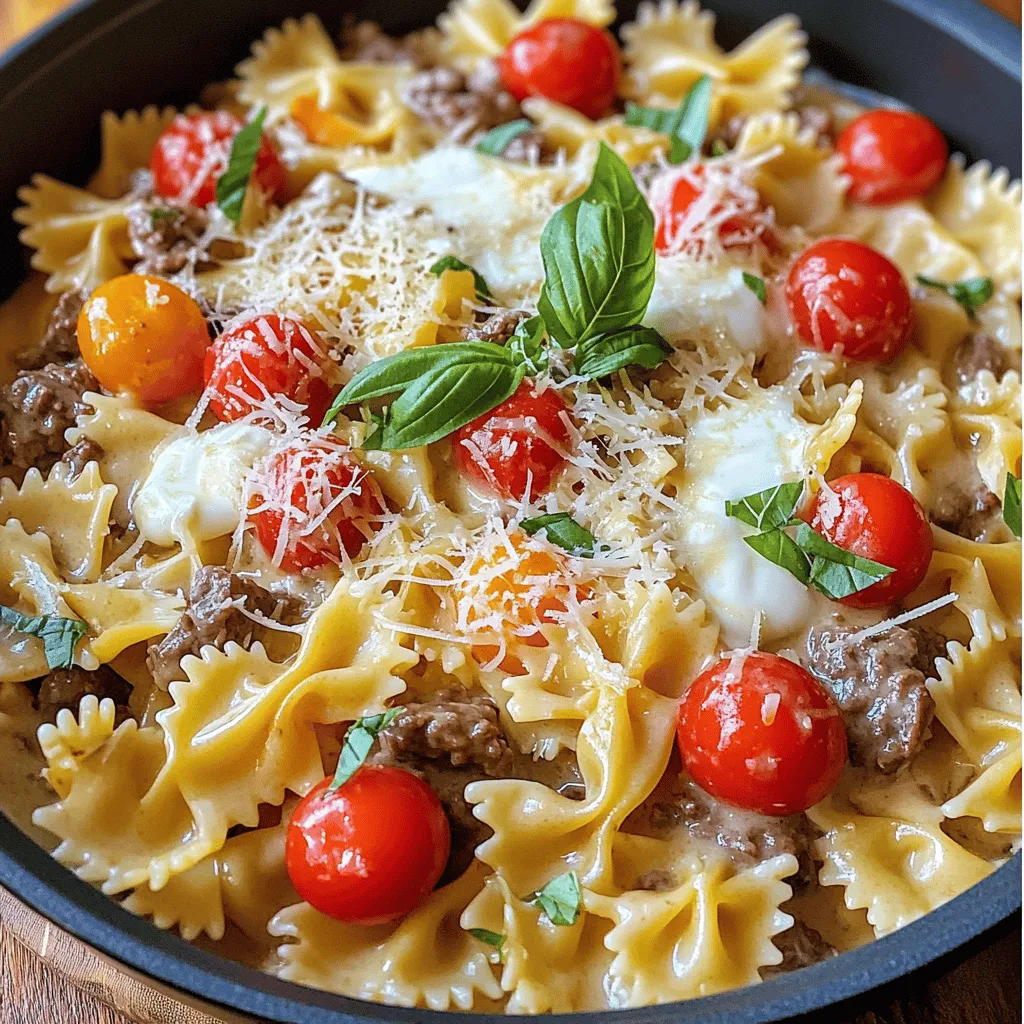
Are you ready for a comforting dish that’s easy to make? My Creamy Beef and Bowtie Pasta is just what you need for a delightful dinner. It’s rich, hearty, and …

Read more

Categories Dinner

Easy Sausage Egg & Cheese Roll-Ups Quick Breakfast Meal

May 23, 2025 by Chef Tavio
To make Easy Sausage Egg & Cheese Roll-Ups, gather these key ingredients: - 6 large eggs - 1 cup of milk - 1 tablespoon of olive oil - 1 medium onion, finely chopped - 1 red bell pepper, finely chopped - 1 cup of cooked sausage, crumbled (breakfast or turkey sausage) - 1 cup of shredded cheddar cheese - 6 large flour tortillas - Salt and pepper, to taste - Fresh parsley, chopped, for garnish (optional) These simple ingredients create a tasty breakfast that is quick and fun to make. You can use any cooked sausage you prefer, and feel free to switch up the veggies! The eggs and milk form a creamy base that holds everything together. The cheddar cheese adds a delicious richness. When you prepare this dish, the colors from the bell pepper and parsley make it look great too. You can find the full recipe for more details on how to combine these ingredients and create a delightful meal. To start, we need to mix the egg and milk base. Grab a large bowl and whisk together 6 large eggs and 1 cup of milk. This will create a creamy filling. Add salt and pepper to taste. Set this mix aside for now. Next, we’ll sauté the sausage and vegetables. Heat 1 tablespoon of olive oil in a large skillet over medium heat. Once hot, toss in 1 medium onion and 1 red bell pepper, both finely chopped. Sauté these for about 3 to 4 minutes. You want them soft and fragrant. Now, it’s time to combine everything. Add 1 cup of cooked sausage, crumbled, to the skillet. Stir well and cook for another 2 to 3 minutes. This warms the sausage and blends the flavors. Carefully pour the egg mixture into the skillet. Stir gently with a spatula to mix it in with the sausage and veggies. Cook until the eggs are just set but still creamy, which takes about 4 to 5 minutes. When ready, take the skillet off heat and stir in 1 cup of shredded cheddar cheese. This makes a delicious, melty filling. Now, let’s roll the tortillas. On a clean surface, lay out 6 large flour tortillas. Spoon an equal amount of the sausage-egg mixture into the center of each tortilla. Roll each one tightly, folding in the sides as you go. This helps to keep the filling inside. For a crisp texture, you can bake the roll-ups. Place them seam-side down on a baking sheet. If you want that golden brown look, bake them in a preheated oven at 350°F (175°C) for 5 to 7 minutes. This step adds a nice crunch to the outside. You can find the full recipe for Easy Sausage Egg & Cheese Roll-Ups for more details. To get the right egg consistency, cook them slowly. Stir gently and keep an eye on them. Eggs should be creamy but not runny. For crumbling sausage, use a fork or your hands. Break it apart before cooking. This helps the sausage mix well with the eggs and veggies. Garnish your roll-ups with fresh parsley. It adds color and a burst of flavor. Cut each roll-up in half for a nice look on the plate. Serve with dips like salsa or hot sauce. These add extra taste and make the meal fun. Pre-cook your sausage ahead of time. Store it in the fridge for quick use. This cuts down your cooking time. Using pre-chopped veggies can save you even more time. Look for them at the store to make meal prep easier. For the full recipe, check out the details above! {{image_4}} You can change the main protein in this recipe. Use bacon or ham instead of sausage. This adds a new flavor. You can also try different cheese options. Mozzarella or pepper jack works well too! These swaps give you tasty choices based on what you have. If you need gluten-free options, use gluten-free tortillas. They work just as well! For those who prefer plant-based meals, choose vegetarian or plant-based sausages. These swaps keep your roll-ups delicious while meeting dietary needs. Adding spices can elevate the taste. Try paprika, garlic powder, or oregano for a kick. You can also include other veggies. Spinach or mushrooms add color and nutrition. They blend well with the sausage and eggs for a richer flavor. Using these variations, you can make Easy Sausage Egg & Cheese Roll-Ups your own. Enjoy experimenting! Check the Full Recipe for details on the base dish. Store any leftover roll-ups in an airtight container. They stay fresh for about three days. When you want to reheat them, use the microwave or a skillet. In the microwave, heat for about 30 seconds to 1 minute. If using a skillet, heat on low until warm. To freeze roll-ups, wrap each one in plastic wrap. Place them in a freezer-safe bag. They can last up to three months in the freezer. When you're ready to eat, remove a roll-up and thaw it in the fridge overnight. For reheating, use the microwave or an oven at 350°F for about 10-15 minutes. This keeps them warm and tasty. Try the Full Recipe for delicious roll-ups today! These roll-ups stay fresh for about three to four days. Store them in an airtight container to keep them safe from moisture and odors. If you want to make them last longer, wrap each roll-up in plastic wrap before placing them in the container. Yes, you can prep these roll-ups ahead of time. Make the filling and roll them up. Store them in the fridge for up to one day before cooking. This makes busy mornings much easier. Just heat them up in a skillet or microwave when you’re ready to eat. You can serve these roll-ups with many delicious dips. Here are some ideas: - Salsa for a fresh kick. - Sour cream for creaminess. - Guacamole for a rich flavor. - Hot sauce for those who like spice. Absolutely! The fillings are easy to customize. Here are some options: - Use bacon or ham instead of sausage. - Try different cheeses like mozzarella or pepper jack. - Add veggies like spinach or mushrooms for extra nutrition. - Experiment with spices like paprika or garlic powder to change the flavor. For the full recipe, check out the details provided above. You now have all the tools to make Easy Sausage Egg & Cheese Roll-Ups. We covered ingredients, cooking steps, tips, and fun variations. This dish is not just tasty; it's also quick and easy. Feel free to customize it to fit your taste. Don't forget about storage tips to keep your leftovers fresh. Enjoy your cooking adventure, and impress your family with these roll-ups!

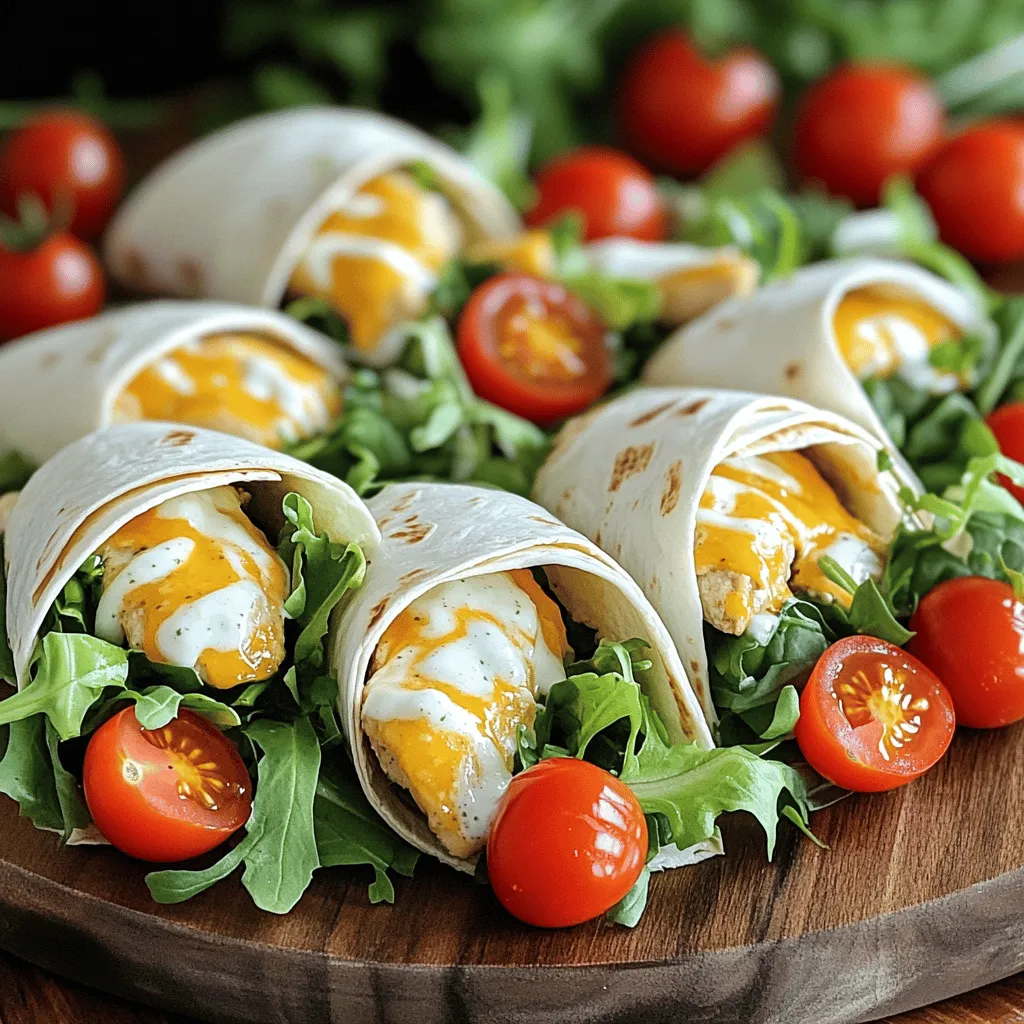
Are you tired of hectic mornings and boring breakfasts? Let’s change that with Easy Sausage Egg & Cheese Roll-Ups! This fun recipe combines eggs, sausage, and cheese into a tasty …

Read more

Categories Breakfast

Chicken Avocado Ranch Burritos Easy Flavors to Enjoy

May 23, 2025 by Chef Tavio
- 2 cups cooked chicken, shredded - 1 ripe avocado, mashed - 1 cup ranch dressing - 1 cup cherry tomatoes, halved - 1 cup shredded lettuce - 1/2 cup corn, canned or frozen (thawed) - 1/2 cup black beans, rinsed and drained - 1/2 cup shredded cheese (cheddar or Monterey Jack) - 4 large flour tortillas - 1 tablespoon lime juice - Salt and pepper to taste - Fresh cilantro, chopped (for garnish) You can tweak this recipe based on what you have. For the chicken, you can use grilled or rotisserie chicken. If you want it vegetarian, swap the chicken for extra beans or veggies. Instead of ranch dressing, try a yogurt-based dressing for a lighter option. Avocados can be replaced with guacamole if you're in a pinch. Use whole wheat tortillas for a healthier choice. Each burrito packs a punch of flavor and nutrients. Here’s a rough breakdown per burrito: - Calories: 450 - Protein: 30g - Carbohydrates: 40g - Fat: 20g - Fiber: 10g This dish offers a good balance of protein and healthy fats, making it a filling meal. Remember to adjust these values based on your ingredient choices and portion sizes. Enjoy making these Chicken Avocado Ranch Burritos with this full recipe. You’ll love the combination of fresh tastes! Start by gathering your ingredients. In a mixing bowl, add the shredded chicken, mashed avocado, ranch dressing, and lime juice. Sprinkle in some salt and pepper to taste. Use a fork to mix everything together well. You want a creamy texture that holds all the flavors. Make sure the chicken is fully coated in the avocado and ranch. This blend gives your burrito a rich taste. Next, lay out your flour tortillas on a clean surface. Take about 1/2 to 3/4 cup of your chicken-avocado mixture and place it in the center of each tortilla. This is where the fun begins! Now, evenly add the cherry tomatoes, shredded lettuce, corn, black beans, and shredded cheese on top of the chicken mix. This extra filling adds color and crunch. To wrap your burrito, fold the sides of the tortilla inwards. Then, start from the bottom and roll it up tightly. Make sure all the filling is secure inside. A good roll keeps everything in place when you cook. Heat a non-stick skillet over medium heat. Carefully place the burritos seam-side down in the skillet. Cook for 2-3 minutes on each side until they turn golden brown. This step adds a nice crisp to the outside. Once cooked, remove them from the skillet and let them rest for a minute. To serve, cut each burrito in half with a sharp knife to reveal the colorful filling. Place them on a plate and garnish with freshly chopped cilantro. For an extra treat, serve with more ranch dressing on the side for dipping. Enjoy your Chicken Avocado Ranch Burritos! To get tender, shredded chicken, use cooked chicken breasts or thighs. Let the chicken cool for a few minutes before shredding. I find that two forks work well for shredding. Hold one fork steady and pull the chicken apart with the other fork. This method gives you nice, even shreds. If you have a stand mixer, you can use it! Just put the chicken in the bowl and turn it on low for a few seconds. The chicken will shred easily. Correctly wrapping your burrito is key for a tasty meal. Start with a warm tortilla; this makes it more flexible. Spoon the filling into the center, leaving space at the edges. Fold the sides in first, then roll from the bottom up. Press gently to seal. If you want to ensure it stays closed, you can use a toothpick. Wrapping tightly helps keep all the flavors inside. You can make your burritos even better with garnishes. Fresh cilantro adds a nice touch. Lime wedges give a zesty flavor. You might also enjoy serving them with extra ranch dressing for dipping. Other good sides include chips or a light salad. This way, you can create a full meal that is both fun and tasty. {{image_4}} If you want a vegetarian twist, swap the chicken for beans or tofu. Black beans work great for protein. You can also use chickpeas for a different taste. For a creamy texture, try mashed avocado or a mix of both. This makes the burrito filling rich and tasty. Ranch dressing is delicious, but you can try other dressings too. A spicy chipotle sauce adds a nice kick. For a zesty twist, use cilantro lime dressing. You can even mix in some salsa for a fresh flavor. Each dressing changes the taste and makes your burrito unique. If you're watching carbs, use lettuce wraps instead of tortillas. This keeps the taste but cuts the carbs. For dairy-free options, choose vegan cheese or skip the cheese entirely. You can also use gluten-free tortillas if needed. These swaps help everyone enjoy the burritos without worry. For the full recipe, check out Chicken Avocado Ranch Burritos. To keep your leftover burritos fresh, wrap each one tightly. Use plastic wrap or aluminum foil for best results. Place the wrapped burritos in an airtight container. This helps them stay moist and tasty. Store your burritos in the fridge for up to three days. If you leave them out, they could spoil quickly. You can freeze burritos for later meals. First, wrap each burrito in plastic wrap. Then, place them in a freezer bag or airtight container. Make sure to remove as much air as possible to prevent freezer burn. Frozen burritos can last for up to three months. When you are ready to eat, thaw them in the fridge overnight. To reheat, you can use the oven or microwave. For the oven, preheat it to 350°F (175°C). Unwrap the burrito and place it on a baking sheet. Heat for about 15-20 minutes, or until warm. The oven keeps the burrito crispy. If you use the microwave, place the burrito on a plate. Heat it for 1-2 minutes on high. Check if it’s hot all the way through. Enjoy these Chicken Avocado Ranch Burritos warm for the best taste! Yes, you can make these burritos ahead of time. Prepare the filling and store it in the fridge. You can fill the tortillas when you are ready to eat. This keeps the tortillas fresh and avoids sogginess. If you want, you can also wrap the fully made burritos in foil or plastic wrap. Store them in the fridge for up to two days. Just reheat before serving. These burritos go well with many sides. Here are a few ideas: - Guacamole: Adds creaminess and flavor. - Salsa: A spicy kick can enhance the taste. - Rice: Serve with cilantro-lime rice for a fresh touch. - Chips: Tortilla chips add crunch and fun. - Salad: A light salad gives a nice contrast. You can mix and match these sides to fit your taste! To adjust the spice level, consider these options: - Add jalapeños: Fresh or pickled for a nice heat. - Use spicy ranch: This can make the burritos zing. - Include hot sauce: Drizzle some inside the burrito or serve it on the side. - Use mild ingredients: If you want less spice, skip the hot options. Feel free to play with these ideas to make it just right for you! In this blog post, we explored how to make Chicken Avocado Ranch Burritos. I shared essential ingredients, measurements, and nutritional info to guide you. You learned step-by-step instructions for preparation, assembly, and cooking. We discussed tips for shredding chicken and wrapping burritos tightly. I also offered variations for dietary needs and how to store leftovers. Enjoy making these burritos any way you like, and don’t hesitate to get creative!

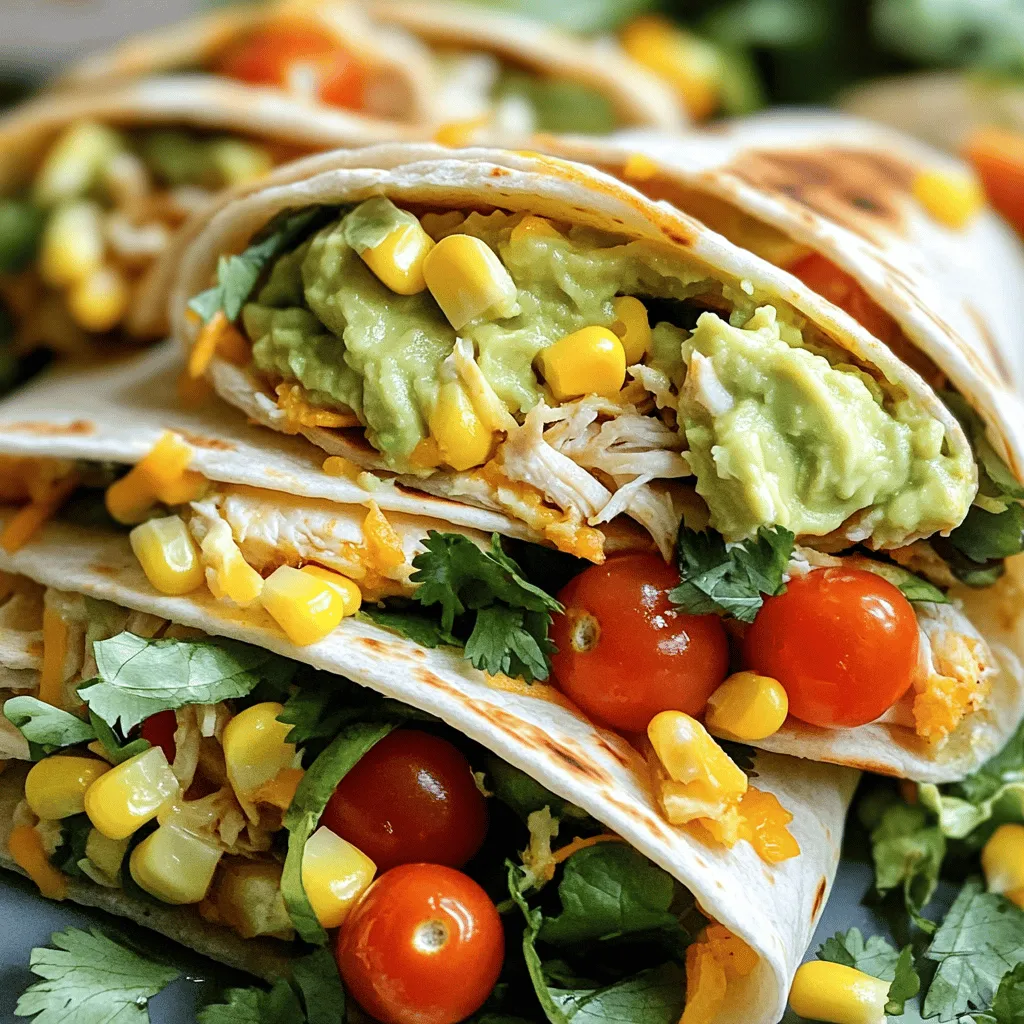
Are you ready for a meal that’s as easy to make as it is bursting with flavor? Welcome to my Chicken Avocado Ranch Burritos! I’m excited to share a quick …

Read more

Categories Dinner

Creamy Parmesan Garlic Beef Bowtie Pasta Delight

May 23, 2025 by Chef Tavio
To make Creamy Parmesan Garlic Beef Bowtie Pasta, you need: - 8 oz bowtie pasta - 1 lb ground beef - 4 cloves garlic, minced - 1 cup heavy cream - 1 cup freshly grated Parmesan cheese - 1 cup beef broth - 1 teaspoon Italian seasoning - Salt and freshly ground pepper to taste - 2 tablespoons extra virgin olive oil - 1 tablespoon fresh parsley, finely chopped (for garnish) These ingredients blend well to create a rich and creamy meal. The garlic adds a strong flavor, while the Parmesan gives it a nice, cheesy finish. If you want to switch things up, consider these options: - Use ground turkey or chicken instead of beef for a lighter dish. - Swap heavy cream with half-and-half for a lower-fat version. - Try using gluten-free pasta if you need a gluten-free meal. - Replace beef broth with vegetable broth for a vegetarian touch. These swaps can change the taste and texture but will still keep the dish delicious. To make your dish look even better, try these garnishes: - A sprinkle of extra Parmesan cheese adds a nice touch. - Red pepper flakes can give it a little heat. - Fresh basil or thyme can enhance the flavor and add color. Adding a simple garnish can elevate the dish and impress your guests. For the full recipe, you can refer back to the instructions provided earlier. Start by boiling water in a large pot. Add a good amount of salt to the water. This helps flavor the pasta. Once the water reaches a rolling boil, add the bowtie pasta. Cook it as directed on the package, usually around 8-10 minutes. You want it to be al dente, meaning it should feel firm yet tender. After cooking, drain the pasta and set it aside. Remember to save a little pasta water for later. Next, heat a large skillet over medium heat. Pour in the extra virgin olive oil. Add the ground beef to the skillet. Season it with salt and pepper to taste. Cook the beef for about 5-7 minutes. Use a wooden spoon to break it apart as it cooks. You want it to be nicely browned with no pink bits left. Once the beef is browned, add the minced garlic. Sauté it with the beef for 1-2 minutes. Watch it closely so it doesn’t burn. Now, it's time to make the creamy sauce. Pour the beef broth into the skillet with the beef and garlic. Stir well to combine. Bring the mixture to a gentle simmer. Lower the heat and slowly whisk in the heavy cream. Let the sauce simmer for about 2-3 minutes. This will help it thicken up slightly. Add the grated Parmesan cheese into the skillet. Stir until the cheese melts and the sauce is creamy. Then add the Italian seasoning. Taste the sauce and adjust with more salt and pepper if needed. Now, add the cooked bowtie pasta directly into the creamy sauce. Toss the pasta gently in the sauce. If it seems too thick, add a splash of the reserved pasta water to reach your desired consistency. Serve the creamy pasta in bowls. For a pop of color, sprinkle freshly chopped parsley on top. This adds a fresh touch. Enjoy your meal warm. Each bite is a delightful mix of flavors. You can find the full recipe in another section, if needed. To boost the creaminess of your sauce, use full-fat heavy cream. This adds richness. You can also add more cheese for a thicker texture. A sprinkle of cream cheese can help too. Stir it in until melted for extra smoothness. If your sauce feels thick, add some pasta water. Just a little can make a big difference. Timing is key when cooking pasta. Always salt your water before boiling. This adds flavor to the pasta. Cook your bowtie pasta for about 8-10 minutes. Test a piece to ensure it's al dente, or firm to bite. Drain it but save a bit of water. You may need this for your sauce later. Store any leftovers in an airtight container. This keeps them fresh for up to three days. If you want to reheat, add a splash of broth or cream. This helps revive the creamy texture. Always cover your dish to prevent it from drying out. Enjoy your creamy Parmesan garlic beef bowtie pasta delight later! For the full recipe, check the main article. {{image_4}} To make this dish vegetarian, swap the ground beef for plant-based meat. You can also use lentils for a hearty texture. Tofu works well too. Just make sure to season it well. Use the same garlic and cream sauce. This will keep the rich flavor but add a lovely twist. Adding veggies can boost nutrition and flavor. Spinach or kale adds color and nutrients. You can also toss in some cherry tomatoes for sweetness. Peas or bell peppers bring a nice crunch. Sauté them with garlic for extra taste. Just mix them into the creamy sauce. This makes the dish even heartier and more delightful. Bowtie pasta is fun, but you can try other shapes too! Penne or fusilli works great with creamy sauces. They hold the sauce well. If you want something smaller, try orzo or macaroni. Each shape brings a unique texture to your meal. Don’t hesitate to experiment to find your favorite! For the full recipe, check out Creamy Parmesan Garlic Beef Bowtie Pasta Delight. This dish is rich and filling. A serving of creamy Parmesan garlic beef bowtie pasta has around 550 calories. The pasta and beef provide most of the calories. The creamy sauce and cheese add extra richness. Keep this in mind if you watch your calorie intake. This meal offers a balance of nutrients. Here’s the breakdown per serving: - Protein: About 30 grams, mainly from ground beef and cheese. - Carbohydrates: Roughly 60 grams, mainly from the bowtie pasta. - Fats: Approximately 25 grams, primarily from heavy cream and olive oil. This mix of protein, carbs, and fats helps keep you satisfied. Each part plays a role in making the dish hearty and delicious. Switching ingredients can change nutrition. For example, using turkey instead of beef cuts calories and fat. Almond milk can replace heavy cream for a lighter option, but it changes the creaminess. Whole wheat pasta increases fiber, making it more filling. Each swap can make the dish healthier or adjust its taste, so choose according to your needs. For more detailed guidance, check the Full Recipe for nutritional tips. You can use ground turkey, chicken, or pork. Each option adds its own flavor. Ground turkey is leaner, while pork adds richness. Yes! Use gluten-free bowtie pasta made from rice or corn. It will taste great in this dish. Always check labels to ensure all ingredients are gluten-free. Reheat leftovers gently on the stove. Add a splash of beef broth or cream. This keeps the pasta creamy and prevents it from drying out. Serve a simple green salad or steamed veggies. Garlic bread also pairs nicely. These sides balance the creamy pasta well. It lasts about 3-4 days in the fridge. Store it in an airtight container. Always check for freshness before enjoying leftovers. For the full recipe, check out the Creamy Parmesan Garlic Beef Bowtie Pasta Delight. We covered the key ingredients, step-by-step cooking methods, and tips for great pasta. You learned about variations, like vegetarian options, and how to store leftovers well. Remember, cooking should be fun and flexible! You can adjust ingredients to suit your taste. Enjoy your creamy Parmesan garlic beef bowtie pasta, and make it your own. Happy cooking!

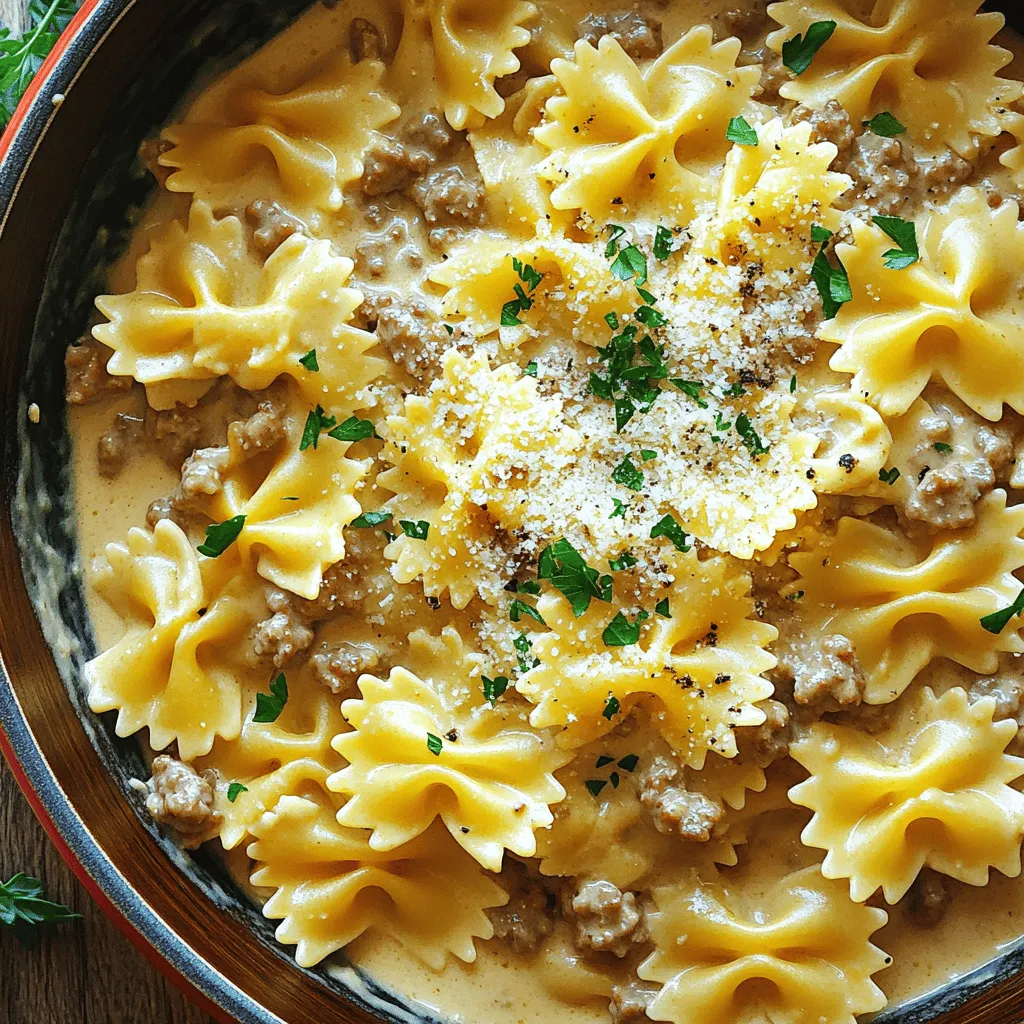
Craving a hearty and creamy meal? You’ll love this Creamy Parmesan Garlic Beef Bowtie Pasta Delight! This dish brings rich flavors together in a simple recipe perfect for a weeknight …

Read more

Categories Dinner

The BEST Bang Bang Chicken Bowl Flavorful Recipe Guide

May 23, 2025 by Chef Tavio
- 1 lb boneless, skinless chicken breasts, diced into bite-sized pieces - 1 cup cornflour - 1 cup buttermilk or a plant-based milk alternative The chicken is the star of this dish. It needs to be juicy and tender. I prefer boneless, skinless chicken breasts for their ease of use. Dicing them into bite-sized pieces ensures every bite is packed with flavor. Cornflour is key to achieving that perfect crunch. It coats the chicken nicely and creates a crisp texture when fried. Buttermilk adds moisture and flavor. It also helps the cornflour stick to the chicken. If you want a dairy-free option, use a plant-based milk. - 1/2 cup mayonnaise - 2 tablespoons sweet chili sauce - 1 tablespoon sriracha sauce (adjust based on your spice preference) The sauce brings everything together. Mayonnaise gives it a creamy base. Sweet chili sauce adds a touch of sweetness and a hint of heat. Sriracha sauce is where you can adjust the spice. If you like it hot, add more. If not, keep it light. Mixing these three creates a rich and delicious sauce that makes the dish special. - 2 cups cooked jasmine rice (feel free to use brown rice for a healthier alternative) - 1 cup finely shredded cabbage (green or purple for color contrast) - 1/2 cup cucumber, thinly sliced - 1/4 cup green onions, finely chopped - Fresh cilantro leaves, for garnish - Lime wedges, for serving Fresh elements add crunch and color. Jasmine rice serves as a great base, but brown rice is a healthy choice. Cabbage gives a nice crunch, plus it looks great. You can choose green or purple for extra color. Cucumber slices add freshness. Chopped green onions bring a mild onion flavor. Fresh cilantro leaves add a nice aromatic touch. Finally, lime wedges give a zesty kick, brightening the whole dish. For a full recipe, refer to the [Full Recipe]. Coating the chicken Start by mixing the cornflour, smoked paprika, garlic powder, onion powder, salt, and pepper in a large bowl. This blend gives the chicken a great taste. In another bowl, pour in the buttermilk. Dip each chicken piece in the buttermilk, letting the extra drip off. Then, coat it in the cornflour mix. Make sure every side is covered. This is key for a crunchy finish. Frying technique Heat a large skillet over medium-high heat. Add enough oil to cover the pan's bottom. Wait until the oil shimmers. Then, add the coated chicken pieces. Do this in batches so they don't crowd each other. Fry them for about 5-7 minutes. Look for a golden brown color and make sure they are cooked through. When done, place the chicken on paper towels to drain the excess oil. Mixing instructions In a small bowl, combine mayonnaise, sweet chili sauce, and sriracha. Whisk these together until they form a smooth, creamy sauce. This sauce is what makes the dish special. Taste adjustments If you like things spicy, add more sriracha. If you want it milder, reduce the sriracha. Taste the sauce as you adjust. This way, you get the flavor just right for your taste. Layering ingredients Start by placing a scoop of cooked rice at the bottom of your bowl. Then, add a layer of crispy fried chicken on top. Next, pile on some shredded cabbage and sprinkle fresh cucumber slices around. Presentation tips Drizzle the Bang Bang sauce generously over everything. Make sure each ingredient gets a touch of that flavor. For a final touch, add chopped green onions and cilantro leaves on top. Serve the bowl with lime wedges on the side. This adds a fresh kick and looks great! To get that perfect crunch, coat the chicken well. First, dip each piece in buttermilk. Let the excess drip off. Then, roll the chicken in the cornflour mixture. Make sure every side is covered. This step is key for a crispy bite. For frying, I recommend using vegetable oil. It has a high smoke point. This means it can get hot without burning. You can also use peanut oil for a nutty flavor. Heat the oil until it shimmers. Fry the chicken in small batches. Overcrowding will make it soggy. Want it spicy? Adjust the sriracha in the sauce. Start with one tablespoon. Taste it, then add more if you want heat. You can also mix in some chili flakes for extra kick. For a milder version, use less sriracha. You can replace it with a bit of honey or omit it entirely. This way, you keep the sweetness without the heat. Consider using a mild sauce if you want a non-spicy option. If you want to prep ahead, cook the chicken in advance. Store it in the fridge until you're ready to eat. You can also make the sauce a day before. Just keep it in an airtight container. When reheating, use the oven if you can. This helps keep the chicken crispy. Preheat it to 375°F (190°C) and heat for about 10 minutes. If you use a microwave, the chicken may get soggy. So, stick to the oven if possible. {{image_4}} You can easily switch up the protein in your Bang Bang Chicken Bowl. If you want to substitute chicken, try using shrimp. Shrimp cooks quickly and adds a nice twist of flavor. Just coat and fry them like the chicken. For a vegetarian choice, use tofu. Firm tofu works best. Press it to remove excess water. Then, cut it into cubes, coat it, and fry until golden. This gives you a crunchy, tasty option that everyone can enjoy. Rice is a key part of this dish. You can use brown rice or jasmine rice. Brown rice is healthier and has a nutty taste. Jasmine rice is soft and fragrant, adding a lovely aroma to your bowl. If you want to try other grains, consider quinoa or farro. Quinoa packs protein and cooks fast. Farro has a chewy texture and adds a nice bite to the dish. Both options work well with the Bang Bang flavors. Garnishes can really elevate your bowl. You might add sliced radishes for a peppery crunch. Avocado adds creaminess and healthy fats. Chopped peanuts give a nice crunch and extra flavor. In terms of seasonal vegetables, think about using bell peppers or snap peas. These add color and fresh taste. Feel free to mix and match based on what you have. The more colorful, the better your bowl will look and taste! To keep your Bang Bang Chicken Bowl fresh, store leftovers in the fridge. Place the chicken and veggies in an airtight container. Make sure to separate the sauce from the other ingredients. This helps keep everything crisp. Your dish can last in the fridge for up to three days. You can also freeze it if you want to keep it longer. Just remember to use a freezer-safe container. The chicken may lose some crunch when thawed. When you reheat, the goal is to keep the chicken crispy. The stovetop is best for this. Heat a pan on medium and add a bit of oil. Once hot, add the chicken until it's warm. This keeps it nice and crunchy. If you use a microwave, place the chicken on a plate. Heat in short bursts, checking often. This method may not keep the crunch, but it’s quick. The Bang Bang Chicken Bowl lasts about three days in the fridge. If you freeze it, it can last up to three months. Look for signs of spoilage, like off smells or changes in texture. If the chicken feels slimy or looks discolored, it’s best to toss it. Keeping an eye on these signs helps you enjoy your meal safely. To make the BEST Bang Bang Chicken Bowl, start by prepping your ingredients. Dice your chicken into small pieces. Then, mix cornflour with spices like smoked paprika and garlic powder. Dip the chicken into buttermilk, then coat it in the cornflour mix. Fry the chicken until golden and crispy. Next, whip up the Bang Bang sauce. Combine mayonnaise, sweet chili sauce, and sriracha in a bowl. Once your chicken is ready, assemble your bowl. Start with rice, then add chicken, cabbage, and cucumber. Drizzle the sauce on top and garnish with green onions and cilantro. This process takes about 30 minutes. Yes, you can make a low-carb version of the Bang Bang Chicken Bowl. Use cauliflower rice instead of jasmine rice. You can also skip the cornflour coating for the chicken. Instead, season the chicken well and grill or bake it. This keeps the flavor while cutting down on carbs. If you need a buttermilk substitute, use plant-based milk. Almond milk or oat milk works well. Add a tablespoon of lemon juice or vinegar to make it sour. This mimics the tang of buttermilk. You can also use regular milk if you are not dairy-free. The spice level of the Bang Bang sauce can be adjusted. The sriracha adds heat, so use more or less based on your taste. For a milder sauce, reduce the sriracha and add more sweet chili sauce. If you want extra heat, you can add red pepper flakes or more sriracha. The Bang Bang Chicken Bowl combines tasty chicken, crispy veggies, and a zesty sauce. Each step, from frying to assembling, helps you craft the perfect dish. Don't forget to customize your spice level or explore different protein and grain options. With smart storage tips, your leftovers stay fresh for later. Enjoy this dish any day of the week, knowing it’s easy to make and full of flavor. Dive in and create your own delicious bowl!

Are you ready to dive into a creamy, spicy delight? This guide presents the BEST Bang Bang Chicken Bowl, packed with flavor and crunch. You’ll learn how to create a …

Read more

Categories Dinner

Loaded Potato Meatloaf Savory and Hearty Meal Idea

May 23, 2025 by Chef Tavio
- 1 lb ground beef - 1 lb ground turkey - 2 cups mashed potatoes (prepared, homemade or instant) - 1 small onion, finely chopped - 2 cloves garlic, minced - 1 cup shredded cheddar cheese - 2 large eggs These main ingredients make the heart of the loaded potato meatloaf. Ground beef and turkey give it a rich flavor and a tender texture. The mashed potatoes make it creamy and hearty. The onion and garlic add a nice depth of flavor. Finally, the cheese melts into the mix, making it extra delicious. - 1/2 cup cooked bacon bits - Fresh parsley for garnish Adding bacon bits gives a smoky flavor that many love. It adds crunch and a salty bite. Fresh parsley is a simple way to make the dish look pretty. It also adds a fresh taste that balances the richness of the meatloaf. - 2 tablespoons Worcestershire sauce - Salt and pepper, to taste - 1/2 cup sour cream - 1/4 cup milk The Worcestershire sauce brings umami, giving the meatloaf a deep flavor. Salt and pepper are must-haves for seasoning. Sour cream makes the mix creamy while adding a slight tang. Milk helps keep the meatloaf moist, ensuring a tender final dish. For the full recipe, check out the Ultimate Loaded Potato Meatloaf. - Preheat your oven to 350°F (175°C). This helps cook the meatloaf evenly. - Grease a 9x5 inch loaf pan. This will keep the meatloaf from sticking. - In a large mixing bowl, combine 1 lb ground beef and 1 lb ground turkey. Mix them well until they blend together. - Add 1 small chopped onion, 2 minced garlic cloves, and 2 cups of mashed potatoes to the meat mixture. These add flavor and moisture. - Stir in 1 cup of shredded cheddar cheese and 1/2 cup of cooked bacon bits if you want extra richness. Mix until everything is combined. - In another bowl, whisk together 1/2 cup sour cream, 1/4 cup milk, 2 large eggs, 2 tablespoons Worcestershire sauce, and some salt and pepper. This mixture will keep your meatloaf moist and tasty. - Pour the wet mixture over the meat mixture. Gently fold everything together with your hands or a spatula. Do not overmix; this can make the meatloaf tough. - Gradually add 1/2 cup breadcrumbs to help bind the mixture. Just add enough until it holds together. - Shape the mixture into a loaf and place it in the greased pan. Make sure it is even for best cooking results. For the full recipe, check out the Ultimate Loaded Potato Meatloaf. To ensure a moist meatloaf, use a mix of ground beef and turkey. The beef adds flavor, while the turkey keeps it tender. Don't forget the mashed potatoes; they add moisture too. Mixing in sour cream helps lock in that juicy texture. When it comes to baking temperatures, preheat your oven to 350°F (175°C). This is the perfect heat to cook the meatloaf evenly. If the oven is too hot, the outside cooks too fast. If it's too cool, the inside remains raw. For side dishes, I love pairing this meatloaf with steamed veggies. Broccoli or green beans add color and crunch. A crisp side salad also works well, bringing freshness to the meal. When serving, slice the meatloaf and place it on a warm plate. Top each slice with a dollop of sour cream. A sprinkle of fresh chives adds a pop of color and flavor. This simple presentation makes the dish look gourmet. One common mistake is overmixing the meatloaf. When you combine the ingredients, mix gently. Overmixing makes the meatloaf dense and tough. Another mistake is using the meat thermometer incorrectly. Insert it into the center of the meatloaf. You want it to read 160°F (70°C) for safe eating. If you check it in the wrong spot, you may think it is done when it is not. {{image_4}} You can easily change the meats in this recipe. For a lighter option, use ground chicken or lamb. Each meat brings a unique taste and texture to the dish. You can also swap the mashed potatoes for sweet potatoes. Sweet potatoes add a hint of sweetness and extra nutrition. This simple change can give your meatloaf a new flavor profile. Want to boost the flavor? Try adding different cheeses. Gouda or pepper jack cheese can make it extra special. You can also mix in fresh herbs. Chives, thyme, or parsley will brighten the dish. For more nutrition, add veggies like bell peppers or spinach. These additions make your meatloaf vibrant and tasty. You don’t have to stick to the oven. A slow cooker is a great option for busy days. It cooks the meatloaf slowly, making it juicy and tender. Grilling or smoking your meatloaf is another fun method. This gives it a smoky flavor that pairs well with the potatoes. Each method offers a different taste experience, so feel free to experiment. For the full recipe, check out the earlier section. To keep your loaded potato meatloaf fresh, store leftovers in the fridge. Place the meatloaf in an airtight container. It will stay good for about 3 to 4 days. If you want to save it for longer, freezing is a great option. Wrap the meatloaf in plastic wrap, then in aluminum foil. This helps prevent freezer burn. You can freeze it for up to 3 months. When reheating in the oven, preheat it to 350°F (175°C). Place the meatloaf in a baking dish and cover it with foil. This keeps it moist. Heat for about 20 to 30 minutes, or until it’s warm all the way through. For a quicker method, use the microwave. Slice the meatloaf and place the slices on a microwave-safe plate. Cover with a damp paper towel and heat for 1 to 2 minutes. Check if it's warm enough, and heat more if needed. In the fridge, your loaded potato meatloaf lasts 3 to 4 days. In the freezer, it can last 3 months. Always check for signs of spoilage. If you see any off smells, discoloration, or mold, it’s best to throw it out. Keeping track of these details helps you enjoy your delicious meatloaf safely. For the full recipe, refer to the earlier sections of this article. The cooking time for this meatloaf is about one hour. This is for a standard loaf size. If you make a larger loaf, it may take longer. Always check the center with a meat thermometer. You want it to reach 160°F (70°C). This ensures it is safe and fully cooked. Yes, you can make this meatloaf ahead. Prepare the mixture and shape it into a loaf. Then, cover it tightly and store it in the fridge. It can stay there for up to 24 hours. When you are ready to cook, bake it straight from the fridge. Just remember to adjust the cooking time if baking from cold. If you need a substitute for breadcrumbs, there are many options. You can use crushed crackers or oats. Another good choice is ground nuts or cooked rice. Each of these adds a different flavor and texture. Adjust the amount until the mixture holds together well. You learned how to make the Ultimate Loaded Potato Meatloaf. The main ingredients are ground beef, ground turkey, and mashed potatoes. Optional items like bacon bits and parsley enhance flavor and look. Remember to mix the ingredients gently to avoid dry meatloaf and serve with tasty sides. Consider trying variations such as different meats or herbs to add your twist. Store leftovers properly, and use safe reheating methods. With these tips, you can enjoy a great meal that satisfies. Your cooking can be fun and easy!

If you’re looking for a meal that’s both hearty and savory, you’ve found it! My Ultimate Loaded Potato Meatloaf combines ground beef and turkey with creamy mashed potatoes, making it …

Read more

Categories Dinner
Older posts
Newer posts
← Previous Page1 … Page76 Page77 Page78 … Page85 Next →

TASTED NEST

Where Flavor Finds a Home 🍳🏡 — warm, simple, and crave-worthy recipes made for real life, from stovetop mornings to backyard dinners.

PAGES

Home About Contact Privacy Policy Terms & Conditions Cookie Policy GDPR Policy Copyright Policy Disclaimer

CATEGORIES

Appetizers Desserts Salads Breakfast Dinner

Contact

  • Pinterest
  • Mail
Copyright © 2025 Tasted Nest. All rights reserved.