Skip to content
Tasted Nest
  • Home
  • Appetizers
  • Desserts
  • Salads
  • Breakfast
  • Dinner
  • Privacy Policy
  • Contact
  • About

Chef Tavio

Chocolate Caramel Toffee Crunch Cake Easy Baking Guide

May 23, 2025 by Chef Tavio
To make the Chocolate Caramel Toffee Crunch Cake, gather these items: - 1 ¾ cups all-purpose flour - 1 ½ cups granulated sugar - ½ cup unsweetened cocoa powder - 2 teaspoons baking powder - 1 teaspoon baking soda - ½ teaspoon salt - 2 large eggs - 1 cup buttermilk - ½ cup vegetable oil - 2 teaspoons vanilla extract - 1 cup boiling water - 1 cup chocolate chips, plus extra for topping - 1 cup caramel sauce (store-bought or homemade) - 1 cup toffee bits (store-bought or homemade) - Whipped cream, for serving - Chocolate shavings or additional toffee bits, for garnish Not every ingredient needs to be set in stone. Here are some swaps you can try: - Instead of all-purpose flour, you can use cake flour for a lighter cake. - If you want less sugar, try using coconut sugar or honey. - Replace buttermilk with regular milk mixed with a teaspoon of vinegar for a similar taste. - You can use canola oil in place of vegetable oil. - For a dairy-free option, use almond milk and a dairy-free butter. - If you don’t have toffee bits, crushed cookies or nuts work well too. To ensure your cake turns out perfect: - Use fresh ingredients. Old baking powder or soda can lead to flat cakes. - Measure flour correctly. Spoon it into the cup and level it off. - Allow eggs and buttermilk to reach room temperature for better mixing. - Boil the water before adding it to the batter. This helps the cocoa bloom. - Mix the batter just until combined. Over-mixing can make the cake tough. - Let the cakes cool completely on wire racks before stacking. This prevents sogginess. Following these tips will help you bake a delicious Chocolate Caramel Toffee Crunch Cake. For the full recipe, check the earlier section! Start by preheating your oven to 350°F (175°C). This helps the cake bake evenly. Grab two 9-inch round cake pans. Grease them with butter. Then, lightly dust the pans with flour. This dusting keeps the cakes from sticking, making them easy to remove. In a large mixing bowl, combine these dry ingredients: - 1 ¾ cups all-purpose flour - 1 ½ cups granulated sugar - ½ cup unsweetened cocoa powder - 2 teaspoons baking powder - 1 teaspoon baking soda - ½ teaspoon salt Whisk everything together. You want a smooth, even mixture. This step ensures the cake rises well and has a great texture. Now, add the wet ingredients to your dry mix: - 2 large eggs - 1 cup buttermilk - ½ cup vegetable oil - 2 teaspoons vanilla extract Use an electric mixer to beat the mix on medium speed for about 2 minutes. You want a smooth batter. It should look well-combined. Next, gradually pour in 1 cup of boiling water. Stir gently until the batter is fully mixed. It will be thin, and that’s just right. Next, pour the batter evenly into the two prepared cake pans. Bake them for 30-35 minutes. Stick a toothpick in the center of each cake. If it comes out clean, they are done. Once baked, let them cool in the pans for 10 minutes. Then, move them to wire racks to cool completely. Once the cakes are cool, place one layer on a serving plate. Drizzle half of the caramel sauce over the top. Then, sprinkle half of the toffee bits on it. This makes the first layer tasty and sticky. Place the second cake layer on top. Repeat the process with the remaining caramel sauce and toffee bits. For a fancy touch, you can frost the sides and top with whipped cream. Add extra chocolate shavings or toffee bits for a beautiful finish. Enjoy your Chocolate Caramel Toffee Crunch Cake! For the complete recipe, you can refer to the Full Recipe. To get a great cake texture, mix the dry ingredients well. This helps the baking powder and soda work together. When you add wet ingredients, mix just until combined. Overmixing can lead to a dense cake. Use room temperature eggs and buttermilk for better mixing. Finally, don't skip the boiling water; it makes the batter smooth and helps the cake rise. Let the cakes cool for about 10 minutes in the pans. After that, move them to wire racks. This helps the cakes cool evenly and prevents sogginess. Store any leftover cake in an airtight container. You can keep it at room temperature for a few days or in the fridge for up to a week. If your cake sinks in the middle, it might be undercooked. Always check with a toothpick before removing it from the oven. If the edges burn but the center is raw, lower the oven temperature. For a dry cake, make sure you measure your flour correctly. Use the spoon-and-level method to avoid adding too much flour. For more help, check out the Full Recipe for detailed baking instructions. {{image_4}} You can change the flavor of your Chocolate Caramel Toffee Crunch Cake easily. For a coffee twist, add 1 tablespoon of espresso powder. It enhances the chocolate taste. You can also swap vanilla extract for almond extract. This adds a nutty layer to each bite. Consider adding orange zest for a fresh, citrusy note. This will brighten the rich flavors. Want a healthier take? You can make this cake gluten-free. Just use gluten-free flour instead of all-purpose flour. For a vegan version, replace eggs with flaxseed meal or applesauce. Use almond milk in place of buttermilk and choose a dairy-free caramel sauce. These tweaks will keep the cake delicious and suitable for various diets. Serve your cake with a scoop of vanilla ice cream for a sweet touch. Fresh berries on the side add a nice contrast and color. Drizzle more caramel sauce on top for extra sweetness. You could also pair this cake with a cup of coffee or a rich hot chocolate. Each option enhances the chocolate and toffee flavors beautifully. These variations let you experiment while enjoying this delightful cake. For the complete Chocolate Caramel Toffee Crunch Cake recipe, check the Full Recipe section. To keep your Chocolate Caramel Toffee Crunch Cake fresh, store it in an airtight container. Place the cake at room temperature for up to three days. If you live in a warm area, keep it in the fridge. Always cover the cake with plastic wrap or foil to prevent it from drying out. You can freeze the cake for longer storage. First, let the cake cool completely. Then, slice it into portions. Wrap each slice in plastic wrap, then place them in a freezer bag. This keeps the cake fresh for up to three months. When you want to enjoy a slice, take it out of the freezer and let it thaw in the fridge overnight. For refrigerating, simply store it in an airtight container for up to a week. If your cake has been in the fridge or freezer, you may want to refresh it before serving. To do this, preheat the oven to 350°F (175°C). Place the cake slices on a baking sheet and cover them with foil. Warm them in the oven for about 10 minutes. This will help restore some of that fresh-baked flavor and texture. You can also microwave individual slices for about 15-20 seconds, but be careful not to overheat them. Enjoy your delicious cake! Yes, you can make the cake ahead of time. Bake the cakes and let them cool completely. Then, wrap them in plastic wrap. Store them in the fridge for up to three days. You can also freeze the cakes for up to three months. Just make sure to thaw them before frosting. To check if the cake is done, insert a toothpick into the center. If it comes out clean or with a few moist crumbs, the cake is ready. If it has wet batter on it, bake for a few more minutes and check again. If you don't have buttermilk, you can use regular milk. Just add one tablespoon of lemon juice or vinegar to one cup of milk. Let it sit for five minutes. This mixture will mimic buttermilk's tangy flavor and acidity. Absolutely! Homemade caramel sauce works great in this recipe. It adds a personal touch and can taste even better than store-bought. Just make sure it’s thick enough to drizzle. To prevent sticking, grease the pans well with butter. Then, dust the pans with flour. You can also use parchment paper on the bottom. This will help the cakes slide out easily after baking. This blog post covered all you need for baking a great Chocolate Caramel Toffee Crunch Cake. We listed ingredients, offered substitutes, and shared tips for success. I detailed the step-by-step process for mixing and baking, and even included storage suggestions. Remember, you can play with flavors, and I answered common questions to guide you. With these tools, you can make this cake and enjoy tasty results. Happy baking!

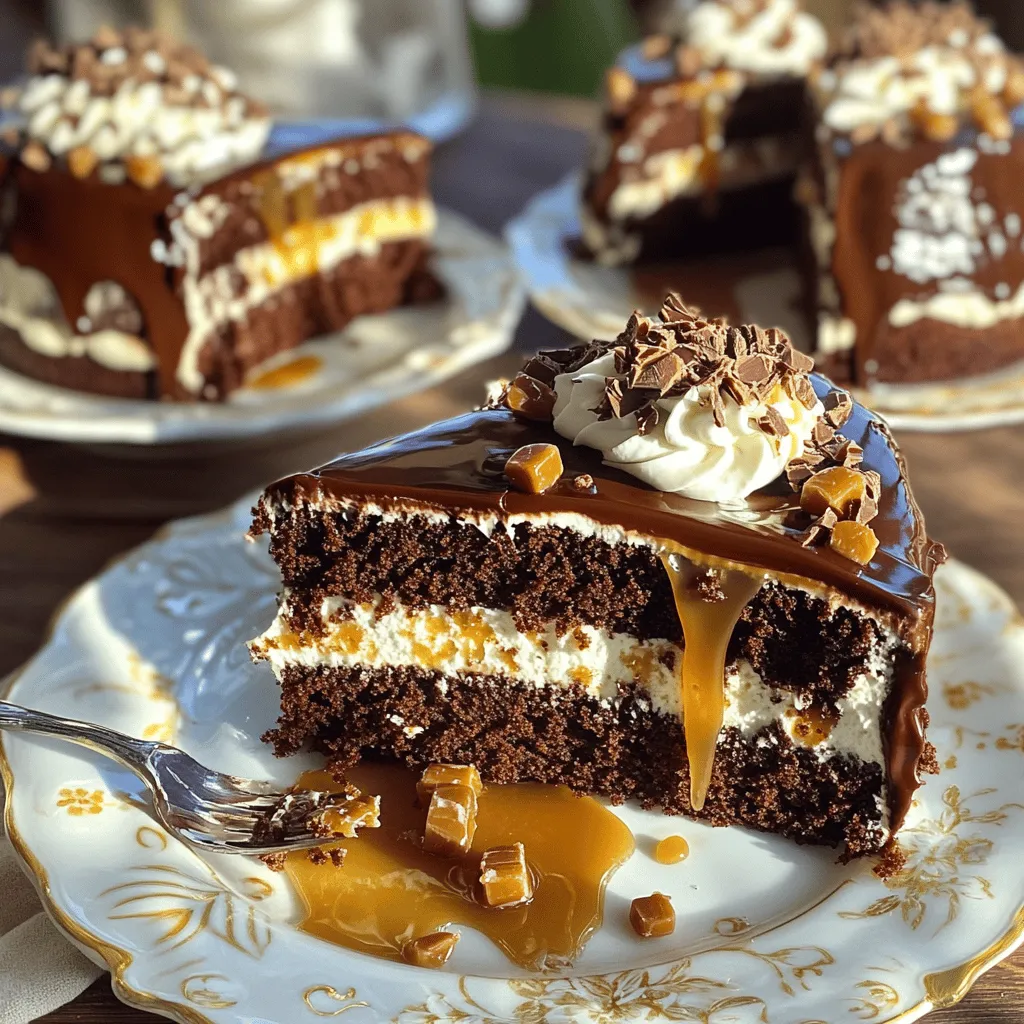
Ready to bake something special? The Chocolate Caramel Toffee Crunch Cake is a treat that will wow your friends and family. In this easy baking guide, I’ll show you how …

Read more

Categories Desserts

Mediterranean Spinach Grilled Cheese Delightful Recipe

May 23, 2025 by Chef Tavio
- 4 slices of whole grain bread - 1 cup fresh spinach, finely chopped - 1/2 cup feta cheese, crumbled - 1/2 cup mozzarella cheese, shredded - 1 small ripe tomato, thinly sliced - 1/4 cup Kalamata olives, pitted and roughly chopped - 2 tablespoons sun-dried tomatoes, finely chopped - 2 tablespoons extra virgin olive oil, divided - 1 teaspoon garlic powder - Salt and freshly ground black pepper to taste When I make Mediterranean Spinach Grilled Cheese, I focus on fresh, vibrant ingredients. Whole grain bread gives a hearty base. I love using fresh spinach for a pop of color and nutrition. Feta cheese adds a salty bite, while mozzarella melts beautifully to create that gooey texture everyone loves. For extra flavor, I include ripe tomatoes, Kalamata olives, and sun-dried tomatoes. Each ingredient brings its own taste to this dish. The olive oil adds richness. To season, I use garlic powder, salt, and pepper. These simple seasonings really enhance the flavors. When you mix all these ingredients together, they create a delightful filling. The combination is not only tasty but also full of nutrients. Check out the Full Recipe for all the steps to create this delicious sandwich! To start, gather your ingredients. In a large mixing bowl, combine: - 1 cup fresh spinach, finely chopped - 1/2 cup feta cheese, crumbled - 1/2 cup mozzarella cheese, shredded - 1 small ripe tomato, thinly sliced - 1/4 cup Kalamata olives, pitted and roughly chopped - 2 tablespoons sun-dried tomatoes, finely chopped Mix everything well. Make sure all the flavors blend together. Now, season your mixture. I like to add garlic powder, salt, and black pepper to taste. This adds a nice kick to your filling. Now, it's time to build your sandwich. Take two slices of whole grain bread. Spread the filling mixture on each slice. Make sure to cover it evenly. Then, place the remaining bread slices on top to create two complete sandwiches. Next, heat your skillet. Pour 1 tablespoon of extra virgin olive oil into a large non-stick skillet. Let it heat over medium heat until it shimmers. Carefully place the sandwiches in the hot skillet. Grill each sandwich for about 3-4 minutes on each side. Look for a nice golden brown color and melted cheese. If they brown too fast, lower the heat. You can add the remaining tablespoon of olive oil when you flip them for a crisp crust. Enjoy the delicious Mediterranean Spinach Grilled Cheese! For the full recipe, check the earlier section. - Optimal skillet temperature: Heat your skillet over medium heat. This helps the bread brown nicely. Too high, and you’ll burn the outside before the inside melts. - Using the right amount of oil: Use about one tablespoon of olive oil per sandwich. This gives a nice crisp crust without being greasy. Add a bit more oil when you flip the sandwiches for an even color. - Tips on achieving gooey cheese: To get that perfect melt, use a mix of cheeses. Feta adds flavor, while mozzarella gives stretch. Cover your skillet with a lid while cooking. This traps heat and helps the cheese melt faster. - Serving suggestions: Cut your grilled cheese in halves or quarters. This makes it easy to share. Arrange the pieces on a rustic wooden board for a homey look. - Garnishing ideas: Add fresh spinach leaves and sliced tomatoes around the sandwiches. For an extra touch, drizzle olive oil in a small dish for dipping. This adds color and makes it look fancy. For detailed steps and measurements, check the Full Recipe. {{image_4}} You can change the cheese in this recipe. Swap feta with goat cheese for a tangy twist. Goat cheese melts well and adds a creamy texture. You can also mix and match cheeses. Try sharp cheddar or creamy brie. Each cheese brings its own flavor and fun to the sandwich. Enhance your grilled cheese with add-ins. Include artichokes or bell peppers for extra flavor. These veggies add crunch and freshness. You can also experiment with herbs. Fresh basil or dill can brighten the taste. Just chop them finely and mix them in. If you're gluten-free, don't worry. You can find great bread alternatives. Look for gluten-free whole grain bread at stores. Many brands offer tasty options that toast well. This way, everyone can enjoy this delicious Mediterranean spinach grilled cheese. For the full recipe, check the complete guide. To keep your Mediterranean Spinach Grilled Cheese fresh, store leftovers in an airtight container. Place the sandwiches in the fridge. They will last for up to three days. Make sure they cool down before sealing the container. Reheat your grilled cheese in a skillet over low heat. This method keeps the bread crispy and the cheese melty. You can also use an oven. Preheat it to 350°F (175°C) and warm the sandwiches for about 10 minutes. To freeze your grilled cheese, wrap each sandwich well in plastic wrap. Then, place them in a freezer bag. They can stay frozen for up to a month. When ready to eat, thaw them in the fridge overnight. Then, reheat as mentioned above. This keeps their taste and texture. For the complete recipe, check the Full Recipe link! You can enjoy this grilled cheese with many tasty sides. Here are some great ideas: - Tomato soup: A classic pairing that balances the flavors. - Side salad: A fresh salad adds crunch and nutrition. - Chips: Crunchy chips offer a fun texture contrast. - Pickles: The tanginess of pickles cuts through the richness of cheese. - Roasted veggies: Flavorful veggies add depth to your meal. These sides enhance the overall experience and make your meal more delightful. Managing heat is key to perfect grilled cheese. Here are some tips: - Use medium heat: Start with medium heat to cook evenly. - Preheat your skillet: This helps the bread toast nicely. - Oil wisely: Use enough oil to prevent sticking but not too much. - Flip carefully: Turn the sandwich gently to avoid burning. - Watch closely: Stay nearby and check often. These steps help you achieve a golden-brown crust without burning. Yes, you can easily make a vegan version! Here are some swaps: - Bread: Ensure your bread is dairy-free. - Cheese: Use vegan cheese or cashew cheese for a creamy texture. - Feta: Consider crumbled tofu with lemon juice for a feta-like taste. - Olive oil: Stick with olive oil; it's already vegan. These changes let you enjoy a delicious Mediterranean Spinach Grilled Cheese that fits your diet. For more details, check the Full Recipe. This blog post detailed how to make a delicious Mediterranean Spinach Grilled Cheese. We covered the key ingredients like whole grain bread, fresh spinach, and flavorful cheeses. I shared simple steps to prepare, assemble, and grill your sandwich to golden perfection. Plus, I provided tips for the best grilling, cheese melting, and serving ideas. Remember, you can customize this sandwich with different cheeses and ingredients. Enjoy making this tasty meal! It’s easy and sure to impress anyone.

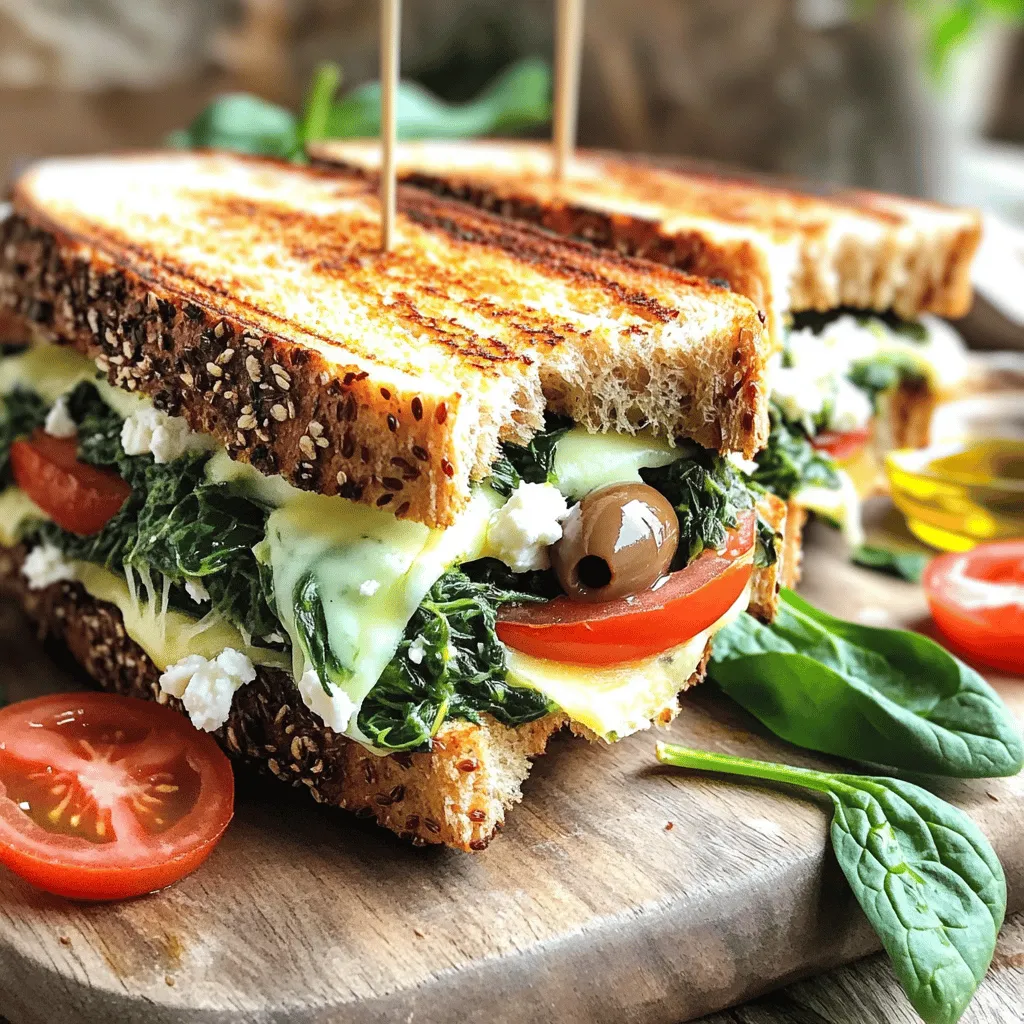
Are you ready to upgrade your grilled cheese game? This Mediterranean Spinach Grilled Cheese recipe combines fresh spinach, creamy feta, and gooey mozzarella. It’s not just a sandwich; it’s a …

Read more

Categories Dinner

Philly Cheesesteak Stuffed Cheesy Breadsticks Delight

May 23, 2025 by Chef Tavio
- 1 package of refrigerated pizza dough - 1 cup cooked steak, thinly sliced (ribeye or your preferred cut) - 1/2 cup bell peppers, diced (a vibrant mix of red and green) - 1/2 cup onion, diced - 1 cup provolone cheese, shredded - 1/2 cup mozzarella cheese, shredded - 2 tablespoons olive oil - 2 teaspoons garlic powder - 1 teaspoon Italian seasoning - Salt and pepper to taste - Marinara sauce for dipping Use fresh ingredients for the best flavor. Choose high-quality steak for a tender bite. I prefer ribeye, but any cut works. Dice bell peppers and onions into small pieces. This helps them cook fast and blend well. When choosing cheese, use a mix of provolone and mozzarella. This combo gives a rich, gooey texture. Don’t skip the olive oil; it adds a nice golden color and flavor. If you want to save time, use leftovers or pre-cooked steak. You can swap out the steak for chicken or turkey. For a veggie version, skip the meat and load up on more peppers and onions. Use any cheese you like; cheddar or Monterey Jack can work well. If you want to cut carbs, use cauliflower crust instead of pizza dough. Start by heating a medium skillet over medium heat. Add 2 tablespoons of olive oil. Once hot, toss in 1/2 cup of diced onion and 1/2 cup of diced bell peppers. Stir them often for about 4-5 minutes. You want them soft and fragrant. Next, add 1 cup of thinly sliced cooked steak to the pan. Mix it well with the veggies. Season the mixture with 2 teaspoons of garlic powder, 1 teaspoon of Italian seasoning, salt, and pepper. Cook for 2-3 more minutes to warm the steak. Remove the skillet from heat. On a lightly floured surface, roll out the pizza dough into a rectangle. Aim for a thickness of about 1/4 inch. Cut the dough into strips, each 3 inches wide. At one end of each strip, place a generous scoop of the steak mixture. Top it with a mix of 1 cup of shredded provolone cheese and 1/2 cup of shredded mozzarella cheese. Carefully roll the dough over the filling to create a stick. Pinch the ends to seal the filling inside. Line a baking sheet with parchment paper. Arrange the stuffed breadsticks on the sheet, leaving space between each one. Brush the tops with more olive oil. Sprinkle garlic powder on top for extra flavor. Preheat your oven to 400°F (200°C). Bake the breadsticks for 12-15 minutes. They should turn golden brown and puff up. Once they are done, take them out and let them cool for a couple of minutes. Enjoy them warm with marinara sauce for dipping. One common mistake is not cooking the vegetables long enough. You want the onions and peppers soft and sweet. If you skip this step, your breadsticks can taste bland. Another mistake is overstuffing the breadsticks. This can lead to a messy bake and spills. Keep the filling generous but not overflowing. Also, remember to seal the edges well. Unsealed breadsticks can burst open while baking. To get that gooey, cheesy center, use a mix of provolone and mozzarella. The provolone adds a rich flavor, while the mozzarella gives that perfect melt. Spread the cheese evenly over the filling. This ensures every bite is cheesy. Don’t forget to brush the tops with olive oil before baking. This step creates a golden and crispy crust. Marinara sauce is a classic choice for these breadsticks. It adds a nice tangy flavor. You can also try ranch dressing for a creamy twist. If you like heat, a spicy aioli works well too. For a fun twist, mix some garlic powder into your dipping sauce. This enhances the garlic flavor in your breadsticks even more. {{image_4}} You can switch up the meat in your breadsticks for fun. Try using cooked chicken or turkey. Both give a lighter taste. You could also use pulled pork for a smoky flavor. If you like bold tastes, thinly sliced lamb works well too. Each meat adds its own twist to the dish. You can make these breadsticks vegetarian by skipping the meat. Use a mix of mushrooms and zucchini for a savory bite. Spinach and artichokes also add great flavor. Just sauté the veggies until soft. Then, follow the same steps as the meat version. You still get a cheesy, tasty treat with this option. Adding spices and herbs can make your breadsticks pop. Try using smoked paprika for a smoky taste. A pinch of cayenne pepper adds some heat. You can also mix in fresh herbs like basil or chives for extra freshness. Don’t forget to add garlic powder for that classic taste. These little changes can make a big difference in flavor. Feel free to explore these ideas and find your favorite version! For the full recipe, check the recipe section above. To keep your leftover breadsticks fresh, place them in an airtight container. You can also wrap them in plastic wrap. Store them at room temperature for up to two days. If you want them to last longer, refrigerate them for up to a week. When you're ready to enjoy your breadsticks again, preheat your oven to 350°F (175°C). Place the breadsticks on a baking sheet and cover them with aluminum foil. Heat for about 10-15 minutes until warmed through. This method keeps them soft and tasty. You can also microwave them for 30 seconds, but they may turn chewy. If you want to freeze your breadsticks, wrap each one in plastic wrap. Then, place them in a freezer bag. They can stay frozen for up to three months. To eat, thaw them overnight in the fridge. Then, reheat them in the oven for that fresh-baked taste. Enjoy every cheesy bite! Philly Cheesesteak Stuffed Cheesy Breadsticks stay fresh for about 3 to 4 days in the fridge. Store them in an airtight container to keep them from drying out. If you want to enjoy them later, freezing is a great option. They can last up to 2 months in the freezer. Yes, you can make these breadsticks ahead of time. Prepare the filling and assemble the breadsticks, then cover and chill them in the fridge. Bake them fresh when you're ready to serve. This way, you can enjoy warm, cheesy goodness without the hassle. Serve Philly Cheesesteak Stuffed Cheesy Breadsticks hot and fresh from the oven. Pair them with marinara sauce for dipping. You can also add some crushed red pepper flakes for an extra kick. For a fun twist, sprinkle fresh herbs like parsley on top before serving. Enjoy this tasty treat with friends or family! To wrap it up, we explored how to make delicious Philly cheesesteak stuffed cheesy breadsticks. You learned about the key ingredients, and how to prep the steak and veggies. I shared tips to avoid common mistakes and suggested tasty pairings. You can also try variations, like different meats or a veggie-only option. Storing and reheating your leftovers is easy too. Enjoy these breadsticks anytime and impress your friends with your cooking skills!

Are you ready for a mouthwatering twist on classic flavors? My Philly Cheesesteak Stuffed Cheesy Breadsticks delight the senses with gooey cheese and savory steak. In this post, I’ll walk …

Read more

Categories Appetizers

Ultimate Breakfast Grilled Cheese Delightful Recipe

May 23, 2025 by Chef Tavio
- 4 slices of sourdough bread - 4 slices of sharp cheddar cheese - 2 slices of crispy cooked turkey bacon (or vegetarian bacon for a meatless option) - 2 large eggs - ½ ripe avocado, thinly sliced - Salt and pepper - Fresh chives - Marinara sauce The main ingredients give this sandwich its tasty flair. Sourdough bread adds a nice crunch. Sharp cheddar cheese melts beautifully and packs flavor. Turkey bacon gives a savory touch. If you prefer, use vegetarian bacon for a lighter bite. Eggs add richness and creaminess. Finally, avocado gives a fresh and creamy finish. For seasoning, a pinch of salt and pepper enhances each layer. Fresh chives add color and a mild onion flavor. Use them for garnish to make the dish pop. If you want to dip your sandwich, marinara sauce is a great option. It adds a tangy twist and pairs well with the cheesy goodness. Check out the Full Recipe for all the details! How do I cook eggs sunny-side up? To cook sunny-side-up eggs, heat a non-stick skillet over medium heat. Crack two eggs into the skillet. Sprinkle a pinch of salt and freshly cracked black pepper on top. Cook for about 3-4 minutes. The egg whites should be set, but the yolks should remain runny. Once done, gently transfer the eggs to a plate and set them aside. How do I prepare crispy turkey bacon? In the same skillet, add the turkey bacon slices. Cook them for about 2-3 minutes on each side. You want them crispy and golden brown. Once cooked, place the bacon on a paper towel. This will absorb any extra grease. How do I butter the bread? Take softened butter and spread it evenly on one side of each sourdough slice. Make sure you cover the entire slice. This helps achieve great crispiness when grilling. How do I layer the ingredients in the skillet? Lower the heat to medium-low and place two slices of sourdough bread in the skillet, buttered-side down. On top of this bread, layer two slices of sharp cheddar cheese. Then, add the crispy turkey bacon. Next, carefully place the sunny-side-up eggs on top. Finally, add the sliced avocado. Top it all off with the remaining two slices of cheddar cheese. What is the grilling technique for perfect crispiness? Gently place the other two slices of bread on top, buttered-side up. Cook the sandwich for about 3-4 minutes until the bottom slice is golden brown. You want the cheese to start melting. How long should I cook each side? After 3-4 minutes, use a spatula to flip the sandwich. Cook the other side for an additional 3-4 minutes. Both sides should be golden brown, and the cheese must be fully melted. Once perfectly grilled, remove the sandwiches from the skillet. Let them cool for a minute, then cut each sandwich in half. Sprinkle finely chopped chives on top for a burst of flavor. For the full recipe, check out the Ultimate Breakfast Grilled Cheese. To get the best melt, use good cheese. Sharp cheddar works great. Make sure to layer the cheese thickly. A good rule is to use two slices per sandwich. This helps the cheese get gooey and delicious. To avoid sogginess, keep your heat at medium-low. If it’s too hot, the bread will burn before the cheese melts. Also, spread the butter evenly on the bread. This creates a nice crisp outside. You can try different cheeses for fun. Monterey Jack, Gouda, or even Brie can add new flavors. If you want something bold, add pepper jack for a kick. Don’t stop at cheese! Try adding fresh spinach or tomatoes. You can also include a dollop of pesto or a sprinkle of hot sauce. These extras make the sandwich unique and exciting. A good non-stick skillet is key. I recommend a heavy-bottomed one. It helps cook evenly and prevents sticking. For utensils, a solid spatula is a must. It should be wide enough to flip the sandwich without losing fillings. A butter knife for spreading and a plate for serving will make your cooking easier. For a full recipe, check out the Ultimate Breakfast Grilled Cheese. {{image_4}} You can easily switch turkey bacon for plant-based options. Many brands now offer tasty alternatives. These choices give you a similar crunch without the meat. You can use veggie bacon or smoked tempeh for a unique flavor. This makes the sandwich perfect for both meat lovers and vegetarians. Adding fruit can take your grilled cheese to the next level. Sliced apples or pears add a nice crunch and sweetness. You can also drizzle some maple syrup on top for extra flavor. This mix of sweet and savory makes each bite exciting and new. If you need a gluten-free option, choose gluten-free bread. This simple swap keeps the taste great while making it suitable for those with gluten sensitivities. Look for hearty gluten-free breads that can hold all the ingredients well. This way, you won’t miss out on flavor or texture. To store your leftover Ultimate Breakfast Grilled Cheese, place it in an airtight container. This keeps it fresh and helps avoid sogginess. Let the sandwich cool to room temperature before sealing it. You can store it in the fridge for up to three days. To reheat your grilled cheese, use a skillet. Heat it over low to medium heat. This keeps the bread crispy while warming the cheese. Cook for about 2-3 minutes per side. If you want to speed things up, use a microwave. Just remember, it may not stay crispy. Yes, you can freeze grilled cheese sandwiches! Wrap each sandwich tightly in plastic wrap, then place them in a freezer bag. They can stay fresh for up to three months. When you're ready to eat, thaw them overnight in the fridge before reheating. Enjoy your delicious creation later! For the best melt, use sharp cheddar cheese. It has a rich taste that pairs well. Other great options include: - Gruyère - Monterey Jack - Fontina These cheeses melt nicely, creating a dreamy texture. You can mix different cheeses for more flavor. Yes, you can make grilled cheese in the oven! It's a great method for cooking multiple sandwiches. Here’s how: 1. Preheat your oven to 375°F (190°C). 2. Assemble your sandwiches on a baking sheet. 3. Bake for about 10 minutes, flipping halfway through. This method gives a crispy texture on both sides without needing to stand by the stove. To avoid burning your grilled cheese, manage your cooking temperature. Keep the heat medium-low. Here are some tips: - Use a non-stick skillet for even cooking. - Butter the bread evenly to promote browning. - Monitor the cooking time closely, about 3-4 minutes per side. These steps help you achieve a golden crust without burning. In this article, we covered how to create the ultimate breakfast grilled cheese. We explored the best ingredients, from sourdough to sharp cheddar, and shared tips for perfecting your sandwich. You learned step-by-step instructions, customization options, and storage tips. Grilled cheese is versatile and fun to make. Experiment with flavors to find your favorite. Enjoy every bite and share your creations with others!

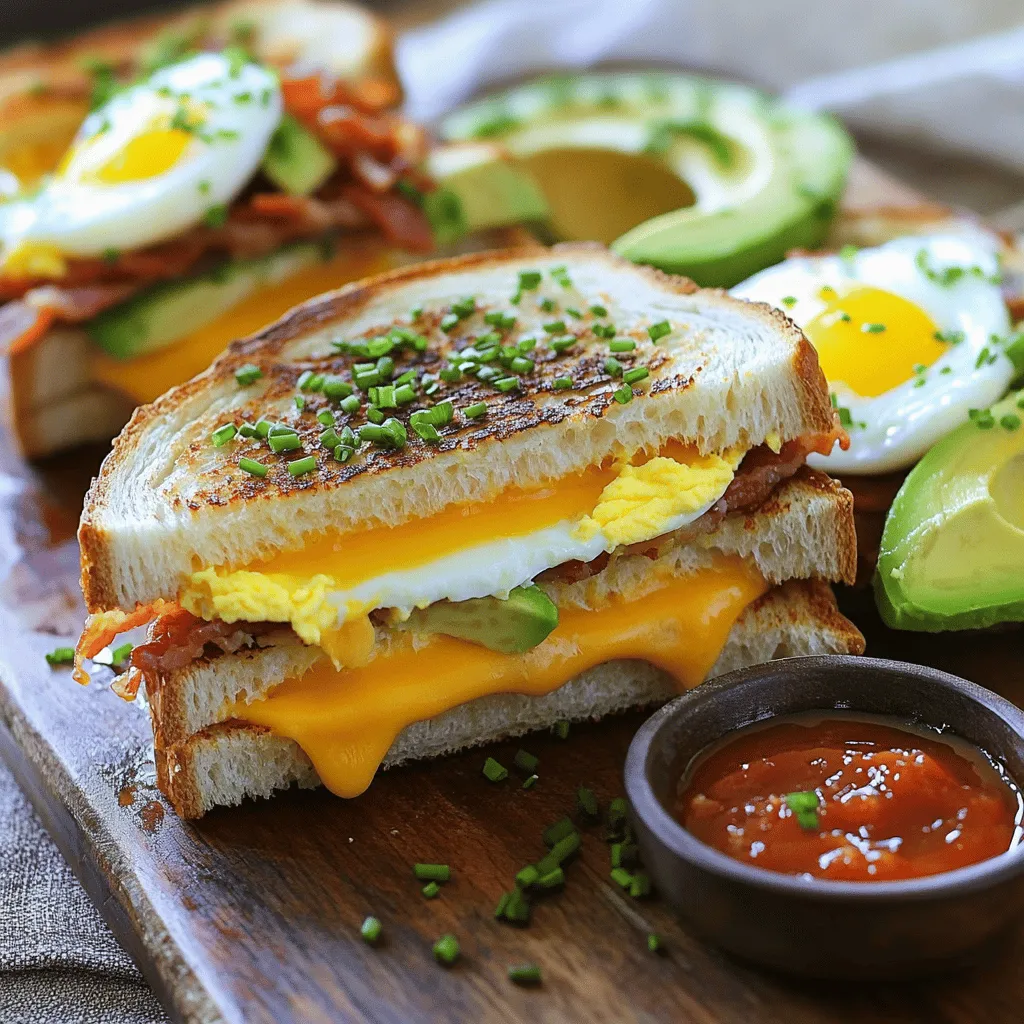
Craving a breakfast that’s both cozy and exciting? Look no further! My Ultimate Breakfast Grilled Cheese brings you layers of deliciousness. With crispy turkey bacon, creamy eggs, and sharp cheddar …

Read more

Categories Breakfast

Brownie Cake Delightful and Rich Dessert Recipe

May 23, 2025 by Chef Tavio
To make the best brownie cake, you need a few simple ingredients. Here’s what you'll need: - 1 cup unsalted butter, melted - 2 cups granulated sugar - 4 large eggs - 1 teaspoon pure vanilla extract - 1 cup all-purpose flour - 1 cup unsweetened cocoa powder - 1 teaspoon baking powder - 1/2 teaspoon salt - 1 cup semi-sweet chocolate chips - 1/2 cup chopped walnuts (optional) These ingredients create a rich and moist brownie cake. Each one plays an important role. For example, the unsalted butter adds creaminess, while the granulated sugar sweetens and helps create a nice crust. If you want to switch things up, consider these options: - Butter: You can use coconut oil or margarine instead. - Sugar: Try brown sugar for a deeper flavor. - Eggs: Use flax eggs or applesauce for a vegan option. - Flour: Almond flour or oat flour works well for gluten-free baking. - Chocolate Chips: Use dark chocolate or even white chocolate for a twist. Feel free to mix and match these ingredients to suit your taste. This flexibility helps you cater to different diets and preferences while still keeping that great brownie cake flavor. For the complete recipe, check the Full Recipe. 1. Preheat the Oven and Prepare the Pan Start by preheating your oven to 350°F (175°C). Grab a 9x13 inch baking pan. Grease it with butter or line it with parchment paper. Lining makes it easier to lift out the brownie cake later. 2. Mix the Wet Ingredients In a large mixing bowl, combine 1 cup of melted unsalted butter and 2 cups of granulated sugar. Use a whisk to mix them until smooth. Then add 4 large eggs, one at a time. Mix well after each addition. Finally, stir in 1 teaspoon of pure vanilla extract. 3. Combine the Dry Ingredients In a separate bowl, whisk together 1 cup of all-purpose flour, 1 cup of unsweetened cocoa powder, 1 teaspoon of baking powder, and 1/2 teaspoon of salt. This step ensures even distribution of dry ingredients. 4. Mix Wet and Dry Ingredients Gradually add the dry mix to the wet mix. Stir gently until just combined. Be careful not to over-mix. Over-mixing can make the cake dense. 5. Add Chocolate Chips and Nuts Carefully fold in 1 cup of semi-sweet chocolate chips and, if you like, 1/2 cup of chopped walnuts. Make sure they are mixed in without overworking the batter. 6. Pour and Spread the Batter Pour the brownie batter into the prepared baking pan. Use a spatula to spread it evenly across the surface. 7. Bake the Cake Place the pan in the preheated oven. Bake for 30-35 minutes. To check if it’s done, insert a toothpick into the center. It should come out with a few moist crumbs, not wet batter. 8. Cool the Brownie Cake Once baked, take the brownie cake out of the oven. Let it cool in the pan for at least 20 minutes. After that, transfer it to a wire rack to cool completely. 9. Slice for Serving After cooling, slice the brownie cake into squares or rectangles. For an extra treat, dust with powdered sugar or serve with creamy vanilla ice cream. For the full list of ingredients and details, check the Full Recipe. To achieve the perfect fudgy texture, use room temperature eggs. This helps them blend well. Melt your butter completely for a smooth batter. Be careful not to over-mix the batter; just combine ingredients until they are mixed. This keeps your cake soft and moist. Common mistakes to avoid include not measuring ingredients accurately. Use proper measuring cups for dry and wet ingredients. Also, remember to preheat your oven. A hot oven gives the best rise and texture. To check doneness, insert a toothpick into the center of the cake. If it comes out with a few moist crumbs, your cake is ready. Avoid overbaking, as this leads to a dry brownie cake. For garnishing, dust your brownie cake with powdered sugar for a sweet touch. You can also add fresh berries or mint to make it pop. Serve your brownie squares on a nice platter to impress your guests. Pair your brownie cake with a scoop of creamy vanilla ice cream. The cold ice cream contrasts well with the warm cake. You can also serve it with a glass of cold milk or coffee for a lovely treat. Enjoy! {{image_4}} You can easily change the flavor of your brownie cake. Start by adding flavor extracts. Vanilla, almond, or mint extracts can boost taste. Just a teaspoon makes a big difference. You can also use spices like cinnamon or espresso powder. These add warmth and depth to the cake. Another fun option is to mix different types of chocolate. You can choose from milk, dark, or white chocolate. Each type brings its own unique flavor. Dark chocolate gives a rich taste, while milk chocolate makes it sweet. White chocolate adds a creamy touch. Try using a mix for a complex flavor. You can make your brownie cake even better with filling and toppings. Layering with frosting or ganache adds a smooth finish. A simple chocolate ganache is easy to make. Just heat cream and pour it over chopped chocolate. Let it sit, then stir until smooth. You can also add fruits, nuts, or candies for texture. Fresh raspberries or strawberries can brighten up the dish. Chopped nuts like pecans or almonds add crunch. For a fun twist, sprinkle some candy pieces on top. These add sweetness and color to your dessert. For the full recipe, check out the Chocolate Delight Brownie Cake section above. To keep your brownie cake fresh, store it in an airtight container. This helps prevent it from drying out. You can also wrap it tightly in plastic wrap. This is a great option if you don't have a container. For longer storage, you can freeze it. Cut the cake into squares before freezing. Wrap each piece in plastic wrap, then place them in a freezer bag. This keeps them fresh for up to three months. When you're ready to enjoy, just take out as many pieces as you want. To reheat the brownie cake, use the oven for the best results. Preheat your oven to 350°F (175°C). Place the brownie cake on a baking sheet. Cover it with aluminum foil to keep moisture in. Heat for about 10-15 minutes. You want it warm, not hot. If you have frozen pieces, let them thaw in the fridge overnight. After thawing, reheat them as mentioned above. This way, you enjoy a warm and delicious brownie cake every time. For the Full Recipe, check out the earlier sections. What is the difference between brownie cake and regular brownies? Brownie cake is thicker and fluffier than regular brownies. It has a cake-like texture but still tastes rich and chocolatey. Regular brownies are denser and more fudgy. Can I make this brownie cake gluten-free? Yes, you can! Use a gluten-free flour blend in place of all-purpose flour. This swap keeps the texture nice and light. How long will the brownie cake last at room temperature? The brownie cake can last about 3 to 4 days at room temperature. Keep it in an airtight container to stay fresh. Can I add extra ingredients like peanut butter or caramel? Absolutely! Adding peanut butter or caramel can boost flavor. Swirl them into the batter before baking for a fun twist. What to do if the brownie cake comes out too dry? If your brownie cake is dry, try adding a bit of melted butter or a splash of milk. This can help restore moisture. How to fix a brownie cake that didn't rise properly? If your brownie cake didn't rise, it may need more baking powder. Always check the freshness of your baking powder before using it. This blog post covered all you need for a perfect brownie cake. We discussed key ingredients, step-by-step baking instructions, and helpful tips to avoid mistakes. I shared variations for unique flavors and toppings that can make your cake stand out. Plus, we explored storage tips for lasting freshness. In the end, it’s all about enjoying the process. Baking should be fun and rewarding. With these ideas, you can create a delicious treat that everyone will love. Happy baking!

Craving a dessert that’s both rich and delightful? You’re in the right place! This Brownie Cake recipe blends fudgy goodness with a simple step-by-step guide. With just a few ingredients, …

Read more

Categories Desserts

Fried Chicken Street Corn Tacos Flavorful and Fun

May 23, 2025 by Chef Tavio
To make Fried Chicken Street Corn Tacos, you need the following ingredients: - 1 lb boneless, skinless chicken thighs - 1 cup buttermilk - 1 cup all-purpose flour - 1 teaspoon paprika - 1 teaspoon garlic powder - 1/2 teaspoon cayenne pepper (adjust to taste) - Salt and pepper to taste - Vegetable oil for frying - 4 small corn or flour tortillas - 2 cups corn kernels (fresh, canned, or frozen) - 1/2 cup cotija cheese, crumbled - 1/4 cup mayonnaise - 1 tablespoon fresh lime juice - 1 tablespoon chopped fresh cilantro - 1/2 teaspoon chili powder If you want to change things up, here are some great substitutions: - Use chicken breasts instead of thighs for lighter meat. - Swap buttermilk for yogurt if you don’t have buttermilk. - Try cornmeal instead of flour for a crunchier coating. - Use feta cheese if you can’t find cotija. - Replace mayonnaise with Greek yogurt for a healthier option. When you pick your ingredients, keep these tips in mind: - Choose fresh chicken thighs for better flavor and texture. - Look for buttermilk with a good expiration date for freshness. - Select corn kernels that are bright and firm for the best taste. - Pick ripe limes; they should feel heavy for their size. - Buy high-quality spices; they make a big difference in flavor. I hope this helps you create amazing Fried Chicken Street Corn Tacos! For the complete details, check the Full Recipe. To start, place your boneless chicken thighs in a bowl. Pour in the buttermilk. Make sure to coat every piece well. Add salt and pepper to taste. Cover the bowl with plastic wrap. Let it chill in the fridge. One hour is good, but overnight works best for flavor. Next, grab a shallow dish. Mix the flour, paprika, garlic powder, and cayenne pepper. Add a pinch of salt and pepper. Stir this well to blend the spices evenly. This mix will give your chicken a tasty crust. Now it’s time to fry! Heat vegetable oil in a large skillet. You need about half an inch of oil. Wait until it shimmers. This means it’s hot enough. Take the marinated chicken out of the buttermilk. Let the excess drip off. Dredge each piece in the flour mix. Make sure it’s well coated. Carefully place the chicken in the hot oil. Fry for about five to seven minutes per side. You want it golden brown and cooked through. The inside should reach 165°F. Once done, move the chicken to a paper towel-lined plate to drain extra oil. For the street corn, use another skillet. Combine corn kernels, mayonnaise, lime juice, cilantro, and chili powder. Cook this over medium heat for about three to four minutes. Stir often until it’s warm. Add half of the cotija cheese and mix well. Now, warm your tortillas in a skillet or microwave. Slice the fried chicken into strips. Place these on each tortilla. Spoon the warm street corn on top. Finish with the rest of the cotija cheese. Enjoy your Fried Chicken Street Corn Tacos! For more detailed steps, check the Full Recipe. Frying chicken can be tricky, but with the right steps, you’ll get it right. Start by using skinless, boneless chicken thighs. They stay juicy and tender. Marinate them in buttermilk to add flavor and moisture. The longer you marinate, the better it tastes. Aim for at least one hour. Heat oil in your skillet until it shimmers. Use enough oil to cover half the chicken. This helps fry the chicken evenly. Test the oil by dropping a bit of flour in it. If it sizzles, you’re ready to fry. Cook each piece for about 5-7 minutes on each side. This gives you a golden brown crust. Street corn is all about bold flavors. Mix corn with mayonnaise for creaminess. Lime juice adds a zesty kick. Fresh cilantro brings a burst of freshness. Don't forget the cotija cheese for a salty punch! When cooking the corn, only warm it for 3-4 minutes. This keeps it sweet and crunchy. Stir in half the cotija cheese while cooking, then sprinkle the rest on top when assembling your tacos. Tacos are all about presentation and fun. Warm your tortillas for a soft, pliable base. Place a few strips of fried chicken on top. Spoon a generous amount of street corn over the chicken. For extra flair, sprinkle more cotija cheese on top. Garnish with chopped cilantro and serve with lime wedges. They add a nice touch and enhance the flavor. Enjoy your delicious Fried Chicken Street Corn Tacos with friends or family! For the Full Recipe, visit the link provided. {{image_4}} You can make Fried Chicken Street Corn Tacos lighter. Use baked chicken instead of fried. Coat the chicken with whole wheat flour for more fiber. You can also swap the mayonnaise for Greek yogurt. This change adds protein and reduces fat. Use corn tortillas instead of flour for fewer calories. These swaps keep the tacos tasty and satisfying. For a veggie twist, replace the chicken with grilled corn or mushrooms. Roasted cauliflower adds a nice bite too. Use the same spices to keep the flavor strong. You can still prepare the street corn mix as usual. This mix pairs well with any vegetarian filling. You’ll have a fresh and fun meal without meat. If you like heat, add more cayenne pepper or hot sauce to the chicken. You can also mix jalapeños into the street corn. Try using spicy cheese, like pepper jack, for a kick. For extra crunch, add pickled onions or sliced radishes on top. These additions make your tacos exciting and packed with flavor. After making Fried Chicken Street Corn Tacos, let leftovers cool to room temperature. Place the tacos in an airtight container. Keep them in the fridge for up to 3 days. If you want to store the chicken and corn separately, that works too. Just make sure to seal them well. To reheat, I suggest using an oven. Preheat it to 350°F. Place the tacos on a baking sheet and cover with foil. Heat for about 10-15 minutes. This keeps the tortillas soft and the filling warm. You can also use a microwave. Just be careful not to make the tortillas too chewy. Heat for 30 seconds at a time until hot. You can freeze the fried chicken and street corn. Wrap each piece of chicken in plastic wrap, then place in a freezer bag. The corn can go in a separate bag. Freeze for up to 3 months. When ready to eat, thaw overnight in the fridge. Reheat as mentioned earlier for a tasty meal again. To get crispy fried chicken, start with well-marinated chicken. The buttermilk helps. Then, coat the chicken in the seasoned flour mix. Fry the chicken in hot oil, about 350°F. Avoid crowding the pan, as this lowers the oil temperature. Fry each piece until golden brown. Drain cooked chicken on paper towels to remove excess oil. This helps keep the crust crispy. Yes, you can use chicken breasts. They will work fine, but thighs are juicier. Breasts can dry out if overcooked. If using breasts, cut them into strips or pieces. Adjust the cooking time to ensure they stay moist and tender. These tacos pair well with a fresh salad or guacamole. You could also add salsas for extra flavor. For drinks, consider a light beer or a refreshing limeade. These sides enhance the meal and balance the rich flavors of the tacos. To make these tasty Fried Chicken Street Corn Tacos, check the Full Recipe for all the details. You’ll find step-by-step instructions to guide you through the cooking process and ensure your tacos turn out perfect. This post covered key steps to create delicious Fried Chicken Street Corn Tacos. We explored ingredient choices, cooking methods, and tips for the perfect fry. Remember, quality ingredients make a big difference. Try the variations for healthier or vegetarian options. Storing leftovers lets you enjoy this meal later. You now have all the tools to impress your friends and taste buds. Enjoy every bite and keep experimenting in the kitchen!

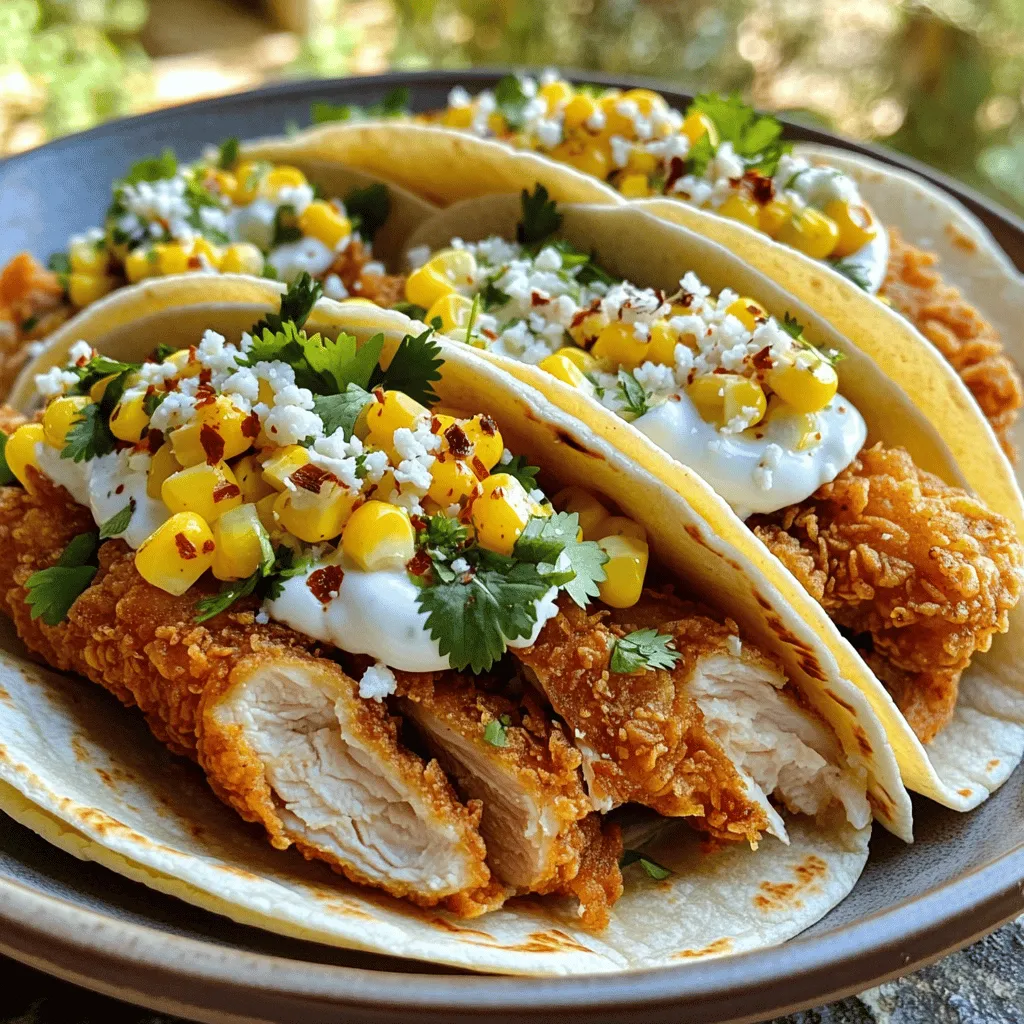
Get ready to spice up your taco night with Fried Chicken Street Corn Tacos! These tasty treats combine crispy fried chicken and sweet, zesty corn in a fun and flavorful …

Read more

Categories Dinner

Louisiana Voodoo Fries Irresistibly Flavorful Delight

May 23, 2025 by Chef Tavio
Here’s what you need to make Louisiana Voodoo Fries. This dish is a spicy, cheesy treat. Gather these items: - 4 large russet potatoes - 1 teaspoon smoked paprika - 1 teaspoon cayenne pepper - 1 teaspoon garlic powder - 1 teaspoon onion powder - ½ teaspoon salt - ½ teaspoon freshly ground black pepper - 2 tablespoons vegetable oil - 1 cup sharp shredded cheddar cheese - ¼ cup thinly sliced green onions - ½ cup sour cream - 2 tablespoons your favorite hot sauce (e.g., Tabasco) - ¼ cup cooked and crumbled jalapeño cornbread (optional) Using these ingredients, you’ll create a dish bursting with flavor. The russet potatoes give the fries their perfect texture. The spices add heat and depth. The cheese melts beautifully, making every bite heavenly. The sour cream cools down the spice, while the green onions add a fresh crunch. And if you want to take it further, sprinkle on some jalapeño cornbread for an extra twist. For the full recipe, check out the detailed instructions. Enjoy cooking! - Preheat your oven to 425°F (220°C). This heat helps make the fries crispy. - Rinse the russet potatoes under cold water to clean them. Scrub off any dirt. Slice them into fries that are about 1/4-inch thick. This size helps them cook evenly. - In a large bowl, mix the sliced fries with vegetable oil, smoked paprika, cayenne pepper, garlic powder, onion powder, salt, and black pepper. Make sure all the fries are coated well with the spices. - Line a baking sheet with parchment paper. Spread the fries in a single layer on the sheet, leaving space between each fry. This helps them get crispy. - Bake the fries for 30-35 minutes. Flip them halfway through to brown both sides. They should be golden brown and crispy when done. - Once the fries are done, take them out and sprinkle the shredded cheddar cheese on top. Return them to the oven for 5 more minutes. This melts the cheese nicely. - Drizzle your favorite hot sauce over the hot, cheesy fries for extra flavor. - Garnish with thinly sliced green onions for a fresh touch. If you want more texture, add crumbled jalapeño cornbread on top. - Serve the fries hot with sour cream on the side for dipping. The cool cream balances the heat perfectly. [Full Recipe] Choosing the right potatoes is key. I recommend large russet potatoes for their starch content. This starch helps fries get crispy. Avoid waxy potatoes, as they tend to get soggy. To prevent sogginess, make sure to space out the fries on the baking sheet. This allows hot air to circulate, promoting even cooking. Flipping the fries halfway through the baking time keeps them crispy all around. To take your Louisiana Voodoo Fries to the next level, consider adding more spices. A pinch of cumin or chili powder can give extra depth. For a fun twist, try topping them with crispy bacon or diced jalapeños. Cheese can also be varied. Instead of cheddar, you could use pepper jack for a spicy kick or mozzarella for a milder taste. Both melt well and add richness. When serving, a large platter works great. Arrange the fries in a mound and sprinkle toppings on top. This creates a colorful and inviting look. For gatherings, consider using creative serving platters. A cast iron skillet adds a rustic touch. You can also serve sour cream in a small bowl in the center, surrounded by fries for easy dipping. These tips will guide you to make your Louisiana Voodoo Fries even more delightful. Enjoy your cooking adventure! For the complete recipe, check out the Full Recipe. {{image_4}} You can change the heat level of Louisiana Voodoo Fries. If you like it spicy, add more cayenne. For a milder taste, use less. Hot sauce also adds flavor. You can try different hot sauces like sriracha or chipotle. Each sauce gives a unique kick. If you want a vegan option, substitute cheese with a plant-based version. You can also use vegan sour cream. For gluten-free fries, check your seasoning and toppings. Use gluten-free hot sauce and cornbread. This way, everyone can enjoy the dish. Many cuisines inspire Louisiana Voodoo Fries. You might add some Creole seasoning for a local touch. Try using unique ingredients like andouille sausage or crawfish. These add great flavors and textures. Explore different herbs and spices to personalize your fries. To keep your Louisiana Voodoo Fries fresh, store them in an airtight container. Allow the fries to cool completely before sealing. This method helps avoid sogginess. You can keep them in the fridge for up to three days. If you want to eat them later, do not add the cheese or toppings until you reheat. When reheating, the oven is best. Preheat it to 400°F (200°C). Spread the fries on a baking sheet and heat for about 10-15 minutes. This method keeps them crispy. If you're in a hurry, you can use a microwave. However, be careful. Microwaving can make the fries soggy. To keep them crispy, place a paper towel under the fries while heating. Enjoy your Louisiana Voodoo Fries just like they were fresh from the oven! Louisiana Voodoo Fries are a tasty dish full of flavors. They combine crispy fries with spicy seasonings and gooey cheese. This dish comes from Louisiana, a place known for its rich food culture. You can taste hints of Cajun and Creole spices that make it special. Many people enjoy it as a side dish or a snack. The mix of textures and flavors in every bite creates a fun eating experience. You can find Louisiana Voodoo Fries at many local restaurants and food trucks. Some places might serve them as a unique appetizer. Look for spots that focus on Cajun or Southern cuisine. Food festivals and markets often feature stalls with these fries. If you’re in Louisiana, you’ll find them on many menus. Ask your friends or check online for the best spots nearby. Yes, you can prepare Louisiana Voodoo Fries ahead of time. Cook the fries and let them cool before storing. Place them in an airtight container in the fridge. They stay fresh for up to three days. Reheat them in the oven for the best crispiness. Avoid the microwave as it can make them soggy. This way, you can enjoy a quick snack or side dish anytime. You can customize Louisiana Voodoo Fries in many ways. Try adding different toppings like jalapeños, bacon, or even avocado. Change up the cheese type for a unique twist. You can also adjust the spice level by using milder or hotter sauces. Experiment with herbs and spices to find your perfect mix. Making it your own adds to the fun of this dish. Louisiana Voodoo Fries blend crispy potatoes with rich flavors. You learned how to prep potatoes, season them, and bake until perfect. We explored various topping ideas and tasty twists to personalize your dish. Don’t forget the storage tips for leftovers. Experiment with the spices and toppings that excite you. Enjoy these fries at home or share them with friends. Embrace the fun of cooking while you enjoy delicious food made just for you.

Are you ready to spice up your snack game? Louisiana Voodoo Fries are a tantalizing treat that combine crispy, seasoned potatoes with gooey cheese and zesty toppings. This dish brings …

Read more

Categories Appetizers

Garlic Butter Honey BBQ Beef Tacos Tasty and Simple Recipe

May 23, 2025 by Chef Tavio
- 1 lb ground beef - 4 cloves garlic, minced - 3 tablespoons unsalted butter - 1/4 cup honey - 1/2 cup BBQ sauce - 1 teaspoon smoked paprika - 1 teaspoon chili powder - Salt and pepper to taste - 8 small taco tortillas - 1 cup shredded lettuce - 1 cup diced tomatoes - 1/2 cup shredded cheddar cheese - Fresh cilantro for garnish - Lime wedges for serving Gather these ingredients before you start cooking. Quality ground beef makes a big difference in flavor. I like to use fresh garlic because it adds a nice punch. Unsalted butter gives you more control over the salt levels in your dish. Honey balances the savory flavors and adds a hint of sweetness. For the BBQ sauce, feel free to select your favorite brand. Smoked paprika and chili powder enhance the taste with warmth and depth. Fresh toppings, like lettuce and tomatoes, provide crispness and freshness. Shredded cheese adds creaminess, while cilantro and lime give a burst of flavor. This recipe is not just tasty; it’s simple and fun to make. The mix of flavors will make your tacos unforgettable. You can find the full recipe to guide you through the steps. - First, melt 3 tablespoons of unsalted butter in a large skillet over medium heat. - Once the butter is melted, add 4 cloves of minced garlic. Sauté for 1-2 minutes until fragrant, but do not let it brown. - Next, add 1 pound of ground beef to the skillet. Season it with 1 teaspoon of smoked paprika, 1 teaspoon of chili powder, salt, and pepper. - Cook the beef for about 5-7 minutes. Stir it often and break it into small pieces. You want it browned and fully cooked. - After the beef is cooked, reduce the heat to low. - Stir in 1/4 cup of honey and 1/2 cup of your favorite BBQ sauce. Make sure the beef is well coated. - Let this mixture simmer for 2-3 minutes. This helps all the flavors blend together nicely. - While your beef is simmering, warm 8 small taco tortillas in another skillet or the microwave. Make them soft and pliable. - Now, take a tortilla and add a scoop of the honey BBQ beef mixture. - Top it with shredded lettuce, diced tomatoes, and shredded cheddar cheese. - To finish, sprinkle fresh cilantro on top and add a squeeze of lime juice for extra flavor. For the complete recipe, check out the [Full Recipe]. How to avoid overcooking garlic To keep garlic from burning, cook it on medium heat. Add the minced garlic after the butter melts. Stir it often for 1-2 minutes. You want it fragrant, not brown. Burned garlic tastes bitter, which is not what you want. Best practices for browning ground beef Start with a hot skillet. This helps the beef brown nicely. Break the beef apart with a spatula. Cook it for about 5-7 minutes, stirring often. Look for a rich, brown color. This step builds flavor in your tacos. Suggestions for BBQ sauce types Choose a BBQ sauce that fits your taste. Sweet sauces work well with honey. If you like a kick, try spicy BBQ sauces. You can even mix different sauces for unique flavors. Experiment to find your perfect blend! Adding extra spices for more depth Spices can enhance your beef's flavor. Consider adding cumin or cayenne for warmth. You might also try onion powder for a savory note. Just a pinch can make a big difference. Taste as you go to find your balance. Ways to arrange tacos on a platter For a fun look, arrange tacos in a circle. This makes it easy for guests to grab one. Use a colorful platter to make the meal pop. Don’t forget to add lime wedges around the tacos for extra flair. Creative serving suggestions Serve each taco with a side of extra BBQ sauce. This lets everyone add their favorite amount. You can also offer toppings like avocado or jalapeños. This way, guests can customize their tacos. Enjoy your delicious creations! For the complete recipe, check the Full Recipe section. {{image_4}} You can switch up the meat in these tacos. Ground turkey or chicken works great. They give you a lighter option while keeping the taste. If you want a vegetarian style, try beans or tofu. Black beans add protein and flavor. Tofu absorbs the garlic and BBQ sauce well. Feel free to play with BBQ sauce flavors. A sweet and smoky sauce can add depth. You can also try spicy sauces for a kick. Adding jalapeños can spice things up even more. Just slice them thin and mix them in. Your tacos will have a fun surprise! If you need gluten-free options, look for corn tortillas. They hold the beef mixture nicely. For a low-carb choice, use lettuce wraps instead. They are fresh and crunchy. You can still enjoy the same tasty filling without the carbs. Tacos can be flexible for everyone! For the full recipe, check out the Garlic Butter Honey BBQ Beef Tacos. To keep your Garlic Butter Honey BBQ Beef Tacos fresh, store them properly. First, place any leftover tacos in a sealed container. Refrigerate them within two hours of cooking. This helps avoid bacteria growth. If you have extra beef mixture, store it in a different container. This keeps the texture of the tacos nice. Reheating tacos can be tricky. To keep your tacos from getting soggy, try these methods. You can warm them in the oven at 350°F for about 10 minutes. If you prefer the microwave, heat them for 30 seconds at a time. Check often to avoid overcooking. For the beef mixture, use a skillet over low heat. Stir it often until it warms up. Yes, you can freeze the beef mixture! Just let it cool first. Then, place it in an airtight container. This will keep it fresh for up to three months. When you’re ready to use it, thaw it in the fridge overnight. To freeze tacos, wrap each one in foil. Thaw them in the fridge before reheating. This keeps them tasty and safe. For the full recipe, check the details above! To make these tacos, start by melting butter in a skillet. Add minced garlic and cook it briefly. Then, add ground beef and season it. Cook until it’s browned. Mix in honey and BBQ sauce. Let it simmer for a few minutes. Warm your tortillas and fill them with the beef mix. Top with lettuce, tomatoes, and cheese. Garnish with cilantro and lime juice. For the full recipe, check out the detailed instructions above. Yes, you can swap beef for other meats. Ground turkey or chicken works well. For a vegetarian option, try black beans or tofu. These alternatives keep the flavor tasty and fun. Just adjust cooking times based on the meat you choose. These tacos pair nicely with several sides. Consider serving them with fresh guacamole or corn salsa. Chips and a tangy dip also make a great snack. For drinks, try a light beer or a refreshing lemonade. These choices enhance the taco experience. Making these tacos is quick and easy. Prep time is about 10 minutes. Cooking takes around 15 minutes. In total, you’ll spend about 25 minutes from start to finish. Perfect for a busy weeknight meal! In this article, we explored how to make Garlic Butter Honey BBQ Beef Tacos. We covered the main ingredients, including ground beef, garlic, and honey. You learned step-by-step instructions for preparing the beef and assembling the tacos. I shared tips to enhance flavor and gave options for variations. Whether you cook for one or many, these tacos are easy and tasty. Embrace these ideas and make your next meal fun and delicious. Enjoy your cooking adventure!

Are you ready to elevate taco night? These Garlic Butter Honey BBQ Beef Tacos combine juicy beef, sweet honey, and rich garlic butter for a flavor explosion. This simple recipe …

Read more

Categories Dinner

Peach Cobbler Cinnamon Rolls Delightful Dessert Treat

May 22, 2025 by Chef Tavio
To make peach cobbler cinnamon rolls, gather these main items: - 2 cups all-purpose flour - 1 cup diced fresh or canned peaches (drained if using canned) - ½ cup packed brown sugar - 2 teaspoons ground cinnamon - ½ cup granulated sugar - 1 teaspoon baking powder - ½ teaspoon baking soda - ½ teaspoon salt - ⅓ cup unsalted butter, melted - 1 large egg - ½ cup milk - 1 teaspoon vanilla extract - 1 cup powdered sugar (for the frosting) - 1-2 tablespoons milk (to adjust frosting consistency) These ingredients create a soft dough with sweet peach flavor. The blend of spices adds warmth and richness. You can add extra flavors to customize your rolls. Consider these options: - Chopped nuts (like pecans or walnuts) for crunch - A dash of nutmeg for warmth - A splash of almond extract for a nutty note - Fresh herbs like mint for a light touch - A sprinkle of sea salt on the frosting for contrast These options can elevate your rolls and make them special. If you have dietary needs, you can make easy swaps: - Use gluten-free flour instead of all-purpose flour for a gluten-free option. - Swap the egg for a flax egg (1 tablespoon ground flaxseed mixed with 2.5 tablespoons water) for a vegan choice. - Replace milk with almond milk or oat milk for a dairy-free alternative. These substitutions allow everyone to enjoy these tasty rolls, no matter their diet. For the full recipe, check the earlier section. First, let's get the oven ready. Preheat it to 375°F (190°C). While that heats up, grab your 9x13-inch baking dish. Lightly grease it with butter or line it with parchment paper. This step helps the rolls come out easily after baking. In a large bowl, mix the all-purpose flour, baking powder, baking soda, and salt. In another bowl, whisk together the melted butter, granulated sugar, egg, milk, and vanilla extract. Pour the wet mix into the dry mix. Stir until it becomes a soft dough. This dough is key to your rolls! Now for the filling! In a small bowl, combine the packed brown sugar and ground cinnamon. Brush a thin layer of melted butter over your rolled-out dough. Next, sprinkle the cinnamon-brown sugar mix evenly across the dough. Finally, add the diced peaches on top. Spread them out so every roll gets peachy goodness. Start from one long edge of the rectangle and roll the dough into a log. Make sure it’s nice and tight. Use a sharp knife to cut the log into 1-inch thick pieces. Place the rolls in your baking dish, leaving space for them to rise. Bake for 20-25 minutes, until golden brown. Use a toothpick to check if they’re done; it should come out clean. While your rolls are baking, whisk together the powdered sugar and 1 to 2 tablespoons of milk in a bowl. You want it smooth and pourable. If it’s too thick, add a bit more milk. After baking, wait for about 5 minutes. Drizzle the frosting over the warm rolls. The frosting will soak in a bit, adding sweetness to each bite. Enjoy these Peach Cobbler Cinnamon Rolls warm for the best taste! For the full recipe, check out the details! To get the best dough, you need the right texture. Start with your flour. Measure it correctly, using the spoon and level method. Avoid packing the flour. When mixing, combine the dry and wet ingredients gently. The dough should feel soft and slightly sticky. If it’s too dry, add a little milk. If it's too wet, sprinkle a bit of flour. This balance is key to great rolls. Even baking makes all the difference. Make sure your oven is fully preheated before placing the rolls inside. This step helps them rise and bake evenly. Arrange the rolls in the baking dish with space in between. This space allows hot air to flow around them. Rotate the dish halfway through baking for even heat. You can check doneness by using a toothpick. It should come out clean when they are ready. Adding flavor can make your cinnamon rolls extra special. Consider adding a pinch of nutmeg to the cinnamon-brown sugar filling. This can give a warm, spicy edge. You can also toss in some chopped nuts or caramel for added texture. A splash of almond extract in the dough can deepen the taste. These small changes make a big impact, enhancing your Peach Cobbler Cinnamon Rolls. For the full recipe, check back to ensure you don’t miss any important steps! {{image_4}} You can swap peaches for other fruits. Try using fresh or frozen blueberries, strawberries, or apples. Each fruit brings its own flavor. Blueberries add a burst of sweetness. Strawberries give a bright, fresh taste, while apples offer a warm, cozy vibe. Just make sure to chop the fruit small, so it mixes well in the rolls. For a fun twist, you can add nuts or chocolate to the mix. Chopped pecans or walnuts add a crunchy texture. You can also sprinkle chocolate chips for a sweet surprise. Roll the dough with your filling, but add these goodies before you roll it up. This creates delightful layers of flavor and texture. You can easily make these rolls vegan or gluten-free. For vegan rolls, substitute milk with almond milk and use flaxseed meal instead of the egg. For gluten-free options, swap the all-purpose flour with a gluten-free blend. Make sure your baking powder is also gluten-free. These swaps keep the flavors rich and the rolls tender. You can still enjoy the joy of Peach Cobbler Cinnamon Rolls with these modifications. For the full recipe, check the details above! To keep your Peach Cobbler Cinnamon Rolls fresh, store them in an airtight container. Place a piece of parchment paper between layers to prevent sticking. They stay fresh for 2 to 3 days at room temperature. If you want them to last longer, consider refrigerating them. They will keep for up to a week in the fridge. To reheat your rolls, you have a few options. The microwave works well for a quick fix. Heat for 10 to 15 seconds until warm. For a crispy exterior, use the oven. Preheat your oven to 350°F (175°C). Place the rolls on a baking sheet and heat for about 5 to 10 minutes. Freezing these rolls is a great idea for future treats. To freeze, let them cool completely. Wrap each roll tightly in plastic wrap and then in aluminum foil. This helps prevent freezer burn. You can freeze them for up to three months. When you’re ready to enjoy, thaw them in the fridge overnight. Reheat them as mentioned above for a fresh taste. Yes, you can use canned peaches for this recipe. Just make sure to drain them well. Canned peaches work well and save time. They can still provide great flavor and sweetness. If using fresh peaches, the rolls will taste even more vibrant. These rolls last about three days at room temperature. Store them in an airtight container to keep them fresh. You can also refrigerate them, which can extend their shelf life by a few days. Just remember, the texture may change a little. These rolls pair well with coffee or tea for breakfast. You can also serve them with whipped cream or vanilla ice cream for dessert. Fresh fruit or a drizzle of caramel sauce adds extra flavor too. They make a lovely treat for brunch gatherings. To make the frosting thicker, add more powdered sugar. If it’s too thick, add more milk, one tablespoon at a time. Mix until you reach your desired consistency. This way, you can customize the frosting to suit your taste. Yes, you can make these rolls in advance. Prepare the rolls, then cover and refrigerate them before baking. When you are ready, let them sit at room temperature for 30 minutes before baking. This helps them rise nicely and bake evenly. You can also freeze baked rolls for later enjoyment. You learned how to make delicious Peach Cobbler Cinnamon Rolls. We covered the main ingredients and optional ones for flavor. You now know how to prepare, bake, and store these rolls. Unique variations let you enjoy different tastes and textures. With these tips, your rolls will impress everyone. Go ahead and try this fun recipe! Enjoy baking and sharing your tasty treats.

If you love sweet treats that make your kitchen smell heavenly, you’ll adore these Peach Cobbler Cinnamon Rolls! This delightful dessert combines the joys of a classic peach cobbler with …

Read more

Categories Desserts

Baked Ham and Cheese Croissants Delightful Recipe

May 22, 2025 by Chef Tavio
- 4 large, freshly baked buttery croissants - 8 slices of delectable deli ham - 8 slices of creamy Swiss cheese - 2 tablespoons smooth Dijon mustard - 2 tablespoons unsalted butter, melted - 1 teaspoon garlic powder - 1 teaspoon fresh thyme leaves (or ½ teaspoon dried thyme) - Salt and freshly cracked pepper, to taste - Optional: 1 tablespoon chopped fresh parsley for garnish Gather these ingredients before you start cooking. Each one plays a key role in making the croissants delicious. The croissants must be fresh and buttery for the best taste. The deli ham adds a savory element, while Swiss cheese melts beautifully. The Dijon mustard gives a nice zing that pairs well with the ham. I love adding garlic powder for extra flavor. Fresh thyme adds a lovely aroma. Don't forget the salt and pepper to enhance everything. If you want to impress, sprinkle parsley on top before serving. It adds a nice pop of color. For the full recipe, check the details above. It’s easy and fun to make these baked ham and cheese croissants. Enjoy the process and savor the results! - Preheat the oven to 375°F (190°C). - Slice each croissant in half lengthwise. - Spread Dijon mustard on the inner sides. - Layer ham and cheese evenly in each croissant half. - Reassemble croissants for baking. - Combine melted butter, garlic powder, thyme, salt, and pepper. - Brush the mixture over the croissants. - Arrange on a baking sheet and bake for 12-15 minutes. - Check for a golden brown finish and melted cheese. As you work through these steps, you will see how simple it is to create a dish that delights. This recipe is not just a meal; it’s a joy that warms the heart and fills the tummy. For the complete details, check out the Full Recipe. You may want to switch things up a bit. Instead of ham, try turkey or roast beef. If you prefer a meatless option, use a mix of sautéed mushrooms and spinach. For cheese, cheddar or pepper jack adds a nice kick. If you want low-fat choices, opt for turkey ham and reduced-fat cheese. Greek yogurt can replace butter for a lighter touch. Always check the labels for health-conscious swaps. The best croissants for this recipe are fresh, flaky, and buttery. You can buy them from a bakery or make your own if you feel adventurous. Look for croissants that are golden and soft. To ensure gooey cheese, choose a cheese that melts well, like Swiss or mozzarella. Layer the cheese on top of the ham for the best melt. Bake until everything is bubbly and golden. These croissants pair well with a fresh side salad or crispy potato wedges. A small bowl of Dijon mustard makes a great dip. For presentation, serve them on a wooden board for a rustic look. Garnish with parsley for that extra pop of color. For more ideas, you can explore various dips or sides that complement the flavors. Your guests will love the effort you put into serving these treats! {{image_4}} You can make these croissants meat-free by using tasty veggies or meat substitutes. Try adding roasted peppers, spinach, or mushrooms. These ingredients give great flavor and texture. For a protein boost, use plant-based ham or tofu slices. These swaps keep the dish hearty and delicious without meat. Exploring other cheeses can add unique flavors. Try cheddar for a sharp taste or mozzarella for a stretchier bite. Mixing cheeses can create depth. For example, blend Swiss with a bit of Gruyère. This combo will make your croissants even creamier and rich. Adding spices or herbs can take your croissants up a notch. Consider mixing in a pinch of smoked paprika for warmth or some fresh basil for a twist. You can also play with different mustards or sauces. A spicy mustard can give a nice kick, while a honey mustard adds sweetness. These choices let you customize the flavor to your liking. To keep your baked ham and cheese croissants fresh, store them in an airtight container. This helps prevent them from drying out. If you want to keep them longer, you can freeze them. Wrap each croissant tightly in plastic wrap, then place them in a freezer bag. This method keeps them tasty for up to three months. To reheat, I recommend using the oven. Preheat it to 350°F (175°C). Place the croissants on a baking sheet. Heat them for about 10 minutes. This method keeps them crispy and warm. Avoid using the microwave. It can make the croissants soggy and chewy. For a quick fix, you can use a toaster oven, too. Just keep an eye on them to ensure they don't burn. Yes, you can prepare these croissants ahead of time. To do this, follow the steps up to the baking part. Once you fill the croissants, wrap them tightly in plastic wrap or foil. Store them in the fridge for up to 24 hours. When you are ready to bake, just take them out and add a few extra minutes to the baking time. This method keeps them fresh and tasty. I love using large, buttery croissants for this dish. They hold the filling well and become flaky when baked. Store-bought croissants are great for convenience. If you have time, making homemade croissants adds flavor and texture. Either way, choose croissants that are fresh for the best results. Absolutely! If you want to switch things up, turkey or roast beef can work well. Even chicken can be a tasty option. For a vegetarian twist, try using grilled veggies or a meat substitute. This recipe is flexible, so feel free to get creative with your choice of meat. To amp up the flavor, try adding some extras. Sautéed onions or peppers can add a nice touch. You could also mix different cheeses like cheddar or pepper jack for more depth. Adding spices like paprika or even a dash of hot sauce can bring a fun twist to the taste. This article guides you through making delicious baked ham and cheese croissants. You'll learn about the key ingredients, step-by-step instructions, and tasty variations. We covered tips for perfecting texture and serving suggestions too. Try different meats or cheeses for your own twist. Whether for breakfast or a snack, these croissants are sure to impress. Follow these steps, and you’ll make something that delights everyone. Enjoy your cooking adventure and have fun experimenting with flavors!

Are you ready to indulge in a warm, cheesy treat? This Baked Ham and Cheese Croissants recipe is simple and oh-so-delicious! In just a few steps, you’ll create a flaky …

Read more

Categories Appetizers
Older posts
Newer posts
← Previous Page1 … Page77 Page78 Page79 … Page85 Next →

TASTED NEST

Where Flavor Finds a Home 🍳🏡 — warm, simple, and crave-worthy recipes made for real life, from stovetop mornings to backyard dinners.

PAGES

Home About Contact Privacy Policy Terms & Conditions Cookie Policy GDPR Policy Copyright Policy Disclaimer

CATEGORIES

Appetizers Desserts Salads Breakfast Dinner

Contact

  • Pinterest
  • Mail
Copyright © 2025 Tasted Nest. All rights reserved.