Skip to content
Tasted Nest
  • Home
  • Appetizers
  • Desserts
  • Salads
  • Breakfast
  • Dinner
  • Privacy Policy
  • Contact
  • About

Chef Tavio

4 Ingredient Blueberry Cobbler Simple and Tasty Treat

May 21, 2025 by Chef Tavio
- 2 cups fresh or frozen blueberries - 1 cup all-purpose flour - 1 cup granulated sugar, divided - 1 cup milk - 1 teaspoon baking powder - 1/4 teaspoon salt These ingredients make a simple, tasty treat. Blueberries shine in this dessert. They bring sweetness and a burst of flavor. You can use fresh or frozen blueberries. Both will work well in this dish. If you don’t have fresh blueberries, you can use other berries. Raspberries or blackberries can add a twist. You can also use frozen blueberries, which save time. For gluten-free options, try almond flour or coconut flour. These flours work well in many recipes. Just remember that they may change the texture a bit. If you want to reduce sugar, consider natural sweeteners. Honey or maple syrup can be good choices. They add flavor and sweetness without using granulated sugar. For the full recipe, check the Berry Bliss Blueberry Cobbler section. Enjoy your baking! - Preheat your oven to 350°F (175°C). - Grease a 9x9-inch baking dish with non-stick spray or butter. - In a bowl, toss 2 cups of blueberries with 1/2 cup of sugar. Make sure the blueberries are well coated. - Spread the blueberry mix evenly in the baking dish. - In a large bowl, mix 1 cup of flour, 1/2 cup of sugar, 1 teaspoon of baking powder, and 1/4 teaspoon of salt. - Gradually add 1 cup of milk to the dry mix. Whisk until the batter is smooth and thick, like pancake batter. - Carefully pour the batter over the blueberries. Do not stir it. - Bake in the oven for 45-50 minutes. The top should turn golden brown. - Check if it's done by inserting a toothpick in the center. It should come out clean. For more details, check the Full Recipe. To get a golden crust, you must watch the baking time. Bake it for 45-50 minutes. Check if the top is brown and a toothpick comes out clean. If it’s golden, your cobbler is ready. For even sweetness, stir the blueberries with sugar well. This helps the sugar coat each berry. When you pour the batter over them, the sweetness spreads as it bakes. Serve warm blueberry cobbler with a scoop of ice cream. Vanilla ice cream goes well with the sweet berries. A dollop of whipped cream also adds a nice touch. You can sprinkle fresh mint on top for some color. For gatherings, cut the cobbler into squares. Place each square on a nice plate. Add a scoop of ice cream next to it for a lovely look. If your batter is too thick, add a splash more milk. This helps it spread better over the blueberries. Mix it gently so you don’t overwork it. If your cobbler is underbaked, put it back in the oven. Bake for 5-10 more minutes. Keep an eye on it to avoid burning. It should be golden and firm when done. For the full recipe, you can check the Berry Bliss Blueberry Cobbler section. {{image_4}} You can make this blueberry cobbler even better with some fun twists. Try adding other fruits. Raspberries or peaches mix nicely with blueberries. They add a zingy taste that pops in your mouth. You could also mix in spices. A little cinnamon or nutmeg gives warmth to the dish. These flavors work well with the sweet berries. This way, you can create a cobbler that feels fresh and new each time. If you want a dairy-free cobbler, use plant-based milk. Almond or oat milk works well in this recipe. You can also lower the sugar. Try using less sugar or a natural sweetener like honey or maple syrup. This keeps the cobbler tasty while making it healthier. With these small changes, everyone can enjoy this treat without worry. Serving this blueberry cobbler can be fun and creative. Use individual ramekins for a personal touch. Everyone gets their own dessert, and it looks fancy! You can also make mini cobblers for parties. Bake small portions in muffin tins. They are easy to grab and eat. These options add a special flair to your gathering. No matter how you serve it, this cobbler will impress your guests. If you want the full recipe, check the complete instructions. To keep your blueberry cobbler fresh, start by refrigerating any leftovers. Place the cobbler in an airtight container. This will help keep moisture in and prevent it from drying out. You can also cover it tightly with plastic wrap or foil. If you want to freeze your blueberry cobbler, cut it into pieces first. Wrap each piece in plastic wrap, then place them in a freezer-safe bag. This method makes it easy to grab just what you need later. Blueberry cobbler lasts about 3 to 5 days in the fridge. Keep an eye on it, as the freshness can fade. If you freeze it, it can last up to 3 months. Look for signs of spoilage, like an off smell or mold. If it smells funny or has dark spots, it is best to toss it. Enjoy your cobbler while it is fresh for the best taste! You can use gluten-free flour blends. They work well in most recipes. I suggest using almond flour or coconut flour. These add a great taste and texture. Just remember, gluten-free flour may absorb more liquid. Adjust the milk as needed for the right batter thickness. Yes, you can use frozen blueberries! They save time and add great flavor. Just let them thaw a bit and drain excess juice. This helps keep the cobbler from getting too watery. If you use frozen blueberries, bake a few extra minutes. This ensures they cook through and blend well with the batter. Cobbler has a soft, biscuit-like topping. The topping is thick and cake-like. Crisp, on the other hand, has a crunchy topping made of oats and nuts. Crisp is usually more crumbly and chewy. Both are delicious but have different textures and flavors. Yes, you can double the recipe! Just use a larger baking dish. A 9x13-inch dish works well for doubling. You may need to bake it a bit longer. Check for doneness with a toothpick. If it comes out clean, your cobbler is ready! This blog post covered the essentials for making a delicious blueberry cobbler. We looked at required ingredients, substitutes, and step-by-step instructions. I shared tips for perfecting your cobbler and offered variations to suit your taste. We also discussed storage methods to keep your cobbler fresh. Now, you can create a tasty dessert that fits your needs. Enjoy your baking adventure and savor each bite of your homemade cobbler! Your guests will love it.

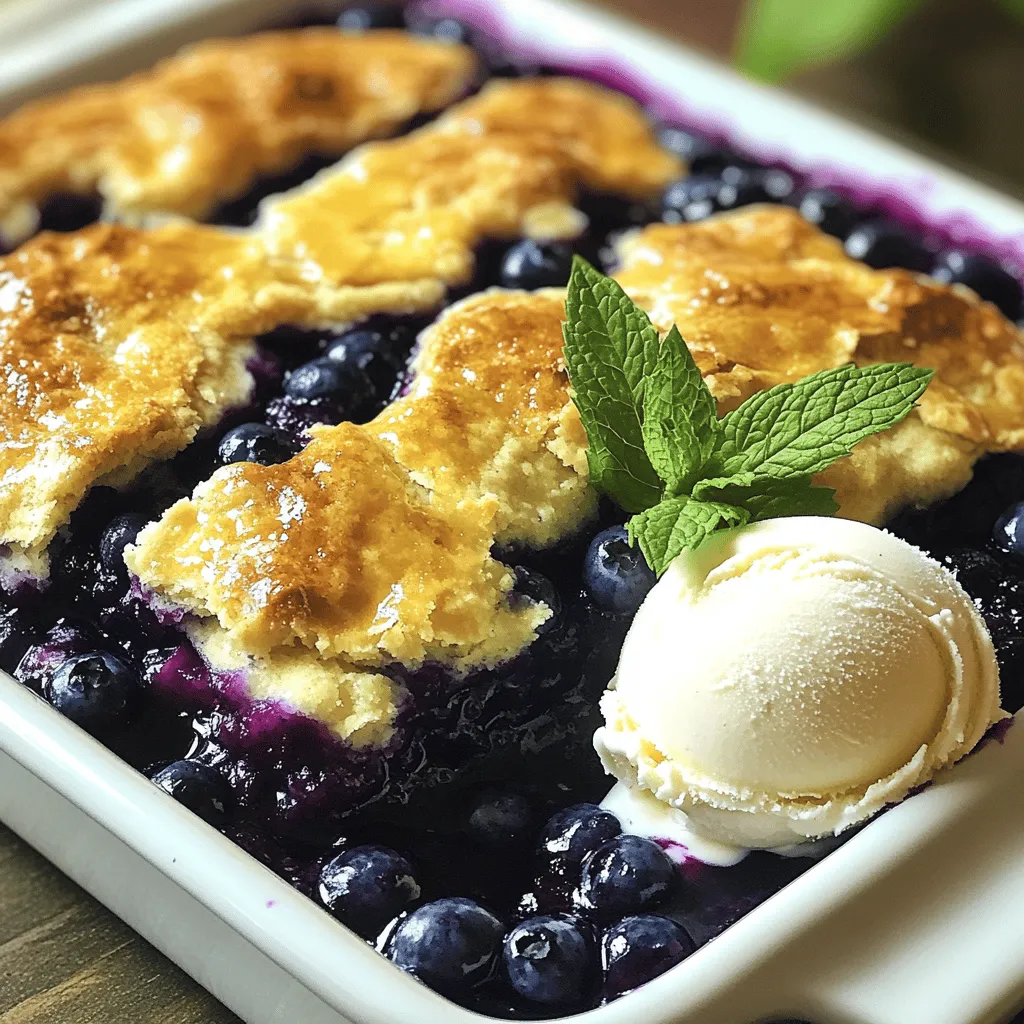
Are you ready to whip up a simple and tasty treat? This 4 Ingredient Blueberry Cobbler combines juicy blueberries with a light, fluffy batter. It’s perfect for dessert or even …

Read more

Categories Desserts

Blueberry Lemon Brownies Delicious Dessert Delight

May 21, 2025 by Chef Tavio
To make blueberry lemon brownies, gather these ingredients: - 1 cup unsalted butter, melted - 1 1/2 cups granulated sugar - 3 large eggs - 1 tablespoon fresh lemon zest - 1/4 cup freshly squeezed lemon juice - 1 teaspoon pure vanilla extract - 1 cup all-purpose flour - 1/2 teaspoon baking powder - 1/4 teaspoon fine sea salt - 1 cup fresh blueberries, rinsed and drained - 1/2 cup white chocolate chips (optional for a sweet twist) These ingredients create a delightful balance of sweet and tart in each bite. The fresh blueberries add a juicy burst, while lemon zest brightens the flavor. If you want to switch things up, try adding white chocolate chips. They melt beautifully and pair well with the fruity notes. Each brownie has about 180 calories. Here’s a quick look at the nutrition: - Total Fat: 8g - Saturated Fat: 5g - Cholesterol: 50mg - Sodium: 80mg - Total Carbohydrates: 27g - Sugars: 16g - Protein: 2g These brownies are a treat, but they’re best enjoyed in moderation. They do contain sugar and fat, so keep that in mind if you're watching your intake. You’ll need a few key tools to make these brownies: - A 9x9 inch baking pan - Mixing bowls (large and small) - A whisk for mixing - A spatula for folding - Parchment paper for easy removal Having the right tools makes baking easier and more fun. Prepare your space, and you'll be ready to create these tasty brownies! 1. Preheat the Oven and Prepare the Baking Pan: Start by setting your oven to 350°F (175°C). Grab a 9x9 inch baking pan, grease it, and line it with parchment paper. Leave some paper hanging over the sides. This helps you lift the brownies out later. 2. Combine Wet Ingredients: In a large bowl, add the melted butter and sugar. Whisk them together until smooth. This makes sure they blend well. 3. Incorporate Eggs and Flavors: Add the eggs one at a time. Mix well after each egg. Next, stir in the lemon zest, lemon juice, and vanilla until it's all mixed together. 4. Mix Dry Ingredients: In another bowl, whisk the flour, baking powder, and salt. Slowly add this to the wet mix. Use a spatula to fold the two together gently. Be careful not to overmix. This keeps the brownies soft. 5. Add Blueberries and Optional Chocolate: Gently fold in the fresh blueberries. If you want, add white chocolate chips for extra sweetness. Mix until they are evenly spread in the batter. 6. Transfer to Baking Pan: Pour the brownie mix into your prepared pan. Spread it evenly with a spatula. - Bake the Brownies: Place the pan in your oven. Bake for 25-30 minutes. Check for doneness with a toothpick. It should come out clean or with a few moist crumbs. - Cool and Slice: After baking, let the brownies cool in the pan for about 10 minutes. Use the parchment paper to lift them out. Move them to a wire rack to cool fully. This helps with cutting neat squares. - Presentation Tips: For a fancy touch, dust your brownies with powdered sugar. Top each square with a few fresh blueberries and a slice of lemon. It adds color and freshness. - Pairing Ideas: These blueberry lemon brownies taste great with a cup of tea or coffee. You can even serve them with vanilla ice cream for a delightful dessert experience. For the full recipe, check out the details above. Enjoy your baking! To keep your brownies soft, avoid overmixing the batter. When you mix the dry and wet ingredients, stir gently. This helps prevent tough brownies. You want a smooth batter but not a lot of air bubbles. Aim for a thick, rich texture. To achieve the perfect texture, use room temperature eggs. They blend well with melted butter. You also want to measure your flour correctly. Too much flour can make brownies dry. Use a kitchen scale if possible. Want to kick up the flavor? Try adding a pinch of sea salt. It brings out the sweetness. You can also add extracts like almond or coconut for a twist. Fresh herbs like thyme or basil can add a unique taste. Consider mixing in more fruit too! Chopped strawberries or raspberries pair well with blueberries. You can also top the brownies with a lemon glaze or whipped cream. If your brownies are too dry, they likely baked too long. Check them a few minutes early next time. You want a toothpick to come out with a few moist crumbs. If they are too moist, they may need more baking time. Use the toothpick test to find the right balance. If they are undercooked, put them back in the oven for a few more minutes. For the full recipe, check out the section above. {{image_4}} You can switch up the fruits in these brownies. Raspberries, strawberries, or even peaches work great. Each fruit gives a new taste. If you want a unique twist, try adding almond extract. It pairs well with the lemon and adds depth. For a gluten-free version, use almond or coconut flour instead of regular flour. Both options keep the brownies moist and tasty. If you're vegan, replace butter with coconut oil and use flax eggs. Mix 1 tablespoon of flaxseed meal with 2.5 tablespoons of water for each egg. These swaps keep the brownies delicious without any animal products. Serve these brownies warm with a scoop of vanilla ice cream. The creaminess contrasts perfectly with the fruity brownies. You can also drizzle a lemon glaze on top for extra zing. For events, cut the brownies into fun shapes and place them on colorful plates. Add fresh berries on the side to make the dessert pop! Check out the Full Recipe for all the details you need. To keep your blueberry lemon brownies fresh, store them at room temperature. Place them in an airtight container. They will stay fresh for about 3 to 4 days. If you want to keep them longer, consider freezing them. To freeze the brownies, first, cool them completely. Wrap them tightly in plastic wrap. Then, place the wrapped brownies in a freezer-safe bag. They can last for up to 3 months in the freezer. To thaw, remove them from the freezer and let them sit at room temperature. You can also warm them in the oven at 350°F for about 10 minutes. Brownies can spoil if not stored correctly. Check for mold or an off smell. If they feel dry or hard, they may not taste good. Always use clean hands when handling brownies to avoid contamination. Can I use frozen blueberries instead of fresh? Yes, you can use frozen blueberries. They work well in this recipe. However, they might add more moisture. This can change the texture a bit. If you choose frozen, do not thaw them. Just add them straight into the batter. What can I substitute for granulated sugar? You can use brown sugar instead of granulated sugar. It adds a nice depth of flavor. Another option is coconut sugar, which is less processed. Both will work well in your brownies. How to make this recipe without lemon? If you want to skip the lemon, you can use orange zest and juice. This will give your brownies a sweet, citrus flavor. You can also substitute with a splash of vanilla extract for a different twist. Can I double the recipe? Yes, you can double the recipe. Just use a larger pan, like a 9x13 inch. Keep an eye on the baking time. It may take a few more minutes to bake through. Can I use margarine instead of butter? Yes, margarine can replace butter. Your brownies will still taste good. Just use the same amount as the recipe calls for. What’s the best type of flour to use for brownies? All-purpose flour is best for brownies. It gives the right texture and structure. If you want a gluten-free option, try almond flour or a gluten-free blend. In this post, we explored brownie-making from start to finish. We detailed ingredients, equipment, and baking steps to help you succeed. I shared tips to enhance flavor and solve common problems. You can also try fun variations and learn how to store brownies properly. Baking brownies can be enjoyable and rewarding. With these insights, you can create your own perfect batch. Happy baking!

Get ready to indulge in a treat that perfectly blends sweet and tart! Blueberry Lemon Brownies are your new go-to dessert, bursting with flavor and a delightful texture that everyone …

Read more

Categories Desserts

Lemon Lavender Sandwich Cookies Delightful and Easy Treat

May 21, 2025 by Chef Tavio
To make these delightful cookies, you need a few key ingredients: - 2 cups all-purpose flour - 1 tablespoon dried culinary lavender - ½ cup unsalted butter, softened - 1 cup granulated sugar - 1 large egg These ingredients create a soft and fragrant cookie that bursts with lemon and lavender flavor. The frosting is simple yet tasty. Gather these: - 1 cup powdered sugar - 2-3 tablespoons fresh lemon juice This frosting adds a sweet and zesty finish to each cookie. For a little extra zing, consider these optional ingredients: - 1 tablespoon freshly grated lemon zest - 1 teaspoon pure vanilla extract Adding lemon zest brightens the flavor. The vanilla adds depth to the frosting. You can find the complete recipe in the Full Recipe section. - Crushing the dried lavender: Start by taking your dried lavender. Use a mortar and pestle or the back of a spoon. Gently crush it to release its oils. This step adds a lovely aroma to your cookies. Set it aside for later. - Mixing dry ingredients: In a medium bowl, whisk together the flour, crushed lavender, baking powder, and salt. This makes sure all the dry ingredients are combined. Set this mixture aside for use later. - Creaming butter and sugar: Get a large bowl and place the softened butter in it. Use an electric mixer to cream the butter and sugar. Mix until it is light and fluffy. This should take about three to five minutes. A well-creamed mixture is key to fluffy cookies. - Adding wet ingredients: Now, it's time to add the egg, lemon zest, fresh lemon juice, and vanilla extract to the butter mixture. Beat these together until everything is smooth and well-blended. This adds flavor and moisture to your cookies. - Rolling out and cutting cookies: Gradually fold the dry mixture into the wet mixture. Mix until just combined. Make sure not to overmix, as this affects texture. Wrap the dough in plastic wrap and shape it into a flat disc. Chill in the fridge for at least 30 minutes. This makes rolling easier. - Baking instructions: Preheat your oven to 350°F (175°C). Line two baking sheets with parchment paper. On a floured surface, roll out the chilled dough to about ¼ inch thick. Use a 2-inch cookie cutter to cut out shapes. Place them on the baking sheets, leaving space between each cookie. Bake for 10-12 minutes, or until the edges are lightly golden. Let them cool for five minutes before moving them to a wire rack. - Preparing the frosting: In a medium bowl, mix the powdered sugar with 2 to 3 tablespoons of fresh lemon juice. Stir until smooth. You want a spreadable consistency for the frosting. - Assembling the sandwich cookies: Take one cooled cookie and spread a layer of lemon frosting on the bottom. Top it with another cookie to create a sandwich. Repeat this for all the cookies until they're all assembled. - Final touches for presentation: For a beautiful finish, sprinkle a few dried lavender buds on top of the frosting. This adds a delicate look and enhances the flavor. Enjoy your delightful Lemon Lavender Sandwich Cookies! For the full recipe, check out the details above. To get the best cookie texture, you need to chill the dough. Chilling makes it easier to roll out. It also helps the cookies hold their shape while baking. Wrap the dough in plastic and cool it for at least 30 minutes. Avoiding overmixing is key. Once you combine the wet and dry ingredients, mix just until you see no flour. Overmixing can make cookies tough and chewy instead of light and soft. Using fresh ingredients makes a big difference. Fresh lemon juice and zest will boost the flavor immensely. It adds brightness and keeps the cookies from tasting flat. For garnishing, sprinkle a few dried lavender buds on top of the frosting. This gives a lovely touch and a hint of extra flavor. You can also use lemon slices around the cookies for a beautiful display. Keep an eye on baking times. Cookies can go from perfect to overbaked quickly. Set a timer for 10 minutes and check them. The edges should look lightly golden, but the centers may still be soft. Oven calibration is important, too. If your oven runs hot or cold, it can affect baking results. Use an oven thermometer to ensure accurate temperatures. This step can prevent cookies from being undercooked or burnt. {{image_4}} You can change the flavor of these cookies easily. Use almond extract instead of vanilla. This adds a nutty taste that pairs well with lemon. You can also try other citrus fruits. Orange or lime zest can add a fun twist to the recipe. Just remember to adjust the lemon juice if you use these zests. If you need gluten-free cookies, swap regular flour for a gluten-free blend. Many brands make good mixes for baking. For a vegan version, use plant-based butter and flax eggs. Mix 1 tablespoon of ground flaxseed with 2.5 tablespoons of water. Let it sit for a few minutes until it thickens. This works well to replace the egg. You can also change the flavor with the seasons. In the fall, add warm spices like cinnamon or nutmeg. These give your cookies a cozy feel. During the summer, mix in fresh berries like blueberries or strawberries. They add a burst of color and flavor. Each variation keeps the cookies fun and exciting. For the full recipe, check out the complete article. - Storing assembled cookies: Place your sandwich cookies in an airtight container. This keeps them fresh and moist. Layer parchment paper between cookies to avoid sticking. Store at room temperature for up to five days. - Storing unassembled cookies and frosting separately: Keep the cookies and frosting in separate containers. This helps maintain the cookie's texture. You can store the cookies at room temperature. Keep the frosting in the fridge for up to one week. - How long cookies stay fresh: When stored properly, these cookies taste best for about five days. After that, they may become dry or lose flavor. - Freezing options for longevity: You can freeze both unassembled cookies and frosting. Wrap cookies in plastic wrap and place them in a freezer bag. They last up to three months. For frosting, store it in an airtight container in the freezer. - Tips on reviving stale cookies: If your cookies lose some moisture, you can revive them. Place a slice of bread in the container with the cookies. The bread adds moisture back to the cookies. - Re-frosting recommendations: If your frosting hardens, you can soften it. Just add a bit of fresh lemon juice. Mix it well until you reach the right consistency. This keeps your cookies looking fresh and tasty. For the complete recipe, check out the Full Recipe. Store these cookies in an airtight container. Keep them at room temperature. They stay fresh for about five days. If you want to keep them longer, freeze them. Wrap each cookie tightly in plastic wrap, then place them in a freezer bag. They can last up to three months in the freezer. Yes, you can use fresh lavender. It gives a strong flavor. However, fresh lavender has more moisture. This can change the cookie's texture. If you use fresh lavender, use less than dried. Start with one teaspoon of chopped fresh lavender. Adjust to your taste. Look for lightly golden edges. The center should look set, not wet. You can also touch them lightly; they should feel firm. If they spring back, they are done. Baking time is about 10-12 minutes. Keep an eye on them to avoid overbaking. You can use coconut oil or margarine. These are good plant-based options. For a lower-fat choice, use applesauce. This adds moisture but will change the texture. You can also use vegan butter. It mimics the taste of regular butter well. Adjust the amount as needed; start with the same amount as butter. For a richer flavor, try cashew or almond butter. Lemon Lavender Sandwich Cookies are a delightful treat. You started with key ingredients like flour, lavender, butter, and sugar. I shared step-by-step instructions to make the dough, bake the cookies, and prepare the frosting. I also included tips to ensure texture and flavor, along with variations to suit different tastes. Remember to store these tasty cookies correctly to keep them fresh longer. Enjoy experimenting with flavors and have fun baking! Your kitchen is now ready for these sweet treats.

Craving something unique and delicious? Let’s make Lemon Lavender Sandwich Cookies! These treats blend zesty lemon with floral lavender, creating a taste that’s refreshing and delightful. They’re also easy to …

Read more

Categories Desserts

Mediterranean Chicken Pasta Salad Flavorful Delight

May 21, 2025 by Chef Tavio
- 2 cups rotini pasta - 1 pound cooked chicken breast, diced - 1 cup cherry tomatoes, halved - 1 cup cucumber, diced - 1/2 cup Kalamata olives, pitted and sliced - 1/2 cup feta cheese, crumbled - 1/4 cup red onion, finely chopped - 1/4 cup fresh parsley, chopped - 1/4 cup olive oil - 3 tablespoons lemon juice - 1 teaspoon dried oregano - Salt and pepper, to taste For this Mediterranean Chicken Pasta Salad, we use fresh and colorful ingredients. Each item adds its unique taste and texture. The rotini pasta serves as a perfect base. It holds the dressing and pairs well with other flavors. The chicken adds protein and makes the dish filling. I love using cooked chicken breast, as it's lean and tender. Cherry tomatoes bring a burst of sweetness. They contrast nicely with the crunchy cucumber. Kalamata olives give a salty kick, while feta adds creaminess. Red onion provides a sharp bite, and parsley adds freshness. The olive oil and lemon juice dressing ties it all together. Dried oregano adds an earthy note. Don’t forget to adjust salt and pepper to your taste. A serving of this salad contains around 350 calories. It has about 15g of fat, 25g of protein, and 40g of carbohydrates. This makes it a balanced meal option. If you need to make changes, here are some ideas: - Use gluten-free rotini for a gluten-free option. - Swap cooked chicken for chickpeas or tofu for a vegetarian salad. - Try goat cheese instead of feta for a different flavor. These substitutions keep the dish tasty while meeting your dietary needs. For more details, check out the Full Recipe. To cook the rotini pasta, start by boiling a large pot of salted water. Once the water bubbles, add the rotini pasta. Cook it for about 8-10 minutes. You want it to be al dente, which means it should still have a little bite to it. Once cooked, drain the pasta in a colander. Rinse the pasta with cold water to stop the cooking. Set it aside to cool before mixing. Next, prepare the salad ingredients. Dice the cooked chicken into small, bite-sized pieces. Halve the cherry tomatoes and dice the cucumber into small cubes. Slice the Kalamata olives and crumble the feta cheese. Finely chop the red onion and the fresh parsley. Place all these ingredients into a large mixing bowl. Gently fold them together to mix well. Now, let’s make the dressing. In a small bowl, whisk together the olive oil and lemon juice. Add the dried oregano, salt, and freshly cracked pepper. Mix until it’s smooth and combined. This dressing will add a bright flavor to your salad. It’s time to combine everything. Add the cooled rotini pasta to the bowl with chicken and vegetables. Drizzle the dressing over the top. Gently toss the pasta, chicken, and veggies until everything is coated nicely. Before serving, taste the salad. Adjust the seasoning if needed. For the best flavor, chill the salad in the fridge for at least 30 minutes. This lets all the flavors blend. For the full recipe, refer to the earlier section. To make your Mediterranean Chicken Pasta Salad shine, start with seasoning. The salt and pepper help bring out the flavors. If you want more zing, add a pinch of garlic powder or crushed red pepper. You can also play with the lemon juice. More juice can brighten the dish, while less can tone it down. Taste as you go to get it just right. Chilling the salad is key. Once mixed, let it sit in the fridge for at least 30 minutes. This time allows the flavors to meld and become more vibrant. The cold also makes it refreshing, perfect for warm days. If you can, chill it longer for even better taste. Your patience will pay off! For serving, a big bowl works best. It shows off the colorful ingredients. Garnish with extra parsley and some feta cheese on top. You can drizzle a little olive oil to add shine. This makes the salad look fresh and inviting. Everyone will want to dig in! {{image_4}} You can create a fun twist on Mediterranean chicken pasta salad by adding roasted vegetables. Try bell peppers, zucchini, or eggplant. Roasting them brings out their sweet flavors. Toss them in the salad for a warm touch. You can also mix in fresh herbs like basil or mint. These herbs elevate the dish and add freshness. Experimenting with different herbs opens up new flavor profiles. For a low-carb option, swap pasta with zucchini noodles or cauliflower rice. These substitutes keep the dish light but still tasty. If you want a vegetarian version, replace chicken with chickpeas or grilled tofu. This makes the dish hearty while keeping it plant-based. Seasonal ingredients make your salad brighter and more flavorful. In summer, use ripe tomatoes and fresh corn. In fall, consider roasted butternut squash or Brussels sprouts. These ingredients add unique tastes and textures. Using seasonal proteins like grilled shrimp or salmon can also boost nutrition. This approach allows you to enjoy the best flavors each season offers. To keep your Mediterranean Chicken Pasta Salad fresh, store it in an airtight container. This helps lock in the flavors and keeps it cool. Place the salad in the fridge as soon as you finish eating. If you leave it out, it can spoil quickly. Remember to keep the salad away from strong-smelling foods in the fridge. This way, it will not absorb any unwanted odors. This salad stays tasty for about three to four days when stored properly. After that, the fresh veggies may start to lose their crunch. Always check for signs of spoilage, like a bad smell or slimy texture. If you see these signs, it’s best to toss it out. Eating old salad can make you sick, so be cautious. While I don’t recommend freezing this salad, you can try it if you need to. To freeze, put the salad in a freezer-safe container. Leave some space at the top, as it may expand. When you want to eat it, thaw it in the fridge overnight. After thawing, the salad might not have the same texture, but it will still taste good. Always mix it well after thawing for the best flavor. Yes, you can make this salad ahead. To prep in advance, cook the pasta and let it cool. Combine the chicken and veggies in a large bowl. Store the dressing in a separate container. When ready to serve, mix everything together. This way, the salad stays fresh and tasty! You can use other proteins. Try grilled shrimp or chickpeas for a vegetarian option. Tofu is also a great choice and absorbs flavors well. These alternatives bring new tastes while keeping the dish healthy. This salad lasts about three to five days in the fridge. Keep it in an airtight container for the best freshness. Look for signs of spoilage, like bad smells or slimy textures. If it looks or smells off, it’s best to toss it. This Mediterranean Chicken Pasta Salad is both simple and tasty. It combines rotini pasta, chicken, fresh veggies, and a zesty dressing. You learned tips for making the salad flavorful and how to store leftovers for later. Whether you want to customize the recipe or try new ingredients, the options are endless. This dish is perfect for warm days or gatherings. Enjoy this light and healthy meal that brings fresh flavors to your table!

Are you ready to treat your taste buds? This Mediterranean Chicken Pasta Salad is a flavorful delight that packs a punch! It combines tender chicken, juicy tomatoes, and creamy feta …

Read more

Categories Salads

Heavenly Lemon Oreo Dessert Irresistible Delight

May 21, 2025 by Chef Tavio
To create this delightful dessert, you need the following items: - 1 package of Lemon Oreo cookies (approximately 14 oz) - 1 cup unsalted butter, melted - 8 oz cream cheese, softened to room temperature - 1 cup powdered sugar - 1 cup cold whipped topping (such as Cool Whip) - 1 cup freshly squeezed lemon juice (about 4-5 medium lemons) - 2 teaspoons freshly grated lemon zest - 1/4 teaspoon fine sea salt - Extra Lemon Oreo cookies for garnish These ingredients come together to form a creamy and tangy treat. The Lemon Oreo cookies add a zesty flavor that complements the smooth filling. You can elevate your dessert with a few extra touches: - Fresh lemon slices - Mint leaves - Additional crushed Lemon Oreo cookies These garnishes not only enhance the look but also add a burst of flavor. Using the right tools makes cooking easier and more fun. Here’s what you’ll need: - Food processor - Mixing bowls - Electric mixer - 9x13-inch baking dish - Spatula - Plastic wrap or lid With these tools, you can smoothly prepare and serve your dessert. They help you mix, bake, and chill everything perfectly. Happy cooking with the Full Recipe! To start, grab your package of Lemon Oreo cookies. Place them in a food processor. Pulse them until they turn into fine crumbs. Next, melt your cup of unsalted butter. In a bowl, mix the Oreo crumbs with the melted butter. Stir until the crumbs are moistened. Now, press this crumb mixture into a 9x13-inch baking dish. Make sure it forms a solid base. Place it in the fridge to chill while you work on the filling. Take out a large mixing bowl. Add the softened cream cheese to it. Beat it with an electric mixer on medium speed until smooth. Gradually mix in the powdered sugar. Then, add the freshly squeezed lemon juice, lemon zest, and salt. Keep mixing until everything is blended well and smooth. You don’t want any lumps. Now it’s time to fold in the whipped topping. Gently add the cold whipped topping to the cream cheese mix. Use a spatula to fold it in carefully. Avoid over-mixing so the filling stays light and fluffy. Next, take the chilled crust out of the fridge. Pour the cream cheese filling over the crust. Spread it evenly with your spatula. Cover the baking dish tightly with plastic wrap or a lid. Refrigerate for at least four hours. This helps the flavors come together. When it’s set, you’re ready to enjoy your Heavenly Lemon Oreo Dessert! For the full recipe, make sure to check out the detailed instructions. To get the best flavors in your Heavenly Lemon Oreo Dessert, fresh lemons are a must. Their juice and zest bring brightness that makes this dessert shine. Use ripe lemons for the best taste. Mixing the cream cheese and powdered sugar well is key. This step ensures a smooth filling, free of lumps. Also, remember to fold in the whipped topping gently. This keeps the filling light and fluffy. One common mistake is rushing the chilling time. Make sure to chill the dessert for at least four hours. This time allows the flavors to blend well. Another mistake is over-mixing the filling. This can make your dessert dense instead of airy. Finally, do not skip the garnish. Crushing extra Lemon Oreos for the top adds both flavor and a nice look. When serving, cut the dessert into neat squares. This makes it easy for your guests to enjoy. Pair it with fresh berries or a scoop of vanilla ice cream. These add extra flavor and texture. You can also serve it at parties or family gatherings. Everyone loves a bright and tangy dessert. For the full recipe, be sure to check out the complete instructions. {{image_4}} You can easily switch up flavors in this dessert. Try using other Oreo flavors, like mint or vanilla, for a fun twist. You can also mix in different fruit juices, such as lime or orange, to give it a fresh taste. If you want a berry flavor, add mashed strawberries or blueberries to the cream cheese filling. Each change can create a new dessert experience. To make this dessert gluten-free, use gluten-free Lemon Oreo cookies. You can find many brands that offer great options. For a vegan version, substitute cream cheese with a vegan cream cheese. Use coconut whipped cream in place of whipped topping. These swaps keep the dessert tasty and allow more people to enjoy it. Make your dessert even more eye-catching! Instead of cutting it into squares, try serving in individual cups. Layer the dessert in clear cups for a pretty view of the layers. You can also add fresh lemon slices or mint leaves on top for a pop of color. Use a piping bag to add whipped topping swirls for extra flair. These simple changes make your dessert look as good as it tastes. To keep your dessert fresh, cover it tightly with plastic wrap. You can also use a lid if your dish has one. This keeps the flavors in and prevents it from drying out. Store the dessert in the refrigerator. Enjoy it within three days for the best taste. You can freeze this dessert for later. Cut it into squares and place them in an airtight container. Make sure to layer parchment paper between the squares to avoid sticking. This way, you can take out just what you need. It stays good in the freezer for up to two months. To enjoy, thaw it in the fridge overnight before serving. When stored correctly, your Heavenly Lemon Oreo dessert can last several days. The cream cheese layer stays tasty for about three days in the fridge. After that, it may lose some texture. If you freeze it, remember to eat it within two months for the best flavor and texture. Yes, you can. If you use regular Oreos, the dessert will taste different. The lemon flavor won’t be as strong. However, you can add extra lemon juice to enhance the flavor. This will help make up for the lack of lemon in regular Oreos. Chill the dessert for at least four hours. This time helps set the layers and blend the flavors. If you have more time, chill it overnight. The longer it chills, the better the taste. I always find that a longer chill makes the dessert even more delightful. Absolutely! This dessert is perfect for making ahead. You can prepare it one or two days in advance. Just store it in the fridge. This makes it a great choice for parties and gatherings. The flavors will deepen, making each bite extra special. For the best results, add the garnish right before serving. You can find the full recipe to ensure all steps are followed. This blog post shared the key steps to create a tasty Lemon Oreo dessert. We covered essential ingredients, tools, and easy step-by-step instructions. I shared tips to help you avoid mistakes and suggested fun variations. You can even adjust recipes for dietary needs. In conclusion, making this dessert is simple and fun. Enjoy it today or share it with friends. Your tastes will shine with these easy steps and ideas. Happy baking!

Are you ready to taste a dessert that is both sweet and tart? My Heavenly Lemon Oreo Dessert will take your taste buds on a joyride! With simple ingredients and …

Read more

Categories Desserts

No Bake Lemon Blueberry Dessert Delightful Treat

May 21, 2025 by Chef Tavio
- 1 ½ cups graham cracker crumbs - ½ cup unsalted butter, melted - 2 cups fresh blueberries, rinsed and drained - 1 cup cream cheese, softened to room temperature - 1 cup powdered sugar, sifted - 1 cup whipped cream - ¼ cup freshly squeezed lemon juice - 1 teaspoon lemon zest - 1 teaspoon pure vanilla extract - Fresh mint leaves for garnish When making this no bake lemon blueberry dessert, I focus on fresh, simple ingredients. Each component adds to the final taste and texture. The graham cracker crumbs form a crunchy base. I melt the butter to bind the crust. Next, I use fresh blueberries because they burst with flavor. Cream cheese gives the filling a rich and creamy feel. Sifting the powdered sugar helps it blend smoothly. Fresh lemon juice and zest bring bright citrus notes, while vanilla adds warmth. Finally, whipped cream lightens the filling, creating a fluffy texture. - 9-inch round springform pan - Medium mixing bowl - Large mixing bowl - Electric mixer - Spatula Using the right tools makes the process easier. A springform pan allows for easy removal of the dessert. Mixing bowls help keep things organized. An electric mixer speeds up the blending, ensuring a smooth filling. A spatula helps with folding and spreading layers evenly. For the full recipe, check out the specific instructions to guide you through each step. To start, you need graham cracker crumbs and melted butter. In a medium bowl, combine these two ingredients. Stir until it looks like wet sand. This means you mixed it well. Next, grab a 9-inch springform pan. Press the crumb mixture firmly into the bottom. Make sure it’s even and tight. Then, put the pan in the fridge for about 20 minutes. This will help the crust set. Now, let’s make the filling. In a large bowl, beat the softened cream cheese until it's smooth. Use an electric mixer to make this easy. Slowly add in the sifted powdered sugar while mixing. Keep going until everything blends well. Next, add the lemon juice, lemon zest, and vanilla extract. Beat until it’s creamy and mixed. Finally, gently fold in the whipped cream. This keeps the filling light and fluffy. To assemble, take the crust out of the fridge. Pour half of the lemon cream cheese mixture on top of the crust. Use a spatula to spread it evenly. Next, add half of the blueberries. Press them gently into the cream cheese layer. Now, spoon the rest of the cream cheese mixture on top. Smooth it out, then add the remaining blueberries on top. Cover the pan with plastic wrap and refrigerate. Let it chill for at least 4 hours. This allows the dessert to set perfectly. For the full recipe, check out the details provided earlier. - Use room temperature ingredients for smoother mixing. Cold ingredients can clump. - Be gentle when folding in whipped cream. This keeps the mix light and fluffy. - Drizzle with extra lemon juice for a zesty kick. Honey adds sweetness. - Garnish with extra blueberries or mint leaves. These add color and freshness. - Don’t skip chilling the crust. It needs time to firm up before adding filling. - Avoid overmixing whipped cream. This can deflate it and ruin the texture. Follow these tips, and your No Bake Lemon Blueberry Dessert will shine! For the full recipe, check out the details above. Enjoy! {{image_4}} You can switch up the flavors in this dessert easily. Try using strawberries or raspberries instead of blueberries. This change will give you a fresh twist that is just as tasty. If you want a nutty taste, add a dash of almond extract. This will enhance the dessert's flavor profile and surprise your guests. For those needing gluten-free options, use gluten-free graham crackers. They work just as well and keep the dessert delightful. If you or anyone you know is lactose intolerant, you can replace cream cheese with a dairy-free alternative. This keeps the dessert creamy while being friendly to those with dietary needs. Want a smaller or larger dessert? Adjust the ingredient amounts easily to fit your needs. For a fun twist, consider using mini springform pans. These are perfect for individual servings and make your dessert look fancy. You can impress friends and family with these lovely personal treats. If you're ready to make this delicious dessert, check out the Full Recipe for all the details! Store the dessert in the refrigerator for up to 5 days. Keeping it cold helps keep the flavors fresh and the texture creamy. Make sure to cover it with plastic wrap or a lid to avoid drying out. This dessert is perfect for warm days when you need a sweet, cool treat. You can freeze portions for later use. Wrap them tightly in plastic wrap to prevent freezer burn. This method is great for saving leftovers or preparing ahead for a party. Just remember to label your wraps with the date, so you know how long they’ve been frozen. Thaw the frozen dessert in the fridge overnight before serving. This slow thawing keeps the texture nice and creamy. Avoid thawing at room temperature, as it can make the dessert too soft or watery. Enjoy the delightful taste of lemon and blueberry as soon as it’s ready! Yes, it can be made up to 2 days in advance and stored in the refrigerator. This makes it perfect for parties or gatherings. Just cover it well to keep it fresh and tasty. While fresh blueberries are preferred, you can use frozen blueberries if necessary. Just remember to thaw them first and drain any excess liquid. This way, your dessert stays creamy and doesn’t get too watery. Yes, alternative crusts like Oreo or nut crusts can also work well. These options add a fun twist to the dessert. You can even mix and match for a unique flavor. Use a warm knife to create clean slices and prevent sticking. This tip helps keep the layers intact. Wipe the knife between cuts for the best results. Yes, add more lemon zest or juice to the cream cheese mixture for a stronger lemon taste. This step can make your dessert even zippier and more refreshing! If you love lemon, go ahead and experiment! This dessert combines fresh blueberries and creamy lemon filling. We covered ingredients, equipment, and step-by-step instructions to make it easy. Remember to chill your crust first and fold whipped cream gently for the best result. You can make this dessert your own with different flavors or dietary choices. It’s a versatile treat that can be stored and served later. Enjoy making this refreshing dessert for any occasion!

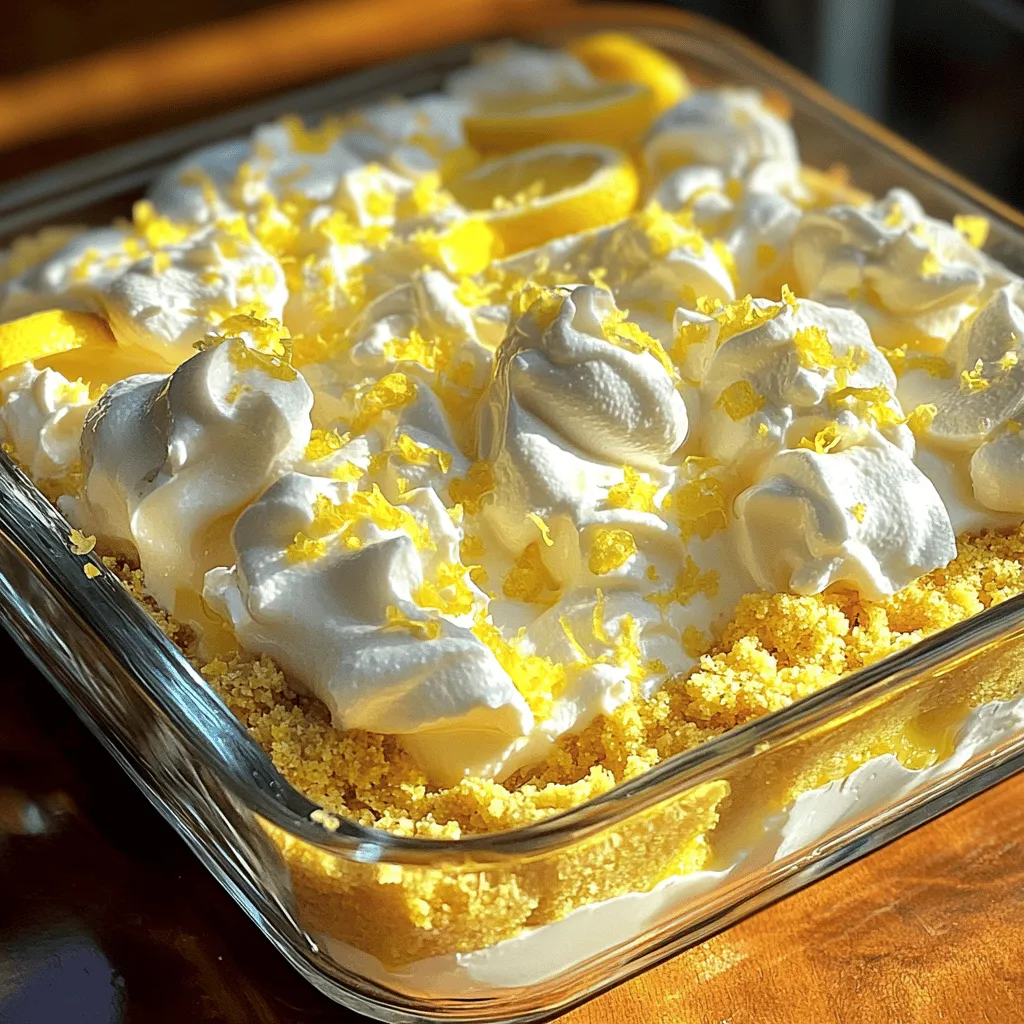
Are you craving a sweet treat that’s both light and refreshing? Dive into my No Bake Lemon Blueberry Dessert—a delightful mix of creamy goodness and zesty flavor. This easy-to-make dessert …

Read more

Categories Desserts

The Best Easy Ricotta Stuffed Shells Delight

May 21, 2025 by Chef Tavio
- 20 large pasta shells - 2 cups ricotta cheese - 1 cup shredded mozzarella cheese - 1/2 cup grated Parmesan cheese - Fresh basil leaves for garnish - Additional mozzarella cheese for topping - 1 tablespoon fresh basil, finely chopped - 1 teaspoon Italian seasoning blend - 2 cups marinara sauce - Salt and freshly ground black pepper The right ingredients make all the difference in stuffed shells. First, choose large pasta shells. They hold the creamy filling well. You’ll need ricotta cheese, a key player in this dish. It adds a rich, smooth texture. Mozzarella cheese brings a stretchy, gooey factor. Parmesan cheese adds a sharp flavor that rounds it all out. For extra flavor, I love using fresh basil. It gives a lovely aroma and taste. You can also add more mozzarella on top for a cheesy crust. Marinara sauce is a must. It ties everything together. Use a good quality sauce for the best taste. Season with salt and black pepper to enhance all the flavors. Feel free to experiment with herbs and spices. You can adjust them to fit your taste. This flexibility allows you to create your perfect dish. For the full recipe, check out the detailed instructions. Enjoy making these delightful ricotta stuffed shells! - Preheat the oven to 375°F (190°C). - Cook the pasta shells in boiling salted water until al dente. First, I always make sure my oven is preheated. This helps the shells bake evenly. Next, I boil the pasta shells. I add salt to the water for flavor. Cook them just a little underdone, as they will bake more later. Drain them well and spread them out on a baking sheet. This keeps them from sticking together. - Combine ricotta, mozzarella, Parmesan, and seasonings. - Mix until creamy and well incorporated. In a large bowl, I mix the ricotta, mozzarella, and Parmesan. I add a large egg for binding. Then, I sprinkle in some fresh basil and Italian seasoning. A pinch of salt and pepper adds flavor. I stir it all together until it’s creamy and smooth. This filling brings a rich taste to the shells. - Fill each pasta shell with the ricotta mixture. - Layer marinara sauce in the baking dish. Now comes the fun part! I take a spoon and fill each shell with the ricotta mix. I make sure they are packed well. Then, I spread some marinara sauce on the bottom of the baking dish. This keeps the shells moist. After that, I place each stuffed shell seam-side up in the dish. Finally, I pour more marinara sauce over the top. - Bake covered with aluminum foil for the first 25 minutes. - Uncover and bake for an additional 10 minutes. I cover the dish with aluminum foil to trap the steam. This helps the shells cook through. After 25 minutes, I remove the foil and bake for another 10 minutes. The cheese should bubble and turn golden brown. The smell is amazing! Once done, I let the dish rest for a few minutes. This makes serving easier and helps the flavors settle. For the full recipe, be sure to check the details above. To make great stuffed shells, cook your pasta to al dente. This means the pasta should be firm when bitten. If you overcook the shells, they may break when you fill them. Use boiling salted water for cooking. This adds flavor to the pasta. To avoid a stuffing mess-up, use a spoon or a piping bag. A piping bag makes filling the shells easy and clean. Fill each shell generously, but don’t overstuff. Place them seam-side up in the dish. For a tasty homemade marinara sauce, start with fresh tomatoes. Crush them and cook on low heat with garlic and olive oil. Add salt, pepper, and basil for extra flavor. When it comes to cheese flavors that complement ricotta, try mixing in some mozzarella or Parmesan. These cheeses add creaminess and depth to your dish. You can even sprinkle them on top for a cheesy crust. For an appealing dish, serve the shells straight from the baking dish. This gives a rustic look. You can also plate them individually. Drizzle with extra marinara sauce for a beautiful finish. Recommended sides to pair with stuffed shells include a simple green salad or garlic bread. These sides balance the richness of the dish and add freshness. For the full recipe, check out the instructions above. Enjoy! {{image_4}} You can make the ricotta stuffed shells even better by adding veggies. Spinach is a great choice. Just sauté it first to remove excess water. Mushrooms also work well. They add a nice, earthy flavor. You can even mix various cheeses. Try goat cheese for a tangy twist or use a blend of mozzarella and Parmesan. For those who want a heartier meal, add cooked ground beef or sausage. Just brown the meat before mixing it in with your ricotta filling. You can also use chicken or turkey. Shredded rotisserie chicken makes this process quick and easy. If you need gluten-free options, look for gluten-free pasta shells. Many brands offer good choices that hold up well. For vegan substitutes, use a plant-based ricotta. You can make it from blended tofu, nutritional yeast, and lemon juice. This way, everyone can enjoy these stuffed shells! For the full recipe, check out the main section. To store leftover ricotta stuffed shells, place them in an airtight container. This helps keep them fresh. Store them in the fridge and eat them within three days for best taste. For reheating, preheat your oven to 350°F (175°C). Place the shells in a baking dish. Add a splash of marinara sauce to keep them moist. Cover with foil and heat for about 20 minutes until warm. You can also microwave them in a microwave-safe dish. Heat for two to three minutes, checking to avoid overheating. You can freeze stuffed shells either before or after baking. If you freeze them raw, assemble the dish and cover tightly with foil. This keeps air out and preserves flavor. They can last up to three months in the freezer. To freeze baked shells, let them cool completely. Then, place them in a suitable container and freeze. When you’re ready to eat them, thaw in the fridge overnight. To cook frozen shells, preheat your oven to 375°F (190°C). Bake covered for 40 minutes. After that, remove the foil and bake for an additional 10 minutes until hot and bubbly. Enjoy your delicious meal! It takes about 20 minutes to prep and 40 minutes to cook. So, the total time is roughly 1 hour. This time gives you a warm, cheesy dish ready to enjoy. Yes, you can! Prepare the stuffed shells a day in advance. Store them in the fridge before baking. Just cover your dish tightly with plastic wrap or foil. When you're ready to bake, remove the cover and adjust the cooking time as needed. If you need a substitute for ricotta, try cottage cheese. You can also use cream cheese for a rich taste. For a dairy-free option, consider using tofu blended with a bit of lemon juice. These work well in your stuffed shells. Yes, there are gluten-free pasta shells available. Look for brands that use rice or corn. These gluten-free options taste great and work well in this dish. Absolutely! Just pick a high-quality marinara sauce. Look for options with simple, fresh ingredients. This can save time and still give your stuffed shells a great flavor. If you want, you can even add some herbs to enhance the taste. For the full recipe, check out the details above. Ricotta stuffed shells are a tasty and easy dish. We covered key ingredients and steps to prepare them. You learned how to make a creamy filling and layer the dish for the oven. Remember the tips for cooking pasta and enhancing flavors. Variations allow everyone to enjoy this dish, plus good storage info keeps it fresh. Now, gather your ingredients and give it a try. Enjoying a homemade meal can bring joy. Happy cooking!

If you’re looking for a delicious meal that’s easy to make, you’re in the right spot! My easy ricotta stuffed shells are packed with creamy cheese and flavorful herbs. This …

Read more

Categories Dinner

Jalapeño Popper Deviled Eggs Flavorful Party Snack

May 21, 2025 by Chef Tavio
To make Jalapeño Popper Deviled Eggs, gather these simple ingredients: - 6 large eggs - 3 tablespoons cream cheese, softened - 1 tablespoon mayonnaise - 1 tablespoon Dijon mustard - 2 fresh jalapeños, finely chopped (seeds removed for less heat if desired) - 1/4 cup shredded cheddar cheese - 1 tablespoon fresh cilantro, chopped - Salt and pepper to taste - 2 tablespoons panko bread crumbs - Olive oil for drizzling If you want to swap any ingredients, I have some great ideas! - Instead of cream cheese, try using Greek yogurt for a lighter option. - You can use sour cream in place of mayonnaise for a tangy twist. - If you prefer, switch out jalapeños with mild peppers like poblano for less heat. - For a different flavor, use pepper jack cheese instead of cheddar. - Fresh parsley can replace cilantro if you don't like its taste. When picking jalapeños, look for firm and shiny peppers. They should feel heavy for their size. The color should be a vibrant green, with no soft spots. If you want more heat, choose smaller peppers as they tend to be spicier. You can find fresh jalapeños at farmers' markets or grocery stores. Always check for freshness before buying. This ensures your deviled eggs will have the best flavor. For more details on making this recipe, check out the Full Recipe. To start, we need to hard boil the eggs. Grab six large eggs and place them in a pot. Cover them with cold water. Bring the water to a rolling boil. Once boiling, lower the heat to a gentle simmer. Cook the eggs for 9 to 12 minutes. This depends on how firm you like the yolks. When they finish cooking, take them out and put them in an ice bath. This cools them down fast and makes peeling easier. Next, let's prepare the egg filling. Once the eggs are cool, peel them gently. Slice each egg in half lengthwise. Carefully remove the yolks and put them in a mixing bowl. Set the empty egg whites aside on a platter. Now, it’s time to mix the yolks. Add 3 tablespoons of softened cream cheese, 1 tablespoon of mayonnaise, and 1 tablespoon of Dijon mustard to the yolks. Then, add the finely chopped jalapeños, 1/4 cup of shredded cheddar cheese, and 1 tablespoon of chopped cilantro. Season it all with salt and pepper. Use a fork to mash everything together until it is smooth and well mixed. Now we’ll fill the egg whites. You can use a spoon or a piping bag for this. Neatly fill each egg white half with the yolk mixture. Make sure to create a nice mound on top. This adds to the look and taste. To add some crunch, mix 2 tablespoons of panko bread crumbs with a drizzle of olive oil in a small bowl. Sprinkle this mixture over the filled eggs. It gives a great texture. For extra flair, you can garnish with a small slice of jalapeño or sprinkle some smoked paprika on top. Check out the Full Recipe for more details on this tasty treat! To make the filling creamy, use softened cream cheese. Beat it well with the egg yolks. This process helps to create a smooth blend. You can also add a bit more mayonnaise if you want it creamier. The key is to avoid lumps, so mix until smooth. Do you want less heat? Simply remove the seeds from the jalapeños. You can also use fewer jalapeños for a milder flavor. If you love spice, leave the seeds in. For an extra kick, add a dash of hot sauce. This way, you can tailor the heat to your taste. Presentation matters! Arrange your deviled eggs on a colorful platter. Garnish each egg with a slice of jalapeño or some fresh cilantro. It adds beauty and flavor. Sprinkle panko crumbs over the top for a crunchy finish. Serve them at your next party for a fun snack. These deviled eggs are sure to impress your guests. For the full recipe, check out the details above. {{image_4}} You can get creative with your fillings. Try adding cooked bacon bits for a smoky flavor. Crumbled feta cheese gives a tangy kick. For a sweet touch, mix in some chopped sun-dried tomatoes. Each addition makes these deviled eggs even more unique. Switching up the cheese is an easy way to change the taste. Cream cheese is creamy and rich, but you can use goat cheese for a tangy twist. Pepper jack cheese adds a spicy kick. You can also play with spices. Adding a pinch of cumin or smoked paprika can give these eggs a whole new vibe. To make these eggs vegetarian, just skip the bacon. For a vegan version, use tofu instead of eggs. Blend silken tofu with the same ingredients for a creamy filling. You can also swap the cream cheese for vegan cream cheese. This keeps the dish delicious and plant-based. These variations make Jalapeño Popper Deviled Eggs fun and exciting! You can explore different flavors and textures. Check out the Full Recipe for more ideas! Store leftover Jalapeño Popper Deviled Eggs in the fridge. Place them in an airtight container. Make sure to cover them well. They will stay fresh for up to three days. If you leave them out, they can spoil quickly. So, always put them back in the fridge after serving. For best results, use glass or plastic containers with tight lids. These containers help keep the eggs fresh. If you don’t have a lid, you can cover the container with plastic wrap. This keeps air out and moisture in. Avoid using metal containers, as they can change the flavor. I don’t recommend freezing Jalapeño Popper Deviled Eggs. The texture changes when thawed. The eggs can become watery, which is not what you want. If you need to store them longer, consider freezing the filling only. You can freeze it in a bag or container. When ready to use, let it thaw in the fridge overnight. Then, fill fresh egg whites for the best taste. For the complete recipe, check out the [Full Recipe]. To reduce the heat in your Jalapeño Popper Deviled Eggs, remove the seeds and membranes from the jalapeños. This part holds most of the spice. You can also use less jalapeño or choose milder peppers like Anaheim or poblano. Mixing in extra cream cheese or mayo can help balance the heat too. Yes, you can use various cheeses! Cream cheese is a must for creaminess, but you can swap cheddar for pepper jack, Gouda, or even feta. Each cheese will bring its own unique flavor. Just remember to keep the balance of textures and taste. These deviled eggs pair well with many dishes. Try serving them with a fresh salad, tortilla chips, or a veggie platter. They also work great alongside spicy dishes like buffalo wings or grilled meat. The flavors complement each other and make for a fun spread at your party. For the full recipe, check out the complete list of ingredients and steps! You learned how to make tasty Jalapeño Popper Deviled Eggs from scratch. We covered important ingredients, substitutions, and sourcing fresh jalapeños. Then, I gave you clear instructions for boiling eggs and making the filling. You also found tips for texture, spice levels, and fun serving ideas. Experiment with variations to suit your taste. Remember to store them well. With this guide, you can enjoy a delicious dish for any occasion. Dive in, get creative, and impress your friends and family.

Looking for a party snack that steals the show? Try these Jalapeño Popper Deviled Eggs! They combine creamy egg filling with a spicy kick from fresh jalapeños. Perfect for gatherings, …

Read more

Categories Appetizers

Air Fryer Taco Bombs Flavorful and Easy Recipe

May 21, 2025 by Chef Tavio
- 1 lb ground beef or turkey - 1 packet taco seasoning - 1 cup refried beans - 1 cup shredded cheddar cheese - 1 can refrigerated crescent roll dough - 1 jalapeño, diced (optional for heat) - Salsa, for dipping - Fresh cilantro, for garnish To make Air Fryer Taco Bombs, you need some tasty ingredients. First, choose your meat. Ground beef or turkey works great. I love using taco seasoning to add flavor. Refried beans and shredded cheddar cheese provide creaminess and depth. For extra fun, get some crescent roll dough. This dough wraps around the filling and becomes crispy in the air fryer. If you enjoy a bit of spice, add diced jalapeño. Serve the taco bombs with salsa for dipping. Don't forget to garnish with fresh cilantro for a pop of color. You can find the Full Recipe for more details on how to cook these tasty bites! 1. Start by heating a skillet over medium heat. Add 1 lb of ground beef or turkey. 2. Cook the meat until it is brown and no longer pink. This will take about 7-10 minutes. 3. Once browned, drain the excess fat from the skillet. This keeps your filling light and tasty. 1. Sprinkle one packet of taco seasoning over the cooked meat. 2. Add about 2 tablespoons of water to help mix the seasoning well. 3. Stir and let it cook for an additional 2-3 minutes. This blends the flavors nicely. 4. Turn off the heat, then mix in 1 cup of refried beans and 1 cup of shredded cheddar cheese. 5. If you like heat, add in 1 diced jalapeño. This adds a spicy kick. 1. Preheat your air fryer to 375°F (190°C) for about 5 minutes while you prepare the dough. 2. Unroll 1 can of refrigerated crescent roll dough on a clean surface. 3. Separate the dough into triangles and pinch the edges to create solid pieces. 4. Place about 2 tablespoons of the taco filling in the middle of each triangle. 5. Carefully fold the edges of the dough over the filling. Pinch tightly to seal them. 1. Lightly spray or brush the air fryer basket with oil. This keeps the taco bombs from sticking. 2. Arrange the filled taco bombs in the basket. Make sure to leave space between each one. 3. Air fry the taco bombs for 10-12 minutes. They should be golden brown and crispy. 4. Flip them halfway through cooking for even browning. These steps will give you flavorful and easy Air Fryer Taco Bombs. For the complete recipe, check the [Full Recipe]. To make sure your taco bombs cook evenly, space them well in the air fryer. This allows hot air to circulate around each bomb. I recommend setting your air fryer to 375°F (190°C). This temperature cooks the dough perfectly while heating the filling inside. When serving taco bombs, arrange them on a colorful platter. You can drizzle extra salsa around them for a fun touch. Adding a sprinkle of chopped cilantro on top makes the dish look fresh and inviting. For parties, serve with small bowls of salsa for dipping. This makes it easy for guests to enjoy! To boost flavor, add spices to the filling. Consider adding smoked paprika or chili powder for depth. If you like heat, try diced jalapeños or a dash of hot sauce. Toppings can include sour cream or guacamole, enhancing the dish further. For a unique twist, try adding corn or diced bell peppers to the mix. You can find the full recipe for these delicious taco bombs [here](insert link). {{image_4}} You can easily change the flavor of your taco bombs. If you want a vegetarian twist, use black beans instead of meat. They add a nice texture and flavor. Just mash them a bit before mixing. You can also add corn for some sweetness. For those who love heat, make spicy taco bombs. Add diced jalapeños or other hot peppers to the filling. This gives a great kick to each bite. You can adjust the amount based on your taste. Remember, a little spice can go a long way! When it comes to dipping sauces, the options are endless. Salsa is a classic choice, but you can try guacamole or sour cream too. Each dip adds its own flair to the taco bombs. You could also mix salsa with a bit of sour cream for a creamy dip. For serving ideas, think about making these taco bombs an appetizer. Pair them with a fresh salad or some crunchy veggies. You can even set up a taco bomb bar. Let your guests choose their own toppings and dips. This makes for a fun and tasty experience! To keep your taco bombs fresh, cool them first. Place them on a rack. This helps air flow around them and prevents sogginess. Once cool, put them in an airtight container. Store them in the fridge for up to three days. Label the container with the date. This way, you won’t forget when you made them. When you are ready to eat leftovers, you want them crispy. Preheat your air fryer to 350°F (175°C). Place the taco bombs in the basket. Heat them for about 5 to 7 minutes. This will make them warm and crispy again. Avoid using a microwave, as that can make them soft. If you want to save taco bombs for later, freezing is easy. First, let them cool completely. Then, wrap each one in plastic wrap. Place the wrapped bombs in a freezer-safe bag. Squeeze out as much air as you can before sealing it. They can stay in the freezer for up to three months. To thaw, move them to the fridge overnight before reheating. Enjoy your taco bombs anytime! For the full recipe, check out the earlier sections. An air fryer cooks food by circulating hot air. It uses a fan and a heating element. This method can make food crispy without much oil. The hot air cooks food evenly. Air frying is faster than traditional frying. It also reduces added fat and calories. You can make tasty meals with less guilt. Yes, you can use various meats for your taco bombs. Ground chicken or pork works well. You can also use plant-based options like lentils or tofu. Each meat adds a unique flavor. Mix and match to find your favorite combo. To make your taco bombs healthier, use lean meat. Ground turkey is a great choice. You can swap refried beans for black beans. Use low-fat cheese or skip it altogether. You can also add more veggies in the filling. Try diced bell peppers or corn for added nutrition. Pair your taco bombs with a fresh salad. A simple green salad works great. You can also serve them with guacamole or salsa. Try corn on the side for a sweet crunch. For a fun twist, add Mexican rice or quinoa. These sides make for a well-rounded meal. For the full recipe, check out the earlier section. Air Fryer Taco Bombs are easy and fun to make. You learned about the main ingredients, like ground beef, refried beans, and cheese. I shared step-by-step instructions to prepare and cook them perfectly. You found tips for serving and storing your taco bombs, plus variations to try. These tasty bites are great for any meal or party. Enjoy creating your own tasty twist!

Craving a quick, tasty snack? Look no further than these Air Fryer Taco Bombs! Packed with ground beef, refried beans, and gooey cheddar cheese, they’re a fun twist on classic …

Read more

Categories Appetizers

Taco Ranch Bites Flavorful Appetizer Delight

May 21, 2025 by Chef Tavio
- 1 lb ground beef or turkey - 1 packet taco seasoning - 1 cup ranch dressing - 1 cup shredded cheddar cheese - 1 cup diced tomatoes - ½ cup chopped green onions - 1 cup corn tortillas, cut into triangles - 1 tablespoon olive oil - Salt and pepper to taste - Fresh cilantro for garnish (optional) To make Taco Ranch Bites, you need simple and fresh ingredients. The ground meat, beef or turkey, gives a hearty flavor. Taco seasoning adds the authentic taste we all love. Ranch dressing adds creaminess, while cheese brings richness. Diced tomatoes and green onions add a fresh crunch. If you want to mix it up, try these options: - Use plant-based ground meat for a vegetarian choice. - For dairy-free, look for vegan ranch dressing. - Use gluten-free tortillas for a lighter version. These substitutes keep the fun alive while meeting dietary needs. Accurate measurements matter. Use a kitchen scale for ground meat. Measure taco seasoning carefully for the best flavor. Chop toppings like onions and tomatoes finely for even bites. This prep makes the cooking process smooth. For an extra touch, prepare your toppings ahead of time. This way, you can assemble your bites quickly when it’s time to eat. Enjoy the process of cooking, and don’t rush! 1. Preheat the oven to 350°F (175°C). This step is key for crispy tortilla triangles. 2. Prepare a baking sheet by lining it with parchment paper. This makes cleanup easy. 3. Cook the ground meat in a large skillet over medium heat. Add 1 tablespoon olive oil first. 4. Add 1 lb of ground beef or turkey to the skillet. Break it apart with a spatula. 5. Brown the meat for about 5-7 minutes until it’s no longer pink. 6. Drain excess fat from the skillet. This keeps the bites from being greasy. 7. Mix in 1 packet taco seasoning and a splash of water. Stir well and let it simmer for 5 minutes. 8. Season with salt and pepper to taste. This step adds flavor to the meat. 1. Spread tortilla triangles on the lined baking sheet in a single layer. 2. Bake for 8-10 minutes until crispy and lightly golden. Watch them closely, so they don’t burn. 3. Combine the cooked meat with 1 cup ranch dressing, 1 cup shredded cheddar cheese, 1 cup diced tomatoes, and ½ cup chopped green onions. Mix well. 1. Remove the baked tortillas from the oven. 2. Spoon the taco ranch mixture onto each triangle. Don't be shy; make it generous! 3. Return the tray to the oven and bake for an additional 5 minutes. This melts the cheese to gooey perfection. 4. Take them out and let cool for a minute. If you like, garnish with fresh cilantro for extra flair. For the full recipe, check the details above. Enjoy your delicious Taco Ranch Bites! To ensure your meat is fully cooked, use a meat thermometer. Ground beef or turkey should reach 160°F. When you cook the meat, break it apart well. This helps it cook evenly. To avoid soggy tortilla bites, bake them until they are crispy. Keep an eye on them while baking. A light golden color is a good sign. You can also add a bit of olive oil to the triangles before baking. This helps them crisp up nicely. The best dips to pair with Taco Ranch Bites are salsa and guacamole. They add fresh flavors. You can also try sour cream or extra ranch dressing. They really enhance the taste. For creative platter ideas, arrange the bites on a large board. Add colorful veggies like bell peppers and cherry tomatoes. This makes the platter look fun and inviting for guests. One common mistake is overcooking the tortilla triangles. When they burn, they lose their crunch and taste. Keep the baking time short and check often. Another mistake is not mixing the toppings evenly. Make sure each bite gets a good amount of all the toppings. This ensures every bite is packed with flavor. {{image_4}} For a twist, you can make Taco Ranch Bites vegetarian. You can replace ground beef or turkey with plant-based protein. This keeps all the flavor while being meat-free. You can use crumbled tofu or lentils for a hearty option. If you want more heat, add jalapeños or hot sauce. This gives a spicy kick that many enjoy. Just chop up some fresh jalapeños and mix them into the meat or topping. You can also drizzle hot sauce over the bites for extra flavor. You can serve these bites in miniature form. This is perfect for parties or game days. Just use smaller tortilla triangles and adjust the toppings. They make great finger foods. Another fun idea is to serve Taco Ranch Bites in a taco salad. Layer the tortilla chips, meat mixture, and toppings on a plate. Add some lettuce for crunch. This gives everyone a chance to enjoy the same great flavors in a new way. Garnishing with fresh herbs can make a big difference. You can use cilantro, parsley, or chives. These add color and fresh taste to your dish. Just sprinkle them on top right before serving. Choose creative serving dishes to impress your guests. Use colorful platters or tiered stands. These can highlight the vibrant toppings and make your meal look appealing. You can even use small bowls for dips, like extra ranch dressing. For the full recipe, check out the Taco Ranch Bites section. Store Taco Ranch Bites in airtight containers. This keeps them fresh and tasty. Make sure to cool them completely before sealing. This helps prevent excess moisture. If you have extra toppings, store them separately. This keeps everything fresh and crisp. The best way to reheat Taco Ranch Bites is in the oven. Preheat your oven to 350°F (175°C). Place the bites on a baking sheet for even heating. You can use a microwave, but it may make them soggy. If using a microwave, cover them with a damp paper towel. This helps keep moisture in while reheating. You can freeze Taco Ranch Bites before or after baking. To freeze before baking, place them on a tray and freeze until firm. Then, transfer them to a freezer bag. If they're baked, let them cool before freezing. When ready to eat, thaw in the fridge overnight. Bake from frozen for about 10-15 minutes. Enjoy your Taco Ranch Bites fresh from the oven! For the full recipe, check the earlier section. You can use lean ground turkey instead of ground beef. Choose low-fat ranch dressing for less fat. Use reduced-fat cheese to cut calories. Consider whole grain tortillas for added fiber. Fresh veggies can add crunch and flavor without many calories. Yes, you can prep the meat mixture and store it in the fridge. Bake the tortilla triangles a day before serving. Assemble the bites just before baking for best results. This makes it easy to serve at parties. Look for pre-made options at grocery stores like Walmart or Publix. Some local delis or restaurants may offer them too. Check the frozen food aisle for easy, ready-made choices. Serve them hot with extra ranch dressing on the side. Pair with a cold drink like soda or iced tea. Add fresh veggies, like carrot sticks, for a nice crunch. Arrange on a platter for a fun party vibe. For more ideas, check out the Full Recipe. Taco Ranch Bites are fun, tasty, and easy to make. We covered key ingredients and some simple swaps. You now know how to prep and bake without sogginess. I shared tips to avoid common mistakes and how to present them well. Try different flavors and ways to serve them. With these bites, fun and creativity are in your hands. Enjoy making and sharing this dish with others!

Looking for a fun and tasty appetizer? Try my Taco Ranch Bites! These crispy, cheesy delights pack bold flavors into every bite. Perfect for parties or cozy nights in, they’re …

Read more

Categories Appetizers
Older posts
Newer posts
← Previous Page1 … Page80 Page81 Page82 … Page84 Next →

TASTED NEST

Where Flavor Finds a Home 🍳🏡 — warm, simple, and crave-worthy recipes made for real life, from stovetop mornings to backyard dinners.

PAGES

Home About Contact Privacy Policy Terms & Conditions Cookie Policy GDPR Policy Copyright Policy Disclaimer

CATEGORIES

Appetizers Desserts Salads Breakfast Dinner

Contact

  • Pinterest
  • Mail
Copyright © 2025 Tasted Nest. All rights reserved.