Skip to content
Tasted Nest
  • Home
  • Appetizers
  • Desserts
  • Salads
  • Breakfast
  • Dinner
  • Privacy Policy
  • Contact
  • About

Chef Tavio

Arancini di Riso: Sicilian Rice Balls Delightful Recipe

May 19, 2025 by Chef Tavio
- 2 cups Arborio rice - 4 cups vegetable broth - 1 medium onion, finely chopped - 2 cloves garlic, minced - 1 cup grated mozzarella cheese - 1/2 cup grated Parmesan cheese - 1/2 cup frozen peas, thawed - 1 teaspoon dried oregano - 1/2 teaspoon red pepper flakes (optional) - Salt and pepper to taste - 1 cup all-purpose flour - 3 large eggs, beaten - 2 cups breadcrumbs (preferably panko) - Vegetable oil for frying Arborio rice is key for its creamy texture. It absorbs flavors well and gives a rich mouthfeel. Vegetable broth adds depth to each bite. Onion and garlic bring a savory base to the filling. The cheeses create a melty, gooey center, while peas add a pop of color and sweetness. Oregano and red pepper flakes give a hint of herbaceous and spicy notes. The flour, eggs, and breadcrumbs form a crunchy coating when fried. Each ingredient plays a part in making these rice balls delicious. If you cannot find Arborio rice, use a short-grain rice. For a dairy-free option, try vegan cheese. Instead of mozzarella, you can use a blend of vegan cream cheese and nutritional yeast for that cheesy flavor. If you want a different flavor, swap out the peas for diced bell peppers or cooked mushrooms. For gluten-free arancini, use gluten-free breadcrumbs and flour. These substitutes keep the dish tasty while accommodating different diets. Making arancini di riso is fun and easy. First, gather your ingredients. You need Arborio rice, broth, onions, garlic, cheeses, peas, and some spices. Set aside flour, eggs, and breadcrumbs for breading. Lastly, prepare oil for frying. 1. Prepare the Broth: Heat 4 cups of vegetable broth in a large pot. Keep it warm on low heat. 2. Sauté the Aromatics: In another pan, heat olive oil. Add 1 medium onion and 2 cloves of minced garlic. Cook for 3-4 minutes. Stir often until soft. 3. Toast the Rice: Add 2 cups of Arborio rice to the pan. Stir for 2-3 minutes. This helps the rice soak up flavors. 4. Cook the Rice: Slowly pour in the warm broth. Add it one ladle at a time. Stir often. Cook for 18-20 minutes until creamy and al dente. 5. Combine the Ingredients: Take the rice off the heat. Mix in 1 cup of mozzarella, ½ cup of Parmesan, ½ cup of thawed peas, and spices. Season with salt and pepper. Let it cool to room temperature. 6. Form the Arancini: Once cool, scoop small portions of the rice mix. Roll them into balls, about the size of golf balls. 7. Set Up the Breading Station: On three plates, place flour, beaten eggs, and breadcrumbs. 8. Bread the Rice Balls: Coat each ball in flour first. Then dip it in eggs and roll in breadcrumbs. Press lightly to make sure they stick. 9. Fry the Arancini: Heat oil in a deep skillet to around 350°F (175°C). Carefully add the balls in batches. Fry for 3-4 minutes on each side until golden brown. 10. Drain Excess Oil: Transfer the fried arancini to a paper towel-lined plate. This helps remove extra oil. 11. Serve: Enjoy your arancini hot! Serve with spicy tomato sauce for a tasty dip. For a lovely presentation, serve arancini on a wooden platter. Add fresh basil leaves for color. A small bowl of marinara sauce will enhance the dish. These tips make your meal look and taste great! To get a nice crisp on your arancini, use panko breadcrumbs. They create a light, crunchy shell. Make sure your oil is hot enough before frying. If the oil is too cool, the balls absorb more oil and become soggy. Fry in small batches. This keeps the temperature steady and helps them cook evenly. One common mistake is rushing the cooling step. If the rice mixture is warm, it won’t hold together well. Another mistake is not seasoning enough. Always taste your rice mixture before forming the balls. Lastly, avoid overcrowding the pan when frying. This can lead to uneven cooking and soggy arancini. Use Arborio rice for the best texture. It has a high starch content, which makes the arancini creamy inside. Other types of short-grain rice can work, but they may not give you the same creamy result. Avoid long-grain rice, as it won’t stick together well. {{image_4}} You can easily make arancini vegetarian by skipping the cheese. Use more veggies instead. Try mushrooms, spinach, or roasted peppers. For vegan arancini, swap cheese for cashew cream or nutritional yeast. It gives a nice cheesy flavor without dairy. Get creative with your fillings! You can use: - Chopped olives for a briny touch - Artichoke hearts for a unique twist - Ricotta cheese for a creamy bite - Sun-dried tomatoes for a rich flavor Each filling adds its own flair to the dish. For the holidays, think about seasonal flavors. Use butternut squash in fall. Add cranberry sauce for a sweet touch. In summer, fill with fresh basil and tomatoes. These seasonal twists keep your arancini exciting all year round. To keep your arancini fresh, let them cool first. Then, place them in an airtight container. Store them in the fridge for up to three days. If you want to enjoy them later, avoid stacking them. This helps prevent them from sticking together. When you’re ready to eat, preheat your oven to 350°F (175°C). Place the arancini on a baking tray. Heat them for about 10-15 minutes or until warm. This method keeps them crispy. You can also reheat them in an air fryer for about 5 minutes. This adds a nice crunch. To freeze arancini, first let them cool completely. Arrange them in a single layer on a baking sheet. Freeze them for about an hour. Once frozen, transfer them to a freezer bag or container. They will stay good for up to three months. When you're ready to enjoy them, bake straight from the freezer. Heat at 350°F (175°C) for 20-25 minutes. This way, you can savor that delicious taste anytime! Arancini di Riso comes from Sicily, Italy. The name means “little oranges.” These rice balls got their name from their shape and color. They are a popular street food. Traditionally, locals filled them with meat, peas, or cheese. Over time, many recipes have evolved. Today, you can find many tasty variations. Yes, you can make Arancini di Riso ahead of time. Prepare the rice mixture and form the balls. You can store them in the fridge for one day. If you want to keep them longer, freeze the uncoated balls. When ready to cook, just coat them in flour, egg, and breadcrumbs. Then fry them as usual. To prevent arancini from falling apart, make sure the rice mixture is cool. If the mix is too warm, it won’t hold shape well. Also, make sure to coat them properly. Flour, egg, and breadcrumbs create a strong shell. Fry them in hot oil. This helps them stay together and become crispy. Many sauces pair well with arancini. A classic choice is marinara sauce. It adds a nice tang. You can also use spicy tomato sauce for extra flavor. Aioli or garlic sauce work well too. For a twist, try pesto or a creamy cheese dip. Each sauce brings out the flavors of the arancini. You can find the full recipe for Sicilian Sunshine Arancini in this article. It includes all the ingredients and steps needed to make these delightful treats. Enjoy making them! Arancini di Riso are delicious rice balls that everyone can enjoy. We explored the ingredients, cooking steps, and tips for a perfect dish. Remember, the right rice and crispness make all the difference. You can get creative with fillings and try different variations. Don’t forget to store and reheat properly for later enjoyment. I hope these insights inspire you to make Arancini di Riso a staple in your kitchen. Happy cooking!

Welcome to the tasty world of Arancini di Riso, the famous Sicilian rice balls! These delightful bites are crispy on the outside and creamy on the inside, perfect for a …

Read more

Categories Appetizers

Homemade Mozzarella Sticks in 30 Minutes Delight

May 19, 2025 by Chef Tavio
Making homemade mozzarella sticks is fun and simple. You will need a few key ingredients to get started. Here’s the list: - 12 ounces fresh mozzarella cheese sticks - 1 cup all-purpose flour - 2 large eggs - 2 cups seasoned breadcrumbs - 1 teaspoon garlic powder - 1 teaspoon Italian seasoning - Vegetable or canola oil for frying - Marinara sauce for dipping These ingredients are easy to find at your local grocery store. Fresh mozzarella is the star of the show, giving you that gooey, melty center. The flour helps the cheese stick to the coating. The eggs create a nice bond, while the seasoned breadcrumbs add flavor and crunch. Garlic powder and Italian seasoning boost the taste, making each bite special. Finally, the oil is essential for frying, giving you that crispy texture. Gather all these items before you start. Having everything ready helps make the cooking process smooth. I love to have my ingredients prepped and organized. It saves time and makes cooking a joy. You can find the full recipe with detailed steps to guide you through the cooking process. Enjoy making these delicious treats! 1. Cut the mozzarella sticks: Start by cutting each mozzarella stick in half. This gives you shorter pieces that cook faster and melt better. You want each piece to be about 3 inches long. 2. Set up a breading station: Next, gather three bowls for breading. In the first bowl, add 1 cup of all-purpose flour. In the second bowl, crack 2 large eggs and add 1 tablespoon of water. Whisk until smooth. In the third bowl, mix 2 cups of seasoned breadcrumbs with 1 teaspoon of garlic powder and 1 teaspoon of Italian seasoning. This will enhance the flavor of your mozzarella sticks. 1. Coating with flour: Take a mozzarella stick and roll it in the flour. Make sure it’s fully coated. Shake off any extra flour to prevent clumping. 2. Dipping in egg wash: Next, dip the floured stick into the egg mixture. Cover it well, allowing the excess to drip back into the bowl. 3. Rolling in breadcrumbs: Finally, roll the stick in the breadcrumb mix. Press lightly to ensure the crumbs stick well. Repeat this for all the mozzarella sticks. 1. Heating the oil: Pour vegetable or canola oil into a large skillet, about 1 inch deep. Heat on medium. To check if it’s ready, drop in a small piece of breadcrumb. If it sizzles, you’re good to go. 2. Frying in batches: Carefully place a few mozzarella sticks in the hot oil. Fry for 1-2 minutes on each side. You want them to be golden brown and crispy. Avoid overcrowding the skillet, as this can lower the oil temperature. 3. Draining excess oil: Once they are done, transfer the sticks to a plate lined with paper towels. This will help soak up any extra oil. Enjoy your homemade mozzarella sticks while they are hot, paired with warm marinara sauce for dipping. For the full recipe, check out Cheesy Bliss Mozzarella Sticks. To get that crispy outside and gooey inside, focus on your oil. Keep the oil at 350°F to 375°F. If it’s too cool, your mozzarella sticks will soak up oil. Too hot? They will burn. Use a thermometer for best results. Coating is key. Start with flour, then dip in egg, and finally roll in breadcrumbs. Make sure to coat evenly to avoid any bare spots. Press the breadcrumbs on firmly so they stick well. This step is vital for a perfect crunch. Fresh herbs can add a lovely touch. Try mixing in some chopped basil or parsley into your breadcrumb mix. This will elevate your sticks and give them a fresh taste. For seasoning, use garlic powder and Italian seasoning as base flavors. You can also add a pinch of cayenne for a bit of heat. Experiment with different spices to find your favorite blend. Serve your mozzarella sticks with warm marinara sauce. The classic pairing complements the cheesy goodness. Dip each stick and savor the flavor. You can also try other sauces. Ranch dressing or spicy aioli can add a fun twist. Mix and match to find your perfect dip! For a party, set up a small sauce bar for everyone to enjoy. These tips will help you craft the perfect homemade mozzarella sticks. For the full recipe, check back to create your cheesy delights! {{image_4}} You can use many cheeses for fun. Cheddar and pepper jack are great choices. They add a nice kick. Just cut them into sticks like mozzarella. This gives you a tasty twist. You can also make stuffed mozzarella sticks. Try adding cheese or meats inside. Use a thin layer of mozzarella to wrap around your filling. This makes a gooey center. Stuffed mozzarella sticks are a fun way to surprise your guests. If you want a healthier option, you can bake these sticks. Set your oven to 400°F. Place the breaded sticks on a baking sheet. Spray them lightly with oil. Bake for about 10-12 minutes. Flip them halfway through. This method gives you a crispy texture with less oil. Another modern way is using an air fryer. Preheat your air fryer to 375°F. Cook the sticks in a single layer for 6-8 minutes. This method is quick and easy. The air fryer gives a nice crunch too. Adding spices to your breadcrumbs can elevate your dish. Try some paprika for a smoky flavor. Cajun spice adds a nice kick too. Mix in some onion powder for extra taste. You can also experiment with different herbs. Fresh basil or oregano can brighten up the flavor. Just chop them finely and mix them into the breadcrumbs. Each bite will be full of flavor. For the full recipe, check out the Cheesy Bliss Mozzarella Sticks recipe above. To keep your mozzarella sticks fresh, store them in the fridge. Place them in an airtight container. This helps prevent them from drying out. If you have leftover marinara sauce, store it separately. Use a small container to keep it fresh too. For best texture, eat the leftovers within three days. If you want to save your mozzarella sticks for later, freezing is a great option. First, let the cooked sticks cool completely. Then, place them in a single layer on a baking sheet. Freeze them for about an hour. This prevents them from sticking together. Once frozen, transfer the sticks to a freezer bag. Make sure to squeeze out as much air as possible. They can last up to three months in the freezer. When you are ready to eat them, you can reheat them straight from the freezer. Simply bake them in the oven at 400°F for about 10-12 minutes. This keeps them crispy and delicious. In the fridge, your mozzarella sticks will last about three days. If you freeze them, they can last up to three months. Always check for signs of spoilage before eating. Look for any off smells or changes in texture. If they seem off, it’s best to toss them. Enjoy your mozzarella sticks fresh for the best taste! For the full recipe, check out the previous section. Homemade mozzarella sticks can last 3 to 5 days in the fridge. Store them in an airtight container. For longer storage, freeze them. To freeze, place the sticks in a single layer on a baking sheet. Once frozen, transfer them to a freezer bag. They can last up to 3 months in the freezer. To reheat, bake them in the oven at 400°F for about 10 minutes. This keeps them crispy. You can use low-fat cheese, but the texture may change. Low-fat cheeses often do not melt as well. They can become rubbery instead of gooey. If you prefer a lighter option, consider part-skim mozzarella. It still melts nicely. The flavor may also be milder, so you might want to adjust your seasonings. Mozzarella sticks pair well with various sides and drinks. Classic choices include marinara sauce for dipping. You can also serve them with ranch dressing or spicy aioli. For sides, try a fresh salad or crispy fries. As for drinks, cold soda or a light beer works great. These pairings enhance the enjoyment of your cheesy treats. In this post, you learned how to make crispy mozzarella sticks. We covered all the steps, from preparing the cheese to frying them perfectly. I shared tips on achieving great texture and flavor. You even discovered variations to suit your taste. Remember, the key is in the details—like keeping the oil hot and using fresh herbs. Enjoy your mozzarella sticks with your favorite dip. With a little practice, you’ll impress everyone with this tasty treat!

Are you ready to impress your friends with a tasty snack? In just 30 minutes, you can whip up homemade mozzarella sticks that are crispy on the outside and gooey …

Read more

Categories Appetizers

Spicy Honey Garlic Shrimp Tasty and Easy Recipe

May 18, 2025 by Chef Tavio
For this spicy honey garlic shrimp, you will need: - 1 lb (450g) large shrimp, peeled and deveined - 3 tablespoons honey - 2 tablespoons soy sauce - 3 cloves garlic, finely minced - 1 teaspoon chili flakes (adjust based on heat preference) - 1 tablespoon olive oil - 1 teaspoon sesame oil - 1 tablespoon freshly squeezed lime juice - Salt and freshly ground black pepper to taste - Chopped green onions and sesame seeds for garnish You can swap some ingredients if needed. - Use maple syrup instead of honey for a vegan option. - Tamari can replace soy sauce for a gluten-free choice. - Ginger adds a nice twist; use 1 teaspoon of minced ginger. - For a milder dish, skip the chili flakes or use sweet paprika. - Any oil can work instead of olive oil, like canola or avocado oil. Always choose fresh shrimp for the best taste. Look for shrimp with a subtle ocean smell. Avoid any with a strong fishy odor. If buying frozen shrimp, check that they are flash-frozen. This keeps them fresh. Also, use fresh garlic for a sharper flavor. Fresh lime juice is key for brightness. The right ingredients make all the difference in this recipe. For the best dish, use high-quality honey and soy sauce. To make Spicy Honey Garlic Shrimp, start by mixing the marinade. In a bowl, combine the honey, soy sauce, minced garlic, chili flakes, lime juice, salt, and pepper. Whisk until well mixed. This zesty blend brings great flavor to the shrimp. Next, add the shrimp to the marinade. Make sure each shrimp is coated well. Cover the bowl and let it sit for at least 15 minutes. If you have time, let it marinate for up to 30 minutes. This step is key for flavor! After marinating, heat a large skillet over medium-high heat. Pour in the olive oil and sesame oil. Wait until the oils are hot but not smoking. Carefully add the shrimp and marinade to the skillet. Cook each side for 2-3 minutes. The shrimp should turn pink and opaque when done. Marinating the shrimp is simple but key. The longer you marinate, the better the taste. At least 15 minutes is good, but 30 minutes is even better. This time allows the flavors to soak into the shrimp. If you want a spicier kick, add more chili flakes. Make sure to stir the shrimp in the marinade. This helps every piece get coated. If you use frozen shrimp, thaw them first. Pat them dry before adding to the marinade. Cooking shrimp can be tricky. You want them cooked but not overdone. Here are some tips for perfect shrimp: - Watch the color: Shrimp should turn pink and opaque. - Don’t overcrowd: If your skillet is too full, the shrimp will steam instead of sear. Cook in batches if needed. - Use high heat: This helps get a nice sear on the shrimp. When the shrimp are done, remove them from the heat right away. This keeps them tender and juicy. Feel free to check out the [Full Recipe] for more details. Enjoy your cooking! To make your spicy honey garlic shrimp even better, try using fresh herbs. Cilantro or parsley can add a nice touch. You might also add lime zest for a bright, fresh flavor. If you want more heat, add extra chili flakes, or try fresh chili peppers. Adjust the soy sauce for a saltier kick or use low-sodium soy sauce for a lighter taste. Mixing in a splash of rice vinegar can bring a lovely tang. These small tweaks can really boost the taste of your dish. One big mistake is overcooking the shrimp. Cook them just until they turn pink and opaque. If they get tough, you won't enjoy them as much. Another error is not marinating long enough. Give them at least 15 minutes to soak up all the flavors. Also, don’t skip the oil in the pan. It helps to sear the shrimp nicely and prevents sticking. Lastly, remember to taste your marinade. Adjust it if needed before adding the shrimp. You don't need fancy tools to make this dish. A large skillet works best for cooking shrimp. Use a mixing bowl for the marinade. A whisk helps blend everything well. For peeling shrimp, a good pair of kitchen scissors can be handy. A spatula is great for flipping shrimp in the pan. If you want to get fancy, a zester or grater is useful for lime zest. These simple tools will help you create a delicious meal with ease. For the complete recipe, check out the Full Recipe. {{image_4}} You can make this dish even better by adding vegetables. Bell peppers, snap peas, or broccoli work well. Chop them into small pieces. Add them to the shrimp during the last few minutes of cooking. This gives you a colorful and healthy meal. Plus, the veggies soak up the tasty sauce. Want a different flavor? You can switch up the sauce. Try adding sriracha for more heat. A dash of lime zest can brighten the dish too. If you like a sweet twist, mix in orange juice instead of lime juice. You can also use teriyaki sauce for a fun change. If you're watching carbs, this recipe is a great fit. Shrimp is naturally low in carbs. You can serve it over cauliflower rice instead of regular rice. This keeps the meal light and healthy. Another option is to skip the rice and enjoy the shrimp with a fresh salad. Both choices keep your meal delicious and filling. For full details on making Spicy Honey Garlic Shrimp, check out the Full Recipe. You can keep leftover spicy honey garlic shrimp in the fridge. Store them in an airtight container. This helps keep them fresh and tasty. They should last up to three days. Avoid leaving them out for too long to prevent spoilage. If you want to save shrimp for later, freezing is a great option. Place the shrimp in a freezer-safe bag or container. Make sure to remove as much air as possible. This helps prevent freezer burn. You can freeze them for up to two months. Just remember to label the bag with the date. When it's time to enjoy your leftovers, reheat them gently. You can use a skillet over low heat. This keeps the shrimp tender and juicy. Stir occasionally to ensure even heating. You can also use the microwave if you're in a hurry. Just heat in short bursts to avoid overcooking. For the best flavor, add a splash of lime juice before serving. For the full recipe, check out the Spicy Honey Garlic Shrimp recipe. You should marinate shrimp for at least 15 minutes. For more flavor, up to 30 minutes works well. The longer you marinate, the deeper the flavors will be. Just be careful not to over-marinate. If you leave shrimp too long in the marinade, they can become mushy. Yes, you can use frozen shrimp! Just remember to thaw them first. You can do this by placing them in cold water for about 10-15 minutes. Once thawed, peel and devein them if needed. Then, you can follow the recipe as usual. Spicy Honey Garlic Shrimp pairs great with several sides. Here are some ideas: - Steamed jasmine rice - Quinoa - Fresh greens or salad - Stir-fried vegetables - Noodles with a light sauce These sides complement the bold flavors of the shrimp. For a bright touch, squeeze extra lime juice over your dish. You can find the full recipe above for more details on making this tasty meal! We've covered key ingredients, cooking steps, and valuable tips for making Spicy Honey Garlic Shrimp. Freshness matters, and substitutions can help adjust flavors. Cook shrimp just right for the best taste. Remember to try new veggies and sauces for a twist. Store any leftovers properly, and reheating is easy. This dish is simple and fun, and I hope you enjoy making it. Happy cooking!

Get ready to ignite your taste buds with my Spicy Honey Garlic Shrimp recipe! This dish packs a punch of flavor while being super easy to whip up. Whether you’re …

Read more

Categories Appetizers

Cinnamon Swirl Cake with Cream Cheese Frosting Delight

May 18, 2025 by Chef Tavio
- 2 cups all-purpose flour - 2 teaspoons baking powder - 1 teaspoon baking soda - 1 teaspoon salt - ½ cup unsalted butter, softened - 1 ½ cups granulated sugar - 1 cup buttermilk, at room temperature - 3 large eggs, at room temperature - 1 teaspoon vanilla extract - 2 tablespoons ground cinnamon - 1 cup brown sugar, packed - For Frosting: 8 oz cream cheese, softened, ½ cup unsalted butter, softened, 4 cups powdered sugar, 1 teaspoon vanilla extract, 2-3 tablespoons milk When I make this Cinnamon Swirl Cake, I start with the dry ingredients. First, I combine the flour, baking powder, baking soda, and salt in a bowl. I whisk them well to ensure they mix evenly. This step is key for a fluffy cake. Next, I move on to the wet ingredients. In another bowl, I cream the softened butter with the granulated sugar. This takes about 3-4 minutes until it becomes light and fluffy. I then add the eggs one at a time, letting each blend in fully. Finally, I mix in the buttermilk and vanilla extract. For the cinnamon swirl, I combine brown sugar and ground cinnamon in a small bowl. This mixture gives the cake its sweet, warm flavor. For the cream cheese frosting, I blend softened cream cheese and unsalted butter until smooth. I then add powdered sugar and vanilla, mixing until fluffy. If it's too thick, I add a bit of milk to reach the right consistency. These ingredients come together to create a delightful cake. You can find the full recipe to make this treat. Enjoy baking! - Preheat the oven to 350°F (175°C). - Grease and flour a 9x13 inch baking pan. This helps the cake come out easily after baking. - Cream together butter and granulated sugar. Use an electric mixer for best results. - Incorporate eggs and vanilla one at a time. Mix well after adding each egg. - Whisk and combine dry ingredients. This includes flour, baking powder, baking soda, and salt. - Add dry mixture alternating with buttermilk. Start and end with the dry mix to keep the batter smooth. - Mix brown sugar and ground cinnamon in a small bowl. This mixture adds a sweet and spicy flavor. - Layer batter and cinnamon mixture in the pan. Pour half the batter, sprinkle half the cinnamon mix, and repeat. - Bake for 25-30 minutes, check with a toothpick. The toothpick should come out clean when the cake is done. - Beat together cream cheese and butter until smooth. This will be creamy and fluffy. - Add powdered sugar and vanilla extract. Adjust consistency with milk if needed. Spread it generously on the cooled cake. For the full recipe, check the details above. Enjoy baking! - Always ensure all ingredients are at room temperature. - This helps them mix better and create a fluffy cake. - Avoid overmixing the batter. - Overmixing can lead to a dense texture instead of a light one. - Use a spatula for even frosting layers. - This will give your cake a nice, smooth top. - Adjust the frosting consistency to your liking. - If it's too thick, add a bit of milk to help it spread. - Cut the cake into squares or rectangles for serving. - This makes it easy for guests to enjoy. - Consider garnishing with a light sprinkle of cinnamon. - You can also drizzle extra frosting on top for a special touch. For the complete recipe, check the Full Recipe section. {{image_4}} You can easily change the flavor of your cinnamon swirl cake. Adding nuts or chocolate chips to the batter gives it a nice crunch and richness. Try mixing in ½ cup of chopped walnuts or pecans for a nutty twist. If you love chocolate, fold in ½ cup of mini chocolate chips. You can also play with extracts. Swap vanilla for almond or maple extract. Each will give your cake a unique taste. If you need a gluten-free cake, you can use almond flour instead of all-purpose flour. This makes the cake lighter and adds a lovely nutty flavor. For a vegan version, replace eggs with flax eggs or applesauce. Use plant-based butter and dairy-free milk for the frosting. These swaps create a cake that everyone can enjoy. This cake pairs well with coffee or tea. A warm drink highlights the cake's sweet cinnamon flavor. You can also serve it with fresh fruit, like strawberries or blueberries. The fruit adds a nice tartness and freshness that balances the cake's richness. Enjoy your cinnamon swirl cake in many ways! For the full recipe, check out the complete instructions. To keep your cinnamon swirl cake fresh, store it properly. For short-term storage, you can keep it at room temperature. Just cover it with plastic wrap or foil. This keeps the cake moist and tasty. If you want to save it for longer, refrigerate it. Make sure to wrap it well to avoid drying out. If you want to enjoy this cake later, freezing is a great option. First, let the cake cool completely. Then, wrap it tightly in plastic wrap, followed by aluminum foil. This keeps out air and prevents freezer burn. You can freeze it for up to three months. When you're ready to eat it, thaw the cake in the fridge overnight. You can also let it sit at room temperature for a few hours. The shelf life of your cake depends on how you store it. An unfrosted cake lasts about a week at room temperature. If you refrigerate it, it can last up to two weeks. A frosted cake, however, is best eaten within five days at room temperature. In the fridge, it can last up to a week. For maximum freshness, enjoy it soon after baking. For the full recipe, check out the details above. If your cake is too dense, you can make a few changes. First, ensure all your ingredients are at room temperature. Cold ingredients can cause the batter to not mix well. Next, avoid overmixing the batter. Mix just until the dry and wet ingredients combine. Overmixing can create a tough cake. Also, check your oven temperature with a thermometer. An oven that is too hot can bake the cake too quickly, making it dense. Using cake flour instead of all-purpose flour can help. Cake flour has less protein, which can yield a lighter texture. You can also try adding an extra egg. This can add moisture and make the cake fluffier. Yes, you can make this cake ahead of time. Bake the cake and let it cool completely. Wrap it tightly in plastic wrap. Store it at room temperature for one day. For longer storage, place it in the fridge for up to a week. If you want to freeze it, wrap it well and store it in an airtight container. This way, it can last for up to three months. To serve, let it thaw overnight in the fridge before frosting. You can easily adjust the recipe for different pan sizes. If you use a smaller pan, the cake will be thicker. This may require a longer bake time. For a larger pan, the cake will be thinner. This usually means a shorter bake time. Here’s a quick guide: - For an 8-inch round pan, bake for 30-35 minutes. - For a 10-inch round pan, bake for 25-30 minutes. - For a 9x5 inch loaf pan, bake for 50-60 minutes. Always check doneness by inserting a toothpick into the center. If it comes out clean, the cake is ready. Yes, you can use different frostings for this cake. A chocolate ganache would work well. Just heat cream and pour it over chocolate chips. Let it cool before pouring over the cake. You can also try a buttercream frosting. Mix unsalted butter with powdered sugar and vanilla. Add milk until you reach your desired consistency. For a fruity twist, consider a lemon glaze. Mix powdered sugar with lemon juice for a sweet and tangy frosting. For the full recipe, check out the complete details to create your own Cinnamon Swirl Cake with Cream Cheese Frosting Delight. This blog post covered everything you need to bake a perfect cake. We discussed the key ingredients, from wet to dry, and included detailed steps for making the batter. You learned tips for frosting and serving, plus fun variations to try. Store the cake properly for the best taste. Remember, baking should be fun. Don’t hesitate to experiment with flavors and textures. Happy baking, and enjoy every delicious bite!

Welcome to a sweet adventure! This Cinnamon Swirl Cake with Cream Cheese Frosting will wow your taste buds. Imagine soft, rich cake swirled with warm cinnamon and topped with creamy …

Read more

Categories Desserts

Creamy Garlic Tuscan Chicken Savory and Simple Dish

May 18, 2025 by Chef Tavio
Creamy Garlic Tuscan Chicken is a dish packed with flavor. Let’s look at the ingredients that make it shine. - Chicken and Dairy Ingredients - 4 boneless, skinless chicken breasts - 2 tablespoons extra virgin olive oil - 1 cup heavy whipping cream - 1/2 cup freshly grated Parmesan cheese - Vegetables - 4 cloves garlic, finely minced - 1 cup cherry tomatoes, halved - 1 cup fresh baby spinach - Seasoning and Garnish - 1 teaspoon Italian seasoning blend (oregano, basil, thyme) - Salt and freshly cracked black pepper to taste - Fresh basil leaves, for garnish Each ingredient plays a key role in the dish. The chicken gives a hearty base, while the cream creates a rich sauce. Garlic adds a fragrant kick, and tomatoes bring a touch of sweetness. Spinach adds color and nutrition. The seasoning ties everything together, making it truly delightful. For the full recipe, check out the [Full Recipe]. This will help you create a meal that impresses everyone! First, take out the chicken breasts. Rinse them under cold water and pat them dry. Next, season both sides with salt, black pepper, and the Italian seasoning blend. This adds a nice flavor. Let the chicken sit for a few minutes to absorb the seasoning. Heat a large skillet over medium-high heat. Add the extra virgin olive oil and let it warm up. Once hot, carefully place the chicken breasts in the skillet. Cook for about 5-7 minutes on each side. Look for a golden-brown color. Use a meat thermometer to check the chicken. It should reach 165°F (75°C). Once done, move the chicken to a plate and cover it to keep it warm. Now, keep the skillet on medium heat. Add the minced garlic into the pan. Sauté it for about 30 seconds. You want it fragrant but not brown. Next, toss in the halved cherry tomatoes. Let them cook for 2-3 minutes until soft. Then, add the fresh baby spinach and cook until it wilts. Lower the heat to medium-low. Slowly pour in the heavy whipping cream. Stir well and let it simmer for a few minutes. Gradually mix in the Parmesan cheese. Stir until it melts and the sauce thickens. Finally, add the chicken back into the skillet. Spoon the creamy sauce over the top and let it simmer for another 2-3 minutes. For the full recipe, you can refer to the section above. Enjoy your meal! To cook chicken well, timing is key. For juicy chicken, cook each side for 5-7 minutes. Use a meat thermometer to check for an internal temperature of 165°F (75°C). This ensures the chicken is safe to eat. If your chicken is thick, it may need a bit more time. Always let it rest for a few minutes before serving. Seasoning makes all the difference. Start with salt and pepper. This basic seasoning brings out the chicken's natural taste. The Italian seasoning blend adds depth. I love using fresh garlic for a strong flavor. You can adjust the seasoning based on your taste. Taste the sauce before serving, and add more salt or pepper if needed. Serving is just as important as cooking. Use a rustic wooden board or a nice plate. The bright colors of spinach and tomatoes make the dish pop. Add a sprinkle of Parmesan on top for a nice touch. Fresh basil leaves add color and flavor. For a special touch, serve with crusty bread or a side salad to complete your meal. Enjoy this comforting dish that looks as good as it tastes! You can find the full recipe for Creamy Garlic Tuscan Chicken to explore more about this dish. {{image_4}} If you need to change the recipe, you have options. For a dairy-free version, use coconut cream. It adds a nice flavor and keeps it rich. To make it gluten-free, simply check all your seasonings and the Parmesan cheese for gluten. You can replace chicken with tofu for a plant-based dish. It will soak up the sauce and taste great. You can always add more taste to this dish. Try adding sun-dried tomatoes for a sweet kick. Mushrooms also work well. They add earthiness to the sauce. For an herb boost, toss in fresh thyme or parsley. These herbs enhance the dish's aroma and taste. A splash of lemon juice at the end brightens the flavors too. This dish pairs well with many sides. A simple pasta or rice works great. They soak up the sauce nicely. You can also serve it with garlic bread for a crunchy touch. A fresh salad balances the creaminess. A mix of greens with a light vinaigrette keeps it refreshing. You can find the full recipe to explore more serving ideas. You can store Creamy Garlic Tuscan Chicken in the fridge for up to three days. Make sure to let it cool to room temperature first. Place the chicken in an airtight container. This helps keep the flavors fresh and the dish safe to eat later. If you want to freeze it, do so in a freezer-safe container. You can freeze it for up to three months. Just remember, the sauce may change a little in texture after thawing. To freeze, let it cool completely. Then, pour it into the container and seal tightly. When you are ready to eat, you can reheat the chicken in the microwave. Heat it on medium power for about two minutes. Stir it halfway through to warm it evenly. You can also reheat it on the stove. Just add a splash of cream or broth to keep it moist. Cook it over low heat until warmed through. Enjoy your delicious meal again! Creamy Garlic Tuscan Chicken is a rich and flavorful dish. It features tender chicken breasts in a creamy sauce. This sauce contains garlic, fresh spinach, and cherry tomatoes. The dish is simple yet elegant, perfect for any meal. You will love how the flavors blend together. To make Creamy Garlic Tuscan Chicken from scratch, follow these steps: 1. Prepare the Chicken: Season the chicken breasts with salt, pepper, and Italian seasoning. 2. Sear the Chicken: Heat olive oil in a skillet. Cook the chicken for 5-7 minutes on each side until golden brown. 3. Sauté Garlic: Add minced garlic to the skillet and cook for 30 seconds. 4. Add Tomatoes & Spinach: Toss in cherry tomatoes and cook for 2-3 minutes. Add spinach and cook until wilted. 5. Make the Cream Sauce: Pour in heavy cream and stir. Add Parmesan cheese and let it melt. 6. Combine: Add the chicken back to the skillet, spooning sauce over it. Simmer for 2-3 minutes. 7. Serve: Plate the chicken and sauce, garnishing with fresh basil. You can find the full recipe above to get all the details you need. Yes, you can make Creamy Garlic Tuscan Chicken ahead of time. Cook the dish and let it cool. Store it in the fridge for up to three days. Reheat it on the stove or in the oven. Add a splash of cream to keep it moist. Some great sides for Creamy Garlic Tuscan Chicken include: - Garlic mashed potatoes - Steamed broccoli - Roasted asparagus - Pasta with olive oil and herbs - A simple green salad These sides balance well with the rich flavors of the chicken. Enjoy your meal! In this article, I covered the key steps to make Creamy Garlic Tuscan Chicken. We explored ingredients, preparation, and cooking methods. I shared tips to improve flavor and presentation. You can also create variations to fit your dietary needs. Don’t forget about storage options for leftovers. With this knowledge, you can make a delicious dish for any meal. Enjoy every bite and impress your friends and family!

Looking for a delicious, easy meal? Let me introduce you to Creamy Garlic Tuscan Chicken! This dish combines juicy chicken, rich cream, and fresh veggies for a tasty dinner. Perfect …

Read more

Categories Dinner

Cheesy Garlic Breadsticks Tasty and Easy Recipe

May 18, 2025 by Chef Tavio
To make cheesy garlic breadsticks, you will need: - 2 cups all-purpose flour - 1 tablespoon sugar - 1 packet (2 1/4 teaspoons) active dry yeast - 3/4 cup warm water (approx. 110°F) - 1 teaspoon salt - 2 tablespoons olive oil - 3 cloves garlic, finely minced - 1 cup shredded mozzarella cheese - 1/2 cup grated Parmesan cheese - 1 teaspoon Italian seasoning These ingredients create a soft, chewy breadstick with a cheesy, garlicky flavor. You can add these for extra flavor: - 1/4 teaspoon crushed red pepper flakes (for a spicy kick) - Fresh parsley, chopped (for garnish) These optional items make the breadsticks unique and vibrant. To make this recipe, gather these tools: - Mixing bowls - Measuring cups and spoons - A whisk - A sharp knife or pizza cutter - A baking sheet - Parchment paper Having these tools will help you create the perfect cheesy garlic breadsticks. For the full recipe, check the details above. Start by mixing warm water and sugar in a small bowl. Sprinkle the yeast over the mixture. Let it sit for about 5 minutes. You will see bubbles form. This means the yeast is active and ready to use. In a large bowl, whisk together the flour and salt. Make a well in the center. Pour in the yeast mixture and olive oil. Mix until it forms a sticky dough. Transfer the dough to a floured surface. Knead it for 5 to 7 minutes until it feels smooth. Place it in a greased bowl and cover it. Let it rise in a warm spot for about 1 hour, or until it doubles in size. Preheat your oven to 425°F (220°C). Once the dough has risen, punch it down gently. Roll it out on a floured surface to about 1/2 inch thick. Move the rolled dough to a lined baking sheet. Brush the top with melted butter or olive oil. Mix minced garlic and Italian seasoning in a bowl. Sprinkle this mix over the dough. Top it with mozzarella and Parmesan cheese. If you like spice, add red pepper flakes. Use a knife to cut the dough into strips about 1 inch wide, but don’t cut all the way through. Bake in the oven for 15 to 18 minutes. The cheese should be melty and golden, and the edges should be lightly browned. Let them cool for a few minutes. Serve warm, garnished with fresh parsley. Enjoy your cheesy garlic breadsticks! To get the right dough texture, start with quality flour. I use all-purpose flour for its balance. When you mix the dough, aim for a sticky but manageable feel. Knead the dough for 5-7 minutes until it feels smooth and elastic. This step helps develop gluten, giving your breadsticks a nice chew. Let the dough rise in a warm spot. It should double in size, which takes about 1 hour. For crispy breadsticks, preheat your oven to 425°F (220°C). This ensures even cooking. Use a baking sheet lined with parchment paper to prevent sticking. Brush the dough with melted butter or olive oil before baking. This adds flavor and helps with browning. Bake for 15-18 minutes, until the cheese is bubbly and golden. Keep an eye on them. Ovens vary, and you don’t want burnt edges. Serve your cheesy garlic breadsticks warm for the best taste. You can arrange them in a basket lined with a cloth napkin for a homey feel. A drizzle of olive oil or balsamic glaze adds a gourmet touch. Pair them with marinara or garlic butter for dipping. These small steps make your meal more fun and tasty. Enjoy sharing them with friends and family! {{image_4}} You can switch up the cheese for fun flavors. Try using gouda or cheddar for a twist. Each cheese brings a new taste to your breadsticks. Mixing cheeses can also create a cheesy surprise in every bite. You can even add some blue cheese for a bold flavor. Just remember to balance strong cheeses with milder ones. Herbs and spices can change the whole vibe of your breadsticks. Add fresh basil or oregano for an Italian touch. You can also sprinkle some garlic powder for an extra kick. If you like heat, try adding chili powder or cayenne. This lets you personalize each batch to match your mood or meal. If you need gluten-free breadsticks, use gluten-free flour instead of regular flour. Make sure to check the flour's instructions for best results. For a dairy-free option, replace the cheese with a dairy-free cheese alternative. You can also use nutritional yeast for a cheesy flavor without dairy. These options let everyone enjoy cheesy garlic breadsticks! To keep your leftover cheesy garlic breadsticks fresh, store them in an airtight container. This helps maintain their softness. You can also wrap them tightly in plastic wrap or aluminum foil. Make sure to cool them completely before storing. This prevents moisture buildup, which can make them soggy. Stored this way, they last up to three days at room temperature. When you want to enjoy your leftover breadsticks, reheating them properly is key. Preheat your oven to 350°F (175°C). Place the breadsticks on a baking sheet. Heat them for about 10 minutes. This helps restore their crispiness. You can also use a microwave, but they may get chewy. If using the microwave, heat for 15-20 seconds at a time. Check often to avoid overheating. If you want to save some breadsticks for later, freezing is a great option. First, let the breadsticks cool completely. Then, wrap each one in plastic wrap. After that, place them in a freezer bag. Make sure to remove as much air as possible. They can stay frozen for up to three months. To enjoy, just thaw them in the fridge overnight and reheat as mentioned above. Yes, you can use store-bought dough for cheesy garlic breadsticks. It saves time and effort. Look for pizza or bread dough in your grocery store. Roll it out and follow the recipe steps for toppings and baking. To make breadsticks without yeast, you can use baking powder instead. Combine flour, baking powder, salt, and water. Mix until you form a dough. Roll it out, top it, and bake. These breadsticks will be quick and easy, perfect for last-minute snacks. Cheesy garlic breadsticks taste great with many dips. Here are some ideas: - Marinara sauce - Alfredo sauce - Garlic butter - Ranch dressing - Pesto sauce These dips add flavor and make your breadsticks even more fun to eat. You can find the full recipe for cheesy garlic breadsticks in this article. It gives you all the steps and tips to make them perfectly. This blog post covered everything you need to know about making cheesy garlic breadsticks. We explored essential ingredients, key tools, and step-by-step instructions. You learned tips for perfect dough and baking, along with tasty variations to try. Plus, we discussed how to store and reheat your breadsticks for later. In summary, making these breadsticks is easy and fun. Enjoy creating your own delicious twists!

Ready to dive into the world of cheesy garlic goodness? In this post, I’ll share my easy and tasty recipe for Cheesy Garlic Breadsticks that will impress everyone at your …

Read more

Categories Appetizers

Feta Spinach Stuffed French Bread Irresistible Delight

May 18, 2025 by Chef Tavio
To make this dish, you need some great ingredients. Every item adds a special touch. Here’s what you will need: - 1 large French baguette - 1 cup fresh spinach, roughly chopped - 1 cup feta cheese, crumbled - 1/2 cup cream cheese, softened - 1/4 cup sun-dried tomatoes, finely chopped - 1 clove garlic, minced - 1/4 teaspoon red pepper flakes (optional) - 2 tablespoons olive oil - Salt and pepper to taste - 1/4 cup grated Parmesan cheese - Fresh parsley for garnish Each of these ingredients plays a role in building flavor. The fresh spinach adds a nice crunch. Feta cheese gives a tangy taste that pairs well with cream cheese's smoothness. Sun-dried tomatoes bring a hint of sweetness. You can also add red pepper flakes if you like some heat. I always use the best quality ingredients. This makes a big difference in taste. Fresh spinach should be vibrant green. Feta cheese should be crumbly and creamy. Using a good olive oil enhances the overall flavor. Trust me, it is worth it! You can find the full recipe to guide you through the steps to create this irresistible delight. 1. Preheating the Oven Start by setting your oven to 350°F (175°C). This gets it ready for baking. 2. Sautéing Garlic and Spinach In a medium skillet, heat 2 tablespoons of olive oil over medium heat. Add 1 clove of minced garlic and sauté for about 1 minute. This brings out the great garlic flavor. Next, toss in 1 cup of roughly chopped fresh spinach and 1/4 cup of finely chopped sun-dried tomatoes. Cook for 2-3 minutes, stirring often. The spinach should wilt and become tender. Season with salt, pepper, and optional red pepper flakes for a bit of heat. Remove the skillet from heat and let it cool down. 3. Mixing the Cheesy Filling In a large mixing bowl, combine the cooled spinach mix with 1 cup of crumbled feta cheese and 1/2 cup of softened cream cheese. Use a fork to mix everything together until it's well blended. 1. Preparing the Baguette Take a sharp bread knife and carefully slice a large French baguette in half lengthwise. Make sure not to cut all the way through. This way, the baguette opens like a book. 2. Stuffing the Baguette Spoon the creamy spinach and cheese filling into the hollowed-out center of the baguette. Use a spatula to spread the filling evenly between both halves. 1. Wrapping and Baking Wrap each half of the stuffed baguette in aluminum foil. Place them on a baking sheet for easy handling. Put the baking sheet in the preheated oven and bake for 15-20 minutes. The bread should warm up and the cheese should begin to melt. 2. Crisping the Topping After baking, carefully unwrap the foil. Return the baguette to the oven for an additional 5 minutes. This helps the top get a nice, crispy texture. 3. Serving Suggestions Once out of the oven, let the baguette cool for a minute. Then, slice it into pieces for serving. Garnish with freshly chopped parsley for a nice touch. This dish pairs well with a light salad or some extra sun-dried tomatoes on the side. Enjoy your feta spinach stuffed French bread! For the full recipe, check out the detailed instructions. - Recommended Seasonings: To boost flavor, use garlic and red pepper flakes. Fresh herbs like basil or oregano also add great taste. A dash of lemon zest brightens the mix. - Customizing Spice Levels: If you prefer more heat, add extra red pepper flakes. For a milder dish, skip them altogether. Taste as you go to find your perfect balance! - The Best Baking Practices: Preheat your oven to 350°F (175°C) for even baking. Wrap the baguette in foil to keep it soft. Unwrap it near the end to crisp the crust. - Ensuring Even Melting of Cheese: Spread the filling evenly to ensure all cheese melts well. Mixing the cream cheese with feta helps it melt uniformly. - Pairing Ideas: Serve this dish with a light salad or extra sun-dried tomatoes. A glass of white wine complements the flavors nicely. - Presentation Tips: Slice the baguette into portions and place it on a wooden board. Garnish with chopped parsley for a pop of color. This makes for a beautiful and appetizing display. Explore the [Full Recipe] for more details on making this delicious dish! {{image_4}} You can change up the cheese in this recipe. Goat cheese gives a nice tang. It melts well and adds creaminess. You could also try ricotta for a lighter taste. Fresh herbs can boost flavor too. Try adding fresh basil or dill. They brighten the dish and add a nice twist. Want to make this dish heartier? You can add meat. Chicken or bacon works great. Cook the chicken first and chop it up. Crispy bacon bits add a smoky flavor. You can also add more veggies. Peppers and mushrooms mix well with spinach. They add texture and extra nutrition. If you need a gluten-free option, use gluten-free baguettes. Many stores offer these now. Just remember to check the label. For a vegan version, swap out the cheeses for vegan options. Nutritional yeast adds a cheesy flavor without dairy. Use vegan cream cheese as well. This way, everyone can enjoy this tasty dish. For the full recipe, check out the details above and get cooking! - Refrigeration Tips: Place any leftover stuffed French bread in an airtight container. Keep it in the fridge for up to three days. Always let it cool before storing. This keeps the bread fresh and tasty. - Freezing Instructions: For longer storage, wrap the stuffed baguette tightly in plastic wrap and then in aluminum foil. It can freeze for up to three months. Label it with the date so you know when to use it. - Oven vs. Microwave: The oven is best for reheating. Preheat it to 350°F (175°C). Place the stuffed bread on a baking sheet and cover it with foil to prevent drying. Bake for about 10-15 minutes. The microwave works in a pinch, but it can make the bread soggy. - Tips for Retaining Crispiness: If using the microwave, heat in short bursts and check often. To keep the bread crispy, place it on a plate with a paper towel beneath it. This will absorb some moisture. Enjoy your Feta Spinach Stuffed French Bread as if it’s fresh out of the oven! For the full recipe, check out the details above. Yes, you can make this dish ahead! It’s a great option for busy days. To prepare ahead, follow these steps: - Prepare the filling: Sauté the spinach and garlic as shown in the recipe. Mix in the cheeses and sun-dried tomatoes. - Stuff the baguette: Cut and fill the baguette as directed. - Wrap the baguette: Cover it tightly in foil. - Refrigerate: Store it in the fridge for up to a day. When you're ready to bake, just preheat your oven and follow the baking instructions from the recipe. This method saves time and keeps flavors fresh. First-time cooks may make a few errors. Here are some tips to help: - Don’t overstuff: Leave some space for the filling to expand. Too much filling can make it hard to close the baguette. - Watch the baking time: Baking too long can dry out the bread. Keep an eye on it, especially during the final crisping stage. - Use room temperature cheese: Cold cheese won’t blend well. Allow the cream cheese to soften before mixing. These tips help create a tasty and satisfying dish. You can easily swap some ingredients for healthier options. Here are some ideas: - Use low-fat cheese: Choose low-fat feta and cream cheese to cut calories. - Add more veggies: Include extra spinach or other greens for more nutrients. - Replace the baguette: Try whole grain bread for added fiber. With these changes, you can enjoy a lighter version of feta spinach stuffed French bread without losing flavor. This blog post gave you all the details to make delicious Feta Spinach Stuffed French Bread. You learned about the ingredients, the step-by-step process, and tips for perfecting it. Remember, you can adjust flavors and even turn it gluten-free or vegan. Don’t forget to enjoy every bite, and store your leftovers properly. With these tips, you can impress anyone at your next meal. Happy cooking!

Are you ready to impress your family and friends with a delicious treat? Feta Spinach Stuffed French Bread is a true crowd-pleaser. This simple, savory recipe combines creamy feta cheese …

Read more

Categories Appetizers

Berry Bliss Smoothie Bowl Easy and Delicious Treat

May 18, 2025 by Chef Tavio
Creating the perfect Berry Bliss Smoothie Bowl starts with fresh and vibrant ingredients. Here’s what you need: - 1 cup frozen mixed berries (strawberries, blueberries, raspberries) - 1 ripe banana, sliced - 1/2 cup Greek yogurt (or dairy-free alternative) - 1/2 cup coconut milk (or preferred milk option) - 1 tablespoon honey or maple syrup (optional) - Toppings: fresh berries, additional banana slices, granola, chia seeds, shredded coconut, mint leaves Using frozen mixed berries gives your bowl a chill and a burst of flavor. The banana adds natural sweetness and creaminess. Greek yogurt not only thickens the blend but also packs a protein punch. Coconut milk makes it rich and smooth. If you like it sweeter, the honey or maple syrup works great. For toppings, the options are endless. Fresh berries and banana slices enhance the fruity taste. Granola adds crunch, while chia seeds and shredded coconut bring texture. Mint leaves not only look nice, but they also add a fresh touch. Feel free to adjust these ingredients to suit your taste. You can check the Full Recipe for exact measurements and instructions. Enjoy crafting your Berry Bliss Smoothie Bowl! - Step 1: Blend the ingredients Start by adding the frozen mixed berries, sliced banana, Greek yogurt, coconut milk, and honey or maple syrup to your blender. Blend on high until it becomes smooth and creamy. If the mix is too thick, add a little more milk. Scrape the sides as needed to get everything blended well. - Step 2: Pour and spread smoothie mixture Carefully pour the smoothie mixture into a bowl. Spread it out evenly for a nice look. You want it thick enough to hold the toppings, so keep that in mind when pouring. - Step 3: Arrange toppings artfully Now comes the fun part! Take your fresh berries, banana slices, granola, chia seeds, and shredded coconut. Start by making a line of granola in the middle. Then, place the fresh berries and banana slices around it. Sprinkle chia seeds and coconut over the top. Add mint leaves for a pop of color. This is how you create a Berry Bliss Smoothie Bowl that looks as good as it tastes! For the complete recipe, check out the Full Recipe. Achieve the right consistency For a thick and creamy smoothie bowl, use frozen mixed berries. They help create a smooth texture. If your mix is too thick, add a splash of coconut milk. Blend until it’s creamy. You want it thick enough to hold toppings without spilling. Scaling the recipe for more servings To make more servings, simply double or triple the ingredients. This recipe is easy to adjust. If you use a larger blender, you can blend everything at once. Just keep the same ratios for the best results. Ideas for customizing sweetness and flavors You can change the sweetness by adjusting the honey or maple syrup. If you like it sweeter, add more! For a new flavor, try adding vanilla extract or a splash of orange juice. Don’t shy away from mixing in different fruits, like mango or peach, to keep things fresh and exciting. For the full recipe, check out the Berry Bliss Smoothie Bowl section. Enjoy creating your perfect smoothie bowl! {{image_4}} You can mix it up with different fruits. Try mango, pineapple, or peaches for new tastes. Each fruit adds a unique flavor and texture to your bowl. Experiment and find your favorite combo! For a dairy-free option, swap Greek yogurt with coconut yogurt. Use almond or oat milk instead of coconut milk. This keeps the creamy texture while catering to your needs. Want to boost nutrition? Add nut butter like almond or peanut butter. You can also mix in protein powder for an extra kick. This makes your bowl more filling and packs in protein. You can check the Full Recipe for more details on making this delightful treat! You might have extra smoothie bowl left after making it. Here are some tips on how to store that deliciousness. - Refrigerating Unopened Portions: If you have some smoothie left, store it in an airtight container. It stays fresh for up to two days in the fridge. Keep it covered to avoid any odd smells from other foods. - Freezing Smoothie Bowls: Want to save some for later? You can freeze your smoothie bowl! Use a freezer-safe container and pour in the smoothie. Just remember to leave some space at the top. It can expand as it freezes. Smoothie bowls can last up to three months in the freezer. - Reheating Tips and Freshness Considerations: Smoothie bowls are best enjoyed cold. If you freeze it, thaw it overnight in the fridge. If it seems too thick after thawing, add a splash of milk and stir. You can also blend it again for a smoother texture. By storing your leftover Berry Bliss Smoothie Bowl correctly, you can enjoy this treat even longer! How do I make a smoothie bowl thicker? To make your smoothie bowl thicker, start with less liquid. Use frozen fruit like berries and bananas. The more frozen fruit you use, the thicker the bowl will be. You can also add Greek yogurt, which helps create a creamy texture. If it’s too runny, add a bit more fruit instead of liquid to keep it thick. Can I prepare this smoothie bowl in advance? Yes, you can prepare this smoothie bowl in advance. Blend all your ingredients and pour them into a bowl. Cover it and store it in the fridge for a few hours. However, for the best taste and texture, I recommend making it fresh. If you want to prep ahead, you can freeze the smoothie base and blend it when you’re ready to eat. What are the health benefits of berries in smoothies? Berries are packed with vitamins and antioxidants. They can help reduce inflammation and improve heart health. They also provide fiber, which is great for digestion. Adding berries to your smoothie bowl gives it a burst of flavor and color. They make your treat not just tasty, but also good for your body. This blog taught you how to make a berry bliss smoothie bowl. You learned about the key ingredients, simple steps, and smart tips. Try different fruits and toppings to make it your own. Store extras in the fridge or freezer for later. Remember, smoothies are fun and healthy, plus they can be a big treat. Enjoy your tasty creations while nourishing your body. You now have the tools to whip up a delicious smoothie bowl whenever you want!

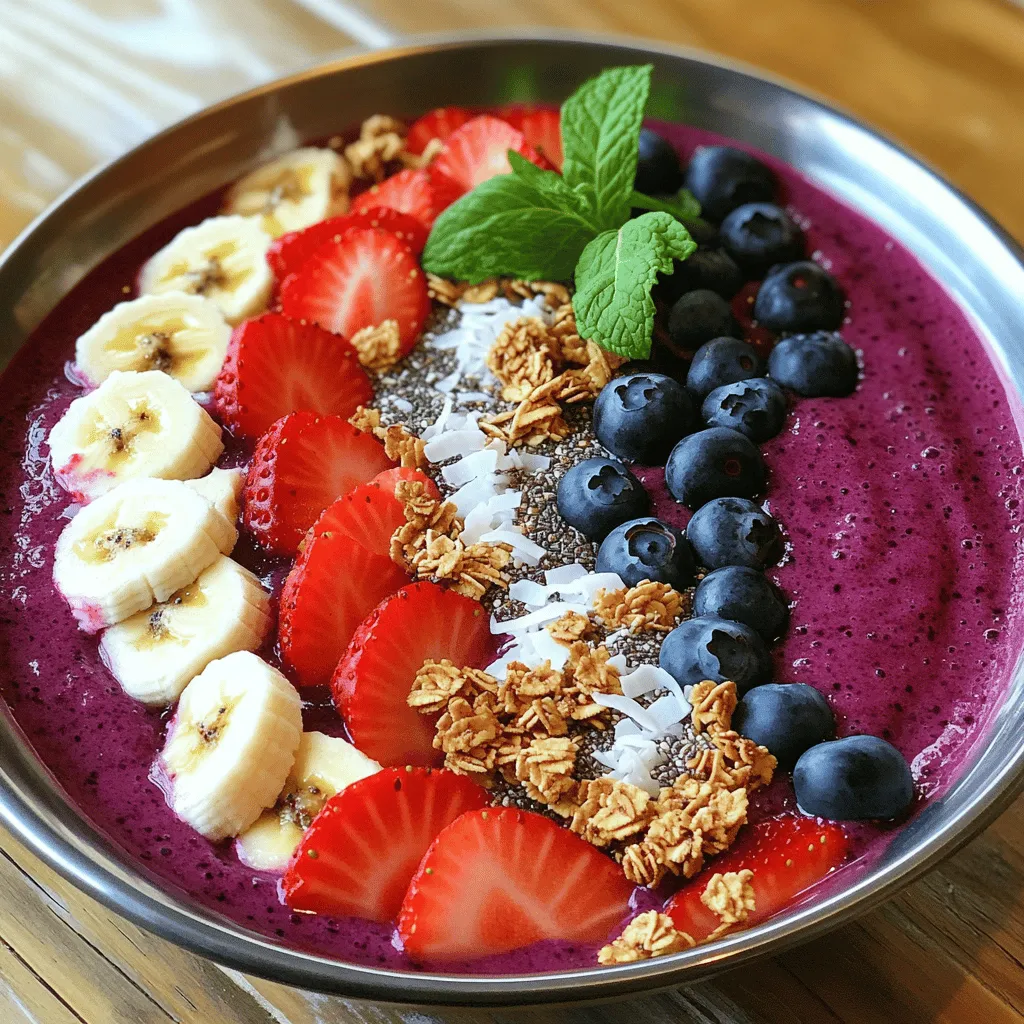
Craving a tasty and healthy treat? Let me introduce you to the Berry Bliss Smoothie Bowl! This easy recipe combines frozen mixed berries, ripe bananas, and creamy yogurt for a …

Read more

Categories Breakfast

Italian Custard Bomboloni Delightful Homemade Treat

May 18, 2025 by Chef Tavio
- 500g all-purpose flour - 70g granulated sugar - 10g instant yeast - 250ml whole milk - 2 egg yolks - 50g granulated sugar - 50g unsalted butter - 1/2 teaspoon salt - Vegetable oil for frying - Powdered sugar for dusting In this recipe, the main ingredients create a soft and fluffy dough. The all-purpose flour is the base for the bomboloni. It gives the dough strength and structure. Granulated sugar adds a hint of sweetness to the dough. Instant yeast helps the dough rise, making it light and airy. For the vanilla custard filling, whole milk provides richness. The egg yolks add creaminess and color. Granulated sugar sweetens the custard, balancing the flavors. I also include essential ingredients like unsalted butter and salt. Butter makes the dough richer and more flavorful. Salt enhances the taste of the other ingredients. You will need vegetable oil for frying. This helps the bomboloni become golden and crispy. Lastly, the powdered sugar is a fun touch. It adds sweetness and a nice look to the finished treats. You can find the full recipe in the article for more detailed steps. Enjoy creating these delightful Italian treats! To start, you need to activate the yeast mixture. In a large bowl, combine 250ml of lukewarm milk with 70g of sugar. Next, sprinkle 10g of instant yeast on top. Let it sit for 5-10 minutes. You want it to become frothy and bubbly. This step is key; it helps your bomboloni rise. Once the yeast is frothy, add 1 large egg, 2 egg yolks, 50g of melted butter, and 1/2 teaspoon of salt. Whisk everything together until smooth. This mixture is the base for your dough. Now it’s time to add the flour. Gradually mix in 500g of all-purpose flour. Stir until a soft dough forms. Once combined, knead the dough on a floured surface for about 10 minutes. You want it smooth and elastic. After kneading, shape the dough into a ball. Place it in a greased bowl, cover it with a damp cloth, and let it rise in a warm spot. Wait about 1-2 hours, or until it doubles in size. While the dough rises, prepare the vanilla custard. Begin by heating 250ml of whole milk in a medium saucepan. Use medium heat and watch closely; do not boil the milk. In a separate bowl, whisk together 2 egg yolks, 50g of sugar, and 20g of cornstarch. This should look smooth and pale. Gradually pour the hot milk into this egg mixture, whisking all the time. This helps avoid scrambling the eggs. Pour the mixed ingredients back into the saucepan. Cook over medium heat, stirring constantly. After about 5-7 minutes, the custard should thicken to a creamy texture. Remove it from the heat and stir in 1 tablespoon of vanilla extract. Allow the custard to cool to room temperature. Cover it with plastic wrap to prevent a skin from forming. Once the dough has risen, gently punch it down to release air. Roll it out on a floured surface to about 1.5 cm thick. Use a 7.5 cm cookie cutter to cut out circles. Arrange the circles on a parchment-lined baking sheet. Cover them with a kitchen towel and let them rise again for 30-45 minutes. They should puff up nicely. Meanwhile, heat vegetable oil in a deep fryer to 175°C (350°F). When hot, carefully fry the bomboloni in batches. Fry them for 2-3 minutes on each side until golden brown. After frying, transfer the bomboloni to a plate lined with paper towels. This helps absorb excess oil. Next, fill each bombolone with the cooled vanilla custard. Use a piping bag with a fine nozzle for this. Make sure to fill them generously for that delightful surprise. Lastly, dust the bomboloni with powdered sugar just before serving. This adds sweetness and an elegant touch. Enjoy your homemade Italian custard bomboloni! For the complete recipe, check out the [Full Recipe]. To make the best bomboloni, start with kneading. Knead your dough for about 10 minutes. This helps develop gluten, which gives the dough its chewy texture. Use a floured surface to prevent sticking. I also like to stretch and fold the dough during kneading. For rising, place the dough in a warm spot. Cover it with a damp cloth. A temperature around 75°F (24°C) works great. Let it rise until it doubles in size, which usually takes 1 to 2 hours. A smooth custard is key to perfect bomboloni. To avoid lumps, whisk the egg yolks and sugar well before adding hot milk. Always pour the hot milk slowly while whisking. This helps temper the eggs and keeps your custard smooth. After cooking, let the custard cool in a bowl. Cover it with plastic wrap, touching the surface. This prevents a skin from forming. Allow it to cool to room temperature before filling the bomboloni. Frying bomboloni requires the right oil temperature. Heat your oil to about 350°F (175°C). Use a thermometer for accuracy. If the oil is too hot, the outside burns while the inside remains raw. If it's too cool, your bomboloni will absorb too much oil. Fry the bomboloni in small batches. This keeps the oil temperature steady. Fry each side for about 2-3 minutes until golden brown. Use a slotted spoon to turn them gently for even cooking. Enjoy the crispy outside with the soft, creamy inside! {{image_4}} You can fill bomboloni with different tasty options. One popular choice is chocolate custard. It adds a rich, sweet flavor. Just replace the vanilla custard in the recipe with chocolate. Another fun option is fruit preserves or jams. You might try raspberry or strawberry. These fruity fillings bring a fresh taste. They also add a nice pop of color. You can change the dough for extra flavor. Try adding spices like cinnamon or nutmeg. Zests from oranges or lemons can enhance the taste too. If you prefer gluten-free bomboloni, you can use gluten-free flour. This swap allows more people to enjoy them. Just ensure you follow a gluten-free recipe to keep the right texture. For toppings, crushed nuts are a great choice. They add crunch and flavor. Choose almonds or hazelnuts for a delightful twist. You might also try a decorative chocolate drizzle. Melt chocolate and drizzle it over the filled bomboloni. This adds a touch of elegance and extra sweetness. Feel free to explore these options to create your perfect bomboloni. Each variation makes this treat even more special! To keep bomboloni fresh, store them in an airtight container. This helps prevent them from drying out. A glass or plastic container works well. Avoid stacking them too high, as they may squish each other. Keep them at room temperature for the best taste. If you need to store them longer, consider freezing. To freeze bomboloni, let them cool completely first. Place them in a single layer on a baking sheet. Freeze them for about an hour until firm. Then, transfer them to a freezer-safe bag or container. Be sure to remove as much air as possible. When ready to eat, thaw them in the fridge overnight. Reheat them in an oven at 180°C (350°F) for about 5-10 minutes. When stored properly, bomboloni can last for 2-3 days at room temperature. In the fridge, they may stay fresh for up to a week. Look for signs of spoilage, like a dry texture or off smell. If they feel hard or have an unusual color, it's best to toss them. Enjoy your bomboloni while they are at their best! Bomboloni are Italian doughnuts. They are soft, fluffy, and filled with custard. This treat comes from Italy, often enjoyed during celebrations. You can find them filled with sweet cream or jam too. Their light texture and sweet taste make them a popular dessert. Yes, you can prepare bomboloni ahead of time. Make the dough and let it rise. After that, you can store it in the fridge for a day. Just remember to let it rise again before frying. You can also fry them in advance and freeze them. To enjoy later, thaw and reheat in the oven. To check if your custard is thick enough, look for a creamy texture. It should coat the back of a spoon. Stir continuously while cooking to prevent lumps. If you see bubbles forming, it’s almost ready. The custard will thicken more once it cools. Here are some common mistakes to avoid: - Not activating the yeast properly; always wait for it to foam. - Overworking the dough can make it tough; knead just until smooth. - Frying at the wrong temperature; aim for 175°C (350°F) for the best results. - Not filling enough custard; make sure each bombolone is generous. - Forgetting to dust with powdered sugar; this adds sweetness and charm. You can find bomboloni at many Italian bakeries. Look for shops that specialize in traditional pastries. Some local cafés may also offer them fresh. If you prefer shopping online, check out specialty dessert websites. They often ship delicious bomboloni right to your door. For a full recipe, try making them at home! In this post, we explored bomboloni: a delicious Italian pastry. We covered key ingredients, like flour and sugar, and shared steps to make light, fluffy dough. You learned to create rich vanilla custard and fry perfect bomboloni. Helpful tips ensured your success, and we shared tasty variations to try. With these skills, you can impress friends and family with homemade bomboloni. Enjoy every bite and have fun experimenting with flavors!

Are you ready to treat yourself to something sweet? Italian custard bomboloni are fluffy, delightful doughnuts filled with rich vanilla custard. In this blog, I’ll guide you through making these …

Read more

Categories Desserts

Salted Caramel Chocolate Cookies Delightful Treats

May 18, 2025 by Chef Tavio
To make the best salted caramel chocolate cookies, you need simple ingredients. Here’s what you will need: - 1 cup unsalted butter, softened to room temperature - 3/4 cup packed brown sugar - 1/2 cup granulated sugar - 1 large egg, at room temperature - 2 teaspoons pure vanilla extract - 2 1/4 cups all-purpose flour, sifted - 1/2 teaspoon baking soda - 1/2 teaspoon fine salt - 1 cup dark chocolate chips (preferably 60% cocoa) - 1/2 cup salted caramel sauce (can be store-bought or homemade) - Flaky sea salt, for finishing Each ingredient plays an important role in the taste and texture. The butter gives richness. The sugars add sweetness and help with the cookie’s structure. The egg binds everything together. Using dark chocolate chips enhances the flavor. The salted caramel sauce adds a sweet, salty kick. Finally, the flaky sea salt on top balances the sweetness. You can find the full recipe to guide you through every step. Enjoy these delightful treats! - Preheat the oven to 350°F (175°C) and prepare baking sheets. - Mix butter and sugars until fluffy. Start by heating your oven to 350°F (175°C). This step is key for even baking. I like to line two baking sheets with parchment paper. It helps the cookies lift off easily. Next, in a large bowl, mix 1 cup of softened butter, 3/4 cup of brown sugar, and 1/2 cup of granulated sugar. Use a hand mixer or stand mixer to beat this mixture until it’s light and fluffy. This can take about 3 to 4 minutes. - Incorporate the egg and vanilla extract. - Combine dry and wet ingredients carefully. Once your butter and sugars are ready, add in 1 large egg and 2 teaspoons of pure vanilla extract. Mix on medium speed until the egg blends in well. Next, grab another bowl and whisk together 2 1/4 cups of sifted all-purpose flour, 1/2 teaspoon of baking soda, and 1/2 teaspoon of fine salt. Slowly add this dry mix to your wet ingredients. Mix on low speed and be careful not to overmix. You want a few flour streaks to remain. - Portion cookie dough into balls. - Indent and fill with salted caramel sauce. - Bake and add finishing salt. Now it’s time to shape the cookies! Use a tablespoon or cookie scoop to form balls of dough. Place them on your lined baking sheets, leaving about 2 inches between each ball. This space allows them to spread. With your thumb or the back of a small spoon, press a gentle indentation in the center of each cookie. Fill these with about 1 teaspoon of salted caramel sauce. Make sure it stays in the center and doesn’t spill over. Bake these cookies in your preheated oven for 10 to 12 minutes. Look for light golden edges and soft centers. As soon as they come out, sprinkle a light pinch of flaky sea salt on top. This adds a nice touch! Let the cookies cool for about 5 minutes on the sheets before moving them to a wire rack. This helps keep them soft and chewy. For the full recipe, please refer to the earlier section. To get the best cookies, avoid overmixing the dough. When you mix too much, the cookies can become tough. Mix just until the flour disappears. This keeps them soft and chewy. Pay close attention to the baking time. Bake for 10 to 12 minutes, until the edges are golden but the middle is soft. This results in a perfect cookie texture. Use unsalted butter for the best taste. It lets you control the salt level. Brown sugar adds moisture and a nice flavor. For the salted caramel sauce, you can use store-bought or homemade. If using homemade, ensure it's thick enough to stay in the cookie. This sauce adds a sweet and salty burst that everyone loves. Make your cookies look great for any event. Place them on a pretty platter and drizzle extra salted caramel sauce on top. A light sprinkle of flaky sea salt enhances their look and taste. Serve them warm for the best experience. They are perfect for parties or as a sweet treat at home. Try serving with cold milk or coffee for a delightful pairing. {{image_4}} You can easily make these cookies gluten-free. Just swap the all-purpose flour with a gluten-free blend. Many blends work well, but look for one that has xantham gum. This helps mimic the texture of regular flour. Adjust the amount to match your blend's instructions. Your cookies will still be soft and tasty. For a vegan version, replace the egg with a flax egg. Mix one tablespoon of ground flaxseed with three tablespoons of water. Let it sit for five minutes until it thickens. For the butter, use a plant-based alternative. Many brands offer dairy-free butter that works great in baking. These swaps will keep your cookies delicious and cruelty-free. You can elevate these cookies with extra flavors. Try adding chopped nuts like pecans or walnuts for a nice crunch. Mixing in different types of chocolate, like white or milk chocolate chips, can also change the taste. Experiment with your favorite ingredients to create a unique treat. Remember, the goal is to make them your own! For the full recipe, check out the section above. To keep your salted caramel chocolate cookies fresh, use airtight containers. This helps keep moisture out and keeps the cookies soft. You can store them at room temperature for about a week. If you live in a humid area, refrigeration is a good choice. However, it might change the texture a bit. Freezing cookies is a great way to enjoy them later. First, let them cool completely. Then, lay the cookies on a baking sheet and freeze them for about an hour. This prevents them from sticking together. Once frozen, transfer the cookies to an airtight bag or container. They can last for up to three months in the freezer. To thaw, simply take them out and let them sit at room temperature for about 30 minutes. You can also warm them in the oven at 350°F for a few minutes. This will restore their soft and chewy texture. Enjoy your cookies even longer with these simple storage tips! For the full recipe, check the earlier section. To keep your cookies soft, follow these tips: - Use room temperature butter. This helps create a light texture. - Don't overmix the dough. Mix just until combined for the best results. - Bake until the edges are golden but the centers are still soft. - Let the cookies cool on the sheet for a few minutes before moving them. - Store them in an airtight container to keep moisture in. Yes, you can use homemade salted caramel! Here’s how: 1. Start with 1 cup of granulated sugar. Cook it in a pan until it melts and turns amber. 2. Slowly add 1/2 cup of heavy cream, stirring to combine. 3. Add a pinch of salt to taste. Let it cool before using. 4. Fill each cookie's indentation with about a teaspoon of your homemade caramel. For the best cookies, use high-quality chocolate chips. I recommend: - Ghirardelli dark chocolate chips (60% cocoa) for rich flavor. - Guittard chocolate chips, known for their smooth melt. - Enjoy Life chocolate chips, perfect for those with dietary needs. These brands ensure your cookies taste amazing every time! These cookies combine rich chocolate, sweet caramel, and a pinch of sea salt. You learned how to mix the dough, bake it, and make it shine. Remember to follow the tips for the best texture and flavor. Experiment with gluten-free or vegan options if needed. Proper storage keeps them fresh longer, and freezing helps save some for later. Enjoy every bite of these delicious cookies, and impress your friends with your baking skills!

If you love cookies that mix sweet and salty, you’re in for a treat! My Salted Caramel Chocolate Cookies are easy to bake and taste amazing. With gooey caramel and …

Read more

Categories Desserts
Older posts
Newer posts
← Previous Page1 … Page82 Page83 Page84 Next →

TASTED NEST

Where Flavor Finds a Home 🍳🏡 — warm, simple, and crave-worthy recipes made for real life, from stovetop mornings to backyard dinners.

PAGES

Home About Contact Privacy Policy Terms & Conditions Cookie Policy GDPR Policy Copyright Policy Disclaimer

CATEGORIES

Appetizers Desserts Salads Breakfast Dinner

Contact

  • Pinterest
  • Mail
Copyright © 2025 Tasted Nest. All rights reserved.