Skip to content
Tasted Nest
  • Home
  • Appetizers
  • Desserts
  • Salads
  • Breakfast
  • Dinner
  • Privacy Policy
  • Contact
  • About

Chef Tavio

Fruit Salad with Cool Whip Easy and Refreshing Treat

June 4, 2025 by Chef Tavio
To create a refreshing fruit salad with Cool Whip, gather these simple ingredients: - Fresh strawberries - Ripe pineapple - Sliced kiwi - Plump blueberries - Sliced banana - Cool Whip - Optional: honey and lime juice - Mint leaves for garnish Each fruit adds its own flavor and color. Fresh strawberries bring sweetness, while pineapple adds a tangy twist. Kiwi offers a unique taste, and blueberries contribute a burst of juiciness. Sliced bananas provide creaminess and help balance the flavors. Cool Whip acts as a delightful dressing that ties everything together. If you want more sweetness, add honey. A splash of lime juice brightens the mix and enhances the fruit's natural flavors. Finally, mint leaves are perfect for garnishing. They add a fresh look and a hint of herbal aroma. Using fresh, ripe ingredients makes your salad taste better. Picking bright and firm fruits ensures a delicious result. This colorful mix is not just pretty; it’s packed with vitamins and nutrients. You can easily make this salad for a family gathering or a picnic. The Full Recipe will guide you through the steps to make this easy and tasty treat. To start, you need to hull and slice the strawberries. Hold the strawberry in one hand. Use a small knife to cut around the green leaves. Then, slice the berry into thin pieces. Next, let’s cut the pineapple and kiwi. For the pineapple, cut off the top and bottom. Stand it up and slice off the skin. Cut it into small cubes. For the kiwi, peel it first. Then slice it into circles or half-moons. Now, wash your blueberries and bananas. Rinse the blueberries under cool water. Drain them gently. For the bananas, peel them and slice them into rounds. Now, let’s make the Cool Whip dressing. In a small bowl, add one cup of Cool Whip. If you like it sweet, add two tablespoons of honey. Then, squeeze in one tablespoon of lime juice. Whisk the mixture until it is smooth. You want it creamy but not too thick. This dressing will be perfect for your fruit. It’s time to mix everything. Pour the Cool Whip dressing over the fruits in your large bowl. Use a spatula to fold the dressing in. Be gentle so the fruit stays whole. Mix until all the pieces are coated with the dressing. This step is key for a tasty salad. Once you finish mixing, cover the bowl with plastic wrap. Place it in the fridge for about 30 minutes. This chilling time helps the flavors blend. When you take it out, give it a light stir. Garnish with fresh mint leaves for a pop of color and flavor. Enjoy this easy and refreshing treat! For the full recipe, check out the earlier section. - Selecting ripe fruits: Look for fruits that feel firm but yield slightly when pressed. Strawberries should be bright red, while pineapples should have a sweet scent. Kiwi should be slightly soft, and bananas should have a few brown spots. - Storage tips for prepped fruits: Keep cut fruits in an airtight container. Store them in the fridge. This keeps them fresh for a day or two. You can sprinkle a little lime juice to prevent browning. - Suggestions for additional ingredients: Try adding chopped nuts like walnuts or almonds for a crunch. You can also mix in a splash of coconut milk for a tropical twist. - Flavor variations: For a citrus flavor, add orange or grapefruit segments. They pair well with the fruit and brighten the taste. Fresh herbs like basil or mint can also add great flavor. - Creative serving suggestions: Serve the fruit salad in a hollowed-out pineapple or watermelon for a fun look. You can also use clear cups to show off the colorful fruits. - Garnishing techniques: Use fresh mint leaves or edible flowers for garnish. They add color and make the dish pop. A sprinkle of lime zest on top can also enhance the visual appeal. This fruit salad with Cool Whip is not only easy to make but also a delight to present. For the full recipe, check out the earlier section. {{image_4}} If you want a vegan option, swap Cool Whip for coconut cream. It gives a nice flavor and texture. Use chilled coconut milk. Whip it until fluffy. For gluten-free needs, this salad is naturally safe. Just ensure all the fruits are fresh and clean. Seasonal fruits make the best salad. In spring, use fresh strawberries and cherries. In summer, think of peaches and raspberries. In fall, apples and pears shine bright. For something fun, try exotic fruits like mango or dragon fruit. They add color and taste. You can use yogurt instead of Cool Whip. Greek yogurt adds protein and a tangy flavor. Cream cheese is also a good choice. Mix it with a bit of milk to make it creamy. You can add vanilla, almond, or even citrus zest for extra flavor. These options keep it fresh and fun! You can store fruit salad in the fridge for up to three days. To keep it fresh, use an airtight container. This helps prevent the fruits from turning brown or losing their flavor. Place a piece of plastic wrap over the surface before sealing the lid. This extra layer helps keep moisture in and air out. I do not recommend freezing fruit salad. Freezing changes the texture of fruits. If you freeze it, the salad can become mushy when thawed. If you still want to freeze it, separate the fruits and freeze them individually. This way, you can use them in smoothies or other recipes later. You can make the salad one day ahead of time. It tastes best when fresh, so try to serve it within 24 hours. Look for signs of spoilage, like a slimy texture or off smell. If you see these signs, it’s time to toss the salad. Always trust your senses when checking for freshness! For a great fruit salad, I love using: - Fresh strawberries - Ripe pineapple - Sliced kiwi - Plump blueberries - Sliced banana These fruits add bright colors and flavors. Each fruit brings its own nutrients. For example, strawberries are full of vitamin C. Pineapple gives us manganese and bromelain, which helps digestion. Kiwi is rich in vitamin K and fiber, while bananas provide potassium. Adding a mix of these fruits makes a healthy and tasty treat! Yes, you can make it without added sugar! Instead of sugar, here are some options: - Use honey or maple syrup for a natural sweetener. - Try agave nectar for a low-glycemic option. - You can also skip sweeteners if the fruits are sweet enough. These alternatives keep the salad tasty and lighter. Feel free to adjust based on your taste! Bananas can brown fast, but there are ways to keep them fresh: - Coat banana slices with lemon juice. The acid slows browning. - Add bananas just before serving to keep them bright. - Use green bananas, as they brown slower than ripe ones. These tips help your fruit salad look fresh and appealing. Making a larger batch is easy! Here’s how: - Simply double or triple the recipe ingredients. - Use a big bowl to mix everything without spilling. - Adjust the amount of Cool Whip to coat all the fruit well. This way, you can serve more people at parties or gatherings. Enjoy the fun of sharing! This blog covered making a tasty fruit salad using fresh fruits and Cool Whip. You learned how to prepare various fruits, blend a simple dressing, and mix everything with care. I shared tips for freshness and flavor, along with fun variations. Remember, you can customize your salad to fit any dietary needs or preferences. Fresh fruit salad is a great choice for any occasion. Enjoy making it and impressing others with your delicious creation!

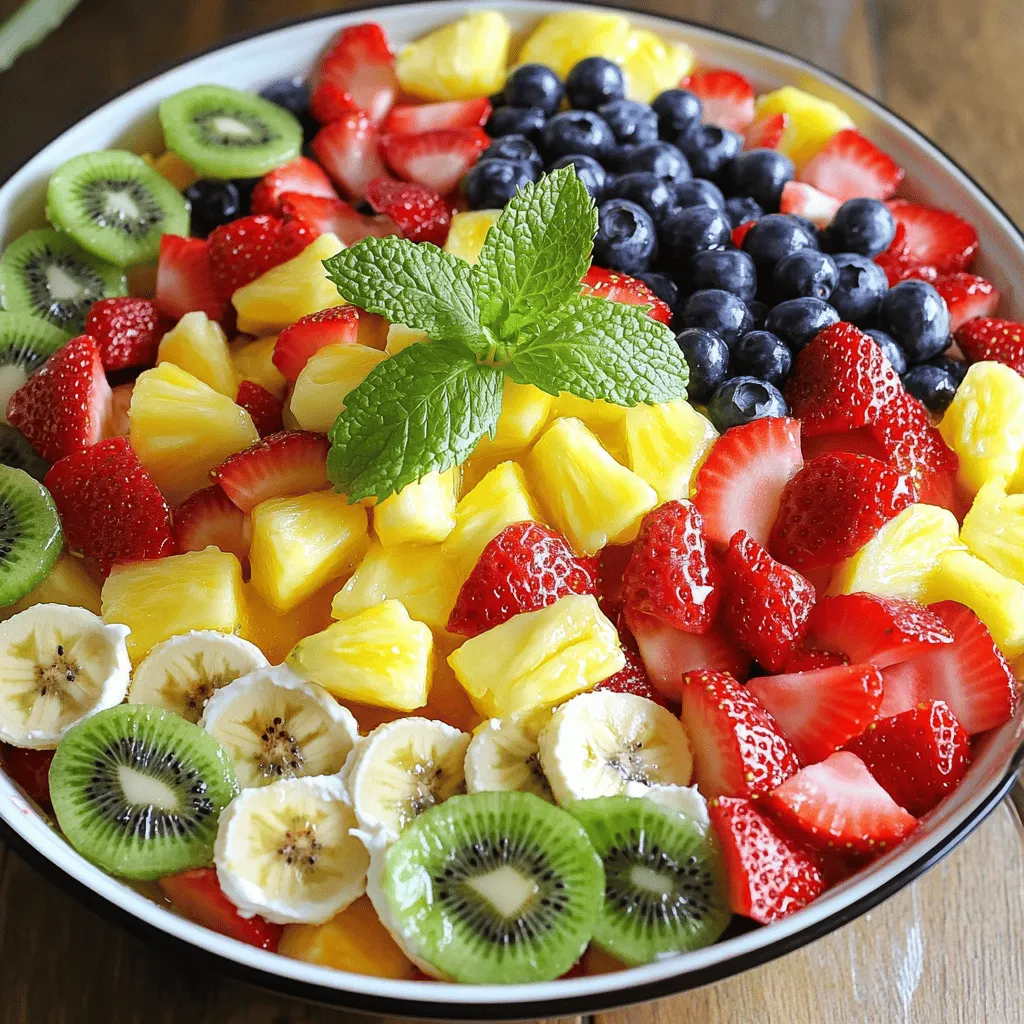
Looking for a quick and tasty dessert? Fruit Salad with Cool Whip is your answer! This easy treat is perfect for hot days or any gathering. You’ll use fresh fruits …

Read more

Categories Salads

Frozen S’more Sandwiches Easy and Fun Treat Recipe

June 4, 2025 by Chef Tavio
To make your Frozen S'more Sandwiches, you need a few key ingredients. Here they are: - 1 cup graham cracker crumbs - 1/4 cup unsweetened cocoa powder - 1/4 cup granulated sugar - 1/2 cup unsalted butter, melted - 2 cups vanilla ice cream (softened slightly for easy spreading) - 1 cup mini marshmallows - 1/2 cup chocolate chips - Extra graham cracker crumbs for rolling These ingredients create the perfect mix of sweet and crunchy. The graham cracker crumbs form a great base. The cocoa powder gives a rich chocolate flavor. Want to mix it up? Here are some optional ingredients for new flavors: - Peanut butter chips for a nutty twist - Strawberry or raspberry puree for fruity fun - Different flavored ice creams like mint or cookies and cream Feel free to get creative! Each option adds a fun spin to your dessert. Before you start making these tasty treats, gather your tools: - A large mixing bowl for combining ingredients - A 9x9 inch baking dish lined with parchment paper - A spatula for spreading the ice cream - A knife for cutting the sandwiches Having these tools ready will make your cooking easy and enjoyable. You’ll have a blast creating your Frozen S'more Sandwiches using these simple steps in the Full Recipe. Start by mixing the dry ingredients. In a large bowl, combine graham cracker crumbs, cocoa powder, and sugar. Then, add melted butter. Stir until the mix feels crumbly. It should hold its shape when squeezed. Next, line a 9x9 inch baking dish with parchment paper. Make sure the paper hangs over the edges for easy lifting later. Press half of the graham cracker mix into the dish. This creates a solid base. Next, take softened vanilla ice cream. Spread it evenly over your graham cracker base. Use a spatula to smooth the top. Now, sprinkle mini marshmallows and chocolate chips on the ice cream. Gently press them in so they stick. Finally, crumble the remaining graham cracker mixture over the top. Lightly press it down to hold the toppings in place. Cover the dish tightly with plastic wrap. Place it in the freezer for at least four hours. This allows the ice cream to freeze completely. Once frozen, remove the dish from the freezer. Use the parchment paper to lift the s'more slab out. Cut it into squares or rectangles. For a fun touch, roll the edges in extra graham cracker crumbs. This adds a crunchy layer. Enjoy your Frozen S'more Sandwiches with friends and family! For the full recipe, check the earlier section. To get the best texture, I recommend using soft ice cream. Let it sit out for about 10 minutes. This makes spreading easy. The graham cracker base should be firm but crumbly. Press it down well in the dish. When you add the toppings, make sure you gently press them in. This helps hold everything together when you cut it. Serving these sandwiches can be a fun experience! I love to place them on a wooden board. This gives a rustic feel. You can add mini chocolate bars and fun skewers for a campfire vibe. Drizzle melted chocolate on top for an extra touch. This makes your treats look even more tempting! A few tools make this recipe simple. Use a large mixing bowl for the graham cracker mixture. A spatula helps spread the ice cream evenly. A 9x9 inch baking dish lined with parchment paper is a must. This ensures easy lifting later. Lastly, a sharp knife or pizza cutter works best for cutting the frozen sandwiches. {{image_4}} You can change up the flavor of your frozen s'more sandwiches easily. Try using different ice cream flavors. Chocolate, strawberry, and peanut butter work well. You can also mix in flavored syrups or jams. For a fruity twist, add crushed berries or banana slices. Each flavor adds a new fun layer to your treat. Toppings are where you can really get creative. Instead of mini marshmallows, try adding crushed nuts or sprinkles. You can also switch the chocolate chips for white chocolate or caramel bits. Drizzle melted chocolate over the top for a sweet finish. These toppings add texture and flavor to your sandwiches. You can make gluten-free s'more sandwiches using gluten-free graham crackers. For a vegan version, use dairy-free ice cream and vegan butter. Look for chocolate chips that are dairy-free as well. This way, everyone can enjoy this yummy treat, regardless of diet. Store your Frozen S'more Sandwiches in an airtight container. You can also use plastic wrap to cover them well. This keeps them fresh and prevents freezer burn. Make sure to separate layers with parchment paper if stacking. This helps avoid sticking. For long-term storage, freeze the sandwiches in individual portions. Wrap each sandwich tightly in plastic wrap. Then, place them in a freezer-safe bag. Remove as much air as possible from the bag. This method keeps them fresh for up to two months. Remember to label the bag with the date. You don't need to reheat these sandwiches. They are best enjoyed frozen. If you prefer a softer texture, let them sit at room temperature for five to ten minutes before eating. This slight thaw gives a nice bite without losing that frozen delight. Frozen s'more sandwiches are a fun dessert made from layers of ice cream and graham crackers. They have chocolate chips and marshmallows for extra flavor. These treats are cold, creamy, and crunchy, perfect for hot days. Yes, you can make these sandwiches ahead of time. They freeze well and are great for parties or summer fun. Just make sure to wrap them tightly after freezing to keep them fresh. Frozen s'more sandwiches can last about one month in the freezer. After that, they may lose some taste and texture. To enjoy them at their best, eat them within a month. You can find tasty frozen s'more sandwiches at many stores. Brands like Ben & Jerry's and Klondike make great options. Always check the ingredients for quality and flavor. Kids can definitely help make these sandwiches! They can mix ingredients, spread the ice cream, and even crumble graham crackers. It's a fun way to get them involved in the kitchen. Frozen s'more sandwiches are fun and easy to make. You need simple ingredients and a few tools. By following the steps, you can enjoy tasty treats at home. Remember to explore different flavors, toppings, and storage methods. With helpful tips, you’ll make the best frozen s’mores. Enjoy sharing these delicious snacks with friends and family! Get creative and have fun with each batch. Now it’s time to make your own frozen s'more sandwiches!

Who doesn’t love s’mores? Now, imagine them cold and creamy! In this post, I’ll share how to make Frozen S’more Sandwiches. This easy treat combines sweet ice cream and crunchy …

Read more

Categories Desserts

Baked Cauliflower Parmesan Delightfully Cheesy Dish

June 4, 2025 by Chef Tavio
- Cauliflower florets - Marinara sauce - Shredded mozzarella cheese Baked Cauliflower Parmesan relies on fresh ingredients for the best taste. Start with a large head of cauliflower. You will want to separate it into bite-sized florets. This helps with even cooking. Next, you need marinara sauce. You can use homemade or store-bought. A good sauce adds rich flavor. Lastly, grab some shredded mozzarella cheese. Freshly shredded cheese melts better, giving you that gooey texture you crave. - Garlic powder - Onion powder - Italian seasoning blend Now, let’s talk about seasonings. The right mix brings your dish to life. Use garlic powder for a savory kick. Onion powder adds depth, while Italian seasoning gives it a herby aroma. Don’t forget salt and pepper, too. These basic seasonings enhance all the other flavors. For a bit of heat, you can add red pepper flakes. Fresh basil is a great garnish if you want to elevate your dish. - Olive oil or non-stick cooking spray - Salt and pepper - Optional add-ins (red pepper flakes, fresh basil) To cook, you need a few essentials. Olive oil or non-stick cooking spray helps prevent sticking. This means easy cleanup later. Salt and pepper are also key for flavor. If you like spice, red pepper flakes can add a nice touch. Fresh basil leaves can brighten the dish, making it look and taste fresh. These cooking essentials help you create a delightful meal every time. For the complete instructions, check the [Full Recipe]. - Preheat the oven to 400°F (200°C). - Grease the baking dish with olive oil or non-stick spray. - In a large bowl, combine the cauliflower florets with garlic powder, onion powder, Italian seasoning, and optional red pepper flakes. - Add salt and pepper to taste. Toss well to coat each floret evenly. - Spread the seasoned cauliflower in the greased baking dish. Bake for 20 minutes until it softens and the edges turn golden. - Remove the dish from the oven. Pour marinara sauce over the cauliflower, making sure all pieces are covered. - Sprinkle mozzarella cheese and then Parmesan cheese over the sauce. - Return the dish to the oven and bake for another 15-20 minutes. Look for bubbling and golden cheese to know it’s done. To make Baked Cauliflower Parmesan sing with flavor, the right marinara sauce is key. I recommend using a sauce that is rich and thick. A homemade sauce shines, but a good quality store-bought one works just fine. Look for brands with simple ingredients and no added sugars. Next, let’s talk cheese. High-quality cheese makes a big difference. Freshly shredded mozzarella melts better and gives a nice stretch. You can also try a mix of cheeses for added depth. Parmesan brings a sharp, nutty flavor that pairs well with the marinara. Getting the cauliflower just right is crucial for a great dish. Start by cutting it into even florets. This way, they cook at the same rate. For tender cauliflower, bake it until it’s slightly soft but not mushy. It should hold its shape when you add the sauce and cheese. To avoid overcooking, keep an eye on the time. Bake the cauliflower for about 20 minutes initially. Check it for doneness before adding the marinara. If it’s too soft, it will become mushy in the final bake. Presentation can elevate your dish. Serve Baked Cauliflower Parmesan in individual bowls for a cozy touch. Sprinkle extra Parmesan on top for a nice finish. A few fresh basil leaves add color and freshness. For an extra pop, consider drizzling a bit of olive oil over the top before serving. This small touch enhances both flavor and looks. Your dish will be as beautiful as it is tasty! {{image_4}} You can switch up the cheese to make it your own. Fontina adds a creamy touch, while gouda brings a nice smokiness. If you want a dairy-free option, try using cashew cheese or a store-bought vegan cheese. Both melt well and keep the dish tasty. Adding more veggies boosts the flavor and nutrition. Spinach adds a nice green touch, and mushrooms give an earthy flavor. For a heartier dish, mix in cooked chicken or turkey. Don’t forget to experiment with herbs and spices! A pinch of smoked paprika or fresh thyme can elevate the taste. You can make Baked Cauliflower Parmesan in an air fryer for a quicker option. It cooks fast and gives a crispy texture. Just follow the same steps but reduce the cooking time. If you're feeling adventurous, try grilling it. This method adds a smoky flavor that pairs well with the cheese. Just place the cauliflower on the grill and follow the same layering steps. To store uneaten portions of Baked Cauliflower Parmesan, let it cool first. Place it in an airtight container. This helps keep it fresh. It will stay good in the fridge for up to 3 days. Make sure to cover it well to avoid drying out. You can reheat your leftovers in two ways: the oven or the microwave. For the oven, set it to 350°F (175°C). Place the dish in for about 15 minutes. This keeps the cheese nice and melty. If you use the microwave, heat it in short bursts. Check every 30 seconds until warm. This way, you keep the texture and flavor intact. If you want to save some for later, freezing works great. First, let it cool completely. Then, wrap it tightly in plastic wrap and place it in a freezer-safe bag. This keeps it fresh for up to 3 months. To defrost, move it to the fridge overnight. Then, reheat as usual. This helps preserve the quality for your next cheesy delight. Yes, you can prepare Baked Cauliflower Parmesan ahead of time. Just follow these steps: - Prepare the cauliflower as instructed, but do not bake it yet. - Cover the dish with plastic wrap or a lid, and store it in the fridge. - You can keep it in the fridge for up to two days. - When you're ready to bake, remove it from the fridge. Let it sit for about 15 minutes at room temperature. - Bake as directed, adding a few extra minutes if needed until the cheese is bubbly. This method saves time and makes meal planning easy. Yes, this recipe is perfect for vegetarians. It features simple ingredients like cauliflower, cheese, and marinara sauce. All these components are plant-based and do not include meat. If you’re vegan, you can swap regular cheese for vegan cheese options. Check labels to ensure they meet your dietary needs. This recipe lets everyone enjoy a cheesy, delightful dish! Baked Cauliflower Parmesan pairs well with several side dishes. Here are some ideas: - A simple green salad to add freshness. - Garlic bread for a tasty complement. - Roasted vegetables like carrots or zucchini to round out your meal. - Pasta tossed in olive oil for a heartier option. These sides enhance the flavors and make a complete dinner. For the complete instructions, check out the [Full Recipe] of Baked Cauliflower Parmesan. In this article, we explored making Baked Cauliflower Parmesan. We discussed fresh ingredients like cauliflower, marinara, and mozzarella, along with seasonings that elevate flavors. I provided clear steps for preparation and baking. You learned tips for perfect flavors and textures, along with ways to add variety. Remember, storing leftovers properly keeps them fresh. This dish is tasty and adaptable, so try it your way. I hope you enjoy this healthy and delicious twist on a classic recipe!

If you’re searching for a tasty and healthy dish, try my Baked Cauliflower Parmesan. This delightfully cheesy recipe blends tender cauliflower with rich marinara and gooey mozzarella, bringing comfort food …

Read more

Categories Dinner

Buffalo Chicken Grilled Cheese Flavorful Comfort Food

June 3, 2025 by Chef Tavio
To make a Buffalo Chicken Grilled Cheese, you need some tasty ingredients. Here’s what you’ll need: - 2 slices of thick-cut bread (sourdough or ciabatta recommended) - 1 cup cooked shredded chicken - 1/4 cup buffalo sauce - 1 cup shredded sharp cheddar cheese - 1/4 cup softened cream cheese - 2 tablespoons butter - Optional add-ins: blue cheese crumbles, sliced green onions These ingredients make a great mix of flavors. The chicken gives protein, while the buffalo sauce adds spice. The cheeses create a creamy texture, and the bread holds everything together. You can also add blue cheese or green onions to make it even better. For the full recipe, check out the detailed cooking steps! First, take your cooked chicken and shred it. Place it in a mixing bowl. Now, pour in the buffalo sauce. Mix it well until every piece of chicken is covered. If you like it spicier, add more buffalo sauce. If you prefer it milder, use less. This mixture packs a punch and gives great flavor to your sandwich. Next, grab another bowl for the cream cheese. Soften the cream cheese first, then add half of the shredded cheddar cheese. Mix them together until you get a smooth blend. This creamy layer will add richness to your grilled cheese. Now it’s time to cook! Heat a skillet over medium heat. Add one tablespoon of butter and let it melt. Take one slice of thick-cut bread and spread the cream cheese mixture on one side. Cover the entire slice for full flavor. On the plain side, pile on the buffalo chicken mixture. Sprinkle the rest of the cheddar cheese on top. If you want, add blue cheese crumbles for extra flavor. Top it all with the second slice of bread, cream cheese side down. Place the sandwich into the hot skillet. Cook for about 3-4 minutes on each side. Flip it carefully to keep it intact. After about two minutes, add the other tablespoon of butter to the skillet. This helps to make the bread golden brown and crispy. When both sides are perfectly brown and the cheese is melty, take it out of the skillet. Let it cool for a minute before slicing. Cut it in half for easy eating. You can serve it with extra buffalo sauce for dipping or a fresh salad on the side. This meal is all about comfort and flavor. Enjoy your Buffalo Chicken Grilled Cheese! For more details, check the Full Recipe. To make a great Buffalo chicken grilled cheese, choose thick-cut bread. Sourdough and ciabatta work well. Their texture holds up to the filling. A thicker slice means more crunch and flavor. Thin bread may get soggy. Go for bread that has a nice crust. It adds to the overall taste and feel. For the best flavor, use a mix of cheeses. Sharp cheddar brings a strong taste. Cream cheese adds creaminess. You can also try mozzarella for stretchiness. If you love blue cheese, sprinkle some in for a punch. Mixing these cheeses makes each bite exciting. The right cooking time and heat matter a lot. Start with medium heat. This helps the cheese melt without burning the bread. Cook each side for about 3-4 minutes. If it browns too fast, lower the heat. Adding butter halfway through boosts the crunch. It creates a golden crust that feels amazing to bite into. {{image_4}} If you want to amp up the heat, try adding more buffalo sauce or some hot peppers. This gives your grilled cheese a fiery kick. Sliced jalapeños or banana peppers work well. Mix them into the buffalo chicken filling for a spicy surprise. You can even sprinkle extra hot sauce on the finished sandwich if you dare! For a tasty vegetarian twist, swap the chicken for roasted cauliflower or mushrooms. Cauliflower gives a nice texture and absorbs flavor well. Simply roast the cauliflower with some buffalo sauce until it's tender. Mushrooms add a rich, earthy taste. Both options make a hearty grilled cheese that everyone can enjoy! Get creative with your choice of cheese and spreads. Try mixing in different cheeses like pepper jack for heat or gouda for a smoky flavor. You can also spread some pesto or ranch dressing inside the sandwich for extra zest. These small changes can elevate your buffalo chicken grilled cheese into a gourmet treat. For the complete recipe, check the Full Recipe section. To keep your Buffalo Chicken Grilled Cheese fresh, wrap it well in plastic wrap or aluminum foil. Store it in the refrigerator. The sandwich tastes best within two days. This helps maintain its flavor and texture. If you leave it out too long, it can get soggy or dry. When you want to enjoy leftovers, use a skillet for the best results. Heat the skillet over low to medium heat. Place the sandwich in the skillet and cover it with a lid. This helps the cheese melt while keeping the bread crunchy. Heat for about 3-4 minutes on each side. You can add a bit of butter in the pan for extra crispiness. To freeze your sandwich, wrap it tightly in plastic wrap, then in foil. Make sure to remove as much air as possible. This way, it won’t get freezer burn. When you are ready to eat it, thaw it in the fridge overnight. After thawing, reheat it in a skillet to get that perfect crunch again. Yes, you can use store-bought buffalo chicken. It saves time and effort. However, the flavor may not match homemade. Store-bought often has added preservatives. Make sure to check the label for quality. If you choose this route, adjust the buffalo sauce to match your spice level. You can always add more sauce if needed. The best cheese for grilled cheese is sharp cheddar. It melts well and offers a strong flavor. Other great options include mozzarella and gouda. These cheeses add creaminess and taste. Mixing different cheeses can enhance the flavor even more. Try adding some blue cheese for a tangy twist. This creates a rich, layered taste that pairs well with buffalo chicken. To prevent sogginess, choose thick-cut bread like sourdough. It holds up better under heat. Use a good amount of butter on the outside. This helps create a crispy crust. Avoid overloading the sandwich with filling. This can trap moisture inside. Cooking on medium heat ensures even cooking without burning. Flip the sandwich gently to maintain its shape. You’ve learned how to make a delicious buffalo chicken grilled cheese sandwich. We covered the best ingredients, from thick-cut bread to creamy cheese. I shared tips on achieving the perfect crunch and your options for variations. Remember, you can customize this recipe to fit your taste. Whether you go spicy or vegetarian, enjoy the fun of cooking! Now, you've got all the tools to create a tasty meal. Happy grilling!

Craving something warm and cheesy that packs a punch? The Buffalo Chicken Grilled Cheese combines rich flavors with simple ingredients for a perfect comfort dish. It’s an easy twist on …

Read more

Categories Dinner

Cobb Salad Recipe Fresh and Flavorful Creation

June 3, 2025 by Chef Tavio
The Cobb salad is a feast for the eyes and the taste buds. Here’s what you need: - 4 cups chopped romaine lettuce - 1 cup cooked grilled chicken, diced - 1 cup cherry tomatoes, halved - 1 ripe avocado, diced - 1/2 cup crumbled blue cheese - 1/2 cup cooked and chopped turkey bacon (or crispy tempeh for a vegetarian option) - 1/4 cup red onion, thinly sliced - 2 hard-boiled eggs, peeled and chopped - 1/4 cup extra-virgin olive oil - 2 tablespoons red wine vinegar - 1 teaspoon Dijon mustard - Salt and pepper to taste - Fresh herbs (such as chopped parsley or chives) for garnish Each ingredient plays a key role. - Romaine lettuce offers a crunchy base. It is low in calories and high in vitamins A and K. - Grilled chicken provides lean protein. It helps to fill you up without extra fat. - Cherry tomatoes add color and sweetness. They are rich in antioxidants and vitamins. - Avocado gives creaminess and healthy fats. It supports heart health. - Blue cheese adds a tangy flavor. It also contains calcium and protein. - Turkey bacon (or tempeh) adds a savory twist. It’s a great way to add flavor. - Red onions offer a mild sharpness. They contain antioxidants that boost health. - Hard-boiled eggs bring protein and creaminess. They are high in vitamins B12 and D. - Olive oil is heart-healthy. It helps to make the dressing rich and flavorful. - Red wine vinegar adds acidity. It brightens up the flavors in the salad. - Dijon mustard gives a zesty kick. It enhances the dressing’s taste. - Salt and pepper balance all the flavors. - Fresh herbs elevate the dish. They add a pop of color and freshness. For dietary needs, you can swap out ingredients. Use grilled tofu or chickpeas instead of chicken for a vegetarian option. If you don’t like blue cheese, try feta or goat cheese. To make the dressing, you need a few simple ingredients: - 1/4 cup extra-virgin olive oil - 2 tablespoons red wine vinegar - 1 teaspoon Dijon mustard - Salt and pepper to taste Start by adding the olive oil, red wine vinegar, and Dijon mustard to a small mixing bowl. Next, sprinkle in a pinch of salt and pepper. To whisk the dressing, hold the bowl steady with one hand. With the other hand, use a whisk to mix the ingredients. Keep whisking until the dressing looks smooth and creamy. This helps blend the oil and vinegar together, creating an emulsion. Set the dressing aside. Let it sit for a few minutes so the flavors can blend well. Now it's time to build your salad! Start with a large bowl or a pretty platter. Lay down 4 cups of chopped romaine lettuce as the base. The bright green color gives a fresh look. Next, layer the ingredients to make it visually appealing. Place the diced grilled chicken, halved cherry tomatoes, diced avocado, crumbled blue cheese, chopped turkey bacon, thinly sliced red onion, and chopped hard-boiled eggs in groups over the lettuce. Arrange the ingredients in a way that highlights their colors. For example, place red tomatoes next to green avocado. This adds charm to your salad. When you finish assembling the salad, it’s time to add the dressing. Drizzle the dressing evenly over the top. This lets the flavors mingle with the fresh ingredients. If you prefer, keep the dressing on the side. This way, guests can add their own amount to their servings. It keeps the salad crisp and fresh until serving. For more details on this delicious Cobb Salad, check out the Full Recipe. To make your Cobb salad stand out, focus on how you serve it. Here are some fun ideas: - Layered in Bowls: Use clear bowls to show off the colorful layers. This looks great and makes it easy to serve. - Wooden Board: For a rustic feel, use a large wooden board. Arrange the ingredients in sections for a buffet-style look. - Mason Jars: For individual servings, layer the salad in mason jars. This is perfect for picnics or meal prep. To kick up the flavor, consider these add-ons: - Seasonings: Try adding smoked paprika or garlic powder to the dressing for a flavor boost. - Crunchy Nuts: Toss in some toasted walnuts or pecans. They add a nice crunch and richness too. - Fresh Herbs: Aside from parsley or chives, fresh dill or basil can elevate the flavor. Avoid these common pitfalls when making your Cobb salad: - Over-Dressing: Drizzle just enough dressing. Too much can make the salad soggy and heavy. - Ingredient Pairing: Be mindful of strong flavors. Blue cheese can overpower if you add too much. Balance it with milder ingredients like lettuce or avocado. Following these tips will help you create a stunning and tasty Cobb salad. For the complete recipe, check out the Full Recipe section. {{image_4}} You can easily make a Cobb salad without meat or dairy. Here are some ideas to help you switch things up: - Meat Substitutes: Replace chicken with grilled tempeh or chickpeas. These options add protein and flavor. - Dairy Alternatives: Use vegan cheese instead of blue cheese. You can also skip cheese altogether for a lighter salad. - Plant-Based Ingredients: Consider adding roasted veggies like zucchini or bell peppers. They bring great taste and texture. Different regions have their own flavors. You can customize your Cobb salad based on local preferences: - Southern Twist: Add fried green tomatoes or pickled okra for a Southern flair. - Mediterranean Style: Swap out the dressing for a lemon-herb vinaigrette. Add olives and feta for a twist. - Customization Tips: Adjust your dressing by adding herbs or spices. Garlic or dill can give it a nice kick. Make your Cobb salad fresh and fun throughout the year by using seasonal ingredients: - Spring: Use fresh peas and radishes for a crisp touch. They add color and crunch. - Summer: Tomatoes are at their peak. Add heirloom varieties for different flavors. - Fall and Winter: Incorporate roasted squash or apples. They bring warmth and sweetness to your salad. With these variations, you can enjoy a Cobb salad that suits your taste and the season. For the full recipe, check out the detailed instructions above. To keep your Cobb salad fresh, store it in an airtight container. This helps prevent sogginess. Layer the ingredients carefully, with the lettuce at the bottom. This way, the dressing won't touch the greens until you are ready to eat. If you have extra dressing, store it separately. It helps maintain the crunch of the salad. If you have a day-old salad, you can refresh it. Start by adding some fresh greens on top. Mix in a little extra dressing to perk up the flavors. If the salad looks wilted, consider tossing in some fresh herbs. Storing the dressing separately is key. This keeps everything crisp until you serve it. Different parts of the salad have varying shelf lives. Here’s a quick guide: - Lettuce: 3-5 days when stored well. - Cooked chicken: 3-4 days in the fridge. - Hard-boiled eggs: 1 week in the shell. - Avocado: 1-2 days once cut. - Tomatoes: 2-3 days if cut. When in doubt, check for signs of spoilage. Discard anything that smells off or looks slimy. Keeping track of these timeframes helps you enjoy your salad at its best. For the full recipe, check the main article. Cobb Salad began in the 1930s at Brown Derby restaurant in Los Angeles. The owner, Bob Cobb, created the dish late one night. He mixed leftover ingredients from the kitchen. This salad became popular for its fresh flavors and colorful look. It represents a meal in a bowl, combining proteins, veggies, and cheese. Yes, you can meal prep a Cobb Salad. Start by washing and chopping your ingredients ahead of time. Store them in separate containers. Keep the dressing separate to avoid sogginess. When ready to eat, just toss everything together. This makes for a quick and healthy lunch or dinner option. If you dislike blue cheese, you have options. Feta cheese works well for a similar flavor. Goat cheese is also a great choice for creaminess. You can even use shredded cheddar for a sharper taste. Just pick what you enjoy the most. You can customize your Cobb Salad in many ways. Start by adding your favorite proteins like shrimp or tofu. You can change the veggies too; try bell peppers or radishes. For crunch, add nuts or seeds. Don't forget to play with dressings—try a balsamic or a creamy ranch. The sky's the limit! For the full recipe, check out the Cobb Salad Extravaganza. In this post, we explored the ingredients and steps needed to make a great salad. We shared tips on presentation, flavor, and common mistakes to avoid. Remember, you can customize your salad with different diets, regions, and seasons. Proper storage keeps your leftovers fresh, while serving ideas enhance your meal. Use the FAQs for extra guidance. Enjoy crafting your perfect salad!

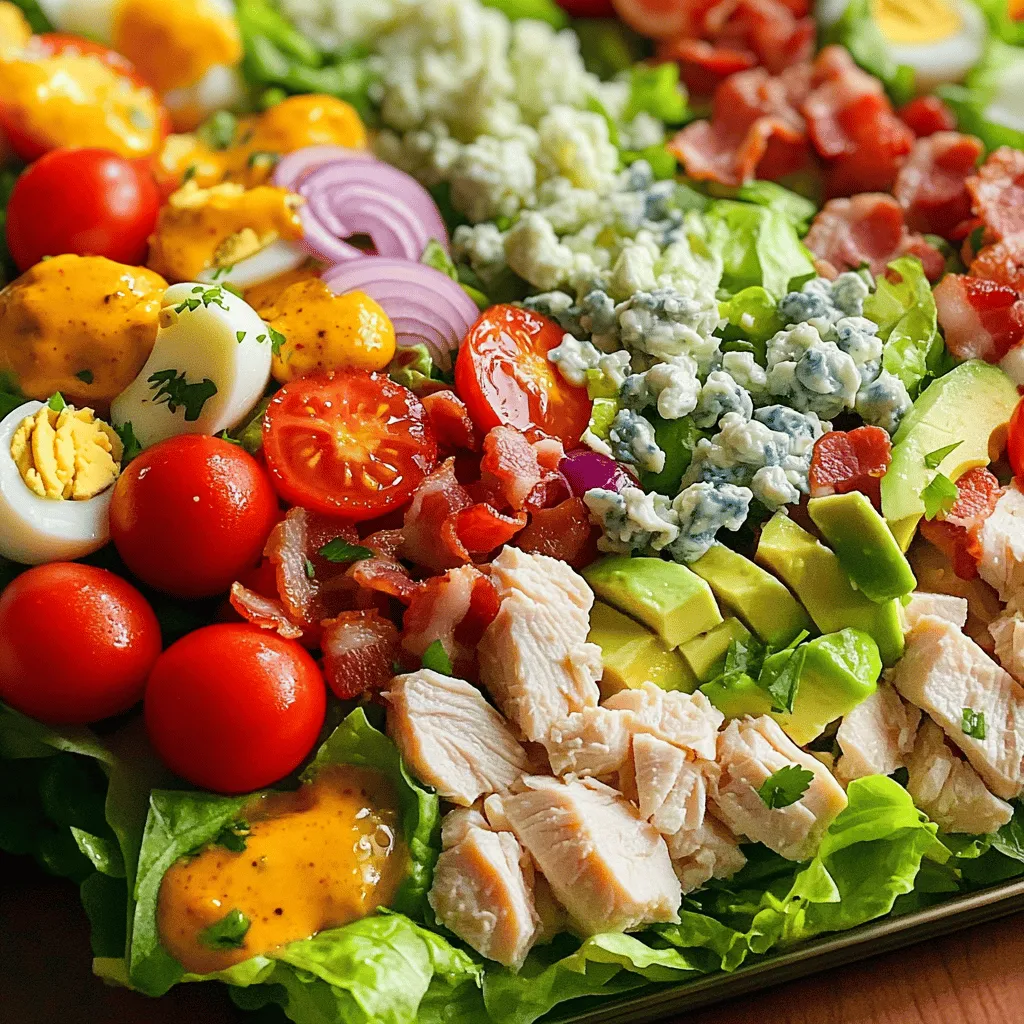
Get ready to create a Cobb Salad that bursts with fresh, vibrant flavors! This classic dish combines crisp greens, savory proteins, and creamy dressing for a meal that’s both healthy …

Read more

Categories Salads

Korean Baked Cauliflower Savory and Flavorful Dish

June 3, 2025 by Chef Tavio
- 1 large head of cauliflower - Extra virgin olive oil - Gochujang - Soy sauce - Maple syrup - Toasted sesame oil - Garlic - Ginger - Rice vinegar - Salt - Pepper - Toasted sesame seeds - Green onions - Tamari for gluten-free option - Honey instead of maple syrup In this recipe, the main ingredient is cauliflower. You want a large head, cut into bite-sized florets. This helps it cook evenly. The marinade is where the magic happens. I use extra virgin olive oil for richness and gochujang for that famous Korean heat. Soy sauce adds saltiness. Maple syrup brings sweetness. If you prefer, honey works well too. You cannot forget garlic and ginger! They add depth and warmth. Rice vinegar gives a nice tang. Don't forget salt and pepper to taste. For garnishing, I love toasted sesame seeds and green onions. They add flavor and a pop of color. For a gluten-free option, swap soy sauce with tamari. It tastes just as good! 1. Preheat the oven to 425°F (220°C). This heat will help the cauliflower get nice and crispy. 2. In a large bowl, mix the marinade ingredients. Combine olive oil, gochujang, soy sauce, maple syrup, sesame oil, garlic, ginger, rice vinegar, salt, and pepper. Whisk it all until smooth. 1. Next, cut the cauliflower into bite-sized florets. Make sure they are all roughly the same size for even cooking. 2. Toss the florets in the marinade. Use your hands or a spatula to coat every piece well. 1. Spread the marinated florets on a lined baking sheet. Make sure they are in a single layer to roast evenly. 2. Bake for 25-30 minutes. Flip the cauliflower halfway through. This helps them brown nicely and stay crispy. Check out the Full Recipe for more details! To get the best results, keep the cauliflower in a single layer on the baking sheet. This helps it roast evenly and become crispy all over. If you crowd the florets, they will steam instead of roast, which leaves them soft. For crispy edges, flip the cauliflower halfway through baking. This way, all sides get golden and crunchy. You can boost the flavor by adding spices or herbs. Try adding a pinch of paprika or some fresh cilantro for a new twist. If you want more heat, adjust the gochujang. Start with less if you prefer mild. You can always add more if you like it spicy. This Korean baked cauliflower pairs well with many mains. It goes great with grilled chicken, rice bowls, or even as a filling for tacos. For dips, a creamy yogurt sauce or a spicy kimchi salsa works well. These add different flavors and make the dish even more fun to eat. For the full recipe, be sure to check out the detailed cooking instructions. {{image_4}} You can change the flavor of Korean baked cauliflower in fun ways. For a sweet and spicy version, add more maple syrup and a dash of extra gochujang. This makes each bite a delightful mix of tastes. You can also toss in bell peppers. Their crunch and sweetness pair well with the spicy cauliflower. Just cut them into strips and add them to the marinade. This adds color and more nutrients. If you want to make this dish vegan, it’s easy to do! Simply replace the honey with maple syrup. Both work well in the marinade. If you need a gluten-free option, use tamari instead of soy sauce. Tamari has a similar taste and fits perfectly in this recipe. You can cook Korean baked cauliflower in different ways. An air fryer is a great choice if you want a faster method. Set it to 400°F (200°C) and cook for about 15-20 minutes. Shake the basket halfway through for even cooking. If you prefer grilling, that works too! Toss the marinated cauliflower on a hot grill. Cook for about 10-15 minutes, turning often. This gives a smoky flavor that I love. Each method brings out unique tastes, so feel free to try them all! For the full recipe, refer to Korean Baked Cauliflower Delight. To store leftovers, let the cauliflower cool first. Place it in an airtight container. This keeps it fresh and prevents odors. I recommend using glass containers as they are sturdy and eco-friendly. You can enjoy your Korean baked cauliflower for up to three days in the fridge. If you want to freeze baked cauliflower, allow it to cool completely. Place it in a freezer-safe bag or container. Remove as much air as possible to prevent freezer burn. For reheating, simply place frozen cauliflower in a preheated oven at 350°F (175°C) for about 20 minutes. You can also microwave it for quick warmth. In the fridge, your leftovers will last about three days. If you freeze them, they can stay good for around three months. Always check for any signs of spoilage before eating. This way, you can enjoy this savory dish at its best. Baking Korean baked cauliflower takes about 25 to 30 minutes. Preheat your oven to 425°F (220°C). This high heat helps the cauliflower brown nicely and get crispy. Flip the florets halfway through for even cooking. Yes, you can use frozen cauliflower! Just thaw it first and pat it dry. This step helps remove excess moisture. You may need to adjust the cooking time. Check for tenderness and browning. Korean baked cauliflower pairs well with many dishes. Here are some ideas: - Grilled chicken or tofu for protein. - Steamed rice or quinoa for a hearty meal. - A fresh salad for crunch and color. - Kimchi for a spicy, tangy kick. To add heat to the marinade, consider these options: - Increase the gochujang amount for more spice. - Add a pinch of red pepper flakes. - Mix in a chopped fresh chili or jalapeño. These options will enhance the flavor and give it that extra kick. For the full recipe, check the section above. This blog post shared simple steps for making Korean baked cauliflower. We covered the ingredients, cooking methods, and tips for the best outcome. Remember, you can easily modify this recipe to fit your taste. Try different spices or cooking methods as you like. Whether you serve it as a side or snack, it’s sure to impress. Enjoy your cooking, and don’t forget to share your results!

Craving a dish that bursts with flavor? Korean Baked Cauliflower is simple, savory, and satisfying. This recipe combines fresh cauliflower with gochujang, soy sauce, and a touch of maple syrup. …

Read more

Categories Dinner

Delicious Peanut Chicken Wraps Quick and Easy Recipe

June 3, 2025 by Chef Tavio
- 2 boneless, skinless chicken breasts - 4 large whole wheat tortillas - 1 cup shredded carrots - 1 cucumber, peeled and thinly sliced - 1 red bell pepper, thinly sliced - 1 ripe avocado, sliced - 1/2 cup fresh cilantro leaves - 1/4 cup creamy unsalted peanut butter - 2 tablespoons low-sodium soy sauce - 1 tablespoon honey - 1 tablespoon freshly squeezed lime juice - 1 teaspoon sesame oil - Salt and black pepper - Fresh cilantro leaves These ingredients form the backbone of my delicious peanut chicken wraps. The chicken provides protein, while the fresh vegetables add crunch and color. The creamy peanut butter, combined with soy sauce and honey, creates a rich sauce that brings it all together. Don't forget the lime juice; it adds a bright note that balances the flavors. For seasoning, a pinch of salt and some black pepper enhance the taste. Lastly, fresh cilantro leaves make for a vibrant garnish that ties everything together. For the full recipe, check the details above. To start, gather the peanut sauce ingredients. You need creamy peanut butter, soy sauce, honey, lime juice, and sesame oil. Place all these in a small mixing bowl. Whisk everything together until it’s smooth. This step is key for a creamy sauce. If it’s too thick, add a little water to thin it out. The goal is a pourable consistency. Now, let’s prepare the filling. In a large bowl, add your sliced chicken, shredded carrots, cucumber, red bell pepper, and cilantro. This mix makes the wrap colorful and tasty. Drizzle half of the peanut sauce over the chicken and veggies. Toss gently until everything is coated well. This step enhances the flavors and ties the filling together. Next, we’ll assemble the wraps. Lay out the whole wheat tortillas on a flat surface. Take the remaining peanut sauce and spread about one tablespoon in the center of each tortilla. This adds flavor right from the start. Now, evenly distribute your chicken and veggie mix over the tortillas. Top each with a few slices of avocado for creaminess. Finally, roll the wraps tightly. Fold the sides in first, then roll from the bottom up. Make sure to keep the filling inside. Once done, slice each wrap in half. This not only looks nice but also makes them easier to eat. Enjoy your vibrant and delicious peanut chicken wraps! For the full recipe, check the ingredients and instructions above. To boost the taste of your peanut chicken wraps, consider adding spices. A pinch of cayenne gives a nice kick. You can also try some garlic powder for depth. Fresh ingredients are key, too. Use ripe avocados and crisp veggies. They add flavor and crunch to your wraps. Always choose the best produce you can find. Making your wraps look good is just as fun as eating them. You can cut them in half to show off the colorful filling. Serve them on a vibrant plate for extra flair. A small bowl of extra peanut sauce beside the wraps makes a great dip. Garnish with fresh cilantro sprigs for a pop of green. This brightens up your dish and makes it inviting. Rolling your wraps tightly keeps all the ingredients inside. Start by folding in the sides first. Then, roll them from the bottom up while holding the filling in. This method helps avoid spills. If you find some filling slips out, don’t worry! You can always tuck it back in before slicing. Following these tips will help you make perfect wraps every time. {{image_4}} You can switch out the protein in these wraps. Try using tofu for a vegetarian option. Tofu absorbs flavors well and adds a nice texture. Shrimp is another great choice. It cooks quickly and adds a seafood twist. For vegetables, get creative! Use bell peppers, zucchini, or even broccoli. You can load your wrap with any fresh veggies you enjoy. Just remember to slice them thinly for easy rolling and eating. Peanut sauce can be fun to tweak! Want it spicy? Add a dash of sriracha or some red pepper flakes. If you prefer sweet, drizzle in extra honey or maple syrup. You can also make your sauce vegan by swapping honey for agave syrup. To make it gluten-free, use tamari instead of soy sauce. Customizing your sauce means everyone can enjoy it! These wraps are great on their own, but sides make them even better! Pair your wraps with a fresh salad for a light meal. Chips can add a satisfying crunch, too. If you want to try different dips, consider hoisin sauce or a tangy yogurt dip. These options can enhance the flavors of your wraps and keep things exciting. The key is to enjoy every bite! To keep your peanut chicken wraps fresh, wrap them tightly in plastic. You can also place them in a sealed container. Store them in the fridge. Leftover wraps stay good for about 2-3 days. After that, the ingredients may start to lose their crispness. If you want to save wraps for later, freezing works well. Wrap each one in plastic wrap. Then, place them in a freezer-safe bag. They can last up to 2 months in the freezer. To enjoy, thaw them in the fridge overnight. Reheat them in a pan or the microwave until warm. To keep ingredients crisp, store veggies separately. Place them in airtight containers. Avoid adding dressing until ready to eat. Whole wheat tortillas can also go stale quickly. Use a container that seals tightly. This way, your wraps stay fresh and tasty! If you need a substitute for peanut butter, try these options: - Almond butter - Cashew butter - Sunflower seed butter - Soy nut butter These nut and seed butters can add a unique flavor to your wraps. Each option has its own taste and texture, so feel free to experiment. You can also mix some of these butters for a fun twist. Yes, you can prepare these wraps in advance. Here are some tips: - Assemble the wraps and store them wrapped tightly in plastic wrap. - Keep them in the fridge for up to 24 hours. - For best results, add fresh ingredients like avocado right before serving. This makes meal prep easy and quick. You can enjoy them anytime without the fuss. To add heat to your sauce, try these ideas: - Mix in a teaspoon of sriracha or chili paste. - Add a pinch of cayenne pepper for a kick. - Use spicy peanut butter if you find it. These options let you control the spice level. Just remember to taste as you go, so it stays tasty. You can use many vegetables to boost flavor and crunch: - Spinach or kale for greens - Bell peppers in different colors - Radishes for a peppery bite - Shredded red cabbage for a crunch Mixing and matching gives your wraps a fresh twist. Get creative and use what you have on hand. For the full recipe, check out the details above. Peanut chicken wraps are simple to make and packed with flavor. You learned about the key ingredients, how to create the sauce, and assembling the wraps. I shared tips for enhancing taste and keeping your wraps fresh. You can even customize ingredients and sauces for variety. Whether for a quick lunch or meal prep, these wraps are a great choice. Enjoy experimenting with different flavors and fillings to make this dish your own. Happy cooking!

Looking for a quick and tasty meal? Try my Delicious Peanut Chicken Wraps! This easy recipe combines juicy chicken, fresh veggies, and creamy peanut sauce all wrapped in a soft …

Read more

Categories Appetizers

Honey Yogurt Fruit Salad Delightful and Healthy Dish

June 3, 2025 by Chef Tavio
- 1 cup creamy Greek yogurt - 2 tablespoons sweet honey - 1 teaspoon pure vanilla extract - 1 large ripe banana, thinly sliced - 1 cup fresh strawberries, hulled and halved - 1 cup juicy blueberries - 1 cup kiwi, peeled and diced into bite-sized pieces - 1 cup crunchy granola (for topping) - Fresh mint leaves (for garnish) I love using high-quality Greek yogurt for this dish. It adds a rich, creamy base. Honey provides natural sweetness that pairs well with fruity flavors. The vanilla extract gives a nice aroma and depth. Next, the fruits! Bananas, strawberries, blueberries, and kiwi make the salad bright and colorful. Each fruit brings its own unique taste and texture. You can also add other fruits like mango or peaches if you wish. For topping, I suggest crunchy granola. It adds a nice crunch and makes the dish more filling. Fresh mint leaves brighten up the presentation, too. - Other fruits to consider: mango, peaches, or raspberries - Alternative sweeteners: maple syrup or agave nectar Feel free to mix it up! This dish is flexible. You can swap in your favorite fruits or sweeteners. The Full Recipe is a great guide, but don’t be afraid to make it your own! Mixing the yogurt and honey Start by gathering your ingredients. In a medium bowl, combine 1 cup of creamy Greek yogurt, 2 tablespoons of sweet honey, and 1 teaspoon of pure vanilla extract. Use a spatula to mix well until smooth. This creamy base adds flavor and richness to your fruit salad. Layering the fruit and yogurt Next, take a large serving bowl or individual dessert cups. Begin with half of your yogurt mixture at the bottom. Then, layer in the fruit. First, add sliced bananas, then fresh strawberries, juicy blueberries, and diced kiwis. This order adds color and flavor. Repeat the layers with the remaining yogurt and fruits. Finish with a dollop of yogurt on top, and sprinkle crunchy granola for texture. Serving suggestions Serve your fruit salad right away for the best taste. If you prefer a cooler treat, you can chill it in the fridge for up to 30 minutes. Presentation matters! Use clear bowls to show off the beautiful layers. A sprig of mint on top adds a fresh touch. Techniques for even layering For even layers, use a spoon to gently push the yogurt to the edges of the bowl. This way, you can see all the colorful fruit. Make sure to distribute your fruit evenly. Importance of color and texture Color makes your dish appealing. Use red strawberries, bright blueberries, and green kiwi to create a vibrant look. Different textures, like creamy yogurt and crunchy granola, provide a delightful eating experience. Mixing these elements keeps every bite exciting. Choosing ripe fruits To make your salad truly shine, select ripe fruits. Ripe fruits taste better and add sweetness. Look for bananas that are yellow with some brown spots. Choose strawberries that are bright red and firm. Blueberries should be plump and shiny, while kiwis should yield slightly when you press them. Freshness is key for the best flavor. Selecting the best yogurt For this salad, creamy Greek yogurt is best. It has a thick texture and rich taste. When buying yogurt, check the label. Look for whole milk or low-fat options without added sugar. This choice enhances the flavor and creaminess of your dish. If you prefer a lighter option, choose a non-fat variety. Serving in clear glass vs. bowls Presentation matters! Serving your salad in clear glass allows guests to see the beautiful layers. Each fruit's color pops against the white yogurt. If you use bowls, pick ones that are bright or colorful to add a fun touch. Ideas for garnishing and drizzling Garnishing adds flair. Fresh mint leaves give a pop of green and a fresh smell. You can also drizzle a bit of honey on top for extra sweetness. A sprinkle of crunchy granola adds texture. Feel free to get creative with your garnishes! {{image_4}} You can make your Honey Yogurt Fruit Salad fun and unique with different fruits. Seasonal fruits work best. In spring and summer, use berries like raspberries or blackberries. In fall, add apples or pears for crunch. In winter, oranges and pomegranates bring color and zest. Tropical variations are also a treat. Use mango, pineapple, or passion fruit for a sunny twist. They add brightness and sweetness to your salad. You can mix and match fruits based on what you love. This way, you create a dish that is fresh and exciting. If you want to make it vegan, swap Greek yogurt for coconut yogurt. It has a creamy texture and adds a nice flavor. Use maple syrup instead of honey for sweetness. This keeps the dish rich and tasty. For low-sugar options, choose unsweetened yogurt. You can skip the honey or use a sugar-free sweetener. Fresh fruits already bring natural sweetness. This way, you keep the dish healthy and delicious without the extra sugar. To keep your Honey Yogurt Fruit Salad fresh, use proper refrigeration. Store any leftovers in an airtight container. This keeps moisture and odors out. You want to avoid any spoilage. The salad stays good for about two days in the fridge. After that, the fruits may become mushy. You can serve the leftovers cold straight from the fridge. It tastes great, especially on hot days. If you have extra yogurt left, add it to smoothies or pancakes. You can also mix the leftover fruit into oatmeal or yogurt bowls. This way, you waste nothing and enjoy tasty meals! Can I make this recipe ahead of time? Yes, you can prepare the honey yogurt fruit salad ahead of time. Make the yogurt mix and cut the fruits. Store them separately in the fridge. Just layer them when ready to serve. What can I substitute for Greek yogurt? If you don’t have Greek yogurt, use regular yogurt or a dairy-free option like coconut yogurt. Both will add creaminess and flavor. Is it possible to use frozen fruits? You can use frozen fruits in this recipe, but they may change the salad's texture. Thaw them first and drain any excess liquid. This keeps the salad from becoming too watery. What are the health benefits of honey and yogurt? Honey is a natural sweetener with antioxidants. It can help soothe sore throats and improve digestion. Yogurt is rich in probiotics, which are good for gut health. Together, they create a nutritious treat that supports your immune system. Is this salad suitable for a weight loss diet? Yes, this honey yogurt fruit salad is great for a weight loss diet. It has low-calorie fruits, protein from yogurt, and healthy fats from honey. It helps you feel full while enjoying a sweet taste. This blog post guided you through a tasty yogurt parfait recipe. We covered ingredients like creamy Greek yogurt and fresh fruits, plus optional sweeteners. You learned to layer for a beautiful look and how to choose the best fruits. In my final thoughts, enjoy the mix of flavors and textures. Experiment with your favorite fruits or dietary needs. Make this dish your own for a healthy treat!

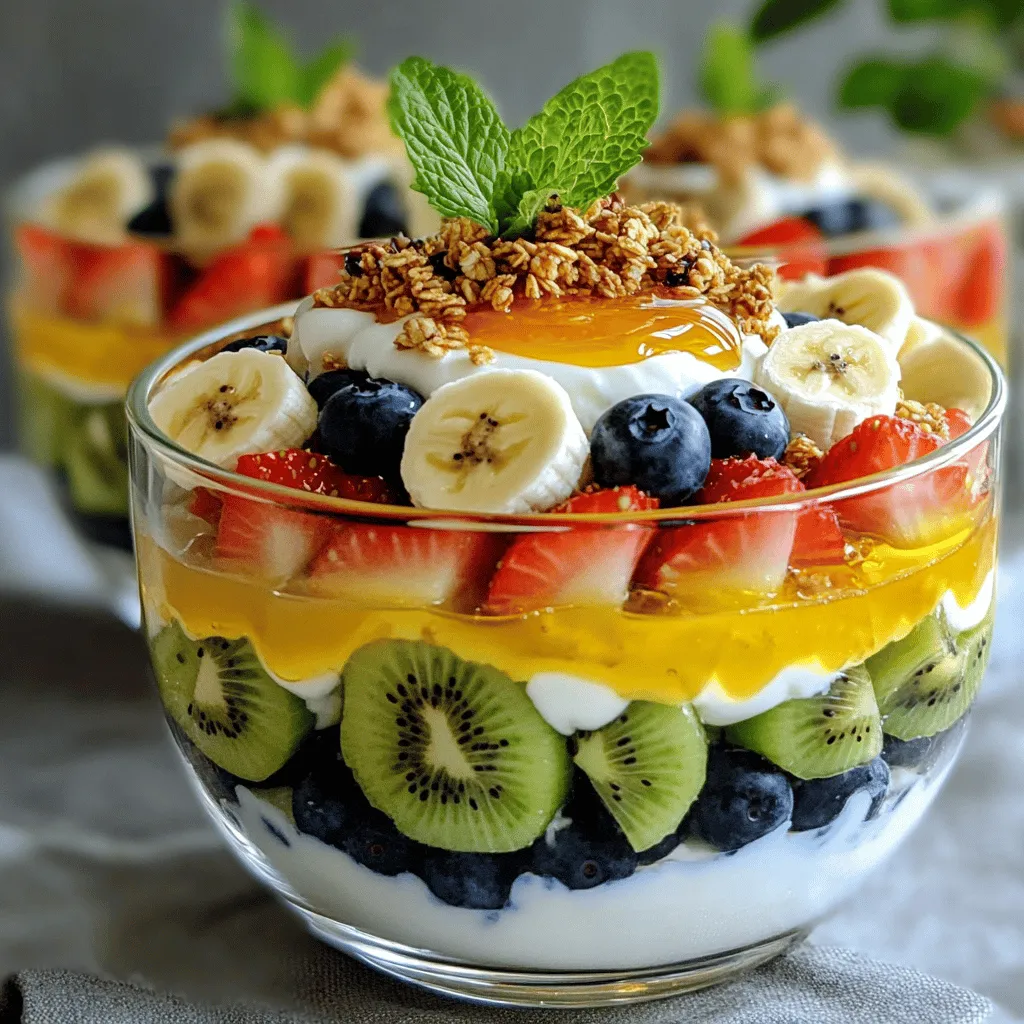
Looking for a quick and tasty dish that’s both delightful and healthy? This Honey Yogurt Fruit Salad checks all the boxes! With creamy Greek yogurt, sweet honey, and a rainbow …

Read more

Categories Desserts

Fall Fruit Salad Delight with Seasonal Goodness

June 3, 2025 by Chef Tavio
- Crisp apples (e.g., Honeycrisp, Fuji) - Fresh cranberries - Ripe pears - Halved grapes - Vibrant pomegranate seeds - Chopped walnuts - Pure maple syrup - Fresh lemon juice - Ground cinnamon - Pinch of salt To create a delightful fall fruit salad, start with seasonal fruits. Crisp apples make a crunchy base. I love using Honeycrisp or Fuji for their sweet bite. Fresh cranberries add a tart note that balances the sweetness. Ripe pears bring juiciness, making each bite refreshing. Halved grapes add a fun texture. Don't forget the vibrant pomegranate seeds for a pop of color and flavor. Next, you'll want to add some extra ingredients. Chopped walnuts give a nice crunch and healthy fats. Pure maple syrup adds natural sweetness. Fresh lemon juice brightens the flavors. Ground cinnamon brings warmth and a hint of spice. Finally, just a pinch of salt enhances all the flavors. This mix of ingredients creates a colorful and flavorful fall fruit salad. For the full recipe and more details, check out the [Full Recipe]. First, gather your fresh fruits. Start by dicing the apples and pears into small pieces. Make sure they are bite-sized for easy eating. Next, take the grapes and cut them in half lengthwise. This helps release their sweet juice. Finally, rinse the cranberries under cool water. Drain them well to remove excess moisture. In a large bowl, combine all the prepared fruits. Add the diced apples, pears, halved grapes, and rinsed cranberries. Use a gentle hand to mix them together. This avoids bruising the fruits. After mixing, fold in the vibrant pomegranate seeds. They add a nice crunch and color to the salad. Next, let’s make the dressing. In a small bowl, whisk together pure maple syrup, fresh lemon juice, ground cinnamon, and a pinch of salt. This mixture should be smooth and well combined. The maple syrup adds sweetness, while lemon juice brightens the flavors. Now, drizzle the dressing over the mixed fruits. Use a spatula or wooden spoon to gently toss everything together. Make sure each piece of fruit gets coated without smashing them. The dressing should enhance the fruit's natural taste. Sprinkle the chopped walnuts on top of the salad. They add a lovely crunch and nutty flavor. Gently toss the salad again to mix in the walnuts. Be careful not to break them apart. Cover the bowl with plastic wrap or a lid. Place the salad in the refrigerator for at least 30 minutes. Chilling helps the flavors blend beautifully. It makes the salad refreshing and delicious. Enjoy this Fall Fruit Salad Delight with Seasonal Goodness! For the Full Recipe, follow the steps outlined above. When making a fall fruit salad, freshness matters. Start by choosing crisp apples. Honeycrisp or Fuji apples are great picks. They add sweetness and crunch. Look for apples with firm skins and bright colors. Next, select ripe pears. Bartlett or Bosc pears work well. They should feel slightly soft when gently pressed. This softness means they are juicy and ready to eat. Pomegranates are a must for this salad. Pick ones that feel heavy for their size. The skin should be bright and firm. Avoid any with cracks or soft spots. These signs show they are fresh and bursting with flavor. To brighten the salad, use fresh lemon juice. It adds a zesty kick that balances the sweetness. Simply squeeze half a lemon into your dressing. This small step makes a big difference. For sweetness, maple syrup is perfect. You can adjust how sweet you want it. Add more syrup for a richer flavor or less for a lighter touch. This flexibility lets you customize the salad to your taste. Serve your fall fruit salad in a festive bowl. A colorful dish makes the salad pop. For a fun twist, use individual jars. This way, each person gets their personal serving. Garnish your salad with a sprinkle of cinnamon. It adds warmth and a lovely aroma. You can also top it with extra pomegranate seeds. This not only looks great but boosts the flavor too. Try these tips for a stunning and delicious salad! Check out the Full Recipe for more details. {{image_4}} You can add seasonal fruits to your salad for more flavor. Figs and persimmons are great choices. They bring a sweet and unique taste. Try adding citrus fruits like oranges or tangerines. Their bright flavor pairs well with apples and pears. You can also toss in some nuts, like almonds or pecans. They add crunch and richness to your dish. Don’t hesitate to try new dressings! A yogurt-based dressing can add creaminess. You can sweeten it with honey for a different taste. Fresh herbs, such as mint or basil, can give your salad a fresh twist. They brighten flavors and make the salad more exciting. Make your fruit salad fit the season or holidays. For Thanksgiving, add spices like nutmeg or cloves. These spices bring warmth and comfort to your dish. You can also think about a winter theme. Use dried fruits like cranberries or apricots for a cozy feel. Each variation can bring new joys to your Fall Fruit Salad Delight. Want to try the full recipe? Check out the [Full Recipe]. To keep your fruit salad fresh, store it in a sealed container. I prefer glass containers because they do not hold odors. Make sure the salad is chilled in the refrigerator. This helps preserve the flavors and crunch. Aim to eat your salad within three days for optimal freshness. After three days, the fruits start to lose texture and taste. Can you freeze fruit salad? I do not recommend freezing fruit salad as it can make fruits mushy. However, if you want to freeze individual ingredients, here are some tips: - Apples: Peel, core, and slice before freezing. - Pears: Slice and sprinkle with lemon juice to slow browning. - Grapes: Wash and freeze whole, perfect for smoothies later. - Cranberries: Freeze them in a single layer for easy use. If you have leftover fruit salad, don’t waste it! Here are some creative ideas: - Smoothies: Blend the fruit with yogurt or milk for a tasty drink. - Parfaits: Layer the fruit with yogurt and granola for a healthy snack. - Pancake Topping: Use the fruit as a topping on pancakes or waffles. These ideas not only reduce waste but also add fun flavors to your meals! In the fall, you can find many delicious fruits. Here’s a list of seasonal fruits: - Crisp apples (like Honeycrisp and Fuji) - Fresh cranberries - Ripe pears - Grapes - Pomegranates These fruits bring bright colors and flavors to your salad. You can store leftover fruit salad for about three days in the fridge. Keep it covered to keep it fresh. The flavors will mix well, but the fruit may soften. Yes, you can make this salad ahead of time. Prepare it a few hours before serving. Store it in the fridge, covered. This lets the flavors blend nicely. Just give it a gentle toss before serving. If you need a substitute for maple syrup, you have options. You can use honey, agave nectar, or brown sugar. Each will give your salad a sweet taste. To make this salad vegan, use maple syrup or agave nectar. Both are plant-based. Check that any nuts or toppings are also vegan. This way, everyone can enjoy the salad. Yes, this recipe is gluten-free. All ingredients used, such as fruits and nuts, do not contain gluten. You can enjoy it worry-free! For the full recipe, check out the provided link. This blog post shared a delicious fruit salad recipe perfect for fall. We explored seasonal fruits like crisp apples and fresh cranberries. You learned how to prep and mix the fruit, make a tasty dressing, and chill the salad for the best flavor. I also provided tips for selecting ingredients and variations to keep things fun. With this simple recipe, you can enjoy a healthy treat that brightens your table. So grab your fruits and start mixing! This dish is great for everyone, anytime.

Fall is the perfect time to indulge in a vibrant fruit salad that celebrates the season’s bounty. Picture crisp apples, fresh cranberries, and ripe pears all mingling together. This Fall …

Read more

Categories Salads

Easy Mexican Coleslaw Fresh and Flavorful Side Dish

June 3, 2025 by Chef Tavio
- 1 small head of green cabbage, finely shredded - 1 cup of purple cabbage, finely shredded - 1 large carrot, grated - 1 cup of corn (fresh or canned, thoroughly drained) - 1 medium red bell pepper, diced - 1 jalapeño, deseeded and minced (optional for an extra kick) - 1/4 cup of fresh cilantro, finely chopped - 1/4 cup of mayonnaise - 2 tablespoons of freshly squeezed lime juice - 1 tablespoon of honey (or agave syrup for a vegan alternative) - 1 teaspoon of ground cumin - Salt and black pepper to taste In this coleslaw, I love to combine both green and purple cabbage. The colors make it pop! The sweet crunch of corn and the crisp red bell pepper give it great texture. If you like a little heat, add jalapeño. Just be sure to remove the seeds first. For the dressing, I blend mayonnaise with lime juice and honey. This adds creaminess and a tangy flavor. Ground cumin brings warmth, while salt and pepper balance everything out. You can adjust these to suit your taste. This fresh mix creates a vibrant side dish. I often serve it with tacos or grilled meats. You can find the full recipe above to make this easy Mexican coleslaw. Enjoy! - Combine shredded cabbages, carrot, corn, red bell pepper, jalapeño, and cilantro in a mixing bowl. - In a separate bowl, whisk together mayonnaise, lime juice, honey, cumin, salt, and pepper. To start, grab a large mixing bowl. I love using a big bowl so I have room to mix well. Add the finely shredded green cabbage and purple cabbage first. Then, toss in the grated carrot, corn, diced red bell pepper, minced jalapeño, and chopped cilantro. This mix not only adds flavor but also brings a rainbow of colors to your dish. Next, take a smaller bowl for the dressing. Whisk the mayonnaise, lime juice, honey, cumin, salt, and pepper together. Make sure it is smooth and well mixed. The lime juice adds tang, while honey gives it a nice touch of sweetness. - Drizzle dressing over the cabbage mixture and toss to combine. - Cover and refrigerate for 15 minutes to let flavors meld. Now, it's time to bring it all together! Drizzle the dressing over the colorful vegetable mix. Use a spatula to gently toss everything together. You want all the veggies to be coated evenly. This step makes sure every bite is bursting with flavor. After mixing, cover the bowl with plastic wrap or put the coleslaw in an airtight container. Place it in the fridge for at least 15 minutes. This short wait allows the flavors to blend beautifully. Trust me; it’s worth the wait! For the full recipe, check it out [here](#). To make your Easy Mexican Coleslaw even more tasty, think about spice. You can adjust the heat by changing the amount of jalapeño you use. If you want less heat, skip the jalapeño or use just a bit. For more flavor, add extra jalapeño. You can also try different herbs. Parsley adds a fresh taste, while mint gives a bright twist. This coleslaw shines when served cold. It works well as a side dish or as a topping for tacos and burritos. Want to save time? Make it a day ahead. Chilling overnight lets the flavors deepen and blend. I often do this to make sure it tastes its best! {{image_4}} To make a vegan version, swap mayonnaise for a vegan mayonnaise or yogurt alternative. This makes the coleslaw creamy without using eggs. You can also use agave syrup instead of honey for sweetness. It keeps the flavors fresh and light. You can make this coleslaw even better with add-ins. Adding black beans boosts nutrition and adds protein. Diced avocado gives it a creamy texture that pairs well with the crunch. If you want a different flavor, try swapping red bell pepper for another color pepper. Each color brings its own taste and vibe to the dish. Experiment and see what you like best! For the full recipe, check the earlier section. Store your coleslaw in an airtight container in the fridge for up to 3 days. This keeps it crisp and fresh. I recommend eating it within 24 hours for the best flavor. The crunch of the veggies shines when fresh. Freezing is not a good idea for this coleslaw. The texture of the vegetables changes when frozen. They become mushy and lose their nice bite. Enjoy this coleslaw fresh instead. Follow the Full Recipe for the best results. To make Easy Mexican Coleslaw, follow these steps for the best results: 1. Start by finely shredding a small head of green cabbage and a cup of purple cabbage. 2. Grate one large carrot and add it to the cabbages. 3. Mix in one cup of corn, fresh or canned and drained. 4. Dice one medium red bell pepper and add it to the bowl. 5. If you like spice, deseed and mince one jalapeño. Add it to the mix. 6. Chop a quarter cup of fresh cilantro and add it too. 7. In a separate bowl, whisk together a quarter cup of mayonnaise, two tablespoons of lime juice, one tablespoon of honey, and one teaspoon of ground cumin. 8. Add salt and black pepper to taste. 9. Drizzle the dressing over the cabbage mix. Toss gently to coat all ingredients. 10. Cover the bowl and chill in the fridge for at least 15 minutes. This helps flavors blend. Yes, you can make this coleslaw one day in advance. Making it ahead of time allows the flavors to enhance. Just store it in an airtight container in your fridge. The coleslaw will taste even better the next day. This coleslaw pairs well with many dishes. Serve it with grilled meats for a fresh side. It also works great with fish tacos. You can add it to burritos for extra crunch. Or, use it as part of a salad platter. This coleslaw adds color and taste to any meal. For the full recipe, check out the Zesty Fiesta Coleslaw! This Easy Mexican Coleslaw recipe includes fresh ingredients and simple steps. You mix shredded vegetables and a creamy dressing, enhancing flavor with optional spices. Feel free to adjust for vegan diets or add extra veggies. Store your coleslaw in the fridge for safety and freshness. By following the tips in this article, you'll create a tasty dish that everyone will enjoy. Enjoy making this bright and vibrant coleslaw at your next meal!

Looking for a fresh side dish that packs a punch? Try my Easy Mexican Coleslaw! This delightful dish combines crisp cabbage, sweet corn, and zesty peppers for a burst of …

Read more

Categories Salads
Older posts
Newer posts
← Previous Page1 … Page95 Page96 Page97 … Page115 Next →

TASTED NEST

Where Flavor Finds a Home 🍳🏡 — warm, simple, and crave-worthy recipes made for real life, from stovetop mornings to backyard dinners.

PAGES

Home About Contact Privacy Policy Terms & Conditions Cookie Policy GDPR Policy Copyright Policy Disclaimer

CATEGORIES

Appetizers Desserts Salads Breakfast Dinner

Contact

  • Pinterest
  • Mail
Copyright © 2025 Tasted Nest. All rights reserved.