Skip to content
Tasted Nest
  • Home
  • Appetizers
  • Desserts
  • Salads
  • Breakfast
  • Dinner
  • Privacy Policy
  • Contact
  • About

Chef Tavio

Bang Bang Cauliflower Crisp and Flavorful Treat

June 3, 2025 by Chef Tavio
- 1 large head of cauliflower, cut into bite-sized florets - 1 cup all-purpose flour - 1/2 cup cornstarch - 1 teaspoon garlic powder - 1 teaspoon onion powder - 1/2 teaspoon smoked paprika - 1/4 teaspoon cayenne pepper (adjust to taste for spiciness) - Salt and black pepper to taste - 1 cup cold water - Vegetable oil (for frying) - 1 cup mayonnaise - 2 tablespoons sweet chili sauce - 1 tablespoon sriracha (add more for extra heat) - 1 tablespoon honey or maple syrup - 2 green onions, thinly sliced - Sesame seeds (for garnish, optional) Bang Bang Cauliflower is a treat that packs a punch. The crisp cauliflower gets a flavorful kick from the sauce. You can easily adjust the spice level to fit your taste. The ingredients are simple but create a dish that feels special. When you gather these items, you set the stage for an amazing cooking adventure. - Blanching Techniques Start by filling a large pot with water. Add a generous pinch of salt and bring it to a boil. Once boiling, add the cauliflower florets. Blanch them for about 2-3 minutes. You want them slightly tender but still crisp. After blanching, drain the florets in a colander. Let them cool completely before moving on. - Cooling Process Cooling is key. If you don’t cool the florets, the batter won't stick well. Spread them out on a clean kitchen towel for quick cooling. This step keeps the cauliflower from steaming and helps it stay crispy when fried. - Combining Dry Ingredients In a large mixing bowl, whisk together the all-purpose flour, cornstarch, garlic powder, onion powder, smoked paprika, cayenne pepper, salt, and black pepper. Make sure all the dry ingredients mix well. This blend adds depth to the flavor. - Achieving the Right Consistency Gradually pour in cold water while stirring. Keep mixing until the batter is smooth and lump-free. You want it to be thick enough to coat the cauliflower but not so thick that it clumps. Adjust with more water if needed. - Heating the Oil Pour about 1-2 inches of vegetable oil into a large skillet. Heat the oil over medium-high heat. Aim for a temperature of 350°F (175°C). To test, drop a small spoonful of batter into the oil. It should bubble and sizzle right away. - Frying Process Carefully dip each cauliflower floret into the batter. Let the excess batter drip off. Gently place it into the hot oil. Fry in batches to avoid overcrowding. Cook for 4-5 minutes until golden brown and crispy. Flip them occasionally for even cooking. - Removing Excess Oil Once fried, use a slotted spoon to take the cauliflower out. Place them on a plate lined with paper towels. This helps absorb any excess oil and keeps them crunchy. - Mixing Ingredients In a small bowl, combine mayonnaise, sweet chili sauce, sriracha, and honey or maple syrup. Stir until fully mixed. This sauce adds a nice kick, balancing the crunch of the cauliflower. - Adjusting Spice Levels Taste your sauce. If you like more heat, add extra sriracha. For a milder flavor, reduce the amount. This step lets you personalize the dish to your taste. - Tossing with Sauce Place the crispy cauliflower into a large mixing bowl. Drizzle the Bang Bang sauce over them. Gently toss the cauliflower to coat each piece evenly. This step ensures every bite is flavorful. - Ensuring Even Coverage Make sure all the pieces have sauce. You want that delicious flavor on every floret. If needed, add more sauce until you reach your desired coating. - Suggested Presentation Transfer the sauced cauliflower to a serving platter. For a nice touch, garnish with sliced green onions and sesame seeds. This makes the dish look appealing and inviting. - Additional Serving Ideas You can serve this dish as an appetizer or a side. Pair it with extra Bang Bang sauce in a small bowl for dipping. It’s a perfect snack for gatherings or movie nights. For the complete recipe, check the Full Recipe. - Temperature Control: Keep your oil hot, around 350°F (175°C). This helps the batter cook fast and stay crispy. If the oil is too cool, the cauliflower absorbs oil and becomes soggy. - Frying Techniques: Fry in small batches. Overcrowding the pan lowers the oil temperature. This can lead to uneven cooking. Frying just a few pieces at a time helps each floret get that golden color. - Spice Adjustments: Want a kick? Add more cayenne to the batter. If you like it milder, cut back. Taste the batter and adjust to your liking before frying. - Alternative Sauces: Try different sauces for variety. A yogurt-based sauce can add creaminess. Or, mix in peanut sauce for an Asian twist. - Best Frying Pan or Skillet: Use a deep skillet or a heavy pot. This ensures even heat distribution. A non-stick surface helps the cauliflower cook without sticking. - Essential Cooking Tools: Have a slotted spoon ready. This helps drain excess oil after frying. A thermometer is also handy for checking oil temperature. It ensures perfect frying every time. For more detailed steps, check the [Full Recipe]. {{image_4}} You can easily make Bang Bang Cauliflower vegan. Just swap the mayonnaise for plant-based options. Many brands offer creamy vegan mayo that works well. You can also use blended silken tofu. It gives a nice texture and flavor. If you need gluten-free options, replace all-purpose flour with a gluten-free blend. You can use almond flour or rice flour too. They help achieve a crispy batter. To make your Bang Bang Cauliflower stand out, try different flavors. You can add Asian-inspired ingredients like sesame oil or ginger. These will enhance the taste and make it more exciting. Experiment with spice mixes too. Try curry powder for a warm twist or smoked chili for a smoky flavor. These changes can add depth and fun to your dish. Bang Bang Cauliflower shines when paired with tasty dipping sauces. Sweet chili sauce or a tangy ponzu sauce works well. You can also serve it with a creamy ranch dip for a twist. For a hearty meal, create a cauliflower bowl. Start with a base of rice or quinoa. Top it with the saucy cauliflower, fresh veggies, and a drizzle of your favorite sauce. This makes for a colorful and satisfying dish. Check out the Full Recipe for more details on how to make this dish shine! Refrigerator Storage Tips After enjoying your Bang Bang Cauliflower, store leftovers in an airtight container. This keeps them fresh for up to three days. Make sure the cauliflower cools down first. If you want to keep the crispiness, store the sauce separately. Freezing Options You can freeze Bang Bang Cauliflower for longer storage. Place the cooled, cooked florets on a baking sheet. Ensure they do not touch each other. Freeze them for about an hour, then transfer to a freezer-safe bag. They stay good for about three months. When ready to eat, thaw in the fridge overnight before reheating. Best Practices for Crispiness To keep your cauliflower crispy, use the oven. Preheat it to 400°F (200°C). Spread the florets on a baking sheet in a single layer. Heat for about 10-15 minutes until they are hot and crispy again. Microwave vs. Oven The microwave is faster but can make the cauliflower soggy. If you are in a hurry, use it for quick reheating. Place the florets on a microwave-safe plate. Heat in 30-second bursts until warm. For the best taste and texture, the oven is the better choice. Now you're ready to store and enjoy your Bang Bang Cauliflower at any time! For the full recipe, check out the complete guide. Bang Bang Cauliflower is a tasty dish made with fried cauliflower. It has a crispy texture and a spicy, creamy sauce. The key flavors are savory, spicy, and a bit sweet. The sauce combines mayonnaise, sweet chili sauce, and sriracha for a burst of flavor. Yes, you can prep this recipe ahead of time. Blanch the cauliflower earlier in the day. Store it in the fridge until you are ready to fry. The sauce can also be made in advance. Just mix the ingredients and keep it in a sealed container. You can use broccoli or Brussels sprouts instead of cauliflower. They both work well in this recipe. Adjust cooking times based on the size of the pieces. Smaller pieces will cook faster, while larger ones may need more time. Bang Bang Cauliflower can be a healthy choice. Cauliflower is low in calories and high in fiber. The dish does use oil for frying, which adds calories. You can also bake the cauliflower for a lighter option. Use the sauce sparingly to keep it healthier. For the complete cooking instructions and ingredient list, check out the Full Recipe. This blog post covered how to make Bang Bang Cauliflower from scratch. We explored the list of ingredients, detailed the step-by-step preparation, and shared useful tips for the perfect dish. You learned about flavor variations and how to store leftovers. Remember, this dish is versatile and can fit many diets. Enjoy experimenting with spices and sauces. Try serving it in fun ways to impress others. Creating tasty meals can be easy and rewarding. Happy cooking!

Looking for a crunchy, flavorful treat that won’t derail your diet? Bang Bang Cauliflower is the answer! This dish packs a punch with its crispy coating and zesty sauce. I’ll …

Read more

Categories Appetizers

Savory Shrimp and Asparagus Stir-Fry Recipe

May 30, 2025 by Chef Tavio
- 1 pound large shrimp, peeled and deveined - 1 bunch of asparagus, trimmed and cut into 2-inch pieces - 2 tablespoons vegetable oil - 4 cloves garlic, finely minced - 1 inch fresh ginger, finely minced - 1 red bell pepper, thinly sliced - 3 tablespoons soy sauce (or tamari for gluten-free) - 2 tablespoons honey - 1 tablespoon sesame oil - 1 teaspoon cornstarch mixed with 1 tablespoon water - Salt and freshly ground black pepper to taste - Toasted sesame seeds for garnish - Chopped green onions for garnish - Large skillet or wok - Mixing bowls - Wooden spatula Fresh ingredients make this dish shine. Use shrimp that smell like the sea. Choose bright green asparagus that snaps when bent. For garlic and ginger, fresh is best for strong flavors. If you're missing any ingredients, here are some substitutes: - Use chicken instead of shrimp. - Try snap peas or broccoli in place of asparagus. - Honey can swap for maple syrup for a different taste. When you use fresh ingredients, your stir-fry will taste amazing. Always aim for the best! For more delicious ideas, check out the Full Recipe. 1. First, heat a large skillet or wok. Pour in 1 tablespoon of vegetable oil. 2. Set the heat to medium-high. Wait until the oil shimmers. 3. Next, add the shrimp. Season them with a pinch of salt and pepper. 4. Stir-fry for about 2-3 minutes. The shrimp should turn pink and opaque. 5. Once cooked, remove the shrimp from the skillet. Place them on a plate. 1. In the same skillet, add the other tablespoon of vegetable oil. 2. Heat the oil again. Add minced garlic and ginger. Stir continuously for 30 seconds. 3. You want to release their strong and tasty flavors. 4. Now, add the asparagus and sliced red bell pepper to the skillet. 5. Stir-fry for 4-5 minutes. The veggies should look bright and stay crisp. 1. Return the cooked shrimp to the skillet with the veggies. 2. In a small bowl, mix soy sauce, honey, and sesame oil. 3. Pour this mixture over the shrimp and vegetables in the skillet. 4. Add the cornstarch mixed with water. Stir well for another 1-2 minutes. 5. This will help the sauce thicken and coat everything nicely. 6. Taste for seasoning. Adjust with salt and pepper if needed. 7. Serve hot, garnished with toasted sesame seeds and chopped green onions. For the full details of this recipe, refer to the Full Recipe above. To achieve crisp vegetables, keep these tips in mind: - Use high heat: This cooks the veggies fast. - Cut evenly: Chop vegetables in the same size. This helps them cook evenly. - Don’t crowd the pan: Stir-fry in batches if needed. This avoids steaming. For shrimp, ensure they don’t overcook: - Cook quickly: Shrimp need just 2-3 minutes. - Watch for color change: They should turn pink and opaque. - Remove early: They continue cooking from heat after you take them out. For seasoning adjustments, consider these ideas: - Add more soy sauce: This boosts umami flavor. - Mix in some citrus: A splash of lemon or lime brightens the dish. - Try different sweeteners: Swap honey for maple syrup or brown sugar. If you like spice or heat, try these options: - Add red pepper flakes: Just a pinch can add warmth. - Include sliced chili peppers: Fresh or dried both work. - Use sriracha or chili sauce: These add bold flavor and heat. To plate the dish beautifully, follow these tips: - Use a large shallow bowl: This shows off the colors. - Layer ingredients: Place veggies first, then shrimp on top. For garnishing ideas, consider these options: - Sprinkle toasted sesame seeds: This adds crunch and a nutty flavor. - Add chopped green onions: They provide a fresh look and taste. - Use a slice of lime: Placing it on the side adds color and zest. Feel free to explore the full recipe for Shrimp and Asparagus Stir-Fry for more details! {{image_4}} You can swap shrimp for chicken or tofu. Chicken adds a hearty bite, while tofu offers a plant-based option. - Chicken: Use boneless, skinless chicken breast. Cut it into small pieces. Cook for about 5-7 minutes until no longer pink. - Tofu: Use firm or extra-firm tofu. Press it to remove excess water. Cut it into cubes and sauté for about 4-5 minutes until golden. Feel free to mix in other veggies for fun. Broccoli, snap peas, or carrots work well. They add flavor and crunch. - Seasonal Ideas: Use fresh veggies based on the season. In spring, try peas or baby bok choy. In fall, add sliced mushrooms or squash. Change up the sauce for new tastes. You can use teriyaki or sweet chili for a twist. - Teriyaki Sauce: This adds a sweet and savory flavor. Use it in the same amount as soy sauce. - Adjustments: If you want more sweetness, add extra honey. For more savory, add more soy sauce. Explore these variations to find your perfect shrimp and asparagus stir-fry! For a full recipe, see the [Full Recipe]. For short-term storage, keep your shrimp and asparagus stir-fry in the fridge. Use an airtight container to keep it fresh. Let the dish cool down before sealing it. This helps prevent moisture build-up. You can store it in a glass or plastic container. Make sure to label it with the date so you know when you made it. If you want to save your stir-fry for longer, you can freeze it. Place the cooled dish in a freezer-safe bag or container. Squeeze out as much air as you can before sealing. This helps avoid freezer burn. To thaw, move it to the fridge overnight. Reheat it in a skillet over medium heat. Stir well to ensure it heats evenly. In the fridge, your stir-fry lasts about 3 to 4 days. In the freezer, it can last up to 3 months. Always check for signs of spoilage before eating. If it smells bad or looks off, it's best to toss it. Freshness is key for a great taste! Yes, you can make this dish ahead of time. To prep, cook the shrimp and veggies. Then, store them in an airtight container in the fridge. When you’re ready to eat, heat them in a skillet. Add the sauce and mix it well. This keeps the flavors fresh. You can serve this stir-fry with rice or noodles. Here are some ideas: - Steamed jasmine rice - Fried rice - Egg noodles - Quinoa These sides add a nice touch to your meal. To tell if shrimp is cooked, look for these signs: - The shrimp turns pink. - The shrimp curls into a C shape. - The flesh is opaque, not clear. These cues show that the shrimp is safe to eat. Yes, this stir-fry can be gluten-free. Use tamari instead of soy sauce. Check labels on other sauces too. Many brands offer gluten-free options. This way, you enjoy great flavors safely. This recipe for shrimp and asparagus stir-fry is simple and full of flavor. You learned about essential ingredients, cooking tools, and step-by-step instructions. I shared tips for perfect texture and presentation. With variations, you can switch proteins and try different sauces. Proper storage tips help keep your dish fresh. Remember, fresh ingredients make the best meals. Enjoy creating this delicious stir-fry!

Are you ready to whip up a quick and delicious meal? This Savory Shrimp and Asparagus Stir-Fry is not only packed with flavor but also super easy to make. With …

Read more

Categories Dinner

Classic Cherry Delight Irresistible Sweet Treat

May 30, 2025 by Chef Tavio
Fresh ingredients make Classic Cherry Delight shine. Here’s what you need: - 2 cups fresh cherries, pitted and halved - 1 cup granulated sugar - 1/4 cup cornstarch - 1 tablespoon freshly squeezed lemon juice - 1 teaspoon pure vanilla extract - 1 cup water - 1 tablespoon unsalted butter - 1 cup whipped cream (for serving) - Fresh mint leaves (for garnish) Using ripe cherries is key. They give the dessert a sweet burst of flavor. The sugar helps to enhance the natural taste of the cherries. Cornstarch thickens the mixture, giving it a nice texture. The lemon juice adds a hint of tartness, balancing the sweetness. Vanilla extract brings warmth, while butter adds richness. Whipped cream provides a fluffy topping, making it even more delightful. Fresh mint leaves add a pop of color and a refreshing finish. Ready to create this sweet treat? Check the Full Recipe for detailed steps! 1. In a medium-sized saucepan, combine the cherries, sugar, cornstarch, lemon juice, and water. Mix well. This step ensures the cherries get sweet and thick. 2. Set the saucepan over medium heat. Cook the mixture, stirring now and then. You want it to boil gently, which takes about 5 to 7 minutes. 3. When it boils, reduce the heat to low. Keep cooking for another 3 to 5 minutes. Stir gently until the mixture thickens and the cherries soften just right. 1. Take the saucepan off the heat. Stir in the vanilla extract and butter. Mix until melted and combined. This adds a rich flavor to your cherry delight. 2. Let the mixture cool for about 10 minutes. Then, transfer it to a serving dish or divide it into bowls. 3. Place the dish in the fridge. Chill for at least 1 hour. This helps the mixture set nicely. 4. To serve, spoon the cherry delight into bowls. Top each portion with whipped cream. Garnish with fresh mint leaves for a pop of color. Enjoy making this Classic Cherry Delight! For the complete recipe, check out the Full Recipe. - Aim for firm yet tender cherries: Fresh cherries add flavor and texture. Pick ripe cherries that are not too soft. - Adjust sweetness to preference: Taste the mixture as you cook. If you like it sweeter, add more sugar. - Ensure proper thickening with cornstarch: Mix cornstarch with water first. This helps it dissolve well in the cherry mix. - Use glass cups for presentation: Clear cups show off the lovely red color. It makes the dessert look fancy. - Pair with additional toppings if desired: Consider adding nuts or chocolate shavings. These toppings add a fun twist to the flavor and texture. Try these tips to elevate your Classic Cherry Delight! For the full recipe, check the earlier section. {{image_4}} You can easily change the flavors of Classic Cherry Delight. Consider using different fruits to create your own twist. Blueberries or raspberries work great! They add a new taste and color. You can also swap out the sweetener. Try honey or agave syrup for a natural option. These will still give you that sweet flavor you love. If you want a vegan version, use coconut cream instead of whipped cream. It adds a rich, creamy texture. For those who need gluten-free options, use a compatible thickener like arrowroot instead of cornstarch. This keeps the recipe safe for all diets. These simple swaps let everyone enjoy this sweet treat! You can find the full recipe to start making your Classic Cherry Delight today! To keep your Classic Cherry Delight fresh, store it in airtight containers. This helps prevent air from getting in, which can affect the taste. Always keep it refrigerated. It will stay fresh for about three to five days in the fridge. Can cherry delight be frozen? Yes, you can freeze Classic Cherry Delight. Just scoop it into a freezer-safe container. Make sure to leave some space at the top for expansion. This treat can last for two to three months in the freezer. Tips for thawing and serving after freezing To thaw, place the container in the fridge overnight. This way, it thaws slowly and keeps its texture. When ready to serve, give it a good stir. If you want, add a fresh dollop of whipped cream and a mint leaf for a beautiful finish. How long does Classic Cherry Delight last in the fridge? Classic Cherry Delight lasts about three to four days in the fridge. Store it in an airtight container. This keeps the dessert fresh and tasty. Can I make Classic Cherry Delight ahead of time? Yes, you can make Classic Cherry Delight a day in advance. Just chill it in the fridge. This gives the flavors more time to blend. What can I use instead of whipped cream? You can use Greek yogurt or coconut cream instead of whipped cream. Both options add creaminess and taste great. What if my mixture doesn’t thicken? If your mixture doesn’t thicken, try cooking it a bit longer. Make sure the heat is low enough to avoid burning. Adding a little more cornstarch can also help. How to fix overly sweet cherry delight? To fix overly sweet cherry delight, add a splash of lemon juice. This adds tartness and balances the sweetness. Another option is to mix in some unsweetened yogurt for a tangy kick. In this blog post, you learned how to make Classic Cherry Delight using fresh ingredients. We walked through clear steps for preparation and final touches. I shared tips on perfecting the recipe and ideas for fun variations. Proper storage methods help keep your dessert fresh and delightful. Remember, this recipe is flexible—feel free to experiment with different fruits and dietary needs. Enjoy your homemade treat, and don’t be afraid to get creative in the kitchen!

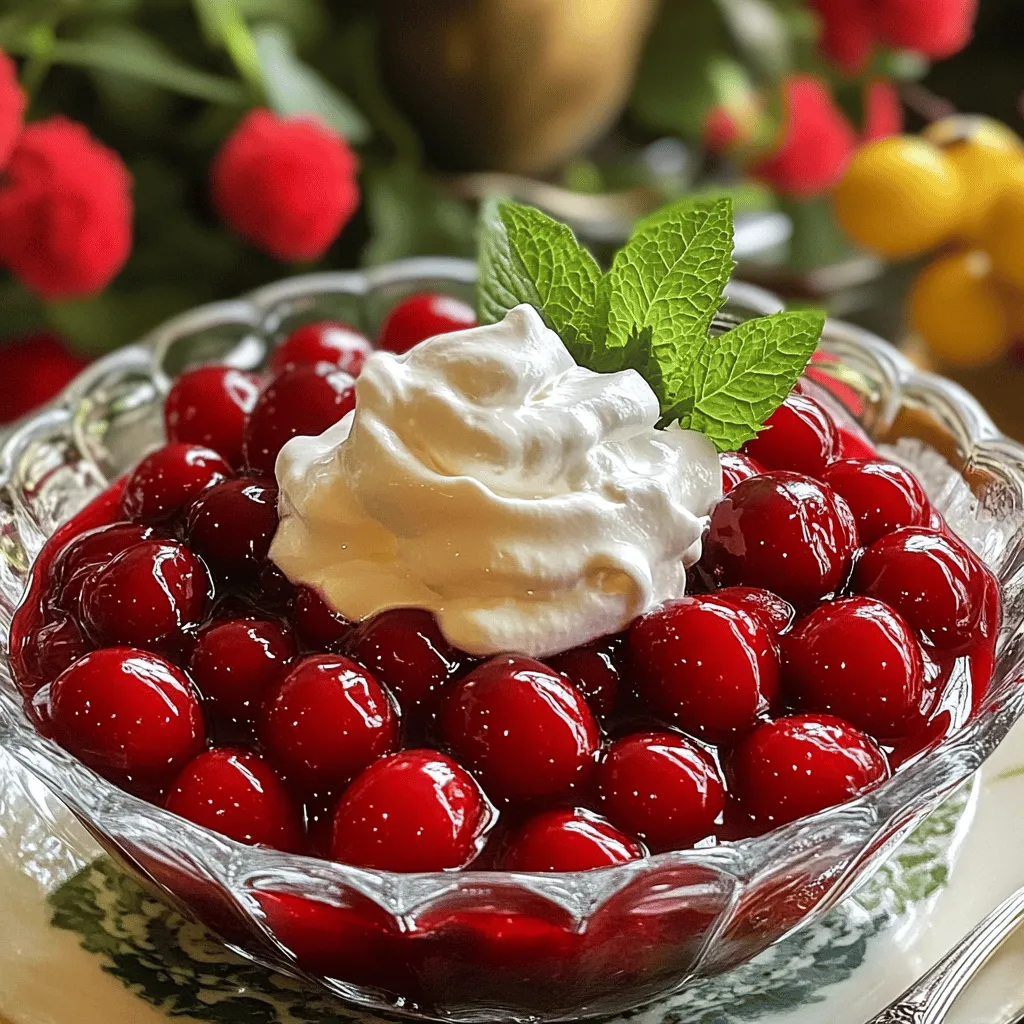
If you’re craving a sweet treat that’s both classic and delicious, look no further than Classic Cherry Delight. This dish brings together the tartness of fresh cherries and sweet vanilla …

Read more

Categories Desserts

Easy Boston Cream Pie Cookie Bites Delightful Treat

May 30, 2025 by Chef Tavio
To make Easy Boston Cream Pie Cookie Bites, you need the right ingredients. Here’s the list: - 1 cup all-purpose flour - 1/2 teaspoon baking powder - 1/4 teaspoon salt - 1/2 cup unsalted butter, softened to room temperature - 1/2 cup granulated sugar - 1 large egg, at room temperature - 1 teaspoon pure vanilla extract - 1/2 cup pastry cream (store-bought or homemade) - 1/2 cup semisweet chocolate chips - 1 tablespoon heavy cream These ingredients work together to create a delightful treat that brings joy with every bite. The all-purpose flour forms the base, while baking powder helps the cookie bites rise. Salt enhances the flavors, and butter adds richness. Sugar gives sweetness, and the egg helps bind everything together. Vanilla extract adds a lovely aroma. The pastry cream is the star, giving a creamy center. Semisweet chocolate chips and heavy cream create a luscious ganache that tops it all off. Each ingredient plays an important role in making these cookie bites special. For the full recipe, be sure to check out the details! 1. Preheat oven and prepare muffin tin: Start by setting your oven to 350°F (175°C). Next, line a mini muffin tin with paper liners. This step helps with easy removal later. 2. Mixing dry ingredients and wet ingredients: In a medium bowl, whisk together 1 cup of all-purpose flour, 1/2 teaspoon of baking powder, and 1/4 teaspoon of salt. Set this aside. In a larger bowl, beat 1/2 cup of softened unsalted butter and 1/2 cup of granulated sugar until light and fluffy. Then, add 1 large egg and 1 teaspoon of pure vanilla extract, mixing until smooth. 3. Combining mixtures and portioning dough: Gradually add the dry mixture to the wet mixture. Stir gently until just combined. Be careful not to overmix. Use a tablespoon to scoop and drop the dough into each muffin cup, filling them halfway. 4. Baking time and cooling tips: Place the muffin tin in the oven. Bake for 10-12 minutes. You'll know they are done when the edges are lightly golden and a toothpick comes out clean. After baking, cool the bites in the pan for 5 minutes. Then, transfer them to a wire rack to cool completely. 5. Techniques for pastry cream filling: Once the cookie bites are cool, use a small piping bag or a teaspoon to fill each bite with about 1 teaspoon of pastry cream. This gives them a creamy center. 6. Making and applying chocolate ganache: To make the chocolate ganache, combine 1/2 cup of semisweet chocolate chips and 1 tablespoon of heavy cream in a microwave-safe bowl. Heat in 15-second intervals, stirring until smooth. Drizzle the ganache over each filled cookie bite or dip them directly into the chocolate for a tasty finish. Allow the chocolate to set before serving. For the complete recipe, check out the [Full Recipe]. To keep your cookie bites tender, do not overmix the dough. Mixing just until combined helps keep them soft. Use room temperature butter and eggs. This makes it easier to blend and gives a nice texture. For cooling, let the cookie bites sit in the pan for five minutes. Then, move them to a wire rack. This helps them cool evenly and keeps them from getting soggy. For a special touch, arrange cookie bites on a pretty platter. Dust them with powdered sugar. Add fresh strawberries or mint leaves to brighten the display. These cookie bites pair well with milk, coffee, or tea. The rich chocolate and creamy filling make a great match with your favorite drink. If you're feeling fancy, serve them with a scoop of vanilla ice cream for a fun treat. Enjoy! {{image_4}} You can play with flavors in your Boston Cream Pie Cookie Bites. Try different fillings like fruit or cream. For a fruity twist, consider using a layer of raspberry or strawberry jam. This adds a fresh burst of flavor. You can also swap out the pastry cream for whipped cream or even lemon curd for a zesty kick. For toppings, the options are endless! You can sprinkle chopped nuts like almonds or hazelnuts for a crunchy texture. If you want something fun, add colorful sprinkles on top of the chocolate. This makes the cookie bites look festive and exciting. If you need gluten-free options, you can use almond flour or a gluten-free flour blend. These flours work well in cookie recipes. Just make sure to check the blend contains a binding agent, like xanthan gum. This helps keep the texture right. For vegan substitutions, replace the egg with a flax egg or applesauce. Use vegan butter instead of regular butter. You can also swap the heavy cream with coconut cream for the ganache. These changes keep the treats tasty while meeting dietary needs. For the Full Recipe, check out the detailed instructions. Enjoy making these delightful bites! To keep your Boston Cream Pie Cookie Bites fresh, store them in an airtight container. This helps to maintain their soft texture and flavor. Place a piece of parchment paper between layers if stacking. Avoid direct sunlight and heat, as they can dry out the cookies. They can last up to five days at room temperature. For longer shelf life, you can freeze your cookie bites. First, ensure they are cool. Then, wrap each cookie bite tightly in plastic wrap. Place them in a freezer-safe bag or container. They can stay fresh for up to three months in the freezer. If you freeze your cookie bites, you’ll want to reheat them before serving. To do this, take them out of the freezer and let them thaw in the fridge overnight. When ready to enjoy, place them on a microwave-safe plate. Heat them for about 10 to 15 seconds. This will warm them up without making them tough. For serving leftovers, try to keep them at room temperature. If they seem a bit dry, add a small dollop of pastry cream on top. This keeps them moist and adds a fresh touch. You can also drizzle a bit of chocolate ganache over the top for extra flavor. Enjoy your delightful treats! Can I use store-bought pastry cream? Yes, you can use store-bought pastry cream. It saves time and is often very tasty. Just make sure it is fresh. It’s a great way to keep your cookie bites simple yet delicious. How do we ensure even baking? To ensure even baking, preheat your oven fully. Use an oven thermometer if unsure. Also, make sure to space the muffin tin evenly in the oven. This helps heat circulate well around the cookie bites. Substituting ingredients for dietary needs If you need to make swaps, here are a few easy ideas: - Use gluten-free flour instead of all-purpose flour. - Replace butter with coconut oil for dairy-free bites. - For egg-free, try a flaxseed meal mixture. Best types of chocolate for ganache I recommend using semisweet chocolate chips for a rich flavor. Milk chocolate works too, but it’s sweeter. Dark chocolate gives a nice contrast to the creamy filling. Choose what fits your taste best! For a detailed guide, check out the Full Recipe. You now have a complete guide to making delicious cookie bites. We covered ingredients, step-by-step instructions, tips, and tasty variations. Remember, the right techniques make a big difference in flavor and texture. Feel free to get creative with fillings and toppings. Proper storage keeps your treats fresh, so don’t skip that. Enjoy your baking adventure and share these cookie bites with family and friends. They’re sure to impress!

Are you ready to indulge in a delightful treat that combines the classic flavors of Boston cream pie with the convenience of cookie bites? My Easy Boston Cream Pie Cookie …

Read more

Categories Desserts

Easy & Healthy Avocado Chicken Salad Delight

May 30, 2025 by Chef Tavio
- 2 cups cooked chicken breast, shredded - 1 ripe avocado, fully mashed - 1/2 cup plain Greek yogurt - 1 tablespoon Dijon mustard - 1 tablespoon fresh lemon juice - Salt and freshly ground black pepper - 1/4 cup red onion, finely diced - 1/4 cup celery, finely diced - Fresh parsley, chopped (for garnish) For this easy and healthy avocado chicken salad, I focus on fresh and simple ingredients. The protein comes from chicken, which you can cook ahead of time. I like to use rotisserie chicken for added flavor and ease. The avocado acts as the creamy base, reducing the need for mayo. It gives a rich taste and smooth texture. Plain Greek yogurt adds tang and helps keep the salad light and healthy. I love the flavor boost from Dijon mustard and lemon juice. They brighten up the dish and add a nice zing. For crunch, I add red onion and celery. They bring texture and a bit of sweetness. Fresh parsley not only enhances the look but also adds a fresh taste. When gathering your ingredients, make sure your avocado is ripe. A ripe avocado will be soft and easy to mash. This will help your salad turn out creamy. You can find the complete method in the Full Recipe. Enjoy the process of mixing and creating! - Start by mixing 2 cups of shredded chicken and 1 ripe avocado, fully mashed. Use a fork to blend them well. - Next, incorporate 1/2 cup of plain Greek yogurt, 1 tablespoon of Dijon mustard, and 1 tablespoon of fresh lemon juice. Stir until the mix turns creamy. - Gently fold in 1/4 cup of finely diced red onion and 1/4 cup of finely diced celery. This adds a nice crunch. - Taste your salad. Season it with salt and freshly ground black pepper to suit your liking. Give it another gentle stir. - Now, cover the bowl tightly with plastic wrap. Place it in the refrigerator for 30 minutes. This lets the flavors meld together. - For serving, scoop generous portions onto slices of whole-grain bread or spoon it into crisp lettuce cups. For a fresh twist, serve over mixed greens. - Don’t forget to sprinkle freshly chopped parsley on top for flavor and a pop of color. This easy and healthy avocado chicken salad is a delight that you can enjoy any time! For a detailed recipe, check the Full Recipe section above. To make your avocado chicken salad smooth, you need ripe avocados. A ripe avocado feels soft when you gently squeeze it. This ripeness gives the salad a creamy texture. Mix the avocado well with the chicken. Use a fork to mash it fully and avoid chunks. This step is key for a delightful bite. You can change the flavor of your salad easily. Adjust the amount of Dijon mustard based on your taste. Want it spicy? Add more mustard! You can also try different herbs. Fresh dill or basil can add a unique twist. This way, your salad can change each time you make it. Chilling your salad is very important. Allow at least 30 minutes in the fridge. This cooling time lets all the flavors blend. Cover your bowl tightly with plastic wrap. This prevents browning and keeps the salad fresh. Enjoy the rich taste that develops while it cools! {{image_4}} You can make this salad lighter. Swap regular Greek yogurt for low-fat Greek yogurt. This change cuts fat but keeps taste. If you want a vegetarian dish, use chickpeas instead of chicken. Just mash them lightly and mix as you would with chicken. To spice things up, add diced jalapeños. This will give your salad a nice kick. If you prefer something sweet, try diced apples. The apples add a crisp texture and a hint of sweetness that balances the creaminess. You have many options for serving this salad. Try it on whole-grain wraps for a tasty lunch. You can also spoon it into lettuce wraps for a low-carb meal. For a complete dish, pair it with a side of fresh fruit. The sweetness of the fruit complements the salad well. Store your avocado chicken salad in an airtight container in the refrigerator. This helps keep it fresh and tasty. Try to consume it within 2-3 days for the best flavor and texture. If you want to save some for later, you can freeze the salad. It stays good for up to 1 month. Just remember to thaw it in the refrigerator before serving. This keeps the taste nice and fresh. To keep your avocado looking vibrant, add a bit of lemon juice. This simple step helps prevent browning. Also, make sure to seal the container tightly. This minimizes air exposure and keeps your salad looking great. For the full recipe, check out the detailed steps above. Enjoy your cooking! Typically, avocado chicken salad lasts 2-3 days if stored properly. To keep it fresh, place it in an airtight container. This helps lock in flavors and keeps it safe to eat. Yes, you can prepare this salad a day in advance for flavor enhancement. It tastes even better after resting! However, add the avocado right before serving. This step prevents the avocado from browning and keeps your salad looking fresh. Avocado chicken salad pairs well with whole-grain bread, lettuce wraps, or fresh veggies. You can create a light meal by serving it with crunchy carrot sticks or cucumber slices. This adds texture and makes your meal more colorful. To make your avocado chicken salad creamy, use fully ripe avocados and plain Greek yogurt. The ripe avocado blends smoothly, and the Greek yogurt adds extra creaminess without excess fat. This combo gives you the perfect texture for your salad. This blog post shared a simple and tasty avocado chicken salad recipe. You learned about essential ingredients, like shredded chicken and ripe avocado, and how to mix them for a creamy base. I also discussed tips for texture, flavor options, and storage methods. Overall, this salad is not only quick to prepare but also adaptable for your tastes. Enjoy making this healthy meal that suits any occasion!

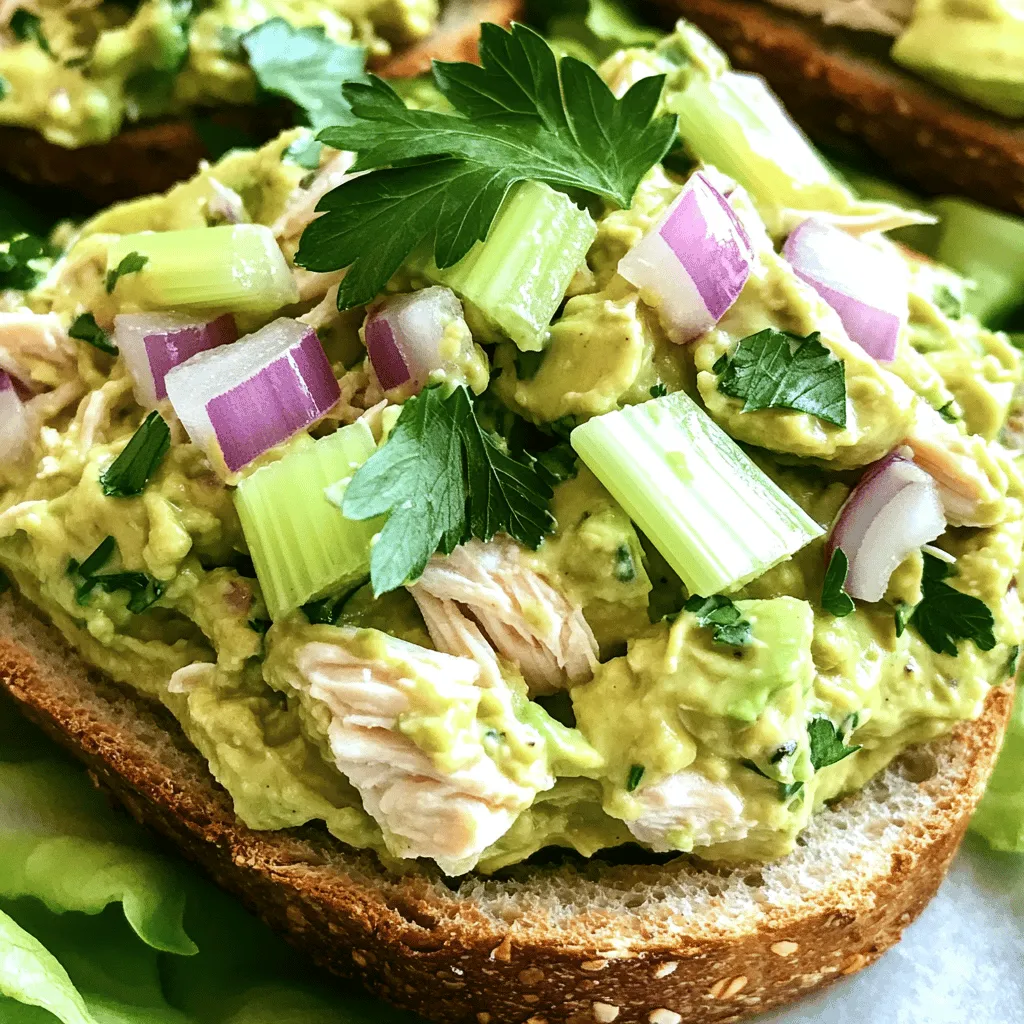
Looking for a quick, healthy meal? This Easy & Healthy Avocado Chicken Salad Delight is your answer! Packed with protein from tender chicken and creaminess from ripe avocados, it’s both …

Read more

Categories Salads

Pudding Fruit Salad Refreshing and Simple Recipe

May 30, 2025 by Chef Tavio
This pudding fruit salad combines creamy pudding with fresh, colorful fruits. It’s a fun dish that everyone loves. This recipe serves six and takes only 15 minutes to prep. You can chill it while you wait to serve. - 1 cup vanilla pudding mix - 2 cups whole milk - 2 ripe bananas, sliced into coins - 1 cup strawberries, hulls removed and cut in half - 1 cup fresh blueberries - 1 cup pineapple chunks, either fresh or canned - 1 cup mini marshmallows - ½ cup sweetened shredded coconut (optional) - ¼ cup crushed nuts, like walnuts or pecans - Fresh mint leaves for an aromatic garnish You can change the fruits in this salad based on your favorite flavors. Try using mango, peaches, or even kiwi. For a twist, swap the vanilla pudding for chocolate or butterscotch. If you want a nut-free version, leave out the nuts. Adding a splash of orange juice can brighten the taste. You can even use yogurt instead of pudding for a tangy kick. The options are endless, so feel free to get creative! To start, you need to prepare the pudding. In a medium bowl, place the vanilla pudding mix. Pour in 2 cups of whole milk. Use a whisk to blend these two ingredients until smooth. You want it to be creamy and thick. Let it sit for about 5 minutes. This allows the pudding to thicken up nicely. Now it's time to mix the fruits. In a large bowl, add the sliced bananas, halved strawberries, blueberries, and pineapple chunks. Use a spatula to gently mix everything together. Be careful not to mash the fruit. You want each piece to stay whole for a great texture. Next, pour the thickened pudding over the fruit. Gently fold the pudding into the fruit. Make sure all the fruits get a nice coating. Add in the mini marshmallows, shredded coconut, and crushed nuts if you choose to use them. Stir carefully to mix everything without crushing the fruit. Cover the bowl tightly with plastic wrap or a lid. Place the bowl in the fridge. Chill it for at least 1 hour. This helps all the flavors blend. Just before serving, give it a light stir. Transfer it to a serving bowl or cups. Add fresh mint leaves on top for a lovely finish. Enjoy this tasty treat! For the full recipe, check the detailed instructions above. When selecting fruits for your pudding fruit salad, freshness is key. Look for fruits that are ripe but firm. Here are some tips: - Choose bananas that are yellow with a few brown spots. - Pick strawberries that are bright red with fresh green tops. - Select blueberries that are plump and dark blue. - Opt for pineapple that smells sweet and is slightly soft to touch. Fresh fruits not only taste better, but they also add color and texture to the dish. For a delightful mix, use a variety of colors and shapes. To get the right texture in your pudding fruit salad, follow these steps: 1. Whisk the pudding mix and milk for a smooth base. 2. Let the mixture rest for about 5 minutes. This helps it thicken. 3. Gently fold the pudding into the fruit. Avoid stirring too hard to keep the fruit intact. The pudding should coat the fruit without being too runny. This balance makes every bite creamy and fruity. Presentation can make your pudding fruit salad even more appealing. Here are some fun ideas: - Use clear glass bowls to show off the colorful layers. - Layer the fruits and pudding in parfait cups for a stunning effect. - Top with fresh mint leaves for a pop of green. - Add a sprinkle of nuts or coconut on top for extra crunch. These small details can turn a simple salad into an eye-catching dessert. Enjoy your beautiful creation! {{image_4}} You can switch fruits based on the season. In spring, use strawberries and peaches. In summer, try cherries and nectarines. Fall is great for apples and pears. Winter calls for citrus like oranges or grapefruits. Each swap keeps your pudding fruit salad fresh and exciting. You can change the pudding flavor to match your mood. Chocolate pudding adds a rich taste. Butterscotch brings a warm sweetness. Lemon pudding adds a zesty kick. Vanilla is classic and pairs well with any fruit. Experiment to find your favorite mix! If you need a dairy-free option, use almond or oat milk with dairy-free pudding mix. For nut-free needs, skip the nuts or use seeds like pumpkin or sunflower seeds. You can also replace shredded coconut with extra fruit. These changes keep the salad tasty for everyone! For the full recipe, check out the delightful pudding fruit salad section. To keep your pudding fruit salad fresh, store it in the fridge. Use an airtight container to prevent the salad from drying out. You can also cover the bowl tightly with plastic wrap. This helps keep the flavors locked in and stops the fruits from browning. Your pudding fruit salad will last about 3 to 5 days in the fridge. If you see any signs of spoilage, like a bad smell or slimy fruit, it’s best to toss it. To enjoy it at its best, eat it within the first couple of days after making it. Freezing pudding fruit salad is not recommended. The fruits can turn mushy when thawed. The creamy pudding may also separate, leading to an odd texture. If you want to make it ahead, keep the pudding and fruit separate. Mix them together just before serving for the best taste. Check out the Full Recipe for more tips! Yes, you can use many flavors of pudding. Chocolate, butterscotch, or even coconut can work well. Each flavor gives the salad a new twist. Experimenting with flavors can make your pudding fruit salad even more fun! To stop bananas from browning, sprinkle them with lemon juice. The citric acid in lemon juice slows down browning. You can also mix them in the salad right before serving. This keeps them fresh and bright! Yes, you can make this salad ahead of time. Just prepare it and chill it in the fridge. Making it a few hours before serving works great. Just remember to stir it gently before serving to mix everything well again. For the full recipe, check out the Delightful Pudding Fruit Salad. You learned how to make delicious pudding fruit salad. We covered the key ingredients and step-by-step instructions for a tasty treat. I shared tips for choosing the best fruit and ways to modify the recipe. Remember, you can swap ingredients and try new flavors. Proper storage helps your salad last longer. Enjoy making this simple dish with your favorite fruits. Have fun with it and share your creations!

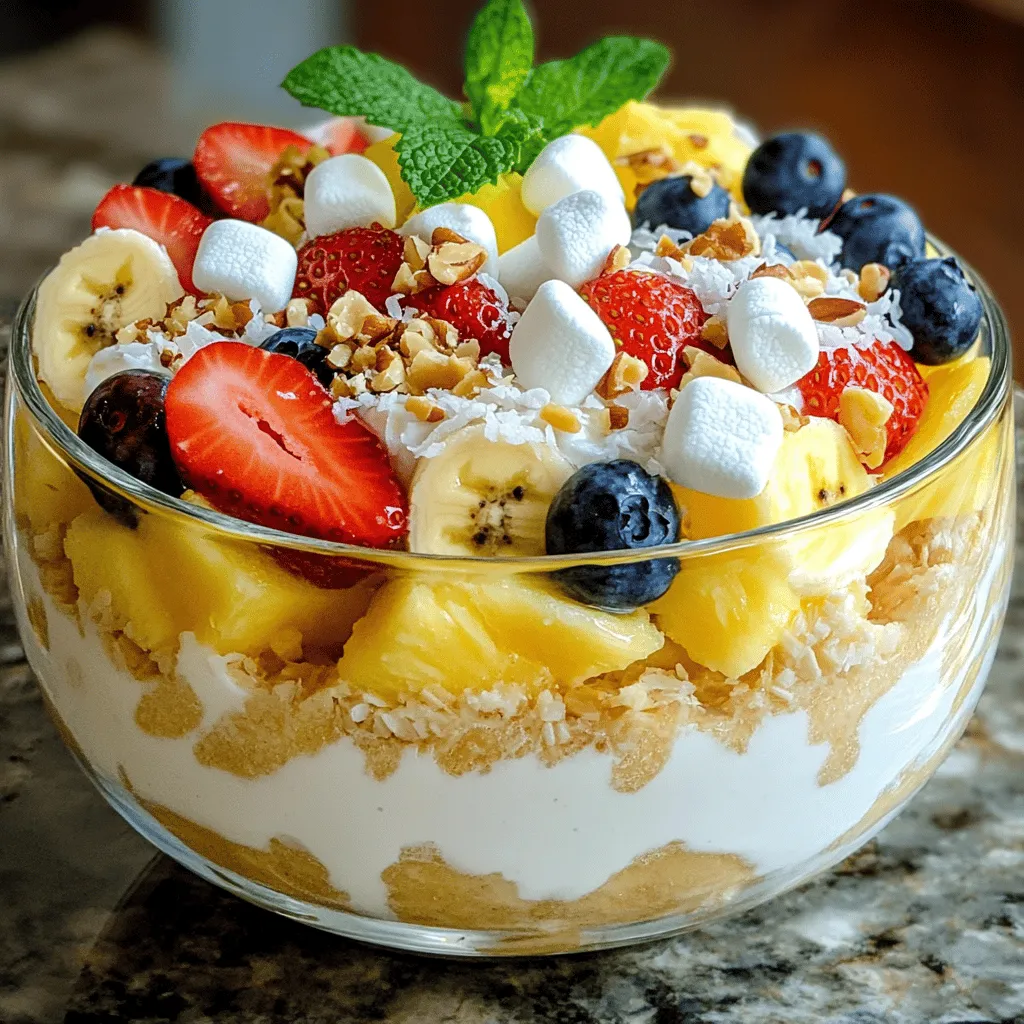
Looking for a refreshing dessert that’s both easy to make and delicious? You’ve come to the right place! My Pudding Fruit Salad combines sweet fruits with creamy pudding, making it …

Read more

Categories Desserts

Air Fryer Sliced Potatoes Crisp and Tasty Snack Option

May 30, 2025 by Chef Tavio
- 4 medium-sized potatoes (Yukon Gold or Red) - 2 tablespoons olive oil - 1 teaspoon garlic powder - 1 teaspoon onion powder - 1 teaspoon smoked paprika - ½ teaspoon dried thyme - Salt and pepper to taste - Fresh parsley for garnish (optional) - Calories: 150 - Fat: 7g - Carbohydrates: 22g - Protein: 2g - Fiber: 2g I love using Yukon Gold or Red potatoes for this recipe. They yield a creamy interior while getting nice and crispy on the outside. Start with four medium potatoes. Wash them well to remove dirt, and slice them into quarter-inch thick rounds. This thickness is key for that perfect crunch. Next, let's get to the fun part: seasoning! You need two tablespoons of olive oil. This helps the spices stick and gives flavor. For the spices, grab one teaspoon each of garlic powder, onion powder, and smoked paprika. Add half a teaspoon of dried thyme, and season with salt and pepper to taste. Toss all the slices in a bowl to coat them evenly. This is where the magic begins, and the aroma fills the air. Now, about the nutritional value. Each serving has about 150 calories, with 7 grams of fat, 22 grams of carbohydrates, 2 grams of protein, and 2 grams of fiber. This makes them a tasty snack that you can feel good about. For the full recipe, I recommend checking out the details above. Enjoy your crispy Air Fryer sliced potatoes! Start by washing and scrubbing your potatoes under cold water. This removes dirt and helps your slices taste fresh. After washing, slice each potato into 1/4-inch thick rounds. Use a sharp knife or a mandoline for best results. Uniform slices ensure even cooking, so take your time with this step. In a large mixing bowl, add your potato slices. Pour in 2 tablespoons of olive oil. Then, sprinkle in the garlic powder, onion powder, smoked paprika, dried thyme, and a pinch of salt and pepper. Mix everything gently with your hands or a spatula. Make sure every slice gets coated in the delicious seasoning. This step brings out all the flavors. First, preheat your air fryer to 375°F (190°C) for about 3-5 minutes. This is key to getting that crispy texture. Next, arrange the seasoned potato slices in a single layer in the air fryer basket. Avoid overcrowding; this allows hot air to flow freely. Air fry the slices for about 15-18 minutes. At the halfway mark, shake the basket gently. This helps them cook evenly and become crispy. Once they turn golden brown and crispy, carefully remove them from the air fryer. If you want to add a pop of color, sprinkle some fresh parsley on top. Enjoy your crispy air fryer sliced potatoes as a tasty snack! For a full recipe, check the section above. To get the best crisp on your air fryer sliced potatoes, preheating is key. I always preheat my air fryer to 375°F. This simple step helps the potatoes cook evenly and turn golden brown. It takes just 3-5 minutes, but it makes a big difference in texture. Avoid overcrowding the basket when you arrange the potato slices. If you pile them on top of each other, they won’t cook well. Instead, place them in a single layer. This allows hot air to circulate freely, giving each slice that perfect crunch. You can add even more flavor with different seasonings. Besides garlic and onion powder, try adding Italian herbs like oregano or basil. You can also sprinkle some cheese after cooking for an extra treat. The type of oil you use can change the taste too. Olive oil is great, but you might want to try avocado oil or even melted coconut oil. Each type of oil brings its own flavor to the dish. If you want to make these sliced potatoes vegan, you're in luck! The recipe is already plant-based. Just ensure your seasonings are also vegan. For a gluten-free option, you can enjoy these potatoes without worry. All the ingredients are naturally gluten-free. So, feel free to serve them at any gathering! For the full recipe, check the earlier sections in this article. {{image_4}} You can easily change the taste of your air fryer sliced potatoes. Here are two fun ideas: - Cheese and Herb Variation: After cooking your potato slices, sprinkle them with cheese. Parmesan or cheddar works well. Add fresh herbs like rosemary or chives for a tasty twist. The cheese melts and adds a rich flavor. - Spicy Seasoned Slices: If you like heat, add some cayenne pepper or chili powder. Mix it with the other spices before tossing the potato slices. You will get a kick that makes every bite exciting! Not everyone has an air fryer, and that's okay! You can still enjoy crispy sliced potatoes with these methods: - Oven-Baked Alternative: Preheat your oven to 425°F (220°C). Spread the seasoned potato slices on a baking sheet. Bake for about 25-30 minutes, flipping halfway through. This method gives a nice crunch without an air fryer. - Stovetop Frying Option: Heat oil in a large skillet over medium heat. Once hot, carefully add the potato slices. Fry them in batches for about 4-5 minutes per side until golden brown. This method brings a delicious, crispy texture. No snack is complete without dips! Here are some great choices: - Best Dips and Sauces: Serve your crispy potato slices with ranch dressing or garlic aioli. Both add a creamy, flavorful touch. You can also try salsa for a fresh vibe. - Mixing with Other Vegetables: For a colorful platter, pair your potato slices with carrots or bell peppers. You can roast or air fry them together for a fun, mixed snack. This adds both flavor and nutrition to your meal. To store your leftover air fryer sliced potatoes, first let them cool. Once cool, place them in an airtight container. Store them in the refrigerator for up to 3 days. If you want to keep them longer, freezing is a great option. To freeze, lay the slices in a single layer on a baking sheet. Freeze until solid, then transfer them to a freezer bag. This method helps prevent sticking. When it’s time to reheat, use your air fryer for the best results. Set it to 350°F (175°C) and cook for about 5 minutes. This method keeps your slices crispy. You can also use an oven if you don’t have an air fryer. Place them on a baking sheet and cover them with foil for the first half. Remove the foil for the last few minutes to crisp them up. Avoid using a microwave, as it can make them soggy. In the fridge, your air fryer sliced potatoes last about 3 days. If you freeze them, they can last up to 2 months. Always check for any signs of freezer burn before using. Enjoy your crispy treats even after a few days with proper storage! To make your air fryer sliced potatoes crispy, start with the right temperature. I recommend setting your air fryer to 375°F (190°C). Preheat it for about 3-5 minutes. This step is key for that golden crunch. Cook the potato slices for about 15-18 minutes. Halfway through, shake the basket to ensure even cooking. This helps all sides get crispy. If you want extra crispiness, you can cook them a few minutes longer, but keep an eye on them. Yes, you can use other types of potatoes! Yukon Gold and Red potatoes work best. They hold their shape well and have a nice flavor. You can also try Russet potatoes. They are starchy, which gives a great texture. Sweet potatoes are another fun option for a twist. Just remember, different types may need slight changes to cooking time. Several dips pair well with air fryer sliced potatoes. My favorites include ranch and garlic aioli. These add a creamy texture and rich taste. You can also try salsa for a fresh kick. Hot sauce adds a nice zing, too. If you love cheese, a cheesy dip is perfect. Experiment with your favorites for a tasty snack! In this post, I shared a simple recipe for air fryer sliced potatoes. We covered the essential ingredients, step-by-step prep, and seasoning methods. I also highlighted tips for achieving a perfect crisp and variations to suit your taste. These potatoes are not just delicious; they can fit different diets too. Remember, you can always get creative with flavors or cooking methods. Enjoy making this snack your own!

Looking for a quick and tasty snack? Air Fryer Sliced Potatoes are the answer! With their crispy exterior and soft inside, they’re easy to make and bursting with flavor. In …

Read more

Categories Appetizers

Grilled Peach Blueberry Salad Fresh and Flavorful Dish

May 30, 2025 by Chef Tavio
- Ripe peaches - Fresh blueberries - Mixed greens - Goat cheese - Candied pecans or walnuts For this salad, ripe peaches are key. They should feel soft but not mushy. Fresh blueberries add a burst of sweetness. Mixed greens provide a nice crunch. Goat cheese gives a creamy contrast. Candied pecans or walnuts add a delightful crunch. - Olive oil - Balsamic vinegar - Honey - Salt and pepper The dressing makes the salad shine. Olive oil adds richness. Balsamic vinegar gives a tangy kick. Honey adds a touch of sweetness. Salt and pepper balance the flavors well. - Grill or grill pan - Large mixing bowl - Small bowl for dressing - Whisk You need a grill or grill pan for the peaches. A large mixing bowl helps combine all the fresh ingredients. A small bowl is for the dressing. A whisk makes mixing easy. This simple setup helps create the perfect grilled peach blueberry salad. For the full recipe, check out the steps that follow. First, you need to preheat your grill or grill pan. Set it to medium-high heat. This step is key for getting great grill marks on the peaches. While the grill heats up, take your ripe peaches. Cut them in half and remove the pits. Brush the cut sides lightly with olive oil. This helps prevent sticking and adds flavor. Now it’s time to grill the peaches. Place them cut-side down on the hot grill. Cook them for about 3 to 4 minutes. Check for beautiful grill marks. The peaches should soften slightly but still hold their shape. Once done, remove them from the grill and let them cool for a few moments. In a large mixing bowl, combine your mixed greens and fresh blueberries. This creates a colorful base. In a separate small bowl, whisk together olive oil, balsamic vinegar, honey, and a pinch of salt and pepper. This will be your dressing. Once the grilled peaches have cooled enough, slice each half into wedges. Gently add these peach slices to the bowl with greens and blueberries. Drizzle the dressing over the salad and toss it gently. Make sure every piece gets a little dressing. Finally, sprinkle crumbled goat cheese and chopped candied nuts on top. This adds a nice crunch and flavor. For the full recipe, check the details above. Enjoy your fresh and flavorful dish! To get those perfect grill marks, start by heating your grill well. Aim for medium-high heat, around 400°F. This ensures the peaches cook evenly. Place the peaches cut-side down on the grill. Cook them for about 3-4 minutes. Keep an eye on them. You want deep marks without burning. Once grilled, let the peaches cool before adding them to your salad. To boost the sweetness, consider adding a touch of honey. Drizzle it over the peaches or into your dressing. This small addition makes a big difference. For a fresh taste, try using herbs. Basil or mint work well. Chopped fresh herbs add a nice pop to your salad. Presentation matters when serving your salad. Arrange the greens, peaches, and blueberries on a large platter. Layer them so colors stand out. For garnish, sprinkle extra blueberries and nuts on top. Adding fresh mint leaves can make the dish look even more inviting. A beautiful salad not only tastes good but also looks great on your table. {{image_4}} You can change up the fruits in this salad. Strawberries and raspberries work well too. They add a nice sweet note and fresh flavor. You can also swap the cheese. Feta gives a salty kick, while blue cheese adds depth. Each option changes the taste profile, making it exciting. If you want a twist, try using a citrus vinaigrette. This adds brightness to your dish. You can also mix in some yogurt for creaminess. It makes the dressing smooth and rich. Both options enhance the salad's flavor and texture. For a heartier meal, you can add proteins. Grilled chicken or shrimp pair nicely with the fruits. They add protein and make the salad filling. Another option is to mix in quinoa. It’s a healthy grain that adds bulk and nutrition. Both choices make your salad more satisfying. For the complete recipe, check out the Full Recipe section above. To keep your grilled peach blueberry salad fresh, place it in an airtight container. The salad lasts about 2-3 days in the fridge. Make sure to separate the dressing from the salad to avoid sogginess. This way, the greens stay crisp. You can grill the peaches a day ahead. Store them in the fridge until you are ready to use them. Make the dressing ahead too. Whisk together the olive oil, balsamic vinegar, honey, salt, and pepper. Keep it in a sealed jar in the fridge. For best results, store the mixed greens separately. This keeps them fresh and crunchy. I do not recommend freezing the salad. Freezing can change the texture of the peaches and greens. If you want to freeze any components, freeze the grilled peaches only. Wrap them well in plastic wrap or a freezer bag. Thaw them in the fridge before using. Grilling peaches is simple and fun. First, preheat your grill to medium-high heat. Brush the cut sides of halved peaches lightly with olive oil. Place the peaches cut-side down on the grill. Cook for about 3 to 4 minutes. You want to see nice grill marks and the peaches should soften slightly. Remove them and let them cool. This method gives peaches a smoky flavor that enhances your salad. Yes, you can prep this salad ahead. Grilled peaches can stay fresh for a day in the fridge. You can also mix the dressing in advance. Store it in a jar and shake it before using. Keep the greens and blueberries separate until you serve. This way, everything stays crisp and fresh. Meal prepping makes it easy to enjoy this dish anytime. This salad is both tasty and healthy. One serving has about 200 calories. Peaches and blueberries are rich in vitamins. They are full of antioxidants that help your body. Goat cheese adds protein and calcium. Candied nuts give a nice crunch but be mindful of added sugars. Overall, this salad is a smart choice for a light meal. Yes, this salad is gluten-free. The main ingredients, like peaches and blueberries, do not contain gluten. Check any store-bought dressings to ensure they are gluten-free. You can make your own dressing easily, as shown in the Full Recipe. This ensures everything stays gluten-free and safe for those with dietary needs. If you want more sweetness, try adding honey or agave syrup. You can also mix in extra fruits like strawberries or mango. These fruits will add natural sugars and flavor. Drizzle a bit more honey in the dressing too. This makes the salad even more delightful. Adjust the sweetness to fit your taste. If you need a substitute for goat cheese, try feta or blue cheese. For a dairy-free option, use vegan cream cheese or almond cheese. These alternatives can give a similar texture. Each choice will change the flavor a bit, so choose what you like best. Enjoy experimenting with different cheese types! This salad combines fresh, ripe peaches and blueberries with mixed greens. The tangy goat cheese and sweet nuts add crunch and flavor. Grilling the peaches gives a smoky taste. You can customize the recipe with different fruits and dressings. Consider making it ahead to save time. Store leftovers well for fresh meals later. This tasty, colorful salad is not just healthy—it’s fun to make and share. Enjoy experimenting with flavors and ingredients for your perfect dish.

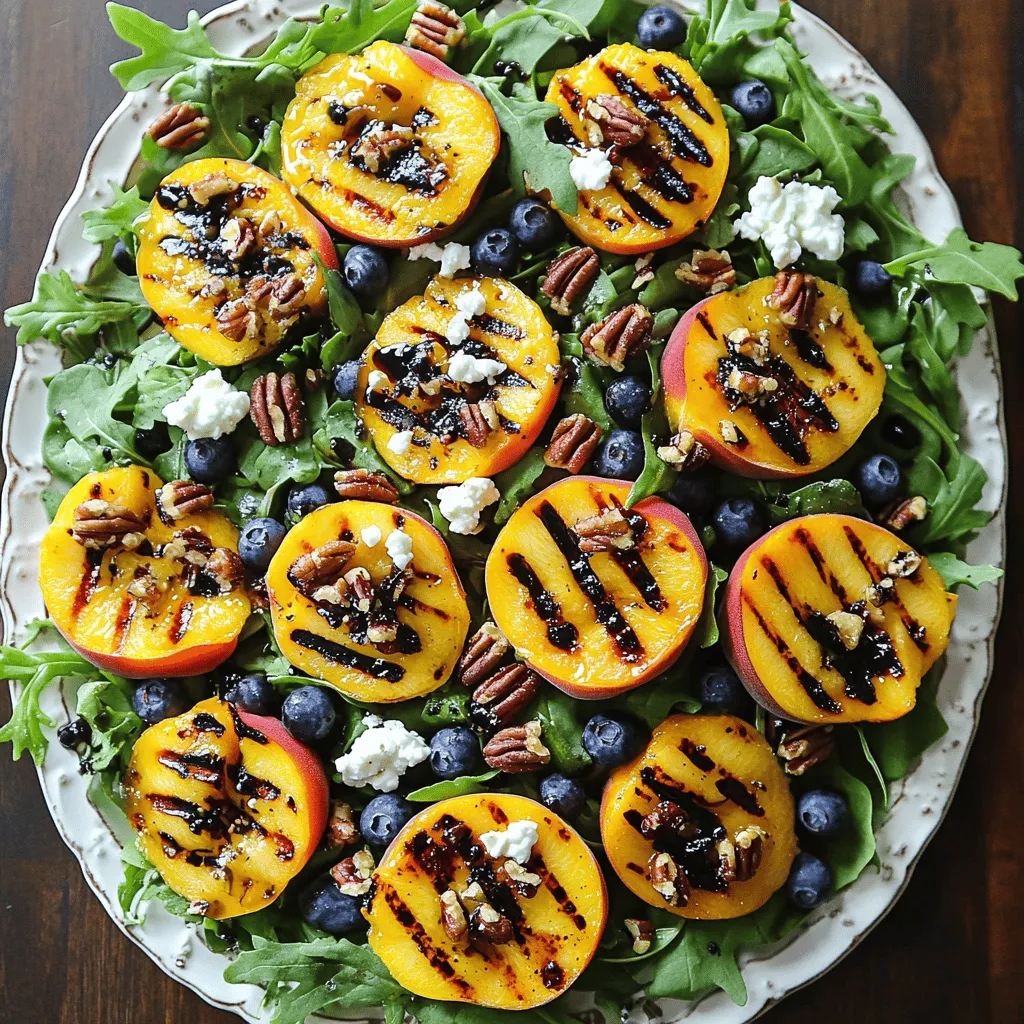
Dreaming of a dish that’s fresh, vibrant, and bursting with flavor? Look no further! This Grilled Peach Blueberry Salad combines sweet, juicy peaches with tart blueberries and creamy goat cheese. …

Read more

Categories Salads

Strawberry and Cucumber Salad Fresh and Flavorful Delight

May 30, 2025 by Chef Tavio
When making the Strawberry and Cucumber Salad, you need fresh and bright ingredients. Here’s what you will need: - Fresh strawberries - Cucumber - Red onion - Fresh mint leaves - Feta cheese - Honey - Balsamic vinegar - Salt and black pepper - Optional: Sliced almonds Each ingredient plays a key role in this dish. Fresh strawberries provide sweetness. The cucumber adds crunch and a refreshing taste. Red onion gives a mild bite, while mint leaves bring a cool flavor. Feta cheese adds creaminess and saltiness. Honey and balsamic vinegar create a sweet and tangy dressing that ties everything together. Salt and black pepper enhance the flavors of the salad. If you want some crunch, include sliced almonds. Using quality ingredients makes a big difference. You want your salad to taste bright and fresh. For the full recipe and detailed steps, check out the [Full Recipe]. First, you need to prepare the fresh ingredients. Start with the strawberries. Remove the green tops, also known as hulling. Then, slice the strawberries into thin pieces. Next, take your cucumber. Wash it well and cut it into thin slices. A sharp knife makes this easier. For the red onion, slice it finely. This gives the salad a nice crunch and flavor. Lastly, chop the fresh mint leaves. This bright herb adds a burst of freshness to your salad. Now, it’s time to combine all the ingredients. In a large salad bowl, add the sliced strawberries, cucumber, and red onion. Mix them gently so they blend well. Then, add the chopped mint leaves. Finally, sprinkle in the crumbled feta cheese. The feta adds a salty taste that balances the sweetness of the strawberries. To make the dressing, take a small bowl. Whisk together the honey and balsamic vinegar. Mix them until well blended. This dressing is sweet and tangy. Once mixed, drizzle the dressing over your salad. This brings all the flavors together beautifully. Gently toss the salad. This step is key. You want to coat all the ingredients without mashing the strawberries. Now, season the salad with salt and freshly ground black pepper. This enhances the flavors, giving it a nice kick. If you like, add sliced almonds for a delightful crunch. These nuts give texture and flavor. For the full recipe, check out the instructions above. - Choosing ripe strawberries: Look for bright red berries. They should feel firm but not hard. The best ones smell sweet and have no dark spots. - Finding the right cucumber: Choose a cucumber that is dark green and smooth. Avoid ones that have soft spots or wrinkles. Fresh cucumbers should feel firm and crisp in your hand. - Adjusting sweetness with honey: You can add more honey if the salad tastes too tart. Start with a little, then taste it. This sweet touch balances the flavors well. - Alternative dressings to try: If you want a change, consider using a citrus vinaigrette. A yogurt-based dressing can also add a creamy twist. - Serving in clear glass bowls: Using clear bowls lets the colors shine through. The red strawberries and green cucumbers create a beautiful display. - Garnishing ideas with mint leaves: Top the salad with whole mint leaves for a fresh look. This simple touch makes it feel special. For the full recipe, check out [Full Recipe]. {{image_4}} You can boost your salad by adding protein. Grilled chicken or shrimp works great. Just slice them thin and mix them in. For a vegan option, try chickpeas or tofu. Both add a nice texture and fill you up. Switching up the dressing can change the whole salad. A citrus vinaigrette brings a zesty flavor. Just mix lemon or lime juice with olive oil and a pinch of salt. Yogurt-based dressings are also a tasty choice. They add creaminess without the heaviness. You can make this salad your own by adding seasonal fruits. In summer, peaches or blueberries taste amazing. In fall, try apples or pears for a crunch. Adjust the salad based on what you find fresh at the market. This keeps it exciting and delicious. For the full recipe, check the detailed instructions above. After making your Strawberry and Cucumber Salad, you may have some leftovers. To keep them fresh, place the salad in an airtight container. This helps prevent any odors from mixing with your salad. Store the container in the fridge. Your salad will stay good for about 1 to 2 days. When storing, avoid adding the dressing right away. This keeps the salad crisp and prevents sogginess. If you’ve already added the dressing, consume the salad within a day for the best taste. If you plan to make this salad in advance, I suggest prepping the ingredients separately. Slice the strawberries and cucumber but keep them in different containers. This helps maintain their freshness. Prepare your dressing using honey and balsamic vinegar, and store it in a small jar. When it's time to eat, simply drizzle the dressing over your salad and mix everything together. By separating the dressing, you ensure your salad tastes fresh and vibrant each time. Enjoy the full flavors every day! For the complete recipe, check out the [Full Recipe]. You can boost the nutrition of your salad in two easy ways: - Adding nuts and seeds: Nuts like almonds or walnuts add healthy fats and protein. Seeds such as chia or sunflower seeds give extra vitamins and crunch. - Incorporating legumes: Chickpeas or black beans can add fiber and protein. They help make the salad more filling and healthy. Using frozen strawberries is possible, but it changes the salad. - Impact on texture and flavor: Frozen strawberries may become mushy when thawed. They might also lack the bright taste of fresh ones. If you use them, try to let them drain well before adding to your salad. Serving this salad can be fun and creative. - Suggestions for side dishes: It pairs well with grilled chicken or fish. You can also serve it with crusty bread or a light soup. These sides balance the flavors and make a great meal. Storing this salad correctly keeps it fresh. - Best storage duration for freshness: You can keep it in the fridge for up to 2 days. After that, the ingredients may become soggy. Store it in an airtight container to keep it crisp and tasty. This blog post guides you through making a delicious strawberry and cucumber salad. We covered the right ingredients, step-by-step prep, and options for variations. With tips on storage and serving, you're set for success. Remember, fresh ingredients enhance taste, so choose wisely. Explore protein options to make it heartier. Enjoy your healthy salad as a bright dish for any meal.

Looking for a bright and refreshing dish? Try my Strawberry and Cucumber Salad! It’s a delightful mix of sweet strawberries and crisp cucumbers, topped with feta and fresh mint. This …

Read more

Categories Salads

Sweet Chili Glazed Chicken Thighs Tasty Quick Meal

May 30, 2025 by Chef Tavio
To make these tasty chicken thighs, you need: - 4 chicken thighs, bone-in and skin-on - 1/4 cup sweet chili sauce - 2 tablespoons soy sauce - 1 tablespoon rice vinegar - 2 cloves garlic, minced - 1 tablespoon ginger, freshly grated - 1 tablespoon honey - 1 tablespoon sesame oil - Salt and black pepper to taste These ingredients blend together to create a sweet and spicy flavor that makes your mouth water. You can add some extra flair and taste with these: - 1 tablespoon sesame seeds (for garnish) - 2 green onions, sliced (for garnish) These garnishes not only look great but also add crunch and freshness to the dish. You might also serve the chicken with rice or steamed veggies for a full meal. Having the right tools makes cooking easier. Here’s what you’ll need: - A mixing bowl for the marinade - A whisk to blend the ingredients - A large resealable plastic bag or bowl for marinating - A baking dish for the chicken - An oven thermometer to check the heat These simple tools help you make the best Sweet Chili Glazed Chicken Thighs. For the full recipe, check out the detailed guidelines above. To start, gather all your ingredients. In a small bowl, mix the sweet chili sauce, soy sauce, rice vinegar, minced garlic, ginger, honey, sesame oil, salt, and black pepper. Whisk them together until smooth. This marinade packs a punch with sweet and spicy notes. It’s a key step in making your chicken delicious. Now, take your chicken thighs and place them in a large resealable bag or bowl. Pour the marinade over the thighs. Make sure each piece gets coated well. Seal the bag or cover the bowl with plastic wrap. Let the chicken marinate in the fridge for at least 30 minutes. If you have time, let it sit for up to 2 hours. This extra time helps the flavors soak in. Preheat your oven to 400°F (200°C). After marinating, take the chicken out of the fridge. Place the thighs skin-side up in a baking dish. Drizzle any leftover marinade on top. Bake the chicken for about 35-40 minutes. You want it to hit an internal temperature of 165°F (75°C). The skin should turn golden brown and crispy. For an extra crunch, switch your oven to broil for 2-3 minutes. Keep a close watch to avoid burning. Once done, let the chicken rest for a few minutes. Sprinkle sesame seeds and sliced green onions on top before serving. This adds a lovely crunch and fresh flavor. You can find the full recipe for more details on how to make this meal. To get the best taste, mix sweet and spicy well. Use a good sweet chili sauce. I like to add a touch of soy sauce for depth. The rice vinegar helps cut through the sweetness. You want a nice balance that makes your taste buds dance. The key to juicy chicken is marinating. Let the chicken sit in the marinade for at least 30 minutes. If you have time, go for two hours. This helps the flavors soak in and keeps the chicken moist. Baking at 400°F also helps cook it evenly. Store any leftover chicken in an airtight container. It stays fresh in the fridge for about three days. If you want to keep it longer, freeze it. Make sure to wrap it well to avoid freezer burn. Enjoy your Sweet Chili Glazed Chicken Thighs later with ease. For the complete process, check the Full Recipe. {{image_4}} If you like heat, add a kick to your sweet chili glazed chicken thighs. Mix in some red pepper flakes or sriracha into your marinade. This gives the dish a fiery edge. You can also try using spicy chili sauce instead of sweet chili sauce. This will change the flavor, making it more bold and exciting. You can easily adapt this recipe for different diets. If you want a gluten-free option, use tamari instead of soy sauce. For a lower sugar option, try using a sugar-free sweet chili sauce. If you are vegan, swap the chicken for tofu or tempeh. Just marinate them the same way and bake as usual. These swaps keep the dish tasty and enjoyable for everyone. While this recipe calls for chicken thighs, you can use other cuts as well. Chicken breasts are a leaner choice. Cook them for a shorter time, about 25-30 minutes. Wings also work well and add fun to your meal. Just adjust the cooking time to ensure they are fully cooked. Each cut brings a unique texture and flavor to the dish. After cooking your sweet chili glazed chicken thighs, let them cool down. Place any leftovers in an airtight container. This keeps them fresh and safe to eat later. Store the container in the fridge. Properly stored, they will last for about 3 to 4 days. To reheat your chicken, preheat the oven to 350°F (175°C). Place the chicken on a baking sheet. Cover it loosely with foil to keep it moist. Heat for about 15-20 minutes or until it’s warm throughout. You can also use the microwave. Put the chicken on a microwave-safe plate and cover it. Heat in short bursts of 1 minute, checking often. If you want to save some for later, freezing is a great option. Allow the chicken to cool completely before freezing. Wrap each thigh in plastic wrap, then place them in a freezer bag. Make sure to remove as much air as possible. You can keep them in the freezer for up to 3 months. When ready to eat, thaw them overnight in the fridge before reheating. For the full recipe, check out the Sweet Chili Glazed Chicken Thighs . You should marinate chicken thighs for at least 30 minutes. This time allows the flavors to soak in well. For a stronger taste, consider marinating for up to 2 hours. The longer you marinate, the richer the flavor becomes. Just remember not to exceed 24 hours. Too long can make the meat mushy. Sweet Chili Glazed Chicken Thighs pair well with many sides. Here are some great options: - Steamed rice or jasmine rice - Stir-fried vegetables like bell peppers and broccoli - A fresh green salad with a light dressing - Crispy fried wontons or spring rolls These sides add color and texture to your meal. They also balance the sweetness of the chicken. Absolutely! Grilling the chicken gives it a lovely smoky flavor. To grill, preheat your grill to medium-high heat. Cook the chicken thighs for about 6-8 minutes on each side. Make sure the internal temperature reaches 165°F (75°C). You can still use the marinade for basting while grilling. This adds depth to the sweet chili glaze. For the full recipe, check out the earlier sections. In this post, we explored how to make sweet chili glazed chicken thighs. We covered main ingredients, cooking steps, and tips. You learned how to balance flavors and keep the chicken juicy. Variations allow for personal twists based on taste or needs. Proper storage will help you enjoy leftovers later. By following these steps, you can make a tasty meal that everyone loves. Enjoy your cooking and impress your family and friends!

If you’re looking for a quick and tasty meal, you’ve found it! Sweet Chili Glazed Chicken Thighs are packed with flavor and easy to make. In this post, I’ll guide …

Read more

Categories Dinner
Older posts
Newer posts
← Previous Page1 … Page97 Page98 Page99 … Page115 Next →

TASTED NEST

Where Flavor Finds a Home 🍳🏡 — warm, simple, and crave-worthy recipes made for real life, from stovetop mornings to backyard dinners.

PAGES

Home About Contact Privacy Policy Terms & Conditions Cookie Policy GDPR Policy Copyright Policy Disclaimer

CATEGORIES

Appetizers Desserts Salads Breakfast Dinner

Contact

  • Pinterest
  • Mail
Copyright © 2025 Tasted Nest. All rights reserved.