Korean BBQ Meatballs Savory and Simple Recipe
![- 1 pound ground beef or turkey - 1/2 cup panko breadcrumbs - 1/4 cup green onions, finely chopped - 1/4 cup toasted sesame seeds - 2 cloves garlic, minced - 1-inch piece ginger, freshly grated - 1/4 cup low sodium soy sauce - 2 tablespoons brown sugar - 1 tablespoon gochujang - 1 tablespoon rice vinegar - 1 teaspoon sesame oil - Salt and pepper to taste - Fresh cilantro and additional sesame seeds for garnish Each ingredient plays a key role. Ground beef or turkey gives the meatballs their base. Panko breadcrumbs add a crispy texture. Green onions bring a fresh, mild flavor. Toasted sesame seeds add crunch and richness. Garlic and ginger give a warm, aromatic taste. Low sodium soy sauce adds saltiness while brown sugar balances it with sweetness. Gochujang adds a spicy kick. Rice vinegar brightens the mix, and sesame oil rounds it out with depth. You can adjust the seasoning with salt and pepper. Garnishing with cilantro and sesame seeds makes the dish pop. For the full recipe, check out the details to ensure you get each step right! - Preheat the oven to 400°F (200°C). - Prepare a baking sheet with parchment paper. - Combine all ingredients in a mixing bowl thoroughly. - Use hands to mix for even consistency. - Form meat mixture into 1-inch balls. - Arrange on the baking sheet evenly spaced. - Bake for 20-25 minutes until browned and cooked through. - Use a meat thermometer to check for 165°F (74°C). - Combine soy sauce, gochujang, and rice vinegar for dipping. - Allow meatballs to cool, then garnish with cilantro and sesame seeds. This Korean BBQ meatball recipe is simple and fun. Follow each step closely for the best results. Enjoy the savory flavors and share with friends! For the full recipe, check the link. To get the best flavor in your Korean BBQ meatballs, adjust the gochujang. If you like spice, add more. If you want it milder, use less. Freshly grated ginger makes a huge difference too. It adds brightness and depth to the dish. Always use fresh ingredients for the best taste. When forming your meatballs, moisten your hands. This simple step keeps the meat from sticking to your fingers. It makes shaping them easier. Also, use parchment paper on your baking sheet. This ensures the meatballs release easily after baking. For a crispy exterior, broil the meatballs during the last few minutes of cooking. This technique gives them a nice crunch without drying them out. Just watch them closely to prevent burning. You want that perfect golden color for the best look and taste. {{image_4}} You can switch up the meat in your Korean BBQ meatballs. Ground chicken or pork adds a unique flavor. If you want a healthier option, try plant-based ground meat. This choice is great for vegetarians and still tastes amazing. To make your meatballs stand out, add fresh herbs. Mint or basil gives a bright taste. You can also chop up bell peppers or carrots. These veggies add crunch and nutrition to your dish. How you cook your meatballs changes their texture. If you want a crispy bite, pan-fry them instead of baking. For that smoky BBQ flavor, grill the meatballs. Both methods enhance the taste and make them fun to eat. If you're ready to dive into the full experience, check out the [Full Recipe]. Store leftover meatballs in an airtight container for up to 3 days. Keeping them sealed helps retain moisture and flavor. You can enjoy them as a quick snack or add them to a salad for lunch. Freeze uncooked meatballs on a baking sheet before transferring them to a freezer bag. This method keeps them from sticking together. You can also freeze cooked meatballs. Just ensure they cool down first. Reheating them later makes for an easy meal. Reheat in the oven at 350°F (175°C) for best results. This way, they warm evenly and stay juicy. If you need a faster option, you can use a microwave, but the oven gives a better texture. Yes, you can substitute ground turkey, chicken, pork, or meat alternatives. Each type of meat brings its own taste and texture. Ground turkey is leaner, while pork offers a richer flavor. Feel free to get creative based on what you have at home. To make the meatballs less spicy, reduce the amount of gochujang or omit it altogether. You can also add a bit more brown sugar to balance the heat. Taste as you go, and adjust until it suits your palate. Serve with steamed rice, pickled veggies, or a fresh salad for balance. The rice helps soak up the flavors, while pickled veggies add a nice crunch. A salad can lighten the meal and bring freshness. Present the meatballs with a dipping sauce and garnish for a colorful platter. Use a nice dish to catch the eye. Adding fresh cilantro and sesame seeds on top makes everything pop. The dipping sauce adds an extra layer of flavor. They can last refrigerated for up to 3 days when stored properly. Keep them in an airtight container to maintain freshness. Reheat them gently to enjoy later. These Korean BBQ meatballs are simple to make and full of flavor. You learned about the key ingredients and steps needed to create them. I shared tips to enhance taste and texture, as well as variations to keep things interesting. Storing and reheating options were also highlighted, ensuring you can enjoy your meatballs later. With this knowledge, you can cook up a tasty dish that pleases everyone. Dive into your kitchen and try making these meatballs for a quick and satisfying meal. Enjoy cooking!](https://tastednest.com/wp-content/uploads/2025/06/4f469120-43aa-48db-b378-ed889e0aa354.webp)
Craving a delicious dish that’s both savory and simple? Look no further than these Korean BBQ meatballs! Made with juicy ground beef or turkey and packed with rich flavors, they …
Craving a delicious dish that’s both savory and simple? Look no further than these Korean BBQ meatballs! Made with juicy ground beef or turkey and packed with rich flavors, they …

Japanese Katsu Bowls are the ultimate comfort food that everyone loves. With crispy chicken, fluffy rice, and tasty sauces, you can create a meal that warms your soul. In this …

Looking for a quick, tasty meal? Let me introduce you to the Easy Hobo Ground Beef Casserole! This dish is perfect for busy families. With just a few simple ingredients, …

Are you ready to elevate your breakfast game? My Fluffy Cinnamon Crunch French Toast is the perfect mix of sweet and crunchy. With thick-cut brioche, a rich egg mixture, and …

Looking for a meal that warms your heart and fills your belly? This Creamy Chicken and Gnocchi Pot Pie is just what you need! With tender chicken, soft gnocchi, and …

If you crave bakery-style banana bread that’s moist and easy to make, you’re in the right place! This foolproof recipe guarantees a delicious result every time. Learn the best ingredients, …
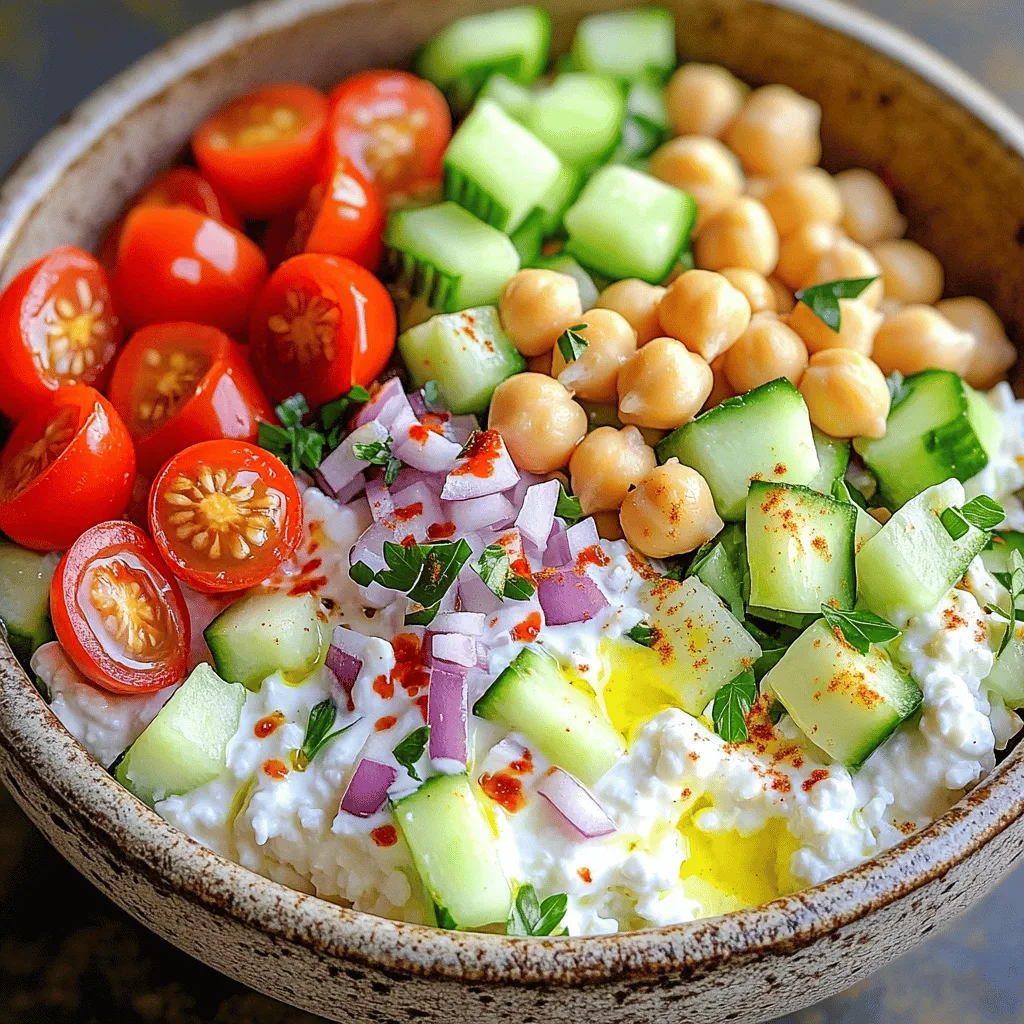
Looking for a fresh, tasty, and healthy meal? Look no further! The Cottage Cheese and Chickpea Salad Bowl brings together protein-packed goodness and vibrant veggies in one delightful dish. This …

Are you ready to transform your dinner routine? This Chicken Breast with Roasted Corn and Avocado Delight is a fresh and tasty dish you can whip up in no time. …
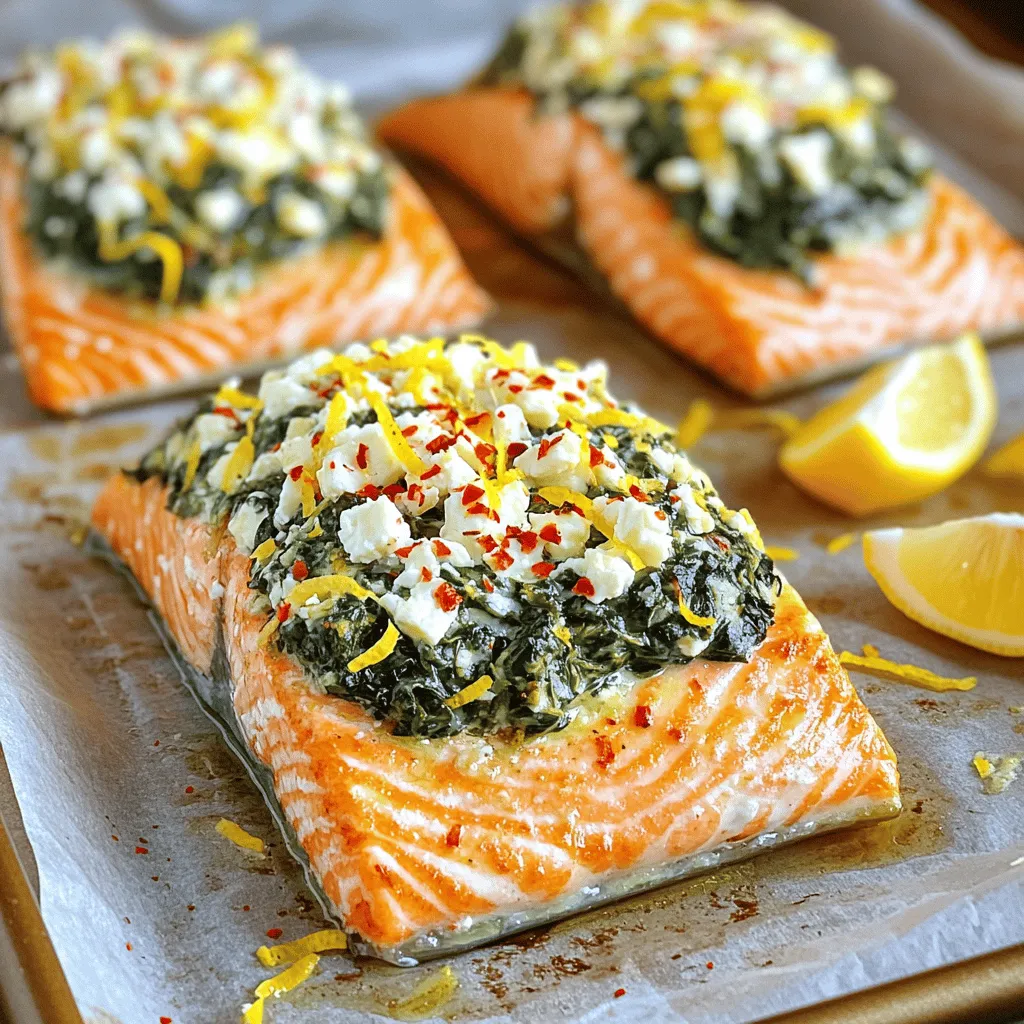
If you’re ready to impress at your next meal, then listen up! I’m sharing my delicious Baked Stuffed Salmon with Spinach & Feta recipe. This dish combines tender salmon with …

Looking for a quick, nutritious meal? This High Protein Tuna Pasta Salad is your answer! Packed with ingredients like whole grain pasta, tuna, and colorful veggies, it balances taste and …