Are you ready to make crispy fried chicken that everyone will love? This recipe is a game changer! With just three main ingredients and some flavorful spices, you can create a juicy chicken that’s bursting with taste. I’ll guide you through each step, from marinating to frying, ensuring your chicken comes out perfectly every time. Let’s dive into the secrets of crispy perfection!
Ingredients
Main Ingredients
– 4 chicken thighs (bone-in, skin-on)
– 2 cups buttermilk
– 2 cups all-purpose flour
Spices and Seasonings
– 1 tablespoon garlic powder
– 1 tablespoon onion powder
– 1 tablespoon smoked paprika
– 1 teaspoon cayenne pepper (adjust for spice preference)
– 1 teaspoon salt
– 1 teaspoon black pepper
Cooking Essentials
– Vegetable oil (for frying)
– Fresh parsley (for garnish)
You need to gather these ingredients for crispy fried chicken. The chicken thighs give a juicy bite, while buttermilk adds flavor. The flour helps create that golden crust we all love. Spices like garlic powder and smoked paprika bring warmth and depth. If you want heat, add cayenne pepper. Salt and black pepper are key to bringing out all the flavors.
When frying, vegetable oil is best. It has a high smoke point and keeps the chicken crispy. Lastly, fresh parsley adds a pop of color to your dish.
For the full recipe, check out the detailed steps provided.
Step-by-Step Instructions
Marinating the Chicken
To start, take your chicken thighs and place them in a big bowl. Pour in the buttermilk until all pieces are covered. This helps the chicken stay moist and adds flavor. Cover the bowl with plastic wrap. Let it marinate in the fridge for at least 4 hours. For the best taste, let it sit overnight.
Preparing the Coating
While the chicken marinates, grab another medium bowl. In this bowl, mix the flour, garlic powder, onion powder, smoked paprika, cayenne pepper, salt, and black pepper. Make sure you mix it well so that all spices blend evenly with the flour. This step is key for adding flavor to your crispy fried chicken.
Heating the Oil
Next, you need to heat the oil. Use a deep skillet or a Dutch oven. Pour enough vegetable oil to cover the chicken thighs by about 2-3 inches. Heat the oil over medium-high heat. Use a thermometer to check the temperature. You want it to reach 350°F (175°C) before frying. This step is important for getting that perfect crisp.
Coating and Frying the Chicken
Now, it’s time to coat the chicken. Take the marinated chicken out of the buttermilk. Let any extra liquid drip off. Dredge each thigh in the flour mix, pressing lightly so the flour sticks. Gently shake off the excess flour. Carefully place the chicken in the hot oil, skin side down. Fry in batches to avoid crowding. Cook each side for 10-12 minutes. The chicken should be golden brown and reach 165°F (75°C) inside.
Draining and Serving
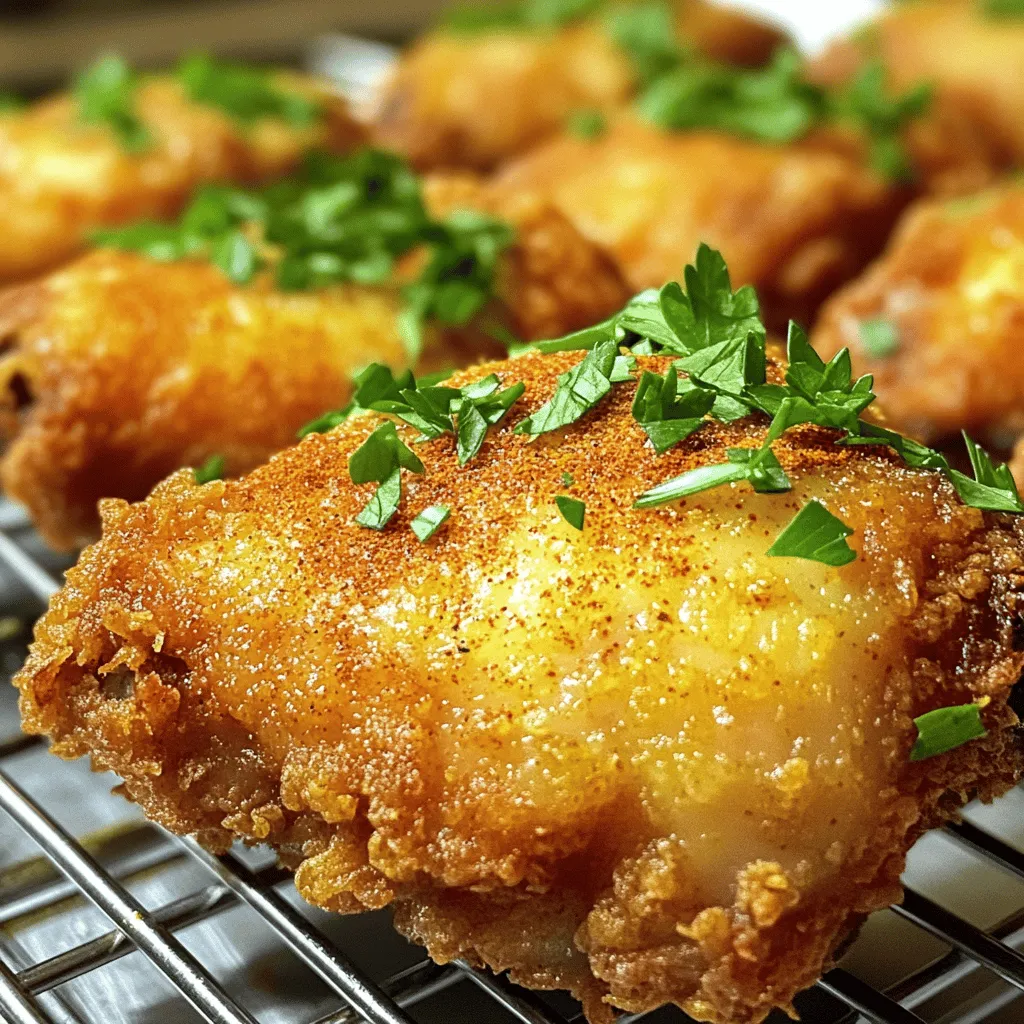
Once cooked, use tongs to take the chicken out. Place it on a wire rack over a baking sheet to drain any extra oil. Let the chicken rest for 5 minutes. This helps the skin stay crispy. Serve your crispy fried chicken with fresh parsley on top. Pair it with coleslaw or cornbread for a tasty meal. You can find the Full Recipe for more details.
Tips & Tricks
Achieving a Crispy Texture
To get that perfect crispy skin, you need a few key tricks. First, always marinate the chicken in buttermilk. This not only adds flavor but also helps keep the chicken moist. After marinating, let the chicken rest. This allows the coating to stick better. When coating, press the chicken into the flour mix firmly. This ensures a thick, crunchy layer. Lastly, fry in hot oil. The oil should be around 350°F (175°C). If the oil is too cool, the chicken will absorb more oil and become soggy.
Common Mistakes to Avoid
Many home cooks make simple mistakes that lead to soggy chicken. One common pitfall is overcrowding the frying pan. Too much chicken at once cools the oil down. This prevents a crispy finish. Another mistake is skipping the resting time after frying. If you don’t let the chicken rest, the steam will make the skin soft. Lastly, avoid using wet chicken. Always shake off excess buttermilk before coating in flour.
Recommended Cooking Tools
Using the right tools makes a big difference. A deep skillet or Dutch oven is best for frying. It holds heat well and allows for even cooking. A good cooking thermometer is also essential. It helps you monitor oil temperature accurately. Tongs are perfect for turning the chicken without breaking the crust. Finally, a wire rack is great for draining excess oil. You can find these tools in most kitchen supply stores. For more detailed cooking, check out the Full Recipe.

Variations
Spicy Crispy Fried Chicken
To make your fried chicken spicy, add more cayenne pepper. Start with one tablespoon. If you want it hotter, add more. You can also mix in chili powder or hot sauce. This way, you can adjust the spice to fit your taste.
Buttermilk Fried Chicken
Buttermilk fried chicken is a classic. The buttermilk makes the chicken tender and juicy. Soaking the chicken in buttermilk helps it absorb flavors. Use the same steps as the main recipe. Just make sure to marinate it well. This adds a tangy taste that many love.
Alternative Cooking Methods
You can try oven-baked or air-fried chicken for a healthier twist. For oven-baked, preheat the oven to 425°F (220°C). Place the chicken on a baking sheet. Bake for about 30-35 minutes until golden. For air-frying, set the air fryer to 375°F (190°C). Cook for about 25 minutes, flipping halfway. These methods still give you a crispy texture while cutting down on oil.
For all variations, check out the Full Recipe for detailed steps and tips.
Storage Info
Storing Leftovers
To keep your crispy fried chicken fresh, place it in an airtight container. Make sure to cool the chicken to room temperature first. Storing it while warm can create steam, making it soggy. Properly stored, your chicken will last up to four days in the fridge. Always label your container with the date so you can track freshness.
Reheating Instructions
Reheating fried chicken can be tricky. You want to keep that crispy skin. Preheat your oven to 375°F (190°C). Place the chicken on a baking sheet lined with parchment paper. Heat for about 15-20 minutes, turning halfway through. This method helps restore the crispiness. You can also use an air fryer for about 8-10 minutes at the same temperature for a quick fix.
Freezing Options
If you need to freeze your fried chicken, wrap each piece tightly in plastic wrap. Then, place them in a freezer bag. This prevents freezer burn. You can freeze the chicken for up to three months. When ready to eat, thaw in the fridge overnight before reheating. This method keeps your chicken juicy and flavorful. Check out the Full Recipe for more tips on making the best crispy fried chicken!
FAQs
How long should I marinate the chicken?
I recommend marinating chicken thighs for at least 4 hours. For the best flavor, marinate overnight. The buttermilk tenderizes the meat and adds a rich taste. This step is key to achieving that juicy interior.
What oil is best for frying?
The best oils for frying chicken are vegetable oil, canola oil, or peanut oil. These oils can handle high heat without burning. They also have a neutral flavor, which will let the chicken shine.
Can I use chicken breasts instead of thighs?
Yes, you can use chicken breasts. However, breasts cook faster than thighs. Keep an eye on them to avoid drying out. Adjust your cooking time to about 7-10 minutes per side for breasts.
How can I make it gluten-free?
To make gluten-free crispy fried chicken, use alternative flours. Almond flour, coconut flour, or gluten-free all-purpose flour work well. These options will keep the crispy texture while avoiding gluten.
What should I serve with crispy fried chicken?
Crispy fried chicken pairs great with many sides. Some popular choices include creamy coleslaw, sweet cornbread, or mashed potatoes. Adding a fresh salad can also balance the meal. For details on making crispy fried chicken, check out the Full Recipe.
You now have all you need for perfect crispy fried chicken. We covered the main ingredients, spices, and cooking steps to help you create this dish. I shared tips to avoid mistakes and get that ideal crunch. You can even explore variations to fit your taste.
Remember, practice makes perfect, so don’t hesitate to try again. With the right techniques, you’ll impress everyone at the table. Enjoy your cooking adventure and the delicious results!