Japanese Katsu Bowls are the ultimate comfort food that everyone loves. With crispy chicken, fluffy rice, and tasty sauces, you can create a meal that warms your soul. In this guide, I’ll show you how to make Katsu Bowls from scratch. Whether you’re a first-timer or a kitchen pro, you’ll find easy steps and tips to take your dish to the next level. Ready to dive in? Let’s get cooking!
Ingredients
Main Ingredients for Katsu Bowls
– 2 boneless, skinless chicken breasts
– Salt and freshly ground black pepper, to taste
– 1 cup all-purpose flour
– 2 large eggs, thoroughly beaten
– 2 cups panko breadcrumbs
– Vegetable oil, for frying (enough to fill the pan about 1/2 inch deep)
– 2 cups jasmine rice
– 2 cups water
Garnishes and Sauces
– 1 cup finely shredded cabbage (for garnish)
– 1 small carrot, peeled and grated (for garnish)
– 2 green onions, thinly sliced (for garnish)
– Tonkatsu sauce (for drizzling)
– Sesame seeds (optional, for garnish)
Equipment Needed
– Meat mallet or rolling pin
– Skillet for frying
– Rice cooker or saucepan
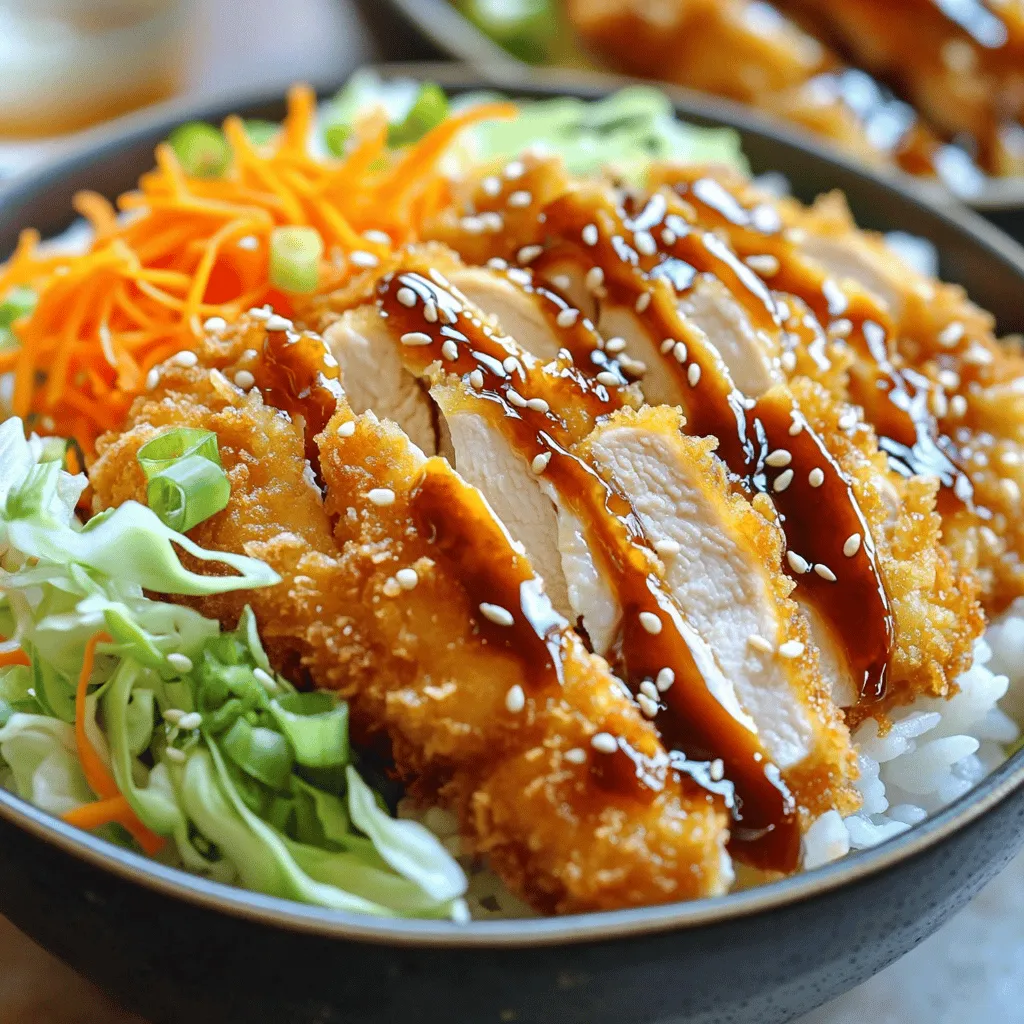
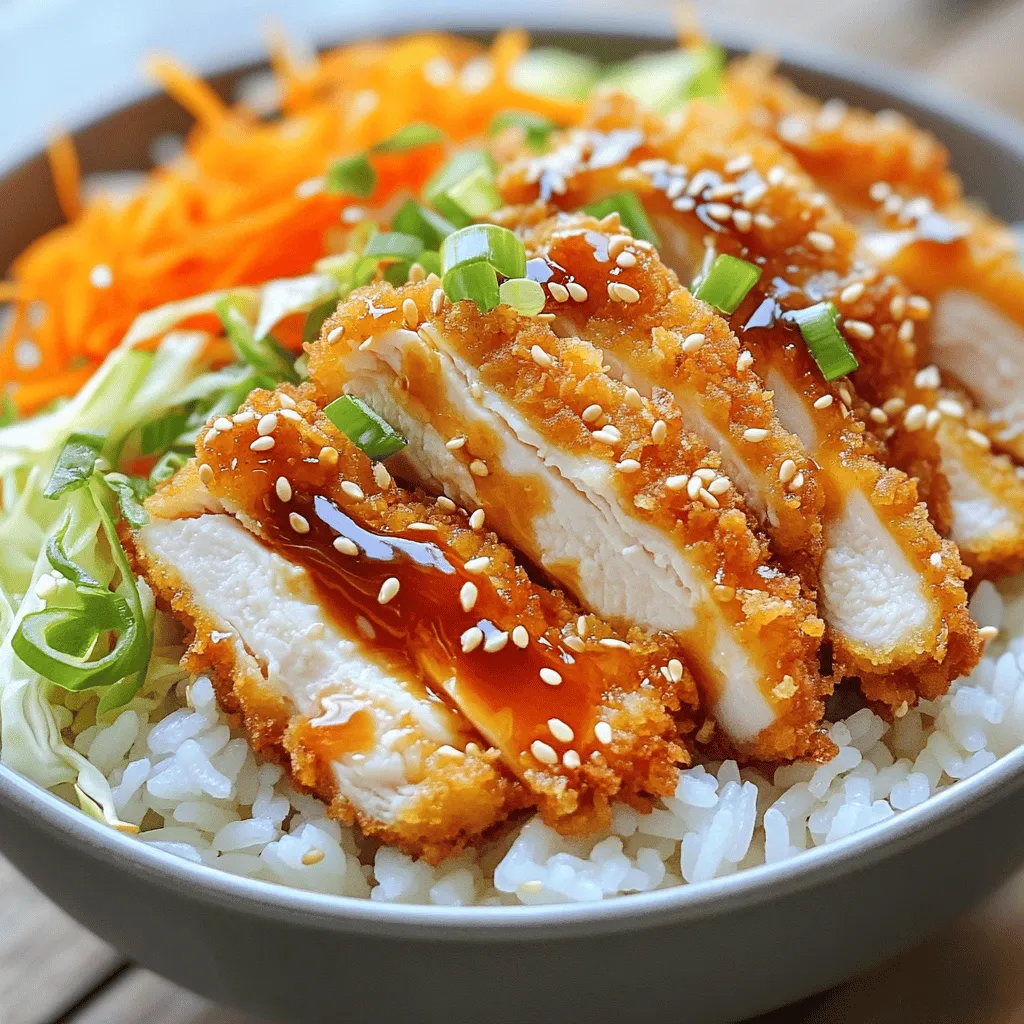
When I make katsu bowls, I love using chicken breasts. They cook well and stay juicy. I use panko breadcrumbs for that perfect crunch. Jasmine rice is my choice because it’s fluffy and pairs well with the katsu.
Toppings make a big difference in flavor and look. I always add shredded cabbage for freshness. Tonkatsu sauce, a sweet and tangy sauce, brings everything together. A sprinkle of sesame seeds adds a nice touch.
To prepare, I grab a meat mallet to pound the chicken. A skillet helps fry until golden brown. I also use a rice cooker or saucepan for cooking the rice just right.
For the full recipe, check out the details above. Enjoy the process and the tasty results!
Step-by-Step Instructions
Preparing the Chicken
To prepare the chicken, start by placing the chicken breasts between two sheets of plastic wrap. This keeps things tidy. Use a meat mallet or rolling pin to pound the chicken to an even thickness of about 1/2 inch. This helps it cook evenly and stay juicy. Next, season both sides of the chicken breasts with salt and freshly ground black pepper. This simple step adds a lot of flavor.
Breading the Chicken
Now, let’s create a breading station. You need three bowls:
– The first bowl for all-purpose flour.
– The second bowl for two large, beaten eggs.
– The third bowl for panko breadcrumbs.
Begin the breading process by dredging each chicken breast in the flour. Make sure to shake off the excess flour. Next, dip the floured chicken into the beaten eggs. Fully coat it on both sides. Finally, press the chicken into the panko breadcrumbs. This gives it a nice, crunchy coating.
Cooking the Rice and Chicken
For the rice, combine 2 cups of jasmine rice and 2 cups of water in a medium saucepan. Bring it to a boil over high heat. Once it starts boiling, reduce the heat to low. Cover the pan tightly and let it simmer for about 15 minutes, or until the rice absorbs all the water. After cooking, let it sit for another 5 minutes to steam.
Next, let’s fry the chicken. Pour enough vegetable oil into a large skillet to reach about 1/2 inch deep. Heat the oil over medium heat until it shimmers but does not smoke. Carefully place the breaded chicken into the hot oil. Make sure not to overcrowd the skillet. Fry each piece for about 5-7 minutes on each side, or until golden brown and cooked through. Check the internal temperature; it should reach 165°F (75°C). Once cooked, transfer the chicken to a plate lined with paper towels to absorb any excess oil.
Now you are ready to slice the chicken. Let it rest on the paper towel plate for a few minutes. Use a sharp knife to slice each chicken breast into strips against the grain. This makes the chicken tender and easy to eat.
For the perfect finishing touch, check out the Full Recipe for detailed steps on assembling your delicious katsu bowl!
Tips & Tricks
Perfecting the Katsu
To get the best crispy texture, you must follow a few key steps. First, make sure your chicken is pounded evenly. This helps it cook uniformly. The coating also plays a big role. Use panko breadcrumbs instead of regular ones for an extra crunch.
The optimal frying temperature is crucial too. Heat your oil to around 350°F (175°C). If the oil is too cool, your katsu will absorb more oil. If it’s too hot, the outside will burn before the inside cooks. A thermometer helps you check the oil’s temperature.
Serving Suggestions
Layering ingredients in your bowl makes a big difference. Start with a scoop of jasmine rice at the bottom. Place the sliced chicken katsu on top of the rice. Then, add shredded cabbage, grated carrot, and green onions. This not only looks appealing but also balances flavors and textures.
For side dishes, consider serving miso soup or pickled vegetables. These add variety and complement the katsu well.
Storage Tips
If you have leftovers, store them properly to keep the katsu fresh. Place the chicken in an airtight container. Store rice separately to avoid sogginess. This keeps the textures nice.
To reheat, use the oven for the chicken. Set it to 350°F (175°C) and heat for about 10-15 minutes. This helps maintain crispiness. For the rice, a quick microwave reheat is best. Add a splash of water to keep it moist while warming.
For the full experience, check out the Full Recipe.
Variations
Different Protein Options
You can switch up the protein in your katsu bowl. The classic choice is pork katsu. Just replace the chicken with pork loin or pork chops. The cooking method stays the same. For a tasty vegan twist, try using tofu. Press firm tofu to remove water. Then, slice it and coat it like chicken. This gives you a crispy, plant-based version.
Flavor Enhancements
To make your katsu even better, add spices to the panko. Try garlic powder or paprika for a kick. You can also mix in some dried herbs like oregano or basil. These little changes will bring a new flavor. For sauce, tonkatsu is a classic, but you can try others. Sweet chili sauce or spicy mayo works well too.
Seasonal Ingredients
When making katsu bowls, think about seasonal veggies. In summer, add fresh cucumbers or radishes for crunch. In fall, use roasted sweet potatoes or pumpkin. These veggies not only add taste but also color. Adjusting your ingredients with the seasons keeps your dish exciting and fresh.
Where to Find the Best Katsu Bowls
Local Restaurants
To find the best katsu bowls, start with local Japanese restaurants. Look for places that focus on authentic dishes. Popular spots often have long lines, which is a good sign. Some well-known chains serve tasty katsu, but small family-owned places offer a unique touch. Ask locals for their favorites; they often know hidden gems. Food markets also serve great katsu bowls. Check out places with food stalls. You can find fresh katsu made right in front of you.
Food Delivery Options
If you prefer staying in, delivery apps offer katsu bowls too. Easy-to-use apps let you browse various restaurants. You can filter your search for Japanese cuisine. Look for high ratings and positive reviews. These tips help you choose the best options. When ordering online, check the estimated delivery time. This helps you avoid long waits. Also, don’t forget to add extra tonkatsu sauce for dipping!
Making Katsu at Home
Making katsu bowls at home has many perks. First, you can control the ingredients. You choose fresh chicken and quality breadcrumbs. This way, you know what goes into your meal. Plus, it’s often cheaper than dining out. With the right recipe, like my full recipe for crispy chicken katsu bowls, you can create a delicious dish. Cooking at home also allows you to customize flavors. Want more spice? Add some chili flakes!
FAQs
What is a katsu bowl?
A katsu bowl is a Japanese dish. It features breaded and fried meat, usually chicken or pork. The meat sits atop a bed of rice. You often add vegetables and drizzle a rich sauce on top. A classic katsu bowl uses tonkatsu sauce, which adds a sweet and tangy flavor. The dish is comforting and satisfying, making it a popular choice for many.
Can I make katsu in an air fryer?
Yes, you can make katsu in an air fryer. This method is healthier and less messy. To air fry katsu, follow these steps:
– Preheat your air fryer to 380°F (193°C).
– Prepare the chicken as described in the full recipe.
– Instead of frying, place the breaded chicken in the air fryer basket in a single layer.
– Spray a light coat of oil over the chicken.
– Cook for about 10-12 minutes, flipping halfway through, until golden brown and crisp.
This way, you still enjoy crispy chicken without as much oil.
How can I make my katsu less greasy?
To make your katsu less greasy, try these tips:
– Use a paper towel to pat the chicken dry before breading.
– Make sure the oil is hot enough before adding the chicken. This helps seal the breading.
– Avoid overcrowding the skillet. Fry in batches if needed.
– After frying, place the chicken on a plate lined with paper towels. This helps absorb extra oil.
These steps will help keep your katsu crispy and light.
What is tonkatsu sauce?
Tonkatsu sauce is a thick, dark brown sauce. It has a sweet and tangy flavor. The sauce typically includes:
– Soy sauce
– Worcestershire sauce
– Sugar
– Ketchup
– Dijon mustard
– Garlic powder
This sauce pairs perfectly with katsu, enhancing its taste. Drizzle it generously over your katsu bowl for a burst of flavor.
In this article, we covered how to make delicious katsu bowls. We explored key ingredients like chicken breasts and panko breadcrumbs. I shared step-by-step instructions for preparing, breading, and cooking your katsu. I also offered tips for perfecting the dish, including serving suggestions and storage advice.
Katsu bowls are easy to make at home, giving you control over flavor and cost. Whether you enjoy classic chicken or want to try vegan options, katsu is a dish that delights everyone. Enjoy experimenting with this fun and tasty recipe!