Skip to content
  • GDPR Privacy Policy
  • Copyright Policy
  • Disclaimer
  • Terms & Conditions
Tasted Nest
  • Home
  • Appetizers
  • Desserts
  • Salads
  • Breakfast
  • Dinner
  • Privacy Policy
  • Contact
  • About

NO-ING-IMG

Cinnamon Swirl Coffee Cake Bakery Style Delight

January 14, 2026October 5, 2025 by Chef Tavio
- 2 cups all-purpose flour - 1/2 teaspoon baking powder - 1/2 teaspoon baking soda - 1 teaspoon ground cinnamon - 1/4 teaspoon salt I start with the dry ingredients. First, I measure 2 cups of all-purpose flour. This flour gives the cake structure. Next, I add 1/2 teaspoon of baking powder and 1/2 teaspoon of baking soda. These help the cake rise and stay fluffy. Then, I mix in 1 teaspoon of ground cinnamon for that warm, sweet flavor. Lastly, I sprinkle in 1/4 teaspoon of salt. This enhances the cake's taste. - 1/2 cup unsalted butter - 1 cup granulated sugar - 2 large eggs - 1 teaspoon vanilla extract - 1/2 cup sour cream Next, I gather the wet ingredients. I use 1/2 cup of unsalted butter that is softened. This makes it easy to cream with sugar. I then add 1 cup of granulated sugar. I mix them until fluffy and light. After that, I crack in 2 large eggs, one at a time. I also add 1 teaspoon of vanilla extract for a rich flavor. Finally, I fold in 1/2 cup of sour cream. This adds moisture and a bit of tang. - 1/2 cup chopped walnuts - Powdered sugar for dusting For some extra crunch, I like to add 1/2 cup of chopped walnuts. They give a nice texture. If you want a sweet touch, you can dust the top with powdered sugar before serving. This makes the cake look pretty and adds a hint of sweetness. 1. Preheat your oven to 350°F (175°C). This heat makes the cake rise well. 2. Get a 9-inch round cake pan or a square dish. Grease it and dust it with flour. This stops the cake from sticking. 3. In a medium bowl, whisk together: - 2 cups all-purpose flour - 1/2 teaspoon baking powder - 1/2 teaspoon baking soda - 1 teaspoon ground cinnamon - 1/4 teaspoon salt Set this dry mix aside. 1. In a large bowl, combine: - 1/2 cup unsalted butter, softened - 1 cup granulated sugar Use an electric mixer. Beat on medium speed until light and fluffy, about 3-4 minutes. 2. Add in 2 large eggs, one at a time. Mix well after each addition. Then, pour in 1 teaspoon vanilla extract and mix until smooth. 3. Carefully fold in 1/2 cup sour cream. This makes the batter rich and moist. 1. Gradually add the dry mix to the wet mix. Stir gently with a spatula. Stop mixing once you don't see dry flour. This keeps the cake tender. 2. In a small bowl, mix: - 1/2 cup light brown sugar, packed - 1 tablespoon ground cinnamon If you like, add in 1/2 cup chopped walnuts for crunch. 3. Pour half of the batter into the pan. Sprinkle half of the cinnamon-sugar mix over it. Then, add the rest of the batter. Finish with the remaining cinnamon-sugar mix on top. 4. To create the swirl, use a butter knife. Gently swirl it through the batter. Don’t go too deep; you want to keep the layers. 5. Put the cake in the oven. Bake for 35-40 minutes. It’s done when a toothpick comes out clean. 6. Once baked, let it cool in the pan for 10 minutes. Then, move it to a wire rack to cool completely. 7. Before serving, dust the top with powdered sugar for a sweet touch. To keep your cake moist, do not overbake it. Start checking for doneness at 30 minutes. Use a toothpick; if it comes out clean, your cake is ready. If not, bake for an extra 5 to 10 minutes. Do not overmix your batter. When you combine wet and dry ingredients, mix just until there are no dry spots left. Overmixing can make the cake tough. For the perfect swirl, use a butter knife. Insert it lightly into the batter and make smooth, gentle motions. This creates beautiful layers without breaking them. Pair your coffee cake with a warm cup of coffee or tea. The flavors blend well and enhance your experience. For extra flair, dust the top with powdered sugar. You can also add fresh berries or a dollop of whipped cream. This adds color and taste to your presentation. Enjoy your cake warm or at room temperature for the best flavor! {{image_4}} You can easily change the flavor of this cake. Try adding chocolate chips for a sweet twist. Raisins also work well, adding a chewy texture. If you want more warmth, use nutmeg or ginger as spice substitutes. For a gluten-free cake, swap all-purpose flour with a gluten-free blend. Make sure to check the blend's instructions. For a vegan version, use plant-based butter and substitute eggs with flaxseed meal or applesauce. This keeps the cake moist and fluffy. Turn your coffee cake into parfaits! Layer pieces with yogurt and fresh fruit. This adds fun and color. You can also enjoy it as a breakfast treat or dessert. Pair it with coffee or tea for a perfect match. After baking your cinnamon swirl coffee cake, let it cool. Place the cake on a wire rack for about 10 minutes. This helps keep it moist. Once cooled, wrap the cake tightly in plastic wrap. You can also use aluminum foil. Store it at room temperature for up to 3 days. Avoid putting it in the fridge, as it can dry out. To freeze your cake, first ensure it is completely cool. Then, wrap it well in plastic wrap. After that, place it in an airtight freezer bag or container. This helps prevent freezer burn. You can freeze the cake for up to 3 months. When ready to eat, move it to the fridge overnight to thaw. For a quick warm-up, heat slices in the microwave for 10-15 seconds. You should eat your coffee cake within 3 days for the best taste. If stored properly, it stays fresh for up to a week. Look for signs of spoilage, like an off smell or dry texture. If the cake becomes hard or develops mold, it’s best to toss it. Enjoy it fresh for the best flavor and texture! You can use plain yogurt instead of sour cream. Greek or regular works well. If you need a dairy-free option, try coconut yogurt. It adds creaminess and a nice flavor. To stop the cake from sticking, grease the pan well with butter. Then, dust it lightly with flour. You can also use parchment paper for extra safety. This ensures easy removal after baking. Yes, you can make this coffee cake ahead of time. Bake it, cool it, and wrap it in plastic. Store it in the fridge for up to three days. You can also freeze it for longer. Just remember to thaw it before serving. All-purpose flour is best for coffee cake. It gives the cake the right texture. If you want a lighter cake, you can mix in some cake flour. This will make it softer and fluffier. To make a larger batch, simply double the ingredients. Use a larger pan to hold the extra batter. Adjust the baking time as needed. Check for doneness with a toothpick. Enjoy more slices! This coffee cake recipe offers simple steps and tasty ingredients. You learned about dry and wet ingredients, along with useful tips to get it just right. Don't forget to explore flavor options and storage methods to keep your cake fresh. Making this dish ahead of time is easy, and variations can add a fun twist. Enjoy your baking journey, and share it with friends and family. Your delicious coffee cake awaits!

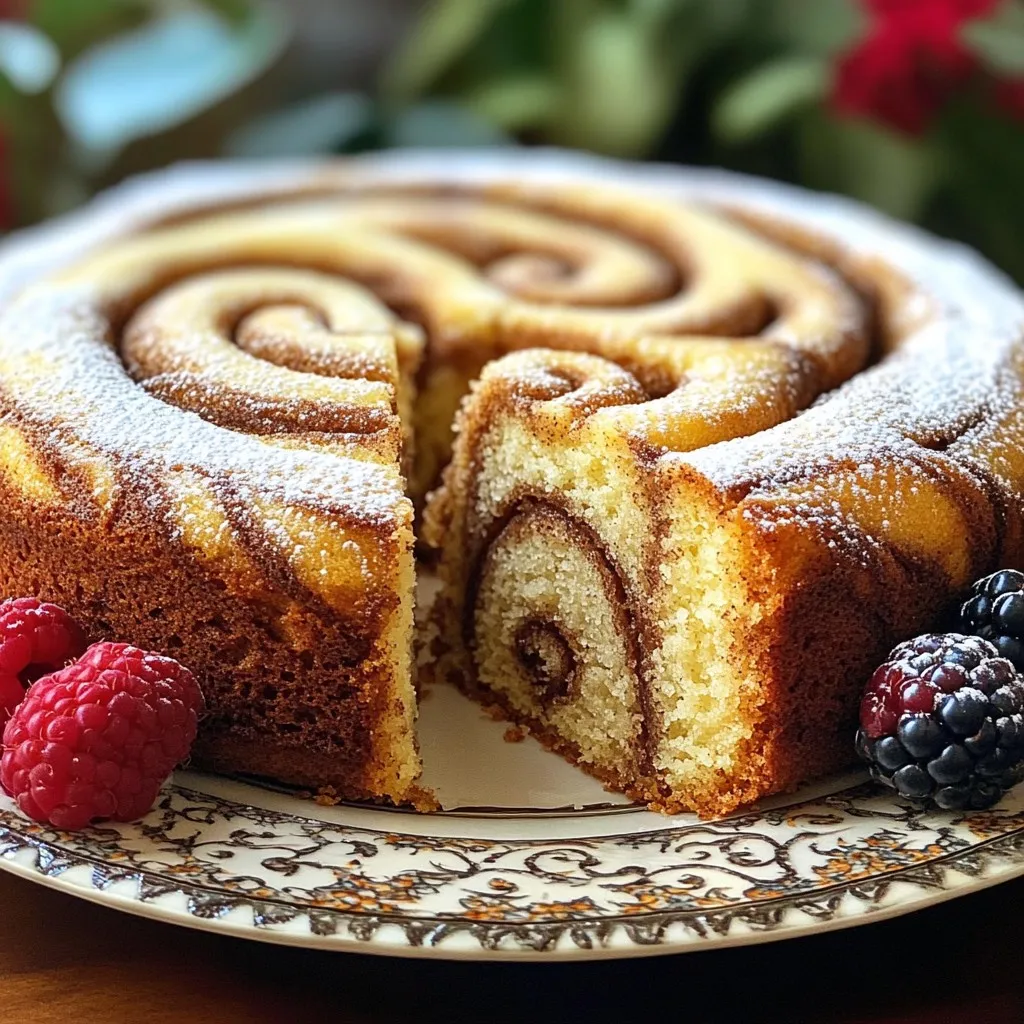
Are you ready to bake a delicious Cinnamon Swirl Coffee Cake that tastes like it came straight from a bakery? This rich, sweet treat is perfect for breakfast or a …

Read more

Categories Desserts Tags NO-ING-IMG

Creamy White Bean Chicken Chili Slow Cooker Delight

January 14, 2026October 5, 2025 by Chef Tavio
To make a delicious creamy white bean chicken chili, gather these essential ingredients: - 1 lb boneless, skinless chicken breasts - 2 cans (15 oz each) white beans (cannellini or great northern), thoroughly drained and rinsed - 1 can (15 oz) diced tomatoes, undrained with juice - 1 medium onion, diced finely - 4 cloves garlic, minced or pressed - 1 cup chicken broth (low-sodium preferred) - 1 jalapeño pepper, finely chopped (seeds removed for a milder flavor) - 2 tsp ground cumin - 1 tsp smoked paprika - 1 tsp chili powder - ½ tsp salt (to taste) - ½ tsp freshly ground black pepper (to taste) - 1 cup cream cheese, softened (or your favorite dairy-free substitute) - 1 cup corn kernels (frozen or fresh) - Fresh cilantro or parsley leaves, chopped for garnish - Lime wedges for serving, for a zesty finish Each ingredient plays a key role in creating layers of flavor. The chicken adds protein, while white beans give creaminess. Diced tomatoes add moisture and taste. Onions and garlic provide a base flavor. Jalapeño adds a mild heat that can be adjusted by removing the seeds. Chicken broth enhances the overall taste. The spices—cumin, smoked paprika, and chili powder—give depth and warmth. Cream cheese and corn round out the dish with a rich texture and sweetness. Finally, garnishes like cilantro and lime bring freshness and zest to each bowl. With these ingredients, you will create a comforting dish that warms your heart and fills your belly. Start by placing the chicken breasts at the bottom of your slow cooker. This helps them cook evenly. Next, layer the other ingredients on top of the chicken. Add the white beans, the diced tomatoes with juice, diced onion, minced garlic, jalapeño, and chicken broth. Now, sprinkle in the spices: cumin, smoked paprika, chili powder, salt, and black pepper. Cover the slow cooker with its lid. You can choose to cook on low for 6-8 hours or on high for 3-4 hours. Cooking on low lets the flavors develop better, while high cooks faster. Once the cooking time is up, take out the chicken breasts. Use two forks to shred the chicken into bite-sized pieces. This method keeps the chicken tender and easy to mix back into the chili. If the chicken is hard to shred, it may need more cooking time. Now, it’s time to make the chili creamy. Add the softened cream cheese and corn to the slow cooker. Stir well until the cream cheese melts into the chili. This adds a rich texture and flavor. Let the chili cook on low for another 20-30 minutes. This step allows the flavors to blend and thickens the chili. Before serving, taste it to adjust the salt or pepper if needed. To boost the taste of your creamy white bean chicken chili, try adding more spices. I suggest: - 1 tsp of oregano for a herbaceous note. - A pinch of cayenne pepper for added heat. - A squeeze of lime juice right before serving for brightness. These simple changes make a big difference in flavor. You can also toss in some diced bell peppers or even a handful of spinach for extra nutrition. Before serving, check a few key points. Make sure the chicken is fully cooked and tender. It should shred easily. Taste the chili and adjust the salt and pepper if needed. If it seems too thick, stir in a bit more chicken broth. Remember to mix well after adding cream cheese. This ensures it blends smoothly and creates that creamy texture. When it's time to serve, use vibrant bowls. Garnish each bowl with fresh cilantro or parsley. This adds a nice pop of color. Place lime wedges on the side for a zesty finish. For a special touch, top each serving with a dollop of sour cream. Serve with crusty bread or tortilla chips for dipping. Enjoy your delicious creation! {{image_4}} If you want a lighter meal, you can use lean chicken or turkey. For a dairy-free twist, try coconut cream instead of cream cheese. This adds a lovely richness without the dairy. You can also reduce the amount of cream cheese for fewer calories. Feel free to mix up the beans! You can use black beans or pinto beans. Each type brings its own flavor. For veggies, try adding bell peppers or zucchini. They add color and extra nutrients. You could even toss in some spinach for a boost of greens. To adjust the spice, play with the jalapeño pepper. If you like it mild, remove all the seeds. For more heat, leave some seeds in or add a pinch of cayenne pepper. You can also use hot sauce to kick it up a notch. Taste as you go to find your perfect balance! To store leftovers, let the chili cool first. Then, place it in an airtight container. You can store it in the fridge for up to 4 days. If you want to keep it longer, freeze the chili. Use freezer-safe containers or bags. Leave some space at the top for expansion. This way, your chili stays fresh and tasty. When you reheat the chili, do it gently. You can use the microwave or the stove. If using the microwave, heat it in short bursts. Stir it often to keep the heat even. On the stove, warm it over low heat. Add a splash of chicken broth or water if it seems thick. This helps keep the flavor and texture just right. This creamy white bean chicken chili lasts well in the fridge. It stays good for about 4 days. In the freezer, it keeps for 2 to 3 months. Always check for signs of spoilage before eating. If it looks or smells off, it's best to throw it out. Enjoy your chili while it’s fresh for the best taste! Yes, you can use frozen chicken breasts in this chili. Just place them directly in the slow cooker. Cook on high for about 4-5 hours. On low, it will take about 8-9 hours. The chicken will cook well and stay juicy. Make sure to check if the chicken is fully cooked before shredding. To make this chili vegetarian, skip the chicken. You can use canned chickpeas or lentils as a protein boost. For cream cheese, try a dairy-free option like cashew cream or coconut cream. This keeps the dish creamy without using animal products. If you want more heat, add extra jalapeños or a chopped serrano pepper. You can also use red pepper flakes, cayenne pepper, or a dash of hot sauce. Taste as you go to find your perfect level of spice. This blog post shared a simple slow cooker chili recipe. You learned about essential ingredients like chicken, beans, and spices. Step-by-step instructions guide you on how to prepare this dish perfectly. I offered tips to enhance flavor and avoid mistakes. We explored variations for health and spice levels, making this chili flexible. Finally, I covered storage and reheating tips. Enjoy making this tasty dish for your friends and family!

Are you ready to savor a warm bowl of creamy white bean chicken chili? This slow cooker delight is the perfect mix of tender chicken, hearty beans, and bold flavors. …

Read more

Categories Dinner Tags NO-ING-IMG

TikTok Feta Roasted Tomato Pasta Delight Recipe

January 14, 2026October 4, 2025 by Chef Tavio
- 250g pasta of your choice (penne or fusilli recommended) - 200g cherry tomatoes, preferably mixed colors - 200g block feta cheese - 4 cloves garlic, finely minced - ¼ cup extra virgin olive oil - 1 teaspoon dried oregano - ½ teaspoon red chili flakes (optional) - Salt and freshly ground black pepper to taste - Fresh basil leaves for garnish - Grated Parmesan cheese (optional) - Alternative pasta types - Additional herbs or spices To make TikTok Feta Roasted Tomato Pasta, gather these ingredients first. The pasta is the base. I suggest penne or fusilli because they hold the sauce well. Cherry tomatoes add sweet bursts, and a block of feta cheese gives creaminess. Garlic brings a rich flavor. The extra virgin olive oil adds a nice touch. Dried oregano gives it an Italian flair. You can add red chili flakes for some heat. Salt and black pepper boost the taste. Fresh basil leaves are perfect for garnish and add color. Grated Parmesan cheese is optional but enhances the flavor. You can also swap pasta types if you like. Try whole grain or gluten-free pasta. Feel free to include extra herbs too, like thyme or parsley, for a twist. This dish is simple but full of flavor. - Preheat the oven to 200°C (400°F). - In a baking dish, combine cherry tomatoes, garlic, and feta cheese. - Drizzle olive oil over the mixture. - Sprinkle with oregano, chili flakes, salt, and pepper. - Roast for 25-30 minutes until the tomatoes burst. - Cook pasta according to the package instructions. - Reserve ½ cup of pasta water before draining. - Remove the roasted dish from the oven. - Stir the mixture to create a creamy sauce. - Combine the drained pasta with the sauce in the baking dish. - If needed, add reserved pasta water for creaminess. - Taste and adjust seasoning as needed. - Serve hot, garnished with fresh basil and optional Parmesan cheese. To make this dish shine, adjust the seasoning to your liking. Start with salt and pepper. Taste your pasta before serving. If it needs more flavor, add a pinch more. For a creamy texture, use the reserved pasta water. This helps blend everything nicely and gives the sauce a smooth feel. Serve your pasta in individual bowls for a lovely look. Top each bowl with fresh basil leaves. A drizzle of olive oil adds shine and extra flavor. You can also sprinkle some grated Parmesan cheese on top for a rich finish. To achieve al dente pasta, follow the package instructions carefully. Usually, this means cooking it for a few minutes less than the time listed. Keep an eye on it. For roasting, make sure to spread the tomatoes and feta evenly in the baking dish. This helps them cook well and boosts the flavors. {{image_4}} You can switch feta cheese for goat cheese or ricotta. Goat cheese adds a tangy taste. It melts well and gives a creamy feel. Ricotta offers a light and fluffy texture. Both options change the flavor but keep the dish rich and tasty. Need more protein? Try adding chicken, shrimp, or plant-based options. Grilled chicken breast is a great choice. It adds a nice savory taste. Shrimp cooks fast and adds a seafood twist. For plant-based options, add chickpeas or lentils for protein and fiber. They mix well with the creamy sauce. Want to boost your veggie intake? Add spinach, zucchini, or bell peppers. Spinach wilts nicely in the hot pasta. Zucchini adds a fresh crunch. Cut it into thin slices for better cooking. Bell peppers bring color and sweetness. Chop them up and toss them in with the tomatoes for extra flavor. To keep your TikTok feta roasted tomato pasta fresh, follow these simple steps: - Refrigeration: Place leftovers in an airtight container. This keeps the pasta moist and flavorful. - Duration: The dish lasts up to 3 days in the fridge. After that, the quality may drop. When it's time to enjoy your leftovers, reheating is key. Here are some easy methods: - Microwave: Place the pasta in a microwave-safe bowl. Add a splash of water. Cover loosely and heat for 1-2 minutes. Stir halfway through. - Stovetop: In a skillet, add a bit of olive oil over medium heat. Mix in the pasta and stir until warm. This helps keep it creamy. Yes, you can freeze this dish! Here’s how: - Freezing: Allow the pasta to cool completely. Then, place it in a freezer-safe container. Make sure to leave some space for expansion. - Thawing: To thaw, move the container to the fridge for a few hours or overnight. Reheat as described above. You can store this pasta dish in the fridge for 3 to 5 days. Make sure to use an airtight container. This keeps it fresh and tasty. Before serving, check for any signs of spoilage. Yes! You can use any pasta you like. Penne and fusilli work great. For gluten-free options, try brown rice or chickpea pasta. Whole grain pasta is also a healthy choice. Each type adds its own flavor and texture. This pasta pairs well with a fresh salad. A simple green salad adds crunch. You can also serve garlic bread or toasted baguette. For protein, consider grilled chicken or shrimp on the side. Absolutely! This dish is great for meal prep. You can cook it ahead of time and store it. Just keep it in the fridge in an airtight container. Reheat portions in the microwave or on the stove. Add a splash of pasta water to keep it creamy. This blog post covered a simple and tasty recipe for TikTok Feta Roasted Tomato Pasta. We discussed the necessary and optional ingredients, step-by-step cooking instructions, and tips for perfecting the dish. I shared variations to customize flavors and instructions for storing leftovers. In the end, this pasta dish offers flexibility and great taste. You can experiment with ingredients and adjust it to your liking. Enjoy making this easy meal!

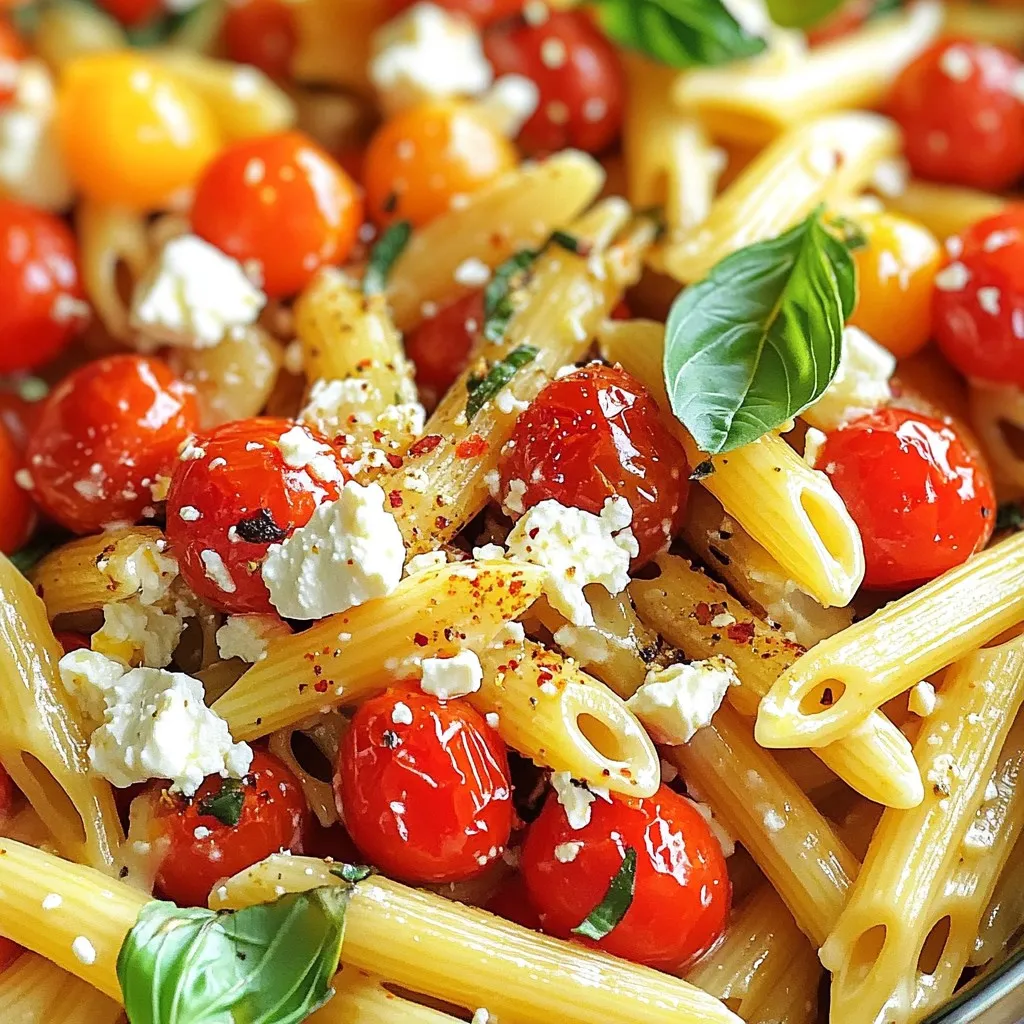
Creamy, rich, and packed with flavor, TikTok Feta Roasted Tomato Pasta is a hit for a reason. Ready to impress your friends and family? This easy recipe combines simple ingredients …

Read more

Categories Dinner Tags NO-ING-IMG

Creamy Lemon Chicken and Rice Easy One Pot Recipe

January 14, 2026October 4, 2025 by Chef Tavio
- 1 lb boneless, skinless chicken thighs - 1 cup long-grain rice (basmati or jasmine) - 4 cups chicken broth - 1 cup heavy cream - 1 medium onion, diced - 3 cloves garlic, minced - 1 tablespoon olive oil - 1 teaspoon dried oregano - Zest of 1 lemon - Juice of 1 lemon - Salt and freshly ground black pepper to taste - Fresh parsley, chopped - Lemon slices In this dish, the chicken thighs bring a rich flavor and tenderness. I often choose basmati or jasmine rice for their light texture. The chicken broth adds depth, making this meal feel complete. Heavy cream ensures a creamy consistency that envelops every bite. The onion and garlic create a fragrant base. When they sauté, they release sweet and savory notes that elevate the dish. Adding olive oil helps to cook these aromatics evenly. Dried oregano gives a warm touch, while the lemon zest and juice add brightness. Salt and pepper enhance all the flavors, making them sing. For garnishes, fresh parsley adds a pop of color and freshness. Lemon slices are a lovely touch, brightening the dish visually and flavor-wise. Each ingredient plays a role in creating this delightful one-pot meal. First, heat 1 tablespoon of olive oil in a large pot over medium heat. Once hot, add the diced onion. Sauté the onion until it turns translucent. This takes about 3 to 4 minutes. Next, add 3 cloves of minced garlic and 1 teaspoon of dried oregano. Stir well to mix. Cook for another minute until the garlic smells great. Be careful not to burn it. Now, add 1 pound of boneless, skinless chicken thighs cut into bite-sized pieces. Season the chicken with salt and freshly ground black pepper. Cook the chicken, stirring often, until it turns brown on all sides. This should take around 5 to 7 minutes. Gradually pour in 4 cups of chicken broth. Bring the mix to a gentle simmer. Next, add 1 cup of long-grain rice, the zest of 1 lemon, and the juice of 1 lemon. Stir everything well to make sure it is evenly mixed. Cover the pot with a lid and reduce the heat to low. Cook for 18 to 20 minutes. Do not lift the lid while it cooks. This keeps the steam in and helps the rice cook perfectly. Once the rice is tender, remove the pot from heat. Stir in 1 cup of heavy cream until it is fully blended. If it looks too thick, add a splash of chicken broth to thin it out. Taste the dish and add more salt and pepper if needed. Let the dish sit for about 5 minutes off the heat. This helps it thicken a bit and lets the flavors mix well. Serve the creamy lemon chicken and rice in bowls. Garnish each bowl with fresh parsley and a lemon slice for extra flavor and color. - How to ensure perfect rice texture To get fluffy rice, use long-grain rice like basmati or jasmine. Rinse the rice in cold water. This removes excess starch and helps keep the grains separate. When cooking, keep the pot covered and avoid lifting the lid. This traps steam and cooks the rice evenly. - Adjusting creaminess and seasoning For a creamier dish, stir in the heavy cream slowly. If it feels too thick, add a splash of chicken broth. Taste your dish as you go. Add salt and pepper to make the flavors pop. Small tweaks can make a big difference. - Efficient chopping techniques Use a sharp knife for quick and safe chopping. Cut the onion and garlic finely to release their flavors. For chicken, chop it into even pieces. This helps it cook evenly and quickly. - Pre-measuring ingredients for convenience Measure out all your ingredients before you start cooking. This makes your cooking process smoother. You won’t have to pause to find or measure ingredients as you go. - Balancing acidity with cream Lemon juice adds brightness but can be sharp. The heavy cream softens the acidity. Start with a little lemon juice, then add more if needed. This way, you control the tanginess. - Enhancing zest for more brightness Use fresh lemon zest to brighten the dish. Grate the zest finely to release more oils. This adds a fragrant aroma and deeper flavor without more acidity. A little zest goes a long way in enhancing your dish. {{image_4}} You can swap chicken thighs for chicken breasts. Chicken breasts are leaner and cook faster. They still taste great in this dish. If you prefer a different rice, you can use arborio or brown rice. Just remember that different rice types may change cooking times. Adding veggies can make this dish even better. Spinach or peas mix well with the creamy sauce. You can also try fresh herbs like basil or thyme. They add depth and freshness to each bite. Spices like paprika or red pepper flakes can bring some heat. If you want to make it dairy-free, use coconut milk instead of heavy cream. It keeps the dish creamy while adding a subtle sweetness. For gluten-free options, choose rice like jasmine or basmati. Always check labels for gluten-free assurance. To keep your creamy lemon chicken and rice fresh, store it in an airtight container. Make sure it cools first before sealing it up. This way, you prevent condensation, which can make the dish soggy. It lasts in the fridge for about 3 to 4 days. Always check for any strange smells or changes in color before eating. If you want to freeze your leftovers, choose a freezer-safe container. Glass or heavy-duty plastic works well. Leave some space at the top for expansion. This dish can be frozen for up to 2 months. When you're ready to eat, thaw it in the fridge overnight. You can reheat your dish in the microwave or on the stovetop. If using the microwave, heat it in short bursts. Stir in between to ensure even heating. If you use the stovetop, add a splash of chicken broth. This helps maintain the creaminess. Stir gently while warming to keep it smooth and delicious. It takes about 40 minutes to make this dish. You need 10 minutes to prep the ingredients. Cooking the chicken and rice takes about 30 minutes. Here’s a breakdown: - Prep Time: 10 minutes - Cook Time: 30 minutes This includes sautéing, simmering, and finishing with cream. Yes, you can prepare this dish ahead of time. Here are some tips for meal prepping: - Cook the chicken and rice as directed. - Let it cool completely before storing. - Place it in an airtight container. - Keep it in the fridge for up to 3 days. When ready to eat, reheat it on medium heat until hot. This creamy lemon chicken pairs well with various sides. Here are some ideas: - Steamed broccoli for a healthy crunch. - A simple side salad for freshness. - Garlic bread to soak up the creamy sauce. - Roasted veggies for added flavor. These sides enhance the meal and add more color to your plate. If you like heat, here are a few ideas: - Add red pepper flakes while cooking the chicken. - Mix in diced jalapeños for a fresh kick. - Use spicy chicken broth if you can find it. - Serve with hot sauce on the side. These additions will give your dish a nice spicy twist, perfect for heat lovers. This recipe for One Pot Creamy Lemon Chicken and Rice combines simple ingredients for a delicious meal. We covered easy steps from sautéing onions to finishing touches with cream. Remember, prep matters; it keeps things smooth in the kitchen. You can also adjust flavors or swap ingredients to fit your taste. Enjoy leftovers with smart storage tips. This dish is versatile and can shine on any table, bringing joy to every meal. Cook with confidence and share this dish with those you love!

Welcome to a delightful culinary experience that will brighten your dinner table! This Creamy Lemon Chicken and Rice one-pot recipe is simple, flavorful, and perfect for busy nights. With tender …

Read more

Categories Dinner Tags NO-ING-IMG

Irresistible Brown Butter Pecan Scones Simple Recipe

January 14, 2026October 4, 2025 by Chef Tavio
To make these scones, gather the following ingredients: - 2 cups all-purpose flour - 1/4 cup granulated sugar - 1 tablespoon baking powder - 1/2 teaspoon salt - 1/2 cup (1 stick) unsalted butter, browned and cooled - 1/2 cup heavy cream - 1 large egg - 3/4 cup pecans, chopped - 1 teaspoon vanilla extract - 1/2 teaspoon ground cinnamon (optional) - 1/4 cup coarse sugar for sprinkling Need to swap some items? Here are some good options: - All-purpose flour: Use whole wheat flour for a nutty flavor. - Granulated sugar: Brown sugar adds a richer taste. - Unsalted butter: Use coconut oil for a dairy-free version. - Heavy cream: Substitute with milk or almond milk for lighter scones. - Pecans: Walnuts or almonds work well too. Having the right tools makes cooking easier. Here’s what you need: - Medium saucepan for browning butter - Large mixing bowl for dry and wet ingredients - Whisk for mixing - Spatula for folding dough - Sharp knife or pastry cutter for slicing - Baking sheet lined with parchment paper - Wire rack for cooling scones With these ingredients and tools, you're ready to make some delicious brown butter pecan scones! Start by melting the unsalted butter in a medium saucepan over medium heat. Stir it often. Watch it change from yellow to golden brown. This takes about 5 to 7 minutes. Once it turns brown and smells nutty, take it off the heat and let it cool slightly. This is the key to rich flavor. In a large mixing bowl, whisk together the all-purpose flour, granulated sugar, baking powder, salt, and optional ground cinnamon. Mix these dry ingredients well. This step helps create a nice, even base for your scones. In another bowl, combine the cooled brown butter, heavy cream, large egg, and vanilla extract. Whisk these together. You want a smooth, creamy mix. This adds moisture and flavor to your scones. Now, pour the wet mixture into the bowl with the dry ingredients. Gently fold them together with a spatula. Stop mixing as soon as the dough is just combined. Overmixing can make the scones tough. Add the chopped pecans and fold them in gently. Lightly flour a clean surface and move the dough onto it. Pat the dough into a circle about 1 inch thick. Use a sharp knife to cut it into 8 wedges. Make sure you cut all the way through the dough so the scones can separate easily. Place the wedges on a lined baking sheet. Brush the tops with a bit of heavy cream. This will give them a nice golden finish. Sprinkle coarse sugar on top for extra sweetness. Bake in a preheated oven at 400°F (200°C) for 15 to 20 minutes. The scones should be golden brown and smell amazing. After baking, let them cool on a wire rack for about 10 minutes before serving. To make brown butter, you need to melt unsalted butter in a pan. Heat it over medium heat. Stir the butter often. This keeps it from burning. Watch closely as the color changes. It should go from yellow to golden brown. You will smell a nutty aroma as it cooks. This process takes about 5 to 7 minutes. Remove it from the heat so it can cool. Brown butter adds a rich flavor to the scones. For soft and tender scones, do not overmix the dough. Mix until the flour is just combined with the wet ingredients. Overmixing makes the scones tough. When adding the pecans, fold them in gently. This keeps the dough light and fluffy. Use cold heavy cream and butter for the best texture. These tips help keep your scones soft and delicious. Always preheat your oven before baking. This ensures even cooking. Line your baking sheet with parchment paper to prevent sticking. Brush the tops of the scones with heavy cream. This gives them a nice golden color as they bake. Sprinkle coarse sugar on top for extra sweetness. Bake until they are golden brown, about 15 to 20 minutes. Let them cool slightly on a wire rack after baking. Serve the scones warm for the best taste. Place them on a rustic wooden platter. Drizzle with honey or add a dollop of clotted cream. This adds a nice touch and enhances the flavors. Garnish with whole pecans on top for a beautiful look. These scones pair well with tea or coffee. Enjoying them with a warm drink makes for a cozy treat. {{image_4}} You can switch up the nuts in your scones. If you want a different flavor, try walnuts or almonds. These nuts add a nice crunch and taste. You can also use pistachios for a fun twist. Just chop them up like you do with the pecans. For extra flavor, think about adding herbs or spices. A bit of rosemary or thyme can give a nice touch. You can also mix in dried fruits like cranberries or apricots. They add sweetness and chewiness. If you love spices, try adding ginger or nutmeg for a warm taste. A glaze can make your scones shine. Mix powdered sugar with milk to create a simple glaze. You can drizzle it over the warm scones for a sweet finish. For a richer taste, use cream cheese icing. Just blend cream cheese, powdered sugar, and a little vanilla. It makes a nice, creamy topping that pairs well with the nutty flavors. To store leftover scones, place them in an airtight container. This keeps them fresh and soft. Line the bottom with paper towels to absorb moisture. Add another paper towel on top before sealing. This setup helps prevent sogginess. You can freeze scones for up to three months. First, let them cool completely. Then, wrap each scone in plastic wrap. Place the wrapped scones in a freezer bag or container. Be sure to remove as much air as possible. When you want one, take it out and let it thaw at room temperature. To reheat scones, use your oven for the best results. Preheat your oven to 350°F (175°C). Place the scones on a baking sheet. Heat them for about 10-15 minutes. This warms them up and brings back their crispiness. You can also microwave them for 20-30 seconds, but they may lose some texture. Enjoy your scones warm for the best flavor! To make brown butter, start with unsalted butter. Heat it in a saucepan over medium heat. Stir it often. Watch for the color to change to a golden brown. You will smell a nutty aroma. This process takes about 5-7 minutes. Be careful not to burn it. Once it is done, remove it from the heat and let it cool. Yes, you can prepare the scones the night before. Follow all steps up to the baking part. Place the shaped scones on a baking sheet and cover them with plastic wrap. Store them in the fridge overnight. When ready to bake, just take them out and bake as directed. This saves time in the morning. If your scones turn out dry, add a splash of cream. Mix it gently into the dough. You can also try adding a bit more butter next time. Make sure not to overmix the dough, as this can cause dryness. Remember, a light touch keeps them tender and fluffy. Brown butter pecan scones pair well with many things. You can serve them warm with honey. Clotted cream also adds a rich touch. A cup of tea or coffee completes the experience. Try adding fresh fruit on the side for a colorful plate. Enjoy experimenting with different toppings! Brown butter pecan scones are a treat worth making. We explored key ingredients, useful tools, and step-by-step instructions to guide you. With tips for perfecting brown butter and ensuring tender scones, you can elevate your baking. We also discussed fun variations and how to store leftovers. Remember, practice makes perfect, so don’t hesitate to try this recipe. Enjoy the warm, nutty flavors of your fresh scones!

If you’re craving a warm, buttery treat, you’re in the right place! In this simple recipe for irresistible brown butter pecan scones, I’ll guide you through every step. With just …

Read more

Categories Desserts Tags NO-ING-IMG

Slow Cooker Maple Dijon Chicken and Carrots Delight

January 14, 2026October 4, 2025 by Chef Tavio
- Chicken and Vegetable Components - 4 boneless, skinless chicken thighs - 4 large carrots, peeled and cut into 1-inch pieces - 1 large onion, sliced into rings - 3 cloves garlic, finely minced - Sauce Ingredients - 1/2 cup pure maple syrup - 1/4 cup Dijon mustard - 1 tablespoon apple cider vinegar - 1 teaspoon dried thyme - 1 teaspoon salt - 1/2 teaspoon freshly ground black pepper - Optional Ingredients for Extra Flavor - 1/4 teaspoon cayenne pepper (for an extra kick) - Fresh parsley, chopped (for garnish) This list includes all the key items you need to create this delicious dish. The chicken and vegetables form a hearty base. The sauce, made with maple syrup and Dijon mustard, brings a sweet and tangy flavor. You can add cayenne pepper if you like heat. Fresh parsley adds color and a pop of freshness. Gather these ingredients before you start cooking for a smooth and fun experience. Mixing the Ingredients Start by taking a medium bowl. Add 1/2 cup of pure maple syrup. Next, add 1/4 cup of Dijon mustard. Then, pour in 1 tablespoon of apple cider vinegar. Now sprinkle in 1 teaspoon of dried thyme, 1 teaspoon of salt, and 1/2 teaspoon of freshly ground black pepper. If you like some heat, add 1/4 teaspoon of cayenne pepper. Whisk all these ingredients together until they blend well. Ensuring a Smooth Consistency Make sure your sauce is smooth. This means whisking until there are no lumps. A smooth sauce covers the chicken better. It helps to keep the chicken moist and tasty. Creating the Vegetable Bed Grab your slow cooker. Start by layering the sliced onion on the bottom. Then, add the carrot pieces. This veggie bed gives flavor to the chicken. It also helps to keep the chicken from sticking to the pot. Placement of Chicken Thighs Now, place 4 boneless, skinless chicken thighs on top of the veggies. Make sure each thigh fits well among the carrots and onions. This placement helps the chicken soak up all the good flavors. Setting the Slow Cooker Put the lid on your slow cooker. Set it to low for 6 to 8 hours. If you're in a hurry, set it to high for 3 to 4 hours. Cook until the chicken reaches an internal temperature of 165°F (75°C). Importance of Stirring Before Serving About 30 minutes before serving, gently stir the mix in the slow cooker. This step helps to blend the flavors better. It also lets the veggies soak in the sauce more fully. Low vs. High Settings Using the low setting cooks the chicken for 6-8 hours. This makes the meat very tender. If you're short on time, use the high setting for 3-4 hours. Both methods yield great results, but low gives a richer flavor. Achieving Perfect Chicken Tenderness To get tender chicken, avoid lifting the lid too often. Every time you open it, heat escapes. Trust the slow cooker. When the chicken reaches 165°F (75°C), it’s done. Best Sides to Accompany the Dish This dish pairs well with steamed rice or crusty bread. Both soak up the tasty sauce. You might also enjoy a side of green beans or a fresh salad. Each adds color and crunch. Presentation Ideas for a Beautiful Serving For a pretty display, serve on a large platter. Add a sprinkle of chopped parsley on top. This adds a pop of color. Use a ladle to drizzle extra sauce over the chicken and carrots for added flavor. Modifications for a Spicier Dish If you like heat, add more cayenne pepper. Start with a full teaspoon for a big kick. You can also try adding diced jalapeños or crushed red pepper flakes for more spice. Suggestions for Additional Herbs For added flavor, consider using rosemary or oregano. You can mix these with the thyme in the sauce. Fresh herbs can also brighten the dish. Just add them right before serving for the best taste. {{image_4}} Alternatives for Chicken Thighs You can swap chicken thighs for chicken breasts. Breasts cook faster. If you prefer, try turkey thighs for a different flavor. Different Vegetables to Use Feel free to mix in other veggies. Potatoes or sweet potatoes work well. Green beans or bell peppers add nice color and texture. Gluten-Free Options This dish is already gluten-free. Just ensure your Dijon mustard is gluten-free. Most brands are safe, but check the label to be sure. Making it Dairy-Free This recipe does not call for dairy, making it easy to keep dairy-free. Enjoy it guilt-free if you have lactose issues. Instant Pot Adaptation You can make this in an Instant Pot! Use the sauté function to brown the chicken first. Add the sauce and veggies, then cook on high for 10 minutes. Oven-Baking Method For oven-baking, preheat to 375°F (190°C). Place chicken and veggies in a baking dish. Pour sauce over everything and cover with foil. Bake for 45-55 minutes until the chicken is done. To store your Slow Cooker Maple Dijon Chicken and Carrots, let it cool first. Place leftovers in an airtight container. This keeps the dish fresh and safe. You can store it in the fridge for up to three days. If you want to enjoy it later, freezing is a great option. For best results, freeze the chicken and carrots after they cool. Use freezer-safe bags or containers. Remove as much air as possible to avoid freezer burn. This dish can last up to three months in the freezer. When you are ready to eat, thaw it overnight in the fridge. Reheat it on low heat in a skillet or the microwave. For best quality, add a splash of water or broth to keep it moist. Enjoy every bit of this tasty meal! Yes, you can use chicken breasts. However, cooking times change. Chicken thighs cook well in the slow cooker because they stay moist. If you use breasts, cook them for 4-6 hours on low or 2-3 hours on high. Check the internal temperature. It should reach 165°F (75°C) for safety. Here are some tasty side dishes to serve: - Steamed rice - Mashed potatoes - Crusty bread - Roasted vegetables - Green salad These sides complement the chicken's sweet and tangy sauce. They also help balance the meal. To add heat, try these suggestions: - Add 1 teaspoon of red pepper flakes. - Use more cayenne pepper than the recipe calls for. - Mix in some diced jalapeños or serrano peppers. These additions will give your dish a nice kick! Adjust the spice level to your taste. This blog post covered all you need for a tasty Slow Cooker Maple Dijon Chicken. We explored the key ingredients, from chicken to vegetables and sauces. I shared step-by-step instructions for making it smooth and flavorful. You learned tips for perfect cooking and serving, plus variations to fit your needs. Remember, you can customize recipes, adjust cooking methods, and store leftovers safely. This dish offers great taste and is easy to prepare. Enjoy making it your own!

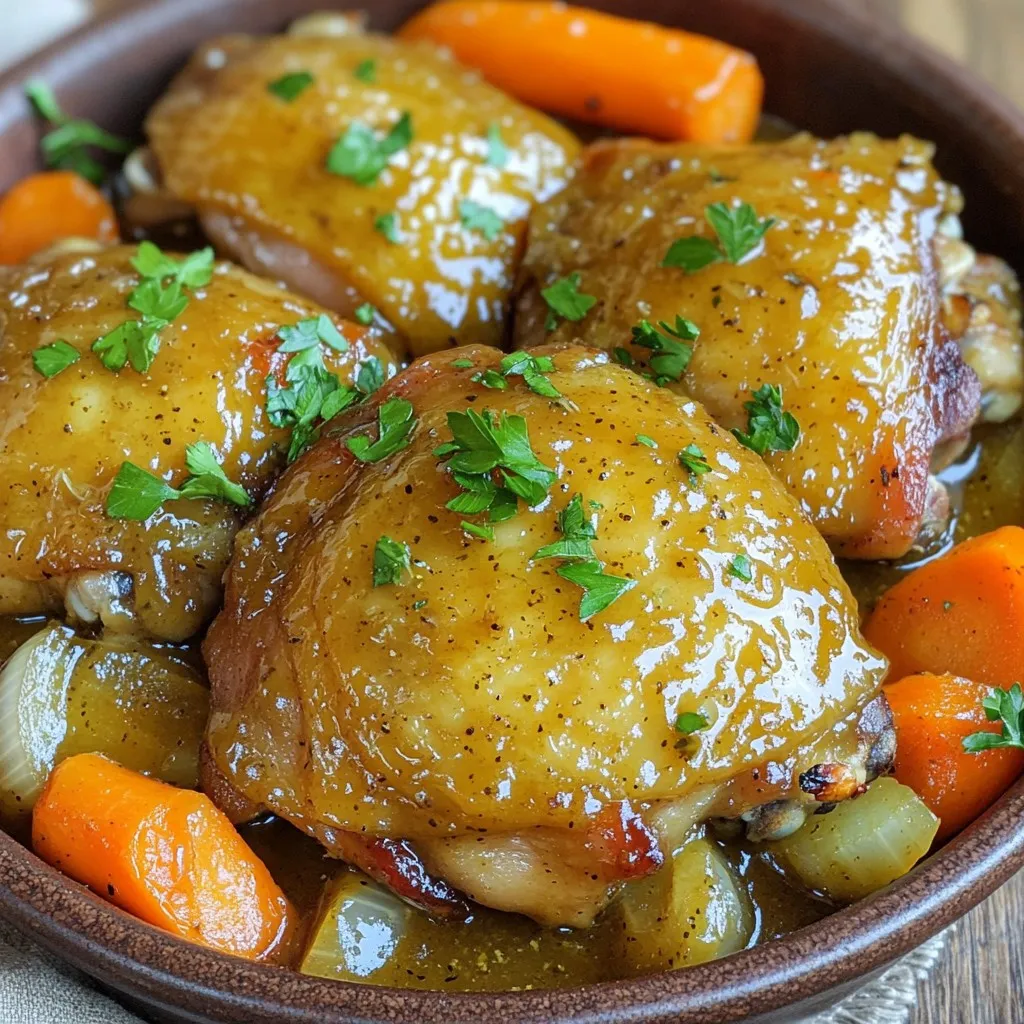
Welcome to the world of easy and delicious meals! Today, we’re making Slow Cooker Maple Dijon Chicken and Carrots. This dish combines sweet and tangy flavors with tender chicken and …

Read more

Categories Dinner Tags NO-ING-IMG

One-Pan Creamy Pesto Chicken Orzo Delightful Recipe

January 14, 2026October 3, 2025 by Chef Tavio
- 1 lb chicken breast, diced - 1 cup orzo pasta - 2 cups chicken broth - 1/2 cup heavy cream - 1/2 cup basil pesto - 1 small onion, finely diced - 3 cloves garlic, minced - Extra virgin olive oil, salt, and pepper - Grated Parmesan cheese - Fresh spinach I love gathering my ingredients before I start cooking. It makes the process smooth and fun. For this dish, the chicken breast forms the heart of the meal. I dice it into small pieces for even cooking. Next, I grab my orzo pasta. It cooks quickly and adds a nice texture. I need rich flavors, so I use chicken broth. It keeps my dish juicy and full of taste. For creaminess, I add heavy cream and basil pesto. They blend together perfectly, making the dish feel luxurious. To boost the flavor, I use a small onion and garlic. I finely dice the onion to release its sweetness. Minced garlic adds a punch that I can’t resist. Extra virgin olive oil helps sauté these ingredients and brings them together. Finally, I think about garnishes. Grated Parmesan cheese adds a salty kick. Fresh spinach not only looks nice but adds color and nutrients. Each ingredient plays a role in making this creamy pesto chicken orzo a delightful dish. Sautéing the Onion and Garlic Start by heating the extra virgin olive oil in a large skillet over medium heat. Once the oil is hot, add the diced onion. Sauté the onion for about 3-4 minutes until it turns translucent. This step builds a great flavor base. Next, add the minced garlic and sauté for one more minute. The garlic will give off a delicious aroma. Cooking the Chicken Now, increase the heat to medium-high. Add the diced chicken breast to the skillet. Season the chicken with salt and pepper. Cook it for about 5-7 minutes. Stir occasionally until the chicken is golden brown and no longer pink in the center. This step ensures the chicken is juicy and full of flavor. Adding the Orzo and Broth Stir in the orzo pasta. Make sure to combine it well with the chicken, onions, and garlic. This helps the pasta soak up all the tasty flavors. Then, pour in the chicken broth. Bring the mixture to a gentle boil. Simmering to Cook Once boiling, reduce the heat to low and cover the skillet with a lid. Let it simmer for about 10 minutes. The orzo will absorb most of the liquid and become tender. Stir occasionally for even cooking. Mixing in Cream and Pesto After the orzo is cooked, gently stir in the heavy cream and basil pesto. Mix until everything is creamy and well combined. This is where the magic happens. You’ll see the dish transform into a rich delight. Adding Spinach Now, add the chopped spinach to the skillet. Cook it for about 2-3 minutes. The spinach will wilt and blend into the dish. This adds a nice color and a healthy touch. Seasoning Adjustments Taste the dish and adjust the seasoning. Add more salt and pepper if needed. This ensures every bite is full of flavor. Presentation Suggestions Serve the creamy pesto chicken orzo in shallow bowls. For a delightful finish, garnish each serving with grated Parmesan cheese. A drizzle of extra pesto on top makes it even better. Enjoy this vibrant and flavorful dish! - Ensuring Chicken is Fully Cooked Cook the chicken until it reaches 165°F. The meat should be white, not pink. Use a meat thermometer for best results. This ensures your dish is safe and tasty. - Tips for Perfectly Cooked Orzo Stir the orzo often while it cooks. This stops it from sticking together. Always taste it at the 10-minute mark. It should be tender but not mushy. - Variations with Additional Spices Add a pinch of red pepper flakes for heat. You can also try Italian seasoning for a new twist. Just a little can change the whole taste! - Substituting Ingredients for Dietary Preferences Use vegetable broth instead of chicken broth for a vegetarian option. Swap heavy cream for coconut milk to make it dairy-free. These swaps keep the flavor but fit different diets. - Best Side Dishes to Pair A simple green salad works well with this dish. Garlic bread is another great choice. Both add freshness and balance the creaminess of the orzo. - Wine Recommendations Pair this meal with a crisp white wine. A Sauvignon Blanc or Pinot Grigio complements the pesto flavors nicely. Choose a wine you enjoy to enhance your meal experience. {{image_4}} Using Turkey or Tofu You can switch chicken for turkey. Turkey breast works well and keeps the dish light. If you want to make it plant-based, use tofu. Firm tofu is best. Press it to remove water, then cube it. Cook it until golden for great texture. Substitute for Vegetarians: Chickpeas Chickpeas are a great choice for vegetarians. They add protein and fiber. Use one can, drained and rinsed. Stir them in with the orzo. This keeps the dish hearty and satisfying. Orzo vs. Other Pasta Types Orzo is small and cooks quickly. However, you can use other pasta shapes. Try penne or fusilli if you prefer. Just adjust the cooking time based on the pasta you choose. Gluten-Free Options If you need gluten-free pasta, look for rice or quinoa pasta. These options work well with the creamy sauce. Just follow package instructions for cooking times. Traditional Basil vs. Other Herb Pestos Basil pesto is classic, but you can try other herbs. Use cilantro or arugula for a twist. Each will bring a new flavor to the dish. Experiment to find your favorite. Making Homemade Pesto Making your own pesto is easy and fun. Blend fresh herbs, garlic, nuts, cheese, and oil. This gives you control over the flavors. Plus, homemade pesto often tastes fresher than store-bought. Refrigeration Tips Store any leftovers in an airtight container. Keep the creamy pesto chicken orzo in the fridge. It can stay fresh for up to three days. Make sure it cools before sealing the container. This helps prevent condensation. Freezing for Later Use You can freeze this dish for longer storage. Use a freezer-safe container or bag. It stays good for about two months. To thaw, place it in the fridge overnight before reheating. Best Methods for Reheating Reheat the chicken orzo on the stove for best results. Add a splash of broth or cream to keep it moist. Stir it over low heat until warmed through. You can also use a microwave. Heat in short bursts, stirring in between. Maintaining Creaminess To keep the dish creamy, avoid high heat. Stir in a little extra cream or broth while reheating. This will help bring back that smooth texture. How Long Does It Last? The creamy pesto chicken orzo lasts about three days in the fridge. If frozen, it can last up to two months. Always check for freshness before eating. Signs of Spoilage Look for changes in color or texture. If it smells off, do not eat it. Mold or a sour odor means it’s time to toss it out. Always prioritize food safety! Can I make this dish ahead of time? Yes, you can prepare this dish ahead. Cook it, let it cool, and store it in the fridge. It stays good for up to three days. Reheat on the stove or in the microwave before serving. This is a great way to save time on busy nights. What can I use instead of chicken broth? If you lack chicken broth, use vegetable broth or water. These options keep the dish flavorful. You can also use a mix of water and a bit of soy sauce for added taste. This helps keep the creamy pesto chicken orzo delicious. Is this dish gluten-free? No, this dish is not gluten-free due to the orzo pasta. However, you can use gluten-free orzo. It cooks similarly and keeps the dish creamy. Always check the package to ensure it is certified gluten-free. Can I make it dairy-free? Yes, you can make this dish dairy-free. Use coconut cream instead of heavy cream. For cheese, try a dairy-free Parmesan or nutritional yeast. These swaps keep the dish creamy while meeting dairy-free needs. What if my orzo is overcooked? If your orzo is overcooked, it might be mushy. Try to drain any extra liquid. You can add a bit more broth or cream to help balance the texture. Adding fresh spinach at the end can make it look better too. How do I make a one-pan dish if I don’t have a skillet? If you lack a skillet, use a large pot or pan. Just make sure it has a lid for simmering. You can also use an electric frying pan. The key is to keep it all in one vessel to maintain flavors. This dish is easy and full of flavor. We covered key ingredients like chicken, orzo, and pesto. You learned step-by-step instructions to create a creamy meal. Remember the tips for cooking and serving to enhance your dish further. You can even try variations to suit your taste or dietary needs. With proper storage and reheating, it will stay delicious for days. Enjoy making this meal and share it with friends and family!

Are you ready to whip up a comforting meal with just one pan? This One-Pan Creamy Pesto Chicken Orzo Recipe will change your weeknight dinners forever. I’ll show you how …

Read more

Categories Dinner Tags NO-ING-IMG

Spiced Hot Chocolate with Whipped Cream Delight

January 14, 2026October 3, 2025 by Chef Tavio
To make the Spiced Hot Chocolate with Whipped Cream, gather these key ingredients: - 2 cups whole milk - 2 tablespoons unsweetened cocoa powder - 2 tablespoons granulated sugar - 1/2 teaspoon ground cinnamon - 1/4 teaspoon ground nutmeg - 1/4 teaspoon cayenne pepper (more for extra heat) - 1/2 teaspoon pure vanilla extract - 1/4 cup heavy cream (for whipped cream) - 1 tablespoon powdered sugar (for sweetening whipped cream) - A pinch of sea salt - Dark chocolate shavings (optional garnish) Each ingredient plays a special role in making this drink rich and flavorful. The whole milk gives creaminess, while cocoa powder adds that classic chocolate taste. Sugar balances the flavors, and spices like cinnamon, nutmeg, and cayenne pepper bring warmth and depth. A touch of vanilla enriches the aroma. When making the whipped cream, heavy cream and powdered sugar blend perfectly to create a sweet topping. Adding dark chocolate shavings on top makes it look fancy, but it’s optional. These simple ingredients come together for a cozy treat that warms the soul. - Mixing the ingredients Start by grabbing a small saucepan. In it, combine 2 cups of whole milk, 2 tablespoons of unsweetened cocoa powder, and 2 tablespoons of granulated sugar. Add 1/2 teaspoon of ground cinnamon, 1/4 teaspoon of ground nutmeg, and 1/4 teaspoon of cayenne pepper. Don't forget a pinch of sea salt. This mix gives your hot chocolate a rich flavor. - Heating and whisking Place your saucepan over medium heat. Whisk the mixture constantly as it warms. This step helps the cocoa powder dissolve well. Heat it until the milk is steamy, but be careful not to let it boil. Once it’s hot, remove it from the heat. - Adjusting flavor to taste Stir in 1/2 teaspoon of pure vanilla extract. Now, take a quick taste. Adjust the sweetness or spice level if needed. Add more sugar for sweetness or more cayenne for a spicy kick. - Combining ingredients In a mixing bowl, combine 1/4 cup of heavy cream and 1 tablespoon of powdered sugar. This mix will become your whipped cream. - Whipping to soft peaks Use a hand mixer to whip the cream. Mix until you see soft peaks form. Be careful not to over-whip, or it might turn grainy. You want it light and fluffy. - Tips for perfect whipped cream Keep your bowl and cream cold for better results. It helps the cream whip up faster. If you desire more flavor, consider adding a splash of vanilla extract. - Pouring into mugs Take the hot chocolate and pour it into two mugs. Fill them generously so everyone enjoys a full serving. - Topping with whipped cream Add a generous dollop of whipped cream on top of each mug. Let it create a lovely swirl. - Adding dark chocolate shavings For a fancy touch, sprinkle dark chocolate shavings over the whipped cream. This step adds extra flavor and elegance to your drink. Enjoy your warm, spiced hot chocolate! To make your spiced hot chocolate shine, adjust sweetness and spice to your taste. Start with two tablespoons of sugar. If you want it sweeter, add more. For spice, cayenne pepper adds heat. Start with a pinch, then add more if you like it spicy. Using high-quality cocoa is key. It makes your drink rich and smooth. Look for brands with high cocoa content. They give a deeper flavor. Fresh spices also help. Buy whole spices and grind them at home. This ensures maximum flavor in every sip. Pick the best saucepan for heating. A heavy-bottomed one helps heat evenly. This stops scorching. For mixing, use a whisk. A good whisk makes it easy to blend ingredients. If you prefer a mixer, a hand mixer works great too. Garnishing makes your hot chocolate special. Dark chocolate shavings on top add beauty and taste. You can also use a sprinkle of cinnamon for a cozy look. Serve it warm, just below boiling. Pair it with cookies or marshmallows for a sweet treat. Enjoy each sip! {{image_4}} You can easily make this spiced hot chocolate dairy-free. Use almond, oat, or coconut milk instead of whole milk. Each milk brings its own flavor. Almond milk adds nutty notes. Oat milk gives a creamier texture. Coconut milk adds richness. You may need to adjust the sugar based on the milk you pick. A sweeter milk may need less sugar. Get creative with flavors! Peppermint is a great choice for a festive twist. Simply add a few drops of peppermint extract. Orange zest brightens the drink. Just a teaspoon will do! You can also add a dash of vanilla extract for extra warmth. Consider mixing in spices like cardamom or ginger for added depth. Each option enhances the chocolate beautifully. If you're watching your sugar, you can use a sugar substitute. Stevia or monk fruit sweetener works well. These keep the flavor while cutting calories. For a vegan whipped cream, try coconut cream instead of heavy cream. Chill a can of coconut milk, then whip the solid part. It creates a fluffy topping that pairs perfectly with hot chocolate. To keep your spiced hot chocolate fresh, store it in the fridge. Use an airtight container to seal in flavor. Glass jars or plastic containers work well for this. Make sure to cool the hot chocolate to room temperature before placing it in the fridge. When you want to enjoy leftovers, reheat the hot chocolate gently. Use a small saucepan over low heat. Stir well to mix in any settled spices. You can also use the microwave, but heat it in short bursts. This helps prevent boiling, which can change the taste. Your spiced hot chocolate should stay good for up to three days in the fridge. The whipped cream lasts about two days. Look for changes in smell or texture to know if it has gone bad. If it smells sour or looks lumpy, it's best to toss it out. For spiced hot chocolate, whole milk is my top choice. It makes the drink creamy and rich. Almond milk is a great dairy-free option. It adds a nice nutty flavor but is thinner. Oat milk offers a smooth texture and sweetness. It’s also dairy-free and works well. Choose the milk that fits your taste and dietary needs. Yes, you can prep spiced hot chocolate ahead of time. Simply make the mixture without the whipped cream. Store it in the fridge for up to two days. When you’re ready, heat it gently on the stove. Stir well to mix everything. Whip the cream fresh for the best taste. This way, it stays fluffy and light. To add more spice, increase the cayenne pepper. Start with a pinch and taste as you go. You can also add more ground cinnamon or nutmeg for warmth. If you enjoy heat, try adding a dash of chili powder. Adjust the spices to fit your taste. Remember, it’s all about what you like! This blog post covered the essentials of making a rich spiced hot chocolate. We explored the key ingredients, step-by-step instructions, and tips for mastering flavor. You can even try different variations to fit your diet. Remember to store leftovers properly and reheat to keep the taste intact. Enjoy experimenting with flavors and garnishes. A cozy cup is just a recipe away! Dive into your hot chocolate journey and savor every sip.

Warm up your chilly evenings with a cup of Spiced Hot Chocolate with Whipped Cream Delight! This rich, creamy drink features whole milk, cozy spices, and a fluffy whipped topping …

Read more

Categories Desserts Tags NO-ING-IMG

Bakery-Style Cinnamon Sugar Pumpkin Donuts Delight

January 14, 2026October 3, 2025 by Chef Tavio
- 1 cup pure pumpkin puree - 1/2 cup granulated sugar - 1/4 cup packed brown sugar - 1/2 cup vegetable oil - 2 large eggs - 1 teaspoon vanilla extract - 2 cups all-purpose flour - 1 teaspoon baking powder - 1/2 teaspoon baking soda - 1 teaspoon ground cinnamon - 1/2 teaspoon ground nutmeg - 1/4 teaspoon ground ginger - 1/4 teaspoon salt - 1/2 cup granulated sugar (for coating) - 2 teaspoons ground cinnamon (for coating) Gathering fresh ingredients is key to great donuts. Use pure pumpkin puree, not pie filling. The mix of sugars gives the right sweetness and depth. Vegetable oil helps keep the donuts soft. The eggs add a nice richness. Vanilla extract enhances flavor without being overpowering. When mixing the dry ingredients, make sure everything is well combined. This helps the donuts rise evenly. The spices bring warmth and flavor, making each bite cozy. The cinnamon sugar coating adds that bakery touch. I love rolling the warm donuts in the mix for a crunchy finish. These ingredients come together to create a delightful treat. You’ll love how simple they are to use. Each component plays a role in making these donuts special. 1. Preheat the oven and prepare the donut pan: Start by setting your oven to 350°F (175°C). Lightly grease your donut pan or use a silicone mold for easy release. 2. Mix the wet ingredients: In a large bowl, combine 1 cup of pure pumpkin puree, 1/2 cup of granulated sugar, 1/4 cup of brown sugar, and 1/2 cup of vegetable oil. Use a whisk to blend until smooth. 3. Incorporate eggs and vanilla: Crack 2 large eggs into the mixture. Add 1 teaspoon of vanilla extract. Whisk until everything is well mixed and creamy. 1. Whisk together all-purpose flour and spices: In a separate bowl, whisk 2 cups of all-purpose flour, 1 teaspoon of baking powder, 1/2 teaspoon of baking soda, 1 teaspoon of ground cinnamon, 1/2 teaspoon of ground nutmeg, 1/4 teaspoon of ground ginger, and 1/4 teaspoon of salt. 2. Gradually mix with wet ingredients: Slowly fold the dry mixture into the pumpkin mixture. Stir gently until just combined. 3. Be careful not to overmix: The batter should be thick and fluffy. Overmixing can make your donuts tough. 1. Fill the donut pan and bake: Using a spoon or piping bag, fill each cavity of your donut pan about two-thirds full. This gives them room to rise. 2. Prepare the cinnamon sugar coating: In a shallow bowl, mix 1/2 cup of granulated sugar with 2 teaspoons of ground cinnamon. Stir well. 3. Cool and coat the donuts: Bake the donuts for 12-15 minutes. They’re done when a toothpick comes out clean. Let them cool for 5 minutes in the pan, then remove them to a wire rack. While still warm, roll each donut in the cinnamon sugar mixture. Enjoy your sweet treat! To get the best donuts, avoid overmixing the batter. When mixing wet and dry ingredients, stop as soon as they combine. This keeps your donuts light and fluffy. Letting the donuts cool is also key. If you coat them too soon, the sugar won’t stick well. Coat your warm donuts for the best results. The heat helps the sugar mixture stick better. For coating, mix your cinnamon and sugar well in a bowl. Roll each donut in the mixture until they are evenly covered. This gives each bite a sweet crunch. Arrange the donuts on a decorative platter for a stunning look. You can sprinkle some extra cinnamon sugar on top. For a rustic touch, serve them in cute paper bags. This adds charm and makes them easy to grab. {{image_4}} You can change the flavor of your donuts easily. Adding chocolate chips gives a sweet twist. You can also mix in nuts for a crunchy bite. Want something different? Swap the spices for unique flavors. Try cardamom or allspice instead of cinnamon and nutmeg. This change can surprise your taste buds! When it comes to styles, you have options. You can choose between glazed and sugar-coated donuts. Glazed donuts are shiny and sweet, while sugar-coated ones have a crunchy texture. You can also decide whether to bake or fry. Baking keeps them light and fluffy. Frying can make them richer and denser. If you have dietary needs, you can still enjoy these donuts. Use gluten-free flour for a gluten-free version. This swap keeps the taste great. For vegan donuts, replace eggs with flax eggs or applesauce. Use a plant-based oil, and you're good to go! These options make sure everyone can indulge. To keep your donuts fresh, store them in an airtight container. This helps prevent them from drying out. You can also wrap them in plastic wrap for extra protection. Place the container in a cool, dry place. For longer storage, consider freezing your donuts. To freeze, first, let the donuts cool completely. Then, wrap each one tightly in plastic wrap. Place them in a freezer bag and remove as much air as possible. They will stay fresh for about three months. When you’re ready to enjoy them, thaw the donuts at room temperature for a few hours. You can also warm them slightly in the oven for a few minutes. The best time to eat your donuts is within the first two days. They taste best when fresh. After that, they can still be good for up to a week if stored properly. Look for signs of spoilage. If the donuts feel hard or dry, they may no longer be tasty. If you notice any mold or off smells, it’s best to toss them. Always trust your senses! To make these tasty donuts, start by preheating your oven to 350°F. Prepare your donut pan with grease or use a silicone mold. In a bowl, mix pumpkin puree, granulated sugar, brown sugar, and vegetable oil. Next, add eggs and vanilla, and whisk until smooth. In another bowl, combine all-purpose flour, baking powder, baking soda, spices, and salt. Then, slowly fold the dry mix into the wet mix until just combined. Fill your donut pan and bake for 12-15 minutes. After baking, cool the donuts and coat them in a mix of sugar and cinnamon. Enjoy! Yes, you can use canned pumpkin. Canned pumpkin is convenient and saves time. It is usually pure pumpkin with no added sugar or spices. Be sure to check the label to avoid pumpkin pie filling, which has added sugars and spices. If you use canned pumpkin, your donuts will still taste great and have a rich pumpkin flavor. To reheat leftover donuts, use an oven or microwave. For the oven, heat to 350°F and warm the donuts for about 5 minutes. This keeps them soft and tasty. If you use a microwave, heat each donut for about 10-15 seconds. Be careful not to overheat, or they may become tough. Enjoy them warm for the best taste! Yes, you can make these donuts ahead of time. Bake them and let them cool completely. Store them in an airtight container at room temperature for up to two days. If you want to store them longer, freeze the cooled donuts. Wrap each one in plastic wrap and place them in a freezer bag. They can last for up to two months in the freezer. When ready to eat, just thaw and reheat! Now you know how to make delicious cinnamon sugar pumpkin donuts from scratch. By following the simple steps and tips, you can create treats with great texture and flavor. Whether you want to switch up the recipe or store leftovers, this guide has you covered. Baking takes practice, so don’t get discouraged if your first batch isn't perfect. Enjoy these bites of fall goodness with friends and family, and share your tasty creations!

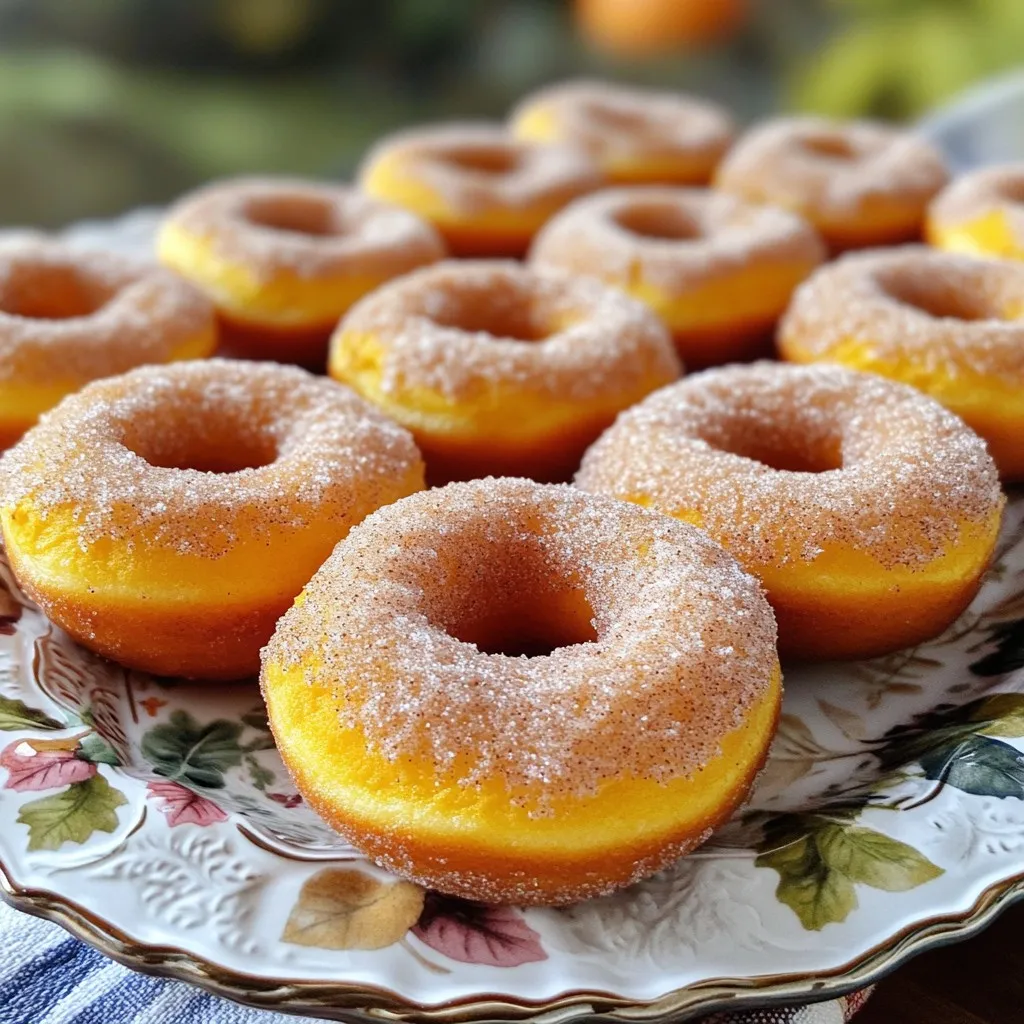
If you crave warm, spiced delights, you’re in for a treat! In this article, I’ll show you how to make Bakery-Style Cinnamon Sugar Pumpkin Donuts that are simply irresistible. These …

Read more

Categories Desserts Tags NO-ING-IMG

One-Pot Creamy Sun-Dried Tomato Orzo Delight

January 14, 2026October 3, 2025 by Chef Tavio
- 1 cup orzo pasta - 2 tablespoons olive oil - 3 cloves garlic, minced - 1 cup sun-dried tomatoes, chopped - 2 cups vegetable broth - 1 cup heavy cream - 1 cup baby spinach, roughly chopped - 1/2 cup grated Parmesan cheese - Salt and pepper to taste - Fresh basil leaves for garnish To make this dish shine, choose quality ingredients. Start with orzo pasta that is not overcooked. The right size and texture help keep the dish creamy. Next, use sun-dried tomatoes packed in oil. They offer a richer flavor than those that are dry. Fresh garlic gives a nice kick, so avoid the jarred type. Always use fresh spinach for the best color and taste. Lastly, opt for a good Parmesan cheese. It melts well and adds a nice depth of flavor. If you want to switch things up, there are good options. For orzo, you can use any small pasta like ditalini or even quinoa for a gluten-free choice. Instead of heavy cream, try coconut milk for a dairy-free version. You can swap sun-dried tomatoes with roasted red peppers for a different taste. If you don’t have Parmesan, pecorino cheese works great too. Start by heating 2 tablespoons of olive oil in a large pot over medium heat. Once the oil shimmers, add 3 cloves of minced garlic. Sauté the garlic for about 1 minute until it smells nice and turns golden. Be careful not to let it burn; burnt garlic can ruin the dish. Next, add 1 cup of chopped sun-dried tomatoes to the pot. Stir them in and cook for 2 more minutes. This step helps the flavors come together and makes your dish more flavorful. Now, it’s time to add 1 cup of orzo pasta to the pot. Stir well so the orzo gets coated with the oil and garlic. Then, pour in 2 cups of vegetable broth. Turn up the heat to bring it to a boil. Once it boils, reduce the heat, cover the pot, and let it simmer for 10 to 12 minutes. Stir occasionally to keep the orzo from sticking. As the orzo cooks, check that it becomes tender but not mushy. This is key for a perfect texture. Stirring helps distribute the heat evenly, so the pasta cooks just right. After the orzo is done, pour in 1 cup of heavy cream and sprinkle in 1/2 cup of grated Parmesan cheese. Stir continuously until everything is creamy and smooth. This creates a rich sauce that wraps around the pasta. Finally, fold in 1 cup of roughly chopped baby spinach. Season with salt and pepper to taste. Stir until the spinach wilts and mixes well with the creamy orzo. This step adds a lovely color and extra nutrients to your meal. Taste and adjust the seasoning if needed. Enjoy your delicious one-pot dish! To cook orzo well, always check the package for cooking time. Orzo cooks fast. Stir it often to prevent it from sticking together. Keep an eye on the pot. If it absorbs too much broth, add more water. This way, you keep it from getting dry. Taste it towards the end to ensure it’s just right. For a creamy texture, use heavy cream, as the recipe shows. Adding Parmesan cheese also helps. Stir these in slowly when the orzo is done. This creates a smooth sauce. If you want it even creamier, consider adding a bit more cream. You can also mix in a splash of pasta water. This adds starch and thickens the sauce nicely. You can make this dish your own with herbs and spices. Fresh basil is great for a pop of flavor. Add some oregano or thyme for warmth. Red pepper flakes give a kick if you enjoy heat. For a twist, try adding lemon zest for brightness. Experiment with flavors that you love! {{image_4}} Serve the creamy orzo in individual bowls. Top with fresh basil leaves for color. A sprinkle of extra Parmesan adds a nice touch. This small detail makes your dish look fancy and inviting. Pair this dish with a crisp green salad. A simple side of garlic bread works great too. For drinks, try a chilled white wine, like Pinot Grigio. Its bright notes match the flavors well. Sparkling water with lemon is a refreshing non-alcoholic choice. Leftovers can be stored in an airtight container. They last up to three days in the fridge. Reheat the orzo on low heat, adding a splash of broth if needed. You can also mix in some cooked chicken or shrimp for a hearty meal. This dish transforms into a new delight with just a few tweaks! To make this dish vegan, swap the heavy cream for coconut cream or cashew cream. These options provide creaminess and a rich taste. Use nutritional yeast instead of Parmesan for a cheesy flavor. Ensure the sun-dried tomatoes are oil-free and check that your vegetable broth is vegan. You can add protein to this orzo dish for a heartier meal. Grilled chicken or shrimp pairs well with the creamy sauce. Simply add cooked chicken or shrimp after you mix in the cream and cheese. For plant-based protein, consider chickpeas or tofu. Cook the tofu until golden, then fold it in just like the spinach. For a gluten-free version, use gluten-free orzo or rice. Quinoa is also a great alternative. Just adjust the cooking time according to the package instructions. Always check labels to ensure the products are certified gluten-free. This way, everyone can enjoy this creamy delight! Yes, you can use other pasta types. Try small shapes like ditalini or farfallini. These shapes hold sauce well. Just remember to adjust cooking time as needed. Check the package for guidance. Store leftovers in an airtight container. Keep them in the fridge for up to three days. If you want to freeze, use a freezer-safe container. It can last up to two months. You can prepare it ahead! Cook the orzo and store it without the cream. Add the cream just before serving. This keeps the dish creamy and fresh. Feel free to add veggies like bell peppers or zucchini. You can also include proteins like grilled chicken or shrimp. They pair well with the creamy sauce and add more flavor. Reheat leftovers on the stove over low heat. Add a splash of broth or cream to help with creaminess. Stir often to avoid sticking. You can also microwave them in a safe dish. This blog post covered how to make a tasty orzo dish. We explored ingredients, cooking steps, and tips for perfecting your meal. You learned how to add your own flavor and make it unique. Remember, cooking is about creativity and fun. Experiment with different herbs, protein, or even make a vegan version. Enjoy your meal and share it with others, as food brings people together. Keep these tips in mind for your next kitchen adventure!

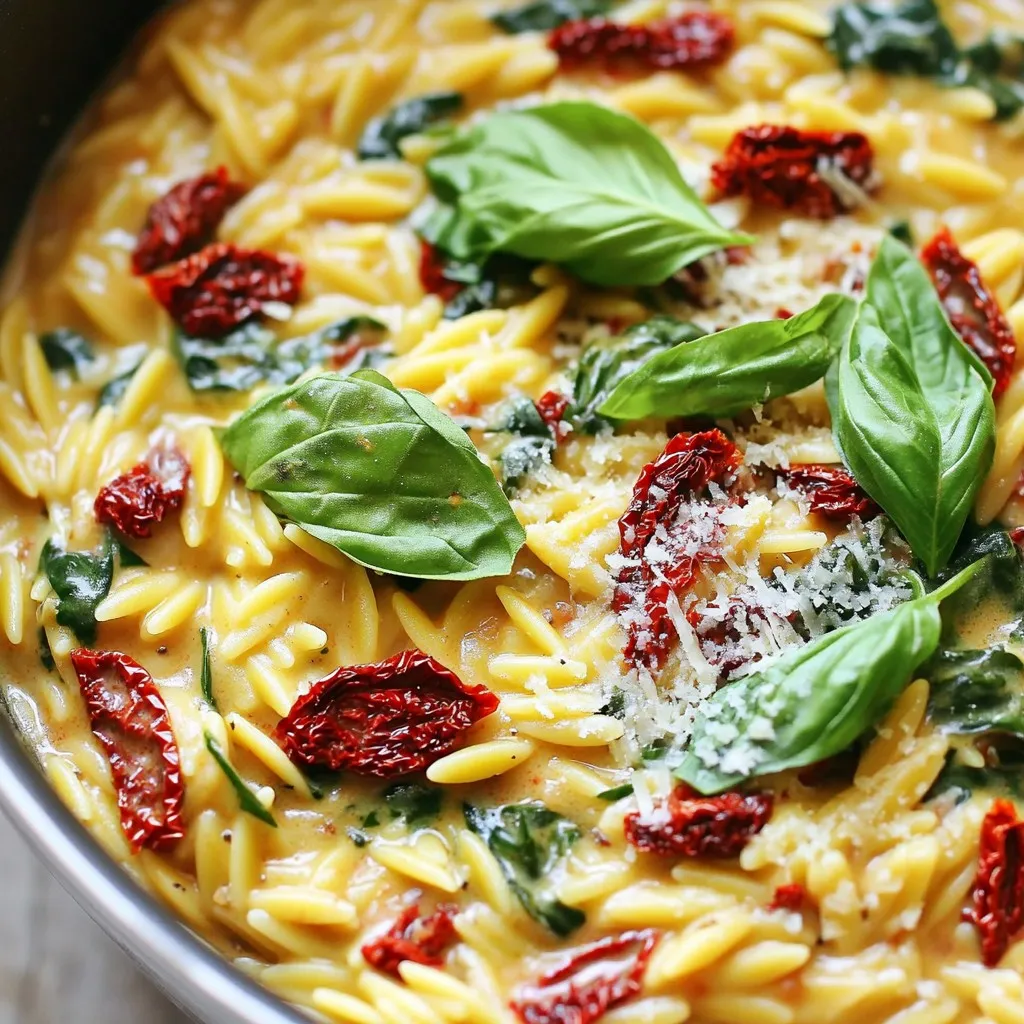
Welcome to a culinary adventure! Today, I’m excited to share my recipe for One-Pot Creamy Sun-Dried Tomato Orzo Delight. This dish is simple to make and packed with robust flavors. …

Read more

Categories Dinner Tags NO-ING-IMG
Older posts
Newer posts
← Previous Page1 … Page14 Page15 Page16 … Page73 Next →

TASTED NEST

Where Flavor Finds a Home 🍳🏡 — warm, simple, and crave-worthy recipes made for real life, from stovetop mornings to backyard dinners.

PAGES

Home About Contact Privacy Policy Terms & Conditions Cookie Policy GDPR Policy Copyright Policy Disclaimer

CATEGORIES

Appetizers Desserts Salads Breakfast Dinner
Copyright © 2026 Tasted Nest. All rights reserved.