Skip to content
  • GDPR Privacy Policy
  • Copyright Policy
  • Disclaimer
  • Terms & Conditions
Tasted Nest
  • Home
  • Appetizers
  • Desserts
  • Salads
  • Breakfast
  • Dinner
  • Privacy Policy
  • Contact
  • About

NO-ING-IMG

High-Protein Mocha Cottage Cheese Pudding Delight

January 14, 2026October 1, 2025 by Chef Tavio
- 1 cup cottage cheese - 1 tablespoon unsweetened cocoa powder - 1 tablespoon instant coffee granules - 2 tablespoons honey or maple syrup - 1 teaspoon pure vanilla extract - A pinch of sea salt - Dark chocolate shavings - Chopped nuts - Ground cinnamon When making high-protein mocha cottage cheese pudding, start with the main ingredients. Cottage cheese is the star here. It adds creaminess and protein. I use unsweetened cocoa powder for a rich chocolate taste. Instant coffee granules give it that mocha kick you crave. Next, sweeteners and flavorings come into play. Honey or maple syrup adds just the right amount of sweetness. I like to use pure vanilla extract for depth. A pinch of sea salt balances everything out. It enhances the flavors beautifully. Don't forget optional toppings! Dark chocolate shavings make it look fancy. Chopped nuts add crunch. A sprinkle of ground cinnamon brings warmth. Choose your favorites for a fun twist. This pudding is not only tasty but also packed with protein. It’s a win-win! First, grab a mixing bowl. Add 1 cup of cottage cheese. Next, mix in 1 tablespoon of unsweetened cocoa powder and 1 tablespoon of instant coffee granules. This is where the magic starts! Then, add 2 tablespoons of honey or maple syrup and 1 teaspoon of pure vanilla extract. Don’t forget a pinch of sea salt to enhance the flavors. Mix everything thoroughly. You want a smooth and creamy blend. Now, it’s time to make it even better. Gradually pour in 1/4 cup of milk. Use dairy or your preferred plant-based option. Blend or whisk the mixture well. Keep going until it’s silky smooth. If it feels too thick, add a bit more milk. Adjust it until you reach your desired thickness. Once your pudding is smooth, transfer it to individual serving bowls. This makes it look nice! Cover the bowls and chill them in the fridge for at least 30 minutes. This step allows all those great flavors to develop. When you’re ready, you can serve it. Enjoy your tasty high-protein mocha cottage cheese pudding! Adjust the sweetness to match your taste. You can add more honey or maple syrup if you want it sweeter. Feel free to try different milk alternatives, like almond, oat, or coconut milk. Each adds a unique twist to the flavor. For a creamier pudding, use a food processor. It will blend the cottage cheese really well. If you want it even smoother, blend for longer. You can also add more milk to get the thickness you like. Use clear cups to show off your pudding’s rich layers. This makes it look fancy! Layer toppings like dark chocolate shavings or chopped nuts. They add texture and flavor, making each bite special. {{image_4}} You can add peanut butter to give your pudding a nutty twist. This makes it richer and creamier. You can also try flavored protein powder. It adds fun tastes like vanilla or chocolate. This change can boost protein too. If you want a vegan option, use plant-based cottage cheese. This keeps the dish creamy while being dairy-free. You can also use sugar substitutes for low-carb options. Sweeteners like stevia or erythritol can work well. Adding seasonal fruits like berries or bananas brings freshness. They add color and natural sweetness too. You can also use mint leaves for a refreshing garnish. Mint gives a bright flavor that pairs well with chocolate. To keep your High-Protein Mocha Cottage Cheese Pudding fresh, refrigerate it in airtight containers. This helps maintain its creamy texture and flavor. I suggest eating it within 3 days for the best taste and quality. If you want to store it for longer, you can freeze the pudding. Just make sure to use a freezer-safe container. When you are ready to enjoy it again, thaw it in the fridge overnight. You may need to stir it to regain that smooth creaminess. Don't let leftovers go to waste! You can blend the pudding into smoothies for a tasty protein boost. It also works great as a filling in other desserts or snacks. Think of it as a secret ingredient to enhance your culinary creations! You can use flavored cottage cheese. It changes the taste of the pudding. For example, using vanilla cottage cheese adds a sweet note. If you choose a fruit-flavored one, it will alter the mocha flavor. Keep this in mind when deciding on your mix. Yes, this pudding is great for meal prep. You can make it ahead and chill it. Store it in individual containers for easy access. It stays fresh for up to three days. Just grab one when you need a quick snack or dessert. You can make this pudding dairy-free easily. Swap regular cottage cheese for a plant-based option. Use almond milk, oat milk, or coconut milk instead of regular milk. These changes keep the flavor rich but fit your diet. This blog post offers a simple, delicious pudding recipe using cottage cheese. You learned about the main ingredients, sweeteners, and optional toppings to make it your own. The step-by-step guide helps you mix, chill, and serve your pudding perfectly. Tips and variations let you customize flavors and adjust for dietary needs. Finally, you can store or repurpose leftovers easily. Try this pudding for a quick, tasty treat that fits your lifestyle. Enjoy making it and sharing it with others!

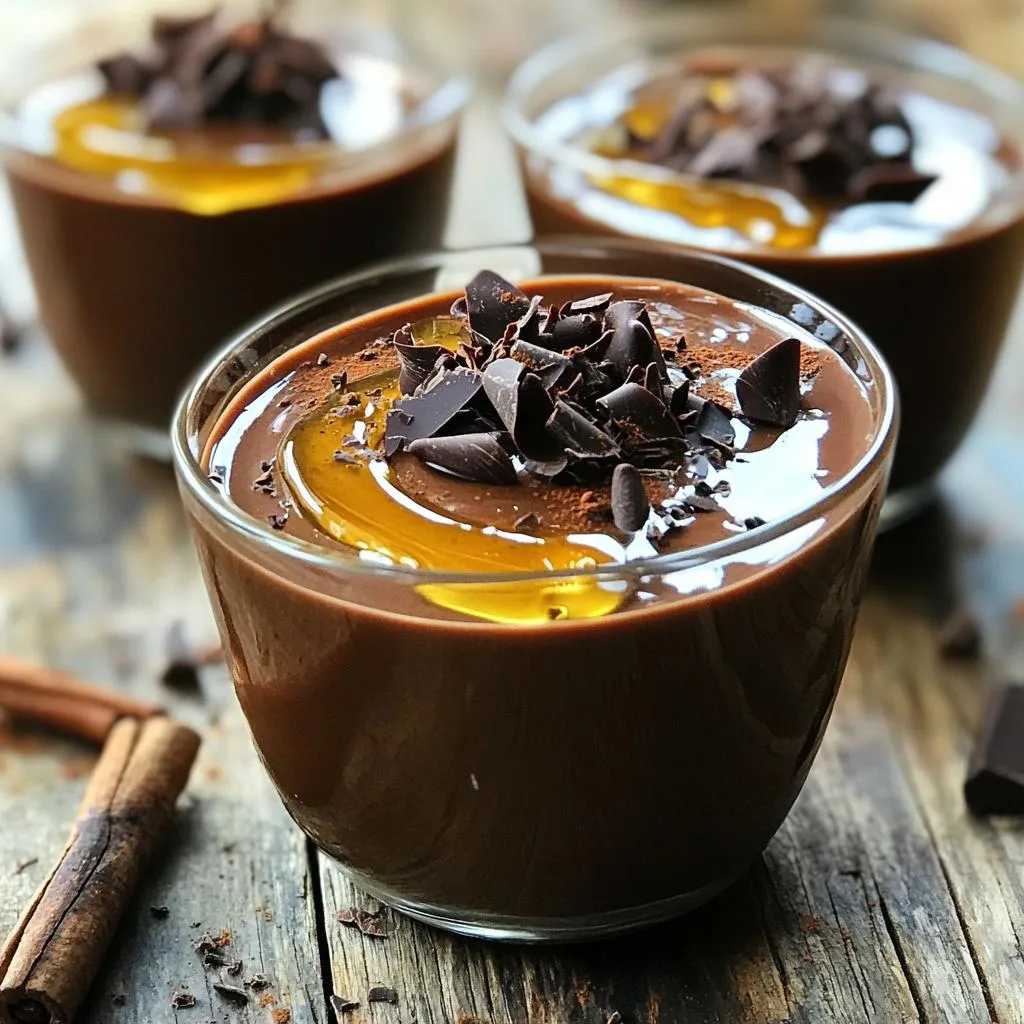
Looking for a tasty treat that packs a protein punch? Meet your new favorite dessert: High-Protein Mocha Cottage Cheese Pudding Delight. With simple ingredients like cottage cheese, cocoa powder, and …

Read more

Categories Desserts Tags NO-ING-IMG

Warm Cranberry Orange Glazed Bread Delightful Recipe

January 14, 2026October 1, 2025 by Chef Tavio
- 2 cups all-purpose flour - 1 cup fresh cranberries, chopped - 3/4 cup granulated sugar - 1/2 cup unsalted butter, softened - 1/2 cup freshly squeezed orange juice - 2 large eggs, at room temperature - 1 tablespoon orange zest - 1 teaspoon baking powder - 1/2 teaspoon baking soda - 1/4 teaspoon salt - 1/2 teaspoon vanilla extract The main ingredients create a wonderful base for the bread. The mix of fresh cranberries and orange juice gives it a bright flavor. The flour and sugar provide structure and sweetness. Softened butter adds richness, while eggs help bind everything together. The baking powder and soda give the bread a nice rise, and salt balances the sweetness. - 1 cup powdered sugar - 2 tablespoons freshly squeezed orange juice - 1 tablespoon orange zest The glaze is simple yet delicious. It adds a sweet, tangy finish to the bread. Just mix the powdered sugar with orange juice and zest. This glaze makes the bread look beautiful and enhances its flavor. - Chopped nuts (e.g., walnuts or pecans) - Dried cranberries - Chocolate chips Optional add-ins let you customize the bread. Chopped nuts add a lovely crunch. Dried cranberries can boost the fruity flavor. Chocolate chips offer a sweet surprise. Feel free to mix and match to create your perfect loaf. - Preheat the Oven: Start by setting your oven to 350°F (175°C). Prepare a 9x5 inch loaf pan by greasing it or lining it with parchment paper. This helps the bread come out easily. - Cream the Butter and Sugar: In a mixing bowl, take the softened butter and granulated sugar. Use a hand mixer or stand mixer to beat them together. Mix until the blend is light and fluffy. This should take about 3 to 5 minutes. - Combine Wet Ingredients: Now, add the eggs, orange juice, orange zest, and vanilla extract to the bowl. Mix until everything is smooth and well combined. - Mix Dry Ingredients: In a separate bowl, whisk together the all-purpose flour, baking powder, baking soda, and salt. Make sure they are evenly mixed. - Combine Mixtures: Gradually add the dry mixture to the wet mixture. Stir gently just until the flour is mixed in. Be careful not to over-mix, as this can make the bread dense. - Fold in Cranberries: Gently add the chopped cranberries to the batter. Use a spatula to fold them in, ensuring they are spread evenly. - Prepare for Baking: Pour the batter into your loaf pan. Use a spatula to smooth the top for an even bake. - Bake: Place the loaf pan in the oven and bake for 50 to 60 minutes. Check if it is done by inserting a toothpick in the center. If it comes out clean, the bread is ready. - Make the Glaze: While the bread bakes, prepare the glaze. In a small bowl, whisk the powdered sugar with 2 tablespoons of orange juice and 1 tablespoon of orange zest. Mix until smooth and creamy. - Cool and Glaze the Bread: Once the bread is out of the oven, let it cool in the pan for about 10 minutes. Carefully move it to a wire rack to cool completely. When it is still warm, drizzle the orange glaze over the top. Let it set for a few minutes before slicing. How to Avoid Over-Mixing To keep your bread light, mix gently. When you add the dry mix, stir just until combined. Over-mixing makes the bread dense and tough. Stop mixing as soon as you don’t see any dry flour. Testing for Doneness To check if your bread is done, use a toothpick. Insert it into the center of the loaf. If it comes out clean, your bread is ready. If the toothpick has batter on it, bake for a few more minutes. Presentation Tips For a beautiful display, slice the warm bread and place it on a wooden board. Add fresh cranberries and orange slices around it. It looks inviting and tastes great! Pairing Ideas Serve each slice with a pat of butter or cream cheese. This adds a rich, creamy flavor that complements the tangy cranberries. You can also serve it with a cup of tea or coffee for a cozy treat. Best Time to Serve This bread is best served warm. The glaze melts into the bread, making it extra tasty. Enjoy it for breakfast, brunch, or as a sweet snack. Making It Ahead of Time You can bake this bread a day in advance. Just wrap it well and store it at room temperature. Reheat slices in the oven for a few minutes before serving. This keeps the bread soft and fresh. {{image_4}} You can twist the flavor of this bread in fun ways. - Lemon Cranberry Variation: Swap out the orange juice for fresh lemon juice. Use lemon zest instead of orange zest. This gives a bright, tart flavor that pairs well with the cranberries. - Spice Addition: Add a teaspoon of cinnamon or nutmeg into the dry ingredients. This will warm up the taste and make it cozy, perfect for cold days. If you need a gluten-free version, you can use gluten-free flour. - Substitutes for Gluten-Free Flour: A good blend is one that contains rice flour, tapioca flour, and potato starch. You can use a 1:1 all-purpose gluten-free mix, too. Just check that it has xanthan gum for better texture. To make this recipe vegan, replace the eggs and butter. - Egg replacements: You can use flax eggs. Mix one tablespoon of ground flaxseed with three tablespoons of water. Let it sit for a few minutes to thicken. - Dairy-free substitutes: Replace unsalted butter with coconut oil or a vegan butter spread. Use almond milk or soy milk instead of orange juice. This keeps the flavor rich without dairy. These variations let you enjoy the bread in new ways. Feel free to get creative! To keep your warm cranberry orange glazed bread fresh, store it at room temperature. Place it on a plate and cover it with a clean kitchen towel. This method allows air to circulate while keeping moisture in. You can also use a bread box. A bread box keeps the bread fresh longer by controlling humidity. If you don’t have one, plastic wrap works too. Wrap the bread tightly in plastic wrap to protect it from air and moisture loss. For long-term storage, freeze your bread. First, let it cool completely. Then wrap it tightly in plastic wrap. This helps prevent freezer burn. Place the wrapped bread in a freezer bag. Label the bag with the date to keep track. When you’re ready to eat it, take it out of the freezer. Let it thaw in the fridge overnight for the best results. If you're in a hurry, you can thaw it at room temperature for a few hours. Your warm cranberry orange glazed bread stays fresh for about 3 to 5 days at room temperature. If you store it in the fridge, it can last up to a week. For best taste, enjoy it within the first few days. If frozen, it can last up to 3 months. Can I use frozen cranberries? Yes, you can use frozen cranberries. Just thaw them first. This helps keep the bread moist and flavorful. How can I tell if my bread is overbaked? If the bread is dark brown or hard, it is likely overbaked. A toothpick inserted in the center should come out clean. What can I substitute for orange juice? You can use lemon juice or apple juice instead. Both will add a nice flavor to the bread. Can I add other fruits? Absolutely! You can add chopped apples or pears. They blend well with cranberries and add more flavor. How do I make the bread less sweet? To reduce sweetness, cut back on the sugar. Try using 1/2 cup instead of 3/4 cup. Is this recipe suitable for meal prep? Yes, this bread is great for meal prep. You can bake it ahead of time and store it. You have all the tools to make delicious Warm Cranberry Orange Glazed Bread. We covered the key ingredients, step-by-step instructions, and helpful tips. Don't forget the fun variations and storage options. Feel free to experiment with flavors and add-ins. This bread is perfect for any occasion. I hope you enjoy baking, sharing, and savoring this tasty treat!

Warm Cranberry Orange Glazed Bread is a must-try! This delightful recipe combines tart cranberries and fresh orange juice for a perfect balance of flavors. It’s easy to make, perfect for …

Read more

Categories Desserts Tags NO-ING-IMG

No-Bake Eggnog White Chocolate Truffles Delight

January 14, 2026October 1, 2025 by Chef Tavio
To make No-Bake Eggnog White Chocolate Truffles, gather the following items: - 8 oz white chocolate, finely chopped - 1/2 cup heavy cream - 1/4 cup eggnog (non-alcoholic) - 1/2 teaspoon ground nutmeg - 1/4 teaspoon ground cinnamon - 1/2 teaspoon pure vanilla extract - 1 cup crushed graham crackers - Additional crushed graham crackers or desiccated coconut for rolling If you can't find white chocolate, try a white chocolate baking bar. For a lighter option, use whipped cream instead of heavy cream. You can swap eggnog with a mix of milk and vanilla if needed. Ground ginger can replace cinnamon for a twist. If you want a dairy-free version, use coconut cream and a dairy-free white chocolate. Using high-quality white chocolate is key. It gives the truffles a rich taste. Fresh spices like nutmeg and cinnamon add depth. They make every bite more enjoyable. Quality heavy cream ensures a smooth texture. Good ingredients lead to better flavor and a more delightful treat. Choose wisely for the best no-bake truffles! Start by finely chopping 8 ounces of white chocolate. Place it in a heatproof bowl with 1/2 cup of heavy cream. Set this bowl over a pot of simmering water. This is called a double boiler. Stir the mixture gently. Keep stirring until it melts and becomes smooth. Remove it from heat once it's melted. Set it aside to cool slightly. Now, add 1/4 cup of eggnog to the melted chocolate. Sprinkle in 1/2 teaspoon of ground nutmeg, 1/4 teaspoon of ground cinnamon, and 1/2 teaspoon of pure vanilla extract. Mix everything together well. You want a smooth and creamy mixture. Make sure there are no lumps. This blend gives the truffles their festive flavor. Let the chocolate mixture cool down to room temperature. Then, cover it tightly with plastic wrap. Place it in the fridge for about 2 hours. You want it firm enough to scoop. Once it’s chilled, check the texture. If it holds shape, you're ready to form the truffles. Use a small scoop or your hands to create balls. Aim for about 1 inch in diameter. Prepare a surface with crushed graham crackers or desiccated coconut. Roll each truffle in the coating until fully covered. Gently place them on a parchment-lined baking sheet. This step adds a nice crunch to each bite. Put the baking sheet back in the fridge. Let the truffles chill for another 30 minutes. This helps them set completely. Once set, they are ready to enjoy. You can serve them straight from the fridge or at room temperature. To get a smooth truffle, melt the white chocolate and cream gently. Use a double boiler to avoid burning. Stir the mix until it is fully melted and creamy. After mixing in the eggnog and spices, let it cool to room temperature. Chill until firm but not hard. This will help you form perfect truffle balls. If the mix is too soft, chill it longer. Presentation can make your truffles shine. Use a nice platter to show off your truffles. You can sprinkle extra crushed graham crackers around them for a festive look. If you want a touch of elegance, add whole nutmeg seeds as a garnish. You can also use colored paper cups for each truffle. This adds color and charm to your display. One common mistake is overheating the chocolate. Always melt it slowly to keep it smooth. Another mistake is not chilling the mixture long enough. This can make shaping hard. If you forget to chill, your truffles may turn out messy. Lastly, don’t rush the rolling step. Take your time to coat each truffle well. This ensures every bite is tasty. {{image_4}} You can change the flavor of these truffles by adding new spices. Try using ground ginger for a warm kick. Or, add a pinch of cardamom for a unique twist. You could even mix in some orange zest for a fresh touch. Each of these flavors can complement the eggnog nicely. Experiment and find your favorite blend! If you want a vegan version, swap the heavy cream with coconut cream. Use dairy-free white chocolate for a rich taste. Make sure your eggnog is dairy-free as well. These changes let everyone enjoy the truffles without missing out on flavor. Coating can also change the look and taste of your truffles. Instead of crushed graham crackers, try using crushed nuts like almonds or hazelnuts. You can also roll the truffles in cocoa powder for a chocolatey finish. For a sweet twist, use desiccated coconut. Each option adds a new layer of flavor and texture to your truffles. Store your no-bake eggnog truffles in an airtight container. Line the container with parchment paper to avoid sticking. This helps keep the truffles fresh and tasty. Place a layer of truffles, then add another layer of parchment, and continue stacking. This keeps them safe during storage. These truffles will stay fresh in the fridge for up to two weeks. If you want to enjoy them later, consider freezing them. They can last for up to three months in the freezer. Just remember to let them thaw in the fridge before serving. To freeze truffles, place them on a baking sheet first. Make sure they do not touch each other. Freeze them for about an hour until firm. Once solid, transfer them to a freezer-safe bag or container. Label the bag with the date so you know when you made them. Yes, you can use dark chocolate, but it changes the flavor. Dark chocolate has a stronger taste than white chocolate. If you like rich flavors, this swap works well. Just remember, the truffles will not taste like eggnog as much. These truffles last up to two weeks in the fridge. Store them in an airtight container to keep them fresh. I recommend enjoying them within a week for the best taste. Absolutely! These truffles are perfect for making ahead. You can prepare them a few days in advance. Just chill them well and store them in the fridge until your party. Transport the truffles in a sturdy container. Use a flat container with a lid to prevent them from rolling around. If it’s warm outside, keep them in a cooler to stop them from melting. Making no-bake eggnog truffles is fun and easy. First, choose good ingredients—you want the best flavor. Next, follow the step-by-step guide for a smooth process. Use tips to avoid mistakes and achieve the perfect texture. Feel free to explore various flavors and dietary options. Store your truffles right, and they will stay fresh longer. With these steps, your truffles will surely impress anyone. Enjoy your delicious creation and share it with friends and family!

Get ready to delight your taste buds with my No-Bake Eggnog White Chocolate Truffles! These creamy treats blend festive eggnog with rich white chocolate for the perfect holiday treat. Best …

Read more

Categories Desserts Tags NO-ING-IMG

One-Pot Spinach Artichoke Tortellini Creamy Delight

January 14, 2026September 30, 2025 by Chef Tavio
- 1 package (9 oz) refrigerated cheese tortellini - 1 can (14 oz) artichoke hearts, drained and quartered - 4 cups fresh spinach, roughly chopped - 2 cups vegetable broth - 1 cup heavy cream - 1 teaspoon garlic powder - 1 teaspoon onion powder - ½ cup grated Parmesan cheese - ½ cup cream cheese, cubed - Salt and pepper, to taste The main stars of this dish are the cheese tortellini and artichoke hearts. The tortellini delivers a soft, cheesy bite. The artichoke hearts add a unique flavor and texture. Fresh spinach not only gives color but also packs in nutrients. The vegetable broth forms a tasty base for the creamy sauce. Heavy cream and cheeses create a rich, smooth texture that coats every piece of tortellini. - Crushed red pepper flakes - Fresh basil leaves for garnish If you want a little kick, add crushed red pepper flakes. This spice heightens the flavors and makes the dish pop. Fresh basil leaves provide a lovely touch of color and a fresh taste. They make the dish look special and inviting. Feel free to mix and match these add-ins to suit your taste! Start by pouring 2 cups of vegetable broth into a large pot. Place the pot on the stove over medium-high heat. Bring the broth to a gentle boil while stirring occasionally. This helps prevent the broth from sticking to the bottom. Once the broth boils, carefully add 1 package (9 oz) of refrigerated cheese tortellini. Cook the tortellini for about 3 to 5 minutes. Look for the tortellini to float to the surface; that means they are ready! Next, add 1 can (14 oz) of quartered artichoke hearts and 4 cups of roughly chopped fresh spinach. Stir gently and let the mixture simmer for an extra 2 to 3 minutes. The spinach will wilt and soften, mixing well with the artichokes. Now, reduce the heat to medium. Slowly pour in 1 cup of heavy cream. Add in 1 teaspoon of garlic powder, 1 teaspoon of onion powder, ½ cup of grated Parmesan cheese, and ½ cup of cubed cream cheese. Stir continuously until everything melts together. This creates a rich, creamy sauce that coats the tortellini perfectly. Finally, season the dish with salt and pepper to taste. If you like a bit of heat, sprinkle in some crushed red pepper flakes. Mix well and let it simmer for another 2 minutes. This allows the sauce to thicken slightly. Once done, remove the pot from heat. Let it rest for a minute before serving. Serve the tortellini hot in deep bowls. For a nice touch, garnish with fresh basil leaves and an extra sprinkle of Parmesan cheese. Enjoy your creamy delight! To make your creamy delight even tastier, focus on the cheese. When adding cream cheese, cut it into small cubes. This helps it melt quickly and mix well. For Parmesan, shred it fresh instead of using pre-grated. Fresh cheese melts better and gives a richer taste. As for spices, garlic powder and onion powder are must-haves. They boost the flavor without overwhelming the dish. If you like a bit of heat, add crushed red pepper flakes. Start with a pinch. You can always add more if you want extra spice. When it's time to serve, use deep bowls. They hold the creamy tortellini well. Plus, they look great on the table. For the final touch, garnish with fresh basil leaves. They not only add color but also a fragrant aroma. Sprinkle some extra Parmesan on top for a nice finish. A drizzle of olive oil enhances flavor and makes the dish shine. This attention to detail makes your meal look as good as it tastes. {{image_4}} You can mix up this dish with different cheeses. Try using mozzarella or cheddar for a new taste. Each cheese adds its own flavor and creaminess. You can also swap out the artichokes or spinach. Try broccoli or peas instead for a fun twist. If you want a vegan version, use plant-based cheese and cream. Cashew cream works well for a creamy texture. You can also use vegan tortellini if you find it. This way, you still enjoy the great taste without animal products. For a gluten-free dish, choose gluten-free pasta options. There are many brands that make gluten-free tortellini now. Just make sure to check the cooking time, as it may differ from regular pasta. This way, everyone can enjoy this tasty meal! To store your One-Pot Spinach Artichoke Tortellini in the fridge, let it cool first. Place it in an airtight container. This helps keep it fresh. You can store it for up to three days. When you want to eat it again, just take it out and enjoy! For freezing, use a freezer-safe container. Make sure to leave some space at the top. The sauce may expand when frozen. This dish can stay fresh in the freezer for up to three months. When ready to eat, let it thaw in the fridge overnight before reheating. To reheat, pour the tortellini into a pot over low heat. Stir gently to warm it evenly. You may need to add a splash of vegetable broth or cream to revive the sauce. Heat until warm but do not boil. This keeps the sauce creamy and delicious. Enjoy it just like new! Yes, you can use frozen tortellini. Just add a couple of extra minutes to the cooking time. Cook them until they float, usually around 5-7 minutes. The process stays the same, and you still get that great flavor. This dish is perfect for meal prep. You can make it in advance and store it in the fridge for up to three days. Just reheat it on the stove or microwave. To keep it fresh, store the sauce and tortellini in separate containers. Absolutely, adding protein is a great idea. You can use cooked chicken, shrimp, or tofu. If you choose chicken, cube it and sauté it before adding the tortellini. For shrimp, toss them in during the last few minutes of cooking. Tofu works well too; just make sure it’s firm and cubed. This blog post covered all you need for a creamy tortellini dish. We explored essential ingredients like cheese tortellini, artichoke hearts, and fresh spinach. I shared simple steps to make a rich sauce and tips for enhancing flavor and presentation. There are variations for dietary needs, too. Whether you want to store leftovers or adapt the recipe, you now have the tools to create a tasty meal. Enjoy experimenting with this dish, and make it your own!

Are you ready to impress your family with a quick and tasty meal? One-Pot Spinach Artichoke Tortellini Creamy Delight is the answer! Packed with creamy goodness, fresh veggies, and cheesy …

Read more

Categories Dinner Tags NO-ING-IMG

Air Fryer Cinnamon Sugar Apple Chips Crunchy Delight

January 14, 2026September 30, 2025 by Chef Tavio
- 2 large apples (Fuji or Honeycrisp recommended) - 1 tablespoon granulated sugar - 1 teaspoon ground cinnamon - 1/4 teaspoon salt - Cooking spray or coconut oil To make Air Fryer Cinnamon Sugar Apple Chips, you need a few simple items. Start with two large apples. I love using Fuji or Honeycrisp apples. They bring great sweetness and crunch to the chips. Next, grab a tablespoon of granulated sugar. This will help sweeten the chips. You will also need one teaspoon of ground cinnamon for that warm, cozy flavor. A pinch of salt, about 1/4 teaspoon, adds depth to the taste. Lastly, have some cooking spray or a little coconut oil on hand. This will help your apple slices crisp up nicely in the air fryer. With these ingredients ready, you’re all set to create a delicious snack that everyone will enjoy. First, wash the apples under running water. This step is key to clean fruit. Next, core the apples. You can use a core remover or a knife. Then, slice the apples thinly. Aim for 1/8 inch thick slices. Thinner slices will give you a crunchier chip. In a small bowl, combine the sugar, cinnamon, and salt. Mix these ingredients well. You want a nice blend of sweet and spice. This blend will coat the apple slices beautifully. Take your sliced apples and place them in a large bowl. Lightly coat them with cooking spray or a drizzle of coconut oil. This helps the cinnamon sugar stick. Next, sprinkle the cinnamon sugar mixture over the apple slices. Toss gently to coat each slice. Make sure every piece gets that sweet spice. Now, it's time to preheat your air fryer. Set it to 320°F (160°C). This temperature is ideal for crisping without burning. Carefully lay the apple slices in a single layer in the basket. Do not overlap them; this ensures even cooking. Cook the apple slices for 10-15 minutes. Remember to shake the basket halfway through. This helps them crisp up nicely. Keep an eye on them, as cooking times can vary. You want them golden brown, not burnt. Once done, remove the chips and let them cool on a wire rack. They will get crunchier as they cool. To get that perfect crunch in your apple chips, slice the apples thinly. Aim for about 1/8 inch. The thinner the slices, the crispier they will be. I love using a mandoline slicer for this. It makes the task quick and easy. When cooking, monitor the time closely. Air fryers can vary in temperature. Start with 10 minutes and check. If they aren’t golden brown yet, add a few more minutes. Remember to shake the basket halfway. This helps them cook evenly. Want to add more flavor? You can sprinkle in some nutmeg or ginger for a warm twist. A drizzle of caramel after cooking can make them even more special. Try adding a pinch of cayenne for a spicy kick. Get creative; the options are endless! Serving your apple chips well makes them even more appealing. Use a decorative bowl lined with parchment paper. This adds a nice touch and keeps things tidy. Dust them lightly with extra cinnamon for flair. Add a few whole apple slices beside the chips for color. It makes a great snack or dessert display! {{image_4}} You can easily change the flavor of your apple chips. Try adding nutmeg or ginger to the cinnamon sugar mix. These spices bring warmth and depth. A pinch of either can make a big difference. Another fun idea is to drizzle your chips with caramel or chocolate. This gives a sweet twist to each bite. Just make sure to do it after the chips cool. This way, the toppings stick better. If you want to make the apple chips healthier, cut back on the sugar. You can use just half a tablespoon. The apple's natural sweetness shines through. For a vegan option, skip the sugar and use maple syrup instead. It adds a lovely flavor and keeps it plant-based. You can also use coconut oil for a great coating. This keeps your chips tasty and healthy. To keep your apple chips crisp, follow these tips: - Cool Completely: Let your apple chips cool fully before storing them. This step helps prevent moisture buildup. - Airtight Containers: Store the chips in airtight containers. Glass jars or plastic bins work well. This keeps air out and maintains crunch. - Avoid Humidity: Keep your containers in a cool, dry place. Humidity can make your chips soft and chewy. Homemade apple chips can last: - 1-2 Weeks: If stored properly in an airtight container, they stay fresh for about one to two weeks. - Longer Storage: For longer shelf life, consider freezing them. Just place them in a freezer bag. They can last up to six months in the freezer. Air-fried apple chips can last up to two weeks if stored correctly. Keep them in an airtight container at room temperature. This helps keep them crunchy and fresh. If you notice them getting soft, they may need a quick re-crisp in the air fryer. Yes, you can use many types of apples. Fuji and Honeycrisp are my favorites for their sweetness and crunch. Other good options include Granny Smith, Gala, or Pink Lady. Each apple type gives a different taste and texture. If your apple chips are not crispy, they might be too thick. Make sure to slice them thinly, about 1/8 inch. Also, check your air fryer settings. You may need to cook them a bit longer. Keep an eye on them to avoid burning. Yes, you can reheat leftover apple chips to restore their crunch. Simply place them back in the air fryer at 320°F (160°C) for a few minutes. This quick method makes them crispy again without losing flavor. This blog post covered how to make delicious air-fried apple chips. You learned about the ingredients, preparation steps, and tips for a perfect crunch. I shared flavor variations and how to store your chips for freshness. Now, it’s time to enjoy your homemade snacks. Experiment with spices and toppings to find your favorite twist. Making these apple chips is fun and rewarding. You can enjoy a tasty treat that is also healthy!

Are you ready to bite into something amazing? In this blog, I’ll show you how to make Air Fryer Cinnamon Sugar Apple Chips. They’re not just healthy; they’re super crunchy …

Read more

Categories Desserts Tags NO-ING-IMG

Creamy Tuscan Sun-Dried Tomato Salmon Flavorful Dish

January 14, 2026September 30, 2025 by Chef Tavio
- 4 fresh salmon fillets - 1 cup rich heavy cream - 1/2 cup sun-dried tomatoes, finely chopped - 1 cup fresh spinach leaves, roughly torn - 3 cloves garlic, minced - 1/2 cup finely grated Parmesan cheese - 2 tablespoons extra virgin olive oil - Salt and freshly cracked pepper, to taste - 1 teaspoon Italian seasoning blend - Fresh basil leaves, for garnish You can swap the heavy cream for coconut cream for a lighter version. Use Greek yogurt instead of cream for a tangy twist. If you don’t have sun-dried tomatoes, try fresh tomatoes cooked down to a paste. Spinach is great, but you can also use kale or arugula. For a dairy-free option, skip the Parmesan cheese or use a plant-based alternative. Each serving of this dish has about 450 calories. You get a good amount of protein, around 30 grams, from the salmon. The dish has healthy fats from the olive oil and cream. It also provides vitamins A and C from spinach and tomatoes. If you watch your sodium, keep that in mind, as the cheese and seasoning can add up. This meal is filling and perfect for a healthy dinner. Start by seasoning your salmon fillets. Use salt, pepper, and Italian seasoning. Make sure to coat both sides evenly. This step is key for good flavor. Let the salmon sit for a few minutes. This helps the seasoning soak in. Heat olive oil in a large skillet over medium-high heat. When the oil is hot, place the salmon skin-side down. Cook for 4-5 minutes until the skin is golden and crispy. Flip the fillets gently. Cook for another 3-4 minutes. The salmon should be cooked through but still moist. When done, transfer the fillets to a plate. Cover them loosely with foil to keep warm. In the same skillet, lower the heat to medium. Add minced garlic and sauté for about 1 minute. Stir it often so it doesn’t burn. Next, add chopped sun-dried tomatoes. Cook for 2 more minutes to let the flavors mix well. Pour in the heavy cream and let it come to a gentle simmer. When it bubbles, stir in the fresh spinach. Cook until the spinach wilts, about 2-3 minutes. Then, add grated Parmesan cheese. Stir until it melts and the sauce thickens. Taste the sauce and add more salt or pepper if needed. Return the seared salmon to the skillet. Spoon the creamy sauce over each fillet. Let it simmer together for 2-3 minutes. This ensures the salmon is heated and coated in the sauce. When ready, plate each salmon fillet. Drizzle more creamy sauce on top. Finally, garnish with fresh basil leaves for color and aroma. Enjoy your beautiful dish! To get that creamy sauce just right, start with heavy cream. It gives the sauce a rich feel. Always heat the cream gently; this helps it blend well with other ingredients. When you add the cheese, do it slowly. This way, it melts smoothly into the sauce. Stir constantly to avoid lumps. If the sauce gets too thick, add a splash of water or broth to thin it out. Using the right tools makes cooking easier. A large skillet is key for searing salmon. I prefer a non-stick skillet to prevent sticking. You’ll also need a spatula to flip the fish without breaking it. A wooden spoon works great for stirring the sauce. For an extra touch, have a whisk handy to blend the cream and cheese smoothly. This dish is all about flavor. You can change the taste to fit your mood. If you like it spicy, add red pepper flakes. For a zestier kick, consider lemon juice or zest. Fresh herbs like dill or parsley can add a nice touch too. Taste your sauce as you go, and feel free to adjust salt and pepper. This way, you make it just right for you! {{image_4}} You can use other fish for this recipe. Try cod, trout, or halibut. Each fish has a unique taste but pairs well with the creamy sauce. Make sure to adjust cooking times. Thicker fish may need longer cooking, while thinner ones cook faster. If you want a dairy-free version, swap heavy cream for coconut cream or cashew cream. Both add a rich flavor without dairy. You can also use nutritional yeast instead of Parmesan. This gives a cheesy taste while keeping it vegan. You can add more veggies to the sauce for extra flavor and nutrients. Consider using zucchini, bell peppers, or cherry tomatoes. You can also replace spinach with kale or arugula. These options will change the dish's taste and color, making it even more appealing. Store leftover Creamy Tuscan Sun-Dried Tomato Salmon in an airtight container. Place it in the fridge within two hours of cooking. It will stay fresh for up to three days. When you reheat it, make sure to do so gently to keep the salmon moist and the sauce creamy. If you want to freeze this dish, let it cool completely first. Place the salmon and sauce in a freezer-safe container. Seal it tightly to avoid freezer burn. It can last up to three months in the freezer. Remember, thaw it slowly in the fridge before reheating. To reheat, use a skillet over low heat. Add a splash of cream or broth to help revive the sauce. Cover the skillet to keep moisture in. Heat until warmed through, but avoid overcooking the salmon to keep it tender. Enjoy your meal again with that rich flavor! To know when salmon is cooked, check its color. The flesh should be opaque, not translucent. You can also use a fork to flake it gently. If it flakes easily, it's done. The internal temperature should reach 145°F. Use a meat thermometer for accuracy. Remember, salmon continues to cook after you take it off the heat, so don’t overcook it. Yes, you can make this dish ahead of time. Cook the salmon and sauce separately. Store them in airtight containers in the fridge. Reheat the salmon gently in a skillet or microwave. Heat the sauce on low until warm. This method keeps the salmon moist and the sauce creamy. Creamy Tuscan Sun-Dried Tomato Salmon goes well with many sides. Here are some great options: - Light salad with mixed greens - Fluffy risotto for a rich complement - Steamed asparagus for crunch - Garlic bread to soak up the sauce - Roasted potatoes for a hearty touch These sides enhance the flavors and add balance to the meal. Enjoy! This blog post covered all you need to know about making Creamy Tuscan Sun-Dried Tomato Salmon. We explored key ingredients, shared step-by-step instructions, and offered helpful tips to enhance your dish. You learned how to substitute ingredients, achieve the perfect texture, and store your leftovers. Cooking can be simple and fun! Experiment with variations to suit your tastes. Enjoy creating this meal, and don’t be afraid to make it your own.

Looking for a dish that combines rich flavors and ease of cooking? Dive into my Creamy Tuscan Sun-Dried Tomato Salmon! This savory meal brings together tender salmon and a luscious …

Read more

Categories Dinner Tags NO-ING-IMG

Spicy Korean BBQ Chicken Wings for Bold Flavor

January 14, 2026September 30, 2025 by Chef Tavio
- 2 pounds chicken wings - 1/4 cup gochujang (Korean chili paste) - 2 tablespoons soy sauce - 2 tablespoons honey - 1 tablespoon rice vinegar - 2 cloves garlic, minced - 1 teaspoon fresh ginger, grated - Sesame seeds (for garnish) - Chopped green onions (for garnish) The main components of this dish make it truly special. The chicken wings offer a juicy base, while gochujang adds a spicy kick. Soy sauce brings depth to the flavor. For sweetness, honey works perfectly, balancing the heat. Rice vinegar adds a tangy note that enhances the overall taste. Garlic and ginger give it a fragrant touch, making every bite delicious. Garnishing with sesame seeds and green onions adds a crunch and fresh flavor. The contrast of colors also makes the dish visually appealing. These ingredients combine to create a bold flavor that shines through. - Mixing Ingredients In a large bowl, mix gochujang, soy sauce, honey, and rice vinegar. Add minced garlic, grated ginger, sesame oil, vegetable oil, salt, and black pepper. Whisk until smooth. This marinade gives the wings a bold flavor. - Combining Chicken Wings Add the chicken wings to the marinade. Make sure each wing is well coated. This step is key for deep flavor. - Covering and Refrigerating Cover the bowl with plastic wrap or a lid. Place it in the fridge. This helps the wings soak up the marinade. - Recommended Marination Time Marinate the wings for at least 1 hour. For best results, leave them overnight. Longer marination means more flavor. - Preheating the Oven Preheat your oven to 400°F (200°C). A hot oven ensures crispy wings. - Baking Instructions Line a baking sheet with parchment paper. Place the marinated wings in a single layer. Bake for 25-30 minutes, flipping them halfway through. This helps cook them evenly. - Final Broiling for Crispness Switch the oven to broil for 3-5 minutes. Keep an eye on them. This step makes the wings extra crispy. After baking, let the wings rest for a few minutes. This keeps them juicy and delicious. Top with sesame seeds and green onions before serving for a great look and taste. Importance of Marination Marination is key for great flavor. It lets the chicken soak up all the spices. Aim for at least one hour, but overnight is best. This time allows the wings to become really tasty. Using Quality Ingredients Quality matters in cooking. Use fresh chicken wings for the best taste. Gochujang gives your wings that strong, spicy kick. Choose a good brand for the best results. Fresh garlic and ginger add a nice zing too. Baking vs. Broiling Baking gives a nice cook, but broiling adds crisp. Start by baking the wings at 400°F. After baking, switch to broil for a few minutes. This step makes the skin crunchy and delicious. Tips for Even Cooking Arrange wings in a single layer on the baking sheet. Don’t let them touch. Flipping them halfway through helps them cook evenly. This way, every wing gets crispy and brown. Presentation Tips Use a colorful platter for serving. This makes your wings look more appealing. Drizzle some sauce on top for extra flavor. Add a sprinkle of sesame seeds and green onions for a fresh touch. Recommended Side Dishes Serve your spicy wings with cool sides. Sliced cucumbers or tangy pickled radishes work well. They balance the heat and refresh your palate. These sides make the meal more exciting! {{image_4}} You can make these wings just right for you. Start with mild spice. Use less gochujang (Korean chili paste) to keep it light. If you want medium heat, stick to the recipe. For hot wings, add more gochujang. Mix it with a bit of chili powder for extra kick. You can also swap the marinade. Try adding a splash of hot sauce for more spice. Or mix in some sriracha for a different flavor. Each change can make your wings unique. You can cook these wings in different ways. Oven-baking gives a nice crisp. Preheat to 400°F (200°C) and bake as the recipe shows. Flip them halfway for even cooking. Grilling adds a smoky taste. Marinate the wings and grill over medium heat. Cook them for about 20 minutes. Make sure to turn them often for even browning. If you have an air fryer, use it! Set it to 375°F (190°C). Cook for 25-30 minutes, flipping halfway. The wings will be crispy without much oil. These wings work great as an appetizer or main dish. Serve them with toothpicks for easy snacking. For a main course, pair with rice or noodles. Think about flavors that match. Serve with cooling cucumber slices. Pickled radishes also bring a nice crunch. You can even add a side of kimchi for a true Korean taste. - Storing in the Refrigerator: Place leftover wings in an airtight container. They keep well for up to three days. Make sure they cool down before sealing. - Freezing Instructions: For longer storage, freeze the wings. Wrap them in plastic wrap, then place in a freezer bag. They are good for up to three months. - Best Methods for Reheating: The oven is best for reheating wings. Preheat it to 350°F (175°C). Bake the wings for about 10-15 minutes. This way, they stay tasty. - Maintaining Crispiness: To keep wings crispy, do not cover them while reheating. Leaving them uncovered helps retain their crunch. - Recommended Storage Times: Store cooked wings in the fridge for up to three days. If frozen, enjoy them within three months. - Signs of Spoilage: If the wings smell off or have a strange color, do not eat them. Trust your senses to decide if they are still good. Yes, you can use frozen chicken wings. However, you need to thaw them first. To do this, place the wings in the fridge overnight. If you're short on time, submerge them in cold water for about an hour. Thawing ensures even cooking. Using frozen wings may change the cooking time. Bake them for 5-10 extra minutes. Always check their internal temperature. It should reach 165°F (74°C) for safe eating. If you don't have gochujang, try a mix of red chili paste and a bit of sugar. You can also use sriracha, but it will taste different. Adjust the amount based on your spice preference. For a milder option, consider using sweet chili sauce. This will change the flavor, making it sweeter. Always taste and adjust the other ingredients to balance the new flavors. To make these wings healthier, try baking instead of frying. Baking allows the fat to drip away from the wings. It results in less grease and fewer calories. You can also use lower-calorie ingredients. For example, substitute honey with agave syrup or a sugar substitute. Use less oil in the marinade or skip it entirely. This way, you keep the flavor while cutting calories. In this guide, I shared how to make delicious chicken wings using key ingredients like gochujang and soy sauce. You learned about marinating, cooking techniques, and tips for extra crispiness. Remember that quality ingredients and proper marination are key for great flavor. Explore variations to suit your taste, and don't forget to store leftovers properly. With these tips, your wings will be a hit whether as an appetizer or a main dish. Enjoy your cooking adventure and savor every bite!

Get ready to spice up your dinner with my Spicy Korean BBQ Chicken Wings! These wings burst with bold flavor, thanks to the special marinade made with gochujang and tasty …

Read more

Categories Appetizers Tags NO-ING-IMG

No-Bake Matcha White Chocolate Truffles Delight

January 14, 2026September 30, 2025 by Chef Tavio
When making No-Bake Matcha White Chocolate Truffles, you need the right ingredients. Here’s what you will need: - 1 cup white chocolate chips - 1/2 cup heavy cream - 2 tablespoons matcha green tea powder - 1/4 teaspoon vanilla extract - Pinch of salt - 1/2 cup crushed almonds (for coating) - Extra matcha powder (for optional dusting) Each ingredient plays a key role in creating these delightful treats. The white chocolate gives a creamy base, while the heavy cream adds smoothness. Matcha powder brings a unique flavor and color that makes these truffles stand out. Vanilla extract adds depth, and a pinch of salt balances the sweetness. Crushed almonds provide a nice crunch as a coating, and the extra matcha dusting adds a lovely touch on top. Gather these ingredients for a fun and easy cooking adventure. You’ll create a treat that is not only delicious but also visually appealing. - Place white chocolate chips and heavy cream in a saucepan. - Heat over low, stirring constantly until smooth. Melting the chocolate is crucial. This step sets the base for our truffles. If the heat is too high, chocolate can seize. Always keep it low and steady. The mixture should be creamy and glossy. - Add matcha powder, vanilla, and salt to the melted mixture. - Stir well to combine until the color is bright green. This is where the magic happens! Matcha adds a unique flavor. The vanilla gives warmth, while salt enhances sweetness. Make sure to mix thoroughly. You want every bite to taste just right. - Transfer the mix to a bowl and cover with plastic wrap. - Refrigerate for about 1 hour until it firms up. Chilling is key for shaping. If the mixture is too soft, rolling will be tough. After an hour, it should feel like dough. You'll know it's ready when it holds its shape. - Use a scoop to take portions of the mixture. - Roll them into balls, making sure they are smooth. This part is fun! You can use your palms to create the perfect spheres. Aim for uniform sizes so they look neat. Compact each truffle well. This ensures they hold together. - Roll each ball in crushed almonds. - Place them on a parchment-lined baking sheet. Coating adds crunch and flavor. Almonds pair well with matcha and white chocolate. Make sure to coat each truffle evenly. This creates a beautiful contrast in texture. - Optionally, dust with extra matcha powder. - Refrigerate for another 30 minutes before serving. Dusting is a fun way to add flair. It enhances the green color and taste. After chilling again, they will be ready to enjoy. The final texture should be firm yet creamy. To get the perfect texture, chilling time is key. After mixing your ingredients, refrigerate the truffle mixture for about one hour. This step makes it easier to shape the truffles. For rolling uniform-sized truffles, use a small cookie scoop or your hands. Aim for each truffle to be about one inch in size. This helps them cook evenly and look great. You can boost flavor with different nut coatings. Try using crushed pistachios or shredded coconut for a twist. Adding a splash of flavored extracts, like almond or orange, can also add variety. Just a few drops can change the whole taste. Experimenting with flavors keeps your truffles exciting. To wow your guests, arrange the truffles on a pretty platter. Scatter some whole almonds around them for a nice touch. Finally, dust the tops with extra matcha powder. This not only looks great but also adds a hint of flavor. A beautiful presentation makes these truffles even more special. {{image_4}} You can have fun with coatings for these truffles. If you want a tropical twist, try rolling them in shredded coconut. It adds a nice texture and flavor. Another option is crushed pistachios, which give a lovely green color and a nutty crunch. If you prefer a richer taste, dip the truffles in dark chocolate. This extra layer of chocolate brings a bold flavor that balances the sweetness of white chocolate. Sometimes, you might want less sweetness. To do this, simply use less white chocolate. This way, you still get the creamy taste without the extra sugar. If you want a different sweetener, try adding honey or maple syrup. Both give a nice flavor and work well with matcha. It’s a fun way to customize the truffles to your taste. Matcha has a unique flavor, but you can switch it up. Try using cocoa powder for a chocolate version. It gives a rich, deep taste that pairs well with white chocolate. You can also explore berry powders. They add a fruity note and a pretty color. This way, you can enjoy different flavors while making the same truffle base. To keep your no-bake matcha white chocolate truffles fresh, use an airtight container. This helps prevent moisture and keeps them from drying out. When molding the truffles, make sure they are smooth and compact. This shape helps them last longer in storage. If you want to save your truffles for later, freezing works well. Place the truffles in a single layer on a baking sheet. Freeze them for about 1 hour. Once frozen, transfer them to an airtight container. When you want to enjoy them, let them thaw in the fridge for a few hours. This keeps the taste fresh and delicious. In the refrigerator, your truffles will last about one week. Look for signs of spoilage, like a change in color or an off smell. If they look dry or crumbly, it's best to toss them. No-bake matcha truffles can last up to one week in the fridge. Store them in an airtight container to keep them fresh. If you want them to last longer, you can freeze them for up to three months. Just remember to thaw them in the fridge overnight before serving. Yes, you can use white chocolate bars instead of chips. Just chop the bars into small pieces to help them melt evenly. This swap can also give a richer flavor, making your truffles even more delicious. If you need a substitute for heavy cream, you can use coconut cream or cashew cream. Both options will give a creamy texture. However, keep in mind that these swaps might change the flavor slightly. Yes, matcha is safe for children in moderation. It has less caffeine than coffee. It also offers antioxidants, which can be good for health. Just make sure not to give them too much, as with any caffeinated product. To make these truffles vegan, you can use dairy-free white chocolate and coconut cream instead of heavy cream. This keeps the same creamy texture while making them suitable for a vegan diet. Serve your no-bake truffles chilled on a decorative platter. You can arrange them with whole almonds around the truffles for an inviting look. A sprinkle of extra matcha powder on top adds a nice touch too! In this blog post, we explored how to create delicious no-bake matcha truffles. You learned about the key ingredients, handy tips, and creative variations. We covered step-by-step instructions, ensuring you achieve the best texture and flavor. Remember, you can customize your truffles with different coatings and sweeteners to suit your taste. These treats are simple to make and perfect for sharing. Enjoy creating your matcha truffles, and let the rich flavors delight your friends and family!

Are you ready to indulge in a sweet treat that’s easy and delightful? This recipe for No-Bake Matcha White Chocolate Truffles combines creamy white chocolate and vibrant matcha for a …

Read more

Categories Desserts Tags NO-ING-IMG

High-Protein Cookie Dough Overnight Oats Delight

January 14, 2026September 28, 2025 by Chef Tavio
- 1 cup rolled oats - 1 cup unsweetened almond milk - 1 scoop vanilla protein powder - 2 tablespoons almond butter - 1 tablespoon maple syrup - 1 teaspoon vanilla extract - 2 tablespoons mini chocolate chips - A pinch of sea salt For my High-Protein Cookie Dough Overnight Oats, I use simple yet nourishing ingredients. The rolled oats form the base. They provide fiber and keep you full. Almond milk adds creaminess without extra calories. I include a scoop of vanilla protein powder. This boosts protein and keeps you energized. Almond butter adds a rich, nutty flavor. Maple syrup sweetens things up just right. The vanilla extract enhances the cookie dough feel. Chocolate chips are a must. They make the oats feel like dessert. Finally, a pinch of sea salt balances the sweetness and elevates the taste. - Sliced bananas - Crushed nuts - Extra chocolate chips For toppings, I suggest sliced bananas. They add freshness and natural sweetness. Crushed nuts bring crunch and healthy fats. If you love chocolate, toss in extra chocolate chips. They make every bite a treat! In a medium bowl, start by combining: - 1 cup rolled oats - 1 cup unsweetened almond milk - 1 scoop vanilla protein powder Mix these ingredients well. Make sure there are no clumps of protein powder. The mixture should look smooth and creamy. Next, add in: - 2 tablespoons almond butter - 1 tablespoon maple syrup - 1 teaspoon vanilla extract - A pinch of sea salt Stir everything together until the mixture is even and creamy. This step adds rich flavor and nice texture. Now, gently fold in: - 2 tablespoons mini chocolate chips Be careful not to break the chips. They add sweetness and a fun texture to your oats. Pour the oat mixture into a jar or airtight container. Seal it tightly to keep moisture inside. Place the container in the fridge to soak overnight. You can also let it sit for at least 4 hours. This soaking helps the oats absorb the liquid and flavors. When morning comes, take the jar out of the fridge. Stir the mixture well. If it seems too thick, add a splash of milk to reach your desired consistency. Finally, decorate your oats with optional toppings like: - Sliced bananas - Crushed nuts - Extra chocolate chips These toppings add fun flavors and textures. Enjoy your high-protein cookie dough overnight oats! Soaking time is key for great oats. I recommend letting them soak for at least 4 hours, but overnight is best. This time allows the oats to absorb the liquid fully. Your oats will be soft and creamy, just how you want them. Adjusting sweetness is easy. If you like it sweeter, add more maple syrup or honey. Start with one tablespoon and taste test. You can always add more, but it's hard to take sweetness out. Try different nut butters for new flavors. Almond butter is great, but peanut butter works too. You can also use chocolate or cookie dough protein powder. Each option will change the taste, making it exciting. {{image_4}} Each serving of High-Protein Cookie Dough Overnight Oats packs a solid protein punch. You get about 25 grams of protein per serving. This comes from the protein powder and almond butter. The protein helps you stay full and supports muscle health. The estimated calorie count for one serving is around 400 calories. This number can change based on the milk or nut butter you choose. If you add toppings, remember that they can also add calories. Oats are a great source of fiber. They help with digestion and keep you satisfied longer. Protein powder boosts your energy and supports your body. Almond butter adds healthy fats and more protein. Together, these ingredients make a balanced meal that fuels your day well. You can change the taste of your overnight oats easily. Try chocolate-peanut butter for a rich flavor. It’s a perfect match! If you prefer something fruity, banana-cinnamon is great. Just add mashed bananas and a dash of cinnamon to the mix. You can also explore options like almond joy with coconut and almond butter or try a berry twist with fresh berries. Each combination adds fun and keeps your breakfast exciting! If you need dairy-free options, use almond milk or oat milk. Both work well. For gluten-free oats, simply choose certified gluten-free oats. You can also make this recipe vegan. Swap the honey for maple syrup and use a plant-based protein powder. These easy changes help fit different diets while keeping the taste delicious. Want to save time? You can prep multiple jars at once. This way, you have breakfast ready for several days. Just mix the oats and liquid, then add your favorite flavorings. Store them in the fridge. They will stay fresh for up to five days. In the morning, grab a jar and top it with nuts or fruits. It’s a quick and healthy start to your day! Yes, you can use other milk types. Almond milk works great, but feel free to try oat, coconut, or soy milk. Each type will bring its own taste and texture. Just ensure it is unsweetened to keep the flavors balanced. You can store your overnight oats in the fridge for up to five days. Use a sealed container to keep them fresh. This makes it easy to prepare multiple servings for the week ahead. Yes, you can heat your overnight oats. Pour them into a bowl and microwave for about one minute. Stir in a splash of milk if they get too thick. Enjoy warm oats for a cozy breakfast treat. You can boost protein by adding nuts, seeds, or Greek yogurt. Consider using more protein powder too. Each option adds flavor and nutrition to your oats, making them even more satisfying. You learned how to make easy, tasty overnight oats with simple steps. This recipe uses oats, almond milk, and protein powder. You can add flavors and toppings to suit your taste. Remember, soaking time helps the oats' texture. Feel free to try different nut butters or sweeteners. This dish is great for busy mornings and fits many diets. Enjoy crafting your perfect bowl of overnight oats, packed with nutrition and flavor.

If you love cookie dough, you’ll adore my High-Protein Cookie Dough Overnight Oats Delight. This tasty treat blends the joy of cookie dough with the health benefits of oats and …

Read more

Categories Breakfast Tags NO-ING-IMG

No-Bake Salted Caramel Pretzel Bars Easy Recipe

January 14, 2026September 28, 2025 by Chef Tavio
You need a few key items to make these bars. Here’s what you will need: - 2 cups crushed pretzels - 1 cup graham cracker crumbs - 1/2 cup unsalted butter, melted - 1/2 cup packed brown sugar - 1 cup sweetened condensed milk - 1 teaspoon pure vanilla extract - 1 cup caramel sauce (store-bought or homemade) - Flaky sea salt for sprinkling These ingredients create a perfect blend of sweet and salty. The pretzels give a nice crunch, and the caramel adds rich flavor. You can add some fun twists to your bars. Here are some optional ingredients to consider: - 1/2 cup mini chocolate chips Adding chocolate chips makes these bars even more delicious. You can sprinkle them on top after the caramel layer. If you have special dietary needs, there are swaps you can make. Here are some ideas: - Use gluten-free pretzels and graham crackers for a gluten-free option. - Replace sweetened condensed milk with coconut cream for a dairy-free choice. These swaps let everyone enjoy these tasty bars. Just remember to adjust the ingredients to fit your taste! To make the pretzel crust, gather your ingredients. You will need crushed pretzels, graham cracker crumbs, melted butter, and brown sugar. In a large bowl, mix these ingredients together. Use a spatula or your hands to blend them well. The mixture should feel like damp sand. Once mixed, press it firmly into the bottom of a 9x9-inch baking pan. Make sure it is even and tightly packed. This helps the bars stay together when cut. Next, we will prepare the caramel layer. In a medium saucepan, combine sweetened condensed milk and caramel sauce. Place it over medium heat. Stir this mixture continuously for about 3 to 5 minutes. You want it warmed and slightly thickened. Once done, remove the saucepan from heat. Add in the vanilla extract and stir until it is well mixed. This layer adds a rich, sweet taste to the bars. Now, pour the warm caramel over the pretzel crust. Use a spatula to spread it out evenly. Let this cool at room temperature for about 15 to 20 minutes. If you like, sprinkle mini chocolate chips on top. Press them in gently so they stick. After that, cover the pan with plastic wrap or foil. Place it in the fridge for at least 2 hours. This helps the bars set up nicely. Once chilled, lift the bars out of the pan using parchment paper. Cut them into squares or rectangles. Before serving, add a sprinkle of flaky sea salt on top for a tasty finish. To get the right texture, it's key to mix well. When you combine crushed pretzels, graham crumbs, melted butter, and brown sugar, make sure everything is coated. It should feel like damp sand. Press it firmly into your baking pan. This step is crucial. A well-packed crust holds up better when you cut it. Using the right tools can save time. A large mixing bowl helps you mix ingredients easily. A spatula is great for spreading the caramel. If you have a whisk, use it for the sauce. It helps blend the sweetened milk and caramel smoothly. A 9x9-inch baking pan works well for these bars. If you line it with parchment paper, cleanup is easier. For flavor, consider adding chocolate chips. They add a nice touch of sweetness. Press them gently into the caramel layer. For a pretty finish, sprinkle flaky sea salt on top after cutting the bars. This adds contrast to the sweet caramel. Drizzling extra caramel sauce over the bars makes them shine. Placing whole pretzels next to the bars also looks great on a platter. {{image_4}} You can easily change the flavor of these bars. Add-ins like nuts or dried fruit work well. Try adding 1/2 cup of chopped pecans or walnuts for a nutty crunch. If you want a fruity touch, mix in some dried cranberries or cherries. You can also swap the chocolate chips for peanut butter chips. This gives a nice twist to the flavor. Each variation brings a new taste, making these bars your own. These bars can fit any occasion! For Halloween, add crushed candy corn on top. In December, swap caramel for peppermint bark. You can also use holiday-themed sprinkles for a festive touch. For birthdays, add colorful sprinkles or even a layer of frosting on top. These small changes can make the bars feel special and fun. If you want to skip the caramel sauce, you have options. You can use chocolate ganache instead. Just heat equal parts chocolate and cream until smooth. Pour it over the pretzel crust for a rich flavor. Another option is to use a fruit puree, like raspberry. This adds a fresh taste and a splash of color. These alternatives keep the bars delicious while offering a new experience. To keep your no-bake salted caramel pretzel bars fresh, store them in an airtight container. This helps to keep them from drying out. You can layer parchment paper between the bars to prevent sticking. Always keep the bars in the fridge, especially in warm weather. These bars can last up to a week in the fridge. If you want to store them longer, freeze them. Wrap each bar in plastic wrap, then place them in a freezer bag. They can stay good in the freezer for up to three months. To enjoy, just thaw them overnight in the fridge. These bars are best enjoyed cold, so you don’t need to reheat them. However, if you want a warm treat, you can soften them slightly in the microwave. Heat them in short bursts of 10 seconds, checking often. Enjoy the gooey caramel and chocolate flavors for a delightful snack! Yes, you can make these bars without condensed milk. You can use coconut cream or cashew cream as a substitute. These options give a creamy texture similar to condensed milk. Just make sure to adjust the sweetness. Taste the mixture before pouring it over the crust. You may need to add a bit of sugar. The bars last up to one week in the fridge. Store them in an airtight container to keep them fresh. If you want to keep them longer, you can freeze them. Just make sure to wrap them well to avoid freezer burn. If you don't have pretzels, you can use crushed graham crackers or rice cereal. Both options will give a crunchy base. You can also try using crushed cookies for a different flavor. Just remember to adjust the sweetness based on what you choose. In this article, we explored how to make no-bake salted caramel pretzel bars. We covered key ingredients, step-by-step instructions, and some helpful tips. You can customize these bars with different flavors or dietary substitutes. Remember the best way to store them for lasting freshness. Making these treats can be simple and fun. Now, you can enjoy delicious bars anytime you want. Happy cooking!

Craving a sweet snack that’s quick and easy? You’ll love these No-Bake Salted Caramel Pretzel Bars! This recipe combines salty pretzels and rich caramel for a treat everyone will enjoy. …

Read more

Categories Desserts Tags NO-ING-IMG
Older posts
Newer posts
← Previous Page1 … Page16 Page17 Page18 … Page73 Next →

TASTED NEST

Where Flavor Finds a Home 🍳🏡 — warm, simple, and crave-worthy recipes made for real life, from stovetop mornings to backyard dinners.

PAGES

Home About Contact Privacy Policy Terms & Conditions Cookie Policy GDPR Policy Copyright Policy Disclaimer

CATEGORIES

Appetizers Desserts Salads Breakfast Dinner
Copyright © 2026 Tasted Nest. All rights reserved.