Skip to content
  • GDPR Privacy Policy
  • Copyright Policy
  • Disclaimer
  • Terms & Conditions
Tasted Nest
  • Home
  • Appetizers
  • Desserts
  • Salads
  • Breakfast
  • Dinner
  • Privacy Policy
  • Contact
  • About

NO-ING-IMG

Baked Apple Fritters Delightful and Simple Treat

January 14, 2026July 22, 2025 by Chef Tavio
To make baked apple fritters, you need these items: - 2 large apples (such as Granny Smith or Honeycrisp), peeled, cored, and diced - 1 cup all-purpose flour - 1/2 cup rolled oats - 1/4 cup packed brown sugar - 2 teaspoons baking powder - 1 teaspoon ground cinnamon (plus extra for garnish) - 1/2 teaspoon salt - 1/4 teaspoon ground nutmeg - 1/2 cup unsweetened applesauce - 1/4 cup milk (dairy or non-dairy) - 1 large egg - 1 teaspoon vanilla extract - 1/2 cup powdered sugar (for the glaze) - 1-2 tablespoons milk (for the glaze) These ingredients work together to create a sweet and soft treat. If you have dietary needs, here are some swaps: - For gluten-free fritters, use gluten-free flour. - To make it vegan, replace the egg with a flax egg (1 tablespoon flaxseed meal mixed with 2.5 tablespoons water). - Use a plant-based milk like almond or oat milk if you need a dairy-free option. These swaps help everyone enjoy this delicious recipe. When choosing ingredients, I recommend some trusted brands: - For apples, look for fresh ones from local farms or organic stores. - Bob's Red Mill offers great gluten-free flour options. - For sweetening, I often use Domino brown sugar; it has a rich flavor. - Silk brand makes tasty non-dairy milk options that work well here. Using quality ingredients can make a big difference in taste! First, set your oven to 375°F (190°C). This temperature helps the fritters bake evenly. While the oven heats, line a baking sheet with parchment paper. This makes cleanup easy and keeps the fritters from sticking. Next, grab a large mixing bowl. In it, whisk together the following dry ingredients: - 1 cup all-purpose flour - 1/2 cup rolled oats - 1/4 cup packed brown sugar - 2 teaspoons baking powder - 1 teaspoon ground cinnamon - 1/2 teaspoon salt - 1/4 teaspoon ground nutmeg Make sure everything is mixed well. In another bowl, combine these wet ingredients: - 1/2 cup unsweetened applesauce - 1/4 cup milk (dairy or non-dairy) - 1 large egg - 1 teaspoon vanilla extract Mix until it's smooth. Now, gently fold the wet mix into the dry mix. Stir just until you can’t see any dry flour. Over-mixing can make the fritters tough. Now, it’s time to add the apples. Carefully fold in the diced apples that you coated with cinnamon earlier. Make sure the apple pieces are spread throughout the batter. Using a spoon or an ice cream scoop, drop rounded portions of the batter onto your baking sheet. Keep them about 2 inches apart. This space helps them rise and bake evenly. Once you’ve scooped them out, bake the fritters for 15 to 18 minutes. They will turn golden brown. A toothpick should come out clean when inserted in the center. Enjoy the delightful smell while they bake! To get soft yet crispy baked apple fritters, focus on the batter. Avoid over-mixing. That can lead to dense fritters. Mix until you see no dry flour. The apples add moisture, so don’t worry if the batter feels thick. The rolled oats also help with texture, giving the fritters a nice bite. One common mistake is not prepping the apples properly. Always peel and core them first. Cut them into small, even pieces. This ensures they cook evenly. Another mistake is baking at the wrong temperature. Make sure your oven is at 375°F (190°C) before you start. Lastly, don’t skip the glaze! It adds sweetness and makes the fritters shine. For gluten-free fritters, swap all-purpose flour with a gluten-free blend. Look for one that includes xanthan gum for better texture. To make vegan fritters, replace the egg with a flax egg. Mix one tablespoon of ground flaxseed with three tablespoons of water. Let it sit until it thickens. Use non-dairy milk for the wet ingredients. These swaps keep the flavor and texture delicious. By following these tips, your baked apple fritters will turn out delightful. Want to make them even better? Check out the Full Recipe for more details! {{image_4}} You can change the flavor of your baked apple fritters in many fun ways. Try adding spices like ginger or cloves to give them a warm kick. You can also mix in chopped nuts like walnuts or pecans. These add a nice crunch and extra taste. If you want a hint of sweetness, consider adding some raisins or dried cranberries. Each of these options gives a twist to the classic recipe. The glaze is a great way to make your fritters shine. Instead of a simple powdered sugar glaze, you can add flavors to it. For example, mix in a bit of maple syrup for a rich taste. A splash of lemon juice can add a nice tang. If you're feeling adventurous, try adding a bit of cinnamon or vanilla to your glaze. Each choice brings a new layer of flavor to your fritters. Serving your baked apple fritters can be part of the fun. You can top them with fresh whipped cream for a special treat. A scoop of vanilla ice cream makes for a delightful dessert. Want to make it more filling? Serve it with yogurt for breakfast. You can also drizzle some caramel sauce on top for extra sweetness. No matter how you serve them, they will be a hit! To store leftover fritters, first, let them cool completely. Then, place them in an airtight container. This keeps them fresh for up to three days in the fridge. You can also layer parchment paper between the fritters to prevent sticking. If you want to freeze your fritters, it’s simple! Start by letting them cool fully. Place them in a single layer on a baking sheet. Freeze for about one hour. After that, transfer them to a freezer bag. They can last up to two months in the freezer. Just remember to label the bag with the date. To reheat, you have a few good options. If you use an oven, preheat it to 350°F (175°C). Place the fritters on a baking sheet and warm for about 10 minutes. This keeps them nice and crispy. You can also use a microwave, but they may get a bit soft. Heat them for about 20-30 seconds. Enjoy your fritters warm for the best taste! For the full recipe, check out the other sections of this article. To make your fritters crispier, try a few simple steps. First, add some cornstarch to the flour mix. This will help create a crunchier texture. Second, bake at a slightly higher temperature, like 400°F. This can help the outside brown better. Lastly, let them cool on a wire rack after baking. This keeps the air flowing around them, preventing sogginess. Yes, you can use other fruits! Pears are a great choice since they have a similar texture. You could also try berries, like blueberries or raspberries. Just be aware that different fruits may need a lower baking time. Adjust as needed, and keep an eye on them while they bake. To cut back on sugar, you can use unsweetened applesauce instead of sweetened. You can also reduce the brown sugar in the recipe. Try using a sugar substitute, like stevia or monk fruit, for a sweet taste without the extra calories. Remember to taste as you go to ensure they still have the flavor you love. In this blog post, we covered how to make delicious baked apple fritters. I shared the key ingredients and great alternatives for different diets. You learned the step-by-step process from prepping to baking, along with tips for the best texture. Variations added fun flavors and toppings, while storage info kept your fritters fresh. Baking apple fritters can be simple and rewarding. With the right steps, you'll love making them!

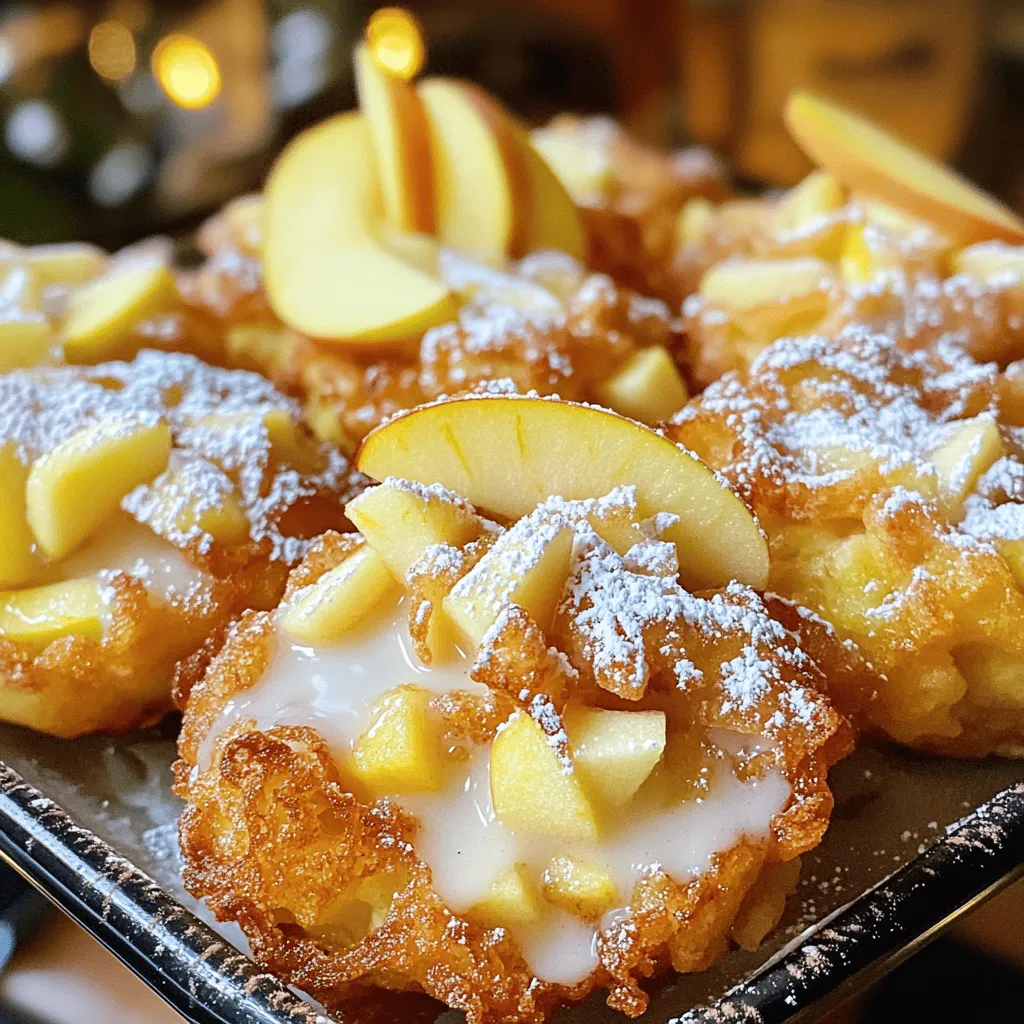
Are you ready to indulge in the warm, comforting flavors of baked apple fritters? This delightful treat is easier to make than you might think! With simple ingredients and step-by-step …

Read more

Categories Desserts Tags NO-ING-IMG

Pumpkin Pie Macarons Delightful Fall Treat Recipe

January 14, 2026July 22, 2025 by Chef Tavio
To create Pumpkin Pie Macarons, you need a few key ingredients. - Almond flour and powdered sugar composition Almond flour gives macarons their unique texture. It offers a nice nutty flavor. The powdered sugar adds sweetness and helps with the smoothness of the batter. - Essential spices: cinnamon and nutmeg These spices add warmth and depth to the macarons. Cinnamon brings a sweet, woody flavor. Nutmeg adds a touch of earthiness, perfect for fall. - Key components for the filling: pumpkin puree and cream cheese Pumpkin puree is essential for that classic pumpkin pie taste. It lends moisture and richness. Cream cheese balances the sweetness and makes the filling creamy and smooth. This combination of ingredients makes Pumpkin Pie Macarons a delightful treat for the season. For the full recipe, check the detailed instructions above. Enjoy crafting these sweet bites! Start by lining your baking sheets with parchment paper or silicone mats. This step helps prevent sticking. Preheat your oven to 300°F (150°C). Preheating is key for good macaron texture. Make sure your oven reaches this temperature before you bake. Place the oven rack in the middle position for even heat. In a medium bowl, whisk together the almond flour, powdered sugar, ground cinnamon, and nutmeg. This mix gives the macarons their flavor. Use a fine-mesh sieve to sift the mixture. Sifting removes lumps and creates a smooth texture. A smooth mixture is crucial for a perfect macaron batter. In a clean bowl, beat the egg whites with a hand mixer on medium speed. Start when you see small bubbles, known as frothy. Add cream of tartar to help stabilize the egg whites. Gradually add granulated sugar while you beat the mixture. Keep mixing until it forms stiff peaks and looks glossy. This stage is vital for the structure of your macarons. Now, carefully fold the sifted dry ingredients into the whipped egg whites. Use a spatula and be gentle. This step keeps air in the batter, making your macarons light. The right consistency is smooth and shiny, flowing like ribbons when lifted. Take your time to avoid over-mixing. Next, fill a piping bag with the macaron batter. Pipe small circles, about 1.5 inches wide, on the baking sheets. Leave space between each circle. Rest the piped macarons at room temperature for 30 to 60 minutes. They should feel dry to the touch before baking. This step is essential for forming a nice skin. Bake the macarons in your preheated oven for 15 to 18 minutes. Bake one tray at a time for the best results. Halfway through, rotate the baking sheet for even baking. Allow the macarons to cool on the sheet for a few minutes after baking. Then transfer them to a wire rack to cool completely before filling. Many home bakers struggle with beating egg whites. Over-beating makes them dry, while under-beating keeps them too runny. To find the sweet spot, beat the egg whites until soft peaks form, then add sugar gradually. This method ensures a stable meringue. Cracked shells often result from too much humidity or high oven heat. Always check the weather before baking. If the air feels damp, it might be best to wait. Also, make sure your oven is at the right temperature. An oven thermometer can help you here. Macarons need a dry environment for success. If your kitchen is humid, consider using a dehumidifier or baking on a drier day. The right temperature helps too. Aim for a room temperature around 70°F (21°C) before you start. To get those lovely "feet," pipe your macarons with care. Allow them to rest until they form a light skin. This step is key. When baked, the air expands, pushing the shell up. This creates the famous feet we all love. You can adjust the spice levels in your filling to fit your taste. If you love stronger flavors, add a bit more cinnamon or nutmeg. A little goes a long way, so start small. For a sweeter filling, add more powdered sugar to your cream cheese mix. Taste as you go. This way, you can find the perfect balance of sweet and spice. You can even think about adding a touch of maple syrup for a unique twist. {{image_4}} You can swap pumpkin for other fall flavors. Try sweet potato or butternut squash. They add a nice twist. You can also enhance the filling. Adding melted chocolate or caramel brings extra richness. These flavors blend well with spices like cinnamon and nutmeg. If you need a gluten-free option, almond flour works well. You can also use ground sunflower seeds or oats as a substitute. For a vegan pumpkin filling, use coconut cream instead of cream cheese. This keeps the flavor while meeting dietary needs. Presentation matters! Use a festive platter for your macarons. You can sprinkle cinnamon on top for a cozy touch. Try adding little pumpkin decorations for a fun look. Colorful macarons make your display pop. Use orange, brown, and cream shades for that fall vibe. Store your pumpkin pie macarons in an airtight container. This keeps them fresh. You can refrigerate them or leave them at room temperature. If you keep them at room temperature, eat them within two days. In the fridge, they last up to a week. The macarons may dry out if left too long. To freeze macarons, follow these steps: 1. Cool Completely: First, ensure the macarons are fully cooled. 2. Prepare for Freezing: Place them in a single layer on a baking sheet. 3. Wrap: Once frozen, transfer them to a freezer-safe bag or container. 4. Label: Don’t forget to label the bag with the date. To thaw, leave them in the fridge overnight. This helps keep their flavor and texture intact. Avoid thawing them at room temperature, as they may become soggy. Serve your macarons at room temperature for the best taste. They shine during gatherings as a sweet treat. Arrange them on a pretty platter to catch guests' eyes. Pair them with warm apple cider or a hot cup of coffee. The flavors blend beautifully! You can also serve them alongside pumpkin spice desserts for an autumn feast. For a fun twist, add a small scoop of vanilla ice cream on the side. Enjoy the delight! To keep macarons from cracking, monitor the humidity and oven temp. If the humidity is high, use a dehumidifier or bake on a dry day. A lower oven temperature also helps. Set your oven to 300°F (150°C) and use an oven thermometer to check the heat. This way, your macarons bake evenly and stay soft inside. Homemade macarons last about three to five days in the fridge. Store them in an airtight container to keep them fresh. If you want to save them longer, freeze them. They can last up to three months in the freezer. Just remember to let them thaw in the fridge before eating. Yes, you can make macarons without almond flour. Use options like hazelnut flour or sunflower seed flour. Each flour gives a different taste and texture. Hazelnut flour has a rich, nutty flavor, while sunflower seed flour is a great nut-free choice. Experiment to find what you like best! If your macarons lack feet, it might be due to under-mixing or not resting long enough. Make sure to fold the batter until it's shiny and flows in ribbons. Let the piped macarons rest until they feel dry to the touch. If you follow these steps, your next batch will have those lovely feet! Making macarons can be fun and rewarding. We covered the key ingredients and steps, from mixing the batter to perfecting the baking process. I shared tips to avoid common mistakes and creative variations you can try. Remember, patience is key. Each batch teaches you something new. With practice, you will make fantastic macarons that impress everyone. Enjoy your baking journey, and don’t hesitate to share your delicious results!

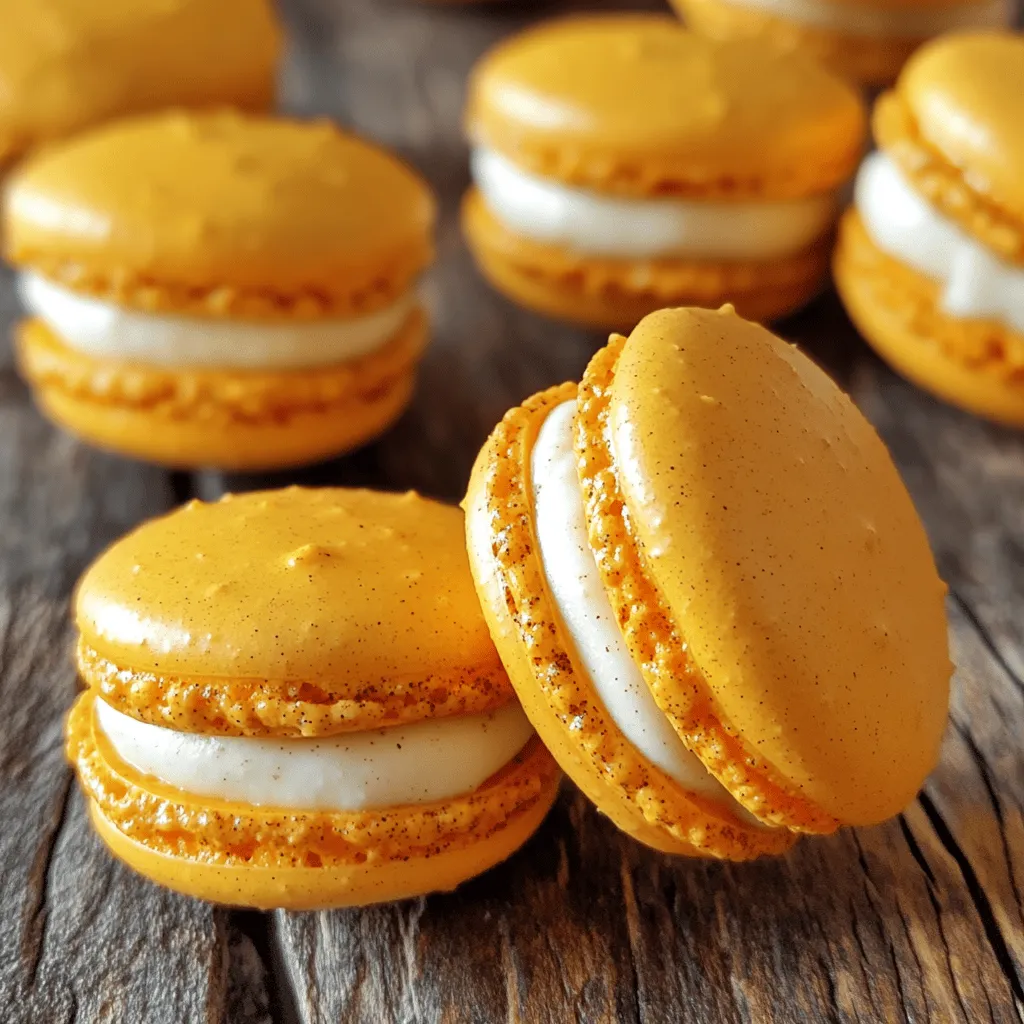
Craving a seasonal treat with a twist? Pumpkin Pie Macarons combine fall’s favorite flavors into delightful bite-sized cookies. This recipe captures the warmth of pumpkin, spiced perfectly with cinnamon and …

Read more

Categories Desserts Tags NO-ING-IMG

Tuscan Chickpea Soup Flavorful and Nourishing Dish

January 14, 2026July 21, 2025 by Chef Tavio
- 2 cups cooked chickpeas - 1 large onion - 2 cloves garlic - 2 medium carrots - 2 stalks celery - 1 yellow bell pepper - 4 cups vegetable broth - 1 can diced tomatoes - Herbs and spices In Tuscan Chickpea Soup, each ingredient plays a key role. The cooked chickpeas add protein and creaminess. The onion and garlic provide a rich base for flavor. Carrots and celery bring sweetness and crunch, while the yellow bell pepper adds a bright note. Vegetable broth gives the soup depth, and diced tomatoes add acidity and texture. I use dried herbs like oregano and basil to enhance the richness. These flavors meld well together, creating a comforting bowl of soup. The combination is both simple and satisfying, making it a favorite in my kitchen. - Grated Parmesan cheese - Fresh basil leaves - Additional spices for flavor For an extra touch, consider adding grated Parmesan cheese. It adds a savory note that enhances the soup's taste. Fresh basil leaves make for a lovely garnish and provide a fresh aroma. You can also experiment with spices. A pinch of smoked paprika or cumin can add a unique depth to your soup. These optional ingredients allow you to tailor the soup to your taste. They help elevate this dish from simple to spectacular. For the full recipe, check out the detailed instructions on how to prepare this delightful soup. - Heat 2 tablespoons of extra-virgin olive oil in a large pot. - Sauté 1 finely chopped onion for 3-4 minutes. - Add 2 minced garlic cloves and cook for 1 minute. - Stir in 2 diced medium carrots, 2 diced stalks of celery, and 1 diced yellow bell pepper. - Cook the vegetables for 5-7 minutes until soft and colorful. - Combine 2 cups of cooked chickpeas, 1 can of diced tomatoes, and 4 cups of vegetable broth in the pot. - Stir in 1 teaspoon of dried oregano, 1 teaspoon of dried basil, and 1/2 teaspoon of red pepper flakes. - Season generously with salt and black pepper. - Bring the soup to a boil over high heat. - Reduce the heat and let it simmer gently for 20-25 minutes. - In the last 5 minutes, add 2 cups of fresh spinach or kale. - Cook until the greens wilt and blend into the soup. - Taste and adjust the seasoning as needed. - Serve in bowls and top with grated Parmesan cheese and fresh basil leaves for a tasty finish. For a complete guide, check the Full Recipe for more details. - How to properly sauté vegetables To sauté vegetables, use a large pot. Add extra-virgin olive oil and heat it over medium. Once the oil shimmers, add finely chopped onion. Stir for about 3-4 minutes until it becomes translucent. Then, add minced garlic, carrots, celery, and bell pepper. Cook for 5-7 minutes. Stir often until they soften and brighten in color. - Adjusting spice levels for different palates For spice, start with 1/2 teaspoon of red pepper flakes. If you want more heat, add more flakes gradually. Always taste as you go. This way, you can find the right balance for you and your guests. - Best accompaniments for the soup Serve Tuscan Chickpea Soup with crusty bread. The bread is perfect for soaking up the rich broth. A simple side salad also pairs well. Try a fresh green salad with a light vinaigrette for a refreshing touch. - How to present the dish attractively Ladle the soup into bowls and top with grated Parmesan cheese. Add fresh basil leaves for color and aroma. For a final touch, drizzle olive oil over the soup. This adds a nice sheen and enhances the flavor. {{image_4}} You can easily change this soup with different beans or lentils. White beans add a creamy texture. Red lentils cook fast and break down well, making the soup thick. You could also use black beans for a unique twist. Adding seasonal vegetables can enhance flavors and nutrition. In the fall, try adding squash or sweet potatoes. In the spring, fresh peas or asparagus work well. Feel free to be creative with what you have on hand! This soup is simple to make vegan or vegetarian. Just skip the grated Parmesan cheese, or use a plant-based cheese. The soup's rich taste still shines through, even without dairy. For gluten-free options, ensure your broth is gluten-free. Most vegetable broths are safe, but always check labels. This way, everyone can enjoy a warm bowl of comforting soup! For the full recipe, check out the detailed steps to create this Tuscan delight. To keep your Tuscan chickpea soup fresh, store it in airtight containers. Make sure the soup cools down before sealing. You can store it in the fridge for about 3 to 4 days. For longer storage, consider freezing it. Pour the soup into freezer-safe containers or bags, leaving space for expansion. You can freeze it for up to 3 months. When you’re ready to eat it, just thaw it overnight in the fridge. When reheating, use a pot on medium heat. Stir the soup often to ensure even heating. You can also use the microwave, but be sure to cover the bowl to avoid splatter. Heat it in short bursts, stirring in between. This helps to keep the flavors bright and fresh. If the soup seems thick, add a splash of broth or water to loosen it up. Enjoy your warm, tasty soup! What can I use instead of chickpeas? You can swap chickpeas for white beans or lentils. Both options add protein and texture. You may even try kidney beans for a different taste. Just remember to adjust cooking times based on your choice. How can I make this soup spicier? To spice things up, add more red pepper flakes or a dash of hot sauce. You can also toss in some diced jalapeños. Start with a small amount and taste as you go. This way, you can find your perfect heat level. Can I make this soup in a slow cooker? Yes, you can! Simply add all ingredients to the slow cooker. Set it on low for about 6-8 hours. This method allows flavors to deepen and meld together, creating a tasty soup. How long does Tuscan Chickpea Soup last in the fridge? Tuscan Chickpea Soup lasts about 4-5 days in the fridge. Be sure to store it in an airtight container. You can enjoy it throughout the week as a quick meal or snack. Caloric content of the soup A serving of Tuscan Chickpea Soup has around 200-250 calories. This can vary based on added ingredients like cheese or oil. It provides a great balance of protein, fiber, and vitamins. Health benefits of chickpeas and vegetables Chickpeas are high in protein and fiber, which help keep you full. They also support heart health. The vegetables add vitamins and minerals, boosting immunity. This soup is not just tasty; it’s also good for you! Tuscan Chickpea Soup is simple and tasty. You need a few key ingredients, like chickpeas, veggies, and broth. The steps are easy: just sauté, combine, and simmer. Want to add your own twist? Use different beans or spices! You can store leftovers well and reheat them easily. This soup is healthy and full of flavor. Remember, cooking is about enjoying food and trying new things. Feel free to make this soup your own! Enjoy each warm bowl.

Looking for a warm and hearty meal? Tuscan Chickpea Soup is your answer! This flavorful dish combines protein-packed chickpeas with fresh veggies and rich broth. It’s simple to make and …

Read more

Categories Dinner Tags NO-ING-IMG

Soft Pumpkin Cookies Delightful and Easy Recipe Guide

January 14, 2026July 21, 2025 by Chef Tavio
Here's what you need to make soft pumpkin cookies that are tasty and fun: - 1 cup pumpkin puree - 1/2 cup unsalted butter - 1 cup brown sugar - 1/2 cup granulated sugar - 1 large egg - 1 teaspoon pure vanilla extract - 2 cups all-purpose flour - 1 teaspoon baking soda - 1 teaspoon baking powder - 2 teaspoons ground cinnamon - 1/2 teaspoon ground nutmeg - 1/4 teaspoon ground ginger - 1/2 teaspoon salt - 1 cup white chocolate chips (optional) - 1/2 cup chopped pecans or walnuts (optional) Each ingredient plays a key role. The pumpkin adds moisture and flavor. Butter gives richness, while sugars add sweetness and texture. The egg binds the mix together. Flour gives structure, and the baking soda and powder are your leavening agents, making the cookies puff up nicely. Spices like cinnamon, nutmeg, and ginger give warmth and depth. You can toss in white chocolate chips or nuts for extra fun. This combination creates cookies that are soft, chewy, and bursting with flavor. For the full recipe, check out the details provided. Happy baking! - Preheat oven to 350°F (175°C) - Line baking sheet with parchment paper First, turn your oven to 350°F (175°C). This step warms up the oven for baking. Next, take a baking sheet and line it with parchment paper. This helps keep the cookies from sticking. - Cream together butter and sugars - Add egg, vanilla, and pumpkin puree In a large bowl, mix the softened butter, brown sugar, and granulated sugar. Use a hand mixer or stand mixer to beat it for about 3-4 minutes. It should look light and fluffy. Then, add in the egg, vanilla extract, and pumpkin puree. Beat this mixture for about 2 minutes until everything is well mixed. - Mix flour, baking soda, baking powder, and spices - Incorporate gently into pumpkin batter In another bowl, whisk together the flour, baking soda, baking powder, ground cinnamon, nutmeg, ginger, and salt. This mixture is important for the cookies' texture. Slowly add this dry mix to the pumpkin batter. Use a spatula or wooden spoon to stir gently. Do not overmix; we want soft cookies. - Scoop dough onto baking sheet - Bake cookies for 12 to 15 minutes Now it’s time to scoop your dough. Use a cookie scoop or a tablespoon to drop rounded portions onto the prepared baking sheet. Keep about 2 inches between each scoop. Bake the cookies for 12 to 15 minutes. They should be slightly golden on the edges and soft in the center. After baking, let them cool on the sheet for about 5 minutes before moving them to a wire rack to cool completely. You can find the full recipe for these delightful cookies [Full Recipe]. To get soft cookies, avoid overmixing. When you mix the dough, do it just enough to blend the ingredients. Overmixing leads to tough cookies. Also, measure your ingredients carefully. Use a kitchen scale or measuring cups to ensure accuracy. Store your cookies in an airtight container. This keeps them fresh longer. You can enjoy your soft pumpkin cookies for up to one week when stored properly. If you want them to last longer, try freezing them. They freeze well for about three months. For a lovely display, use a decorative platter. Stack the cookies high and dust them lightly with powdered sugar. You can also sprinkle some cinnamon on top for flair. If you want to enhance the taste, add toppings like white chocolate chips or chopped nuts. These add flavor and texture to your beautiful cookies. For the full recipe, check out the provided link. {{image_4}} To make gluten-free soft pumpkin cookies, you need to swap the all-purpose flour. Use a gluten-free flour blend instead. Look for blends that include xanthan gum for better texture. These blends help the cookies stay soft and chewy. You can find them at most grocery stores. Just measure the same amount as the regular flour in the recipe. For a vegan version, you can replace the egg and butter easily. Use 1/4 cup of applesauce in place of one egg. This keeps the cookies moist. For butter, substitute it with 1/2 cup of coconut oil or a vegan butter. Melt it first and let it cool before mixing. Your cookies will still taste amazing! You can add fun flavors to your soft pumpkin cookies! Try using dark chocolate chips or milk chocolate chips for a sweet twist. Nuts like walnuts or pecans also add a nice crunch. If you want, you can mix in dried cranberries for a fruity touch. For spices, consider adding a pinch of cloves or allspice. These will add warmth and depth to the cookies. Experiment with these options to find your favorite combination! Look for a few signs while baking. First, check if the edges are slightly golden. Second, the centers should feel soft but set. If the cookies spring back when lightly touched, they are ready. Make sure not to overbake; soft pumpkin cookies should be tender. Yes, you can freeze soft pumpkin cookies! To do this, let the cookies cool completely. Then, place them in a single layer on a baking sheet. Freeze them for about one hour. After that, transfer the cookies to a freezer-safe bag. Make sure to remove as much air as possible. When you want to eat them, thaw the cookies in the fridge overnight. Soft pumpkin cookies can last for about one week at room temperature. Store them in an airtight container to keep them fresh. If you want to keep them longer, freezing is a great option. Follow the freezing tips above to enjoy them later. If you want to know the full recipe, check out the details for perfect soft pumpkin cookies. Making soft pumpkin cookies is simple and fun. Here is what you need: - 1 cup pumpkin puree - 1/2 cup unsalted butter - 1 cup brown sugar - 1/2 cup granulated sugar - 1 large egg - 1 teaspoon pure vanilla extract - 2 cups all-purpose flour - 1 teaspoon baking soda - 1 teaspoon baking powder - 2 teaspoons ground cinnamon - 1/2 teaspoon ground nutmeg - 1/4 teaspoon ground ginger - 1/2 teaspoon salt - 1 cup white chocolate chips (optional) - 1/2 cup chopped pecans or walnuts (optional) Start by preheating your oven to 350°F (175°C). Line a baking sheet with parchment paper to keep cookies from sticking. Cream the softened butter, brown sugar, and granulated sugar in a large bowl. Mix until light and fluffy. Then, add the egg, vanilla, and pumpkin puree. Beat the mixture until it's smooth. In another bowl, whisk together the flour, baking soda, baking powder, cinnamon, nutmeg, ginger, and salt. Gradually mix this into the pumpkin batter. Be careful not to overmix. If you like, fold in white chocolate chips and nuts. Scoop rounded dough onto the baking sheet, leaving space for spreading. Bake for 12 to 15 minutes. The cookies should be soft and slightly golden around the edges. Let the cookies cool on the baking sheet for about 5 minutes before moving them to a wire rack. You can find the full recipe [here](#). In this post, we covered how to make soft pumpkin cookies. We explored the key ingredients, easy steps, and shared tips for the best results. Remember to blend the wet and dry ingredients carefully to keep your cookies soft. Storage in an airtight container keeps them fresh, and you can try fun variations to meet your taste. These cookies are great for any season. Enjoy baking and tasting your delicious treats!

Get ready to fall head over heels for soft pumpkin cookies! This delightful and easy recipe will fill your kitchen with warm, spicy scents that scream autumn. With just a …

Read more

Categories Desserts Tags NO-ING-IMG

Whipped Pumpkin Spice Honey Butter Delicious Delight

January 14, 2026July 21, 2025 by Chef Tavio
To make whipped pumpkin spice honey butter, gather these simple ingredients: - 1 cup unsalted butter, softened to room temperature - 1/2 cup pumpkin puree (canned or homemade) - 1/4 cup honey (adjust to taste) - 1 teaspoon pure vanilla extract - 1 teaspoon pumpkin spice blend (or a mix of ground cinnamon, nutmeg, and ginger) - 1/4 teaspoon fine sea salt - Unsalted butter: Use soft, fresh butter for the best texture. It should be at room temperature. - Pumpkin puree: Choose organic options if you can. Homemade puree can add a fresh taste. - Honey: Pick a local or raw honey for unique flavors. Taste it before adding to decide on sweetness. - Vanilla extract: Use pure vanilla for a richer flavor. Avoid imitation vanilla for the best taste. - Pumpkin spice blend: You can make your own blend. Mix equal parts of cinnamon, nutmeg, and ginger. - Fine sea salt: A small pinch enhances sweetness. Adjust based on your taste. You can make this recipe your own! Here are some fun ideas: - Maple syrup: Swap honey for maple syrup for a different sweetness. - Nutmeg or allspice: Add extra spices for a stronger flavor. Just a pinch can change the taste! - Cream cheese: Mix in softened cream cheese for a tangy twist. - Chopped nuts: Add crushed pecans or walnuts for texture and crunch. Try out these options to find your favorite combo! Check out the Full Recipe for more details. To make whipped pumpkin spice honey butter, start with the right tools. You need a large mixing bowl and a hand or stand mixer. Gather your ingredients first. This keeps things simple and fun. 1. Softened Butter: Put 1 cup of unsalted butter in your bowl. 2. Pumpkin Puree: Measure out 1/2 cup of pumpkin puree. You can use canned or make your own. 3. Honey: Have 1/4 cup of honey ready. You can add more later if you like. 4. Vanilla Extract: Get 1 teaspoon of pure vanilla extract. 5. Pumpkin Spice Blend: Use 1 teaspoon of your spice blend. 6. Sea Salt: Finally, you need 1/4 teaspoon of fine sea salt. Now, we will mix everything together to make it creamy and fluffy. 1. Beat the Butter: Start by beating the softened butter on medium speed. Do this for 2-3 minutes until it's light and fluffy. 2. Add Other Ingredients: Next, carefully add in the pumpkin puree, honey, vanilla, pumpkin spice, and salt. 3. Mix Again: Continue mixing for another 2-3 minutes. The goal is a smooth and creamy texture. Taste your whipped pumpkin spice honey butter. If it needs more sweetness, add extra honey. Mix it in briefly. Once it’s perfect, transfer the butter into a decorative jar or bowl. Cover it tightly with a lid or plastic wrap. You can refrigerate it for up to 2 weeks to keep it fresh. For serving, scoop some into a small bowl. Pair it with warm toast or bagels. A sprinkle of cinnamon on top makes it look great. Enjoy your delicious treat! To get the best whipped pumpkin spice honey butter, start with soft butter. If your butter is too cold, it won't whip well. I like to let it sit out for about an hour. Use a hand mixer or a stand mixer. Beat the butter for 2-3 minutes. You want it light and fluffy. The more air you whip in, the better the texture. Adding pumpkin puree adds creaminess, but don’t rush it. Mix until smooth and creamy. If you want to change the flavor, adjust the honey first. Some like it sweeter; others prefer less sweetness. Add more honey a little at a time. You can also add more pumpkin spice blend if you want a stronger taste. If you like a bit of heat, try a dash of cayenne. It adds a fun twist! Serve your whipped pumpkin spice honey butter on warm toast or pancakes. It also goes well with muffins and bagels. I love to place it in a small bowl on a wooden board. Garnish with a sprinkle of cinnamon and a cute pumpkin. This makes a lovely fall display. You can also serve it with tea or coffee for a cozy treat. For the full recipe, check out the complete instructions above! {{image_4}} You can switch up your whipped pumpkin spice honey butter with other spices. Try adding a pinch of cardamom for warmth. You can also use allspice for a bolder flavor. If you want more heat, a dash of cayenne can give your butter a nice kick. Use your taste buds to guide you. Honey is a classic choice, but you can try other sweeteners too. Maple syrup adds a rich, earthy tone. Agave nectar is a lighter option that blends well. Brown sugar can give your butter a deeper flavor. Just remember to adjust the amount based on the sweetness you prefer. Fresh herbs can bring a new twist to your butter. Chopped sage or thyme adds a savory touch. Adding citrus zest, like orange or lemon, can brighten the flavor. Just a little zest goes a long way, so start small. These additions make your whipped pumpkin spice honey butter even more special. To keep your whipped pumpkin spice honey butter fresh, store it in an airtight container. A jar with a tight lid works well. Make sure to press a layer of plastic wrap against the surface before sealing. This helps to keep air out and prevents the butter from absorbing other scents in the fridge. Whipped pumpkin spice honey butter lasts up to two weeks in the fridge. Check for any changes in color or smell before use. If it looks or smells off, it’s best to toss it. For the best taste, use it within the first week. You can freeze whipped pumpkin spice honey butter for longer storage. Scoop it into a freezer-safe container, leaving some space at the top for expansion. Seal it tightly and label it with the date. It can stay frozen for up to three months. When ready to use, thaw it overnight in the fridge. Whip it again briefly before serving for a fluffy texture. Yes, you can make it ahead of time. This butter stays fresh in the fridge for up to two weeks. Just store it in a sealed jar or bowl. It’s perfect for parties or cozy mornings. If you don’t have pumpkin puree, try using sweet potato puree. It has a similar texture and taste. Applesauce can work too, but it will change the flavor a bit. You can even try mashed bananas for a fun twist. Whipped pumpkin spice honey butter lasts about two weeks in the fridge. Keep it in an airtight container for best results. Always check for any off smell or changes in texture before use. You can use salted butter, but it will change the taste. If you do, cut back on adding any extra salt. This helps balance the flavors and keeps it tasty. To make it dairy-free, use a plant-based butter. Many brands offer great options that mimic real butter. You can also try coconut cream for a unique flavor. Just blend it as you would with regular butter. Now you know how to make whipped pumpkin spice honey butter. We covered key ingredients, mixing tips, and variations you can try. Each section helped you find the best ways to enjoy this treat. Remember to store it well to keep it fresh. Feel free to experiment with flavors and share your creations. This butter is perfect for spreading on warm bread or pancakes. Enjoy making and tasting your own unique version!

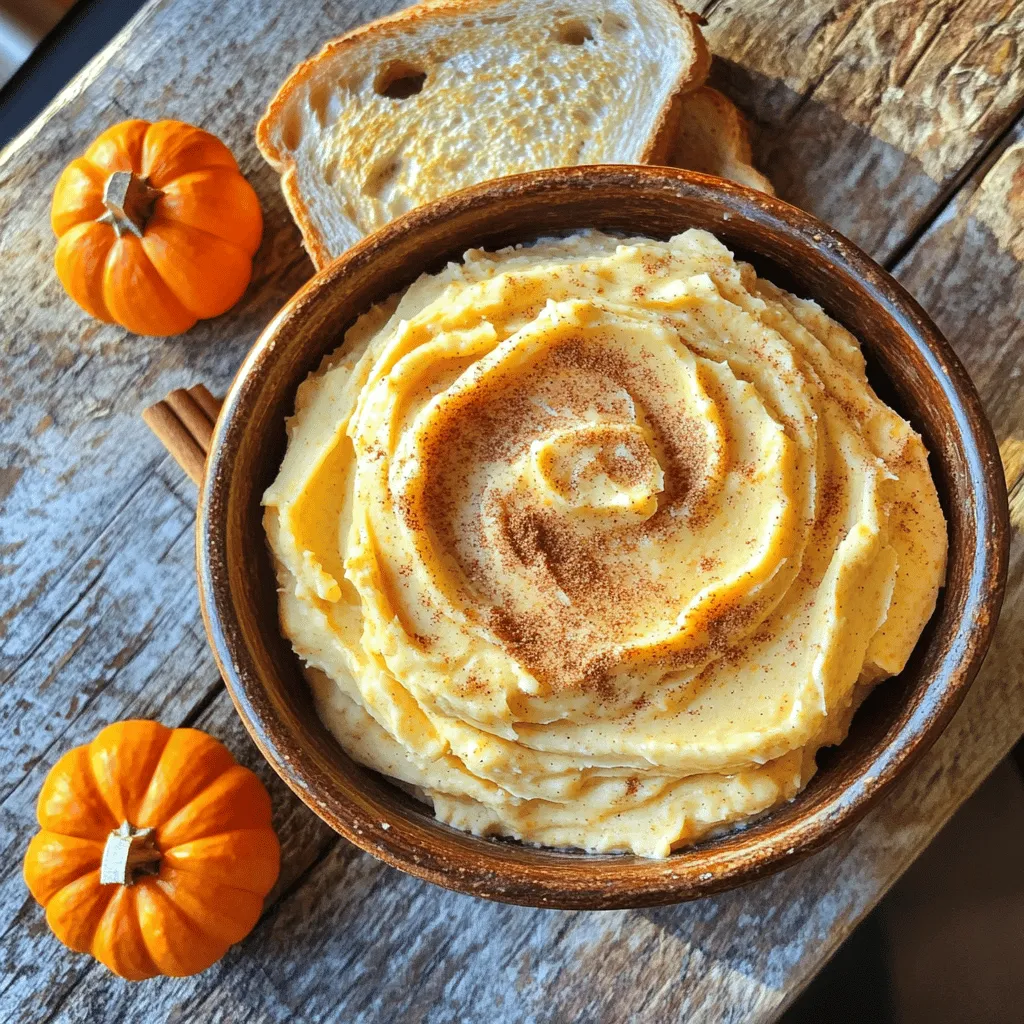
Are you ready to elevate your fall breakfast game? Whipped Pumpkin Spice Honey Butter is a delicious delight that will make your mornings special. This sweet treat blends the warmth …

Read more

Categories Desserts Tags NO-ING-IMG

Homemade Healthy Chicken Nuggets for Tasty Meals

January 14, 2026July 21, 2025 by Chef Tavio
To make these tasty chicken nuggets, you'll need a few key ingredients: - 1 lb boneless, skinless chicken breasts, cut into bite-sized pieces - 1 cup whole wheat bread crumbs - 1/2 cup finely grated parmesan cheese - 1 teaspoon garlic powder - 1 teaspoon onion powder - 1 teaspoon smoked paprika - 1/2 teaspoon freshly ground black pepper - 1/2 teaspoon sea salt - 2 large eggs - 1 tablespoon extra virgin olive oil - Cooking spray These ingredients provide great flavor and a crispy texture. Whole wheat bread crumbs add fiber, while parmesan gives a rich taste. You can swap some ingredients for an even healthier option. Use almond flour instead of bread crumbs for gluten-free nuggets. If you're avoiding cheese, try nutritional yeast for a cheesy flavor. For a lighter option, use egg whites instead of whole eggs. These small changes can make your nuggets even better for you! Each serving of these chicken nuggets packs a punch. Here’s a quick look at the nutritional info: - Calories: 250 - Protein: 30g - Carbohydrates: 20g - Fat: 10g - Fiber: 3g This makes for a balanced meal! You can enjoy them guilt-free. For the full recipe, check the earlier section. First, gather your ingredients. You will need chicken breasts, whole wheat bread crumbs, and spices. Also, have eggs and olive oil ready. Preheat your oven to 400°F (200°C). This helps the nuggets cook evenly. 1. Prepare the baking sheet. Line it with parchment paper and spray lightly with cooking spray. 2. Mix the dry ingredients. In a bowl, combine whole wheat bread crumbs, parmesan cheese, garlic powder, onion powder, smoked paprika, black pepper, and sea salt. Stir well. 3. Prepare the egg mixture. In another bowl, crack two eggs and add one tablespoon of olive oil. Whisk until smooth. 4. Coat the chicken. Dip each chicken piece into the egg mixture, letting the extra drip off. Then roll it in the breadcrumb mix. Press down gently to help the crumbs stick. 5. Arrange on the sheet. Place the coated chicken nuggets on your baking sheet. Leave space between each one for even cooking. 6. Spray the tops. Lightly spray the nuggets with cooking spray. This helps them get crispy. 7. Bake. Put the baking sheet in the oven for 15-20 minutes. Flip the nuggets halfway through for a nice golden finish. 8. Cool and serve. Once done, let the nuggets cool for a few minutes before enjoying. To cook evenly, keep nuggets similar in size. Use a meat thermometer to check if the chicken reaches 165°F (74°C). This ensures all pieces are safe to eat. Also, avoid overcrowding the baking sheet. Proper air circulation helps them crisp up nicely. To make your chicken nuggets super crispy, use whole wheat bread crumbs. They add texture and flavor. Make sure to coat them well in the breading mix. A light spray of cooking oil helps too. This step encourages a golden finish. Don’t overcrowd the baking sheet; give them space. Air needs to flow for even cooking. One common mistake is skipping the egg wash. It helps the breading stick. Another mistake is not preheating the oven. A hot oven ensures the nuggets cook right. Flipping them halfway is key. This makes both sides crispy. Lastly, avoid overcooking. Check the chicken to ensure it's fully cooked but not dry. Store leftover chicken nuggets in an airtight container. They keep well in the fridge for up to three days. For reheating, use an oven instead of a microwave. The oven keeps them crispy. Preheat your oven to 375°F (190°C). Bake for about 10 minutes. This way, they regain their crunch. Enjoy your delicious homemade healthy chicken nuggets again! For the complete recipe, check out the Full Recipe. {{image_4}} You can boost the flavor of your chicken nuggets by adding spices and herbs. Try using: - Cumin for a warm, earthy taste. - Oregano for a hint of Mediterranean flair. - Chili powder for some heat. - Dried thyme for a fresh, herby note. Mix these spices into your breadcrumb coating for unique flavors. You can also add fresh herbs, like parsley or basil, for a pop of freshness. If you need a gluten-free option, swap whole wheat breadcrumbs for gluten-free breadcrumbs. You can make your own using ground oats or rice. For a vegan twist, use: - Chickpea flour mixed with water instead of eggs. - Nutritional yeast instead of Parmesan cheese. These changes keep the nuggets tasty while catering to dietary needs. Dipping sauces can enhance your chicken nuggets. Here are some popular choices: - Honey mustard for a sweet and tangy flavor. - Barbecue sauce for a smoky, rich taste. - Ranch dressing for a creamy, herby option. - Salsa for a fresh kick. Feel free to mix and match sauces to find your favorite pairings! To keep your homemade chicken nuggets fresh, store them in an airtight container. Let them cool before sealing. This helps prevent moisture buildup. Keep the container in the fridge for up to three days. If you want to keep them longer, freezing is a great option. To freeze your nuggets, first, let them cool completely. Then, arrange them on a baking sheet in a single layer. Freeze until solid, about one to two hours. Once frozen, transfer them to a freezer bag. Label the bag with the date for easy reference. Homemade chicken nuggets can last up to three months in the freezer. When you’re ready to enjoy your frozen nuggets, preheat your oven to 400°F (200°C). Spread the nuggets on a baking sheet. Bake for 15-20 minutes until they are hot and crispy. If you’re using fresh nuggets, just reheat them in the same way for about 10-15 minutes. This keeps them crunchy and delicious. To make chicken nuggets healthier, choose lean chicken and whole wheat crumbs. Use less oil and cheese. You can also add spices for flavor instead of extra fat. This way, you keep taste while cutting down on calories. Yes, you can air fry these nuggets! Preheat your air fryer to 400°F (200°C). Place the nuggets in a single layer in the fryer basket. Cook for about 10-12 minutes, flipping halfway through. This method gives them a crispy exterior and juicy inside without much oil. Many sauces go well with chicken nuggets. Here are some favorites: - Honey mustard - BBQ sauce - Ketchup - Ranch dressing - Sweet and sour sauce Feel free to mix and match based on your taste! Check if the chicken nuggets are done by cutting one open. The inside should be white, not pink. You can also use a meat thermometer. The safe cooking temperature for chicken is 165°F (75°C). When they are crispy and golden, they are ready to enjoy! Homemade chicken nuggets can be healthy and tasty. We explored key ingredients, cooking steps, and storage tips. You can use healthier swaps and make them gluten-free or vegan. Remember to add spices for flavor and crispiness. Store any extras safely for later. With these insights, you can create delicious chicken nuggets anytime. Enjoy the process and make your meals memorable. Your cooking journey starts now!

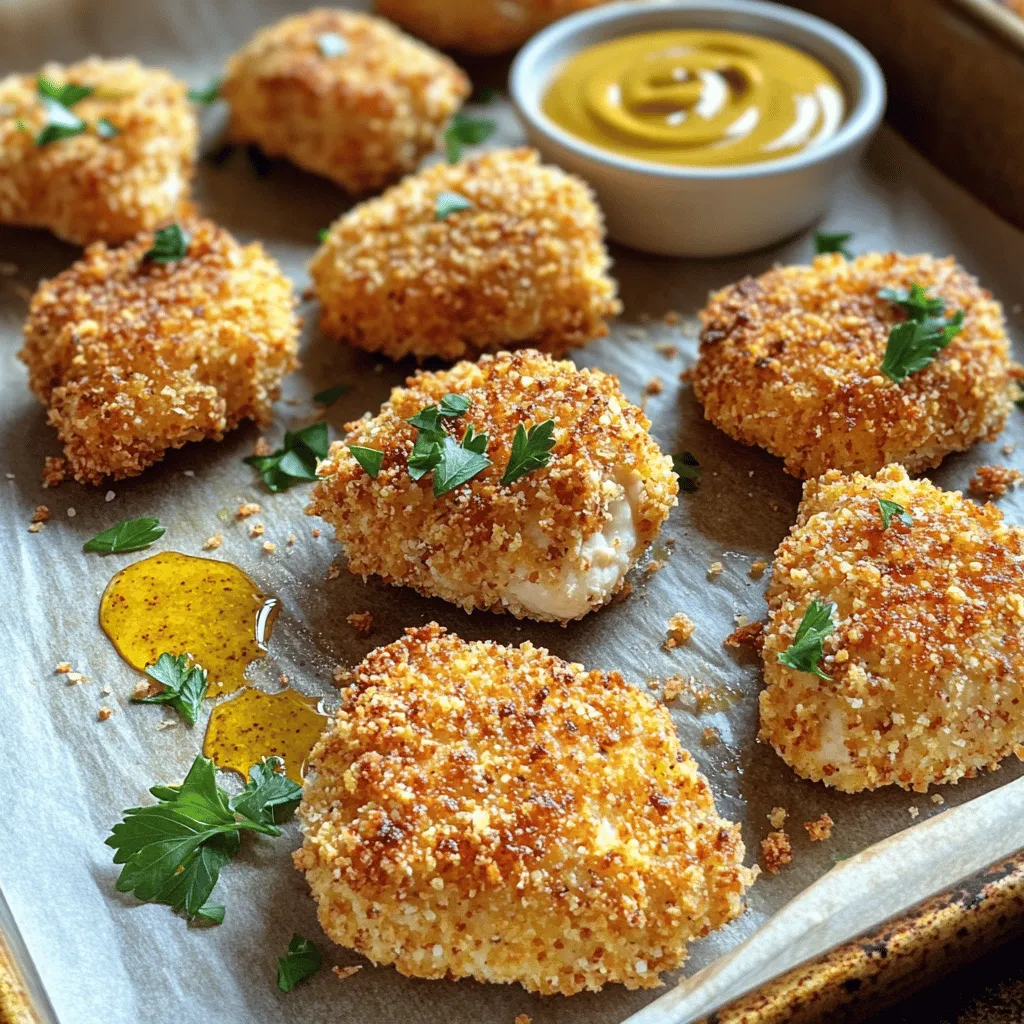
Looking for a healthy twist on a classic favorite? Homemade healthy chicken nuggets are your answer! In this article, I’ll guide you through easy steps to whip up tasty, nutritious …

Read more

Categories Appetizers Tags NO-ING-IMG

Baked Apple Cider Donut Holes Irresistible Treat

January 14, 2026July 21, 2025 by Chef Tavio
To create delicious baked apple cider donut holes, you will need the following ingredients: - 2 cups all-purpose flour - 1 teaspoon baking powder - 1 teaspoon baking soda - 1/2 teaspoon salt - 1 teaspoon ground cinnamon - 1/2 teaspoon ground nutmeg - 3/4 cup apple cider - 1/2 cup granulated sugar - 1/4 cup packed brown sugar - 1/2 cup unsweetened applesauce - 1 large egg - 2 tablespoons vegetable oil - 1 teaspoon vanilla extract - 1/4 cup granulated sugar (for coating) - 1 teaspoon ground cinnamon (for coating) Each ingredient plays a crucial role in the texture and flavor of the donut holes. The apple cider adds moisture and a sweet, tangy taste. Meanwhile, the spices like cinnamon and nutmeg bring warmth and depth to the flavor. When choosing your ingredients, some brands stand out for quality: - All-Purpose Flour: King Arthur Flour or Bob's Red Mill are great choices. - Baking Powder: Rumford or Clabber Girl ensure good rising. - Apple Cider: Look for local, fresh apple cider for the best taste. - Granulated Sugar: C&H or Domino provide consistent sweetness. These brands tend to deliver the best results in baking, ensuring your donut holes taste fantastic. If you have dietary needs, here are some easy swaps: - Gluten-Free: Use a gluten-free all-purpose flour blend. - Vegan: Replace the egg with 1/4 cup of flaxseed meal mixed with 1/2 cup of water. Use a plant-based oil instead of vegetable oil. - Low-Sugar: Substitute granulated sugar with a stevia blend that measures like sugar. These substitutions will allow everyone to enjoy baked apple cider donut holes without missing out on flavor or fun! Start by preheating your oven to 350°F (175°C). This step is key for even baking. Next, take a mini muffin pan or donut hole pan and lightly grease it with non-stick cooking spray. This helps the donut holes pop out easily after baking. In a medium bowl, sift together the dry ingredients. You will need 2 cups of all-purpose flour, 1 teaspoon of baking powder, 1 teaspoon of baking soda, and 1/2 teaspoon of salt. Add in 1 teaspoon of ground cinnamon and 1/2 teaspoon of ground nutmeg. Sifting keeps the mixture smooth and lump-free. Once combined, set this dry mix aside for now. In a larger bowl, pour in 3/4 cup of apple cider. Next, add 1/2 cup of granulated sugar, 1/4 cup of packed brown sugar, and 1/2 cup of unsweetened applesauce. Crack in 1 large egg, then pour in 2 tablespoons of vegetable oil and 1 teaspoon of vanilla extract. Use a whisk to blend all the wet ingredients until smooth. Now, take the dry mix and add it to the wet mix gradually. Use a spatula to fold these together gently. Make sure not to overmix; a few lumps are okay. This keeps the donut holes light and fluffy. Once your batter is ready, spoon it into the prepared pan. Fill each cavity about two-thirds full. This allows the donut holes to rise without overflowing. Place the pan in your preheated oven and bake for 12-15 minutes. Check for doneness by inserting a toothpick; it should come out clean. While the donut holes bake, prepare a sweet cinnamon-sugar coating. In a small bowl, combine 1/4 cup of granulated sugar with 1 teaspoon of ground cinnamon. Mix well. After baking, let the donut holes cool in the pan for about 5 minutes. Then, carefully remove them and roll each warm donut hole in the cinnamon-sugar mixture until covered. Now, you can enjoy your freshly baked apple cider donut holes. They are a perfect treat for any time! For the full recipe, refer to the complete instructions above. To get soft and fluffy donut holes, use these tips. First, don’t overmix the batter. Mix just until the dry and wet ingredients blend together. Leaving a few lumps helps keep the texture light. Second, measure your ingredients correctly. Too much flour can make them dense. Use the spoon and level method for flour. Lastly, bake them until just golden. They should spring back when touched. This way, you get that perfect bite. Many people make simple mistakes when baking. One big error is not preheating the oven. If your oven isn’t hot enough, the donuts won’t rise as they should. Another mistake is filling the pan too full. Fill each cavity only two-thirds full for the best rise. Lastly, rolling them in cinnamon-sugar too soon can make the coating stick poorly. Wait until they are warm but not hot. Measuring ingredients right is key in baking. Use dry measuring cups for flour and sugar. Spoon the flour into the cup, then level it off with a knife. Don’t pack it down. For liquid ingredients, use a clear measuring cup. Pour until you reach the right mark. When using sticky ingredients like applesauce or oil, spray the cup with non-stick spray first. This helps them slide out easily. Following these practices ensures your donut holes turn out great every time. Try the full recipe for Baked Apple Cider Donut Holes to enjoy this tasty treat! {{image_4}} You can get creative with flavors for your baked apple cider donut holes. Here are some fun ideas: - Pumpkin Spice: Add 1/2 cup of pumpkin puree and a pinch more of nutmeg. - Maple: Substitute maple syrup for half of the granulated sugar. - Chocolate: Mix in 1/2 cup of cocoa powder with the dry ingredients. - Caramel: Drizzle caramel sauce on top after baking for a sweet touch. Each option changes the taste and adds a unique twist, keeping your treats exciting. You can easily make these donut holes gluten-free and vegan. To do this: - Gluten-Free: Use a gluten-free all-purpose flour blend. Ensure it has xanthan gum for a good texture. - Vegan: Replace the egg with 1/4 cup of unsweetened applesauce. Use a plant-based oil and non-dairy milk for the apple cider. These swaps let everyone enjoy the treat, no matter their dietary needs. Baked apple cider donut holes shine with the right pairings. Here are my top suggestions: - Coffee or Tea: Enjoy them with a hot cup of your favorite brew. - Ice Cream: Serve warm donut holes with vanilla ice cream for a dessert delight. - Fruit: Add some sliced apples or pears for freshness. These pairings enhance the flavors and make the experience even better. For the full recipe, check the earlier section. To keep your baked apple cider donut holes fresh, store them in an airtight container. They will stay good for about 3 days at room temperature. If you want to keep them longer, the fridge is a great option. Just make sure to wrap them well to avoid drying out. For longer storage, you can freeze the donut holes. Place them in a single layer on a baking sheet. Freeze them for about 1-2 hours. Once frozen, transfer them to a freezer bag. They will stay fresh for up to 3 months. Label the bag with the date so you remember when you made them! To enjoy the donut holes again, thaw them overnight in the fridge. You can reheat them in a toaster oven or regular oven at 350°F for 5-10 minutes. This will bring back their soft texture. If you're in a hurry, a microwave works too. Just heat them in 10-second bursts until warm. Enjoy every bite of your delicious treat! Baked donut holes are lighter and less greasy than fried ones. They use oven heat to cook, which gives them a fluffy texture. Fried donut holes have a crispy outside due to oil cooking them quickly. Baking is often healthier since it needs no oil. Yes, you can! If you want a gluten-free option, try almond flour or a gluten-free mix. Each type of flour can change the taste and texture. Experiment to find what you enjoy best. The donut holes are done when a toothpick comes out clean. They should look golden brown. If they bounce back when you touch them, they are ready. Keep an eye on them during the last few minutes of baking. Leftover donut holes taste great at room temperature. Try warming them in the microwave for 10-15 seconds. You can also dip them in coffee or hot chocolate for a fun treat. If you want to keep them for later, store them in an airtight container. Baked apple cider donut holes are a fun treat. We covered key ingredients, like quality flour and spices. You can use brands that suit your taste or diet. The steps to make them are clear and easy. Pay attention to the tips for the best texture and avoid common mistakes. Try variations to keep things exciting. Store any extras properly so they stay fresh. Answering your FAQs helps you enjoy these treats to the fullest. Now you’re ready to bake your own delicious donut holes!

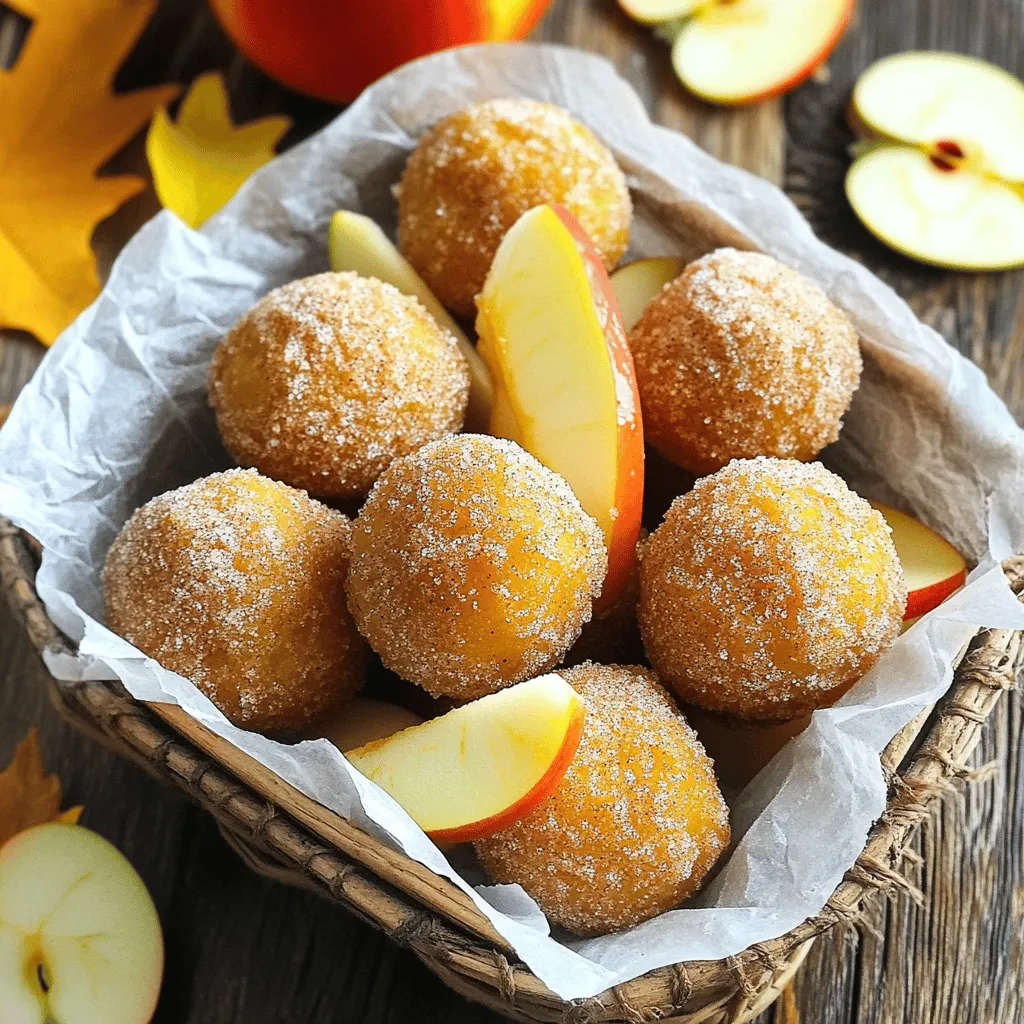
Are you ready to indulge in a cozy fall treat? Baked apple cider donut holes are a delicious way to enjoy the flavors of autumn. In this post, I’ll guide …

Read more

Categories Desserts Tags NO-ING-IMG

Delicious Homemade Apple Pie Perfectly Baked Treat

January 14, 2026July 21, 2025 by Chef Tavio
- 6 cups of medium-sized apples (Granny Smith or Honeycrisp) - 1 cup granulated sugar - 2 tablespoons fresh lemon juice - 1 teaspoon ground cinnamon - 1/4 teaspoon ground nutmeg - 2 tablespoons all-purpose flour - 1 tablespoon unsalted butter (cut into small cubes) - 1 package (15 oz) refrigerated pie crusts (or your favorite homemade pie crust) - 1 egg (for egg wash) - 1 tablespoon milk (for egg wash) To make a delicious apple pie, you need simple, fresh ingredients. First, select your apples. I love using Granny Smith for their tartness, or Honeycrisp for their sweetness. You will need about 6 cups of sliced apples. Next, granulated sugar adds sweetness, so grab 1 cup. The lemon juice, about 2 tablespoons, helps keep the apples fresh and bright. Ground cinnamon and nutmeg, 1 teaspoon and 1/4 teaspoon, add warmth and depth to the pie. You also need 2 tablespoons of all-purpose flour to thicken the filling. The butter, cut into small cubes, adds richness and flavor. For the crust, you can use 1 package of refrigerated pie crusts or make your own if you prefer. Lastly, an egg and a tablespoon of milk create a lovely egg wash for that golden finish. These ingredients come together to create a pie that brings joy to any gathering. Follow the Full Recipe for detailed steps to craft this delightful dessert. - Preheat the Oven: Set your oven to 425°F (220°C). - Prepare the Filling: In a bowl, mix 6 cups of apples, 1 cup of sugar, 2 tablespoons of lemon juice, 1 teaspoon of cinnamon, 1/4 teaspoon of nutmeg, and 2 tablespoons of flour. Stir gently. Let it sit for 10 minutes. - Prepare the Crust: Roll out one pie crust and fit it into a 9-inch pie pan. Trim excess dough for a clean edge. - Fill the Pie: Pour the apple filling into the crust. Spread it evenly. Add small butter cubes on top for flavor. - Top Crust: Roll out the second crust. Place it over the pie. Crimp the edges to seal. Cut slits on top for steam to escape. - Egg Wash: Whisk 1 egg and 1 tablespoon of milk together. Brush this mix on the top crust. - Bake the Pie: Place the pie on a baking sheet and into the oven. Bake for 15 minutes at 425°F (220°C). - Lower Temperature: After 15 minutes, reduce the heat to 350°F (175°C). Bake for 35-45 more minutes. Look for a golden crust and bubbling filling. - Cool and Serve: Remove the pie from the oven. Let it cool for at least 2 hours. This cooling time helps set the juices. Enjoy slices warm or cold. You can find the full recipe for more details. To create the best crust, use chilled ingredients. Cold butter and water help make the crust flaky. You can choose between homemade or store-bought crust. Homemade crust lets you control the flavor. Store-bought is quick and easy, perfect for busy days. When picking apples, choose a mix of sweet and tart varieties. I love using Granny Smith and Honeycrisp together. They add depth to the pie. You can also add spices like ginger or cloves for a unique twist. A splash of vanilla extract can enhance the sweetness, too. To know when your pie is done, look for a golden crust. The filling should bubble slightly, which shows it's hot inside. To prevent a soggy bottom, bake your pie on a preheated baking sheet. This helps the crust cook evenly. If your crust starts browning too early, cover the edges with foil. For more details on making this pie, check out the Full Recipe. {{image_4}} You can make your apple pie even tastier with some fun additions. Try adding caramel or toffee to the apple filling. This adds a rich sweetness that pairs well with the tart apples. You can also mix in nuts, like walnuts or pecans, for a nice crunch. Raisins add a chewy texture that complements the apples. These small changes can turn a classic pie into something special. If you need a gluten-free option, there are great pie crusts available. You can find them in stores or make your own using gluten-free flour. For a unique flavor, use almond flour or coconut flour in your crust. Each type of flour offers a different taste and texture. Experiment with these alternatives to find your favorite. Apple pie is delicious on its own, but you can make it even better. Serve warm slices with a scoop of vanilla ice cream. The cold ice cream melts into the warm pie, creating a delightful mix. You can also top the pie with whipped cream for a light and creamy finish. Planning a pie night? Set up a pie bar with toppings like caramel sauce, chopped nuts, and extra spices. This lets everyone customize their slice for a fun experience. After you bake your apple pie, let it cool completely. Then, you can keep it at room temperature for up to two days. Cover it loosely with foil or parchment paper. This keeps the crust from getting soggy. If you have leftovers after two days, it's best to refrigerate the pie. Wrap it tightly in plastic wrap or store it in an airtight container. This helps the pie stay fresh for up to a week. Want to save your pie for later? Freezing is a great option. First, let the pie cool completely. Wrap it tightly in plastic wrap, then in aluminum foil. This protects it from freezer burn. You can freeze the pie for up to three months. When you want to enjoy it again, take it out and let it thaw in the fridge overnight. To reheat, place it in a preheated oven at 350°F (175°C) for about 20-30 minutes. This will make the crust crispy again and warm the filling. Enjoy your slice of homemade apple pie anytime! For the full recipe, check out the earlier section. To stop bubbling, you can use a pie shield or foil. Cover the edges of the crust. This helps keep the pie from burning while allowing the filling to cook. You should also cut slits in the top crust. This lets steam escape, preventing too much pressure. Absolutely! You can use many types of apples. For a sweeter taste, try Fuji or Gala. If you prefer tartness, go for Granny Smith. Mixing different apples adds depth of flavor. Just remember that some apples break down more than others during baking. If your crust browns too fast, cover it with foil. This protects the crust while the filling cooks. You can also lower the oven temperature slightly. Check your pie regularly to catch any browning early. A homemade apple pie can last about 2 days at room temperature. If you refrigerate it, it can stay fresh for about 5 days. Just wrap it well to keep it from drying out. Yes, you can make it ahead! You can prepare the pie and keep it in the fridge for up to 2 days before baking. If you want to freeze it, wrap it well. It can last for about 2 months in the freezer. Just bake it straight from the freezer when you're ready to enjoy. For the full recipe, refer to the section above. This blog post gives you all the details to make a great apple pie. We covered ingredients, preparation, baking, tips, variations, and storage. Remember, the right apples and careful baking make the best pie. Don't forget to cool it before serving. Whether it's a family dessert or a special treat, apple pie brings joy. Follow these steps, and you’ll impress everyone with your baking skills. Enjoy your pie journey!

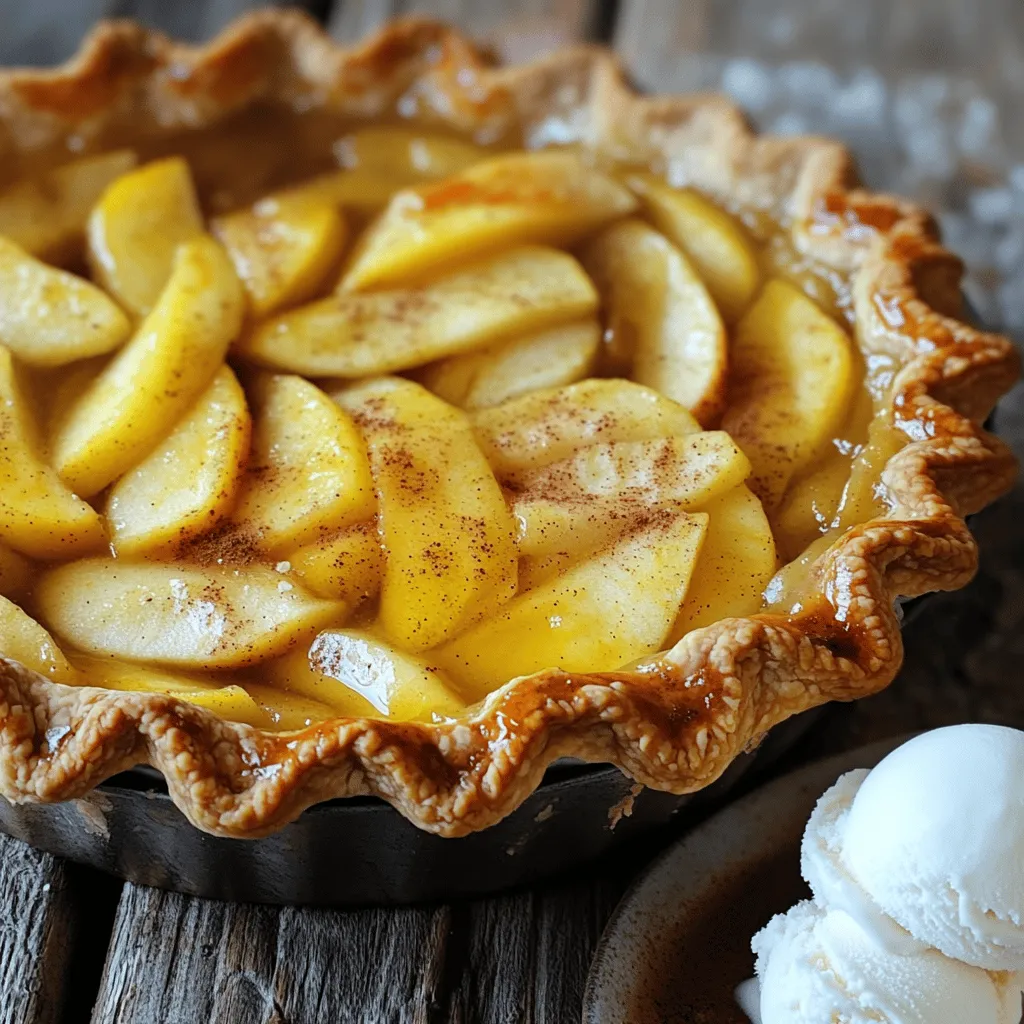
Are you ready to impress friends and family with a classic dessert? This homemade apple pie is easy to make and tastes like a warm hug. With crisp apples, a …

Read more

Categories Desserts Tags NO-ING-IMG

Iced Pumpkin Cream Chai Tea Refreshing Fall Drink

January 14, 2026July 20, 2025 by Chef Tavio
To make Iced Pumpkin Cream Chai Tea, gather these ingredients: - 2 cups strong brewed chai tea - 1/2 cup pumpkin puree - 1/4 cup milk (your choice of dairy or non-dairy) - 1/4 cup heavy cream (or substitute with coconut cream) - 2 tablespoons maple syrup (adjust to taste) - 1 teaspoon pumpkin pie spice (plus extra for garnish) - Ice cubes - Whipped cream (optional, for topping) This drink is rich in flavor and nutrients. Here’s what you get per serving: - Calories: Approximately 200-250 - Protein: 3-5 grams - Fat: 10-15 grams - Carbohydrates: 25-30 grams - Fiber: 2 grams Enjoying this drink gives you a nice boost of energy. The pumpkin adds fiber and vitamins, while chai offers antioxidants. You can swap ingredients to fit your tastes or needs: - Chai tea: Use rooibos tea for a caffeine-free option. - Pumpkin puree: Substitute with sweet potato puree for a different flavor. - Milk: Use almond, oat, or soy milk for dairy-free choices. - Heavy cream: Coconut cream gives a nice vegan alternative. - Maple syrup: Honey or agave syrup can replace maple syrup. - Pumpkin pie spice: Use cinnamon, nutmeg, or allspice if you need. These swaps let you customize the drink while keeping it tasty. You can make this recipe your own with simple changes. Now, let’s get ready for a delicious drink! For the full recipe, check out the [Full Recipe]. To begin, brew the chai tea. I recommend using two cups of strong chai tea. Use extra tea bags or loose leaf for a bold flavor. Follow the package instructions closely. After brewing, let the tea cool to room temperature. You can speed this up by placing it in the fridge for a bit. Next, prepare the pumpkin cream mixture. In a medium bowl, mix together the following: - 1/2 cup pumpkin puree - 1/4 cup milk (your choice) - 1/4 cup heavy cream (or coconut cream) - 2 tablespoons maple syrup (tweak to taste) - 1 teaspoon pumpkin pie spice Whisk these ingredients together until smooth. The mixture should be velvety and rich. Taste it and adjust the sweetness or spice as you like. Now, it’s time to assemble your drink. Grab a tall glass and fill it with ice cubes. Once the chai tea is cool, pour it over the ice, filling the glass about two-thirds full. Next, take the pumpkin cream mixture and spoon it gently over the chai tea. Watch as it floats! This makes a lovely layered drink. For an extra treat, add a dollop of whipped cream on top. Finish with a sprinkle of pumpkin pie spice for that fall vibe. To drink, give it a gentle stir to mix the layers, or enjoy the beautiful look as you sip. You can find the full recipe easily to follow along! To make your Iced Pumpkin Cream Chai Tea taste amazing, start with strong chai tea. Use double the amount of tea bags or loose leaf for a bold flavor. Let the tea cool before adding the pumpkin cream. This helps keep the drink refreshing. Mixing pumpkin puree with milk and cream creates a smooth blend. Whisk it well to avoid lumps. Taste it! Adjust the maple syrup and pumpkin pie spice to match your liking. Serve your drink in a tall glass filled with ice. Pour in the cooled chai tea, then add the pumpkin cream mixture on top. This creates a lovely layered look. For a fun touch, top it with whipped cream. A sprinkle of pumpkin pie spice on top makes it festive. Use a straw or spoon to mix it up before drinking. Share it with friends or enjoy it solo while relaxing. You can prepare the chai tea and pumpkin cream mix ahead. Brew the tea and chill it overnight. Prepare the pumpkin cream mixture and store it in the fridge. When you're ready, just pour the tea over ice and add the cream. This saves time and keeps your drink cool. You can also make a batch for a gathering. Just double the recipe for more servings. Enjoy every sip of this delightful fall drink! {{image_4}} You can easily make this drink vegan. Just swap the milk and cream with non-dairy options. Almond, oat, or soy milk works great. For the cream, use coconut cream. This keeps the rich flavor while being plant-based. You still get that pumpkin spice goodness without using any dairy. If you want to change the sweetness, try different sweeteners. Agave syrup, honey, or stevia can replace maple syrup. Adjust the amount to fit your taste. Each sweetener adds a unique flavor twist, so feel free to experiment. Less sugar can still give you a tasty drink. Want to change up the spices? You can! Try adding cinnamon, nutmeg, or ginger. Each spice brings its own warmth. For a spicy kick, add a pinch of cayenne pepper. Just a little can make your drink exciting. Mix and match spices for a unique flavor profile. For the full recipe, check out the main section on ingredients. To store any leftover Iced Pumpkin Cream Chai Tea, pour it into a sealed container. This keeps the drink fresh for up to three days in the fridge. If you plan to enjoy it later, do not add whipped cream until serving. If you have leftover chai tea, you can warm it up. Pour it into a pot and heat it on low. Stir it gently and avoid boiling. Once it's warm, you can add the pumpkin cream mix or enjoy it plain. You can freeze the chai tea base if you want to save it for later. Pour it into an ice cube tray and freeze until solid. Once frozen, pop the cubes into a bag. This gives you ready-made chai that you can blend with fresh pumpkin cream later. Avoid freezing the cream mixture, as it may change texture when thawed. Iced Pumpkin Cream Chai Tea is a cool drink that mixes chai tea with pumpkin and cream. It has warm spices, sweet pumpkin, and a rich creaminess. This drink is perfect for fall, making it a comforting choice on warm days. Yes, you can use any milk you like! Dairy milk, almond milk, or oat milk all work well. Each type of milk gives a different flavor and texture, so choose what you enjoy most. To reduce the sweetness, cut back on maple syrup. You can also skip the whipped cream or use unsweetened milk. Adjusting the pumpkin pie spice can also help balance the flavors without adding sugar. You can find Iced Pumpkin Cream Chai Tea at coffee shops, especially in fall. Many cafes offer seasonal drinks. You can also make it at home with the full recipe I shared above. - Chai Tea: Contains antioxidants and can boost heart health. - Pumpkin: Rich in vitamins A and C, good for your skin and vision. - Maple Syrup: Offers minerals like zinc and manganese, better than refined sugar. - Milk: Provides calcium and vitamin D for strong bones. Absolutely! If you have pre-made chai tea, just use that instead of brewing your own. This saves time and still gives the same great flavor. Just make sure it is strong for the best taste. Iced Pumpkin Cream Chai Tea is a fun and tasty drink. We discussed the key ingredients, including swaps for those you might not have. I shared easy steps to brew and prepare your chai. Tips helped you learn how to add great flavor. You found ways to make this drink vegan or adjust its sweetness. Enjoy making this drink at home. It's easy, fun, and perfect for fall!

Looking for a fun way to enjoy fall flavors? You’ll love Iced Pumpkin Cream Chai Tea! This drink blends cozy spices with refreshing iced tea. In this post, I’ll walk …

Read more

Categories Desserts Tags NO-ING-IMG

Brown Butter Pumpkin Chocolate Chip Cookies Delight

January 14, 2026July 20, 2025 by Chef Tavio
To make these delicious cookies, gather the following ingredients: - 1 cup unsalted butter - 1 cup pumpkin puree (canned or fresh) - 1 cup packed brown sugar - 1/2 cup granulated sugar - 1 large egg, at room temperature - 2 teaspoons pure vanilla extract - 2 cups all-purpose flour - 1 teaspoon baking soda - 1 teaspoon ground cinnamon - 1/2 teaspoon ground nutmeg - 1/2 teaspoon salt - 1 cup semi-sweet or dark chocolate chips - 1/2 cup chopped pecans (optional but recommended for added crunch) If you need to swap some ingredients, here are some easy options: - Use coconut oil instead of butter for a dairy-free version. - Maple syrup can replace granulated sugar for a natural sweetener. - For gluten-free cookies, try almond flour or a gluten-free flour blend. - You can swap the chocolate chips for dried cranberries or raisins for a twist. The type of chocolate chips you choose can change the cookies. Here are my favorites: - Semi-sweet chocolate chips provide a nice balance of sweet and rich. - Dark chocolate chips offer a deeper flavor and less sweetness. - Milk chocolate chips add creaminess and extra sweetness. - Try a mix of different types for a fun flavor combo. Now you're all set to create these amazing brown butter pumpkin chocolate chip cookies! For the full recipe, check out the details above. To start, melt 1 cup of unsalted butter in a medium saucepan. Use medium heat to keep it from burning. Stir it often, watching closely. After about 5-7 minutes, the butter will foam and turn golden brown. You will smell a rich, nutty aroma. Once it reaches this color, remove it from heat. Let it cool slightly so it doesn’t cook the egg later. In a large bowl, combine the warm brown butter with 1 cup of pumpkin puree, 1 cup of packed brown sugar, and 1/2 cup of granulated sugar. Use a whisk or wooden spoon to mix until it is smooth and creamy. Next, add 1 large egg and 2 teaspoons of pure vanilla extract. Whisk again until everything blends well and no lumps remain. In another medium bowl, whisk together 2 cups of all-purpose flour, 1 teaspoon of baking soda, 1 teaspoon of ground cinnamon, 1/2 teaspoon of ground nutmeg, and 1/2 teaspoon of salt. Make sure all the dry ingredients mix well. This step is key for even flavor in your cookies. Gradually add this dry mix to the wet ingredients. Stir gently with a spatula or wooden spoon until just combined. Be careful not to overmix. Next, fold in 1 cup of chocolate chips and, if you like, 1/2 cup of chopped pecans. Ensure they are spread evenly in the dough without overworking it. This step will help keep your cookies soft and chewy. For the full recipe, check out the complete instructions. To get the right texture for your cookies, remember these key points: - Chill the dough: Chilling for at least 30 minutes is a must. This helps the cookies stay thick and chewy. - Don’t overmix: When you mix the wet and dry ingredients, stop as soon as you see no dry flour. Overmixing makes them tough. - Watch the bake time: Remove the cookies when the edges set but the centers look soft. They will continue to cook on the sheet. Store your cookies in an airtight container. This keeps them fresh and soft. Here are some tips: - Room temperature: They stay good for about a week on the counter. - Freezing: For longer storage, freeze cookies in a single layer on a baking sheet. Once frozen, place them in a zip-top bag. They last up to three months. - Reheat: To enjoy warm cookies, heat them in the oven at 350°F for 5-7 minutes. Baking can be tricky. Avoid these mistakes to ensure perfect cookies: - Using cold butter: Use brown butter, but let it cool slightly before mixing with other ingredients. - Ignoring measurements: Accurate measuring is key. Use measuring cups and spoons for best results. - Skipping the cooling time: Don’t rush to move cookies off the tray. Let them cool on the sheet for 5 minutes to set properly. For a full recipe of these delightful cookies, check out the [Full Recipe]. {{image_4}} You can make these cookies gluten-free easily. Simply replace all-purpose flour with gluten-free flour. Look for blends made for baking. They work well and keep the cookies soft. You might need to add a bit of xanthan gum to mimic the texture. This helps hold everything together. Want a vegan version? Swap the egg for a flax egg. To make a flax egg, mix 1 tablespoon of flaxseed meal with 2.5 tablespoons of water. Let it sit for a few minutes to thicken. Use plant-based butter instead of regular butter. Choose dairy-free chocolate chips to keep it vegan-friendly. You can play with flavors in these cookies. Try adding spices like ginger or allspice for warmth. A bit of vanilla bean paste can give extra depth. Nuts like walnuts or pecans add a lovely crunch. You can even fold in dried cranberries for a tart twist. Mix and match to find your favorite combo! For the full recipe, check out the Brown Butter Pumpkin Chocolate Chip Cookies. To keep your Brown Butter Pumpkin Chocolate Chip Cookies fresh, proper storage is key. First, let the cookies cool completely. This prevents moisture from building up, which can make them soggy. Once cooled, place the cookies in an airtight container. Layer them with parchment paper to avoid sticking. Store at room temperature for up to four days. If you want them to last longer, consider freezing. Freezing cookies is a great option for later enjoyment. To freeze, first, shape the dough into balls. Place them on a baking sheet and freeze for about an hour. Once firm, transfer the dough balls to a freezer-safe bag. This method prevents them from sticking together. You can freeze them for up to three months. When ready to bake, just take out the desired amount and bake from frozen, adding a few extra minutes to the bake time. For the best taste, eat the cookies within the first few days. The flavors are at their peak freshness then. If stored well, they can last up to a week at room temperature. Always check for any signs of spoilage before eating, such as changes in texture or smell. The combination of brown butter and pumpkin gives these cookies a rich flavor. It’s worth taking care to store them right so you can enjoy every bite! For the full recipe, check the earlier sections. To make your cookies chewy, focus on a few key steps. Use more brown sugar than white sugar. Brown sugar adds moisture, which keeps cookies soft. Also, don't overmix the dough. Overmixing can make cookies tough. Chilling the dough is another great trick. It helps the cookies keep their shape. Lastly, bake them just until the edges are set. The centers should look slightly underbaked for that perfect chewy texture. Yes, you can use fresh pumpkin! To do this, start by roasting a small pumpkin. Cut it in half, scoop out the seeds, and bake it face down until soft. This usually takes about 30-45 minutes at 350°F (175°C). Once it cools, scoop out the flesh and puree it. This fresh pumpkin will add a wonderful flavor to your cookies. Just make sure to measure it out like you would with canned pumpkin. Brown butter is special because it adds a rich, nutty flavor to baked goods. When you heat butter, the milk solids toast and caramelize. This process creates a depth of flavor that plain butter can't match. Brown butter also has a lovely aroma that fills your kitchen. The warm, rich taste enhances the flavors of pumpkin and chocolate in your cookies. It’s a simple step that makes a big difference in taste. You can find the full recipe for Brown Butter Pumpkin Chocolate Chip Cookies to explore this delightful flavor further. This blog post covered all you need to bake amazing cookies. We explored essential ingredients and their substitutes. You learned about the best types of chocolate chips too. The step-by-step guide made it easy to follow along. Understanding tips for texture and storage will help you keep cookies fresh. We also looked at variations for gluten-free and vegan diets. Remember these insights next time you bake. Enjoy your delicious creations and happy baking!

If you crave a warm, cozy treat, you’ll love my Brown Butter Pumpkin Chocolate Chip Cookies. This recipe combines rich brown butter with pumpkin for a soft, flavorful cookie. The …

Read more

Categories Desserts Tags NO-ING-IMG
Older posts
Newer posts
← Previous Page1 … Page64 Page65 Page66 … Page73 Next →

TASTED NEST

Where Flavor Finds a Home 🍳🏡 — warm, simple, and crave-worthy recipes made for real life, from stovetop mornings to backyard dinners.

PAGES

Home About Contact Privacy Policy Terms & Conditions Cookie Policy GDPR Policy Copyright Policy Disclaimer

CATEGORIES

Appetizers Desserts Salads Breakfast Dinner
Copyright © 2026 Tasted Nest. All rights reserved.