Skip to content
  • GDPR Privacy Policy
  • Copyright Policy
  • Disclaimer
  • Terms & Conditions
Tasted Nest
  • Home
  • Appetizers
  • Desserts
  • Salads
  • Breakfast
  • Dinner
  • Privacy Policy
  • Contact
  • About

NO-ING-IMG

The BEST Homemade Apple Fritters Simple and Tasty

January 14, 2026July 20, 2025 by Chef Tavio
To make the best homemade apple fritters, gather these ingredients: - 2 large apples (like Granny Smith or Honeycrisp), peeled, cored, and diced - 1 cup all-purpose flour - 1/2 cup granulated sugar - 1 teaspoon baking powder - 1/2 teaspoon baking soda - 1/2 teaspoon ground cinnamon - 1/4 teaspoon ground nutmeg - 1/4 teaspoon salt - 1 large egg - 1/2 cup whole milk - 1 teaspoon vanilla extract - Vegetable or canola oil, for frying - 1 cup powdered sugar (for glaze) - 2 tablespoons milk (for glaze) - 1 teaspoon ground cinnamon (for glaze) Using the right measurements is key to great fritters. If you lack an ingredient, here are some smart swaps: - For flour, you can use whole wheat flour. It adds a nutty flavor. - Instead of granulated sugar, try brown sugar for a richer taste. - Almond or oat milk can replace whole milk if you want a dairy-free option. - If you don’t have eggs, use 1/4 cup of unsweetened applesauce. These swaps can change the taste but still keep the fritters delicious. Choosing the right apples makes a big difference. I recommend: - Granny Smith: They are tart and hold their shape well. - Honeycrisp: They are sweet and juicy, adding a lovely flavor. - Fuji: These apples are sweet and crisp, making for a tasty bite. Mixing different apples can create a great flavor balance. Choose your favorites and enjoy the tasty results! If you want the full recipe, check out the Heavenly Homemade Apple Fritters section for all the details. Start by gathering your mixing bowl and measuring cups. In the bowl, combine the dry ingredients. You will need: - 1 cup all-purpose flour - 1/2 cup granulated sugar - 1 teaspoon baking powder - 1/2 teaspoon baking soda - 1/2 teaspoon ground cinnamon - 1/4 teaspoon ground nutmeg - 1/4 teaspoon salt Whisk them together until they blend well. This mix will give your fritters a nice rise and flavor. Now, grab another bowl for the wet ingredients. Crack one large egg into it. Add: - 1/2 cup whole milk - 1 teaspoon vanilla extract Whisk these until smooth. Once mixed, pour this into the dry ingredients. Stir gently. You want a lumpy batter, so don’t overmix. Fold in your diced apples carefully to ensure they spread evenly. For frying, heat about 2 inches of vegetable or canola oil in a deep skillet. Use a thermometer to check the temperature. Aim for 350°F (175°C). Once hot, drop spoonfuls of batter into the oil. Fry only a few at a time to keep the heat steady. Cook for about 3-4 minutes on each side until golden brown. Use a slotted spoon to move them to a paper towel-lined plate. While your fritters cool, let’s make the glaze. In a medium bowl, mix: - 1 cup powdered sugar - 2 tablespoons milk - 1 teaspoon ground cinnamon Stir until smooth. This glaze adds a sweet finish to your warm fritters. Drizzle it over the fritters or dip them directly for a thicker coating. Let them set for a few minutes before serving for the best look. Check out the Full Recipe for more detailed guidance on making these tasty treats! To get your fritters just right, keep the oil hot. Aim for 350°F (175°C). Use a thermometer to check. If the oil is too cool, fritters will soak up oil and become greasy. If it’s too hot, they can burn outside while still raw inside. Fry in small batches. This keeps the oil temperature steady, ensuring a perfect golden brown crust. Preventing oil splatter is key for a safe kitchen. Use a deep pot or a heavy skillet. This helps control the oil and keeps it contained. When adding batter, do it slowly. A spoon helps keep the batter from splashing. If you have a lid, place it on the pot slightly ajar. This lets steam out but keeps oil from splattering everywhere. For fluffy fritters, don’t overmix the batter. A few lumps are good! The air pockets created help make the fritters light. Also, fold in the apples gently. This keeps the batter airy. Finally, let the batter rest for about 10 minutes. This short break allows the flour to absorb moisture, which creates a lighter texture in your fritters. {{image_4}} You can enhance your apple fritters by adding spices. Cinnamon is a classic choice. Just add an extra pinch to the batter. Nutmeg also adds a warm taste. You might try ginger for a zesty kick. Cardamom can bring a unique flavor too. Experiment with these spices to find your perfect mix. The glaze for your fritters can change too. Instead of a classic glaze, try maple syrup. It gives a rich flavor that pairs well with apples. You can also use a chocolate glaze for a sweet twist. For a fruity note, mix in some orange juice or zest. Each option adds a different flair to your fritters. If you want a healthier option, swap out some ingredients. Use whole wheat flour instead of all-purpose flour. This adds fiber and nutrients. You can reduce sugar or use honey or maple syrup. Applesauce can replace the egg for a vegan choice. These changes keep the fritters tasty while making them better for you. For the full recipe, check the earlier sections for guidance. To keep your fritters fresh, let them cool completely. Once cooled, place them in an airtight container. Line the bottom with paper towels to absorb excess moisture. This step helps keep them crispy. Store the container in the fridge for up to three days. When you’re ready to enjoy leftovers, reheating is key. The best way to reheat fritters is in the oven. Preheat your oven to 350°F (175°C). Arrange the fritters on a baking sheet. Heat them for about 10 minutes. This method helps restore their crispiness. You can also use a toaster oven for a quicker option. If you want to save some fritters for later, freezing is a great choice. Allow the fritters to cool completely first. Then, wrap each fritter in plastic wrap. Place the wrapped fritters in a freezer-safe bag. They can stay in the freezer for up to three months. When you're ready to eat, thaw them in the fridge overnight. Reheat them in the oven for the best texture. For the full recipe, check out the delicious steps I shared earlier. Enjoy your homemade apple fritters anytime! For apple fritters, I love using Granny Smith or Honeycrisp apples. Granny Smith gives a nice tartness, which balances the sweetness. Honeycrisp, on the other hand, adds a juicy sweetness that complements the dough perfectly. Both hold their shape well while frying, making them ideal for this recipe. Yes, you can make apple fritters without eggs! To replace one egg, use 1/4 cup of unsweetened applesauce or a mashed banana. This will keep your fritters moist and tasty while maintaining the right texture. Just mix it in with the wet ingredients as you would with an egg. To achieve crispy fritters, first, make sure your oil is hot enough, around 350°F (175°C). Fry small batches to prevent the temperature from dropping. After frying, place them on paper towels to absorb excess oil. A light glaze also helps add a bit of crunch without making them soggy. Homemade apple fritters are best enjoyed fresh. They can last for about 1-2 days when stored in an airtight container at room temperature. If you want them to last longer, consider freezing them. Just reheat in the oven for a few minutes to regain crispiness. For the full recipe, check out the details above! Apple fritters are easy to make with the right steps and tips. We covered the ingredients, measurements, and the best apples to use. I shared simple instructions for preparing the batter, frying, and glazing your fritters. Tips helped you achieve the perfect fry and avoid messes. You can also explore fun variations and learn storage options for leftovers. Remember, have fun experimenting with flavors. Enjoy your delicious apple fritters!

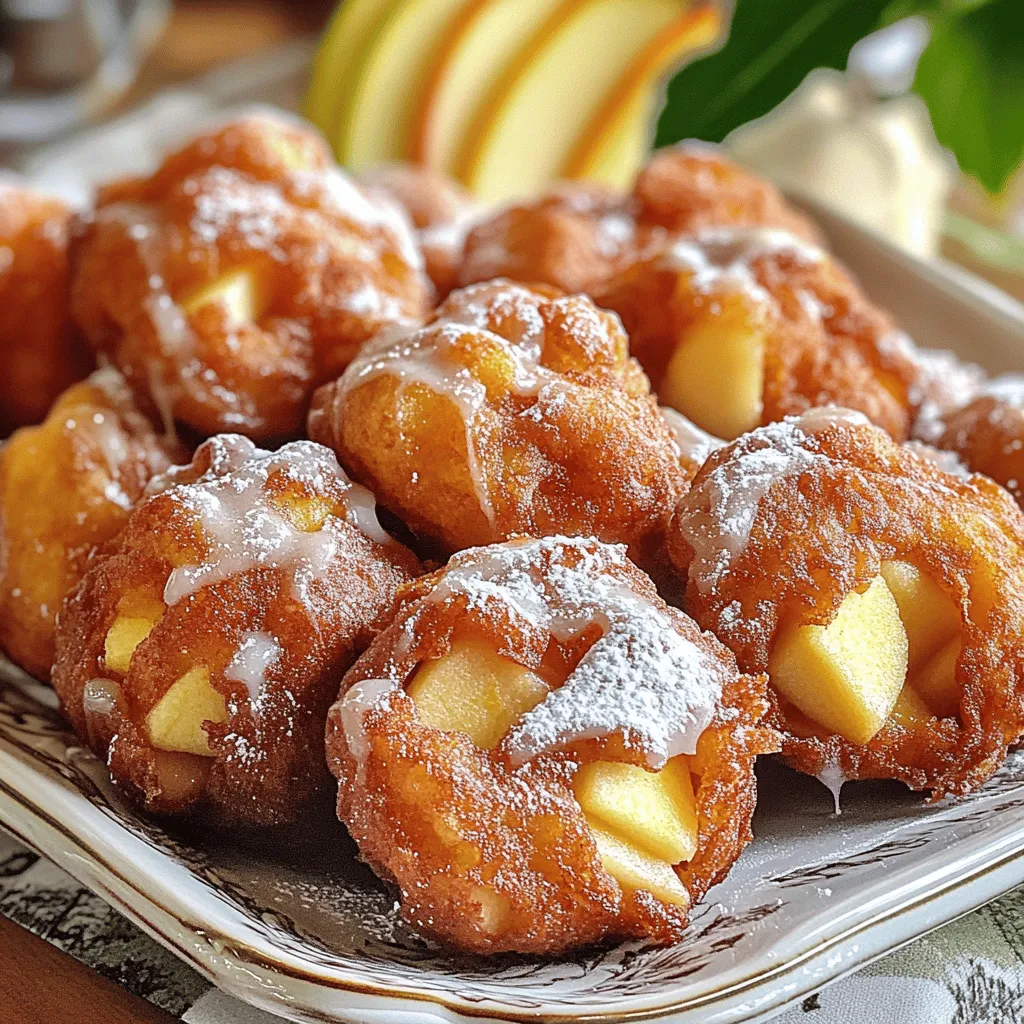
Looking for the perfect treat? My recipe for the BEST homemade apple fritters is simple and delicious! These warm, crispy bites filled with sweet apples are a game-changer. I’ll guide …

Read more

Categories Desserts Tags NO-ING-IMG

Baked Pumpkin Donuts with Maple Glaze Delight

January 14, 2026July 20, 2025 by Chef Tavio
- 1 cup pumpkin puree (preferably homemade or canned) - 1/2 cup granulated sugar - 1/4 cup packed brown sugar - 1/2 cup unsweetened applesauce - 2 large eggs - 1/2 cup vegetable oil - 1 teaspoon pure vanilla extract - 1 1/2 cups all-purpose flour - 1 teaspoon baking powder - 1 teaspoon baking soda - 1 teaspoon ground cinnamon - 1/2 teaspoon ground nutmeg - 1/4 teaspoon ground ginger - 1/4 teaspoon salt - 1 cup powdered sugar - 2 tablespoons pure maple syrup - 1 to 2 tablespoons milk (adjust as needed for the glaze) Each ingredient plays a key role in our baked pumpkin donuts. Pumpkin puree adds moisture and a rich, sweet flavor. Granulated sugar and brown sugar sweeten the mix while giving it a lovely texture. Applesauce replaces some fat, making the donuts soft. Eggs act as a binder, holding everything together. The vegetable oil keeps the donuts moist and fluffy. Baking powder and baking soda help the donuts rise and get that perfect lightness. Spices like cinnamon, nutmeg, and ginger bring warmth and depth to the flavor. Salt balances the sweetness and enhances every bite. Finally, powdered sugar and maple syrup create a sweet, sticky glaze that makes our donuts shine! When choosing pumpkin puree, look for organic brands or make your own from fresh pumpkins. For sugars, select pure granulated and brown sugar without additives. Fresh eggs should be large and free-range if possible. Use high-quality vanilla extract for the best flavor. For flour, choose all-purpose for the right texture. Spices should be fresh for maximum taste. Check the expiration dates on baking powder and baking soda to ensure they are active. Lastly, use real maple syrup for the glaze, as it adds a wonderful touch of flavor. Following these tips will ensure your donuts are the best they can be! Start by preheating your oven to 350°F (175°C). Grab your donut pan and spray it with cooking spray. This helps the donuts come out easily. In a large bowl, mix together the pumpkin puree, granulated sugar, brown sugar, applesauce, eggs, vegetable oil, and vanilla extract. Use a whisk to blend these items until smooth. In another bowl, whisk the flour, baking powder, baking soda, cinnamon, nutmeg, ginger, and salt. This step is key for even mixing. Now, slowly pour the dry mix into the wet mix. Stir gently until just combined. Be careful not to overmix; this keeps the donuts fluffy. Use a spoon or piping bag to fill the donut pan about 3/4 full with the batter. Bake in your preheated oven for 12 to 15 minutes. To check if they are done, insert a toothpick into a donut. If it comes out clean, they are ready. Let them cool in the pan for 5 minutes before moving them to a wire rack. While your donuts cool, prepare the maple glaze. In a bowl, whisk together the powdered sugar and maple syrup. Slowly add milk until the glaze is smooth yet thick enough to coat the donuts. Once the donuts are completely cool, dip the tops into the glaze. Allow excess glaze to drip back into the bowl. Place the glazed donuts back on the wire rack. Let them set for a few minutes before you enjoy them. For the full recipe, check the section above. When making baked pumpkin donuts, a few mistakes can ruin the fun. - Overmixing the batter: This can lead to dense donuts. Mix just until combined. - Not greasing the pan: Always grease your donut pan well. This helps with easy removal. - Underbaking: Donuts should be firm to the touch. Use a toothpick to check doneness. - Skipping the glaze: The maple glaze adds flavor. Don't skip it! To enhance flavor and texture, follow these tips: - Use fresh pumpkin puree: If you can, use fresh pumpkin. It has a richer taste than canned. - Add spices: A pinch more cinnamon or nutmeg can boost flavors. - Let the batter rest: Allow the batter to sit for a few minutes. This can help with texture. - Cool before glazing: Make sure the donuts cool completely. This helps the glaze stick better. Having the right tools makes baking easier. Here’s what you need: - Donut pan: A non-stick donut pan is best for easy removal. - Whisk: A good whisk helps mix ingredients well. - Mixing bowls: Use large bowls for mixing wet and dry ingredients separately. - Piping bag or spoon: For filling the donut pan neatly. - Wire rack: This allows donuts to cool evenly and helps glaze set. For a full recipe of baked pumpkin donuts with maple glaze, check the main section. {{image_4}} You can get creative with flavors. Adding chocolate chips can make these donuts extra special. Consider using nuts like walnuts or pecans for added crunch. You can also try spices like cardamom or allspice for a twist. If you love citrus, a touch of orange zest brightens the flavor. You can make these donuts healthier without losing taste. Swap granulated sugar for coconut sugar to lower the glycemic index. You can replace vegetable oil with applesauce for a lighter version. For a gluten-free option, use almond or oat flour instead of all-purpose flour. These donuts fit various seasons. In fall, add cinnamon and clove for warmth. For winter, a hint of peppermint in the glaze can be festive. In spring, incorporate fresh citrus for a bright taste. In summer, try using fresh berries in the batter. Each season brings new flavor possibilities, making this recipe versatile. You can find the full recipe [here](#). To keep your baked pumpkin donuts fresh, store them in an airtight container. This helps prevent moisture loss and keeps them soft. If you have leftover donuts, wait until they cool completely. Then, layer them with parchment paper to avoid sticking. You can also refrigerate them if you live in a warm area. However, for the best taste, enjoy them at room temperature. Baked pumpkin donuts can last about 3 to 5 days when stored properly. If you keep them in the fridge, they may stay fresh for a week. However, the flavor and texture may change over time. If you want to keep them longer, consider freezing them. They can last up to three months in the freezer. To bring back the warmth and softness, reheat your donuts in the oven. Set it to 350°F (175°C) and heat them for about 5 minutes. You can also use the microwave for quick reheating. Warm them for about 10-15 seconds. Just be careful, as they can become tough if overheated. Enjoy these treats fresh for the best experience! For the full recipe, check out the detailed instructions above. Yes, you can make these donuts gluten-free. Use a 1:1 gluten-free flour blend. This blend works well and keeps the texture light. I suggest checking the label to ensure it contains xanthan gum. This ingredient helps give the donuts structure. Just replace all-purpose flour with the gluten-free blend in the recipe. To make the maple glaze thicker, add more powdered sugar. Start with one tablespoon at a time. Mix well after each addition. You can also reduce the amount of milk. Less milk makes the glaze thicker. Keep adjusting until you reach your preferred consistency. Toppings can really add fun to your pumpkin donuts. Here are some great options: - Chopped pecans - Crushed graham crackers - Cinnamon sugar - Chocolate chips - Extra maple syrup drizzle These toppings give flavor and a nice texture contrast! Enjoy experimenting with your favorites. For the full recipe, check out the earlier section. Baked pumpkin donuts are easy to make and fun to eat. We covered essential ingredients, steps for baking, and tips for the best results. Remember to choose quality ingredients for great flavor. Avoid common mistakes to get the perfect texture every time. Consider trying new flavors or substitutes to keep things fresh. With proper storage, these donuts will stay tasty for days. I hope you enjoy making and sharing these delicious treats!

Welcome to a cozy fall treat: Baked Pumpkin Donuts with Maple Glaze Delight! If you love the warm flavors of pumpkin and the sweetness of maple, you’re in for a …

Read more

Categories Desserts Tags NO-ING-IMG

The Best Snickerdoodle Zucchini Bread Delightful Recipe

January 14, 2026July 20, 2025 by Chef Tavio
To make the best snickerdoodle zucchini bread, you'll need the following main ingredients: - 2 cups grated zucchini (about 2 medium zucchinis) - 1 ½ cups all-purpose flour - 1 cup granulated sugar - ½ cup packed brown sugar - ½ cup vegetable oil - 2 large eggs - 1 teaspoon vanilla extract - 1 teaspoon baking soda - 1 teaspoon baking powder - 1 teaspoon ground cinnamon - ½ teaspoon ground nutmeg - ½ teaspoon salt - ¼ teaspoon cream of tartar These ingredients work together to create a moist and flavorful bread that everyone will love. You can add some optional ingredients to elevate the flavor of your bread: - ½ cup chopped walnuts or pecans (optional) - 2 tablespoons cinnamon-sugar mixture (for topping) The nuts add crunch, while the cinnamon-sugar topping gives it a sweet finish. To make your snickerdoodle zucchini bread, you will need these tools: - 9x5 inch loaf pan - Mixing bowls - Whisk - Spatula - Grater for zucchini - Clean kitchen towel - Small bowl for cinnamon-sugar mixture Having these tools ready will make your baking process smooth and fun. You can find the full recipe to get started! Start by preheating your oven to 350°F (175°C). Take a 9x5 inch loaf pan and grease it well. You can dust it with flour or line it with parchment paper. This makes it easy to remove the bread later. In a large mixing bowl, add the granulated sugar, brown sugar, and vegetable oil. Whisk these together until smooth. This step makes the base of your bread sweet and moist. Next, add the eggs one at a time, mixing well after each. Stir in the vanilla extract until it's all mixed in. Grate your zucchini and squeeze it lightly in a clean kitchen towel. This removes extra moisture. Now, fold the zucchini into your wet mixture. In a separate bowl, sift the flour, baking soda, baking powder, cinnamon, nutmeg, salt, and cream of tartar together. Gradually mix this dry mix into the wet ingredients. Stir gently until just combined. Don't overmix, as this keeps your bread light. If you want to add nuts, now is the time. Fold in the chopped walnuts or pecans gently. Pour the batter into your loaf pan and smooth the top. In a small bowl, mix the cinnamon-sugar topping. Evenly sprinkle this over the batter for extra crunch and flavor. Bake for 50-60 minutes. Use a toothpick to check for doneness. If it comes out clean, your bread is ready! Let it cool for about 10 minutes in the pan. Then, transfer it to a wire rack to cool completely. Enjoy this delightful recipe! For the full recipe, check [Full Recipe]. To get the best texture, start with fresh zucchini. It must be grated well. Too much moisture can make the bread soggy. Squeeze out excess water using a clean towel after grating. This trick helps keep your Snickerdoodle zucchini bread light and fluffy. Remember, a light hand when mixing is key. Overmixing can create a dense loaf, which we want to avoid. Use a box grater or food processor to grate zucchini. Aim for small, even pieces. This helps the zucchini blend well into the batter. Do not peel the zucchini; keep the skin on for added nutrients and color. You can grate extra and freeze it for later use. This way, you always have zucchini ready for your next bake. Serve your Snickerdoodle zucchini bread warm or at room temperature. Slice it into thick pieces for a hearty treat. I love adding a dollop of cream cheese or butter on top. It adds a rich flavor that pairs well with the spices. For a fun twist, sprinkle some extra cinnamon-sugar on top before serving. You can also garnish with fresh mint leaves. This makes the bread look fancy and inviting. Enjoy the unique taste of this delightful recipe! {{image_4}} You can make a gluten-free version of this tasty bread. Use gluten-free flour instead of regular all-purpose flour. Brands like Bob's Red Mill or King Arthur Flour work well. You may need to add a bit more moisture, like an extra egg or some applesauce. This keeps the bread moist and fluffy. While snickerdoodle is great, mixing flavors can be fun. Try adding chocolate chips for a sweet twist. A touch of lemon zest can brighten the flavors. You could also mix in dried fruits, like cranberries or raisins. These additions give your bread a unique taste. Mini loaves are adorable and perfect for sharing. To make mini versions, use a mini loaf pan. Fill each mini pan about halfway. Bake for 30-35 minutes, but check them often. They cook faster than a full loaf. You can give them as gifts or enjoy them yourself. For the complete recipe, check out the Full Recipe section. Happy baking! To keep your snickerdoodle zucchini bread fresh, wrap it in plastic wrap. This helps lock in moisture. Place it in an airtight container or a resealable bag for added protection. Store it at room temperature for up to three days. If you want it to last longer, refrigerate it. Just remember to let it cool completely before wrapping it. Freezing is a great way to save your snickerdoodle zucchini bread. First, slice the bread into individual pieces. This makes it easier to thaw later. Wrap each slice tightly in plastic wrap, then place them in a freezer-safe bag. Label the bag with the date. You can freeze the bread for up to three months. To enjoy a slice, just take it out and let it thaw at room temperature. Reheating snickerdoodle zucchini bread is simple. For the best taste, use an oven. Preheat your oven to 350°F (175°C). Place the slice on a baking sheet and warm it for about 10 minutes. This helps restore its soft texture. You can also use a microwave, but be careful. Heat it for just 10-15 seconds to avoid making it tough. Enjoy it warm with butter or cream cheese for a tasty treat! Yes, you can substitute the granulated sugar. Use coconut sugar or maple syrup instead. These options will add a unique flavor. Keep in mind that the texture may change slightly. Adjust the liquid in the recipe if using liquid sweeteners. To check if the bread is done, insert a toothpick into the center. If it comes out clean, the bread is ready. You can also gently press the top. It should spring back when cooked. If it leaves an imprint, bake a bit longer. To make the recipe vegan, replace the eggs. Use flax eggs or applesauce instead. For flax eggs, mix one tablespoon of flaxseed meal with three tablespoons of water. Let it sit for a few minutes. This will help bind the ingredients together. If your loaf sinks, it could be due to overmixing. Mix just until combined to avoid this. Also, check your oven temperature. An oven that is too hot can cause sinking. Lastly, ensure you add enough leavening agents like baking soda and baking powder. Snickerdoodle zucchini bread is a fun twist on classic flavors. We covered its main and optional ingredients, tools needed, and gave step-by-step instructions. You also learned tips for a perfect loaf, serving ideas, and variations like gluten-free options. Remember to store your bread properly and follow the reheating tips for the best taste. With this recipe, you can enjoy a delicious treat that not only tastes great but is also easy to make. Happy baking!

Are you ready to enjoy a unique twist on a classic treat? My Snickerdoodle Zucchini Bread recipe brings all the warm spices and sweetness you love, while adding a healthy …

Read more

Categories Desserts Tags NO-ING-IMG

Caramel Apple Bark Irresistible Sweet Treat Recipe

January 14, 2026July 20, 2025 by Chef Tavio
- 2 cups white chocolate chips - 1 cup caramel sauce - 2 medium apples (Granny Smith or Honeycrisp recommended) - 1/2 cup crushed graham crackers - 1/4 teaspoon ground cinnamon - A pinch of sea salt - Optional ingredients for garnish: Chopped walnuts or pecans To make caramel apple bark, you need simple ingredients. First, get white chocolate chips to create a sweet base. The caramel sauce adds a rich, gooey layer. Apples give a fresh crunch and flavor. I love using Granny Smith or Honeycrisp apples for their crispness. Crushed graham crackers add texture and a hint of toasty flavor. Ground cinnamon enhances the warmth of the bark. A pinch of sea salt balances the sweetness perfectly. If you want to take it up a notch, sprinkle chopped walnuts or pecans on top for extra crunch. Each ingredient plays a key role in this treat. They work together to create layers of flavor and texture. This blend gives your bark that irresistible taste. You can find the full recipe to guide you through the steps. Enjoy making this fun treat with simple items from your kitchen! - Wash and core the apples. - Chop apples into bite-sized pieces. Start with clean apples. Rinse them well under water. Remove the core from each apple. You can use a knife or an apple corer. Now, chop the apples into small, bite-sized pieces. This size helps them mix well into the bark. - Microwave method for melting chocolate. - Tips for achieving a smooth consistency. Next, we melt the white chocolate. Place the chocolate chips in a microwave-safe bowl. Heat them in the microwave. Set the timer for 30 seconds. Stir the chocolate after each interval. Keep heating until it is smooth. If it's not fully melted, heat it a bit more. Be careful not to burn it. - Folding in graham crackers and spices. - Ensuring even coating with white chocolate. Now, it's time to mix. Once the chocolate is smooth, add the crushed graham crackers. Sprinkle in the ground cinnamon and a pinch of sea salt. Gently fold everything together. Make sure the graham crackers are well-coated in the chocolate. - Lining the baking sheet with parchment paper. - How to spread the mixture evenly. Grab a baking sheet and line it with parchment paper. This step helps with easy removal later. Pour the white chocolate mixture onto the sheet. Use a spatula to spread it out evenly. Aim for a rectangle about 1/4 inch thick. - Distributing chopped apples. - Drizzling caramel sauce effectively. Time to add the apples. Sprinkle the chopped apples evenly over the white chocolate layer. Then, take the caramel sauce and drizzle it all over. Make sure some caramel lands on the apple pieces. This adds sweetness and flavor. - Refrigerating to set. - Breaking the bark into pieces. Now, place the baking sheet in the refrigerator. Let it chill for 30 to 45 minutes. This step helps the chocolate harden. Once set, take it out. Break the bark into irregular pieces. This gives it a rustic look. You can also sprinkle chopped nuts on top if you like. For the full recipe, check out the details above. Using fresh apples is key. They provide crunch and a bright flavor. Choose apples like Granny Smith or Honeycrisp for a nice balance of sweet and tart. These apples hold their shape well and add a nice bite to the bark. When it comes to chocolate, always pick high-quality white chocolate chips. They melt smoothly and create a creamy base. Avoid cheap brands; they can clump or seize. To enhance the caramel flavor, try adding a splash of vanilla extract to the caramel sauce. This boosts the sweetness and adds depth. You can also sprinkle some sea salt on top after drizzling caramel. The salt cuts through the sweetness and makes each bite more exciting. For toppings, you can get creative! Consider adding mini chocolate chips, crushed pretzels, or even dried cranberries. Each topping brings a unique texture and flavor that makes your bark stand out. If your chocolate turns grainy, it likely overheated. To fix this, try adding a teaspoon of coconut oil while stirring. This helps smooth it out. To keep your apples from browning, toss them in a little lemon juice after chopping. The acid in the juice slows down oxidation. This way, your bark stays bright and fresh-looking. For the full recipe, check out the detailed steps to make this delicious treat! {{image_4}} You can switch up the chocolate in your bark. Milk chocolate brings a creamy taste. Dark chocolate makes it rich and bold. Try adding flavors like peppermint or coconut. These will give your bark a fun twist. Don’t stop at apples! You can use pears for a juicy flavor. Bananas add a soft sweetness. Dried fruits like cranberries or apricots work well too. They give a chewy texture and extra taste. Want to make your bark more fun? Nuts like walnuts or pecans add crunch. Seeds like pumpkin or sunflower are great too. You can sprinkle colorful sprinkles for a festive look. Seasonal spices, like nutmeg or ginger, can add warmth and depth. These unique touches make your bark stand out. For more ideas, check out the Full Recipe for Caramel Apple Bark! To keep your caramel apple bark fresh, place it in an air-tight container. This step is key to preventing it from becoming stale. You can also layer pieces of parchment paper between layers to avoid them sticking together. Storing the bark in the fridge can help it stay firm. If you want to store it for a longer time, freezing is a great option. Wrap the bark tightly in plastic wrap before placing it in a freezer bag. This helps keep out air and moisture. Caramel apple bark can stay fresh for about two weeks when stored properly. In the fridge, it can last even longer. If you freeze it, expect it to last up to three months. Keep an eye out for signs that the bark has gone bad. If you see any discoloration or a change in smell, it’s time to toss it. Always trust your senses; they help you know when food is not safe to eat. To make Caramel Apple Bark, follow these steps: 1. Wash and core the apples, then chop them into small pieces. 2. Melt white chocolate in the microwave. Stir well for a smooth texture. 3. Mix in crushed graham crackers, ground cinnamon, and sea salt. 4. Spread the mixture on parchment paper, forming a rectangle. 5. Add chopped apples evenly on top and drizzle with caramel sauce. 6. Chill in the refrigerator for 30 to 45 minutes until hard. 7. Break into pieces and enjoy! This recipe is simple and fun, perfect for sharing with friends. Yes, you can use different chocolates for your Caramel Apple Bark. Milk chocolate adds sweetness. Dark chocolate gives a rich, bold taste. You can also mix chocolates for a unique flavor. Each option creates a different treat, so feel free to experiment! Granny Smith and Honeycrisp apples work best. Granny Smith apples are tart and crisp. They balance the sweetness of caramel and chocolate. Honeycrisp apples are sweet and juicy, adding a delightful flavor. Both types hold their shape well and give the bark a great crunch. Caramel Apple Bark can last up to two weeks when stored properly. Keep it in an air-tight container to maintain freshness. If stored in the fridge, it stays good longer. Check for any signs of spoilage, like a change in smell or texture. You can definitely customize your Caramel Apple Bark! Try adding nuts like walnuts or pecans for crunch. Dried fruits like cranberries or cherries can add sweetness. You can also mix in spices, like nutmeg or allspice, for extra flavor. Personalizing your bark makes it even more special! You now know how to make Caramel Apple Bark. This treat mixes chocolate, apples, and caramel for a tasty snack. We covered each step, from preparing the apples to setting the bark. Remember to choose fresh ingredients for the best results. Don’t hesitate to customize your bark with different fruits or chocolates. Store it properly to keep it fresh and delicious. Enjoy sharing this easy recipe with friends and family. You’ll impress them with your new skills!

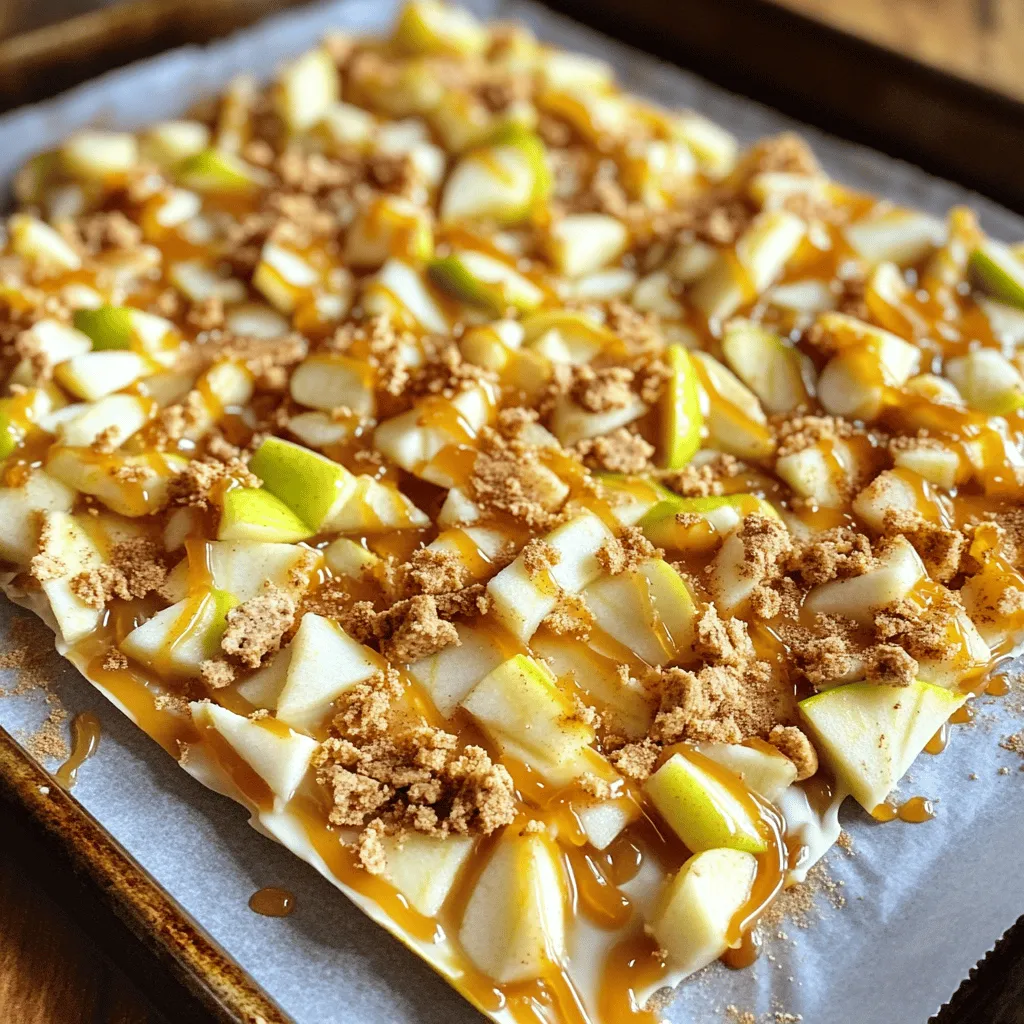
Looking for a fun and tasty treat? Caramel Apple Bark is the perfect solution! This sweet delight mixes white chocolate, apples, and caramel into an easy, crowd-pleasing snack. Whether for …

Read more

Categories Desserts Tags NO-ING-IMG

Cinnamon Roll Pumpkins Delightful Fall Treat Recipe

January 14, 2026July 20, 2025 by Chef Tavio
To make cinnamon roll pumpkins, you need some simple ingredients. Here’s the list: - 2 cups all-purpose flour - 1/2 cup granulated sugar - 1 tablespoon ground cinnamon - 1/4 teaspoon ground nutmeg - 1/2 teaspoon salt - 2 1/4 teaspoons active dry yeast (1 packet) - 1/2 cup warm milk (approximately 110°F) - 1/4 cup unsalted butter, melted - 1 large egg - 1/2 cup packed brown sugar - 1 tablespoon vanilla extract - 1/4 cup chopped pecans or walnuts (optional) - 1/2 cup icing sugar for drizzling Each ingredient plays a key role. The flour gives the rolls their structure. Sugar adds sweetness, while cinnamon gives that warm flavor we all love. Yeast makes the dough rise, creating soft and fluffy rolls. Warm milk activates the yeast, and butter adds richness. The egg binds everything together. Brown sugar adds a deep taste, and vanilla gives a nice aroma. Chopped nuts add crunch if you like, and icing sugar finishes them off with a sweet drizzle. For detailed cooking steps, check the Full Recipe. This way, you can enjoy these delightful treats at home! 1. Start by combining warm milk and yeast in a small bowl. Let it sit for 5-10 minutes. It will get frothy, which shows the yeast is ready. 2. In a large bowl, mix together the dry ingredients. This includes the all-purpose flour, granulated sugar, ground cinnamon, ground nutmeg, and salt. Whisk until everything is well combined. 1. Once your dough is ready, add the melted butter, large egg, vanilla extract, and the frothy yeast mixture to the dry mix. Stir until a soft dough forms. 2. Transfer the dough to a floured surface and knead gently for about 5-7 minutes. You want it to be smooth and elastic. 3. Roll the dough out into a rectangle that is about 1/4 inch thick. 4. Spread the packed brown sugar evenly over the dough. Then sprinkle some more ground cinnamon and chopped nuts on top if you like. 5. Starting from one edge, roll the dough tightly into a log. Make sure to seal the edges well. 1. Use a sharp knife to cut the log into 12 equal pieces. Place these pieces in a greased round baking pan or a muffin tin. 2. Preheat your oven to 375°F (190°C). Let the dough pieces rise for another 30 minutes, uncovered. 3. Bake the rolls in your preheated oven for 20-25 minutes. They should be golden brown and smell great. 4. After baking, let them cool for a bit. While they cool, mix icing sugar with a few drops of water to make a simple icing. Drizzle it over the warm rolls before serving. For the full recipe, check out the details provided above. Ensuring proper yeast activation To ensure your yeast works well, use warm milk. The milk should be about 110°F. Mix the yeast with the warm milk and let it sit for 5-10 minutes. You know the yeast is activated when it gets frothy. This step is key. If the yeast is not active, your rolls won't rise. Tips for kneading and dough texture Kneading develops gluten. This gives the dough its texture. Knead the dough for about 5-7 minutes. It should feel smooth and elastic. If it is too sticky, sprinkle a little flour. Make sure not to add too much flour, as it can make the rolls dry. How to make the ideal icing for drizzling For a simple icing, mix icing sugar with a few drops of water. The goal is a drizzling consistency. Start with one tablespoon of water and add more if needed. This icing adds sweetness and a nice touch to your rolls. Presentation ideas for autumn-themed display Serve your rolls in a pumpkin-shaped dish for a festive look. You can also sprinkle chopped nuts on top for added texture. Arrange them on a wooden board with small pumpkins around. This creates a warm, inviting scene perfect for fall gatherings. {{image_4}} You can add fun flavors to your cinnamon roll pumpkins. Adding spices like ginger or cloves brings warmth. These spices give a cozy fall vibe. You can also add chocolate chips or dried fruit. Chocolate chips add sweetness. Dried fruit, like raisins or cranberries, adds a chewy texture. Try mixing different flavors to find your favorite twist! You might want to change the recipe for dietary needs. If you're gluten-free, use gluten-free flour. It works well and tastes great! For a vegan option, swap the egg for a flax egg. You can also use plant-based butter and milk. These changes help everyone enjoy this treat. Feel free to get creative with substitutions! For the full recipe, be sure to check the guide. Store leftover cinnamon rolls at room temperature for up to two days. Place them in an airtight container. This keeps them soft and fresh. If you want to keep them longer, refrigerate them for up to a week. However, the fridge can dry them out. For best results, freeze the rolls. Wrap each roll in plastic wrap, then place them in a freezer bag. You can freeze them for up to three months. When ready to eat, let them thaw in the fridge overnight. To reheat cinnamon rolls, avoid the microwave if possible. The microwave can make them tough. Instead, use the oven for the best texture. Preheat the oven to 350°F (175°C). Place the rolls on a baking sheet. Cover them with foil to keep the moisture in. Heat for about 10-15 minutes. You can also reheat them in the toaster oven. Just be careful not to overdo it. Enjoy your warm, gooey cinnamon roll pumpkins! For a full recipe, check out the section above. How do you make pumpkin-flavored cinnamon rolls? To make pumpkin-flavored cinnamon rolls, start with your dough. Add pureed pumpkin to the dough mixture. You can use about half a cup of pumpkin puree. This gives the rolls a rich flavor and moist texture. Mix the pumpkin in with the wet ingredients. Then, follow the same steps in the Full Recipe to roll and fill the dough. Can I make these in advance? Yes, you can make these cinnamon roll pumpkins in advance. Prepare the dough and fill it, then cut the rolls. Place them in a greased pan and cover them tightly with plastic wrap. You can store them in the fridge overnight. The next day, take them out, let them rise, and bake as usual. How do you know when the rolls are fully baked? You can tell the rolls are fully baked by their color and smell. They should be golden brown and smell sweet. You can also use a toothpick. Insert it into the center of a roll. If it comes out clean, the rolls are ready. If you see wet dough, bake a few minutes longer. In this post, we explored making delicious cinnamon roll pumpkins. We covered ingredients, step-by-step instructions, and tips for perfection. We even looked at fun variations and storage tips. Remember, the right techniques make a big difference in flavor and texture. Enjoy experimenting with these rolls. They bring warmth and joy to your kitchen. Happy baking!

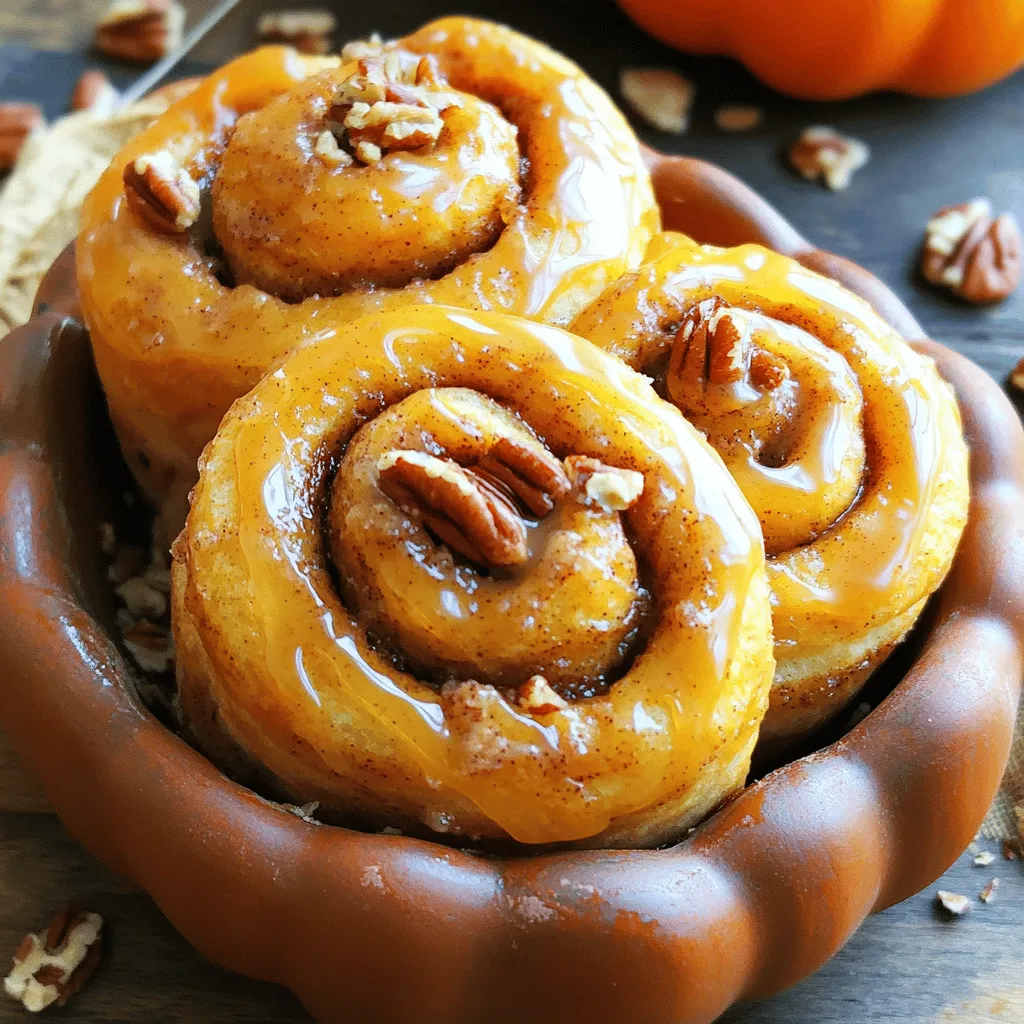
Fall is the perfect time for cozy treats, and what could be cozier than Cinnamon Roll Pumpkins? This delightful recipe combines the warm flavors of cinnamon and pumpkin into a …

Read more

Categories Desserts Tags NO-ING-IMG

Fall Harvest Vegetable Soup Nourishing and Hearty Meal

January 14, 2026July 20, 2025 by Chef Tavio
For this Fall Harvest Vegetable Soup, fresh produce is key. Seasonal vegetables bring out the best flavors. I love using: - 1 medium onion, finely diced - 2 cloves garlic, minced - 2 medium carrots, peeled and diced - 2 stalks celery, diced - 1 medium sweet potato, peeled and cut into 1/2-inch cubes - 1 cup butternut squash, peeled and cubed - 1 cup green beans, trimmed and cut into 1-inch lengths - 1 medium zucchini, diced Using organic ingredients is also important. They offer better taste and are better for you. When you buy organic, you avoid harmful chemicals. This makes your soup not just tasty but also healthier. You also need some pantry staples for this soup. These include: - 4 cups low-sodium vegetable broth - 1 can (14 oz) diced tomatoes in juice - 1 tablespoon extra virgin olive oil - 1 teaspoon dried thyme - 1 teaspoon ground cumin - Salt and freshly ground black pepper to taste Spices and seasonings are the heart of this soup. They add depth and warmth to every spoonful. Low-sodium broth keeps it light while still being flavorful. You can use other broths too, but vegetable broth is my favorite. This soup is packed with health benefits. Each ingredient has its own perks: - Onions and garlic boost your immune system. - Carrots are high in beta-carotene, great for your eyes. - Sweet potatoes provide fiber, which is good for digestion. - Butternut squash is full of vitamins A and C. - Green beans are a low-calorie source of fiber. - Zucchini is hydrating and low in carbs. Using seasonal produce makes it even better. Seasonal veggies are fresher and tastier. They contain more nutrients because they are picked at their peak. Eating seasonal food also helps local farmers and reduces your carbon footprint. For the full recipe, check out the details above. To start, gather your fresh vegetables. Use a sharp knife for safety and ease. - Dicing Onion: Cut off both ends. Slice the onion in half. Place the flat side down. Make vertical cuts, then slice horizontally. This gives you fine dice. - Garlic: Smash the clove with the knife. Peel off the skin. Chop finely for a strong flavor. - Carrots and Celery: Cut the ends and peel the carrots. Slice them into even rounds. For celery, slice into small pieces. This helps them cook evenly. - Sweet Potato and Butternut Squash: Cut these into 1/2-inch cubes. This size ensures a nice texture in the soup. - Green Beans and Zucchini: Trim the ends of the beans. Cut into 1-inch pieces. Dice the zucchini into small cubes. To maximize flavor during cooking, always start with the aromatics. Sauté onions and garlic first. This builds a strong base for your soup. 1. Heat the olive oil in a large pot over medium heat. 2. Add the diced onion. Cook for 3-4 minutes until soft. 3. Stir in the minced garlic. Cook for 1 minute until fragrant. 4. Next, add the carrots, celery, sweet potato, and butternut squash. Cook for 5-7 minutes, stirring often. This allows them to soften. 5. After that, mix in the green beans and zucchini. Cook for another 3-4 minutes. Keep stirring for even cooking. 6. Pour in the canned tomatoes with juice and the vegetable broth. Add the thyme and cumin. Stir well to combine all flavors. 7. Increase the heat to bring it to a gentle boil. Once boiling, lower the heat and simmer uncovered for 20-25 minutes. This helps all the flavors blend. After cooking, it’s time to taste. Add salt and pepper to your liking. This step is key for balance. For garnishing, use fresh parsley or basil. Chop it finely and sprinkle on top. This not only adds color but also a fresh taste. This soup is comforting and perfect for fall. It warms you up and fills you up. You can find the full recipe in the article for detailed steps and exact measurements. To boost your soup's flavor, consider adding fresh herbs like rosemary or sage. These herbs bring warmth and depth. You can also add spices like smoked paprika or a pinch of cayenne for some heat. When cooking, use a technique called "sweating." This means cooking onions and garlic slowly to release their flavors. This step builds a solid base for your soup. One common mistake is overcooking vegetables. This can make them mushy and dull in taste. To avoid this, cook them just until tender. Another tip is to season your soup gradually. Start with a little salt and pepper. Taste as you go to find the right balance. This way, you won’t overpower the fresh flavors. For serving, ladle your soup into deep bowls. This adds a nice touch. You can also serve it with crusty bread for dipping. To elevate your soup's appearance, drizzle some olive oil on top right before serving. A sprinkle of fresh herbs makes it look great too. These small touches can turn a simple meal into a feast. You can find the full recipe in the earlier sections. Enjoy making your Fall Harvest Vegetable Soup! {{image_4}} For a vegetarian or vegan soup, choose vegetable broth. You can use homemade or store-bought options. Look for low-sodium varieties to keep the flavor balanced. You can also add plant-based proteins. Chickpeas or tofu work well. They add great texture and protein. To make the soup heartier, mix in beans or lentils. They boost the fiber and protein content. Use canned beans for ease, or cook dried beans in advance. Lentils cook quickly and add a nice bite. You can also use grains for extra texture. Quinoa or barley are great choices. They absorb flavors and make the soup filling. Add them during the cooking process to let them soften. Switch up vegetables based on what’s fresh. In fall, root veggies shine, but in spring, you might add peas or asparagus. This keeps the soup vibrant and seasonal. Also, think about flavor pairings for different seasons. Try adding lemon zest in spring for brightness. In winter, a hint of nutmeg can warm the dish. This keeps your soup exciting all year round. Check out the Full Recipe for more ideas! After enjoying your Fall Harvest Vegetable Soup, store any leftovers in the fridge. Use a clean, airtight container. Glass jars or plastic containers work well. Make sure the soup cools down before sealing. This helps keep it fresh and tasty. To freeze your soup, let it cool completely first. Then, pour it into freezer-safe bags or containers. Leave some space at the top for expansion. Label each bag with the date and type of soup. When you want to eat it, thaw it overnight in the fridge. For quick thawing, place the bag in cold water. Reheating frozen soup is easy. Use a pot on the stove over low heat. Stir often to prevent sticking. You can also use a microwave, but be sure to cover it. Heat in short bursts and stir in between. This keeps the soup from getting too hot in spots. When warming up leftover soup, the stove is best. Pour it into a pot and heat it gently. This way, you keep the flavors intact. If using a microwave, cover the bowl to avoid splatters. After reheating, taste the soup again. You might need to add a little salt or pepper. This helps restore the flavor after storage. If it seems thick, add a splash of vegetable broth or water to loosen it. Enjoy every warm, hearty bite! Fall Harvest Vegetable Soup can last up to five days in the fridge. To keep it fresh, store it in an airtight container. Make sure the soup is cool before sealing the container. This helps keep the flavors intact and prevents spoilage. Check for any signs of spoilage, like off smells or changes in color, before eating. Yes, you can make this soup in advance. I often prepare it a day or two before I plan to serve it. This allows the flavors to mix well. To store, let the soup cool before pouring it into a container. When you’re ready to eat, just reheat it on the stove over low heat. Stir it well to ensure even heating. You may want to add a bit of water or broth to adjust the thickness. To enhance your meal, serve this soup with crusty bread. A simple green salad also works well. You can try a light vinaigrette to add a nice touch. For a heartier option, pair it with grilled cheese sandwiches. These choices complement the soup's flavors and make for a satisfying meal. In this article, we explored the ingredients, cooking steps, and variations for a delicious Fall Harvest Vegetable Soup. We emphasized the value of fresh, organic produce and pantry staples. You learned about preparation, enhancing flavors, and common mistakes to avoid. I shared tips for storing and reheating soup, along with answers to your most frequently asked questions. Remember, cooking is an art, so don't be afraid to make it your own. Enjoy the warmth and comfort of your homemade soup all season long.

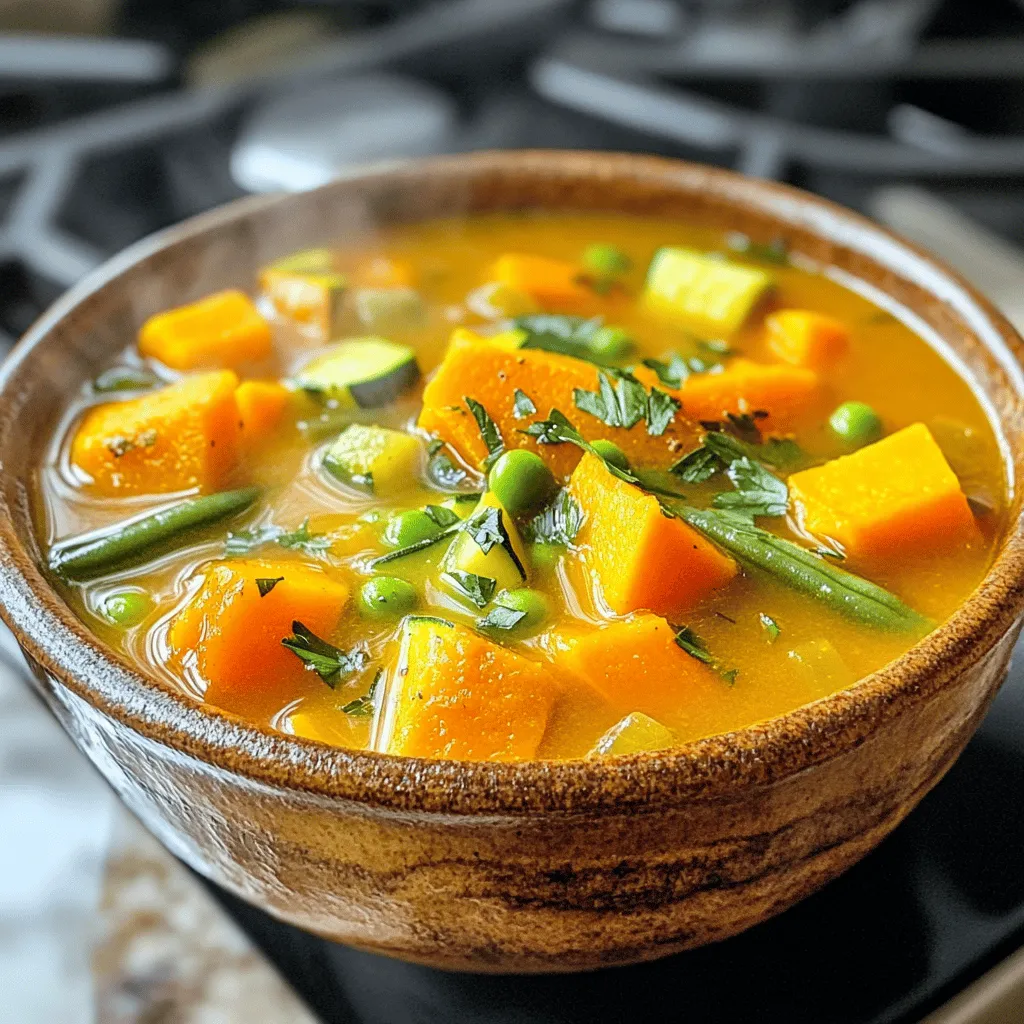
As the leaves turn golden and the air grows crisp, there’s nothing quite like a warm bowl of Fall Harvest Vegetable Soup. This comforting dish is packed with fresh, seasonal …

Read more

Categories Dinner Tags NO-ING-IMG

Baked Crunchy Hot Honey Chicken Easy and Flavorful Meal

January 14, 2026July 20, 2025 by Chef Tavio
To make Baked Crunchy Hot Honey Chicken, you'll need some simple, fresh ingredients. Here’s what you should gather: - Chicken: boneless, skinless chicken thighs - Marinade: buttermilk - Coating: - all-purpose flour - garlic powder - onion powder - smoked paprika - cayenne pepper - salt - black pepper - Sauce: hot honey (or homemade with honey and hot sauce) - Garnish: olive oil, fresh parsley These ingredients work together to create a dish that is both tasty and easy to prepare. Using chicken thighs keeps the meat juicy. The buttermilk marinade makes the chicken tender and flavorful. The coating adds that perfect crunch, while the hot honey sauce brings a sweet and spicy kick. Want to explore more? Check out the Full Recipe for detailed steps on how to bring these ingredients together for a delightful meal. Soak the chicken thighs in buttermilk. This step is key. Let them soak for at least 1 hour, or even overnight. The buttermilk adds moisture and flavor. It makes the chicken tender and juicy. Preheat your oven to 425°F (220°C). This high heat helps the chicken crisp up nicely. While the oven heats, line a baking sheet with parchment paper. This prevents sticking and makes cleanup easy. Now, let’s make the coating. In a large bowl, mix together these ingredients: - 1 cup all-purpose flour - 1 teaspoon garlic powder - 1 teaspoon onion powder - 1 teaspoon smoked paprika - 1 teaspoon cayenne pepper - 1 teaspoon salt - 1/2 teaspoon black pepper Stir well until everything blends. This mix adds flavor and crunch to the chicken. Take the marinated chicken out of the buttermilk. Let the extra liquid drip off. Dredge each piece in the flour mixture. Press lightly to ensure a thick coating. This will give you a great crunch when baked. Drizzle the coated chicken with olive oil. This helps with browning. Bake in the oven for 25-30 minutes. Keep an eye on them. They should turn golden brown and reach an internal temperature of 165°F (74°C). During the last 5 minutes of baking, drizzle hot honey over the chicken. This step adds sweetness and a nice kick. The honey caramelizes slightly, creating a sticky and flavorful glaze. You can find the full recipe for Baked Crunchy Hot Honey Chicken in the main article. To get that perfect crunch, proper dredging is key. First, let the chicken soak in buttermilk. This helps the flour stick better. When you coat the chicken, press the flour mixture firmly onto the meat. This builds a thick layer that fries up crispy. For oven baking, remember these tips to enhance crispiness: - Use parchment paper on the baking sheet. It prevents sticking and allows for even heat. - Drizzle olive oil over the coated chicken. This adds extra crisp. - Bake at 425°F (220°C) for a golden finish. Adjusting spice levels is simple with cayenne and hot honey. For a milder dish, use less cayenne. If you love heat, add more. Hot honey can also be mixed with regular honey. This gives you more control over the sweetness and heat. You can elevate the flavor with extra spices: - Try adding a pinch of cumin for warmth. - A dash of black pepper boosts the overall taste. - Experiment with herbs like thyme or rosemary for a fresh twist. Present your chicken beautifully for the best dining experience. Pair it with creamy coleslaw or pickled vegetables. They add coolness and crunch to the meal. For a fun twist, serve the chicken on a rustic wooden board. Drizzle some extra hot honey on the side for dipping. This not only looks great but also lets your guests customize the heat level. {{image_4}} You can switch out chicken thighs for chicken breasts or drumsticks. Each option gives a different taste and texture. Chicken breasts will be leaner but still juicy. Drumsticks add more flavor with the bone. Both work well with the crunchy coating and hot honey sauce. If you're looking for gluten-free options, use alternative flour. Almond flour or rice flour can work great. They give a nice crunch too. Just make sure to adjust the seasoning to fit the new flour. This way, everyone can enjoy this meal. You can explore different hot sauces for unique flavor profiles. For example, try a smoky chipotle sauce for a deeper taste. Adding herbs or citrus can also bring new layers. Fresh thyme or lemon zest can brighten the dish. Each change can make your hot honey chicken feel fresh and exciting. For the full recipe, check out the details above. To keep your Baked Crunchy Hot Honey Chicken fresh, store leftovers in an airtight container. Place it in the fridge within two hours of cooking. This helps to prevent bacteria growth. Your chicken will taste best if eaten within three days. You can also separate the chicken and sauce for better storage. To reheat and keep the chicken crispy, use an oven. Preheat your oven to 375°F (190°C). Place the chicken on a baking sheet and cover it lightly with foil. Heat for about 10-15 minutes. This method helps revive the crunchy texture. You can also use an air fryer for a quicker option. Set it to 350°F (175°C) for about 5-7 minutes. If you want to freeze the chicken, it’s best to do so without the sauce. Wrap each piece tightly in plastic wrap, then place them in a freezer bag. Remove as much air as possible. This helps prevent freezer burn. You can freeze the chicken for up to three months. When ready to eat, thaw it in the fridge overnight before reheating. For the full recipe, check the section above. To keep your chicken crispy, make sure it is well-coated in the flour mix. Press the chicken into the flour, so it sticks well. Bake it on parchment paper, which helps crisp up the bottom. Avoid covering the chicken while it bakes, as this traps moisture. The higher oven temperature helps too. Yes, you can prepare the chicken in advance. Marinate the chicken in buttermilk and coat it the day before. Store it in the fridge. When you are ready, bake it straight from the fridge. This saves time and keeps the chicken juicy. If you want a milder flavor, use less cayenne pepper in the coating. You can also add less hot sauce to the honey. For more heat, add extra cayenne or use a spicier hot sauce. Always taste as you go to find your perfect balance. This chicken goes well with creamy coleslaw, roasted veggies, or cornbread. A fresh salad can lighten the meal. If you like carbs, serve it with rice or mashed potatoes. These sides add variety and complement the chicken nicely. Check the chicken with a meat thermometer. It should reach 165°F (74°C) in the thickest part. The outside should be golden and crispy. If you don’t have a thermometer, cut into the chicken; it should be white inside, with no pink. This baked crunchy hot honey chicken recipe covers everything from marination to serving. You learned about ingredient choices, step-by-step preparation, and tips to enhance flavor and texture. Variations help you cater to different tastes and diets. Embrace these cooking methods to impress your friends and family. Enjoy the crunch, heat, and sweetness in every bite. Happy cooking, and remember, practice makes perfect!

Get ready to spice up your dinner routine with Baked Crunchy Hot Honey Chicken! This easy and flavorful meal combines crispy chicken thighs with a sweet and fiery hot honey …

Read more

Categories Dinner Tags NO-ING-IMG

Chocolate Covered Caramel Apple Slices Easy Delight

January 14, 2026July 20, 2025 by Chef Tavio
To make these tasty treats, you need a few key items: - 2 large apples (recommended: Granny Smith or Honeycrisp for tartness) - 1 cup caramel candies (or use homemade caramel sauce for a gourmet touch) - 1 tablespoon heavy cream (to ensure smooth melting of caramel) - 1 cup dark chocolate chips (or substitute with milk chocolate if preferred) - 1 teaspoon coconut oil (to achieve a silky texture in the chocolate) - Sea salt (for a savory finish on top) For the best flavor, I suggest using tart apples. Granny Smith apples work great. They add a nice crunch and balance the sweetness of the caramel and chocolate. Honeycrisp apples are also a fantastic choice. They are sweet and juicy, making each bite a delight. You can take your chocolate covered caramel apple slices to the next level with some fun toppings. Here are a few ideas: - Crushed nuts (like pecans or almonds) for crunch - Mini chocolate chips for extra sweetness - Sprinkles for a festive touch - A drizzle of white chocolate for a pretty finish Feel free to mix and match these toppings to make your slices unique! For the full recipe, check out the details above. Start by washing your apples well. Use cool water to remove any wax. Dry each apple completely with a clean towel. Next, slice the apples into ½-inch thick rounds. Make sure to remove the core from each slice. This step helps keep your apple slices crisp and easy to eat. Now, grab a microwave-safe bowl. Add the caramel candies and heavy cream. Heat this mix in the microwave. Do it in 30-second bursts, stirring after each time. Be patient; it may take a couple of rounds to melt smoothly. Once it's all melted, it should look rich and glossy. Take each apple slice and dip it into the warm caramel. Make sure the slice gets a nice, even coating. Use a fork or a toothpick for easier handling. Let any extra caramel drip off before placing the slice on a parchment-lined baking sheet. Once all slices are coated, chill them in the fridge for 15-20 minutes. This helps the caramel set. After that, melt your chocolate as described in the Full Recipe. Finally, dip each caramel-coated slice into the chocolate. Sprinkle some sea salt or toppings if you like. Return them to the fridge again, letting the chocolate harden. Enjoy your sweet, crunchy treats! To get the best caramel, use high-quality caramel candies. Melt them slowly with heavy cream. Microwaving in 30-second bursts works well. Stir often to avoid lumps. The goal is a smooth, thick caramel. If it’s too thick, add a bit more cream. This makes it easier to coat your apple slices. For a nice chocolate layer, use dark chocolate chips. Mixing in coconut oil helps the chocolate flow better. Melt the chocolate in short intervals, stirring after each. This keeps it from burning. A smooth, glossy finish makes your apple slices look great and taste even better. Cooling times are key to great texture. After caramel coating, chill the slices for 15-20 minutes. This helps the caramel harden. Once you dip in chocolate, chill again for another 10-15 minutes. This step ensures the chocolate sets well, giving you that perfect bite. For the best results, resist the urge to rush this process. {{image_4}} You can choose from different types of chocolate. Dark chocolate gives a rich flavor and pairs well with apples. Milk chocolate is sweeter and creamy, perfect for kids. White chocolate adds a touch of sweetness and a nice contrast. Each chocolate brings its own charm. Try mixing chocolates for a fun look and taste. You can boost the flavor of your chocolate-covered caramel apple slices. Adding a pinch of cinnamon or nutmeg can warm up the taste. A few drops of vanilla extract adds depth and sweetness. For a twist, try adding a splash of orange or almond extract. These small changes can make your treats unique and exciting. Toppings can make your apple slices even more fun. Use colorful sprinkles for a festive look. Shredded coconut adds a chewy texture and tropical flavor. Dried fruits like cranberries or apricots provide a sweet and chewy contrast. Crushed nuts like almonds or pecans give a nice crunch. Mix and match these toppings to create your perfect treat! To keep your chocolate covered caramel apple slices fresh, store them in an airtight container. Line the container with parchment paper to prevent sticking. Place a layer of apple slices, then add more parchment paper before stacking more slices. This method keeps them intact and ready to enjoy. In the refrigerator, these tasty treats last for about 3 to 5 days. The apples will stay crisp, and the chocolate will remain firm. Just remember to keep them covered to maintain their flavor and texture. If you notice any moisture, it’s best to eat them sooner. If you want them to last longer, freezing is a great option. Wrap each slice in plastic wrap and then place them in a freezer-safe bag. They can stay frozen for up to 2 months. To enjoy, let them thaw in the fridge overnight before snacking. Enjoy the delicious flavors of caramel and chocolate even after a long freeze! Yes, you can use homemade caramel. It adds a personal touch to your slices. Just make sure it has the right consistency. A thick, gooey caramel works best for dipping. Dark chocolate is my favorite for this recipe. It balances the sweet caramel and tart apple well. Milk chocolate also works if you prefer a sweeter flavor. White chocolate can be used for a fun twist too! To avoid cracking, make sure the chocolate is melted smoothly. Adding coconut oil helps create a nice, glossy finish. Let the chocolate cool slightly before dipping. This will give a beautiful coat without cracking. You can find them at many grocery stores or specialty shops. Look in the dessert section or the candy aisle. Some bakeries also sell them fresh. If you want the full experience, try making them at home with the [Full Recipe]. You can enjoy making chocolate-covered caramel apple slices using simple steps. We covered the key ingredients and the best types of apples. You learned how to prepare, melt, and dip the apples for a perfect treat. With handy tips on caramel and chocolate, you can ensure great results every time. Play with different chocolate types and toppings for fun variations. Store them carefully to keep the flavor fresh. Now, go ahead and create some tasty slices for yourself and friends!

Get ready for a sweet treat that’s both fun and easy to make! Chocolate covered caramel apple slices combine the crispiness of apples with rich caramel and smooth chocolate. In …

Read more

Categories Desserts Tags NO-ING-IMG

Espresso Chocolate Chip Cookies Irresistible Recipe

January 14, 2026July 20, 2025 by Chef Tavio
- 1 cup unsalted butter - 3/4 cup granulated sugar - 3/4 cup brown sugar - 1 large egg - 2 teaspoons vanilla extract - 2 cups all-purpose flour - 1 teaspoon baking soda - 1 teaspoon salt - 1 tablespoon instant espresso powder - 1 cup semi-sweet chocolate chips - Optional: 1/2 cup chopped walnuts When baking cookies, using the right ingredients is key. Each component plays a role in flavor and texture. The unsalted butter gives the cookies a rich taste. The two sugars create a perfect balance of sweetness. The egg adds moisture and helps bind the dough. Vanilla extract adds warmth to the flavor. The all-purpose flour provides structure, while baking soda helps them rise. The salt enhances all the flavors, making them pop. Instant espresso powder brings the coffee flavor to life. Semi-sweet chocolate chips add a delicious touch of sweetness. If you like crunch, add chopped walnuts for texture. - 1 cup = 227 grams - 1 tablespoon = 3 teaspoons Knowing how to convert measurements helps in baking. If you don’t have cups, use grams instead. This way, you can achieve perfect results every time. - Vegan butter alternatives: Use coconut oil or vegan margarine. - Gluten-free flour options: Almond flour or a gluten-free flour blend works well. - Adjusting sugar levels: Reduce sugar by 1/4 cup for less sweetness. Sometimes, you may need to adjust ingredients. If you follow a vegan diet, try coconut oil for butter. If you need gluten-free options, almond flour is a great choice. You can also cut back on sugar if you prefer less sweetness. These swaps make the cookies friendly for various diets. Check out the Full Recipe to see how to make these delicious treats! - Preheat your oven to 350°F (175°C). - Line two baking sheets with parchment paper. This helps cookies not stick. - In a large bowl, combine 1 cup of softened unsalted butter, 3/4 cup granulated sugar, and 3/4 cup brown sugar. - Using an electric mixer, cream these together for about 2-3 minutes. The mix should be light and fluffy. - Add 1 large egg and 2 teaspoons of pure vanilla extract. Mix until smooth. - In another bowl, whisk together 2 cups of all-purpose flour, 1 teaspoon baking soda, 1 teaspoon salt, and 1 tablespoon instant espresso powder. - Gradually add this dry mix into the wet ingredients. Stir gently with a spatula to combine. - Use a tablespoon or cookie scoop to drop rounded balls of dough onto the baking sheets. - Leave about 2 inches between each ball for spreading. - Bake in the preheated oven for 10-12 minutes. The cookies should be golden brown on the edges and soft in the center. - Let cookies cool for 5 minutes on the sheets before moving them to a wire rack. This helps them set nicely. For more details, check out the Full Recipe. To get the best texture in your espresso chocolate chip cookies, avoid overmixing. When you mix the dry ingredients with the wet ones, stir just until you see no flour. Overmixing can make cookies tough and less chewy. Using room temperature ingredients helps too. When butter and egg are warm, they blend better. This gives your cookies a nice, soft texture. Espresso powder comes in many types. You can choose dark roast for a strong flavor or a lighter roast for a milder taste. Both work well in this recipe. Adding extra chocolate chips boosts the flavor and richness. You can mix semi-sweet with dark chocolate chips for a fun twist. For serving, arrange your cookies on a wooden platter. It gives a warm, inviting look. A dusting of powdered sugar adds a nice touch. To keep your cookies fresh, store them in an airtight container. If you need to reheat, pop them in the microwave for a few seconds. This helps regain the soft texture. For the full recipe, check the details above. Enjoy your baking! {{image_4}} You can change the chocolate in your cookies for different tastes. Using dark chocolate chips gives a rich and bold flavor. It pairs well with the espresso and adds depth. On the other hand, white chocolate or milk chocolate brings sweetness and creaminess. You can mix these chocolates or use them alone. The choice is up to you! Adding spices can make these cookies even more special. A pinch of cinnamon or nutmeg can warm up the flavor. You can also try adding orange or almond extract for a twist. These flavors blend nicely with chocolate and coffee. Experiment and find what you love! If you want a healthier cookie, try reducing the sugar. You can cut the sugar by a quarter without losing taste. Another option is to use whole wheat flour instead of all-purpose flour. This swap adds fiber and nutrients. Your cookies will still taste great, but with a little boost in health! For the Full Recipe, follow the steps and enjoy your baking adventure! To keep your espresso chocolate chip cookies fresh, use an airtight container. This helps seal in moisture and flavor. You can also use a cookie jar with a tight lid. Make sure to layer parchment paper between the cookies. This prevents them from sticking together. - Use these best containers: - Airtight containers - Cookie jars with lids To keep cookies fresh, store them at room temperature. Avoid placing them in the fridge, as this can dry them out. If you want to keep them for longer, consider freezing them. Espresso chocolate chip cookies can last about a week when stored properly. Their shelf life may vary based on ingredients and conditions. If you notice any change in texture or smell, it's best to toss them. For longer storage, you can freeze your cookies. Wrap each cookie in plastic wrap and place them in a freezer-safe bag. This method keeps them fresh for up to three months. When you're ready to enjoy them, simply thaw them at room temperature. To reheat your cookies, use the oven for the best results. Preheat the oven to 350°F (175°C) and place the cookies on a baking sheet. Heat them for about 5 minutes. This method revives their soft texture. If your cookies get stale, you can refresh them. Place a slice of bread in the container with the cookies for a few hours. The cookies will absorb moisture from the bread, making them soft again. To make your cookies chewier, adjust the baking time. Bake for a shorter time. Check them at 10 minutes. If they look soft in the center, remove them. They will firm up as they cool. Using brown sugar helps too. Brown sugar adds moisture. It makes cookies softer. White sugar can make them crispier. Use a mix of both for the best texture. Yes, you can make the dough in advance. Mix the dough and chill it in the fridge. This helps the flavors blend. You can keep it in the fridge for up to 3 days. Freezing cookie dough works well too. Scoop the dough into balls. Place them on a baking sheet and freeze. Once frozen, transfer them to a bag. They stay good for about 3 months. If you don’t have espresso powder, try instant coffee. It gives a similar coffee flavor. Just use the same amount as espresso powder. You can also use brewed espresso. Use 2 tablespoons of brewed espresso for each tablespoon of espresso powder. Reduce the liquid in your other ingredients slightly. This helps keep the dough right. These cookie recipes are simple and fun to make. We covered the main ingredients and their roles. You learned about substitutions and how to measure accurately. Following the steps, you can create chewy cookies every time. Keep experimenting with flavors and variations to find your favorite. Remember the storage tips to enjoy your cookies longer. With practice, you'll master these delicious treats!

Craving a sweet treat with a kick? Let’s dive into my guide to making irresistible Espresso Chocolate Chip Cookies. This simple recipe combines rich espresso flavor with gooey chocolate chips …

Read more

Categories Desserts Tags NO-ING-IMG

The BEST Soft Cinnamon Roll Cookies Delightful Treat

January 14, 2026July 20, 2025 by Chef Tavio
- 2 cups all-purpose flour - 1 cup brown sugar, packed - 1/2 cup granulated sugar - 1/2 cup unsalted butter, softened - 2 large eggs - 1 tablespoon pure vanilla extract - 1 teaspoon baking powder - 1 teaspoon baking soda - 1/2 teaspoon salt - 2 tablespoons ground cinnamon - Optional: chopped pecans or walnuts To make the best soft cinnamon roll cookies, you need a few key items. First, all-purpose flour forms the base. Brown sugar gives the cookies a rich, sweet flavor. Granulated sugar adds sweetness and helps with texture. Softened unsalted butter binds everything together, creating a tender cookie. Next, you need eggs. They add moisture and richness. Pure vanilla extract enhances the cookies' aroma and flavor. Baking powder and baking soda help the cookies rise, making them soft and fluffy. Salt balances the sweetness and brings out the flavors. Ground cinnamon is what makes these cookies taste like cinnamon rolls. If you want a nice crunch, add chopped nuts like pecans or walnuts. - 1 cup powdered sugar - 2 tablespoons milk The glaze is simple but essential. You will need powdered sugar for sweetness and a smooth texture. Milk helps to create the right consistency. Mix both ingredients until smooth, and drizzle it over the warm cookies. This glaze adds a beautiful finish that makes your cookies shine. For the full recipe, you can check out the details above. Enjoy making these delightful treats! - Preheat to 350°F (175°C). - Line baking sheets with parchment paper. First, I start by setting my oven to 350°F (175°C). This step is key. While the oven warms up, I get my baking sheets ready. I line them with parchment paper. This helps keep the cookies from sticking. It also makes cleanup easier later. - Creaming butter and sugars. - Incorporating eggs and vanilla. - Combining dry ingredients. Next, I mix the butter and sugars in a large bowl. I use an electric mixer for this. I beat them until the mix is light and fluffy. This should take about 2-3 minutes. Then, I add the eggs one at a time. I mix well after each egg. After that, I stir in the vanilla extract. In a separate bowl, I whisk together the flour, baking powder, baking soda, salt, and cinnamon. I make sure these dry ingredients are well mixed. This helps the flavors blend better. - Mixing dry into wet ingredients. - Scooping cookie dough onto sheets. - Baking time and tips. Now, I add the dry mix to the wet mix. I do this slowly and stir gently. I stop mixing when the dough comes together. If I want extra crunch, I can fold in some chopped nuts. Using a cookie scoop or a spoon, I drop rounded portions of dough on the baking sheets. I space them about 2 inches apart. This allows them to spread without touching. I then place the sheets in the oven. I bake the cookies for 10-12 minutes. They will turn lightly golden at the edges. The centers should stay soft. Remember, they will firm up as they cool. While they bake, I prepare the glaze. I mix powdered sugar and milk in a small bowl. I whisk until smooth. If the glaze is too thick, I add a bit more milk. If it’s too runny, I add more powdered sugar. After baking, I let the cookies cool for a few minutes. Then, I transfer them to a wire rack. I drizzle the glaze over the warm cookies. This makes them look and taste amazing. To get soft cookies, avoid overmixing the dough. Overmixing can make cookies tough. Mix just until everything is combined. This keeps the cookies light and fluffy. Using room temperature ingredients is key. When butter and eggs are warm, they blend better. This helps create a smooth dough. Adding nuts gives a nice crunch. Chopped pecans or walnuts work well. They add texture and flavor to the cookies. Plus, they look great too! Garnishing with cinnamon adds extra flavor. A sprinkle on top makes the cookies pretty. It also brings out that warm cinnamon taste we all love. Make sure to scoop even cookie sizes. Uneven sizes bake at different rates. This can lead to some cookies being too hard or too soft. Be careful not to overbake. Check the cookies at the 10-minute mark. They should be lightly golden at the edges. They will firm up as they cool. Enjoy baking these delightful treats with my full recipe! {{image_4}} You can change up the flavor of these soft cinnamon roll cookies in fun ways. Here are two tasty ideas: - Pumpkin spice cinnamon roll cookies: Add 1/2 cup of pumpkin puree to the dough. Mix in 1 teaspoon of pumpkin pie spice. This gives your cookies a warm fall flavor. - Chocolate chip cinnamon roll cookies: Stir in 1 cup of chocolate chips when mixing the dough. This sweet twist adds a rich touch to your cookies. If you have special dietary needs, you can still enjoy these cookies. Here are some easy swaps: - Gluten-free alternatives: Use 2 cups of gluten-free all-purpose flour instead of regular flour. Make sure it contains a binding agent, like xanthan gum, to help with texture. - Vegan adaptations: Replace the eggs with 1/2 cup of applesauce or 2 tablespoons of flaxseed meal mixed with 6 tablespoons of water. Swap the butter for 1/2 cup of coconut oil or vegan butter. These variations and modifications keep the cookies fun and friendly for everyone! For the full recipe, be sure to check the complete steps outlined above. To keep your soft cinnamon roll cookies fresh, store them at room temperature. Use an airtight container. This helps keep them soft and tasty. If you want to store them longer, try refrigeration. Place the cookies in a sealed container. They will stay good for about a week. Just remember to let them warm up before enjoying. Freezing is a great way to save unbaked dough. Scoop the cookie dough onto a tray. Freeze the scoops until firm, then place them in a freezer bag. This way, you can bake fresh cookies anytime! You can also store baked cookies for later. Let them cool completely. Then, place them in a freezer-safe container. They can last for up to three months. When you're ready to eat, thaw them at room temperature. Enjoy the soft, delicious taste! For the complete recipe, check out the Full Recipe. To tell if your cookies are done, look for a few signs. The edges should be lightly golden. The centers must look soft but set. You can also gently press the cookies; they should spring back slightly. If you remove them too early, they may be too doughy. If you bake them too long, they become hard. Remember, they will firm up as they cool. Yes, you can use brown sugar instead of granulated sugar. This swap makes your cookies softer and chewier. Brown sugar has more moisture due to its molasses content. This adds a rich flavor that fits well with cinnamon. If you use all brown sugar, the cookies might be denser. A mix of both sugars gives the best results. To adjust the glaze's thickness, change the amount of milk or powdered sugar. For a thicker glaze, add more powdered sugar. For a thinner glaze, add more milk. Mix well until you reach your desired consistency. You can also add a pinch of vanilla for extra flavor. This glaze makes your cookies shine and taste even better. These cookies differ from traditional cinnamon rolls in texture and flavor. Cinnamon roll dough is soft and fluffy. In contrast, these cookies are thicker and denser. The cinnamon flavor is still strong, but the cookie base offers a unique twist. You get the classic taste of cinnamon rolls without the need for rolling or baking times. Yes, you can prepare the dough ahead of time! It’s best to chill the dough in the fridge for at least 30 minutes. This helps the flavors to meld and makes it easier to scoop. You can also store the dough for up to 2 days. When ready, just scoop and bake. This makes it easy for busy days. These cookies are great for baking in bulk! The recipe makes about 24 cookies, perfect for sharing. If you want more, just double the recipe. You can freeze any extras after baking. Place them in an airtight container for best results. They’ll stay fresh for up to three months. Enjoy warm cookies anytime with this method! Soft cinnamon roll cookies combine warmth, flavor, and comfort. We discussed essential ingredients like flour, sugar, and cinnamon, plus tips to achieve the best texture. You can enhance these cookies with nuts or different flavors, too. Storing options ensure you can enjoy them later. Bake wisely, avoid mistakes, and enjoy your delicious creations. With these steps, you’ll master soft cinnamon roll cookies every time. Happy baking!

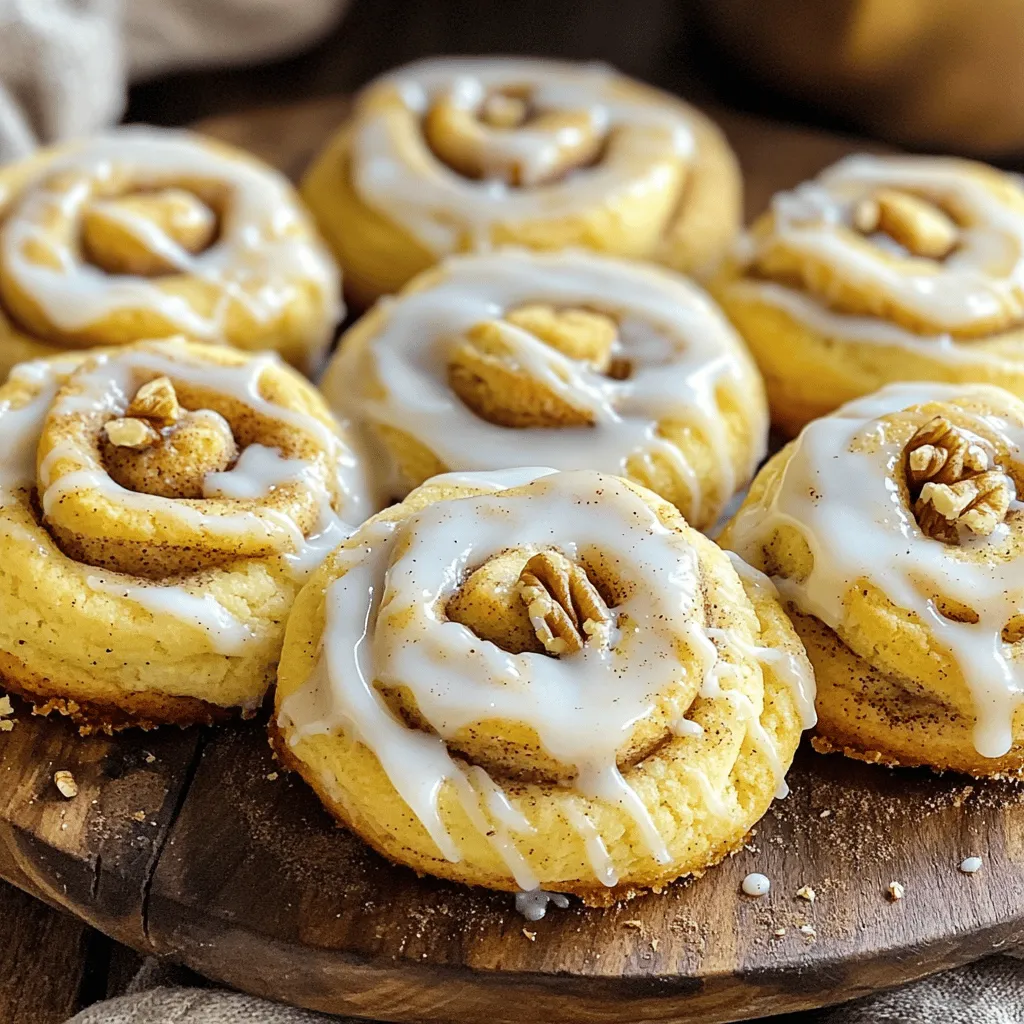
Are you ready to savor the ultimate soft cinnamon roll cookies? These delightful treats combine classic flavors with a cozy twist, perfect for any occasion. Imagine biting into a warm …

Read more

Categories Desserts Tags NO-ING-IMG
Older posts
Newer posts
← Previous Page1 … Page65 Page66 Page67 … Page73 Next →

TASTED NEST

Where Flavor Finds a Home 🍳🏡 — warm, simple, and crave-worthy recipes made for real life, from stovetop mornings to backyard dinners.

PAGES

Home About Contact Privacy Policy Terms & Conditions Cookie Policy GDPR Policy Copyright Policy Disclaimer

CATEGORIES

Appetizers Desserts Salads Breakfast Dinner
Copyright © 2026 Tasted Nest. All rights reserved.